

Page 1

I. Default Configuration
We have pre-configured this router to the following settings. If you accept the
settings, all you need to do is to follow the next section.
Router IP address 192.168.1.1
Subnet mask 255.255.255.0
VPI 0 (do not change)
VCI 100 (do not change)
Encapsulation PPPoA VC-MUX (do not change)
Operating mode G.dmt (do not change)
Dynamic WAN IP dynamic
DHCP off
NAT on
For router management:
User name admin
Password private
Users must not change VPI, VCI, Encapsulation and Operating Mode settings.
These settings must be used for connection to the Telecom ADSL network.
Experienced users who have other setup prefer ences s houl d refer to the User
Manual (A126.PDF) on the provided CDROM.
II. Installing Router
IMPORTANT- Before you start
Make sure your computer has these installed:
! Network interface card (NIC)
! TCP/IP protocol.
Other than attaching to a host computer the router can be connected to an
uplink port of a network hub. If the hub has no uplink port available, a crossover Ethernet cable must be used. This cable is not provided.
Dynalink RTA020
ADSL Router
Quick Set Up Guide
Important
This Guide is intended to get you started quickly.
We have pre-configured the router for the Telecom
ADSL network. All you need is to follow through the
steps we describe here.
This Guide must be read in conjunction with the
User Manual (A126.PDF). This file which can be
found on the provided CDROM. Experienced
users who prefer a different configuration, or wanting
to use applications that require user set up, they
should refer to the User Manual. We have drawn up a
table in Section III to assist you in finding the relevant
material.
Contents inside this box:
# RTA020 router
# Power adapter
# ADSL line cord
# Ethernet cable
# Utility CDROM (User Manual included)
Page 2
A web browser is required to enter your Internet account user name &
password. Make sure your web browser is Internet Explorer 5.0/Netscape 6 or
better. Install either Explorer 5.5 or Netscape 6 from the provided CDROM if
your computer does not have a suitable browser.
Remember to obtain these from your ISP:
! Login user name and password
! Public IP address (only if you subscribe for static IP)
! DNS server IP.
Step 1. Connect it up
If you require a step-by-step guide for this please refer to Page 5 Chapter 2
Hardware Description & Installation of the User Manual.
# Connect the DSL port of the router into your ADSL jackpoint (telephone wall
socket) with the provided ADSL line cord. Never connect through an
ADSL micro filter.
# Connect the LAN port of the router and the Ethernet port of your computer
(or uplink port of a network hub) with the Ethernet cable provided.
# Connect the supplied 16VAC power adapter to the PWR jack of router, and
plug the adapter into a mains power outlet. Switch on router.
Make sure the LAN light on the front panel of router is on. Otherwise it
suggests a problem with the
Ethernet connection.
Step 2. Prepare your
computer
Set your computer’s IP address to
192.168.1.x (x is between 2 and
254) and Subnet mask
255.255.255.0. Add gateway as
192.168.1.1 and enter DNS server
IP. A step-by-step guide can be
found on Page 19 Chapter 4
Setting Up PC on the LAN of the User Manual. The following is an example
for Windows 98/Windows ME:
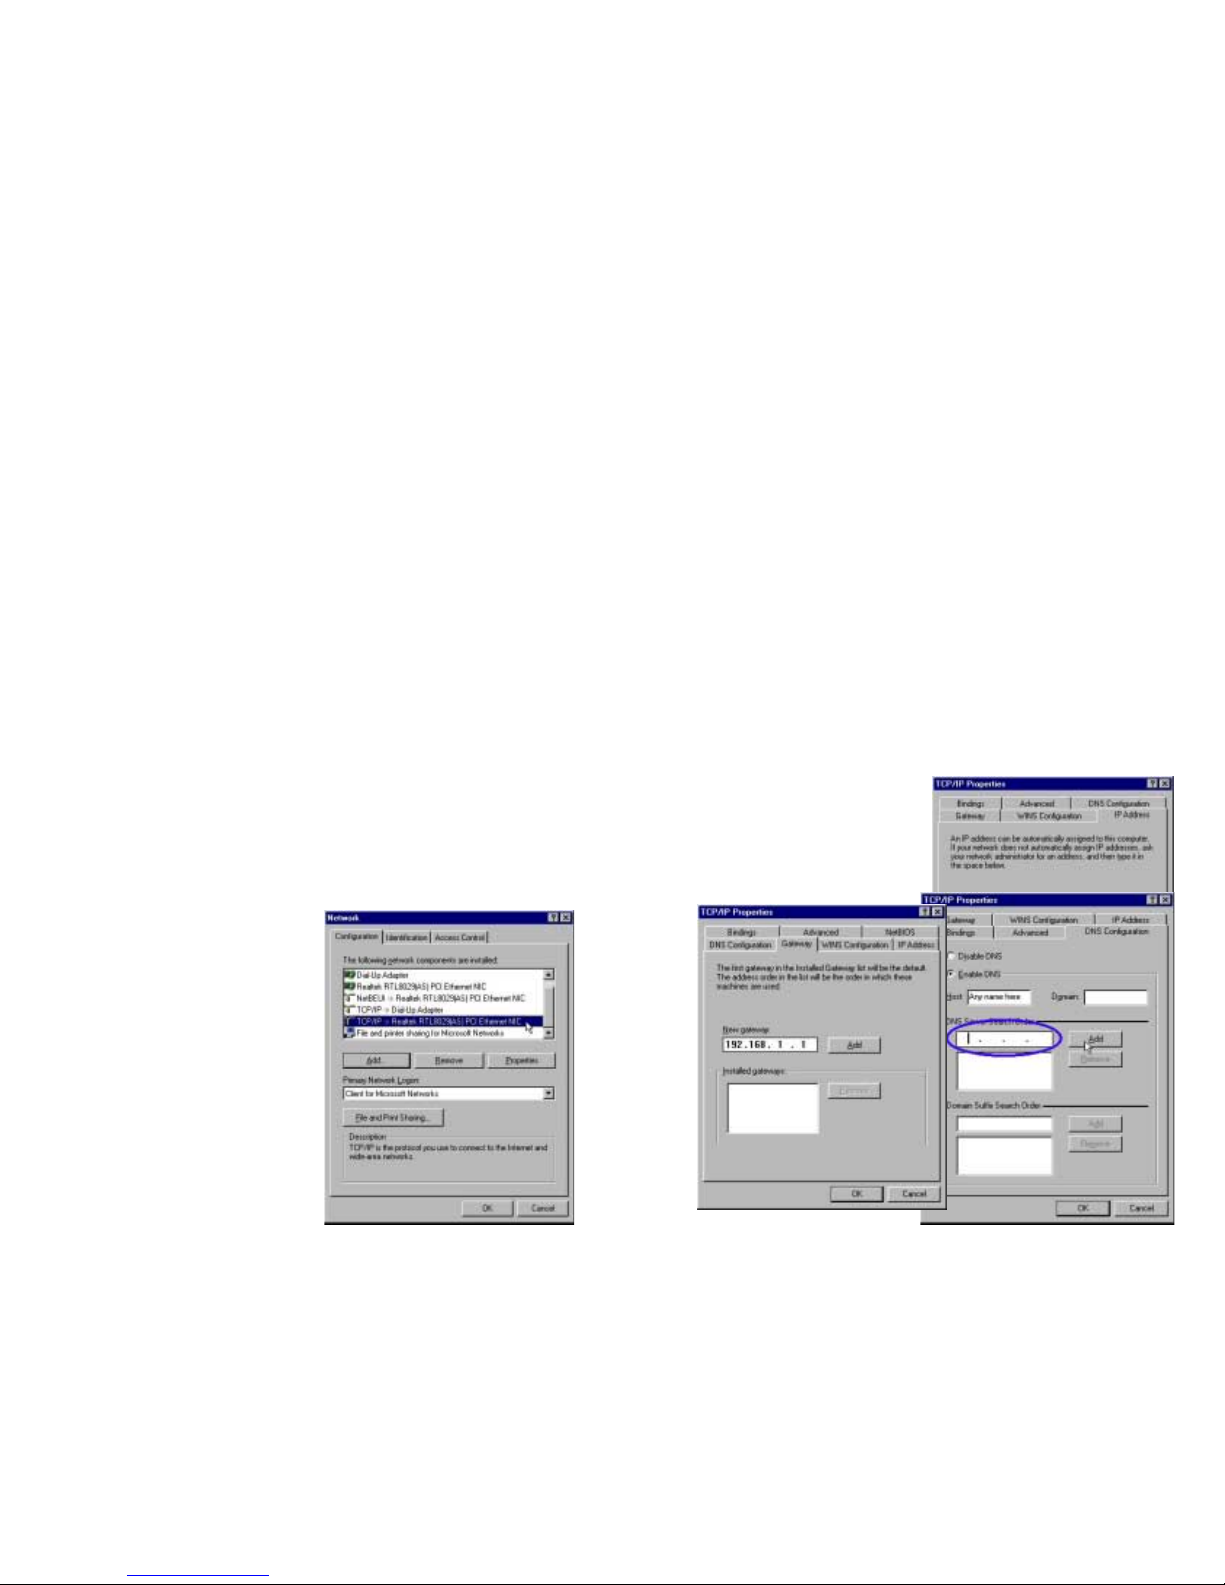
# From Control Panel, double click Network.
# Scroll down to highlight TCP/IP -> (your network card). Click on
Properties.
# Select IP Address. Specify
192.168.1.x and 255.255.255.0. (x
is between 2 and 254)
# Select Gateway. Put in the router’s
IP address 192.168.1.1.
Page 3

# Select DNS Configuration, click Enable DNS. Type in any name for host.
Put in your ISP’s DNS address. Click Add. A second DNS address (if
specified) can be added in a similar way.
# In case you do not have a DNS address from your ISP, you may use one of
the following:
150.199.1.11
128.206.2.252
131.151.254.243
# Click OK & then OK to exit. Windows may ask for the Windows CDROM
and will ask to restart. Answer Yes.
Step 3. Use web browser to configure router
Start your web browser and
type the private IP address
of the router
http://192.168.1.1.
You will be prompted to
enter User Name and
Password. By default, user
name is admin and
password is private.
Step 4. Enter Internet account User Name and Password
Go to Configuration > WAN > ATM PVC > Setup ATM PVC. Select the preconfigured “MyConnection” PVC Interface as shown in the figure.
Next scroll down to locate PPPoA Configuration. Edit the User Name and
Password fields using the user name and password specified by your ISP,
scroll down and click Submit.
Page 4

Step 5. Save configuration
Go to Tool > Save Configuration. Click on Save. Next go to Tool > Reset
Router. Make sure the “Reset to factory default settings” box is NOT ticked.
Click Restart. Note- if you reset to factory default the configuration will be lost!
When router restarts the DSL light on the front panel turns solid normally within
one minute. This means router has already established link to the telephone
exchange and will attempt to log in using you Internet account information.
Subject to successful authentication you can start browsing. Observe that the
DATA light flashes as data get through.
If nothing happens return to Step 4. Scroll down to the bottom of page and click
Connect. Soon after that you should be able to observe data getting through.
Any time if you want to check the connection status, go to Status >
Connection > PPP. The picture here shows router logged in.
III. Experienced users
Refer to these sections of User Manual if you want to…..
Configure PC to get IP from DHCP Page 34 Section 4.2
Use the Web Configuration Manager Page 41 Chapter 5
Change the private IP address of the router Page 46 Section 6.2.1
Enable DHCP Page 47 Section 6.2.2
Enable routing RIP v1/v2 Page 49 Section 6.2.3
Modify ISP login name or password Page 51 Section 6.3.2
Change from Dynamic to Static WAN IP Page 51 Section 6.3.2
Modify user name or password
for router management Page 57 Section 6.4.1
Set static routing table Page 58 Section 6.4.2
Set IP packet filtering (NAT) Page 61 Section 6.4.3
Set virtual server (NAPT);
Run applications such as Netmeeting, IRC,
Quake, FTP/Mail/Web server Page 64 Section 6.4.4
Get connection status Page 66 Section 6.5
Get connection statistics Page 71 Section 6.5.4
Show routing table Page 73 Section 6.5.5
Show DHCP table Page 74 Section 6.5.6
IV. Indicator lights
There are five indicator lights on the front panel of the router:
Indicator Function Description
PWR Power Off - No power.
Page 5

On - Power is on.
DIAG Diagnosis Off - Self-test OK.
Blinking – Software upgrade in progress.
On - Self-test failed.
LAN Network Link Off - Ethernet not present.
Blinking – data going through port.
On - Ethernet is present.
DSL Link Status Slow blinking - handshaking in progress.
Quick blinking - training in progress.
On - Linked to DSLAM at exchange.
DATA Data Status Off - No data.
Blinking – Sending or receiving data.
V. Reconfigure router after reset to factory default
If it happens that router has been reset to factory default, restore the NZ
configuration you will require to connect. Go to Configuration > WAN > ATM
PVC > Setup ATM PVC:
Next go to Configuration > Advanced > IP Static Routing > Setup:
To save configuration, follow Step 5 of Section II.
Page 6

VI. How to get help
Always check that your hardware is installed correctly. Check our web site for
the latest information and troubleshooting guide. If you have difficulties,
contact Dynalink Technical Support for issues relating to router installation and
operation:
Phone: 0800 653 962 (Mon-Fri, 9am-4pm)
Fax: 0800 503 962
Email: support@dynalink.co.nz
Web: http://www.dynalink.co.nz
Warranty
Dynalink Modems Ltd warrants this product against defects in materials and
workmanship for a period of twelve months from the original date of purchase.
We will, at our discretion, repair or replace the faulty unit, free of charge,
provided it is returned to us with proof of purchase from an authorised dealer
within the warranty period. Return delivery after repair will be paid for by
Dynalink Modems Ltd within New Zealand. We reserve the right not to repair or
replace goods that:
have been mishandled, abused or not installed according to the
guidelines as outlined in the instructions.
have been subjected to a power surge from other equipment or other
external factors.
have been alt er ed or m odif ied.
 Loading...