

Page 1

A 2704B
Dual DAB + AM/FM Tuner
With RS-232
Operating Instructions
• Dual outputs (one for each section) – AM/FM and DAB+/FM • Dual
LCD readouts – one LCD for each tuner section • 80 station presets –
Section Left (10 AM/30 FM), Section Right (20 DAB+, 20 FM)
• Antenna sockets – DAB+, FM, AM loop • PLL synthesised tuner
circuit with digital processing • Rear mounted level control knobs
• Mono/stereo selector (for FM tuner only) • IR remote control
• RS-232 control • 19” rack mount ears included
• 240V a.c. operation
PACKAGE CONTENTS: Dual Radio Tuner 1RU, Antennas - AM loop + 75Ω FM wire +
DAB Telescopic, Remote control + 2 x AAA batteries, 2 x 1.5m stereo RCA to stereo
RCA leads, IEC power cord, Rack mounting ears, Instruction Manual
Congratulations on your purchase of the Dual Tuner with RS232 interface and infra-red remote control.
This radio tuner is a 1RU rack-mountable device with a sleek design and a symmetrical layout of buttons across the front panel. The stylish two-line LCD screens displays essential information pertaining
to each section’s tuner – left side AM/FM bands, right side DAB+ / FM bands. This receiver uses
precision Phase Lock Loop (PLL) synthesized digital tuning technology, and is sensitive to the weakest
signals when connected to appropriate antennas.
1
Page 2

Dynalink® A 2704B Dual DAB + AM/FM Tuner with RS-232
Installation
1. The unit is supplied with separate RCA line level outputs for each tuner section. Connect the stereo
RCA output(s) as required to a line level amplifier input.
2. Connect a suitable FM antenna to the FM antenna terminals, and connect the AM loop antenna to the
AM antenna terminals. (Included)
3. Connect the provided IEC cable to the unit, and plug it in to a 240V a.c. mains outlet. Install the batteries (supplied) in the remote control.
4. The battery compartment is located on the reverse of the remote control. Ensure the 2 x AAA batteries
are inserted with the correct polarity.
5. Switch the mains outlet on.
CAUTION
• Do not use this unit where the temperatures are below 5°C
or exceeds 35°C.
• Do not attempt to clean with chemical solvents as this may cause damage.
Use a clean, dry cloth.
Fig 2. REAR PANELFig 1. FRONT PANEL
1. POWER - ON/OFF master switch
2. AM/FM TUNER - LCD Tuner A
3. Power ON/OFF - Tuner A Standby
4. BAND - AM/FM selection
5. SLEEP – Return to standby after a set period.
6. DOWN - Frequency (manual steps/auto search)
7. UP - Frequency (manual steps/auto search)
8. M.DOWN – Scroll down through stored memory
9. M.UP – Scroll up through stored memory stations
10. TUNER - Power LED for remote control LHS
11. MEMORY – Store frequency in preset memory
12. Tuner A Preset selection 1 to 5, 5+
13. DAB+/FM TUNER – LCD Tuner B
14. MODE – Switch between DAB+ and FM (like BAND)
15. MENU – Choose functions for DAB+ and FM settings
16. DAB - Power LED for remote control RHS
17. INFO – Scroll through the data transmitted for each band
18. POWER ON/OFF – Tuner B Standby
19. TUNE - Jogwheel FM / DAB+ stations, navigate menus, ENTER
20. FM LIST – Displays list of stored FM station frequencies
21. ENTER – Press to select a setting or function in Menu
22. UP – Station and frequency search up (manual/auto-scan)
23. DOWN - Station and frequency search down
1. RS232 control port
2. DAB Ant (F-Type socket)
3. FM Ant (PAL socket)
4. AM Loop (Spring terminal)
5. DAB Out Level adjustment
6. DAB Out Stereo L/R RCA line
7. Tuner Out Level adjustment
8. Tuner Out Stereo L/R RCA line
9. 240V a.c. Mains IEC input
NOTE: On Tuner B, jogwheel
performs the same functions as
the front panel buttons
UP / DOWN and ENTER. If the
jogwheel is pressed for two
seconds, it will auto scan and
store stations in both DAB+
and FM modes (like ASM).
2
Page 3
Dynalink® A 2704B Dual DAB + AM/FM Tuner with RS-232
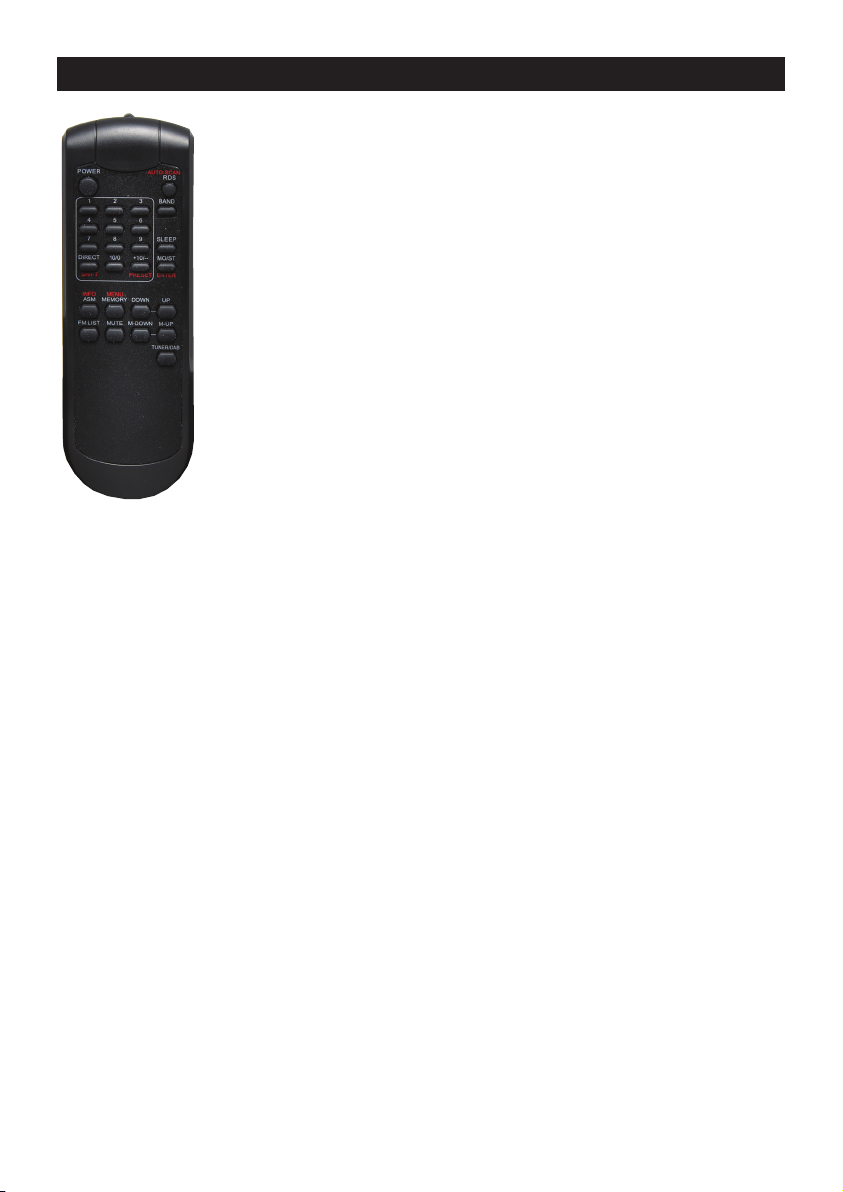
Fig 3. REMOTE CONTROL {Red alternate functions for buttons}
1. Power ON/OFF - Affects only the section whose LED is lit.
2. Numeric keypad - Memory presets 1-10+
3. Direct {SHIFT} - Tune to a specific station using the numeric
keys to enter the frequency. Only affects the AM/FM tuner.
4. ASM – Auto Search Memory {INFO} - Auto Search Memory.
Automatically scans the entire band (AM or FM) and stores
the strongest frequencies found in memory.
5. Memory {MENU} - This button can store a station frequency
into a Memory preset number. It can also activate the
Menus.
6. FM List - Displays list of stored FM station frequencies
7. MUTE – Sets volume level to zero. Mute mark appears LCD.
8. RDS – Radio Data Service {AUTO SCAN}
9. BAND – Toggle between AM and FM bands (Tuner Section)
and DAB+ / FM modes (DAB+ Section)
10. SLEEP [Timer] - Sets the duration for the playback timer that
counts down the minutes to power standby. Max 90 min.
11. MO/ST - Mono/Stereo {ENTER} - Change between mono and
stereo mode for FM radio tuning. Enter is the same as
pressing the jog wheel.
12. DOWN / UP – Search up or down through frequencies.
13. M-Down / M-Up – Scroll up or down through preset stations.
14. TUNER / DAB – Toggle between the two tuners, left (Tuner A
= AM/FM) or right (Tuner B = DAB+/FM).
General Operation
NOTE: While the Remote Control (Fig 3) and the front panel of each tuner (Fig 1) share some common
function controls, a few functions are ONLY available using the Remote Control, namely: DIRECT, RDS,
MUTE, ASM, MO/ST, TUNER/DAB. (ASM doubles as INFO button when the DAB+/FM tuner is active.)
- MUTE button functions with whichever tuner section is active, as determined by pressing the TUNER/
DAB button. When pressed, the word MUTE will flash on the screen.
- The LCD displays of each tuner will show the current frequency or Station ID for which each receiver is
tuned, for whichever band or mode has been selected.
• POWER ON / OFF: The unit has a main POWER switch on the front panel (Fig 1, button 1). When
switched ON the unit will power up both tuner display screens. If a tuner – either A or B – is not required,
simply press the ‘POWER’ button applicable to that tuner. The POWER button on the Remote (See Fig
3, button 1) is the same as the POWER buttons (Fig 1, buttons 3 & 18) on the front panel of each tuner
section.
• SWITCHING BETWEEN THE DUAL TUNERS: On the Remote Control, press the TUNER/DAB button
to toggle between which section (Left or Right) that the remote will control. A blue light on the front panel
will be lit to indicate which tuner is under the remote’s control. The Power / Standby button will work with
whichever section is under the control of the remote handset. The same is true for the MUTE, SLEEP,
BAND buttons. Furthermore, all the red labels on remote control buttons will work when pressed during
DAB section operation.
• TUNING A RADIO STATION: A station frequency can be located by pressing either the ‘UP’ or ‘DOWN’
buttons (Refer Fig 1 – Buttons 6 or 7 [Tuner AM/FM] and Buttons 22 or 23 [DAB]+ / FM). Holding the
3
Page 4

Dynalink® A 2704B Dual DAB + AM/FM Tuner with RS-232
buttons down for a couple of seconds will start the AUTO SEARCH function, which will stop on the next
strong frequency that the tuner can lock on to.
Press and hold the ‘UP / DOWN’ buttons again to recommence AUTO SCAN either up or down the dial.
In manual tuning, the frequency will move up or down in fixed steps for each button press, according to
frequency step applicable to the band in which the tuning is taking place.
AM/FM Tuner Operation
• SWITCH BETWEEN BANDS: On either the Remote Control or the front panel, pressing the ‘BAND’ button will switch the tuner section between AM and FM frequencies, and allow tuning to proceed. “AM” or
“FM” markers will appear on the screen to indicate the Band in use.
• MONO/STEREO SELECTION: On the Remote Control only (Fig 3), press the ‘MO/ST’ button to switch
between FM mono and FM stereo reception for the Tuner A side. A marker will show on the screen to
indicate Mono or Stereo mode, unless the station is broadcasting in FM mono only, as some low-power
stations between 87.6 MHz and 88.0 MHz sometimes do, in which case there will be no marker and the
MO/ST button will do nothing.
NOTE: This button only works with the AM/FM section tuner. It has no impact on the FM tuner
integrated with the DAB+ section. However, there is a setting within the MENU functions on the
DAB side (Tuner B) which controls the FM Stereo and Mono audio for that FM receiver only.
• AUTO SCAN MEMORY (ASM):
1. Press TUNER/DAB to switch to the AM/FM tuner.
2. On the Remote Control, press and hold the ‘ASM’
button. The tuner will SCAN the frequencies in that band (AM or FM), and store in memory automatically
any station signals that are strong enough to lock onto. This is an easy way to store preset stations for
Tuner A across each band.
3. To replace a presentation frequency with another frequency, simply follow the PROGRAM A STATION
PRESET procedure below, and manually select the preset memory number you wish to replace with a
new frequency, and it will be stored in that preset.
• DIRECTLY ENTERING A FREQUENCY: This is only possible using the ‘DIRECT’ button on the Remote
Control, and it only works with the AM/FM tuner section.
1. Use TUNER/DAB toggle button to select the AM/FM tuner. Press ‘DIRECT’ (see Fig 3).
SCAN MEMORY (ASM):
2. The display on the front panel (Fig 1) will delete the current frequency and leave spaces for numbers
referring to the frequency to which you wish to tune.
3. Use the keypad on the Remote to enter the station frequency and press ‘DIRECT’ again to confirm.
4. The tuner will jump to that frequency. If the input frequency is beyond the tuning range, the tuner will
display ERR.
• TO PROGRAM A STATION PRESET MANUALLY:
1. Use the ‘UP/DOWN’ tuning keys to find a desired station frequency that you wish to program as a preset.
2. Press the ‘Memory’ key to enter the memory mode for that tuner (either A or B). The memory mode is
set, when the ‘MEMORY’ key was pressed. The “MEMO” mark appears on the display.
3. The memory mode is released automatically after five seconds if there is no further input in this mode.
4. Select a memory number, either by accepting the number displayed on screen, or by pressing another
preset button number, either using the panel buttons or from the remote control.
5. Press the ‘Memory’ button again and the frequency will be stored to that preset number.
NOTE: The FM band has 30 channels for memory storage while the AM band has 10 channels for
4
Page 5

Dynalink® A 2704B Dual DAB + AM/FM Tuner with RS-232
the Tuner section. Use the ‘BAND’ button to select FM or AM frequencies. The FM and AM
antenna connections for each tuner are on the rear of the unit, along with the RCA outputs and
level controls. (refer Fig 2)
• SELECTING A PRESET STATION:
1. Use the ‘M-UP’ or ‘M-DOWN’ buttons, on either the
front panel (Fig 1) or the Remote Control (Fig 3), to scroll up or down through the preset station frequencies that have been programmed using the ‘MEMORY’ function.
2. The other method to get to a preset station is to use the station preset buttons directly on the front
panel (1 to 5 for AM/FM Tuner A) OR by typing the station preset number on the Remote Control (1 to 10).
3. You can also move through the stored present stations using the jogwheel. Press to enter / select the
station.
4. Furthermore, pressing the ‘+5’ button TWICE on the tuner panel (Fig 1) OR the ‘+10’ button ONCE on
the Remote Control (Fig 3) will jump up the preset list by that number to another frequency programmed
into the memory.
5. Meanwhile, by hitting the +5 key first, and then another number on the front panel or on the remote
handset keypad, the tuner will jump to the preset position equal to the sum of numbers on those keys.
Examples: On remote control press the number ‘9’ and then ‘+10’, and that tuner will jump to station preset 19. On the front panel, press ‘+5’, then another preset button number 3, and that tuner
will jump to station preset 8. Press ‘+5’ twice, and the 6 on the remote and the preset will jump up
to number 16.
NOTE: AM station memories on Tuner A number from 1 to 10 only. FM stations memories on Tuner
A number 1 to 30 only.
• SLEEP FUNCTION: When ‘SLEEP’ key is pressed on either the AM/FM tuner front panel or the remote
control, the SLEEP function is set and the timer starting duration is displayed for 2 seconds. The sleep
time is changed as shown below:
1. Every press of the ‘SLEEP’ key while the sleep time is displayed on the screen will decrease the sleep
time as follows (in minutes): 90 80 70 60 50 40 30 20 10 OFF
2. The “SLEEP” mark appears on the display when the sleep function is set and operating.
3. Pressing the ‘SLEEP’ button while the sleep timer is active will cancel the sleep function.
4. The power for that tuner switches off automatically once the sleep timer reaches zero.
DAB/FM Tuner Operation
• SWITCH BETWEEN MODES: On the front panel, when the DAB+ tuner section is active, press the
MODE button to toggle between DAB+ and FM radio modes. On the remote handset, the BAND button
functions the same as the MODE button on the DAB+ tuner section’s front panel.
• SETTING THE CLOCK TIME: From the MENU, choose the Main Menu option and press ‘ENTER’
(remote or on panel). Then use the Up or Down button to select the Time Setup function and press enter.
Follow the prompts to set the time. Remember that the DAB+ transmissions already contain the time
codes in the signal data, and the DAB+ tuner decodes these and sets the time automatically, which is the
default setting for the receiver.
• FM LIST: Press this button to display the FM frequencies stored on Tuner B. Scroll through the list using
Up / Down buttons or the TUNE jogwheel. To organise and retune the FM List, when in FM Mode, press
FM List and then press the Jogwheel knob for two seconds until it starts FM auto scanning. Any FM station frequencies strong enough to be locked on will be stored – up to 20 memories on Tuner B side. This
function is similar to ASM, which only activates on the left side AM/FM tuner.
SLEEP function on the DAB+ Tuner side: This can be activated two ways.
5
Page 6

Dynalink® A 2704B Dual DAB + AM/FM Tuner with RS-232
1. From the MENU functions, for both FM and DAB+ modes. Press MENU and then use the jogwheel to
select “MAIN MENU”. Within Main Menu you will find the SLEEP function - Off, 15, 30, 45, 60, 90 min.
2. SLEEP menu can also be activated by pressing the SLEEP button on the remote, but only when the
DAB side is actively under the remote’s control.
Menu Functions
Menu Options – DAB Mode [Use Up / Down or Knob + Enter]
Press Menu
Command
Sation Scan
Main Menu Time Setup
Menu Options – FM Mode [Use Up / Down or Knob + Enter]
Press Menu
Command
Audio Settings Stereo or Mono <Choose> N/A
Main Menu
~ Press and hold MENU to display the device’s SW version.
st
1
Level Functions 2
Full <Auto Scans> N/A
Manual <Search> N/A
Sleep
Tune Stations <Automatic> N/A
Station Order Multiplex N/A
Factory Reset N/A N/A
SW Version N/A N/A
st
1
Level Functions 2
Mono Only <Choose> N/A
Time Setup Set Clock <Time>
Sleep
Factory Reset N/A N/A
SW Version N/A N/A
nd
Level Functions 3
Set Clock <Time>
Set Date <Date>
Auto Update <Radio>
Set 12Hr/24Hr <Choose>
Off, 15, 30, 45. 60,
90min
Alphanumeric N/A
Active N/A
nd
Level Functions 3
Set Date <Date>
Auto Update <Radio>
Set 12Hr/24Hr <Choose>
Off, 15, 30, 45. 60,
90min
rd
Level Operation
<Choose>
rd
Level Operation
<Choose>
Station ID data displayed on LCD
• RDS – RADIO DATA SERVICE: This feature only operates for the FM receiver on Tuner A. RDS is a series of data bits encoded within the FM Audio signal, which enable text to be transmitted and displayed on
6
Page 7

Dynalink® A 2704B Dual DAB + AM/FM Tuner with RS-232
the screen of an RDS enabled tuner. If the FM station is transmitting any RDS, the information will scroll
across the bottom line of the LCD. Otherwise, the LCD will display “NONE” for the following codes: PS –
Program Callsign, PTY – Program Type, RT – Radio Text, CT – Clock Time & Date, Signal Strength Bar
(FM Receiver Tuner B INFO only)
**Press RDS on remote when in DAB+ mode to start auto scan.
• INFO – RDS for DAB+ stations: This button feature operates for the FM and DAB+ receiver on Tuner B.
Press the INFO button in FM mode and the FM RDS will display on the right LCD if it is being transmitted
by that station. (See RDS above). Press the INFO button in the DAB+ mode and the data that is encoded
in the DAB+ signal will display on screen. The DAB+ INFO data codes are as follows: Scroll Text, Program
Type, Multiplex Name, Clock Time & Date, Bit Error Rate (BER), Channel, Quality, Signal Strength Bar.
Specifications RS-232 Control Information
FM Input:
Tuning Frequency Range:
FM Frequency Step:
Usable Sensitivity:
Signal to Noise Ratio:
Total Harmonic Distortion:
Stereo Separation:
IF Rejection Ratio:
AM Input:
Tuning Frequency Range:
Usable Sensitivity:
Signal to Noise Ratio:
Total Harmonic Distortion:
Frequency Response:
Selectivity:
RS232 Baud rate:
Data Bit:
STOP Bit:
Parity:
Flow Control:
Power:
Output Connection:
Dimensions:
Weight:
75Ω unbalanced antenna wire
87.5-108MHz in 0.5MHz steps
50KHz
6μV emf
50dB
0.1%
40dB (1KHz)
45dB
AM loop antenna terminals
522-1710KHz in 9KHz steps
50μV emf
50dB
1%
30Hz -8KHz (±3dB)
25dB
9600 bps
8 bits
1 bit
None
No
230VAC 50-60Hz 50VA
RCA
44H x 482W x 250D
3.45kg
Command String Hexadecimal
1 45 43 41 0D 0A
2
3 45 43 43 0D 0A
4 45 43 44 0D 0A
5 45 43 45 0D 0A
6 45 43 46 0D 0A
7 45 43 47 0D 0A
8 45 43 48 0D 0A
9 45 43 49 0D 0A
10/10 45 43 4A 0D 0A
+10 45 43 4B 0D 0A
DIRECT 45 43 4C 0D 0A
DOWN 45 43 4D 0D 0A
UP 45 43 4E 0D 0A
POWER ON 45 43 4F 0D 0A
POWER OFF 45 43 50 0D 0A
TUNER 1 45 43 51 0D 0A
TUNER 2 45 43 52 0D 0A
ME-UP 45 43 30 0D 0A
ME-DOWN 45 43 31 0D 0A
MEMORY 45 43 32 0D 0A
ASM 45 43 32 0D 0A
MO/ST 45 43 34 0D 0A
SLEEP 45 43 35 0D 0A
BAND 45 43 36 0D 0A
Auto search DOWN 45 43 37 0D 0A
Auto search UP 45 43 38 0D 0A
Answer from device
if all ok
Answer from device
if not all ok
45 43 42 0D 0A
2B 4F 4B OD 0A
2B 45 52 OD 0A
**The RS-232 communication is 2-way.
Therefore any commands entered via
the remote control are outputted as an
RS-232 command.
7
Page 8

Dynalink® A 2704B Dual DAB + AM/FM Tuner with RS-232
Altronic Distributors warrants this product for one year from date of purchase from Altronics or its resellers
to the consumer. If this item is part of an installation or another product, please contact the installer or
supplier for your warranty.
During the warranty period, we undertake to repair or replace your product at no charge if found to be
defective due to a manufacturing fault. The warranty excludes damage by misuse or incorrect installation
(i.e. failure to install and operate device according to specifications in the supplied instruction manual),
neglect, shipping accident, or no fault found, nor by use in a way or manner not intended by the supplier.
For speakers, misuse includes burnt out voice coils.
For repair or service please contact your PLACE OF PURCHASE.
If this item was purchased directly from Altronics please make a warranty claim by:
1. FOR MAIL ORDER CUSTOMERS (includes school and trade orders),
a) Ringing us on 1300 797 007 and quoting your tax invoice number.
b) Upon contacting Altronics, we will issue an R.A. (Return Authorisation). As Altronics have a
number of service agents throughout Australia, a copy of the R.A. will be emailed, faxed or mailed to
you with full instructions of how and where to send the goods. The freight for shipping goods back to
Altronics for all repairs is at the customer’s expense.
c) A copy of the R.A. form, (or at the very minimum, the R.A. number) must accompany the goods to
effect the repair.
d) Altronics will pay the return freight to the customer where the warranty claim has been accepted.
e) Please quote the R.A. number in any correspondence to us.
2. FOR OVER THE COUNTER PURCHASES; to make a warranty claim, please return the goods
to us in any of our stores, with a copy of your proof of purchase (tax invoice).
a) Upon leaving the goods at one of our stores, an R.A. number will be issued to you.
b) Once repaired, you will be contacted, advising that the goods are ready to be collected from
the store.
It is at Altronics discretion as to whether the goods will be repaired or replaced (whilst under
warranty); and as to whether identical goods will be used to replace the item due to changes of
models / products.
Note: Under no circumstances should you attempt to repair the device yourself or via a non-
Our goods come with guarantees that cannot be excluded under the Australian Consumer Law. You
are entitled to a replacement or refund for a major failure and for compensation for any other reasonably
foreseeable loss or damage. You are also entitled to have the goods repaired or replaced if the goods fail
to be of acceptable quality and the failure does not amount to a major failure.
authorised Altronics service centre, as this will invalidate the warranty!
Distributed by Altronic Distributors Pty. Ltd.
• Perth • Sydney • Melbourne
Phone: 1300 780 999 Fax: 1300 790 999
altronics.com.au
8
 Loading...