

Page 1

56K e-modem III
Quick Setup Guide
DY56EXT3
Page 2

56K e-modem III Quick Set-up Guide
Introduction
This Quick Setup Guide summarises
the modem installation in four simple
steps. Please follow each step exactly
as described. Upon completion of step
3 you can be certain that your modem
is correctly installed.
This Guide is intended for Windows
Vista/XP/2000/98/95/ME users. There is
also a full User Manual on this CD.
Once on the Internet you can visit
Dynalink Modems’ web site at
www.dynalink.com.au (Australia) or
www.dynalink.co.nz (New Zealand) to
access further helpful information.
Page 3
1
2
Connect the modem to your PC
1. Turn your PC OFF.
2. Connect the serial cable to both the modem and a spare COM port at the back
of the PC.
3. Connect the supplied phone cord to the modem LINE jack and a phone wall
socket.
4. Connect the supplied power adaptor unit to the modem and a power point.
5. Turn the modem on – the power light should light up.
Install the modem drivers
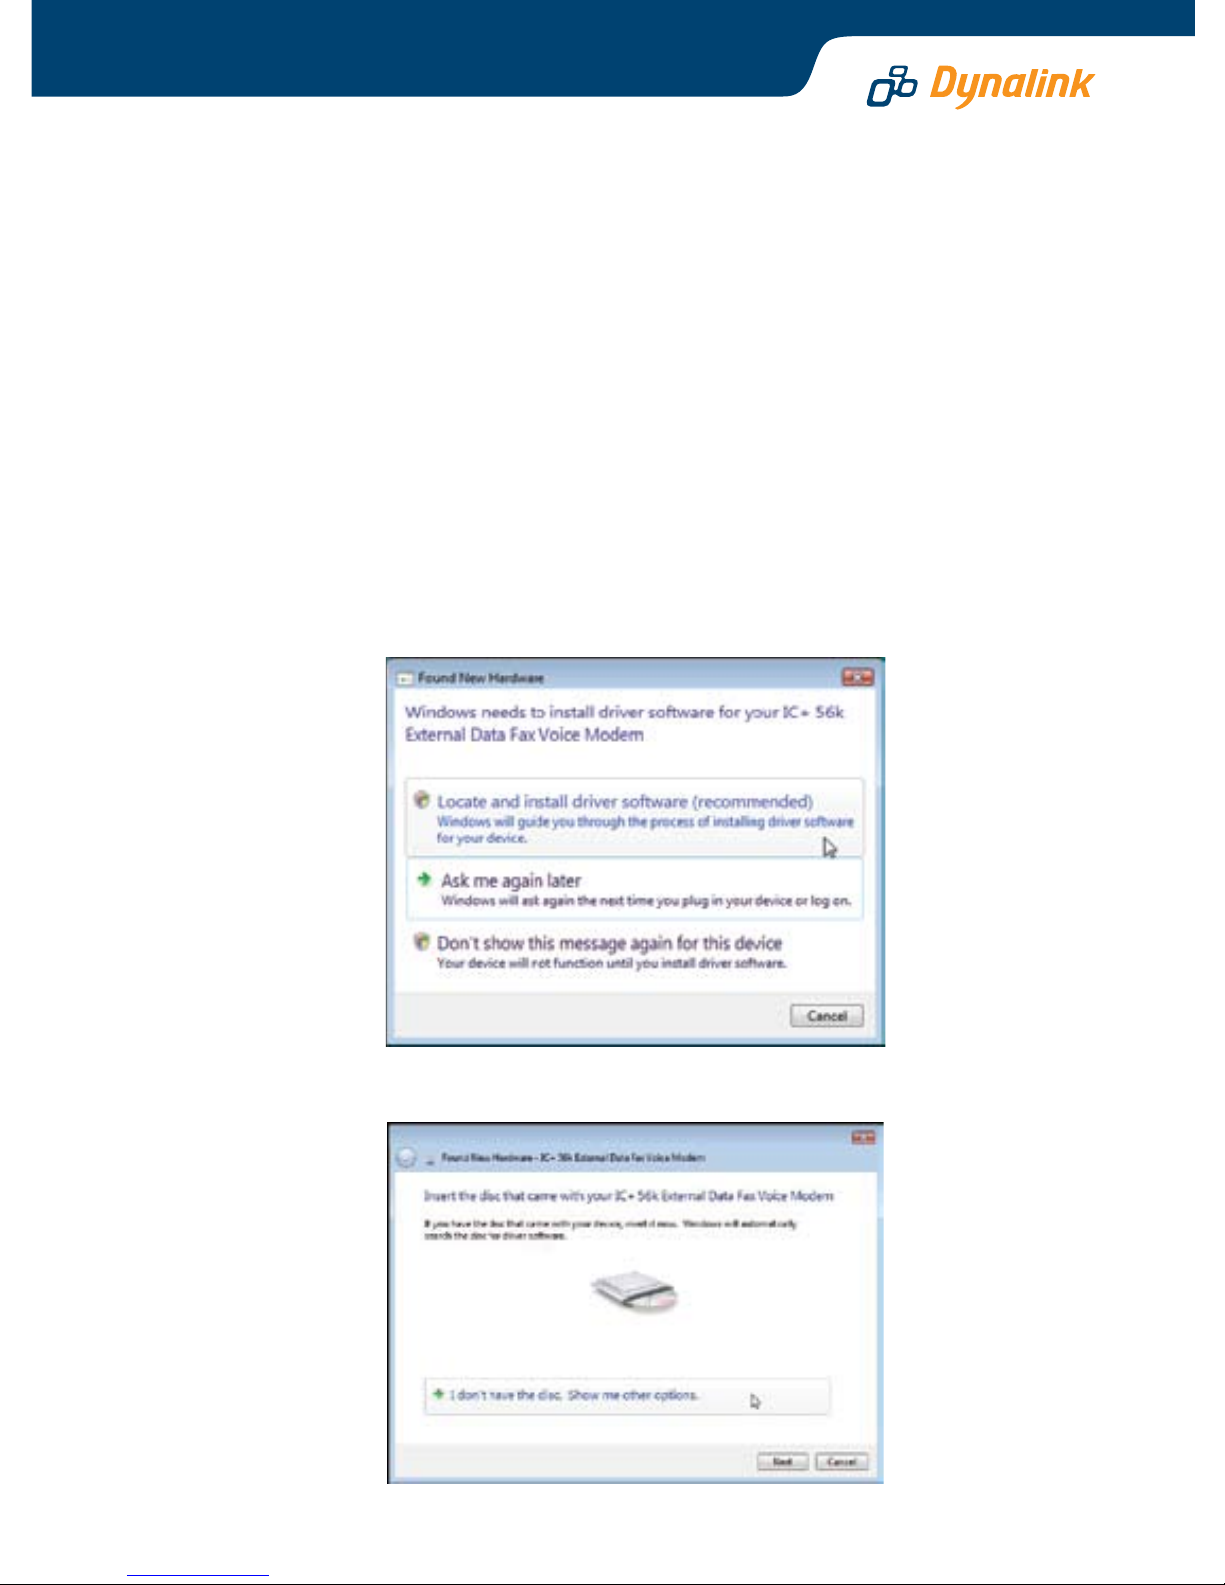
For Windows Vista
1. Windows will detect the modem automatically; please insert the driver CD
supplied and click Locate and install driver software (recommended).
2. Select I don’t have the disc. Show me other options.
Page 4

3. Select Browse my computer for driver software (advanced).
4. Select Use Browse…to select file of E:\Driver\Vista32 (E is the letter of the
CD-ROM drive), then click Next to continue.
E:\Driver\Vista64 for Vista 64
Page 5

5. Click Install this driver software anyway.
6. Click Close end of procedure.
Page 6

3
For Windows XP/2000/ME/98SE
1. Power ON your PC.
2. Windows “Plug & Play” will detect the modem as IC+56k External Data Fax Voice
Modem and attempt to search for the modem drivers. If the modem is not
detected, please refer to the Troubleshooting section.
3. Point Windows to this CD.
4. Please continue to follow the on-screen prompts as Windows guides you
through the remainder of the modem installation. In Windows XP click Continue
Anyway to continue the installation.
5. After the drivers have been installed power the modem off and then on.
Note: Generic modem drivers that are available in Windows XP can also be used with
this modem.
Check the modem can talk to the pc
Windows Vista, XP & 2000 users:
1. Go to Control Panel – Phone and Modem Options – Modems.
2. You will see the modem listed next to a COM Port. Note down the COM port
number in this box [ ].
3. Click Properties – Diagnostics – Query Modem. If a table of ATI responses is
reported, then the modem and computer are communicating. If a table is not
reported, but instead an error message such as CANNOT OPEN PORT, please
refer to the Troubleshooting section.
Windows 95, 98 & ME users:
1. Click Start – Settings – Control Panel – Modems – Diagnostics.
2. You will see the modem listed next to a COM Port. Note down the COM port
number in this box [ ].
3. Click on your modem's COM port and click More Info. If a table of ATI responses
is reported, then the modem and computer are communicating. If a table is not
reported, but instead an error message such as CANNOT OPEN PORT, please
refer to the Troubleshooting section.
The modem has been installed successfully and passed all our tests. Any
roblems that arise when the modem is used by other applications are not
related to the installation of the modem, but to the setup of the software
using the modem. We suggest that you now proceed to the next section, as
the Internet will give you access to our website support area. If you have
problems during this step you can be confident that the problem is not a basic
modem installation problem, but rather the setup of the Internet software.
Page 7

The Internet & optional fax software
In order to connect to the Internet you will need to establish an account with an Internet
Service Provider (ISP). Once you are connected to the Internet, you will find further information
on Dynalink Modem’s World Wide Web site at www.dynalink.com.au (Australia) or
www.dynalink.co.nz (NZ).
This CD contains optional software that allows you to fax with your modem and use the
modem as a Telephone Answering Machine (TAM). To install the software, insert the CD and
follow the instructions on screen. If a menu does not load automatically, click Start – Run and
enter d:\Setup.exe (substitute d: with your CD drive letter), then click OK. Follow the on-screen
instructions to continue. A full User’s Manual can be found installed with the software.
Troubleshooting
When following Step 3, the modem is not listed under “Modem Properties”.
This error can occur when the drivers have not been installed correctly.
Click Start – Settings - Control Panel – System – Device Manager
Check under Other Devices. If there is a reference to a modem, highlight it then click
Remove.
Click Refresh. Windows should re-detect the modem and ask for the drivers.
NO DIALTONE is reported.
Click Start – Settings - Control Panel – Modems – Properties – Advanced. Under
Extra Settings, enter X3.
Eliminate any cables or devices between the phone cable and the wall jack, such
as fax switches or extension phone cables.
Windows does not detect the modem.
Check the modem is powered ON - the PWR LED should be lit. If the LED does
not light, check you are using the AC Power Supply Unit that shipped with the
modem and that it is plugged into an active power point.
Check the serial cable is rmly attached to your PC and modem.
Verify the modem's COM port is enabled in the BIOS - if you are not familiar with
your PC's BIOS, contact your PC dealer.
When clicking the More Info button, an error is reported.
Check you have clicked on the COM port your modem is attached to.
Check the serial cable is rmly attached to your PC and modem and is turned on.
Ensure no other programmes are using the modem - exit all programmes before
running More Info.
Page 8

Warranty
The warranty is granted on the following conditions:
1. This warranty extends to the original purchaser (you) and is not transferable;
2. This warranty shall not apply to software programs, batteries power supplies, cables or other
accessories supplied in or with the product;
3. The customer complies with all of the terms of any relevant agreement with Dynalink
Modems Limited and any other reasonable requirements of Dynalink Modems Limited
including producing such evidence of purchase as Dynalink Modems Limited may require;
4. The cost of transporting your product to and from Dynalink Modems Limited nominated
premises is your responsibility; and,
5. Dynalink Modems Limited does not have any liability or responsibility under this warranty
where any cost, loss, injury or damage of any kind, whether direct, indirect, consequential,
incidental or otherwise arises out of events beyond Dynalink Modems Limited reasonable
control. This includes but is not limited to: acts of God, war, riot, embargoes, acts of civil or
military authorities, fire, floods, electricity outages, lightning, power surges, or shortages of
materials or labour.
The warranty is automatically voided if:
1. You, or someone else uses the product, or attempts to use it, other than as specified by
Dynalink Modems Limited;
2. The fault or defect in your product is the result of a voltage surge subjected to the modem
either by power supply or communication line, whether caused by thunderstorm activity or
any other cause(s);
3. The fault is the result of accidental damage or damage in transit, including but not limited to
liquid spillage;
4. Your modem has been used for any other purposes than that for which it is sold, or in any
way other than in strict accordance with the user manual supplied;
5. Your modem has been repaired or modified or attempted to be repaired or modified, other
than by a qualified person at a service centre authorised by Dynalink Modems Limited, or
6. The serial number has been defaced or altered in any way or if the serial number plate has
been removed.
Page 9

Limitations of Warranty:
The Fair Trading Act 1986 and corresponding State and Territory Fair Trading Acts or
legislation of another Government ("the relevant acts") in certain circumstances imply
mandatory conditions and warranties which cannot be excluded. This warranty is in
addition to and not in replacement for such conditions and warranties. To the extent
permitted by the Relevant Acts, in relation to your product and any other materials
provided with the product ("the Goods") the liability of Dynalink Modems Limited under
the Relevant Acts is limited to, at the option of Dynalink Modems Limited to:
Replacement of the Goods; or
Repair of the Goods; or
Payment of the cost of replacing the Goods' or
Payment of the cost of having the Goods repaired.
Help
Always check that your hardware is installed correctly. Check our web site for the latest
information and troubleshooting guide. If you have dificulties, contact Dynalink Technical
Support
If possible, visit Dynalink's on-line support area & Online knowledge base at:
Australia: http://www.dynalink.com.au
New Zealand: http://www.dynalink.co.nz
Contacts at Dynalink Technical Support:
Australia:
Phone: 1800 653 962
Fax: 1800 063 962
(Monday-Friday: 8:30am-5:30pm)
New Zealand:
Phone: 0800 653 962 or 09 913 1700
Fax: 09 448 5549
(Monday-Friday: 8:30am-7:30pm)
 Loading...