

Dyna-Glo RMC-TT15, RMC-TT30P, RMC-TT15P, RMC-TT30 Installation, Operation And Maintenance Manual

Dyna-Glo
Liquid Propane
Tank Top Heaters
USER’S INSTALLATION, OPERATION AND MAINTENANCE MANUAL
MODELS:
RMC-TT15 (PROPANE, 15,000 BTU/HR), RMC-TT15P (PROPANE, 15,000 BTU/HR)
RMC-TT30 (PROPANE, 30,000 BTU/HR), RMC-TT30P (PROPANE, 30,000 BTU/HR)
WARNING: If the information in this manual is not followed exactly, a fire or explosion
may result causing property damage, personal injury or loss of life.
— Do not store or use gasoline or other flammable vapors and liquids in the vicinity of
this or any other appliance.
— An LP cylinder not connected for use shall not be stored in the vicinity of this or any
other appliance.
— WHAT TO DO IF YOU SMELL GAS
• Do not try to light appliance
• Extinguish any open flame
• Shut off gas to appliance
— Service must be performed by a qualified service agency.
California Prop 65- Fuels in gas or oil-fired appliances and the products of combustion of such fuels, contain
chemicals known to the State of California to cause cancer, birth defects and other reproductive harm.
CONSUMER: RETAIN THIS MANUAL FOR FUTURE REFERENCE.
20005209 9/02 Rev. 1
1

Table of Contents
Specifications ........................................................................................................................................ 2
General Safety Instructions................................................................................................................... 3
Safety Precautions ................................................................................................................................ 3
Heater Assembly ................................................................................................................................... 4
Connecting Heater to Propane Tank..................................................................................................... 4
Operation .............................................................................................................................................. 4
Operating Information ........................................................................................................................... 4
Lighting Instructions when Using Piezo ................................................................................................ 5
To Turn Off Heater.................................................................................................................................5
Lighting Instructions when Using Match................................................................................................6
To Turn Off Heater.................................................................................................................................6
Technical Service and Replacement Parts............................................................................................ 6
Warranty................................................................................................................................................ 7
Specifications
BTU Operating
Model Output Ignition Time UPC Carton Packaged Country Warranty
(high) Type (20lb. cyl.) Dims. Weight of Origin
RMC-TT15 15,000 Match 28 Hrs. (high) 03511102015-9 18”x15”x12” 16lbs (est) So. Korea 1 Year
RMC-TT15P 15,000 Piezo 28 Hrs. (high) 03511102016-6 18”x15”x12” 16lbs (est) So. Korea 1 Year
RMC-TT30 30,000 Match 14 Hrs. (high) 03511102030-2 30”x13”x15¹⁄₂” 32lbs (est) So. Korea 1 Year
RMC-TT30P 30,000 Piezo 14 Hrs. (high) 03511102031-9 30”x13”x15¹⁄₂” 32lbs (est) So. Korea 1 Year
General Hazard Warning
Failure to comply with the precautions
and instructions provided with this
heater, can result in death, serious
bodily injury and property loss or
damage from hazards of fire, explosion, burn,
asphyxiation and carbon monoxide poisoning.
Only persons who can understand and follow the
instructions should use or service this heater.
If you need assistance or heater information such
as an instruction manual, labels, etc. contact the
manufacturer.
2

General Safety Instructions
Accidents are always tragic, especially because so
many of them could have been prevented with a little
care and judgement. The following are basic good
practices, we hope you will follow for the safe use of
your heater.
Important: Read this user’s manual carefully and
completely before trying to operate or service this
heater. Improper use of this heater can cause serious
injury or death from burns, fire, explosion and carbon
monoxide poisoning.
Safety Precautions
Make certain you read and understand all warnings. Do
not allow anyone who has not read this manual to
operate this heater. Keep this manual for reference. It is
your guide to safe and proper operation of this heater.
1. Check the heater thoroughly for damage. DO NOT
operate a damaged heater.
2. Do not modify the heater or operate a heater which
has been modified from its original condition.
3. Read and understand this manual before assembling or using this heater. Improper use of this heater
can cause serious injury.
4. For outdoor use only. Do not use inside house,
camper, tent, vehicle or any type of unvented or
enclosed area.
5. Never operate heater while sleeping or unattended.
Keep children and animals away from heater.
6. This heater produces carbon monoxide, which is
listed by the State of California as a reproductive
toxin under Proposition 65.
7. Minimum heater clearances from combustibles:
Top and Front 5 ft.
Sides and Rear 3 ft.
8. Use only in well vented areas.
9. Use only propane gas set up for vapor withdrawal.
10. Before connecting heater to propane tank, make
sure heater regulator knob is in the “OFF” position.
Always connect and light heater in areas free of
open flames.
11. Before each use, check heater for leaks. Never use
an open flame to check for a leak. Apply a mixture of
liquid soap and water to all joints. Bubbles forming
show a leak. Correct all leaks at once.
12. Locate propane tank on a stable and level surface.
The heater burners must be at least two feet above
the floor. Always attach heater to propane tank in an
upright position. Never operate heater on its side or
attach to propane tank in a horizontal position. This
could lead to dangerous flare-ups or fire.
13. Do not use heater in basement or below ground
level. Propane is heavier than air. If a leak occurs,
propane gas will sink to the lowest possible level. If
you smell gas or suspect a leak, shut off the propane tank valve at once and ventilate the area. Do
not strike a match or create any flame or electric
spark. Find and correct leak before attempting to
light any appliance. If you cannot correct leak, do not
tamper with heater. Return heater to nearest authorized service center or to address on back page of
this manual, freight prepaid.
14. Do not remove or handle a hot or operating heater.
Do not attach or remove a propane tank from a hot
or operating heater. Severe burns may result.
15. Always remove heater from propane tank after each
use. Always store propane tank outdoors. Never
store propane tank in an enclosed area. Never store
propane tank near high heat, open flame or where
temperatures exceed 100°F.
16. Keep all connections and fittings clean. Make sure
propane tank valve outlet is clean. Check the “O:
ring on the heater inlet fuel connector for damage
before each use. Replace if worn or damaged.
17. Do not attempt to light one burner off of the other.
Use one match per burner.
18. Do not overlap or point burners at each other.
19. Do not raise burner heads and cover air inlet holes
in mixing tube with burner head bracket.
20. Wing nuts and burner heads become very hot
during operation. Do not attempt to adjust burner
position while heater is operating. Allow 15 minutes
to cool.
21. Check heater for damage before each use. Do not
use a damaged heater. Do not alter heater. Keep
heater in its original state. Do not use heater if
altered.
22. If possible, keep containers in a warm area (under
no circumstances should the heater exhaust be
directed toward the propane container).
3
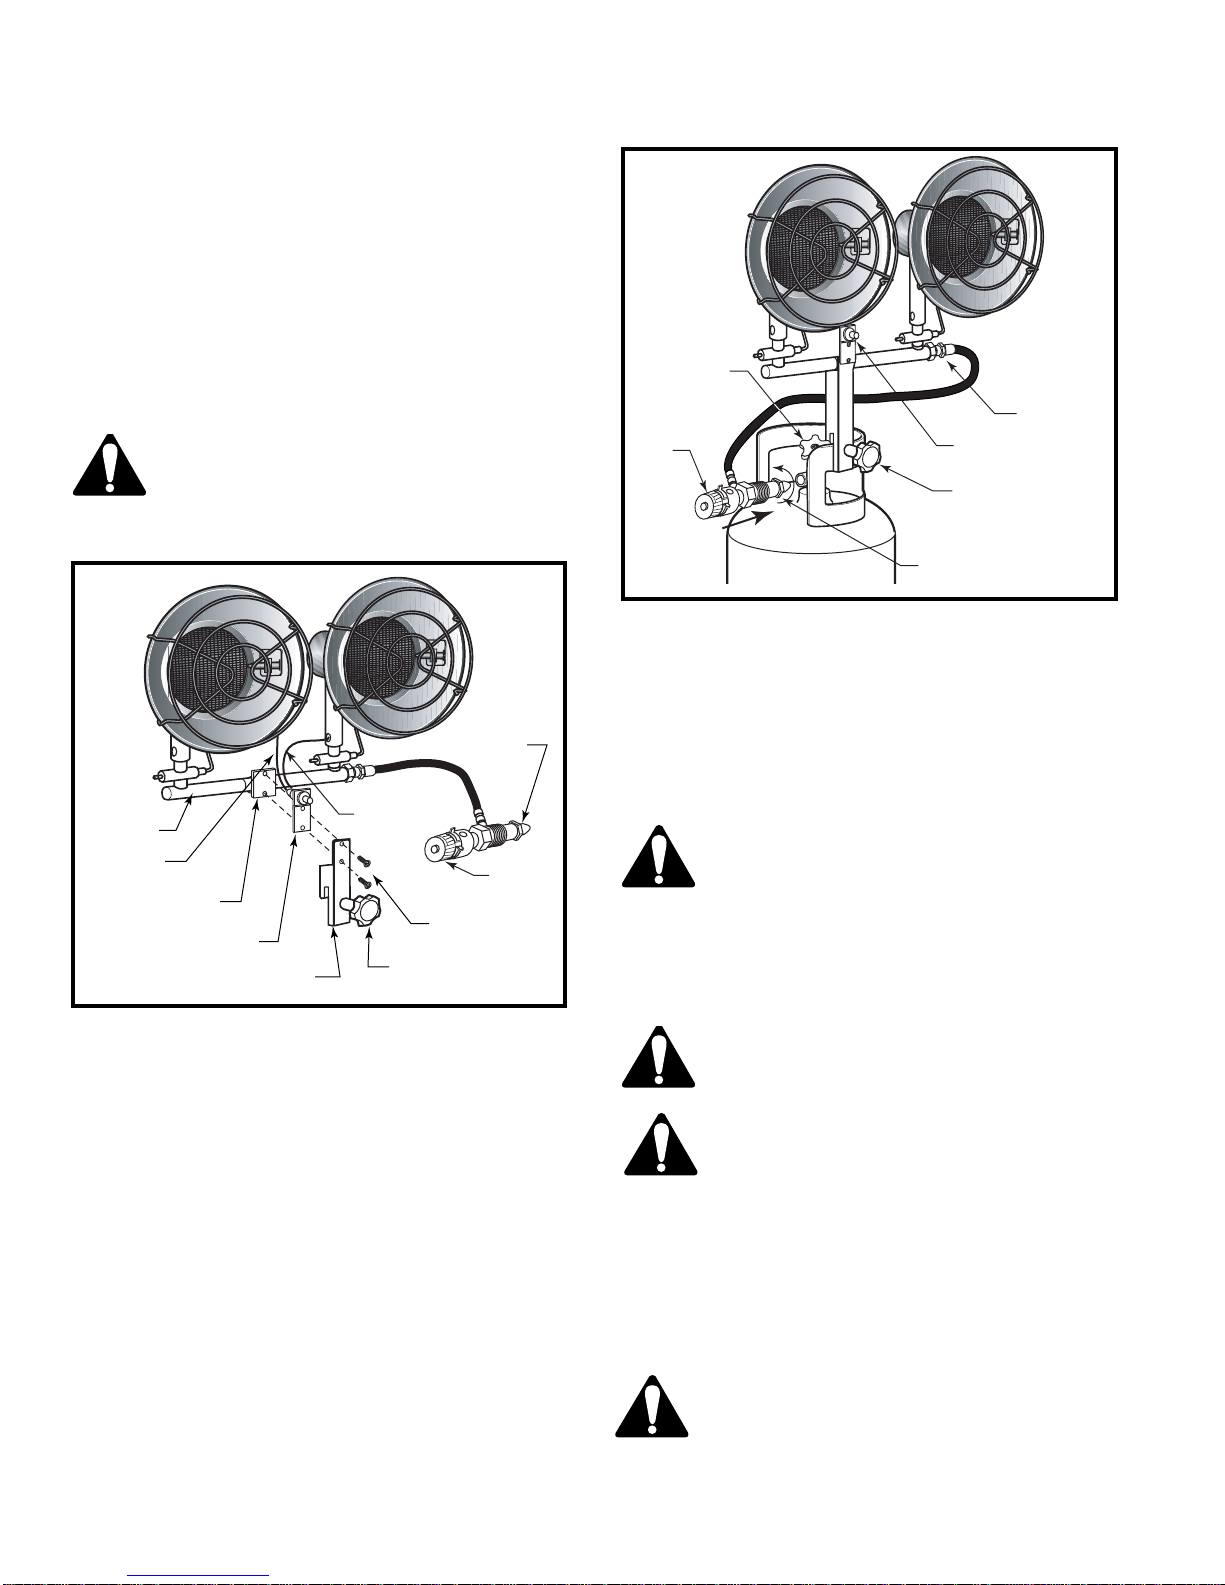
Heater Assembly (Dual burner models only)
The tank collar bracket must be assembled before the
heaters can be attached to the propane tank.
1. Align bolt holes in tank collar bracket and piezo
bracket with bolt holes in center plate on manifold.
2. Thread two machine screws into the bolt holes
attaching tank collar bracket and piezo bracket to
center plate on manifold. (Fig. 1)
3. Connect spark plug cable (left) and spark plug cable
(right) into each terminal of piezo lighter.
CAUTION: The spark plug cables have
different connectors. Be sure to connect
each spark plug into the correct terminal.
Make sure terminals are securely con-
nected.
Fuel
Connector
Nut
Spark Cable
Manifold
Spark Plug
Cable (Left)
Center Plate
Piezo Bracket
Tank Collar Bracket
RMC134
Fig. 1 Assemble tank collar bracket.
(Right)
Mounting Bolt
Knob
Machine
Screw
Heat
Regulator
Knob
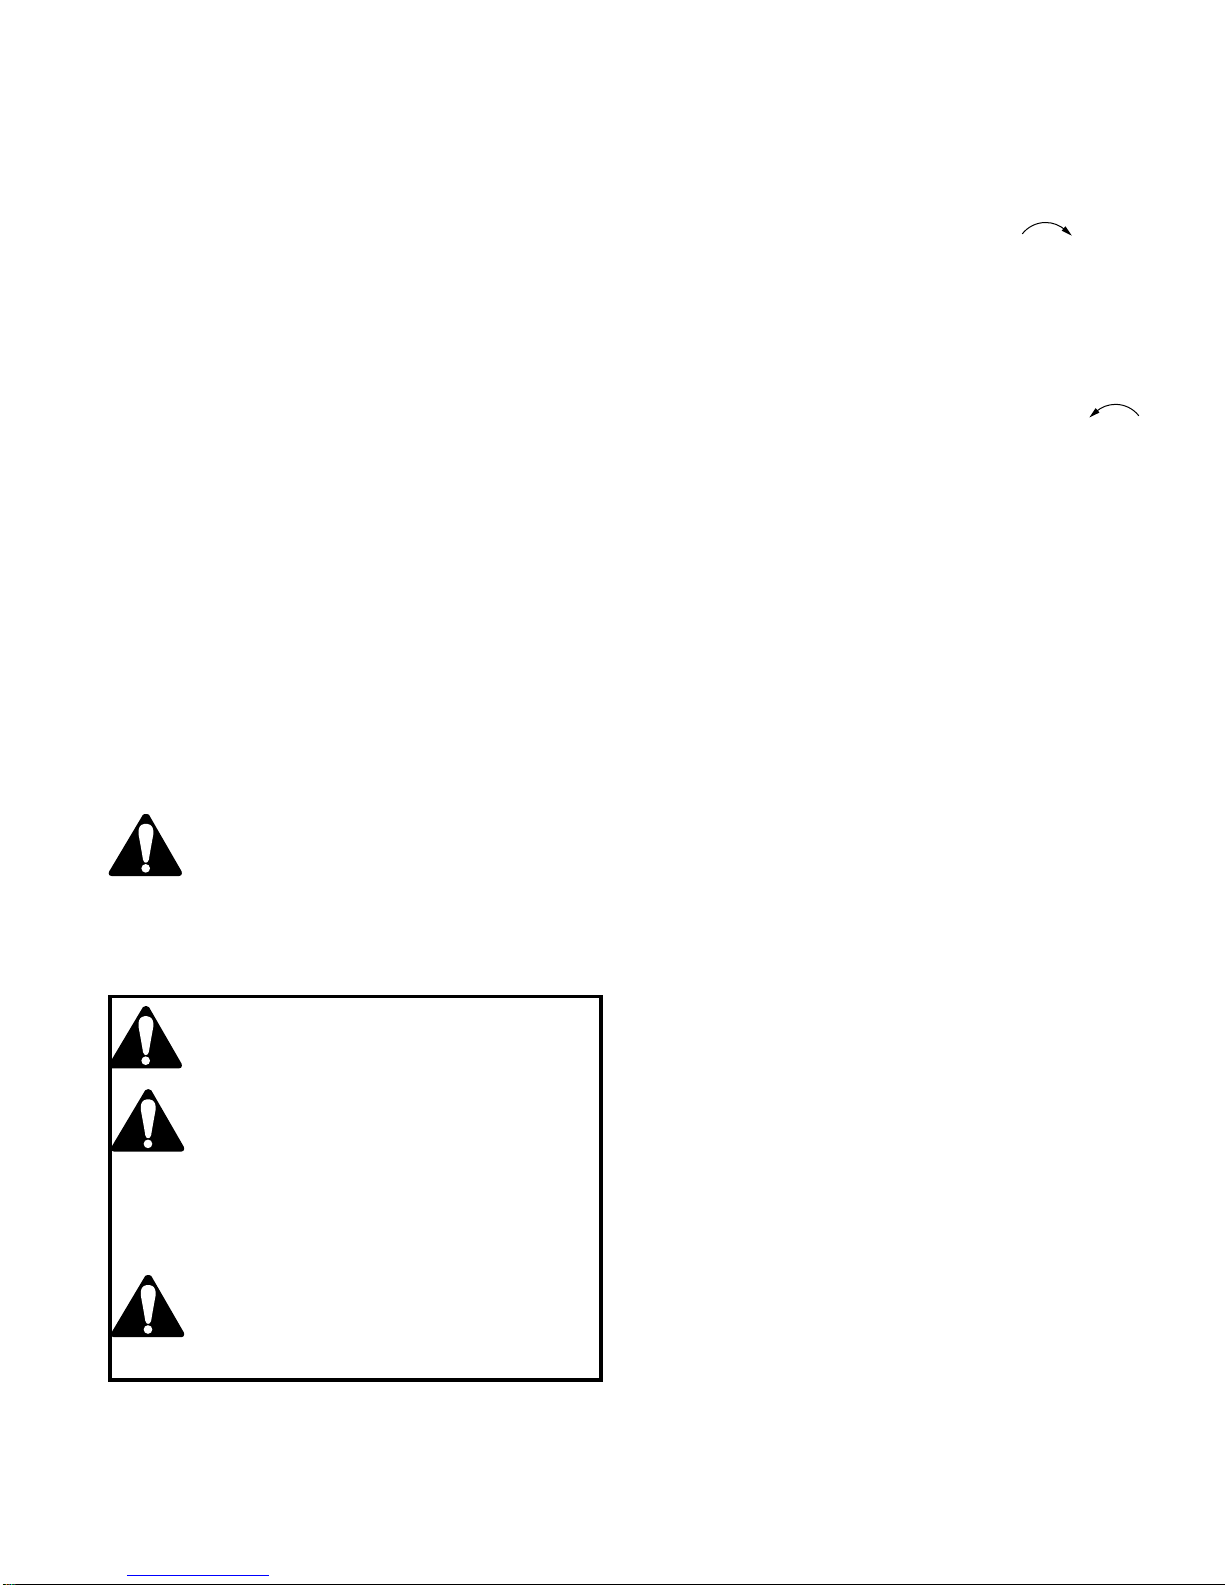
Connecting Heater to Propane Tank
Read and understand all safety information before
connecting heater to propane tank.
1. (Applies to dual burner models only). Place heater
onto tank with tank collar bracket over tank collar
(Fig. 1) Mounting bolt knob should be positioned to
the outside of tank collar.
2. (Applies to dual burner models only). Firmly secure
to tank by hand-tightening mounting bolt knob. Do
not overtighten mounting bolt knob.
3. Make sure heater regulator knob is in the “OFF”
position.
4. Wrench tighten the fuel connector nut into the
propane tank valve with both gas hose fittings in a
horizontal position. (Fig. 1) Turn fuel connector nut
counterclockwise to tighten. Threads are lefthanded.
4
Propane
Tank
Valve
Heater
Regulator
Knob
Fuel Connecting Nut
RMC101
Fig. 2 Attach heater to tank with tank collar bracket.
Inlet
Connector
Piezo
Mounting Bolt
Knob
5. Connect the hose to inlet connector. (Fig. 2) Tighten
firmly using wrench. Make sure hose is connected
before opening the tank valve.
6. Open propane tank valve slowly.
7. Check all fittings for leaks. Apply a mixture of liquid
soap and water to all joints. Bubbles forming show a
leak. Correct all leaks at once.
WARNING: Never use an open flame to
check for leaks.
8. Always remove propane tank from heater after each
use. Do not store heater while attached to propane
tank.
Operation
WARNING: Burner and Burner Guard
should always face away from propane
tank shut-off and regulator.
WARNING: Improper installation, alteration, service or maintenance can cause
property damage, injury or death. Read
the installation, operating and maintenance instructions thoroughly before
installing or servicing this equipment.
Operating Information
This is a propane, direct-fired, heater. Its intended use
is primarily temporary heating of buildings under
construction, alteration or repair.
WARNING: Not for home or recreational
vehicle use.
Propane is heavier than air. If propane leaks from a
connection or fitting, it sinks to the floor, collecting there
with the surrounding air, forming a potentially explosive
mixture. Obviously, propane leaks should be avoided,
so set up the propane supply with utmost care. Leak
check new connections or reconnections with a soap
and water solution and follow all connection instructions
herein. Also ask your propane dealer for advice on the
propane supply installation and ask him to check it if
there are any questions.
Direct-fired means that all of the combustion products
from burning propane enter the heated space. Even
though this heater operates very close to 100 percent
combustion efficiency, it still produces small amounts of
carbon monoxide. Carbon monoxide (called CO) is
toxic.
CO can build up in a heated space and failure to
provide adequate ventilation could result in death. The
symptoms of inadequate ventilation are:
headache
dizziness
burning eyes and nose
nausea
dry mouth or sore throat
So, be sure to follow advice about VENTILATION in
these operating instructions.
WARNING: Do not look over top of heater
(reflector) during ignition.
This heater may produce a small puff of
flame during ignition, which could result
in serious bodily injury.
Lighting Instructions when Using Piezo
WARNING: Review and understand the
Safety Information on page 3 before
lighting the Tank Top Heater.
CAUTION: Due to high surface temperature, keep children, clothing and furniture away.
Keep burner and control compartment
clean.
This heater shall not be installed in a
bedroom or a bathroom.
WARNING: Hot while in operation: Do
not touch. Keep children, clothing,
furniture, gasoline and other liquids
having flammable vapors away.
1. Stop! Read all safety information.
2. Check that gas supply to the heater is on.
3. Turn heater regulator knob clockwise
position.
4. Wait five (5) minutes to clear out any air. Then smell
for gas, including near the floor. If you smell gas,
STOP! Follow “B” in the safety information on the
side of heater. If you do not smell gas, go to the next
step.
5. Turn heater regulator knob counterclockwise
to “Hi” position. Press in safety shut-off valve plunger
for five (5) seconds. (Fig. 3)
NOTE: The first time the heater is operated after
connecting the gas supply, the safety shut-off valve
plunger should be depressed for about thirty (30)
seconds. This will allow air to bleed from the gas
system.
6. With safety shut-off valve plunger pressed in, push
down and release piezo ignitor button. This will light
pilot. If needed, keep pressing piezo ignitor button
until pilot lights.
7. Keep safety shut-off valve plunger pressed in for
thirty (30) seconds after lighting pilot. After 30
seconds, release safety shut-off valve plunger.
8. If burner goes out, repeat steps 5 through 7 or use a
match. If heater will not light after repeated attempts,
do not attempt to repair heater. Return heater to
nearest authorized service center or to the address
on back of this manual, freight prepaid.
9. When burner is lit, turn heater regulator knob to
desired heat setting (LO, MED, HI).
10.Light both burners when maximum heat is needed.
Use one burner to conserve fuel.
to “OFF”
To Turn Off Heater
1. Tightly close propane tank valve by turning clockwise.
2. Turn the heater regulator knob to the “OFF” position.
Wait at least 15 minutes for the heater to cool before
handling heater.
3. Always remove the heater from the propane tank
after each use. Do not store heater while attached to
propane tank in an enclosed area.
5
 Loading...