

Dyna-Glo DG4WB User Manual

Universal
Rotisserie Kit
Model# DG4WB
Español p. 9
Français p. 17
ATTACH YOUR RECEIPT HERE
Serial Number ______________ Purchase Date ______________
Questions, problems, missing parts? Before returning to your retailer, call our customer
service department at 1-877-447-4768, 8:00 a.m. - 4:30 p.m., CST, Monday - Friday or
email us at customerservice@ghpgroupinc.com
70-10-123 2019-05-28
1

TABLE OF CONTENTS
Package Contents ................................................................................................................. 3
Hardware Contents ............................................................................................................... 3
Safety Information ................................................................................................................. 3
Preparation ............................................................................................................................ 4
Assembly Instructions ........................................................................................................... 5
Operating Instructions ........................................................................................................... 7
Care and Maintenance..........................................................................................................7
Troubleshooting ....................................................................................................................7
Replacement Parts List ......................................................................................................... 8
Warranty ................................................................................................................................ 8
WARNING
THIS PRODUCT CAN EXPOSE YOU TO CHEMICALS INCLUDING
DI(2-ETHYLHEXYL)PHTHALATE (DEHP) WHICH IS KNOWN TO THE STATE OF CALIFORNIA
TO CAUSE CANCER AND REPRODUCTIVE HARM.
FOR MORE INFORMATION GO TO WWW.P65WARNINGS.CA.GOV
2

PACKAGE CONTENTS
A
B
J
C
E
I
F
H
D
G
PART DESCRIPTION QUANTITY MODEL#
A Rotisserie Motor 1 CS-6002
B Spit Rod 1 N/A
C 4-Prong Spit Fork 2 N/A
D Handle 1 N/A
E Collar 1 N/A
F Counterweight Washer 1 N/A
G Counterweight 1 N/A
H Spit Rod Bracket 1 N/A
I Spit Rod Extender 1 N/A
J Motor Bracket 1 N/A
HARDWARE CONTENTS
AA BB CC
Nut Washer
Qty. 4Qty. 4
Bolt
Qty. 4
SAFETY INFORMATION
Please read and understand this entire manual before attempting to assemble, operate or install the
product. If you have any questions regarding the product, please call customer service at
1-877-447-4768, 8:00 a.m. - 4:30 p.m., CST, Monday - Friday.
3

WARNING: DO NOT TAKE APART ANY COMPONENTS OF THE MOTOR.
Always conrm that this product, when installed, has been grounded in accordance with applicable
local codes or, in the absence of local codes, with the National Electrical Code, ANSI/NFPA No. 70
or the Canadian Electrical Code, CSA C22.1, when an external electrical source is being utilized
for the rotisserie motor.
1. Read all instructions before assembly, installation, and use.
2. Do not touch hot surface with bare hands.
3. To protect against electrical shock, do not immerse cord, plug, or motor in water or other liquid.
4. Close supervision is necessary when any appliance is used by or near children.
5. Unplug from outlet when not in use and before cleaning. Allow to cool before putting on or taking
off parts. Do not clean this product with a water spray or the like.
6. Do not operate any appliance with a damaged cord or plug or after the appliance has been
damaged in any manner.
7. The use of other accessory attachments is not recommended by the appliance manufacturer
as it may cause injuries.
8. Do not let the electrical supply cord touch hot surfaces or hang over edge of table or counter.
9. Do not place on or near a hot gas or electrical burner or in a heated oven.
10. Caution must be used when assembling the pointed end of spit rod and the meat forks as the
ends are sharp.
11. Always attach plug to appliance rst, then plug cord into the wall outlet. If the plug does not t
in the outlet, contact a qualied electrician. DO NOT attempt to modify the plug or override
the safety feature indicated on the product’s warning label and in this manual.
12. Never use this product for any purpose other than the ones specically intended by the manufacturer.
13. Any type of fuel and/or charcoal briquettes are not to be used with this appliance.
14. Do not expose rotisserie motor to rain.
15. Always connect this product to an electrical circuit protected by a Ground Fault Interrupter (GFI).
16. A short power supply cord is provided to reduce the risk of becoming entangled in or tripping
over a longer cord.
17. Longer detachable power-supply cords or extension cords may be used if care is exercised in
their use.
18. If it is necessary to use an extension cord, always select one that has a three-pronged (grounded)
power plug that is adequate for the power rating of the unit, that has been approved for outdoor
use, and has a W-A marking.
19. Keep any electrical supply cord and the fuel supply hose away from any heated surfaces.
20. To reduce the risk of electrical shock, keep extension cord connection dry and off the ground.
21. When the rotisserie motor is not in use, remove and store in a dry environment.
22. Never connect the 3-pronged (grounded) power plug to a 2-pronged adapter.
23. Always follow all safety procedures as stated in the rotisserie and grill manuals.
WARNING: ELECTRICAL GROUNDING INSTRUCTIONS
This outdoor cooking gas appliance is equipped with a three-prong (grounding) plug for your
protection against shock hazard and should be plugged directly into a properly grounded three-prong
receptacle. Do not cut or remove the grounding prong from this plug.
SAVE THESE INSTRUCTIONS
PREPARATION
Before beginning assembly or operation, make sure all parts are present. Compare parts with
package contents and hardware contents list. If any part is missing or damaged, do not attempt to
assemble or operate the product.
• Estimated Assembly Time: 15 minutes
• Tools Required for Assembly (not included): Phillips screwdriver, Pliers
4
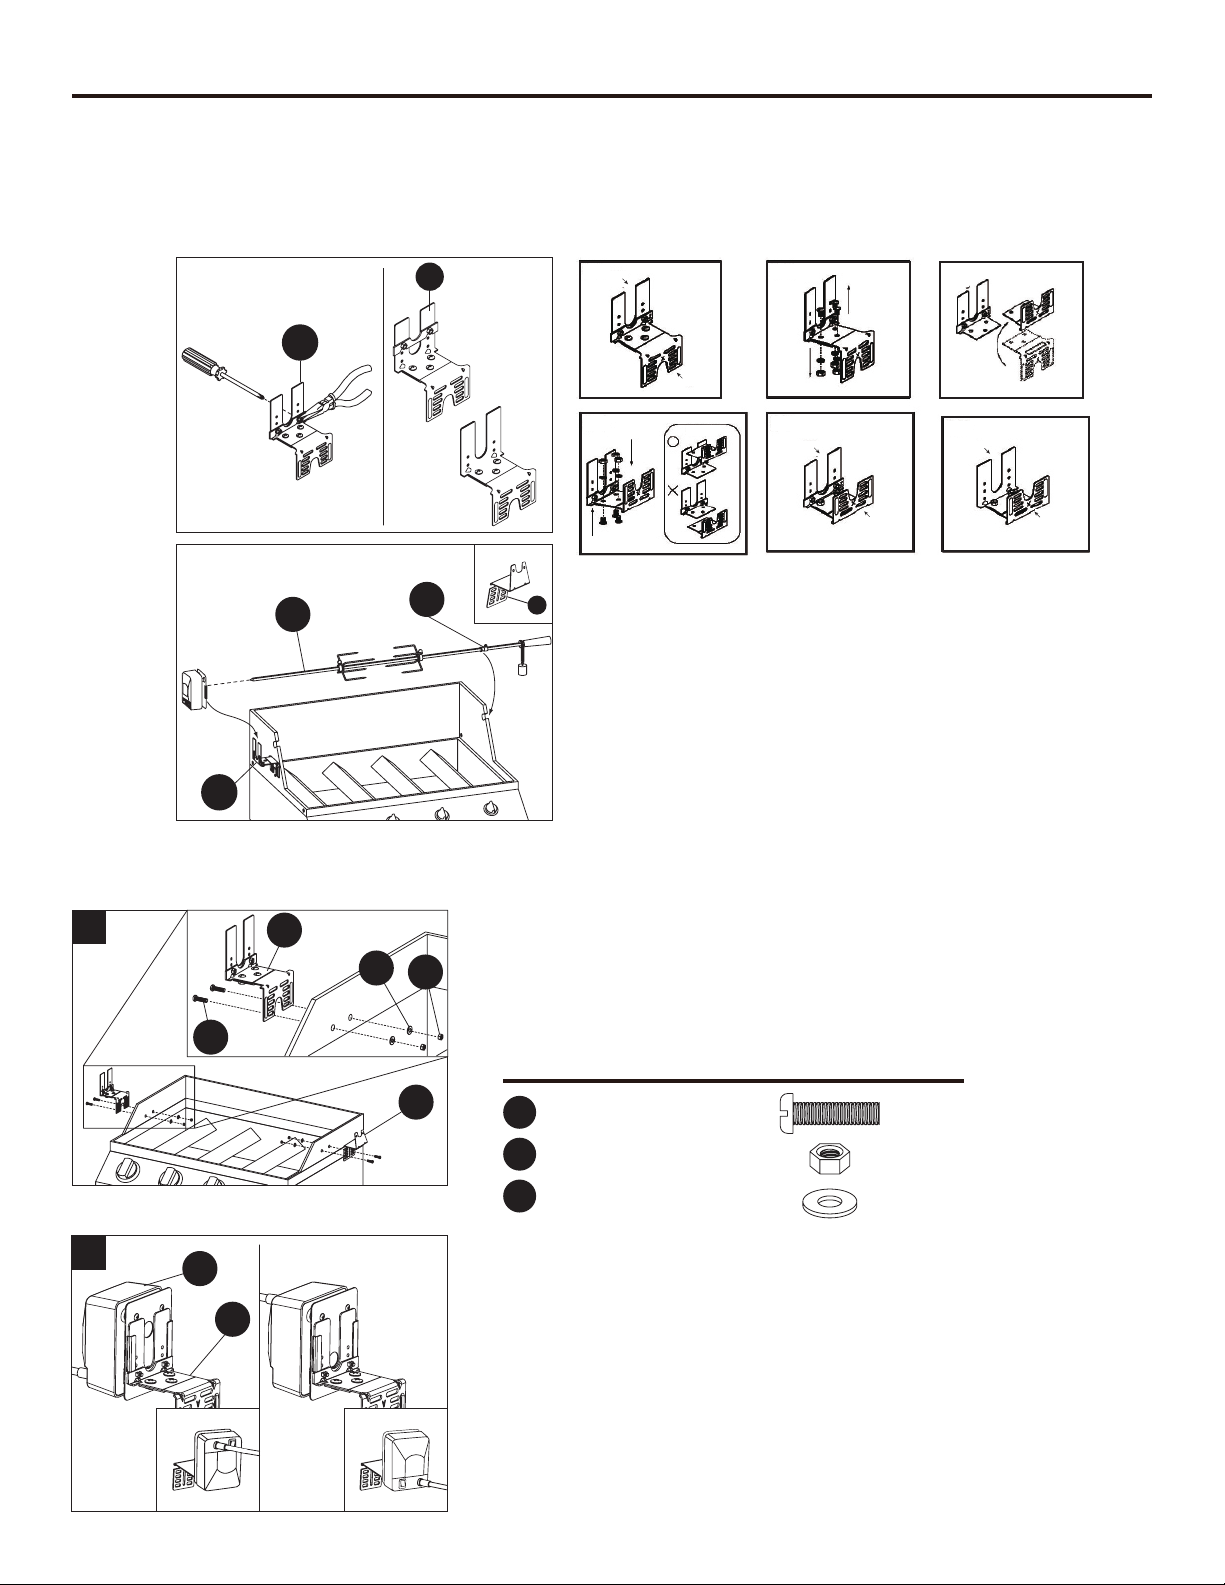
ASSEMBLY INSTRUCTIONS
NOTE: The motor bracket (J) can be adjusted to accommodate most attachment points (see Figure 1).
Review the various adjustment methods (shown in Figures 2 through 7) to determine the correct t for
your grill before attaching. Some grills have a spit rod slot on the rebox and it is possible that the spit
rod bracket (H) might not t your grill. If this is the case, slide the collar (E) onto the spit rod (B). Allow
the groove in the collar (E) to rest in the slot opening, as shown in Figure 8.
Fig. 1
Fig. 8
J
Fig. 2Fig. 2 Fig. 3 Fig. 4
J
B
Fig. 5 Fig. 6
E
H
Fig. 7
J
NOTE: On some grills the spit rod (B) may not be long enough. Attach the spit rod extender (I) and
proceed with installation.
1
J
CC
1. Attach motor bracket (J) to outer left or right side of the rebox
using two bolts (AA), two washers (CC) and two nuts (BB).
Allow enough clearance for spit rod. Note the attachment
BB
holes used for motor bracket (J) and repeat for spit rod bracket
(H) for opposite side using two bolts (AA), two washers (CC)
AA
and two nuts (BB).
Hardware Used
H
2
A
2. Slide rotisserie motor (A) over motor bracket (J). The rotisserie
motor (A) can be mounted one of two ways, depending on the
Bolt x 4
AA
BB
Nut x 4
CC
Washer x 4
desired height of the spit rod (B).
J
This side up This side up
5
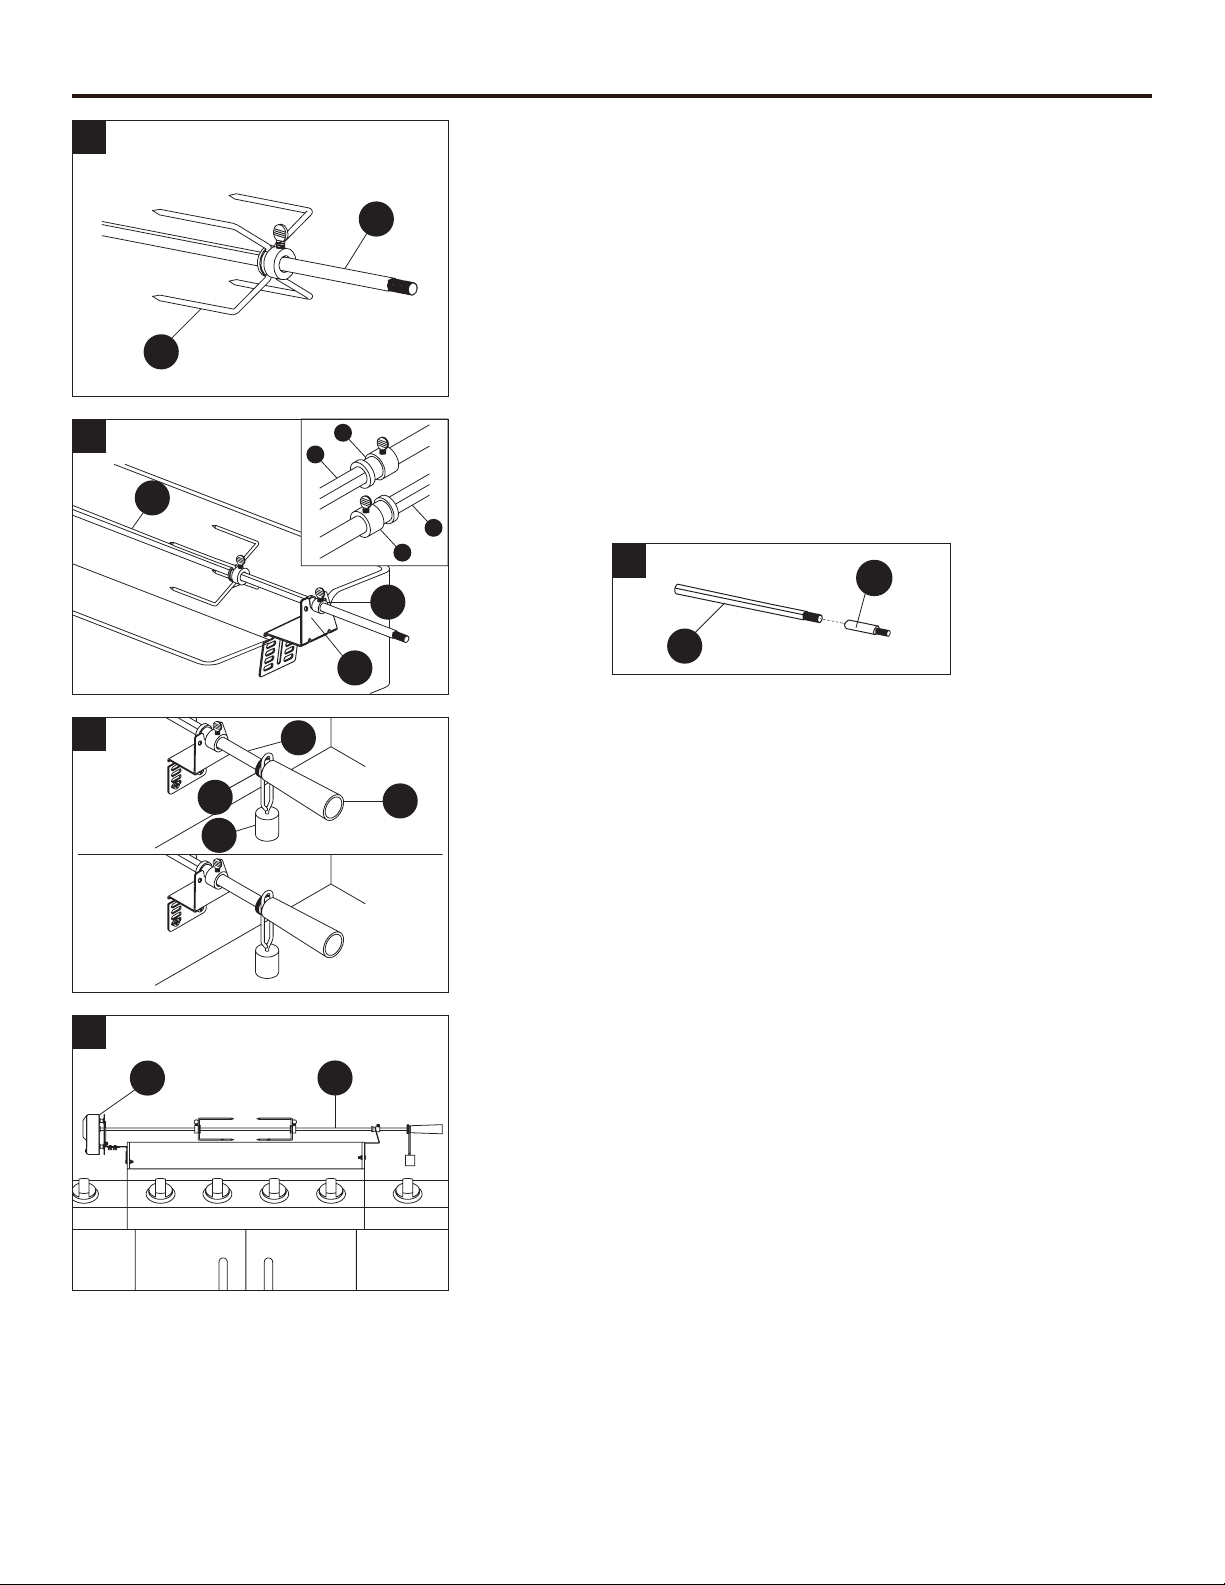
ASSEMBLY INSTRUCTIONS
3
3. Place the rst 4-prong meat fork (C) onto the spit rod (B). The
second fork will be attached after the food is skewered on the
spit rod (B). See Operating Instructions for more information.
B
C
4
E
B
4. Slide the collar (E) onto the spit rod (B) and place the collar
(E) onto the support notch on spit rod bracket (H). The collar
(E) can be positioned in two ways, as shown in the
B
E
inset. Choose the position that works best with your grill.
B
4-1
I
E
B
H
5
F
G
6
A B
B
5. Screw the counterweight washer (F) onto the spit rod (B).
Slide the counterweight (G) onto the spit rod, then securely
attach the handle (D).
D
NOTE: The counterweight (G) is used when large pieces of
food create imbalance on the spit rod (B). Determine which
side of the spit rod (B) is taking on the most weight then secure
the counterbalance weight on the opposite side (with less food
weight) by tightening the handle (D).
6. Place the pointed end of the spit rod (B) into the rotisserie
motor (A). Make sure the collar (E) is resting on the spit rod
bracket (H) and that spit rod (B) is aligned properly with the
rotisserie motor (A) before turning the power on.
6

OPERATING INSTRUCTIONS
IMPORTANT: If your grill is equipped with a rotisserie burner, only that burner should be used for
cooking when the rotisserie is mounted and in operation. The main burners on the grill must be turned
OFF when the rotisserie burner is in use. Do not use side burners and the rotisserie simultaneously.
1. Skewer the desired food using the pointed end of the spit rod then secure the food on the pre assembled fork. Make sure the food is balanced proportionately on the spit rod before placing
onto the fork. Do not tighten the fork. Slide the second fork onto the spit rod and into
the food. Center the food on the rod then tighten the thumbscrew on each fork. If desired,
wrap food with butcher’s string (not included; never use nylon or plastic string) to
secure loose portions.
2. Once the food is secure, insert the pointed end of the rotisserie rod into the motor assembly and
rest the collar on the spit bracket on the other side of the grill.
3. Check for clearance with the cooking grates. The grates can be removed if additional clearance
is required. IMPORTANT: If grates are removed, make sure food is not touching burner(s).
4. Plug the unit into an electrical outlet. Turn the power switch to the “ON” position to start the
rotisserie motor. Follow the lighting instructions that came with your grill, before igniting the
burners. Once all of the available burners are lit, start with the lowest setting and adjust
as needed.
5. Check for constant speed of the rotisserie rod. If the rod does not turn at a constant speed,
reposition the food on the forks and adjust the weight so it is balanced on the rod. An
unbalanced rotisserie rod will damage the motor.
6. Check food frequently and adjust burner temperature based on observations. This will require
some experimentation as each grill has different heating and cooking characteristics.
CARE AND MAINTENANCE
Turn off, unplug, and remove the rotisserie kit when not in use. After using, clean all metal parts by
wiping clean using a damp cloth. Do not immerse any parts in water. Wipe completely dry before
storing. Store in a dry place.
TROUBLESHOOTING
PROBLEM POSSIBLE CAUSE CORRECTIVE ACTION
The rod is not rotating
at a constant speed.
Food is not balanced on the
forks.
7
Reposition the food on the
forks and rod to adjust the
weight so that it is balanced.
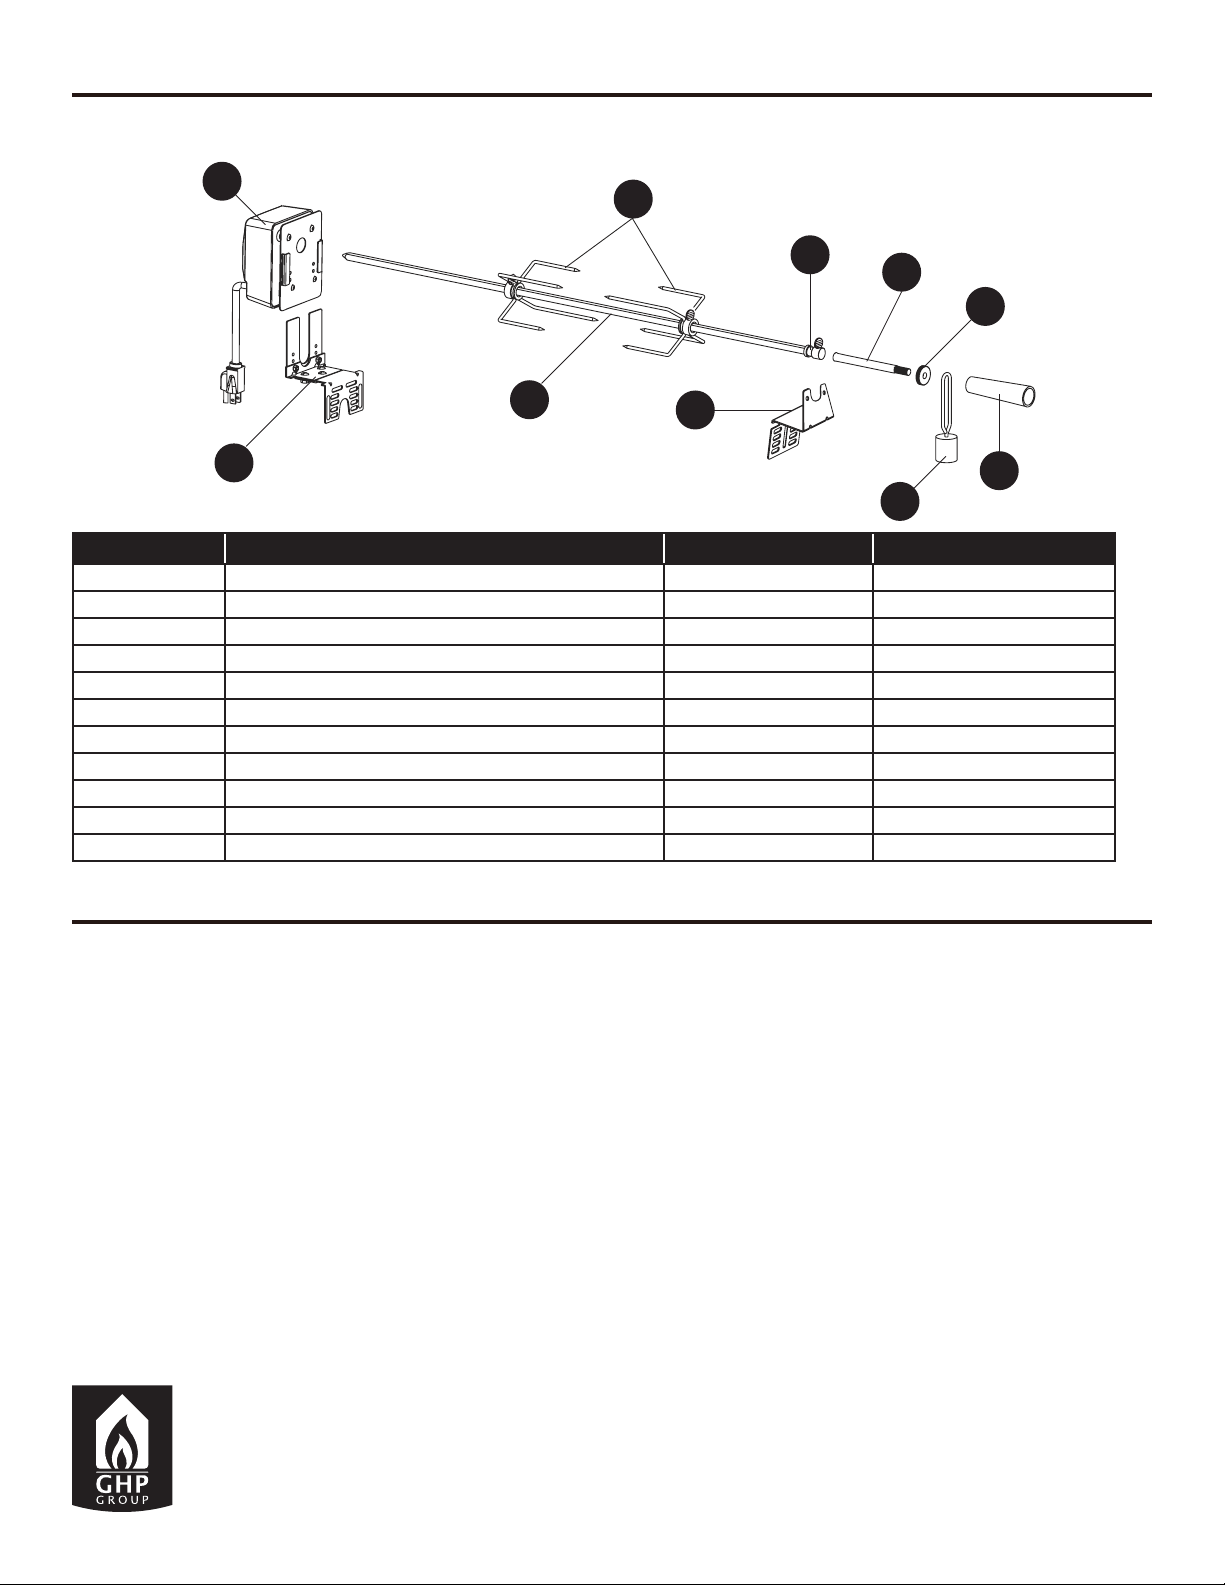
REPLACEMENT PARTS LIST
For replacement parts, call our customer service department at 1-877-447-4768, 8:00 a.m. – 4:30 p.m.,
CST, Monday – Friday.
A
B
J
PART DESCRIPTION PART# MODEL#
A Rotisserie Motor 70-03-107 CS-6002
B Spit Rod 70-01-242 N/A
C 4-Prong Spit Fork 70-01-243 N/A
D Handle 70-01-244 N/A
E Collar 70-01-255 N/A
F Counterweight Washer 70-09-002 N/A
G Counterweight 70-01-246 N/A
H Spit Rod Bracket 70-09-003 N/A
I Spit Rod Extender 70-01-247 N/A
J Motor Bracket 70-09-004 N/A
HWP Hardware Pack 70-09-552 N/A
C
E
I
F
H
D
G
1 YEAR LIMITED WARRANTY
This universal rotisserie kit is warranted to be free of defects for 1 year from the time of purchase.
This warranty does not cover damage or issues related to neglect, abuse, exposure to rain, or
modications to the motor. Repair labor is not covered.
All parts that meet the warranty requirements will be shipped at no charge via the discretion of the
manufacturer (ground shipments, US Mail, or Parcel Post ONLY). Any special handling charges (i.e.
Second Day, overnight, etc.) will be the responsibility of the consumer.
All warranty claims apply only to the original purchaser and require a proof of purchase verifying
purchase date. Do not return parts without rst obtaining a return authorization number from our
customer service. This service is available by calling toll free 1-877-447-4768, 8:00 a.m. – 4:30 p.m.,
CST, Monday – Friday.
NOTICE: Some states do not allow the exclusion or limitation of incidental or consequential damages or
limitations on how long an implied warranty lasts, so the above limitations or exclusions may not apply
to you. This warranty gives you specic legal rights and you may also have other legal rights which may
vary from state to state.
GHP Group Inc.
6440 W. Howard St.
Niles, IL, USA 60714-3302
Item Name: Dyna-Glo Universal Rotisserie Kit
Model #: DG4WB
8
 Loading...