

DynaColor D7723 series User Manual
User’s Manual
ENGLISH
HIGH SPEED IP- DOME SERIES
HEAVY DUTY MODEL
Before attempting to connect or operate this product, please read these instructions completely.
00-37723EZ1EA2

CONTENTS
PREFACE....................................................................................................................3
FEATURES..................................................................................................................4
PRECAUTIONS...........................................................................................................7
QUICK STARTING ......................................................................................................8
FUNCTION DEFINITION ........................................................................................ 8
QUICK START FROM MICROSOFT WINDOWS ................................................... 9
CONSTRUCTION......................................................................................................11
SWITCH SETTING ....................................................................................................12
SWITCH DEFINITION........................................................................................... 12
ID SETTING .......................................................................................................... 12
DOME CONTROL PROTOCOL............................................................................ 12
INSTALLATION – HARD CEILING ...........................................................................13
HARD CEILING MOUNTING................................................................................ 13
INSTALLATION – T-BAR CEILING...........................................................................16
T-BAR CEILING MOUNTING ............................................................................... 16
CONNECTION...........................................................................................................19
CABLE CONNECTION......................................................................................... 19
LAN PORT (RJ-45)............................................................................................... 19
OSD DISPLAY FORMAT ...........................................................................................20
OSD DISPLAY FORMAT ...................................................................................... 20
SPECIFICATIONS .....................................................................................................21
SYSTEM ARCHITECTURE .......................................................................................23
ARCHITECTURE 1 ............................................................................................... 23
APPENDIX - NETWORK CONNECTION..................................................................24
APPENDIX - NETWORK PASSWORD .....................................................................25
APPENDIX - NETWORK SETUP ..............................................................................26
APPENDIX - IP DOME CONTROL............................................................................32
APPENDIX - SERVER CONFIGURATIONS .............................................................33
1. SERVER GENERAL SETTINGS................................................................... 33
2. USER SETTINGS.......................................................................................... 34
3. CLOCK SETTINGS ....................................................................................... 35
4. SYSTEM COMMANDS ................................................................................. 36
APPENDIX - NETWORK CONFIGURATIONS..........................................................37
1. NETWORK GENERAL SETTINGS............................................................... 37
2. DHCP SETTINGS.......................................................................................... 38
3. DDNS SETTINGS.......................................................................................... 39
APPENDIX - VIDEO CONFIGURATIONS .................................................................40
1. TIME STAMP................................................................................................. 40
00-37723EZ1EA2
1

2. VIDEO QUALITY........................................................................................... 41
APPENDIX - EVENT CONFIGURATIONS ................................................................42
1. SCRIPT EDIT ................................................................................................ 42
2. SCRIPT WIZARD .......................................................................................... 44
APPENDIX - OSD MENU (R, K MODEL)..................................................................47
OSD TREE STRUCTURE (R, K MODEL) ............................................................ 47
OSD MENU (R, K MODEL) .................................................................................. 49
APPENDIX - OSD MENU (S MODEL) ......................................................................57
OSD TREE STRUCTURE (S MODEL) ................................................................. 57
OSD MENU (S MODEL) ....................................................................................... 60
00-37723EZ1EA2
2

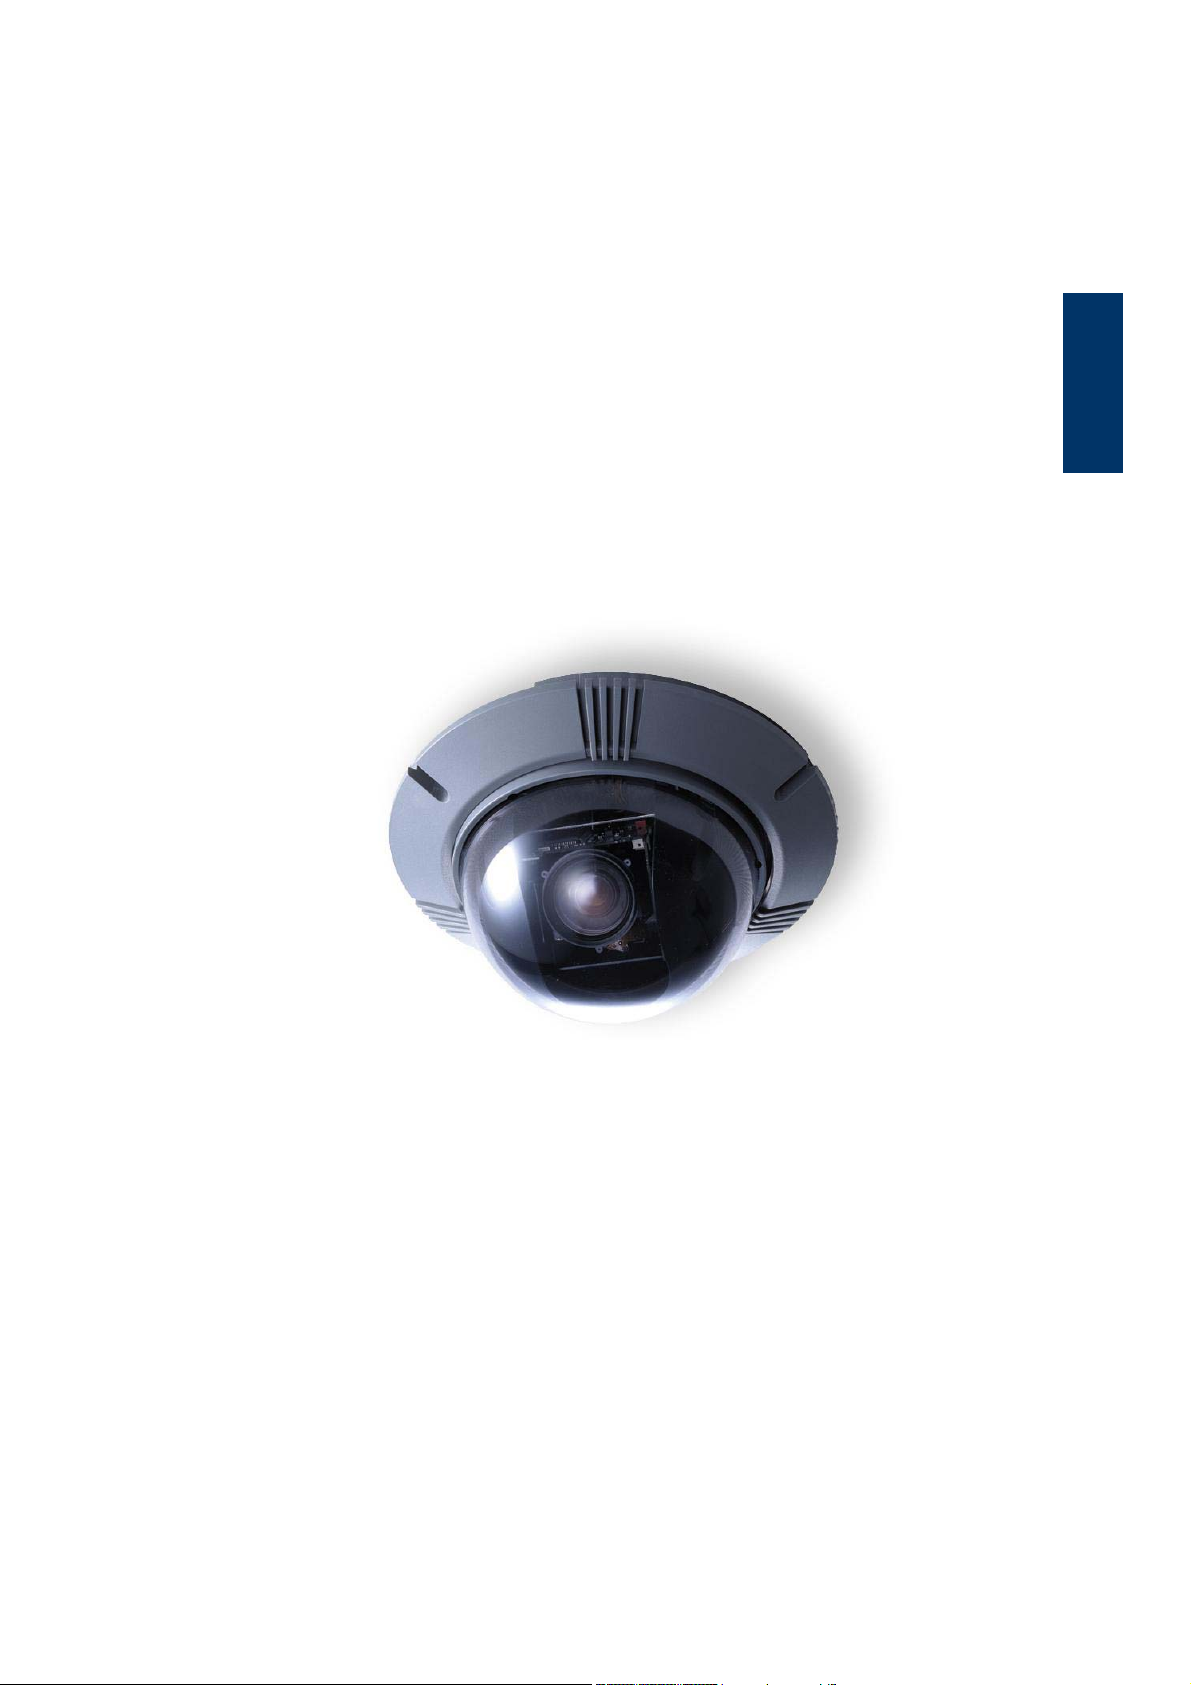
PREFACE
The speed dome is a new subcompact dome camera system designed to deliver
superb performance and durability with a pristine housing that looks good in any
security and surveillance installation.
This speed dome contains new generation advanced DSP color camera, with
25X optical zoom multiply 12X digital magnifier (22X optical zoom with 12X digital
magnifier, or 23X optical zoom with 10 digital magnifier are selectable items), delivers
the power of a 300X zoom (264X ,230X zoom) to make sure that the finest details are
captured. Continuous auto focus, back light compensation, auto iris controls, IR cut
filter removable, privacy mask functions (IR cut filter removable and privacy mask
functions are not included in 22X lens) are some of the salient features incorporated
to fit your needs.
High speed tilt and 360° endless rotation and auto flip function allows this speed
dome to be installed in the most demanding applications. RS-485 communication
channel is available for remote control purposes, 128 preset points can be
programmed for precise location of target areas, and you can also define multiple
cruise routes for the camera to operate automatically.
Home function allows the user to specify a preset position as the ‘home position’.
Dome camera can come back to home position when the user stops to move the
camera for a while.
Built in network module allows users control all speed dome features through
internet or intranet. User needn’t pre-install specific windows application to access the
IP dome cameras. Instead of that, user can access IP dome cameras through internet
browser such like Microsoft IE.
Dependability and ultra high reliability are key factors in the speed dome design
cycle. Every speed dome is assembled with meticulous care and thorough testing at
our ISO 9001 compliant factory. High performance, reliability, and reasonably pricing,
this speed dome is an ideal solution to your tough surveillance requirement.
00-37723EZ1EA2
3

FEATURES
NETWORK VIDEO SERVER FEATURES
1. Built-in HTTP web server providing Internet access capability.
2. Dome IP assignment via ARP/Web Page/IP Installer for easy setup.
3. JAVA-based web page providing maximum platform compatibility.
4. Active-X control for Internet Explorer providing maximum performance.
5. Motion Detection/ Date/ Time/ GPIO Input for event trigger.
6. Email/ FTP/ Internal Buffer Storage/ Relay Out/ PPP Dialing out for event trigger
action.
7. Programmable event script for various applications.
8. IP Dome DDNS support for dynamic IP application.
9. 3- Layer user security control.
10. Firmware and user content pages are remote upgradeable via FTP.
11. CGI based server is easy to integrate new application for users.
CAMERA FEATURES
1. Optical performance:
(1). S model: 25X optical zoom with 12X digital magnifier.
(2). K model: 23X optical zoom with 10X digital magnifier.
(3). R model: 22X optical zoom with 12X digital magnifier.
2. Continuous Auto-focus or manual focus
3. Minimum illumination:
(1). S model: 25X lens: 0.01 lux (0 lux: IR illuminator ON)
(2). K model: 23X lens: 0.01 lux (0 lux: IR illuminator ON)
(3). R model: 22X lens: 1 lux
4. Advanced DSP camera provide:
(1) Auto white balance
(2) Back-light compensation
(3) Auto iris control
(5) IR-cut filters removable mechanism. (S, K model only)
(6) Electronic shutter
5. Slow Shutter function enable dome to gain a brighter video output through
shutter speed control. (S, K model only)
6. Title Display function enable dome to display a string for a view. The title will be
displayed on screen if you pass through the region what you saved before.
7. IR-Cut Filter Removable :
(1). S model: 25X lens: Equipped
00-37723EZ1EA2
4

(2). K model: 23X lens: Equipped
(3). R model: 22X lens: N/A
8. WDR
(1). S model: 25X lens: N/A
(2). K model: 23X lens: Equipped
(3). R model: 22X lens: N/A
9. Privacy Mask
(1). S model: 25X lens: Equipped
(2). K model: 23X lens: Equipped
(3). R model: 22X lens: N/A
ROTARY BODY FEATURES
1. 5” compact, low profile color dome camera
2. 360° endless rotation
3. Pan speed up to 375° /sec
4. Tilt speed up to 300° /sec
5. Preset function enable user to record different 128 viewpoints what you want. You
can set Pan/ Tilt/ Zoom for every preset position.
6. Proportional Zoom enables Pan/ Tilt speed inverse proportional to Zoom ratio.
You can track an object easily with this function.
7. Auto-Turn Around function allows user to keep tracking object even the object
pass through the bottom of camera. You needn’t rotate 180 degrees in pan
direction to keep observing the object. This function will do this for you quickly.
8. Auto-Pan function enable dome camera to scan a specific region repeatedly with
user defined speed. You can set start point, end point and scan speed to scan a
specific region. User can make dome camera to do continuously panning without
limit through setting the start point the same as end point
9. Sequence function enable dome camera to switch viewpoints between presets.
There are three parameters can be filled into sequence function. You can set
“Preset number”, “Dwell Time” and “Speed” for sequence line.
10. Cruise function enable dome camera to scan a user defined path. User can
manipulate dome camera with joystick to establish this path.
11. Home function enables the possibility to lock a viewpoint or a function. Home
function will go back to home position or functions (Auto-pan/ Sequence/ Cruise)
when user move the camera to other position and the time period is expired.
12. Auto Restoring function will record current position when user defined period of
time is reached. Dome will go to the position if the power of your installation site is
recovery after shutdown.
13. Remote V-Sync Adjustment function enable user to adjust the line lock signal
remotely. You can adjust the phase of line lock signal to synchronize the system
from keyboard.
00-37723EZ1EA2
5

14. D Protocol and P Protocol Supported from OSD. You can control our dome
camera easily from any keyboard of PELCO (Pelco Corporation).
15. VCL Telemetry Control Protocol Supported from OSD. You can control our
dome camera easily from system of DM (Dedicated Micros Corporation).
16. Build-in 4 alarm input connectors
17. On Screen Display for camera control
18. 12VDC/ 24VAC power model available
19. Twist lock release from bracket for easy installation and servicing
00-37723EZ1EA2
6

PRECAUTIONS
1. Handle the camera carefully
Do not abuse the camera. Avoid striking, shaking, etc. The camera could be
damaged by improper handing or storage.
2. Do not disassemble the camera
To prevent electric shock, do not remove screws or covers. There are no user
serviceable parts inside. Ask a qualified service person for servicing.
3. Do not block cooling holes on the bracket
This camera has a cooling fan inside. Blocking the cooling holes leads to build up
of heat the camera and may cause malfunction.
4. Do not operate the camera beyond the specified temperature, humidity or
power source ratings
Use the camera under conditions where temperature is between 0°C ~ 40°C
(32°F ~ 104°F), and humidity is below 90%.
5. Do not expose the camera to rain or moisture, or try to operated it in wet
areas
This product is designed for indoor use or locations where it is protected from
rain and moisture. Turn the power off immediately and ask a qualified service
person for servicing. Moisture can damage the camera and also create the
danger of electric shock.
6. Do not use strong or abrasive detergents when cleaning the camera body
Use a dry cloth to clean the camera when dirty. In case the dirt is hard to remove,
use a mild detergent and wipe gently.
7. Never face the camera towards the sun
Do not aim the camera at bright objects. Whether the camera is in use or not,
never aim it at the sun or other extremely bright objects. Otherwise, blooming or
smear may be caused.
* PELCO is a registered trademark of PELCO Corporation.
* P protocol and D protocol are protocols what PELCO corporation used.
* DM is a registered trademark of Dedicated Micro Corporation.
00-37723EZ1EA2
7

QUICK STARTING
The section is a quick reference for users to manipulate a dome camera in a
short time.
FUNCTION DEFINITION
■ Preset Function Definition
Preset point means that dome camera will save pan/tilt/zoom positions to its
memory.
You can recall the preset position through this function.
■ Auto-Pan Function Definition
Auto-Pan means that dome camera will scan a predicted region. The region is
defined by “start point”, ”end point”, “scan direction” and “scan speed”.
Dome camera will scan a region from “start point” to “end point” according to the
“scan direction” and “scan speed”.
Dome camera will do pan motion continuously without limit if user set the start
point the same as end point.
You can manipulate zoom in/out function when the dome camera is executing
Auto-Pan function.
■ Sequence Function Definition
Sequence means that dome camera will switch its view between different preset
positions.
The sequence parameters are “preset point”, “jump speed” and “dwell time”.
Dome camera will switch its view according to the sequence parameters. It will go
to the “preset position N” with “jump speed S” and stay there for a period with
“dwell time T”. Then dome camera will go to the second preset position with the
parameter 2….etc.
■ Cruise Function Definition
Cruise means that dome camera will patrol a special path. This path is generated
by joystick movement. The memory sizes of dome camera limit the length of
cruise path. After the memory of dome camera is filled up, it will stop to record the
latter path. When you recall cruise function, it will patrol the path which is
memorized in memory.
00-37723EZ1EA2
8

QUICK START FROM MICROSOFT WINDOWS
STEP1: Run “IPinstaller.exe” from PC.
The IP Installer will scan the Ethernet node address (MAC address) to check
how many devices are connected to the network segment. Select an IP
DOME with Ethernet node address and change its IP address to an
assigned IP address which is issued by your network administrator.
STEP2: Control IP dome cameras through internet browser (Microsoft IE).
■ Preset Function Operation
(1) Setting
Press <Preset> for setting the preset point and select a number such as <2>.
Press <SET> to record this position as preset point 2. If you want to name
the preset position, you could fill in the <Title> blank, select a number and
press <Set> button (Max. 20 set).
(2) Recall preset position
Select a number in the “RUN” area for preset point such as <2>. Then the
camera will go to the preset position 2.
■ Auto-Pan Function Operation
(1) Setting
a. Move dome camera to a specific position and press <Start> to save it as
start point of scan region.
b. Pan dome camera to another position and press <End> to save it as end
point of scan region.
c. Using direction key to select the scan direction what you want.
d. Using direction key to select speed of Auto-Pan.
(2) Execute Auto-Pan function
Press <Start> in the “RUN” area to entering Auto-Pan mode.
■ Sequence Function Operation
(1) Setting
a. Select a Group for a sequence line such as <1>. You can modify
parameters of sequence 1.
NOTE: Before setting sequence, you should have some preset points.
b. You can edit the parameters such as <3> for group, <1> for Point, <4> for
Preset, <2> for Dwell Time, <6> for Speed and press <Set>. That means
that the first preset point of sequence group 3 is preset point 4, dome
00-37723EZ1EA2
9

camera will stay 2 seconds there and dome will go to next preset with
speed 6.
c. Please continuous edit the parameters Point 2 / Preset / Dwell Time /
Speed and so on.
(2) Execute sequence function
a. Press a group number (1~4) in the “RUN” area, and the dome will execute
its sequence function.
■ Cruise Function Operation
(1) Setting
a. Press <Start> in the “Set” area to start recording your cruising path.
b. When finishing cruising, press <End> to stop recording your cruising path.
(2) Execute cruise function
Press <Start> in the “RUN” area to entering cruise mode.
00-37723EZ1EA2
10
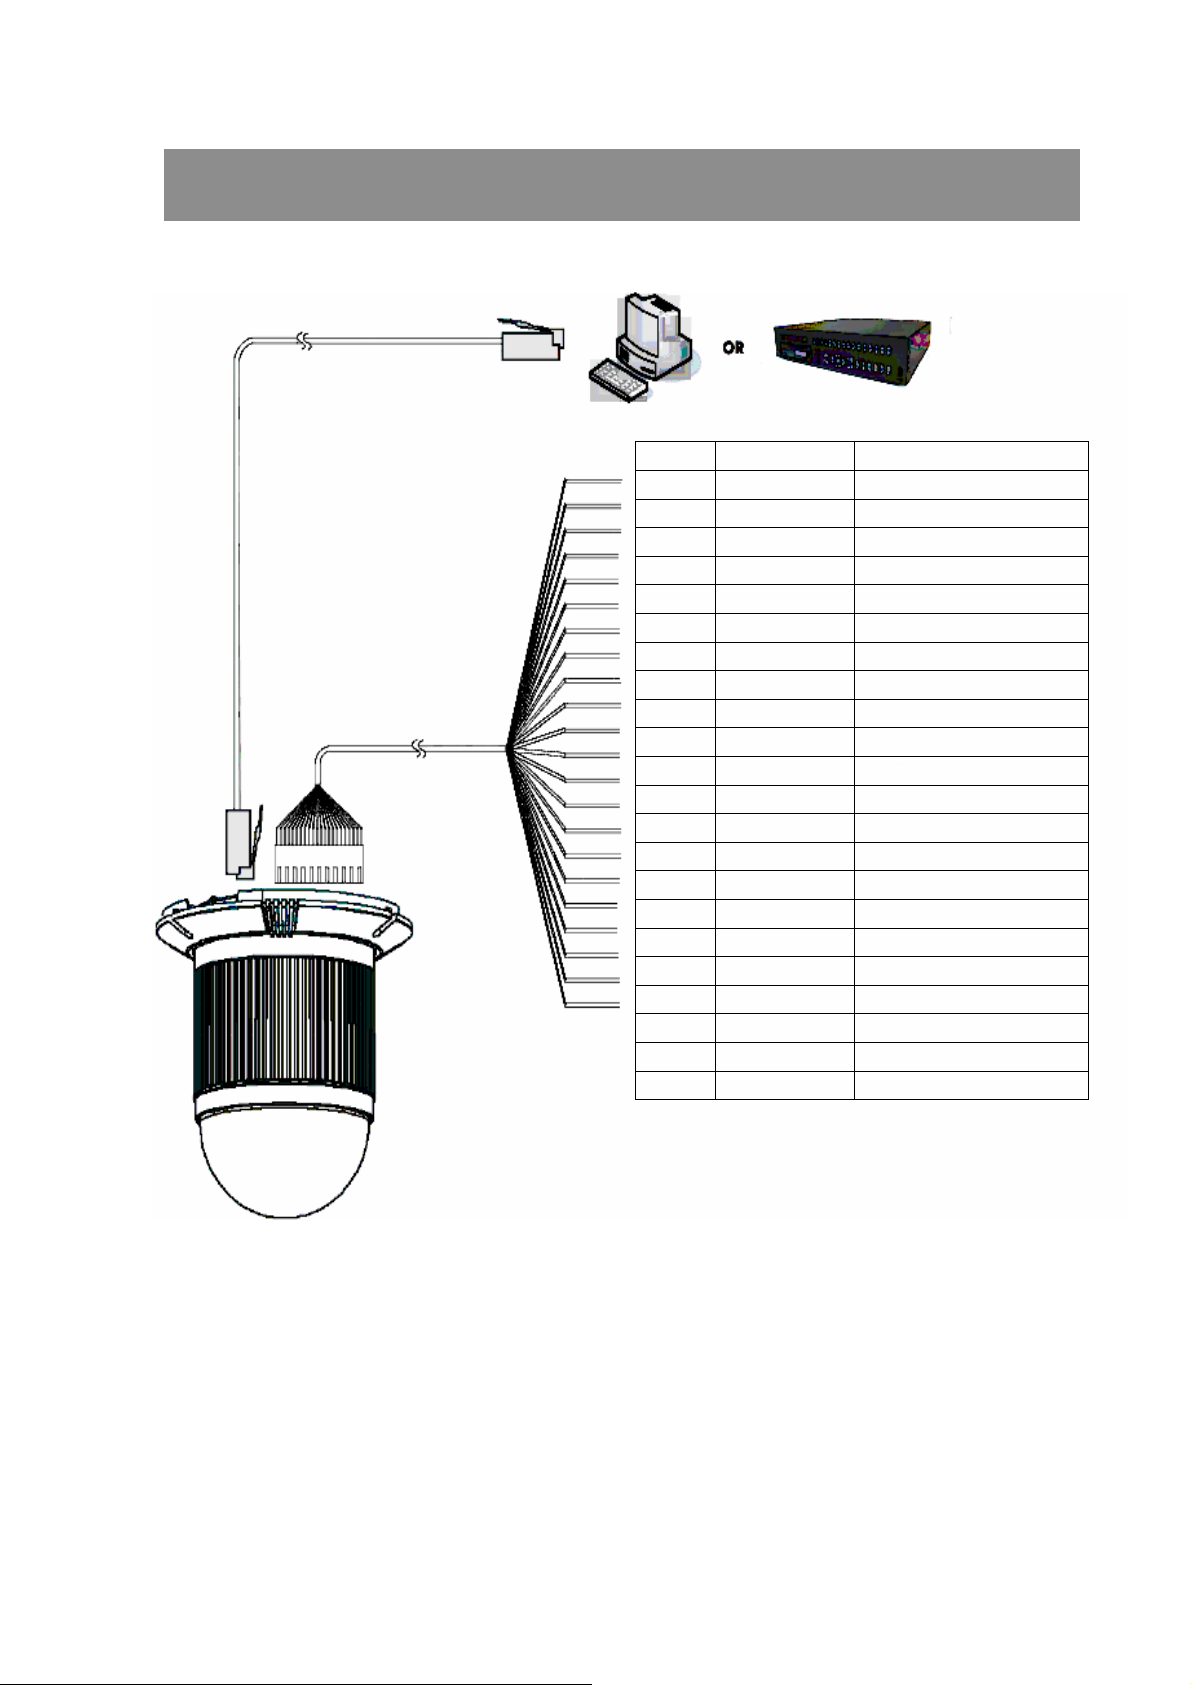
CONSTRUCTION
LINE SIGNAL COLOR
1 AC24V-1 BLACK
2 ALMNO BROWN
3 AC24-2 RED
4 ALMNC ORANGE
5 FG YELLOW
6 ALMCOM GREEN
7
8
9
10
11 ISOG BLACK / WHITE
12 ALM_1_IN BROWN / WHITE
13 ALM_3_IN RED / WHITE
14 ALM_2_IN ORANGE / BLACK
15 ALM_4_IN YELLOW / BLACK
16 ALM_5_IN GREEN / BLACK
17 ALM_6_IN BLUE / WHITE
18 ALM_7_IN PURPLE / WHITE
19 ALM_8_IN GRAY / BLACK
20 ALMGND WHITE / BLACK
21 VGND
22 VIDEO
NOTE:
There is a “connector box” accessory. It is easy installation for users to
enable alarm function.
00-37723EZ1EA2
11
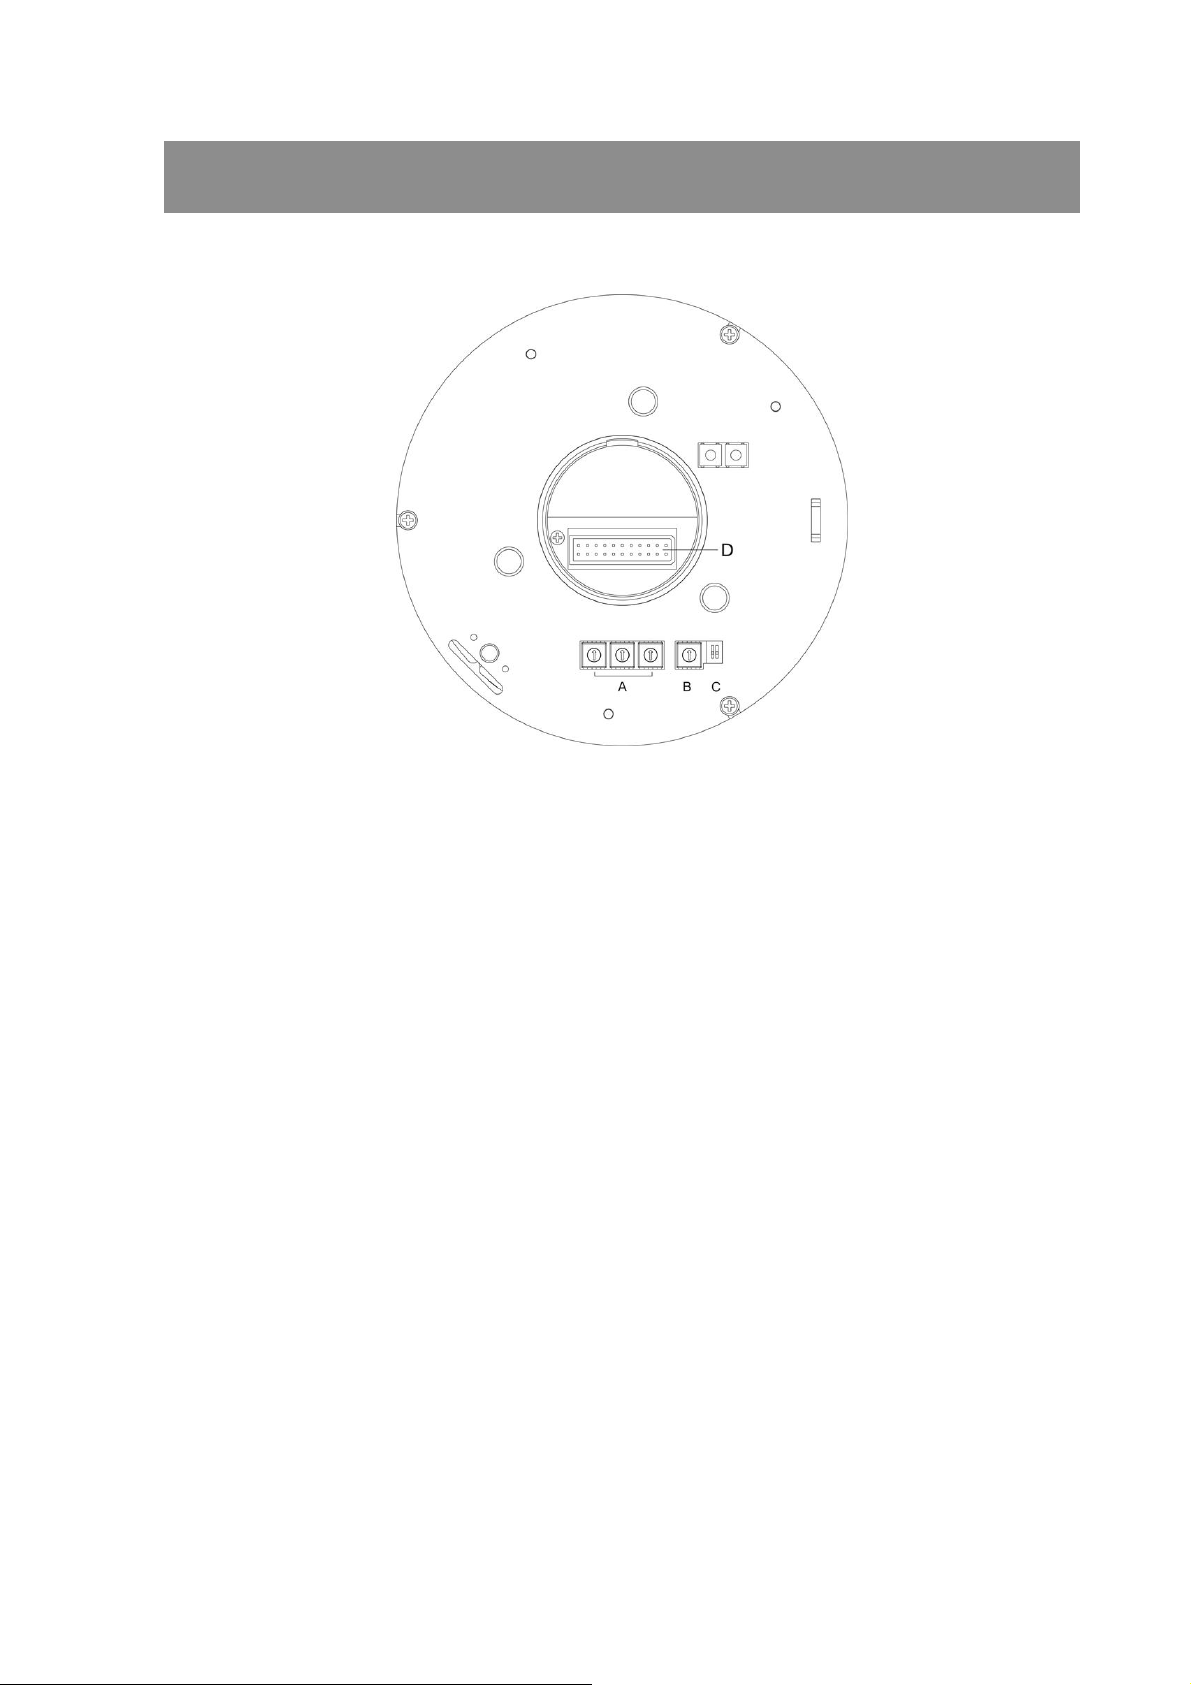
SWITCH SETTING
SWITCH DEFINITION
A. ID Setting
B. Dome Control Protocol
C. Reserved
ID SETTING
Use SW1 ~ SW3 to change your speed dome ID to “0” “0” “1”.
Please set every IP dome address to “001” even you install multiple IP dome
cameras.
DOME CONTROL PROTOCOL
Use SW4 to change the protocol to “B”.
00-37723EZ1EA2
12

INSTALLATION – HARD CEILING
HARD CEILING MOUNTING
STEP1:
Screw the Fixing Plate to your
Dome Body. Drill three holes on
the hard ceiling.
STEP2:
Unpack the dome package and
take out the Decorative Cover.
Remove the Mounting Plate
from the Decorative Cover.
STEP3:
Attach the Mounting Plate to the
ceiling. Insert a pencil or any other
pen into the three ports to mark the
locations where all three ceiling
holes sould go.
STEP4:
Drill these holes on the hard
ceiling.
00-37723EZ1EA2
13

STEP5:
Fix the attached Bracket to the
holes on the hard ceiling with three
screws.
STEP6:
Connect data cable and RJ-45 cable
through the center hole of the
Bracket to Dome Body.
STEP7:
Mount Dome Body to the Bracket
and rotate the Dome Body
clockwise. Tighten the fixing screw
to fix the Dome Body.
00-37723EZ1EA2
14
STEP8:
Assemble the Decorative Cover to
the Bracket.
00-37723EZ1EA2
15
INSTALLATION – T-BAR CEILING
T-BAR CEILING MOUNTING
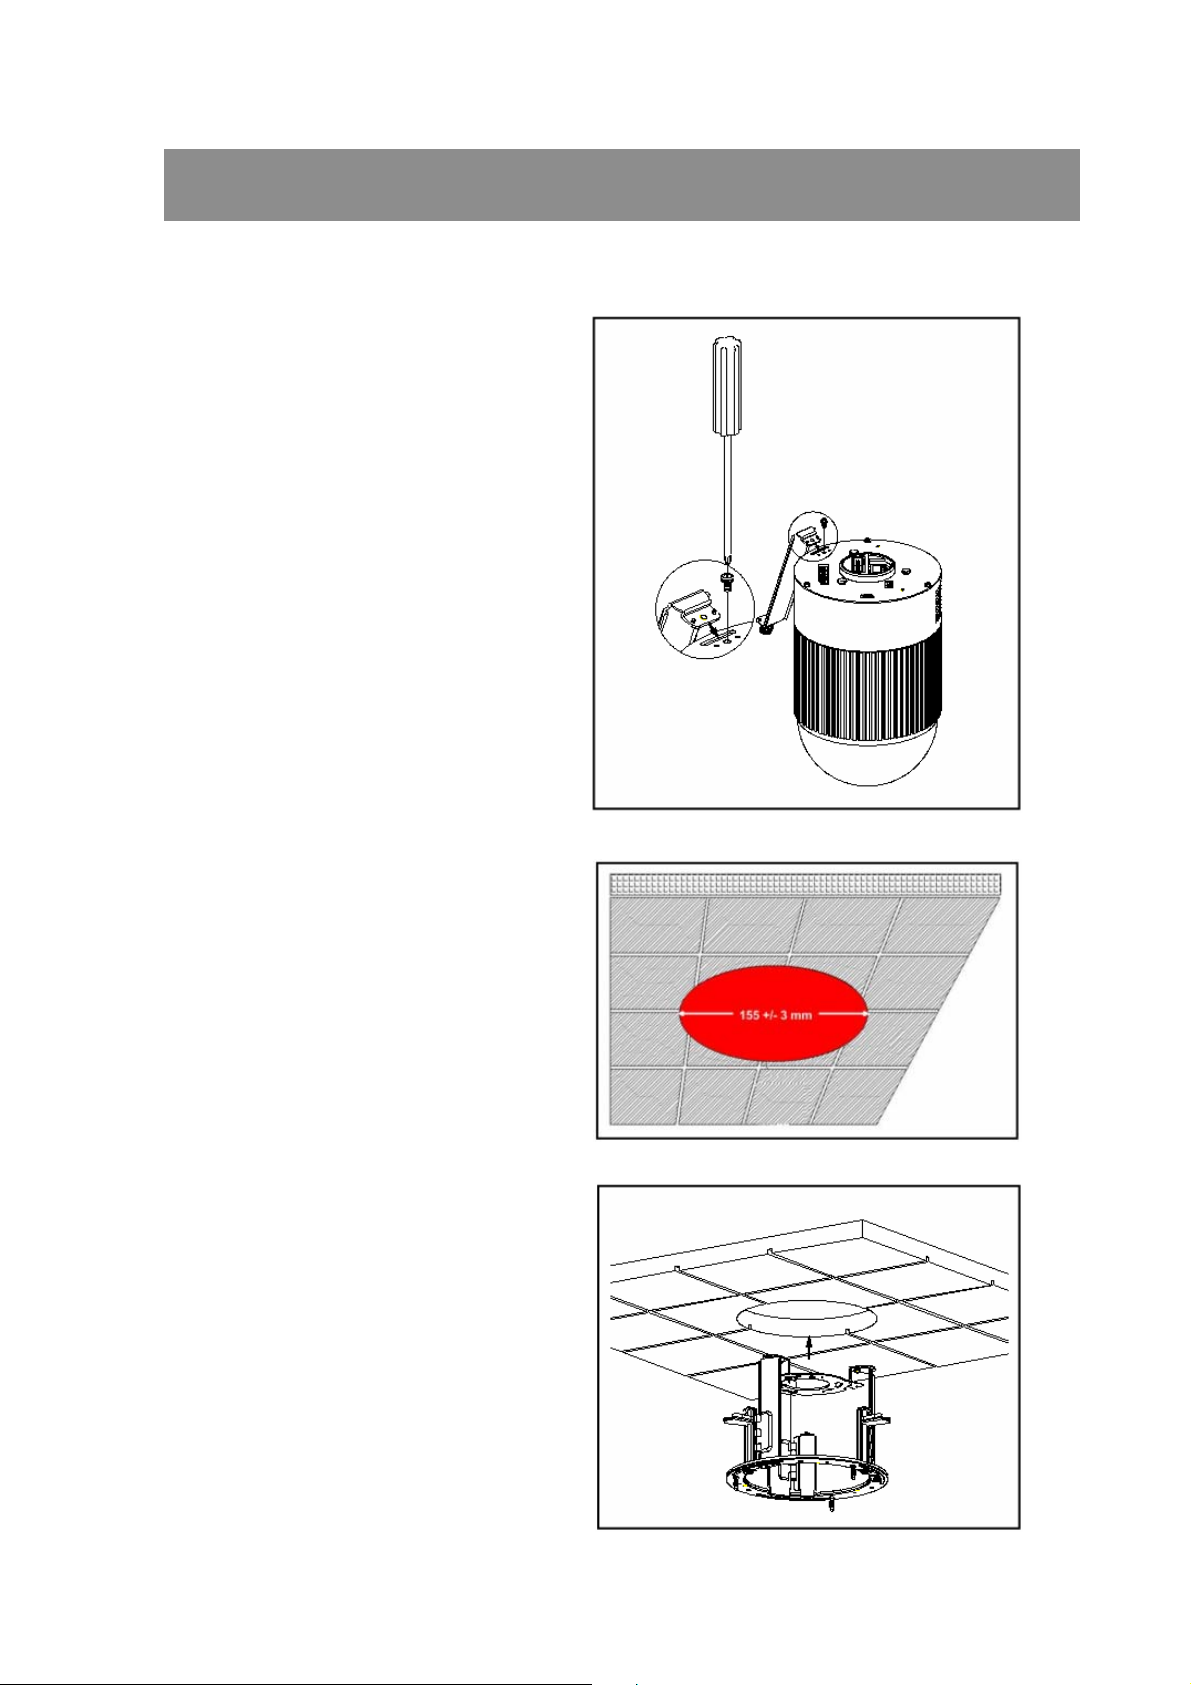
STEP1:
Screw the Fixing Plate to the Dome
Body.
STEP2:
Place the Red Sticker on the ceiling
plate, and cut the circle part out of
the ceiling.
STEP3:
Put up the T-Bar into the ceiling
hole.
00-37723EZ1EA2
16
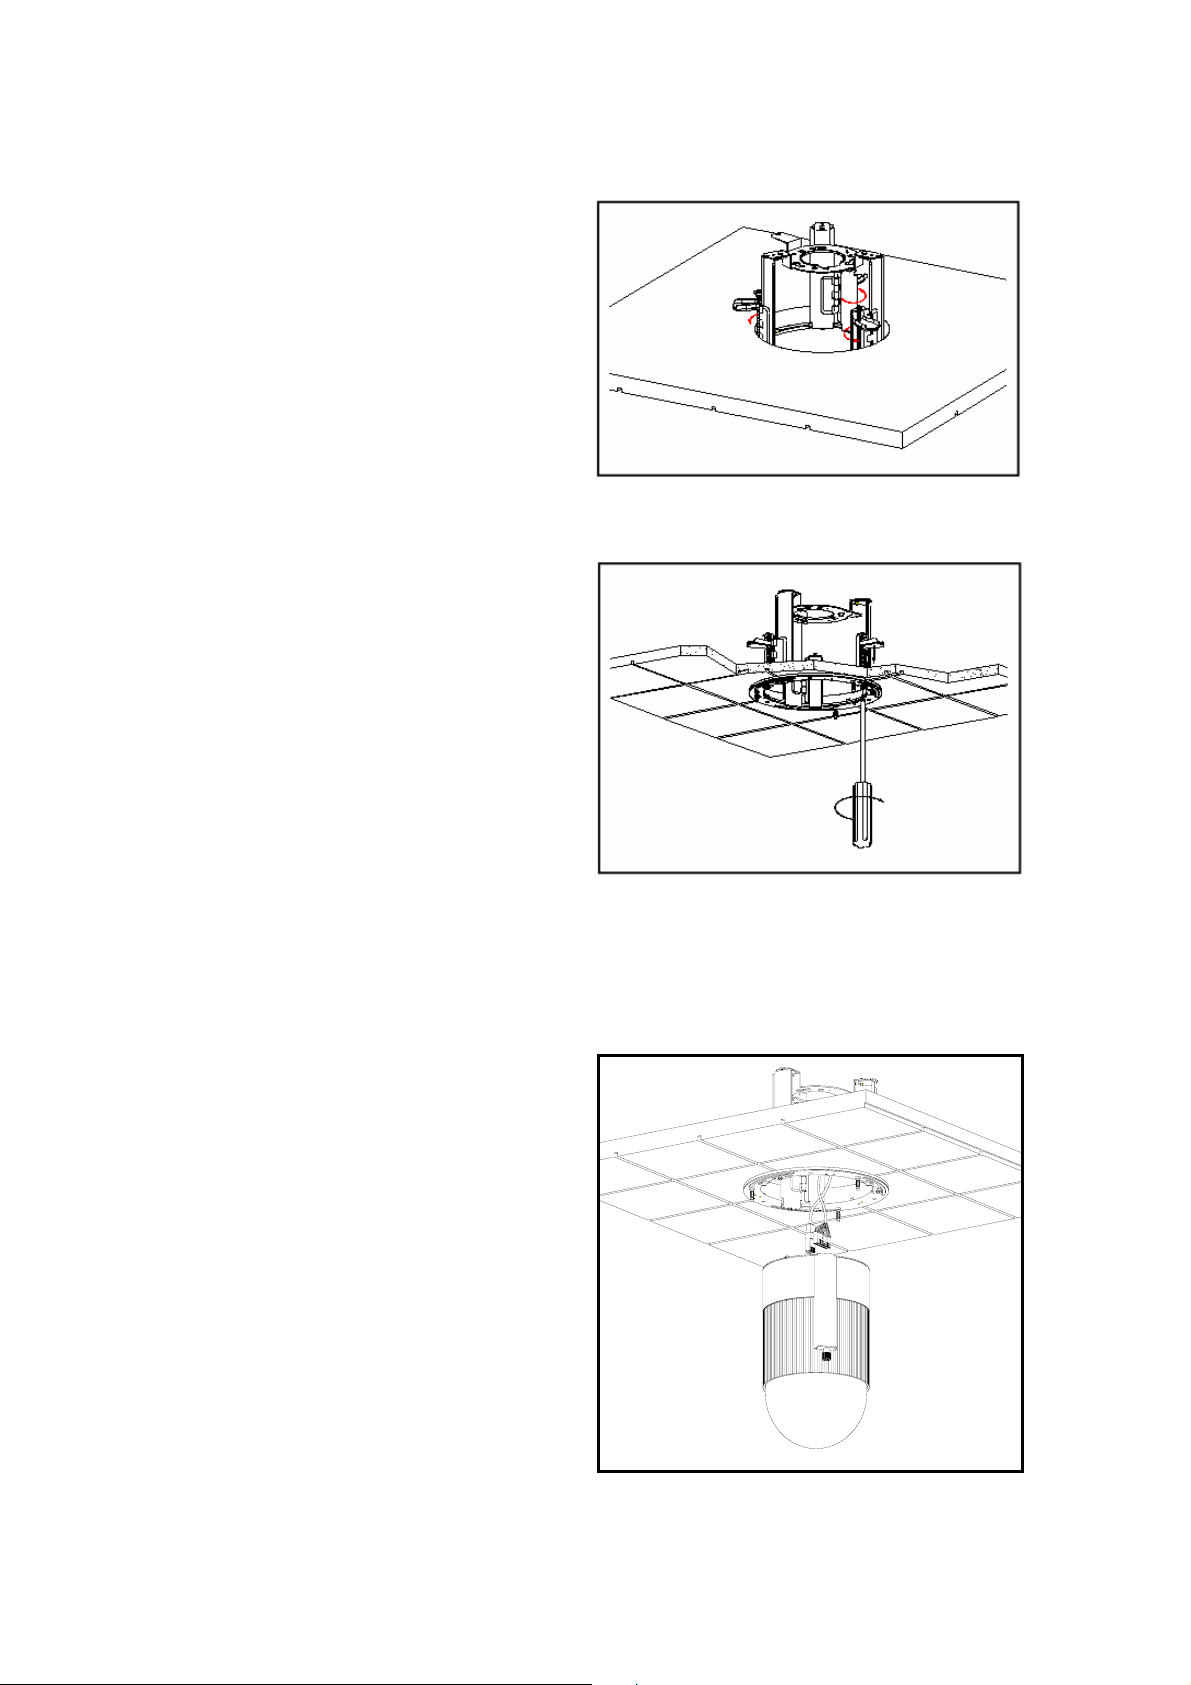
STEP4:
Rotate T-Bar wings of hinge to fix
the T-Bar at the edge of the ceiling
hole.
STEP5:
Tighten the screw of hinge.
STEP6:
Connect data cable and RJ-45
cable to Dome Body through the
center hole of the Bracket.
00-37723EZ1EA2
17
5. STEP1:
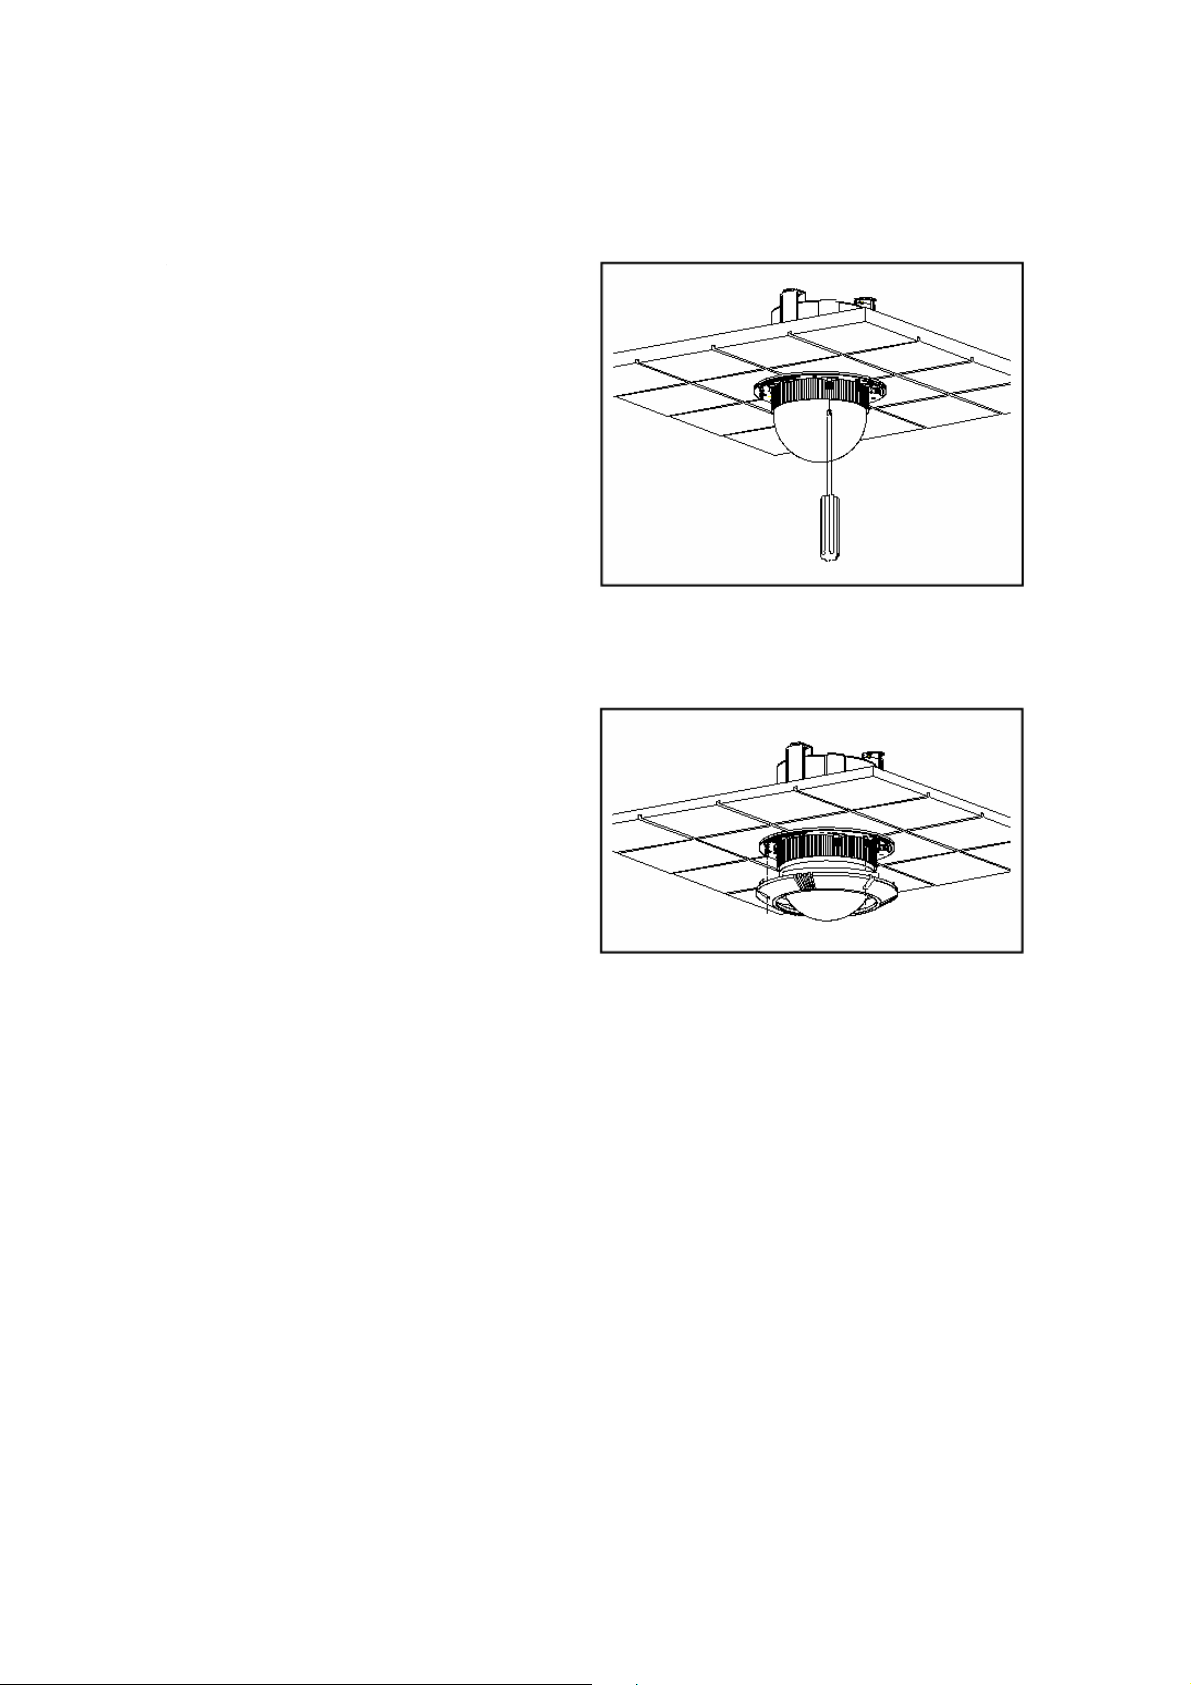
STEP7:
Assembly the dome set and
Mount Dome Body to the Bracket
decoration cover with three screws.
and rotate it clockwise. Tighten the
fixing screw to fix the dome body.
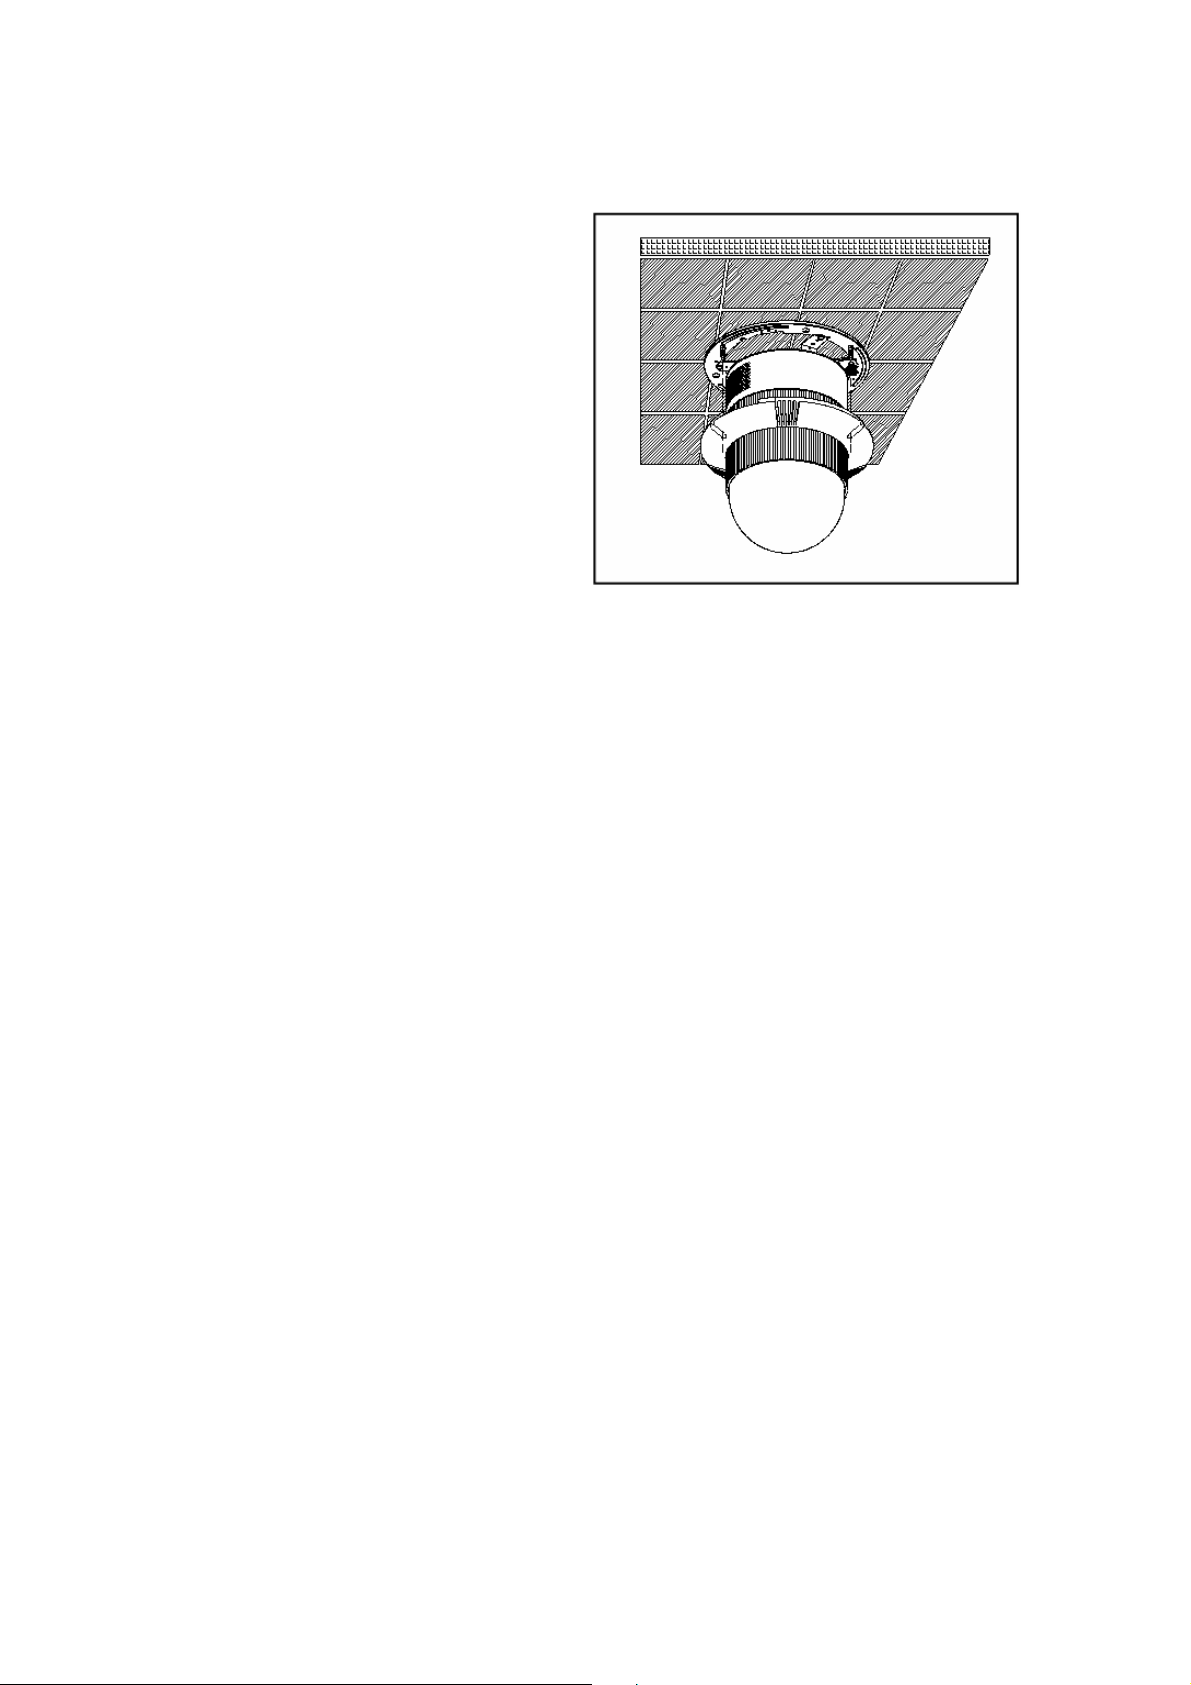
STEP8:
Assemble the Decorative Cover to
the T-BAR.
00-37723EZ1EA2
18
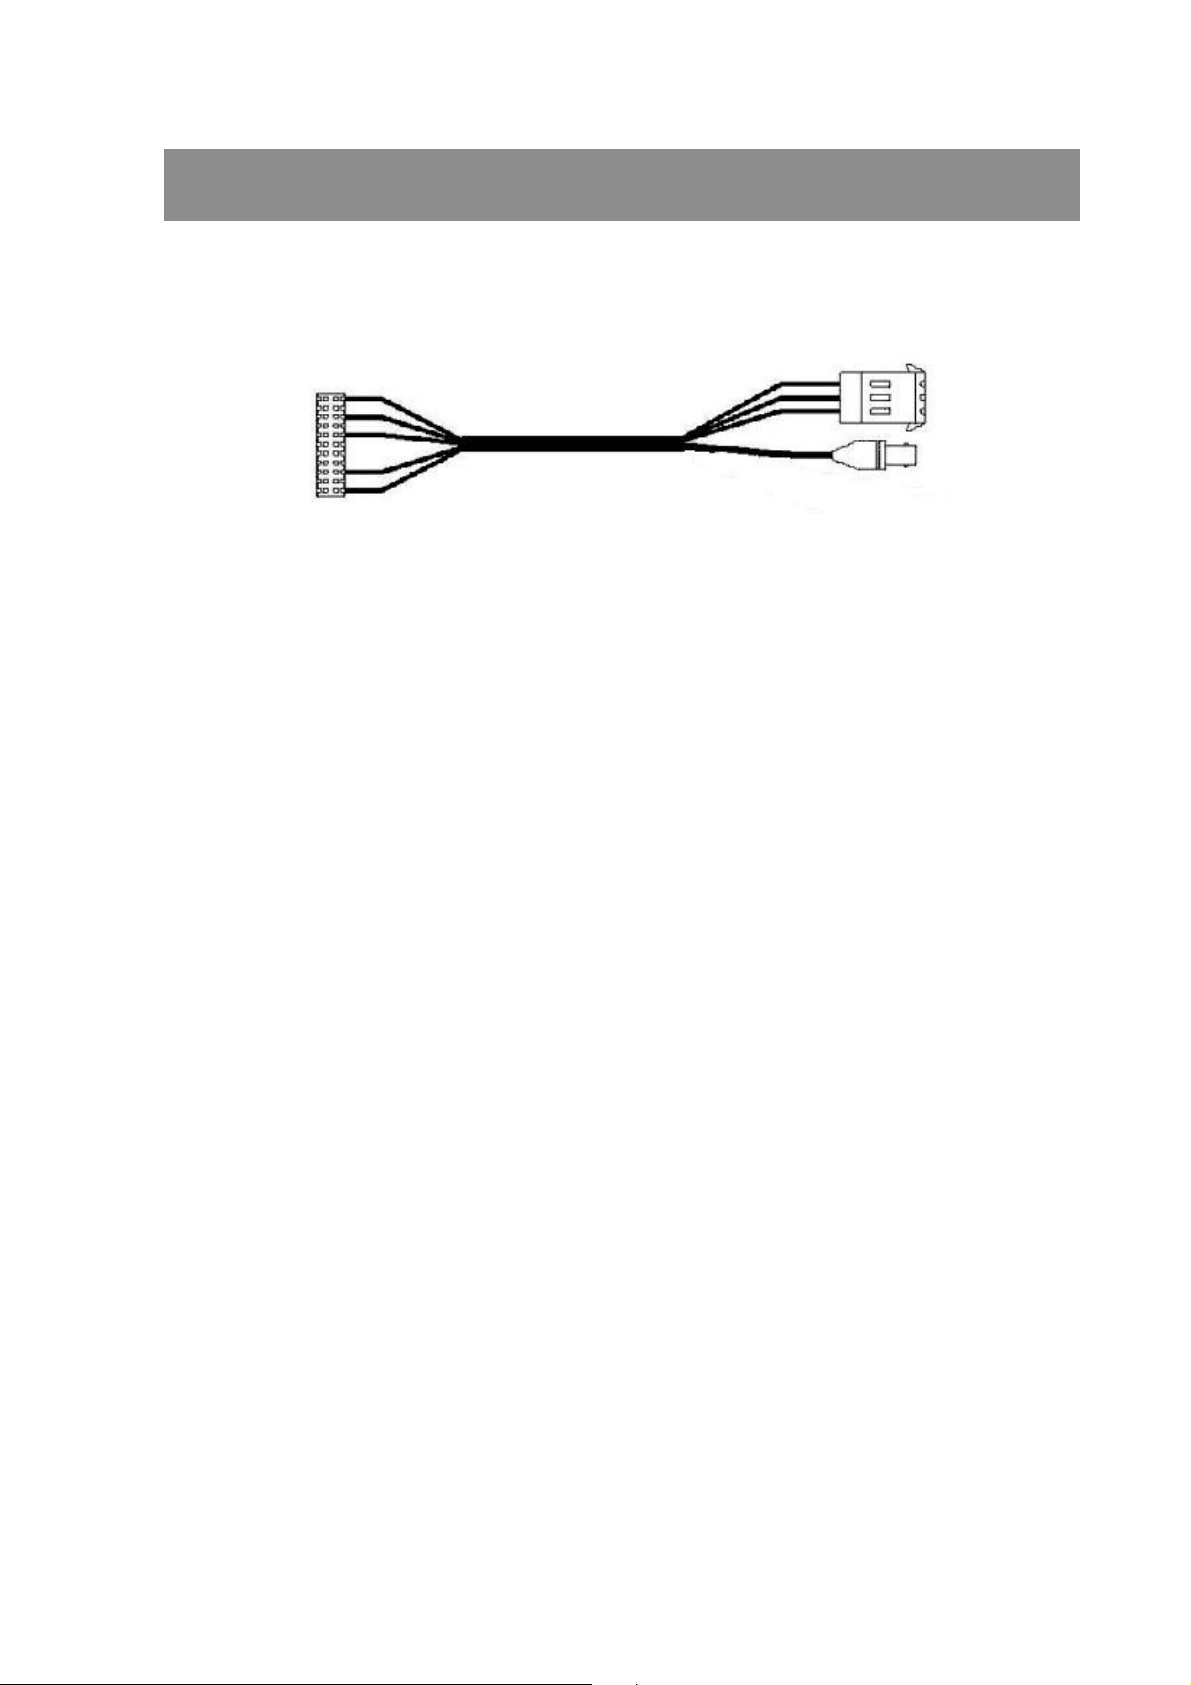
CONNECTION
CABLE CONNECTION
To 24VAC
To IP dome
LAN PORT (RJ-45)
1. RJ-45 connector: Network cable connection connector.
The recommended cable is CAT5 twisted pair cable.
2. NETWORK LED status:
a. Constant green. Constant orange: Network is connected.
b. Blinking orange. Blinking green: Networks have activities.
c. Blinking orange. Blinking green: Data sent out from server.
d. Constant slow blinking green. Constant slow blinking orange: Network
disconnected.
Test purpose
e. Constant blinking orange from slow to fast: Upgrading software.
00-37723EZ1EA2
19
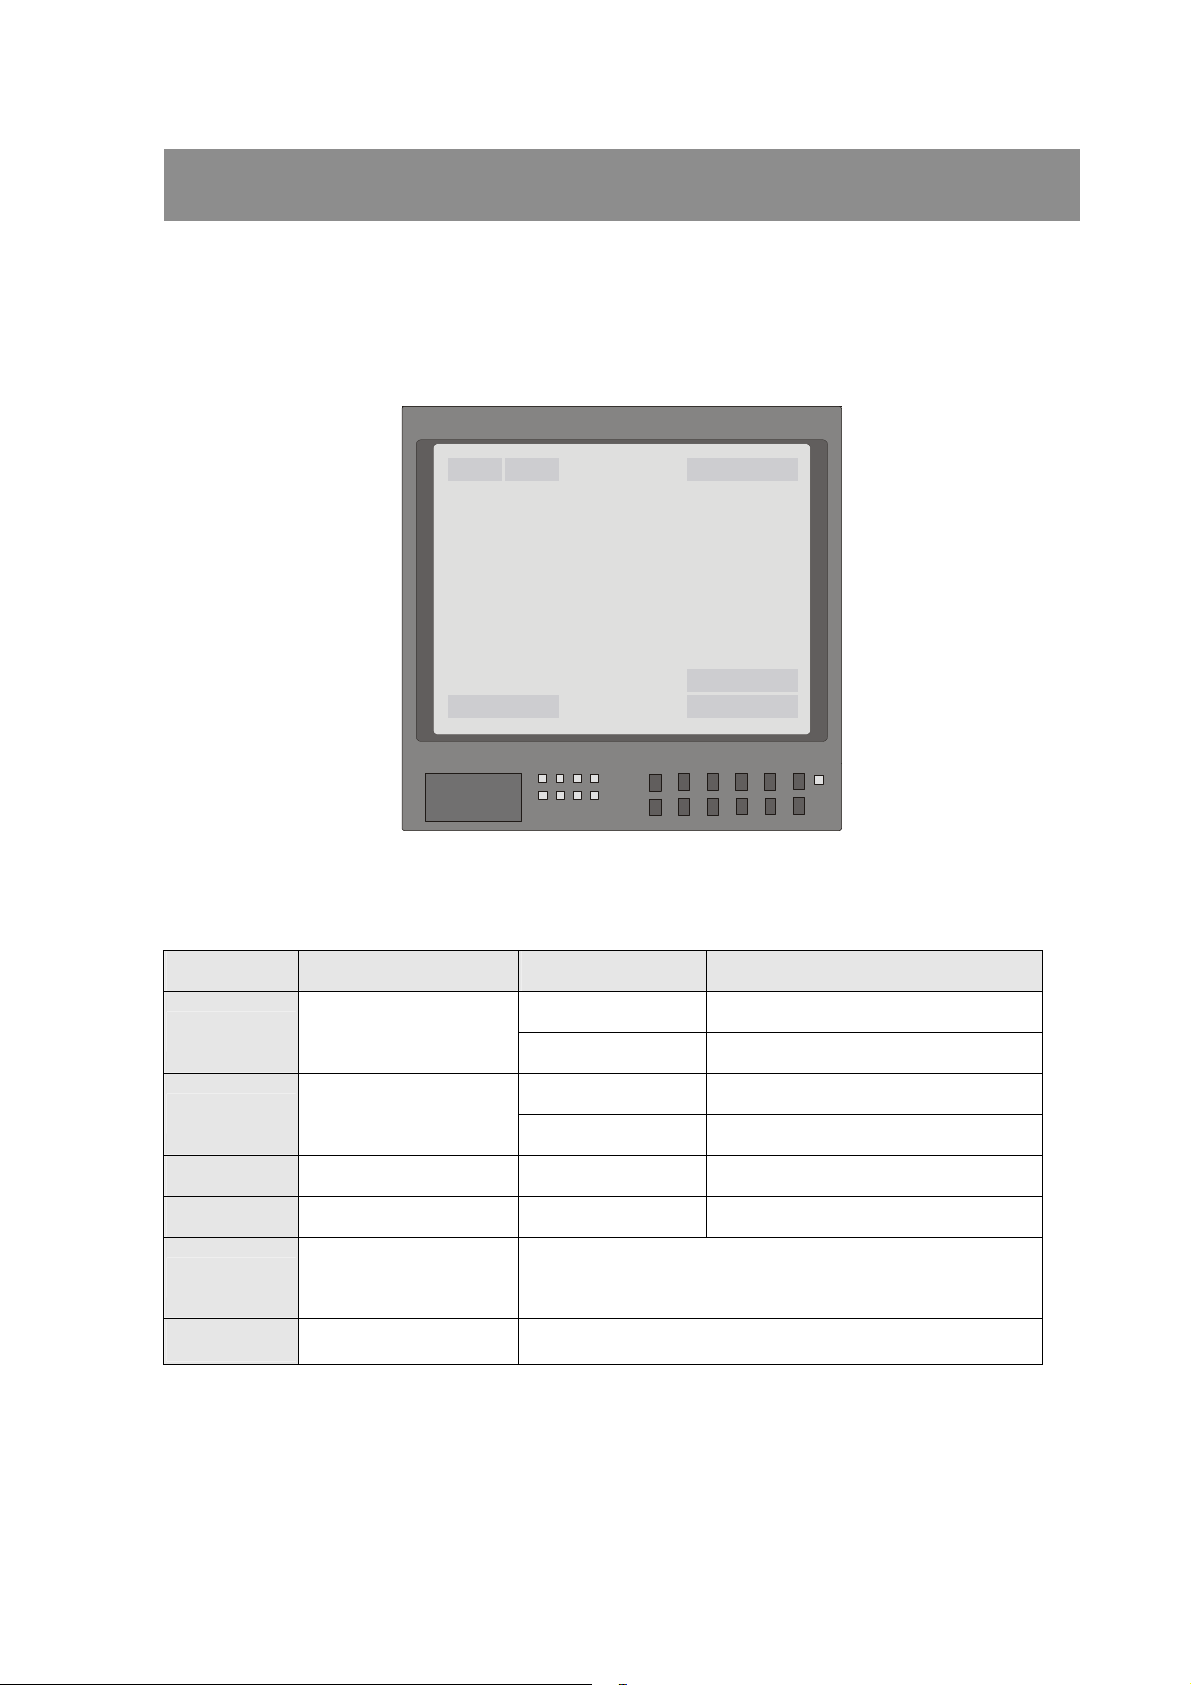
OSD DISPLAY FORMAT
OSD DISPLAY FORMAT
1
2
56
< Fig1. OSD DISPLAY POSITION>
3
4
POSITION FUNCTION OSD DISPLAY DESCRIPTION
A Auto Focus Mode
1 FOCUS MODES
M Manual Focus Mode
2
3 ALARM ALARM Alarm Message
4 ZOOM RATIO X1 Present Zoom Ratio
5 TITLE
6 CAMERA ID Show the camera ID of this camera
00-37723EZ1EA2
BACKLIGHT
X Back Light Compensation OFF
B Back Light Compensation ON
1. Max. 20 letters for each title.
2. 16 sets of titles are available.
20
 Loading...