

DynaColor D7313 Quick Manual
Integrated High Speed Dome Camera Quick Guide Integrated High Speed Dome Camera Quick Guide
00-5H8110ZSEA3 00-5H8110ZSEA3
This quick operation guide is a reference for users to operate dome cameras quickly, and therefore only provides
basic information on control keyboard and dome function. Before attempting to connect, configure and operate
the integrated high speed dome, please read the installation guide and control keyboard user’s manual
completely.
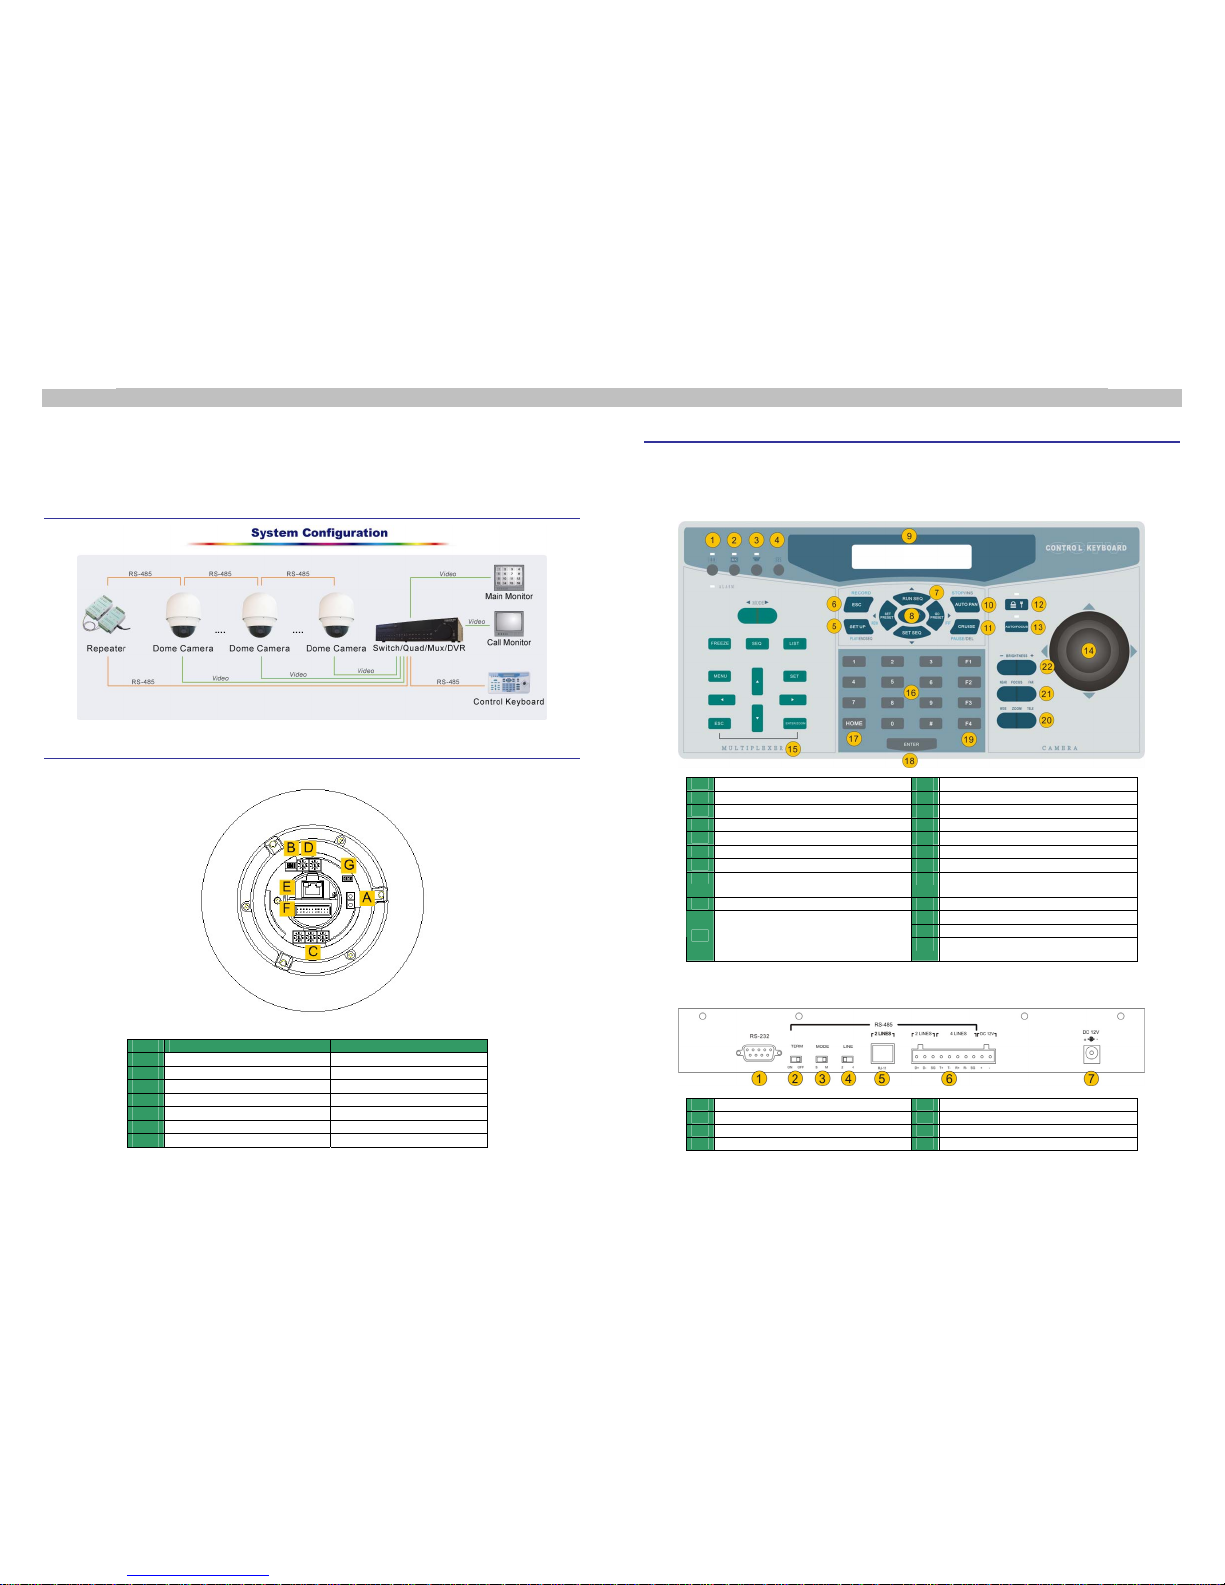
System Configuration
Dome Switch Definition
SW. Definition Remarks
A
Reserved
B
RS-485 Setting Refer to User’s Manual
C
Dome ID Setting Refer to User’s Manual
D
Dome Control Protocol Refer to User’s Manual
E
RJ-45 Connector For Ethernet IP function Only
F
22-Pin Connector Connect the equipped cable
G
ISP Connector For FW upgrade
D7313 Control Keyboard
The control keyboard function keys and connectors are illustrated and described as below. For more information
on keyboard installation and operation, please refer to the System Control Keyboard user’s manual.
Front Panel
1
Multiplexer/DVR Selection Key
2
Matrix Selection Key (Reserved)
3
Camera/Dome Selection Key
4
CCTV System Setup Key
5
Camera Setup Key
6
ESC Key
7
Direction Keys and Function Keys
8
Camera OSD Key and Enter Key
9
LCD Panel
10
Auto-Pan Function Key
11
Cruise Function Key
12
Keyboard Lock Up Key
13
Auto-Focus Function Key
14
Joystick
15
Multiplexer, DVR or Matrix Control
Keys
16
Number Keys
17
Home Function Key
18
Enter Key
20
Zoom Wide/Tele Keys
21
Focus Near/Far Keys
19
F1: Remote Reset Function
F2: Lock/Unlock Device
F3: Reserved
F4: Dome Speed Test
22
Brightness Up/Down Keys
Rear Panel
1
RS-232 D-SUB
2
Termination Switch
3
Mode Switch
4
Line Selection Switch
5
RJ-11 Jack
6
Terminal Blocks
7
Power Jack

Integrated High Speed Dome Camera Quick Guide Integrated High Speed Dome Camera Quick Guide
00-5H8110ZSEA3 00-5H8110ZSEA3
Control Keyboard Setting
Follow the instruction to configure the keyboard system setups before using it to control domes.
RS-485 Setting
Refer to the rear panel figure to connect dome cameras to the control keyboard with RS-485 cable and configure
the RS-485 communication port setting.
Control Keyboard System Setting
Keyboard will enter ‘CCTV System Setting Mode’ when user presses the <SYS> key and enter a correct
password (default password is 0000). Please use "▲" and "▼" keys to scroll these setup items. For detailed
description, please refer to DynaColor Control keyboard user’s manual.
No. Setup Menu Description
1.1
System Linking Scan connected cameras on the RS485 bus again.
1.2
Set Keyboard ID Assign a new ID for this keyboard, Default ID is 000
1.3
System Monitor There are 4 sources, select one to output the camera image to
the main monitor.
1.4
RS 232 Baud Rate Change the baud rate of RS232 interface. The default setting is
9600bps.
1.5
Date Setting Set a new date into keyboard
1.6
Time Setting Set a new time into keyboard
1.7
Date Time Correction Synchronize the local time to all devices
1.8
Alarm List List the latest 10 Alarm information came from system bus.
1.9
Camera Type & Class Assign proper individual protocol for every camera and assign
class to keyboard
1.10
Key Press Beep Turn on/off the built in buzzer.
1.11
Alarm Reaction Turn on/off the response action of keyboard when an alarm
message is sent to keyboard from other devices
1.12
Password Change the password of keyboard
Dome Control
The user is allowed to control the dome camera when the keyboard is under Camera Control Mode; to enter
Camera Control Mode, press the camera/dome selection key. Please follow the instructions to operate the dome
camera. The OSD displays as below when the keyboard is under Camera Control Mode.
To Pan/Tilt/Zoom the Dome Camera
Push the joystick up/down/left/right directly to pan or tilt the dome;
rotate the joystick to zoom in/out the camera lens.
Lens Control Keys
User can adjust the camera lens through lens control keys under Camera
Control mode.
• Zoom Function
Press the <Tele> key to zoom in the lens. Press the <Wide> key to zoom
out the lens.
• Focus Function
Press the <Focus Near> key to move focus lens near. Press the <Focus
Far> key to move focus lens far.
• Brightness Adjusting
Press the <Brightness +> key to increase the video brightness. Press the
<Brightness -> key to decrease the video brightness.
• Auto-Focus Function
Press <Auto Focus> key to toggle the Auto-Focus function.
Preset Function
• Configuring Preset
Press a number key for preset point, e.g. <2> and then press <SET
PRESET> to record this position as preset point 2.
• Calling preset position
Press a number key for preset point, e.g. <2> and then press <GO
PRESET> to go to the preset position 2.
Sequence Function
• Configuring Sequence
1) Press a number key to set a sequence line, e.g. <1> and then press
<SET SEQ.> to start to modify parameters of sequence 1.
PST indicates Preset Point (1~128).
SPD indicates Speed (1~15).
DWELL indicates Dwell time (1~127 seconds).
2) Edit the parameters, for example, press <4> <ENTER> for PST, <1>
<5> <ENTER> for SPD and <5> <ENTER> for DWELL. That means
that the first preset point for sequence 1 is preset point 4, dome
camera will staying 5 seconds at that position and go to next preset
with speed 15. Follow the above steps to set other sequence line;
press <SETUP> to end the setting when finished.
3) User is allowed to use ▲ ▼ keys to scroll up or down the all pages.
User can also use ◄ ► keys to move the cursor.
• Executing Sequence
Press a number key to specify a sequence line that you want to
execution and then press <RUN SEQ.> to start sequence.
User can insert or delete a preset position from sequence line easily. Press
<INS> key to insert a preset position into the sequence line. Press <DEL> key
to delete the current preset position from this sequence line.
User can press <ESC> or <ENDSEQ> key to exit sequence mode after
sequence line editing is finished. The difference between these two keys is:
<ENDSEQ> will remove all preset positions behind current preset position;
<ESC> will keep all preset positions.
Auto-Pan Function
• Configuring Auto-Pan
1) Press <Auto Pan> to enter Auto-Pan mode. The LCD on keyboard will
display “1. RUN 2. SETTING”. Press <2> to start configuring Auto-Pan
parameters.
2) Move dome camera to a specific position and press <ENTER> to save it as
the start position of scan region; pan the dome camera to another position
and press <ENTER> to save it as the end position of scan region.
3) Select the scan direction and Auto-Pan speed using direction keys, then
press <ENTER> to confirm the selection.
• Executing Auto-Pan
Press <Auto Pan> to enter Auto-Pan mode and press <1> to execute Auto-Pan function.
Cruise Function
• Configuring Cruise
1) Press <CRUISE> key on keyboard to enter Cruise mode. LCD is displaying
“1. RUN 2. SETTING” now. Press <2> to set the cruise path.
2) LCD is displaying “ENTER for START POS” now. Press <ENTER> and move
dome camera to form a cruise path; press <ENTER> to stop cruise recording
procedure.
3) LCD is displaying “ENTER for SAVING” now. Press <ENTER> to save this
cruise path.
• Executing Cruise
Press <CRUISE> key and then <1> to start cruising.
Entering Camera OSD Setup Menu
If selected camera equips the OSD function, press <CAMERA MENU> button and
hold for 3 seconds to enter the OSD menu. User can move the OSD cursor through
direction keys on keyboard.
xxx P/T/Z/F/OSD Cam
___
xxx. PST SPD DWELL
[004] [15] [005]
 Loading...