


CONTENTS
Professional Specifications .................... 3 Schematic .............................................. 12
Description ............................................ 4 Component Values .............................. 13
Installation ........................................... 4 Initial Adjustment—Biaset ................... 18
Connections............................................. 4 Output Meter Reading ......................... 18
Assembly Instructions............................. 6 In Case of Difficulty .................................19
Mechanical Assembly ........................ 7 Voltages and PC-44 Board Layout ........... 20
Wiring the Output Stage ..................... 9 International AC Line Connections ......... 21
Wiring the Power and Bias Supplies. .11 Service Policy and Limited Warranty….22
Wiring PC-44 and Control Bracket . . .15 Parts List .................................................23
Final Assembly.....................................16
PROFESSIONAL SPECIFICATIONS
Power Output: 120 watts continuous.
Power Response: 20 Hz to 15 kHz within 1 dB of 120 watts with less than
Frequency Response: +0, -1 dB, 10 Hz to 40 kHz @ 1 watt.
Intermodulation Distortion: 1% or less at rated power using 60 Hz and 7000 Hz
Hum and Noise: Greater than 95 dB below rated output.
Input: 50,000-ohm load; unbalanced line.
Damping Factor: 14 at 16 ohms; 1 kHz.
Output Impedance: 4, 8 and 16 ohms. Power
Consumption: 250 watts.
Tube Complement: 8417 (4); 7199; silicon rectifiers; time delay relay
Fuses: 5 amp AC line; speaker.
Meter: Switchable for 3 output ranges and for output tube bias.
Finish: Satin charcoal 1/8” steel front panel and
Size: 19" x 101/2" x 83/4" high; add 11/2" for handles.
Weight: 55 lbs. (25 kg.)
1% total harmonic distortion.
Mixed 4:1. Distortion reduces at low er power levels.
1.6 volts for 120 watts.
electrostatically applied black epoxy coated 16 gauge
steel chassis.
3

DESCRIPTION
The Mark VI is a vacuum tube high power basic power
amplifier designed for the professional sound installer.
Vacuum tubes are most often favored in their ability to withstand enormous physical and electrical abuses—conditions
frequently encountered in discotheques, public address and
musical instrument applications. Its rugged construction
and utilization of superior components, including the
patented Dynaco Super Fidelity transformers, permit continuous duty at full power, while maintaining safe operating
margins. Protective isolation of the load from the driving
circuits, and uniform power output into a variety of load
impedances are inherent in all designs which use an impedance matching transformer.
The Mark VI employs a basic circuit arrangement which
all Dynaco vacuum tube amplifiers have used since the
inception of the Mark II amplifier in 1955. Refinements of
the operating parameters have been incorporated for circuit
balance, stability, and for drive capability. The components
used have been selected to protect against failure, and all
parts are operated conservatively to assure superior performance and proper operation for many years.
The pentode section of the 7199 tube is a high gain voltage
amplifier, which is direct-coupled to a cathodyne—split
load—phase inverter. The operation of this type of phase
inverter is independent of tube aging, a unique advantage
INSTALLATION
of its design. The input gain and inverter stages are refined
to provide an accurately balanced signal to the output tubes.
The 8417 output tubes are a matched set of four, to assure
proper operation of the Mark VI. The output tubes are operated in a fixed bias arrangement, which may be accurately
checked and adjusted with the lighted meter and recessed
potentiometer on the front panel.
The output tubes drive a Dynaco Super Fidelity output
transformer expressly designed for this circuit. Taps on the
plate windings connect to the screen grids, and contribute to
the linearity of the overall design. The impedance match
and bias conditions employed contribute to very low distortion over a wide range, even without feedback. The overall
feedback loop adds 20 decibels of additional distortion reduction.
In addition to front panel adjustment of bias, recessed controls for input level and a 4-position range switch (three
positions for observing output power levels on the meter,
plus one position for observing bias) are supplied. A speaker
fuse holder and lighted power switch complete the front
panel layout.
The simplicity of this circuit—a minimum of phase shift-
ing stages and very careful attention to output transformer
design—assures maximum stability.
The Mark VI is designed for mounting in a standard 19"
rack (mounting hardware for the rack is not supplied); its
supplied large feet also permit placement on any flat surface. The amplifier should be installed where the front panel
is accessible. If the Mark VI is to be mounted near a phonograph, check to make sure that the phono cartridge does not
pick up hum from the power transformer.
VENTILATION is an important consideration. This amplifier
generates almost the same heat under quiescent (no signal)
conditions as it does at full power—the equivalent of a 250
watt light bulb within the confines of the perforated cage.
Thus, ADEQUATE AIR CIRCULATION IS ESSENTIAL. If the Mark VI is rack mounted, 1 foot (30 centimeters) of unimpeded air space MUST be provided above
the unit. Otherwise fan cooling is recommended. Also, the
amplifier is intended to be installed horizontally, with its
CONNECTIONS
INPUT
A signal input is connected by a single conductor shielded
cable to a choice of two RCA type phono jacks or an XLR connector. One of the phono jacks and the XLR input provide flat
low frequency response; the other phono jack provides a low
frequency rolloff @ 6 dB per octave (—3 dB @ 70 Hz). The
input impedance is 50,000 ohms, unbalanced line. The input
sensitivity is 1.6 volts rms for 120 watts output with the input
level control turned fully clockwise. The Mark VI may
therefore be easily driven by one channel of many brands of
control preamplifiers, such as the Dynaco PAT-5, PAT-4,
PAS-3X, or PAS-2/3. The PAS tube type preamplifiers require
internal modification: To change the PAS-3X, simply locate
and remove the pair of 62,000 ohm resistors (blue-redorange) on the PC-5 printed circuit board; to change the
PAS-2 or PAS-3, remove the 62,000 ohm resistors, as indicated
4
feet providing clearance for air flow under the unit. Do not
allow the ventilation slots in the bottom to be restricted
(don't place the amplifier on a rug, for example), or there
will be excessive heat buildup within the enclosed section of
the chassis. Vertical mounting is not recommended, even
with fan cooling.
If the amplifier is to be permanently installed, the handles may be removed before installation, if desired. The
bolts which affix the handles to the front panel should be
reinstalled once the handles have been removed, since these
bolts also attach the front panel to the chassis. However, the
handles not only facilitate carrying the Mark VI, but they
also protect the front panel components from breakage.
Therefore, unless it is to be permanently mounted, their removal is not suggested.
above, and additionally remove the pair of 510,000 ohm resistors (green-brown-yellow) on the back panel of the preamplifier.
Some other tube type preamplifier brands may require
modification for optimum performance into a 50,000 ohms
load.
OUTPUT
Select speaker leads of sufficient size to preserve the
damping factor of your amplifier. Standard 18 gauge lamp
cord ("zip cord") is suitable for distances up to 30 feet.
Larger wire sizes are advised for longer distances—#16 for
50 feet; #14 for 80 feet. #18 and #16 lamp cord is available
from hardware and electrical supply stores, and is the
easiest to use and conceal.

Be s ure to maintai n simi lar wiring "se nse" fo r each
E
speaker in a mono, stereo, or quadraphonic system, so that
they will be connected in phase. Normally the "-", common, or
ground terminal of each speaker is attached to the "c"
terminal on the output barrier strip, or to the "sleeve" connection on the output jack. The other speaker terminal is
attached to the correct impedance terminal (4, 8, 16) on the
barrier strip (the "tip" connection on the output jack is normally wired to the 8 ohm tap of the output transformer,
although this connection may be changed to either the 4
ohm or the 16 ohm tap, if desired). Proper phase sense is
easily maintained with lamp cord because one conductor is
coded with a molded ridge on the outer insulation.
Two speakers are connected in phase when maximum low
frequency output is heard when they are driven from a monophonic source. Lowered output is observed when the connection to one of the speakers is reversed (out of phase, or
reversed polarity). When using multiple speakers on each
channel, or with 4-channel systems, it is important that all
of the speakers in the same area be wired in phase.
If stranded lamp cord is used, the wire ends should be
"tinned" first with solder to avoid fraying. In any case, make
certain that no wire strands can touch other than the intended terminal.
The "c" terminal of the amp lifier is connected to the
chassis, so the Mark VI may be used in multiples, if desired,
with special output connections which require common
grounds. If so, it will be necessary to connect together all
the "c" terminals of the Mark VI amplifiers being used in
the same system.
An in-phase signal at the input of the Mark VI amplifier
provides an in-phase signal at the output. This is characteristic of all Dynaco tube and solid state amplifiers.
AC POW E R
The power cord should be plugged into a wall outlet pro-
viding 120 volts, 50/60 Hz (alternately 100 volts, 220 volts
or 240 volts depending on the wiring of the primary of the
power transformer). Do not attempt to switch the amplifier
remotely by plugging it into a switched outlet on a control
preamplifier unless the outlet is designated as a 5 amp, or
higher capacity. The Dynaco PAT-5, which can handle 15
amps, may be used.
LOUDSPEAKE R RATINGS
Nominal speaker power ratings are a matter of concern.
There is currently no U.S. standard. Manufacturers usually
provide a "music power" rating, or indicate amplifier power
limits. These should not be confused with continuous, or
"rms" power acceptance for a sustained period which will be
substantially lower. It is rare for a speaker to be able to
handle as much power near the frequency extremes as in the
midrange. Single woofer high fidelity speaker systems rarely
have "music" ratings as high as 100 watts, or continuous
duty wide band sine wave ratings a s high as 40 watts.
In view of the power limitations of most high accuracy
speaker systems, the connection of two or four similar
speakers in the same location to a single channel is often
advisable, if high signal levels are wanted. Lacking more
definitive advice, a rough test is to place your hand in front
of the woofer when playing a loud passage at your anticipated listening level. If you can feel any heat generated by
the voice coil, you should consider the need for additional
speakers to reproduce that level safely. When high output,
high accuracy reproduction is desired, a series-parallel connection of four 8 ohm speakers (such as the Dynaco A-35)
on each channel provides a resultant 8 ohm load with exceptional power handling capacity.
Speaker impedance varies with frequency—often by a
factor of 4 or 5 to 1. Even the least variable speakers, like
Dynaco's, have a 2:1 change. While most nominal ratings
are close to the actual minimum impedance, when combinations approach the 4 ohm minimum recommended amplifier
load, the safest procedure is to measure the resistance across
the terminals with an ohmmeter. Speaker impedance usually varies upwards from this value. Use this figure to determine how multiple speakers should be connected:
IN PARALLEL: IN SERIES: IN SERIES-PARALLEL:
2 x 8 ohms =4 ohms 2x4 ohms = 8 ohms 4x16 ohms =16 ohms
2x16 ohms =8 ohms 2x8 ohms =16 ohms 4 x 8 ohms= 8 ohms
4x 16 ohms =4 ohms 4x4 ohms= 16 ohms 4 x 4 ohms= 4 ohms
These simple examples assume identical models. It is not
wise to connect dissimilar speakers in series or in seriesparallel because of adverse audio effects.
LOUDSPEAKER FUSING
The output of the Mark VI is provided with a speaker
fuse, which is mounted on the front panel. The 5 ampere,
3AG fuse supplied will not fail when the amplifier is operated
at full power (120 watts into 8 ohms), and therefore it provides NO PRO TEC TIO N for your speaker. The size of the fuse
should be determined by the type of speaker you are using.
The protective fuse rating determination for a speaker is
largely empirical, because the power passed by a fuse varies
with load impedance, test signals have little correlation with
music signals, and fuses vary in their tolerance of music
overloads. Logic would suggest the smallest fuse which does
not blow frequently at what are high, but nonetheless safe
levels for your speaker. There are few speakers capable of
safely handling more power than will blow a 2 ampere fuse.
The speaker manufacturer wh o specifies a fuse rating
solves your problem. Lacking this, remember that a fuse will
not blow until a sustained signal well above its rating is imposed for a time. A slo-blo fuse will allow appreciably more
overdrive than the same value standard fast-blow type, and
is thus not generally recommended for speaker protection.
The chart below shows the highest sustained power level
which will not blow the fuses shown. Remember that speaker
impedance typically rises well above its nominal value.
Experience suggests that on this basis power levels of 10
watts are safe starting points for most high fidelity speakers
using a single woofer.
3AG FUSE TYP
1
/2 ampere
3
/4 ampere 2.2 watts 4.5 watts 9 watts
4 OHMS 8 OHMS 16 OHMS
l wat t 2 watts 4 watts
1 ampere* 4 watts 8 watts 16 watts
11/
ampere** 9 watts 18 watts 36 watts
*Dynaco A-10, A-25 and A-35 speakers
**Dynaco A-25XL, A-40XL, and A-50 speakers
5
ASSEMBLY INSTRUCTIONS
GE NER AL AS SE M BLY IN FOR M AT IO N
Construction of the Mark VI is very simple when compared to other kits. The printed circuit board for audio has
been preassembled to save you some of the work, and the
assembly that remains is in an open, uncluttered layout to
make wiring quick and easy. The construction time will be
several hours. It is better to work slowly and carefully rather
than concern yourself about the time.
When you unpack the kit, check off the components
against the parts list on page 23. Separate the hardware
items in an egg carton or similar container. You can identify
unfamiliar parts by checking them against the Pictorial
Diagram, bearing in mind that the drawing is necessarily
somewhat distorted for visual separation.
Have the proper tools at hand before starting construction.
The tools necessary are:
1. A pencil-type soldering iron with a 3/16" tip or
smaller of 40 to 60 watts rating, with a tip temperature of 700 to 800° F.
2. A damp sponge or cloth to wipe the tip of the iron.
3. 60/40 rosin core solder not larger than 1/16" diameter.
4. A medium sized screwdriver (1/4" blade).
5. Long nosed and diagonal cutting pliers.
6. Heavy "slip joint" pliers.
7. A single edged razor blade or inexpensive wire strip
ping tool for removing insulation.
8. Wood toothpicks.
9. Transparent or masking tape.
10. Heavy cardboard.
We do not recommend using a soldering gun. Not only
can a gun provide more heat than is necessary—an unskilled
user might damage printed circuit boards—but also many
users tend to make poor solder connections, simply because
they do not wait long enough for the gun to reach its operating temperature each time. Use a conventional pencil type
iron.
A good solder connection does not require a large amount
of solder around the joint. A well-made connection looks
smooth and shiny because the solder flows into the joint
when both parts are hot enough.
There are four steps to making a good solder connection:
1. Make a good mechanical connection.
2. Heat both parts with the tip of the iron at the junction.
3. Apply solder to the junction until it melts and flows.
4. Allow the connection to cool undisturbed.
ALL SOLDERING MUST BE DONE WITH
A GOOD GRADE OF ROSIN CORE SOLDER
Under no circumstances should acid core solder be used.
Unmarked solder, cheap solder or any of doubtful origin
should be discarded, and separate solder fluxes should never
be used. The warranty is voided on any equipment in which
acid core solder or acid type fluxes have been used. Silver
solder is not suitable. The recommended solder is 60/40
(60% tin, 40% lead) ROSIN CORE. Do not confuse this
with 40/60, which is harder to use.
You should realize that many of the more delicate components are less likely to be damaged in the soldering process if you use a hot iron for a short time, rather than a cooler
iron for a longer period. You will also make a better connection with the hot iron. If you keep the iron clean by wiping
the tip frequently, and occasionally add a small amount of
solder to the tip, it will aid the transfer of heat to the connection. Do not allow too much solder to build up on the
tip though, or it may fall onto adjacent circuitry.
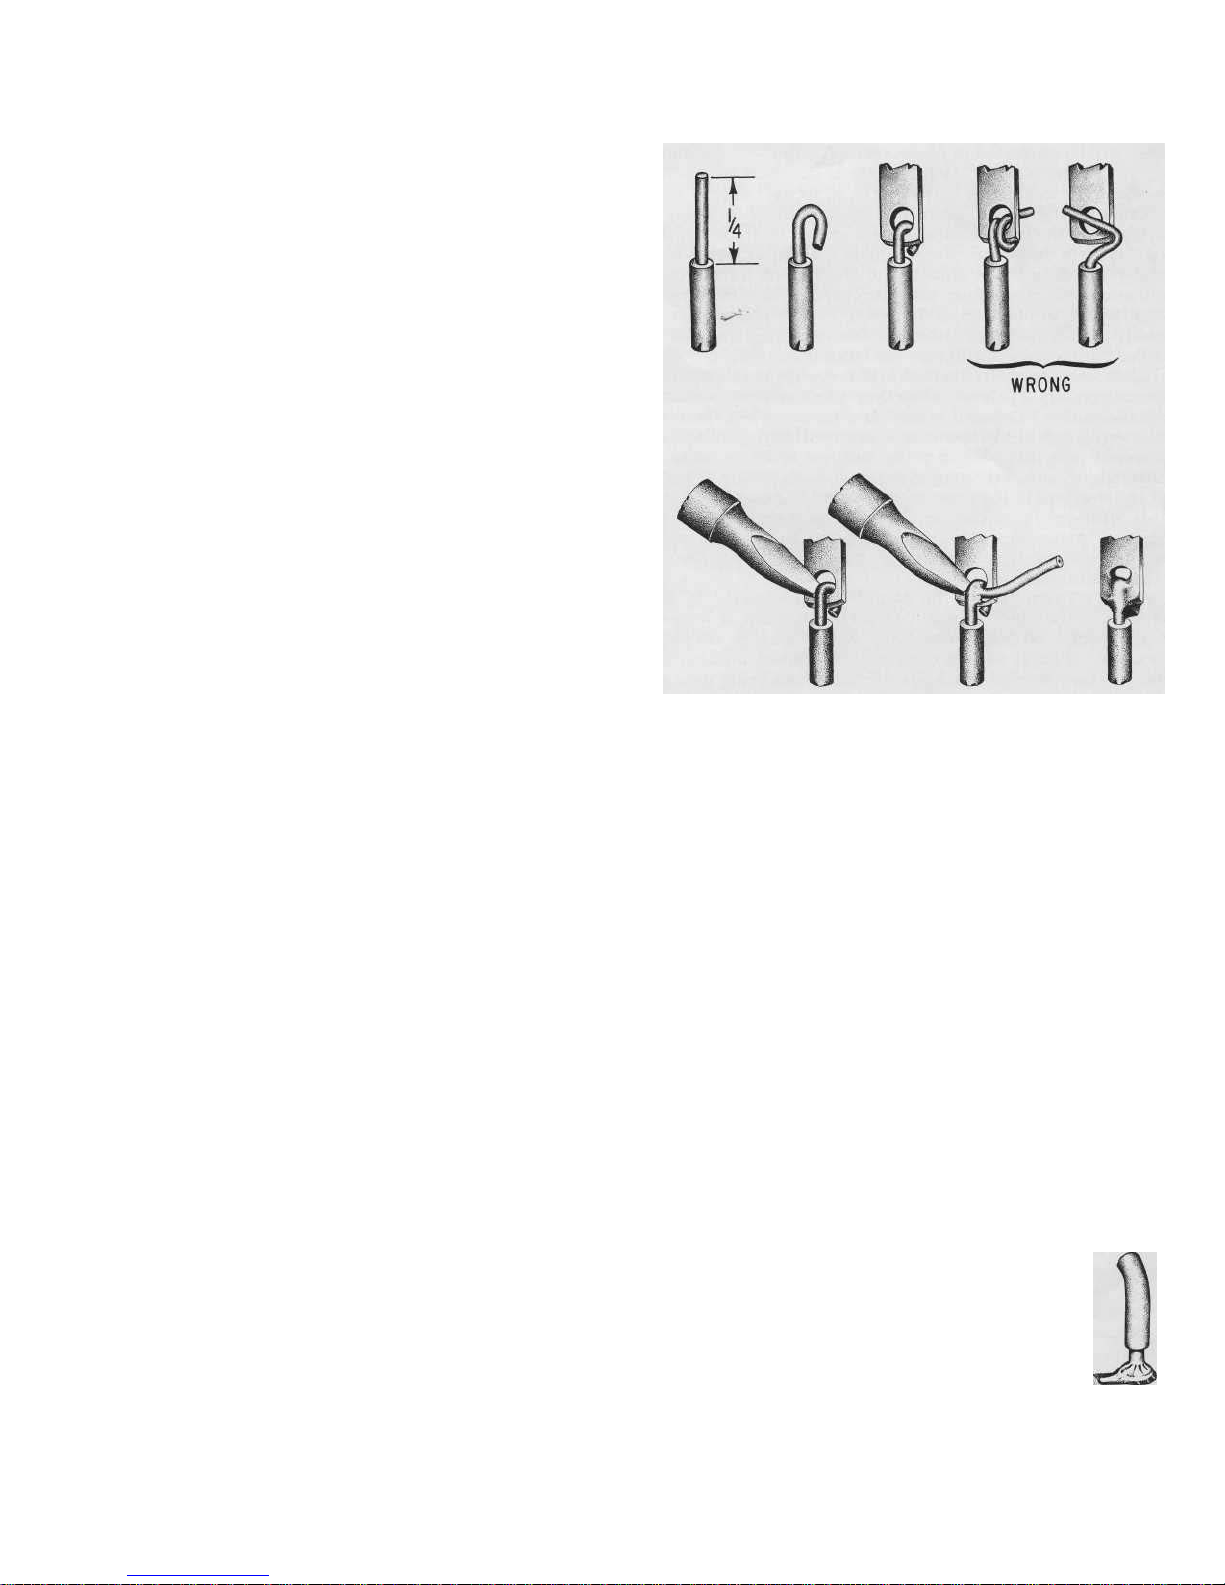
One of the best ways to make a good mechanical connec-
tion is to bend a small hook in the end of the wire, and then
to crimp the hook onto the terminal lug. The amount of bare
wire exposed need not be exactly 1/4 inch, but if it is too
long, the excess might touch another terminal lug or the
chassis. Do not wrap the wire around the lug more than one
time, as this makes the connection difficult to remove if an
error is made.
Many of the wiring steps will call for "preparing" a wire
of a certain length and color. This involves cutting the necessary length of wire and stripping 1/4 inch of insulation from
each end. This is most easily done with wire strippers, but
diagonal cutters can be used if you are careful not to nick
the wire and weaken it.
When soldering a lead to a numbered, platedthrough hole on a circuit board, push the lead
through the hole first. Do not push the wire all
the way into the hole up to the insulation. Apply
the solder and the hot iron at the same time to
the junction of the hole and lead. The solder
should melt very quickly; it should flow easily
and fully into the hole and completely around the lead.
Remove the iron and allow the connection to cool. It is
essential to have a smooth, shiny flow of solder from the lead
to the plated circuitry on the board.
6
WIRING THE KIT
The position of all wire leads should follow the diagram
closely, bearing in mind that the pictorial diagram has necessarily been distorted somewhat to show all connections
clearly. See that uninsulated wires do not touch each other
unless, of course, they are connected to the same point. It
is especially important that uninsulated wires or component
leads or terminals do not touch the chassis accidentally.
Whenever one wire is to be soldered to a connection such
as a lug terminal or hole, the instructions will indicate this
by the symbol (S). If more than one wire is to be soldered
to the same point, the instructions will cite the number of
wires that should be connected to that point when it is to be
soldered. If no soldering instruction is specifically given, do
not solder; other connections will be made to that point
before soldering is called for.
Check your work after each step, and make sure the entire
step has been completed. When you are satisfied that it has
been correctly done, check the space provided and go on to
the next step. Be sure you read carefully the explanatory
paragraphs in the assembly instructions.
MECHANICAL ASSEMBLY
Where stranded wire is used, as on the transformer leads,
be very careful not to cut through the strands when stripping
the end. Where stranded wire is supplied for hookup wire
in the kit, the strands will be bonded together to minimize
this likelihood and make handling easier.
All mounting screws are installed from the outside of the
chassis, and a nut with lockwasher attached, called a KEP
nut, is used except when otherwise specified.
This kit uses a variety of hardware. Before starting as-
sembly, separate all the hardware by using an egg carton,
muffin pan, or small cups. #4, #6, #10 and 1/4" machine
screws with binder heads (flat tops with rounded sides) are
used in various lengths. Much of the hardware used is #4
binder head in a 5/16" length. There are also #6 oval head
screws with tapered sides, which are used only when attaching the XLR connector to the chassis.
TAKE THE TIME TO BE NEAT AND ACCURATE,
and your amplifier will operate properly at first, and for
many years.
1( ) Select the "U" shaped bottom plate with slanted
sides, the four rubber feet, and four of the 1/4" diameter bolts (the largest hardware). Insert a bolt
through each foot, and then mount a foot at each corner of the bottom plate on the outside (sides turned
away from you). No other hardware is required; the
bottom plate is supplied with threaded nuts for these
bolts. Set the assembly aside.
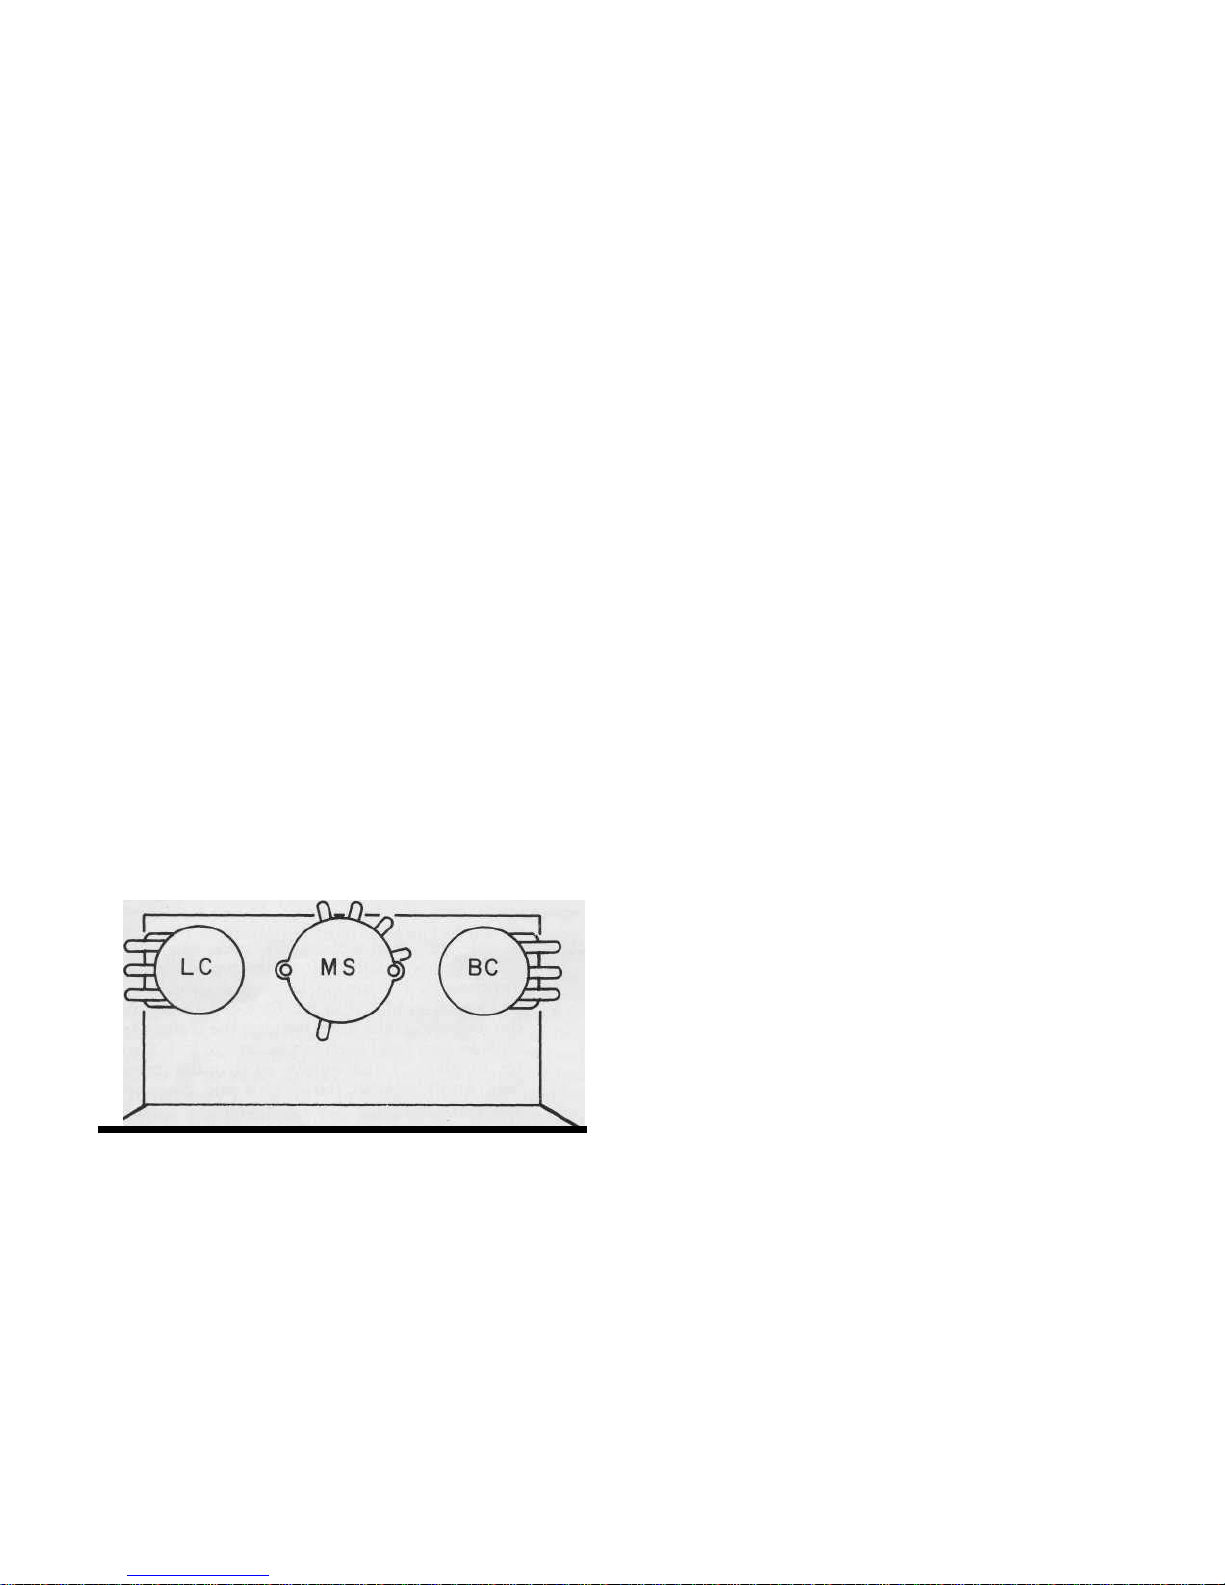
Select the black "L" shaped control bracket. Note that
the bottom edge of the inside surface turns toward you. The
three parts attached to this bracket will be mounted from
the inside.
2( ) Select the 10,000 ohm control, part #145103, a 3/8"
nut, and a 3/8" thin lockwasher. Do not confuse this
with the 100,000 ohm control, part #144104, which
will be called for in the next step. Place a lockwasher
on the threaded shaft, install the control in location
BC with the lugs positioned as shown, and tighten
the nut.
3( ) Select the 100,000 ohm control, part #144104, a 3/8"
nut, and a 3/8" thin lockwasher. Place the lockwasher
on the shaft, install the control in location LC, position the lugs as shown, and tighten the nut.
4( ) Select the meter switch, a 3/8" nut, and the last 3/8"
lockwasher. Place the lockwasher on the shaft, install
the switch in location MS, position the lugs as shown,
and tighten the nut.
Set this assembly aside, and place the front panel in front
of you. The front surface is printed. The parts attached to
this panel will be mounted from the front.
5( ) Select the square fuse holder. Notice that one face is
marked "top". With this surface facing the top edge
of the front panel, press the fuse holder into the right
bottom square cutout. No hardware is used.
6( ) Select the power switch. Observe that the dark red
jewel is positioned toward the bottom edge of the
front panel. Press it into the left bottom rectangular
cutout. No hardware is used.
7( ) Select the meter, the two small lamps, the two lamp
sockets, the two pieces of insulating tubing, and six
#4 KEP nuts (the smallest hardware). Install the
meter upright from the outside. Carefully secure the
meter with four KEP nuts. Avoid excessive force,
since the meter is plastic. Snap each lamp into a
lamp socket to where the socket engages the lamp detent, and then slip a piece of insulating tubing onto
the lamp socket to cover the metal portion of the
lamp and socket. Install a lamp socket on each of the
lower meter mounting studs. Fasten each socket
firmly with a second KEP nut.
Set this assembly aside, and select the chassis. The outside back edge is printed. Some of the parts will be mounted
from the outside, and others from the inside.
8( ) Select the 4-screw output barrier strip, and four each
5
/8" #6 screws and #6 KEP nuts (next to the smallest
hardware). This output strip mounts outside the
chassis at the right back, so that its four lugs protrude
through the slot. Insert the screws from the outside,
and fasten with the KEP nuts on the inside. Make
sure that the lugs do not touch any chassis metal.
9( ) Select the output jack, and the last 3/8" nut. Install
the jack from the inside in the round hole adjacent to
the output strip, and fasten with the nut on the outside. Position the lugs and the flattened corner of the
jack, as shown in the Pictorial Diagram. Avoid excessive force on the plastic threads.
7
 Loading...