

Page 1

SAFETY INSTRUCTIONS
Carefully Read all instructions before operating or servicing any Dynabrade
®
Abrasive Power Tool.
Products offered by Dynabrade are not to be modified, converted or otherwise alerted from the original design.
Tool Intent: RedTred
TM
Eraser Disc Tool uses eraser discs for erasing and removing tapes, adhesives, vinyl graphics, pin striping and decals without harming
the substrate.
Do Not Use Tool For Anything Other Than Its Intended Applications.
This power tool is not intended for use in potentially explosive atmospheres and is not insulated against contact with electrical power.
Training: Proper care, maintenance, and storage of your tool will maximize its performance.
• Employer's Responsibility – Provide RedTred
TM
Eraser Disc Tool operators with safety instructions and training for safe use of tools and accessories.
Accessory Selection:
• ONLY USE Dynabrade Eraser Discs (P/N 92297).
• Accessory speed rating MUST be approved for AT LEAST the tool Revolutions Per Minute (RPM) rating.
Parts Page Reorder No. APD10•02R
Effective March, 2010
Supersedes APD10•02
RED-TRED®Eraser Disc Tool
Standard Duty
Air Tool Manual – Safety, Operation and Maintenance
WARNING
Read and understand this tool manual before operating your air tool. Follow all safety rules for the protection of operating personnel
as well as adjacent areas. Always operate, inspect and maintain this tool in accordance with the American National Standards Institute
(ANSI) Safety Code for Portable Air Tools – B186.1. For additional safety information, refer to Safety Requirements for the Use, Care
and Protection of Abrasive Wheels – ANSI B7.1, Code of Federal Regulation – CFR 29 Part 1910, European Committee for Standards
(EN) Hand Held Non-Electric Power Tools – Safety Requirements and applicable State and Local Regulations.
SAVE THIS DOCUMENT, EDUCATE ALL PERSONNEL
WARNING
Some dust created by sanding, grinding, drilling, and other construction activities contain chemicals known to cause cancer, birth defects
or other reproductive harm. Some examples of these chemicals are:
• Lead from lead-based paints
• Crystalline silica from bricks and cement and other masonry products
• Arsenic and chromium from chemically treated lumber
Your risk from these exposures varies, depending on how often you do this type of work. To reduce your exposure to these chemicals: work in a well
ventilated area, and work with approved safety equipment, such as those dust masks that are specially designed to filter out microscopic particles.
AUTOMOTIVE
Model:
18067 – 2,400 RPM
WARNING
Read and understand tool manual before
work starts to reduce risk of injury to
operator, visitors, and tool.
WARNING
Eye protection must be worn
at all times, eye protection to
conform to ANSI Z87.1.
WARNING
Respiratory protection to be used when
exposed to contaminants that exceed the
applicable threshold limit values required by law.
WARNING
Air line hazard, pressurized supply lines and flexible
hoses can cause serious injury. Do not use damaged,
frayed or deteriorated air hoses and fittings.
SAFETY LEGEND
WARNING
Ear protection to be worn when exposure to sound,
exceeds the limits of applicable Federal, State or
local statues, ordinances and/or regulations.
WARNING
Practice safety requirements. Work alert,
have proper attire, and do not operate tools under
the influence of alcohol or drugs.
(continued on next page)
Page 2
SAFETY INSTRUCTIONS
(Continued)
• DO NOT USE cut-off wheels or grinding wheels on this tool.
• Before mounting an accessory, visually inspect for defects. Do not use defective accessories.
• Only use recommended fittings and air line sizes. Air supply hoses and air hose assemblies must have a minimum working pressure rating of 150 PSIG
(10 bars) or 150 percent of the maximum pressure produced in the system, whichever is higher.
OPERATING INSTRUCTIONS
Warning: Always wear eye protection. Operator of tool is responsible for following: accepted eye, face, respiratory, hearing and body protection.
Caution: Hand, wrist and arm injury may result from repetitive work, motion and overexposure to vibration. A vibration level of 1.34 (m/s^2) was established.
Warning: Be sure that any loose clothing, hair and all jewelry is properly restrained.
• Keep hand and clothing away from moving end of the air tool which has a potential hazard of cutting.
• Install air fitting into inlet bushing of tool. Important: Secure inlet bushing of tool with a wrench before attempting to install the air fitting to avoid damaging
valve body housing.
Warning: Check free speed of RedTred
TM
Eraser Disc Tool regularly using a tachometer without an accessory attached. Test with 90 PSIG at the inlet while
tool is running. Always check tool speed after any maintenance or repair. If tool is operating at a higher RPM (speed) than marked on the housing, or
operating improperly, the tool must be corrected before use.
Warning: Tool must never exceed accessory RPM rating. Check accessory manufacturer for details on maximum operating speed or special
mounting instructions.
• Disconnect tool from air supply when changing recommended accessories.
• Completely press all six raised tabs on the eraser disc into the erase hub. Once in place fasten the flange nut using provided 96507 Pin W
rench to secure
the hub and eraser to the spindle.
•
Connect air tool to power source. Be careful NOT to depress throttle lever in the process.
Do not expose air tool to inlet pressure above 90 PSIG or (6.2 Bars).
Caution: After installing the accessory, before testing or use and/or after reassembling tool, the tool must be started at a reduced speed to check for good
balance. Gradually increase tool speed. DO NOT USE if tool vibration is excessive. Correct cause, and retest to insure safe operation.
Warning: Use only appropriately sized eraser properly secured and centered to the hub provided with the RedTred
TM
Eraser Disc Tool.
• Make sure that work area is uncluttered, and visitors are at a safe range from the tools and debris.
Warning: Potentially explosive atmospheres can be caused by dust and fumes resulting from erasing. Always use dust extraction or suppression systems
which are suitable for the material being processed.
• Use only Dynabrade lubricants. See Maintenance Instructions.
• Use a vise or clamping device to hold work piece firmly in place.
• Work may generate hazardous dust.
• Always be aware of bystanders in work areas.
• DO NOT apply excessive force on tool or apply “rough” treatment to it.
• Always work with a firm footing, posture and proper lighting.
• Release the throttle lever in case of an interruption of the energy supply.
• Ensure that sparks and debris resulting from work do not create a hazard such as a fire or explosion.
• Tool is rear exhaust. Exhaust air may contain lubricants, grease, and other materials flushed through the tool.
Report to your supervisor any condition of the tool, accessories, or operation you consider unsafe.
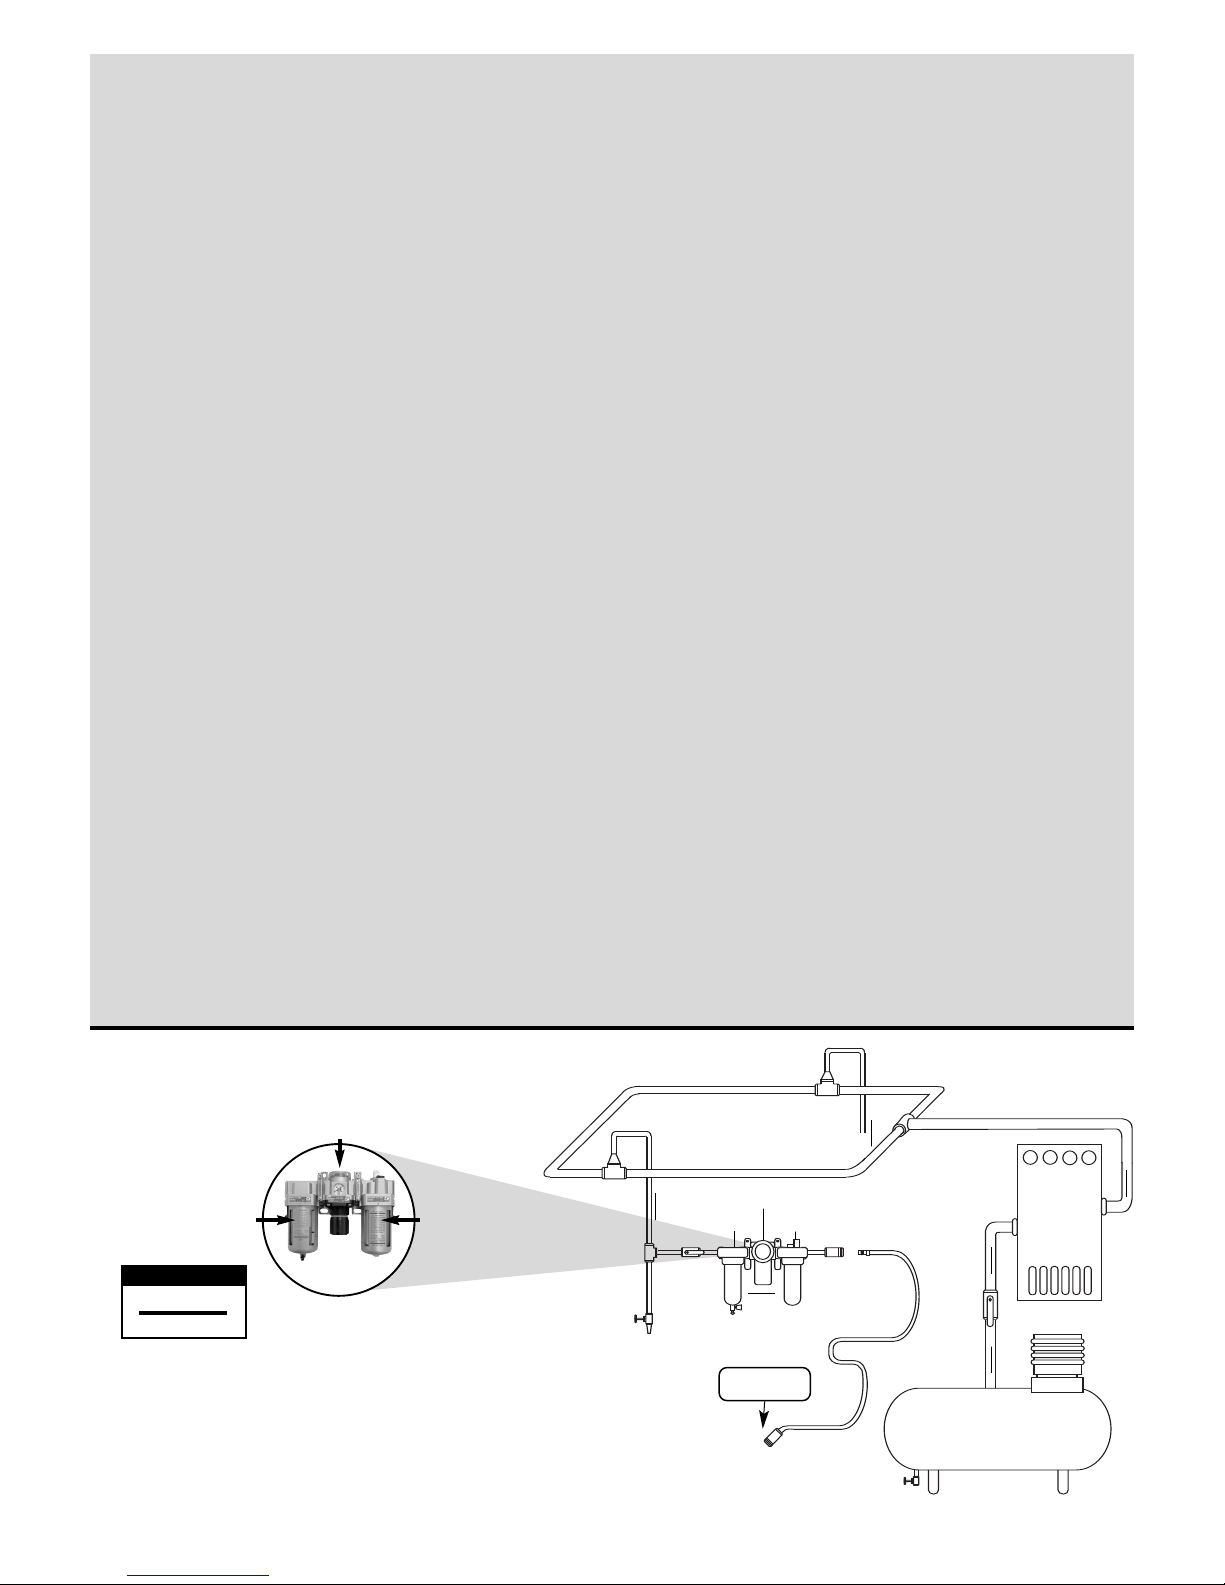
2
Filter
Regulator
Lubricator
90 PSIG
(6.2 Bar)
To Tool Station
Ball
Valve
Ball
Valve
Filter
Regulator
Lubricator
Air Flow
Drain
Valve
Drain
Valve
Air Tool
Air Compressor
and Receiver
Drain Valve
Air Hose
90 PSIG MAX
(6.2 Bar)
Air Flow
Refrigerated
Air Dryer
• Dynabrade Air Power Tools are designed to operate at 90 PSIG
(6.2 Bar) maximum air pressure at the tool inlet, when the tool is
running. Use recommended regulator to control air pressure.
• Ideally the air supply should be free from moisture. To facilitate
removing moisture from air supply, the installation of a refrigerated
air dryer after the compressor and the use of drain valves at each
tool station is recommended.
➤
➤
➤
➤
➤
➤
AIR SYSTEM
Closed Loop Pipe System, Sloped in Direction of Air Flow
1 DROP/MIN.
20 SCFM
LUBRICATOR SETTING
Page 3

3
1 04127 Flange Nut
2 92297 Eraser Disc
3 92298 Eraser Disc Hub
4 55066 Spindle Adapter
5 18748 Spindle
6 18443 Key
7 18441 Clamp Nut
8 18428 Ball Bearing (4)
9 18267 Bevel Gear
10 18421 Bearing (2)
11 18747 Angle Head Housing
12
* 18447 Grease Fitting
13 95239 Screw (2)
14 55067 handle Mount
15 95042 Lock Washer
16 53163 Handle Housing
17 18268 Pinion
18 18745 Socket
19 18746 Transmission Shaft
20 18744 Coupling
21 18741 Bearing (2)
22 18742 Gear Carrier
23 18743 Pin (2)
24 18738 Needle Bearing (2)
25 18737 Pinion Gear (2)
26 18736 Annular Gear
27 18740 Housing Lock Ring
28 18438 Rubber Gasket
29 18427 Front End Plate
30 18436 Pin
31 18739 Rotor
32 18426 Rotor Blade (4/Pkg.)
33 18424 Cylinder
34 18422 Rear End Plate
35 18423 Cylinder Pin
36 18420 Valve Screw
37 18419 O-Ring
38 18418 O-Ring
39 18417 Regulator
40 18416 Valve Spring
41 18415 O-Ring
42 18413 Valve Stem
43 18414 O-Ring
44 18412 Valve Bushing
45 18400 Housing
46 18410 Safety Lever Spring
47 18411 Stop Rod
48 18409 Spring Pin
49 18407 Lever Pin
50 18408 Throttle Lever
51 18401 Silencer
52 18402 Washer
53 18403 O-Ring
54 18404 Deflector
55 18405 Air Inlet
O
1
A
2
1
2
3
4
5
7
8
9
10
6
11
13
14
15
16
17
8
18
19
8
20
21
21
26
24
23
22
10
34
35
33
31
30
29
28
8
27
55
54
53
5251
50
49
48
47
46
44
45
43
42
41
39
40
38
37
36
Index Key
No. Part # Description
Machine Specifications
Additional Specifications: Air Inlet Thread 1/4" NPT • Hose I.D. 1/4" (6 mm)
Sound Level is the pressure measurement according to the method outlined in ISO regulation ISO-15744
Model Motor Disc Diameter Sound Max. Air Flow Air Pressure Weight Length Height Spindle
Number SPM Inch (mm) Level SCFM (LPM) PSIG (Bars) Pound (kg) Inch (mm) Inch (mm) Thread
18067 2,400 4-1/8 (105) 82 dB(A) 28 (793) 90 (6.2) 3 (1.4) 11-7/8 (301) 2-3/4 (71) 5/8-11"
*Lubricate the bevel gears through the grease
fitting located in the 18747 Angle Head Assembly.
Apply 2-3 plunges for every 40 hours of use,
to achieve maximum gear life.
(Order 95542 Grease and 95541 Gun)
RED-TRED®Eraser Disc Tool
Complete Assembly
O
T
G
A
Oil: O
1
= Air Lube
Adhesive: A
2
= Loctite #271
A
10
= Loctite #243
Torque: N•m x 8.85 = In. - lbs.
Grease: G
1
= Lubriplate 630AA
KEY
A
2
A
10
A
10
G
1
G
1
O
1
23 N•m
T
23 N•m
T
17 N•m
T
23 N•m
T
17 N•m
T
23 N•m
T
25
12
*
32
95281 – 19 mm Open-End Wrench
95049 – 3/16" Hex Key Wrench
96507 – Pin Wrench
LEFT HAND THREAD
A
10
Always follow adhesive manufacturers
cleaning and priming recommendations.
92295 Eraser Disc Hub Assembly
Page 4

Our obligation is contingent upon proper use of “Autobrade Red” tools in accordance with factory recommendations, instructions and practices.
The warranty shall not apply in these cases:
1. Normally wearable parts such as bearings, rotor blades, etc. 5. Tools requiring normal tune-up or cleaning.
2. Consumables such as erasing pads, etc. 6. Tools being used after they are badly worn such as using ratchet with worn yoke.
3. Misuse, neglect in maintaining tool or tool modification. 7. Ratchets, anvils damaged by excessive hand torquing.
4. Lack of lubrication or evidence of rust, dirt or corrosion. 8. Use in production-type applications.
Maintenance Instructions
Important: To keep tool safe a Preventative Maintenance Program is recommended whenever portable power tools are used.
•
Use only genuine Dynabrade replacement parts to insure quality. To order replacement parts, specify Model#, Serial# and SPM of your air tool.
•
It is strongly recommended that all Dynabrade air tools be used with a Filter-Regulator-Lubricator to minimize the possibility of misuse due to unclean
air, wet air or insufficient lubrication. Dynabrade recommends the following: 10681 Air Filter-Regulator-Lubricator (FRL) – Provides accurate air pressure
regulation and two stage filtration of water contaminates.
•
Dynabrade recommends one drop of air lube per minute for each 20 SCFM (example: if the tool specification states 40 SCFM, set the drip rate on the
filter-lubricator to 2 drops per minute). Dynabrade Air Lube (P/N 95842: 1 pt 473 ml) is recommended.
Routine Preventative Maintenance: Check free speed of RedTred
TM
Eraser Disc Tool regularly using a tachometer without an accessory attached. Test with
90 PSIG at the inlet while tool is running. Always check tool speed after any maintenance or repair. If tool is operating at a higher RPM (speed) than marked
on the housing, or operating improperly, the tool must be corrected before use.
•
Lubricate the bevel gears through the grease fitting located in the 18747 Angle Head Assembly. Apply 2-3 plunges for every 40 hours of use, to
achieve maximum gear life. (Order 95542 Grease and 95541 Gun)
•
Mineral spirits are recommended when cleaning the tool and parts. Do not clean tool or parts with any solvents or oils containing acids, esters, ketones,
chlorinated hydrocarbons or nitro carbons.
•
DO NOT clean or maintain tools with chemicals that have a low flash point (example: WD-40
®
).
•
Air tool stampings must be kept legible at all times, if not, reorder and replace. User is responsible for maintaining specification information.
i.e.: Model #, S/N, and SPM.
•
Blow air supply hose out prior to initial use.
•
Visually inspect air hoses and fittings for frays, visible damage and signs of deterioration. Replace damaged or worn components.
•
Refer to Dynabrade's Warning/Safety Operating Instructions Tag (Reorder No. 95903) for safety information.
After maintenance is performed on tool, add a few drops of Dynabrade Air Lube (P/N 95842) to the air line and start the tool a few times to lubricate air motor.
Check for excessive tool vibration.
Handling and Storage:
•
Use of tool rests, hangers and/or balancers is recommended.
•
Protect tool inlet from debris.
•
DO NOT carry tool by air hose or throttle lever.
•
Protect accessories from exposure to water, high humidity, freezing temperature and extreme temperature changes.
•
Store accessories in protective racks or compartments to prevent damage.
•
DO NOT rest tool on eraser disc or eraser hub.
Autobrade Red Tool Warranty
Following the reasonable assumption that any inherent defect which might prevail in a product will become apparent to the user within 6 months
from the of date purchase, “Autobrade Red” tools are warranted against defects in workmanship and materials under normal use and service.
We shall, at our option, repair or replace at our factory, any “Autobrade Red” tool which shall, within 6 months
after delivery to the original purchaser, indicate upon our examination to have been defective.
Page 5

Index Key
No. Part # Description
1 18428 Bearing (4)
2 18421 Bearing (2)
3 18741 Bearing (2)
4 18738 Needle Bearing (2)
5 18438 Rubber Gasket
6 18426 Rotor Blade Set (4/pkg.)
7 18419 O-Ring
8 18418 O-Ring
9 18416 Valve Spring
10 18415 O-Ring
11 18413 Valve Stem
12 18414 O-Ring
13 18401 Silencer
Air Motor and Machine Parts.
Refer to appropriate parts page for additional parts identification. Parts included in kit are identified by part number.
For use with Right Angle Extension Models.
Parts Page Reorder No. APD00•30
Effective December, 2000
96673 Tune-Up Kit
AUTOMOTIVE
2
1
5
1
6
2
7
8
9
11
10
12
13
1
3
4
3
1
®
DYNABRADE
Dynabrade puts everything within reach.
Discover other air tools & compressors on our website.
 Loading...