

dye M3s Owner's Manual
2 01 8 OWNER ’ S M A N UA L
Fuse Legacy
2 Piece barrel kit
(1) 14” ULs Barrel tip
(1) .684” UL Barrel back
(1) .688” UL Barrel back
• Allen tool set
• 1/4oz slick lube
• Parts kit
• Barrel sock
• Customer support passport
• Software upgrade cable
• Charging cable
• Digital copy of owner’s manual
• Warranty card
INCLUDED WITH YOUR M3S MARKER
WWW.DYEPAINTBALL.COM
THE CHOICE OF CHAMPIONS
1
WWW.DYEPAINTBALL.COM
• The M3s marker is not a toy. Misuse may cause serious injury or death.
• Please read, understand and follow the directions in the M3s owner’s manual.
• Eye protection that is designed specifically for paintball and meets ASTM/CE
standards must be worn at all times by user and persons within range.
• Recommend 18 years or older to purchase. Persons under 18 must have adult
supervision.
• Always treat the M3s marker as if it were loaded and able to fire.
• Only use compressed air or nitrogen gas in the M3s marker. DO NOT USE CO
2
.
• Do not exceed 850 psi input pressure.
• Ensure all screws and components on M3s are tightened and secured before
gassing up.
• Always chronograph the M3s marker before playing paintball.
• Never shoot the M3s marker at velocities in excess of 300 feet per second, or at
velocities greater than local or national laws allow.
• Never look into the barrel or breech area of the M3s when the marker is switched
on and able to fire.
• Always fit a barrel-blocking device to your M3s when not in use on the field of play.
• The owner’s manual should always accompany the product for reference or in
the event of resale and new ownership.
• Do not point the M3s marker at anything that you do not intend to shoot.
• Do not shoot at people, animals, houses, cars or anything not related to the
sport of paintball.
• Do not fire the M3s without the FL-21™ bolt locked in place.
• If you read these instructions and do not fully understand them or are unsure of
your ability to make necessary adjustments properly, call DYE or your local pro
shop for help.
WARNING
IMPORTANT SAFETY INSTRUCTIONS AND GUIDELINES
TABLE OF CONTENTS
IMPORTANT SAFETY INSTRUCTIONS AND GUIDELINES .......... PAGE 01
QUICK REFERENCE ......................................... PAGE 02
PRISM INTERFACE .......................................... PAGE 03
METHOD OS (MOS) ......................................... PAGE 04
TRAINING MODES .......................................... PAGE 10
SOFTWARE & BOOT SCREEN UPGRADE........................ PAGE 11
POWER SUPPLY ............................................ PAGE 13
EDGE1 TRIGGER ADJUSTMENT............................... PAGE 14
STICKY GRIP ............................................... PAGE 15
FL-21™ BOLT............................................... PAGE 16
HYPER6S PRO™ ............................................ PAGE 18
SHIFTPORT ASA ............................................ PAGE 20
EYE PIPE ANTI CHOP EYES/BALL DETENTS ..................... PAGE 22
TROUBLE SHOOTING GUIDE ................................. PAGE 23
M3S MENU TREE ........................................... PAGE 25
EXPLODED VIEW ........................................... PAGE 26
WARRANTY INFORMATION .................................. PAGE 27
DSR OWNER’S MANUAL
2
WWW.DYEPAINTBALL.COM
QUICK REFERENCE
AIR SUPPLY
The M3s should be operated using air/nitrogen gas only. This
air needs to be supplied at a regulated pressure of no more
than 850 psi.
GASSING UP YOUR M3S
Screw in your air system to the Airport and rotate the side
lever counter clockwise until the internal stop is reached.
TURNING ON YOUR M3s
Power up M3s marker.
Note: Be sure to fully charge your M3s marker before first use.
To power on your M3s marker depress and hold the joystick located on the back strap
of the grip frame, for 2 seconds. The LED will illuminate and the boot up screen will be
displayed on the OLED.
The eye system is automatically powered on during boot up.
To turn the eyes on or off, press and hold the joystick downward for 2 seconds.
Blue: Boot sequence
Red: Breech is clear, no ball (eyes on)
Green: Ball in breech, ready to fire (eyes on)
Blinking Red: Eyes are off
Blinking Green: Eye failure
HOPPER
To get the best performance out of your M3s, it is recommended that you use a motorized
loader. Preferably, the R-2™ Loader.
BATTERY CHARGING INSTRUCTIONS
The M3s marker uses a rechargeable battery.
To access the M3s’s charging port open the dust cover labeled USB on the upper left side
of the grip. Lift and rotate the cover out of the way.
In order charge your M3s marker, simply use any standard micro USB cable and power
supply. A micro USB cable is provided with the marker.
Plug the full size USB end of the cable into any standard power supply adapter (car
charger, wall charger, computer, etc.) See page 12 in manual for complete battery detail.
LED LIGHT COLOR INDEX-CHARGING
Blinking Blue: Charging up to 95%
Blinking Green: Charging up to 95% - 99%
Solid Green: 100% charged
BASIC VELOCITY ADJUSTMENT
The velocity is CONTROLLED through the Hyper6s Pro™ regulator. The Hyper6s Pro™ is
preset from the factory at approximately 115 psi. This pressure setting should have the
marker shooting at about 285fps. Your paint-to-barrel fit will also have a noticeable effect
on your velocity.
You can adjust your velocity through the
Hyper6s Pro
™
regulator, located in the fore
grip. To adjust the velocity, insert a 3/16”
Allen wrench into the bottom of the fore
grip.
Turning the Allen wrench clockwise, or in,
will lower the output pressure, decreasing
the velocity. Turning the adjustment screw
counterclockwise, or out, will raise the
output pressure, increasing the velocity.
• A LOW BATTERY WILL NOT BE ABLE TO POWER BOTH THE ACE EYE AND
THE TRIGGER SWITCH, CAUSING ACE EYE FAILURE.
• IF THE BATTERY IS LOW, IT MAY NOT BE ABLE TO POWER THE SOLENOID
CORRECTLY. THIS WILL AFFECT THE M3S’S VELOCITY, CAUSING IT TO
BECOME INCONSISTENT AND/OR LOW.

3
WWW.DYEPAINTBALL.COM
THE PRISM INTERFACE AND METHOD OS AIR
The massive 1 inch, full color, high resolution OLED screen, combined with the 5-way
Joystick provides simple control of the M3s. Intuitive navigation gives you access to DYE’s
Method Operating System. Prism is an intuitive interface, for an advanced operating
system. The joystick control index will help you become quickly familiarized with
interfacing with the Method Operating System.
Dye’s new MOS gives the operator unparalleled access to precision tuning, vital
performance feedback, and service reports. Not only does the new operating system take
the M3s’s performance to the next level, it also actively tracks important sub systems to
make sure our marker is kept running at its best. Customize nearly every aspect of the
M3s to your exact playing specifications. With 5 different customizable player profiles
you’ll be ready for any environment, and rule book.
PRISM INTERFACE
V3 .01 .1
POWER ON
Press and hold the center of the joystick for 2 seconds. The M3s
will boot up, during the boot up process the boot screen will be
displayed. After boot up, the board will enter the Play screen. The
gun is now ready to be fired.
POWER OFF
Press and hold the center of the joystick for 2 seconds. The board
will automatically shut down if the marker is not used for a set
period of time. You can adjust the auto shut off time. See Auto
Shut Off under Data Settings (page 7).
LED LIGHT COLOR INDEX
Blue: Boot sequence
Red: Breech is clear, no ball detected inside the M3s (eye is on)
Green: Ball in breech, ready to fire (eye is on)
Blinking Red: Eye is turned off
Blinking Green: Eye failure, eye is blocked or dirty (see M3s Eye,
page 22).
To turn the eyes off, press and hold the joystick down for 2 seconds
until the light begins flashing red.
NOTE: You are able to force the M3s to fire with eyes on
and no ball in the breech. To do so, depress and hold the
trigger for 1 second.
BOOT UP SCREEN
The boot screen will be displayed for 4 seconds. You can select
between 4 pre-set screens or you can download your own personal
boot screen. See the Select Boot Screen section under Data
settings (see page 6).
SOFTWARE VERSION
The software version is displayed at the bottom of the standard
boot screens. The software version will not be displayed on custom
boot screens.
5-WAY
JOYSTICK
CONTROL
INDEX
1
1
2
2
3
3
4
4
5
5
ENTER PROFILE
SELECTION
DISPLAY
(HOLD FOR 2 SEC)
GAME
TIMER
START/STOP
(TAP)
SYSTEMS
CHECK
(TAP)
EYES ON/OFF
(HOLD FOR 2 SEC)
POWER
ON/OFF
(HOLD FOR 2 SEC)
GAME
TIMER
RESET
(HOLD FOR
2 SEC)
SELECT
PROFILE
(TAP)
ENTER
SETTING
ADJUSTMENT
MENU
(HOLD FOR 2 SEC)
SCROLL
UP
(TAP)
VALUE
UP
(TAP)
EXIT TO
PROFILE
SELECT
(HOLD FOR 2 SEC)
NO
FUNCTION
SCROLL DOWN
(TAP)
NO
FUNCTION
RETURN
TO PLAY
MODE
(HOLD FOR 2 SEC)
SHOT
TRACKER
RESET
(HOLD FOR
2 SEC)
PLAY MODE PROFILE SELECTION
DISPLAY
SETTING ADJUSTMENT
MENUS
SCROLL RIGHT
THROUGH MENU
(TAP)
VALUE DOWN
(TAP)
SCROLL LEFT
THROUGH MENU
(TAP)
SELECT
SETTING
TO ADJUST
(TAP)
SAVE
VALUE
(TAP)
4
WWW.DYEPAINTBALL.COM
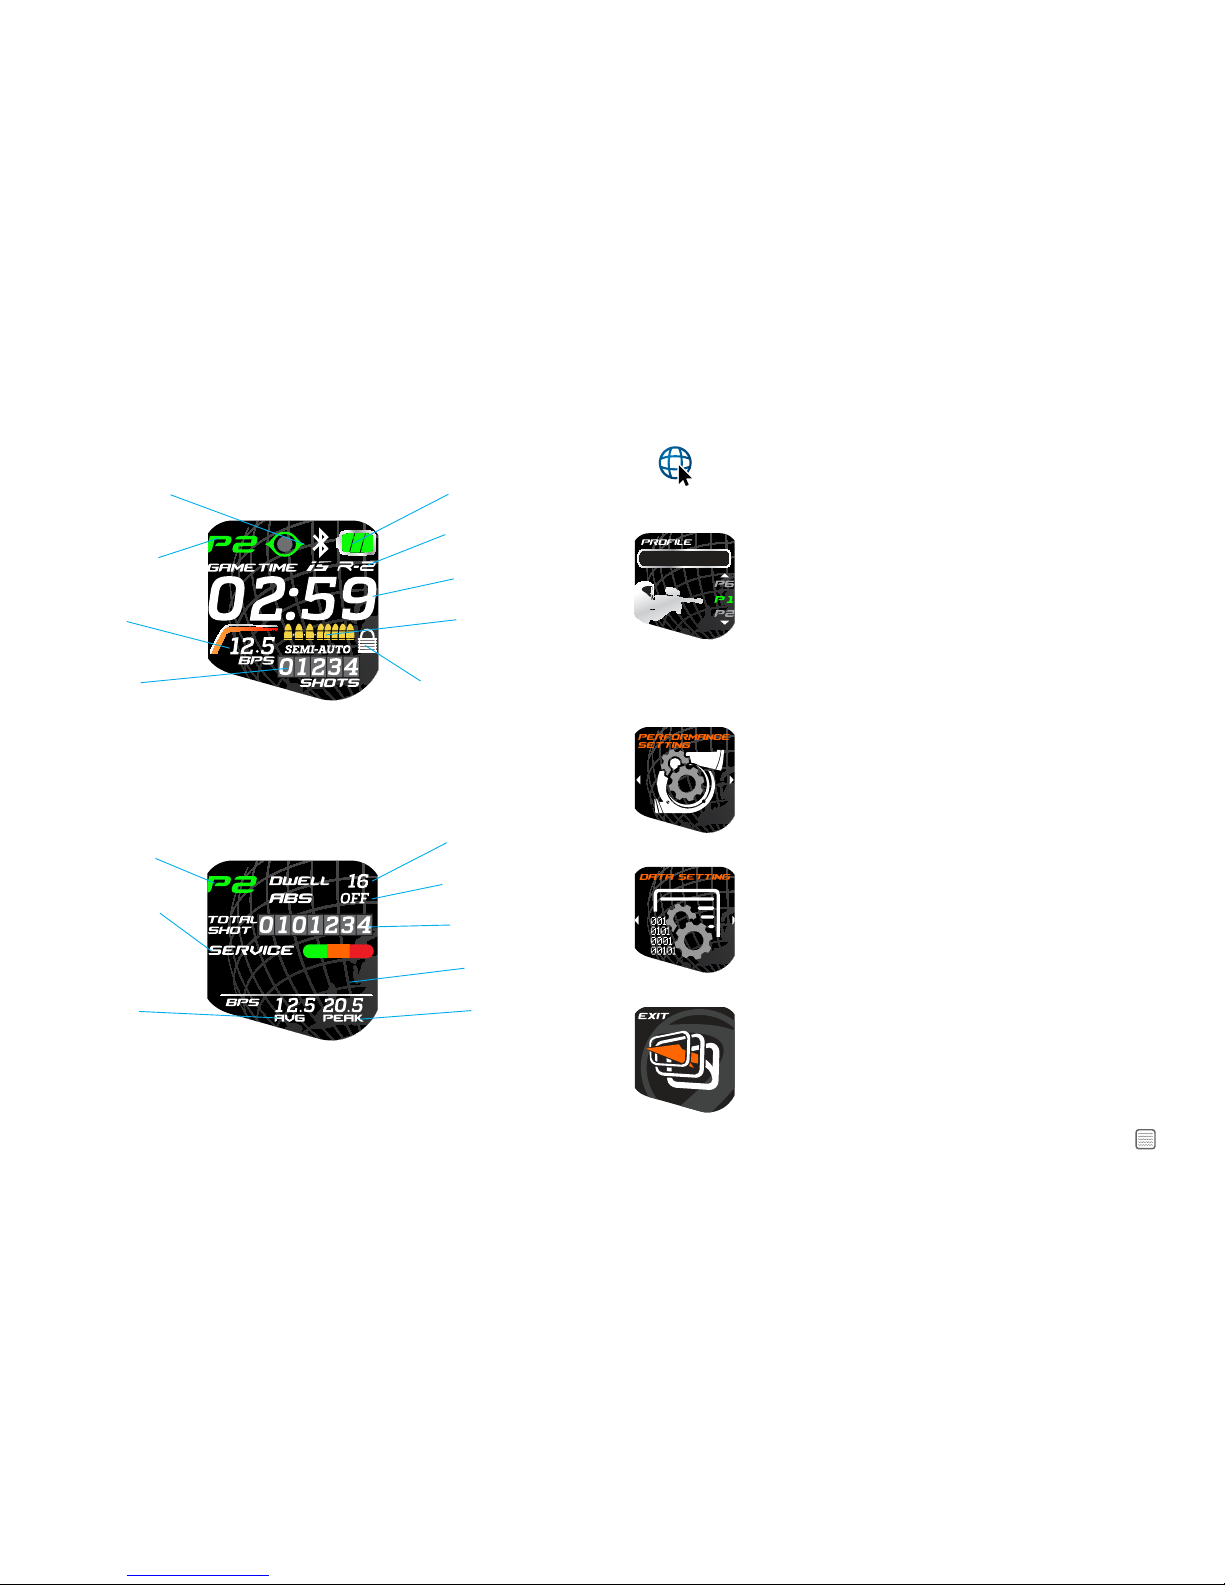
AVERAGE RATE
OF FIRE
DWELL SETTING
SERVICE SCHEDULE
SELECTED PROFILE
ANTI BOLT STICK
STATUS
PEAK RATE
OF FIRE
SHOT COUNTER
HYPER6S PRO
PRESSURE
BATTERY LEVEL
BT CONNECTION
STATUS
COUNT DOWN
GAME TIMER
FIRING MODE
TOURNAMENT LOCK
SELECTED PROFILE
SHOT COUNTER
RATE OF FIRE
EYE SYSTEM STATUS
PLAY SCREEN
You are able to select between 3 play screens depending on what information you wish
to have displayed. Option 1 is the default setting, for more play screen options see Select
Play Mode Screen under Data Settings (page 6).
SYSTEMS CHECK SCREEN
From the Play screen you can quickly access the Systems Check screen by pressing the
Joystick LEFT. The Systems Check screen gives you a quick overview of your gun’s primary
operating settings and service status. The screen will automatically return to the Play Screen
after 10 sec.
METHOD OPERATING SYSTEM (MOS)
PROFILE SELECTION
To enter into Profile Selection screen press and hold the joystick UP
for 2 seconds. This will take you to the profile selection screen. Scroll
up and down to hi-lite the profile you wish to select. Press the CENTER
of the joystick to select the highlited profile. The selected profile is
indicated in the upper right corner.
There are 5 fully adjustable profiles and 1 locked Factory default profile.
Once you have selected your desired profile press and hold UP on the
joystick to return to Play Mode screen, or press and hold the CENTER of
the joystick to enter into the Settings Adjustment menu.
SETTINGS ADJUSTMENT
Enter settings adjustment menu from the profile selection screen, after
selecting the profile you wish to adjust press and hold the CENTER of
the joystick. Scroll left and right to display either Performance or Data
settings. Press the center of the joystick to select the displayed category.
Settings are separated into two categories: Performance and Data.
PERFORMANCE SETTINGS will affect the M3s’s shooting
performance. These settings are not adjustable when the tournament
lock is on.
DATA SETTINGS are for reviewing collected data, display controls,
and system parameters.
Scroll left or right to display menu options.
Press the center of the joystick to select the displayed menu option.
Once selected the setting’s values can be adjusted using the joystick.
Once the desired value or setting has been entered Press the center
of the joystick to save the value, and continue scrolling through menu
options.
NOTE: To exit scroll till the “exit” screen appears and then
press the center of the Joystick. At any point you can
also press and hold the Joystick UP to exit to the Profile
selection screen.
P.S.I.
115

5
WWW.DYEPAINTBALL.COM
PERFORMANCE SETTINGS
DWELL
Values 12 - 20 (Factory Default 16)
Dwell is the amount of time, in milliseconds, that the solenoid is
activated for each shot. Setting the dwell too high will decrease max
rate of fire, setting the Dwell to low will not be sufficient to ensure the
optimal velocity.
16.0
GAME CLOCK
Set countdown game timer. (Default 2:30) To operate game timer in
play mode press the joystick right to start and stop the game timer,
Press and hold the joystick right for 2 seconds to reset.
TRIGGER SENSITIVITY
Values 1 - 20 (Factory Default 3)
Trigger sensitivity is the amount of time that the trigger must be
released before the next trigger pull is allowed.
1 2 . 5
RATE OF FIRE
Values 5.0 - 18.0 (Factory Default 12.5 bps)
The ROF setting is used to set the maximum rate of fire. ROF is
adjustable by 1/10th per second.
SEM I-AU TO
OUTLAW
FIRE MODE
(Factory Default Semi-Auto)
Choose between 5 different fire modes:
Semi-Auto: One trigger pull = one shot
Millennium/ NXL Ramp: Compliant with Millennium series rules
Burst: Compliant with PSP series rules
Full Auto: Continuous fire with trigger depressed after 3rd trigger pull
Outlaw: Customize PPS, pulls to start, burst of ramp. Select Outlaw mode
and follow prompts to customize fire mode
06
ABS
Anti Bolt Stick - Values off-10(Factory Default 6)
ABS is the amount of time, in Milliseconds, that the dwell is increased
for the first shot after a period time of no shots. This is to help prevent
bolt stick, and first shot drop off.
20
ABS WAIT TIME
Values 10-90 seconds in increments of 5 sec (Factory Default 20)
ABS wait time is the time, in seconds, that must expire between shots
before the ABS activated.
EYE DELAY
Values 01-20 (Factory Default 3)
Eye Delay is the amount of time, in milliseconds, that the eyes must
read a paintball in the breach before the M3s is allowed to fire. This
helps to prevent ball chop in the breach. It is recommended to increase
the Eye Delay for slower feeding loaders.
METHOD OS AIR (MOSair)
6
WWW.DYEPAINTBALL.COM
CAP : BPS
LOCKED
1 2 . 5
Burst
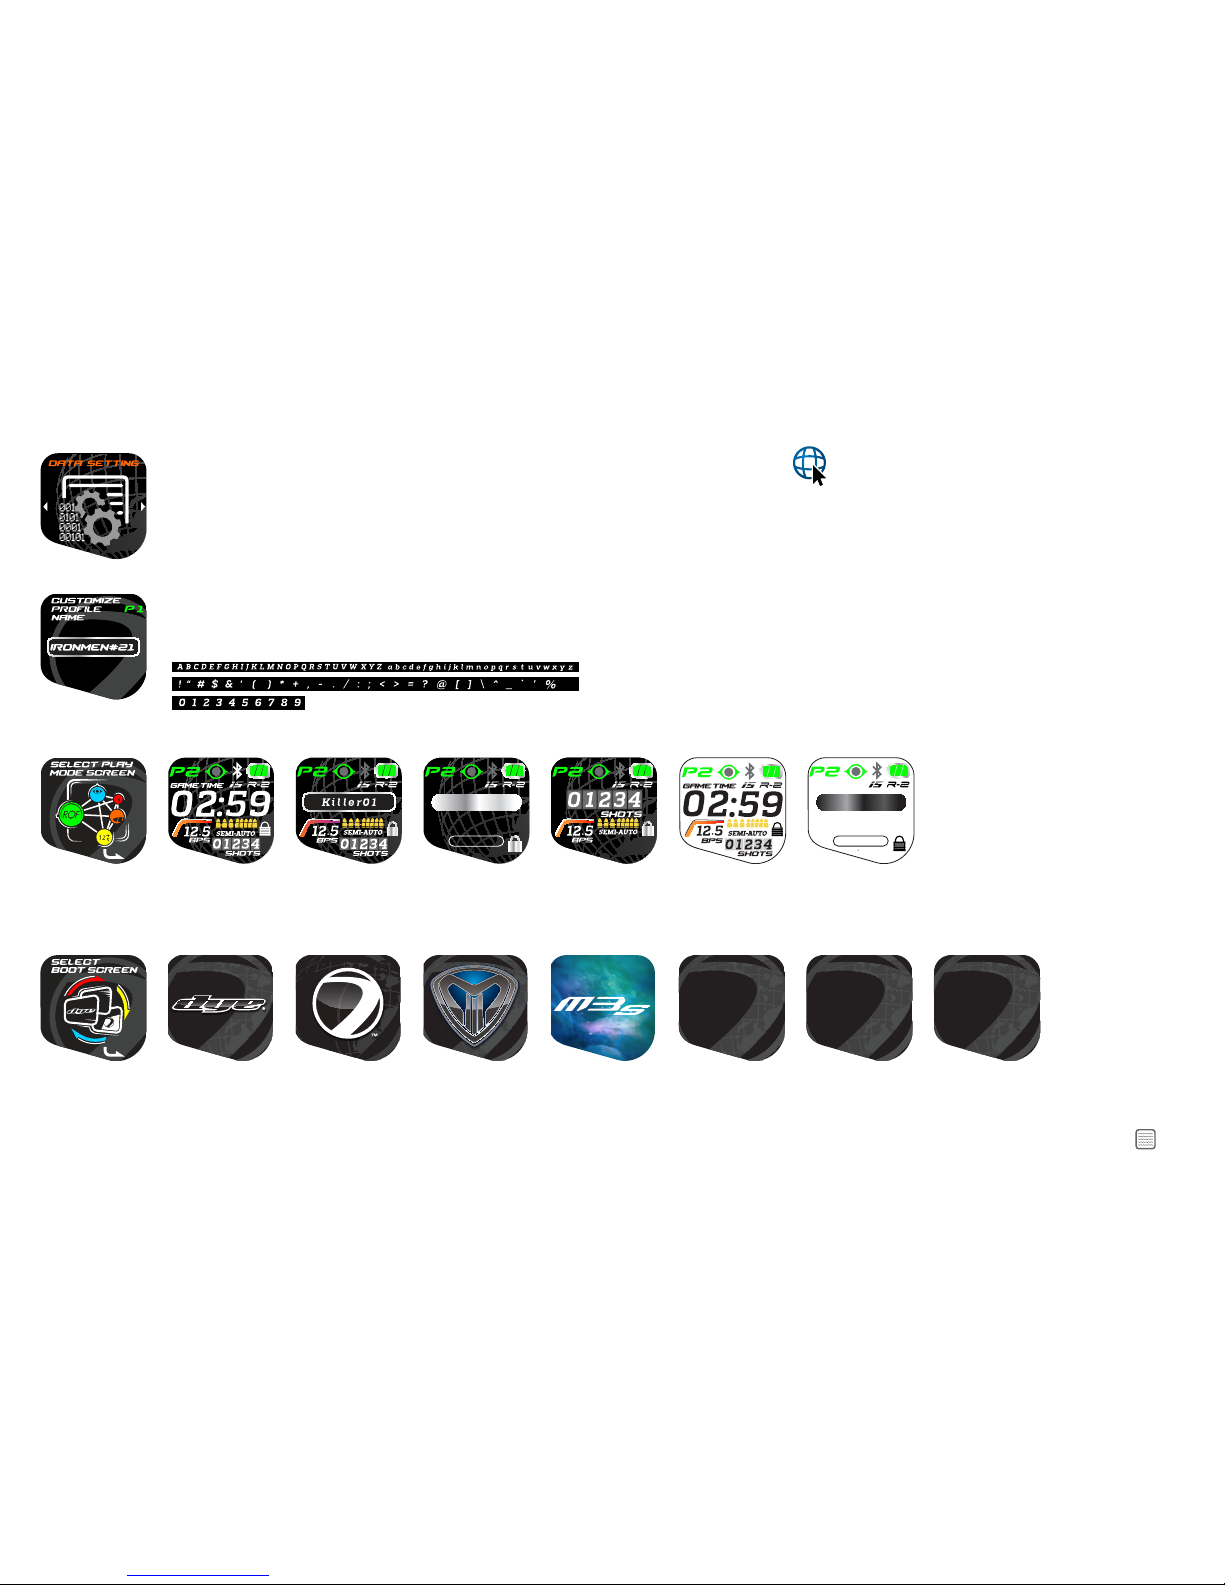
DATA SETTINGS
CUSTOMIZE PROFILE NAME
(Factory Defaults P1-P5, Factory)
Personalize each Profile with a distinct name to help identify them. Move the joystick up and down to scroll through letters
numbers and special typescript. Move the joystick left and right to change the next character.
LOCKED
CAP : BPS
12 . 5
Burst
LOCKED
CAP : BPS
12 . 5
Burst
V3 .01 .1
V3 .01 .1
V3 .01 .1
V3 .01 .1
Space saved for
Custom Boot Screen
See manual for
download instructions
M2cbs1
Space saved for
Custom Boot Screen
See manual for
download instructions
M2cbs2
Space saved for
Custom Boot Screen
See manual for
download instructions
M2cbs3
SELECT PLAY SCREEN
Values 1-6 (Factory Default 1)
Select the best play mode screen for your style of play.
SELECT BOOT SCREEN
Select your favorite Boot screen from the 4 pre-set options, or download your our own personalized boot screen. For directions on how to download
a custom boot screen see the programing section on page 12. All standard boot screens display software version.
METHOD OS AIR (MOSair)
7
WWW.DYEPAINTBALL.COM
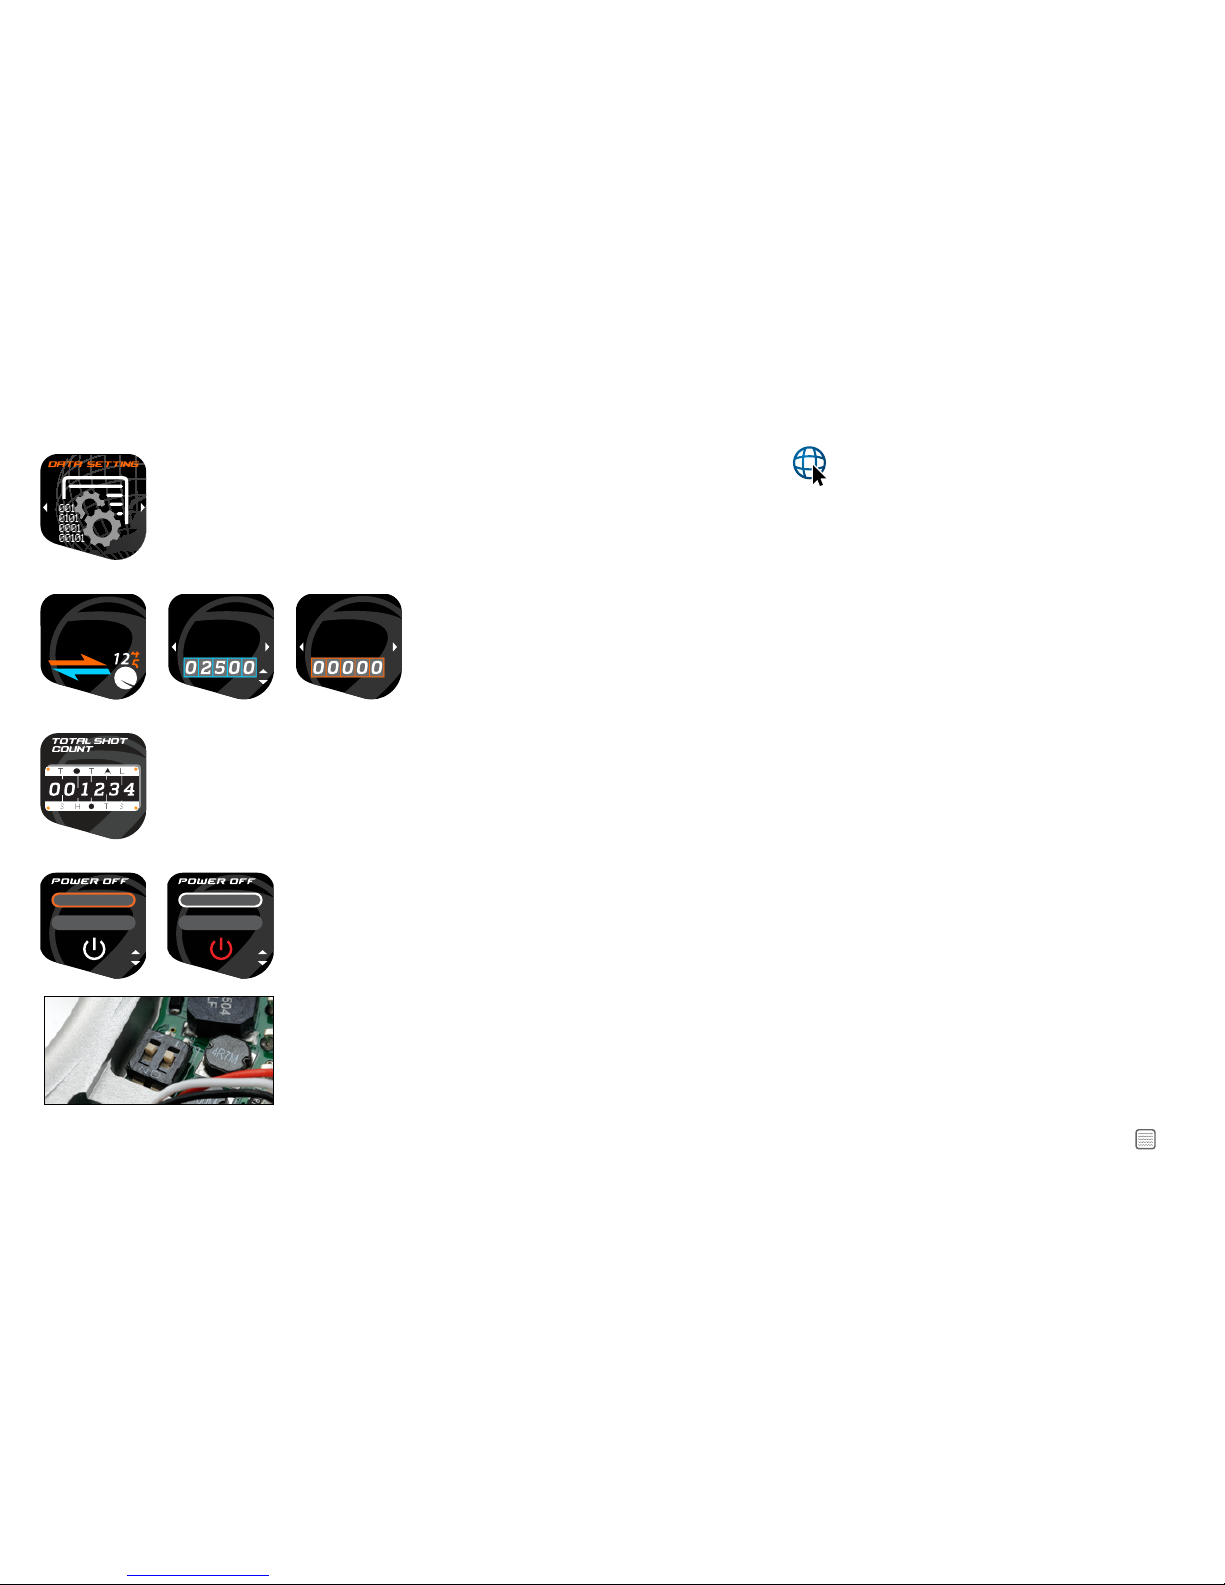
DATA SETTINGS
SHOT
TRACKER
MODE
SETTINGS
SHOT TRACKER
The shot tracker helps you monitor your paint consumption during a game or a day. Choose between
countdown and sum track. The Shot tracker can be set to zero from the Data settings menu, and reset from
the play mode screen. To reset from the Play mode screen press and hold the joystick left for 2 seconds.
When you select countdown track in the data settings menu you will be prompted to enter your how much
paint you will start with. Tap joystick up and down to adjust. When desired count is displayed tap center of
joystick to save. Once you exit to the play screen every shot will be tracked.
SHOT
TRACKER
MODE :
COUNTDOWN
SHOT
TRACKER
MODE :
SUM
TOTAL SHOT COUNTER
The total Shot Counter cannot be re-set, it is used to monitor systems and service schedules. The total Shot
Counter also indicates that the gun was tested at the factory prior to shipping. It is also a strong indicator of
how much use the M3s has seen in its life.
HOLD FOR 2 SEC
TAP TWICE
HOLD FOR 2 SEC
TAP TWICE
POWER OFF OPERATION
Sellect how to power your M3s off. How do you prefer to power down your M3s? Choose between double tap
or the standard press and hold
QUICK DRAW POWER UP
Under the right side of the UL sticky grip you will find a 2 button dip switch. Dip switch #1 controls the quick
draw power up feature. With Dip switch #2 in the down position your gun is ready to fire the moment the LED
lights up.
METHOD OS AIR (MOSair)
 Loading...