

Page 1
1
DXG-502 User's Manual
Page 2

Table of Contents
■Precautions
Safety Precautions......................................................................................................................................... 4
Precautions Before Use................................................................................................................................. 4
Precautions for Operation.............................................................................................................................. 4
■Package Contents
■Digital Camera Overview
Product Overview.......................................................................................................................................... 7
Button Operation...........................................................................................................................................9
■Battery Usage
Inserting/Changing Batteries .................................................................................................. ................... 10
■Memory Card and Built-in Memory
Loading the Memory Card..........................................................................................................................11
Removing the Memory Card...................................................................................................... .................11
Using the Built-in Memory ...................................................................................................... ................... 13
■Adjusting the Wrist/Lens Straps
■Turning on the Camera and Lights
Power...........................................................................................................................................................15
Battery Capacity Meter................................................ ..................... ................................ .... .......................15
Lights...........................................................................................................................................................16
■Setting the Date, Time and Language
Setting Date and Time........................................................................................... ...................................... 17
Setting Language..................................... ....................................................................................................17
■Basic Operations
LCD Monitor...............................................................................................................................................18
Info/Hint...................................................................................................................................................... 18
Description of Button Functions .................................................................................................................19
Menu............................................................................................................................................................19
■Setup Mode
Advanced Settings.......................................................................................................................................20
Menu Index.................................................................................................................................................. 21
■Photo Mode
Auto Mode...................................................................................................................................................25
Manual Mode ..............................................................................................................................................27
Scene Mode.................................................................................................................................................29
Descriptions of the Three Modes ................................................................................................................30
Taking Pictures............................................................................................................................................ 30
1
Page 3

Table of Contents
LCD Screen................................................................................................................................................. 31
Optical Zoom / Digital Zoom............................ ........... .......... ........... ......... .................................................31
Flash ............................................................................................................................................................ 32
Burst / Self Portrait / Close-up.................................................................................................................... 32
Self-timer Mode............................ ........... ..................... .................... ..................... ...................................... 33
Close-Up Mode (Macro).............................................................................................................................33
Focus Selection............................................................................................................................................34
Instructions for Scene Modes.......................................................................................... ............................ 34
Descriptions on Menu..................................................................................................................................36
Image Resolution .............. ..................... .......... ..................... ..................... .................... ... ......................... 36
Picture Quality ................................................. ............................... ........................................................... 36
Photo Mode .................................................................................................................... ........................... 36
Auto.............................................................................................................................................................36
Manual.........................................................................................................................................................36
White Balance ................................................................................................................ ........................... 36
EV Compensation ...................................................................................................................................... 37
Metering Mode .......................................................................................................................................... 37
ISO............................................................................................................................................................... 37
Scene Mode ........... ..................... ..................... ..................... ..................... .......... ...................................... 37
Effects ........................................................................................................................................................37
Off .............................................................................................................................................................38
Black and White ......................... ..................... ..................... ..................... ..................... ........................... 38
Vivid ..........................................................................................................................................................38
Sepia .......................................................................................................................................................... 38
Advanced Settings ..................................................................................................................................... 38
Self Timer ..................................................................................................................................................38
Burst (Number of Pictures in Succession) ................................................................................................. 38
Self Portrait Flash Unit .............................................................................................................................. 38
Sound Effect of Shutter .............................................................................................................................38
Menu Index.................................................................................................................................................. 39
■Video Mode
Recording Videos.................................................................................................. ...................................... 44
Description on Menu...................................................................................................................................45
Image Resolution .............................................................................................................. ......................... 45
White Balance ................................................................................................................ ........................... 45
Record ....................................................................................................................................................... 45
Menu Index.................................................................................................................................................. 46
■Review Mode
Picture.......................................................................................................................................................... 47
Video...........................................................................................................................................................49
Thumbnail Display...................................................................................................................................... 49
Playing Video.............................................................................................................................................. 50
Picture Magnification Mode........................................................................................................................50
Audio Record ..............................................................................................................................................51
Playing/Deleting the Audio Record............................................................................................................. 52
Playing the Audio Record .........................................................................................................................52
Deleting the Audio Record ........................................................................................................................ 52
Adjusting Volume ........................................................................................................... ............................53
2
Page 4

Table of Contents
Description on Menu...................................................................................................................................54
Deletion .....................................................................................................................................................54
Delete One ................................................................................................................................................. 54
Delete All .................................................................................................................................................. 54
Single Protection / Single Protection Remove .......................................................................................... 54
All Protection ............................................................................................................................................ 54
Remove All Protection .............................................................................................................................. 54
Slide Show ................................................................................................................................................. 54
Starting the Slide Show .............................................................................................................................54
Display Interval ......................................................................................................................................... 55
Repeating the Slide Show ..........................................................................................................................55
DPOF ......................................................................................................................................................... 55
Setting Single ................................................................................................................ ............................ 55
Setting All ............................................................................................................ ...................................... 55
Direct Printing ...........................................................................................................................................55
Printing a Single Picture ............................................................................................................................ 55
Printing All Pictures ..................................................................................................................................55
Paper Size ..................................................................................................................................................55
Menu Index.................................................................................................................................................. 56
Printing Notices...........................................................................................................................................62
■PC Mode
Removable HDD (Hard Drive) ...................................................................................................................63
Data ............................................................................................................................................................. 64
■Video Out
■Installing the Software
Installing the Software on a PC................................................................................................................... 66
■Installing Application Programs
Installing Application Programs on a PC....................................................................................................68
■Appendix
Product Specifications................................................................................................................................. 72
System Requirements.................................................................................................................................. 73
3
Page 5

Precautions
Safety Precautions
The supplied Software CD is designed exclusively for a PC. Playing the CD on a stereo or audio CD player
may damage the player.
This is a sophisticated elec tron i c devic e. Do not di sas s em ble th e uni t; the ins ide c o nta in high- vo l tag e
components can cause an electrical shock or fire hazard.
To reduce the risk of fire, do not store this product in direct sunlight for long periods of time.
Precautions Before Use
Take some test shots before taking pictures.
Before using this camera for an impo rtan t oc cas io n, su ch as a wedding cer em o n y or overseas trip, first test
the camera to ensure that it functions properly. DXG is not responsible for any incidental losses (such as the
costs of photography or the loss of income from photography) incurred as the result of this product
malfunctioning, and no compensation will be provided for it.
Copyright information
All pictures taken with this digital camera must be in accordance with copyright law. When "No
Photography" restrictions are in place, it is illegal to record any live performance, improvisation, or exhibit,
even for personal use. Any transfer of pictures or memory card data must be conducted under the constraints
of copyright law.
LCD (Liquid Cry s ta l Di s pla y) Monitor
Notes on the LCD (Liquid Crystal Display) monitor
Be extra careful with the LCD monitor. If it is damaged and begins to leak, do the following:
1. If the liquid touches the sk i n: wip e th e skin d r y wi th a cloth and rinse imm ed i at el y with plen t y of
water.
2. If the liquid comes in contact with eyes: rinse immediately with plenty of water for at least 15
minutes and seek medical advice as soon as possible.
3. If the liquid is accidentally swallowed: rinse the mouth with wate r, drink ple n t y of wate r and
induce vomiting. Seek medical advice as soon as possible.
Precautions for Operation
This product consists of intricate electrical parts. To ensure the highest possible performance, do not drop or
hit the camera.
Avoid using or storing th e cam era in the fo llowing locations:
1. Damp or dusty places.
2. In sealed vehicles, in direct sunlight or in any areas with extremely high temperatures.
3. Turbulent or high-vibration environments.
4. Areas with smoke, oil fumes or steam.
5. Locations subject to strong mag net ic fie lds .
6. Rainy or snowy environments.
4
Page 6

Precautions
Do not open the battery cover when the power is on.
If water has entered the camera, turn the power OFF and remove the batteries immediately.
How to maintain the camera:
1. If the lens, LCD monitor, or viewfinder surface is dirty, use a lens brush or soft cloth to wipe it
clean. Do not touch the lens with your fin ger s.
2. To avoid scratching the lens, LCD monitor, or viewfinder surface, do not use any hard or
abrasive object to touch the camera.
3. Do not use any detergents or volatile solutions to clean the camera. This may harm the camera
and/or paint. Use a soft cloth only.
5
Page 7
Package Contents
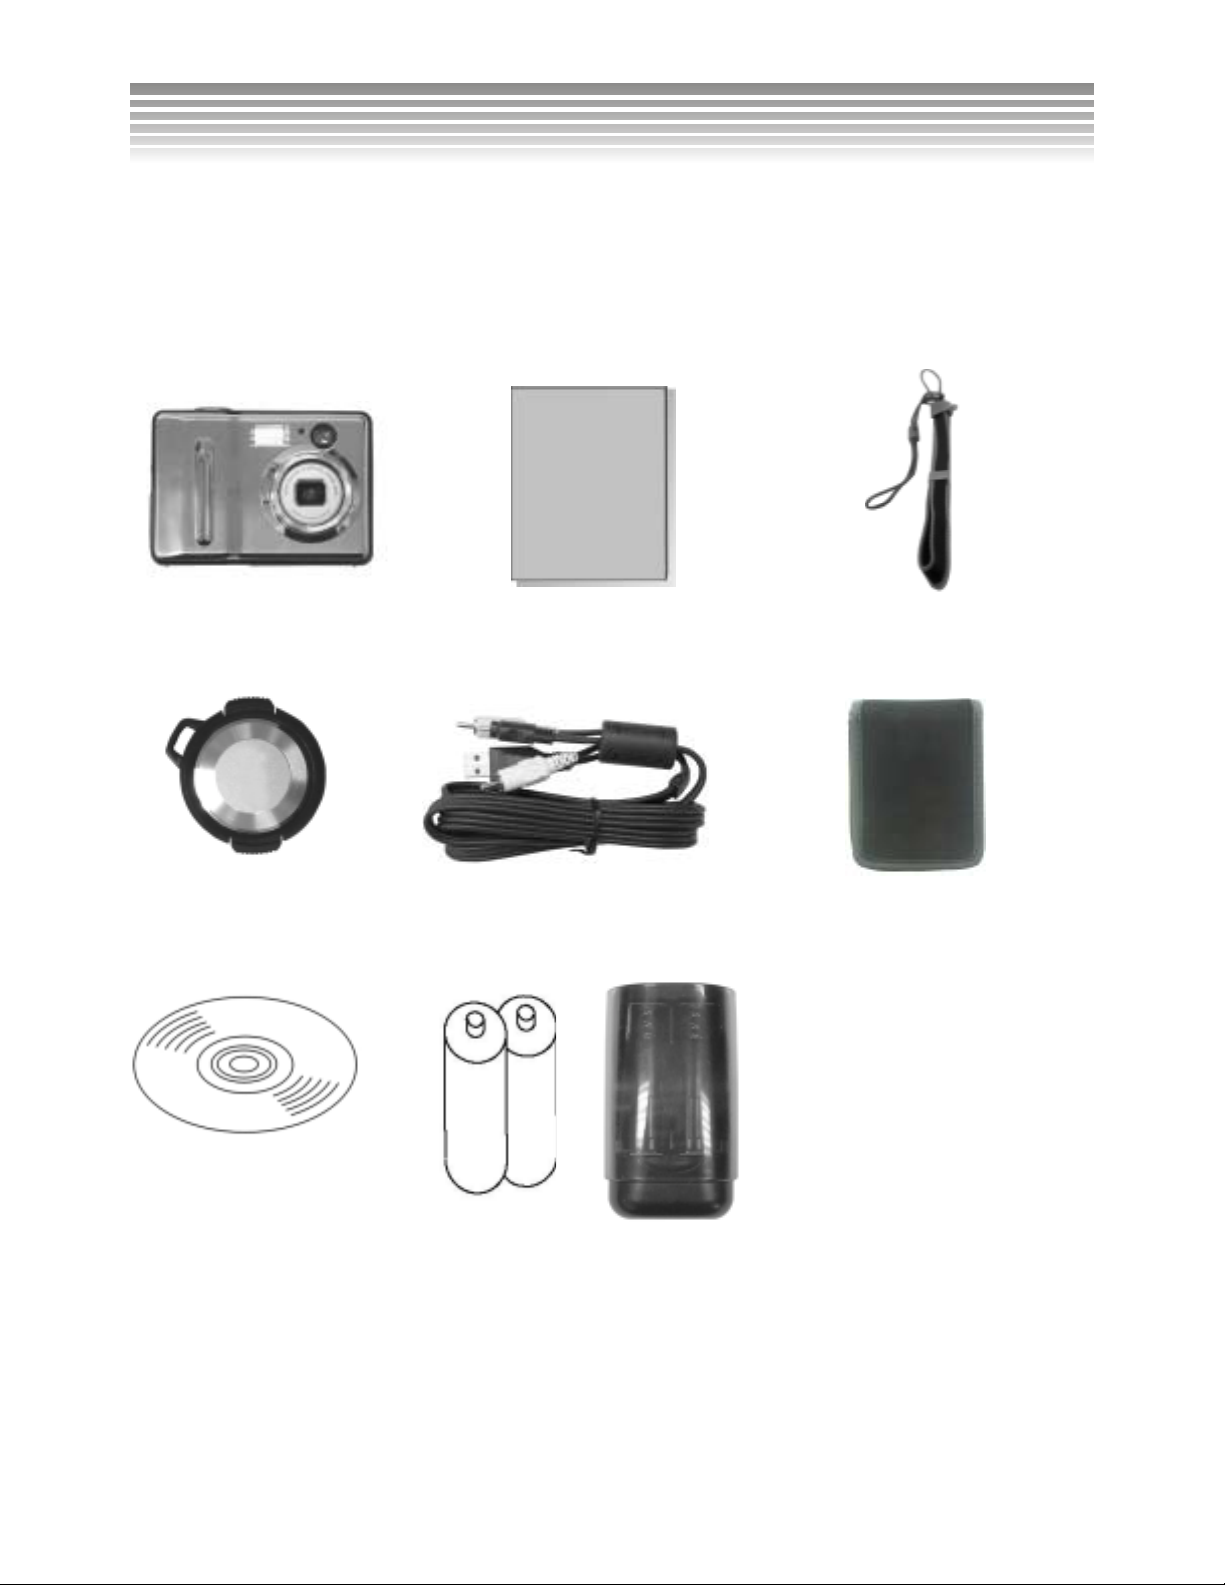
Please check the package contents. Please contact your dealer right away in case of any item missed.
1. Digital Camera 2. User Manual 3. Wrist Strap
4. Lens Cap
7. Software CD
5. USB /TV-OUT
CABLE
8. AA NiMH Batteries x2
with Charger
6. Camera Leather
Case
6
Page 8
Digital Camera Overview
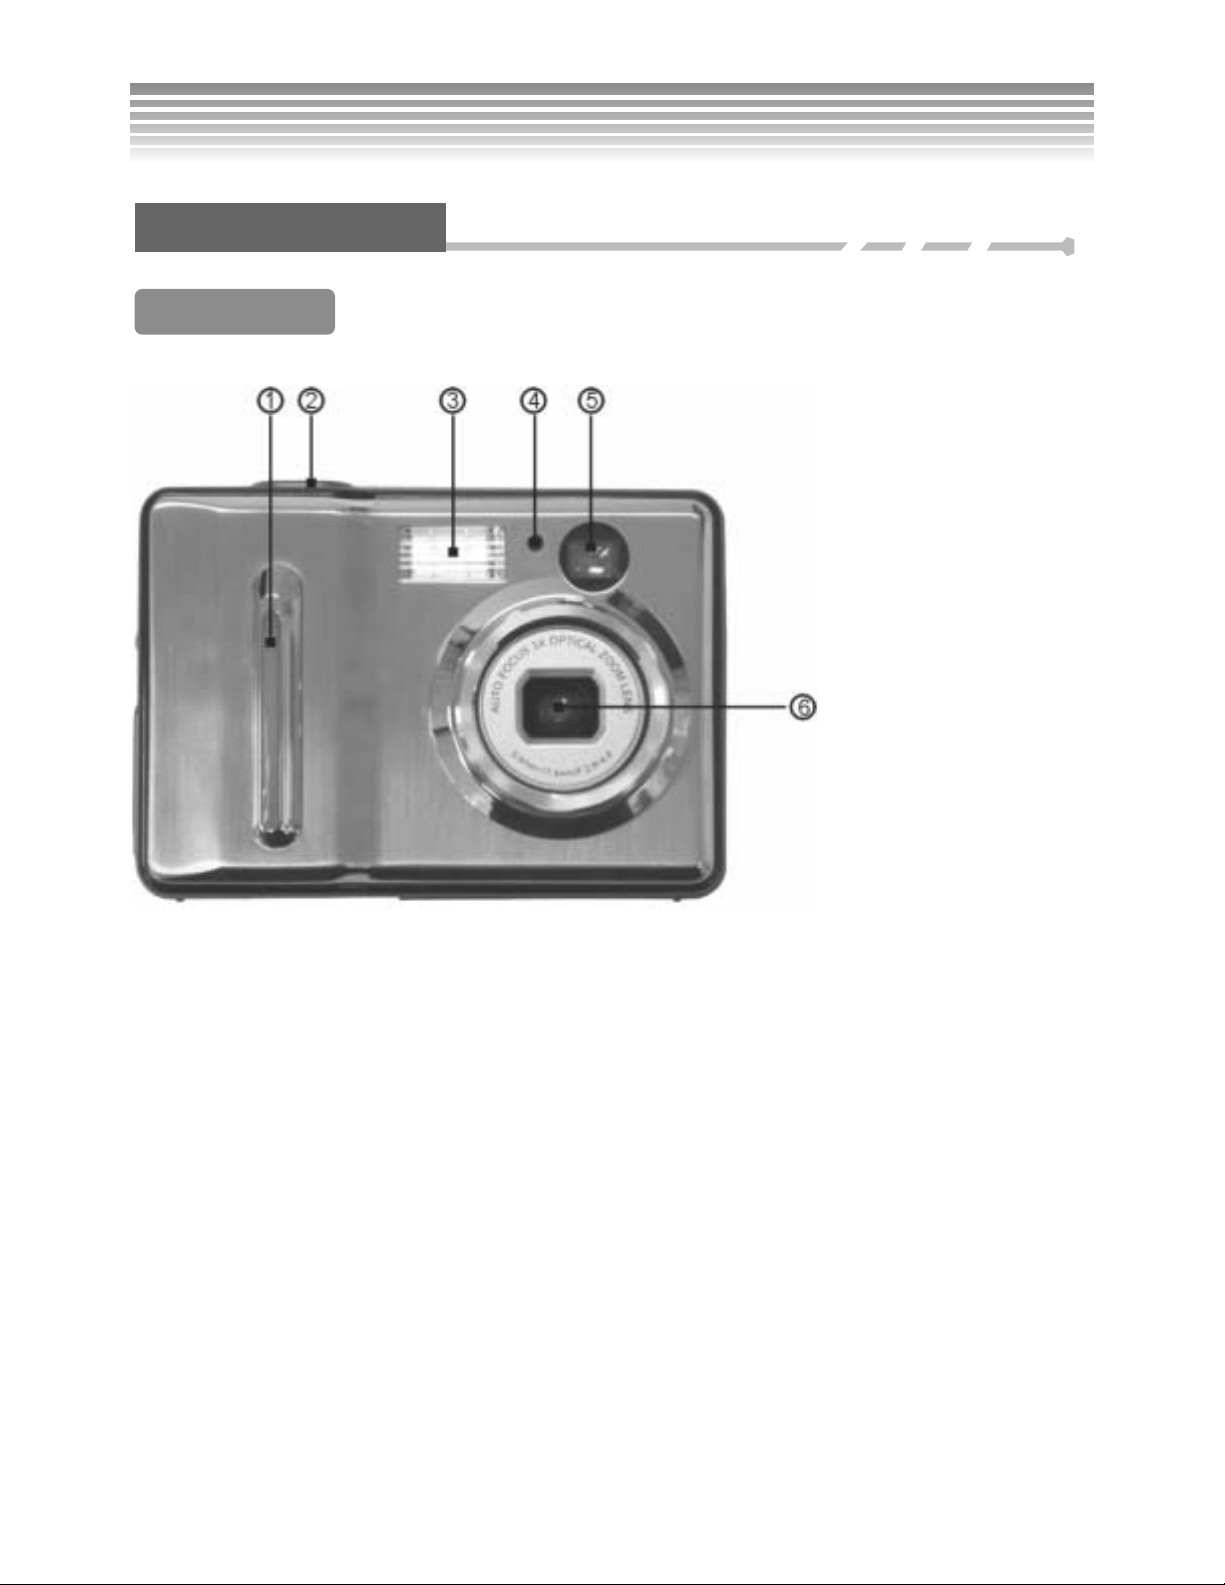
Product Overview
Front View
(1) Self-timer/
Programmer/Timer
(2) Shutter Button
(3) Flash
(4) Image Sensor
(5) Viewfinder
(6) Lens
■Shutter
Press the shutter button to take photos and start video recording.
■Lens Cap
Remove the lens cape before turning on the camera. Refit the cape when the camera is powered off to
protect the lens and keep dust out.
■USB Cover
Open the USB cover, which has a slot for both USB and TV-Out cables.
7
Page 9
Digital Camera Overview (Continued)
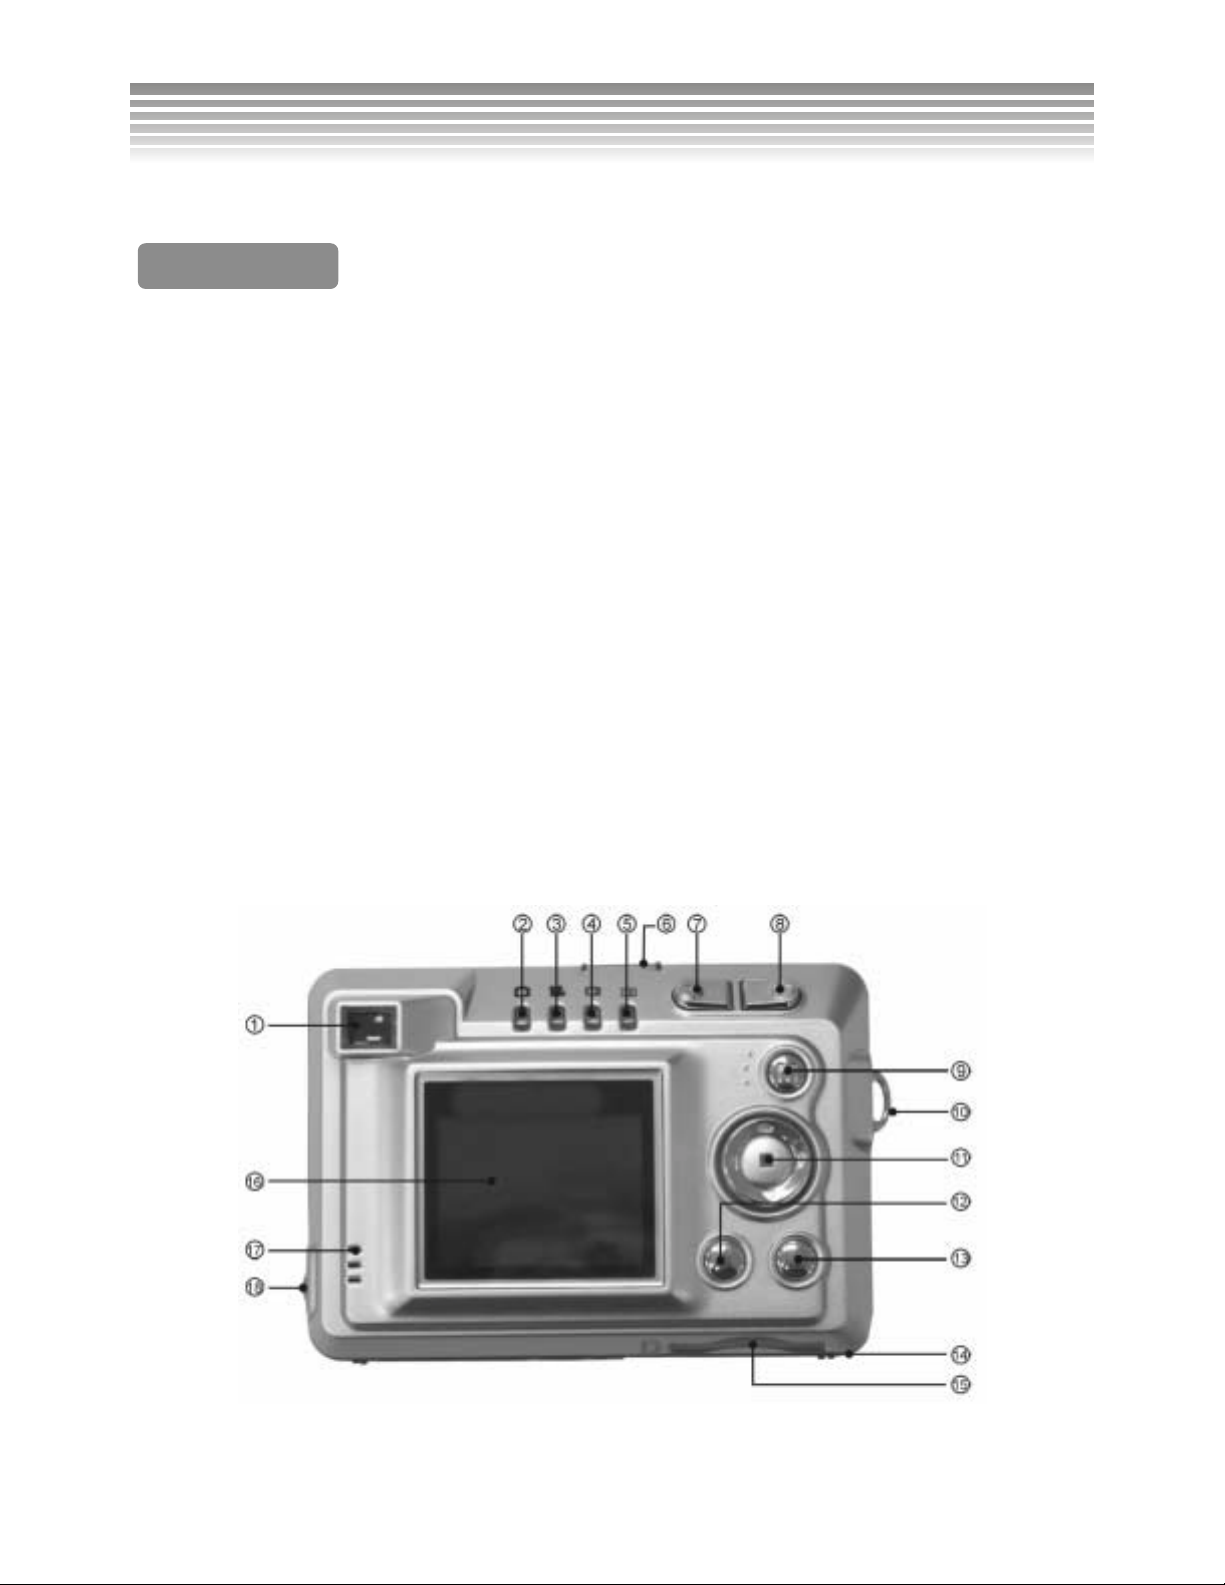
(1) Viewfinder
Back View
(2) Photo Mode
(3) Video Mode
(4) Review Mode
(5) Setup Mode
(6) Power Switch
(7) Reduction Key
(8) Magnifier Key
(9) Mode dial
(10) Wrist Strap Buckle
(11) Confirm/Function Button
(12) Flash Button
(13) Menu button
(14) Battery Cover
(15) Memory Card Slot
(16) LCD Screen
(17) Speaker
(18) USB/TV-OUT Slot
8
Page 10

Digital Camera Overview (Continued)
Button Operation
■Mode Switch
There are four modes available, including Photo Mode , Video Mode , Review Mode
and Setup Mode
. The LED indicates which mode is in use.
■Menu button
This displays the selection menu for each of the modes. For details, please refer to menu descriptions in
each mode.
■Flash Button
There are six selections for the flash mode. Refer to the flash setting for greater detail.
■Multiple Controller
Besides the menu selection, the Multiple Controller has a quick function. Select “Hint of Info” in the
“Info” to read the function of each butto n.
■Zoom Button
The Zoom button is used to adjust the size of the subject.
9
Page 11
Battery Usage
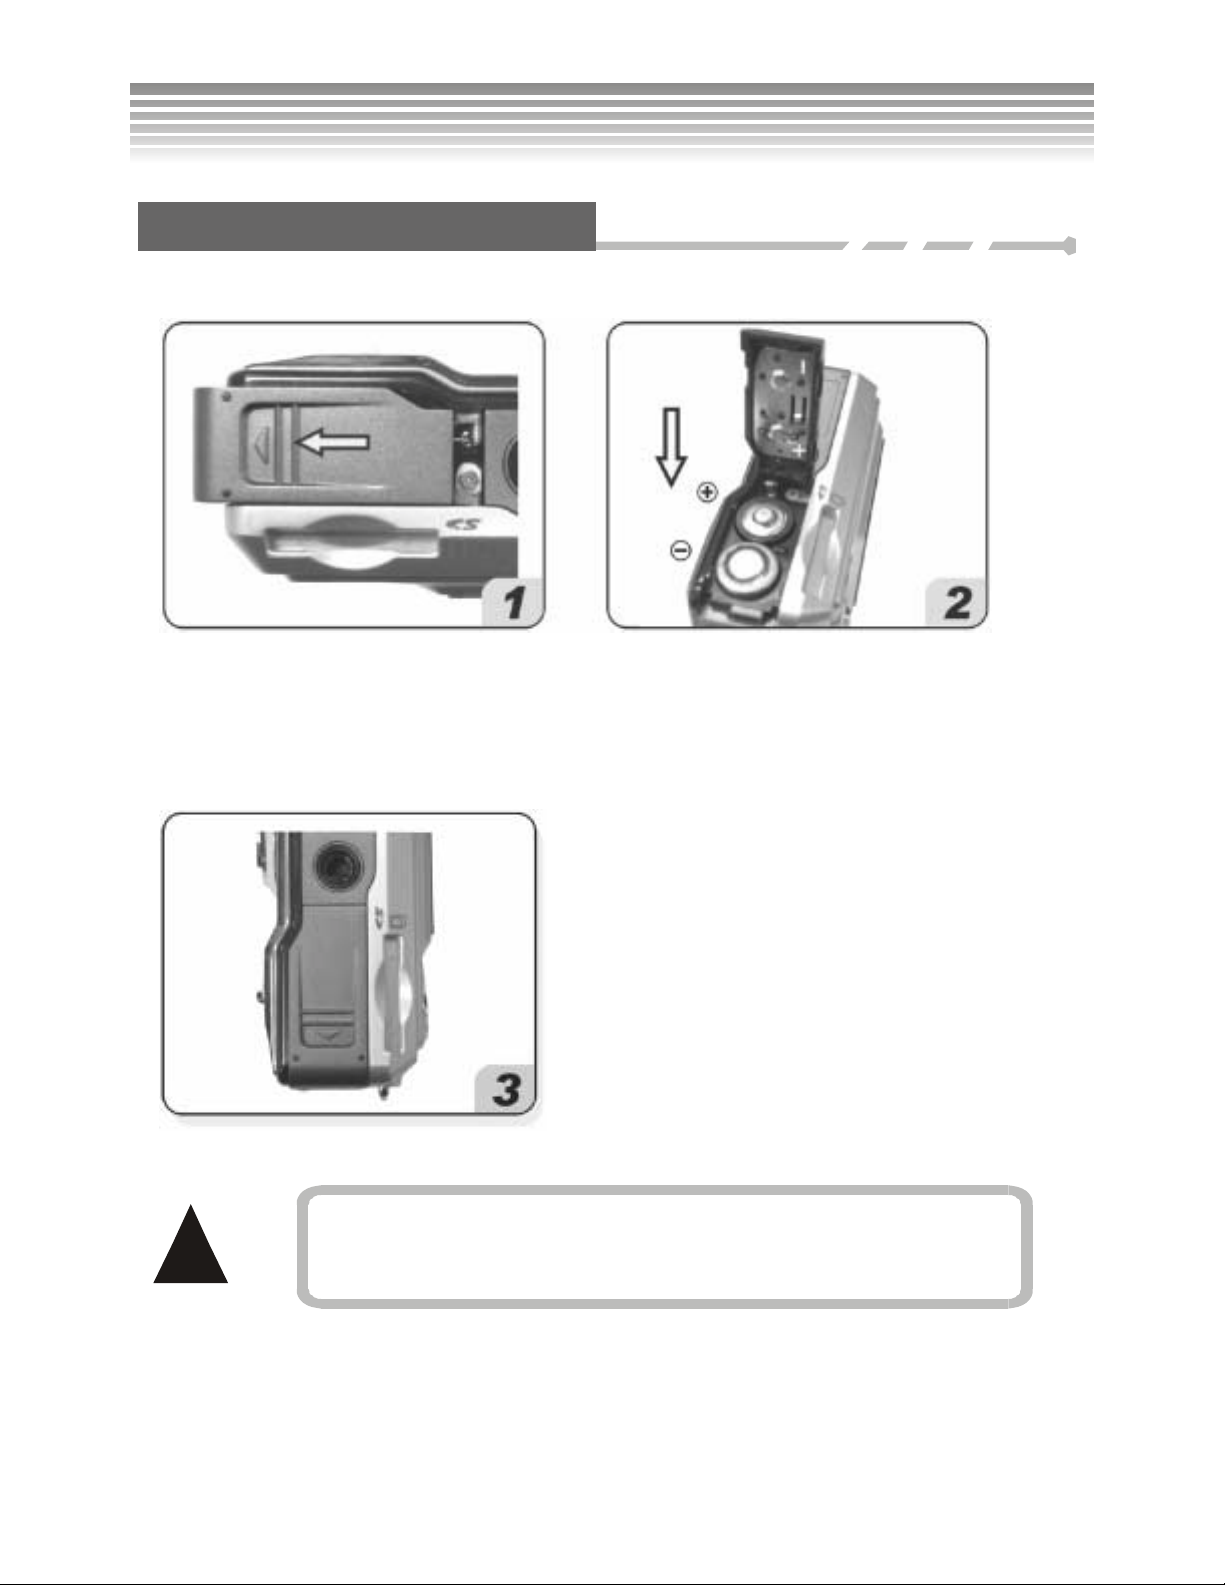
Inserting/Changing Batteries
Turn the digital camera off and follow the instructions below.
Slide the battery cover in the direction of
the arrow and lift it open as shown.
Follow the instruct io n lab e led on the
inside of the battery compartment door
and insert the batteries as indicated.
Close the battery cover.
!
To avoid any possible damage, be gentle when
opening and closing the battery compatment.
10
Page 12
Memory Card and Built-in Memory
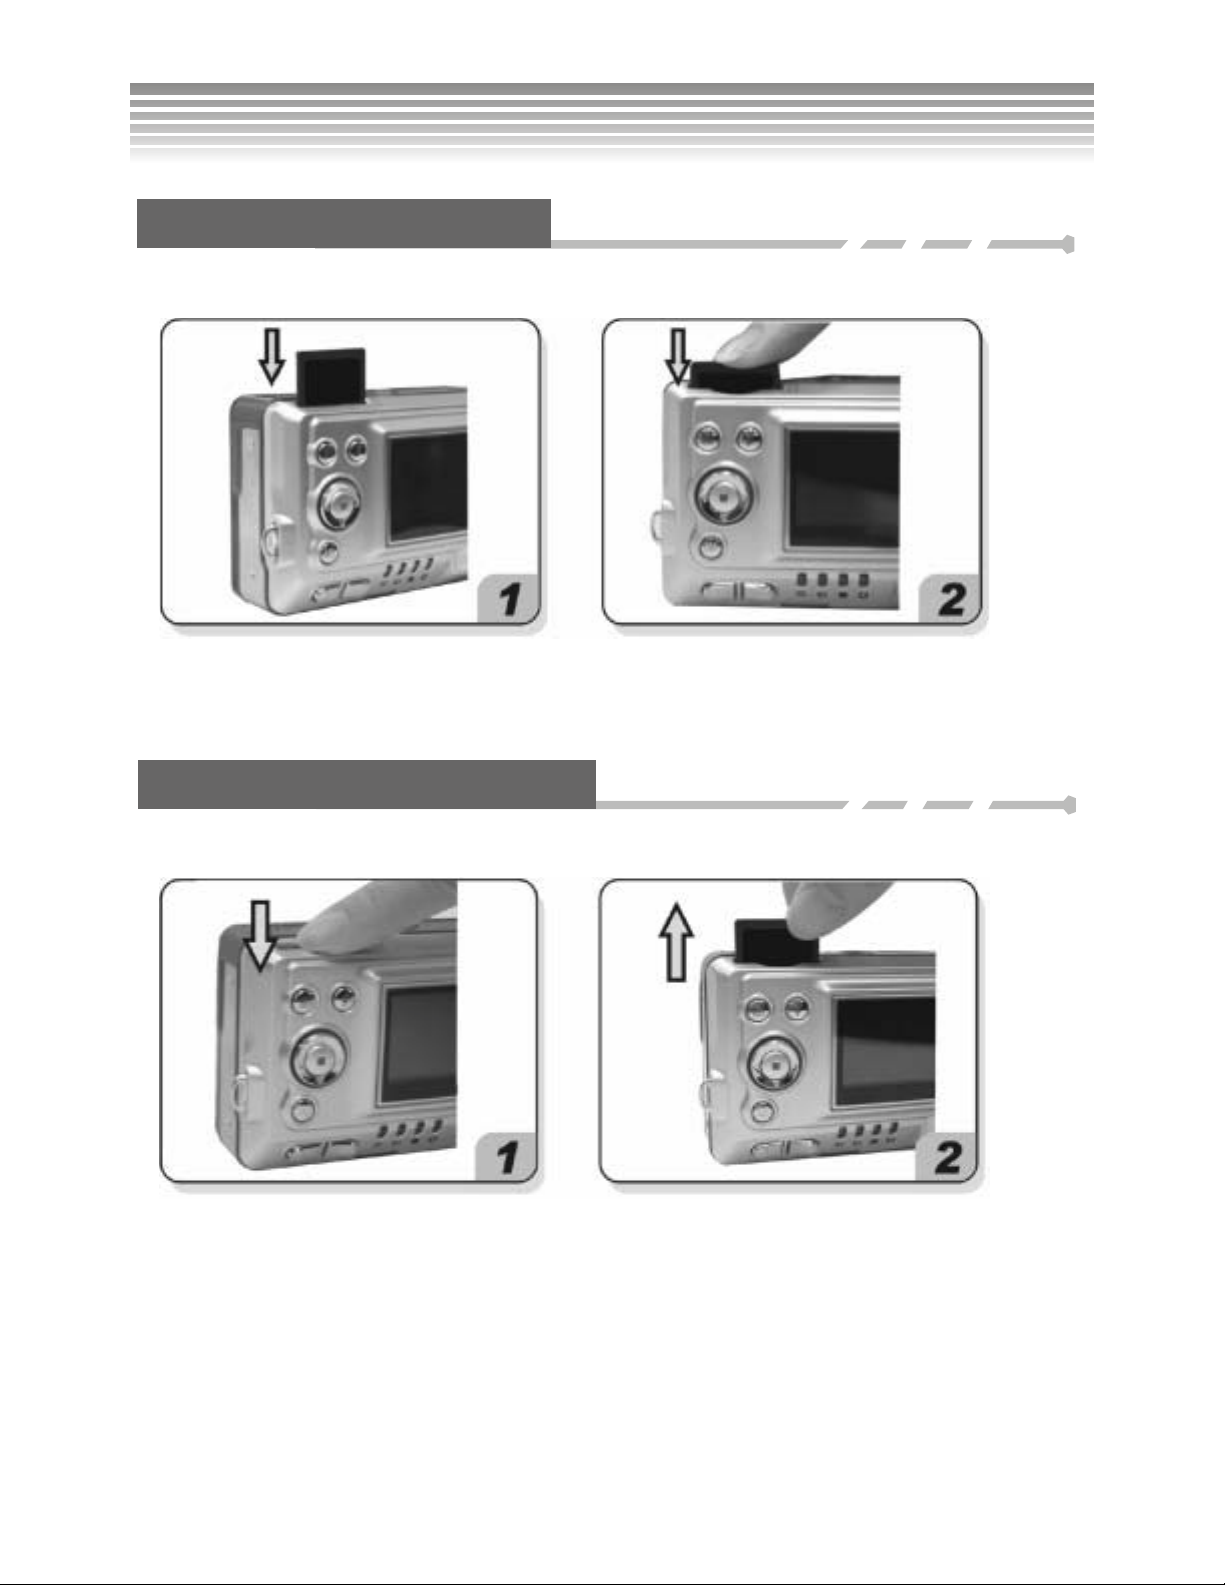
Loading the Memory Card
Turn the camera off and follow the instructions below.
Orient the memoray card as shown, and
insert it into the slot.
Press the memory card in all the way.
Removing the Memory Card
Turn the digital camera off and follow the instructions below.
Gently push the card in and it will eject
automatically.
Pull the memory card out as shown.
11
Page 13
Memory Card and Built-in Memory(Continued)
This product can use an SD orMMC memory card,
!
with memory capacity ranging from 16MB to 512 MB.
The memory card can only fit in one direction. Do not
use excessive force when installing into a memory
card socket; too much force could cause damage.
If the memory card is unreadable, wip e its metal side
with a soft, dry cloth and install it again.
Make sure to unloc k the memory card bef ore
!
inserting. Otherwise, the camera will display an
icon and be unable to save images.
Notice! Use FAT 16 or FAT32 when formating the
memory card with PC.
12
Page 14

Memory Card and Built-in Memory(Continued)
After installing the memory card, the screen will display an
(indicating that the built-in memory is in use), please refer to the following four possible reasons and
resolutions.
The memory card format is unrecognizable.
Back up the data on the memory card to a PC and re-format the memory card.
A poor connection is being made with the card contacts.
Wipe the card contacts clean with a dry soft cloth and reinstall.
The memory card is damaged and unable to function.
Contact the memory card company for repair or replacement.
The memory card slot is damaged and unable to read data.
Contact the dealer for repa i r or replac em ent .
icon under normal status. If it displays
Usage of Built-in Memory
When the memory card capacity is full, the camera’s built-in 16MB flash memory offers a temporary space
for storage (Due to intern al fir m ware storage, the ac tua l mem or y capa c it y is slightly less than 16MB).
While the memory card is installed, all functions (format, save, review, upload/download and so on) are
directed to the memory card.
Simply pull out the memory card out to use the built-in memory, then all the data fuctions are based on the
built-in memory.
13
Page 15
Adjusting the Wrist/Lens Straps
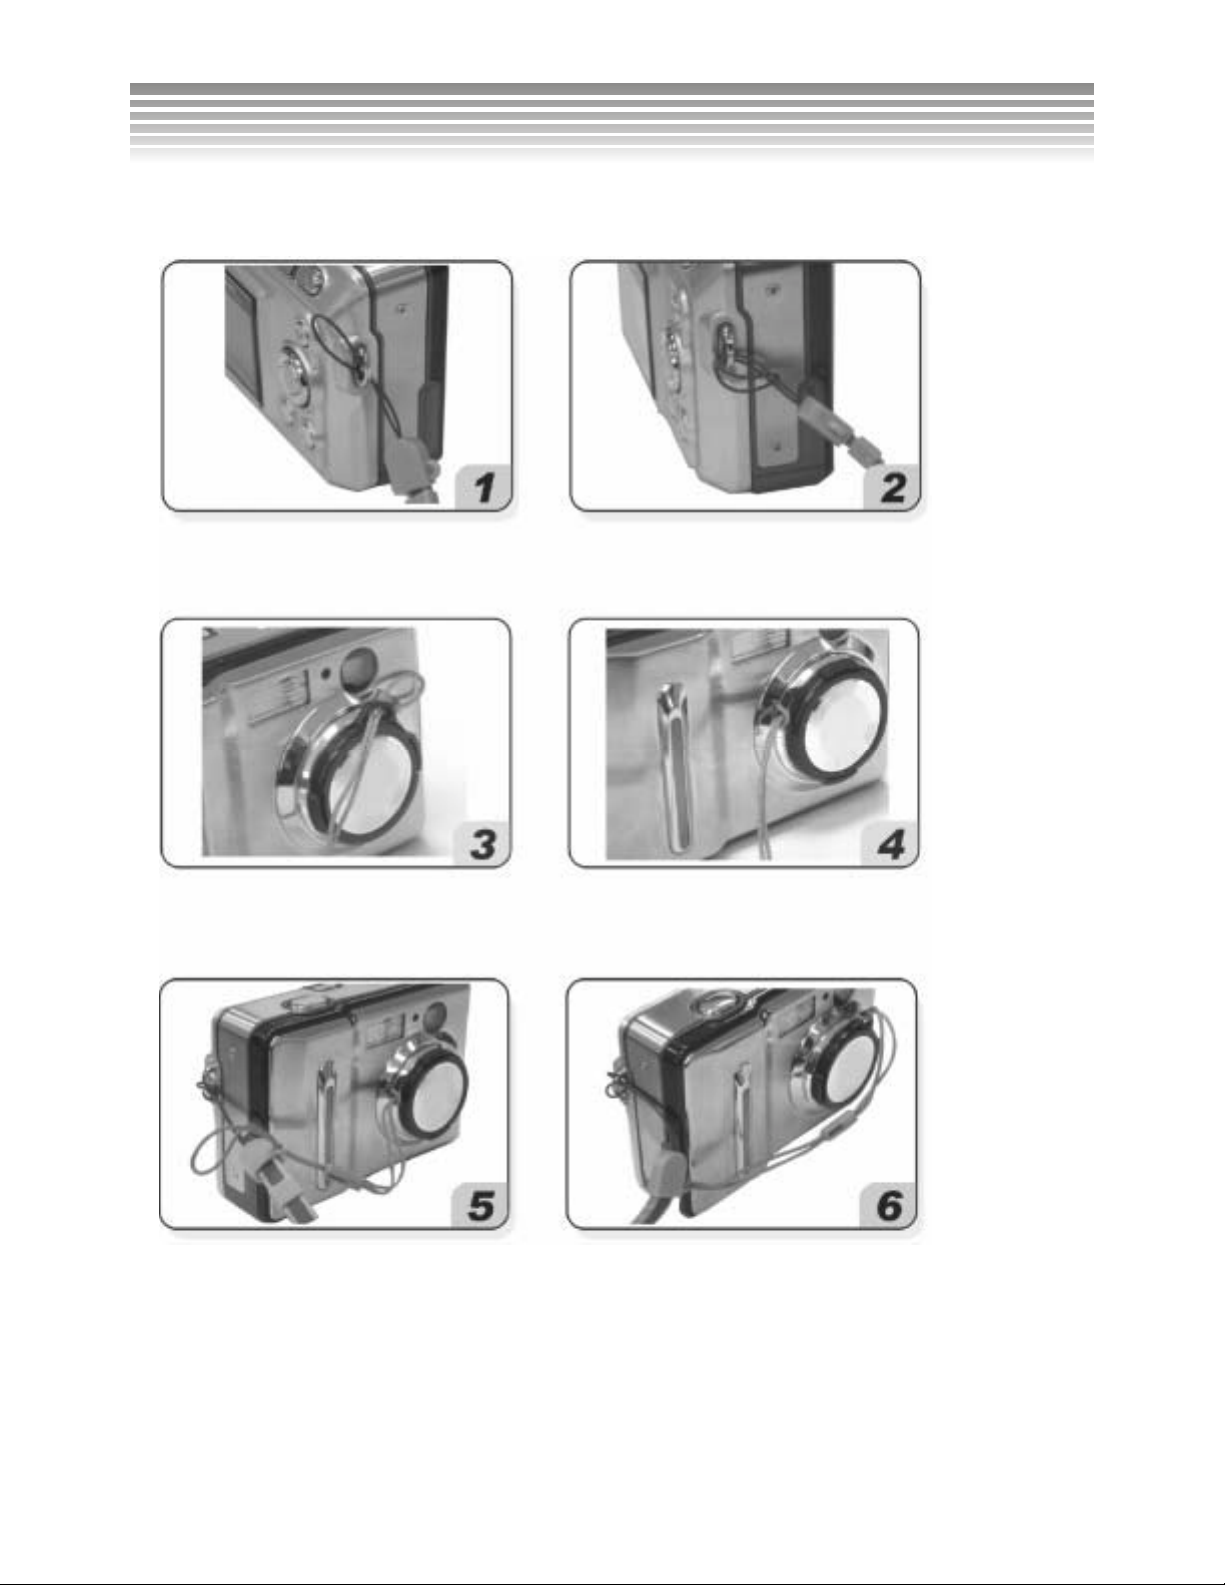
Follow the illustrations below to secure the camera strap.
Put the wrist strap through the wrist
strap post.
Put the lens strap through the lens
strap post.
Pull one end of the strap through the
other and tighten it.
Pull the other end of the strap through
the other side of the lens strap post
and tighten it.
Put one end of the lens strap through
the camera strap post.
Finally, pull the lens cap through and
tighten it.
14
Page 16

p
Turning on the Camera and Lights
Power
Press the Power button to turn on the camera and press it again to turn it off.
!
This camera features a power-saving mode, it switchs off
automatically when there is no action within a preset time.
Please refer to the Setu
mode/Power Saving for details.
Battery Capacity Meter
The battery capacity meter on the camera screen indicates:
: Full (This icon dissappears 5 seconds after entering the mode.)
: Half (This icon dissappears 5 seconds after entering the mode.)
: Low (The icon changes to yellow and remains.)
: Exhausted (The icon changes to red and keeps blinking.)
!
When replacing batteries, the date and time need to be reset.
Other settings of the menu will be restored and need no
re-setting.
15
Page 17
Turning on the Camera and Lights (Continued)
!
!
Low battery level adversley affects the recharge of the flash.
Use fully-charged batteries for best results.
The camera cannot opperate under a certain power level. Use
fully charged batteries to make sure the camera doesn’t shut
off.
Lights
Descriptions of the front Flashing Unit and the back mode status indicator.
Mode Status Indicator Yellow/Red Indicator Light on
Programmer/Timer
Indicators Description
This indicates the cur ren t m ode you are
in, for example, the Photo Mode or
Video Mode.
Four lights change and
blink.
Blink
When turning on the camera, it blinks.
When using the self-timer, it blinks.
16
Page 18
Setting the Date,Time and Language
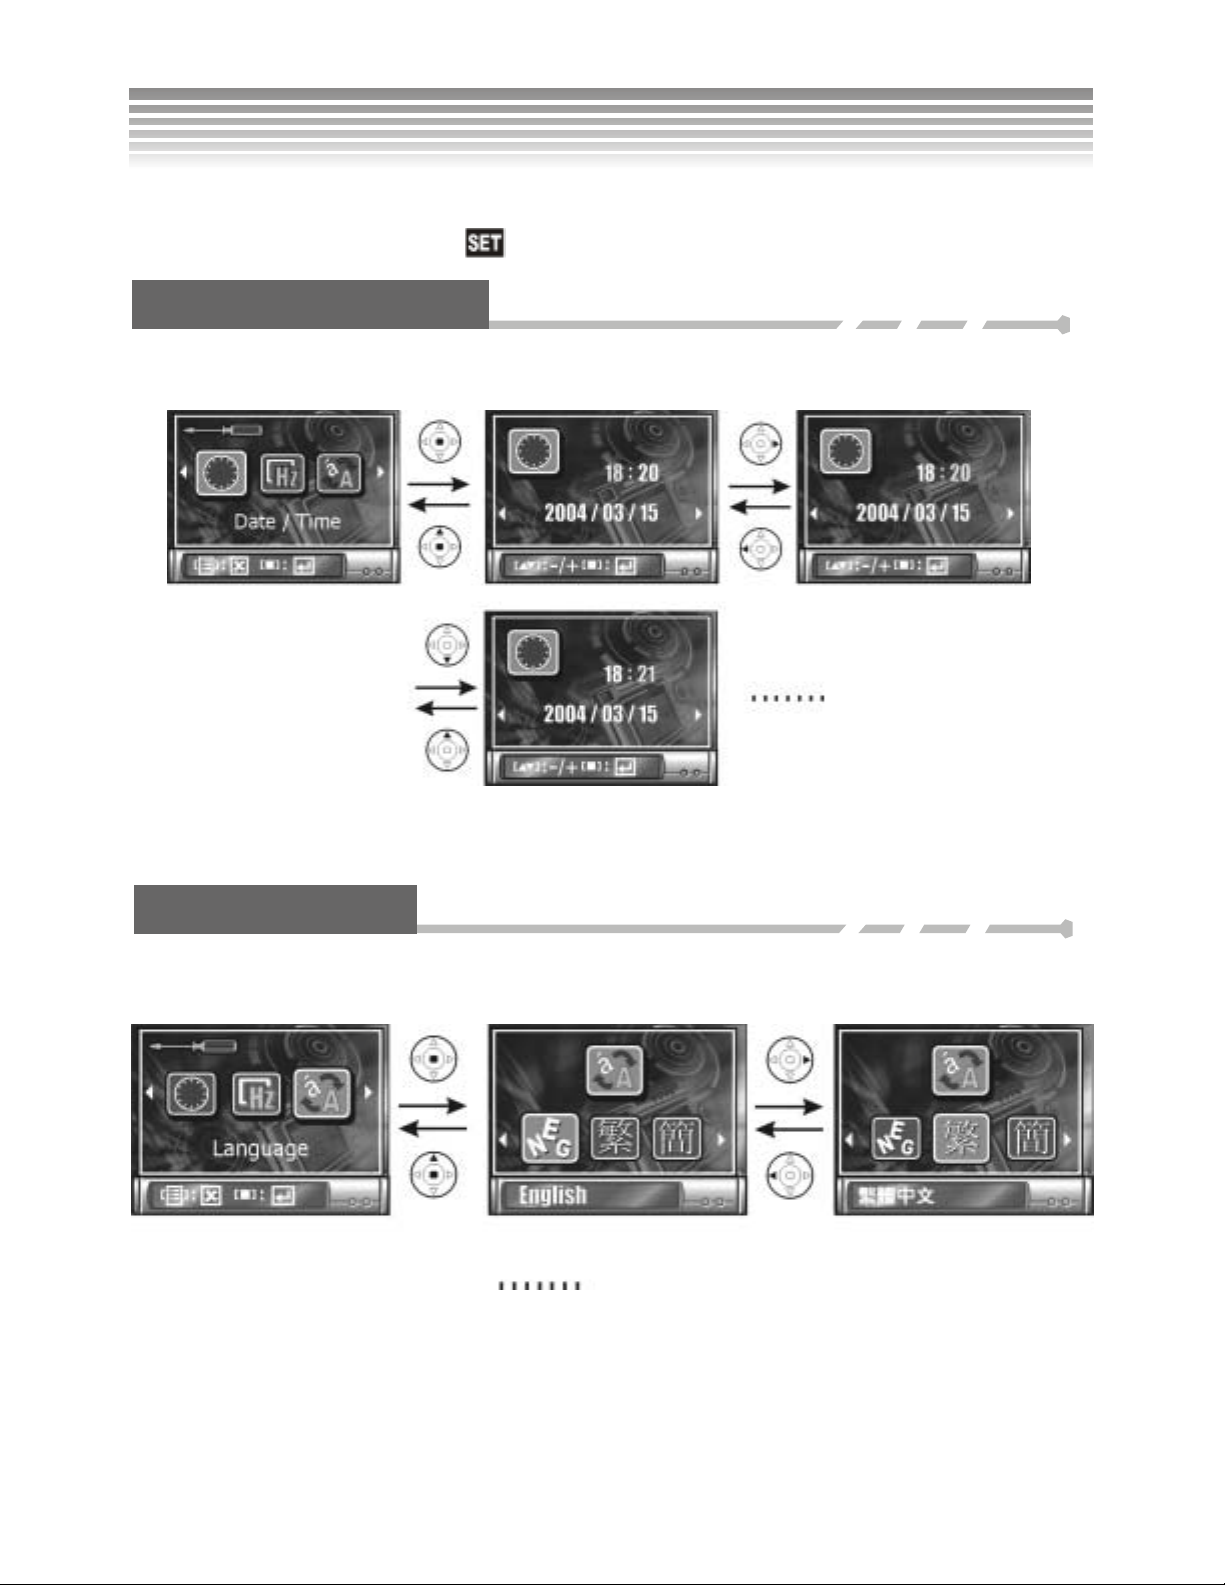
Use the Mode dial to enter the Setup ( ) Mode.
Setting Date and Time
This camera can record the date and time on pictures. Be sure to set the correct date and time before taking
pictures. Please refer to Setup Mode on page 21 for more details.
Setting Language
Select the language of your choice; the options include English, Traditional Chinese, French, German, Italian,
Japanese, and Spanish.
17
Page 19
Basic Operations
LCD Monitor
The LCD screen is used to frame the pic tu r e, adjust settings, and review pictures and videos. It is normal that
the LCD screen looks darker under direct sunlight or bright light.
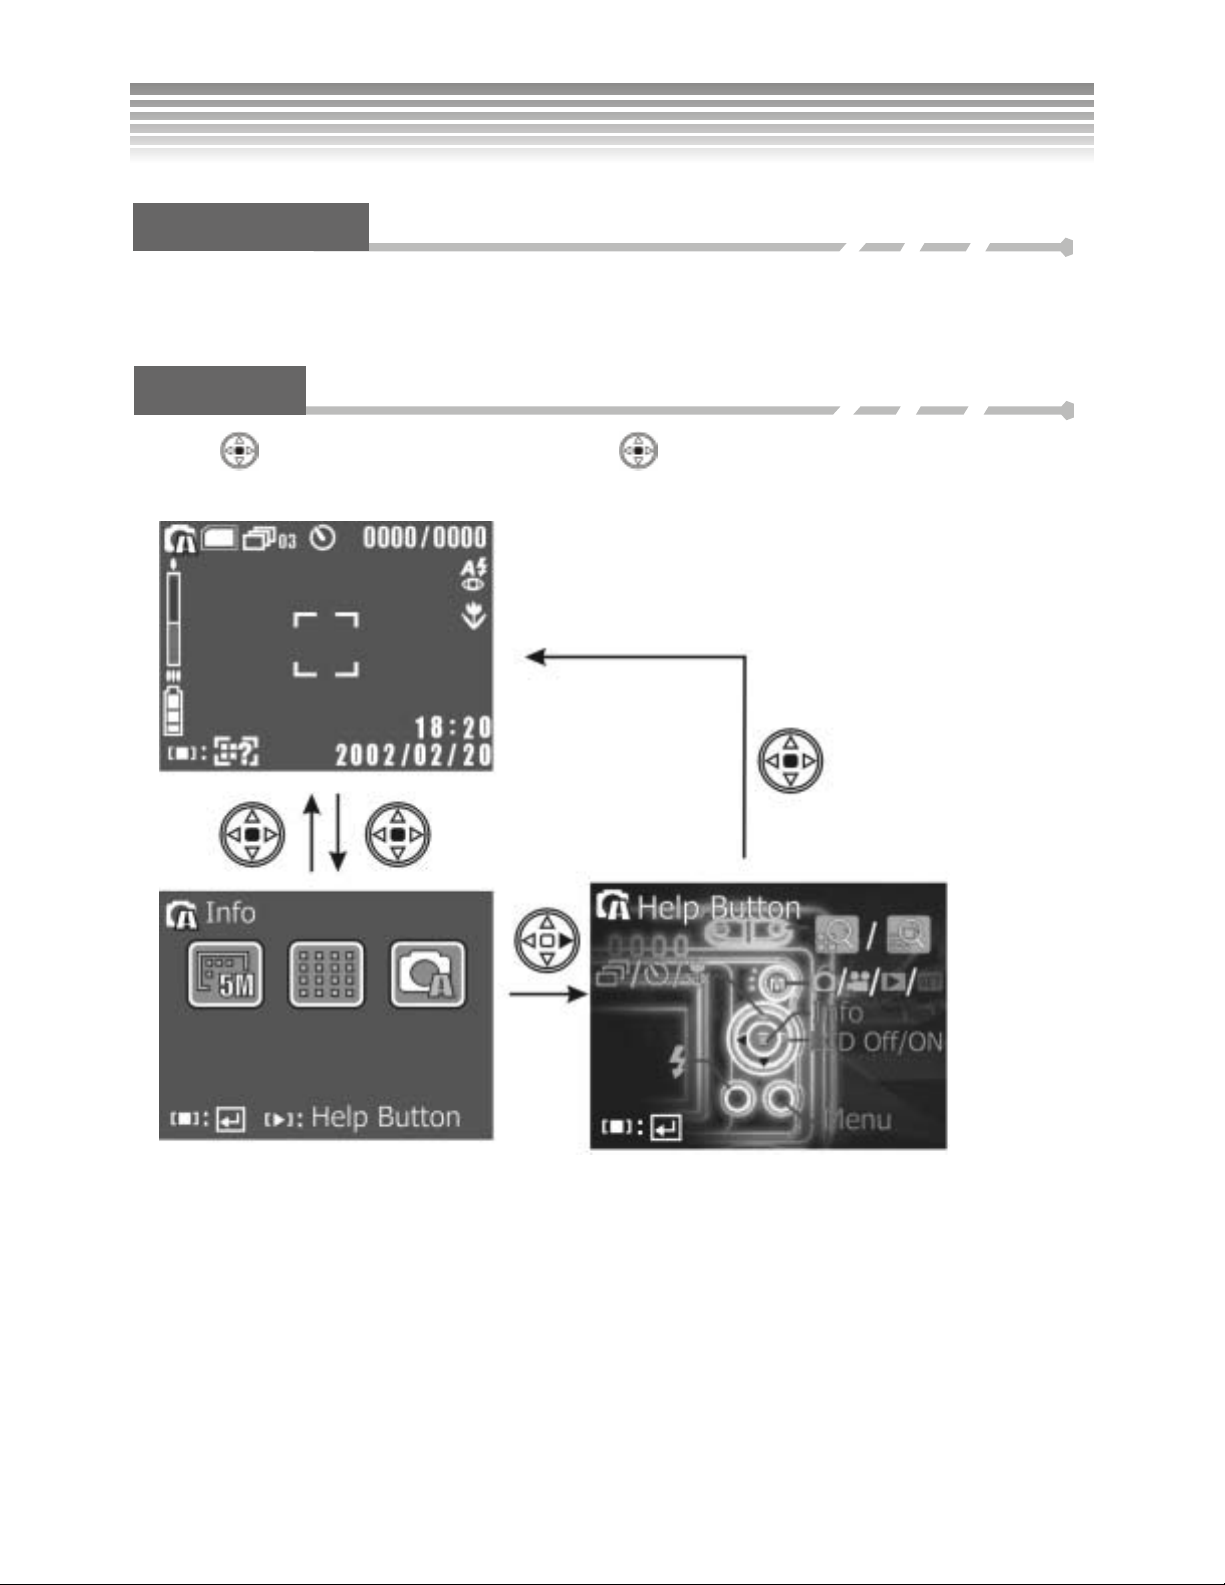
Info/Hint
Press the
descriptions of functions of buttons. For example:
button to enter the Info page. Press the
botton again to provide a Hint that offers
Current status of settings Description of each active function.
18
Page 20
Basic Operations
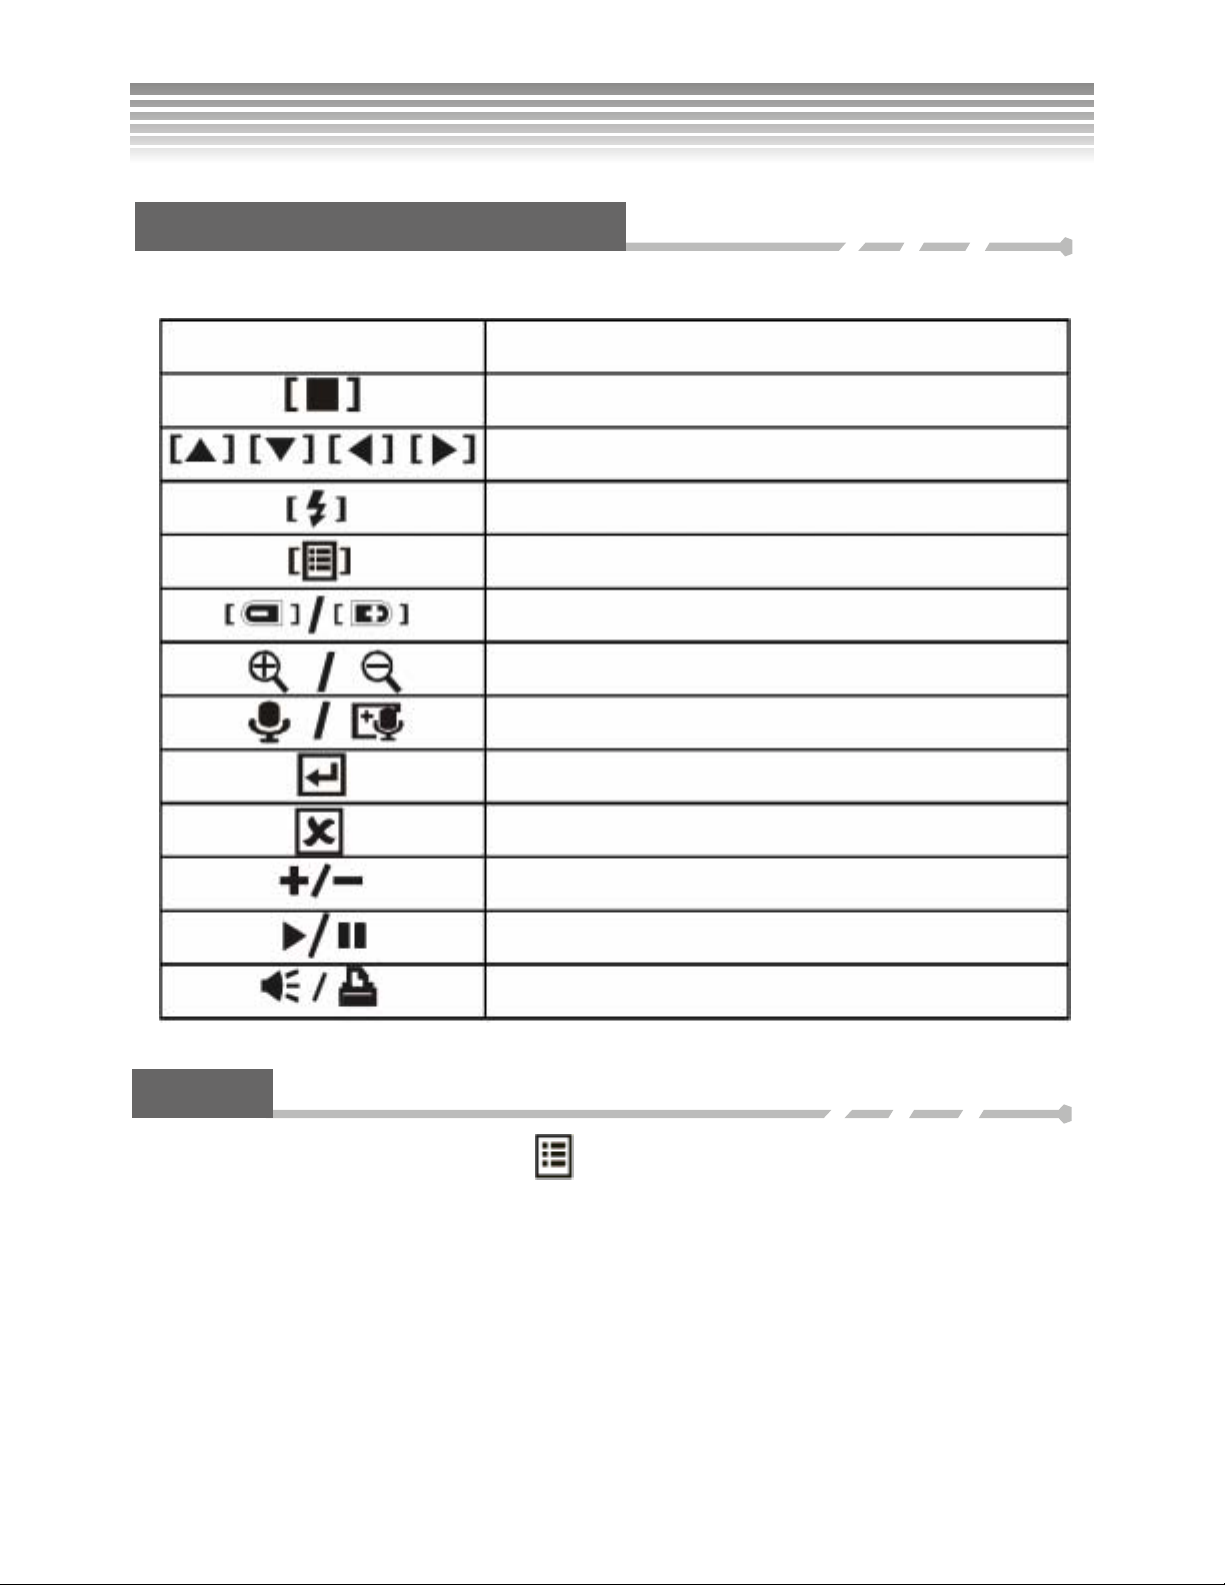
Description of Button Functions
On the bottom of the LCD screen there are button function direc tions, wh ich d escribe what the buttons do.
Icons
Centerof the Multiple controller
Up/down/left/right of the multiple controller
Flash Button
Menu button
Zoom button
Zoom in/Zoom out
Sound Recording Mode/Sound Recording Menu
Set/Enter
Delete/Back
Increase/ Decrease
Play/ Stop
Volume/ Print
Description
Menu
In the Photo/Video/Review Modes, press the button to enter the Mode Menu for relevant settings.
19
Page 21
Setup Mode
Use the Mode dial to enter the Setup (
) Mode. The following are descriptions of the settings.
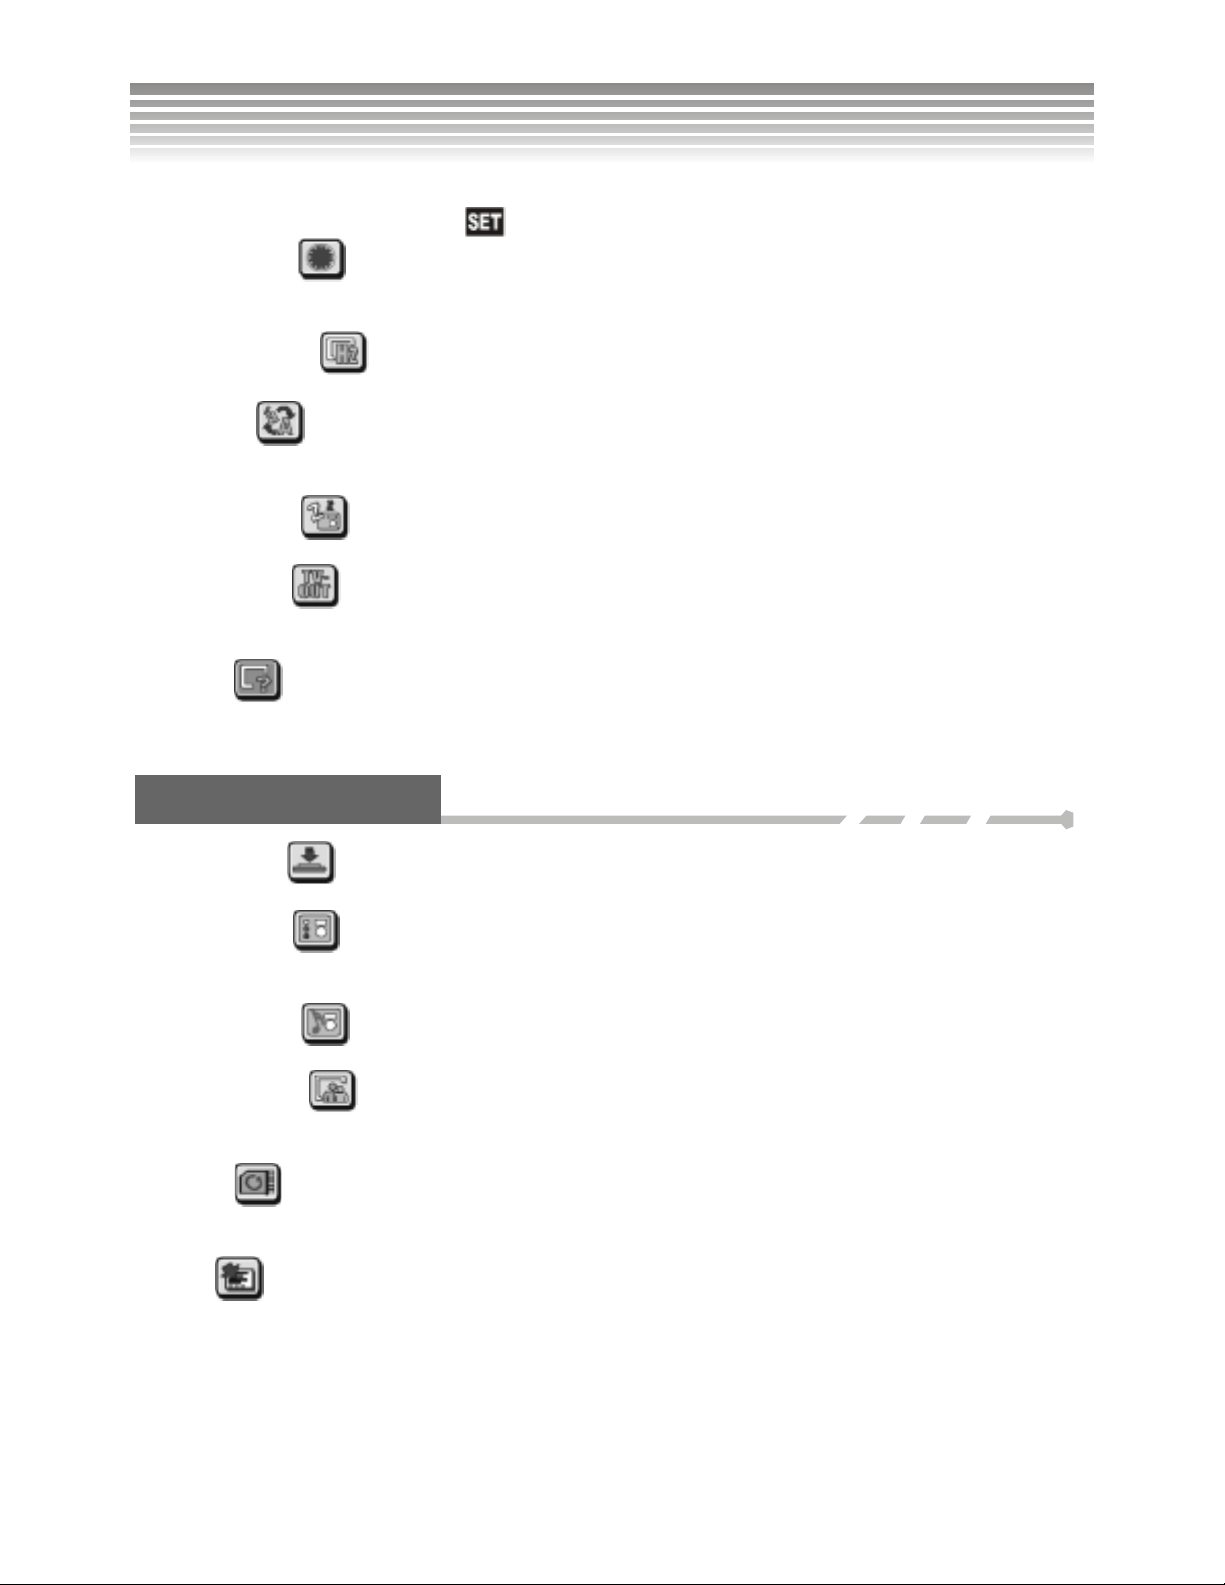
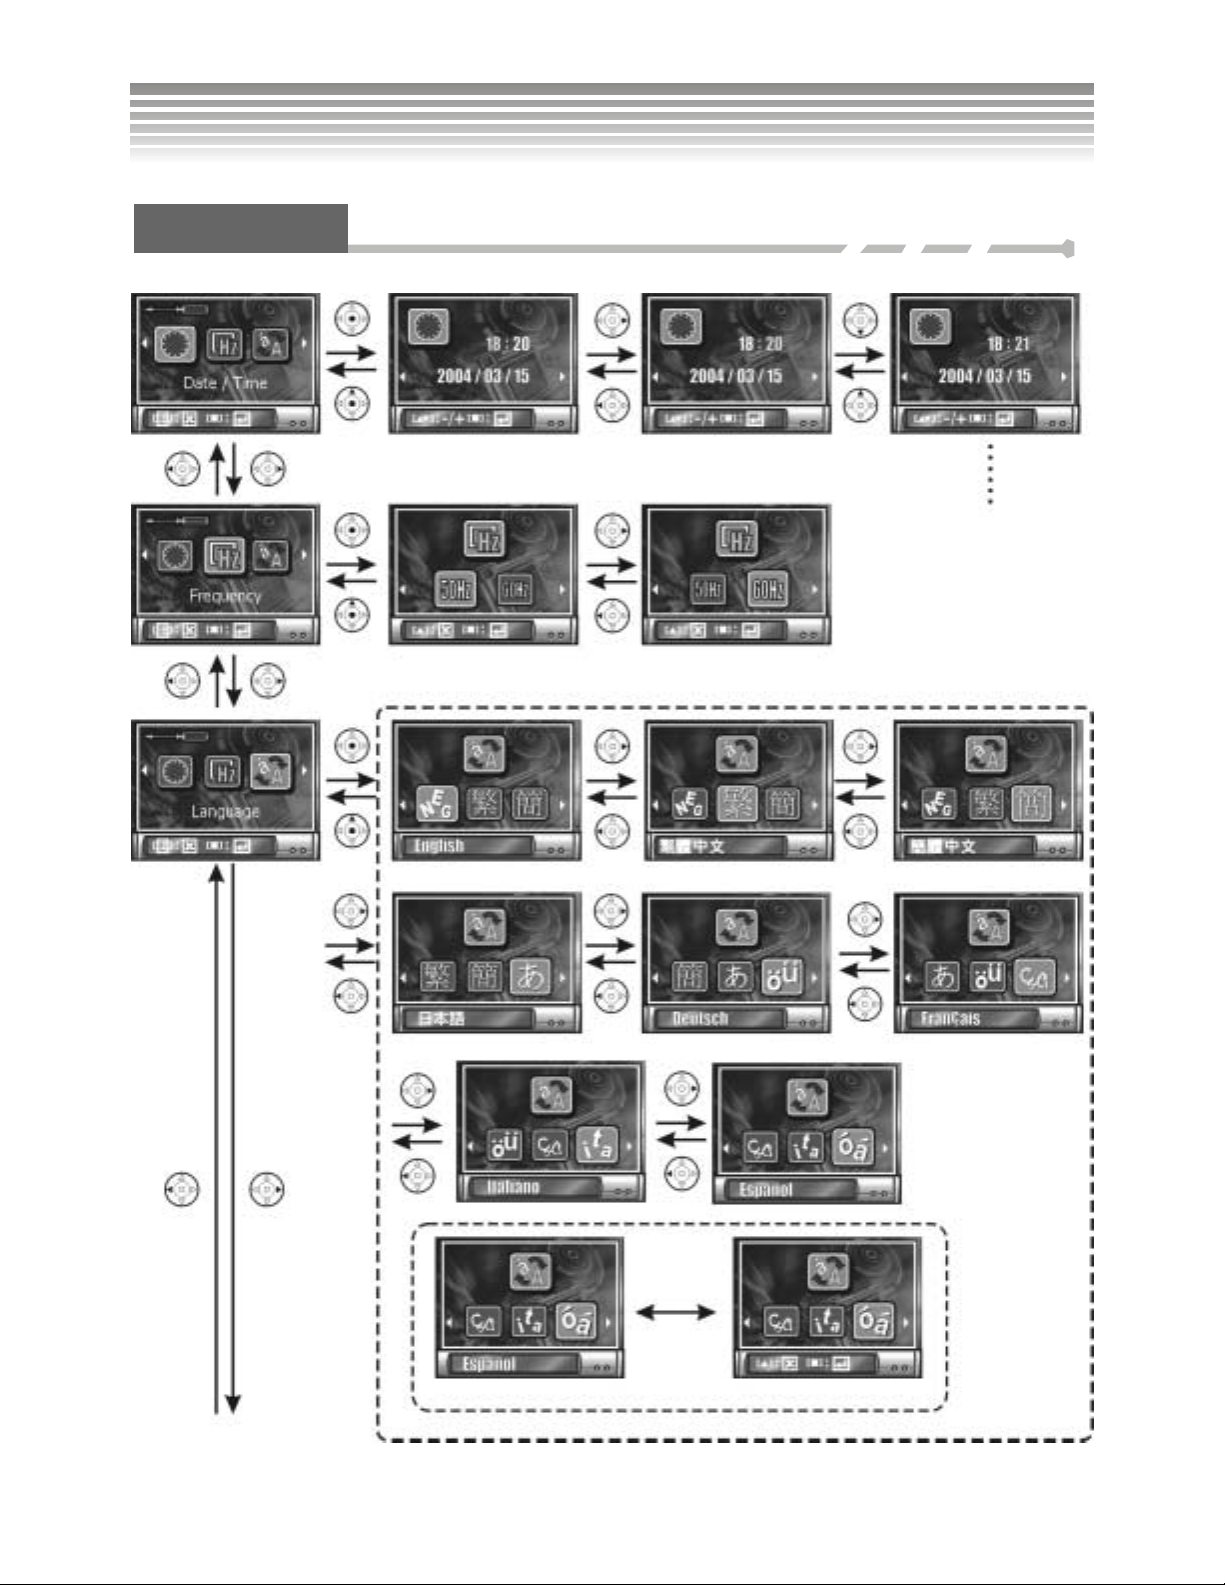
■Date/Time Set
This allows the camera to record the date and time on pictures. Correct date and time should be set before
taking pictures.
■Light Frequency
Adjusts the power frequency to your regional setting, such as 50Hz (Europe) or 60HzAC (U.S.A).
■Language
Displays different languages; English, Traditional Chinese, Japanese, German, French, Italian, and
Spanish.
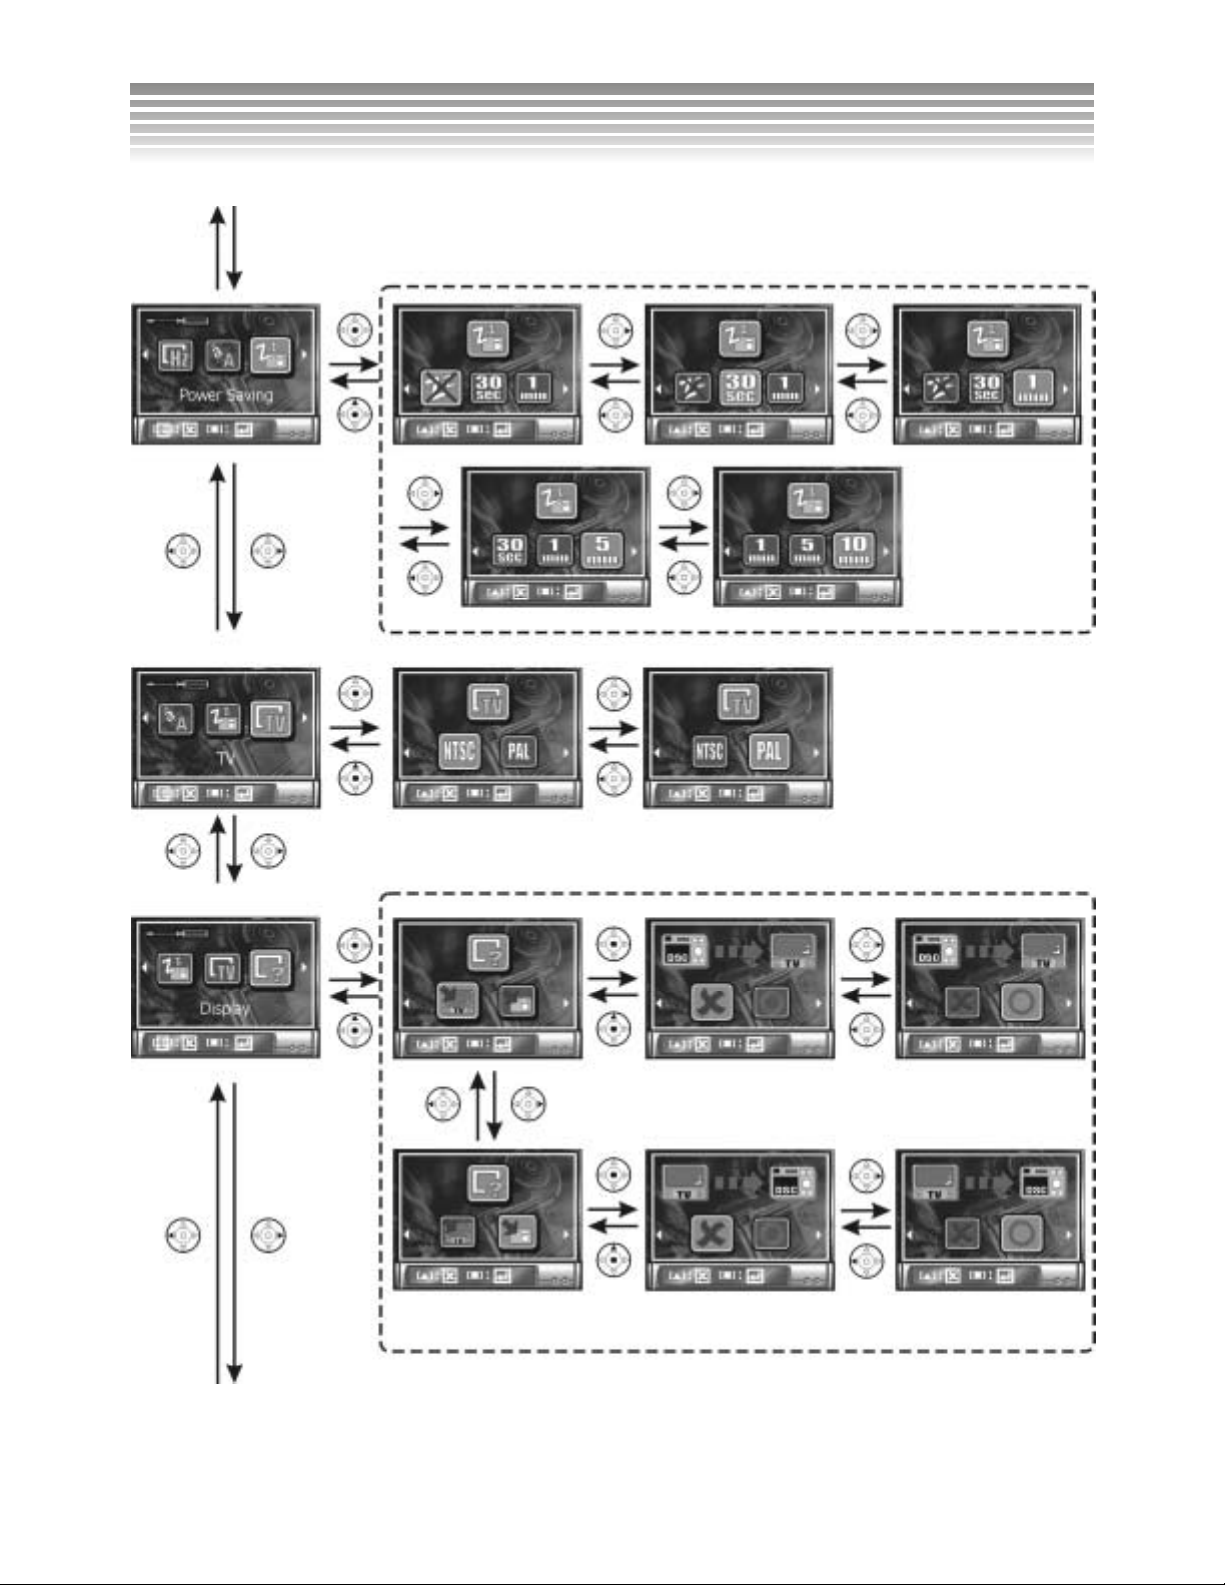
■Energy Saving
Provides auto power off timing options: Off, 30 sec, 1 min, 5 min, and 10 min.
■Video Output
Adjusts the video output format to the regional setting, so pictures can be seen on TV. The United States
uses NTSC.
■Display
Allows you to display pictures/videos on the camera screen or TV. Use this option to tranfer images to a
TV.
Advanced Settings
■Button audio
Activates the sound eff ects when buttons are pressed.
■Startup Light
Activates the front LED light effect when the camera is turned on. Four options are available: OFF, Effect
1, Effect 2 and Effect 3.
■Startup Sound
Offers an opening sound effect when tur ning the came ra on (Optio n : ON/ OFF).
■Startup Picture
Four options are available for setting the startup picture: default startup picture, customized 1, customized
2, and customized 3. The customised picture can be any one you have taken.
■Format
This will reformat and delete all the data on the memory (card). Please make sure the information is
backed up before formatting. NOTE: Once deleted, the files cannot be recovered.
■Reset
After reseting, all options are restored to the default settings.
20
Page 22
Setup Mode (Continued)
Menu Index
21
Page 23
Setup Mode (Continued)
22
Page 24

Setup Mode (Continued)
23
Page 25

Setup Mode (Continued)
The selected picture will be saved to b ecom e the st ar tup picture.
24
Page 26

Photo Mode
Use the Mode dial to switch to the Photo (
The Photo Mode has following options: Auto, Manual, and Scene Mode.
Auto Mode
Icon Description
) Mode.
Information on the current
settings
Focus Zone
Indication of the current
mode
25
Page 27

N
Photo Mode (Continued)
Photo Mode (Auto)
Status of Memory Card
: Memory Card em pty
: Memory Card half full
: Memory Card is almost full
: Memory Card full (red light blinks)
: Memory card wri te protect
: Built-in memory
: Built-in memory half full
: Built-in memory full (red light blinks)
Burst Mode / Number of pictures
Self Portrait
umber of pictures taken / Maximum number of pictures
Flash Mode
Portrait Mode
Effect Mode
Time and date (This icon disappears 5 seconds after entering the mode.)
Info
Battery I n f o
Optical Zoom / Digital Zoom
Image Resolution
Picture Quality
Photo Mode (Auto)
26
Page 28

Photo Mode (Continued)
Manual Mode
Icon Description
Focus Zone
Indication of the current mode
Information on the current
settings
27
Page 29

N
Photo Mode (Continued)
Photo Mode (Manual)
Status of Memory Card
Burst Mode / Number of pictures
Self Portrait
umber of pictures taken / Maximum number of pictures
Flash Mode
Portrait Mode
Effect Mode
Time and date (this icon disappears 5 seconds after entering the mode,.)
Info
Battery I n f o
Except for
Optical Focus / Dig i ta l Focus
Image Resolution
Picture Quality
White Balance
EV Compensation
Metering Mode
ISO Sensitivity
, other sttings are the same as in the Auto Mode.
28
Page 30

Photo Mode (Continued)
Scene Mode
Icon Description
Focus Zone
Information on the current
settings
Except for “ ” other resttings are the same as in the Auto
Mode.
Photo Mode (Scene Mode)
Indication of the current mode
29
Page 31

N
N
Photo Mode (Continued)
Descriptions of the Three Modes
■Auto
The Auto Mode offers users a simple, fast capture mode. Except for Image Resolution and
Picture Quality, other settin gs are defau lt val ues wh ich can no t be adjust ed (Eg : White
Balance, Exposure Compensation, Metering, ISO and Focus Selection will be modified
automatically by the camera). This setting is suitable for most users.
■Manual
The Manual Mode offers settings which are fully adjustable, such as Image Resolution,
Picture Quality, White Balance, Exposure Compensation, Metering, ISO, and Focus
Selection. This setting is suitable for more advanced users.
■Scene Mode
The Scene Mode offers twelve built-in scenes. Individual settings cannot be adjusted, except
for Image Resolution and Pict ure Qu al it y.
Portrait
Landscape
Party
ight Portrait
ight Landscape
Beach
Sunset
Multiple Exposure
Fireworks
Image Transfer
Backlight
Sport
Taking Pictures
This camera takes digita l st ill im ag es in JPEG format. The number of pictu res you can take is subject to the
storage capacity of the memory (card), Image Resolution, and Picture Quality. Pictures with higher
resolution and quality require more memory.
Follow these steps to take pictures.
Turn on the camera and set up the date and time (Please refer to Date and Time Set).
Use the Mode dial to switch to Photo Mode (Choose among Auto, Manual, and Scene Mode. Auto
Mode is suggested for most users.) Find corresponding icons displayed on the upper left hand corner
of the screen and set the Image Resolution and Picture Quality according to your preference (Please
refer to Picture Quality) .
30
Page 32

Photo Mode (Continued)
Use the to choose the Burst / Self Portrait / Close- up Mode.
Frame the view on the LCD screen and press the Shutter button. The Shutter button has two parts.
Press it halfway and hold for focus, with a red framing mark. Then press it the rest of the way down to
save the picture. A
Use the Zoom button to zoom out/in / on the s ubject. This camera has a maximum 12X
zoom (3X Optical Zoom and 4X Digital Zoom).
Activate the Flash when there are insufficient light sources (refer to the Flash Mode for details.)
Refer to the Review Mo d e for vie w ing the p ic tur es .
icon will appear on the screen.
LCD Screen
Use the
key to switch screen display types.
Standard Screen LCD screen turned off.
Optical Zoom / Digital Zoom
Use the Zoom button to zoom out/in
(3X Optical Zoom plus 4X Digital Zoom).
The blue region indicated by
the arrow indicates the optical
zoom range.
/ on the subject. This camera has a maximum 12X zoom
The red region indicated by the
arrow indicates the digital zoom
range.
31
Page 33

Photo Mode (Continued)
Using the Digital Zoom to enlarge images may cause slight aliasing. Note: Full Digital Zoom is not
recommended for taking pictures that require the highest clarity.
Flash
Use the
key to switch to Flash mode.
Display Function Description
No Flash Turns off the Flash (for bright places).
Auto Auto Flash automatically comes on when needed.
Forced Flash Always flashes (bright or dark areas).
Auto Flash plus Red
Eye Reduction
Forced Flash plus
Red Eye Reduction
Slow Sync
Flash fires automatically in low light, and pre-flashes to reduce “red
eye” effects. Auto Flash is sui tab le for por t ra it s.
Always flashes with red eye reduction flash.
Keeps the shutter open long er . Use d a t night and i n low light to
lighten the background and foreground. A tripod is advised.
Burst / Self Portrait / Close-up
Use the
Continuous Photography Mode
When entering the Burst Mode, the
represents the number of camera pictures that will be taken (up to 5 pictures). After framing, press the
Shutter button and the camera will shoot continuously for that number of photos.
button to switch among Burst / Self Portrait / Close-up Mode.
Standard Mode
(Burst Mode)
icon appears on the upper part of the screen. The numbe r
(Self-timer)
(Macro)
32
Page 34

Photo Mode (Continued)
Shutter
!
■Self-timer Mode
The icon appears on the upper part of the screen after entering the Self-timer mode. Press the
Shutter after framing the view and you will see the countdown (the default value is 10 seconds and can be
adjusted on the menu). The front Flash Unit blinks, and as soon as it reaches 3 seconds, it blinks faster.
When it reaches zero, the camera tak es the pic tur es au t omati cal l y.
■Close-Up Mode (Macro)
The icon appears on the right side of the screen when entering the Close-Up Mode or “Macro”
Mode. Take pictures with short distance under the following ranges:
Image Resolution is set at 5MP and Flash is “OFF” in the
Burst Mode, regardless of the current settings.
Shutter
Mode Icon on the screen Description
Close-Up
Basic None
An ideal close-up picture will be shot within 6 ~ 20
inches.
For general picture-taking, a suitable shooting
distance ranges from 20 in. to infinity; the picture
will become blurred if the distance is less.
33
Page 35

Photo Mode (Continued)
!
The Close-Up function is unavailable in the Scene Mode.
Focus Selection
Press the
zone. The Focus Zone is divided into five areas and five framing marks will be displayed on the screen. The
green one represents the area in use. Use the
button. Follow the usual procedures for photographing.
button in the Manual and Scene Mode to enter the focus selection. Set the desired focus
buttons for selection, and press the
Choose the Upper
The first
section of
the shutter
Focus Zone
!
The Focus Zone is disabled in the Auto Mode. Only the
Manual and Scene Modes offer the Focus Zone selection.
Instructions on Scene Modes
Twelve built-in scenes are offe red in the Sc en e Mode. Di ff ere nt set ti ngs for Wh ite Balance, Exposure
Compensation, Metering and other functions are set at default values and cannot be adjusted in these scenes.
Choose the scene according to your p ref ere nce.
Press the
below.
Portrait: For people and other subjects in the daytime.
Landscape: For landscapes in the daytime. The Focus is set at distant scenery.
button to enter the Quick Menu and choose the scene. The twelve scenes are described
34
Page 36

Photo Mode (Continued)
Party: For parties indoors.
Night Portrait: For taking pictures of people at night. A slower shutter speed is used. To avoid blurred
pictures, use a tripod.
Night Landscape: For taking pictures of landscapes at night. A slower shutter speed is used . To avoid
blurred pictures, use a tripod.
Beach: For shooting beach scenes. This enables to you to accurately capture the color of the water.
Sunset: For sunrises, sunsets, or rosy clouds at sunset.
Multiple Exposure: For scenes that requires two exposures to create a mix effect. Capturing the first
subject is the same as general photog raph y. But in the s econd p hoto , th e
button should be pressed within 3 seconds (otherwise the camera shoots
automatically as soon as the timer counts down to zero).
The first
section of
the shutter
(Use the Viewfinder to fram e
the subject for the second
capture.)
Capture the
second image
The second section
of the shutter
3 second
count
down
Capture the first
image
Capture the
second image
Fireworks: For taking pictures of fireworks at night. Focus is set at a distance with a slower shutter
speed. To avoid blurred images, use a tripod.
Copy: For duplicating images.
Backlight: For taking pictures of subjects with bright light behind them.
Sports: For caputuring subjects that are in motion. A fast shutter speed is used, so use this scene under
ample lighting.
Display the final
image
35
Page 37

Photo Mode (Continued)
!
The Close-Up function will not opperate in these scenes:
Landscape, Night Landscape, Beach, Sunset, and Fireworks.
Description on Menu
Use Menu button
■Image Resolution
Four resolution options are avai lab le for taking still images, including VGA, 3MP, 5MP, and 8MP.
Pictures with higher resolution can be printed clearly, but consume more memory and take longer to write
to memory. The resolution of 8MP applies to firmware interpolation, and is not recommended for pictures
that require high detail.
■Picture Quality
Three picture quality options are available: Best , Standard , and Basic . The difference is
the picture compression ratio. For example,
memory, but it has the lowest picture quality.
to display/hide the menu. Here are the descriptions:
has the highest compression ratio. It takes up the least
■Photo Mode
Photo Mode includes Auto , Manual
and Scene
,
.
■Auto
■Manual
●White Balance
Have you ever wondered why pictures take n indoo rs som etim e s come out lo ok ing yel lo w ? The reason is tha t
different lighting sources produce different colors of light (a flash bulb produces a very white light, while a
100 watt incandescent bulb produces a very yellow-looking light). Our brain automatically adjusts the color
so that a white object always appears white regardless of the lighting condition, but a photograph records the
true color. To compensate for this, the DXG-502 can shift the RGB color balance of the ambient light so that
the color in the photograph appears as it should. This process is referred to as “matching the white balance”.
The Manual Mode offers five settings of White Balance.
Auto: Automatically matches White Balance; suitable for general picture taking.
Daylight: For taking pictures outdoors in natural lighting.
36
Page 38

Photo Mode (Continued)
Tungsten: For taking pictures indoors under incandescent lighting.
Fluorescent: For taking pictures indoors under fluorescent lighting.
Cloudy Day: For taking pictures outdoors on a cloudy day.
●EV Compensation
The Exposure Value (EV) compensation can be adjusted automatically , or manually in 20 levels
from -2.0EV to +2.0EV. All things being equal, the higher the EV compensation, the brighter the photos.
●Metering Mode
Four Metering Modes are available, as below:
!Matrix Metering
Matrix Metering divides the viewfinder into several zones to make an ideal exposure value.
!Center-Weighted Metering
This uses the entire image area but calculates the exposure by giving more importance to the center of the
image. This mode is best for portrait photography.
!Spot Metering
This measures a spot in the center, which is about 1/25th of the viewfinder’s area to determine the
exposure of the entire image. Spot Metering is suitable for extremely bright and dark backgrounds.
!Auto Focus Metering
This metering techni que is appl ied to the cur rent focus zone.
■ISO
ISO is the speed of the camera's respons e to light. Use a higher ISO settin g in low light scenes. Four
options are available: Auto, 100, 200 and 400. NOTE: Higher ISO setting may cause “noise” in pictures.
■Scene Mode
Twelve built-in scen es are offe red in the S cen e Mode. Di ff e re nt set ti ngs on Whit e Ba lance, Exposure
Compensation, Metering, and other functions are set at default values and cannot be adjusted. Choose the
scene according to your p re fer ence.
■Effects
This camera offers three default effect settings, allowing users to apply effects in the Manual, Auto and
Scene Mode. These are three default settings:
37
Page 39

Photo Mode (Continued)
■Off
Choose “OFF” to close all effect functions.
■Black and White
This option is for black-and-white pictures.
■Vivid
Choose this to stress the contrast between colors and saturation, making pictures look more coloful.
■Sepia
This effect makes pictures have an antique look.
■Advanced Settings
■Self Timer
Choose this function to set the Self-Portrait and the countdown time, from 2 sec to 10 sec. (The default
value is 10 sec.)
■Burst (Number of Pictures in succession)
Choose this to set the Burst Mode and number of pictures taken in succession, from 3 to 5 pictures. (The
default value is 5.)
■Self Portrait Flash Unit
Use this to set the Self Portrai t mode and the front light effect, which has three modes avai lable.
■Sound Effect of Shutter
Use this to set the sound effect when the shut ter is pressed. Fours options are available, including OFF,
default sound effect 1, defa ult sou nd effec t 2, and default so und ef fec t 3.
38
Page 40

Photo Mode (Continued)
Menu Index
Record Mode
39
Page 41

Photo Mode (Continued)
Advanced Settings
40
Page 42

Photo Mode (Continued)
Photo Mode
41
Page 43

Photo Mode (Continued)
Photo Mode
Twelve built-in scenes are prov id ed
42
Page 44

Photo Mode (Continued)
Advanced Settings
43
Page 45

N
Video Mode
Use the Mode dial to switch to the Video (
Icon Description
) Mode.
Video Mode
Status of Memory Card
Audio Recording Statu s
umber of Videos Recorded
Time of Video Recorded
Time and Date (This icon disappears 5 seconds after en ter ing the mod e.)
Info
Battery In f o
Optical Zoom / Digital Zoom
Recording Videos
You can use the DXG-502 to reco rd a vide o with MPE G-4 format, and use the upper microp hone to re co rd
the audio. (The audio recording function can be turned off.)
The length of video recording is subject to the memory capacity, as well as the image resolution and quality;
Video clips with higher resolution and quality will take up more memory.
44
Page 46

Video Mode (Continued)
Follow these steps to record a video.
Turn on the camera and set up the date and time (Please refer to Date and Time Set).
Use the Mode dial to switch to Video ( ) Mode, the icon is shown on the screen. Set the image
resolution and picture quality according to your needs.
Frame the view you want to record on the screen. Press the Shutter button to start. The length of video
recording time appears on the upper right of the screen, and a lower-right icon begins rotating.
The Zoom button is disabled during video recording. Use the zoom button to adjust the lens before
pressing the Shutter button.
Press the Shutter button again to stop video recording.
If you want to review the video, check the Review Mode (Please refer to Review Mode).
The zoom button is disabled during video recording. Use the
zoom button to adjust the lens before pressing the Shutter
!
button.
Descriptions on Menu
Use the Menu button
■Image Resolution
Three picture quality options are available: Best , Standard , and Basic . The difference is
the video compression ratio. For example,
memory, but has the lowest picture quality.
■White Balance
Please refer to W hite Banlance in the manual for details on White Balance.
Auto: Automatic correction of White Balance; ideal for general photography.
Indoor: Ideal for pictures in doors .
to display/hide the menu. The following are descriptions:
has the highest compre ss ion ra tio. It takes up the least
Outdoor: Ideal for pictu re s outd oor s (in natural light).
■Record
This switches the microphone (On) or (Off).
45
Page 47

Video Mode (Continued)
Menu Index
46
Page 48

Review Mode
Use the Mode dial to switch to Review Mode .
View pictures and videos in the Review Mode. Icons on the screen and functions vary depending on the file
format.
Picture
Icon Description
Current picture information
Information about the current
mode
47
Page 49

Review Mode (Continued)
Review Mode
Picture with audio record (refer to the audio recording).
Protect Mode
Current file format (Picture)
Current file index /Total file number
Date and Time (in five seconds after entering this mode, changes to
Magnification Mode/Recording
Info
Battery Info
Image resolution for photos
White Balance for photos
The picture contains audio recording time
Exposure compensation in photos
Metering mode in picture taking
ISO in photos
!
Where there is no file stored in the memory, a “No File”
message will appear on the screen, and you cannot access
the selection menu.
)
48
Page 50

Review Mode (Continued)
Video
Icon Description
Review Mode
Protect Mode
Current file format (Video)
Current file index /Total file number
Video Recording Time
Date and Time (5seconds after entering this mode, this changes to
Video Review/Volume Adjustment
Info
Battery Info
Thumbnail Display
Use the
display that picture (video) in full size.
button to display thumbnails. Select a thumbnail picture (video) and press the
)
button to
49
Page 51

Review Mode (Continued)
Playing Video
Select the video and press the
the
button to stop during playback.
button to play the video. To pause, press the button again. Press
Picture Magnification Mode
When selecting a picture file, press the
Magnification Mode, press the
displayed on the upper l eft. You can also use the
different parts of the picture.
The maximum magnification value depends on the image resolution of the picture. Pictures with higher
button to enter the Picture Magnif ica ti on Mode. In the
/
buttons to zoom in/out the picture. The magnification value is
buttons to navigate and zoom into
resolution can have a larger m agnification value. To exit the Magnif ic at ion Mode, pres s the
50
button.
Page 52

Review Mode (Continued)
The red framing mark
becomes smaller when
increasing the
magnifaction value.
Audio Record
When selecting a picture file, press the
button to stop recording.
When the memory is
full, the text blinks and
the camera stops
recording.
button to record the audio record of the picture. Press the
51
Page 53

Review Mode (Continued)
Playing/Deleting the Audio Record
If the selected picture has an audio record, the
button to enter the mode of playing/deleting the audio record and follow the directions below.
icon will be shown above the picture. Press the
■Playing the Audio Record
Press the button to play the audio file in the Play/Delete Mode, the audio recording time is shown on
the upper right of the screen. To stop playing, press
button.
■Deleting the Audio Record
In the Play/Delete Mode, you can delete the audio records of pictures. Press the button to delete the
audio record and record another one with the picture. NOTE: the record can not be restored once deleted.
52
Page 54

Review Mode (Continued)
Adjusting Volume
When selecting video clips or picture with an audio record, press the
either before or during playback. Press the
is mute.
Before playing audio record
Playing audio record
or
buttons to adjust the volume; the lowest volume
button to adjust the volume,
Before video is playing
While video is playing
53
Page 55

Review Mode (Continued)
Description on Menu
Use the Menu button
■Deletion
to display/hide the menu. The following are descriptions:
■Delete One
This deletes the unwanted files from the memory card. NOTE: The file can not be restored once
deleted.
■Delete All
This deletes all files from the memory card. NOTE: The file can not be restored once deleted.
■Single Protection / Single Protection Remove
Important pictures/videos can be protected. Protected pictures and videos cannot be deleted without first
removing the protection. Protected pictures or videos include the
sub-options (this differs on wheth e r the fi le has been se lec ted for p ro tection), as shown below:
Single Protection (when the selected file has not been set for protection)
Single Protection Remove (when the selected file is set for protection)
To return to the menu, select
Press the
icon on thescreen, including two
and press button.
button to exit the menu under any selection.
!
■All Protection/Remove Protection
■All Protection
All the pictures/videos on the memory card can be set for protection.
■Remove All Protection
Removes the protection from a ll of the pictures/videos on the memory card.
■Slide Show
The Slide Show can display all the pictures (not including the movie and audio files).
■Starting the Slide Show
54
Page 56

Review Mode (Continued)
Starting the Slide Show. To cancel the Slide Show, press the
button.
■Display Interval
Select the slide show displa y interval from 1 to 10 seconds.
■Repeating the Slide Show
Choose to repeat the Slide Show, with two options : (Repeat) and (No Repeat).
■DPOF (Digital Print Order Format)
This setting stores the digital printing commands in the picture files. Users can directly print the pictures
by inserting the memory card into any DPOF compatible printer.
■Setting Single
Sets the printing number of every single picture. Use / to increase/decrease the printing number,
/ to select the previous/next picture, and the button to set/cancel the date stamp on pictures.
■Setting All
Sets an equal printing number for all of the pictures and whether the date stamp is printed or not. The
operation is the same as that of setting a single picture.
■Direct Printing
This setting enables a direct print out of your pictures by connecting the camera with a printer through the
USB cable (The printer must support the Direct Printing function).
■Printing a Single Picture
For printing one selected picture only. Use / to select the previous/next picture and the
button to set/cancel the printing of the date stamp. After making sure every thing is set, press the
button to start printing.
■Printing All Pictures
Print all the pictures. Use / to increase/decrease the printing number and / button to
select the date stamp option. When everything is set, press the
button to start printing.
■Paper Size
Set the printing paper size; there are five built-in sizes:
55
Page 57

Review Mode (Continued)
Menu Index
Deletion
If the selected file has been set
for protection, it shows…
All Protection/
Remove
Protection
Slide Show
Single Protection
(Single Protection
Remove )
Direct Printing
56
Page 58

p
Review Mode (Continued)
Deletion
Select
Previous/Next
Come back after
0.5 seconds
The file is
rotected and
cannot be
deleted (The
icon blinks)
After the second picture is deleted, the
original third picture becomes the
second and the total file number
decreases by one.
57
Page 59

Review Mode (Continued)
Single Protection
(Single Protection Re move )
Displays this message if the protection
of a single file is removed.
All Protection/Remove Protection
58
Page 60

p
Review Mode (Continued)
Slide Show
Starting the Slide Show…
This message appears when entering the Slide Show,
DPOF, Direct Printing Mode with only videos but no
ictures on the memory card.
59
Page 61

p
Review Mode (Continued)
Skip over it if the
second file is a video.
Direct Printing
Connect the camera with a
rinter that supports Direct
Printing.
Connection OK
Before connection
60
Page 62

Review Mode (Continued)
The following options show up only when the printer supports
these functions.
Skip over a picture file.
Current Picture/Total
File Number
61
Page 63

Review Mode (Continued)
■Printing Notices
!
If the screen displays one of the following messages, there might be a
problem with the printer. Examine the printer status. Often the problems
are the result of the printer being:
Out of Paper
Out of Ink
Using Mismatched Paper Size
For other un-correctable printer errors, please contact the printer
manufacturer.
If you plug the USB cable into other device instead of a printer
in the Direct Printing Mode, disconnect the USB cable and
restart the camera.
62
Page 64

PC Mode
Switch from any mode to PC Mode by plugging the USB cable into the USB port on the camera.
Plug in the USB cable
(connecting the camera
with your computer)
■Removable HDD (Hard Drive)
The camera memory card can be used as a removable HDD. After making a connection, transfer the data
from the memory card to your PC or from the PC to the memory card.
When the camera screen goes dark, you can operate directly from the PC. Once the USB connection is
removed, restart the camera to resume operation.
!
When memory card is inserted, all of the operations will be
based on the data on the memory card. If you want to use the
internal memory, simply remove the memory card.
63
Page 65

PC Mode (Continued)
■Data
Find the DCIM folder in the memory card of the camera from a PC. The data structure is as follows:
(Picture)
(Video)
When files in the 100DGCAM fo lde r reach D AT A99 99, th e came ra wi l l autom at ica ll y make a new fo ld er
named 101DGCAM, where new pictures, videos, and audio files will be saved. When the file index
reaches 9999 again, it will r epeat this process again.
!
If the upload file cannot be opened, the file format is probably
not compatible with the camera.
64
Page 66

Video Out
Use the TV-Out function provided by the camera to transfer the images to a television.
Please follow these steps:
Before getting started, set the Video Out setting to either NTSC or PAL, according to your regional
setting (The United Sta tes u ses NT S C). Please refer to the Setup Mod e /V ide o Out.
Use the video cable provided to connect the camera with the televsion. Switch to the Setup Mode,
enter
television will rec eiv e the data and d isp la y the im age s. You can then use the cam e ra as usual.
Remember to switch the display back to the camera screen before disconnecting the video cable, or the
camera screen will remain off.
!
under (Display) and press the
Because of different TV formats, it is normal for pictures to be
cropped when displayed on the television screen.
button. When the camera LCD turns off; the
65
Page 67

Installing the Software
■Installing the Software on a PC
You can use and operate the “storage device” and “video device” provided by the camera through a PC.
Before operation, follow the instructions below to install the software drivers.
1. Insert the Software CD supplied by the package in t o the CD-ROM drive.
2. The Auto-run program will be executed and the welcome screen will appear with the following
message: (If your CD-ROM drive doesn't support th e auto-ru n fun ct ion, please double click on the
"My Computer" icon on the desktop. Then double click the CD-ROM drive icon and click the
"Driversetup\Setu p.exe " fil e in the ro o t dire cto r y.)
3. Select the desired language of setup program you wish to install.
4. Click on "Driver > Install", and the following screen will appear:
5. Select the desired language, and then press "OK".
66
Page 68

Installing the Software (Continued)
6. Click "Next" to continue the setup program.
7. After the installation is completed, the following screen will appear. Click "Finish" to complete the
application installation.
67
Page 69

g
Installing Application
Pro
rams
■Installing the Application Programs on a PC
Installing the NewSoft ap pli cation programs (Take MP38 for example)
1. Insert the Software CD supplied by the package in t o the CD -R O M drive .
2. The Auto-run program will be executed and the welcome screen will appear the following message: (If
your CD-ROM drive doesn't support the auto-run function, please double click on the "My Computer"
icon on the desktop. Then double click the CD-ROM drive icon and click the "MP38\Setup.exe" file in
the root directory.)
3. Select the desired language of setup program you want to install.
4. Click on the " NewSoft Video works > Install", the following screen will appear:
5. Select the desired language, and click "OK".
68
Page 70

Installing Application Programs (Continued)
6. Click "Yes" to accept the conditions of the Legal Disclaimer and continue the installation.
7. After entering the application setup screen, click "Next" to continue.
8. Press "Yes" to accept the conditions of Software License Agreement and continue the installation.
69
Page 71

Installing Application Programs (Continued)
9. Follow the installation wizard to sele c t the fold er loc at i on.
10. Select the program folder name and click " Next" to con tinue.
11. Click "Yes" to accept the conditions of the Software License Agreement and continue the
installation.
70
Page 72

Installing Application Programs (Continued)
12. The following screen w il l appe ar. Cl ick "Fi n ish " to complete the applicat ion in sta ll at ion.
13. The Windows Media applicatio n has been insta lled succes sfu l ly. Cl ick "O K" to continu e.
14. Go to DirectX9 for setting, and click “Set” after confirmation
71
Page 73

Appendix
■Product Specifications
Image sensor
Pixel
Lens
Focus Distance
Shutter Speed
Display Screen
Storage Media
Optical Zoom
Digital Zoom
Flash mode
1/2.5” CCD
5.0 Megapixels
W : F2.8 f=5.8mm
T : F4.8 f=17.4mm
4 to 20 inches (macro)
20 in. to infinity (people/landscape)
Mechanical shutter & Electrical shutter
(3 sec~1/2000 sec)
1.5” LTPS full color LCD
(502 x 240 PIXELS)
Built-in 16MB FLASH MEMORY
SD card (MMC compatible), supports 16MB~512MB.
3X Optical Zoom
4X Digital Zoom
Off/Forced Flash/Auto Flash plus Red Eye Reduction/Forced Flash
plus Red Eye Reduction/Slow S ync
Flash Effective Rang e
Photo Mode
EV Compensation
White Balance
Metering Mode
ISO
Self Timer
Continuous Photography
File Formats
2 ~ 6 feet
Auto/Manual/Scene
-2.0EV~+2.0EV (20 options)
Picture: Auto/Daylight/Tungsten/Cloudy/Fluorescent
Movie: Auto/Indoor/Outdo o r
Matrix Metering/Center-Weighted Metering/Spot Metering/Auto
Focus Metering
Auto/100/200/400
2~10 sec
3~5 pictures (5.0 Megapixels)
Picture: JPEG(Exif2.2/DCF) Standard
Video: MPEG-4 with Sound
72
Page 74

Appendix (Continued)
Picture Resolution
Picture: VGA, 3MP, 5MP, 8MP
Video: VGA (640 x 480) (10fps)
QVGA (320 x 240) (20fps)
Picture Quality
Interfaces
Languages
Auto Shut Down
Power
Dimensions
Weight
Picture: Best/Standa rd/Basic
Video: Best/Standard/Basic
USB 2.0
Video Output (NTSC/PAL Selectable)
English/Tranditio nal Chinese/Japanese /Ge rm an/French/
Italian/Spanish
30 sec / 1 min / 5 min / 10 min
2X “AA” Ni-MH Rechargeable B atteries
3.5” x 2.48 ”x1.58”
<5.29 ounces (without batteries)
■System Requirements
Please refer to the minimum system requirements when operating the digital camera. Better computer
equipment is strongly recommended for achieving better performance. The minimum system
requirements are as follows:
OS Windows® 98SE/Me/2000/XP
CPU Pentium® 166MHz or higher
Memory 32 MB memory or more
CD-ROM 4X and above
Hard Drive At least 20 MB free space (longer video requires more space).
Others One standard USB 1.1 port
Copyright 2005 DXG Technology USA. Revision Date 2/15/05
73
 Loading...