

Page 1
r
’
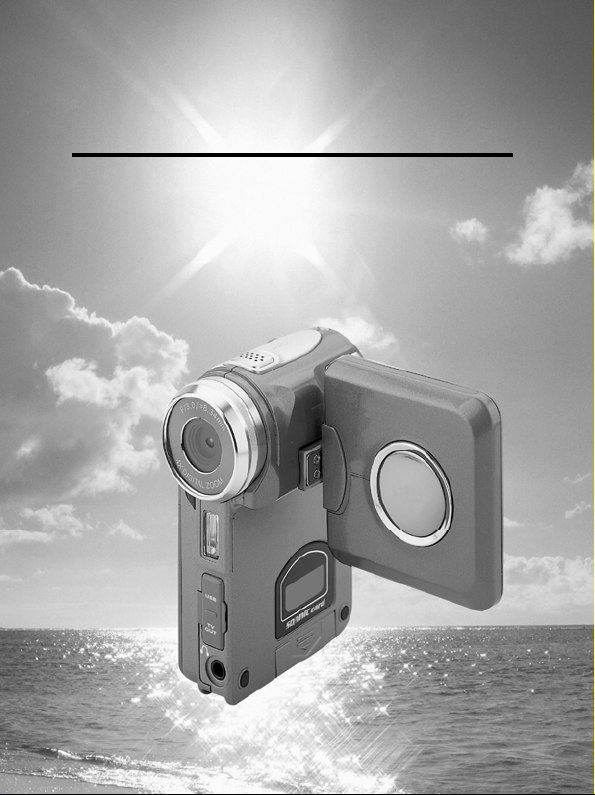
DXG-305V
Use
s Manual
Page 2

Thank you for purchasing the DXG-305 digital video camera.
This easy-to-follow manual shows you how to use your new
DXG-305V digital video camera and install the included software.
You'll find clear instructions on how to take pictures, record videos
and sound, play MP3 files, and use the 305V as a Web camera.
Instructions on using the software to transfer photos and video
segments from the camera into your computer are also provided.
Whether you want to send snapshots or short video clips via email,
create exciting photo albums, see your friends and family over the
Internet, or play MP3 files, the DXG-305V provides you with all of the
tools you’ll need.
Welcome
1
Page 3

Contents
1.Attention…………………………………………………………..…….…..……4
Safty Precautions……………………………………………..……………..….………….…..4
Before Using Your Digtial Video Camera………………….…..…..……….………………..4
Operational Precautions………………………………….…………….………...………..….5
Package Contents………………………….………….…………….…………….…..…...….6
2.Getting to Know Your Digital Video Camera………..………..……....…….7
Digital Video Camera Controls….…….……...……………..…………….………….…….7
Top View……………………………………..……....….…………...………………...…...7
Front Side View………………………………………………....….…………...…………7
Back View………………………………………………....….…………..…………………8
Right Side View…………………………………………...…………...………………..…8
Bottom View………………………………………....….……………...………………..…9
Battery Power Level…………………………....….……………...…………….……..…9
3.Getting Started………..……………..……..…..……………………..……….10
Preparing Your Digital Video Camera….……...………...…………. …...………………10
4.Using Your Digital Video Camera…………….…………...………...…..….11
Function Tree………………….……………….……………….…………….……..…….….11
Video Mode………………………..…….………………….…………….…………..……....14
Status Identifier……………………..………………………....….…………...…………....14
Recording Video …………...….………….….…………….….…………….….………….15
Recording Video with Self-Timer……………….….…….……….….……..…….…….....16
Special Effects…………………..……………….….…….……….….……..…….…….....17
Video Playback…...………….….…….……….….……..…….……...……………………17
Video Index……………….….…….……….….……..…….……………………..……......18
Video Playback Menu………………………….….…….……….….……..…….…..….....18
Camera Mode…………………………………………………………………………………20
Status Identifier……………….……………………. …………………………….…….….20
AE Lock……………….……………………. …………………………….………….….….21
Camera Menu……………….……………………. ……..……………………….….….….21
Flash Function...…………………………………………………….…………………...….21
EV Value Adjust…..……………………………………………….………………….....….21
Taking a Photo with Self-timer…..………….………….………….……….……….….....21
Special Effects…..…………………….……………...…………………………….……....22
Shooting Photos………………………….…………...…………………………….……....22
Taki ng Close-up Pict ures………………………….…………….……...………….……....23
Taki ng Portrait and Dist ant Pictures…… .……………….………….…….….….... .......... 23
Photos Playback………………….……….……………….…….…….……….….…….....23
2
Page 4

Trim Function…..…….……….………….……………….………….……..….……..….....23
Photos Index……………….………….……………….………….……..….………….......24
Camera Playback Menu……………….………….……………….………….……….......24
MP3 Player …….….……………….…….…....………………………………………...……29
Status Identifier ………………………….….…………………………….…..…………....29
Getting MP3 Files Onto Your 305V…….….…………………………….…..…………....29
Playing MP3 Files………….….…………………………………………….………….…..30
Volume / Bass / Treble Adjust ……………………………………………..…….….…….31
Fast Forward / Fast reward / Next / Previous……………………………….……….….32
Repeat One / Repeat All / Random / Playing In-order……………..……….……….….32
MP3 Playback Menu …...…………………….….…………………………...…………....33
Voice Modes…………………………………………………………………………….…….35
Status Identifier……...……………….………………………………………..….…….…..35
Record Voice………………………………………………………………………………...35
Voice Playback Menu…...……………………………..…………………………………...36
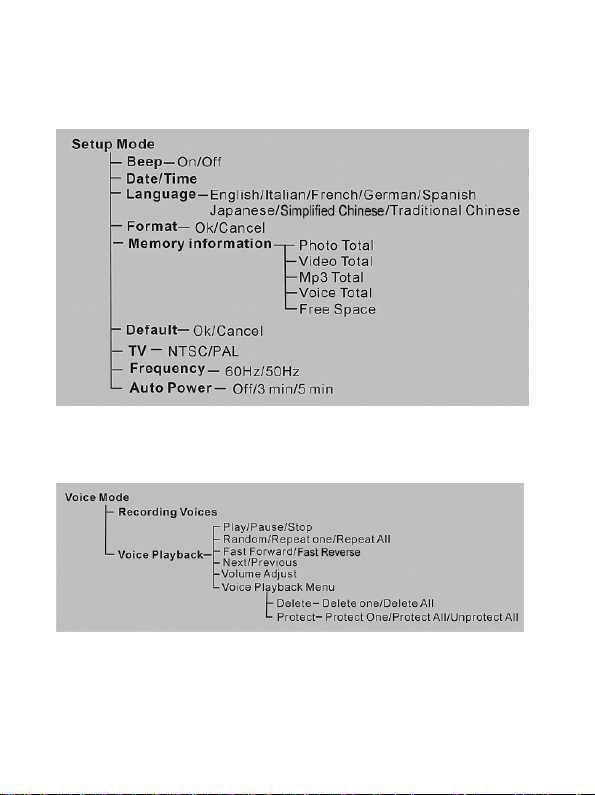
Setup Mode …….….……………….…….….…………………………….…………...……38
Status Identifier ………………………….….…………………………….…..…………....38
Setting………….….…………………………………………….…………….……………..38
Help Screen…………………………………….….……...………………..…….………….40
Prompt……………………………….….……………...………………………………..….. 41
5.Connecting Your Computer….…... ....….…..….….…...…….…......…......42
Using the Digital Video Camera as a Web Camer a or a Mass Storage Device.…….…..42
Connecting to Your TV / VCR…..………………………………..………….………..….…..43
System Requirements……………….……………………………………………….…...…..44
6.Installing Drivers… …………………….. ……… ……………… .... … …… ...46
7.Installing the Applications for PC………...………...………...……...….…48
8.Appendix: Digital Video Camera Specifications….…..........…..………..52
9.Common Malfunctions Disposal…….….....….....……... ..…..…… ....…..53
3
Page 5

1. Attention
Please read through this manual before using the digital video camera and follow
the instructions carefully to avoid camera damage.
Safty Precautions:
●The software CD-ROM packaged with the DXG-305V is for a PC only. Playing
this CD-ROM on a stereo or CD player may damage it.
●This digital video camera is a precision electronic device. Do not attempt to
service the camera yourself, as opening or removing covers may expose you to
dangerous voltage points or other risks. To reduce the risk of fire, do not store
this product under direct sunlight.
Before Using Your Digital Video Camera:
●Take some test shots prior to formal recording
Before using this camera for an important occasion, such as a wedding
ceremony or trip, first test the camera to ensure that it functions properly . DXG
is not responsible for any incidental losses (such as the costs of photography or
the loss of income from photography) incurred as the result of this product
malfunctioning, and no compensation will be provided.
●Copyright information
All pictures taken with this digital camera must be in accordance with copyright
law. When "No Photography" restrictions are in place, it is illegal to record any
live performance, improvis ation or exhib it, even f or personal use. Any tr ansfer
of pictures or memory card data must be conducted under the constraints of
copyright law.
●Notes on the LCD (Liquid Crystal Display) monitor
Be extra careful with the LCD monitor. If it is damaged and begins to leak, do
the following:
1. If the liquid touches the skin: wipe the skin dry with a cloth and rinse
immediately with plenty of water.
2. If the liquid comes in contact with eyes: rin se immediatel y with plenty of
water for at least 15 minutes and seek medical advice as soon as
possible.
3. If the liquid is accidentally swallowed: rinse the mouth with water, drink
plenty of water and induce vomiting. Seek medical advice as soon as
possible.
4
Page 6

Operational Precautions:
This product consists of intricate electrical parts. To ensure the highest possible
performance, do not drop or hit the camera.
●Avoid using or storing the camera in the following locations:
1. Damp or dusty places.
2. In sealed vehicles, in direct sunli ght, or in any areas with extremely high
temperatures.
3. Turbulent or high-vibration environments.
4. Areas with smoke, oil fumes or steam.
5. Locations subject to strong magnetic fields.
6. Rainy or snowy environments.
●Do not open the battery cover when the power is on.
●If water enters the camera, turn the power OFF and remove the batteries
immediately.
●How to maintain your digital video camera:
1. If the lens, LCD monitor or viewfind er surface is dirty, use a lens brush
or soft cloth to wipe it clean. Do not touch the lens with your fingers.
2. To avoid scr atching the lens, LCD m onitor or viewfinder surface, do not
use any hard or abrasive object to touch the camera.
3. Do not use any detergents or volatile solutions to clean the camera.
This may harm the camera and/or paint. Use a soft cloth only.
5
Page 7
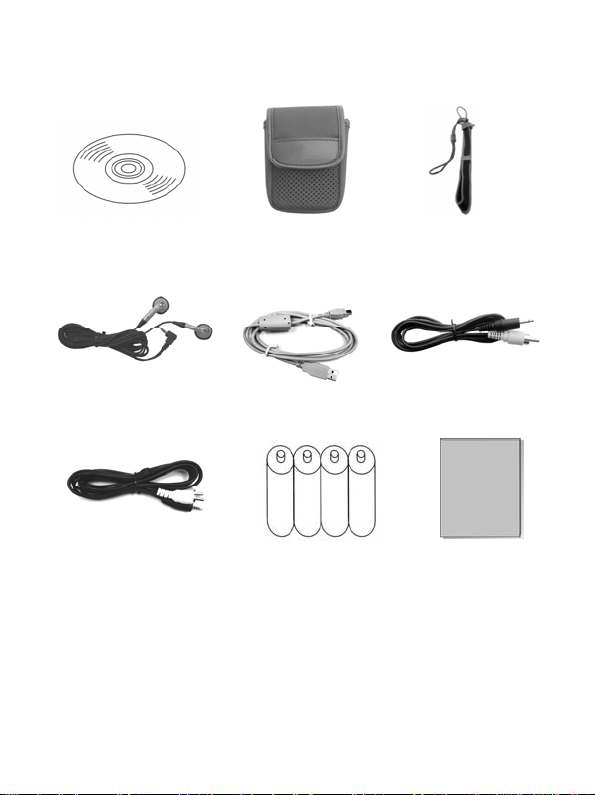
Package Contents
CD-ROM
(Driver & Application Software)
Earphones USB Cable TV OUT Cable
Pouch
Audio Cable 4x AAA Alkaline Batteries User's Manual
●CD-ROM (Driver & Application Software)
Wrist & Lens Cover Strap
●Pouch
●Wrist Strap & Lens Cover Strap
●Earphones
●USB Cable
●TV OUT Cable
●Audio Cable
●4 x “AAA” Alkaline Batteries
●User's Manual
6
Page 8
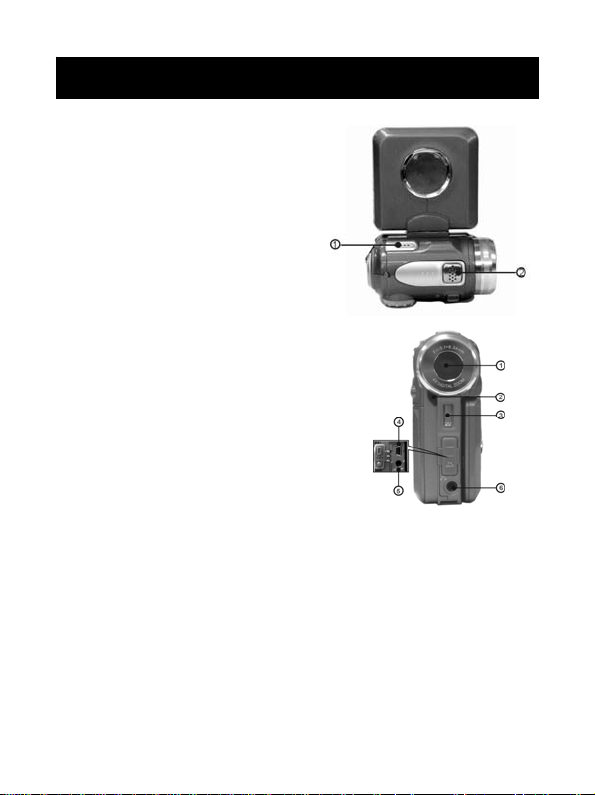
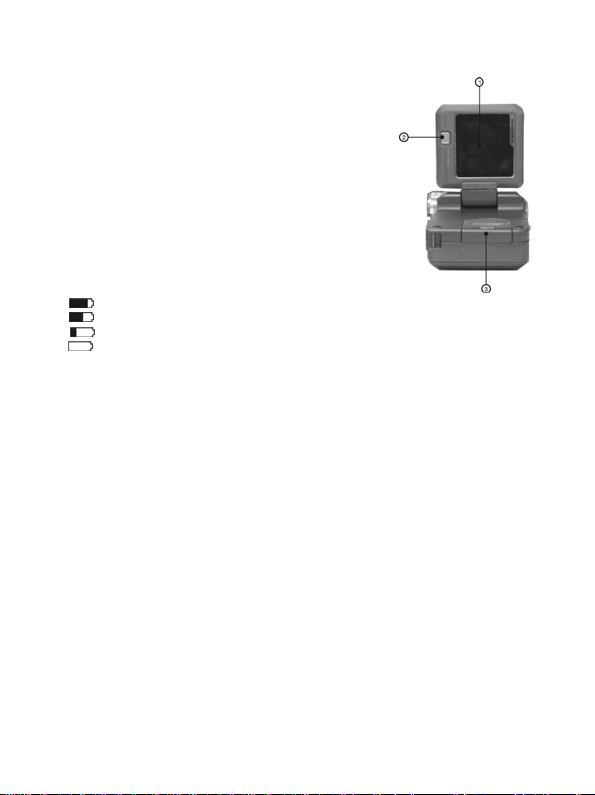
2. Getting to Know Your Digital Video Camera
Digital Video Camera Controls
Top View:
1. Microphone
2. Speaker
Front Side View:
1. Lens
2. Self-timer LED
3. Built-in Flash
Terminal Compartment
The DXG-305V has three ports for
attaching the following cables: Audio Output, Video
Output, and USB. These ports will enable you to attach the appropriate cables
from the digital video camera to your computer,TV/VCR or earphones.
4.USB Port - Used to connect your digital video camera to the computer via the
USB cable. You can then transfer photos, recorded videos (with sound), or MP3
files. This also allows you to use the digital video camera as a web camera.
5.Video Output Port - Used to connect your digital video camera to a TV/VCR
for viewing images/videos on TV.
6.Audio Output Port - Used for earphones to listen to MP3 and v oice recordings
stored in your digital video camera.
7
Page 9
BACK VIEW:
1. Multi-function Button-In all modes, this
selects directions such as Up, Down, Left, Right
and other special functions.
2. Shutter Button- Press to take pictures in Capture
mode, and to start & stop recording videos or
voices in Video or Voice mode.
3. Dual Color LED (Power LED/Busy LED)-When
the digital video camera is turned on, the LED will
turn green. When the digital video
camera is busy, the LED will turn red.
4. Menu Button- Press the MENU button in any mode and the operation menus
of that mode will be displayed on the LCD monitor.
5. Select Button – In any mode, this performs the tasks of select, confirm,
forward, rewind, and OK.
6. Playback Button - In video mode, camera mode, voice mode, MP3 player
mode, press this button for “Play”.
7. Power Button- If pressed for one second, this will power the camera on/off.
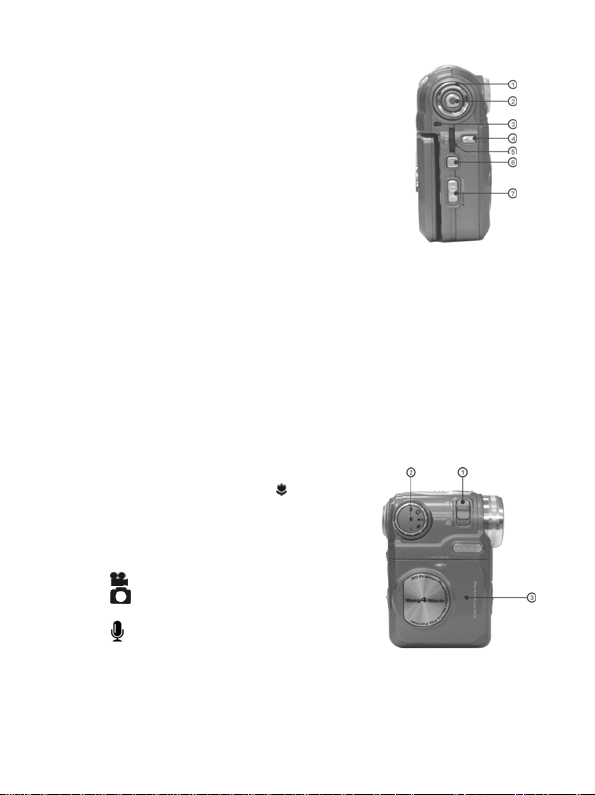
Right Side View:
1. Macro Switch-This is used for “Normal”
and “Macro” (close-up) modes. The
appear on the LCD panel if the Macro mode
is selected.
2. Mode Dial- You can select the following modes
by rotating this dial:
1.
-Video mode
2. -Camera mode
2. MP3 -MP3 player mode
4. -Voice mode
5. SET -Setup mode
3. Battery Cover
icon will
8
Page 10
Bottom View:
1. Color Liquid Crystal Display
2. Display Button-In Video mode and Camera mode,
this button will clear the icon on the LCD panel and
allow you to enter the help screen:
Normal → Full screen → Help
In other modes, this button will help you to enter
help screen directly: Normal → Help Screen.
3. SD Card Slot
Battery power level
Full battery power
Medium battery power
Low battery power
Battery exhausted
9
Page 11
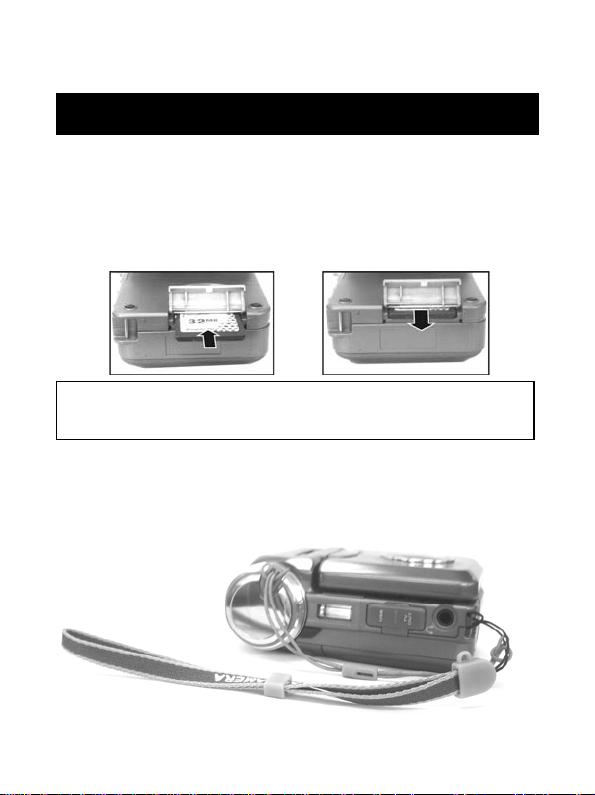
3.Getting Started
Preparing Your Digital Video Camera
●Step 1 Insert four "AAA" batteries into the battery compartment .
●Step 2 When inserting an SD/MMC memory card, follow the icon shown in the
compartment to orient the card. Push the memory card all the way into
the memory slot to insert. Pushing the card in again gently , will cause
it to pop-out.
Note: When memory card is inserted, the internal 16MB memory will be
disabled regardless of whether the card is full or not. Do not remove the
memory card when the power is on.
10
Page 12
4.
Using Your Digital Video Camera
●Step 1 Press the Power button to turn on the digital video camera. The Power
LED will illumitate.
●Step 2 The LCD Display will turn on automatically.
Note: The LCD Display will turn off automatically if you do not use the
camera for over 1 minute. The camera will also turn off automatically after
a predetermined time, if you have set up that functionality.
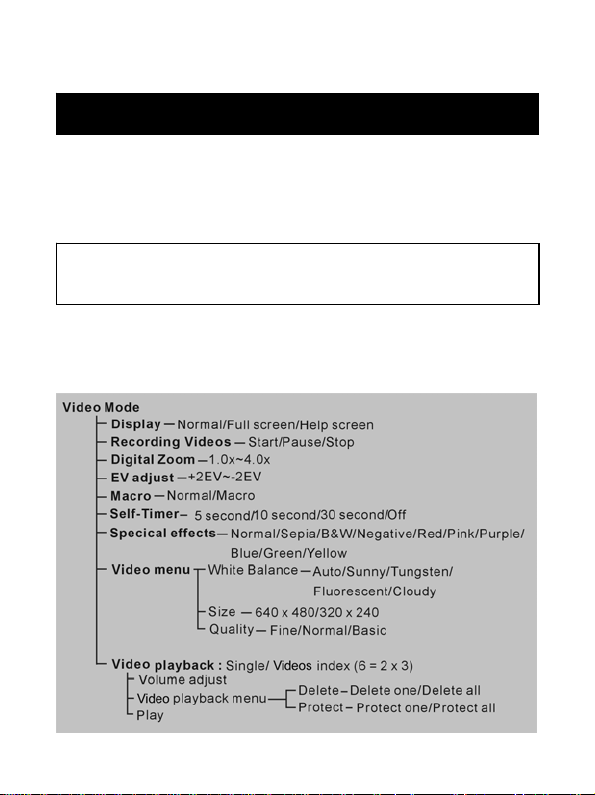
Function Tree
Video Mode
11
Page 13
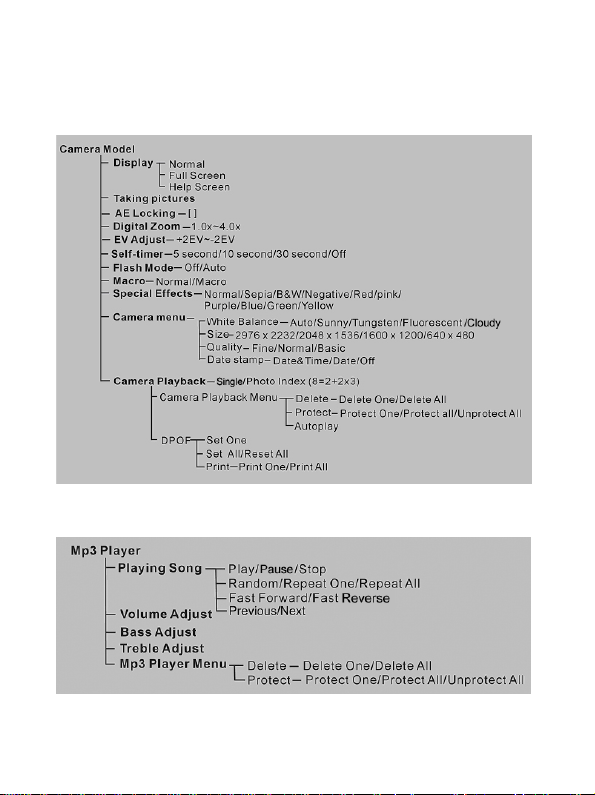
Camera Mode
MP3 Player
12
Page 14
Setup Mode
Voice Mode
13
Page 15
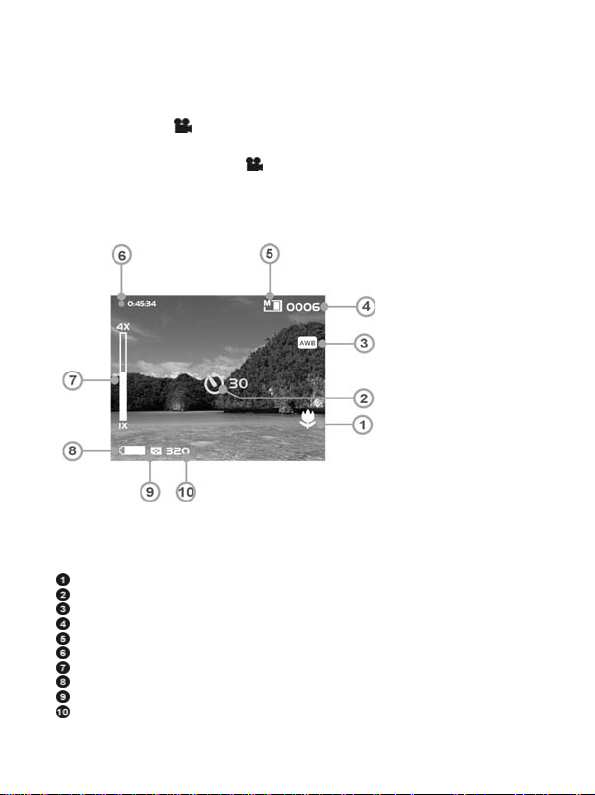
Video Mode [
Rotate Mode Dial to [Movie] [ ]
]
Status Identifier
Macro
Self-Timer/Delay
White B alance
Videos Co unter
Memory Status
Recording Time Left
Zoom Lever
Battery
Video Q uality
Video Size
14
Page 16
Recording Video
This digital video camera can record
video in the MPEG-4 format.
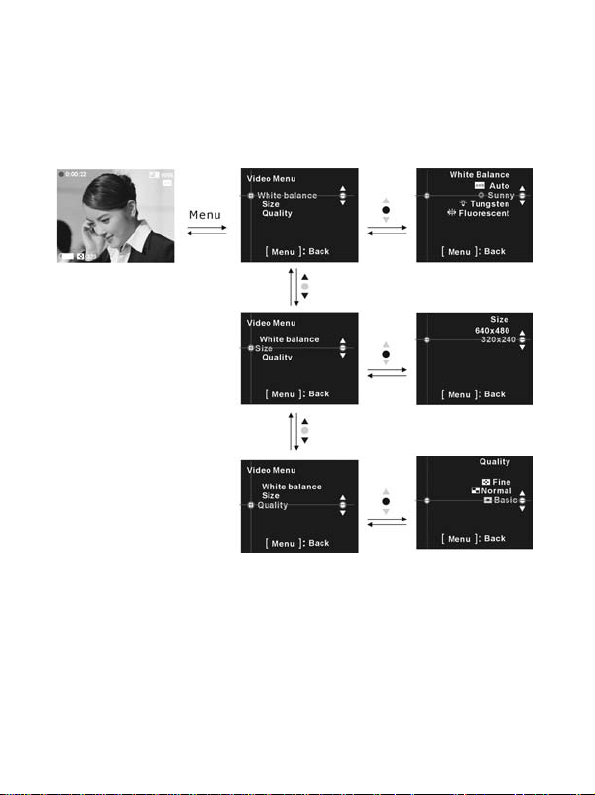
In video mode, press the menu button to enter the video menu.
Select video size:
1. Roll the select button up or down to select「Size」and press the ok button.
2. Roll the select button up or down to select the size that you want to record
and press the ok button. Size options: 640X480 and 320X240
Select the white balance:
1. Roll the select button up or down to select「White balance」and press the ok
button.
2. Roll the select button up or down to select the conditions under which you
are recording and press the ok button. White balance options:
Auto,Sunny,Tungsten,Fluorescent,Cloudy
Select video quality:
1. Roll the select button up or down to select「Quality」and press the ok button.
15
Page 17
2. Roll the select button up or down to select the qua lity that you want to recor d
and press the ok button.
Quality options: Fine, Normal, Basic
Start recording:
●Step 1 Press shutter to start recording video. You will see
live views of the subjects or sc enes you are recording on the
LCD panel. Roll the select button up or down to zoom.
2 Sec.
When recording, press the multi-func button up or down on to adjust the
exposure value.
When recording, press the multi-function button right to pause recording, press
again to continue recording.
●Step 2: Press the shutter button again to stop recording.
Recording Video With Self-timer
1.Press the left button of multi-func button to enter the self-timer setup
interface.
2.On the self-timer setup, roll the select button up or down to select the wait
time of the self-timer and press the ok button.
3.Press the shutter button to start the countdown. When the count reaches
zero, the digital video camera will start recording. During countdown, pressing
the ok button will cancel the countdown.
16
Page 18

Special effects:
In video mode, press the ok button to enter the special effects menu.
Roll the select button up or down to select the effect that you want.
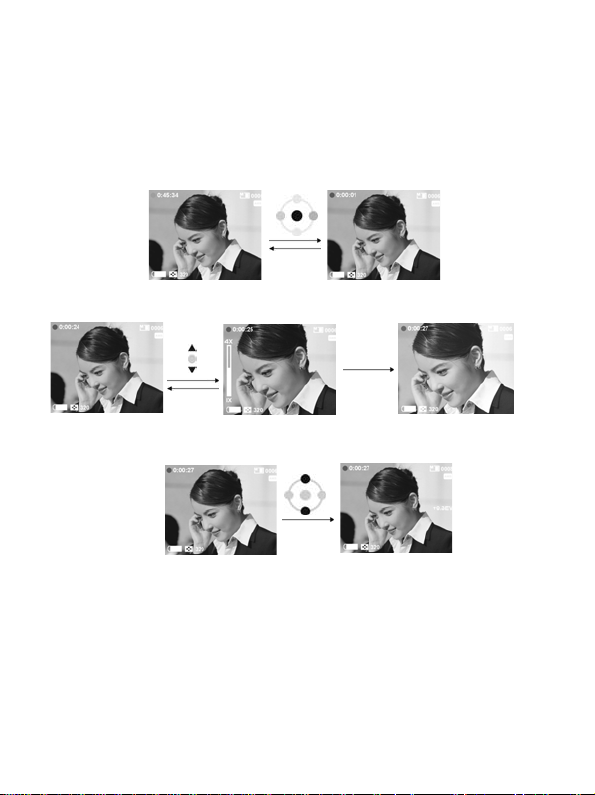
Video playback:
In video mode, press the playback button to enter the video playback mode.
1. Roll the select button up or down to select the video that you want to play
and press the ok button to start playing.
2. Press the ok button again to stop playing.
17
Page 19

3. When playing, press the right button of the multi-func button to pause
playing, and press it again to continue playing. Pressing the multi-function
button up or down will adjust the volume.
Video index:
In video playback mode, press the left button of the multi-func button to browse
the video index, which shows 6 images per page in a preview window. Roll the
select button up or down to change the images previewed. Press the OK
button to return to Playback Mode which displays in full screen.
Video playback menu:
In video playback mode, press the menu button to enter the video
playback menu.
Delete one
1. Roll the select button up or down to select「delete」and press ok
2. Roll the select button up or down to select 「delete one」and press
3. Roll the select button up or down to select the file that you want to
button.
ok button to enter the “delete one” fil e interface.
18
Page 20

delete, and press the ok button to delete file selected (protected files
can’t be deleted).
Delete all
1. Roll the select button up or down to select「delete」and press the ok
button.
2. Roll the select button up or down to select「delete all」and press the
ok button to enter the “delete all” file interface.
3 On the “delete all” file interfac e, rol l t he selec t b ut t on u p or d own t o
select「ok」and press the ok button to delete all files. Select「cancel」
and press the ok button to exit.
Protect one
1. Roll the select button up or down to select「Protect」and press the ok
button.
19
Page 21

2. Roll the select button up or down to select「Protect one」and press
the ok button to enter the “protect one” file interface.
3. Roll the select button up or down to select the file that you want to
Protect. If the current file has not been protected, press the ok button
to protect the current file and the
button again to unprotect the current file and the
disappear.
Protect all
1. Roll the select button up or down to select「Protect」and press ok the
button.
2. Roll the select button up or down to select 「Protect all」and press the
ok button to enter the “protect all” file interface.
3. In the “protect all” file interface, roll the select button up or down to
select「ok」and press ok button to protect all files. Select「cancel」and
press ok button to unprotect all of the files.
icon will appear. Press the ok
icon will
Camera Mode
Rotate the mode dial to
Status identifier:
Time
Macro
AE-Lock
White B alance
Photo Counter
Memory Status
Flash
Zoom Lever
Battery
Photo Quality
Photo Size
Date
AE lock:
When pressing the Shutter button half-way down, the [ ] Icon appears to
indicate stop auto exposure.
Camera menu:
20
Page 22

Before taking photos,you can configure your camera options by pressing
the menu button.
Select image size:
1. Roll the select button up or down to select「Size」and press the ok button.
2. Roll the select button up or down to select the size that you want to
record and press ok the button. Size op tions: 2976X2232, 2048X1536,
1600X1200, 640X480
Select the white balance:
1. Roll the select button up or down to select「White bala nce」and press the
ok button.
2. Roll the select button up or down to select the means that you want to
record and press the ok button.
White balance options: Auto, Sunny, Tungsten, Fluorescent, Cloudy
Select image quality:
1. Roll the select button up or down to select「Quality」and press the ok
button.
2. Roll the select button up or down to select the quality that you want to
record and press the ok button.
Quality options: Fine, Normal, Basic
Select the date stamp option:
1. Roll the select button up or down to select 「Date stamp」and press the
ok button.
2. Roll the select button up or down to select the option you want and press
ok button.
Date stamp options: Date & Time, Date, Off
Flash function:
The flash function is active only in camera mode and has two options. Pressing
the right button of the multi –func button, can place it in auto or off status.
EV value adjust:
In camera mode, press the multi-func button up or down to adjust the
exposure value.
EV value range:-2.0~+2.0
Taking a photo with self-timer:
Right button
Off
Auto
1. Press left button of multi-func button to enter the self-timer setup interface.
2. On the self-timer setup interface, press the select button up or down to
select the wait time of the self-timer and press ok button.
3. Press the shutter button to start the countdown. After the countdown
reaches zero, the digital video camera will take the picture. During
countdown, pressing the ok button will cancel countdown.
21
Page 23

Special effects:
In camera mode, press the ok button to enter the special effects menu. Press
the up or down button of select button to select the effect that you want .
Effect options:
Normal/Sepia/B&W/Negative/Red/Pink/Purple/Blue/Green/Yellow
Shooting photos:
●Step 1 Make sure the digital video camera is turned on.
●Step 2 Use the LCD display to frame th e subjects you w ant to photogr aph.
●Step 3 Press the shutter button halfway to lock the auto exposure.
●Step 4 Press the Shutter button the entire way to take the picture.
The LCD will display the still scene until it is stored in memory. When the LCD
display resumes, you may focus your next target to take the next picture.
To take close-up pictures:
●Step 1 Push the Macro switch upwards to select Macro mode.
22
Page 24

The Macro indicator on the LCD display will illum inate, a llowing y ou
to take pictures at a closer range (between 17~22cm).
●Step 2 To take pictures, follow the steps in the "Shooting Photos" section.
To take portrait and distant pictures:
●Step 1 Push the Macro switch downward. This sets the digital video camera to
normal mode, and the icon on the LCD panel will disappear, allowing you to
take pictures of people or scenery at distance 3 feet~infinity.
●Step 2 To take pictures, follow the steps in the "Shooting Photos
"section.
Photo playback:
1.In camera mode, press the playback button to enter camera playback
mode.
2 In camera playback mode, press the select button up or down to select the
photo you want.
3.Press the ok button to scale the current photo and press the select button
up or down button to size. When a photo is scaled up, you can press the
multi-func button up, down, left or right to move to the position that you
want.
Trim function:
When current photo is being scaled up, you can press shutter button to enter
trim function menu. Press the select button up or down to select the image size
that you want, then press the ok button and the current photo will be trimed to
a new photo.The image size selected must be smaller than the size of current
photo.
23
Page 25

Photos index
In camera playback mode, press the left button of the multi-func
button to browse the photo index. This shows 8 images per page in a
mid-size preview window. Press the multi-func button up or down to
change previewed images, and press the ok button to return to
Playback Mode which displays selected image with full screen.
.
Camera playback menu:
In camera playback mode, press the menu button to enter the camera playback
menu.
Delete one
1.Press the select button up or down to select 「delete」and press the ok
button.
2. Press the select button up or down to select「delete one」and press
the ok button to enter the “delete one” file interface.
3. Press the select button up or down to select the file that you want to
delete, and press the ok button to delete file selected (protected files
can’t be deleted).
Delete all
1. Press the select button up or down to select 「delete」and press the ok button.
24
Page 26

2. Press the select button up or down to select「delete all」and press the ok
button to enter the “delete all” file int erface.
3. On delete all file interface, press the select button up or down to select「ok」
and press the ok button to delete all files (protected file can’t be deleted),select
「cancel」and press the ok button to exit the “delete all” file interface.
Protect one
1. Press the select button up or down to select「Protect」and press the ok button.
2. Press the select button up or down to select「Protect one」and press the ok
button to enter the “protect one” file interface.
3. Press the select button up or down to select the file to be protected. If the
current file has not been protected, press the ok button to protect current file
and the icon will appear. Press the ok button again to unprotect the current
file and the icon will disappear. If on the other hand, the current file had
been protected, the icon would appear, and pressing the ok button would
unprotect the current file and make the icon disappear.
Protect all
1. Press the select button up or down to select「Protect」and press the ok button.
2. Press the select button to select 「Protect all」and press ok button to enter the
“protect all” file interface.
3. On the “protect all” file interface, press the select button up or down to select
「ok」and press the ok button to protect all files. Select「cancel」and press the
ok button to unprotect all the files.
Auto play:
Press the select button up or down to select 「Auto play」and press the ok button
to show all of the pictures previously taken with the digital video camera at a
fixed interval. Press the menu button to exit the slide show.
DPOF:
Selecting the DPOF option in Playback Menu allows you to save your printing
orders for compatible printers that read DPOF (Digital Print Order Format)
files.
Set one
1. Press the select button up or down to select「DPOF」and press the ok
button .
2. Press the select button up or down to select 「Set one」and press the ok
button to enter the “Set one” interface.
3. On the “Set one” interface, press the select button up or down to select
the file that you want to set, and then press the ok button to add the
number of prints you want printed; the maximum number is three.
Set all:
Press the select button up or down to select
1.
Press the select button up or down to select
2.
to enter the “Set all” interface.
「DPOF」and press the ok button .
「Set all」and press the ok button
25
Page 27

3. In the “Set all” interface, press the select button up or down to select「ok」
and press the ok button to set all of the files to DPOF. The print number for
each picture is set at one. Select「cancel」and press the ok button to reset all
the files.
26
Page 28

Direct print (for printers that support PictBridge )
Press the select button up or down to select「Print」and press the ok
button. You will be prompted to connect the digital video camera to a
printer with the USB cable. If the connection is successful, the print
menu will appear.
Print one
1.On the print menu, press the sel ect butto n up or down to select「Print
one」and press the ok button to enter “print one” file interface.
2.On the “print one” file interface, press the select button up or down to
select among 「photo to print」, 「copies to print」, 「paper size」,
「date stamp,「Print」.
-Photo to print: Press the left or right button of the multi-func
- Copies to print: Press the left or right button of the multi-func
- Paper size: Press the left or right button of the multi-func button
- Date stamp: Press the left or right button of the multi-func button
- Print: Press the ok button to start printing
Print all
1. On the print menu, press the select button up or down to select
「Print all」and press the ok button to enter the “print all” file
interface..
2.On the “print all” file interface, press the select button up or down to
select among「copies to print」, 「paper size」, 「date stamp」,
「print」.
- Copies to print: Press the left or right button of the multi-func
- Paper size: Press the left or right button of the multi-func button
- Date stamp: Press the left or right button of the multi-func button
- Print: Press the ok button to start printing
button to select the photo file that you want to print.
button to set the number of copies you want printed.
to set the paper size you are printing to.
to select the date stamp option.
button to set the number of copies you want printed.
to set the paper size you are printing to.
to select the date stamp option.
27
Page 29

28
Page 30

MP3 Player
Status Identifier:
Getting MP3 Files Onto Your 305V:
The DXG-305V has the ability to play MP3 files. Only song files in the MP3 file
format can be played in the MP3 function. Files on CDs are usually in the
Windows Media format (.wma) or wav format and cannot be played in their
native format; they must first be converted into MP3 files. This can be
accomplished with many types of software which are available at little or no
cost.
Once the songs are in the MP3 format, they can be tr ansferred to the MP3 folder
in the camera’s onboard memory or onto the SD card. This can be
accomplished by one of two ways: 1.) Attach the USB cable to the camera,
select “Mass Storage” and then u se your PC to find the removable hard drive
( the camera / SD card). Once located, drag and drop the MP3 files into the MP3
folder . NOTE: T wo removable hard drives will be visible if the camera has an SD
card inserted. 2.) The other way is to place the SD card into a card reader,
locate the MP3 folder, and drag and drop the MP3 files into the MP 3 folder. The
card can then be re-inserted into the camera.
Once the files are in the MP3 folder, they can be played by rotating the mode
dial to the MP3 mode.
29
Page 31

Playing MP3 Files:
In MP3 mode, press the select button up or down to select the MP3 files that
you want to play, then press the ok button. At this time, you will see the time
length and the baud rate of current MP3 file. To play MP3 song selected, press
the shutter button.
Volume, Bass, Treble Adjust:
When playing MP3 files, press the up or down button of the multi-func
button to adjust the volume , press the ok button to switch between volume,
bass and treble.
30
Page 32

Fast Forward, Fast Reverse, Next, Previous:
When playing MP3 files, press the up or down button of multi-func button
once to select the previous song or next song. Press and hold the left or right
button of the multi-func button for fast reverse or fast forward. Press the menu
31
Page 33

button to pause, and again to continue playing. When not playing,you can
press the left or right button of the multi-func button to select previous song or
next song.
Repeat One, Repeat All, Random, Playing In-order:
When playing an MP3 files, press the playback button to switch to various
play formats. The formats are are following:
1. Repeat one: Repeats a single song
2. Repeat all: Repeats all songs
3. Random: Plays the songs in random number
4. Playing in-order: Plays the songs sequentially
32
Page 34

MP3 Player Menu:
After the MP3 player st ops playing a s ong in MP3 mode, press the menu button
to enter MP3 player menu.
Delete one
1.Press the select button up or down to select「delete」and then press the ok
button.
2. Press the select button up or down to select「delete one」and press the ok
button to enter the “delete one” file i nterface.
3. Press the select button up or down to select the file to be deleted and press
the ok button to delete (protected file can’t be deleted).
Delete all
1. Press the select button up or down to select 「delete」and press the ok button.
2. Press the select button up or down to select「delete all」and press the ok
button to enter the “delete all” file int erface.
3 In the “delete all” file interface, p ress th e sel ect bu tton up or d own t o sel ect
「ok」and press the ok button to delete all files. Select「cancel」and press the
ok button to exit the “delete all” file interface (protected file can’t be deleted).
Protect one
1. Press the select button up or down to select「Protect」and press the ok button.
2. Press the select button up or down to select「Protect one」and press the ok
button to enter the “protect one” file interface.
3. Press the select button up or down to select the file that you want to protect.
33
Page 35

If the current file has not been protected, press the ok button to protect the
current file and the icon will appear. Press the ok button again to
unprotect current file and the icon will disappear. If on the other hand, the
current file had been protected, the icon would have appeared.
Protect all
1. Press the select button up or down to select「Protect」and press the ok button.
2. Press the select button up or down to select「Protect all」and press the ok
button to enter the “protect all” file interface.
3. In the “protect all” file interface, press the select button up or down to select
「ok」and press the ok button to protect all files. Select「cancel」and press the
ok button to unprotect all files.
Voice Mode
Switch to Voice mode
Status Identifier:
In voice mode ,press the shutter button to start recording and press it again
to stop recording.
Voice recording:
Voice playback:
In voice mode, press the playback button to enter the voice playback
mode.
Press the select button up or down to select the voice file, then press the ok
button to start playing the voice selected. Press the ok button again to stop
playing.
34
Page 36

In voice playback mode, press the multi-func button up or down to adjust
volume.
Fast forward, Fast reverse, Next, Previous:
When playing voice recordings, press the multi-func button once left or
right to select the previous recording or next recording. Press and hold for
fast reverse or fast forward. Press the menu button to pause, and press it
again to continue playing.
Repeat one, Repeat all, Random, playing in-order:
When playing voice recordings press the playback button to switch mode
playing. The modes of playing are following:
1.Repeat one:Repeats a single recording
2.Repeat all: Repeats all recordings
3.Random: Plays the recordings in random order
4.Playing in-order: Plays the recordings sequentially
35
Page 37

Voice playback menu:
In voice playback mode, press the menu button to enter the voice playback
menu。
Menu
Delete one
1.Press the select button up or down to select「delete」and then press the ok
button.
2. Press the select button up or down to select「delete one」and press the ok
button to enter the “delete one” file i nterface.
3. Press the select button up or down to select the file to be deleted and press
the ok button to delete (protected file can’t be deleted).
36
Page 38

Delete all
1. Press the select button up or down to select 「delete」and press the ok button.
2. Press the select button up or down to select「delete all」and press the ok
button to enter the “delete all” file int erface.
3 In the “delete all” file interface, p ress th e sel ect bu tton up or d own t o sel ect
「ok」and press the ok button to delete all files. Select「cancel」and press the
ok button to exit the “delete all” file interface (protected file can’t be deleted).
Protect one
1. Press the select button up or down to select「Protect」and press the ok button.
2. Press the select button up or down to select「Protect one」and press the ok
button to enter the “protect one” file interface.
3. Press the select button up or down to select the file that you want to protect.
If the current file has not been protected, press the ok button to protect the
current file and the icon will appear. Press the ok button again to
unprotect current file and the icon will disappear. If on the other hand, the
current file had been protected, the icon would have appeared.
Protect all
1. Press the select button up or down to select「Protect」and press the ok button.
2. Press the select button up or down to select「Protect all」and press the ok
button to enter the “protect all” file interface.
3. In the “protect all” file interface, press the select button up or down to select
「ok」and press the ok button to protect all files. Select「cancel」and press the
ok button to unprotect all files.
37
Page 39

Setup Mode
Switch to setup mode
Status Ident ifier:
In setup mode,you can configure the basic settings for the digital video
camera, such as:
1. Date/Time 2.Language
3. Format 4. Memory information
5. Default 6. Frequence
7. Auto power off time 8. Beep
9. TV signal method
Options setup
In setup mode , press the select button up or down to select the option you
want to set, and press the ok button to set.
Date/Time:year/month/day/hour/minute/second
Language: E nglish/Italian/French/Deutsch/Spanish/Japanese/
Format:Ok/Cancel
Memory information:Video file total/Photo file total/MP3 file total/Voice file
Default: Ok/Cancel
Frequency:60HZ/50HZ
Auto power off: Off / 3 minute/ 5 minute
Beep: On/Off
Setting:
Simplified Chinese/Traditional Chinese
total/Memory free space
38
Page 40

39
Page 41

Help Screen:
This digital video camera has a help screen corresponding to every mode. Press
the display button to enter the help screen.
Help screen in camera mode Help screen in camera playback mode
Help screen in video mode Help screen in video playback mode
40
Page 42

Help screen in MP3 mode
Help screen in voice mode Help screen in voice playback mode
Help screen in setup mode
41
Page 43

5. Connecting to Your Computer:
This digital video camera can be used as a Web camera or a
Mass Storage Device.
● Step 1 Make sure the digital video camera has four ”AAA”
● Step 2 Connect the smaller end of the USB
Note: Make sure to plug-in USB cable in right direction gently to avoid
● Step 3 Connect the other end of the USB cable to the USB port l ocated on
the back of your computer.
● Step 4 The Digital video camera’s LCD Panel will turn on and will display
the PC Connection Menu.
batteries in the compartment.
cable into the USB port of your Digital
Video C amera.
possible damage to USB connector.
42
Page 44

●Step 4 Press the select button up or down button to select Mass Storage
Device or PC Camera option on the menu screen. “Mass Storage” al lows you
to download pictures onto your computer by desigtating the memory inside the
camera as a separate hard drive or “Mass Storage Device.” The SD card, if
inserted, will also be seen as a separate hard drive.
Connecting to Your TV/VCR
You can connect your digital video camera to a television if you want a larger view
of your photos.
●Step 1 Connect the plug from the TV Output port to the television with the TV
Output cable.
●Step 2 Connect the plug from the Audio Output port to the television with the
Audio output cable.
●Step 3 On your television, select the channel or mode for the auxiliary
Audio/Video input.
Note: Channels may vary by manufacturers; refer to your VCR's operating
manual.
43
Page 45

System Requirements
Listed below are the minimum system requirements for the DXG-305 digi tal
video camera. We recommend that you use a computer system that exceeds the
minimum requirements in order to utilize the video camera to it’s fullest capacity.
The minimum system requirements for the DXG-305V are as follows:
System (PC) Requirements
OS Microsoft Windows 98SE/Me/2000/XP
CPU Intel Pentium 166MHz or higher
Memory Minimum 32 MB memory or above
CD-ROM 4X or above
HDD 10 MB free disk space (minimum)
Others One standard USB 1.1 port
For users of Microsoft Windows98SE and Me, install the driver and appli cations
first. Be sure to connect the bigger end of the USB
cable into the USB port of your PC and the other end into the USB port of your
digital video camera. When the PC connection menu appears, press the select
button up or down to select PC Camera,then press ok button.
●Step1 Select “my computer” and click the right key of mouse.
●Step2 Select and click “Device Manager”.
●Step3 Select “GENERIC IDE DISK TYPE47” and click “Properties”,
the screen will appear as following:
44
Page 46

●Step4 Select “DMA” and click “OK”
Note:Before playing Video Clips(*.AVI file), make sure your PC has a
working sound card and DirectX8.0 or higher installed.
45
Page 47

6.
Installing Drivers
Installing the Camera Driver for PC
1. Insert the Software CD supplied by the package into the CD-ROM drive.
2. The Auto-run program will start and the welcome screen will appear. (If your
CD-ROM drive doesn't support the auto-run function, please double click on the
"My Computer" icon on the desktop. Then double click the CD-ROM drive icon
and click the "Driversetup\Setup.exe" file in the root directory.)
3. Select the desired language of setup program..
4. Click on the "Driver > Install", the following screen will appear:
5. Select the desired language, and then click "OK".
6. Enter the application setup screen, and click "Next" to continue.
46
Page 48

7. After the installation wizard is completed, the following screen will appear. Click
"Finish" to complete application installation.
47
Page 49

7.Installing the Application
NewSoft application installation (In case of MP38)
1. Insert the Software CD supplied by the package into the CD-ROM drive.
2. The Auto-run program will start and the welcome screen will appear. (If your
CD-ROM drive doesn't support the auto-run function, please double click on the
"My Computer" icon on the desktop. Then double click the CD-ROM drive icon
and click the "MP38\Setup.exe" file in the root directory.)
3. Select the desired language of setup program you want to install.
4. Click on the "New Soft Video works > Install" and the following screen will
appear:
5. Select the desired language, and then click "OK".
48
Page 50

6. Press "Yes" to accept the conditions of the Legal Disclaimer and continue the
installation.
7. Select the area and click "Next" to continue.
8. After entering the application setup screen, click "Next" to continue.
9. Click "Yes" to accept the conditions of the Software License Agreement and
continue the installation.
49
Page 51

10. Follow the installation wizard to select the folder location.
11. Select the program folder name.
12.After the installation wizard is completed, the following screen will appear.
Click "Finish" to complete the application installation.
50
Page 52

13. After the Multimedia Software installation is completed, the following screen
will appear. Click "Ok" to continue.
14. Enter the DirectX9 setup screen, and click "Ok" after the content is confirmed.
51
Page 53

8.Appendix: Camera Specifications
●Lens : f=8.34mm
●Sensor : 3.0 megapixel CMOS sensor
●Aperture: F/3.0
●Sensitivity : ISO 100
●White Balance : Auto, Sunny, Tungsten, Fluorescent, Cloudy
●Shutter : Programmed electronic shutter
●Shutter speed : 1/4second ~ 1/2000second
●Storage Media : 16MB Internal Memory and SD/MMC Card Slot (supports max. 512MB card)
●File Format : : still: JPEG motion: MEPG sound: WAV
●Resolution : still:2976 x 2232(Firmware Interpolation Technology)
2048 x 1536 1600 x 1200 640 x 480
motion: 640x480 320x240
●Digital Zoom : 4x
● Focal distance: Standard: 1.2m ~ Infinity Macro: 17 ~ 22cm
●Self-timer : 5 second、10 second、30 second
●PC Camera Mode : 30 fps. (320 x 240) 10 fps. (640 x 480)
●Flash Mode : Auto/off
●TV-OUT:NTSC / PAL
●PC Interface : USB1.1
●Motion Storage data capability (Built-in 16MB memory ):
320x240:
Fine Normal Basic
Approx. 400 second Approx. 400 second Approx. 400 second
640x480:
●Sound storage data capability (Built-in 16MB memory ): Approx. 21minute
●Still storage data capability (Built-in 16MB memory ) :
●Power source : “AAA” 1.5V alkaline battery x4
●Dimension: 90x 70 x 37 mm
●Weight :Approx.136g (without battery)
Fine Normal Basic
Approx. 300 second Approx. 300 second Approx. 300 second
640X480 1600X1200 2048X1536 2976X2232
Fine 85 27 17 10
Normal 120 43 28 11
Basic 160 63 38 24
52
Page 54

9.Trouble Shooter
Deadlock
Any error prompt
in Direct Print
service mode
Deadlock caused
by card removal
Can’t format
memory card
If the digital video camera appears to stop suddenly when it is running, it
may be deadlocked. Check the battery level and press the power button to
restart. If you still can’t restart, check to see if the video camera has been
damaged by improper handling.
contact DXG.
When entering the Direct Print service mode, you might see an error prompt
caused by a printer malfunction, improper operation, or a power supply
problem. Unplug the USB cable from your digital video camera, and after you
made sure all the connections are secure, press the power button to restart the
print task again.
Removing the card when the digital video camera is running may cause it
deadlock. In case of deadlock, remove and reinstall the batteries and the press
the power button to restart.
If the digital video camera can’t format the memory card, it may be because it
is in an unreadable format. Reformat the card with FAT (File Allocation Table)
through your PC.
Do not atte mpt to service it yourself, ple ase
53
 Loading...