

Page 1
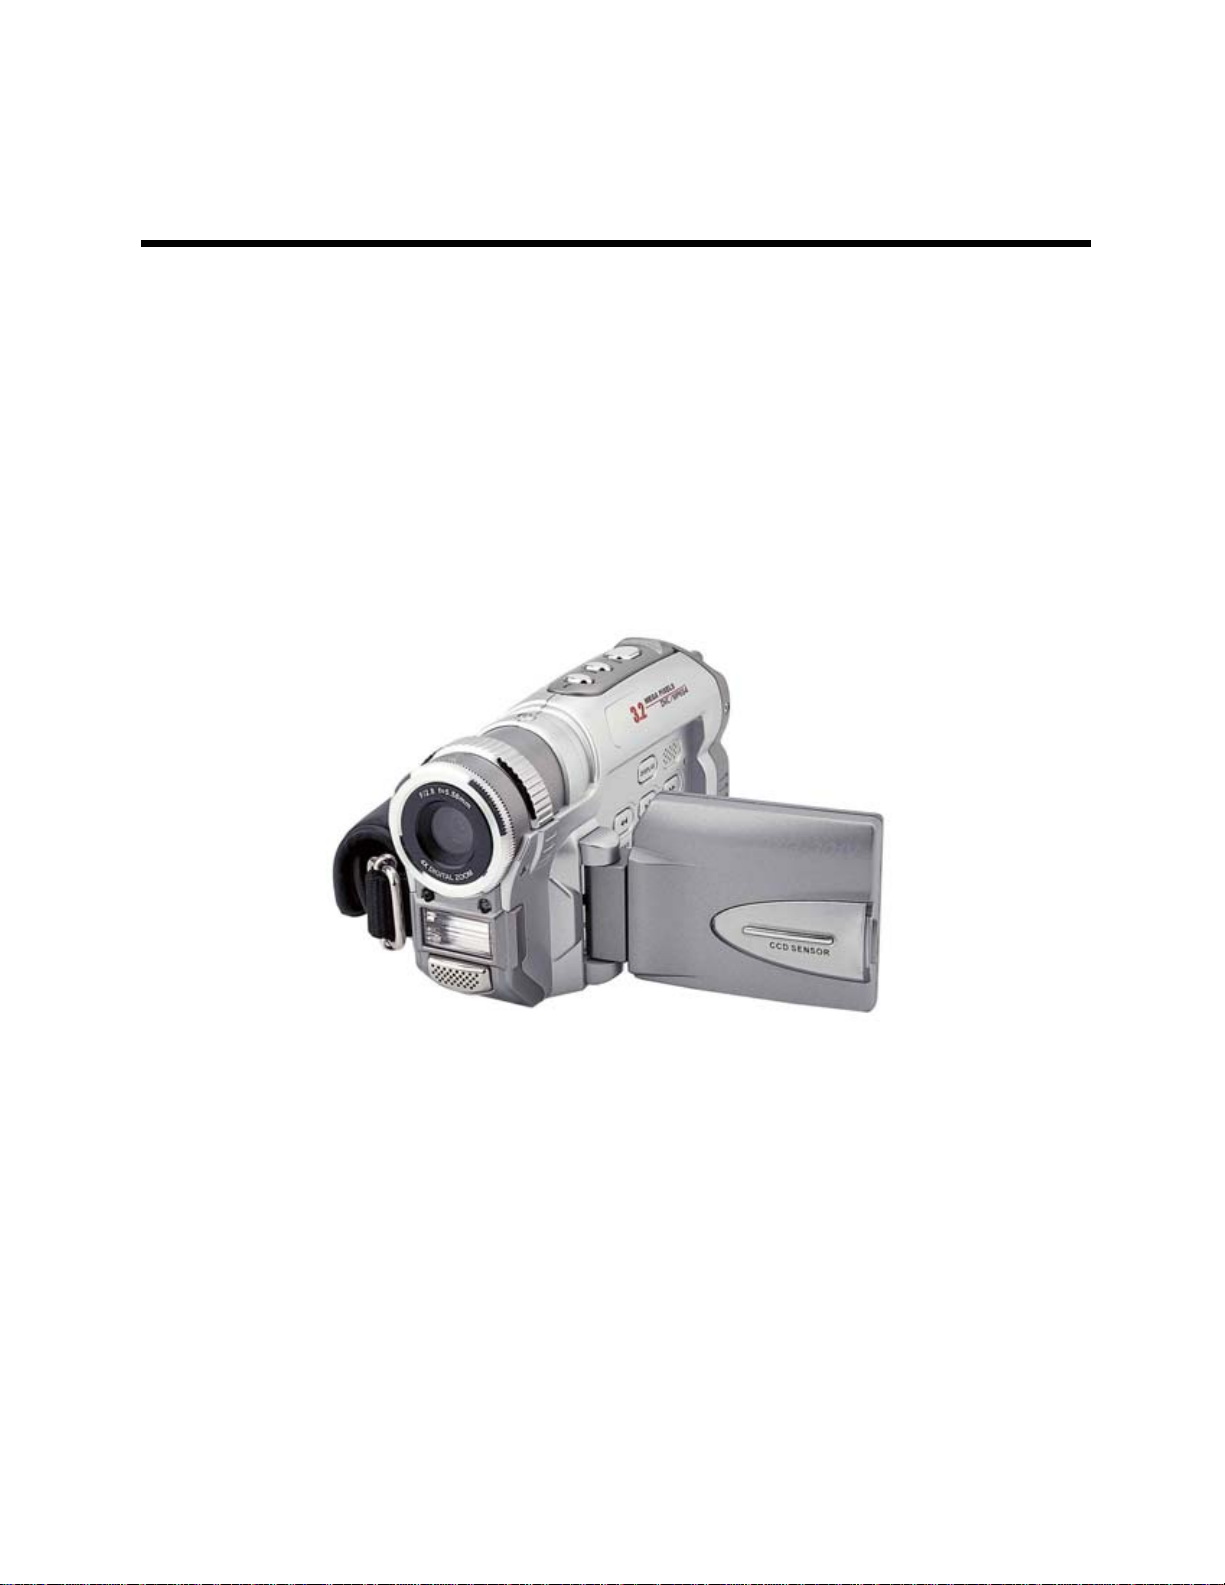
DXG-301V Video Camera
Ver 2.0 July 2004
User's Manual
Page 2

Contents
Getting Started
■ Attention
Safety Precautions……………………………….………………………………………………3
Before You Start……………………………………………………………………………………3
Important Notices ……………………………………………………………………………..….….…4
■ Package Contents …………………………………………………………………… ……………5
Preparing Your Camera
■ Features Overview
Front……………………………………………………………………………………………………………6
Left………………………………………………………………………………………………………………7
Rear………………………………………………………………………………………………………………8
LCD………………………………………………………………………………………………………………9
■ Batteries…………………………… ………….…………………………………………………………10
■ AC Adapter…..……………………………………………………………………………………….…11
■ Memory
Internal vs. External Memory ……………………………………….…………..…………….12
Memory Card Use ………………………………………………………….…………..…………….12
Memory Card Handling………………………………………………………………………………13
Troubleshooting…………………………………………………………………………………………14
■ Wrist Strap ……………………….………………………………………………………..……….….15
Using Your Camera
■ Power and LED Indicators……..………………………..….………………………….….16
■ Practice…………………………….………..…………………..………………………..17
■ Setup
Date and Time ………….……………………… …………………………………..……..20
Language …………………………………………………………………………………..……..20
Setup Menu Navigation.…………………………………………………………………………..21
■ Video
Video Indicators…………………………………………………………………………23
Recording Video………………………………………………………… ………………………24
Display Toggle ………………………………………………………………………………………25
Resolution ………………………………………………………………………………………25
Quality ……………………………………………………………………………………………25
1
Page 3

Audio….………………………………………………………………………………………………………25
White Balance ………………………………………………………………………………………25
Video M enu Navigation……………………………………………………………………………….27
■ Still Photos
Still Indicators ……………………………………………………………………………………………27
Taking Pictures………………………………………………………………………………………28
LCD Display Indicators………………………………………………………….……………………28
Flash……………………………………………………………………………………………………29
Self-Timer…………………………………………………………………………………………………29
Resolution……………………………………………………………………………………………29
Quality……………………………………………………………………………………………………29
Scenes………………………………………………………………………………………………30
White Balance………………………………………………………………… ……………………31
Exposure Value………………………………………………………………………………………….31
Metering………………………………………………………………………………………31
ISO …………………………………………………………………….…………………………….……..33
Still Menu Navigation…………………………………………………………………….…………33
Viewing Videos and Photos
■ Camera Playback
Playback Indicators…………………………………………………………………………35
Display Toggle…………………………………………………………………………………36
Thumbnails………………………………………………………………………………………36
Volume…………………………………………………………………………………………36
View Photos……………………………………………………………………………………37
View Videos…………………………………………………………………………………37
Delete………………………………………………………………………………………….37
Protect/Unprotect………………………………………………………………………………….37
Slideshow……………………………………………………………………………………38
DPOF……………………………………………………………………………………………………….38
Removable Device……………………………… …………………………………………….38
Playback Menu Navigation……………………………………………………………39
■ TV-Out………………… ……………………………………………………………………… …….44
■ Camera Driver……………………………………………………………………………46
■ Applications…………………………………………………………………………………47
■ File Transfers ..…………………………………………………………………………………49
Appendices
■ A. Specifications….………………………………………………………………………………50
■ B. System Requirements………………………………………………………………………51
■ C. NTSC & PAL Count ries………………………………………………………………………52
2
Page 4

Attention
Safety Precautions
■
This product is a precision electronic device. Do not attempt to service this
camera by yourself, Opening or removing covers may expose you to
dangerous voltage points or other risks. Read the familiarization information
and important notices below before operating the camera.
Before You Start
■
About this manual. This manual assumes basic digital photography
knowledge. It is not a “how-to” guide to digital photography . It is an owner’s
manual. Discussions of photographic and image processing techniques are
beyond the scope of this manual. Please consult other sources.
Test the camera.
Before taking pictures formally with the DXG-301V camer a, take time to g et
acquainted with the product’s features and functions. T est the camera before
formal recording to ensure that it functions well. Any loss caused by the
malfunction of this came ra (s uch as costs of photography or any loss of
benefit generated by the photography) is not the manufacturer’s
responsibility and no compensation will be given for it.
Copyright information
Unless agreed to by the owner, all pictures taken with this camera should not
be used in violation of copyright law. Moreover, when restrictions are in place,
you may not record any live performance, improvisation or exhibits even for
personal purpose. Any transfer of pictures or use of memory card with data
must be conducted under the constraints of copyright law. Pl ease obser ve
others’ privacy, unlawful use of this device may result in penalties.
Notes on the LCD (Liquid Crystal Display)
Exercise extreme caution with the LCD fluid if the LCD display is damaged.
Please follow these e mergency procedures if any of the following occurs:
1. If the li quid makes contact with the skin, wipe li quid from the skin w ith a
cloth and wash thoroughly with water.
2. If the liquid gets into the eye, rinse with water immediately for at least 15
minutes and receive treatment as soon as possible.
3. If the liquid is accidentall y swallowed, rinse mouth with water, drink a
large amount of water and induce vomiting. Seek medical treatment as
soon as possible.
3
Page 5

■ Important Notices
This product consists of intricate electrical parts. To ensure proper
performance, hold the camera steady when taking pictures.
Do not use or place the camera in the following locations:
1. Damp and dusty places.
2. Sealed vehicles, direct sunlight exposure areas, or places with extremely
high temperatures or heat.
3. High-vibration environments.
4. Locations full of smo ke, oil fumes, or steam.
5. Strong magnetic fields.
6. Rainy or snowy environments.
Do not open the battery cover when the power is on. Always turn the
power off first to av oid damage to sensitive electro ni c circuits.
If water gets into the camera, turn the power OFF and remove the
batteries immediately.
Basic care:
1. If the lens, LCD display or viewfinder surfaces become dirty, use lens
brush or soft cloth to clean. Do not touch the lens with fingers.
2. Avoid scratching the lens, the LCD display or viewfinder surface. Do not
allow solid objects to come into contact the camera.
3. Do not use any detergent or volatile so lutions which could cause t he
camera case and the paint to dissolve or distort. Use soft cloth only.
4
Page 6
Contents
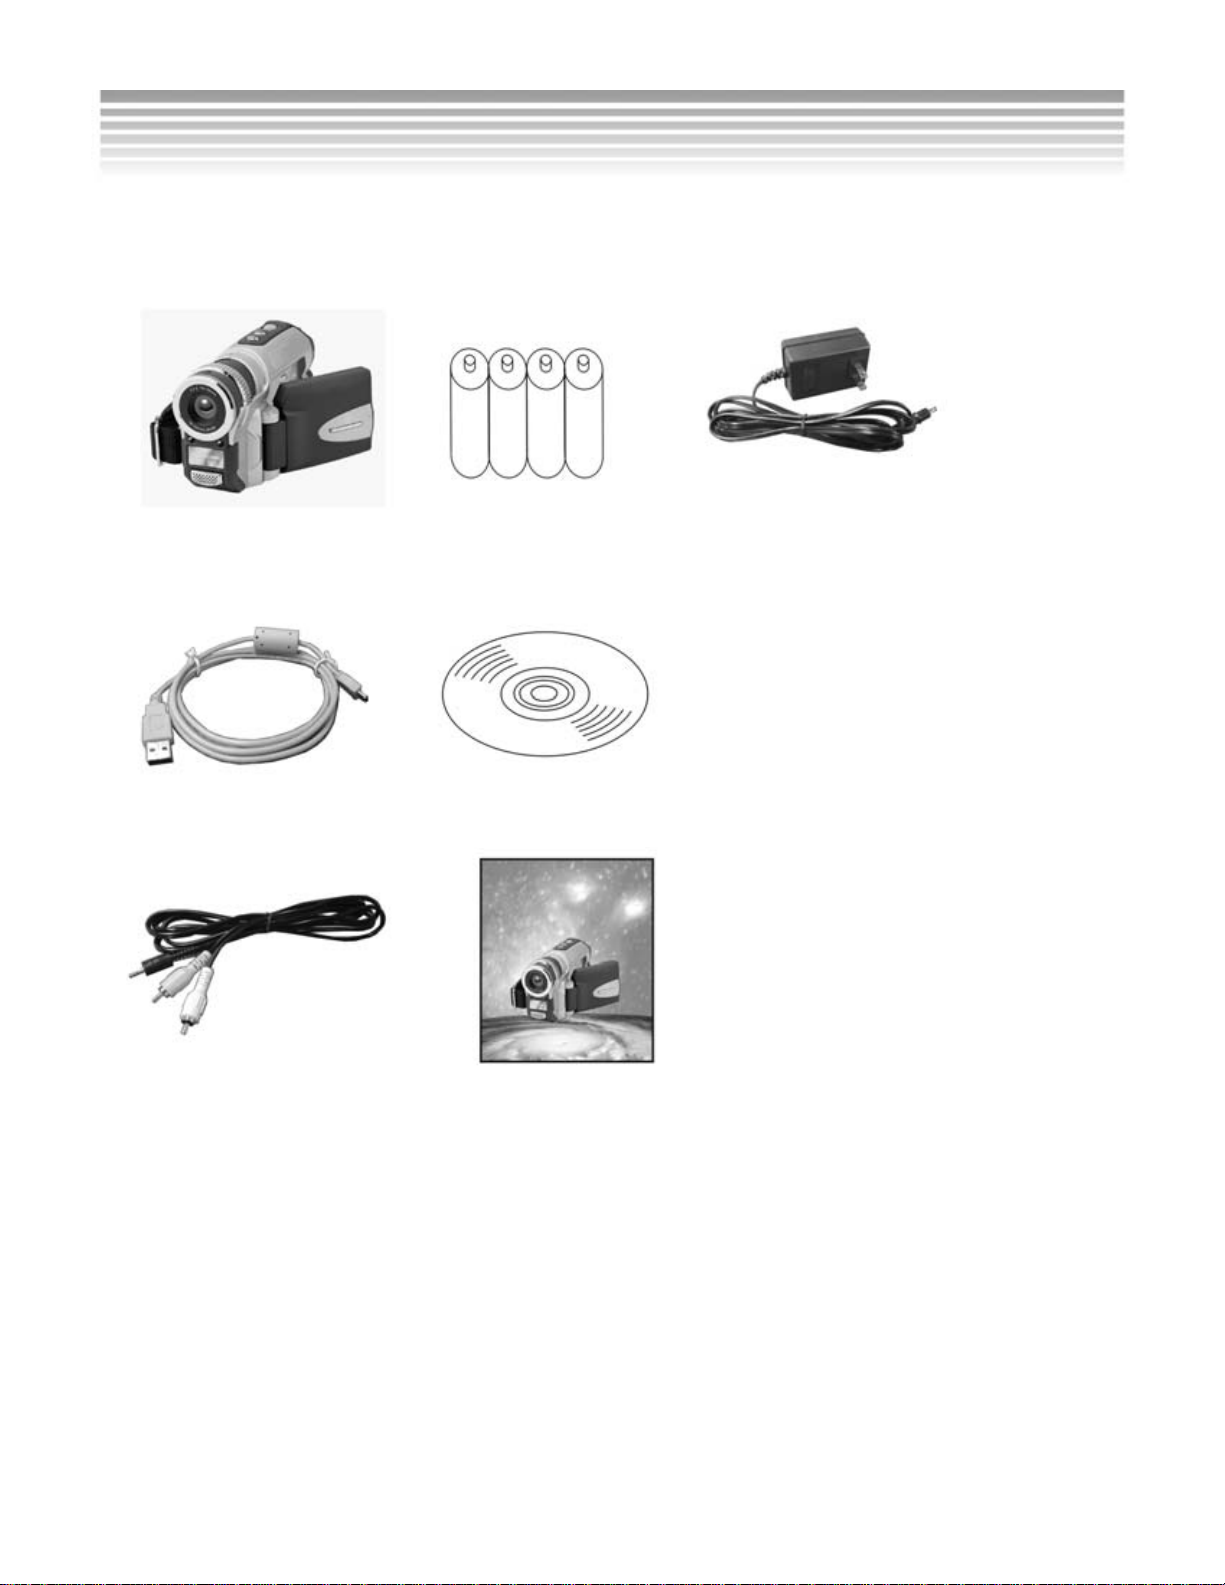
Carefully unpack and inspect package contents. Make sure the following
items are inside. If anything is missing or damaged, please contact your
vendo r i m media tely.
1. DXG-301V
Camera
4. AA Alkaline Batteries x 4 7. AC Adapter
(Optional)
2. USB Cable 5. Software CD (incl. Camera Driver)
3. TV-OUT Cable 6. User's Manual
5
Page 7
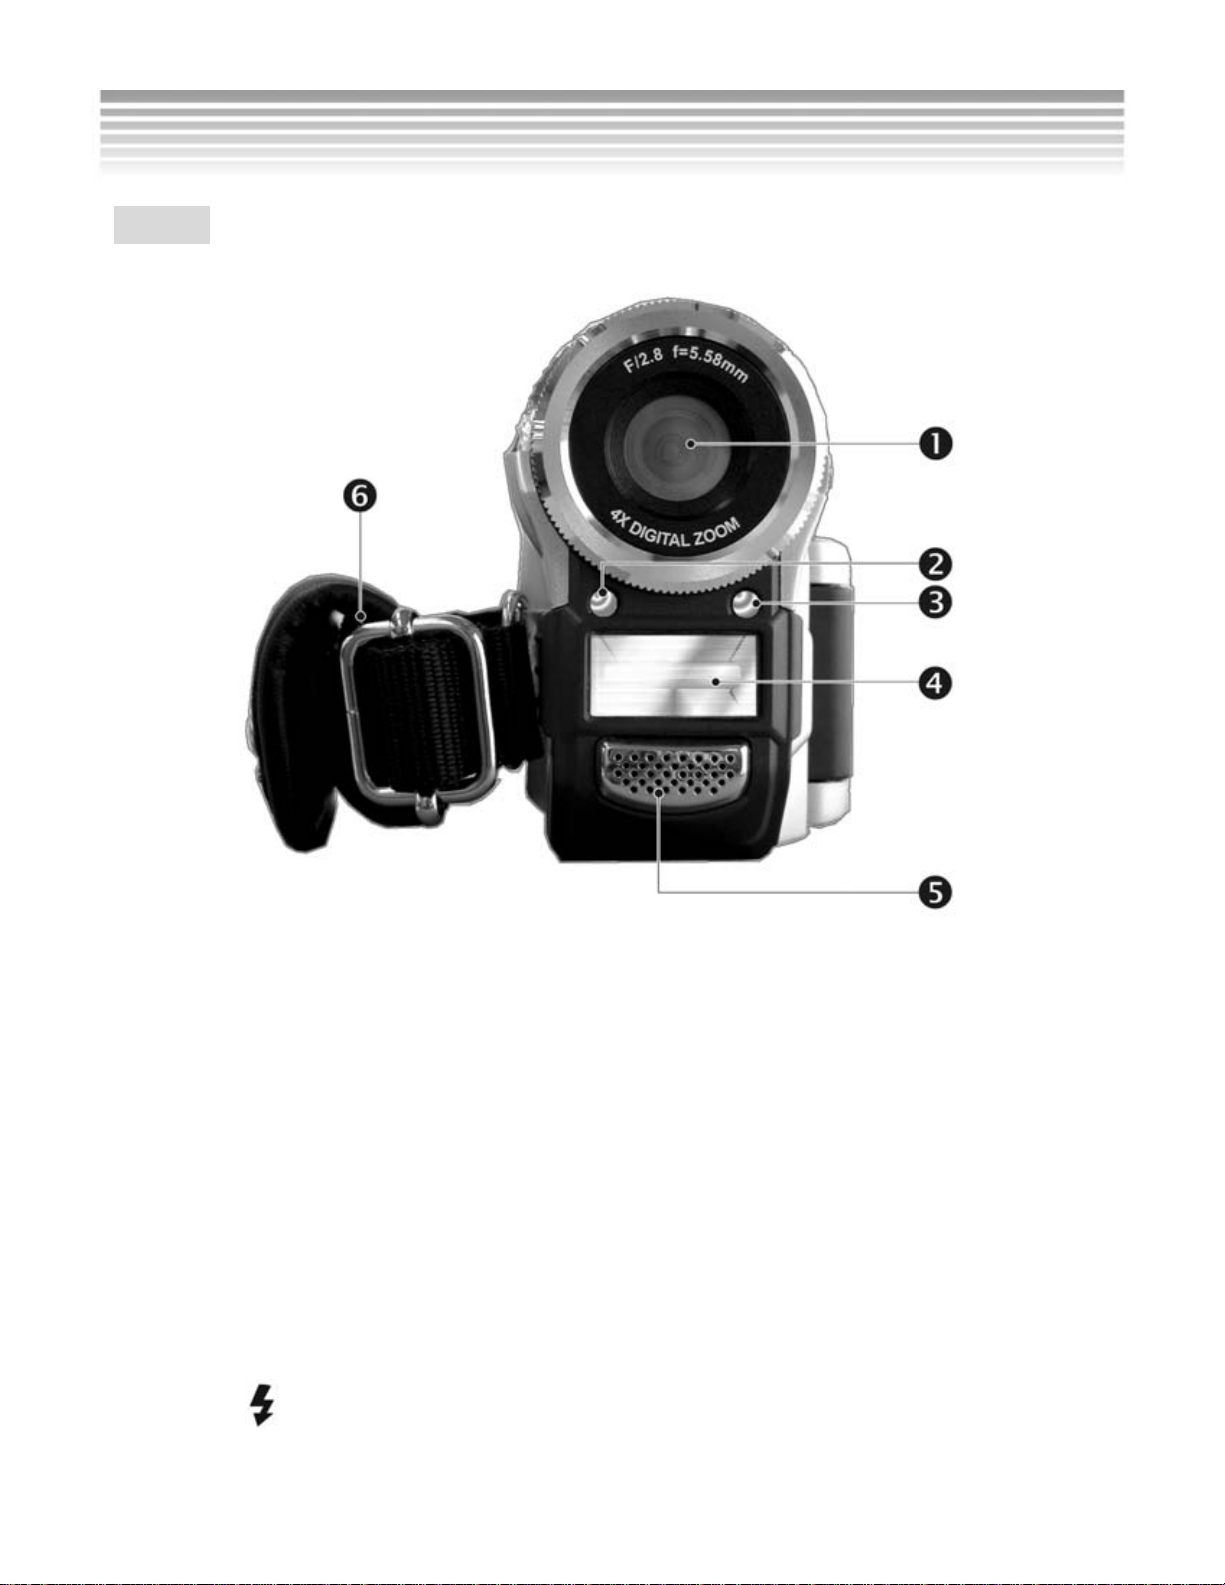
Getting to Know Your Camera
Front
Lens (4) Flash
(1)
Photo Sensor (5) Microphone
(2)
(3)
Self-Timer LED (6) Wrist Strap
● Shutter button (Top)
Press the Shutter button to take a p icture or to start re cording a video. (Firs t
you must press the Power button.)
● Menu button (Top)
Press the MENU button in the Still, Video, and Playback modes, and the
operation menus for each of these modes appears on th e LCD display.
● Flash button (Top)
Press the
button to toggle between flash modes
6
Page 8
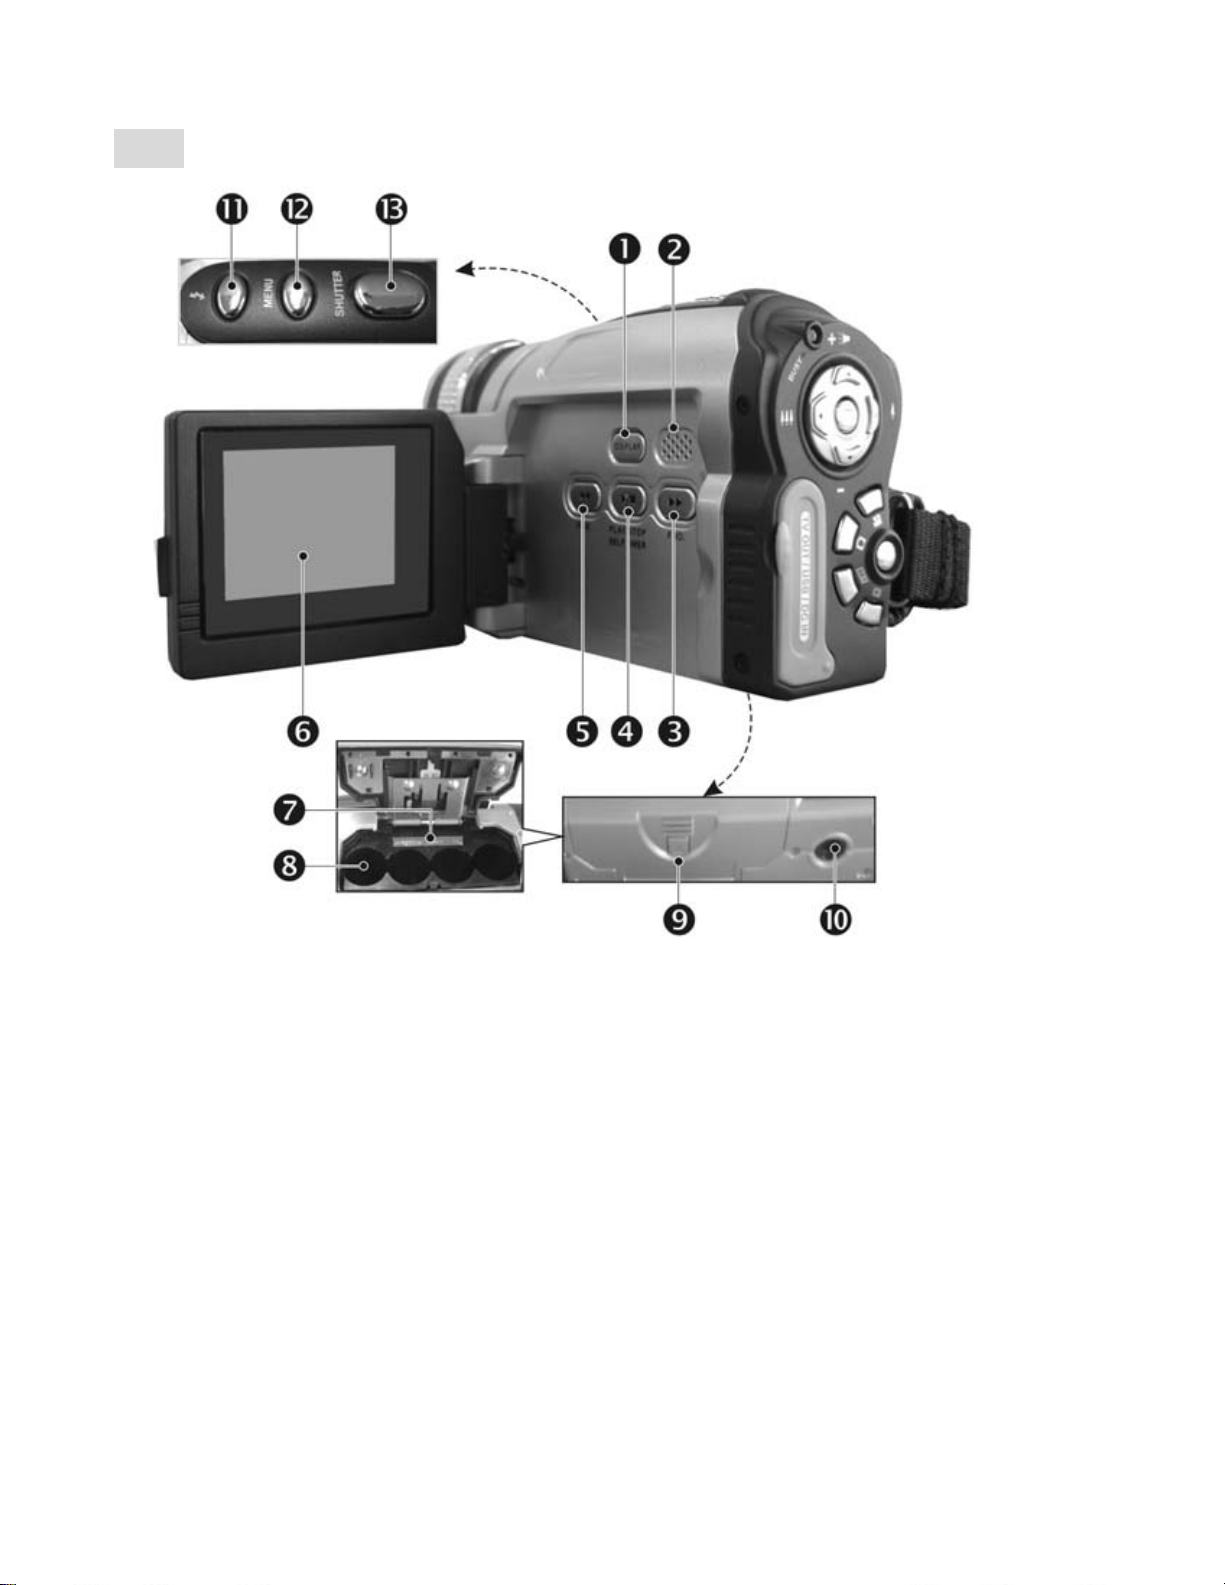
Left
Mode Display Button (8) Battery Silo
(1)
Speaker (9) Battery Cover Latch
(2)
Fast Forward (10) Tripod Socket
(3)
(4)
Playback/Stop/Self-timer
Button
(5)
Fast Rewind (12) MENU Button
LCD Display (13) Shutter Button
(6)
SD Memory Card Slot
(7)
● DISPLAY button
(11) Flash Button
Press this button to toggle between display modes.
● RWD, PLAY/STOP and FWD buttons
In the Playback mode, press these buttons to reverse, play , stop, forward. In
the Still mode, the PLAY/STOP button acts as the Self-timer button.
7
Page 9
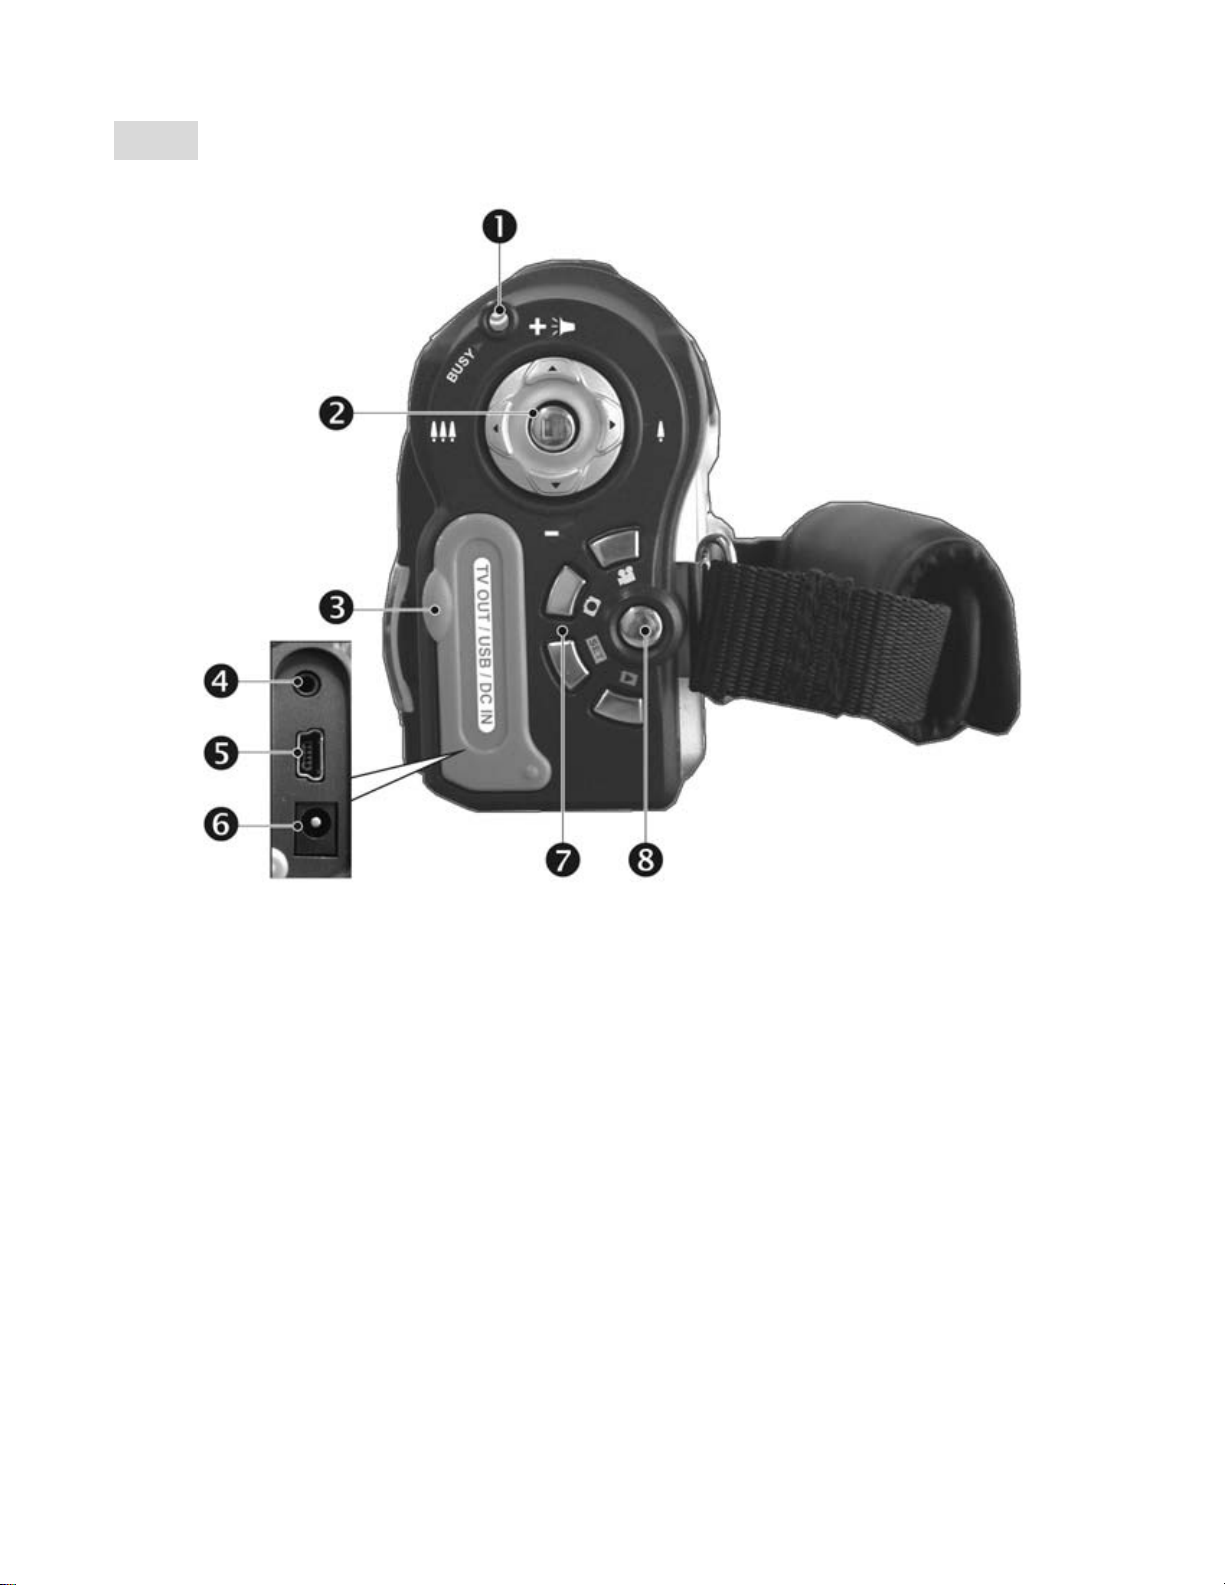
Rear
Status LED (5) USB Port
(1)
Multi-Select Button (6) DC-in Jack
(2)
Connector Cover (7) Mode Buttons
(3)
(4)
TV-OUT Port (8) Power Button
● Multi-Select Button
Use this button to access the menus and perform digital zoom and volume
adjustment.
● Mode Buttons
Press these buttons to switch to Video, Still, Setup, and Playback modes.
8
Page 10
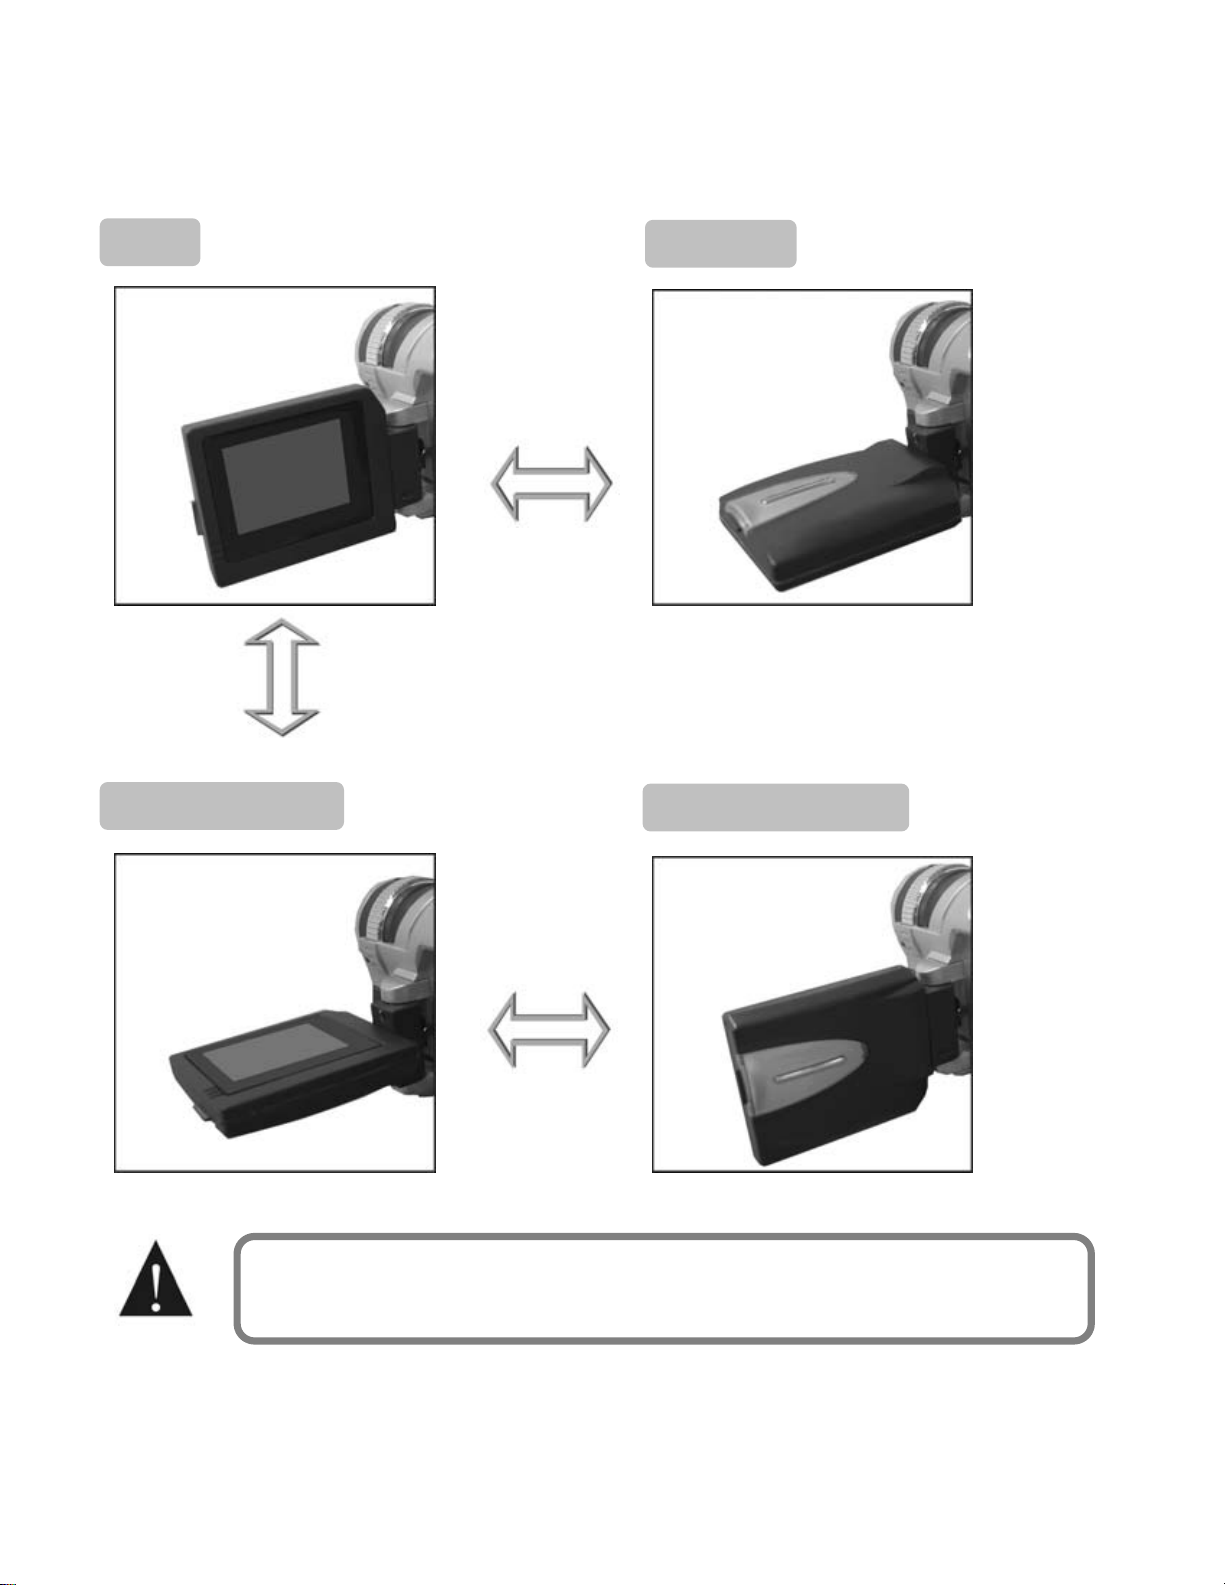
■ Rotating the LCD Display
Open the camera’s LCD display.
The rotation directi ons and stop positi ons of the LCD display are as follows:
Open Clockwise
90 degrees clockwise
Counterclockwise Counterclockwise
90 degrees counterclockwise 180 degrees counterclockwise
Do not rotate the LCD display past its stop positions.
9
Page 11
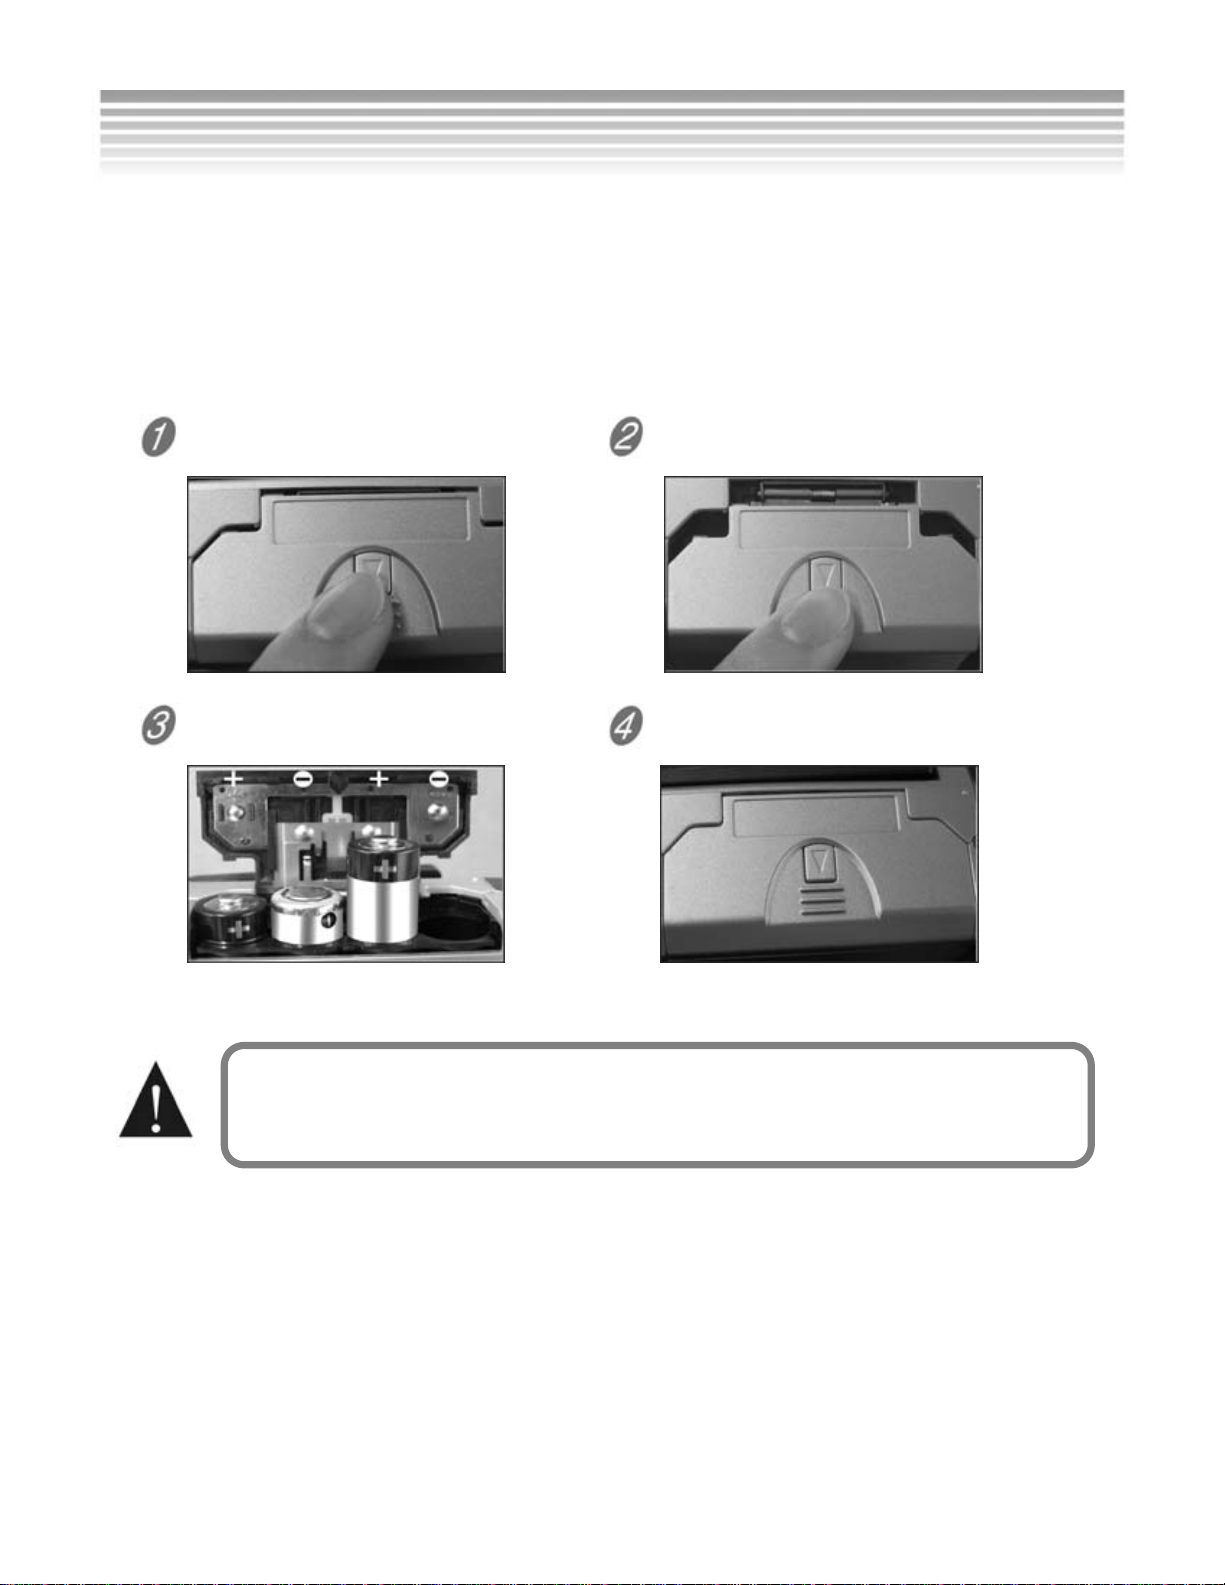
Batteries
AA Alkaline batteries typically last for 1.5 hours of co ntinuous use. Longer
run times are possible using AA NiMH or AA Lithium batteries. Always keep a
spare set of fresh batteries on hand. See AC Adapter section for using an AC
adapter as an alternative power source.
Loading Batteries
■
Press the battery cover latch.
Slide the battery cover open as
indicated by the arrow.
Insert the b atte ri es a s i n di ca ted
on the inside cover.
Opening and closing the cover roughly may damage
battery cover.
Close and lock the battery cover.
10
Page 12
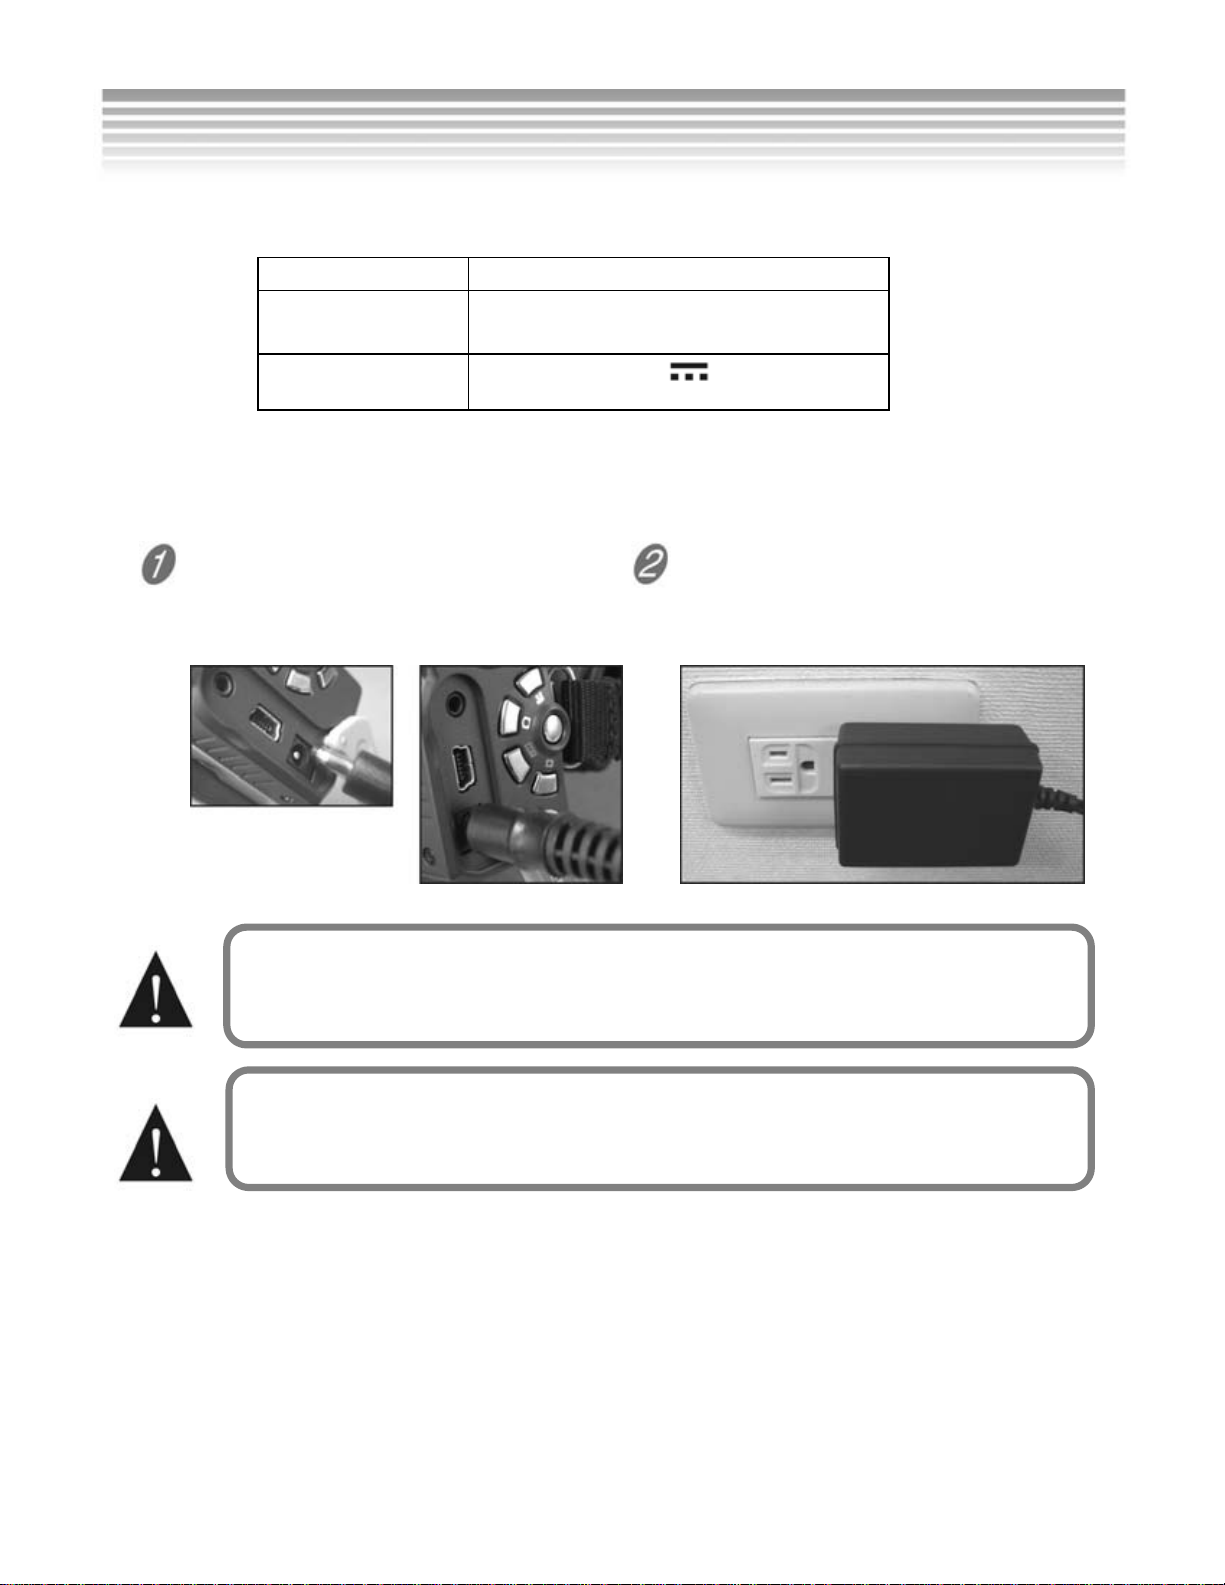
AC Adapter
■ AC Adapter Specifica tions
Operation Spec.
Input 100 ~ 240V
1.0A MAX 50~60Hz
Output
Connecting the AC adapter
●
Turn the camera off and follow the instructions below:
Open the connector cover and
connect one end of the AC
adapter to the DC-in jack on
the camera.
+5.0V
2.0A
Connect the other end to an
electrical outlet.
Make sure the AC adapter is accordance with the above
specifications to avoid causing damage to the camera.
This camera cannot be used as a battery charger. Do not
attempt to charge batteries in the camera.
The following product has been tested and approved for use at the 5V setting:
Brand: RadioShack. Product: Digital Camera Power Adapter
Catalog #: 273-1696 Model: 273-1696
11
Page 13

Memory
Internal vs. External Memory
■
The camera comes with internal memory built into the camera. You cannot
see it, but it is there. If you have a memory card (external memory) the
camera’s 16MB built-in memory can provide additional storage space when
the external memory car d is full. Image files will sav e to the memory card, or
with no memory card, to the internal memory.
If a memory card is inserted into the camera, all of the memory-related
actions--such as the ability to format the memory card, save images, play
back video, and transfer images--are enabled, and the internal 16MB
memory is disabled and unavailable for use until the memory card is
removed.
If you have a memory card, you might want to consider the internal memory
as a sort of “reserve tank” i n case you run out of memo ry card space and
want to take more shots. If you need to use the internal memory, simply
remove the memory card and all memory-related actions you perform will
use the 16MB internal memory. Be careful, cards are very small and easily
lost!
Memory Card Use
■
Please format memory cards in the camera prior to first use. Doing so will
ensure the memory is formatted for this particular camera model.
If you want to use a mem ory card from a different camera, offload the files
to a secure location, such as to your computer’s hard drive, or onto a CD,
before formatting the memory card. Reason: Camera designs and camera
formats vary, and you may get erratic memory ca rd performance when
installing a card in a different camera without reformatting, resulting in
images not being stored properly or perhaps not stored at all.
When you insert a memory card into the camera, it takes over the memory
storage functions from the camera’s internal memory . Therefore, you should
make sure your card is cl ean, seated properly, and formatted within the
camera, because the camera’s internal memory is not being used at all. If
your memory card is not functioning properly, remove the car d and use the
camera’s internal memory until you can get your card replaced.
12
Page 14
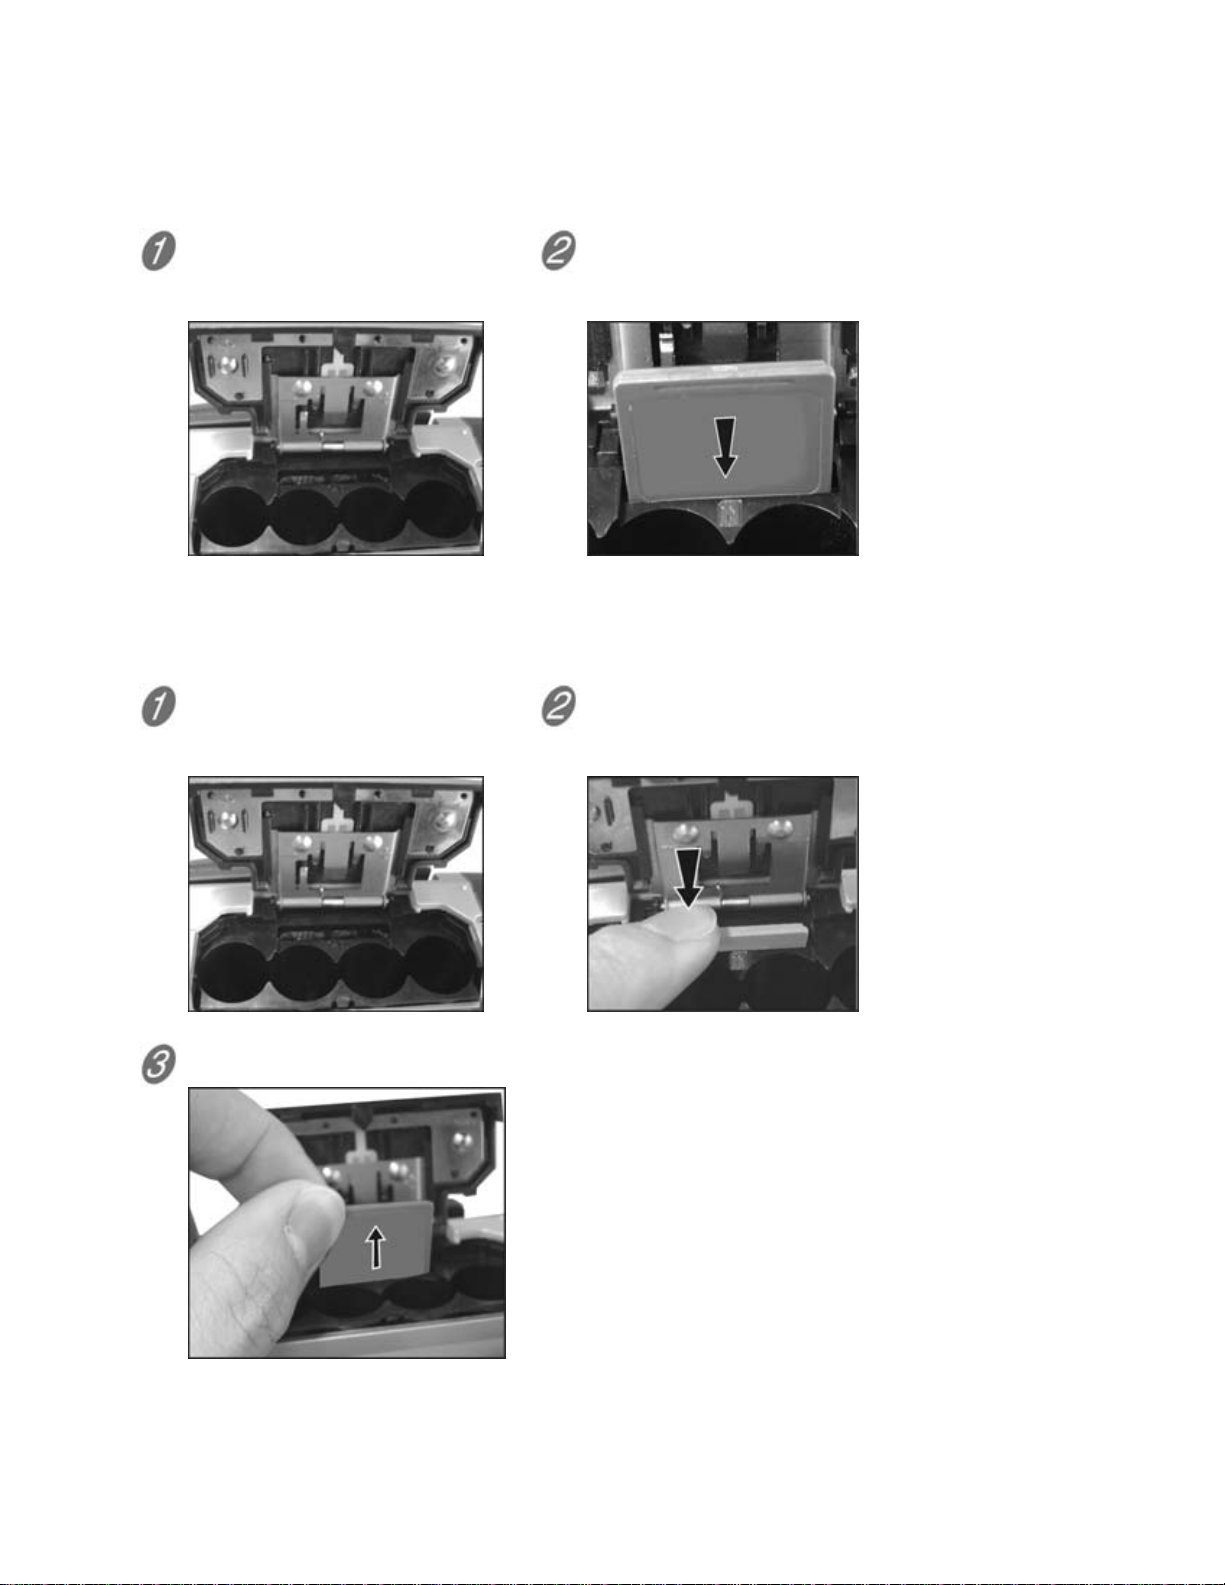
■ Memory Card Handling
● Inserting
Turn the camera off.
Slide the battery cover
open as indicated by the
arrow.
Insert th e memory card as
indicated by the arrow.
● Removing
Turn the camera off.
Slide the battery cover
open as indicated by the
arrow.
Withdraw the memory card.
Push the memory card
down gently and the
memory card will pop up.
13
Page 15
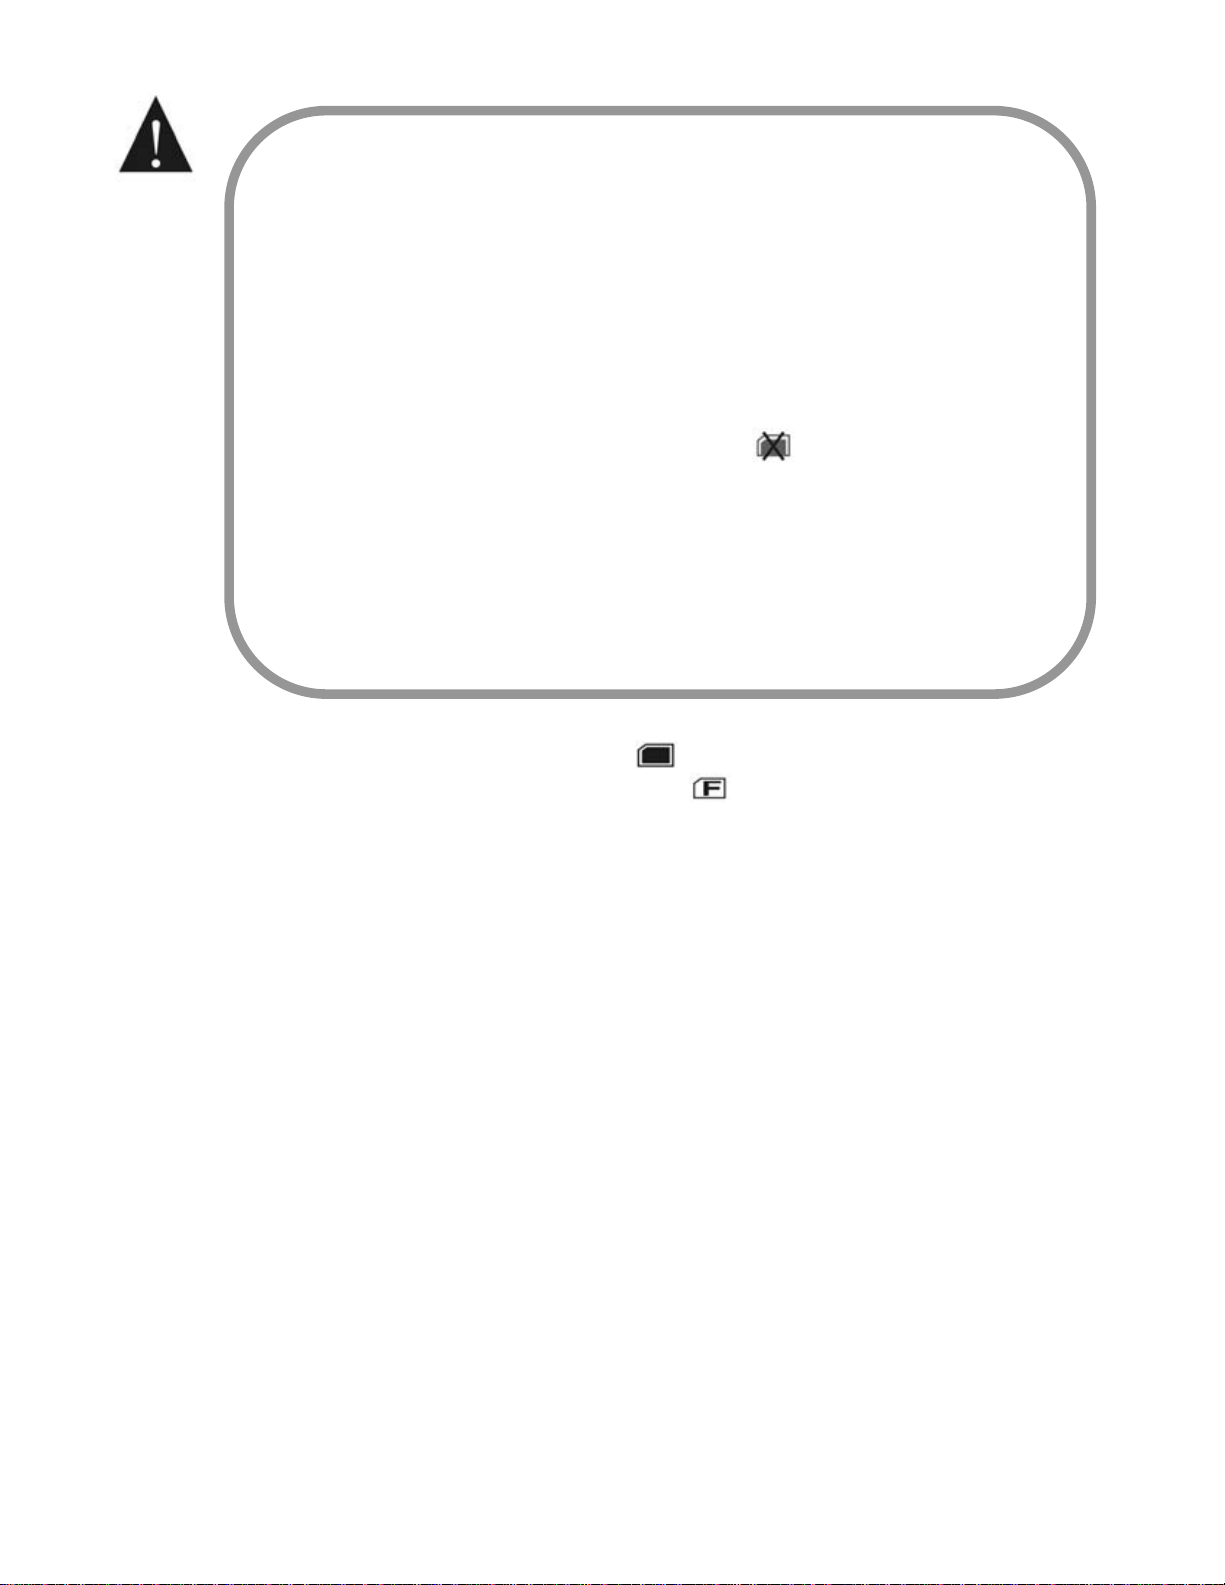
Use only SD or MMC (4 MB~512MB) memory cards.
Never force a card. Re-orient the card and try
inserting it again if it does not fit.
Format memory cards in the camera only. Format
cards periodically.
If the memory card is locked, a
displayed on the LCD display. Unlock the card by
sliding the small switch on the card.
Format memo ry card s in the camera prior to firs t use.
After loading the memory card, the card
symbol is
indicator displays on the LCD
display under standard display mode. If the
indicator (internal
memory status) is displayed on the LCD d isplay.
■
Troubleshooting
Cannot recognize the image files stored on the memory card.
Save images to your PC if possible and reformat the memory card.
Memory card not detected. Gently wipe the metal interface with a soft
cloth and reload t he card.
Memory card won’t store images. Contact the memory card vendor for
assistance.
If the card does not work, use a different card you have formatted in
the camera. Please do not simply assume the camera is not working properly .
Check the memory card by testing it in other devices before calling for support.
Most often, it is the card or card use at fault, and not the camera.
14
Page 16
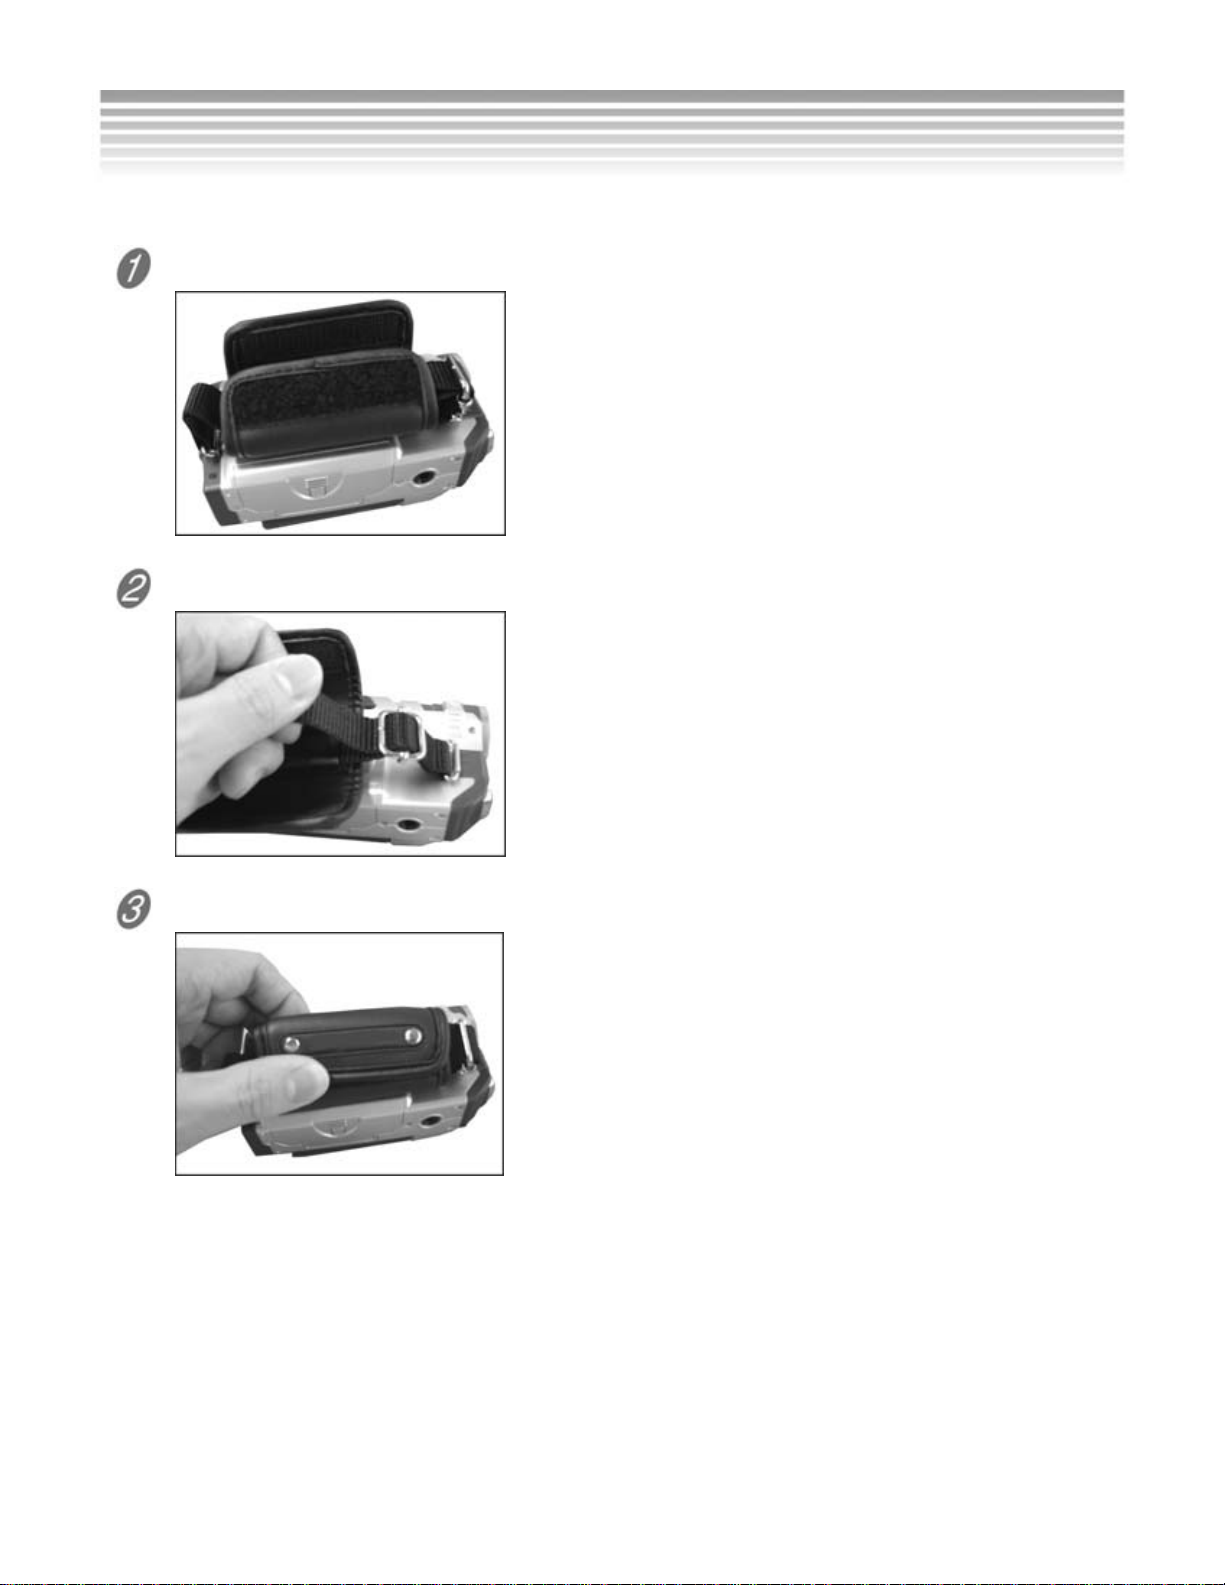
Wrist Strap
To adjust the wrist strap:
Open the wrist strap pouch.
Adjust the wrist strap to fit your wrist.
Close the wrist strap pouch.
15
Page 17
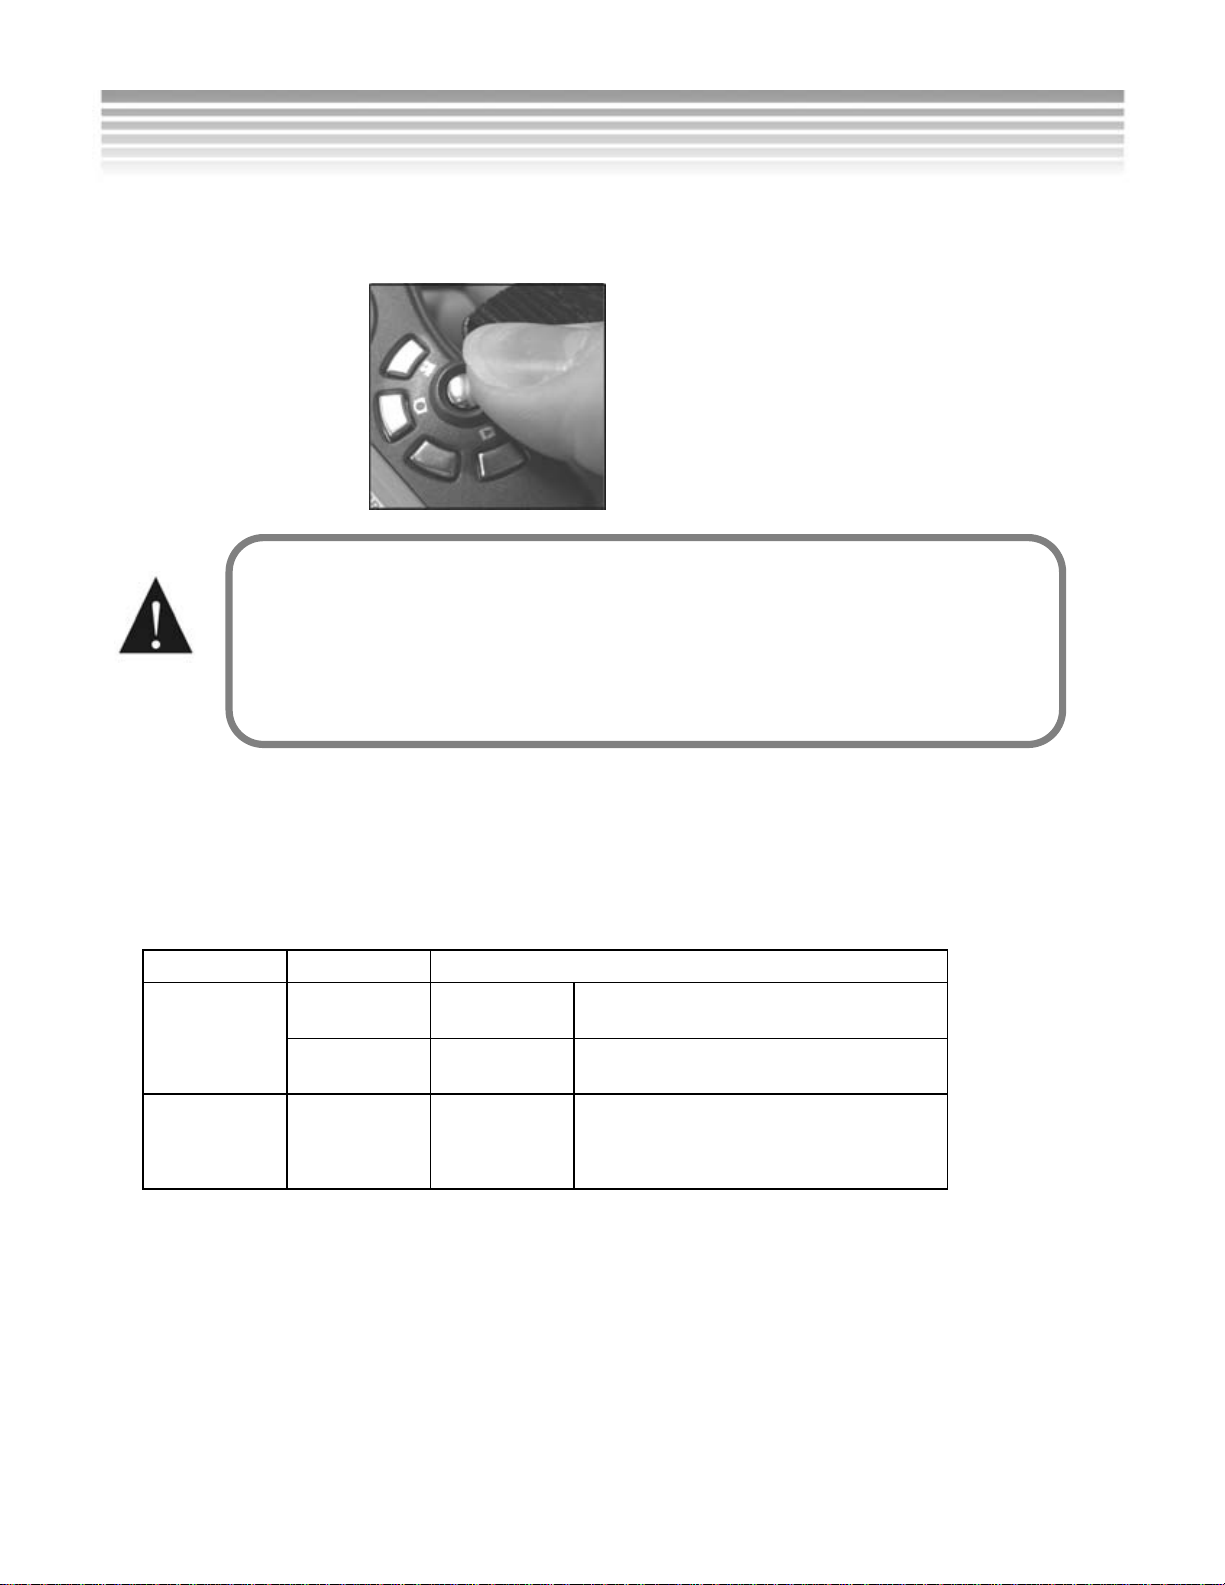
Power On and LED Indicators
Power Supply
●
Press the Power Button to turn on the camera; press the Power Button again
to turn it off.
Without user input, the camera will turn OFF
automatically (default: 3 minutes).
You can select idle-off times. (See “Setup”).
●
LED Indicators
The following table explain s the Self-Timer LED (located in the front of
camera) and the Status LED (located in the rear of camera):
Status Meaning
Status
LED
Self-timer
LED
Red Blinking Busy
Green On Camera on and in standby .
Self-timer activated.
Red Blinking
Blinks rapidly for 3
seconds prior to flash.
16
Page 18

Power On and LED Indicators Practice with Your Camera
● Using the Mode Buttons
Here are five easy practice steps to get you started. All revolv e mostly around
the use of the Mode Buttons, which are grouped around the Power Button in
the lower right of th e camera 's rear side, and the Shutter Button, on the top of
the camera. After this easy series of short exercises, you will understand the
camera’s essential operations and have basic competence in its use, in
particular these primary buttons. If you forget how to use the camera, please
refer back to this se ction. Refer to the camera’s quick start guide.
● Use Fresh Batteries
The 4AA alkaline batteries will last around 1.5 hours of typical continuous use.
Keep spare batteries handy at all times.
● Format New Memory
If you have a new memory card, or a card that has been used in a different
camera, skip ahead to Step 4 and return to Step 1 below and star t practicing.
Turn the Power on
● Start Practicing:
Record a Video
1) T urn on the camera by pressin g the round button as illustr ated. Y ou are now
in Video Mode. (Note: Every time you start the camera, the camera starts in
Video Mode. You can then switch to other modes by pressing t he other mode
buttons. If y ou switch to a diffe rent mode, press the button nearest the movie
camera icon
2) Press and release the Shutter Button; a timer starts counting on the LCD
to return to Video mode)
17
Page 19

display.
3) Press and release the Shutter button again to stop recording.
You have recorded a video. Good. If you are anxious to see what you have
recorded, jump to step 3 below, “Review Your Shots,” otherwise, continue to
step 2.
4) Optional: Change Video Settings
When in Video Mode, change video recording settings by pressing the Menu
Button.
(Refer to User's Manual p. 25 for Video Mode explanation and navigational
guidance.)
------------------
Take a Still:
1) Turn on the camera.
2) Press the button n earest the still camera icon
. It is just left of the Power
Button.
You are now in Still mode.
3) Press Shutter Button halfway down, wait a few seconds for the camera to
stop whirring as it adjusts focus, and then fully depress the Shutter Button.
You have just taken a photo.
4) (Optional Step) Change Photo Settings: When in Still Mode, change
picture-taking settings by pressing the Menu Button.
Note that the camera only starts up in Video Mode. You can switch back to it at
any time by pressing the movie camera icon, just above the Power Button.
(Refer to User's Manual p.30 for Still mode navigational guidance.)
---------------------
Review Your Shots:
1) Press the Playback button, in dicated by the Pla yback icon
which is just
below the power but ton. You are now in Playback Mode.
2) When in Playback mode, you can view images using the VCR-style buttons
on the LCD display side of the camera.
18
Page 20

3) (Optional Step): You can also Delete images by pressing the Menu Button
and do other playback-related things.
(Refer to User's Manual p. 38 for Playback mode explanation and navigational
guidance.)
-------------------
Format the Memory
Press the button indicated by “SET.” Y ou are now in Se tup mode. This mode is
for setting time and date, language, and formatting memory. (See “Memory”
for more information)
1) Scroll down the menu list to Format using the Multi-Select button's arrows.
Warning! SELECTING THIS FUNCTION WILL ERASE IMAGES on the card. If you
have recorded anything worth saving, transfer files first. (Refer to FILE
TRANSFER SECTION).
2) Select Format, using the square Enter button, to format.
3) Use arrow buttons and enter button to answer "yes" to the series of
questions to affirm the fact you want to format.
Why: Reformatting the memory helps return memory to its most ready state.
Format your memory card before using it for the first time, and periodically
thereafter.
(Refer to Setup mode menu navigation section for navigational guidance.)
END OF PRACTICE
19
Page 21

Setup
Press the SET button to switch to the Setup mode.
Setting the Date/Time
●
The DXG-301V camera can record image dates and times. Set the current
date and time for y our locati on befor e usi ng the c amer a. R efer to the S etup
Mode section for more information.
Setting the Language
●
Select the preferred language for displaying information on the LCD display .
There are 7 language optio n s: English, Chinese (Traditional) Japanese,
German, French, Italian and Spanish.
Press the SET button to enter Setup mode.
20
Page 22

● Setup Menu Navigation
21
Page 23

Set the appropriate video output mode (NTSC/PAL)
corresponding to your region’s TV standard to view
videos on TV. (USA=NTSC. See Appendix C for others.
Make sure you back up important data from the
memory card before f o rmatting. Formatting the
memory card/internal memory will permanently erase
all stored data.
The Frequency option helps to prevent image quality
loss caused by 50Hz or 60Hz AC power interference.
USA=60Hz
Selecting the Reset option restores the factory default
values. The default display language is English.
22
Page 24

Video
The camera defaults to Video Mode upon power on. Pr ess the b utton neares t
the movie camera icon
Video Indicators
■
Standby Recording
Image resolution
Image quality
Video mode
Audio
:Enable audio recording
to switch to Video from other modes.
White balance
Video files count
Date/Time
Digital zoom
:Disable audio recording
Memory status
:Card full
:Card half full
:Card empty
:Card protected
:Internal memory full
:Internal memory empty
Remaining battery power
:Full
:Medium
:Low
:Ve ry l ow
Video length
Recording status (animation)
23
Page 25

■ Recording Video
When recording videos, we recommend you take short clips. This way, if you
decide to transfer your video clips to your computer, the fil es will be smaller,
your computer will need fewer system resources, and you will be better able to
process, playback and edit video files. The files are MPEG4 standard, .ASF file
format. A 256MB memory card will allow up to over an hour of recording time
in (CIF, Normal quality, appr. 75 minutes). For smoother video, use CIF mode,
which offers a faster frame rate than VGA.
Turn on the camera.
The camera starts up in vide o mode . Press and release the shut ter
button on the top of the camera to begin taking a video. The movie camer a
indicator will show on the LCD display.
Frame the scene using the LCD display, then press the Sh utter Button to
start recording. The counter starts in the upper right of the LCD display.
Press the Shutter Button again to stop recording.
If you take still photos and want to r eturn to Vide o mode, press the button
nearest the movie camer a icon
will also return you to video mode.)
To view the recorded video, press the Playback button
. (Powering the camera off and on again
24
Page 26

■ Video Display Toggle
Press DISPLAY button to toggle between the four display modes.
Standard display Basic display Full display Display Off
■
Image Resolution
There are 2 video resolutions: VGA (640 x 480), and CIF (320 x 240). CIF
offers faster frame rates and takes less memory space. Press the Menu
button in Video mode to se le ct resolutions and quality levels.
■
Image Quality
The DXG-301V camera provides three image quality settings: Fine, Normal,
and Basic. The main difference among these three image qualities is the
video compression ratio. For example, Basic quality provides the highest
compression ratio and smallest file size.
■
Audio (Voice)
Use this option to enable or disable audio recording. Select "ON" to enable
the audio recording and select "OFF" t o disable.
■
White Balance (WB)
White object looks white to human eyes no matter unde r what lighting
conditions (sunny, cloudy, and bulb lighting). However, for digital video
cameras, there are different white colors under different lighting conditions
because RGB value varies for each kind of white color. To mimic human
vision, the camera adjusts the balance of the ambient light around th e
objects. This adjustment process is ref erred as “matching the white
balance.” Serious photographers use spec ial white balance cards to help
attain optimal balance.
There are three White Balan ce settings in the Record mode:
Auto: adjusts the white balance automatically. For most
general-purpose photography.
Indoor: For indoor photography.
25
Page 27

Outdoor: For outdoor/sunny day photography.
See White Balance section.
Video Menu Navigation
■
Press the MENU button (camera top) to sho w /hide the menus.
26
Page 28

Still Photos
To take photos, press the button nearest the still cam era
■
LCD Display Indicators
Focus
Area
Standby Self-Timer Mode
Image Resolution White Balance
icon.
Image Quality Metering Mode
Record Mode Flash Status
Scene Mode Digital Zoom
Memory status
:Card full
:Card half full
:Card empty
:Card protected
:Interna l memory full
:Internal memory empty
Recorded images /Total
Images
Date/Time Self-Timer Countdown
Battery Power Levels
:Full
:Medium
:Low
:Very Low
Self-Timer Mode
27
Page 29

■ Taking Pictures
The DXG-301V can capture fine still images. The camera has a tripod mount
for this purpose. The still image fi le format is JPEG. The maximum number of
recordable images depends on the amount of memory space available to it.
The image setting and quality level you select also affect the number of
maximum recordab le images. Higher i mage resolutions and q ualities (e.g.
2048 x 1536, Fine) occupy mor e mem ory space th an lower r eso lutions and
qualities (e.g. 640 x 480, Basic). Exactly how much space is occupied by
each image res o lution varies from shot to shot.
To take a picture:
Turn on the camera.
Press the button nearest the still camera icon to switch to Still mode.
The Still mode indicator shows on the LCD display. Select the preferred
image setting and quality level.
Compose the picture on the LCD display and press the Shutter Button.
Press the Shutter b utton halfway down and the camera adjusts its focus.
When the frame turns red, press the shutter button all the way down.
Use the Flash when the light is insufficient.
To view recorded images, press t he button nearest the Playback ico n
(See “Playb ack”)
Display Toggle
■
Press DISPLAY button to toggle between display modes.
Standard display Basic display Full display Turned off display
.
28
Page 30

■ Flash
Press button to toggle between flash modes.
Display
Flash mode Description
Flash Off T urns off the flash; best for environments with
Auto Flash The flash fires automatically according to the
Auto Flash +
Red-eye
Reduction
Forced Flash +
Red-eye
Reduction
Slow Synchronize For taking pictures of night scenes or in dark
sufficient light.
ambient light level; best for general-purpose
photography.
The flash fires automatically in low light; the
flash emits a precursor-strobe before the main
flash to reduce red-eye effect; for pictures of
people.
The flash always fires and reduces red-eye
effects automatical ly; for fill-in of people in
bright light
lighting. Tripod use recommended.
■
Self-Timer Mode
See page 7, Playback/Stop/Self-timer Button. When the self-timer is
enabled, the preset time (10 seconds) and self-timer mode indicator is
displayed on the LCD display. The self-timer LED blinks.
■
Image Resolution
There are three resolution settings for taking still pictures: 2048 x 1536,
1600 x 1200, and 640 x 480. Choose higher numbers for images intended
for print.
■
Image Quality
The camera prov ides three image quality settin gs: Fine, Norm al, and Ba sic.
The main difference among these 3 imag e qualities is the image
compression ratio. For example, Basic quality provides the highest
compression ratio and smallest file size.
29
Page 31

■ Scenes
The camera provides 13 scene modes for still photography. For your
convenience you can select one of the following scene modes to
automatically use pre-set White Balance, EV Comp ensation, Metering, and
ISO settings.
Symbol
Mode General Application
Auto Leaves the settings up to the camera. For
most general-purpose photography.
Manual Select your own settings. (See note below)
Portrait Photographs of people.
Landscape
Photographs of outdoor scenery.
Party Photographs of indoor parties.
Beach For bright scenes, such as beaches,
snowfields, or lakes.
Sunset For sunrise and sunset scenes.
Night-P For night photographs of people.
Night-L For night landscapes/scenes.
Fireworks For firework displays/faster shutter speeds.
Close-up Close-up (macro) photography.
Copy Photographs of text or printed matter.
Backlight Photographs whe re light sources are behind
the subject.
Manual Mode--White ba lance, EV compensation, metering mode, and ISO
menus can only be adjusted in Manual Mode. To access Manual Mode, in the
Still Photo Setup Menu highlight and select “Scene.” See following section for
further explanations reg a rd ing Manual Mode settings. Man ual mode menu
navigation is not explained in this manual but is fairly straightforward.
30
Page 32

■ White Balance
There are six white ba lance settings in the Still mode:
Auto: Automatic. For general-purpose photography.
Sunny: For shooting outdoors on sunny days.
Bulb: For indoors with fluorescent lighting.
Neon: For indoors with tungsten lighting.
Cloudy: For outdoor scenes with cloudy or overcast skies.
Speed: For shooting fast-moving objects.
For more information on White Balance.
EV Compensation
■
The EV compensation can be adjusted manually from -2.0EV to +2.0EV . It is
divided into 9 steps.
■
Metering Mode
The DV camera provides four metering modes:
Matrix metering: the picture area is divided into sections. The light
metering sys tem will eval uate the best- suggested exposur e values. The
indicator displays in the lower left corner of the LCD display.
Center-weighted metering: measures the entire image area but
calculates the exposure by emphasizing the center of the image. The
indicator is displayed in the lower left hand corner of the LCD display. This
mode is well applicable to portrait photography.
31
Page 33

Spot metering: measures a spot in the center which is about 1/25 of the
viewfinder’s area to determine the exposure of the entire image. A square
frame is displayed in the center and
indicator appears at the lower left
side of the LCD display. This mode is best applicable to objects with very
bright or dark backgrounds.
Metering area
Focus area
Auto focus area: the metering system only focuses on the current focus
area, and the
indicator is displa yed on the lower left of the L CD display .
32
Page 34

■ ISO
ISO (Sensitivity) setti ngs control the DXG-301V c amera's sensitivity to ligh t.
The lower the sensitivity, the higher the exposure value needed. When you
increase the sensitivity, the shutter speed is faster and the exposure value is
reduced. The DXG-301V camera provides four ISO settings: Auto, 100, 200
and 400. (100 is equiv alent to the ISO 100 fi lm, 200 is equivalen t to ISO 200
film, and so on.)
Still Mode Setup Navigation
■
In Still mode, press the MEN U b utton to show/hide the Still setup menus.
33
Page 35

34
Page 36

Playback
Press the Playback button to switch to the Playback mode.
Indicators
■
Image Video
Playback mode
Current image (video)
number/Recorded files
count
File protection indicator
Battery power
:Full
:Medium
:Low
:Very Low
Image (video) recorded
date and time
Previous/next image
(video)
Image (video) indicator
If there is no image/videos stored in the internal
memory or memory card, a blinking "NO File"
message will appear on the LCD display.
Audio enabled/disabled
status
Length of recorded video
Video play/stop indicator
35
Page 37

■ LCD Display Toggle
Press DISPLAY button to toggle between display modes.
Full display Standard display Basic display Display Off
■
Thumbnail Display
Thumbnails are smaller representations of images, helpful for fast review
where viewing space is limited. Press
After enterin g the thumbn ail display mode, press the
(right arrow) to select the previous/next image (video); press the
arrow) /
After selecting the image/video, press the
(down arrow) to select the previous/next page.
button to see thumbna il im ages.
(left arrow) /
(center) to view the result.
(up
Adjusting Volume
■
Press the (up arrow) / (down arrow) to increase or decrease the
volume. If no operation is carried out for three seconds, the operation will be
canceled. (You can also adjust the volume while playing t he video)
3 sec.
36
Page 38

■ Viewing Photos
Press the (left arrow) / (right arrow) to select an image or video.
Image Video
■
Viewing Videos
Press the
The following screen will appear on the LCD display after a video is selected.
Press the PLAY/STOP button to start playing a video. Press the PLAY/STOP
button again to s top play ing v ideo. P ress the FWD . bu tton to fast for wa rd or
RWD. button to fast rewind the video.
Delete
■
Use the Menu button on the camera’s top to access the menu to delete
unwanted images/videos. Use the Multi-Select button to navigate the
display (see page 41 for guidance). NOTE: The deleted images/videos
cannot be retrieved. You must first remove protection before deleting
images/videos.
(left arrow) / (right arrow) to select an image or video.
Deleted images cannot be retrieved.
■
Protect/Unprotec
Set protection to avoid accidentally deleting important images/videos. The
protected images/videos can not be removed unless the protection is off. For
the protected images/videos, the
display.
indicator will be displayed on the LCD
37
Page 39

■ Slideshow
Slideshow plays back images (but not videos) automatically in sequential
order. You can adjust the slideshow display interval within the range of 1
second to 10 seconds. Select
(down arrow) to increase or d ecrease the interval. The and
symbols are to enable or disable the repeat function, respectiv ely . Select the
menu item and press the
function.
After completing settings, go to the
If there is no image stored in the internal memory or memory card, the
following message will appear on the LCD display:
■
DPOF
menu, and press the (up arrow) /
(center) to enable or disable the repeat
menu and press the to play.
DPOF allows embedded printing information on stored images. With DPOF
you can insert the memory card into a DPOF compatible pr inter and print
your stored ima ges to p rin t in varying quantities and wi th or wi thou t dates.
Set Each: to set the printing quantity for each image one by one; press
the
desired print quantity; press the
select the previous or next image.
Set All: set all images to the same print quantity.
Date On/Off: press (center) to enable or disable the printing of date
on the images.
Removable Device
■
Your computer’s operating system treats the camera like a removable mass
storage device when it is attached to the computer. When you attach the
camera, "USB MSDC" appears on the LCD display and you can transfer files
between the camera and the computer. (See File Transfer section )
(up arrow) / (down arrow) to increase or decrease the
(left arrow) / (right arrow) to
38
Page 40

■ Playback Menu Navigation
In Playback, Press the MENU button to show/hide the menus.
39
Page 41

If the selected image/video is protected
If the selected image/video is protected, the "Remove" sub-menu appears
automatically.
40
Page 42

41
Page 43

Slideshow plays only still images, not videos.
42
Page 44

If no image stored in
the memory.
43
Page 45

TV-Out
Use TV-Out to display images on an output display device, such as a television.
To transfer the image display to an external device:
Set the appropriate video output mode (NTSC or PAL) corresponding to
your TV and video recorder standards. USA=NTSC (See Appendix B for a
list of NTSC & PAL countries.)
Use the video cable provided to connect the DXG-301V camera your output
device. These two devices will t hen display the same image.
T ur n on the camera. Images/videos and their information will be shown on
the output device.
You can operate the camera normally with the TV-OUT function. The only
significant difference is that the display of images/videos an d their related
information are displayed on the video output device instead of on the
camera’s LCD display. If you want to restore the display to the LCD display,
simply disconnect the video c ab le from the camera.
Troubleshooting the TV-Out feature.
Any TV with RCA jacks should be able to display the signal from the camera.
Televisi ons and home enter tainment setups v ary in compl exity. T ry “channel
surfing” to see if there is a required channel for your setup. Your TV may
display the TV-Out from the camera under “aux” or “video” or some other
setting. Check your tel evision owner’s manual. Use an inexpensive, simple
TV to test the feature. Consult a qualified AV technician.
44
Page 46

Camera Driver
Installing the Camera Driver
●
The camera driver is not required for XP/Windows 2000 systems. For older
Windows operating systems, insta ll the camera driver to your PC:
1. Insert the companion CD included in the retail package into the CD-ROM
drive.
2. The Auto-run program will execute and the main screen appears:
(Note: If your CD-ROM drive doesn't support the auto-run function, double
click on the "My Computer" icon on the desktop. Then double click the
CD-ROM drive icon and click the Setup.exe file in the root directory.)
3. Click "Install Driver", the following screen shows as follows:
4. Click "Next" to continue. The screen will show the following message:
45
Page 47

5. Click "Finish" to restart the compute r and installation completes.
46
Page 48

Applications
Installation Procedure
●
Please feel free to use the bundled application software. If you have
questions, please do not contact DXG, which does not provide assistance in
the use of these programs.
To install ArcSoft applications (Example: Photo Impression)
1. Insert the Software CD included the package into the CD-ROM drive.
2. The Auto-run program execute and the main screen shows as follows:
(Note: If your CD-ROM drive doesn't automatically run, double click on the
"My Computer" icon on the desktop. Then double click the CD-ROM drive
icon and click the Setup.exe file in the root directory.)
3. Click "Install ArcSoft PhotoImpression,” and the following screen
shows:
4. Select the desired language, and press "OK".
5. Press "Next" to cont inue.
47
Page 49

6. Press "Yes" to accept the terms and conditions of Software License
Agreement and continue.
7. Follow the installatio n wizard to select the folder location and
application components.
8. Select the program folder.
9. After the installation is completed, the following screen shows. Press
"Finish" to complete the installation.
48
Page 50

File Transfers
File Transfer Procedure
■
Use the Mass Storage function in the camera and your operating
system to tr ansfer files via USB. Do not use the PC app lication software
for this purpose. Note: Windows XP and Windows 2000 users do not
need to install the camera driver to transfer files.
1. Turn the camera on.
2. Connect the USB cable between the camera and the computer; “USB
MSDC” appears on the camera’s LCD display.
3. Your operating system resp onds with a window (wizard) offer ing
options to view and copy files. If the operating system does not
respond, see below.
File Transfer Shortcut
■
Because your computer’s operating system recognizes the camera as a
mass storage device, you can easily transfer files from the camera using
an alternative method from the one described above. With the camera
connected and with “USB MSDC” icon on the LCD display:
1. Double click on the My Computer icon.
2. Eject any CDs in the CD-ROM drive.
3. Find a new icon, which looks like a flat gr ay box, repr esenting the digital
camera. XP lists it as a removable device, Windows 98 as a r e m ovable
disk.
4. Double click on the icon.
5. Double click on file folder labeled DCIM.
6. Double click on file fo lder, labeled 100DV301.
7. Drag and drop photo files, or the whole folder.
The file folders containing the images from the camera are automatically
created upon camera connection. Now that you have successfully
transferred files, use your Windows viewer or imag e editor to view the
images. Videos have the .ASF file name extension. Photos have the JPEG file
name extension. Double click on them to see them in viewers/players.
49
Page 51

Appendix A.
DXG-301V Specifications
■
Image sensor 1/2.7" CCD
Pixels 3.2 mega pixels
Focus F / 2.8
Focus range
Shutter speed Electrical shutter (1/2 sec. ~ 1/1500 sec.)
LCD display 1.8" TFT LCD (280 x 220 pixels)
Storage
Medium
Digital Zoom 4X Digital Zoom, 10-Step
File Format Image: JPEG
Compression
format
Image
resolution
Self-timer 10 sec. delay
Flash mode Auto Flash / Auto Flash + Red-eye Reduction / Forced Flash
TV-Out NTSC / PAL system selectable
Audio
recording
Auto power off 3 minutes / 5 minutes / 15 minutes
USB USB1.1
Power Supply AA Alkaline Batteries x 4
Dimensions Size: 120 x 71 x 45 mm
10 cm~∞
16MB Internal Flash Memory
SD card (MMC compatible), support 4MB ~ 512MB
Video: ASF
Image: JPEG (Exif2.2/DCF) standard
Video: MPEG4 standard
Image: 2048x1536, 1600x1200, and 640x480
Video: VGA (640 x 480) 15~25 fps
QVGA (320 x 240) 30fps
+ Red-eye Reductio n / Slow Synchronize / Flash Off
Enable / Disable
Optional: AC Adapter (external power supply)
Weight: approx. 200g (without batteries)
50
Page 52

Appendix B.
■
System Requirements
These are minimum system requirements for use with the DXG-301V camera.
We strongly recommend that you use a better computer system for optimal
performance, as these are bare minimums.
OS Microsoft Windows 98SE/Me/2000/XP
CPU Intel Pentium 166MHz or higher
Memory 32 MB memory or above
CD-ROM 4X or above
HDD 20 MB free space or above (the longer the video
the more HDD space will be needed)
Others One standard USB 1.1 port (or higher)
51
Page 53

Appendix C.
NTSC & PAL Countries
NTSC Countries: USA, Antigua, Bahamas, Barbados, Belize, Bermuda, Bolivia, Burma, Canada, Chile,
Colombia, Costa Rica, Cuba, Dominican Republic, Ecuador, El Salvador, Greenland, Guam, Guatemala,
Guyana, Honduras, Jamaica, Japan, South K orea, Mexico, Netherlands Antilles, Nicaragua, Panama, Pe ru,
Philippines, Puerto Rico, St. Vincent & the Grenadines, St. Kitts, Saipan, Samoa, Surinam, Taiwan,
Tobago, Trinidad, Venezuela, Virgin Islands.
PAL Countries: Abu Dhabi, Afghanistan, Albania, Algeria, Andorra, Angola, Argentina, Ascension Island,
Australia, Austria, Azores, Cameroon, Canary Islands, Cape Verde, Cayman Islands, China (Peoples
Appendix C.
Republic), Christmas Island, Cook Island, Croatia, Cyprus (Turkish) Denmark, Dubai, Easter Island,
Eritrea, Ethiopia, Equatorial Guinea, Falkland Islands, Faeroe Islands, Fiji, Finland, Gambia, Gaza & West
Bank, Germany , Ghana, Gibraltar, Great Britain, Greenland, Guinea, Guinea-Bissau, Holland, Hong Kong,
Iceland, India, Indonesia, Ireland, Israel, Italy, Jordan, Kenya, Korea (N), Kuwait, Lebanon, Lesotho,
Liberia, Liechtenstein, Luxembourg, Macao, Macedonia, Madeira, Malawi, Malaysia, Maldives, Malta,
Namibia, Nepal, Netherlands, New Zealand, Nigeria, Norfolk Island, Norway Montenegro, Mozambique,
Namibia, Nepal, Netherlands, New Zealand, Nigeria, Norfolk Island, Norway , Oman, P akistan, Papua New
Guinea, Paraguay, Portugal, Qatar, Seychelles, Sierra Leone, Singapore, Slovenia, Solomon Islands,
Somalia, South Africa, Spain, Sri Lanka, Sudan, Swaziland, Sweden, Switzerland, Tanzania, Thailand,
Tonga, Tristian Da Cunah, Turkey, Uganda, United Arab Emirates, United Kingdom, Vanuatu, Vatican,
Western Sahara, Yemen, Yugoslavia, Zambia, Zimbabwe.
52
Page 54

DISCLAIMER
The information in this document is believed to be reliable, though no
responsibility is assume d for in accur acies. DXG Technology reserves the right
to make changes to th e ite ms descri bed he rein to im prove r eliabil ity, function
or design. Neither DXG nor any of its employees, assume any liability for
damages or losses, either direct or incidental, that may arise out of the
application or use of any of its products or circui ts , particularly with regard to
damage that may occur in the operation of its products.
Manual version 2.0 July, 2004
© DXG USA, City of Industry, CA 2004
53
 Loading...