

Page 1
Page 2

Page 3

1
Preface...............................................................................................................4
About this manual....................................................................................... 4
Copyright ........................................................................................................... 4
Safety.................................................................................................................. 5
1. Introducing the camera..............................................................6
1.1 System requirements.................................................................................... 6
1.2 Features.......................................................................................................6
1.3 Unpacking.................................................................................................... 7
1.4 About the camera......................................................................................... 8
1.4.1 Front view ................................................................................... 8
1.4.2 Top view...................................................................................... 8
1.4.3 Back view..................................................................................... 8
2. Getting started ..........................................................................11
2.1 Inserting an SD card................................................................................. 11
2.2 Inserting the battery...................................... .............................................12
2.3 Charging the battery.................................................................................. 13
2.4 Turning on for the first time...................................................................... 14
2.5 Changing modes................................... ..................................................... 14
2.6 Before you start.......................................................................................... 15
2.6.1 Setting the date and time......................................................... 15
2.6.2 Setting the language................................................................. 16
2.7 Taking pictures........................................................................................... 16
2.7.1 Taking your first still picture .................................................. 16
2.7.2 Taking pictures ......................................................................... 17
2.8 Video r ecording.......................................................................................... 20
2.8.1 Video .......................................................................................... 20
2.8.2 Video playback ......................................................................... 20
2.9 Audio or voice recording............................................................................ 22
2.9.1 Audio ......................................................................................... 22
2.9.2 Playing the audio file............................................................... 24
Contents
Page 4

2
2.10 Connecting to a computer........................................................................25
2.10.1 Mass Storage................................................................................ 25
2.10.2 PC camera .................................................................................... 26
2.11 Connecting to a TV.....................................................................................26
3. Using the camera.........................................................................27
3.1 Photo mode...................................................................................................27
3.1.1 Icons.............................................................................................. 27
3.1.2 Setting the flash........................................................................... 28
3.1.3 Setting the size............................................................................. 28
3.1.4 Quality.......................................................................................... 28
3.1.5 White balance .............................................................................. 29
3.1.6 Color effect...................................................................................29
3.1.7 Date Stamp................................................................................... 29
3.2 V ideo recorder mode.....................................................................................30
3.2.1 Icons.............................................................................................. 30
3.2.2 Setting the size............................................................................. 31
3.2.3 Quality.......................................................................................... 31
3.2.4 White Balance.............................................................................. 31
3.2.5 Color effect...................................................................................31
3.2.6 File format.................................................................................... 31
3.3 Audio or V oice Recording mode...................................................................32
3.3.1 Icons.............................................................................................. 32
3.4 Setup mode...................................................................................................32
3.4.1 Setting the date and time ...........................................................33
3.4.2 Setting the beep function ........................................................... 33
3.4.3 Setting the language ................................................................... 33
3.4.4 Auto Display Off.........................................................................33
3.4.5 Auto Power Off ...........................................................................34
3.4.6 Format ..........................................................................................34
3.4.7 TV Standard.................................................................................35
3.4.8 Default..........................................................................................35
3.4.9 Memory Status ............................................................................ 35
3.4.10 Frequency..................................................................................... 36
3.5 FM Radio mode............................................................................................37
Page 5

3
3.5.1 Sound recording icon............................................................... 37
3.5.2 Operation instructions............................................................. 37
3.6 Music Player mode .................................................................................... 39
3.6.1 Icons ........................................................................................... 39
3.6.2 Operation instructions............................................................. 39
3.7 Movie player mode..................................................................................... 41
3.7.1 Mode icons ................................................................................ 41
3.7.2 Operation instructions............................................................. 41
3.8 Photo viewer mode.....................................................................................42
3.8.1 Operation instructions............................................................. 43
3.9 Game mode ................................................................................................ 44
3.9.1 Boxman ...................................................................................... 44
3.9.2 Tetris........................................................................................... 45
3.9.3 Memory (game) ........................................................................ 46
3.9.4 Gobang....................................................................................... 47
4. Recording TV programs ..........................................................48
4.1 Operation instructions............................................................................... 48
5. Installing software and drivers................................................49
5.1 Drivers........................................................................................................ 49
5.1.1 Mass Storage ............................................................................. 49
5.2 Presto! V ideo Wo rks 6................................................................................ 50
5.3 Presto! Mr. Photo 3....................................................................................50
5.4 XviD codec for PC..................................................................................... 51
6 . Troubleshooting .......................................................................54
6.1 Problems and remedies................ .............................................................. 54
Appendix .......................................................................................55
Specification .................................................................................................... 55
Page 6

4
Preface
Congratulations on your purchase of this advanced digital camera. Please read this manual
carefully and keep it in a safe place for future reference.
About this manual
Every effort has been made to ensure that the contents of this manual are correct and up to date.
However, no guarantee is made regarding the accuracy of the contents, and the manufacturer
reserves the right to make changes without notice.
If the accessories don’t match the actual items in the package, please take th e actual items as the
standard.
Copyright
© Copyright 2005.
All rights reserved. No part of this publication may be reproduced, transmitted, transcribed, stored
in a retrieval system or translated into any language or computer language, in any form or by any
means, electronic, mechanical, magnetic, optical, chemical, manual or otherwise, without the prior
written permission of the manufacturer.
Page 7

5
Safety
• When using lithium-ion battery of this product, ensure that it is inserted correctly. Inserting
the batteryupside down can cause damage to the product and possibly start a fire.
• Use only the supplied type of battery and charger with the camera. Using other types of
batteries or chargers may damage this device and void the warranty.
• Do not use or store the product in dusty, dirty, or sandy areas, as its components may be
damaged.
• Do not store the product in hot areas. High temperatures can shorten the life of electronic
devices, damage batteries and warp or melt certain plastics.
• Do not store the product in cold areas. When the product warms up to its normal
temperature, moisture can form inside, this may da mage the electronic circuits.
• Do not attempt to open the casing.
• Do not drop or knock the product. Rough handing may damage the internal components.
• Do not use harsh chemicals, cleaning solvents or strong detergents to clean the product.
Wipe the camera with a soft cloth slightly dampened.
If the product or any of its accessories are not working properly, take them to your nearest
qualified service center. The personnel there will assist you, and if necessary, arrange for the
product to be repaired.
Page 8

6
1. Introducing the camera
Read this section to learn about the features and functions of the camera. This chapter also covers
system requirements, package contents, and front and rear views.
1.1 System requirements
The camera requires a host PC with the following specifications:
• Windows
®
XP, 2000 and ME operating system
• Intel® Pentium III 500 MHz CPU or higher
• At least 256 MB of RAM or higher
• Standard USB 1.1 port or higher
• 4 x speed CD-ROM drive or higher
• At least 200 MB of available disk space
Note: A USB 1.1 port will enable you to transfer files to and from your host PC, but transfer
speeds will be much faster with a USB 2.0 port.
1.2 Features
The camera offers a variety of features and functions including:
• Digital still camera (max. 12.0 Mega pixels)
• Digital camcorder
• Movie player
• Music player
• FM Tuner
• Voice recorder
• Photo viewer
• Video Game Player
Additionally, the camera also has 4X digital zoom, with mass storage device and SD card reader
functions.
Page 9
7
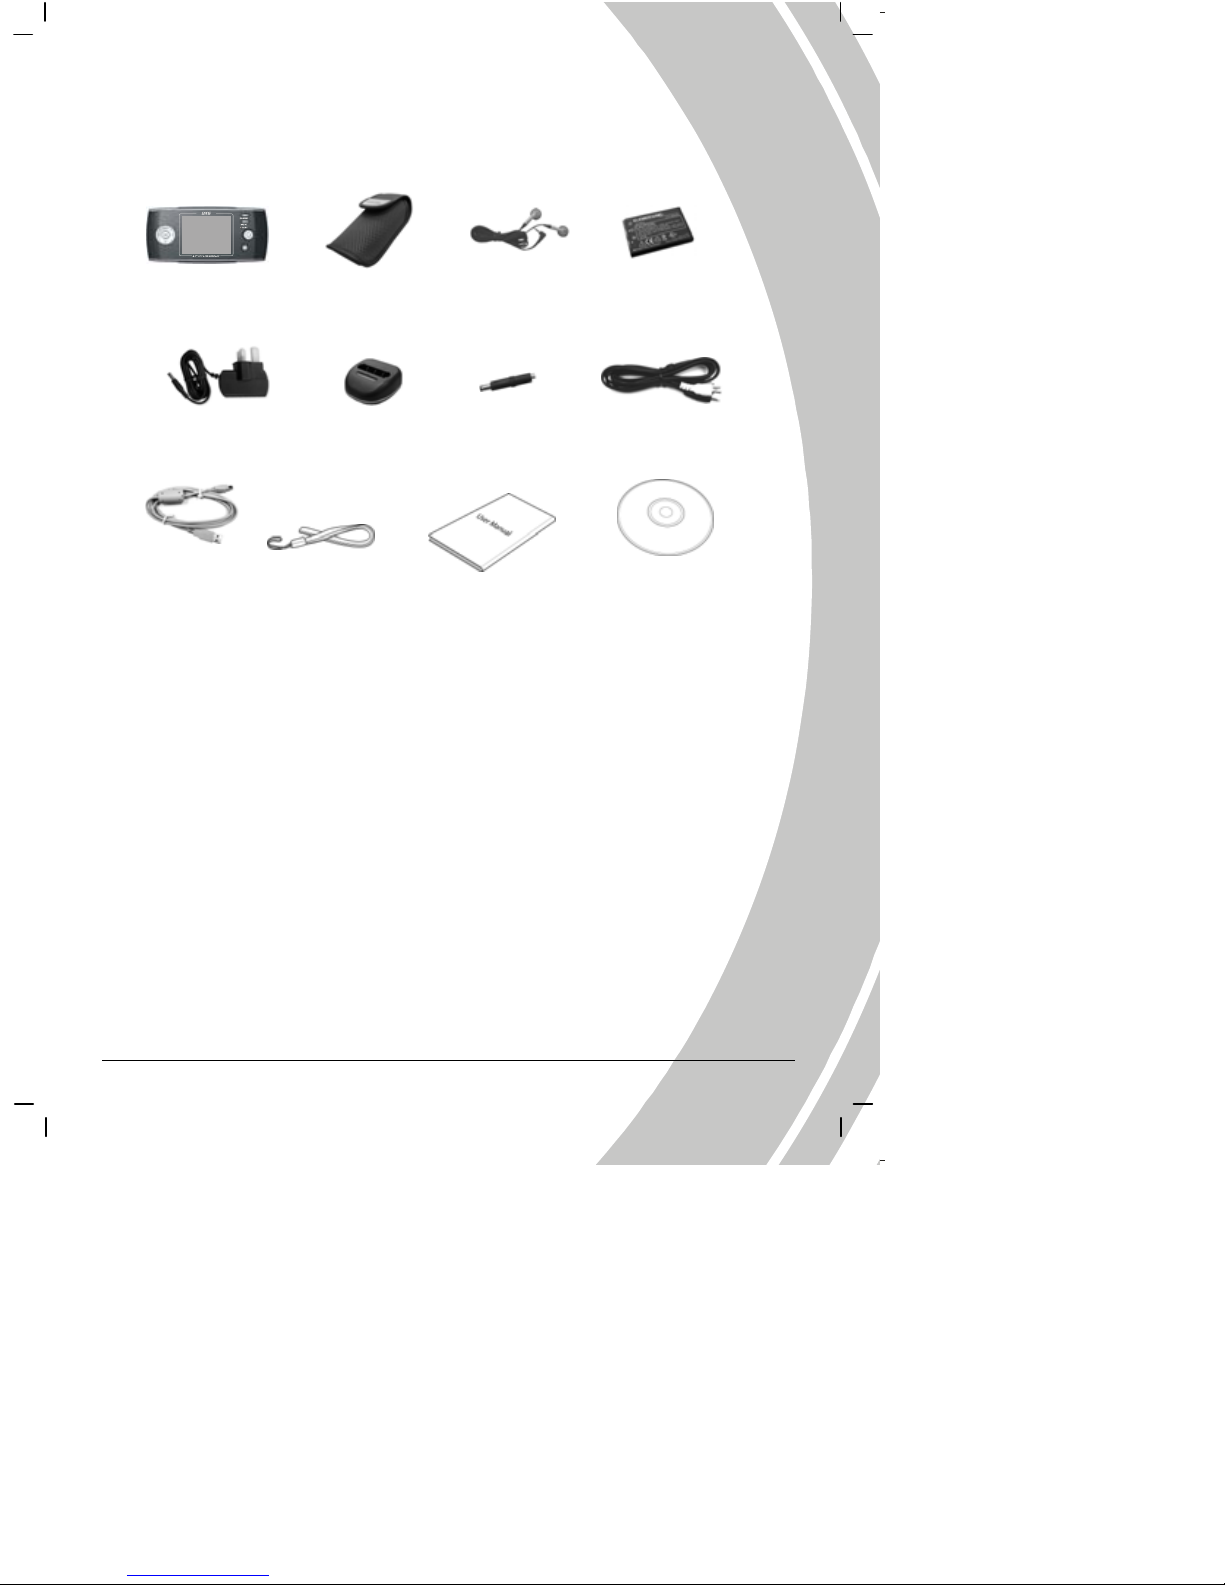
1.3 Unpacking
The following items should be present in the camera package. If any item is missing or appears
damaged, contact your dealer immediately.
User Manual
Digital Camera
Camera Pouch
CD-ROM
(Driver and Application software)
AV C able
Wrist Strap
Li-ion Bet tery
USB Cable
Earphones
DC-IN 5V Adapt er
Changer Stand DC-IN Connector
Page 10
8
1.4 About the camera
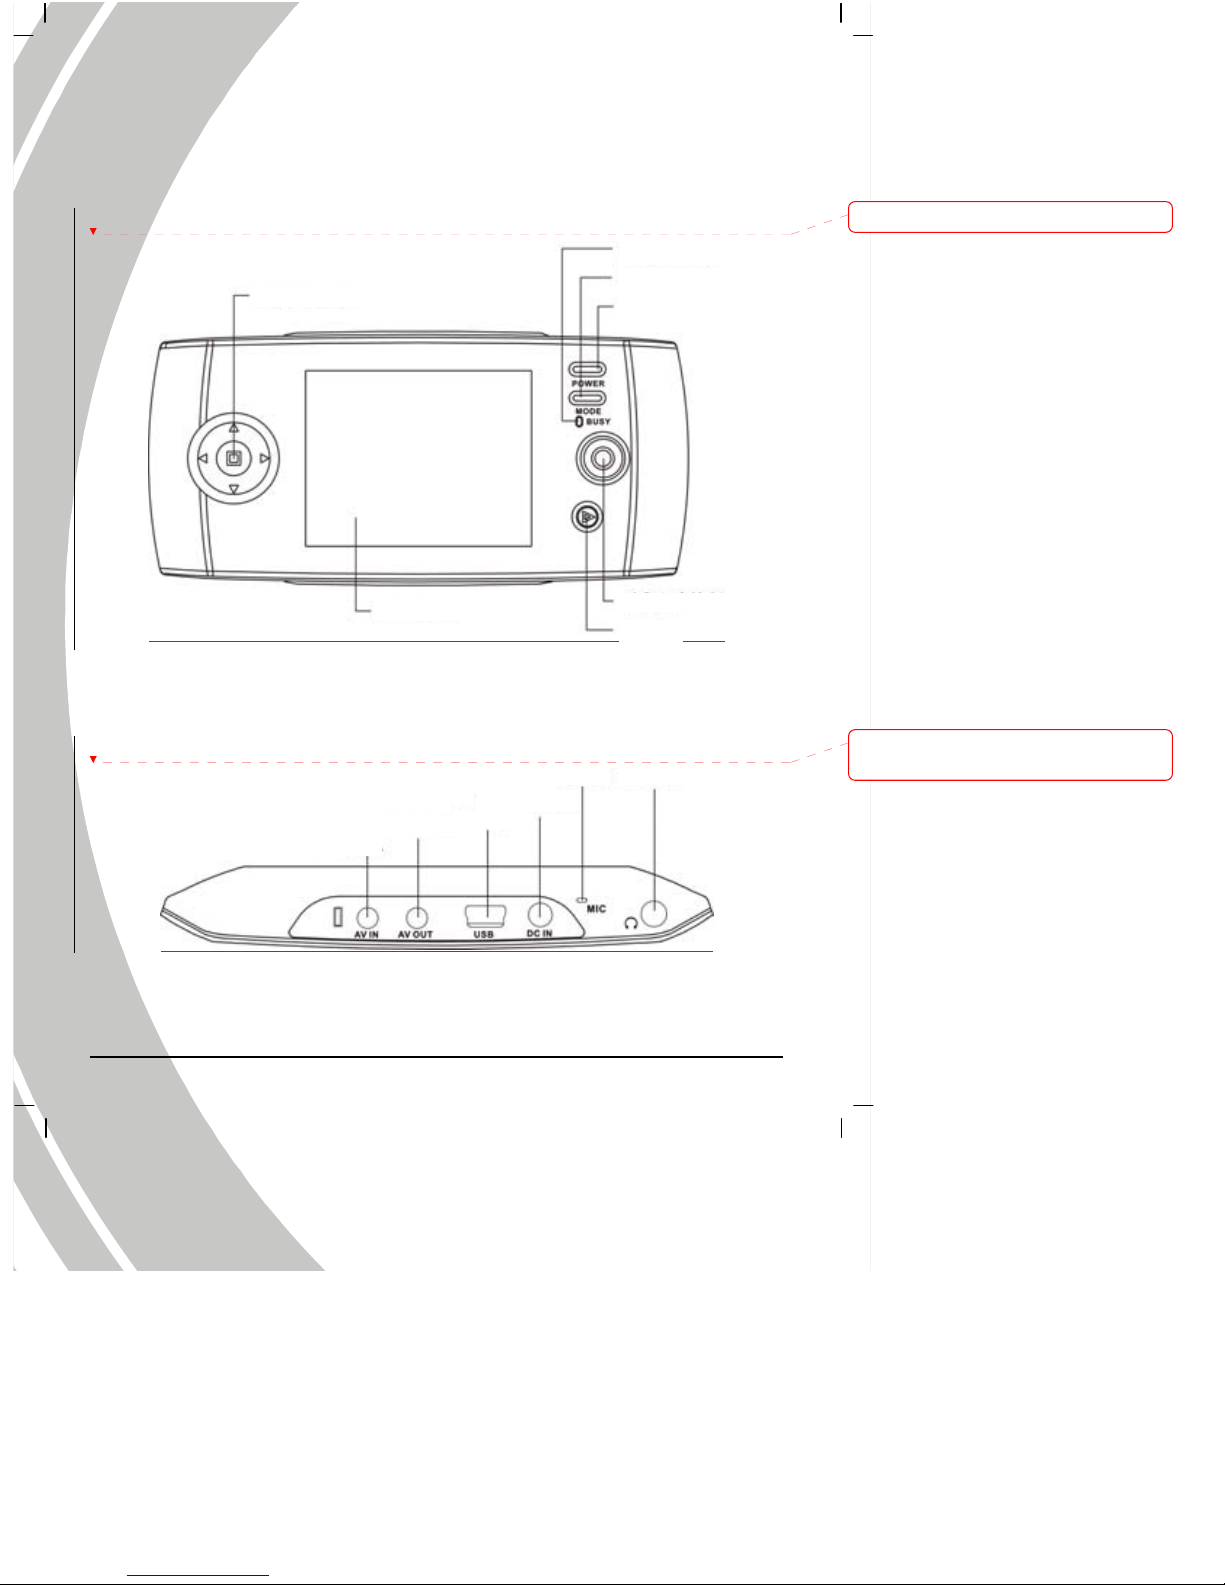
Refer to the following diagrams to familiarize yourself with the buttons and controls of the
camera.
1.4.1 Front view
1.4.2 Top view
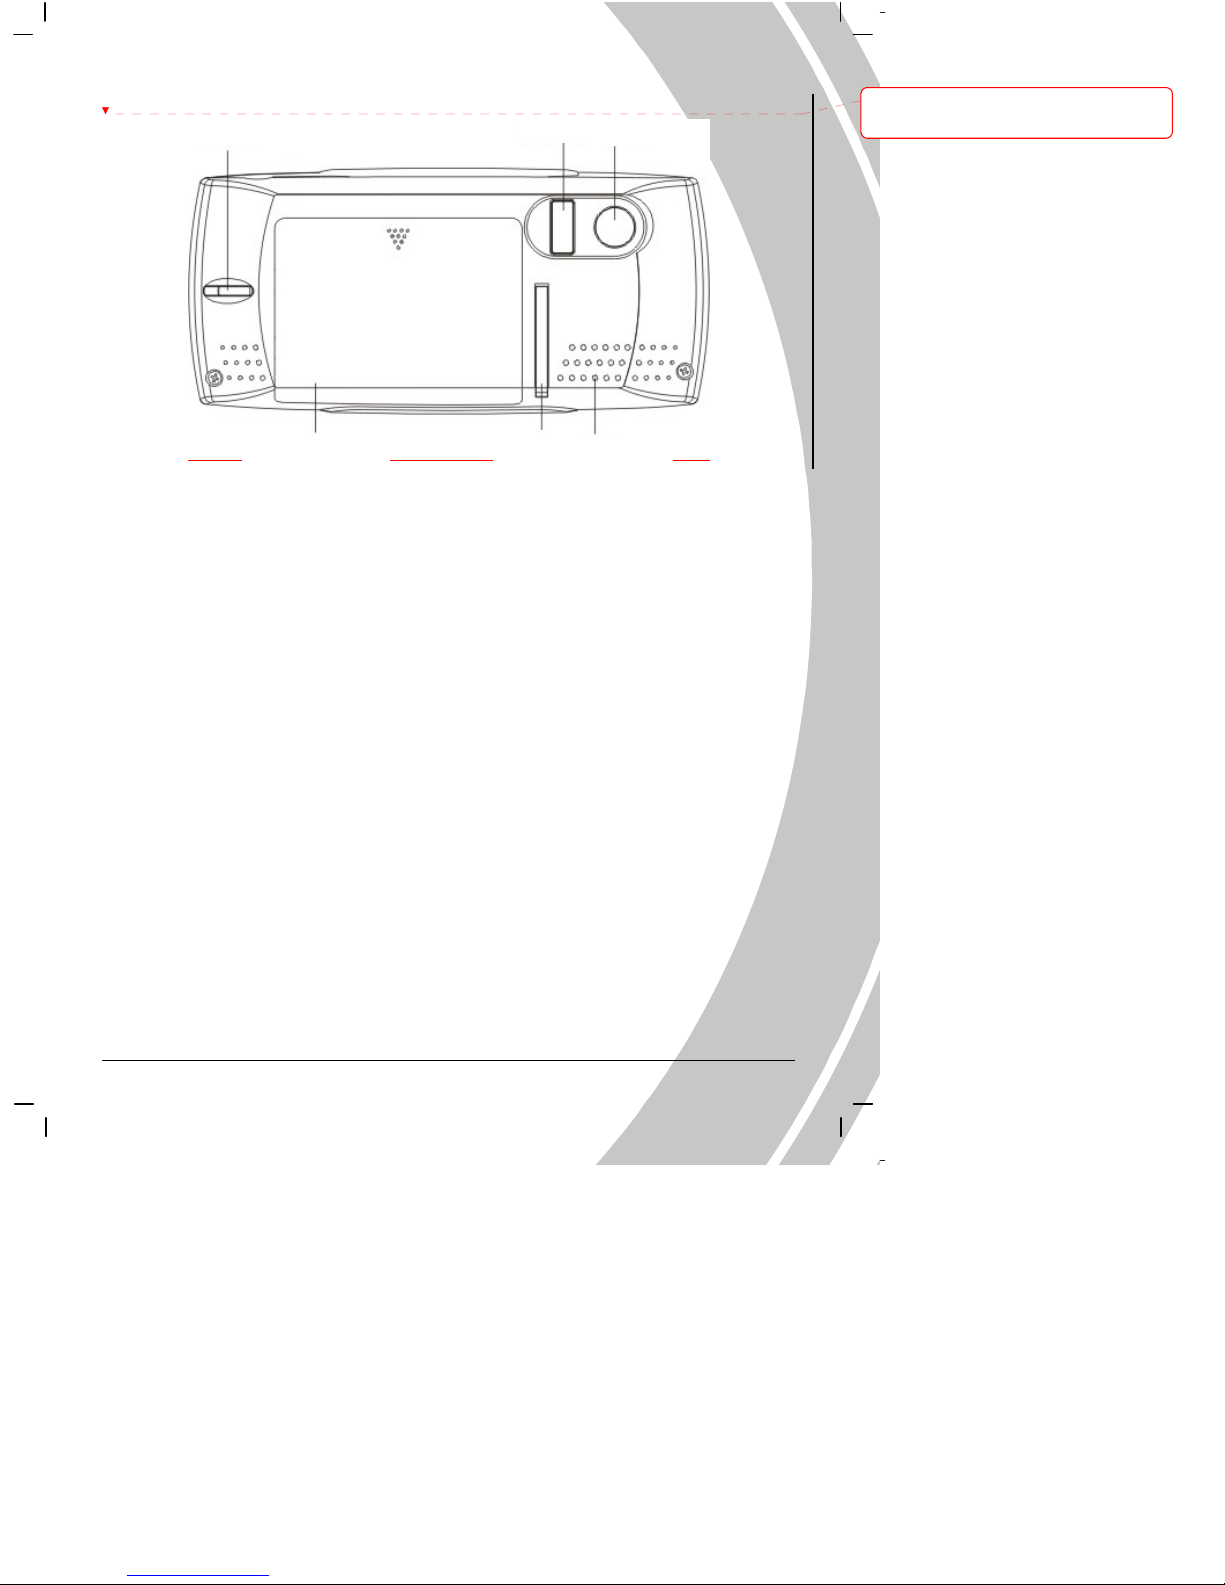
1.4.3 Back view
Microphone
AV IN jack
USB
AV OUT jack
DC IN jack
Browse
O
K
Earphones jack
LCD screen
Joystick
Mode Button
Power
Status LED
Deleted: 
Deleted: 

Page 11
9
Speaker
Lens
Wrist Strap
Buckle
Stand Battery Cover
Flash
Deleted: 

Page 12
10
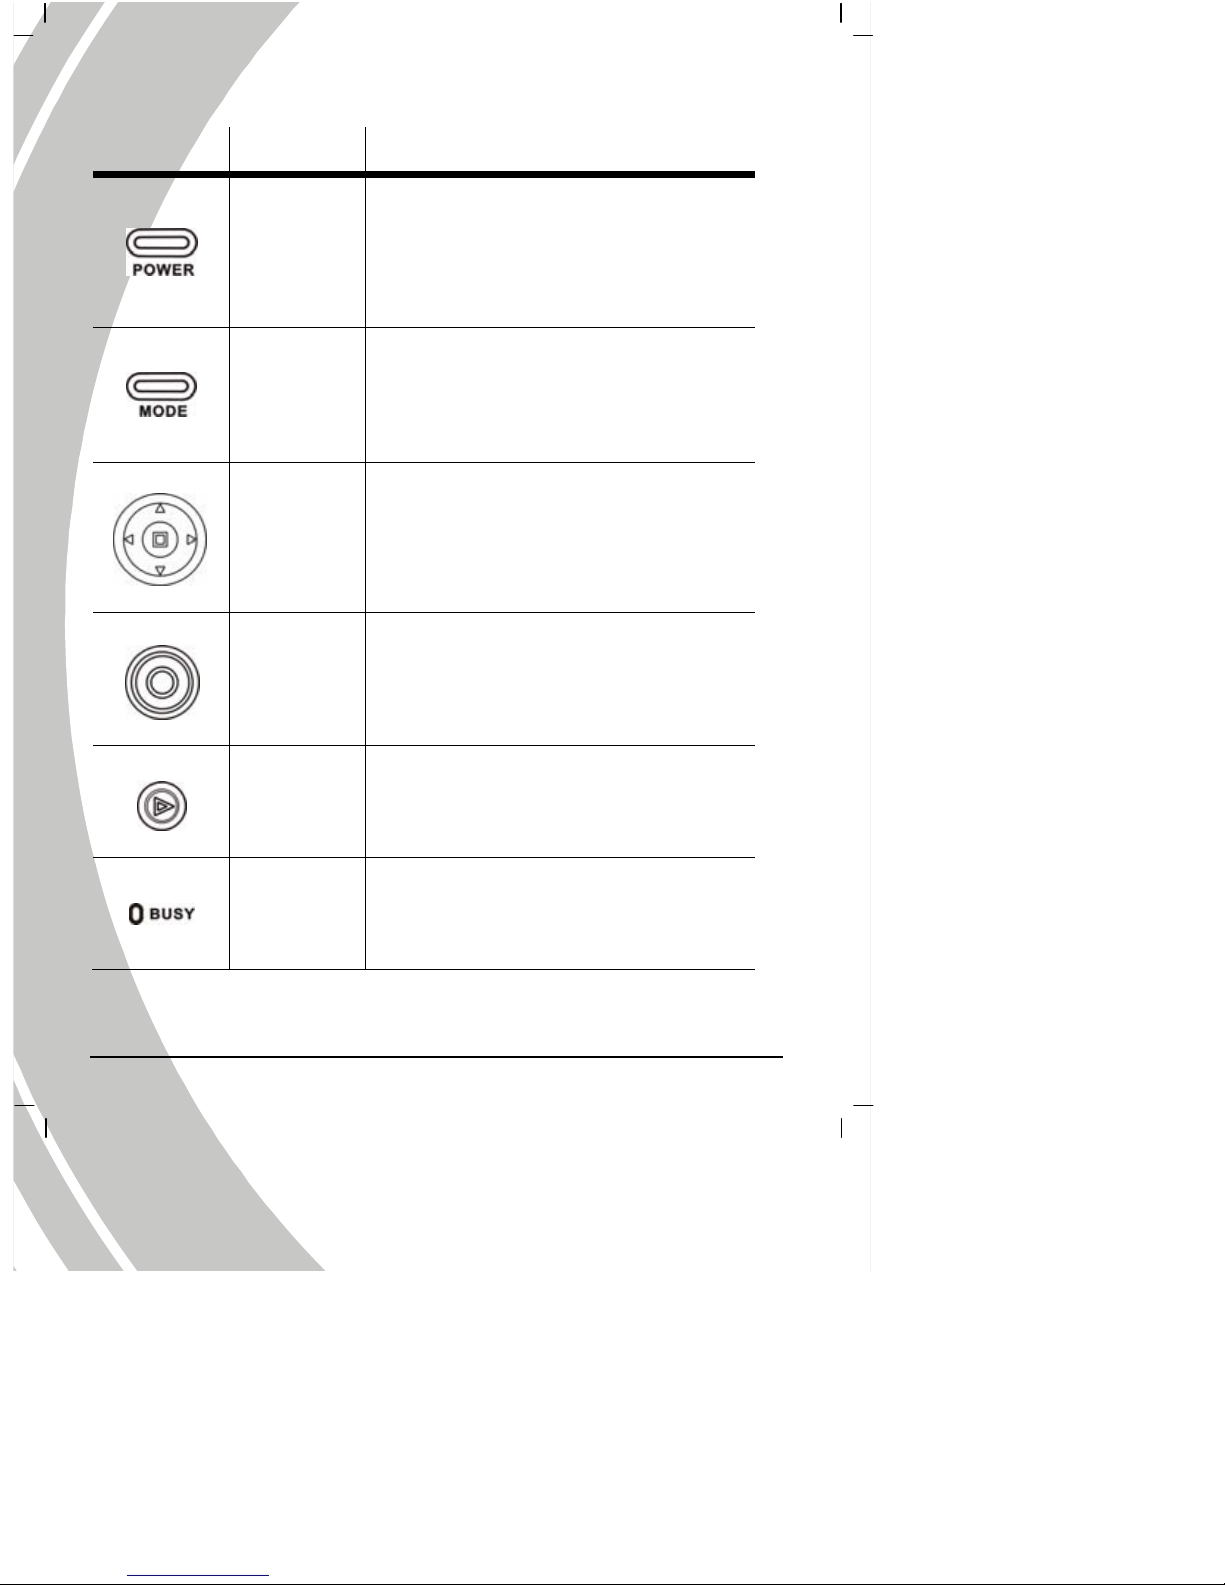
See the table below for a description of each button’s function.
Button Name Function
Power
z Press to turn power on or off.
z When the camera is in work/standby status,
the green indicator lights.
z When the camera is in “Flash charging”
status, the red indicat or light s .
Mode
z
Press this Mode button to switch to the
following modes: Photo mode, FM Radio
mode, Game mode, Music player mode,
Photo viewer mode, Setup mode, Video
mode, Sound recording mode, Movie
player mode.
joystick
z Use this button to execute differ e nt
operations with different mode, such as
selecting, moving up/down/left/right.
z Adjust EV value and self-capturing time,
zoom and flash charging in Photo mode.
z Adjust EV value and zoom in Video mode.
OK
z Use this button with joystick and Mode
button to finish the related selection and
setup.
z Press to capture in the Photo mode.
z Press to start/stop recording video/sound in
the Video/Sound recording mode.
Browse button
z Press this button in the Photo, Video or
Sound recording mode to enter the Playback
mode (quick browse), and press again to
return to the Photo, Video or Sound
recording mode.
Standby/Busy
(green indicator)
Flash charging
(red indicator)
z When the camera is in work/standby status,
the green indicator lights.
z When the camera is in use and “Flash
charging” status, the red indicator lights.
Page 13
11
2. Getting started
Read this section to learn how to start using the digital camera. This section covers only basic
functions, such as inserting the battery and memory card, turning on/off and initial setup. See later
chapters for details about advanced functions.
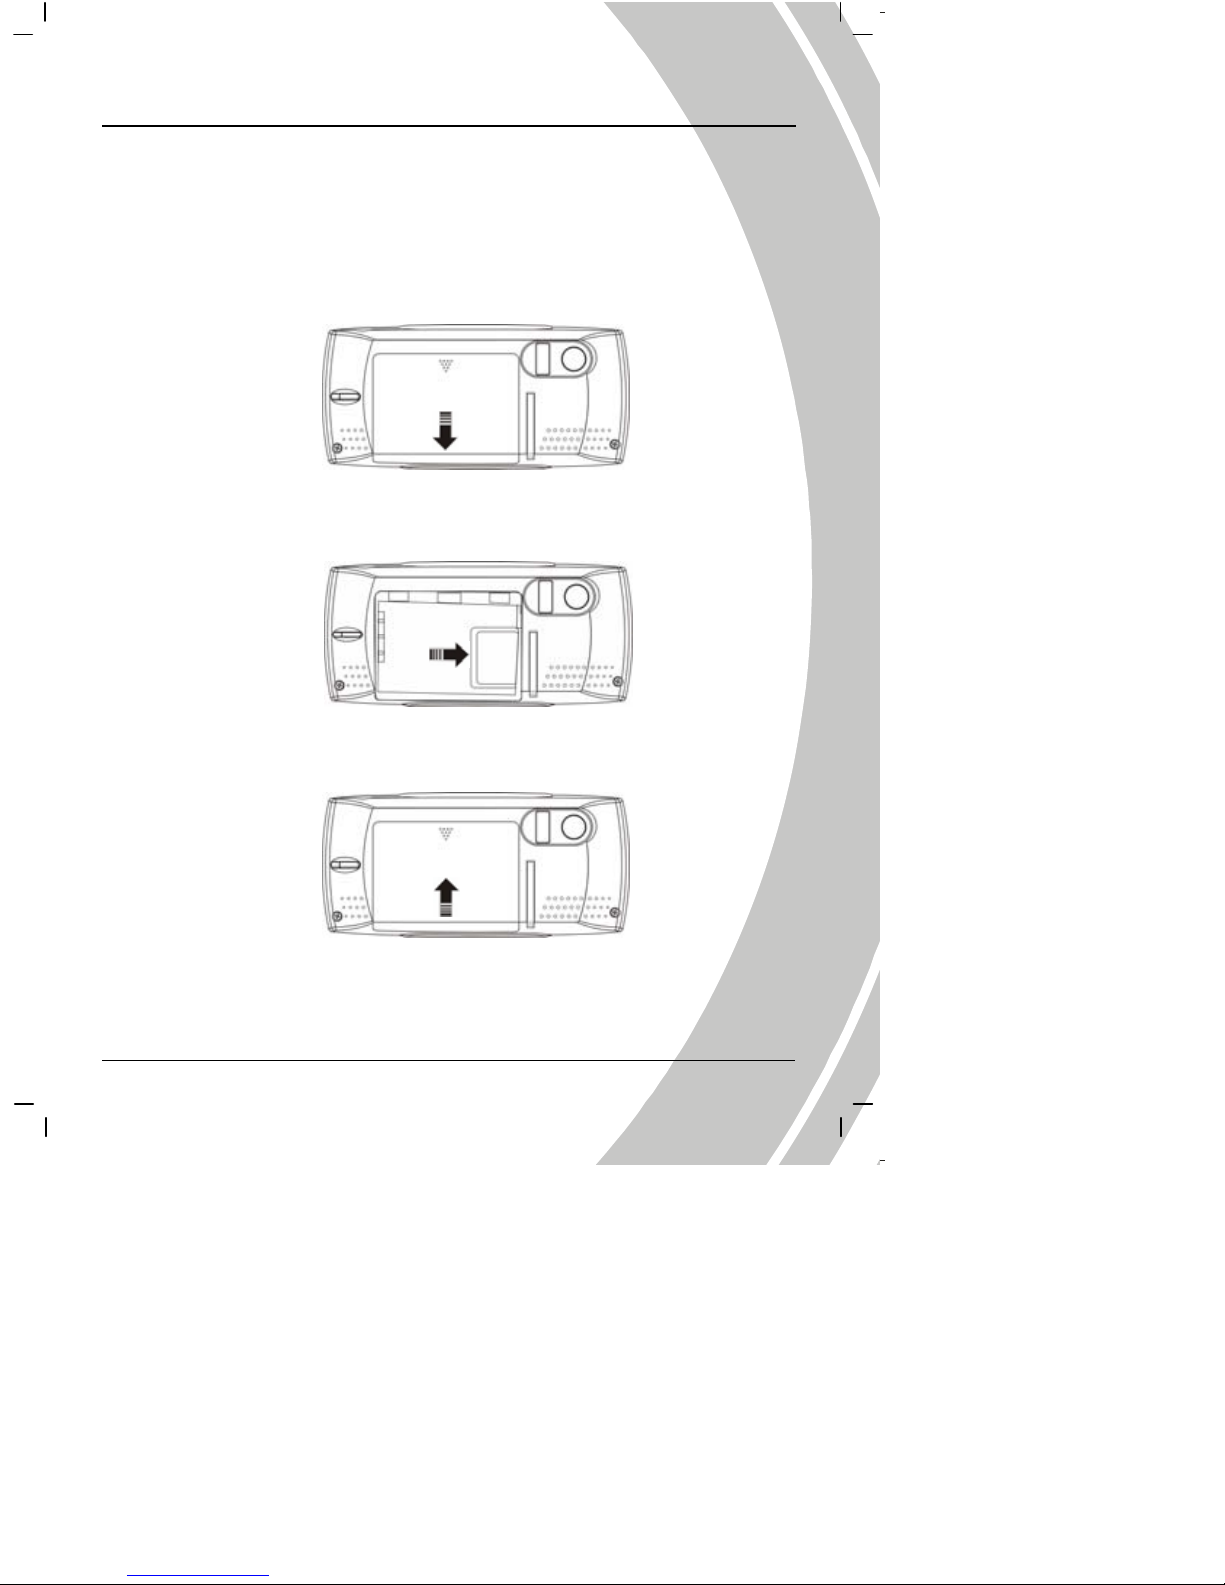
2.1 Inserting an SD card
An SD card can be installed in the camera to provide additional storage space for s till images,
video, MP3 or other files.
1. Open the battery compartment as shown.
2. Insert an SD card as shown. Make sure the gold contacts ar e facing down, as shown.
3. Close battery compartment as shown.
Page 14
12
2.2 Inserting the battery
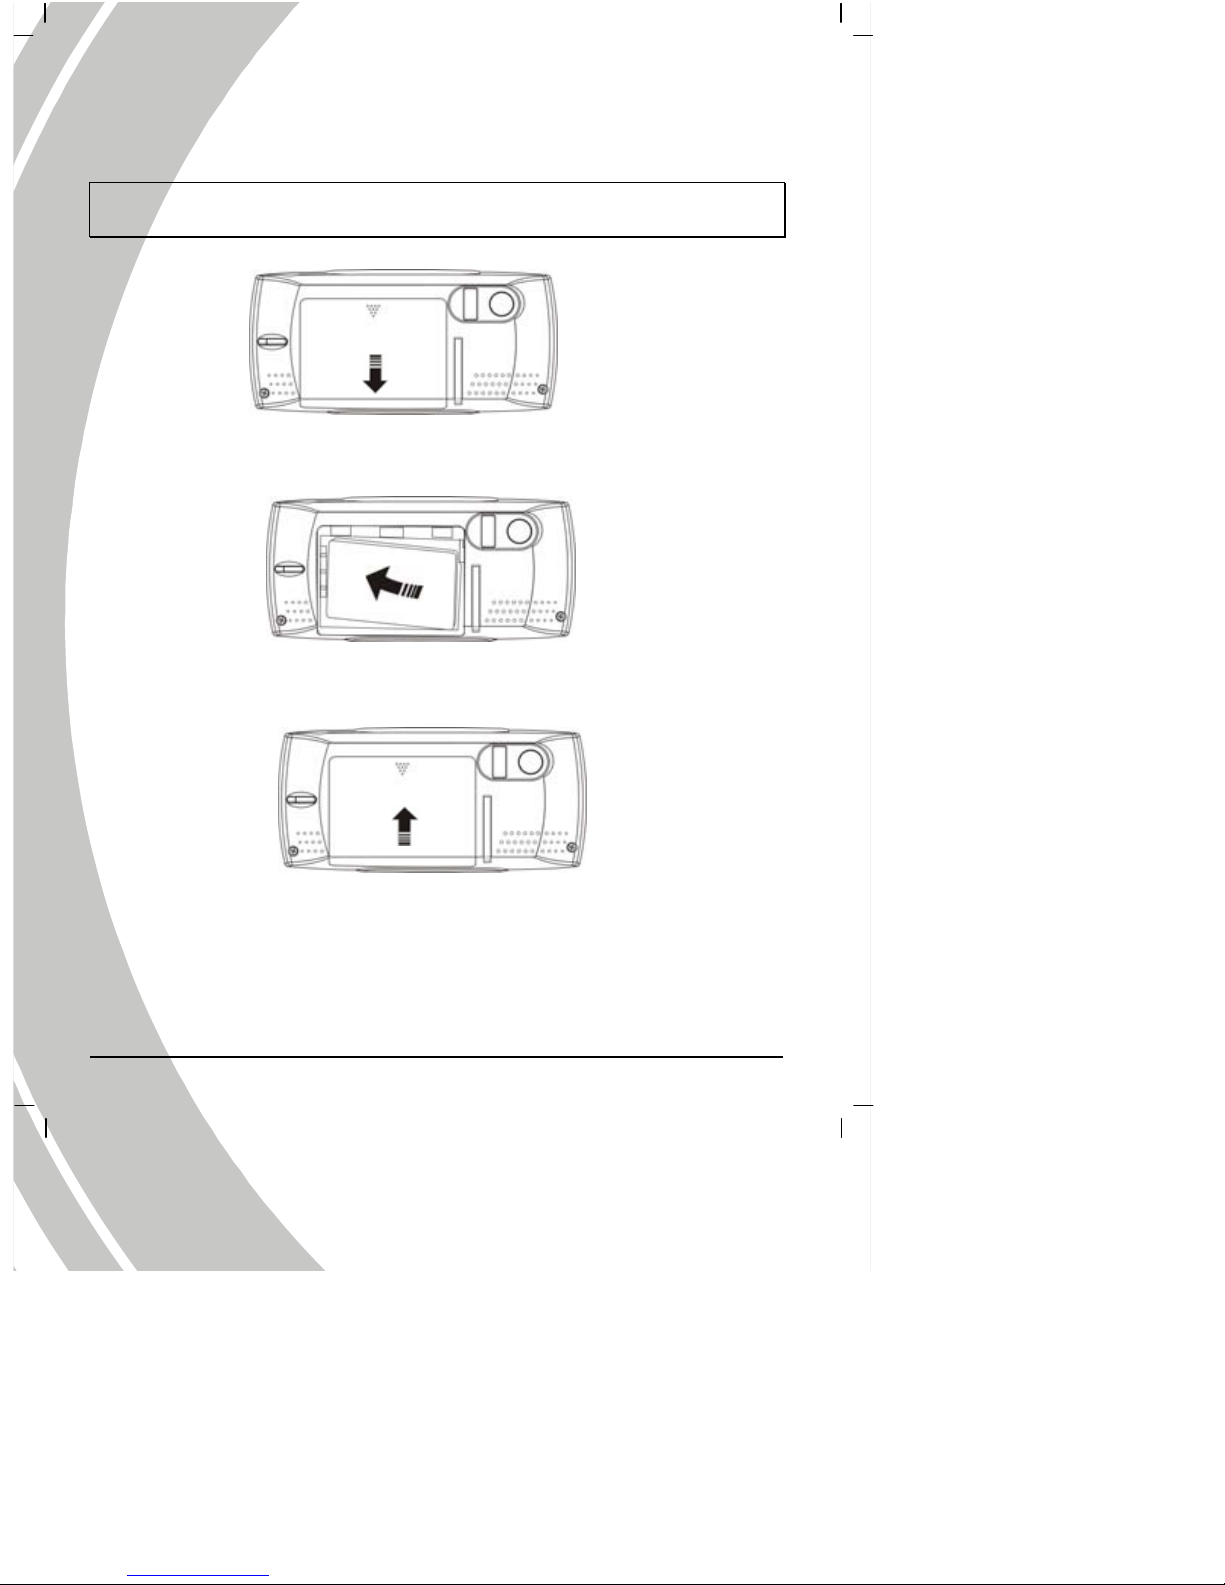
The camera is designed to use a rechargeable Li-ion battery.
Note: Install the battery exactly as described here. Installing the batteries incorrectly could cause
damage to the camera and possibly start a fire.
1. Open the battery compartment as shown.
2. Insert the battery as shown.
3. Close the battery compartmen t.
Page 15
13
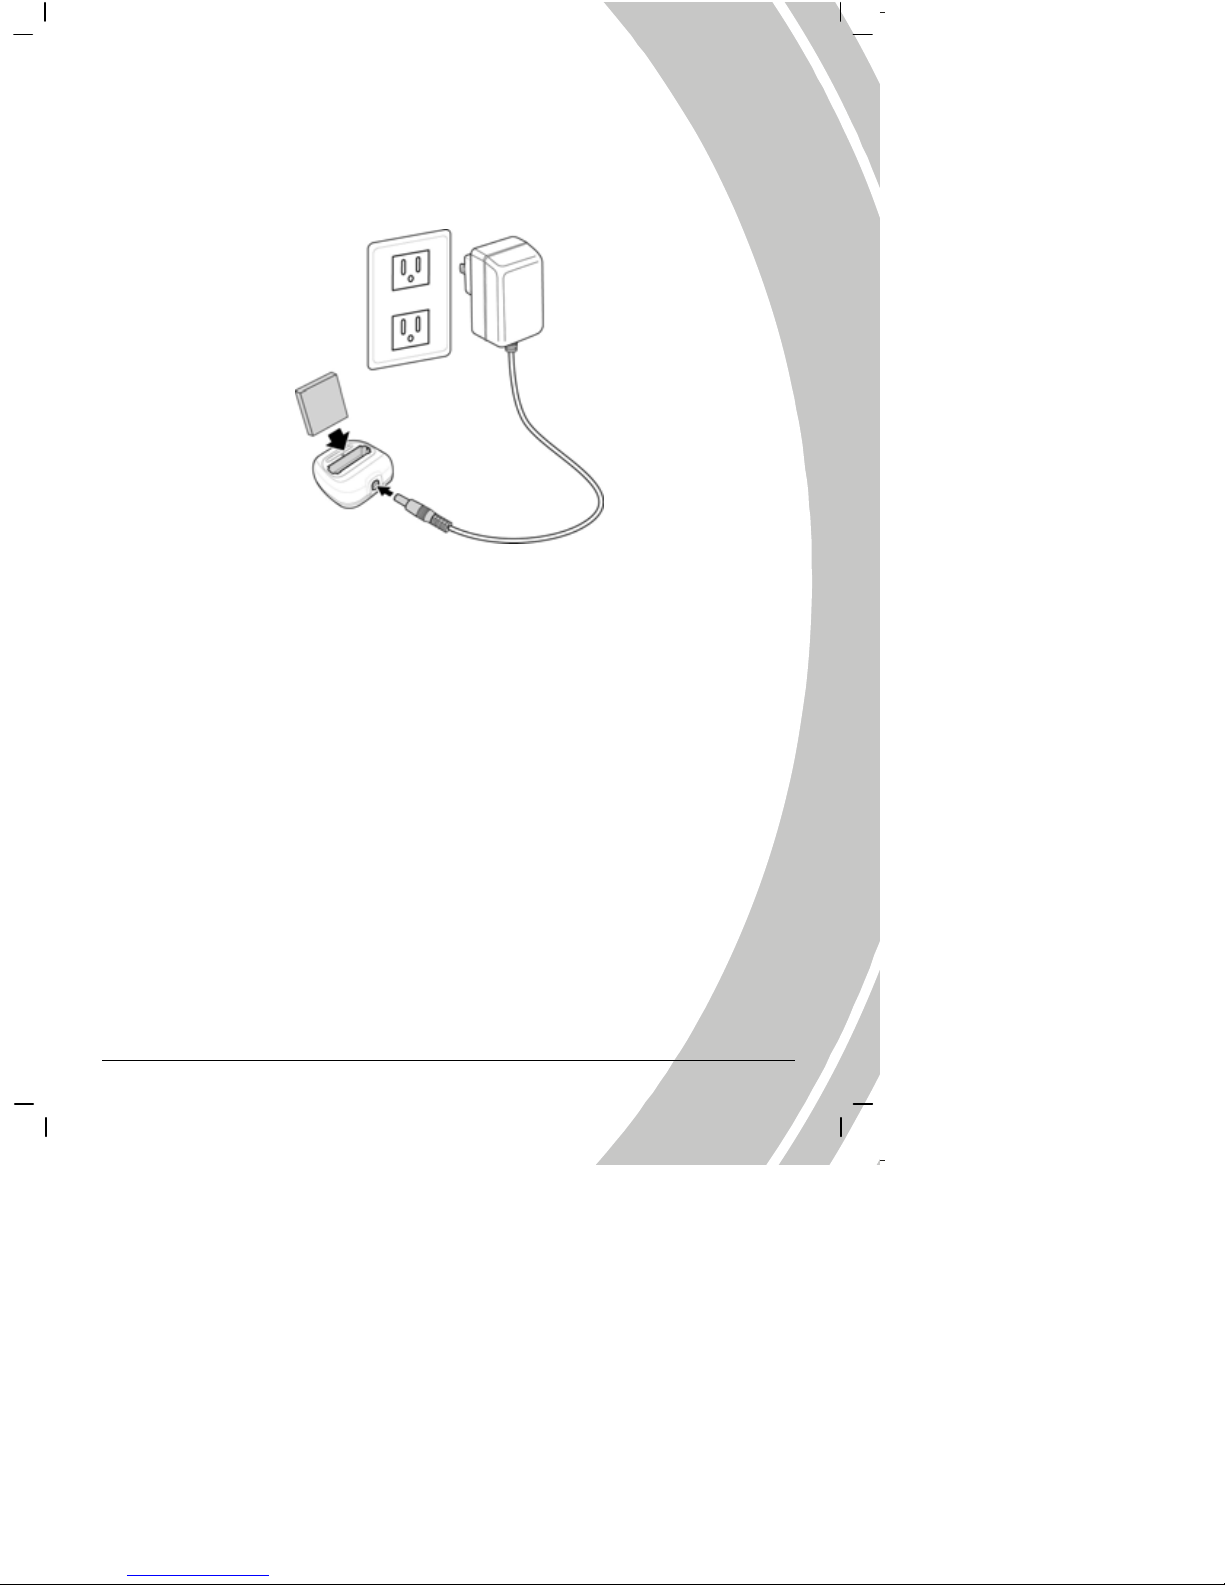
2.3 Charging the battery
Insert the battery into the charger as shown and connect the power supply to the charging unit and
the mains supply.
The indicator on the charger will turn into red. It will take about five hours to completely charge
the battery. When battery is full, the indicator will turn into green.
Page 16
14
2.4 Turning on for the first time
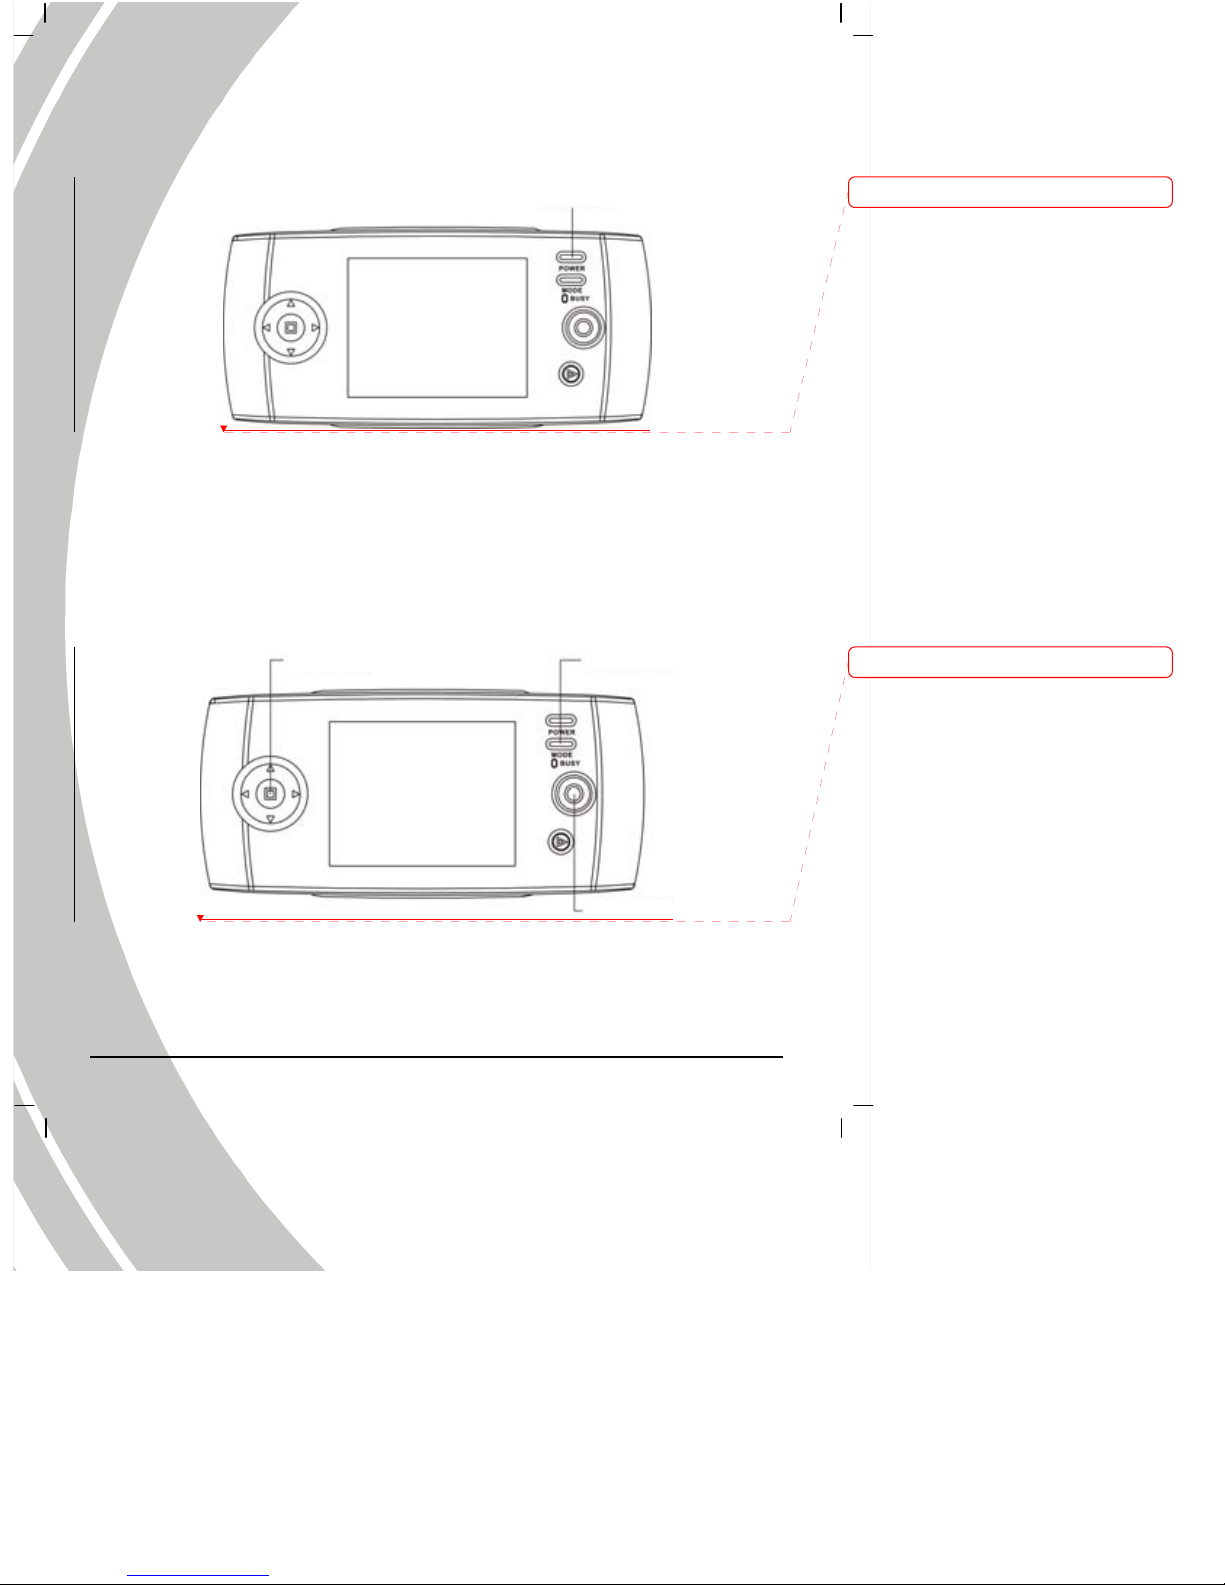
Press and hold the power button for two seconds to turn on/off the camera. The green LED on the
camera lights up.
2.5 Changing modes
The camera can operate in nine modes: Photo mode, FM Radio mode, Game mode, Music
player mode, Photo viewer mode, Setup mode, Video mode, Sound recording mode, Movie
player mode. Press the mode button to display modes Use the joystick to select a mode, and press
the OK to enter when selected.
Power key
O
K
Joystick
Mode Button
Deleted: 
Deleted: 
Page 17
15
2.6 Before you start
Before you can use your camera there are some basic settings to be configured, please refer to the
following sections.
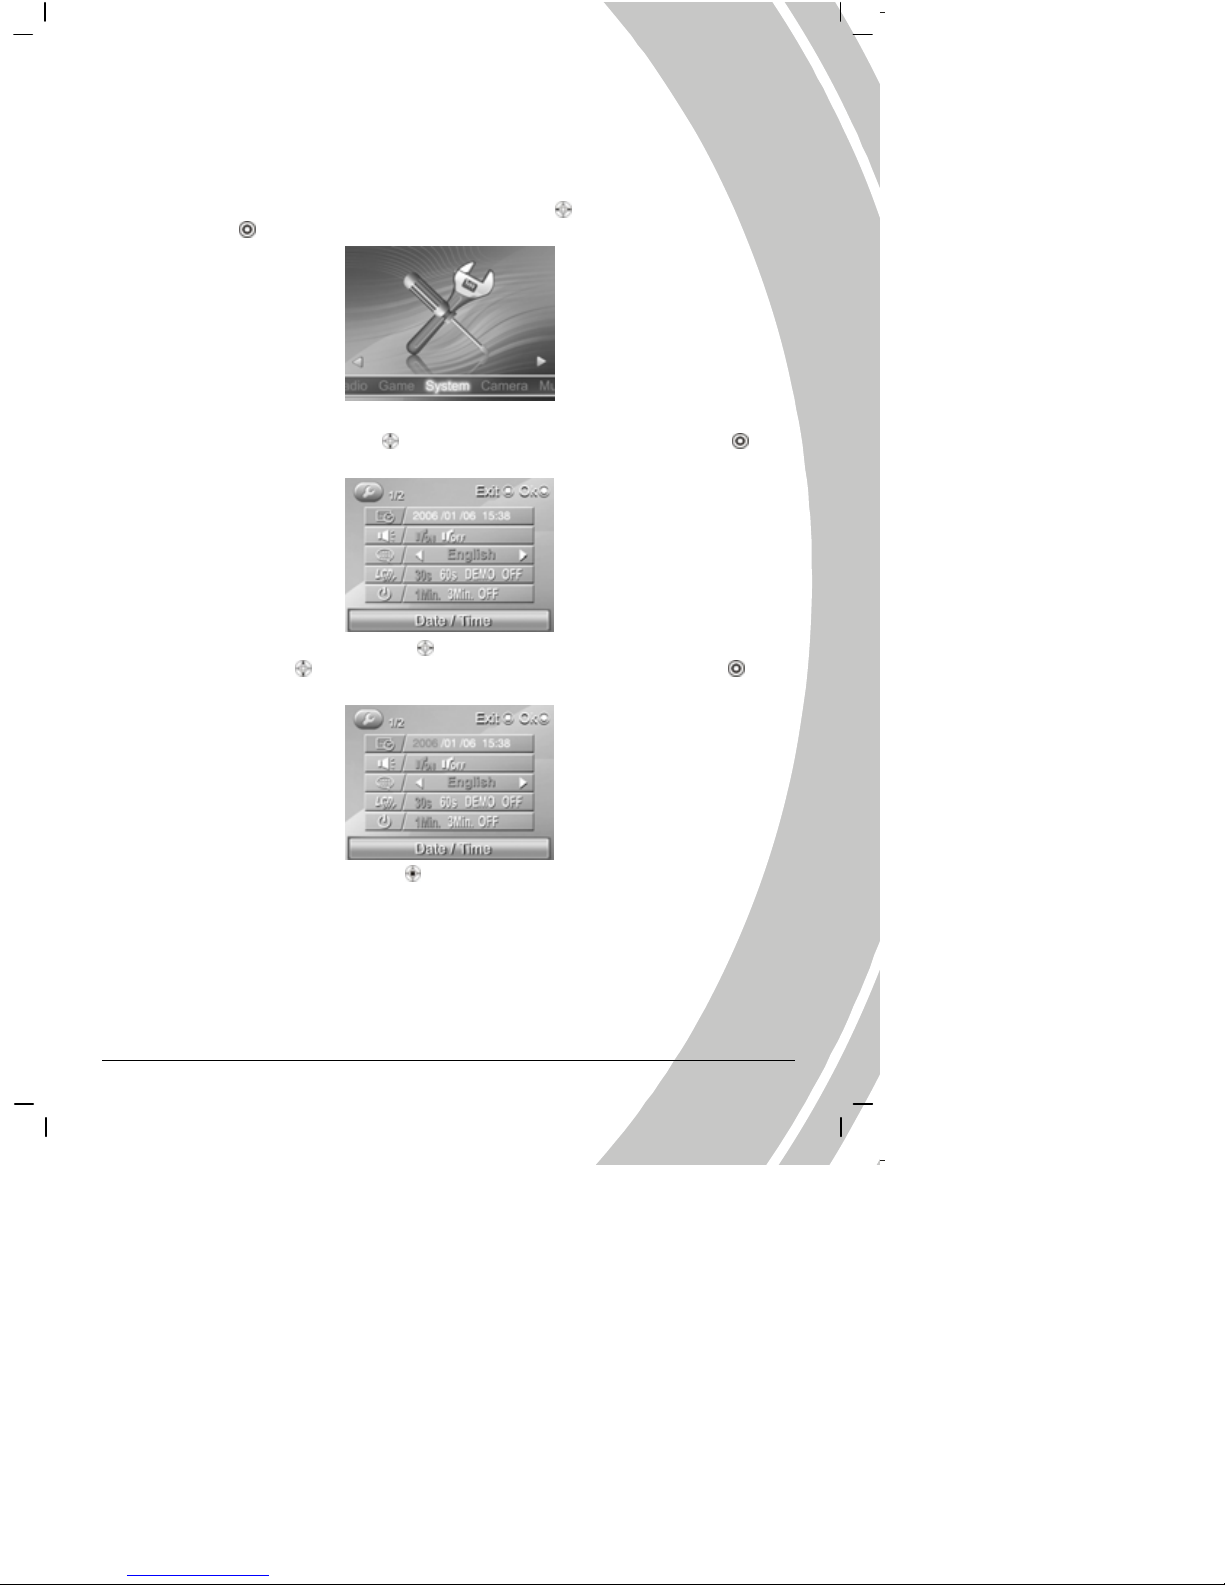
2.6.1 Setting the date and time
1. Turn the camera on, and use joystick (Left/Right button ) to System icon, and then
press OK
.
2. Use joystick (Up/Down button
) to select the Date/Time option. Press the OK and
the submenu flashes.
3.
Use the joystick (Left/Right button ) to select the field, and then use the joystick
(Up/Down button
) to adjust the value. When finishing changin g, use the OK to
confirm.
4. Press the joystick (ENTER button ) or Mode button to leave the menu.
Page 18
16
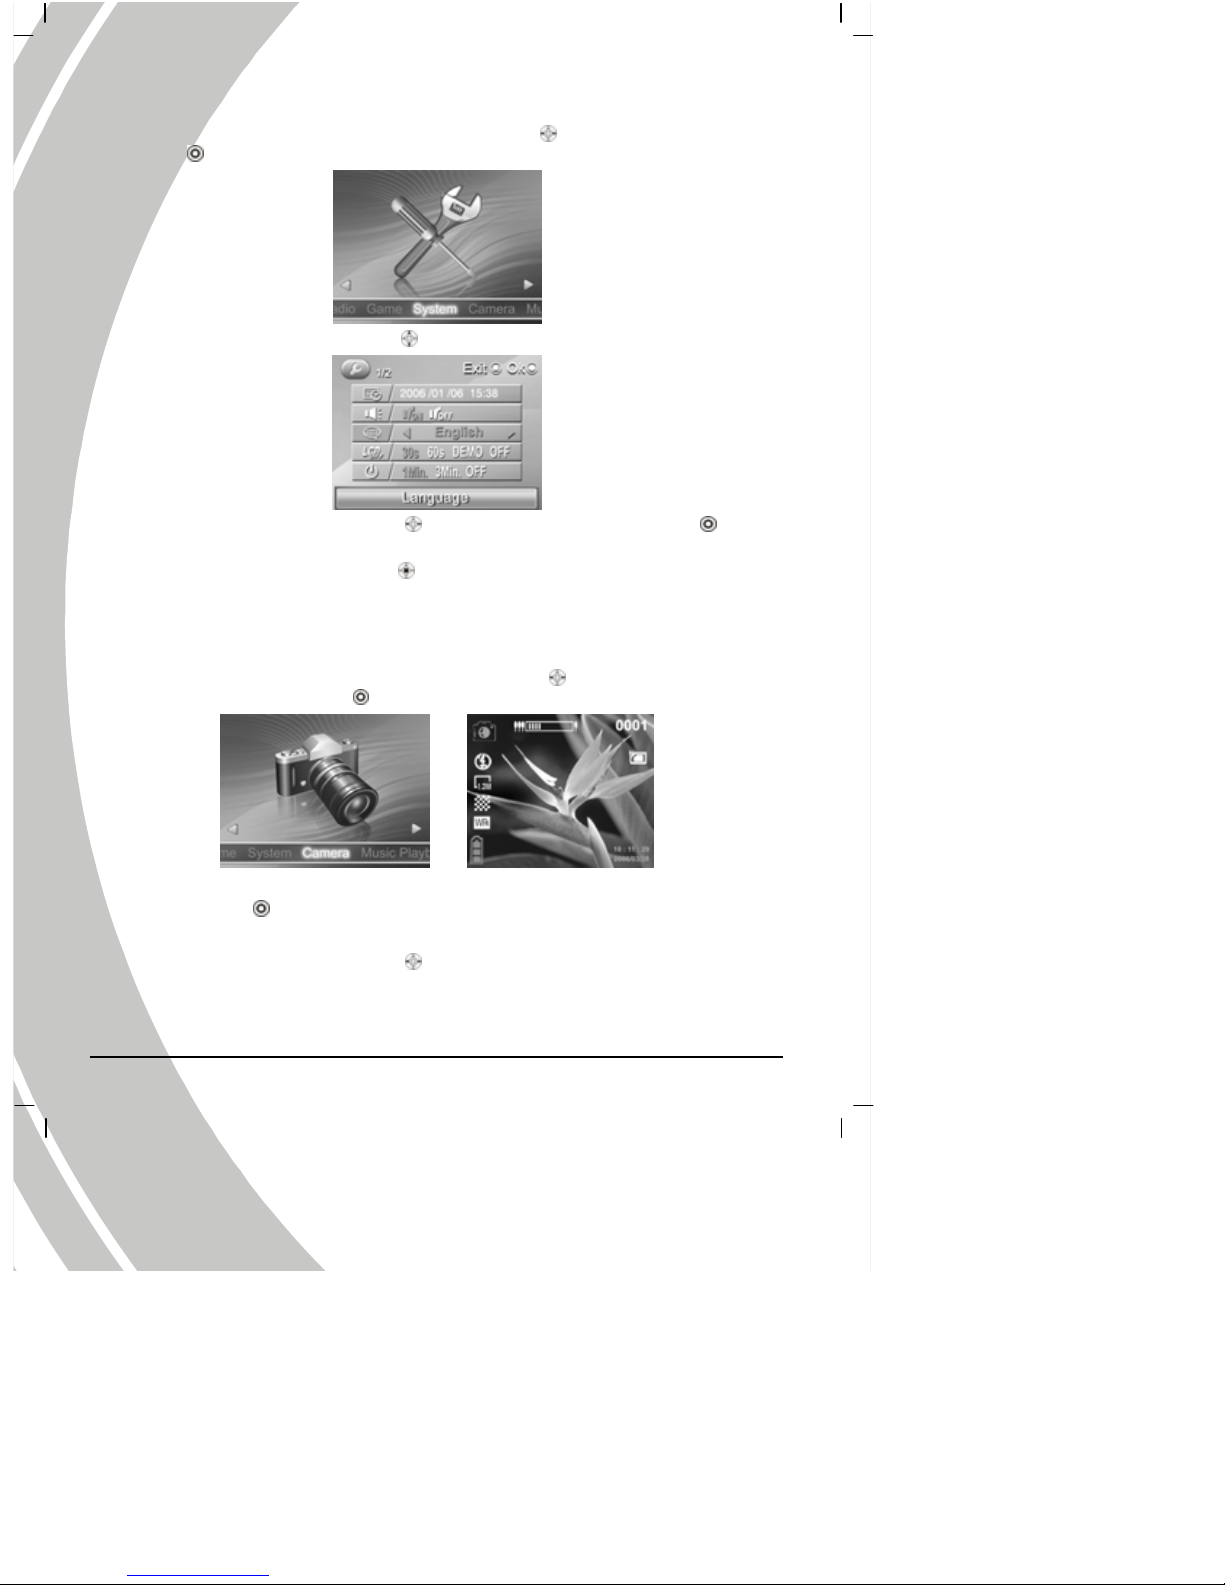
2.6.2 Setting the language
1. Turn the camera on, and use joystick (Left/Right button ) to System icon, and then press
OK
.
2. Use the joystick (Up/Down button ) to select the Language option.
3. Use the joystick (Le ft/ Right button ) to select languages, and press the OK to
confirm.
4. Press the joystick (ENTER button
) or Mode button to leave the me nu.
2.7 Taking pictures
2.7.1 Taking your first still picture
1. Turn the camera on, and use joystick (Left/Right button ) to scroll until you reach
Camera, and then press OK
to enter the Photo mode.
2. Use the LCD screen to frame the picture.
3. Press the OK
to take a still pictur e.
4. The picture will automatically be saved with a unique file name.
5. Use the joystick (Le ft/ Right button
) to hide the icons on the screen.
Page 19
1
7
You can use the joystick to execute the following functions while taking pictures:
Digital
zoom
Use the joystick (Up/Down button ) until the upper of the screen appears
zoom display, and then use the joystick (Left/Right button
) again to
adjust the digital zoom. The screen will appear the digital zoom ratio.
Exposure
value
Use the joystick (Up/Down button ) until the center of the screen displays
the exposure value. Use the joystick (Left/Right button
) to adjust
exposure values, and the screen will display the exposur e value –2.0~+2.0.
Self
timer
setting
Use the joystick (Up/Down button ) until the center of the screen displays
auto capturing icon, and then use the joystick (Left/Right button
) to
adjust the self time r. The screen will display the self timer value: Off, 5
seconds, 10 seconds, 30 second. Press the OK
to start self- capturing
after selecting.
Flash
setting
Please refer the section 3.1.2 “Setting the flash”.
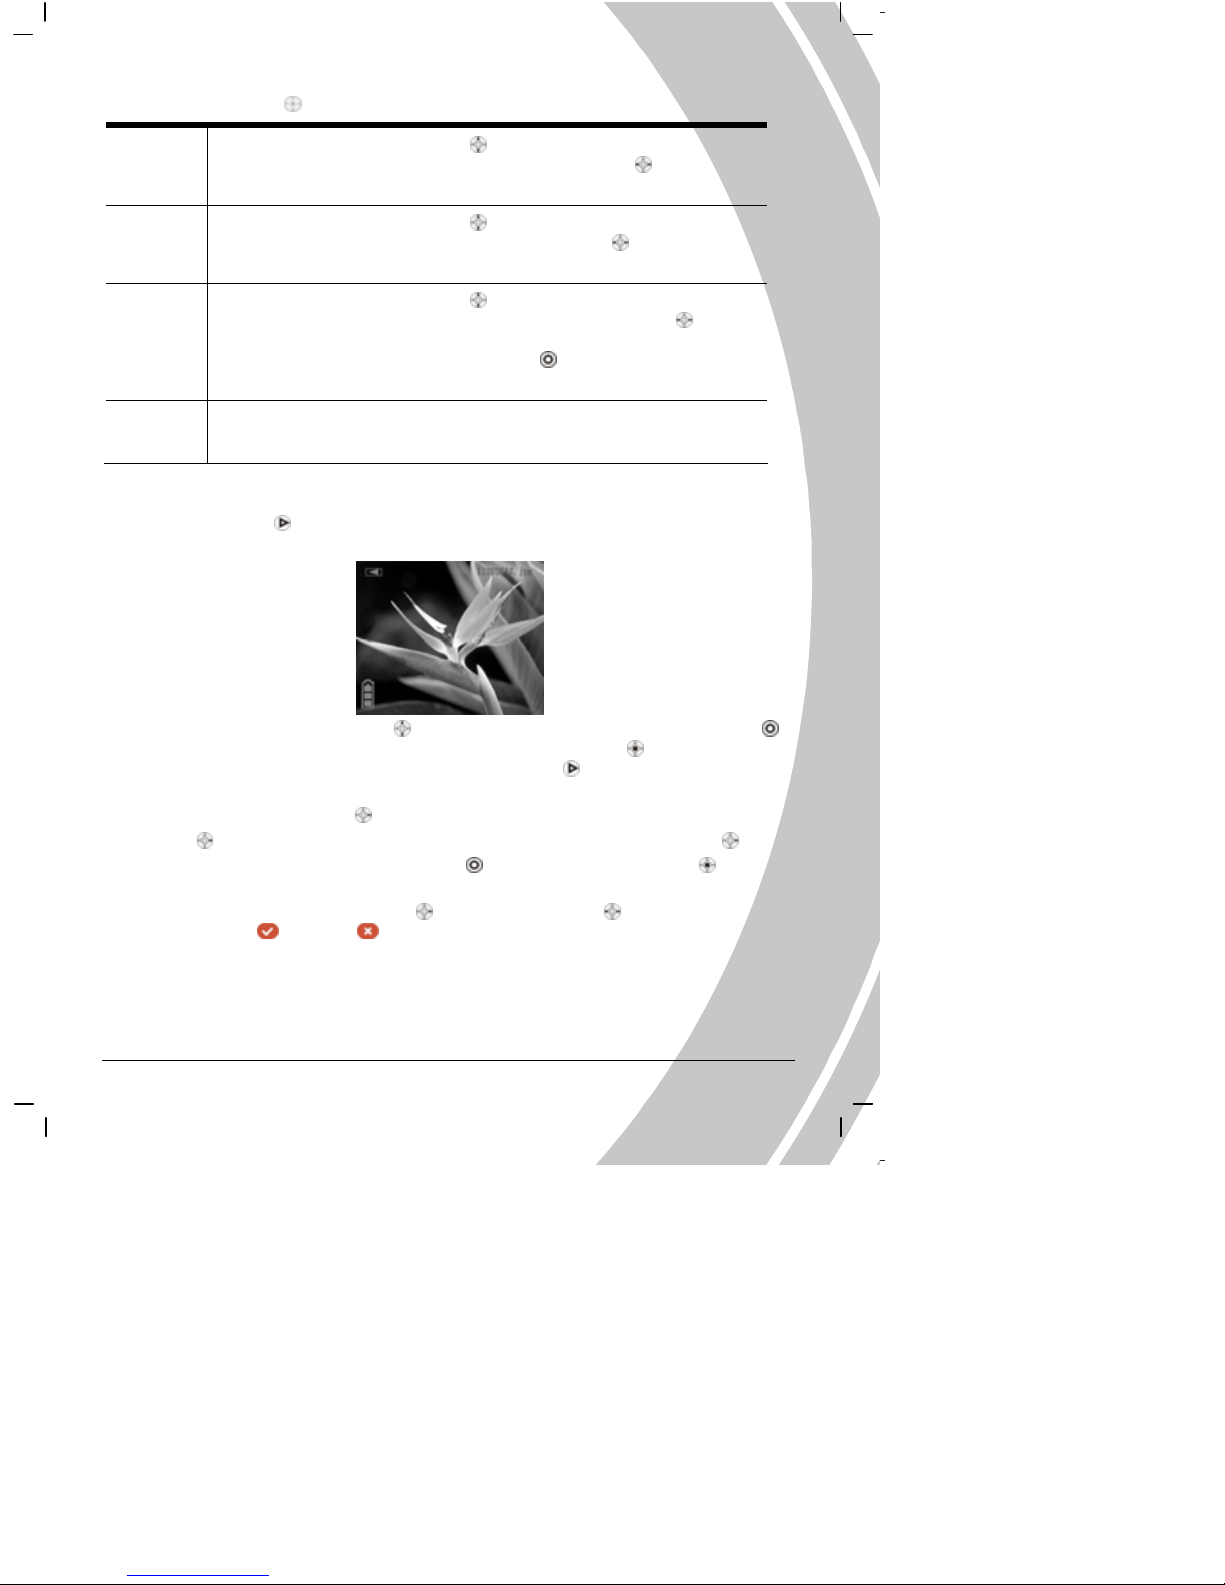
2.7.2 Taking pictures
1. Press the Browse to go to the picture playback mode, and the last files will display on
the LCD screen.
2. Use the joystick (Up/Down button
) to select the previous/next picture. Press the OK
to enlarge (zoom in ratio 1.0-8.0). Press the joystick (ENTER button
) to reduce the
enlarged picture (zoom out ratio 8.0-1.0). Press the Browse
to exit while
enlarging/reducing.
3. Use the joystick (Left button
) to change the ratio of the picture. Press the joystick (Left
button
) to display the picture by ratio 1:4, and press the joystick (Left button ) to
display the picture by ratio 1:9. Press the OK
or joystick (ENTER button ) to
display the picture by ratio 1:1.
4. Use the joystick (first the right button
, then Left/Right button ) to delete or save
pictures (select
to save, to delete), and press the OK to confirm. (See diagram on
next page)
Page 20
18
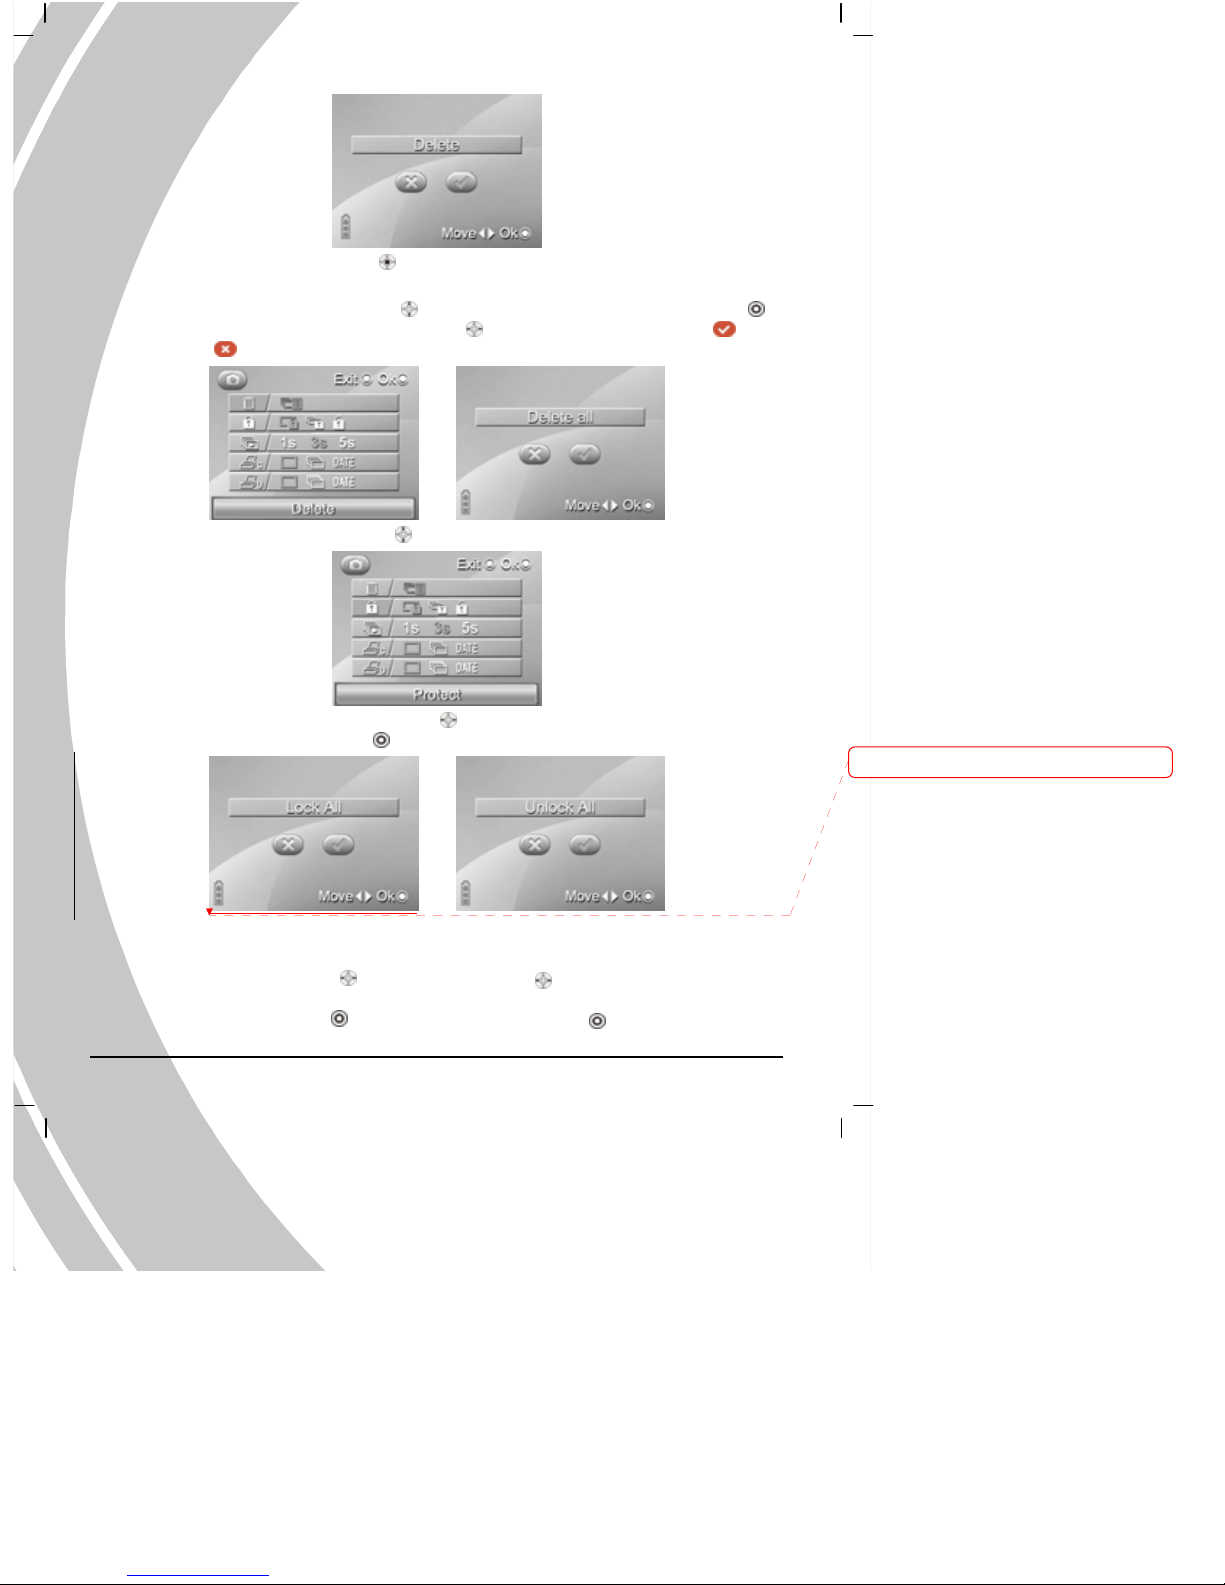
5. Press the joystick (ENTER button ), and the screen will appear the Setup menu under the
Playback mode.
(1) Use the joystick (Up/Down button
) to select the Delete option, and press the OK
to enter. Use the joystick (Left/Right button
) to delete pictures or not (select to
delete,
no), and press the OK to confirm.
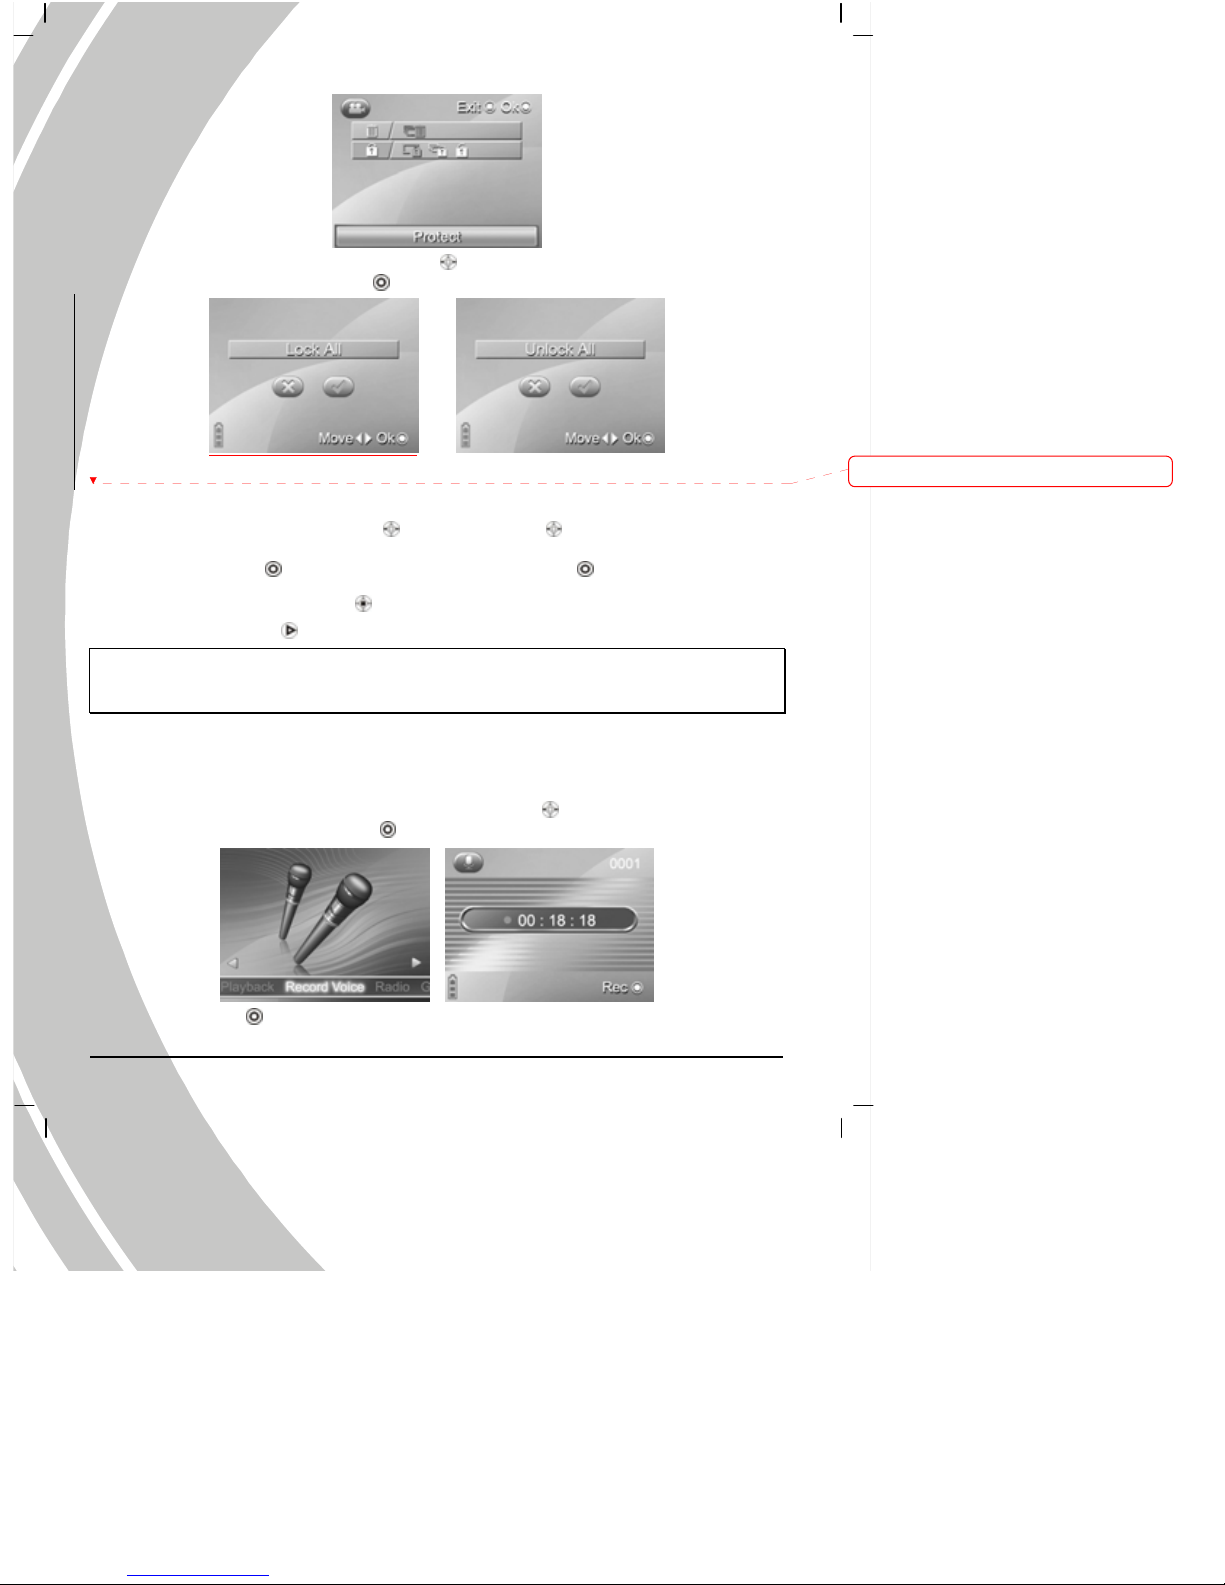
(2) Use the joystick Up/Down button ) to select the Protect option.
Use the joystick (Left/Right button ) again to select Protect One, Protect All or
Cancel, and press the OK
to confirm.
If selecting Protect All, shown
as above,then use the
joystick (left/right
button)
to select to Lock All or not.
Press the OK to
confirm.
If selecting Cancel, shown as
above,then use the joystick
(left/right
button) to select
to cancel all protection or not.
Press the OK to
confirm.
Deleted: <sp><sp>
Page 21
19
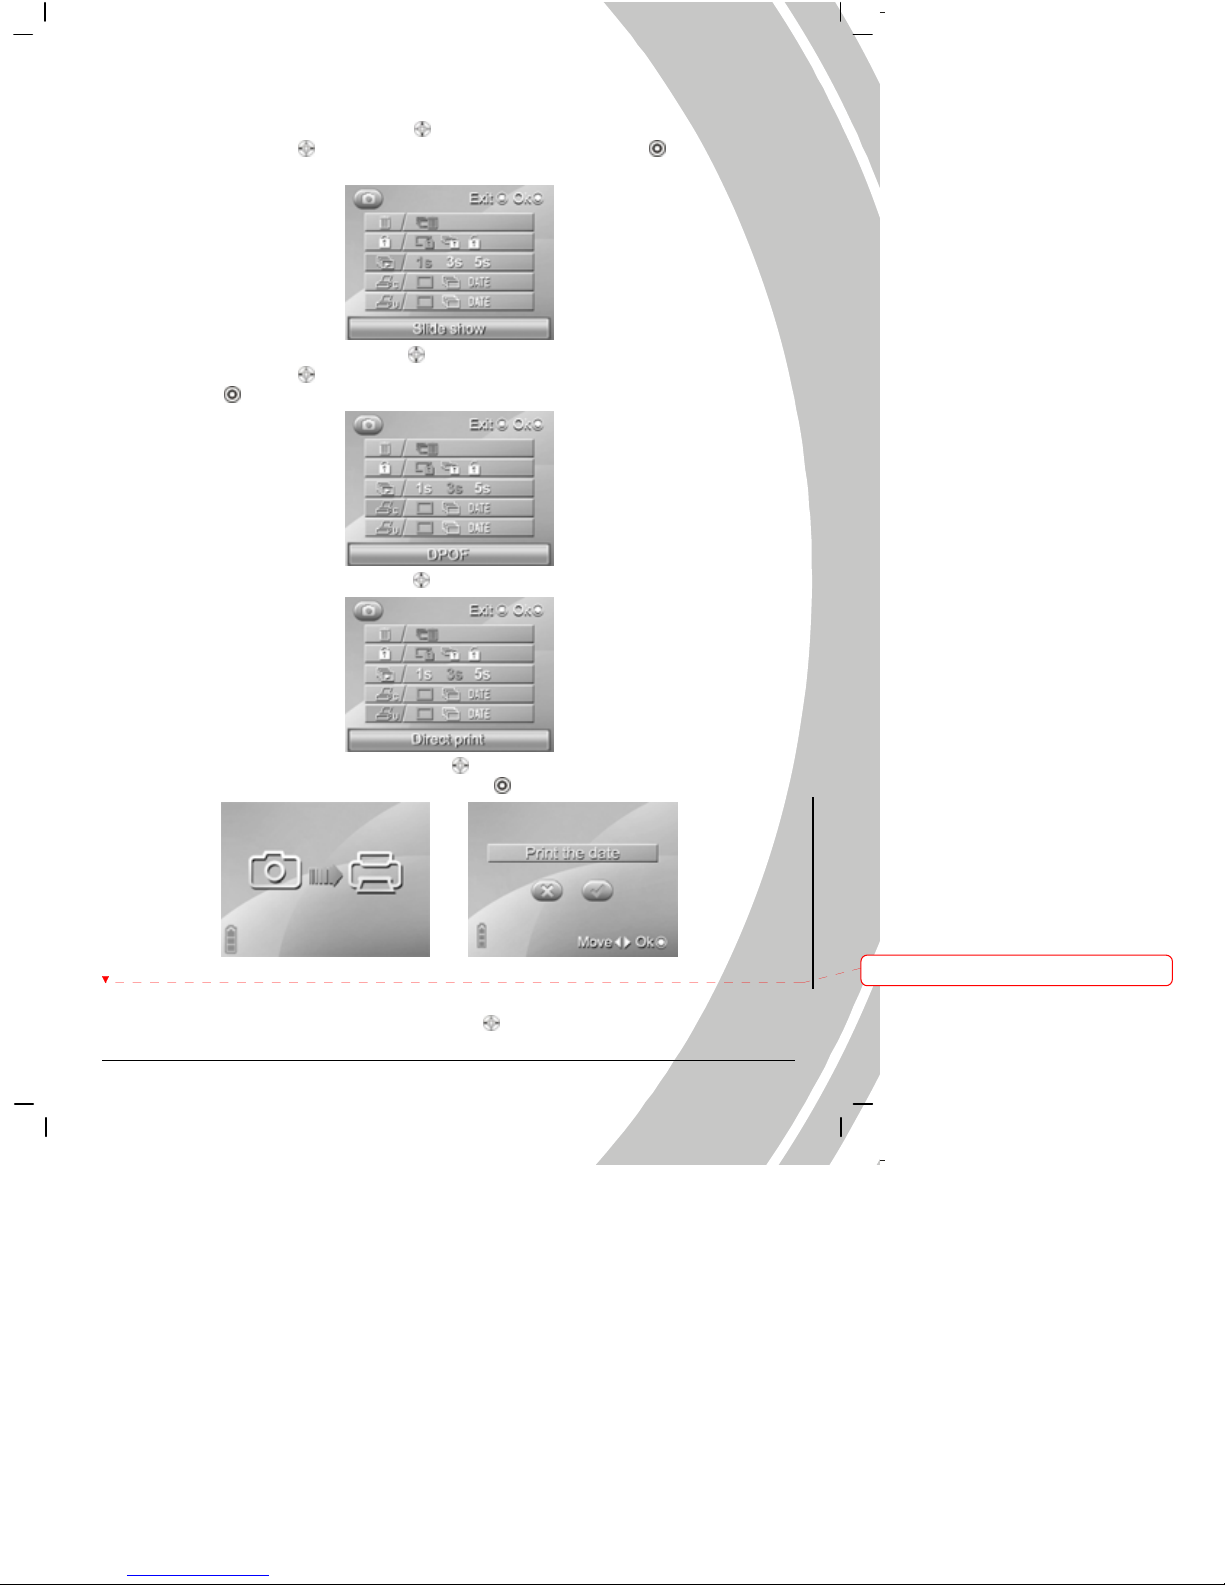
(3) Use the joystick (Up/Down button
) to select the Slide show option. Use the joystick
(Left/Right button
) again to select 1s, 3s, or 5s, and press the OK to view the
pictures automatically:
(4) Use the joystick Up/Down button ) to select the DPOF option. Use the joystick
(Left/Right button
) again to select Setup One, Select All or Select Print Date, and press
the OK
to confirm:
(5) Use the joystick Up/Down button ) to select the Direct Print option.
Use the joystick (Left/Right button ) again to select Direct Print One, Direct Print
all or Print Date or not, and press the OK
to confirm:
If selecting Pr int One or
Print All photos directly,
the screen appears as
above.
If selecting Print Date, use
the joystick (Left/R i ght
button)to select to
Deleted: 
Page 22
20
※When the camera is connected to the printer, whether the printer is compatible with the camera
depends on the printer type.
(6) Press the ENTER button
to return to the playback mode.
6. Press the Browse
again to leave the playback mode and return to the Photo mode.
※ If there isn’t any saved picture in the camera memory or memory card, the scre en will appear
“No files” message while using the Replay mode.
2.8 Video recording
2.8.1 Video
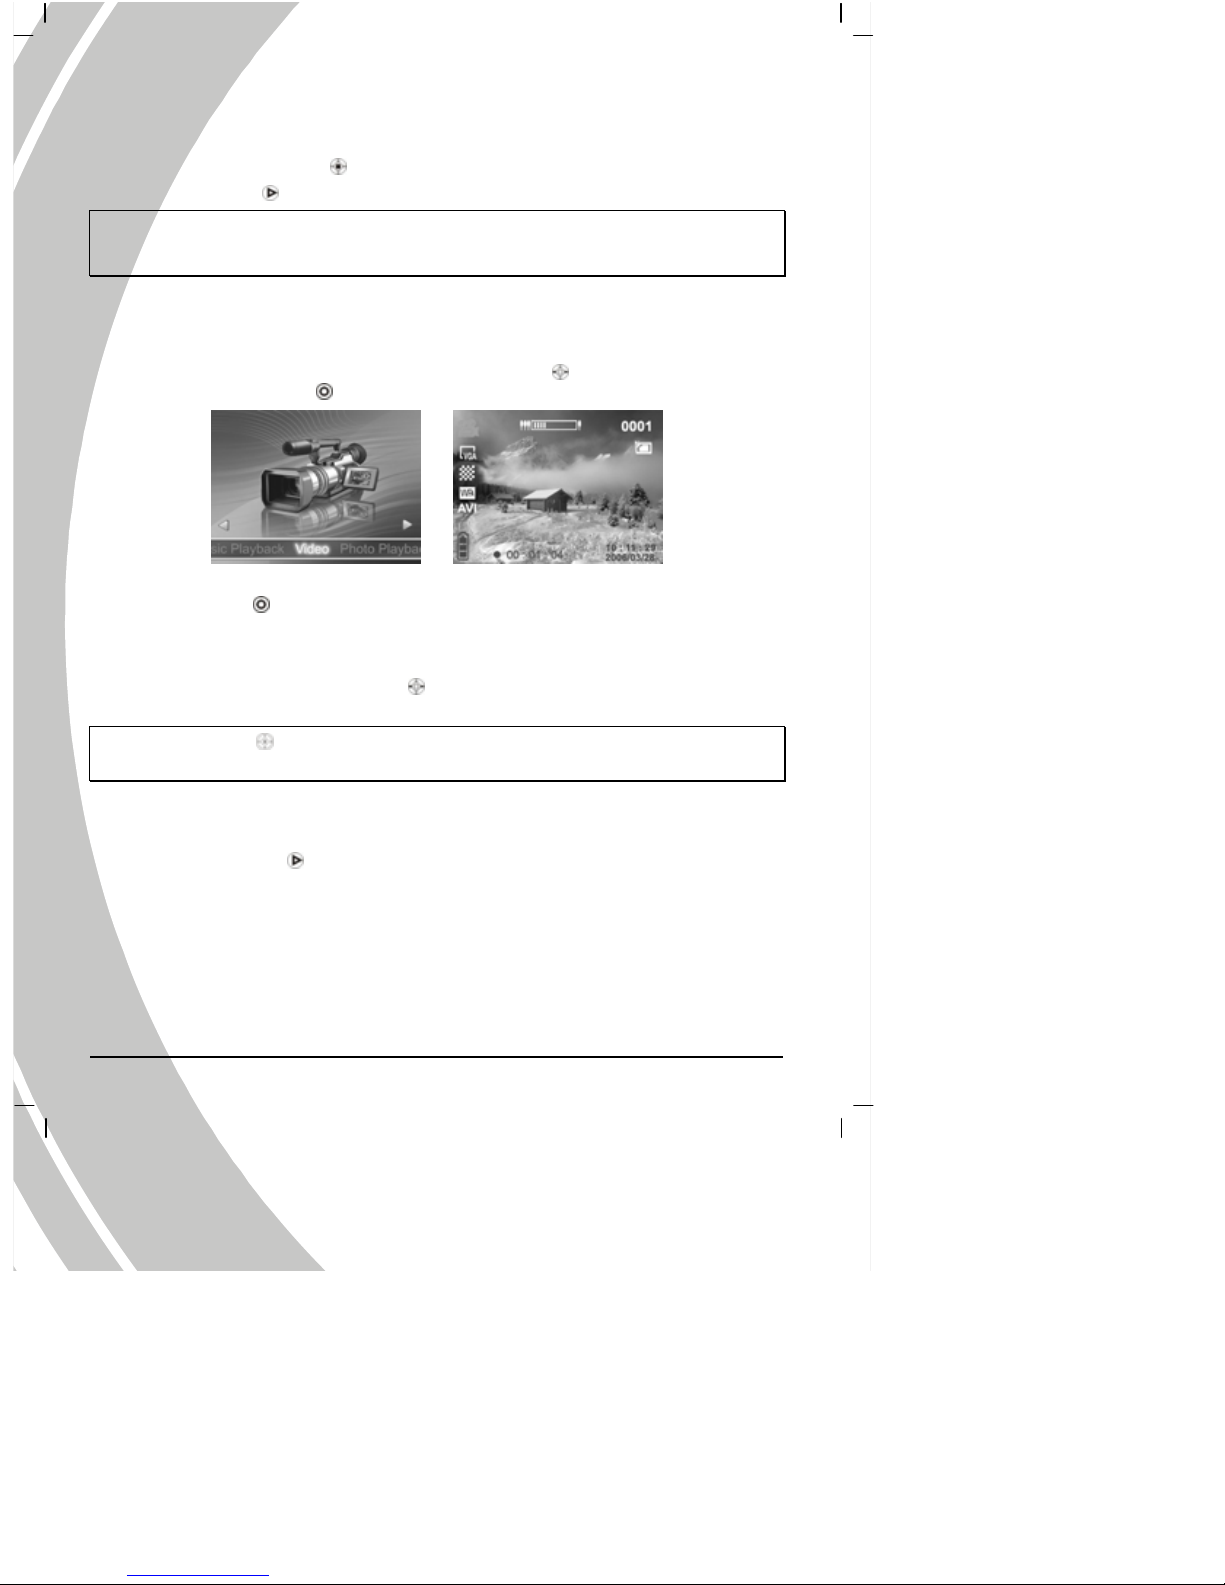
1. Turn the camera on, and use joystick (Left/Right button ) to scroll through Video icon,
and then press the OK
to enter the Video mode.
2. Use the LCD screen to frame your video.
3. Press the OK
in this mode, and the camera starts recording.
4.
Press the OK button again to stop recording.
5. The video is automatically saved with a unique file name.
6. Use the joystick (Left/Right button
) to erase the display of part or all the icons on the
screen.
Note: Use the joystick
to setup the Digital Focus and Exposure Value. The steps are the same
as those in Photo mode.
2.8.2 Video playback
1. Ensure the digital camera is in Video mode.
2. Press the Browse
to enter the video playback mode, and the last file will display on
the LCD screen.
Page 23
21
3. Use the joystick (Up/Down button
) to select previous/next video clip, and press the
OK
to play the video c lip.
4. To pause the video, please press the OK
again.
5. Use the joystick (Up/Down button
) to adjust the volume. Short press the joystick
(Left/Right button
) to select the previous/next song, and long press the joystick
(Left/Right button
) to fast reverse/forward (2x, 4x, 8x). (Note: Fast Forward and Fast
Reverse is only supported when playing AVI format files. Fast Forward and Fast
Reverse are not supported during playback of ASF and MOV format files).
6. Use the joystick (first the righ t button
, then Left/Right button ) to delete movies
(select
to delete, no), and press the OK to confirm.
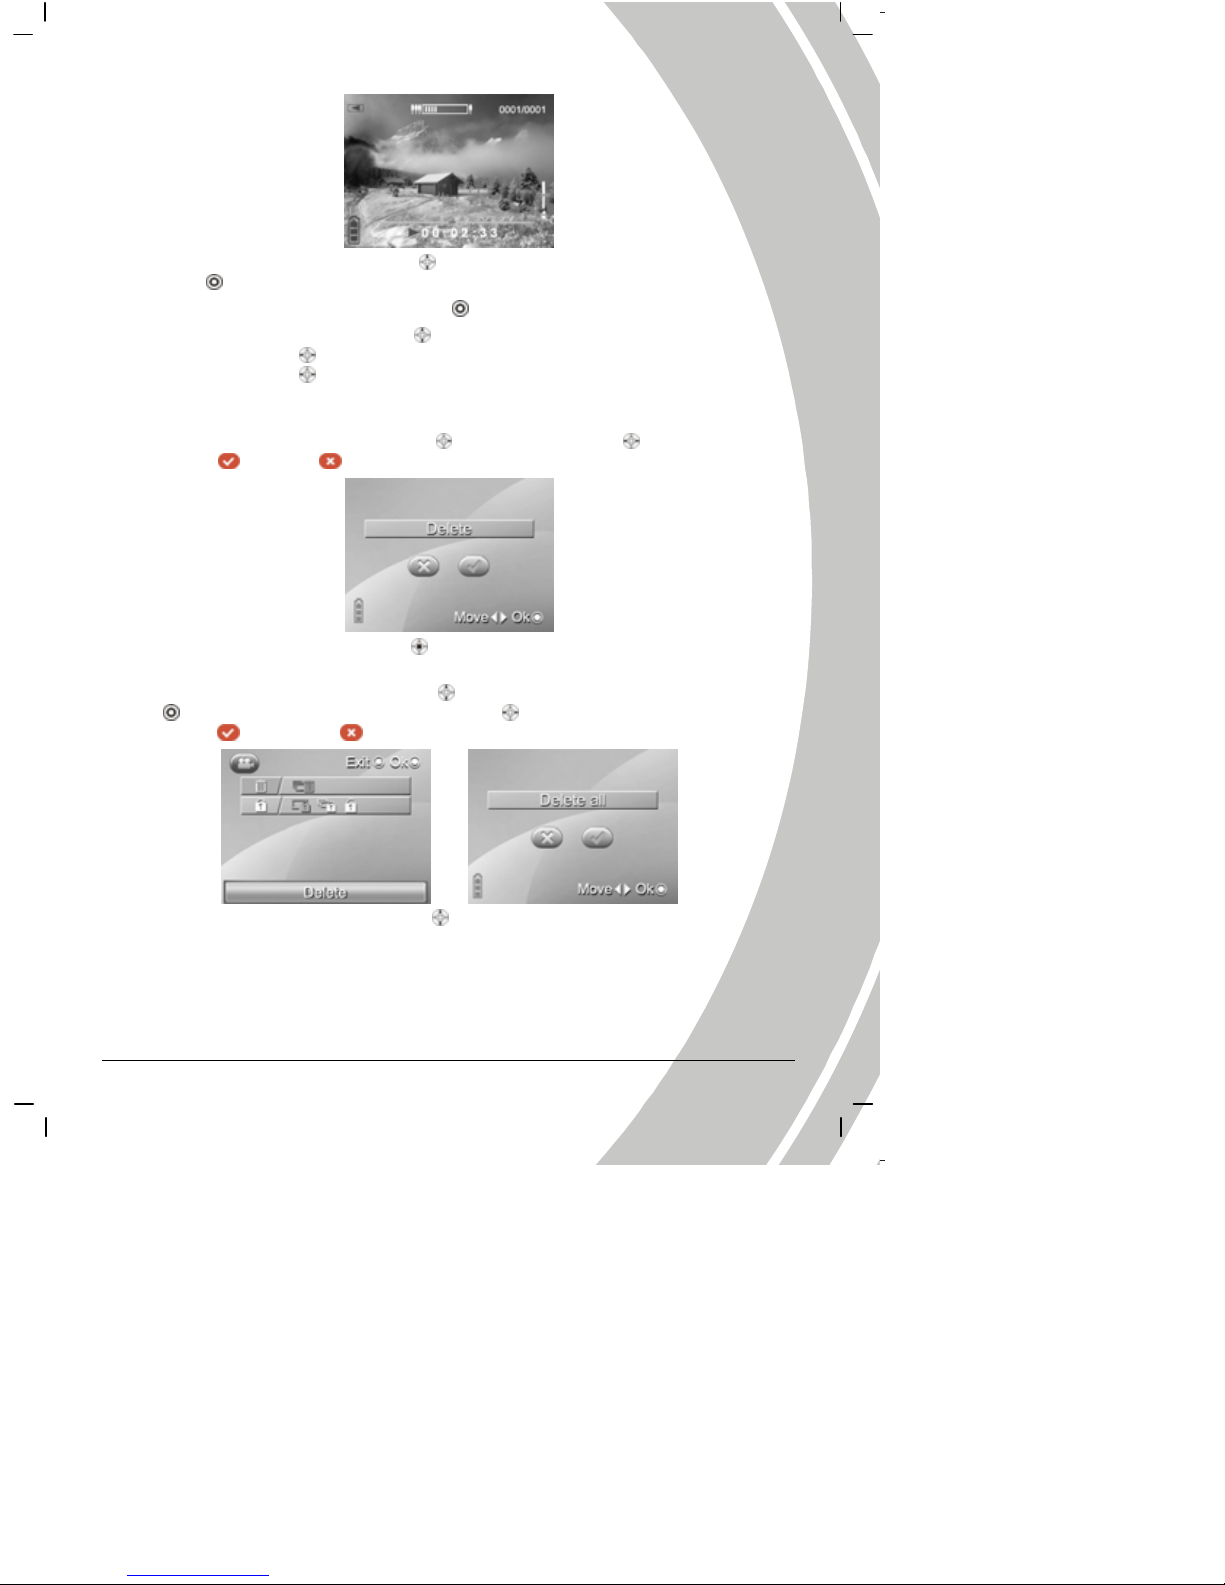
7. Press the joystick (ENTER button ), and the screen will appear the Setup menu under
the Playback mode.
(1) Use the joystick (Up/Down button
) to select the Delete opti on, and press t he OK
to enter. Use the joystick (Left/Right button ) to select to delete videos or not
(select
to delete all, no), and press the OK to confirm.
(2) Use the joystick Up/Down button ) to select the Protect option.
Page 24
22
Use the joystick (Left/Right button ) again to select Protect One, Protect All or
Cancel, and press the OK
to confirm.
(3) Press the ENTER button
to return to the playback mode.
8. Press the Browse
again to leave the playback mode and return to Video mode.
※ If there isn’t any saved video in the camera memory or memory card, the scr een will appear
“No files” message while using the Replay mode.
2.9 Audio or voi ce recording
2.9.1 Audio
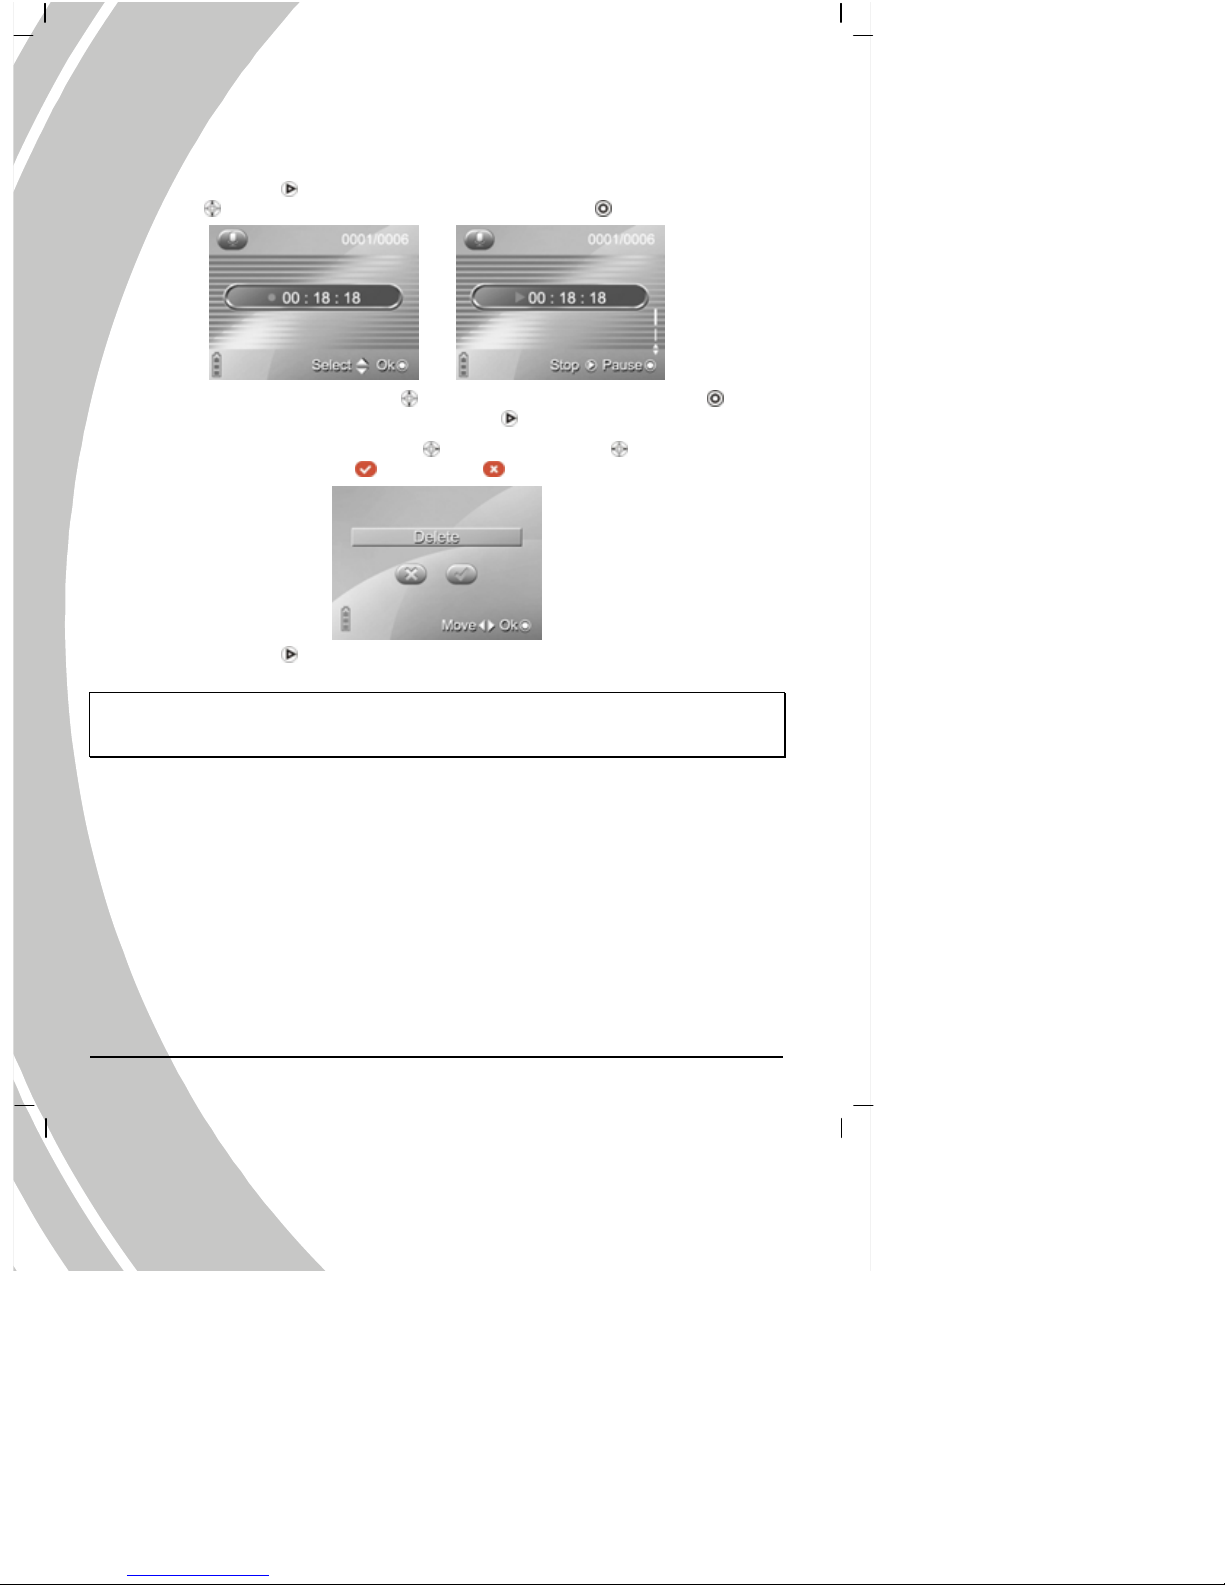
1. Turn the camera on, and use joystick (Left/Right button ) to scroll through Audio
Record icon, and then press OK
to enter Audio Recording mode.
2. Press the OK
to start recording.
If selecting Protect All,the screen
appears as above,
then use the joystick (Left/Right
button) to select to Lock All or not.
Press the OK to
confirm.
If selecting Cancel,the screen appears
as above, then use the joystick
(Left/Right
button) to select to
Cancel all protection or not.
Press the OK to
confirm.
Deleted: 
Page 25

23
3. Press the OK again to stop recording.
4. The camera will save the sound file automatically with the built-in file name.
Page 26
24
2.9.2 Playing the audio file
1. Be sure that the digital camera is in Audio recording mode.
2. Press the Browse
to enter the recording playback mode.Use the joystick (Up/Down
button
) to select previous/next recording, and press the OK to play the recording.
3. Use the joystick (Up/Down button ) to adjust the volume, and press the OK again
to pause playing recording file. Press the Browse
to stop playing recording files.
4. Use the joystick (first the right bu tto n
, then Left/Right button ) to select to delete
recording files or not (select
to delete, but not), and press the OK to confirm.
5. Press the Browse again to leave the playback mode and return to Audio recording
mode.
※ If there isn’t any saved recording in the camera memory or memory card, the screen will
appear “No files” message while using the Replay mode.
Page 27
25
2.10 Connecting to a computer
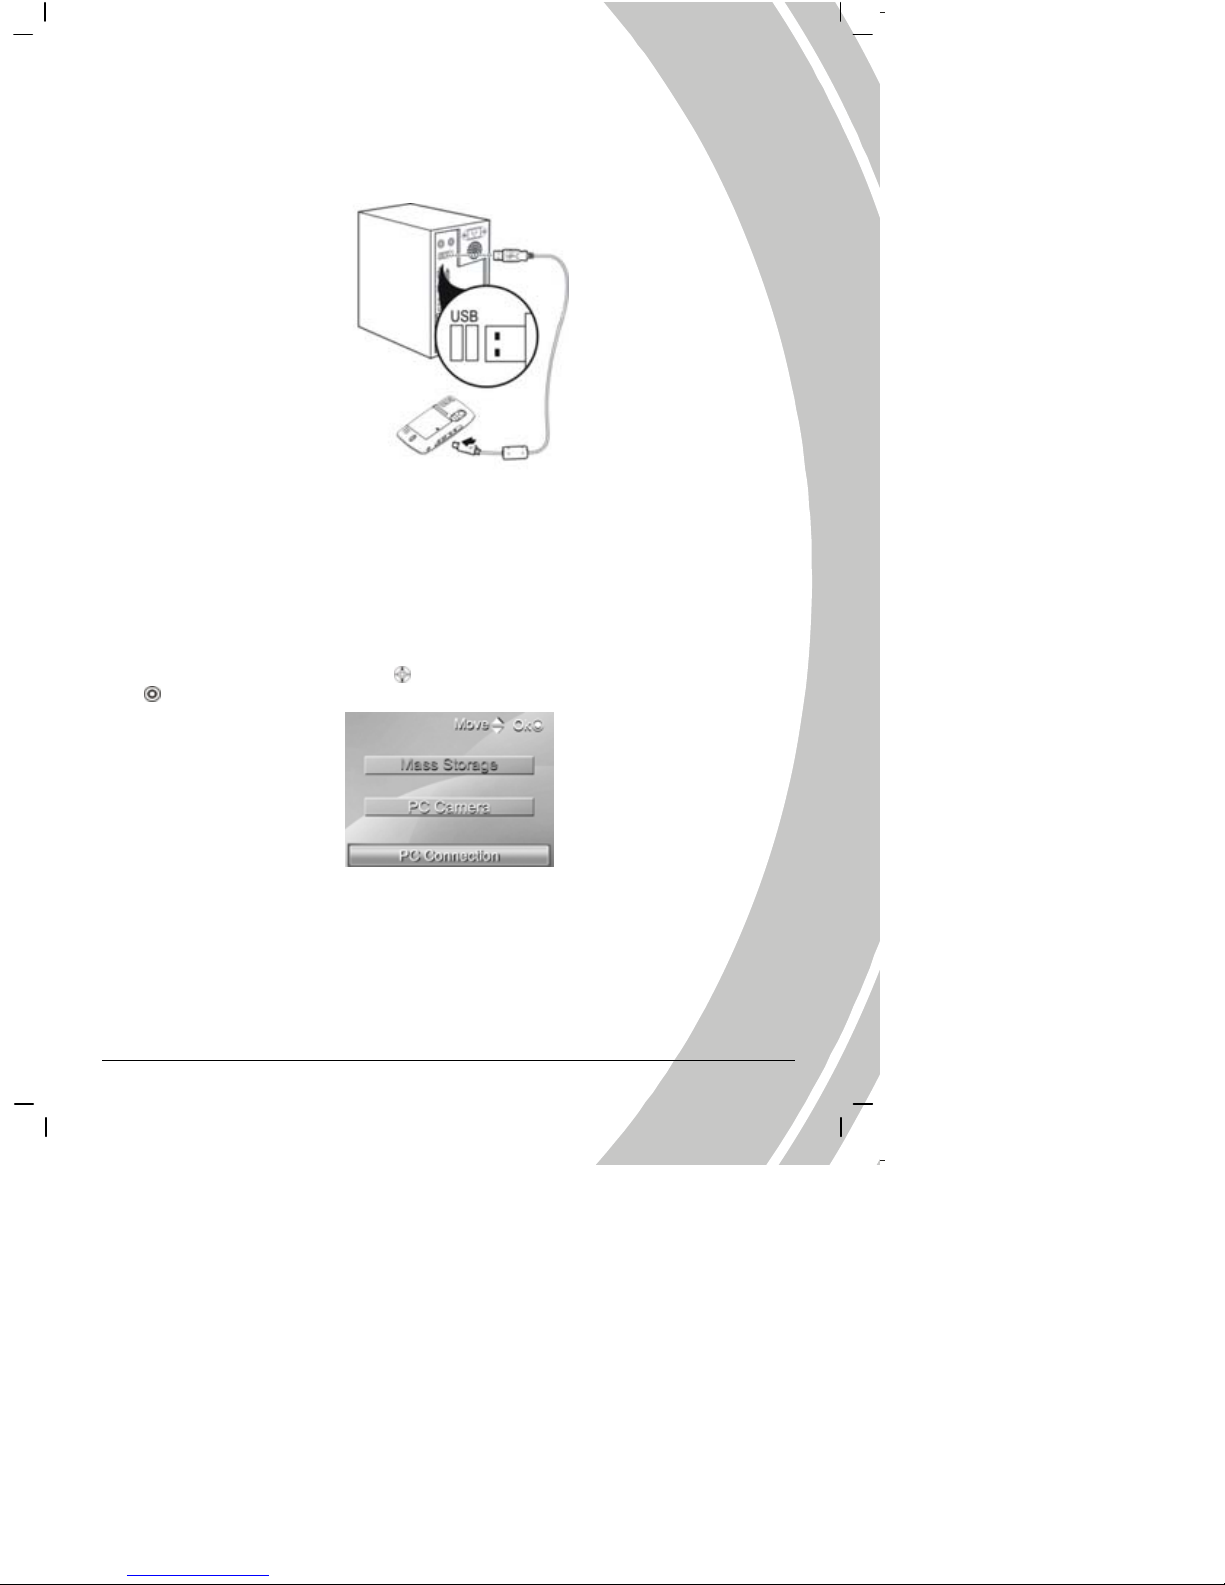
Read this section carefully to learn how to transfer files to a PC. Use the supplied USB cabl e to
connect the digital camera to the computer.
2.10.1 Mass Storage
The digital camera can provide the function of mass storage which is the same as card reader.
1. Use the USB cable to con nect the digital camera to computer as the picture shown above.
2. When the digital camera is connected to the PC by USB cable, the digital camera will
automatically pop up two function modes Mass Storage and Video Camera for the choosing
to connect the computer by USB.
3. Use the joystick (Up/Down button
) to select the Mass Storage item, and press the OK
to confirm the selection. Th e s creen turns off.
4. When finishing installing the system, the Mass Storage item will be added to My Computer
of the system.
5. You can start using the added mass storage which is the SD car d reader provided by the
camera. There are five folders in the mass storage: DCIM/ 100FSCAM, MOVIE, MUSIC,
PHOTO and DEMO.DCIM/ 100FSCAM is used to save the files generated by capturing,
shooting the video and sound recording. MOVIE is used to save the AVI, ASF and MOV
movie files stored externally. MUSIC is used to save the MP3 and WAV music files stored
Page 28
26
externally. PHOTO is used to save the JPEG picture files stored externally. DE MO is used to
save the AVI, ASF and MOV movie filed and JPG picture files stored externally.
2.10.2 PC camera
This digital camera can work as a PC camera or web camera.
1. Use the USB cable to connect the digital camera to computer as the picture shown above.
2. When the digital camera is connected to the PC by USB cable, the digital camera will
automatically pop up two function modes Mass Storage and PC Camera for the choosing to
connect the computer by USB.
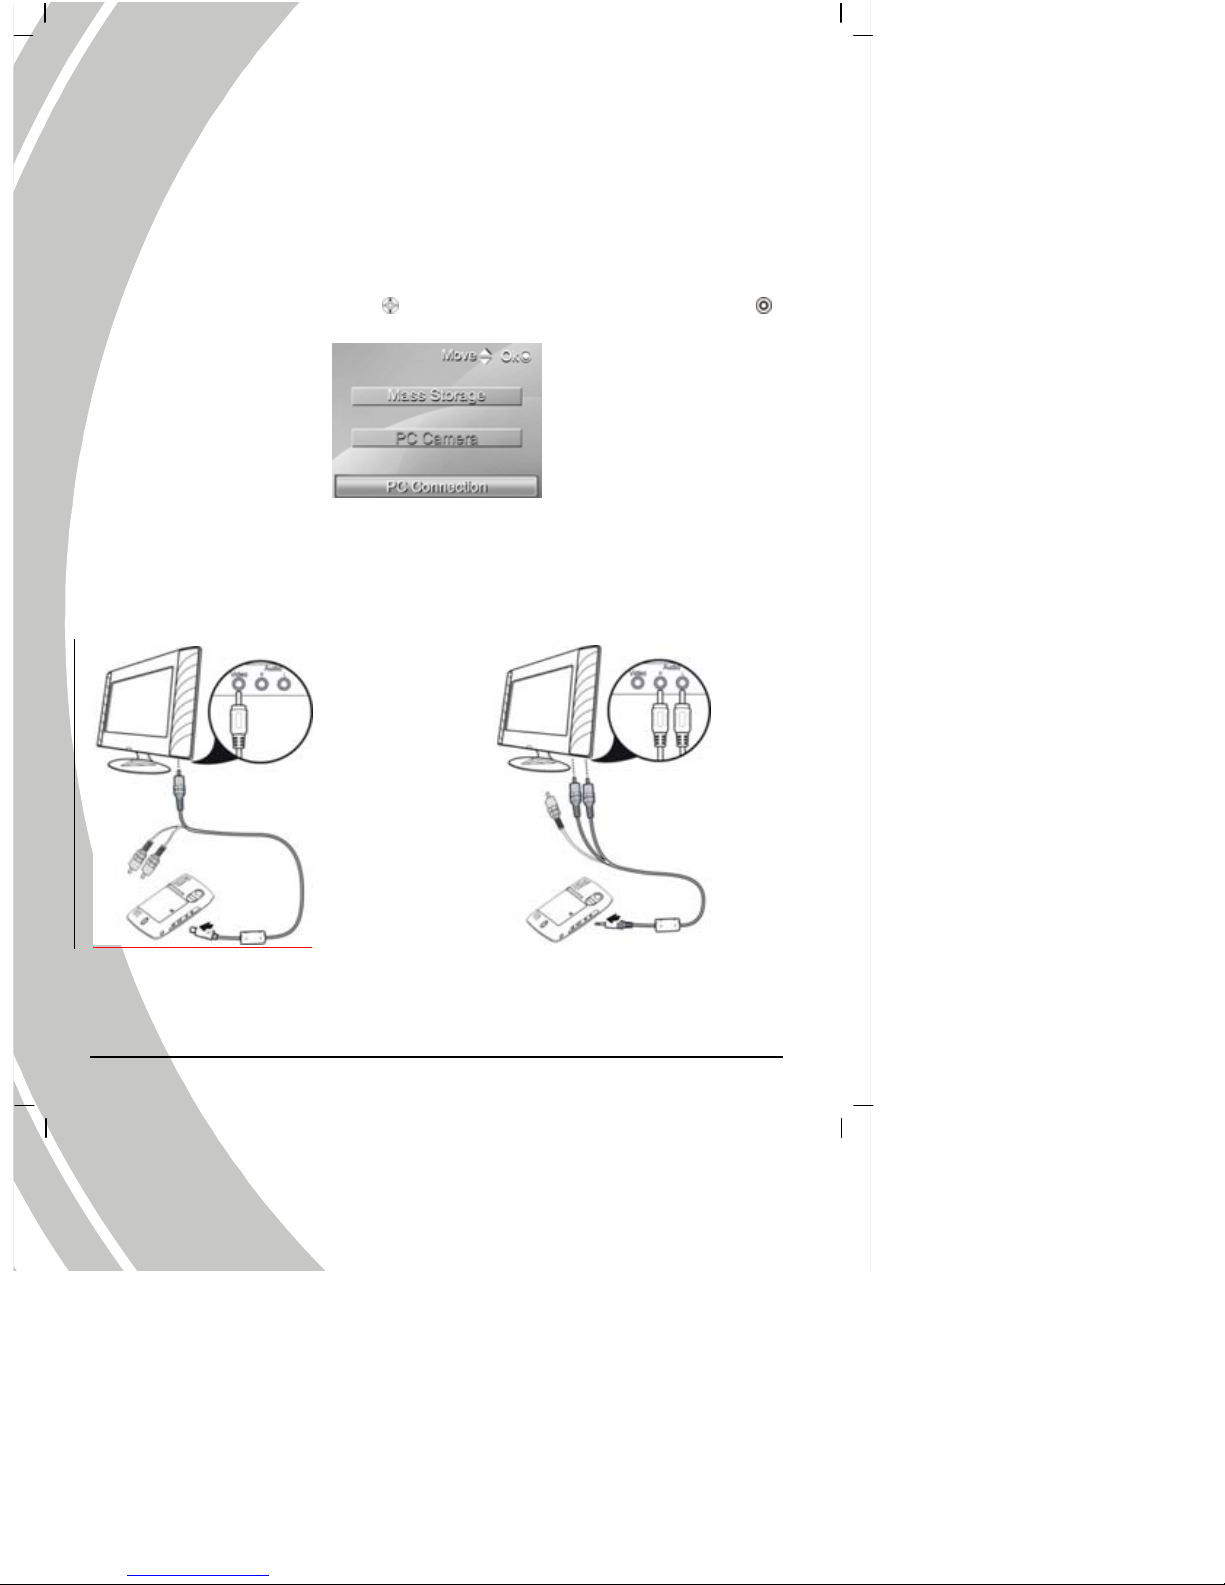
3. Use the joystick (Up/Down button
) to select the PC Camera item, and press the OK
to confirm the setting. The camera starts framing.
4. You can use the PC camera function provided by the camera through the software in the
supplied CD-ROM or other software.
2.11 Connecting to a TV
Use the supplied AV OUT cable to connect the camera to a T V as shown.
Insert the white and red
connectors of the AV Out cable
to the Video-i n port of TV or
VCR
Insert the yellow connector of the
AV Out cable to the Video-in port
of TV or VCR
Page 29
2
7
3. Using the camera
Read this section to learn how to use the camera.
3.1 Photo mode
Use the Photo mode to capture pictures, and store them in internal memory or on an SD card.
3.1.1 Icons
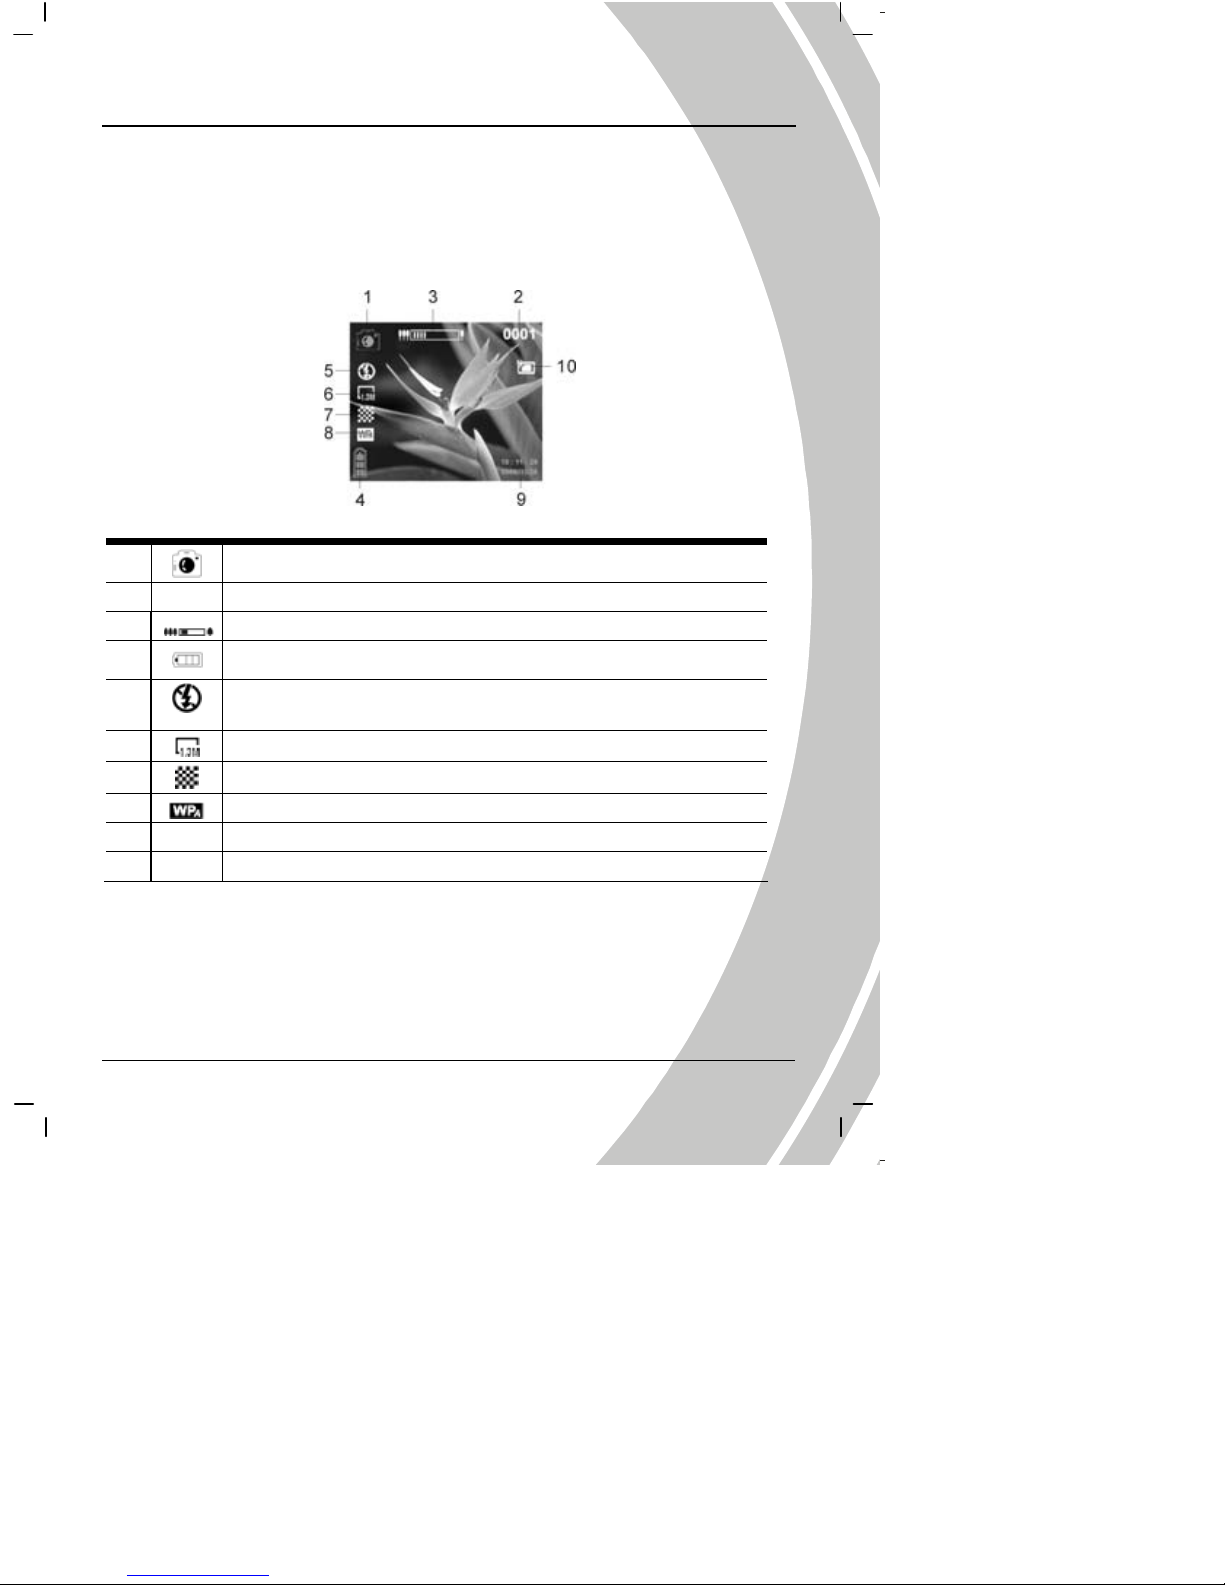
The following screen shows the photo mode icons and their symbols.
See the table below for a description of each button’s function.
1
Photo mode indicator
2 Display the number of saved pictures
3
Digital zoom status
4
Battery status indicator
5
Flash mode indicator
6
Image size indicator
7
Image quality indicat or
8
White balance indicator indicates the settings of white balance
9 Display the date of taking pictures
10 The icon of built-in memory or SD/SMM card storage status
Page 30
28
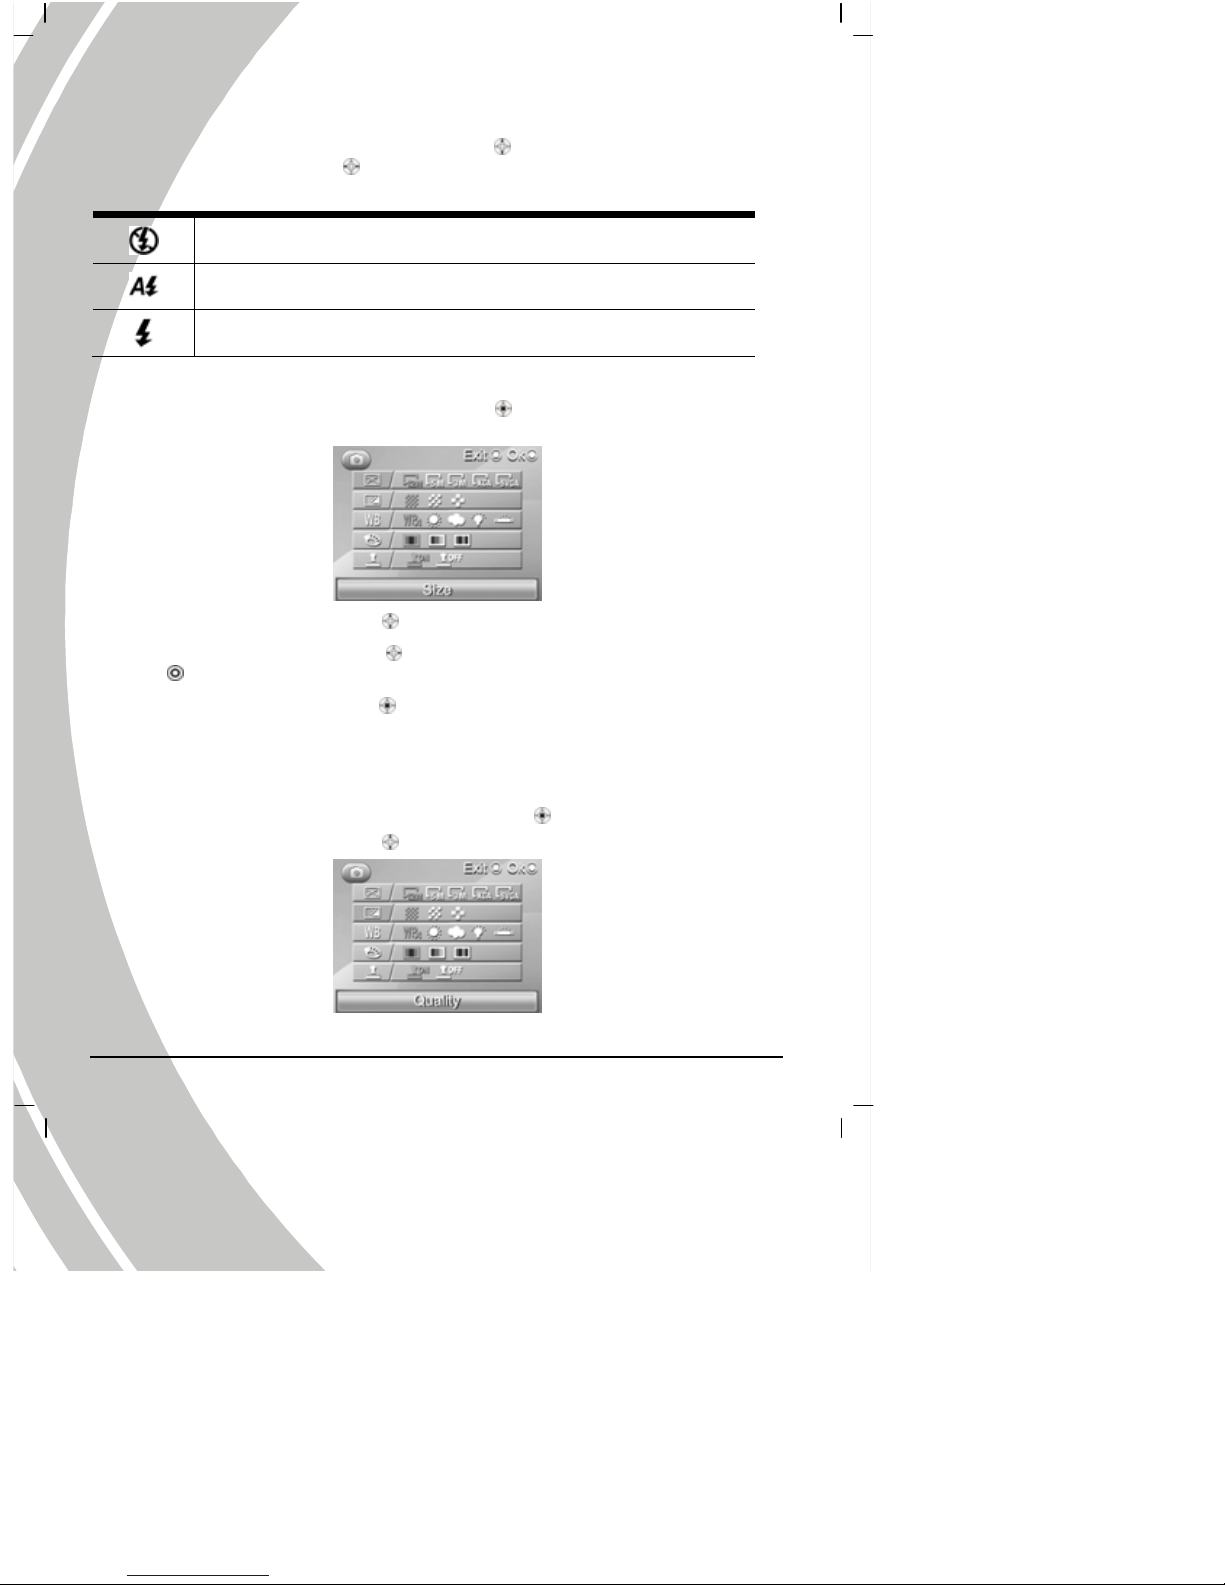
3.1.2 Setting the flash
While in Photo mode, use the joystick (Up/down button ) to highlight the Flash option, and
use the joystick (Left/Right butt on
) to switch the Flash mode.
See the table below for a description of each button’s function.
Flash is turned off
Auto flash, fires only when needed.
Force flash, the flash is always on.
3.1.3 Setting the size
While in Photo mode, press the joystick (ENTER button ) to enter the Setup menu to adjust the
size of the file.
1. Use the joystick (Up/Down button
) to select the Size option.
2. Use the joystick (Left/Right button
) to select 12M, 5M, 3M, 1.3M or SVGA and press
OK
to confirm.
3. Press the joystick (ENTER button
) again to leave the menu.
3.1.4 Quality
The Quality option lets you setup the quality of the captured picture. The larger size picture
contains more content; therefore it takes more memory space.
1. While in Photo mode, press the joystick (ENTER button
) to enter the Setup menu.
2. Use the joystick (Up/Down button
) to select the Quality option.
Page 31
29
3. Use the joystick (Left/Right button ) to select Fine, Normal or Basic, then press OK
to confirm.
4. Press the joystick (ENTER button
) again to leave the menu.
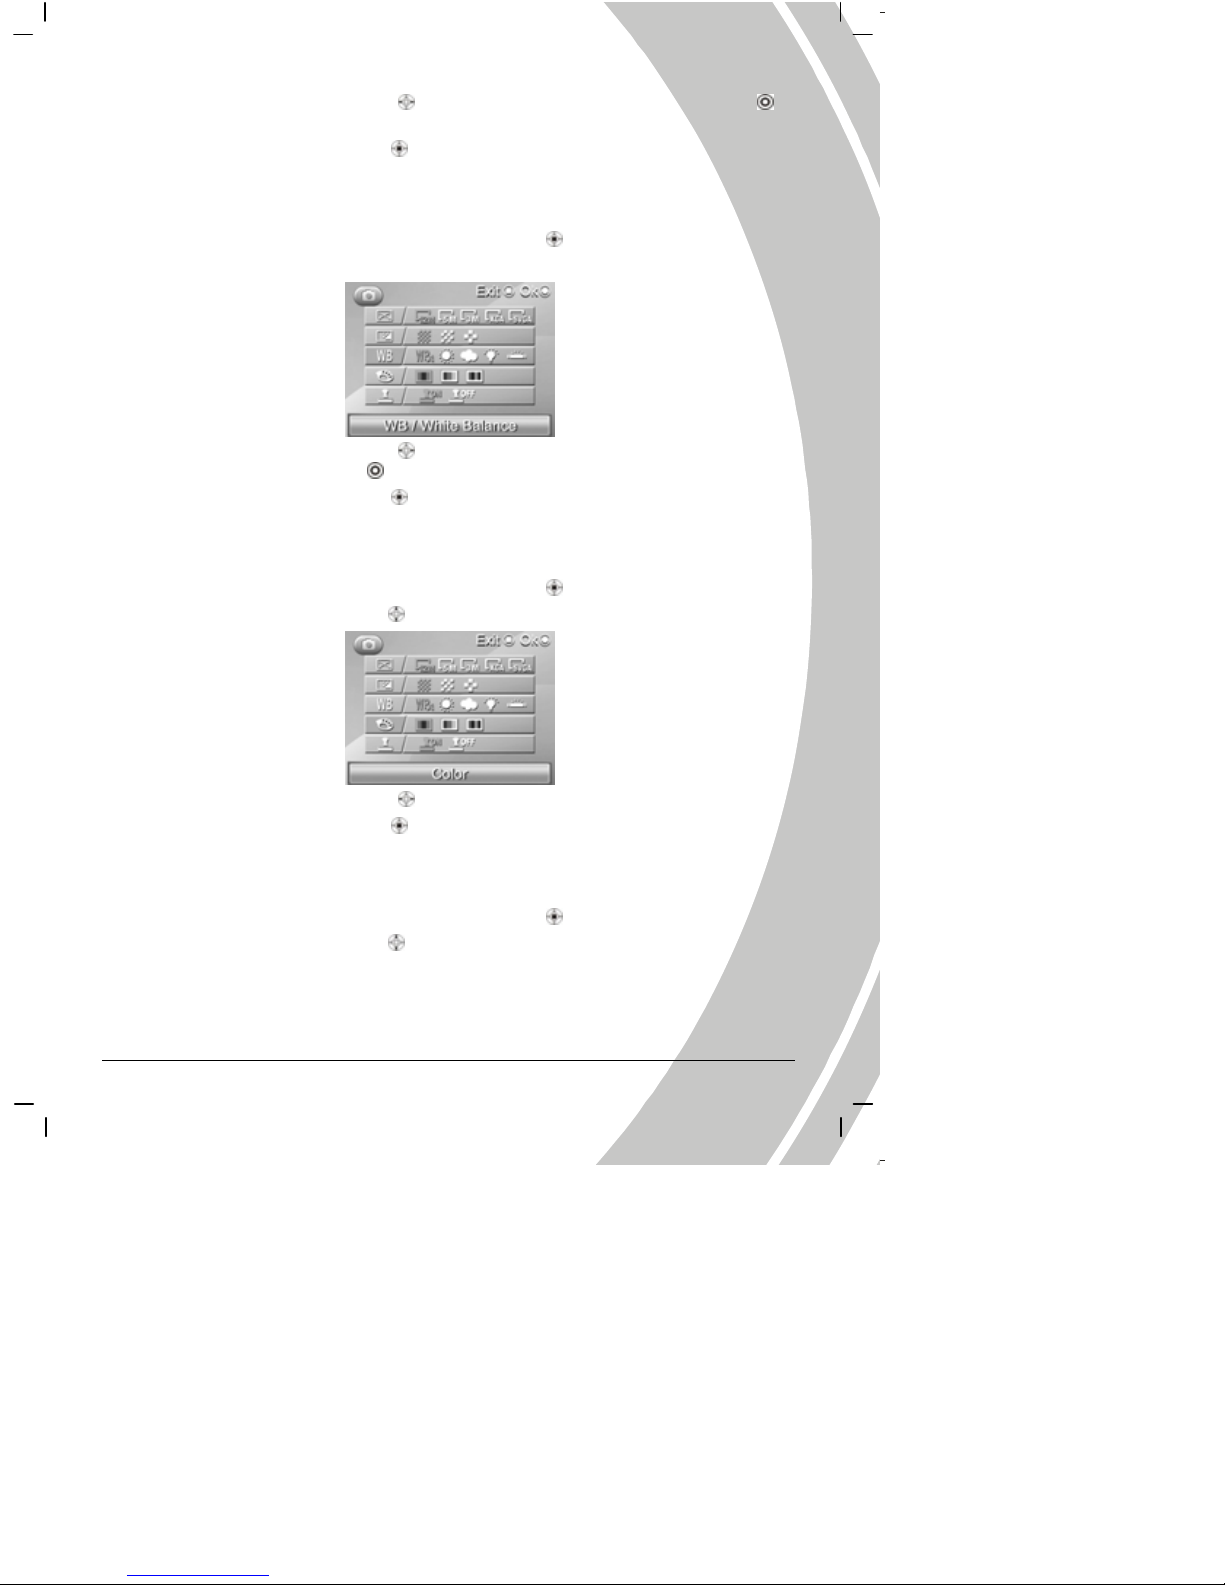
3.1.5 White balance
Use the white balance option to correct color for different lighting conditions.
1. While in Photo mode, press the joystick (ENTER button
) to enter the Setup menu.
2. Use the joystickUp/Down button ) to select the White Balance option.
3. Use the joystick (Left/Right button ) to select Auto, Sunny, Cloudy, Tungsten,
Fluorescent, then press the OK
to confirm.
4. Press the joystick (ENTER button
) again to leave the menu.
3.1.6 Color effect
The camera can capture standard color images, black and white images or sepia tone images.
1. While in Photo mode, press the joystick (ENTER button
) to enter the Setup menu.
2. Use the joystick Up/Down button
) to select the Color Effect option.
3. Use the joystick (Left/Right button ) to select Color Effect, W/B or Sepia.
4. Press the joystick (ENTER button
) again to leave the menu.
3.1.7 Date Stamp
Use this option to open/close the date stamp when taking pictures.
1. While in Photo mode, press the joystick (ENTER button
) to enter the Setup menu.
2. Use the joystick Up/Down button
) to select the Date Stamp option. (see diagram on next
page)
Page 32
30
3. Use the joystick (Left/Right button ) to select if the date stamp is displayed.
4. Press the joystick (ENTER button
) again to leave the menu.
3.2 Video recorder mode
Use this mode to capture video clips, and store them in internal memory or on an SD card.
3.2.1 Icons
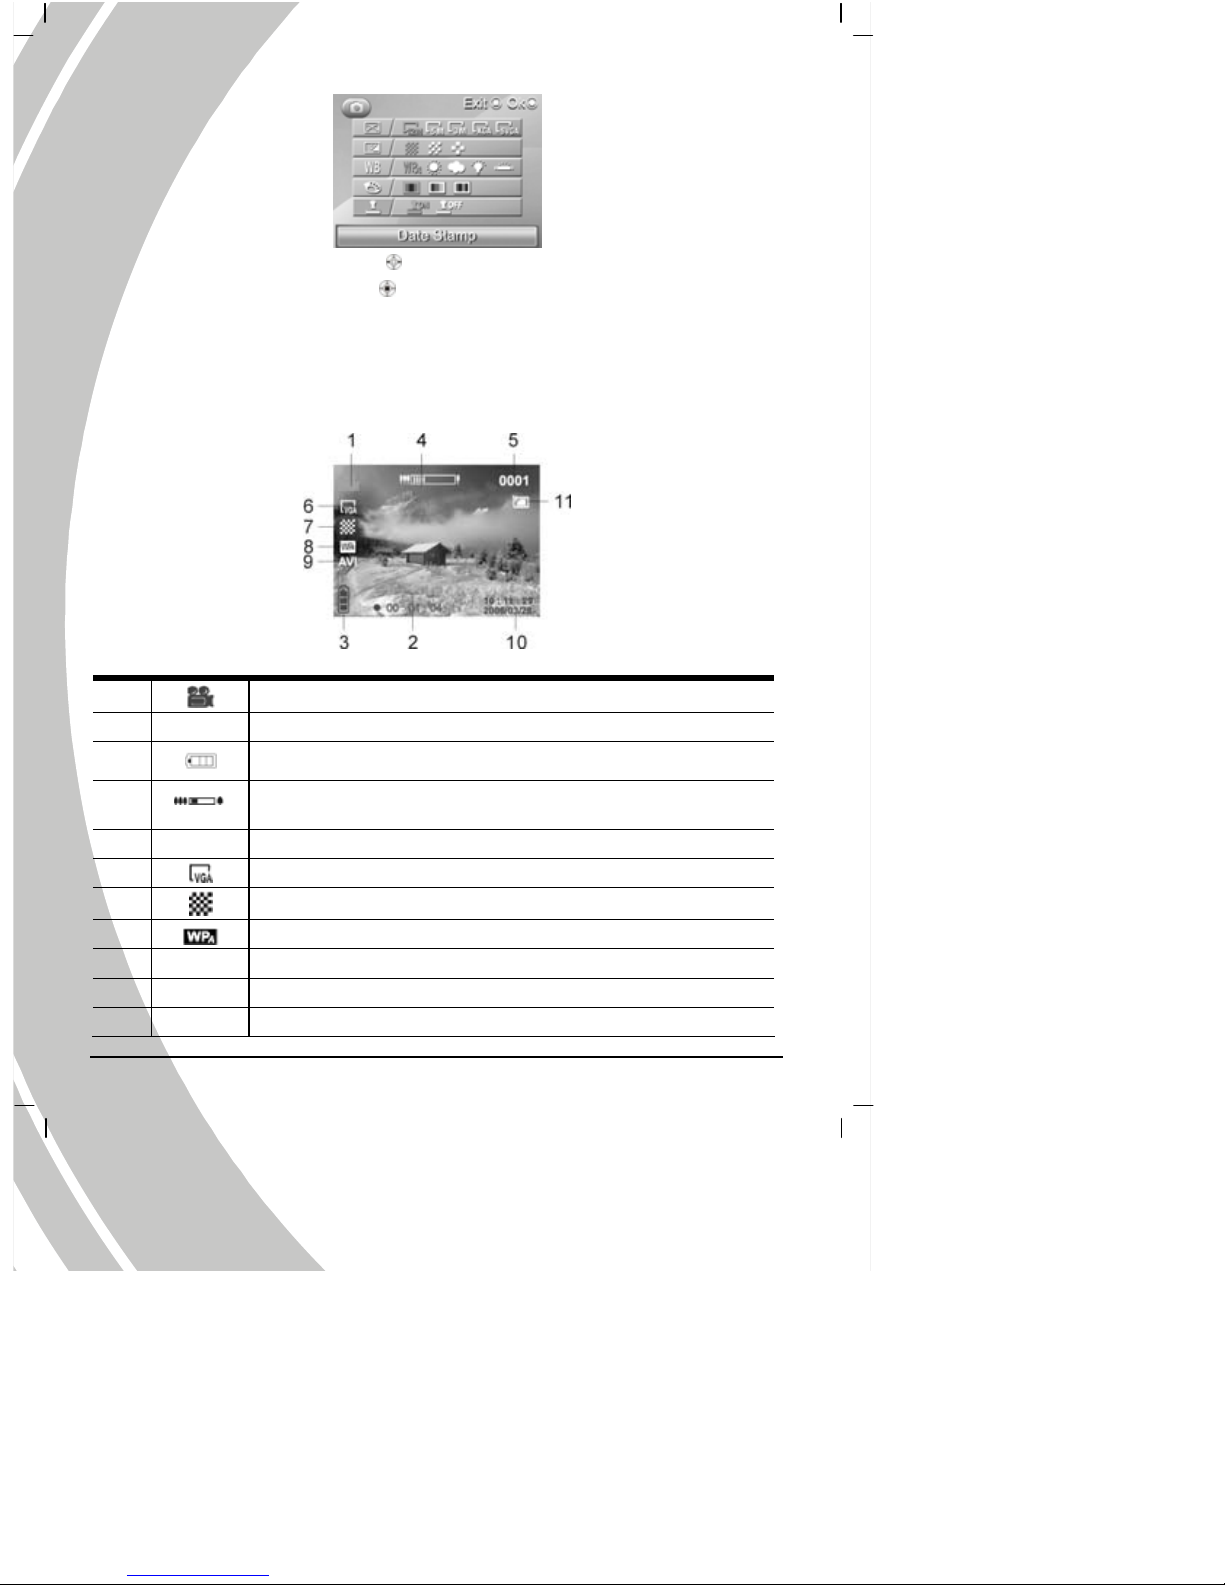
Use the following pic ture to familiarize your self with the Video mode icons and symbols.
See the table below for a description of each button’s function.
1
Video mode
2 Recording Timing
3
Battery status
4
Digital zoom status
5 Display the number of saved video clips
6
Image size indicator
7
Image quality indicat or
8
White balance indicator indicates the settings of white balance
9 Video file formats
10 Display system date/time
11 The logo of built-in memory or SD/SMM card storage status
Page 33
31
3.2.2 Setting the size
1. While in Photo mode, press the joystick (ENTER button ) to enter the Setup menu to
adjust the file format.
2. Use the joystick (Up/Down button
) to select the Size option.
3. Use the joystick (Left/Right button
) to select VGA or QVGA, and press the OK to
confirm.
4. Press the joystick (ENTER button
) again to leave the menu.
3.2.3 Quality
Please refer to “3.1.4 Quality” section.
3.2.4 White Balance
Please refer to “3.1.5 White Balance” section.
3.2.5 Color effect
Please refer to “3.1.6 Color effect” section.
3.2.6 File format
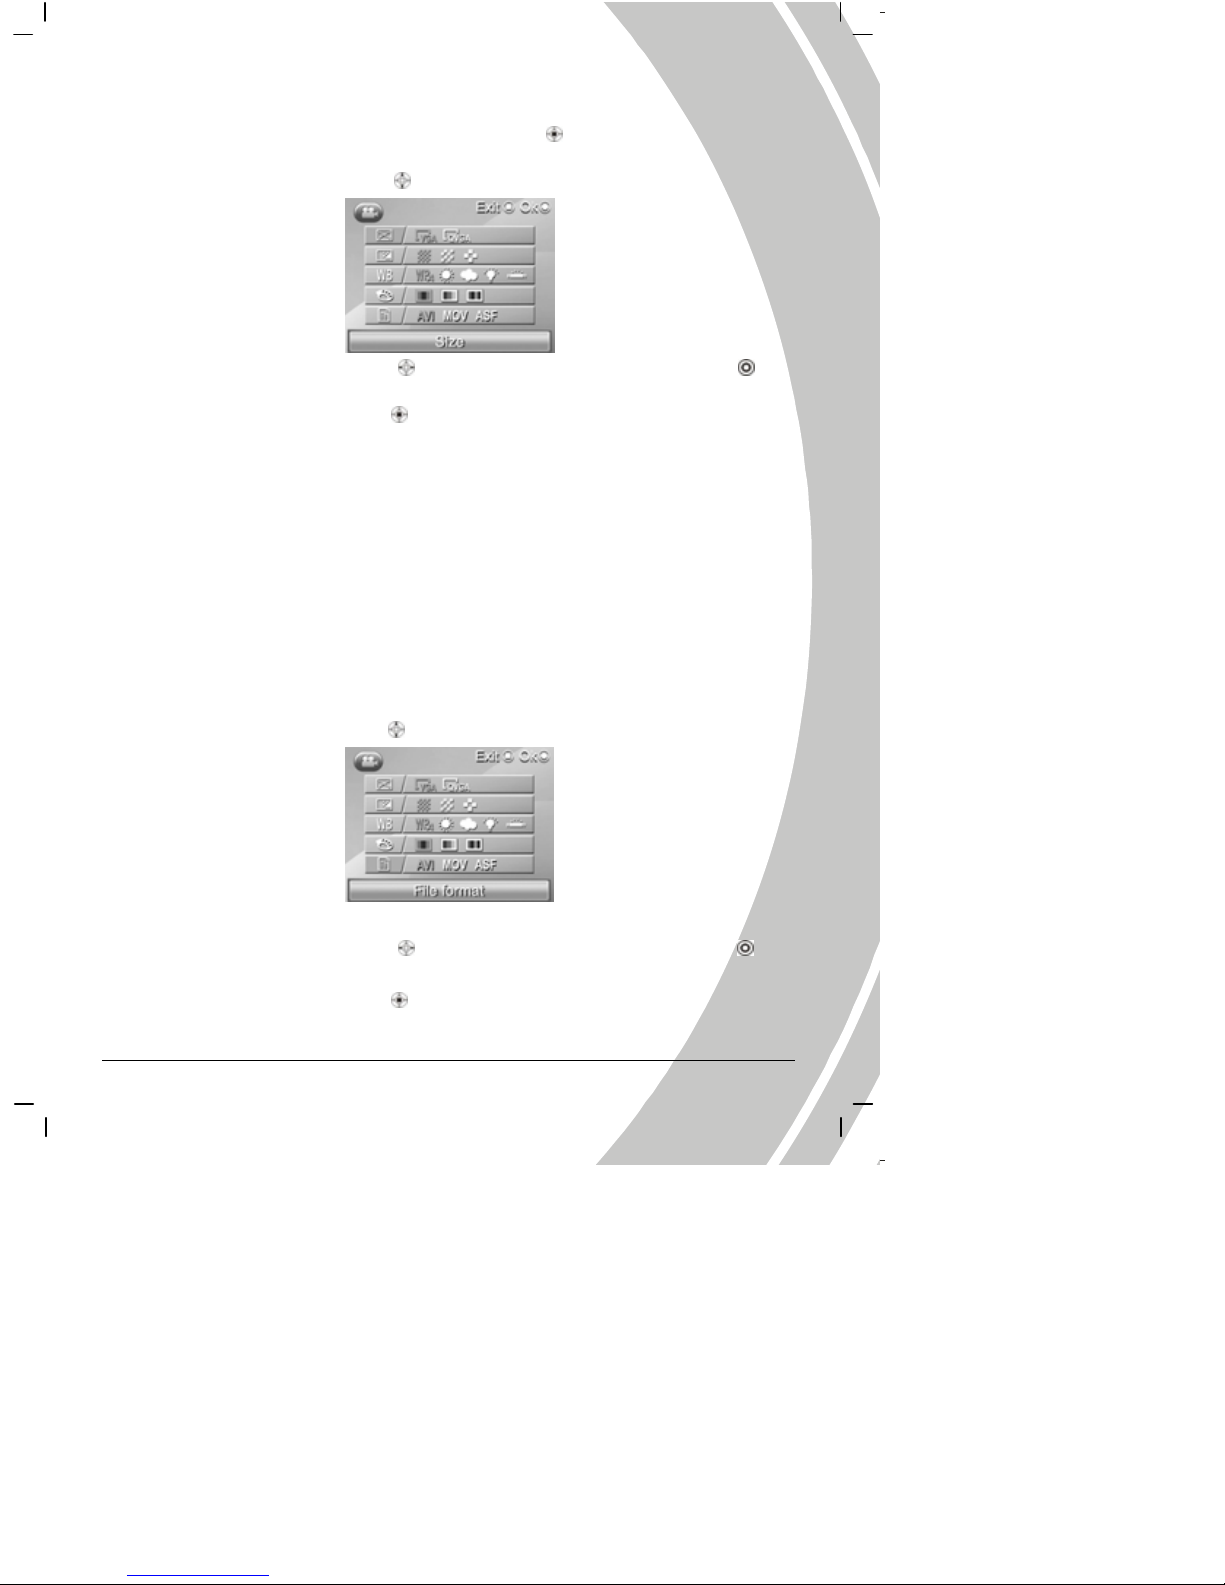
1. While in Photo mode, press the joystick (ENTER button ) to enter the Setup menu to adjust
the file format.
2. Use the joystick Up/Down button
) to select the File Format option.
3. Use the joystick (Left/Right button
) to select AVI, MOV or ASF, and press OK to
confirm.
4. Press the joystick (ENTER button
) again to leave the menu,
Page 34
32
3.3 Audio or Voice Recording mode
Use the Audio or Voice Recording mode to record sound files, and then save them in the internal
memory or SD card.
3.3.1 Icons
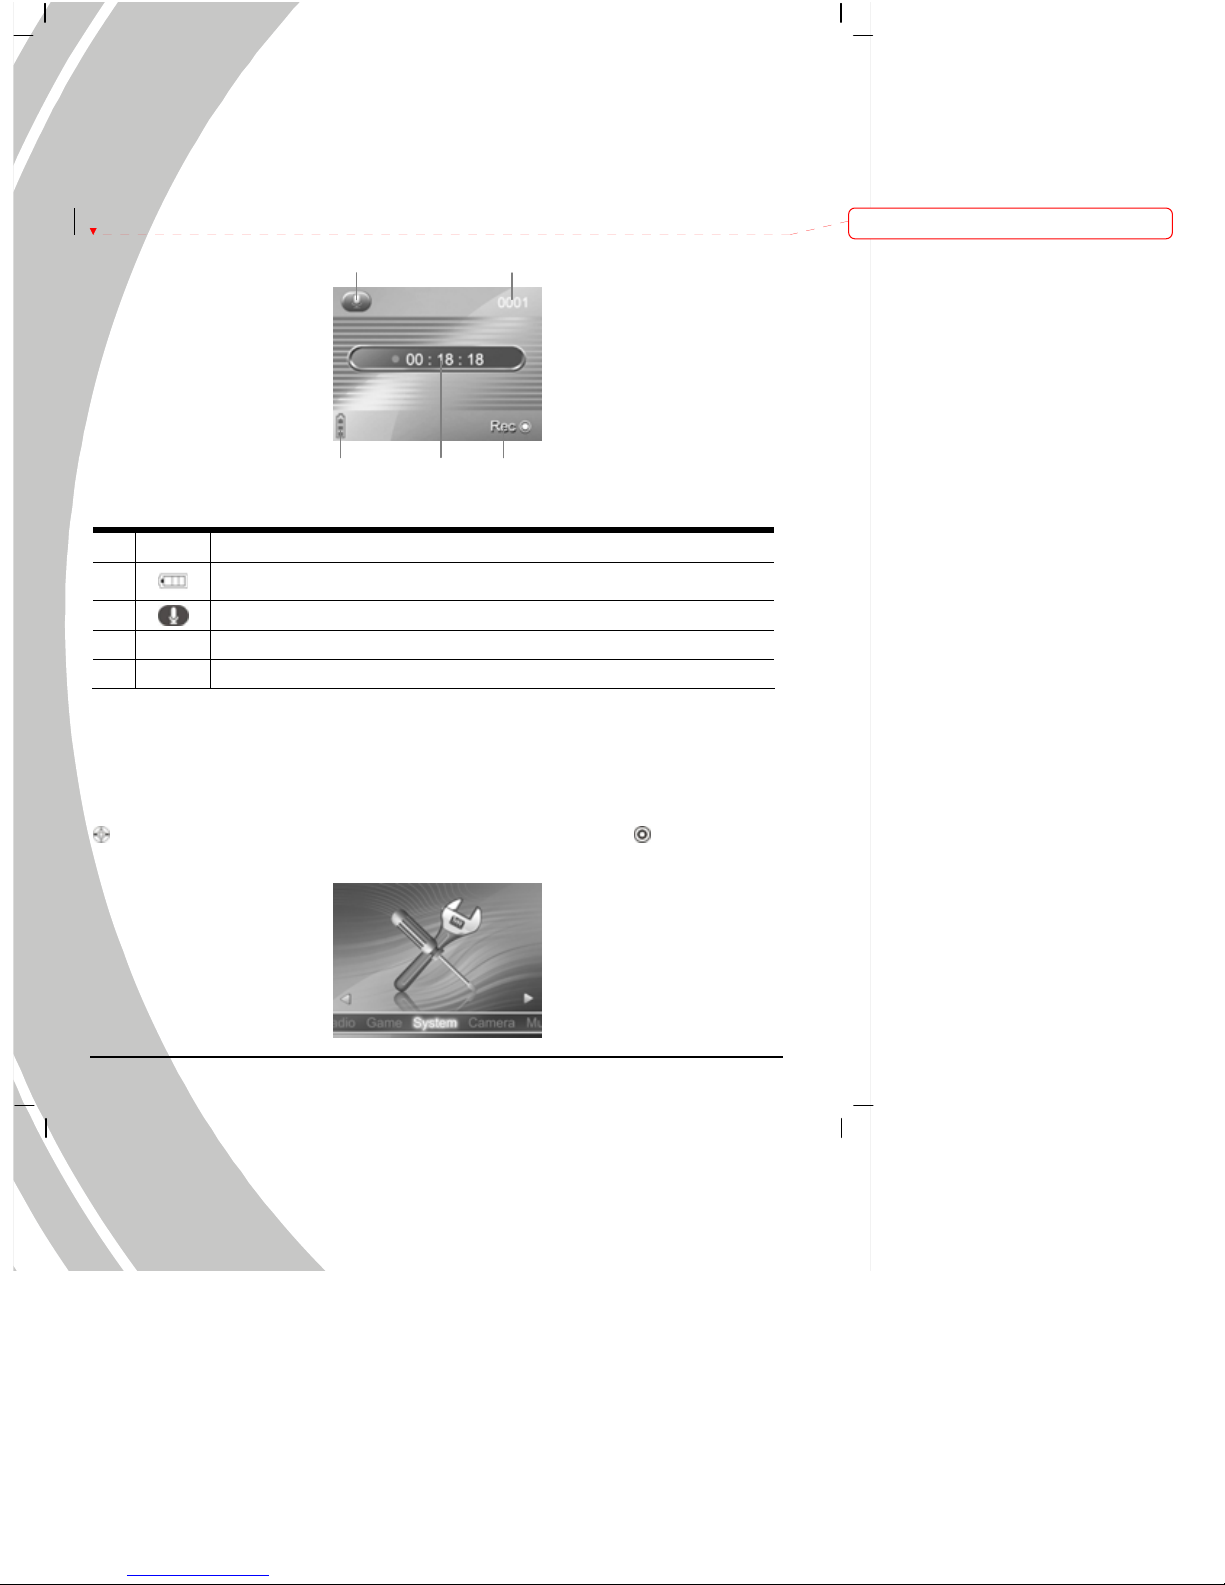
Use the following pic ture to familiarize your self with the Sound Recording mode icons and
symbols.
See the table below for a description of each button’s function.
1 Display the number of saved files
2
Battery status
3
Sound recording icon
4 Recording status
5 Recording Timing
3.4 Setup mode
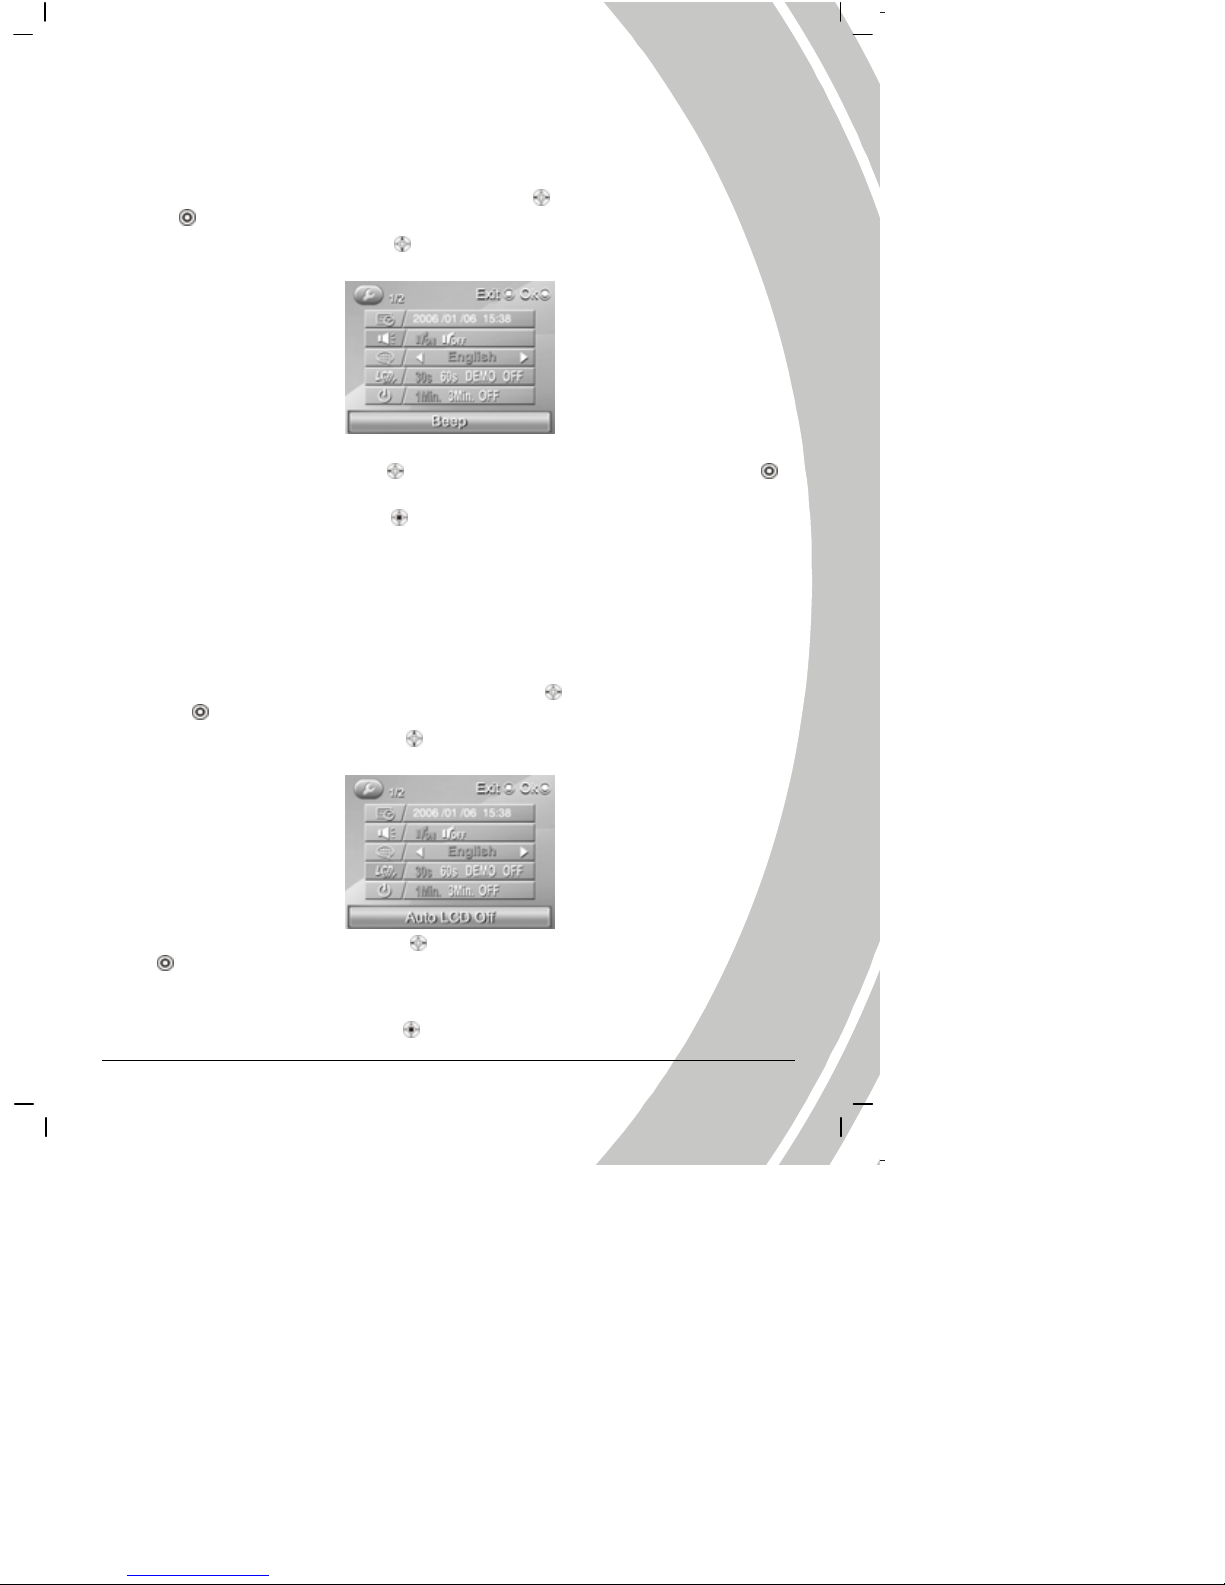
You can finish some special settings in this mode. This mode contains two menu pages. They are
system menu 1/2 and system menu 2/2.Turn the camera on, and use the joystick (Left/Right button
) to system setup unit (shown as the picture below), and then press the OK to enter. The
following settings are made in Setup mode.
3 1
2 5 4
Deleted: <sp>
Page 35
33
3.4.1 Setting the date and time
Please refer to the section 2.6.1 “Setting the date and time”.
3.4.2 Setting the beep function
1. Turn the camera on, and use joystick (Left/Right button ) to System icon, and then press
OK
to enter Setup mode.
2. Use the joystick (Up/Down button
) to select the Beep option. The screen appears as
below.
3. Use the joystick (Left/Right button ) to select Beep On or Beep Off, and press the OK
to confirm.
4. Press the joystick (ENTER button
) or Mode button to leave the menu.
3.4.3 Setting the language
Please refer to the section 2.6.2 “Setting the language”.
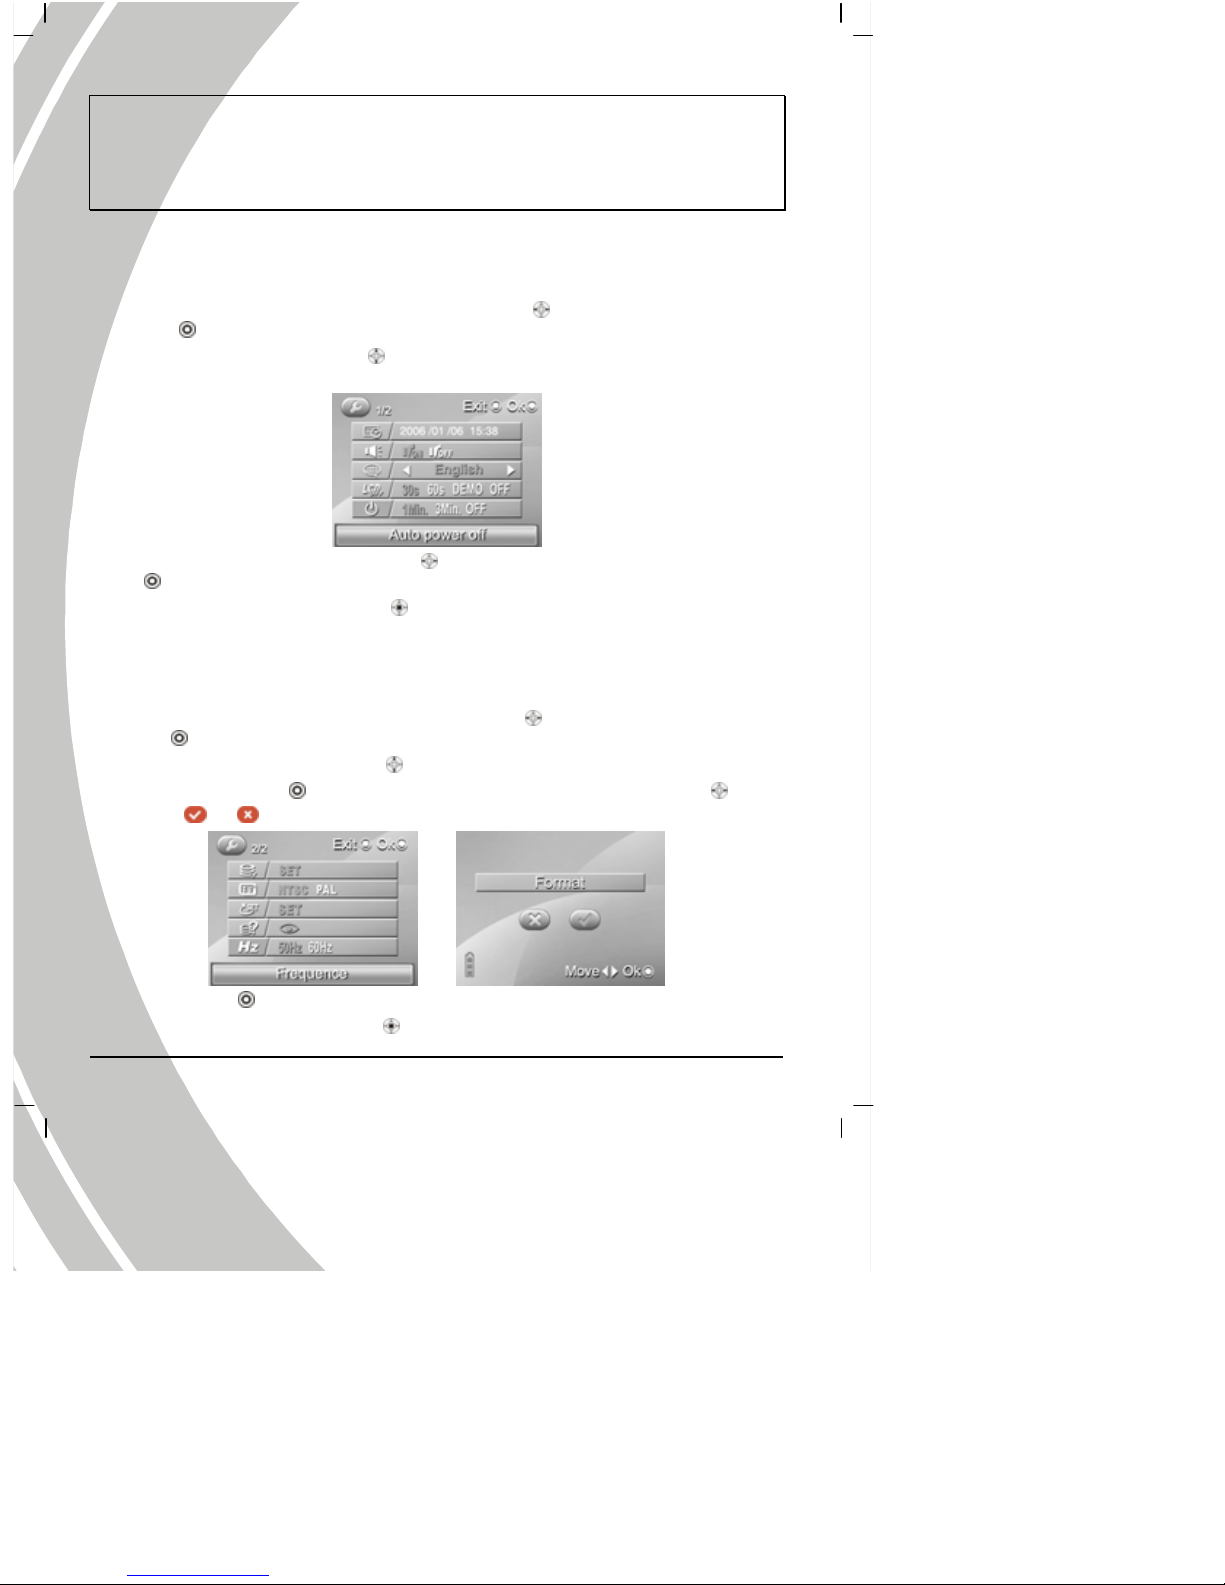
3.4.4 Auto Display Off
Use the auto power off function to set a period of inactivity after which the camera will switch the
LCD screen off.
1. Turn the camera on, and use joystick (Left/Right button
) to System icon, and then press
OK
to enter Setup mode.
2. Use the joystick (Up/Down button
) to select the Auto Display Off option. The screen
appears as below.
3. Use the joystick (Left/Right button ) to select 30s, 60s, DEMO, OFF and press the OK
to confirm. If the option is set to DEMO, the camera will automatically play the movie
and picture files in the DEMO folder repeatedly after 30 seconds. It’s the same as the
screensaver.
4. Press the joystick (ENTER button
) or mode button to exit the menu.
Page 36
34
Note: Convert the demo movie ands and picture files to the format supported by this camera before
saving them in the camera. Please save the converted movie and picture files or the folder with
converted movie and picture files in the DEMO folder of the camera, or the camera can’t execute
the DEMO function. If you delete all the movie and picture files in DEMO folder by formatting or
through the computer, the current option of Auto Display Off is setup to 30S automatically.
3.4.5 Au to Po wer Off
Use the auto power off function to set a period of inactivity after which the camera will switch
itself off.
1. Turn the camera on, and use joystick (Left/Right button
) to System icon, and then press
OK
to enter Setup mode.
2. Use joystick (Up/Down button
) to select the Auto Power Off option. The screen
appears as below.
3. Use the joystick (Left and right button ) to select 1Min, 3Min, OFF and press the OK
to confirm.
4. Press the joystick (ENTER button
) or mode button to leave the menu.
3.4.6 Format
Use the option to format the current storage media. This function will delete all the files in the
storage media.
1. Turn the camera on, and use joystick (Left/Right button
) to System icon, and then press
OK
to enter Setup mode.
2. Use the joystick (Up/Down button
) to select Format option. The screen appears as
below. Press the OK
to enter the option。Use the joystick (Left/Right button ) to
select
or .
3. Press the OK to confirm.
4. Press the joystick (ENTER button
) or mode button to leave the menu.
Page 37
35
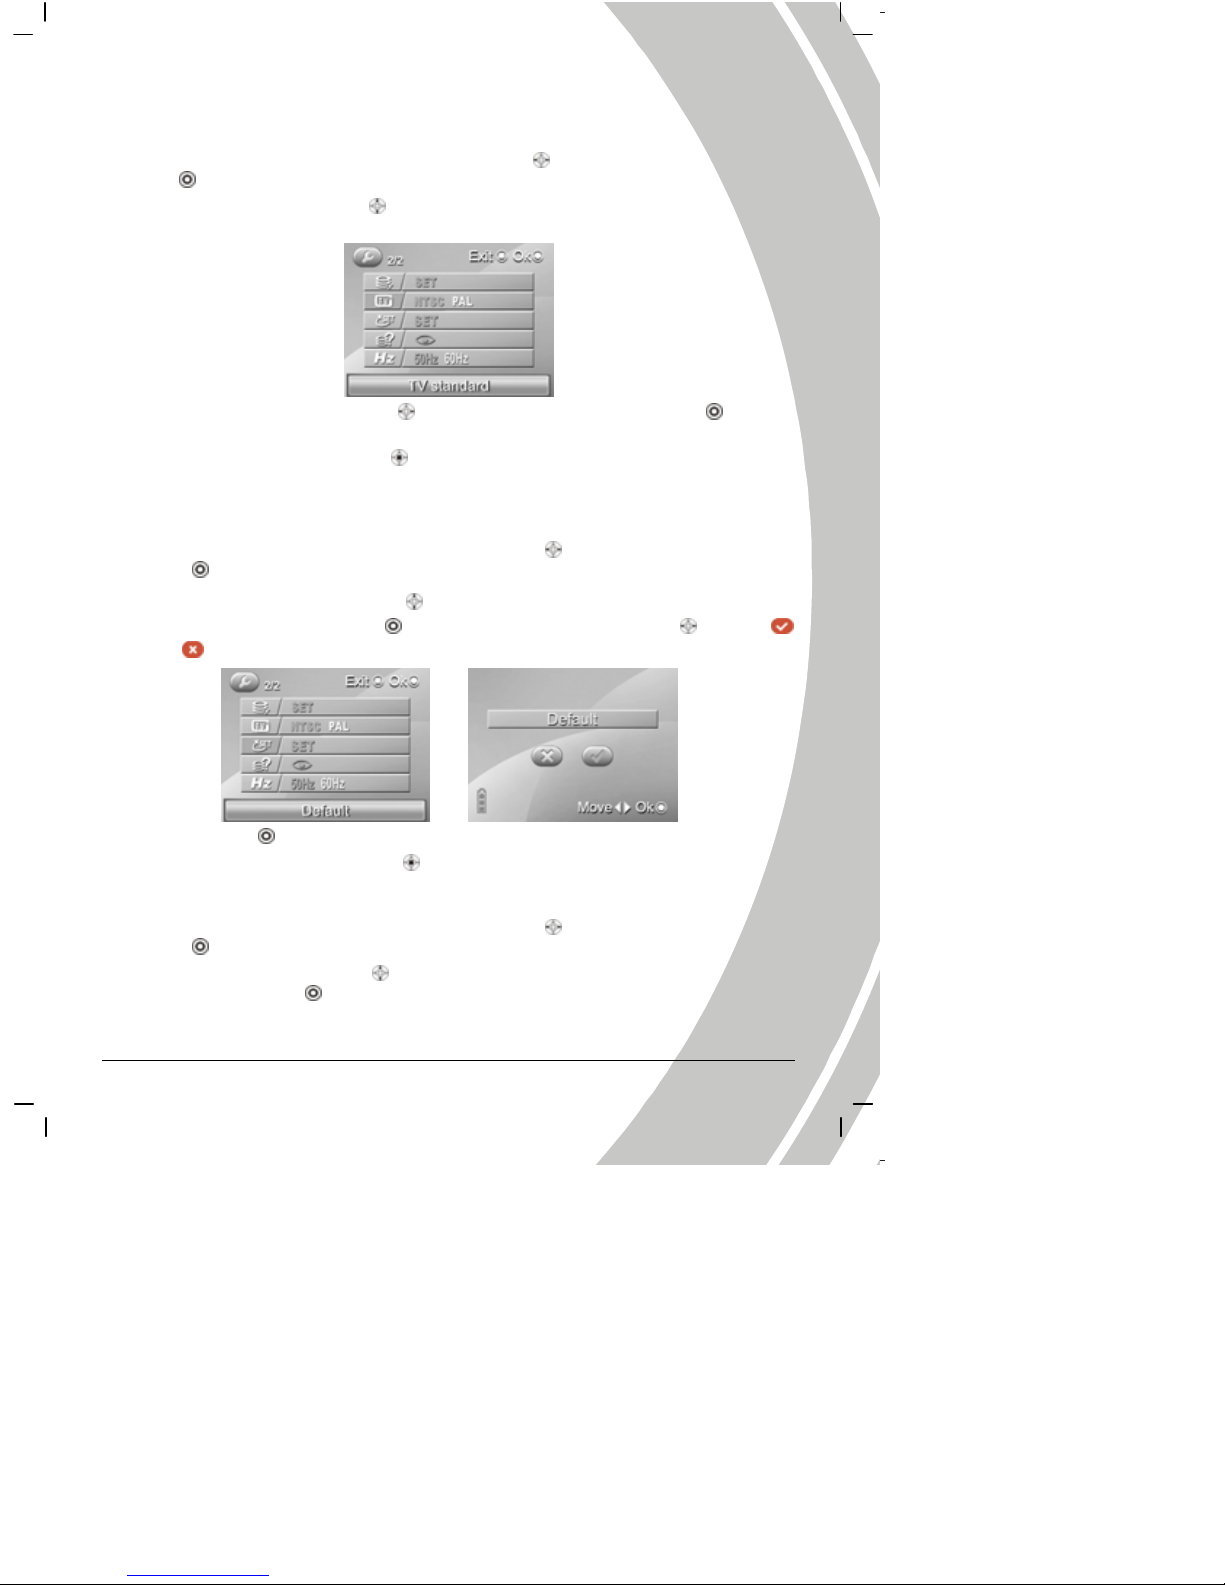
3.4.7 TV Standard
Use the TV option to set up the applica ble local TV syste m.
1. Turn the camera on, and use joystick (Left/Right button
) to System icon, and then press
OK
to enter Setup mode.
2. Use joystick (Up/Down button
) to select the TV Standard option. The screen appears as
below.
3. Use the joystick (Left/Right button ) to select NTSC/PAL, and press the OK to
confirm.
4. Press the joystick (ENTER button
) or Mode button to leave the menu.
3.4.8 Default
Use this option to reset all settings to the factory default.
1. Turn the camera on, and use joystick (Left/Right button
) to System icon, and then press
OK
to enter Setup mode.
2. Use the joystick (Up/Down button
) to select the Default 選option, and the screen
appears as below. Press the OK
to use the joystick (Left/Right button ) to se lect
or .
3. Press the OK to confirm.
4. Press the joystick (ENTER button
) or mode button to leave the menu.
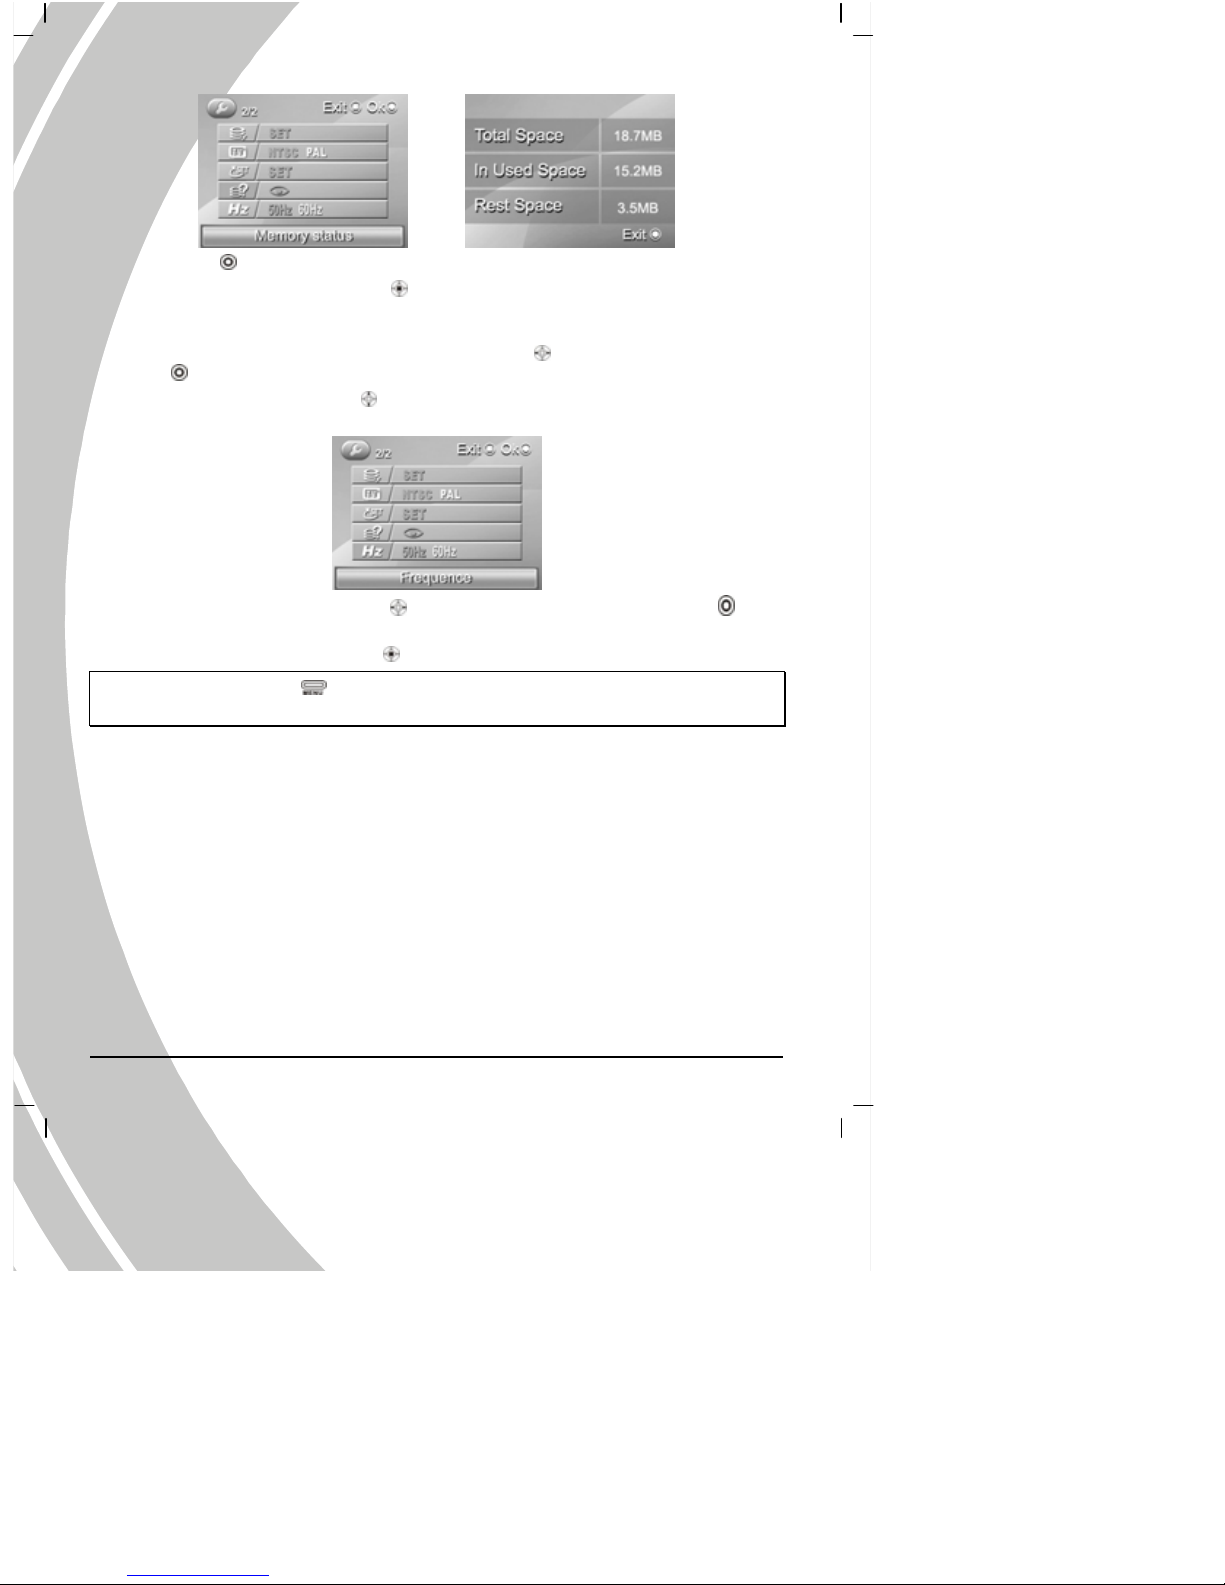
3.4.9 Memory Status
1. Turn the camera on, and use joystick (Left/Right button ) to System icon, and then press
OK
to enter Setup mode.
2. Use joystick (Up/Down button
) to select the Memory S t atus option. The screen appears
as follow. Press OK
to enter to displa y the current storage status.
Page 38
36
3. Press OK to return to Setup menu.
4. Press the joystick (ENTER button
) or mode button to leave the menu.
3.4.10 Frequency
1. Turn the camera on, and use joystick (Left/Right button ) to System icon, and then press
OK
to enter Setup mode.
2. Use joystick (Up/Down button
) to select the Frequency option. The screen appears as
below.
3. Use the joystick (Left/Right button ) to select 50Hz or 60 Hz, and press the OK to
confirm.
4. Press the joystick (ENTER button
) or Mode button to leave the menu.
Note: Press the Mode button
, and the camera system will switch to mode selection interface
in any mode.
Page 39
3
7
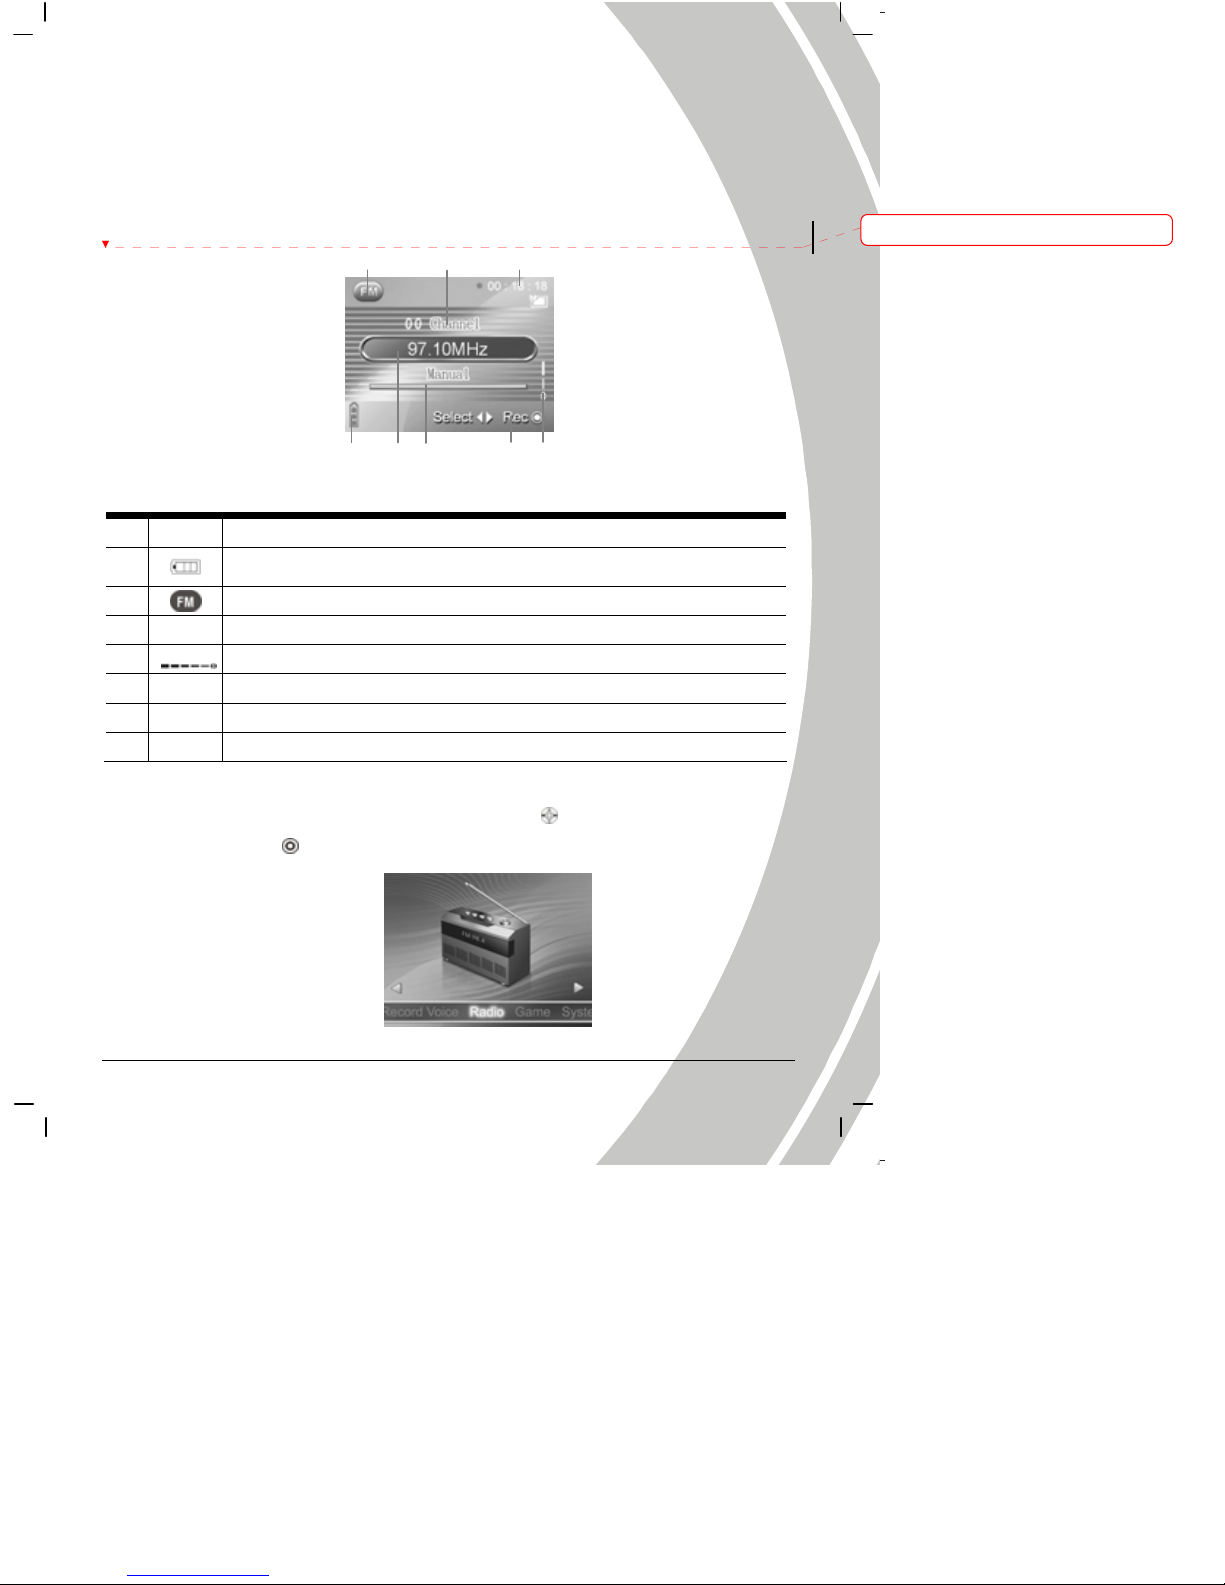
3.5 FM Radio mode
Use the FM Radio to receive radio reception from frequency FM87.5~108MHz, record and save
them in the internal memory or on a SD card.
3.5.1 Sound recording icon
Use the following picture to familiarize yourself with the FM Radio mode icons and symbols.
See the table below for a description of each button’s function.
1 Recording time
2
Battery status
3
FM radio mode icon
4 Recording status
5
Volume
6 Channel display
7 Manual search
8 Receiving Station
3.5.2 Operation instructions
1. Turn the camera on, and use joystick (Left/Right button ) to scroll through Radio icon,
and then press OK
to enter FM radio mode.
3
2
1 8
6 7 4 5
Deleted: <sp>
Page 40
38
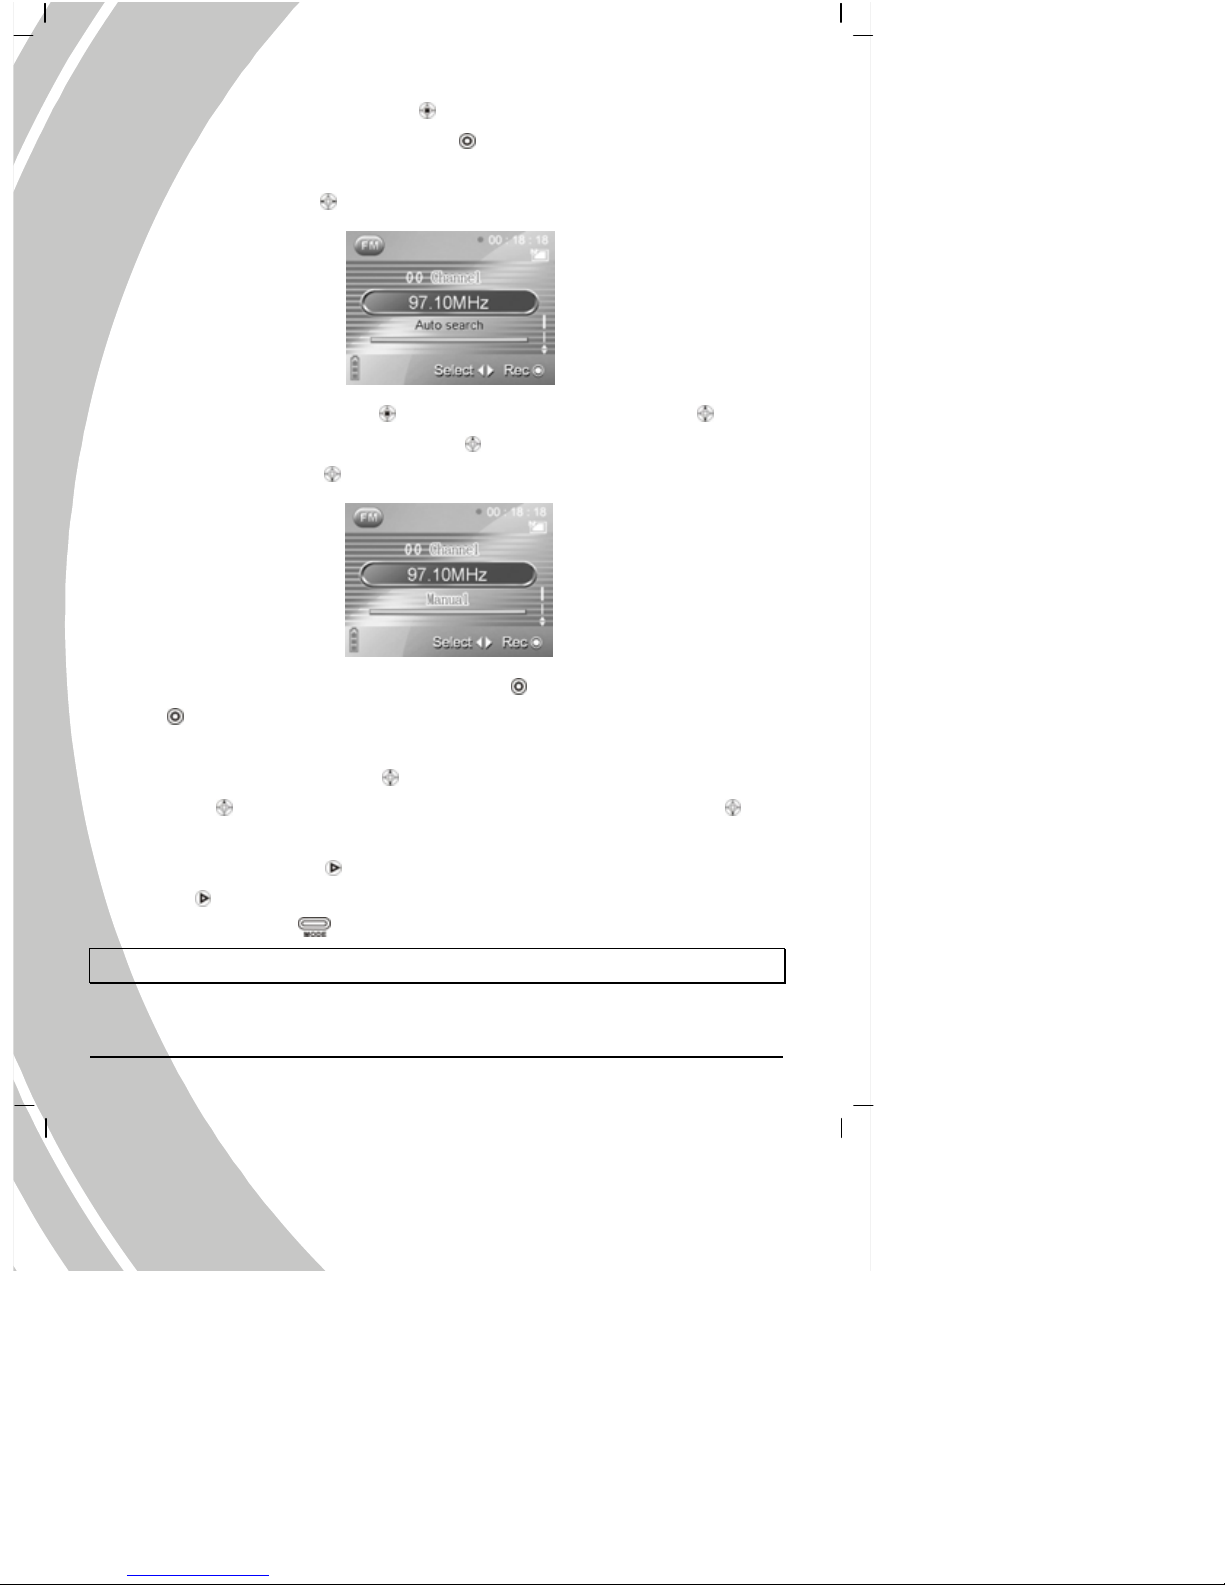
2. Long press the joystick (ENTER button ), and the camera will star searching for the
station frequency automatically. Press the OK
to stop rece iv in g the fr eque n c y durin g th is
process. When finishing auto search, the camera will save the station automatically. Use the
joystick (Left/Right button
) to select the station searched automatically.
3. Press the joystick (ENTER button ), and press the joystick (Up/Down button ) to
search manually. Press the joystick (Up button
) and the current channel is +0.1. Press
the joystick (Down button
) and the current channel is -0.1.
4. Choose the station you want to receive. Press the OK
to start recording, and press the
OK
again to stop recording. To listen to your FM recording, please refer to section 2.9.3
“Playing the audio file”, found on page 23.
5. Use the joystick (Up/Down button
) to increase or decrease the volume. Press the joyst ick
(Up button
) and the current volume increases. Press the joystick (Down button ) and
the current volume decreases .
6. Press and hole the Browse
to lock all the buttons of the camera. Press and hold the
Browse
again to unlock the buttons.
7. Press the Mode button
, and the camera system will switch to mode selection interface.
Note: Use the earphone as antenna while searching the station.
Page 41
39
3.6 Music Play er mode
Use the Music player mode to play the music in mp3 or wav format in the internal memory or on
a SD card.
3.6.1 Icons
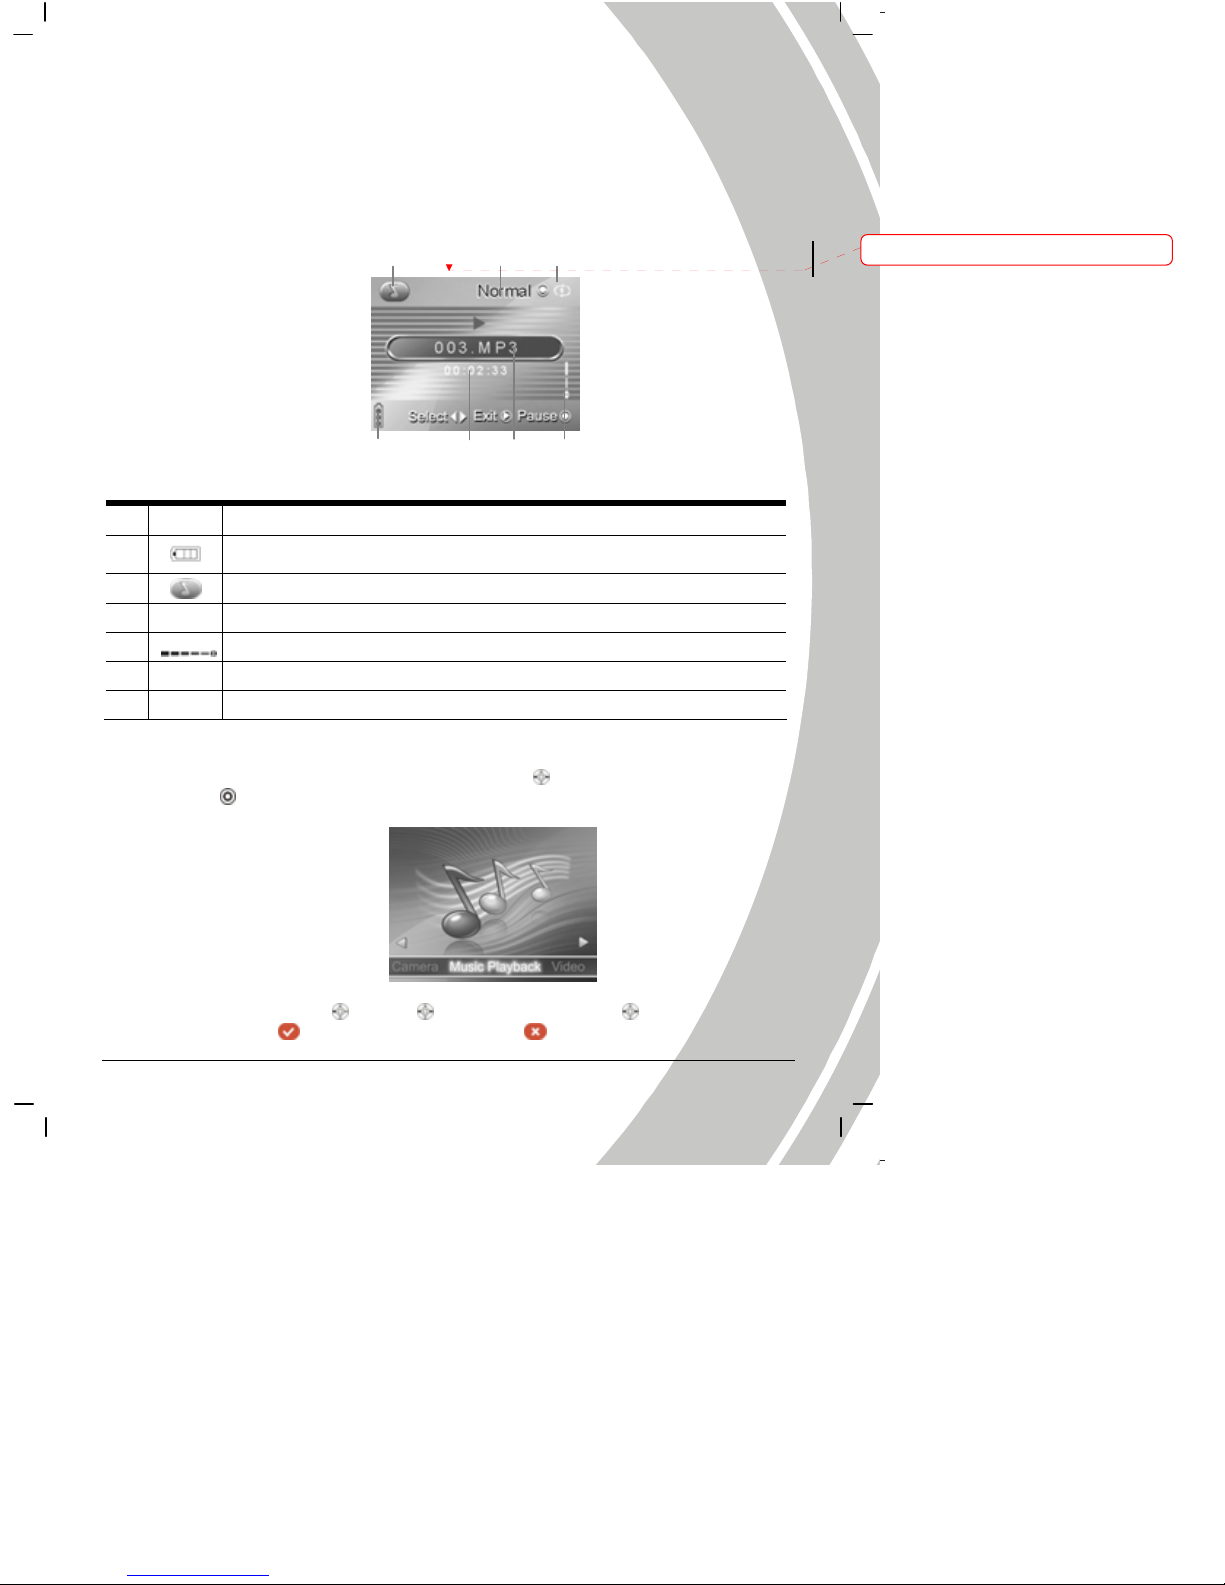
Use the following picture to familiarize yourself with the Music Player mode icons and symbols.
See the table below for a description of each button’s function.
1 Playing time
2
Battery status
3
Music Player mode icon
4 Repeat mode
5
Volume
6 Audio mode
7 Display the sequence num ber of the song
3.6.2 Operation instructions
1. Turn the camera on, and use joystick (Left/Right button
) to the music player unit, and then
press OK
to enter Music Player mode.
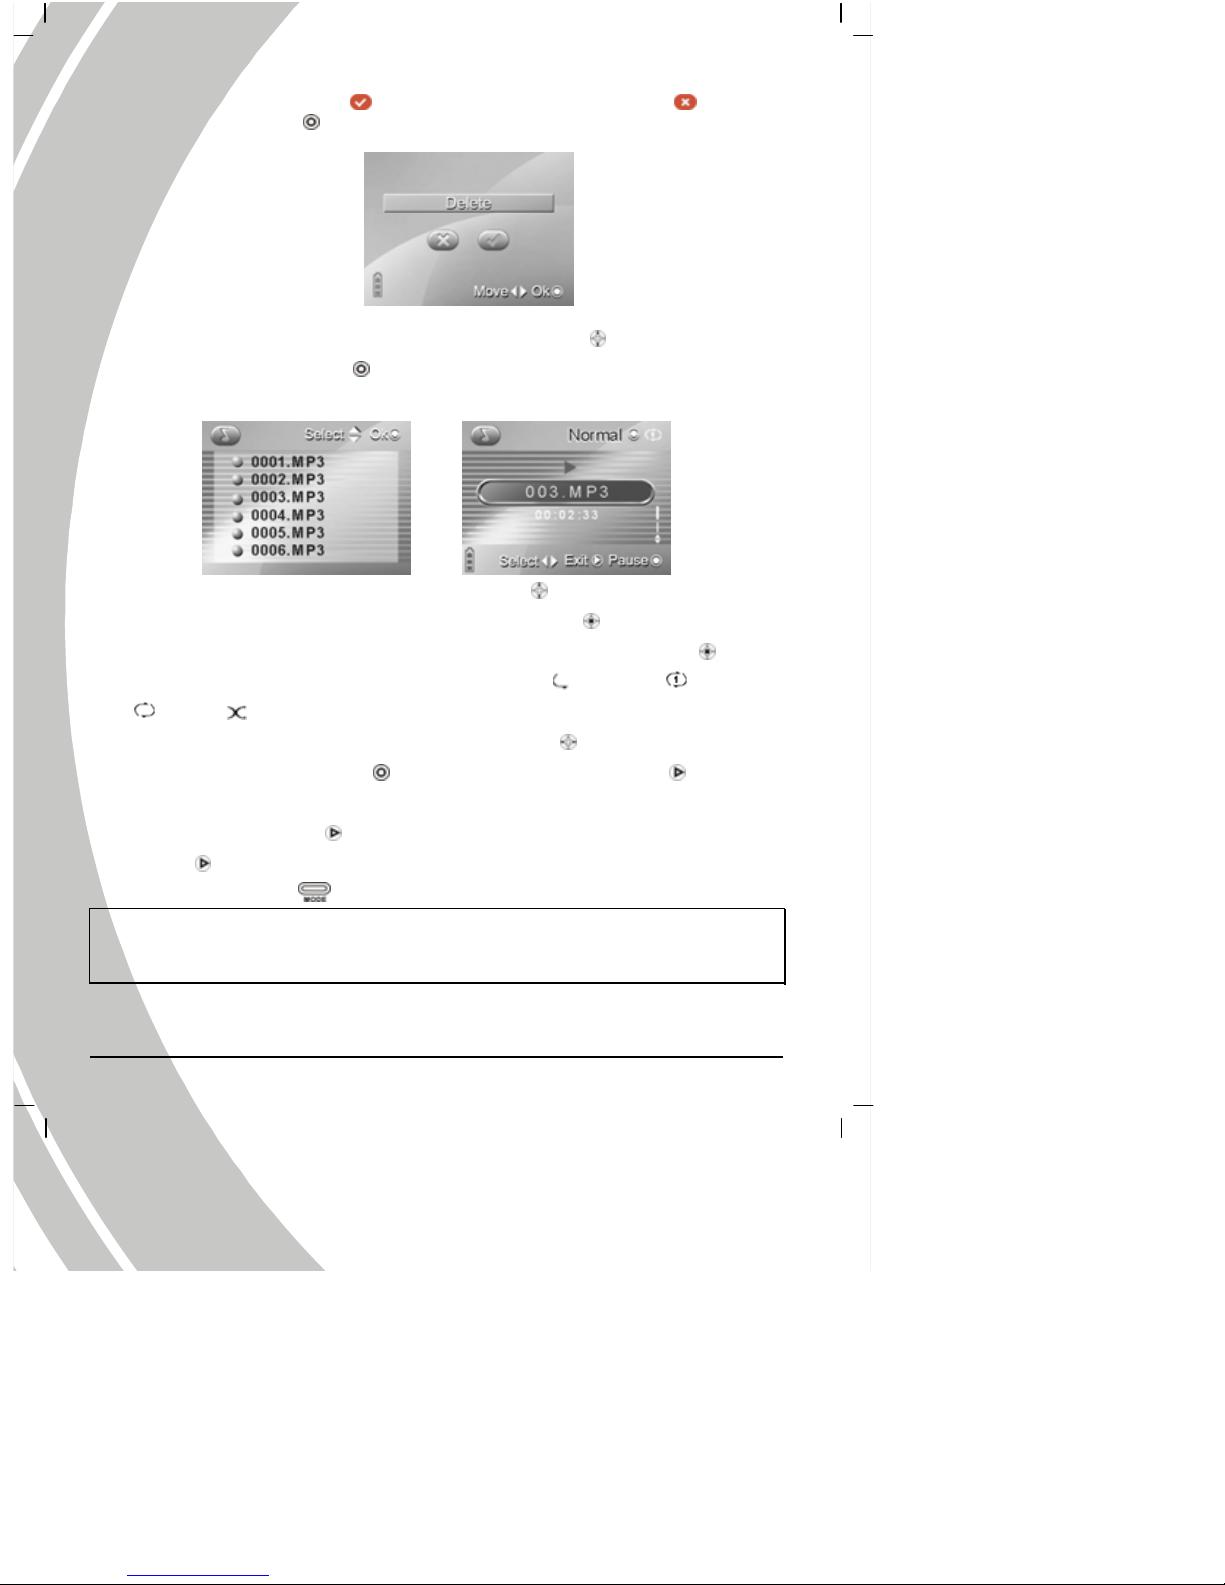
2. Use the joystick (first left
or right , and then left/right button ) to select to delete all
music files (sel ect
to delete all music files, select to cancel deleting) , or select to
3
2
4 6
7 6
5
Deleted: <sp>
Page 42
40
delete single music file (select to delete single selected music file, select to cancel
deleting). Press the OK
to confirm deleting all music files or single selected music file.
3. In song selection menu mode, use the joystick (Up/Down button
) to select the songs you
want to play, and press the OK
to enter the playback mode. (Note: T he musi c file nam e
displays with four-digit number incrementally.)
4. While playing music, use the joystick (Up/Down button
) to adjust the volume.
5. While playing the music, long press the joystick (ENTER button
) to switch the EQ:
Standard, Pop, Classical, Rock and Bass. Short press the joystick (ENTER button
) to
switch the repeat modes for playing music: Play in Order
, Repeat One , Repeat All
, Shuffle 。
6. While playing the music, use the joystick (Left/Right button
) to switch to the
previous/next song. Press the OK
to pause playing, and press the Browse to return to
the playlist.
7. Press and hole the Browse to lock all the buttons of the camera. Press and hold the
Browse
again to unlock the buttons.
8. Press the Mode button
, and the camera system will switch to mode selection interface.
Note: the music file formats supported by this camera are MP3 and WAV. Pleas save the music
files of these two formats into the MUSIC folder of the camera, or the music player can’t find
music files.
Page 43
41
3.7 Movie player mode
Use the Movie player mode to play the movie in AVI, AS F or MOV format in the internal
memory or on a SD card.
3.7.1 Mode icons
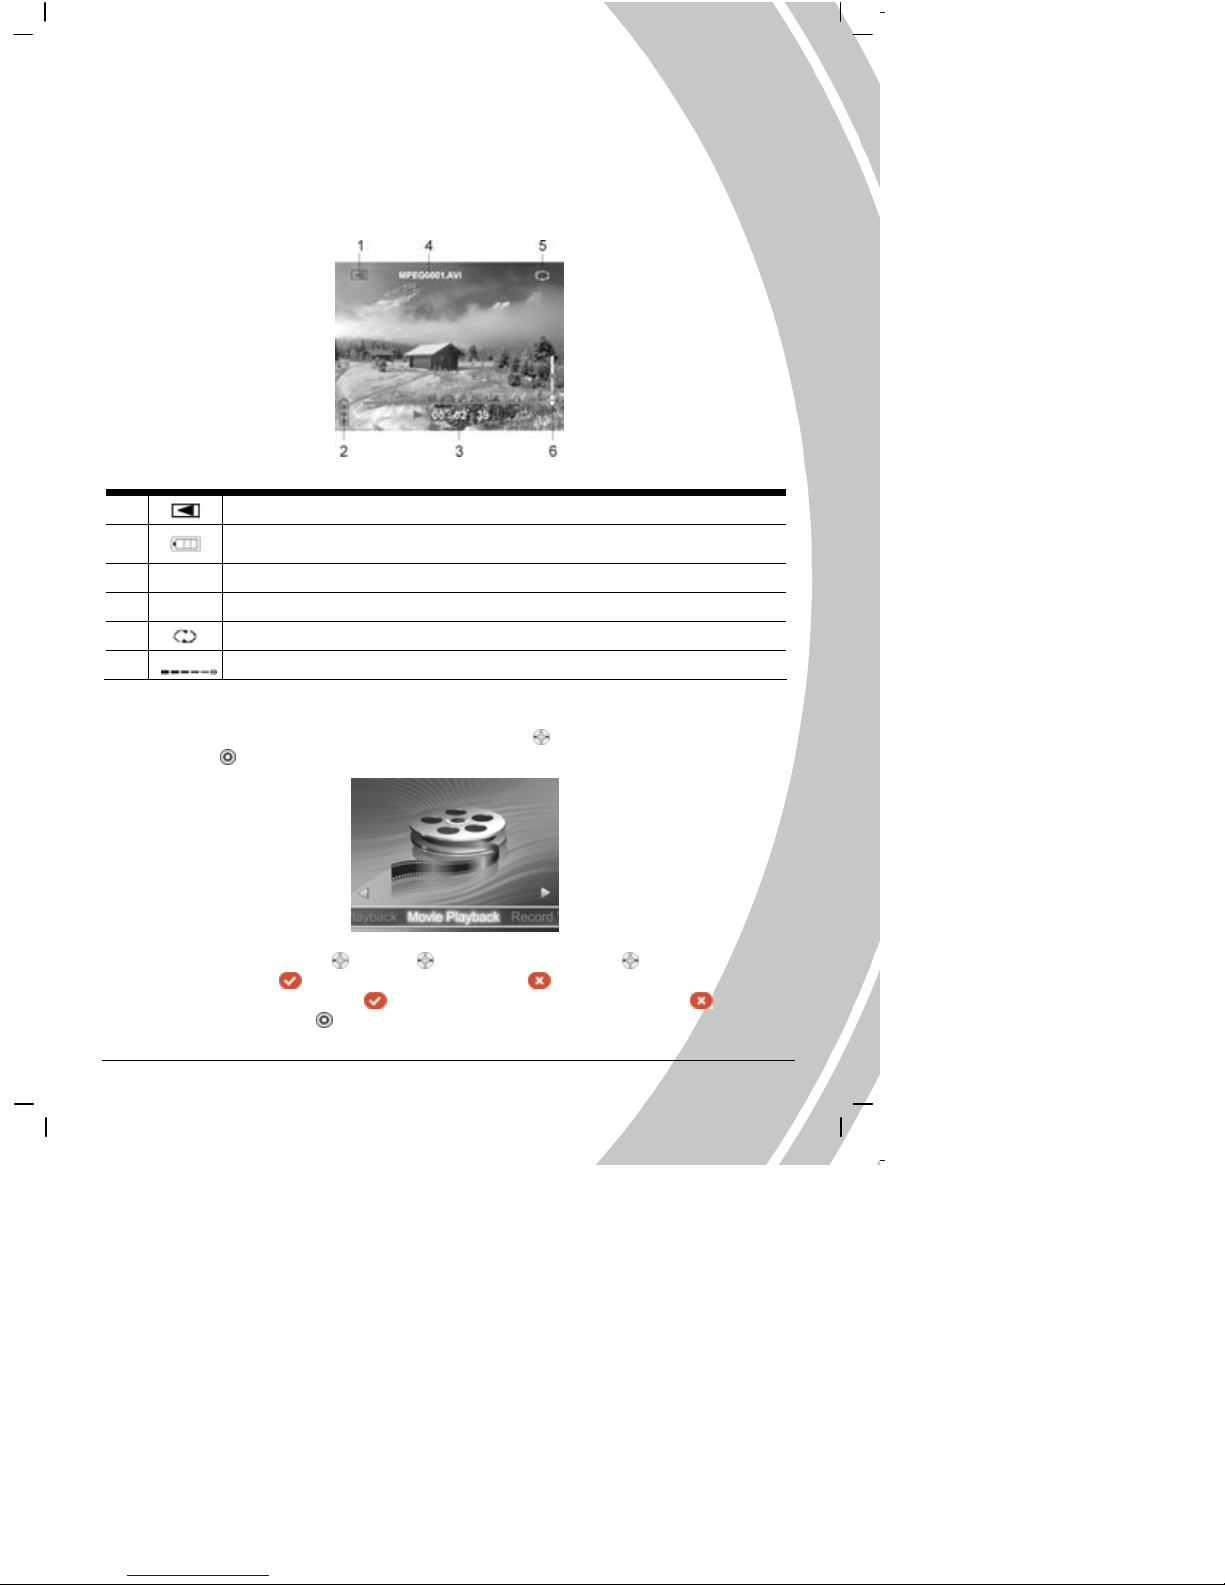
Use the following picture to familiarize yourself with the Movie Player mode icons and symbols.
See the table below for a description of each button’s function.
1
Playback mode
2
Battery status
3 Playing time
4 Movie file name
5
Repeat mode
6
Volume
3.7.2 Operation instructions
1. Turn the camera on, and use joystick (Left/Right button
) to the movie player unit, and then
press OK
to enter Movie Player mode.
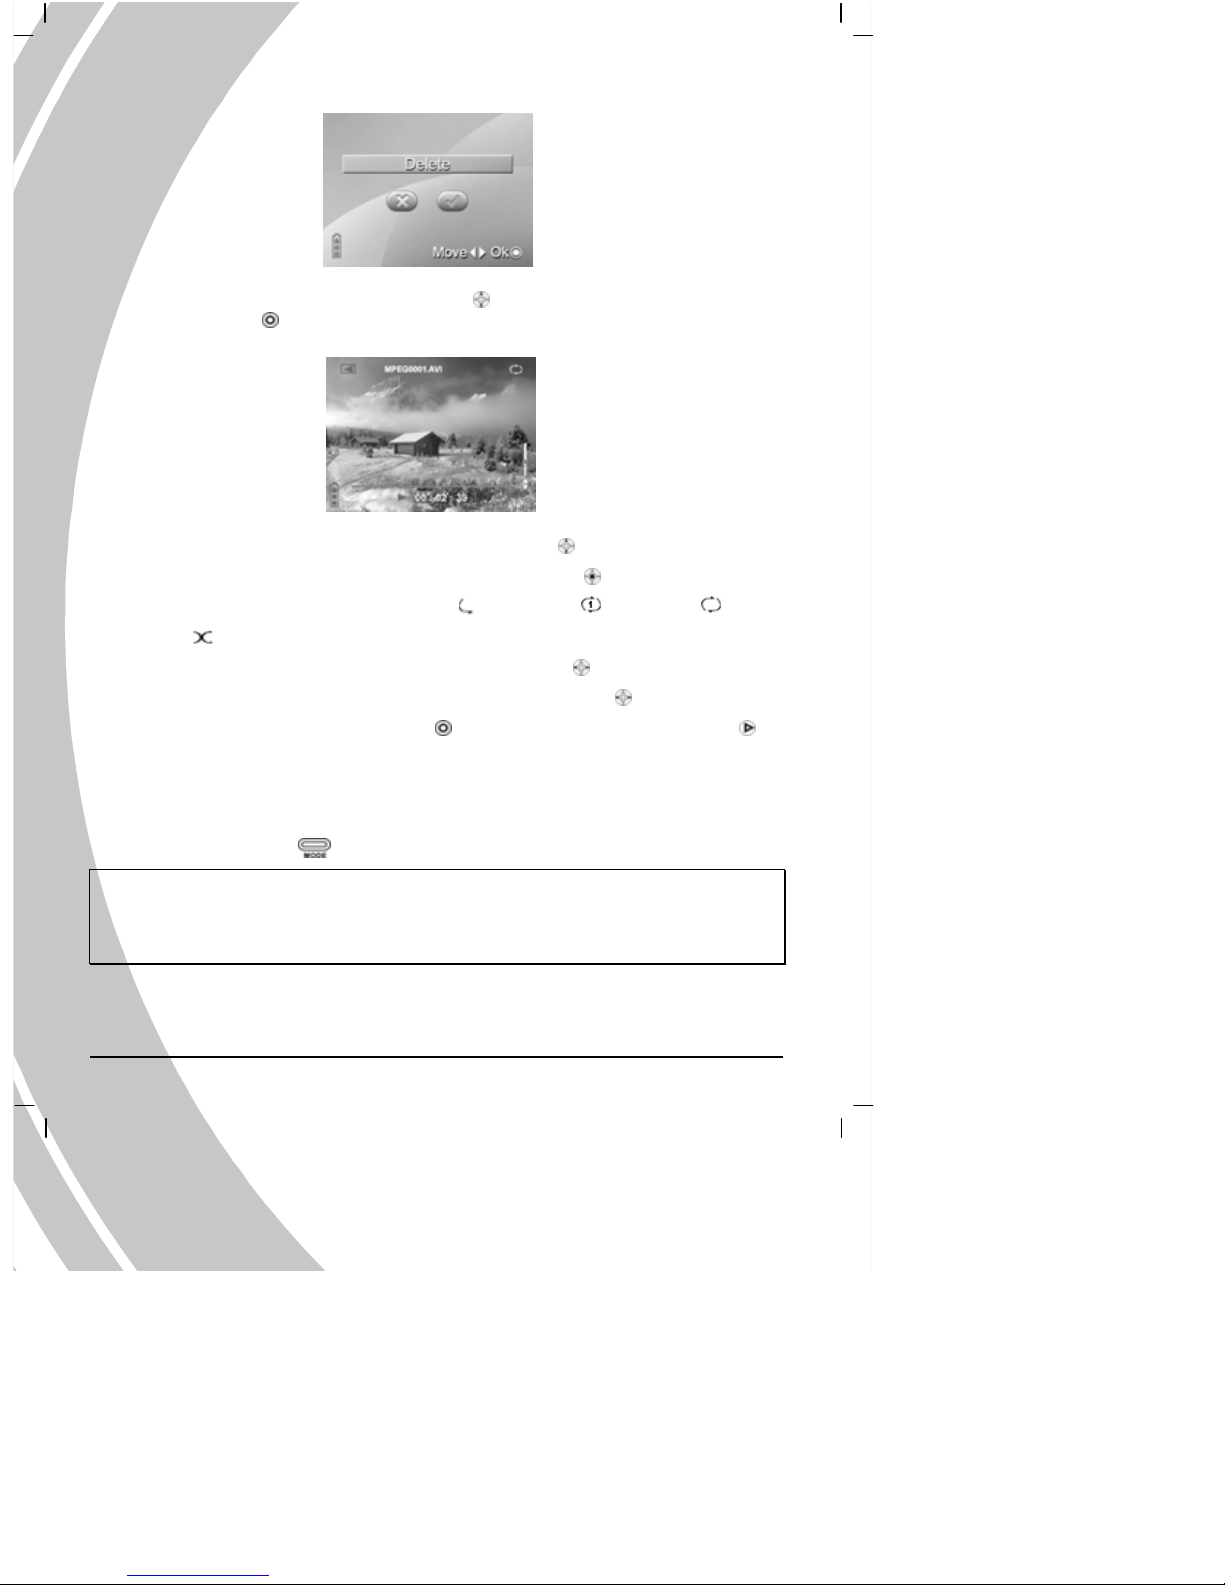
2. Use the joystick (first left
or right , and then left/right button ) to se lect to delete all
movie files (select
to delete all movie files, select to cancel deleting), or select to
delete single movie file (select
to delete single selected movie file, select to cancel
deleting). Press the OK
to confirm deleting all movie files or single selected movie file.
Page 44
42
3. In this mode, use th e joystick (Up/Down button
) to select the movie you want to play,
and press the OK
to enter the playback mode.(Note: the movie file name can just display
numerals and letters, the other symbols will display as random codes.)
4. While playing the movie, use the joystick (Up/Down button
) to adjust the volume.
5. While playing a movie, short press the joystick (ENTER button
) to switch the repeat
modes for playing the movie: Play in Order
, Repeat One , Repeat All ,
Shuffle
。
6. While play a move, short press the joystick (Left/Right button
) to switch to the
previous/next section, and long press the joystick (Left/Right button
) to fast
rewind/forward (2x, 4x, 8x). Press the OK
to pause playing, and press the Browse to
return to the menu for selecting movies. (Note: Fast Forward and Fast Reverse is only
supported when playing AVI format files. Fast Forward and Fast Reverse are not supported
during playback of ASF and MOV format files).
7. Press the Mode button
, and the camera system will switch to mode selection interface.
Note: Convert the movie files to the format supported by this camera before saving them in the
camera, such as AVI and ASV (converting to AVI file format is highly suggested). Please save the
converted movie files or the folder with converted movie files in the MOVIE folder of the camera,
or the picture viewer can’t find the movie files.
3.8 Photo viewer mode
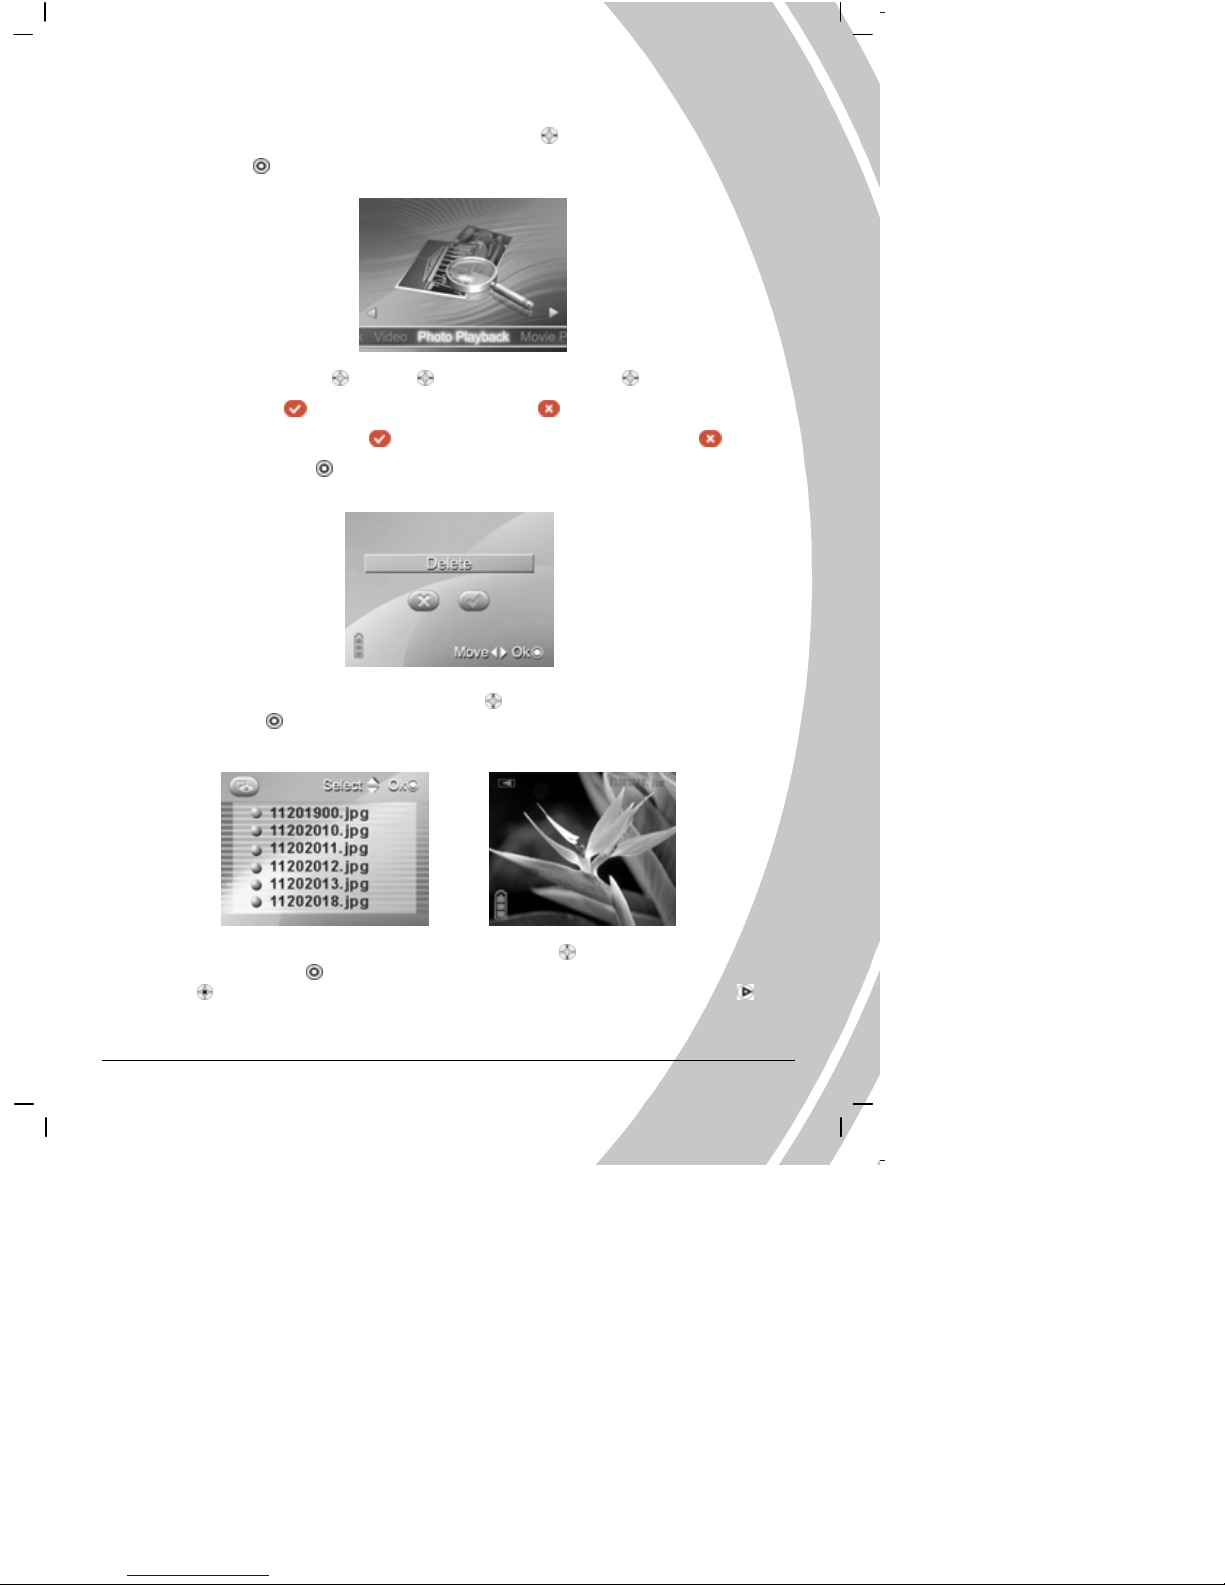
Use the Photo Viewer mode to play the pictures in the internal memory or SD memory card.
Page 45
43
3.8.1 Operation instructions
1. Turn the camera on, and use joystick (Left/Right button
) to the movie player unit, and
then press OK
to enter Photo viewer mode.
2. Use the joystick (first left
or right , and then left/right button ) to se lect to delete all
picture files (select
to delete all pict ure files, select to cancel deleting), or select to
delete single picture file (select
to delete single selected p icture file, select to cancel
deleting). Press the OK
to confirm deleting all picture files or single selected picture file.
3. In this mod e , use the joystick (Up/Down button
) to select the picture you want to view,
and press the OK
to enter the playback mode.(Note: the pi ct ure fil e name ca n just displ ay
numerals and letters, the other symbols will display as random codes.)
4. When viewing pictures, use the joystick (Up/Down button
) to select the picture you want
to view. Press the OK
to enlarge (zoom in ratio 10-8.0). Press the joystick (ENTER
button
) to reduce the enlarged picture (zoom out ratio 8.0-1.0). Press the Browse to
exit while enlarging/reducing.
Page 46
44
5. When viewing pictures, use the joystick (Left/Right button ) to select to display battery
level, picture name, etc.
6. When viewing pictures, press the Browse
to return to picture menu.
7. Press the Mode button
, and the camera system will switch to mode selection interface.
Note: Convert the picture files to the format JPEG supported by this camera before saving them in
the camera. Please save the converted picture files or the f older with converted picture files in the
PHOTO folder of the camera, or the pictur e viewer can’t find the picture files.
3.9 Game mode
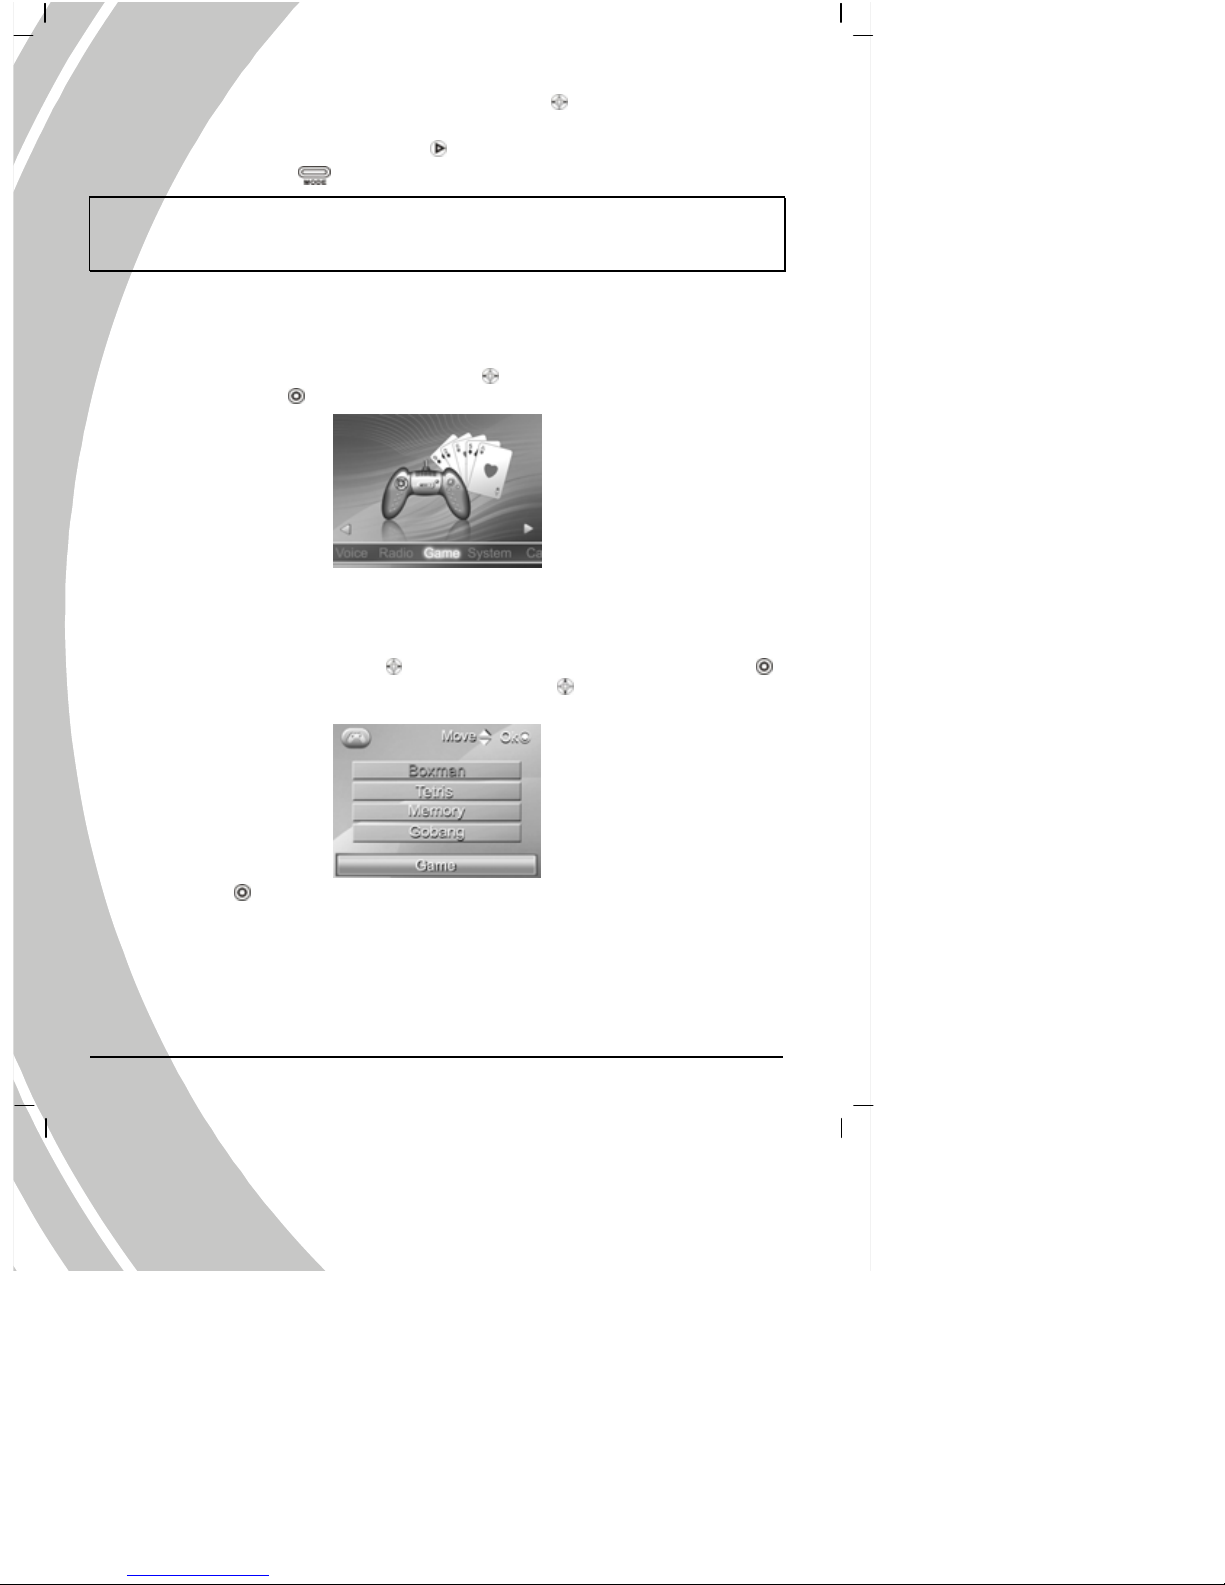
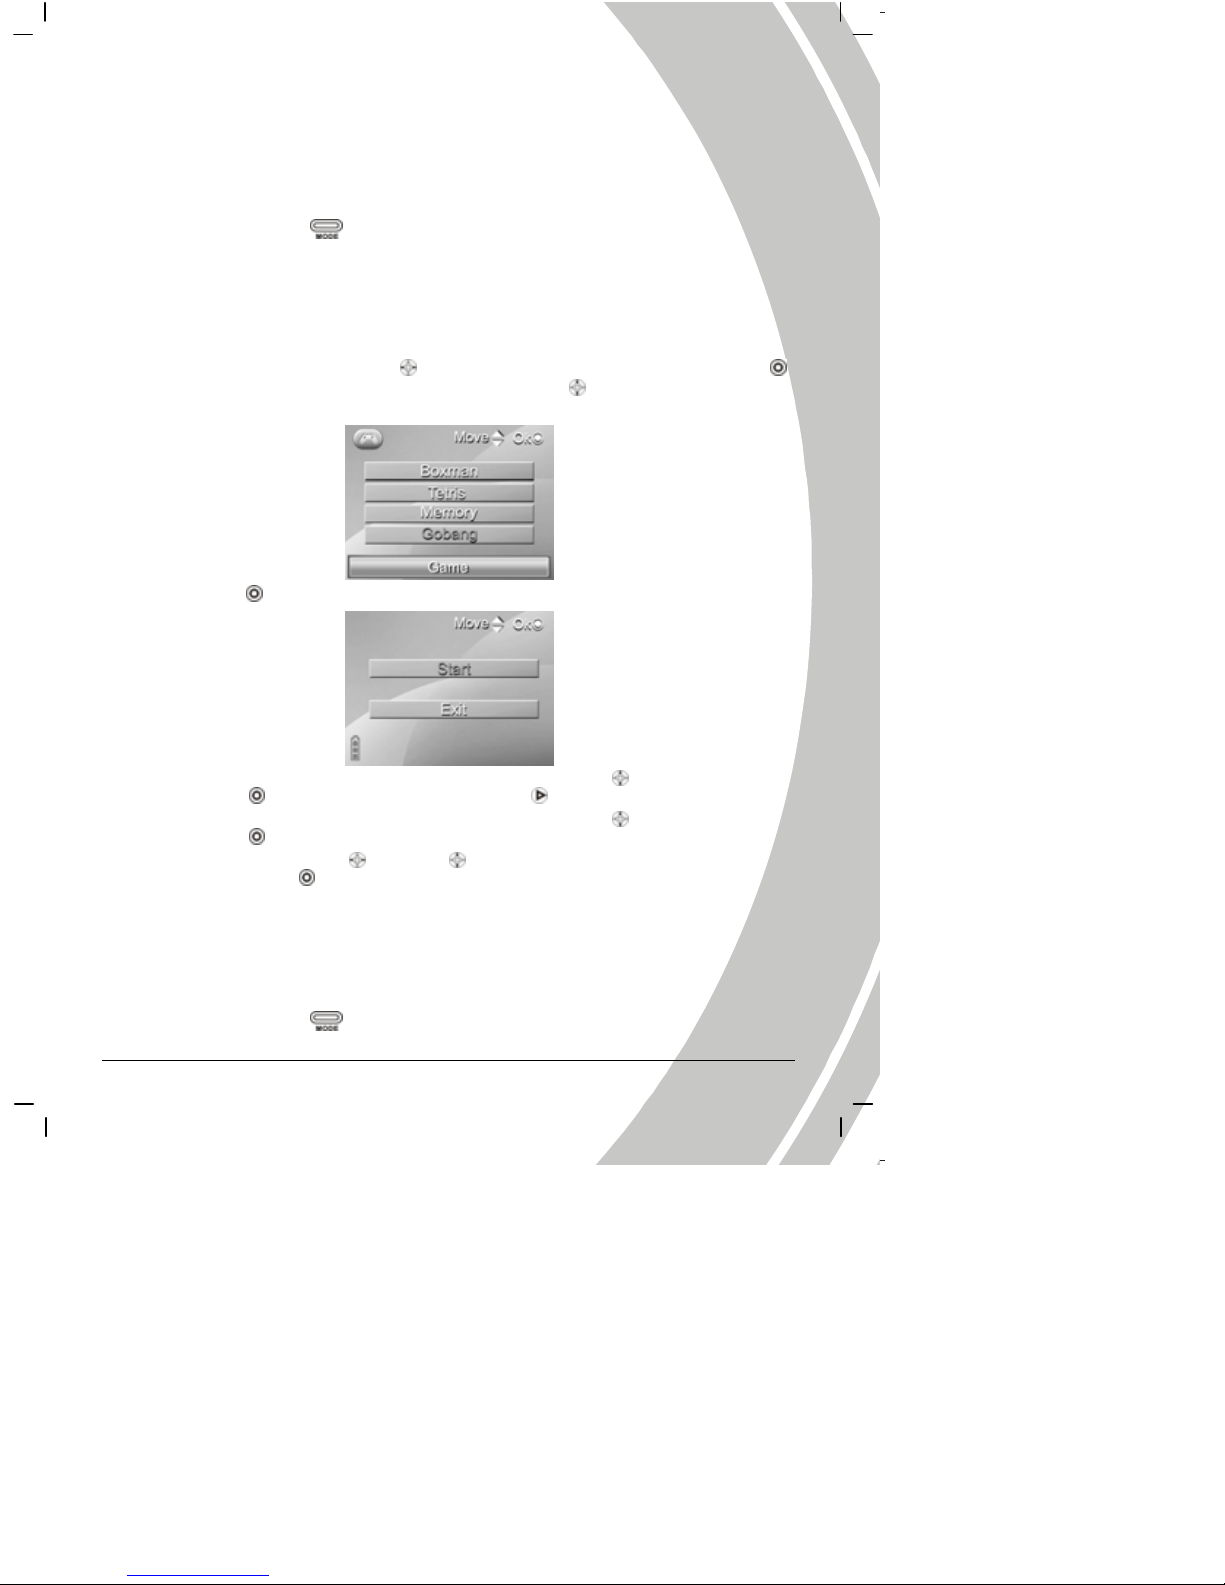
Use the Game mode to operat e the four built-in games in this camera : Boxman, Tetris, Memory,
Gobang.
Turn the camera on, and use joystick (Left/Right button
) to scroll through the game (show as
below), and then press OK
to ente r Game mod e.
3.9.1 Boxman
Boxman game is also called pushing the box. It’s designed to let the player push the box onto the
ball to make the box red, and develop the user’s thinking ability by this.
1. Use the joystick (Left/Right button
) to scroll through the Game mode, and press OK
to enter the Game menu. Use the joystick (Up/Down button
) to select the Boxman
option.
2. Press the OK
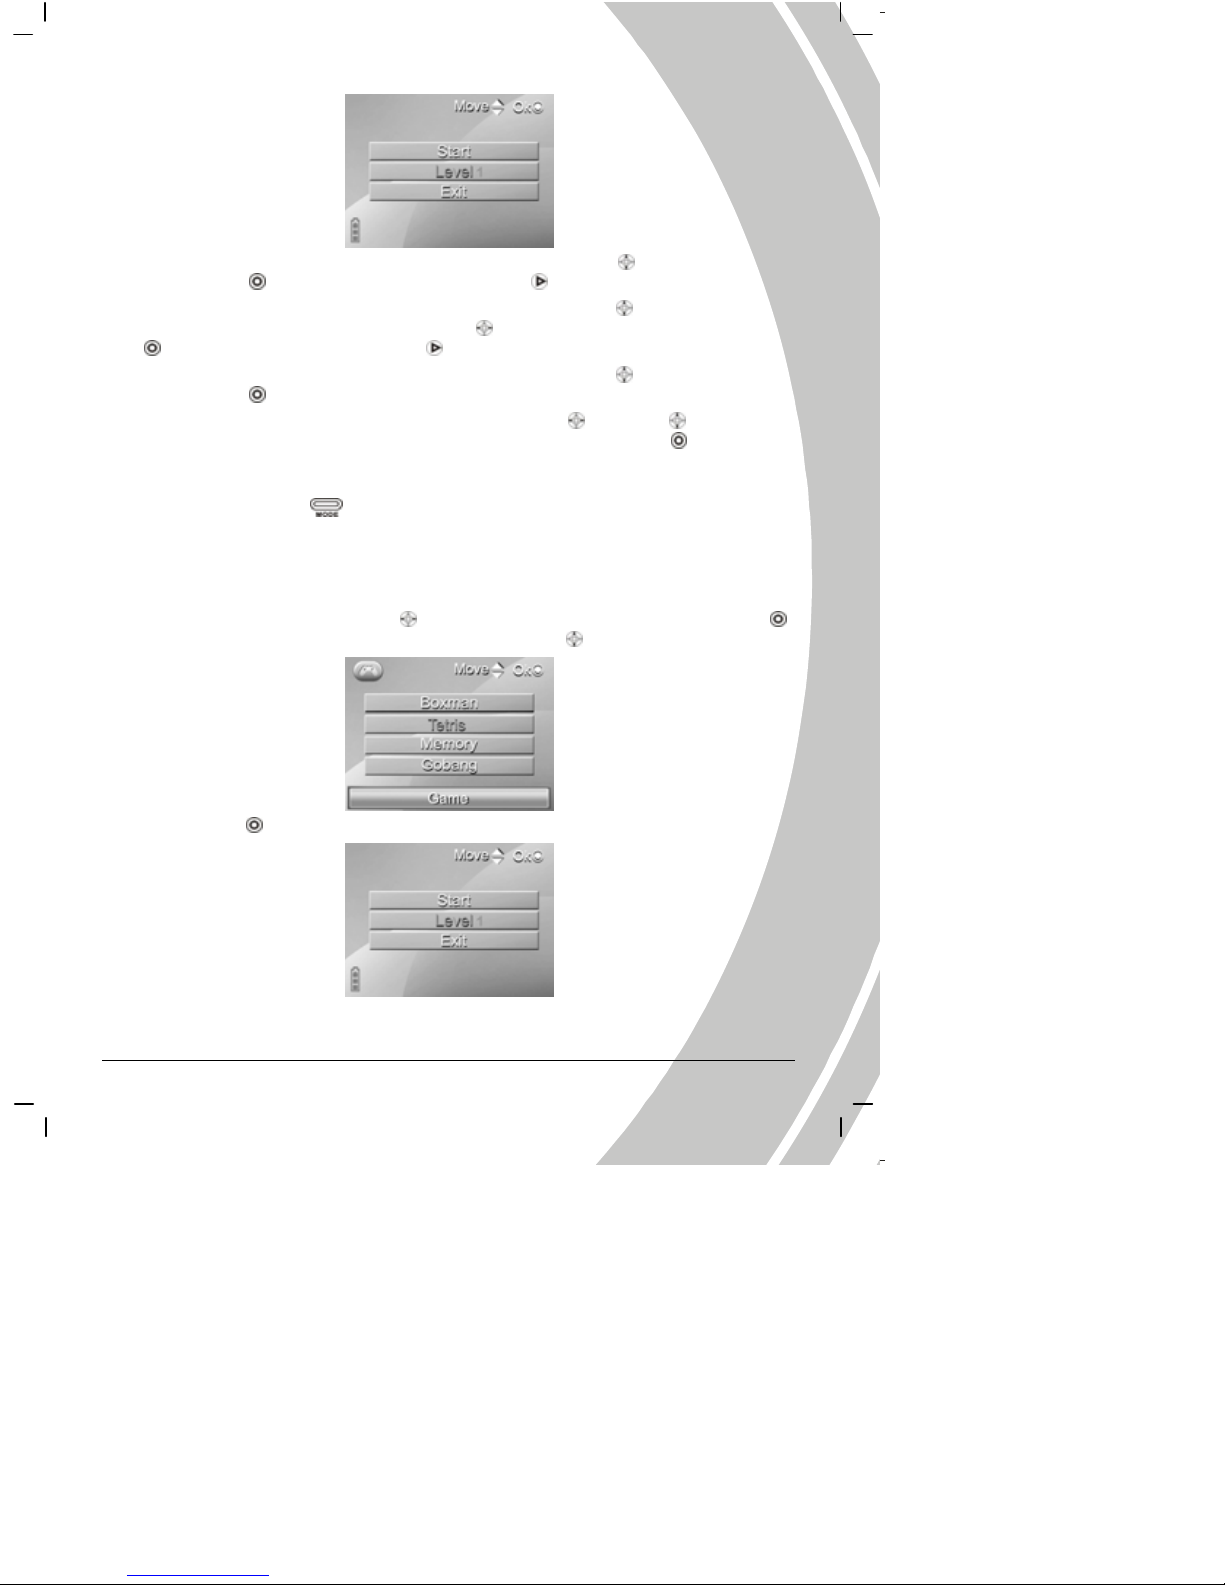
to enter the Boxman menu.
Page 47
45
3. Under the Boxman menu mode, use the joystick (Up/Down button
) to select Start option,
and press OK
to en ter the game . Pr ess the Browse to return to the Boxman menu.
4. Under the Boxman menu mode, use the joystick (Up/Down button
) to select the Level
option, and use the joystick (Left/Right button
) to adjust the level (1~30). Press the OK
to enter the game. Press the Browse to return to the Boxman menu.
5. Under the Boxman menu mode, use the joystick (Up/Down button
) to select Exit option,
and press OK
to exit the Boxman menu to return to Game Menu.
6. While playing the game, please use the joystick (Left/Right
Up/Down ) to move the
figure and push the box. If you walk the wrong step, you can press the OK
to undo the
previous action. When you push all the boxes to the locations marked with a little ball, you
win. The screen will appear “Next map”, and then enter the next map.
7. Press the Mode button
, and the camera system will switch to mode selection interface.
3.9.2 Tetris
The Tetris game is desi gned to develop your reaction ability by filling in the empty space with the
blocks.
1. Use the joystick (Left/Right button ) to scroll through the Game mode, and press OK
to enter the Game menu. Use the joystick (Up/Down button
) to select the Tetris option.
2. Press the OK
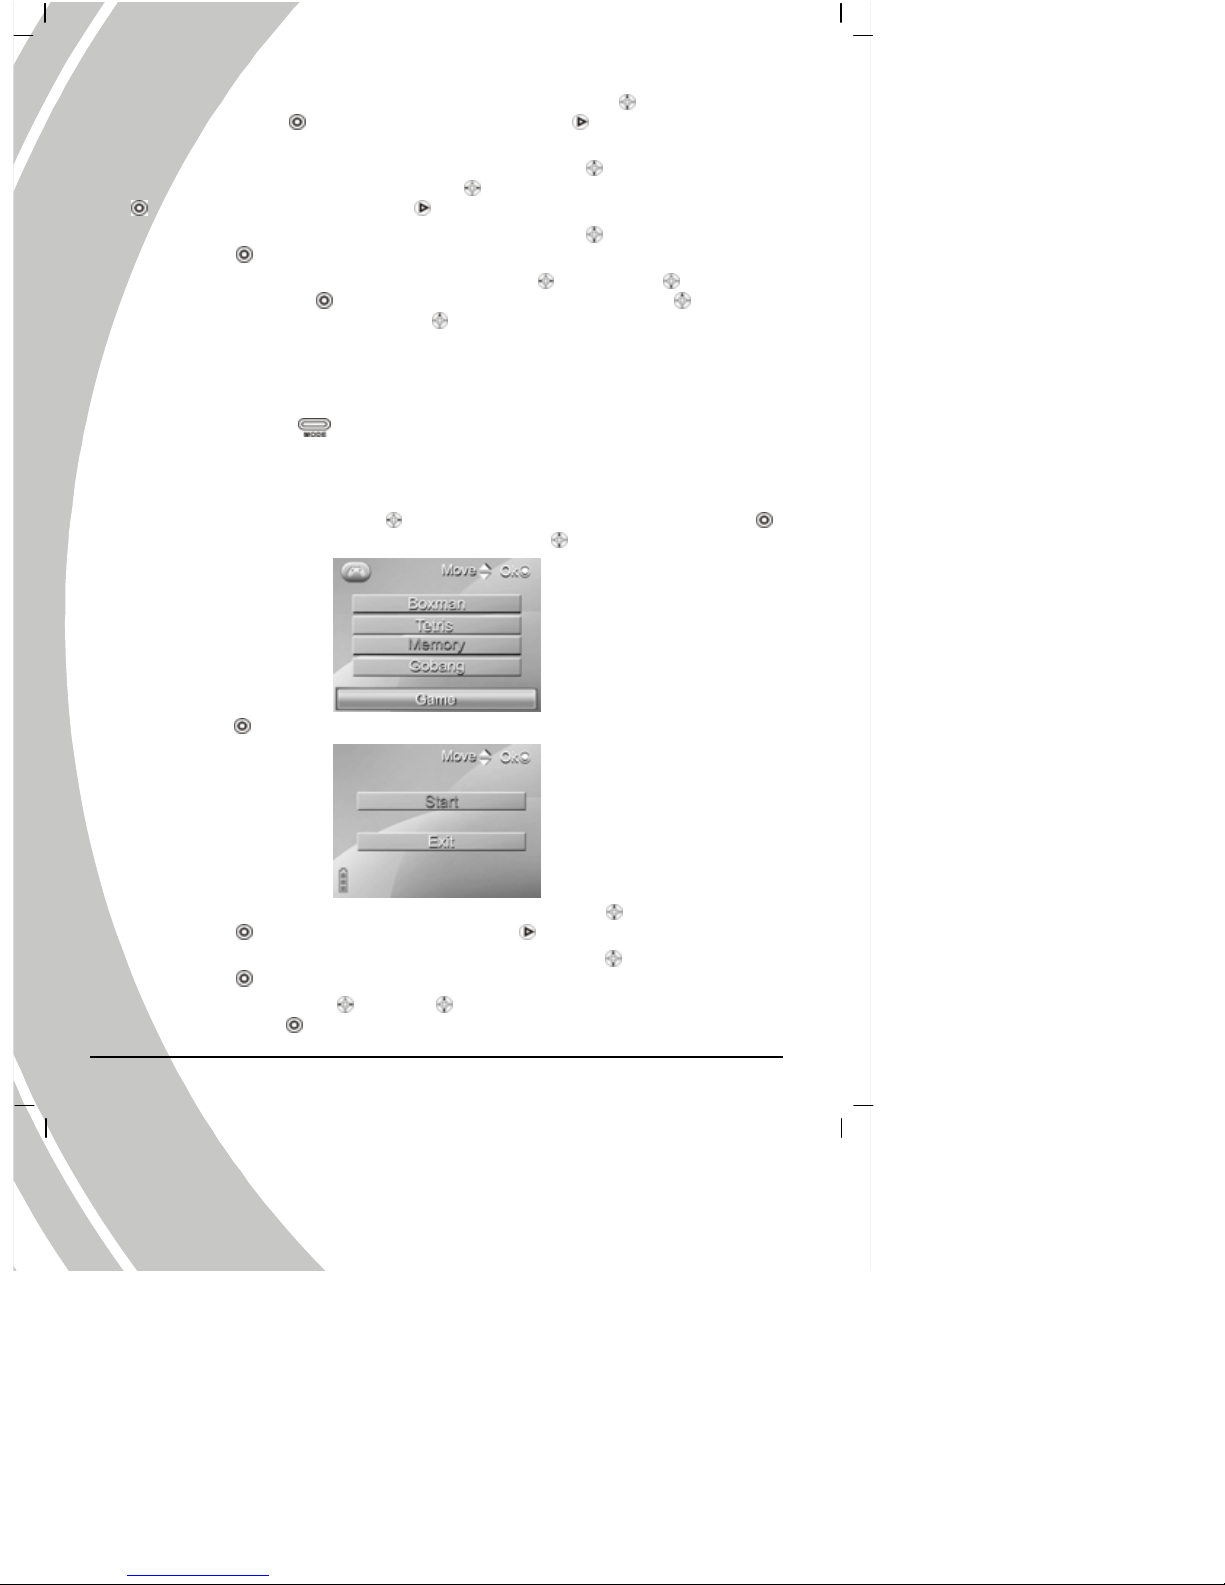
to enter the Tetris menu.
Page 48
46
3. Under the Tetris game menu mode, use the joystick (Up/Down button ) to select Start
option, and press OK
to enter the game. Press the Browse to return to the Tetris
game menu.
4. Under the Tetris menu mode, use the joystick (Up/Down button
) to select the Level
option, and use the joystick (Left/Right button
) to adjust the level (1~7). Press the OK
to enter the game. Press the Browse to return to the Tetris menu.
5. Under the Tetris menu mode, use the joystick (Up/Down button
) to select Exit option,
and press OK
to exit the Tetris menu to return to Game Menu.
6. While playing gam es, use the joystick (Left/Right button
Down button ) to move the
blocks, and press the OK
to turn the blocks. Use the joystick (Up button ) to pause
the game, and use the joystick (Up button
) again to continue the game. The upper right of
the game screen will appear the shape of next block. The upper down of the games screen
will appear the score you get. When the score of each level reaches 1500, the screen will
appear “Next level”, and then enter the next level (the falling speed of the blocks become
faster).
7. Press the Mode button
, and the camera system will switch to mode selection interface.
3.9.3 Memory (game)
The memory game trains your memory ability by opening two of the same objects continuously.
1. Use the joystick (Left/Right button ) to scroll through the Game mode, and press OK
to enter the Game menu. Use the joystick Up/Down button
) to select the Memory option.
2. Press the OK
to enter the MEMORY game menu.
3. Under the Memory menu mode, use the joystick (Up/Down button
) to select Start option,
and press OK
to enter the game. Press the Browse to return to the Me mory menu.
4. Under the Memory menu mode, use the joystick (Up/Down button
) to select Exit option,
and press OK
to exit the Memory menu to return to Game Menu.
5. Use the joystick (Left/Right
Up/down button) to move the light mark while playing
games. Press the OK
to open the picture which the light mark is on. Remember the
Page 49
4
7
picture of this location. When you open the same picture again, both the same pictures will
be erased. If different, the previous two pictures will be covered again when opening the
third picture. You will win the game when all the pictures are erased. The screen will ap pear
message “You win”, and then return to the Memory menu. The lower left corner of the game
screen will display the n umber of erased pictures. The lower right corner of the games screen
will display the elapsed time of the game.
6. Press the Mode button
, and the camera system will switch to mode selection interface.
3.9.4 Gobang
The Gobang game is designed to develop your thinking ability through aligning five pieces in a
line.
1. Use the joystick (Left/Right button ) to scroll through the Game mode, and press OK
to enter the Game menu. Use the joystick (Up/Down button
) to select the Gobang
option.
2. Press the OK
to enter the Gobang menu.
3. Under the Gobang menu mode, use the joystick (Up/Down button
) to select Start option,
and press OK
to enter the game. Press the Browse to return to the Gobang menu.
4. Under the Gobang menu mode, use the joystick (Up/Down button
) to select Exit option,
and press OK
to exit the Gobang menu to return to Game Menu.
5. Use the joystick (Left/Right
Up/down button) to move the light mark while playing
games. Press the OK
to put the black piece on the place which the light mark is. After
you put one piece, your opponent (camera) also puts one white piece. When you put five
black pieces in a line, you win. The screen will appear message “Yo u win”, and then return
to the Gobang menu. Instead, when the camera puts five white pieces in a line, you lose. The
screen will appear message “You lose”, and then return to the Gobang menu. When the
board is full of pieces and you tie with the computer, the screen will appear message “Draw”,
and then return to the Gobang menu. The lower right corner of the game screen will indicate
that you use the black piece, and the camera use the white piece.
6. Press the Mode button
, and the camera system will switch to mode selection interface.
Page 50
48
4. Recording TV programs
For more information on recording TV programs, please refer to this section.
4.1 Operation instructions
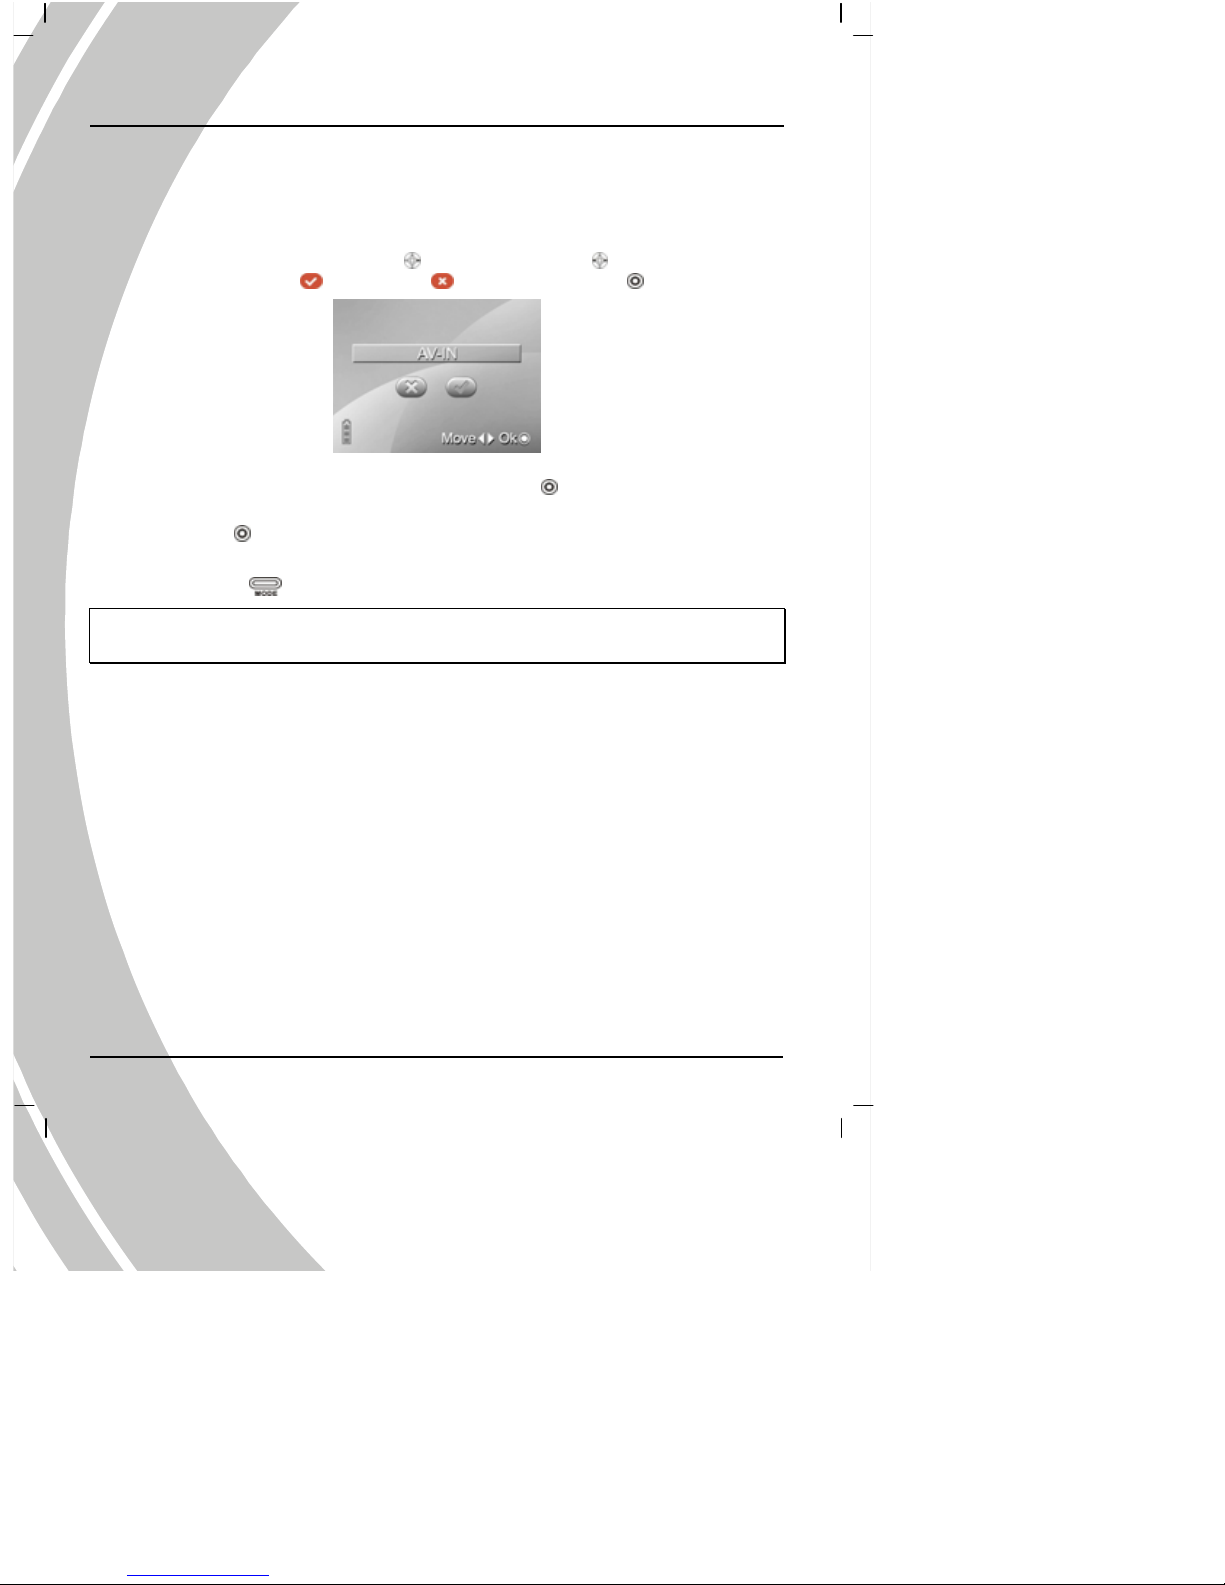
1. Use the AV IN cable to connect the camera to external audio equipments, and the camera
will pop up an AV IN interface.
2. Use the joystick (first the right button
, then Left/Right button ) to select to record
programs or not (select
to record, but not), and press the OK to confirm.
3. The display of pictures by the screen and the playing of the sound by the speaker are
synchronized with the external audio/video. Press the OK
and the camera will start
recording.
4. Press the OK
again to stop recording.
5. The setting of the function and replaying is the same as that the Photo mode.
6. Press the Mode
b utton to return to AV IN interface.
Note: do not press any button while recording. If SD card/MMC card or NAND FLASH is full, the
camera will prompt.
Page 51
49
5. Installing software and drivers
Read this section to learn how to install drivers and softwar e for the video camera.
5.1 Drivers
You can use the “Mass Storage” functions of the video camera on the PC.
5.1.1 Mass Storage
The digital camera offers Mass Storage function as a card reader device. You can treat this digital
camera as an SD device.
You will only need to install a driver for the camera if your operating system is Windows 98SE.
Windows XP/ME/2000 is plug and play operating systems and do not require a driver to be
manually loaded.
When the driver has been installed and the camera is connected, the camera memory and any
installed mini SD card will appear as Mass Storage in Windows Explorer. Files can be dragged
and dropped in the same way as on an ordinary disk.
To install drivers, please follow the instructions below:
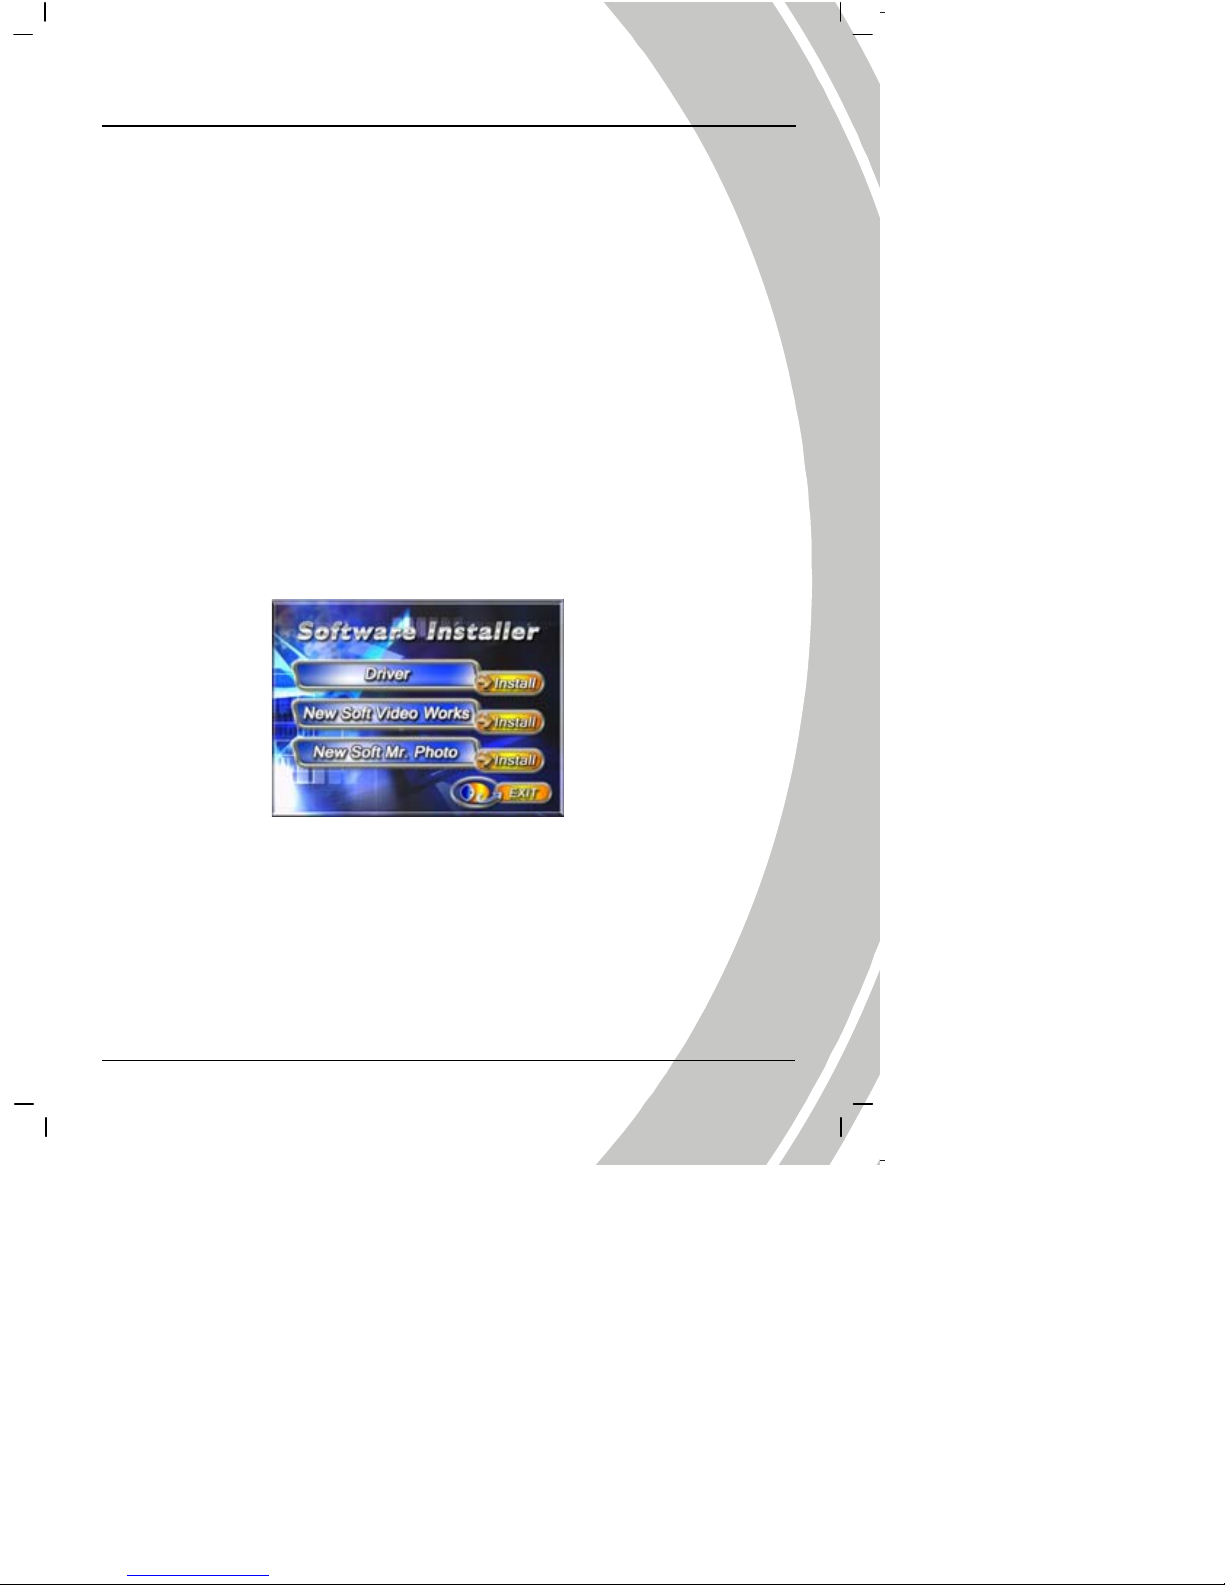
1. Insert the supplied CD-ROM in the CD-ROM drive .
2. If the CD-ROM doesn’t automatically boot, use Windows Explorer to execute the
InstallMgr.exe file in the root directory.
The following screen is displayed.
3. Click the install button to install the driver.
4. Follow the on-screen instructions.
5. Click Finish to restart the computer and finish the video camera driver ins tallation.
Page 52
50
5.2 Presto! Video Works 6
Presto! Video Works 6 is an advanced software application for editing video.
To install Presto! Video Works 6:
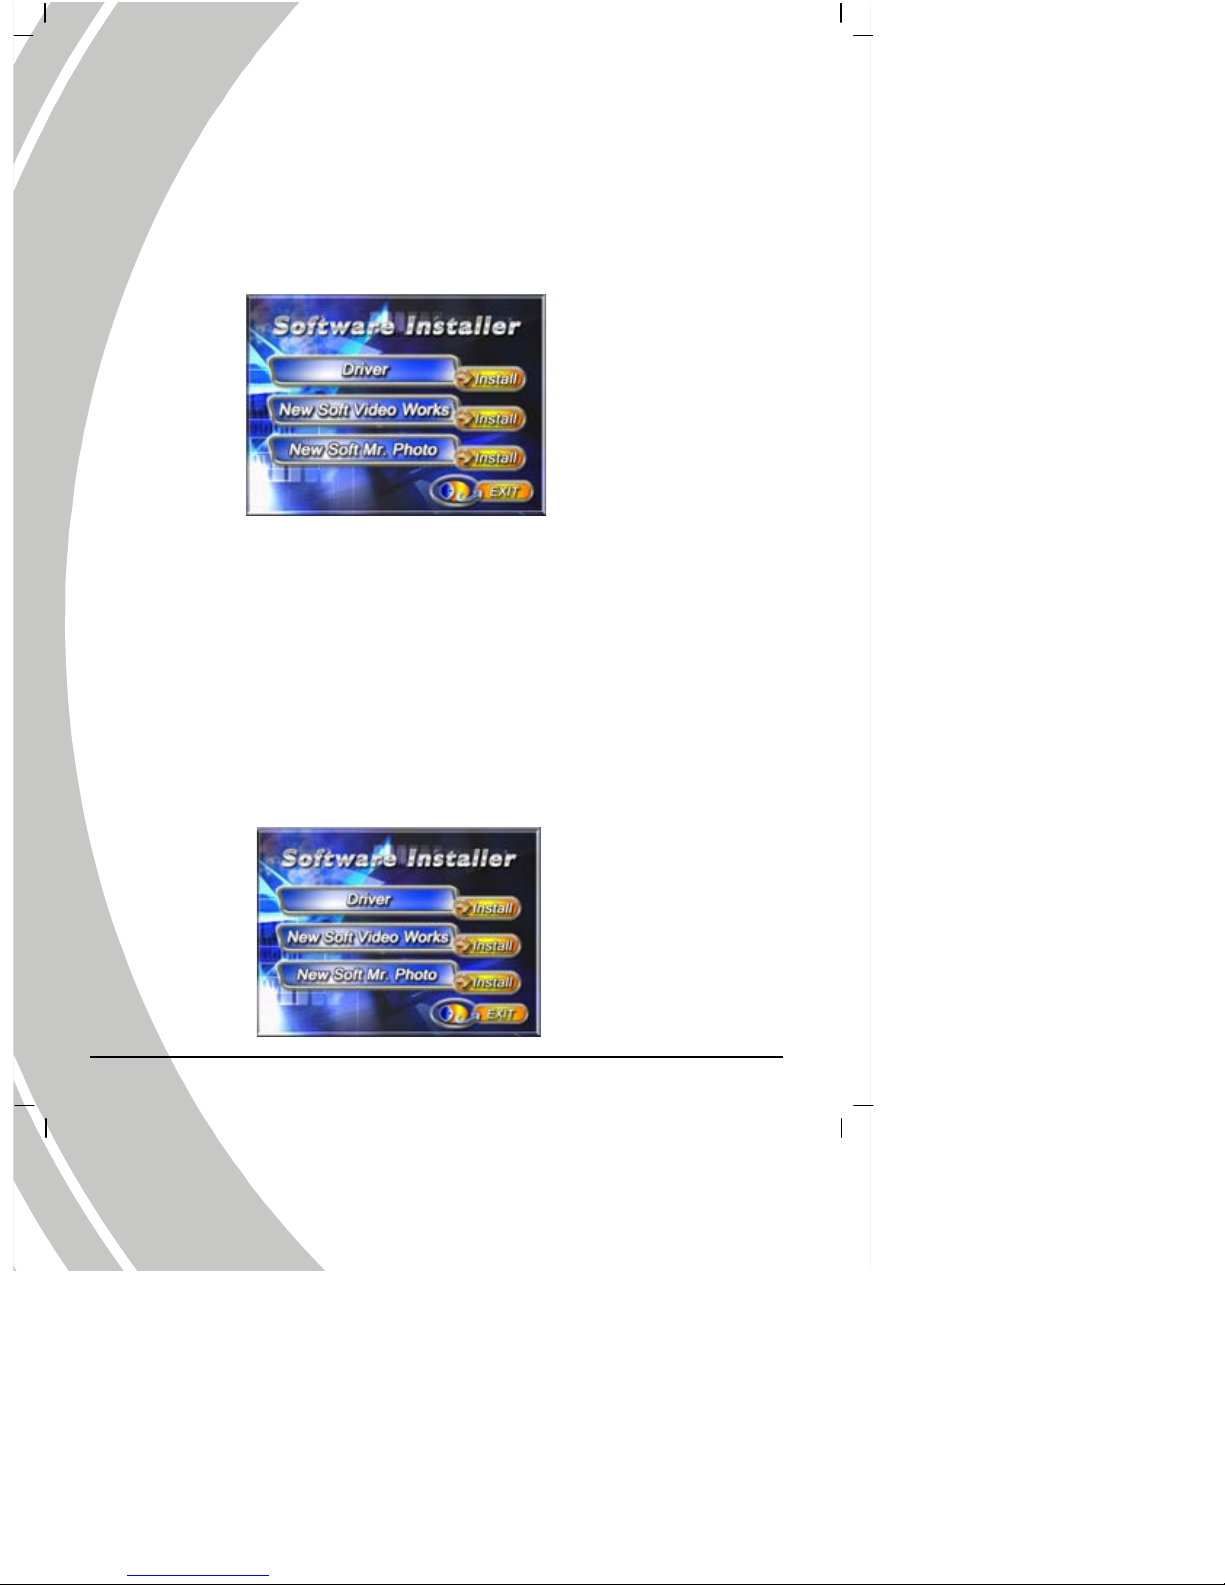
1. Insert the supplied CD- R O M in the CD -R O M dr ive .
2. If the CD-ROM doesn’t automatically boot, use Windows Explorer to execute the
InstallMgr.exe file in the root directory.
The following screen is displayed.
3. Click the Install button to begin the installation process follow the instructions on-screen.
More information about Presto! Video Works 6 can be found in the help files when the application
is started.
5.3 Presto! Mr. Photo 3
Presto! Mr. Photo 3 is an advanced photo editing software application.
To install Presto! Mr. Photo 3:
1. Insert the supplied CD- R O M in the CD -R O M dr ive .
2. If the CD-ROM doesn’t automatically boot, use Windows Explorer to execute the
InstallMgr.exe file in the root directory.
The following screen is displayed.
Page 53
51
3. Click the Install button to begin the installation process follow the instructions on-screen.
More information about Presto! Mr. Photo 3 can be found in the help files when the application is
started.
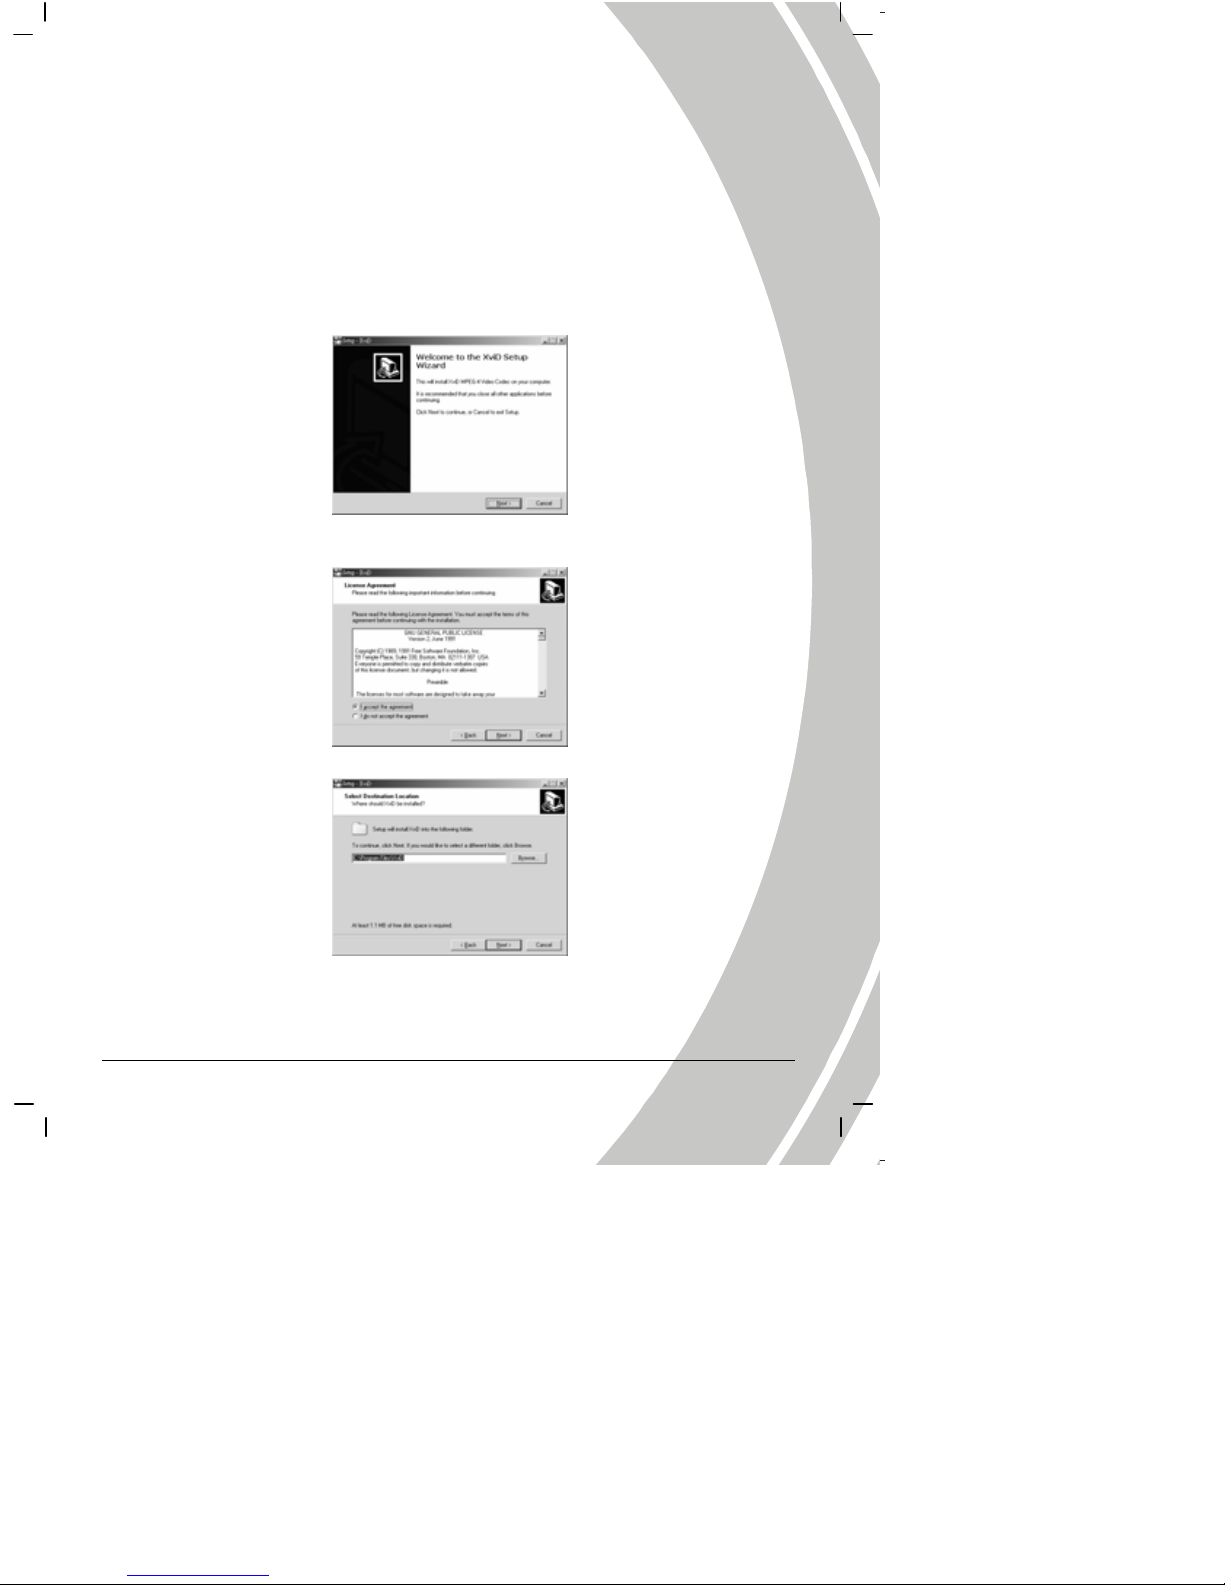
5.4 XviD codec for PC
Installing the XviD codec program
1. Insert the supplied software CD-ROM in the CD-ROM drive.
2. Double click the My Computer icon on the desktop. Then double click the CD-ROM drive
icon and then click the setup file of Xvid in the root directory.
3. Click XviD.exe to start the installation. The setup screen appears. Click Next to continue.
4. Click I accept th e agreement to accept the conditions of Software License Agreement and
click Next to continue.
5. Click Browse to select the folder location and cli c k Next to continue.
Page 54
52
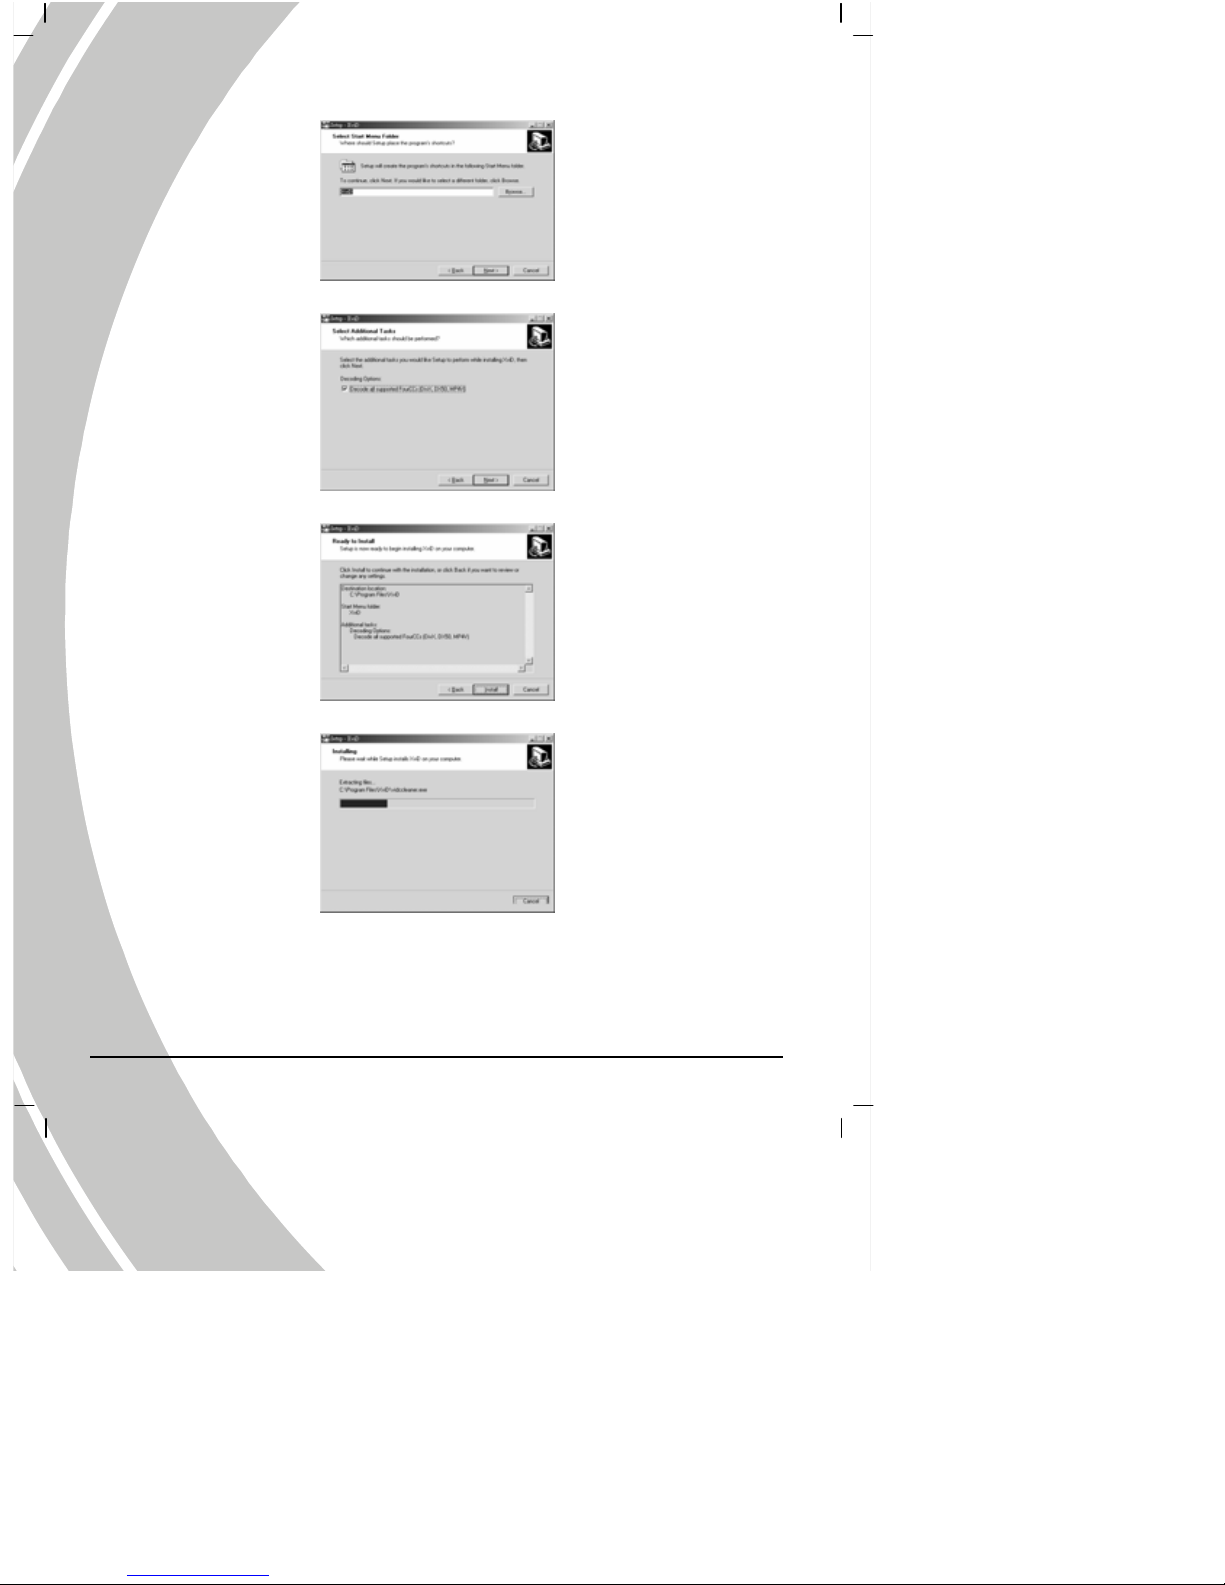
6. Click Browse to select the folder location and click Next to continue.
7. Click
Next to continue from the additional tasks setup screen.
8. Press Install to continue from the main program setup screen.
9. Press Cancel if you want to stop setup during installation.
Page 55

53
10. The following screen will appear after the installation is completed. Click Finish to complete
the installation.
Page 56

54
6 . Troubleshooting
This chapter describes the common problems and their remedies while operating the camera.
6.1 Problems and remedies
The camera
is down
The camera is down and can’t be operated while using. Please check the
contact of battery, and the restart the camera. If the camera cannot be
restarted, please make sure if the improper operation damaged the camera.
Do not disassemble it by yourself and return it for service.
Error occurs
when
entering the
Direct Print
mode
The error prompt displays when entering the Direct Print mode. Please
unplug the USB connector from the camera and check to see if the printer is
normal and the battery is full, and then restart the camera. Connect to the
printer with proper operation procedures to start printing.
The camera
is down
while
removing
the card
Do not remove the memory card while operating. The camera could fail by
doing that. If this happens, please restart it.
The camera
can’t format
the memory
card
It’s not guaranteed by the digital camera to format all kinds of memory cards.
If the camera can’t format the memory card, please format it into FAT file
system by the computer.
Page 57

55
Appendix
Specification
General
Imaging sensor 1/1.8” 5.17 Mega pixel CMOS sensor
Active pixels 5.0 Me ga pixel
Storage media Built-in 32MB Flash memory
SD/MMC card (32/64/128/256/512 MB/1 GB/2GB)
Sensor sensitivity Auto ISO
Lens F3.0/8.0,f=8.54mm
Focus range 1.5m ~ infi nity
Still image
Formats: JPEG (EXIF), DPOF, Direct Print (DPS)
Resolution: SVGA, 1.3M, 3M, 5M, 12M (firmware
interpolation)
Quality: Fine, Normal, Basic
Movie clips MPEG-4 (AVI, MOV, ASF,)
640 x 480 30 fps/320 x 240 30 fps
Audio Support for audio playback
Zoom 4x digital zoom
TFT screen 2.5-inch LTPS
Flash Auto/Off/Force
White balance Auto/Sunny/Cloudy/Tungsten/fluorescent
EV compensation -2.0 EV ~ +2.0 EV
Self timer Off, 5 seconds, 10 seconds, 30 seconds (user definable)
PC interface USB 2.0 Full speed
Page 58

56
General
TV out format NTSC/PAL
Shutter 1/4~1/500 second
Auto power off Off, 1 or 3 minutes (user definable)
Power supply Single rechargeable Li-ion battery
Dimension 120 (L) x 56 (W) x 23 (H) mm
Weight 129g (with batteries), 102g (without batteries)
Page 59

Page 60

Website
Please visit our website at
www.dxgusa.com for any product
updates or special announcements
You can also check out our online support desk where you can
register your product, send emails to our technical support, and
find a list of frequently asked questions (FAQs).
DXG USA
 Loading...