

Page 1

Vertical Antenna Tilt Base Assembly
DXE-VA-BASE
DXE-VA-BASE-INS Rev. 6
(DXE-VA-BASE shown with customer supplied; mounting pipe with mounting pipe U-Bolts and antenna section)
© DX Engineering 2019
1200 Southeast Ave. - Tallmadge, OH 44278
Phone: (800) 777-0703 ∙ Tech Support and International: (330) 572-3200
Fax: (330) 572-3279 ∙ E-mail: DXEngineering@DXEngineering.com
Page 2

Introduction
Description
Quantity Description
Quantity
Stainless Steel Tilt Base
1
1/4-20 Nyloc Nut
4
Mast Mount Insulated Channel
1
1/4-20 Hex Nut
4
Aluminum Spacer
4
1/4" Split Washer
4
Aluminum Mounting Plate
1
1/4" Flat Washer
4
3/8" U-Bolt x 2" ID x 3.25" leg, Saddle & Hardware
2
1/4" Flange Nut
2
1/4-20 x 2" Hex Head Bolt
4
1/4" Fender Washer, 1" OD
4
For heavy duty applications, the DXE-VA-BASE Insulated Vertical Antenna Base with its supplied
laser cut stainless steel Tilt Base, and complete stainless steel hardware package is intended to
support a 2 inch OD antenna base section in a vertical position and to allow tilting for easy
maintenance or tuning. The DXE-VA-BASE is designed for vertical antennas that exceed 30-35
feet.
The DXE-VA-BASE consists of a unique reinforced fiberglass insulating channel which has twice
the strength of commonly used nylon and other insulating materials. It is fastened with stainless
steel hardware to a rugged 3/16 inch thick stainless steel laser cut Tilt Base.
With a DX Engineering Tilt Base, operators can raise or lower their vertical antenna in seconds
while leaving the base plate securely attached to the mounting pipe or post. One person can
service the antenna. No more climbing ladders or removing brackets. Easily make repairs, tune your
vertical or lay your antenna down before bad weather hits. The Tilt Base may be bolted to a secure
flat mounting surface, or to the recommended galvanized steel mounting pipe described in the
installation instructions using two optional DXE-SSVC-2P Stainless Steel V-Clamps.The standard
1-1/2" galvanized water pipe (with its 1.9" OD) is just fine for this application and can usually be
found at your local home building supply store.
WARNING!
INSTALLATION OF ANY ANTENNA NEAR POWER LINES IS DANGEROUS
Warning: Do not locate the antenna near overhead power lines or other electric light or power
circuits, or where it can come into contact with such circuits. When installing the antenna, take
extreme care not to come into contact with such circuits, because they may cause serious injury or
death.
Tools and Supplies Required
3/8", and two 1/4" nut drivers or wrenches (SAE)
JTL-12555 Jet-Lube™ SS-30 Pure Copper Anti-Seize 12555 - To ensure good electrical and RF
connection for Aluminum Element Sections and also used on the threads of Stainless Steel
Hardware to prevent galling (seizing) and aid in proper tightening.
Parts Included
- 1 -
Page 3
Installation
Note: JTL-12555 Jet-Lube™ SS-30 Anti-Oxidant should be used between all antenna element
sections. Jet-Lube™ SS-30 is an electrical joint compound to affect a substantial
electrical connection between metal parts such as aluminum tubing or other antenna
pieces. It ensures high conductivity at all voltage levels by displacing moisture and
preventing corrosion or oxidation. Jet-Lube™ SS-30 should also be used on all element
clamps and stainless steel threaded hardware to provide good electrical contact,
prevent galling, allow easier disassembly and to ensure proper tightening.
Site Selection
Select a mounting location clear from power lines, structures and other antennas by a minimum of
your antenna height. Consider overhead power lines, utility cables and wires. The further away
the vertical is mounted from local noise sources or other metallic objects, which can re-radiate noise
and affect the tuning, radiation pattern and SWR, the better.
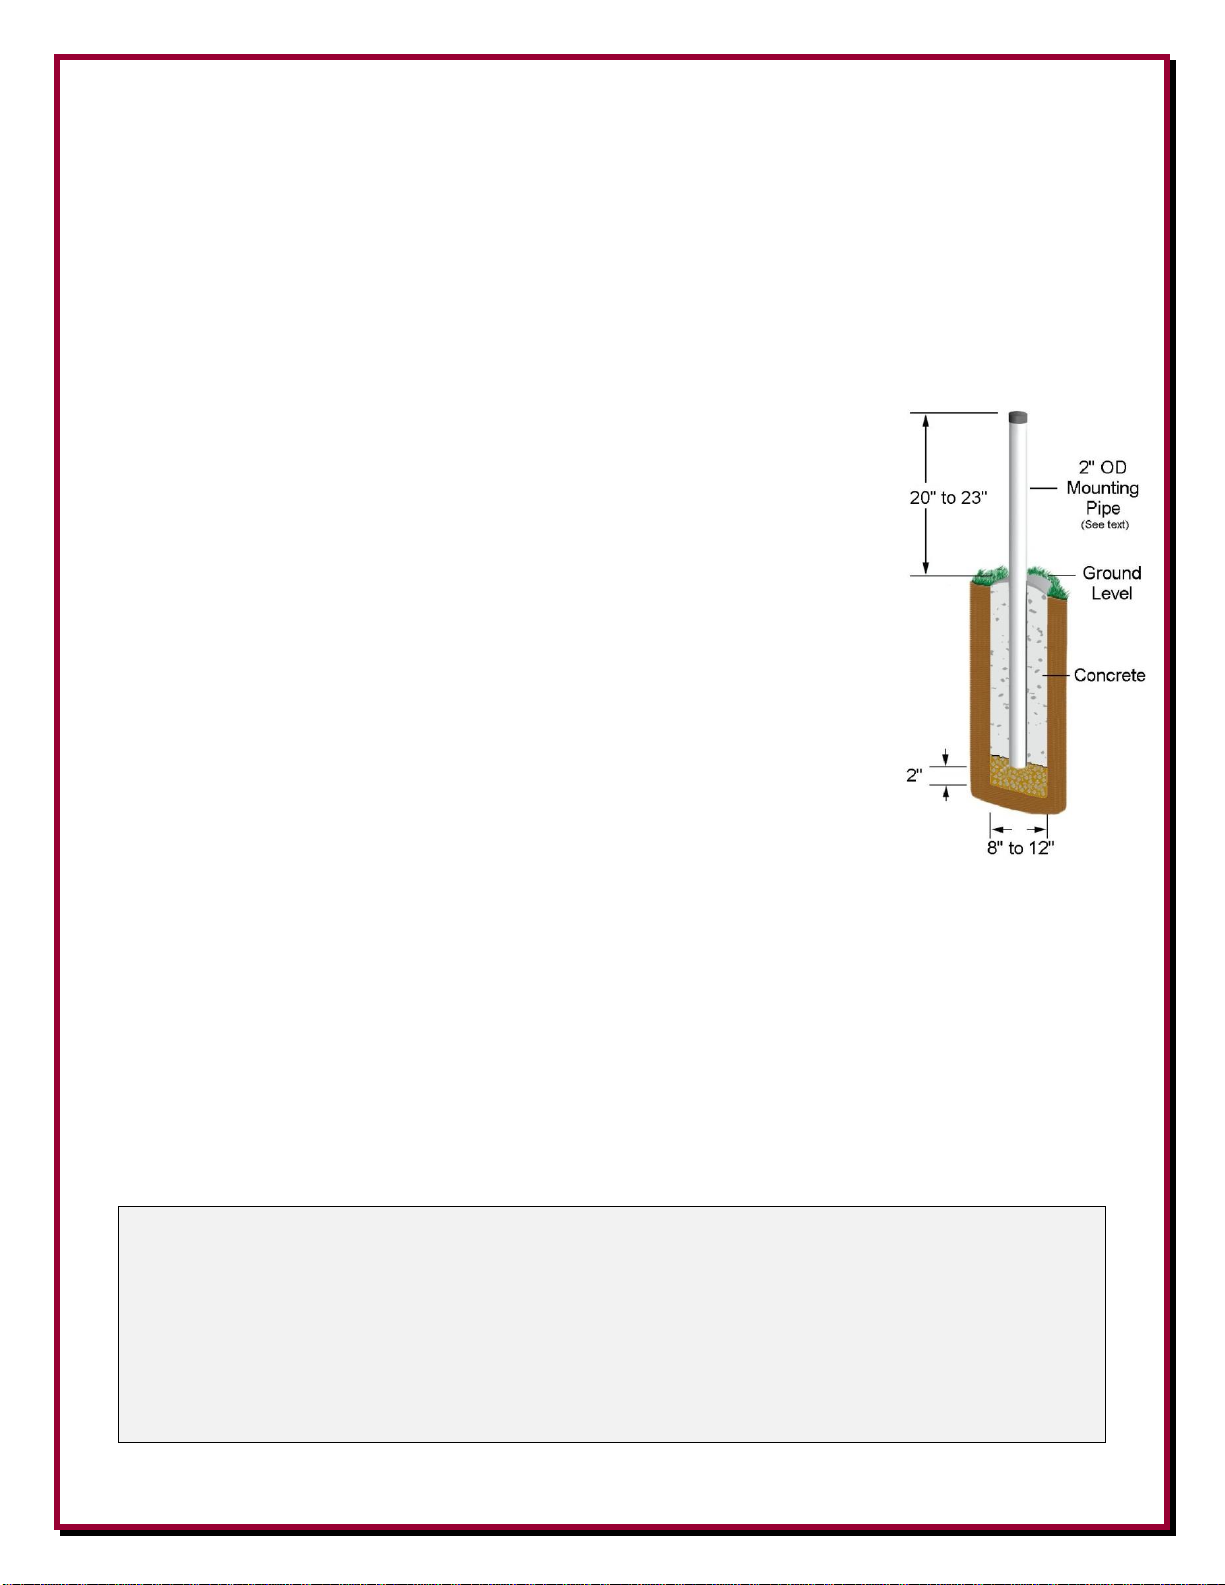
Mounting Pipe
Use a thick-walled galvanized steel mounting pipe at least 4 feet long. This
will allow approximately 2 feet or more to be below ground and 2 feet above
ground. A thick-walled steel pipe 1-3/4" OD to 2" OD maximum is
recommended with a minimum thickness of 1/8" (1/4" preferred) should be
used. A standard 1-1/2" galvanized water pipe (with its 1.9" OD) will work for
this application and can usually be found at your local home building supply
store. DX Engineering also has the DXE-VGMT-2CG Steel tubing for
ground mount antennas made from high strength Chromoly: 2 inch OD x .25
wall thickness x 5 foot 4 inch length. For permanent mounting, use a post-hole
digger to make the hole deep enough to accommodate 2 feet of pipe and a
couple inches of gravel at the bottom for drainage. Set the pipe on the gravel,
use the pre-mix concrete to fill around the pipe, adding water and mixing as
you fill or mix the concrete first, then pour in the hole. Fill the hole until the
concrete is level with the ground around it. Use a level as you fill the hole to
be sure the pipe is straight. Allow to set overnight. Your location, landscape
and ground conditions may require different mounting solutions in order to
have the steel mounting pipe and the vertical antenna in a secure position.
Note: Galvanized steel, rather than aluminum, is much more suitable for mounting in concrete.
Aluminum will quickly corrode due to incompatibility with the materials used to make
concrete.
Base Assembly
The DXE-VA-BASE shipping box contains the stainless steel tilt base, an aluminum plate with four
holes, an insulated channel, two U-Bolt Saddle Clamp assemblies and stainless steel hardware.
- 2 -
Page 4

Attach the Aluminum Mounting Plate to the Insulated Channel using the 2" x 1/4" Hex Bolts, 1/4"
Flat Washers, 1/4" Split Washers, Aluminum Spacers, and 1/4-20 Hex Nuts in four places as shown
in Figure 1. Do not over tighten to avoid crushing the insulated channel.
Figure 1
The 2" OD base section of your vertical antenna is installed to the DXE-VA-Base assembly using
the two 2" OD U-Bolt Saddle Clamps as shown in Figure 2. When tightening, observe the split
washers. When they fully seat (flatten out), the clamp is tight enough. Any clamp should be
tightened evenly from side-to-side with an equal amount of thread above the nut.
Figure 2
Tilt Base Section to Mounting Pipe
If you are using the optional DXE-RADP-3 Radial Plate, it must be installed on your mounting pipe
prior to installing the DXE-VA-Base and Tilt Base assembly.
Attach the Tilt Base Plate to your ground mounting pipe using two optional DXE-SSVC-2P
Stainless Steel V-Clamps, as shown in Figure 3. When tightening, observe the split washers.
When they fully seat (flatten out), the clamp is tight enough. Any clamp should be tightened evenly
from side-to-side with an equal amount of thread above the nut.
- 3 -
Page 5

Figure 3
Rear View
The DXE-VA-BASE is mounted to the Tilt Base using the Fender Washers, Flange Nuts and Nyloc
Nuts as shown in Figure 4.
Figure 4
Using a wrench or nut driver, securely tighten the two Nyloc Nuts at the bottom of the Tilt Base.
Then loosen them one-half turn each. This will allow proper movement of the Tilt Base while
raising or lowering the antenna. It is not necessary to tighten these nuts more securely unless further
tilt operation is no longer required. They should not be loosened more than one-half turn at any
time.
Test the tilt function to ensure proper clearances. Standing in front of the Tilt Base, lift the antenna
base section, slide it to the right, and let it down slightly until the lower outside bolt is resting in the
- 4 -
Page 6

pivot point. Then slowly tilt as shown in Figure 5. Make sure when you are tilting the antenna to
Note: A pair of sawhorses or ladders should be used to support the vertical sections during
assembly with the tilt-base and whenever the vertical is tilted down. Do not allow the
Tilt Base to support the entire weight of the vertical when horizontal.
lift, slide to the right, and then tilt. Be careful to keep the pivot bolt resting in the pivot point.
Reverse the process when raising the antenna.
It is important to note that the lower, outside bolt becomes the pivot point while raising or lowering
the antenna. This pivot bolt MUST be retained in the pivot point. It seems natural to push the
antenna toward the Tilt Base while raising. Push up while raising, but not toward the base since this
could cause the pivot bolt to lift out of the slot and allow the mechanism to bind up and bend the
lower bolts.
The Tilt Base is not made to support the whole antenna by itself when tilted. When the antenna is
tilted over, ensure you have some sort of table, stand, or saw horse to set the antenna on to aid in
supporting the weight. When the antenna is in the upright position, ensure the mounting hardware
(reference Figure 4) is tightened.
View from top
Figure - 5 - Tilt Action
- 5 -
Page 7

Optional Accessory Items
DXE-RADW-500K
Bulk Radial Wire Kit, 500 ft Spool of Wire, 20 Lugs, 100 Staples
DXE-RADW-1000K
Bulk Radial Wire Kit, 1000 ft Spool of Wire, 40 Lugs, 200 Staples
DXE-RADP-3 - Radial Plate, Stainless Steel with 20 Sets of SS Radial Attachment Hardware
The DX Engineering Radial Plate is meant for those of you that have or are building a quarter wave vertical antenna
and who want an easy, neat and effective way to connect those essential radial wires and the coax to your vertical
antenna for the lowest takeoff angle and strongest signals. DX Engineering Radial Plate is laser cut from tough
stainless steel so that it has smooth edges, won’t corrode and will always look good. You will be proud of how good
your installation looks. This plate will work perfectly with most commercially available vertical antennas such as
the Hutsler BTV series (4BTV thru the 6BTV), the SteppIR (BiggIR or SmallIR) or one of your own construction.
DXE-SSVC-2P - Stainless Steel V-Clamp for steel pipe, 2 inch V-bolt
This V-Clamp is made in one size that fits Steel tubing or pipe from 1" to 2'' OD as used in antenna construction. The supplied Vbolt is long enough to attach tubing to thick plates and is made with anti-corrosive properties. The special Stainless Steel saddle has
serrated teeth will clamp to the pipe securely by biting into the surface. For this reason, it is not recommended for
softer aluminum tubing or pipe. Ideal for fastening a radial plate and antenna mounting to a steel pipe.
Used to clamp 1 to 2'' (OD) steel tubing or pipe
Designed for attachments that don't require resistance to torque
V-bolt and saddle made from high-strength 18-8* stainless steel
The use of an anti-seize compound is HIGHLY recommended to achieve proper torque and prevent galling.
JTL-12555 Jet-Lube™ SS-30 Pure Copper Anti-Seize 12555
Jet-Lube™ SS-30 Pure Copper Anti-Seize is the top choice of engineers and technicians in government, industry and leading Amateur
Radio contest stations, for protecting mechanical assemblies of aluminum tubing, general hardware and copper grounding
systems. On bonded metal surfaces Jet-Lube™ SS-30 assures electrical and RF conductivity while preventing oxidation
and corrosion. Surpassing the capabilities of other aluminum anti-oxidants, the wide temperature range of Jet-Lube™ SS30 prevents long-term drying and caking, and allows easy disassembly and effortless cleaning of parts. An
environmentally preferred thread lubricant and conductive termination compound, Jet-Lube™ SS-30 helps keep your
equipment in serviceable condition. It contains a high concentration of copper flakes, a requirement for heavy loads or
compression; controlled frictional characteristics allow the surfaces of nuts and bolts to be tightened to their design torque
specifications. This anti-seize product assures full hydraulic efficiency by allowing the metal surfaces to slide over each
other without damaging metal-to-metal contact. Jet-Lube™ SS-30 is also designed to work as a similar and dissimilar
component between two metal surfaces to prevent seizing and galvanic action. The SS-30 compound formula improves
conductivity and ground continuity - and will not melt in high temperatures.
Jet-Lube™ SS-30 Pure Copper Anti-Seize Features include:
* Meets MIL-PRF-907E spec
* K-factor: 0.13
* Service rating: -65 degrees F (-54 degrees C) to 1800 degrees F (820 degrees C)
* SS-30 Resistivity (ohm-CM x 108) 5
DXE-AOK-TB1193 - Wing Nut No-tools Tilt Base Add-on Kit (pack of 2)
Wing nut knobs for tool-less quick release of the DX Engineering DXE-TB-3 or DXE-TB-4 Tilt Base - handy for
lowering the antenna for tuning or daily stealth operation.
Simply remove the existing hex nuts and thread on the wing nuts. The old hardware stores on the tilt base for
future use. Purchase two sets to also allow tightening of the lower mounting hardware without tools - and for
extended periods of upright installation and use.
DXE-RADW - 500K or 1000K Radial Wire Kits and Components
To achieve optimal performance with a ground-mounted vertical, install as many radials as possible. These bulk radial wire kits
use insulated wire that is UV resistant, hard to see and lays down easily, unlike the wire that is commonly available at the big box
stores. It will last much longer in contact with soil than bare wire.
The DXE-RADW- 500K or 1000K kit provide everything you will need to build the perfect radial system!
500/1000 ft. spool of 14 AWG, stranded copper wire with vinyl insulation
20/40 lugs
100/200 radial wire anchor pins - eliminating the need to bury your radials!
Build up to 20/40 radials, 25 feet long
- 6 -
Page 8

DXE-RADW-500KBD or 1000KBD - Bulk Radial Wire Kits and Components
DXE-RADW-500KBD
Bulk Radial Wire Kit, 500 ft Spool of Wire, 20 Lugs, 100 Biodegradable Staples
DXE-RADW-1000KBD
Bulk Radial Wire Kit, 1000 ft Spool of Wire, 40 Lugs, 200 Biodegradable Staples
To achieve optimal performance with a ground-mounted vertical, install as many radials as possible. These bulk radial wire kit use
insulated wire that is UV resistant, hard to see and lays down easily, unlike the wire that is commonly available at
the big box stores. It will last much longer in contact with soil than bare wire. The biodegradable anchors allow easy
installation of radial wires, and will degrade and disappear in a year or so when they are no longer needed.
The DXE-RADW-500 or 1000KBD kit provide everything you will need to build the perfect radial system!
500/1000 ft. spool of 14 AWG, stranded copper wire with vinyl insulation
20/40 lugs
100/200 biodegradable radial wire anchor pins- Eliminating the need to bury your radials!
Build up to 20/40 radials, 25 feet long
Technical Support
If you have questions about this product, or if you experience difficulties during the installation,
contact DX Engineering at (330) 572-3200. You can also e-mail us at:
DXEngineering@DXEngineering.com
For best service, please take a few minutes to review this manual before you call.
Manual Updates
Every effort is made to supply the latest manual revision with each product. Occasionally a manual
will be updated between the time your DX Engineering product is shipped and when you receive it.
Please check the DX Engineering web site (www.dxengineering.com) for the latest revision manual.
Warranty
All products manufactured by DX Engineering are warranted to be free from defects in material and workmanship for a period of one
(1) year from date of shipment. DX Engineering’s sole obligation under these warranties shall be to issue credit, repair or replace any
item or part thereof which is proved to be other than as warranted; no allowance shall be made for any labor charges of Buyer for
replacement of parts, adjustment or repairs, or any other work, unless such charges are authorized in advance by DX Engineering. If
DX Engineering’s products are claimed to be defective in material or workmanship, DX Engineering shall, upon prompt notice
thereof, issue shipping instructions for return to DX Engineering (transportation-charges prepaid by Buyer). Every such claim for
breach of these warranties shall be deemed to be waived by Buyer unless made in writing. The above warranties shall not extend to
any products or parts thereof which have been subjected to any misuse or neglect, damaged by accident, rendered defective by reason
of improper installation, damaged from severe weather including floods, or abnormal environmental conditions such as prolonged
exposure to corrosives or power surges, or by the performance of repairs or alterations outside of our plant, and shall not apply to any
goods or parts thereof furnished by Buyer or acquired from others at Buyer’s specifications. In addition, DX Engineering’s warranties
do not extend to other equipment and parts manufactured by others except to the extent of the original manufacturer’s warranty to
DX Engineering. The obligations under the foregoing warranties are limited to the precise terms thereof. These warranties provide
exclusive remedies, expressly in lieu of all other remedies including claims for special or consequential damages. SELLER
NEITHER MAKES NOR ASSUMES ANY OTHER WARRANTY WHATSOEVER, WHETHER EXPRESS, STATUTORY, OR
IMPLIED, INCLUDING WARRANTIES OF MERCHANTABILITY AND FITNESS, AND NO PERSON IS AUTHORIZED TO
ASSUME FOR DX ENGINEERING ANY OBLIGATION OR LIABILITY NOT STRICTLY IN ACCORDANCE WITH THE
FOREGOING.
©DX Engineering 2019
DX Engineering®, DXE®, DX Engineering, Inc. ®, Hot Rodz®, Maxi-Core®, DX Engineering THUNDERBOLT®, DX Engineering
Yagi Mechanical®, EZ-BUILD®, TELREX®, Gorilla Grip® Stainless Steel Boom Clamps, Butternut
SecureMount™, OMNI-TILT™, RF-PRO-1B®, AFHD-4® are trademarks of PDS Electronics, Inc. No license to use or reproduce
any of these trademarks or other trademarks is given or implied. All other brands and product names are the trademarks of their
respective owners.
Specifications subject to change without notice.
®
, SkyHawk™, SkyLark™,
- 7 -
 Loading...