

Heavy Duty Rotator
DXE-RT4500HD
DXE-RT4500HD-INS Revision 1b
© DX Engineering 2023
1200 Southeast Ave. - Tallmadge, OH 44278 USA
Phone: (800) 777-0703 - Tech Support and International: (330) 572-3200
E-mail: DXEngineering@DXEngineering.com

- 1 -
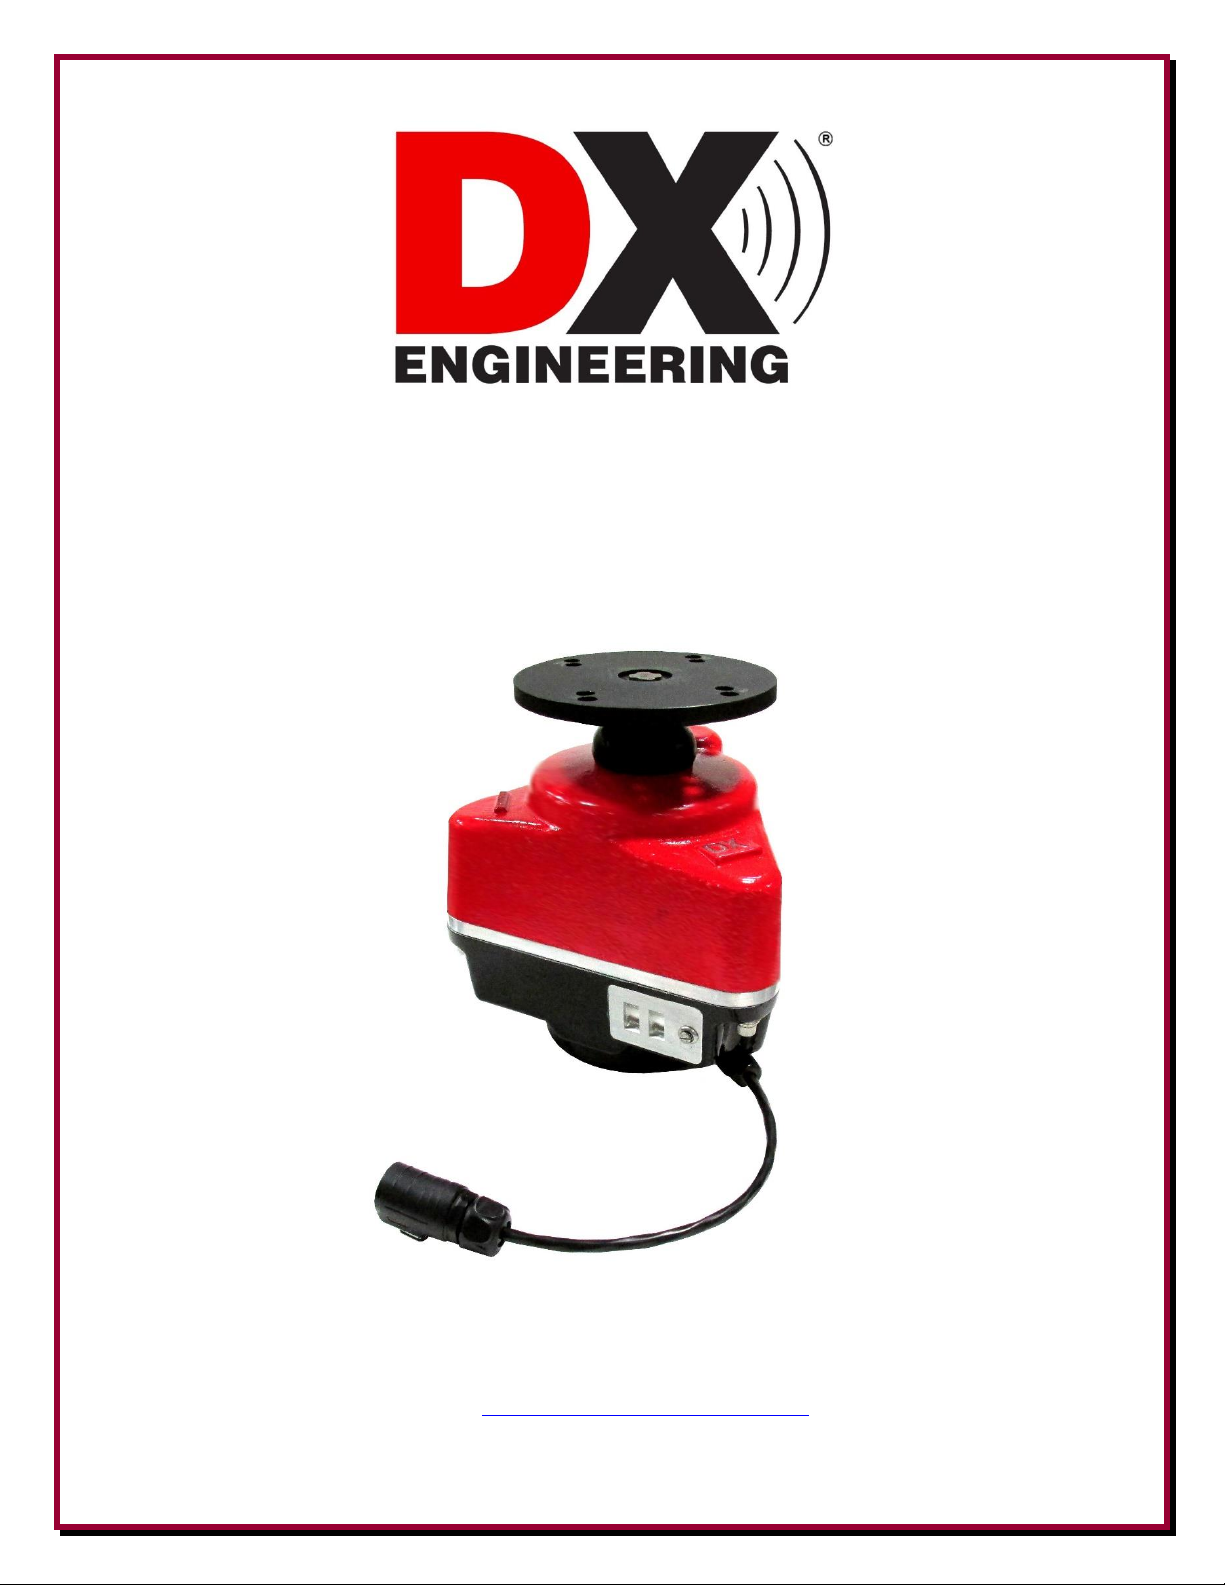
DX Engineering RT-4500HD Rotator
Introduction
The RT4500HD Heavy-Duty Rotator has capabilities that surpass most rotators available on the Amateur
Radio market. In addition to an impressive list of features and benefits, it is especially noteworthy that this
rotator does not have mechanical limit switches. Soft rotation limits are set as desired in the controller, to the
limits of the installed antenna cables. If the antenna or the mast ever slips, simply reset the controller to the
new center of rotation and recalibrate the rotational range. Climbing or antenna mast repositioning is not
immediately required.
Install the DX Engineering RT4500HD Heavy-Duty Rotator in your tower to take advantage of these features
and benefits:
Superior Rotational Torque > 4,400 in. lbs. with high ratio worm gear drive powered by an extra
heavy-duty 24VDC motor
Exceptional Braking Torque >18,500 in. lbs. by high ratio gear reduction that prevents rotation of the
mast mounted antenna system due to wind
Very High Vertical Load Capacity — internal needle thrust
bearing handles up to 2,000 lbs.
High-compression Heavy-Duty Top Mount Mast Clamps
available for 2-inch OD or 3-inch OD masts
Precision Movement — accuracy within +/-0.1 degrees with
high resolution magnetic pulse sensor controller
Easy Maintenance — access panel allows service of the
magnetic pulse sensor assembly without removing the
rotator from the tower
Built for Longer Life — all steel gears are hardened; high-
load gears are welded onto their shafts to prevent slippage;
larger main gear provides increased strength
Weather-Protected — sloped powder coated cast
aluminum alloy body sheds water; seals at the output shaft,
intermediate plate and access panel keep moisture out;
weep holes make sure it stays dry
Worry-Free Installation — four-bolt standard mount; this
triangular-shaped rotator is ideally sized to fit inside any Gseries ROHN tower, including 25G (but the RT4500HD
easily handles larger antenna systems than 25G will
withstand). Note: Recommended for Rohn 45G and
larger towers. This rotator may overload a Rohn 25G tower.
Works with High-Quality Controllers — Optional DX Engineering Green Heron Rotator Controller DXE-
RT21DXE or other 24VDC, Pulse Counting Programmable Controllers including Green Heron and the
MOH-ARCO-115V microHAM ARCO Advanced Rotator Controller
Fully bench tested prior to packing to ensure rotator is functioning within design specifications

- 2 -
General Information
The DX Engineering rotator is designed to rotate large tower mounted amateur and professional antenna
arrays under control from the station operating position.
The internal motor is variable DC coupled to a series of hardened gears to provide the turning power. A
magnetic pulse sensor sends the appropriate information to the rotator controller to indicate speed and
positioning. There are no starting capacitors, limit switches or positioning potentiometers that are normally
prone to failure in the DX Engineering rotator.
In the event of a nearby lighting strike, the pulse sensor may be damaged. Unlike other rotators, the DX
Engineering pulse sensor can be easily replaced by opening the pulse sensor assembly access panel without
having to remove the rotator from the tower.
The DX Engineering rotator is designed to fit Rohn 25, 45, 55 and
other large towers as well.
Note: Recommended for Rohn 45G and larger towers. This
rotator may overload a Rohn 25G tower.
The rotator should be mounted approximately 10 feet inside from
the top of the tower with an optional thrust bearing (DXE-TB-300
or DXE-TB-400) mounted on a thrust bearing shelf – or flat tower
top.
The rotator mounting shelf must be installed so it is level and
centered to the tower which will then be in-line with the rotator to
eliminate any undue stress. The Rotator is attached to the Rotator
Shelf using four single-use patch bolts for secure mounting.
An optional Mast Clamp (DXE-RTMC-2A or DXE-RTMC-3A) is
required to be mounted to the rotator top plate using four bolts
with single-use Nyloc hex nuts and flat washers.
An Important Note About Rotator Capacity – Antenna Wind
Area, expressed in square feet or square meters, is a
specification that applies for tower loading, but it does not
properly equate to rotator specifications. The appropriate specification for rotators is Rotational Torque.
Antenna system size, boom and element lengths, antenna balance, as well as total antenna and mast weight,
must all be considered to determine torque requirements. Total antenna wind area handling of the DX
Engineering RT4500HD may be expected to be greater than 35-40 sq. ft. for very well-balanced antenna
systems, while also using the appropriate torque calculations that account for total antenna system size and
weight.
If the antenna(s) used is (are) rated at a total of 18 square feet wind load or more, it is highly
recommended that a three inch mast be used.
PLEASE – Read the entire manual before starting installation to get familiar with the procedure and to
ensure you have the required tools and supplies needed for a successful and Safe installation.

- 3 -
IMPORTANT SAFETY INFORMATION
The installation of a rotatable antenna system on a tower is a dangerous and potentially life-threatening task if
due care is not taken. DX Engineering shall not be held liable for any accident or injury involved in the
installation or operation of the RT4500HD rotator. It is the responsibility of the customer to ensure the
installation is completed by an experienced and reliable installation company complying with standard safety
practices and using the best practices for working on or near a tower.
SAFELY working on a tower system is THE MOST IMPORTANT thing. Your installation team must follow all
safety requirements to avoid any injury or possible death from an accident. If you and your team do not have
the experience or safety equipment required, you should contact a qualified tower/antenna installation team.
The DXE-RT4500RT weighs approximately 22 pounds – ensure no one is located below the tower working
area either on the ground or on the tower. If the rotator it is accidently dropped while working on the tower
injury or death may occur if someone is struck by the falling rotator.
NOTE: The lifting handle must always be used when transporting the rotator and
when raising it up the tower.
Do NOT lift the rotator by the top round rotator plate.
A snap ring holds the top plate in position and it is not designed to hold the
weight of the rotator. If you hold the rotator by the top plate, you risk having the
snap ring fail and the rotator will then drop away from the top plate.
A tower must never be installed in a position where it could fall across power lines in the event of a
catastrophic failure during a windstorm or other environmental disaster. Follow all safety related items when
installing or working on a tower – Safety First.
The control cable attached to the DX Engineering rotator could, in the event of a nearby or direct lightning
strike carry lethal voltages down the cable and into your radio room. DX Engineering strongly recommends the
installation of suitable lightning arrestors on all rotator control lines and coaxial cables entering your radio room
from your antenna installation. Additionally a thrust bearing by-pass kit and lightning rod should be installed to
further help mitigate lightning damage.
If an electrical storm should be approaching your area, quickly disconnect the control cable from the rear of the
rotator’s control box and disconnect the AC cable from the wall outlet. Disconnect the coaxial cables from the
antennas as well. Only do this if the lightning is NOT in your immediate area, as you could be killed instantly if
lightning should strike while you are holding a cable.
NOTE: If you have any doubts about your ability to install this
rotator, seek out the services of a professional antenna – tower
installation company.

- 4 -
Combinations Available
DXE Combination
Part Numbers
DXE-RT4500HD
Rotator
DXE-RTMC-2A
2” Mast Clamp
DXE-RTMC-3A
3” Mast Clamp
DXE-RT21-DXE
Green Heron
Controller
MOH-ARCO-115V
microHAM
Controller
DXE-RT4500HD-2
X X
DXE-RT4500HD-3
X X
DXE-RT4500HD-2DX
X X X
DXE-RT4500HD-3DX
X X X
DXE-RT4500HD-2MH
X X X
DXE-RT4500HD-3MH
X X X
Included Parts List
Part Number
Description
Qty
DXE-RT4500HD
Rotator
(1)
1
DXE-ROT-MTG-HWK
Patch Bolt
(2)
, 5/16-18 (18-8) x 3/4” Stainless Steel
4
Flat Washer, #18, Stainless Steel
4
DXE-LP20-F
4 pin control female cable connector with 6mm and 8-12mm water tight grommet
1 - Rotator Lift Strap – Aluminum
(3)
5-1/4” x 1” x 1/4”
1
-
Rotator Lift Strap Bolt
(3)
5/16-18 x 3/4”, Socket Head Cap, Stainless Steel
2
-
Rotator Lift Strap Flat Washer
(3)
5/16”, Stainless Steel
2 - Rotator Top Plate Snap Ring, spare, External 3/4” shaft, .704 groove, Black Phosphate
1
DXE-RT-UB-INS
Unboxing Information Sheet
1
DXE-RT4500HD-INS
Instruction Manual
1
(1)
Rotator Weight: With no mounting hardware and no clamp: Approximately 22 pounds
With all mounting hardware and 2” mast clamp: Approximately. 27 pounds
(2)
Single-Use Thread Lock Patch Bolts
(3)
For transport only – will be removed when rotator is installed

- 5 -
Required Parts
JTL-12555 - Jet-Lube® SS-30™ Anti Seize – for all stainless steel hardware to avoid galling
LCT-37477 - Loctite® - 242 Medium Strength Threadlocker (blue)
TES-06143 – 3M Scotch® Super 88 Premium Vinyl Electrical Tape – to secure the rotator control cable to a
tower leg as needed and also to weatherproof the rotator cable connectors
TES-2155 – 3M Temflex™ 2155 Rubber Splicing Tape - to weatherproof the rotator cable connectors
-------------------------------------------------------------
Rotator Control Box – Select One
DXE-RT-21DXE - Digital Universal Controller, manufactured by Green Heron
MOH-ARCO-115V – MicroHam ARCO Rotor Controller
-------------------------------------------------------------
Tower Accessory Shelf – Select One
DXE-AS25G – Tower Accessory Shelf for Rohn 25 tower
DXE-AS455G – Tower Accessory Shelf for Rohn 45 and 55 tower
-------------------------------------------------------------
Mast Clamp – Select One*
DXE-RTMC-2A – DX Engineering Rotator Top HD Mast Clamp for 2 in. OD mast
DXE-RTMC-3A – DX Engineering Rotator Top HD Mast Clamp for 3 in. OD mast
-------------------------------------------------------------
Thrust Bearing – Select One*
DXE-TB300 – Advanced Design Thrust Bearing for 2 in. OD masts
DXE-TB400 – Advanced Design Thrust Bearing for 3 in. OD masts
-------------------------------------------------------------
DX Engineering Chrome-Moly Mast – Select one*
DXE-ST200CM-22 - 2 in. OD Mast, Chrome-Moly 4130 Steel Tube, 100K PSI Min. Yield, 0.250 in Wall, 22 ft. L
DXE-ST300CM-22 - 3 in. OD Mast, Chrome-Moly 4130 Steel Tube, 100K PSI Min. Yield, 0.250 in Wall, 22 ft. L
-------------------------------------------------------------
Bearing By-Pass Kit – Select One
DXE-BBGK-2-25-P - Bearing Bypass Ground Kit, for 2 in. OD Mast, 25G/45G Tower Leg
DXE-BBGK-3-25-P - Bearing Bypass Ground Kit, for 3 in. OD Mast, 25G/45G Tower Leg
DXE-BBGK-3-55-P - Bearing Bypass Ground Kit, for 3 in. OD Mast, 55G Tower, Leg
-------------------------------------------------------------
* NOTE: If the antenna(s) used is (are) rated at a total of 18 square feet wind load or more,
it is highly recommended that a three inch mast be used.

- 6 -
-------------------------------------------------------------
Lightning Rod Kit – Select One
DXE-LRMM-2-434 - Lightning Rod Kit, for Mast Top, Incl. Clamps for 2 in. OD Mast, Fasteners, 3/4 in. D. x 4 ft. L. Rod
DXE-LRMM-2-458BS - Lightning Rod Kit, for Mast Top, Incl. Clamps for 2 in.OD Mast, Fasteners, 5/8 in. D. x 4 ft. L. Rod
DXE-LRMM-2-458B - Lightning Rod Kit, for Mast Top, Incl. Clamps for 2 in. OD Mast, Fasteners, 5/8 in. D. x 4 ft. L. Rod
DXE-LRMM-2-834 - Lightning Rod Kit, for Mast Top, Incl. Clamps for 2 in. OD Mast, Fasteners, 3/4 in. D. x 8 ft. L. Rod
DXE-LRMM-3-434 - Lightning Rod Kit, for Mast Top, Incl. Clamps for 3 in. OD Mast, Fasteners, 3/4 in. D. x 4 ft. L. Rod
DXE-LRMM-3-458B - Lightning Rod Kit, for Mast Top, Incl. Clamps for 3 in. OD Mast, Fasteners, 5/8 in. D. x 4 ft. L. Rod
DXE-LRMM-3-458BS - Lightning Rod Kit, for Mast Top, Incl. Clamps for 3 in.OD Mast, Fasteners, 5/8 in. D. x 4 ft. L. Rod
DXE-LRMM-3-834 - Lightning Rod Kit, for Mast Top, Incl. Clamps for 3 in. OD Mast, Fasteners, 3/4 in. D. x 8 ft. L. Rod
-------------------------------------------------------------
DXE-CW1812OR – DXE Engineering CW1812OR Rotator Control Cable – two 12 AWG and three 18 AWG
wires, Tinned Stranded Copper wires, Foil Shield Direct-Bury, UV Resistant Black PE Jacket
DXE-LP20-F – Cable Connector, female – (included with the rotator) to connect to the RT4500HD Rotator
Pigtail
------------------------ And/Or -------------------------------------
Pre-Made Rotator Control Extension Cables – Select as needed
DXE-RTC-010PE – Pre-made Rotator Control Extension Cable assembly with connectors installed – 10 feet long
DXE-RTC-025PE – Pre-made Rotator Control Extension Cable assembly with connectors installed – 25 feet long
DXE-RTC-050PE – Pre-made Rotator Control Extension Cable assembly with connectors installed – 50 feet long
DXE-RTC-075PE – Pre-made Rotator Control Extension Cable assembly with connectors installed – 75 feet long
DXE-RTC-100PE – Pre-made Rotator Control Extension Cable assembly with connectors installed – 100 feet long
DXE-RTC-125PE – Pre-made Rotator Control Extension Cable assembly with connectors installed – 125 feet long
DXE-RTC-150PE – Pre-made Rotator Control Extension Cable assembly with connectors installed – 150 feet long
DXE-RTC-200PE – Pre-made Rotator Control Extension Cable assembly with connectors installed – 200 feet long
DXE-RTC-250PE – Pre-made Rotator Control Extension Cable assembly with connectors installed – 250 feet long
DXE-RTC-300PE – Pre-made Rotator Control Extension Cable assembly with connectors installed – 300 feet long
-------------------------------------------------------------
Suggested Parts
DXE-MASTLOCK - Mast Anti Rotation Assembly for Use on Antenna Towers
DXE-RT-PULSE-ASM - Pulse Sensor Assembly, Sensor, Door Cover and Gasket, Kit - or -
DXE-RT-SENSOR - Pulse Sensor Component, Sensor Only Replacement
Tools Required
Torque Wrench – capable of 12 foot pounds with 9/16”, 1/2” sockets
Socket set and Wrench set – will use: 7/16”, 1/2”, 9/16”
Small Carpenter Square
Straight Slot Screwdriver
Box Cutter or Knife
Sharpie type marker

- 7 -
Control Cable Information
Included with the DX Engineering rotator is a control cable plug (DXE-LP20-F) that mates to the rotator cable
pigtail (DXE-LP20-M). This plug may be used to assemble your own rotator control cable. DX Engineering
also offers pre-made control cables with the connector installed in various lengths (see information above).
The cable needed for controlling the DX Engineering Rotator uses four wires. Two 12AWG wires for DC supply
to the motor and two 18AWG wires for the Pulse Sensor. For cable runs over 300 feet, use larger diameter
wire as needed to supply the rotator with 24 VDC at 3.1 amps nominal operating requirements.
DXE-LP20-F
Unpacking the DXE-RT4500HD Rotator from the custom made shipping box
Please review the important unpacking instructions that are included in the box to avoid damage or injury when
handling the DXE-RT4500HD Rotator.

- 8 -
Installation of the DXE-RT4500HD Rotator
NOTE: If you are replacing an existing Rotator – you must verify rotator mounting holes in your existing
rotator shelf, and your existing mast OD does not exceed the OD specification on the chosen
Mast Clamp (2 or 3 inch OD).
Additionally, you may want to use two of the DXE-MASTLOCK - Mast Anti Rotation Assemblies for Use on
existing Antenna Towers to hold your existing 2 or 3 inch OD mast in place while the old rotator is removed
and the DXE-RT4500HD rotator is installed.
If you are using a non-DX Engineering rotator shelf, ensure the rotator bolt pattern is correct
(see Reference Information later in this manual) and there is an opening on the bottom to allow moisture
drainage from the weep holes on the bottom of the DXE-RT4500HD.
The following installation example uses a Rohn 45G tower, DXE-AS455G Rotator Shelf,
DXE-RTMC-2A Two Inch Mast Clamp, DXE-TB300 Thrust Bearing. A temporary 2”
aluminum tube to simulate a mast (it will be replaced with the steel mast in a later step),
DXE-ST200CM-22 Two Inch OD Mast
and JTL-12555 Jet-Lube® SS-30™ Anti Seize
NOTE: Your installation may vary – this is only one example of the installation.
The Thrust Bearing (DXE-TB300) is installed on the upper flat bearing plate on the Rohn 45 tower.
The four bolts holding the TB-300 in place should be fully and properly tightened in place and use Jet-Lube
®
SS-30™ to avoid galling and Loctite® - 242 Medium Strength Threadlocker (blue).
The three bolts that snug against the mast should be evenly loose to allow the 2 inch mast to pass through.
These bolts will be tightened in a later step.

- 9 -
The Rotator Mounting Shelf (DXE-AS455G) should be installed in the tower approximately 8-10 feet below
the Thrust Bearing.
Assemble and install the Rotator shelf per its instruction sheet.
Ensure the Rotator Mounting shelf is properly mounted to the tower and not tilted. A small carpenter square
can assist in making sure the shelf is mounted square to the tower.
The V-Bolts and shelf extension bolts should be snug (not tight). Adjustment may be needed for centering the
rotator with the mast clamp when the mast is ready to be inserted in the mast clamp. The clamps will be fully
tightened when the final shelf alignment is completed.
Rotator Connections to the Rotator Control Box
The RT4500HD uses four wires. Two 12AWG wires for DC supply (White Pin 1 and Black Pin 2) to the motor
and two 18AWG wires for the Pulse Sensor (Red Pin 3 and Green Pin 4). For cable runs over 300 feet, use
larger diameter wire as needed to supply the rotator with 24 VDC at 3.1 amps nominal operating requirements.
Rotator Control Box Connections are detailed in the Appendix.
Testing the Rotator
Set up the DXE-4500HD Rotator and controller box on the bench. The uninstalled and unloaded RT4500HD
Rotator may have elevated reduction gear noise when tested on the bench which is COMPLETELY NORMAL.
This noise is NOT a defect. This gear noise will be dissipated and not easily heard when the rotator is
installed.
Connect the rotator control cable from the rotator to the rotator control box

- 10 -
Test for a full 360 degrees of rotation and make any adjustments that are necessary to the controller box.
Mast Clamp
The Mast Clamps have multiple holes for mounting to the rotator top plate. Place the Mast Clamp that will be
used on the rotator top plate. Move it around to locate the four holes that align with the top plate and the mast
clamp. Mark the four holes with a Sharpie style marker on the mast clamp that are used. This will make it a bit
easier once you are on the tower and installing the mast clamp to the rotator.
The chosen mast clamp should already have the clamping hardware loosely installed per the mast clamp
instructions. Ensure Jet-Lube SS-30 is used.
(DXE-RTMC-2A Two Inch Mast Clamp used in this installation example.)
Installing the Rotator and Mast in the Tower
There are two ways to accomplish the installation and alignment of the mast to the rotator in the tower.
- Using a Gin Pole raise the mast to the point that it can pass though the Thrust Bearing for existing towers.
Keep in mind, there is not a lot of play between the Thrust Bearing and Mast so alignment between the Thrust
Bearing and Mast is critical.
Allow the mast to be lowered through the Thrust Bearing and stop about 14-1/4” inches above the Rotator
Shelf. This allows room for the rotator and the 2 inch mast clamp.
- The alternative for a new installation is to use a 2 inch OD aluminum tube, long enough to go from the just
above the Thrust Bearing to the Rotator Shelf in place of the steel mast. When everything (rotator shelf, rotator
alignment, mast clamp alignment) is properly adjusted, remove the temporary aluminum mast and install the
steel mast. Doing it this way avoids any concerns about the heavy steel mast moving things around when
mast-rotator shelf-tower alignment adjustments are made.
NOTE - For this example: A temporary 2 inch OD aluminum tube will be used for alignments.
Once alignments are completed, the aluminum tube will be removed
and the 2” OD steel mast will then be installed.

- 11 -
NOTE: If you are using a non-DX Engineering rotator shelf, ensure the rotator bolt pattern is correct (see
Reference Information later in this manual) and there is an opening on the bottom to allow moisture
drainage from the weep holes on the bottom of the DXE-RT4500HD.
Rotator Installation on Rotator Shelf
When installing the rotator into the tower, align the rotator so the
motor bulge (looking at the bottom) is aligned as shown in this
photo (Looking up from the bottom of the rotator shelf).
Once the rotator is in position to be installed, remove the two temporary hex head bolts and temporary lifting
strap.
Slip the DXE-4500HD rotator through the Rohn RG45 tower legs.
Align the rotator bottom 4 mounting holes with the rotator shelf
holes.
Install the four washers and four hex head patch bolts.
Tighten the four mounting patch bolts securely in place.
These bolts do not require Jet-Lube® SS-30™ since the bolts are
being threaded into the bottom rotator case that is cast aluminum.
The yellow patch you see on the threads of the four bolts is a
ready-to-use thread locking compound (no Loctite® is needed).
Torque specs for the patch bolts are actually 12 foot pounds, BUT
because of the patch compound this will vary considerably. It is
up to the installer to insure they are actually tight.
NOTE: The patch bolts are single-use.
If for any reason you remove the patch bolts, you must replace the patch bolts with new patch bolts.
The Mast Clamp should already have the clamping bolts loosely installed per the
instruction manual for the mast clamp.
NOTE: Ensure the Mast Clamp is open just wide enough to allow the aluminum tube to slide in place.
There is one bolt on the mast clamp that is used to open the clamp (when the other four bolt sets are loose).

- 12 -
Using the four hex head bolts, eight stainless steel washers and four Nyloc nuts install the Mast Clamp to the
rotator top plate using the previously identified four holes that match up. Use Jet-Lube® SS-30™ on the hex
head bolts. Double check the tension after all four bolts are tightened.
NOTE: The Nyloc nuts in this application are considered single-use.
If for any reason you remove or loosen the Nyloc nuts, you must replace them with new Nyloc Nuts.
Alignment of Mast to Rotator
Carefully lower the 2 inch OD aluminum tube (temporary mast) to
the top of the mast clamp.
Carefully adjust the rotator shelf brackets as needed to center the
tube with the mast clamp. Do not loosen the clamps too far or the
rotator shelf may drop down. Once the shelf is verified as properly
aligned, tighten all of the rotator shelf bolts securely in place.
Installing the Steel Mast
Remove the temporary 2 inch OD aluminum tube.
Carefully install the 2 inch OD steel mast through the Thrust
Bearing and fully seat the steel mast in the Mast Clamp.
Note: Some installations may want the start/stop point to be at 180 degrees (South).
ENSURE you have a proper coax loop to allow the 360 degree turning of the rotator.
Tighten the three Thrust Bearing to Mast bolts as needed.
Antenna Alignment and Final Mast Clamp Tightening
Loosen the one hex bolt in the Mast Clamp that spreads the clamp apart.
Tighten the Mast Clamp Hex Head Bolts securely in place to hold the Mast in place. The four bolts squeeze
the clamp securely around the steel mast.
Torque for the clamp bolts is 11 foot pounds tightening from the inside to the outside, and double
check the tension after all four bolts are torqued.
Connect the rotator cable to the rotator cable pigtail and test the rotation and coax loop clearance. Make any
adjustments as needed. Ensure the control unit for the rotator is properly set for the antenna direction. Since
there are no limit switches in the rotator, verify North and South are in sync to the rotator, controller, coax loop
and antenna(s) all rotate properly.

- 13 -
NOTE: Since there are no limit switches if adjustments are made in positioning – ensure a team
member is visually watching the rotation to verify the rotator loop is not getting too tight. The
rotation beyond the loop limits will damage the rotator/antenna coax cable loop.
The rotator control cable connectors are rated to IP65/IP67. It is still recommended to add further
weatherproofing. Use Temflex™ tape and Scotch® 88 tape for weatherproofing this connection.
Use Scotch® 88 tape for securing the control cable to the tower leg.
Lightning Protection
As with any tall structure a tower is subject to being a target for lightning. Although a direct hit is catastrophic,
local nearby strikes can also cause equipment failures. Your tower must be properly grounded to help avoid
any damage to your home or radio gear. This includes the rotator control lines and coaxial cables. Consult
other publications with details concerning lightning protection, bonding and grounding.
Any thrust bearing could be welded in place from lightning. To help avoid this problem it is strongly suggested
a lightning rod and bearing by-pass be installed. Reference the following products:
Bearing By-Pass Kit
DXE-BBGK-2-25-P - Bearing Bypass Ground Kit, for 2 in. OD Mast, 25G/45G Tower Leg
DXE-BBGK-3-25-P - Bearing Bypass Ground Kit, for 3 in. OD Mast, 25G/45G Tower Leg
DXE-BBGK-3-55-P - Bearing Bypass Ground Kit, for 3 in. OD Mast, 55G Tower, Leg
-------------------------------------------------------------
Lightning Rod Kit
DXE-LRMM-2-434 - Lightning Rod Kit, for Mast Top, Incl. Clamps for 2 in. OD Mast, Fasteners, 3/4 in. D. x 4 ft.L.Rod
DXE-LRMM-2-458BS - Lightning Rod Kit, for Mast Top, Incl. Clamps for 2 in. OD Mast, Fasteners, 5/8 in. D. x 4 ft.L.Rod
DXE-LRMM-2-458B - Lightning Rod Kit, for Mast Top, Incl. Clamps for 2 in. OD Mast, Fasteners, 5/8 in. D. x 4 ft.L.Rod
DXE-LRMM-2-834 - Lightning Rod Kit, for Mast Top, Incl. Clamps for 2 in. OD Mast, Fasteners, 3/4 in. D. x 8 ft. L.Rod
DXE-LRMM-3-434 - Lightning Rod Kit, for Mast Top, Incl. Clamps for 3 in. OD Mast, Fasteners, 3/4 in. D. x 4 ft. L.Rod
DXE-LRMM-3-458B - Lightning Rod Kit, for Mast Top, Incl. Clamps for 3 in. OD Mast, Fasteners, 5/8 in. D. x 4 ft. L.Rod
DXE-LRMM-3-458BS - Lightning Rod Kit, for Mast Top, Incl. Clamps for 3 in. OD Mast, Fasteners, 5/8 in. D. x 4 ft.L Rod
DXE-LRMM-3-834 - Lightning Rod Kit, for Mast Top, Incl. Clamps for 3 in. OD Mast, Fasteners, 3/4 in. D. x 8 ft. L. Rod
Maintenance
The DX Engineering RT4500HD Rotator is a factory sealed and lubricated unit and does not require any
additional lubrication.
Routine maintenance would be to verify all bolts are properly tightened and nothing has shaken loose over
time from wind/weather vibrations and the bottom weep holes are not clogged.

- 14 -
Magnetic Pulse Sensor Replacement
In the event that the magnetic pulse sensor is damaged from a nearby lightning strike it is easy to replace.
Unlike other rotators, the DXE-RT4500HD does not have to be removed from the tower to replace the
magnetic pulse sensor. You can order and keep on hand a spare magnetic pulse counter from DX
Engineering.
DXE-RT-PULSE-ASM – Magnetic Pulse Sensor Assembly Kit: Includes Magnetic Sensor Component, Door
Cover and Gasket.
The pulse sensor in the assembly is factory preset.
However, you should verify it is the same setting (distance)
as the existing assembly in your rotator.
DXE-RT-SENSOR – Magnetic Pulse Sensor Component (Gasket
included), Replacement for RT4500HD Rotator

- 15 -
1. On the side of the rotator body, you will notice an aluminum hatch or door.
2. Using a straight slot screwdriver, rotate the 1/4 turn screw counter-clockwise to open the door.
3. You can then carefully pull out the magnetic pulse sensor assembly until you see the green connector.
4. Unplug and remove the old pulse sensor assembly.
1 2 3 4
5. Position the new replacement Pulse Assembly (with gasket) as shown.
6. Plug in the new replacement pulse sensor assembly.
7. When tucking the connector and wires into the rotator, push them toward the right side (as you are looking
at the opening in the rotator). This ensures the wires are kept away from any moving parts inside the rotator,
8. Carefully push the assembly in place and use a straight slot screwdriver and turn the 1/4 turn door screw
clockwise to lock it and the gasket in place.
5 6 7 8

- 16 -
Specifications
Maximum Torque: Over 4,400 in-lbs. @ 24VDC
Braking Torque: Over 18,500 in-lbs.
Vertical Load: 2,000 lbs., maximum
Rotating Range: Unlimited (limited by the range of installed coaxial cables)
Rotational Speed: 61 seconds/revolution (360 degrees) @ 24VDC, max.
Resolution: 0.1 degree, nominal (dependent upon controller)
Travel Accuracy: 0.1 degree
Pulse Counter Ratio: 4,814 pulses per revolution (required for third-party controller programming)
Antenna Mast Clamp: For 2 in. OD - DXE-RTMC-2A or for a 3 in. OD - DXE-RTMC-3A, available with
rotator and separately
Voltage: 24VDC
Current: 3.1 Amps, nominal, during rotation
Control Wire: 4 Cond. Cable, 2 @ 12 AWG (motor) + 2 @ 18 AWG (pulse counter) for controller to
rotator total length up to 400 ft., 4-Cond. Male weatherproof locking shielded connector installed on
rotator pigtail; Female cable-mount mating connector supplied. Extension cables available separately. For
runs over 300 feet, use appropriate size wire for 24 VDC at 3.1 Amps operation power requirements at
the rotator.
Weight: 22 lbs. without hardware or mast clamp; 27 lbs. with hardware and 2 in. RTMC Mast clamp
Width: 7.970 in. apex to side; 8.855 in. apex to apex (fits inside Rohn 25G and larger) (not recommended
for Rohn 25G – the rotator can overstress the 25G tower)
Height, without clamp: 9.205 in. from base to top of mast clamp platform
Operating Temperature Range: -10 degrees F to +140 degrees F
An Important Note About Rotator Capacity – Antenna Wind Area, expressed in square feet or square
meters, is a specification that applies for tower loading, but it does not properly equate to rotator specifications.
The appropriate specification for rotators is Rotational Torque. Antenna system size, boom and element
lengths, antenna balance, as well as total antenna and mast weight, must all be considered to determine
torque requirements. Total antenna wind area handling of the DX Engineering RT4500HD may be expected
to be greater than 35-40 sq. ft. for very well-balanced antenna systems, while also using the appropriate
torque calculations that account for total antenna system size and weight.
If the antenna(s) used is (are) rated at a total of 18 square feet wind load or more, it is highly recommended
that a three inch mast be used.

- 17 -
Appendix - Reference Information
Overall dimensions of Rotator
Top Plate Dimensions
Bottom Rotator Mounting Bolt Pattern

- 18 -
==================================================
DXE RT4500HD Setup for RT-21 - Refer to the Green Heron RT-21 manual for
details.
SETUP/OPTION = DXE (Forces Pulse Divider to 4814)
If older version RT-21 controller use the SET/OPTION = ORION and set Pulse Divider to 4814.
DC Motor
Transformer Taps
Jumper
Position
Transformer
J9 Connection
NOTE
J10
2-3
Brown
J9-3
J14
2-3
Orange
J9-4
J12
2-3
Position Feedback
Rotator Connections
Jumper
Position
Function
DXE-RT4500HD
RT-21
J5
2-3
MOT CW
1 (White)
1
J6
2-3
MOT CCW
2 (Black)
2
J16
1-2
POS
3 (Red)
3
GND
4 (Green)
4
Optional: cable shield to 6-32 ground stud (if shield is used)
(Shielded rotor cable is not required with the DXE-RG4500HD)
Green Heron suggested starting information
Divide Lo
4814
Bright
4 Max Speed
10
Divide Hi
4814
Calibrate
42
CCW Limit
180
Knob Time
40
Offset
180
CW Limit
180
Mode
Normal
Delays
4
Option
DX ENG
Ramp
2
Min Speed
7
If after entering these settings you get an error message – reset the control box and all should be fine.
Calibration Procedure
1. Install antenna if not already installed. Since there are no hard limit switches in the DXE-RT4500HD,
you can point the antenna at any known direction to complete the calibration. The rotator does not
need to be in the center of Rotation. Likewise, if the mast clamp or any part of the system gets out of
calibration, just point the antenna at a known heading and continue with the calibration procedure
below.
2. Look at the current direction of the antenna and note the true heading. Then press SETUP until the
displays says “Setup”, then let go and you will be in the “Calibrate” item. Turn the knob until NEW
VALUE is equal to the current true heading. Press CHANGE, then press SAVE.
==================================================

- 19 -
==================================================
DXE RT4500HD Setup for the microHAM ARCO Advanced Rotator
Controller - Refer to the microHAM ARCO Advanced Rotator Controller manual for
complete details.
Technical Support
If you have questions about this product, or if you experience difficulties during the installation, contact DX Engineering at (330) 572-3200. You can also e-mail us at: DXEngineering@DXEngineering.com
For best service, please take a few minutes to review this manual before you call.
Warranty
All products manufactured by DX Engineering are warranted to be free from defects in material and workmanship for a period of one (1) year from date of shipment. DX Engineering’s sole obligation under these warranties
shall be to issue credit, repair or replace any item or part thereof which is proved to be other than as warranted; no allowa nce shall be made for any labor charges of Buyer for replacement of parts, adjustment or repairs, or
any other work, unless such charges are authorized in advance by DX Engineering. If DX Engineering’s products are claimed to be defective in material or workmanship, DX Engineering shall, upon prompt notice thereof,
issue shipping instructions for return to DX Engineering (transportation-charges prepaid by Buyer). Every such claim for breach of these warranties shall be deemed to be waived by Buyer unless made in writing. The above
warranties shall not extend to any products or parts thereof which have been subjected to any misuse or neglect, damaged by accident, rendered defective by reason of improper ins tallation, damaged from severe weather
including floods, or abnormal environmental conditions such as prolonged exposure to corrosives or power surges, or by the performance of repairs or alterations outside of our plant, and shall not apply to any goods or parts
thereof furnished by Buyer or acquired from others at Buyer’s specifications. In addition, DX Engineering’ s warranties do not extend to other equipment and parts manufactured by others except to the extent o f the original
manufacturer’s warranty to DX Engineering. The obligations under the foregoing warranties are limited to the precise terms thereof. These warranties provide exclusive remedies, expressly in lieu of all other remedies
including claims for special or consequential damages. SELLER NEITHER MAKES NOR ASSUMES ANY OTHER WARRANTY WHATSOEVER, WHETHER EXPRESS, STATUTORY, OR IMPLIED, INCLUDING
WARRANTIES OF MERCHANTABILITY AND FITNESS, AND NO PERSON IS AUTHORIZED TO ASSUME FOR DX ENGINEERING ANY OBLIGATION OR LIABILITY NOT STRICTLY IN ACCORDANCE WITH THE
FOREGOING.
©DX Engineering 2023
DX Engineering®, DXE®, DX Engineering, Inc.®, Hot Rodz®, Maxi-Core®, DX Engineering THUNDERBOLT®, DX Engineering Yagi Mechanical®, EZ-BUILD®, TELREX®, Gorilla Grip® Stainless Steel Boom Clamps, Butternut®,
SkyHawk™, SkyLark™, SecureMount™, OMNI-TILT™, RF-PRO-1B®, AFHD-4® are trademarks of PDS Electronics, Inc. No license to use or reproduce any of these trademarks or other trademarks is given
or implied. All other brands and product names are the trademarks of their respective owners.
Specifications subject to change without notice
 Loading...