


OMNI-TILT
™
Vertical Antenna
Tilt Base
DXE-OMNITILT-1
DXE-OMNITILT-INS Revision 1b
© DX Engineering 2021
1200 Southeast Ave. - Tallmadge, OH 44278 USA
Phone: (800) 777-0703 - Tech Support and International: (330) 572-3200
Fax: (330) 572-3279 - E-mail: DXEngineering@DXEngineering.com
- 1 -
Introduction
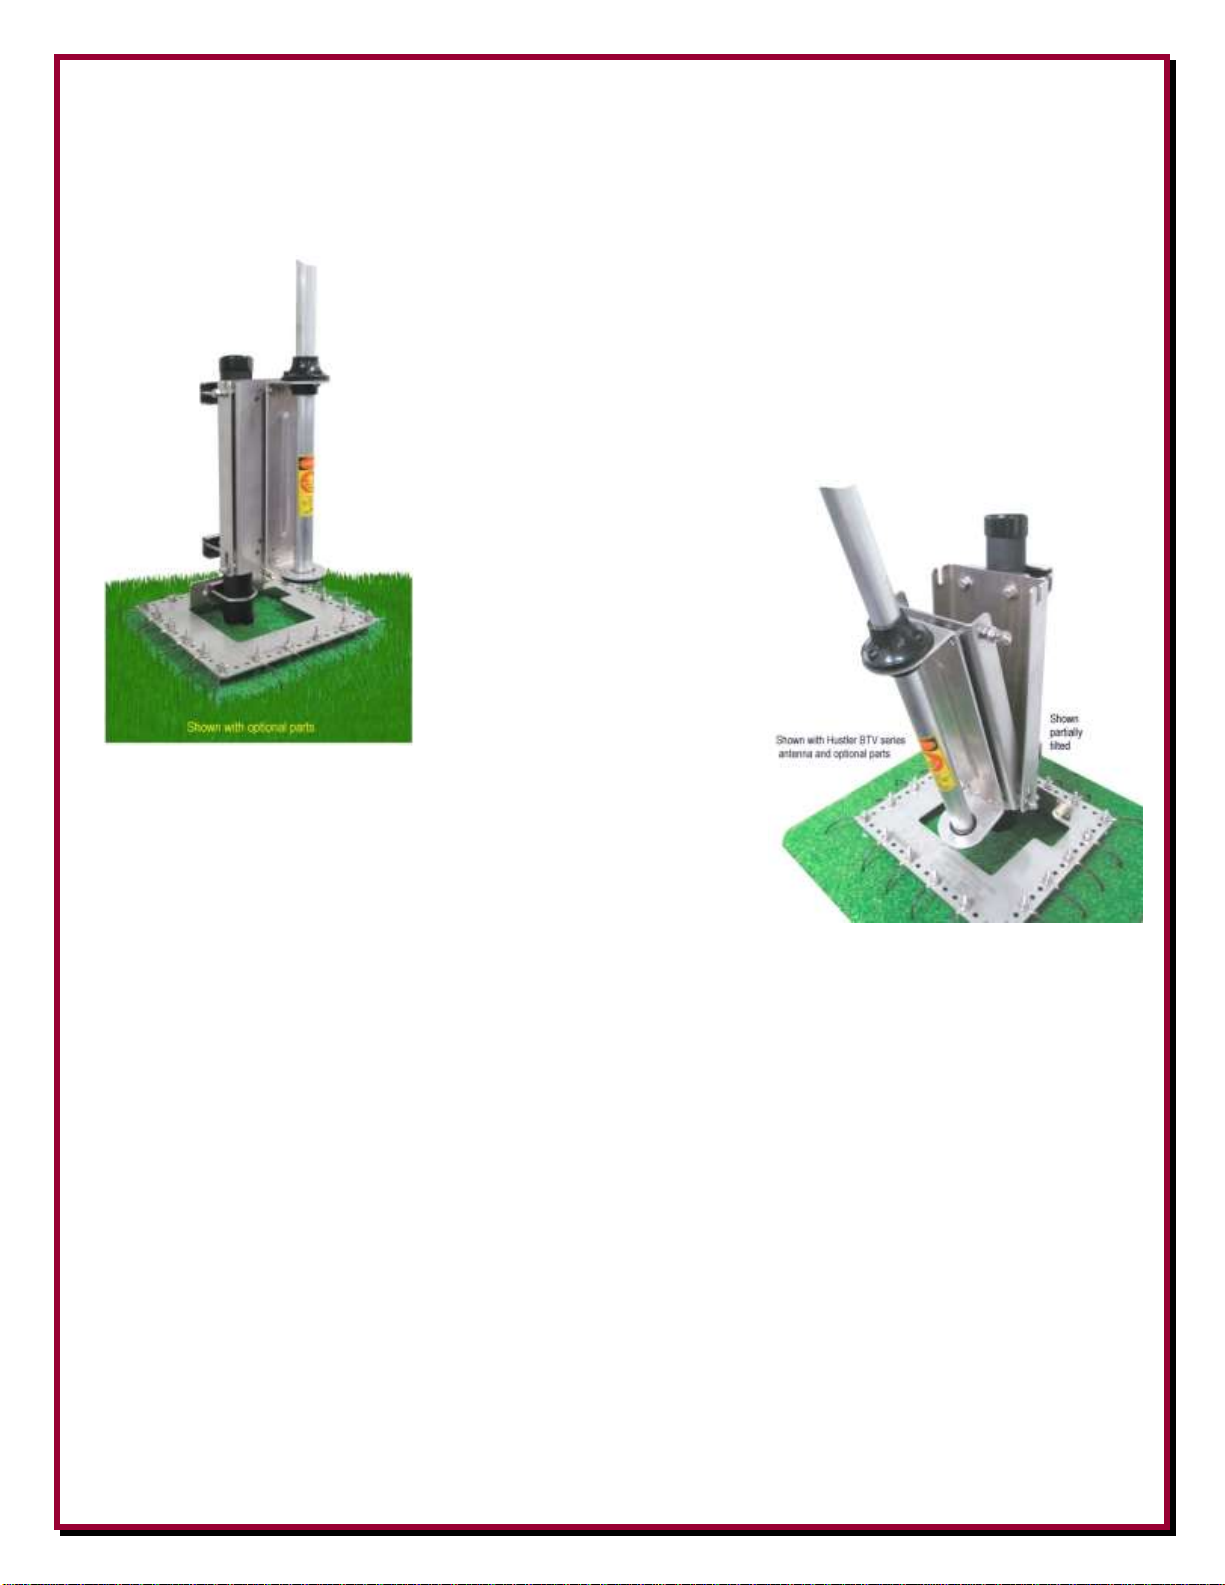
The DX Engineering OMNI-TILT™ Vertical Antenna Tilt Base is a new design incorporating
features that make this Tilt Base a ‘must have’ for all types of vertical antennas.
The OMNI-TILT™ base is patterned on the same proven safe
technology as the patented DX Engineering SAF-T-TILT™ base and
the patented DXE-TB-3P tilt base that prevent the antenna from
falling when the fasteners are loosened. The user simply lifts the
OMNI-TILT™ base plate and this positive action disengages the
bolts from the top and allows the user to easily lower the antenna for
maintenance or if extreme weather is on the way.
Custom made from laser cut 1/8”
thick Stainless Steel for strength
and durability. All of the
hardware used in the OMNI-
TILT™ Base is Stainless Steel to
ensure long and dependable
service.
The DX Engineering OMNI-
TILT™ is safe to use and is available with a wide range of
optional mounting hardware to maximize the use of this tilt base
with all types of vertical antennas.
The OMNI-TILT™ was designed to be used with the Hustler
BTV series antennas and can be used with the Hy-Gain AVQ
series antennas which both use the optional DXE-TVA-HWK
Trap Vertical Mounting Hardware kit. Additionally, the OMNI-TILT™ may also be used with
other vertical antenna or mast mounting schemes depending on the mounting hardware chosen to
correspond to the diameter of pipe (1-1/4” to 2-1/2” diameter) being used.
Additional Material and Tools Needed but not Supplied:
JTL-12555 - Jet-Lube SS-30 Anti-Seize Lubricant or PTX-81343 - Permatex Anti-
Seize Lubricant. Used on the threads of Stainless Steel Hardware to prevent galling
(seizing) and aid in proper tightening.
DXE-TVA-HWK Trap Vertical Mounting Hardware Kit for BTV or AVQ series
antennas (included with the DXE-OMNITILT-1P ) (see text)
DXE-OTMC-250P Mounting Clamps to mount to a customer supplied ground mounted
pipe and for mounting a customer supplied antenna mast (see text)
Standard tools including wrenches, nut drivers, etc.
1/2” Nut Driver
7/16” Nut Driver or Open End Wench (for mounting pipe clamps)
1/2” Open End Wrench
- 2 -
There are three OMNI-TILT™ kits and one clamp kit available:
Part Number
Description
DXE-OMNITILT-1
OMNI-TILT™ Base with hardware
DXE-OMNITILT-1P
OMNI-TILT™ Base with hardware for Trap Vertical - includes one DXE-TVA-HWK
DXE-OMNITILT-2P
OMNI-TILT™ Base with hardware for Mast Mounted Vertical includes 2 DXE-OTMC-250P Clamp Kits
DXE-OTMC-250P
Double V-Clamp fits 1.25 to 2.5" OD, includes bolts
Basic Assembly
The following describes the basic assembly of the OMNI-TILT™ base. Fastening to a customer
supplied ground mounted pipe and antenna are described after this basic assembly.
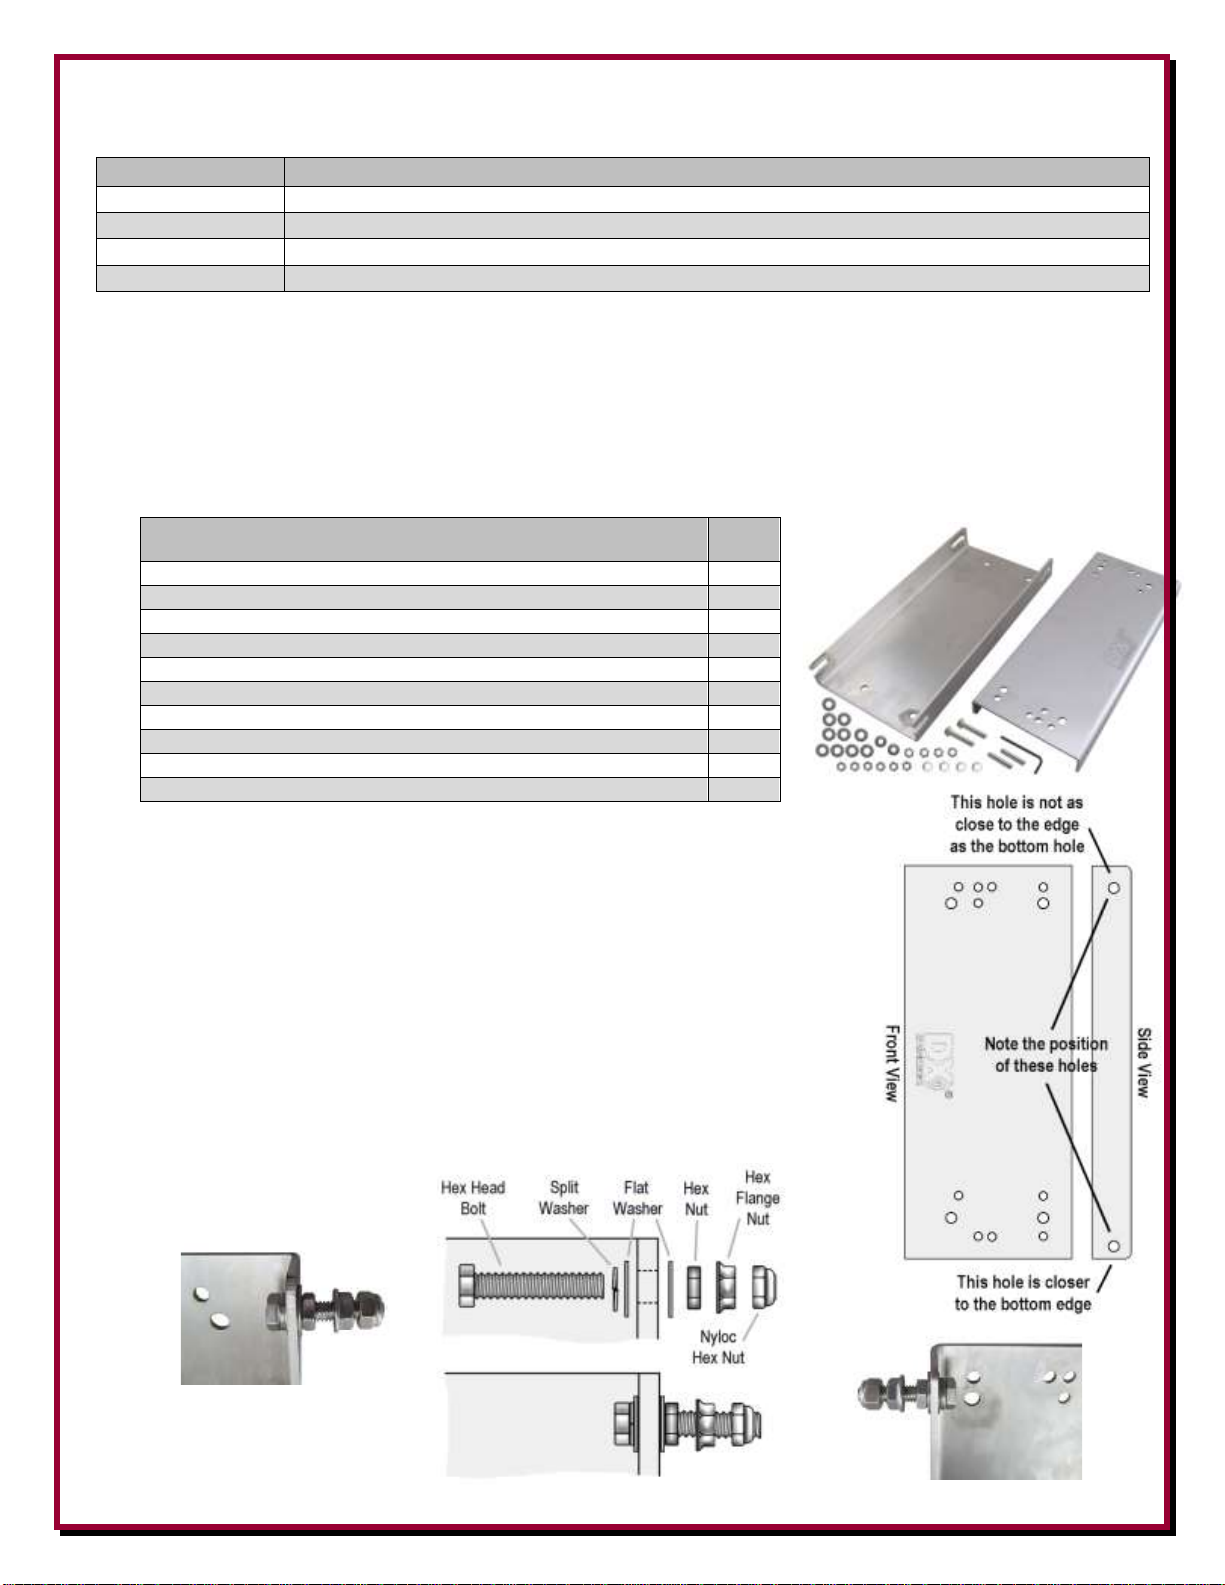
DXE-OMNI-TILT™ Base with Hardware Parts List
DXE-OMNITILT-1 OMNI-TILT™ Base with Hardware
Qty
OMNI-TILT™ Tilt Base, Front, Stainless Steel with DX logo
1
OMNI-TILT™ Tilt Base, Rear, Stainless Steel
1
5/32” Hex Wrench, 2-1/2” long
1
5/16”-18 Hex Serrated Flange Nut, Stainless Steel
2
5/16”-18 Nyloc Hex Nut, Stainless Steel
4
5/16”-18 Hex Nut, Thin, Stainless Steel
6
5/16”-18 x 1.5” long Hex Head Cap Screw, Full Thread
2
5/16-18 x 1.5” long Set Screw, Stainless Steel, Full Thread
2
5/16” Washer, Flat, Stainless Steel
10
5/16” Washer, Split Lock, Stainless Steel
4
1. Note the front and rear plates have a variety of holes which will be explained.
The front plate has mounting holes in the sides used for the tilting
process and these holes are not located in identical positions.
Take care to position the front plate properly before starting to mount
the hardware. Refer to the drawing for reference.
2. Install the upper hardware as shown. Do not tighten the flange hex
nut or the Nyloc hex nut at this time. Use Jet-Lube SS-30 Anti-Seize
(part number JTL-12555 or PTX-81343) on all stainless steel parts to
avoid galling. Even good stainless steel parts will freeze up if anti-seize
is not used.

- 3 -
3. Position the rear plate and the front plate together as shown below.
Rear Plate Front Plate
(Has DX logo)
4. Install a flat washer and hex nut onto one of the set screws as show.
Note: position these parts on the opposite end of the set screw that
has the hex wrench opening. Do the same for the second set screw.
5. Position the front and rear plates together and insert the set screws as shown below.
6. Using one of the Nyloc hex nuts as a measuring tool, adjust both of the set screws inward so
when the Nyloc hex nut is installed and tightened during a later step, there will be
approximately three exposed threads sticking out. Using a 1/2” open end wrench helps to hold
the hex nut in place while you turn the set screw.

- 4 -
7. Install a flat washer, split washer and hex nut as shown. Tighten these
parts using a 1/2” open end wrench and the supplied 5/32” Allen
Wrench. Note that the parts are tightened together on the front plate as
shown.
Hardware in place
Allen Wrench and 1/2” open end wrench
Hardware tightened in place
8. Place a flat washer over the set screws (ensure you are using anti-seize – Permatex Anti-Seize
Lubricant or Jet-Lube-SS-30 ). Finger tighten the Nyloc Nuts.

- 5 -
9. Using the supplied Allen Wrench and a customer supplied 1/2” open end wrench, tighten the
Nyloc hex nuts. Note that when tightening the Nyloc Nuts in place, you DO NOT want
them completely tightened. The Allen wrench used in combination with the open end wrench
as shown will not loosen the previously installed hardware.
When installed, you want to be able to tilt the plate, thus you need a slight gap as shown
below.
Using the Allen wrench and 1/2” hex wrench
Parts in place
Reference Drawing

- 6 -
10. Once the hardware is properly installed, you can tilt the front and rear plates of the OMNI-
TILT™ base together. Note the bottom has an elongated hole so you lift the front plate in place
over the rear plate and drop it into position. The following pictures show the completed basic
assembly.

- 7 -
Installing the OMNI-TILT™ Tilt Base Ground Mounting Pipe
The following is a suggested 2” OD mounting pipe installation. You may want a heavier and/or
longer ground mounted pipe depending on your soil conditions and the type of antenna mast
being used with the OMNI-TILT™ base. Refer to your antenna’s manual for possible
suggestions. The OMNI-TILT™ DXE-OTMC-250P Double V-Clamp fits pipes from 1.25” to 2.5”
in diameter. DX Engineering also has the DXE-VGMT-2CG Steel tubing for ground mount
antennas made from high strength Chromoly: 2 inch OD x .25 wall thickness x 5 foot 4 inch
length.
Wooden Post
The OMNI-TILT™ Tilt Base can be installed to a customer supplied wooden post or to a ground
mounted antenna mounting pipe. Since there are multiple considerations in mounting to a wooded
post, the customer will have to decide what hardware to use.
Ground Mounted Pipe
Use a customer supplied thick-walled galvanized steel mounting pipe at least 4
feet long. This will allow approximately 2 feet or more to be below ground and
20 inches above ground. A thick-walled steel pipe 1-3/4" OD to 2" OD
maximum is recommended with a minimum thickness of 1/8" (1/4" preferred)
should be used. A standard 1-1/2" galvanized water pipe (with its 1.9" OD)
will work for this application and can usually be found at your local home
building supply store. DX Engineering also has the DXE-VGMT-2CG
Steel tubing for ground mount antennas made from high strength
Chromoly: 2 inch OD x .25 wall thickness x 5 foot 4 inch length. For
permanent mounting, use a post-hole digger to make the hole deep enough to
accommodate at least 2 feet of pipe and a couple inches of gravel at the bottom
for drainage. Set the mounting pipe on the gravel, use the pre-mix concrete to
fill around the pipe, adding water and mixing as you fill or mix the concrete
first, then pour in the hole (depends on the type of quick concrete you
purchase). Fill the hole until the concrete is level with the ground around it.
Use a level on the mounting pipe as you fill the hole to be sure it is vertically straight. Allow to set
overnight or per the concrete manufacturer’s recommendations. Your location, landscape and
ground conditions may require different mounting solutions in order to have the steel
mounting pipe and the vertical antenna in a secure position. A black vinyl cap (DXE-VC-2000
for 2” pipe) can be used to cap the top of the mounting pipe to prevent water and debris from
getting into the pipe.
Note: Galvanized steel, rather than aluminum, is much more suitable for mounting in concrete.
Aluminum will quickly corrode due to incompatibility with the materials used to make
concrete.
Optional Radial Plate to Mounting Pipe
Install the optional patented DXE-RADP-3 Radial Plate on the 2" OD customer supplied mounting
pipe using the DXE-SSVC-2P V-Bolt Saddle Clamp as shown. The standard 1-1/2" galvanized
water pipe (with its 1.9" OD) is just fine for this application and can usually be found at your local

- 8 -
home building supply store. Mount the Radial Plate so you have approximately 1" of space between
the bottom of the plate and the ground level. This will allow easy access to install the radial wire
hardware. The DXE-RADP-3 Radial Plate comes with 20 sets of stainless steel hardware for
mounting the radial wires. Additional hardware kits are available from DX Engineering: DXE-
RADP-1HWK contains 20 sets of Radial Plate Hardware.
NOTE: If a larger diameter mounting
pipe is used (up to 2.5” OD) the
Optional Radial Plate will need a
larger clamp (DXE-SSVC-3P).
Optional DXE-RADP-3 Radial Plate Installation on customer supplied ground mounting pipe
Attaching the optional Ground Radial Wires to the Radial Plate
Using the 20 sets of supplied 1/4" stainless steel hardware (Bolt, Star Washer, Flat Washer, Split
Washer, Nut) connect the optional ground radial wires to the DXE-RADP-3 Radial Plate as shown
below. Additional hardware kits are available from DX Engineering: DXE-RADP-1HWK
contains 20 sets of Radial Plate Hardware.
There are optional DX Engineering Radial Wire Kits available. DXE-RADW-500K/BD contains a
500 foot spool of 14 gauge copper stranded wire with relaxed black PVC insulation, 20 Terminal
Lugs and 100 Steel or Biodegradable Lawn Staples. The DXE-RADW-1000K/BD Radial Wire Kit
contains a 1,000 foot spool of 14 gauge copper stranded wire with relaxed black PVC insulation, 40
Terminal Lugs and 200 Steel or Biodegradable Lawn Staples. RADW-20RT, -32RT or -65RT
contain 20 each radial wires with 1/4" terminal attached. These kits come in 20 Ft, 32 Ft, or 65 Ft
lengths. See these and other options available listed at the
end of this manual.
Depending on the number of radial wires used, space them
out evenly around the Radial Plate like the spokes on a
wheel. The Radial Plate will accommodate up to 60 radial
wires (60 laser drilled holes), or up to 120 radials if doubled
up.
Radial Wire Hardware Installation Radial Wire Pattern

- 9 -
Mounting the OMNI-TILT™ to the Ground Mounted Pipe
Two DXE-OTMC-250P Mounting Clamp Kits are used to mount the OMNI-TILT™ Tilt Base to
the ground mounted mounting pipe.
DXE-OTMC-250P (Qty 2 are required) Mounting Clamps
2 - DXE-OTMC-250P Mounting Clamps with Hardware Kits
For mounting to a 1-1/4” to 2-1/2” Dia. Mounting pipe
(----- Parts list and picture show 2 clamp kits ----)
Qty
1-1/4” x 2-1/2” Saddle Clamp, Stainless Steel
4
5/16”-18 x 4-1/2” long Hex Head Bolt, Full Thread, Stainless Steel
4
5/16” Washer, Flat, Stainless Steel
8
5/16” Washer, Split Lock, Stainless Steel
4
5/16”-18 Hex Nut, Stainless Steel
4
1. Using the hardware supplied, attach the OMNI-TILT™ Tilt Base to the ground mounted
mounting pipe as shown. Slightly tighten the upper and lower clamps in place just enough to
hold the OMNI-TILT™ base. Once the antenna base is mounted, up or down positioning
adjustment can be made which ensures the tilting action does not interfere with the optional
radial plate. When placement is where you want it, tighten the hardware (do not overtighten).

- 10 -
Mounting a Hustler BTV Series Vertical Antenna
to the OMNI-TILT™ Tilt Base
DXE-OMNITILT-1P
1. Mounting the Hustler BTV Series antenna to the OMNI-TILT™ Tilt Base requires installation
of four hex head bolts, Flat, Split Lock washers and Hex Nuts.
DXE-TVA-HWK Parts List
DXE-TVA-HWK Mounting Hardware Kit
For Trap Verticals (Hustler BTV series, Hy-Gain AVQ series)
Qty
1/4”-20 x 1” long Hex Bolt, Stainless Steel
4
1/4” Washer, Split Lock, Stainless Steel
4
1/4” Washer, Flat, Stainless Steel
4
1/4”-20 Hex Nut, Stainless Steel,
8
2. Position the BTV Base on the OMNI-TILT™ base. Align the Hustler BTV base with the
DXE-TVA-HWK mounting hardware and installed
the antenna base to the OMNI-TILT™ base as shown.
Install the flat washers, split washers and hex nuts and
tighten in place.

- 11 -

- 12 -
Mounting Other Vertical Antennas to the OMNI-TILT™ Tilt Base
DXE-OMNITILT-1P
Hy-Gain: DX88, AV-18VS, 12AVQ, 14AVQ, 18AVQ
vertical antenna to the OMNI-TILT™ Tilt Base
When mounting one of the above listed Hy-Gain vertical antennas, the procedure is exactly the
same as the Hustler BTV series. The only difference is the Hy-Gain base mounting holes are
spaced differently than the Hustler BTV series on the OMNI-TILT™ Base.
Typical Hy-Gain Base

- 13 -
Mounting methods for other vertical antennas to
the OMNI-TILT™ Tilt Base
Cushcraft R-8 will require a customer supplied 1-1/2” water pipe (1.90” OD)
approximately 8 feet long. The water pipe is installed on the OMNI-TILT™ base using
two DXE-OTMC-250P clamp kits.
Hy-Gain AV-620 or AV-640 will require a customer supplied 2” water pipe (2.38” OD)
approximately 8 feet long. The water pipe is installed on the OMNI-TILT™ base using
two DXE-OTMC-250P clamp kits.
MFJ-1796 will require a customer supplied 1-1/2” water pipe (1.90” OD) approximately 8
feet long. The water pipe is installed on the OMNI-TILT™ base using two DXE-OTMC250P clamp kits.
MFJ-1798 will require a customer supplied 2” water pipe (2.38” OD) approximately 8 feet
long. The water pipe is installed on the OMNI-TILT™ base using two DXE-OTMC-250P
clamp kits.
The above listed antennas use a clamping scheme that is common and is described below
DXE-OMNITILT-2P includes the DXE-OMNITILT-1 and
two DXE-OTMC-250P Clamp Kits
Two DXE-OTMC-250P Mounting Clamp Kits are used to mount the water pipe that will hold the
vertical antenna (see listing above) to the OMNI-TILT™ base.
DXE-OTMC-250P (Qty 2 are required) Mounting Clamps
2 - DXE-OTMC-250P Mounting Clamps with Hardware Kits
For mounting to a 1-1/2” to 2” Water Pipe
(Parts list and picture show 2 clamp kits)
Qty
1-1/4” x 2-1/2” Saddle Clamp, Stainless Steel
4
5/16”-18 x 4-1/2” long Hex Head Bolt, Full Thread, Stainless Steel
4
5/16” Washer, Flat, Stainless Steel
8
5/16” Washer, Split Lock, Stainless Steel
4
5/16”-18 Hex Nut, Stainless Steel
4
1. Using the mounting clamp hardware, attach the customer supplied water pipe (as described in
the previous antenna list) to the OMNI-TILT™ base as shown.
2. When the mounting pipe is attached to the OMNI-TILT™ base, the antenna is mounted to the
mounting pipe per the antenna manufacturer’s instructions.

- 14 -

- 15 -
Manual Updates
Every effort is made to supply the latest manual revision with each product. Occasionally a manual
will be updated between the time your DX Engineering product is shipped and when you receive it.
The OMNI-TILT™ tilt base is capable of mounting a wide variety of vertical antennas and
masts. As new mounting schemes are tested, this manual will be revised to include the latest
information.
Please check the DX Engineering web site (www.dxengineering.com) for the latest revision manual.
The following drawing shows the laser cut hole pattern in the OMNI-TILT™ base (front plate).
The various hole spacing can accommodate a wide variety of vertical antenna bases and clamps for
different mounting schemes.
- 15 -

- 16 -
Tilt Action
The OMNI-TILT™ is easy and safe to operate.
1. To tilt downward loosen the top Nyloc Nuts to allow the Flanged Nuts to be loosened
approximately 1/2 to 1 turn.
2. Grasp the antenna base (or mounting pipe) that is bolted to the OMNI-TILT™ base and lift
until the upper bolts on the front plate are out of the grooved area on the tilt base rear plate.
3. Slightly tilt until the front plate can be set downward into its resting place.
4. Carefully walk the antenna (or antenna and mounting mast) downward.
5. Use of a chair or saw horse to support the antenna so it remains level or protruding parts of the
antenna do not hit the ground when tilted down is suggested.
Reverse the above step to raise the antenna (or antenna and mounting mast).
Once raised and the front plate is in the grooved area and fully seated, tighten the flanged nuts.
The Nyloc nuts can then be tightened against the flanged nuts to prevent them from loosening from
wind vibration.
The bottom set screws and nuts can remain slightly loose as described in the assembly instructions.
Notes: Heavy antennas or antennas using an approximately 8 foot water pipe mount attached
to the OMNI-TILT™ may require help when walking the antenna down or up.
Ensure you have adequate room for tilting and you are not near any power lines
or other obstructions.
The use of Anti-Seize on all stainless steel hardware is required to avoid having
the hardware freeze up (galling).

- 17 -
Optional Tilt Base Wing Nut Knobs
DX Engineering has optional Tilt Base Wing Nut Knobs - DXE-AOK-OT1194 - allow for the toolless, quick release of the DX Engineering DXE-OMNI-TILT™ base.
They are perfect for lowering the antenna for tuning or daily stealth operation.
To install them, simply remove the existing hex nuts and thread on the wing nut knobs.
DXE-AOK-OT1194

- 18 -
Guying a Vertical Antenna System
Guying of any vertical antenna is always recommended for stability. If your area encounters severe
wind velocities or icing conditions, simple guying will reduce the possibility of failure. Using the
DXE-GUY kits, you can install one, two or three level guy ropes. The drawing below shows an
example of dual level guying. Guy ropes should be tightened just enough to permit the antenna to
swing a few inches. The ends of the ropes are tied to the earth anchors that are screwed into the
ground at about the same angle as the ropes will be. The ropes are tied just above a band clamp at
the height desired. When using the OMNI-TILT™ base, position the guy ropes as shown below in
the overhead view. This will make it easy to raise or lower the antenna and only one guy rope needs
to be loosened. The other guy ropes will help guide the antenna on the way up.

- 19 -
Technical Support
If you have questions about this product, or if you experience difficulties during the installation,
contact DX Engineering at (330) 572-3200. You can also e-mail us at:
DXEngineering@DXEngineering.com
For best service, please take a few minutes to review this manual before you call.
Manual Updates
Every effort is made to supply the latest manual revision with each product. Occasionally a manual
will be updated between the time your DX Engineering product is shipped and when you receive it.
Please check the DX Engineering web site (www.dxengineering.com) for the latest revision manual.
Warranty
All products manufactured by DX Engineering are warranted to be free from defects in material and workmanship for a
period of one (1) year from date of shipment. DX Engineering’s sole obligation under these warranties shall be to issue
credit, repair or replace any item or part thereof which is proved to be other than as warranted; no allowance shall be
made for any labor charges of Buyer for replacement of parts, adjustment or repairs, or any other work, unless such
charges are authorized in advance by DX Engineering. If DX Engineering’s products are claimed to be defective in
material or workmanship, DX Engineering shall, upon prompt notice thereof, issue shipping instructions for return to
DX Engineering (transportation-charges prepaid by Buyer). Every such claim for breach of these warranties shall be
deemed to be waived by Buyer unless made in writing. The above warranties shall not extend to any products or parts
thereof which have been subjected to any misuse or neglect, damaged by accident, rendered defective by reason of
improper installation, damaged from severe weather including floods, or abnormal environmental conditions such as
prolonged exposure to corrosives or power surges, or by the performance of repairs or alterations outside of our plant,
and shall not apply to any goods or parts thereof furnished by Buyer or acquired from others at Buyer’s specifications.
In addition, DX Engineering’s warranties do not extend to other equipment and parts manufactured by others except to
the extent of the original manufacturer’s warranty to DX Engineering. The obligations under the foregoing warranties
are limited to the precise terms thereof. These warranties provide exclusive remedies, expressly in lieu of all other
remedies including claims for special or consequential damages. SELLER NEITHER MAKES NOR ASSUMES ANY
OTHER WARRANTY WHATSOEVER, WHETHER EXPRESS, STATUTORY, OR IMPLIED, INCLUDING
WARRANTIES OF MERCHANTABILITY AND FITNESS, AND NO PERSON IS AUTHORIZED TO ASSUME
FOR DX ENGINEERING ANY OBLIGATION OR LIABILITY NOT STRICTLY IN ACCORDANCE WITH THE
FOREGOING.
©DX Engineering 2021
DX Engineering®, DXE®, DX Engineering, Inc.®, Hot Rodz®, Maxi-Core®, DX Engineering THUNDERBOLT®, DX
Engineering Yagi Mechanical®, EZ-BUILD®, TELREX®, Gorilla Grip® Stainless Steel Boom Clamps, Butternut®,
SkyHawk™, SkyLark™, SecureMount™, OMNI-TILT™, RF-PRO-1B®, AFHD-4® are trademarks of PDS Electronics,
Inc. No license to use or reproduce any of these trademarks or other trademarks is given or implied. All other brands
and product names are the trademarks of their respective owners.
Specifications subject to change without notice.
 Loading...