

Page 1
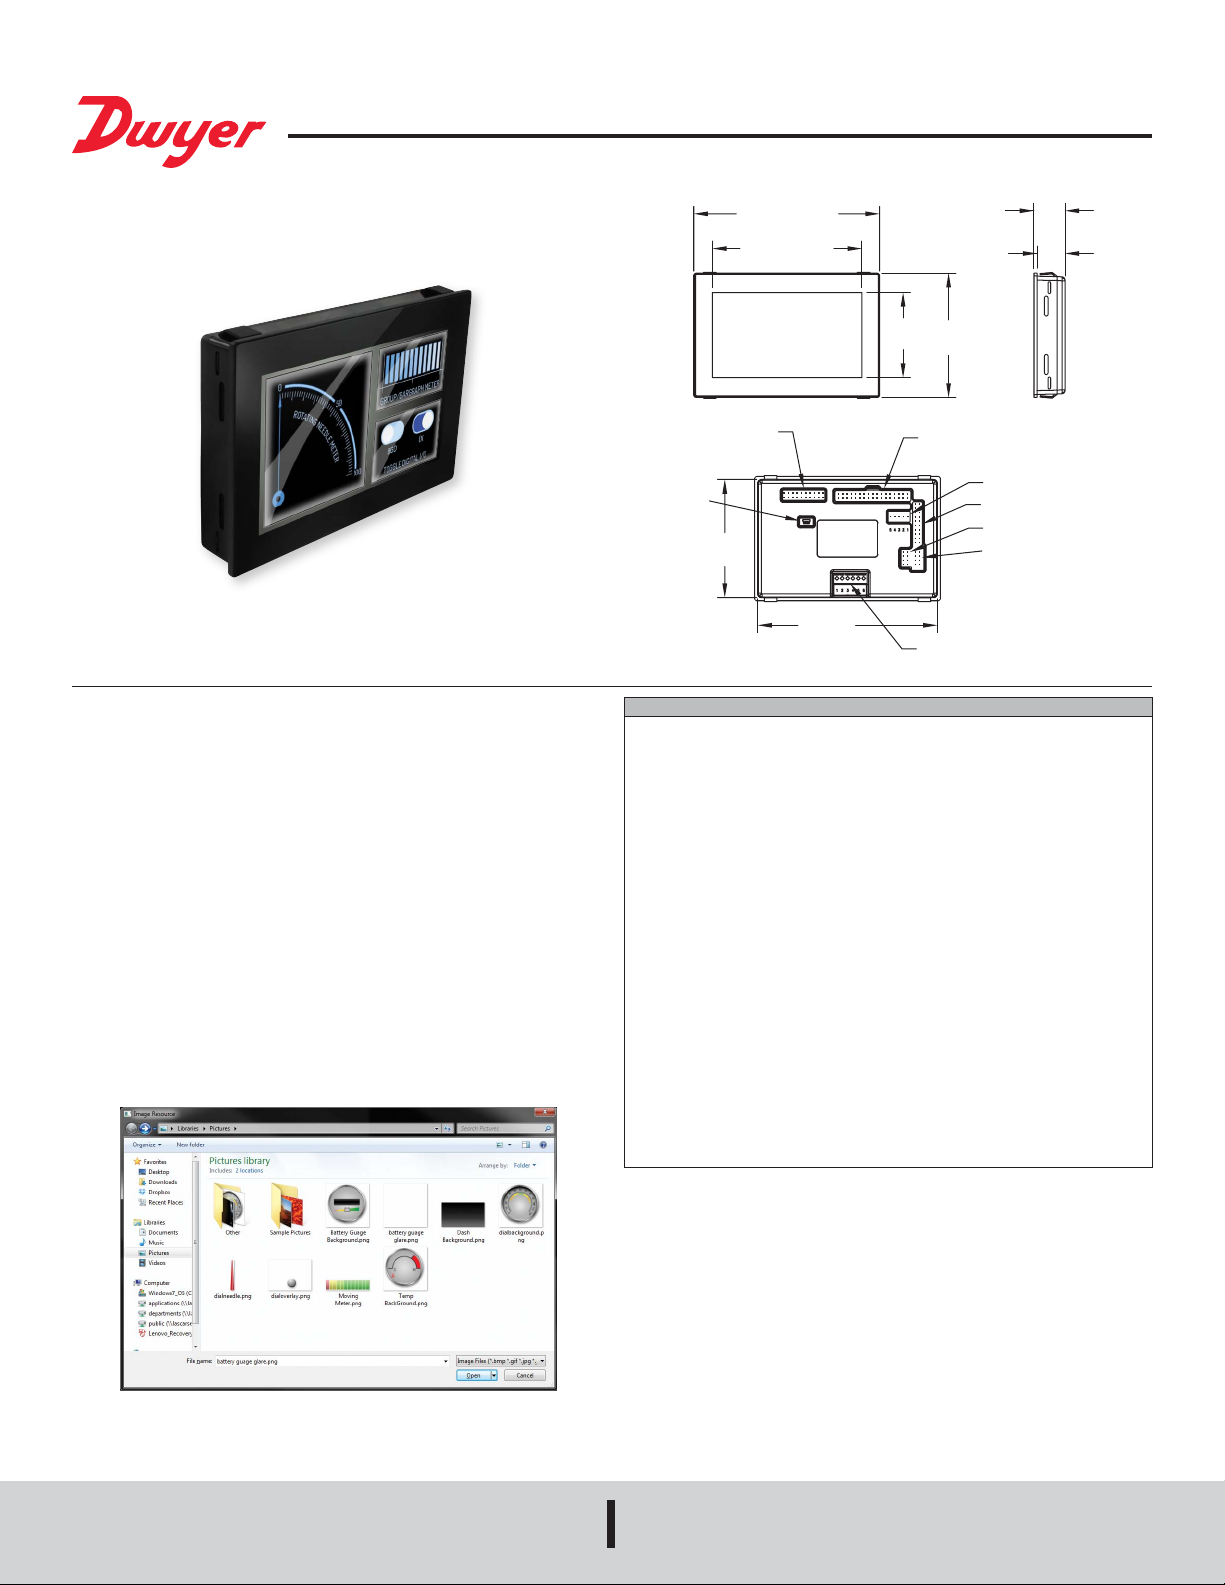
Series SPPM2 Graphical User Interface Panel Meter
25/32
MINI USB PO
ANSION I/O
POWER & ANALOG INPUTS
®
Specications - Installation and Operating Instructions
Bulletin PC-SPPM2
The SERIES SPPM2 Graphical User Interface Panel Meter is a congurable, full-color
4.3˝ (109 mm) touch screen display that can be used in a variety of applications.
By using the free Windows
can personalize the display to suit their needs. A development kit is also available,
which a development board with buttons, dials, LEDs, and screw terminals to test the
functionality of all inputs and outputs.
DOWNLOADING SOFTWARE
Customization software is available at www.dwyer-inst.com/SPPM2. To download,
follow these instructions:
1. To begin downloading, click “Run” when prompted.
2. When a security warning appears, click “Run” a second time.
3. As soon as the InstallShield Wizard screen appears, follow the on-screen
instructions.
4. When installation is complete, click “Finish” to quit the installer. The software can
now be used by clicking on the new icon on the desktop.
BUILDING AN APP
1. Open the software by double-clicking on the icon.
2. Connect the SPPM2 model to the PC using a mini-USB cable.
3. Gather any extra images to be used other than what is already included in the
app.
®
based Interface Panel Design Studio software, users
4-45/64 [119.30]
3-49/64 [95.84]
2-5/32
[54.66]
JTAG [FOR INTERNAL USE]
RT
2-63/64
[75.86]
4-17/32
[115.30]
SPECIFICATIONS
Inputs: Mini-USB, 6-line screw terminal analog, 4 x ±40 V, or 4 to 20 mA, 8 x digital
I/O.
Outputs: 4 x PWM, 2 x alarms (open collector).
Accuracy: ±0.05% ±0.1 mV (typ).
Resolution: 0.04 mV (max ) or 4 decimal places.
Power Supply: USB port or 5 to 30 VDC.
Current Consumption: 400 mA at 5 VDC.
Display: 4.3˝ (10.9 cm) TFT LCD with 262k colors.
Display Resolution: 480 x 272 pixels.
Sampling Rate: 10 samples/sec.
Temperature Limits: 32 to 104°F (0 to 40°C).
Warm Up: 15 sec.
Mounting: Panel mount.
Electrical Connection: Multi-pin DIL’s, 1 mini-USB, and 1 RS232.
Computer Requirements: Compatible with Windows
®
Windows
Weight: 6.7 oz (181 g).
Approvals: CE.
DEVELOPMENT BOARD SPECIFICATIONS
Inputs: 4 x ± 5 VDC.
Outputs: 8 x digital I/O’s, 4 x PWM outputs.
Serial Communication: RS232.
Power Supply: USB port or 5 to 30 VDC.
Weight: 19.7 oz (560 g).
10.
[19.93]
45/64
[17.93]
3-9/64
[79.82]
ALARMS, SERIAL INPUT & DIGITAL I/O
RS232 INTERFACE
ETHERNET & EXP
4-20mA CURRENT LOOP
CONFIGURATION
ANALOG INPUTS
®
7, Windows® 8, and
DWYER INSTRUMENTS, INC.
P.O. BOX 373 • MICHIGAN CITY, INDIANA 46360, U.S.A.
Windows® is a registered trademark of Microsoft Corporation.
Phone: 219/879-8000
Fax: 219/872-9057
www.dwyer-inst.com
e-mail: info@dwyermail.com
Page 2
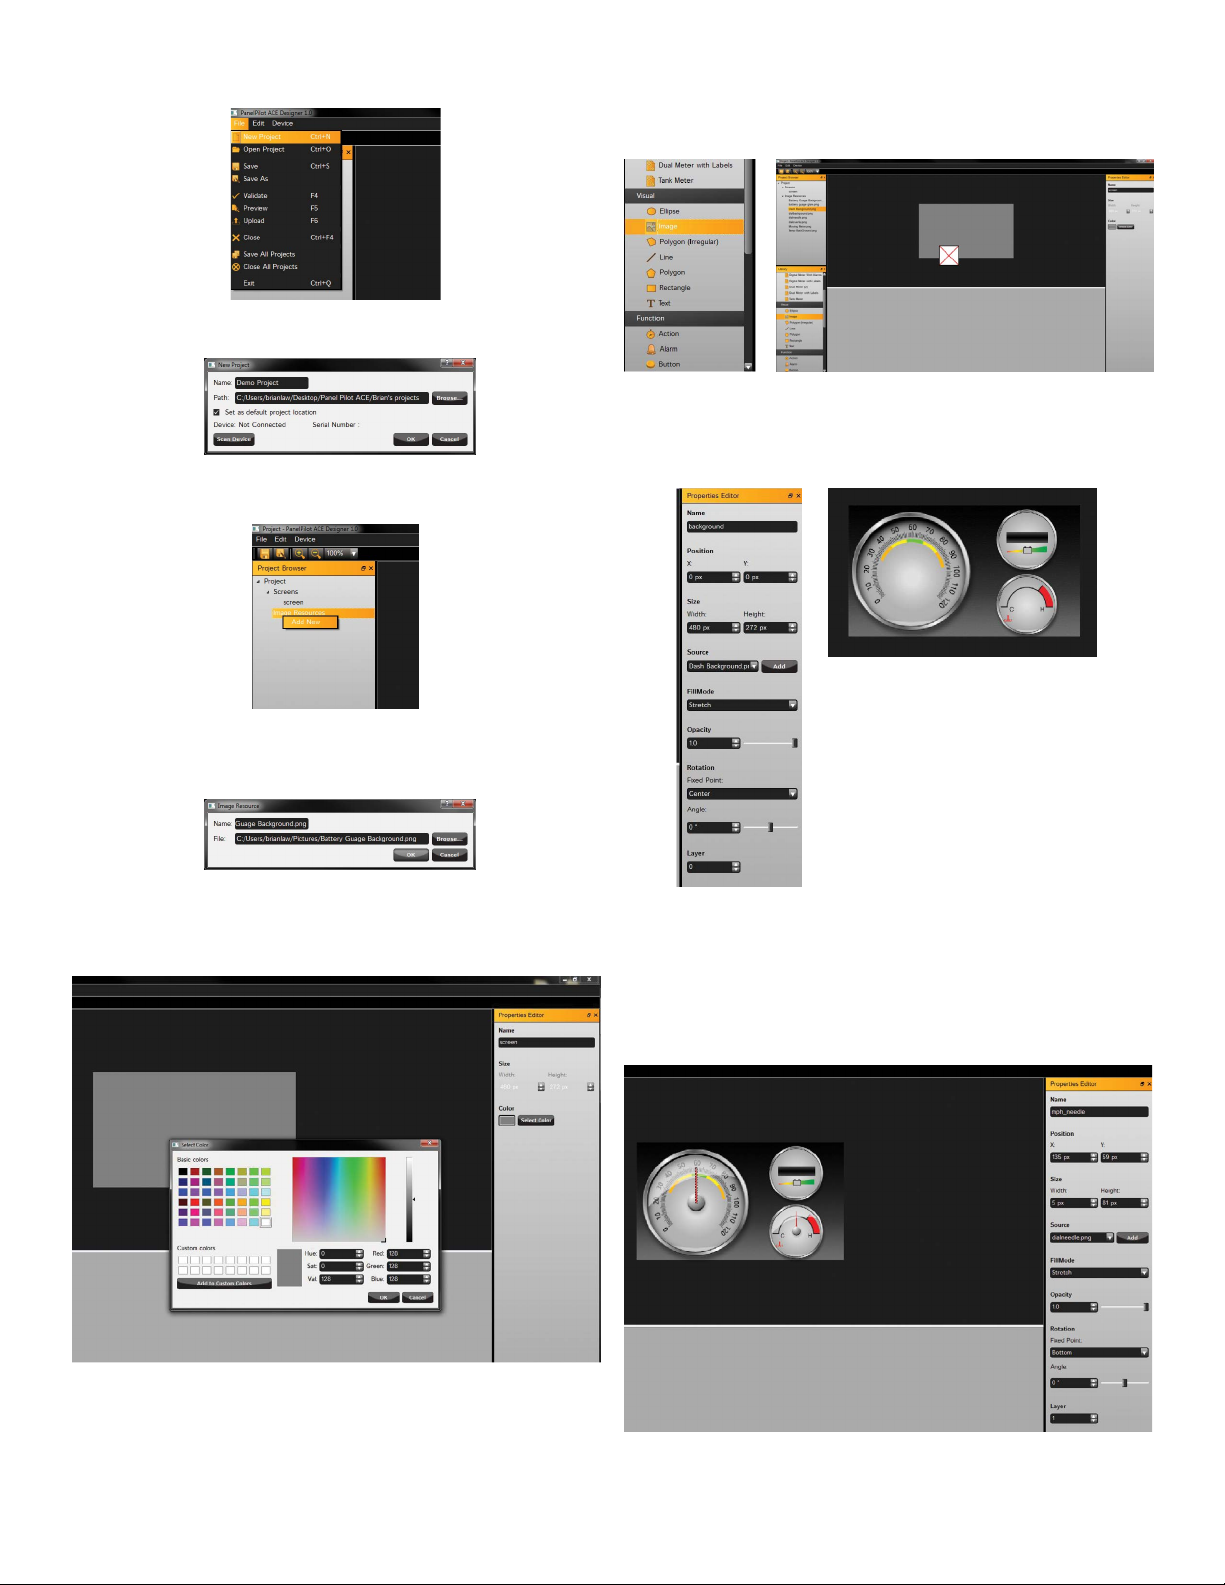
4. In the GUI software, choose “New Project”.
5. In the window that pops up, name it, choose where it will save, and press “OK”.
6. Bring the images in by right-clicking “Image Resources” and choosing “Add New”.
9. To use an image as the background: a) Choose “Image” under the library window
and drag it onto the gray box. b) Give the image an appropriate name and use the
appropriate size settings to ll the entire screen. c) Select the image background in
“Source”.
10. To add the meters: a) Add in meter images in the same way as mentioned in step
9. b) To resize the images, grab the corners or sides and stretch them to the
necessary size. c) Once nished, click on the individual meters and name them for
easy access later.
7. Navigate to the location where the pictures are stored and select the picture to
bring in. The image will now appear under image resources in the project browser.
8. To use a color as the background: a) Click on the gray box in the middle of the
screen where the display preview will be. b) Choose the background color in the
“Properties Editor” menu that appears on the right.
11. To add the needles for each display: a) Add in needle images as mentioned in
step 9. b) Position the bottom of the needle to be in the center of the dial. c) Set
the transform origin to the bottom center of the picture in the “Properties Editor”
menu on the right. (This is the xed point that will be the “hinge” that the dial turns
on.) d) Under “Rotation”, change the angle to check how the image will rotate and
verify it is moving in the expected way. (Make a note of the angles where the needle
needs to start and stop.)
Page 3

12. To add the battery gauge: a) Add the gauge photo as mentioned in step 9. b) Drop
the image into position and name it.
13. To make the dials move: a) Choose “rotating needle” under the function setting of
the library and drag it to the gray area to the right. b) Click on rotatingNeedle and
name it appropriately. c) The analogueInput will default to channel one. d) The
visual element is the picture of the needle. e) The angle range is where the needle
needs to start and stop. (Noted in step 11.)
16. To test the app, click File>Preview or press F5 to bring up the simulation window.
Inputs can be simulated in this screen to verify that everything is working properly.
17. Once satised with the simulation, click File>Upload or press F6 with the meter still
plugged in to send the app to the display.
14. Click on analogueInput and assign the wanted channel to control the mph_needle.
Here, also set the voltage range and what value that voltage range translates to on
the display. Follow the same instructions to add any other needle channels.
15. To add bar graph ll graphics, drag in the “ll meter” function and another
analogueInput and follow the directions above.
Page 4

MOUNTING
1. Punch out a rectangular hole in the panel of the enclosure 4.6˝ x 3.07˝ (117 x 78
mm).
2. For panels between 0.04˝ and 0.12˝ (1 and 3 mm) in thickness, use the integral
clips to attach the SPPM2 to the panel.
3. For panels between 0.01˝ and 0.15˝ (0.5 an 4 mm) in thickness, place the gasket
around the bezel of the display, slide the display through the front hole in the panel,
and attach the mounting clip from the rear, as shown in Figure 1.
Figure 1
WIRING
19
20
PL5
USB
1
2
33
34
TBLK1
123456
Figure 2
PL4
PL7
54321
1
PL8
7
1
2
1
2
PL6
21
22
2
1
2
PL11
878
TBLK1: POWER & ANALOG INPUTS
PIN Number Function
1
2
3
4
5
6
PL4: ALARMS, SERIAL INPUT, & DIGITAL I/O
PIN Number Function
1
2
3
4
5
6
7
8
9
10
11
12
13
14
15
16
17
18
19
20
21
22
23
24
25
26
27
28
29
30
31
32
33
34
PL5: PROGRAMMING INTERFACE (JTAG)
PIN Number Function
1
2
3
4
5
6
7
8
9
10
11
12
13
14
15
16
17
18
19
20
Supply Voltage (V+)
0 V
Analog Input 4 (IN4)
Analog Input 3 (IN3)
Analog Input 2 (IN2)
Analog Input 1 (IN1)
0 V
Supply Voltage (V+)
Alarm 1 (ALM1)
Alarm 2 (ALM2)
I2C0 SCL
I2C0 SDA
SPI SS1
SPI MOSI
SPI MISO
SPI SCK
Digital I/O Channel 1 (DIG1)
Digital I/O Channel 2 (DIG2)
Digital I/O Channel 3 (DIG3)
Digital I/O Channel 4 (DIG4)
Digital I/O Channel 5 (DIG5)
Digital I/O Channel 6 (DIG6)
Digital I/O Channel 7 (DIG7)
Digital I/O Channel 8 (DIG8)
PWM Channel 1 (PWM1)
PWM Channel 2 (PWM2)
PWM Channel 3 (PWM3)
PWM Channel 4 (PWM4)
DUART TX (for internal use)
DUART TX (for internal use)
USB D+
USB DI2C1 SDA (for internal use)
I2C1 SCL (for internal use)
+5 V Output Voltage
High Speed ADC
+3 V3 Output Voltage
0 V
Shorted together to enable rmware upgrade
Shorted together to enable rmware upgrade
+3 V3 Output Voltage
N/C (no connection)
JTAG_TRST
OV
JTAG_TDI
0V
JTAG_TMS
0V
JTAG_TCK
0V
JTAG_RTCK
0V
JTAG_TDO
0V
n_reset
0V
N/C
0V
0V via a 47 kΩ resistor
0V
Page 5

PL6: ETHERNET & EXPANSION I/O
PIN Number Function
1
2
3
4
5
6
7
8
9
10
11
12
13
14
15
16
17
18
19
20
21
22
PL7: RS232 INTERFACE
PIN Number Function
1
2
3
4
5
PL8: 4-20 mA CURRENT LOOP MEASUREMENT
PIN Number Function
1-2
3-4
5-6
7-8
PL11: ANALOG INPUTS
PIN Number Function
1
2
3
4
5
6
7
8
ENT CLK
ENT MDC
ENT MDIO
ENT RXD0
ENT RXD1
ENT RX EN
ENT TXD0
ENT TXD1
ENT TX EN
Digital I/O 9 (expansion)
Digital I/O 10 (expansion)
Digital I/O 11 (expansion)
Digital I/O 12 (expansion)
Digital I/O 13 (expansion)
Digital I/O 14 (expansion)
Digital I/O 15 (expansion)
Digital I/O 16 (expansion)
Digital I/O 17 (expansion)
+5 V
0 V
External Module Hardware ID
External Module Hardware ID
TX
RTS
RX
CTS
0 V
4-20 mA Current Loop Measurement (IN1) when shorted
4-20 mA Current Loop Measurement (IN1) when shorted
4-20 mA Current Loop Measurement (IN1) when shorted
4-20 mA Current Loop Measurement (IN1) when shorted
Analog Input 1 (IN1)
0 V
Analog Input 2 (IN2)
0 V
Analog Input 3 (IN3)
0 V
Analog Input 4 (IN4)
0 V
SUPPLY VOLTAGE
Supply to the display module can be connected to either the screw terminals (TBLK1),
pins (PL4), or the mini-USB connector. (Note: For best results, ensure the power
supply is free from electrical noise.
Supply Voltage Screw Terminals (TBLK1) PIN (PL4)
V+
0 V
MEASURING AN ANALOG VOLTAGE
An analog voltage can be connected to either the screw terminals (TBLK1) or pins
(PL11).
Analog
Input
IN1
1
0 V
2
IN2
0 V
3
IN3
0 V
4
IN4
0 V
To minimize offsets, it is best practice to connect the analog grounds directly to the
meter pins (PL11) or screw terminals (TBLK1). The SPPM2 uses a programmable gain
amplier (PGA) together with a 16-bit analog to digital converter (ADC) for its analog
voltage measurements. The PGA is automatically set when the analog range of a
channel is input into the design software.
The table below shows the maximum resolution of the SPPM2’s analog measurements
across a number of voltage ranges
Analog Input Resolution
±1.25 V
±2.5 V
±5 V
±10 V
±20 V
±40 V
MEASURING A 4-20 mA CURRENT
The 4-20 mA signal should be connected as for “Measuring an Analog Voltage”, but
a jumper link should be placed across pins PL8 for each analog channel being used.
Analog Voltage Jumper Link (PL8)
IN1
IN2
IN3
IN4
Scaling: The sense resistors used are 110Ω. Therefore, in software scaling, 4 mA
equates to 0.44 V and 20 mA equates to 2.2 V. (Note: Transmitter terminals + or – must
be isolated from the power supply.).
1
2
Screw Terminals
(TBLK1)
6
2
5
2
4
2
3
2
0.04 mV
0.08 mV
0.16 mV
0.33 mV
0.66 mV
1.3 mV
1 & 2
3 & 4
5 & 6
7 & 8
PIN
(PL11)
1
2
3
4
5
6
7
8
2
1
Page 6

DRIVING AN ALARM OUTPUT
V+
OV
v+
The alarm outputs are open-collector. When an alarm is active, the output can sink as
much as 10 mA. Alarm outputs are connected via PL4.
Alarm Output PIN (PL4)
ALM1
ALM2
3
4
SPPM2
USING PWM OUTPUT
If the SPPM2 is congured to have a PWM output, it can be used to drive a buzzer
or produce a simple digital-to-analog converter. The PWM outputs are connected via
PL4.
PWM Output PIN (PL4)
PWM1
PWM2
PWM3
PWM4
19
20
21
22
R> V+-VLED
3.3
0.8
3.3
0.4
-
-
<10mA
R
15
16
17
18
V
V
V
V
mA
mA
ALM1
Figure 3: Driving an LED using Alarm Output
SPPM2
<10mA
ALM1
Figure 4: Driving a Relay using Alarm Output
USING DIGITAL INPUT/OUTPUT PINS
Digital inputs/outputs are connected via PL4.
Digital I/O PIN (PL4) Digital I/O PIN (PL4)
DIG1
DIG2
DIG3
DIG4
The characteristics of the digital I/O pins are as follows:
Parameter Min Max Unit
Input Voltage (High)
Input Voltage (Low)
Output Voltage (High)
Output Voltage (Low)
Output Source Current
Output Sink Current
11
12
13
14
DIG5
DIG6
DIG7
DIG8
2
0
2.6
0
-11.4
9.0
10mA
The characteristics of the PWM output pins are as follows:
Parameter Min Max Unit
LED
Voltage
Output Source Current (PWM)
Output Sink Current (PWM)
Figure 6: Using PWM Output to Convert Digital to Analog
SPPM2
Figure 7: Using PWM Output to Drive a Buzzer
MAINTENANCE/REPAIR
Upon nal installation of the Series SPPM2 Graphical User Interface Panel Meter, no
routine maintenance is required. The Series SPPM2 is not eld serviceable and is not
possible to repair the unit. Field repair should not be attempted and may void warranty.
SPPM2
PWM
PWM
0
-9.5
7.7
3.3
-
-
V
mA
mA
R
OV
R
OV
SPPM2
VDD 3.3V
1kΩ to 10k
DIG1
Figure 5: Generating a Digital Input with a Push Button
©Copyright 2017 Dwyer Instruments, Inc. Printed in U.S.A. 11/17 FR# 444322-00 Rev.1
DWYER INSTRUMENTS, INC.
P.O. BOX 373 • MICHIGAN CITY, INDIANA 46360, U.S.A.
WARRANTY/RETURN
Refer to “Terms and Conditions of Sale” in our catalog and on our website. Contact
customer service to receive a Return Goods Authorization number before shipping the
product back for repair. Be sure to include a brief description of the problem plus any
additional application notes.
Phone: 219/879-8000
Fax: 219/872-9057
www.dwyer-inst.com
e-mail: info@dwyermail.com
 Loading...