

Page 1
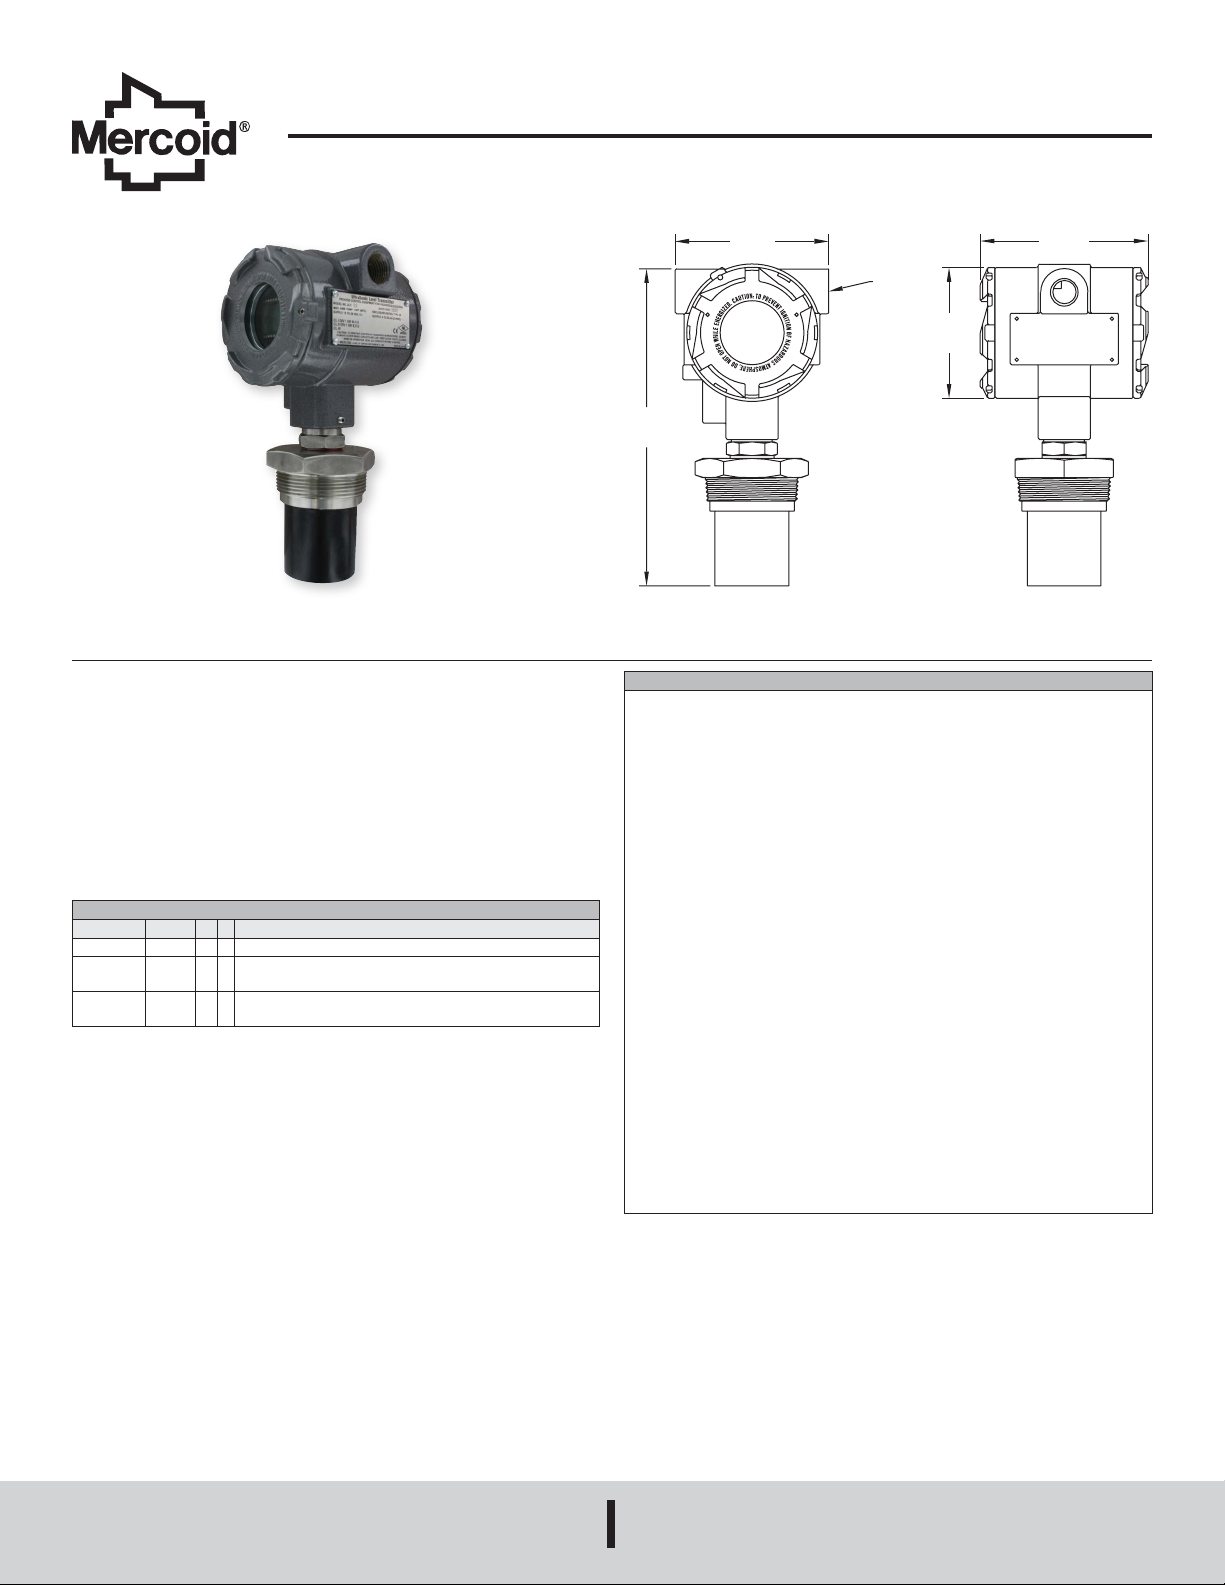
Series ULT Ultrasonic Level Transmitter
3 29/32
[204.79]
4 9/32
By Dwyer
Specications - Installation and Operating Instructions
Bulletin L-45
Series ULT Ultrasonic Level Transmitter provides reliable, accurate, noncontact
measurement of liquid levels. Ultrasonic non-contact technology offers no moving parts
to wear, jam, corrode, or get coated like contact technologies. Mapping software makes
effective measuring surface only a 3˝ diameter column. No concerns with ladders,
pipes, or other tank intrusions in the remaining sound cone. Unit is FM approved
explosion-proof making it ideal for use in hazardous locations. The ULT features easy
programming with 6 digit LCD display and simple menu structure. Output range is
adjustable with choices of inputting tank dimensions or just ll and empty the tank
while calibrating and it automatically scales to levels it senses. Window cover allows
early viewing of display. Failsafe output options and diagnostic capabilities makes the
ULT a good choice for critical applications.
MODEL CHART
Example ULT 1 1 ULT-11
Series ULT Ultrasonic level transmitter
Range 1224.6´ (7.5 m)
Options 122˝ NPT male process with 1/2˝ NPT female conduit
32.8´ (10 m)
2˝ BSPT male process with M20 conduit
[99.21]
2X 1/2 NPT
ø3 21/64
[84.53]
8 1/16
SPECIFICATIONS
Service: Compatible uids. Not for use with powder and bulk solids.
Wetted Materials: Sensor: PVDF; Process connection: 303 SS.
Ranges: 24.6´ (7.5 m), 32.8´ (10 m).
Accuracy: ±0.2% of maximum range.
Resolution: 0.079˝ (2 mm).
Blind Zone: Under 8˝ (20 cm).
Beam Width: 3˝ (7.6 cm) diameter.
Temperature Limits: Ambient: -40 to 140°F (-40 to 60°C); Process: -4 to 140°F
(-20 to 60°C).
Temperature Compensation: -40 to 140°F (-40 to 60°C).
Pressure Limits: 30 psi (2 bar) up to 25°C (77°C). Above 25°C (77°F), rating
decreases 1.667 psi per 1°C increase. See pressure and temperature chart.
Power Requirement: 18-28 VDC (two-wire).
Output Signal: 4-20 mA or 20-4 mA (two-wire).
Max. Loop Resistance: 250 Ω at 24 VDC.
Electrical Connections: Screw terminal.
Conduit Connection: 1/2˝ NPT female (two) or M20.
Process Connection: 2˝ NPT male or BSPT.
Enclosure Rating: Weather-proof meets NEMA 4X, explosion-proof rated Class I,
Div. 1, Groups B, C, D; Class II/III, Div. 1, Groups E, F, G.
Mounting Orientation: Vertical.
Failsafe: On lost echo after 30 s, user selectable to 4, 20, 21, 22 mA or last signal.
Memory: Non-volatile.
Display: 6 character LCD.
Units: In, cm, ft, m, percent.
Memory: Non-volatile.
Programming: 4 button.
Weight: 4.0 lb (1.8 kg).
Agency Approvals: CE, FM.
[108.74]
MERCOID
A DIVISION OF
DWYER INSTRUMENTS, INC.
Page 2
TEMPERATURE/PRESSURE DERATING
TEMPERATURE °C
OPERATING PRESSURE PSI
INSTALLATION
S
40
UNACCEPTABLE
30
20
ACCEPTABLE
10
RANGE
RANGE
Unpacking
Remove the ULT from the shipping carton and inspect for damage. If damage is found,
notify the carrier immediately.
Materials
The ULT may be used to detect level of a variety of materials. Since the sensing
technology is non-contact it is well suited for corrosive, coating, slurry, or sticky media.
The hazardous approval rating also makes the unit ideal for use with hazardous
rated applications. Please see the specications section for hazardous approval
classications.
0
-40 -20 0 20 40 60 80
OPERATING PRINCIPLE
Ultrasound is sound with a frequency greater than the upper limit of human hearing;
approximately 20 kilohertz. The ULT contains an ultrasonic transducer and a
temperature sensing element. The ultrasonic transducer transmits ultrasound wave
pulses through air directed towards the material of which the level is desired. The
ultrasound waves then reect off of the material as an echo and travel back to the
transducer. The level of the material is determined by the transit time of the ultrasound
wave pulse from the sensor to material and for the echo to come back to the sensor.
The speed of sound through air is sensitive to the air temperature. The ULT uses the
temperature sensing element to compensate for air temperature changes.
The ULT incorporates patented surface processing technology and adaptive signal
processing. Surface processing technology lters out all signal obstructions that may
be in the tank creating an effecting beam diameter of only 3˝ (7.6 cm). This beam
diameter is a straight column and not cone shaped like competitor units. Adaptive signal
processing continuously optimizes sensor power, output ltering, and environmental
noise rejection.
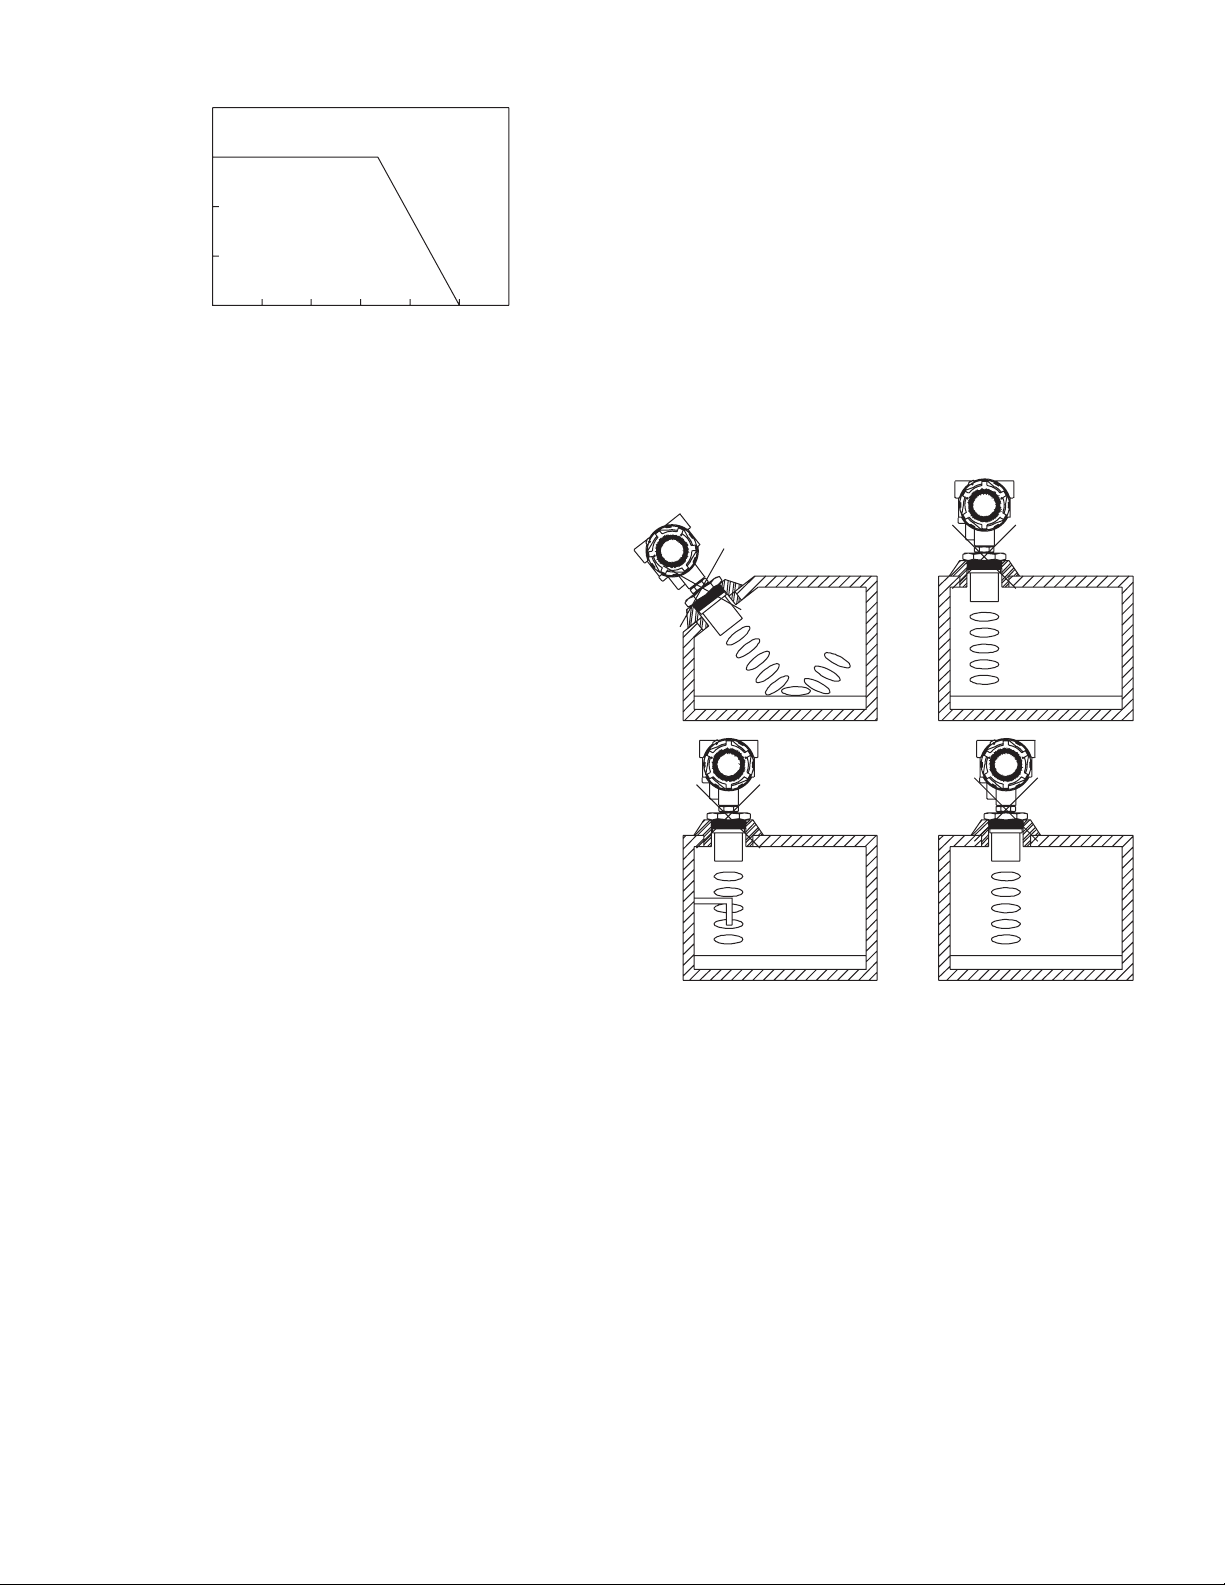
Mounting Location
• The process temperature and ambient temperature must be within the specied
limits.
• The probe must be located away from tank inlets or chutes where material may fall
on the probe during lling or emptying.
• The probe must be located at least 3˝ (7.6 cm) away from the tank side wall.
• The probe cannot be used in vacuum applications.
• The probe must be installed vertically and perpendicular to the media surface.
• Make sure the covers are accessible to allow for programming, wiring, and ability
to see the display.
DO NOT INSTALL AT
AN ANGLE RELATIVE
TO THE LIQUID
DO NOT INSTALL
WITH OBJECTS
IN THE BEAM
DO NOT INSTALL
WITHIN THREE INCHE
OF TANK SIDE WALL
DO NOT INSTALL
IN APPLICATIONS
WITH VACUUM
VACUUM
Figure 1: Unsuitable mounting locations
Page 3
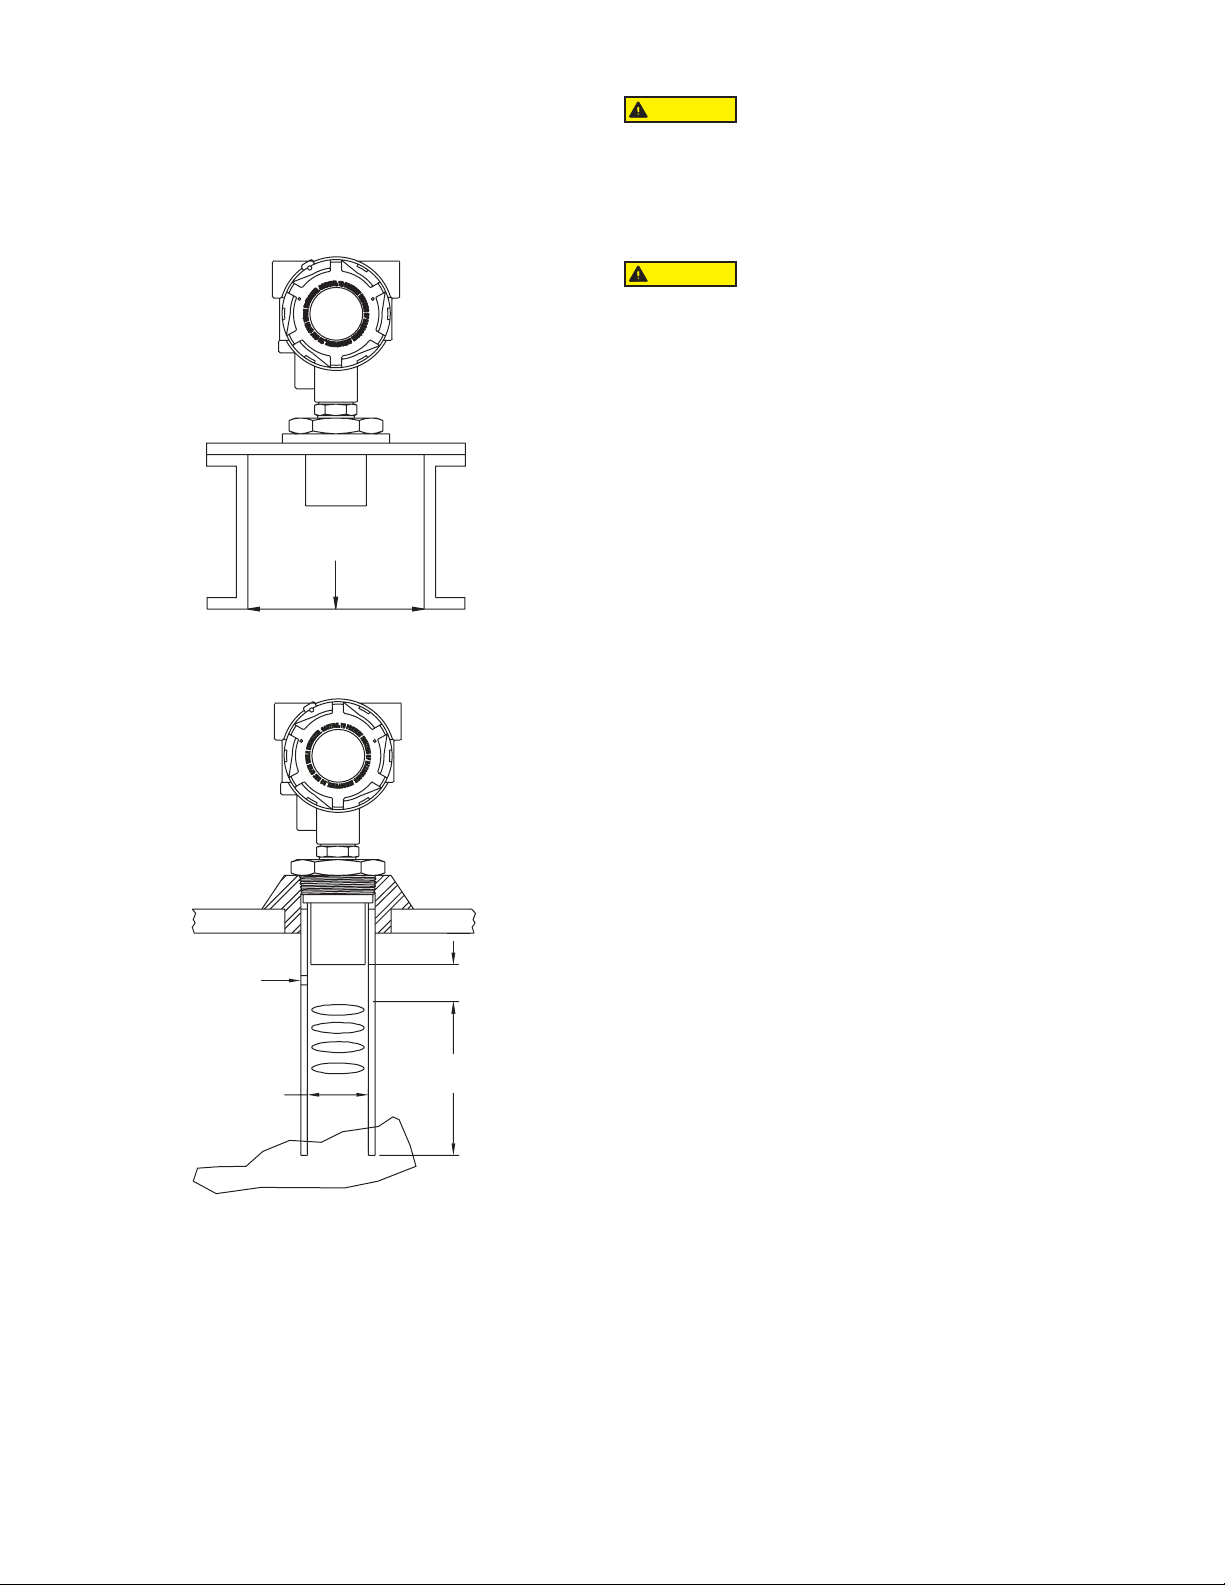
MOUNTING FITTING
VENTILL
LIQUID LEVEL
DIAMETER
RISER
Fittings should be selected that minimize the installation height of the transmitter so
that mounting hardware does not interfere with the acoustic signal. If the installation
does require a riser then the transmitter may be elevated up to 12˝ (30 cm) in a 6˝ (15
cm) diameter riser, 8˝ (20 cm) in a 4˝ (10 cm) diameter riser, and 3˝ (7.6 cm) in a 2˝ (5
cm) diameter riser, see Figure 2. A stand pipe may be used to dampen turbulence or
separate surface foam. Use a minimum 3˝ diameter pipe and cut to the desired length
of the transmitter span with a 45° notch at the bottom. A ventillation hole needs to be
created at the top of the pipe within the 8˝ (20 cm) blind zone, see Figure 3.
HEIGHT
INNER
ELECTRICAL CONNECTION
CAUTION
designed for AC voltage operation.
Note: Installation must be made in accordance with local codes and regulations. When
shing wire through the conduit connection do not allow the wire to touch or press on
components on the boards. Damage to the circuitry may result. Make sure that the
wire is routed so it will not interfere with the calibration switches.
CAUTION
within 18˝ (45.7 cm) of conduit entry. Disconnect power before opening, servicing,
programming, installing, or removing.
The ULT provides two 1/2˝ NPT female ports for conduit connection. The conduit
connection must be made such that condensation is not allowed to enter the sensor
housing. If necessary install a conduit breather drain in a separate conduit body to
prevent buildup of moisture. If nonmetallic conduit is used the protective ground may
be connected to the internal ground connection screw.
The ULT transmitter is designed as a two wire 4-20 mA device. Connection to the
board is through a two pin terminal block. The circuitry is polarized so the positive must
be connected to terminal 1 and the negative must be connected to terminal number
2. It is recommended that shielded twisted pair wire be used if the potential exists
for interference from external noise sources. Ground the shield at the case using the
internal ground screw and leave the other end of the shield open. Do not use the shield
as one of the current loop conductors.
Do not exceed the specied supply voltage rating. Permanent
damage not covered by the warranty may result. This unit is not
Hazardous Area Use: Plug any unused conduit openings.
Plug must engage a minimum of 5 threads. Use a conduit seal
Figure 2: Riser mounting
ATION HOLE
Ø3 [76.20] MINIMUM
Figure 3: Stand pipe mounting
BLIND ZONE
8 [203.20]
OPERATIONAL
RANGE
LOWEST
Page 4

Power Supply
The transmitter requires a minimum of 18 Volts DC at its connection for proper operation,
and a maximum of 28 Volts. Choose a power supply with a voltage and current rating
sufcient to meet this power specication under all operational conditions. If the supply
is unregulated, make sure that the output voltage remains within the required voltage
range under all power line conditions. Ripple on the supply should not exceed 100 mV.
Loop Resistance
The maximum allowable loop resistance is dependent on the power supply voltage.
The maximum loop voltage drop must not reduce the transmitter voltage below the 18
Volt minimum. The maximum loop resistance can be calculated using the following
equation:
PS - 18.0
V
R
MAX =
20 mA
PS is the power supply voltage.
Where V
24 VDC
SETUP & CALIBRATION
Four buttons are provided for all setup and calibration operations. All settings are
stored in nonvolatile memory so they will not be lost if the power is removed.
INDEX
ENTER
UP
DOWN
Figure 5: Display and programming buttons
KEY FUNCTIONS
INDEX
Pressing the INDEX button advances the display to the next menu item.
ENTER
Pressing the ENTER button for approximately two seconds will end operating mode
and enter programing mode. In programming mode press the ENTER button will store
the value of menu items once they are changed to a new value.
UP
Pressing the UP button increments a value in programming.
Figure 4: Electrical wiring diagram
DOWN
Pressing the DOWN button decrements a value in programming.
UP & INDEX
Pressing the UP and INDEX simultaneously will allow faster increments in a value for
programming.
DOWN & INDEX
Pressing the DOWN and INDEX simultaneously will allow faster decrements in a value
for programming.
Page 5

MENU SELECTIONS
The transmitter has two modes: operating and programming. In the normal operating
mode the transmitter will display the liquid height. The unit comes factory calibrated
with the output defaulted to 4 mA equal to the maximum range and 20 mA equal to
the minimum range of the transmitter model. In the programming mode the transmitter
will display the programming menus and choices. When in the programming mode
the transmitter will hold the last current value. The value will not change until the
transmitter is returned to operating mode via RUN in the menu structure.
To enter the programming mode press and hold the ENTER button for approximately
5 seconds. Once in programming mode there are the following top menu selections:
DISPLAY, TANK, OUTPUT, TARGET CAL, VALUES, HELP, and RUN. Pressing the
INDEX button will increment to the next top menu and pressing the ENTER button will
enter the menu for programming changes.
DISPLAY MENU
Press INDEX to advance to the next menu time. Press ENTER to retain the value.
MEASURE
Sets the transmitter output: Select LIQUID or AIR. Factory default is LIQUID.
UNITS
Sets the transmitter display and output unit of measure. Select INCHES, FEET, CM, or
METER. Factory default is INCHES.
SHOW
Sets the transmitter display for distance measure or percentage measure. Select
DISTANCE or PERCENT. Factory default is DISTANCE.
HELP
Displays a guide to the menu items in this menu. Press ENTER to display.
EXIT
Exits DISPLAY menu and goes back to the top menu. Press ENTER to go back to the
top menu or press INDEX to loop back through the DISPLAY menu options.
LIQUID Output will be the height of the liquid in the tank.
AIR Output will be the height of the air above the liquid in the tank.
EXIT Exit without making changes.
INCHES Display and output will be in inches.
FEET Display and output will be in feet.
CM Display and output will be in centimeters.
METER Display and output will be in meters.
EXIT Exit without making changes.
DISTANCE Display will be in units of distance.
PERCENT Display will be in percentage of range.
EXIT Exit without making changes.
Page 6

TANK MENU
If the tank dimensions are known these menu item can be used to set the 4 and 20 mA
points manually. See Figure 6 below. Press INDEX to advance to the next menu item.
Press ENTER to retain the value.
HEIGHT
Sets the 4 mA value. Program as the distance from the transducer face to the 4 mA
value desired (normally the bottom or lowest value of the tank). Factory default is the
maximum range of the model. Use the UP and DOWN buttons to change the value
in the length units the unit has been programmed for. The programmed value can
be anywhere in the range below FILL HEIGHT. If reverse mA is used then this will
become the 20 mA value.
FILL HEIGHT
Sets the 20 mA value. Program as the distance from the HEIGHT (normally the
bottom of the tank) to the 20 mA value desired. Factory default is the maximum range
of the model minus the blind zone distance of 8˝ (20 cm). Use the UP and DOWN
buttons to change the value in the length units the unit has been programmed for. The
programmed value can be anywhere in the range above HEIGHT. The maximum value
for FILL HEIGHT is the maximum range of the unit minus the blind zone distance of
8˝ (20 cm). The blind zone distance is automatically subtracted from the FILL HEIGHT
value programmed. If reverse mA is used then this will become the 4 mA value.
NOTICE
within the BLIND ZONE and that the FILL H is not higher than the HEIGHT. If these
parameters are not maintained, unit may remain in WARM UP mode until the proper
levels have been input. If unit is in WARM UP ensure no targets are within the BLIND
ZONE area and cycle power to return to set up to update the set up parameters.
When setting up HEIGHT and FILL HEIGHT ensure that the
minimum BLIND ZONE requirements are adhered to with no target
OUTPUT MENU
Press INDEX to advance to the next menu item. Press ENTER to retain the value.
SAFE MODE
Sets the output of the transducer for fail-safe mode. The transmitter will output the safe
mode programmed setting if the transmitter loses the echo signal. Select 22 mA, 21
mA, 20 mA, 4 mA or HOLD. Factory default value is 22 mA. Unit will resume normal
operation when echo signal is again received.
22 mA Output of 22 mA.
21 mA Output of 21 mA.
20 mA Output of 20 mA.
4 mA Output of 4 mA.
HOLD Output of last known signal is held.
EXIT Exit without making changes.
REVERSE MA
Sets the transmitter output to be forward or reverse acting. Select NORM or REV.
Factory default is NORM with 4 mA set at the maximum range of the unit and 20 mA
set at the end of the blind zone. See Figure 7 below.
Note: HEIGHT and FILL H must be set before reversing the output.
NORM 4 mA is set to be the bottom of the tank (tank empty) and 20 mA is set to be
the height the liquid can go in the tank (tank full).
REVERSE 20 mA is set to be the bottom of the tank (tank empty) and 4 mA is set to
be the height the liquid can go in the tank (tank full).
EXIT Exit without making changes.
BLIND ZONE 8 [203.2]
20 mA [FULL]
4 mA
[EMPTY]
Figure 6: Height and ll height
HELP
Displays a guide to the menu items in this menu. Press ENTER to display.
EXIT
Exits TANK menu and goes back to the top menu. Press ENTER to go back to the top
menu or press INDEX to loop back through the TANK menu options.
BLIND ZONE 8 [203.2]
4 mA [FULL]
20 mA
[EMPTY]
Figure 7: Reverse output operation
HELP
Displays a guide to the menu items in this menu. Press ENTER to display.
EXIT
Exits OUTPUT menu and goes back to the top menu. Press ENTER to go back to the
top menu or press INDEX to loop back through the OUTPUT menu options.
Page 7

TARGET CAL MENU
Target Calibration sets the tank empty and tank full distances for the transmitter output
based on the actual level in the tank. This is good to use if the tank dimensions are
unknown or if it is desired to ll and empty the tank for precise measurement points.
Press INDEX to advance to the next menu time. Press ENTER to retain the value.
See Figure 8 below.
FULL
Fill the tank to the full liquid level desired. Press ENTER and this level will be saved.
EMPTY
Drain the tank to the empty level desired. Press ENTER and this level will be saved.
HELP
Displays a guide to the menu items in this menu. Press ENTER to display.
EXIT
Exits TARG CAL menu and goes back to the top menu. Press ENTER to go back to
the top menu or press INDEX to loop back through the TARG CAL menu options.
BLIND ZONE 8 [203.2]
[MIN R]
VALUES MENU
SETUP
Displays the current programmed setup for the unit. This is scrolling data that will
return to the VALUES menu after displaying all the parameters. Values shown are:
MEASUR, then the setting; UNITS, then the setting; SHOW, then the setting; HEIGHT,
then the setting; FILL H, then the setting; SAFE, then the setting; REV MA, then the
setting.
DIAGNOSTICS
Displays diagnostic items that may be relevant to the transmitter and its performance
in the application. This is scrolling data that will return to the VALUES menu after
displaying all the parameters. Values shown are RANGE, then the setting; TEMP, then
the setting; ECHO, then the setting; POWER, then the setting; VER, then the setting.
RESET
Resets the programming to factory default settings.
YES Resets the programming to factory default settings.
NO Exits without making changes.
EXIT
Exits VALUES menu and goes back to the top menu. Press ENTER to go back to the
top menu or press INDEX to loop back through the VALUES menu options.
HELP MENU
Contains contact information for Dwyer Instruments, Inc.
HEIGHT
[MAX R]
Figure 8: Target calibration
FILL H
Page 8

MAINTENANCE & REPAIR
Other than the controls mentioned in this manual there are no user maintenance
adjustments or routine servicing required for this product. The unit is not eld
repairable and should be returned to the factory if service is required. Disassembly or
modications made by the user will void the warranty and could impair the continued
safety of the product. If repair is required obtain a Returned Goods Authorization
(RGA) number and send the unit, freight prepaid, to the address below. Please include
a detailed description of the problem and conditions under which the problem was
encountered.
Dwyer Instruments, Inc.
Attn: Repair Department
102 Highway 212
Michigan City, IN 46360
This symbol indicates waste electrical products should not be disposed
of with household waste. Please recycle where facilities exist. Check with
your Local Authority or retailer for recycling advice.
MERCOID
Printed in U.S.A. 2/20 FR# 443689-00 Rev. 2©Copyright 2020 Dwyer Instruments, Inc.
A DIVISION OF
DWYER INSTRUMENTS, INC.
 Loading...