

Page 1
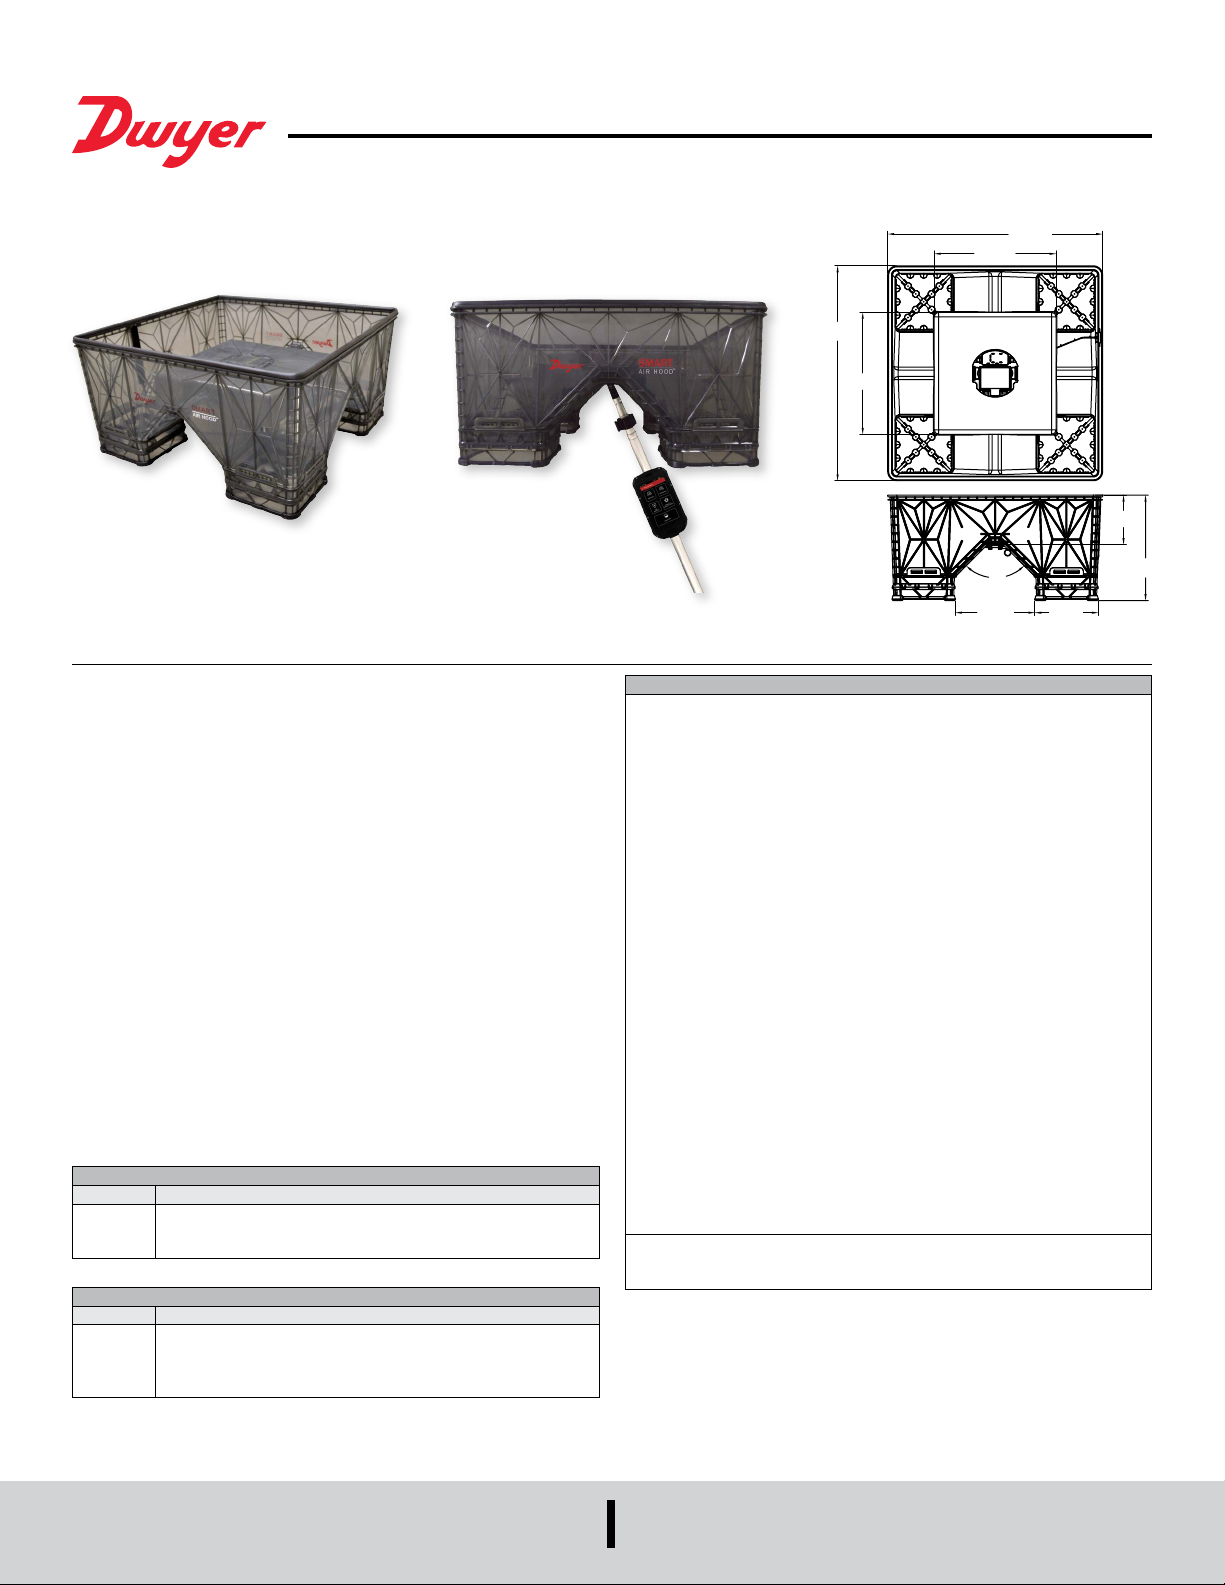
Series SAH SMART Air Hood™ Balancing Instrument
12
24.074
7.103
8.909
®
Specications - Installation and Operating Instructions
24.074
13.662
Bulletin TE-SAH
13.662
5.543
90.000°
The SERIES SAH SMART Air Hood™ balancing instrument is the most accurate and
easy to operate air ow hood on the market. By using the included hood stand and
wireless communications to the handheld, a single operator can balance a branch in
less time than traditional balancing teams. Besides being lighter than most traditional
capture hoods, the ergonomic design makes the Series SAH easy to maneuver, with
less physical stress. The rugged polypropylene base hood features patented Quad
Flow Design Technology for controlling air ow and minimizing back pressure, which
yields superior measurement accuracy. The Wi-Fi direct communication gives reliable
communication with a distance of up to 200 yards between the hood and the handheld
test instrument. The SMART Air Hood
application software which reduces the number of steps in the air ow balancing
process using Predictive Balancing’s Express Balance mode. Predictive Balancing
is a method of predicting the optimal ow set point for each register and the order in
which they should be adjusted.
INCLUDED WITH THE SAH
1. Translucent gray SAH base unit with 2´ x 2´ (600 mm x 600 mm) opening
2. Handheld test instrument with attached quick release
3. Extendable pole 4.5´ to 12´ with handheld test instrument connection
4. Extendable pole 2´ to 4’ with handheld test instrument connection
5. Installation and operating manual
6. Pole safety clamp
7. Stationary Pole Adapter
8. SAH travel case
9. Cable adapter to connect the SAH and handheld test instrument
10. Charger and cable for SAH and handheld test instrument
MODEL CHART
Model Description
SAH-22
SAH-22-LB
ACCESSORIES
Model Description
A-SAH-14S
A-SAH-BK
A-SAH-CK
SMART Air Hood
SMART Air Hood
lithium battery
Canvas hood 1´ x 4´
SAH adapter base kit for canvas hood
Spare calibration kit, Includes quad ow sensing grids, and sensor
module
™
balancing instrument includes the PredictAir™
™
balancing instrument with 2´ x 2´ opening
™
balancing instrument with 2´ x 2´ opening, less
SPECIFICATIONS
VOLUME FLOW
Service: Air.
Volume Flow Units: CFM, l/s, m
Volume Flow Ranges: Supply: 40 to 2000 CFM. (68 to 3398 m3/h); Exhaust: 80 to
2000 CFM.
Accuracy at Calibration > 40 CFM: ±3% of reading ±7 CFM*.
Accuracy for Any Diffuser > 40 CFM: ±3% of reading ±10 CFM**.
Resolution: 1 CFM (1.7 m³/h) (.5 l/s).
TEMPERATURE
Units: °C, °F, °K.
Operating Range: 40 to 140°F (4.4° to 60°C).
Storage Range: -4 to 122° F (-20° C to 50° C).
Accuracy: ±0.3% of reading (no calibration required).
RELATIVE HUMIDITY
Range: 5 to 95%.
Accuracy: ±5% of reading (no calibration required).
ABSOLUTE PRESSURE
Units: mbar, Pa.
Range: 10 to 2000 mbar.
Accuracy @ 25°C and within 300 to 1100 mbar: ±2% of reading z9b (no
calibration required).
Power Requirements: 3.6 V NCR18650B MH12210 lithium ion battery, included,
user replaceable or (4) 1.5 V AA alkaline batteries, not included, user replaceable.
Housing Material: Polypropylene.
Weight: 5.75 lb (2.6 kg).
Agency Approvals: CE, FCC, IC.
*Based on calibration with Sensing Precision Calibration Fixture and Dwyer
standard diffuser.
**Based on any diffuser in the Dwyer downloadable library.
Please see Bulletin TE-SAH-SW for PredictAir
instructions.
3
/h.
™
Application Software
DWYER INSTRUMENTS, INC.
P.O. BOX 373 • MICHIGAN CITY, INDIANA 46360, U.S.A.
Phone: 219/879-8000
Fax: 219/872-9057
www.dwyer-inst.com
e-mail: info@dwyermail.com
Page 2
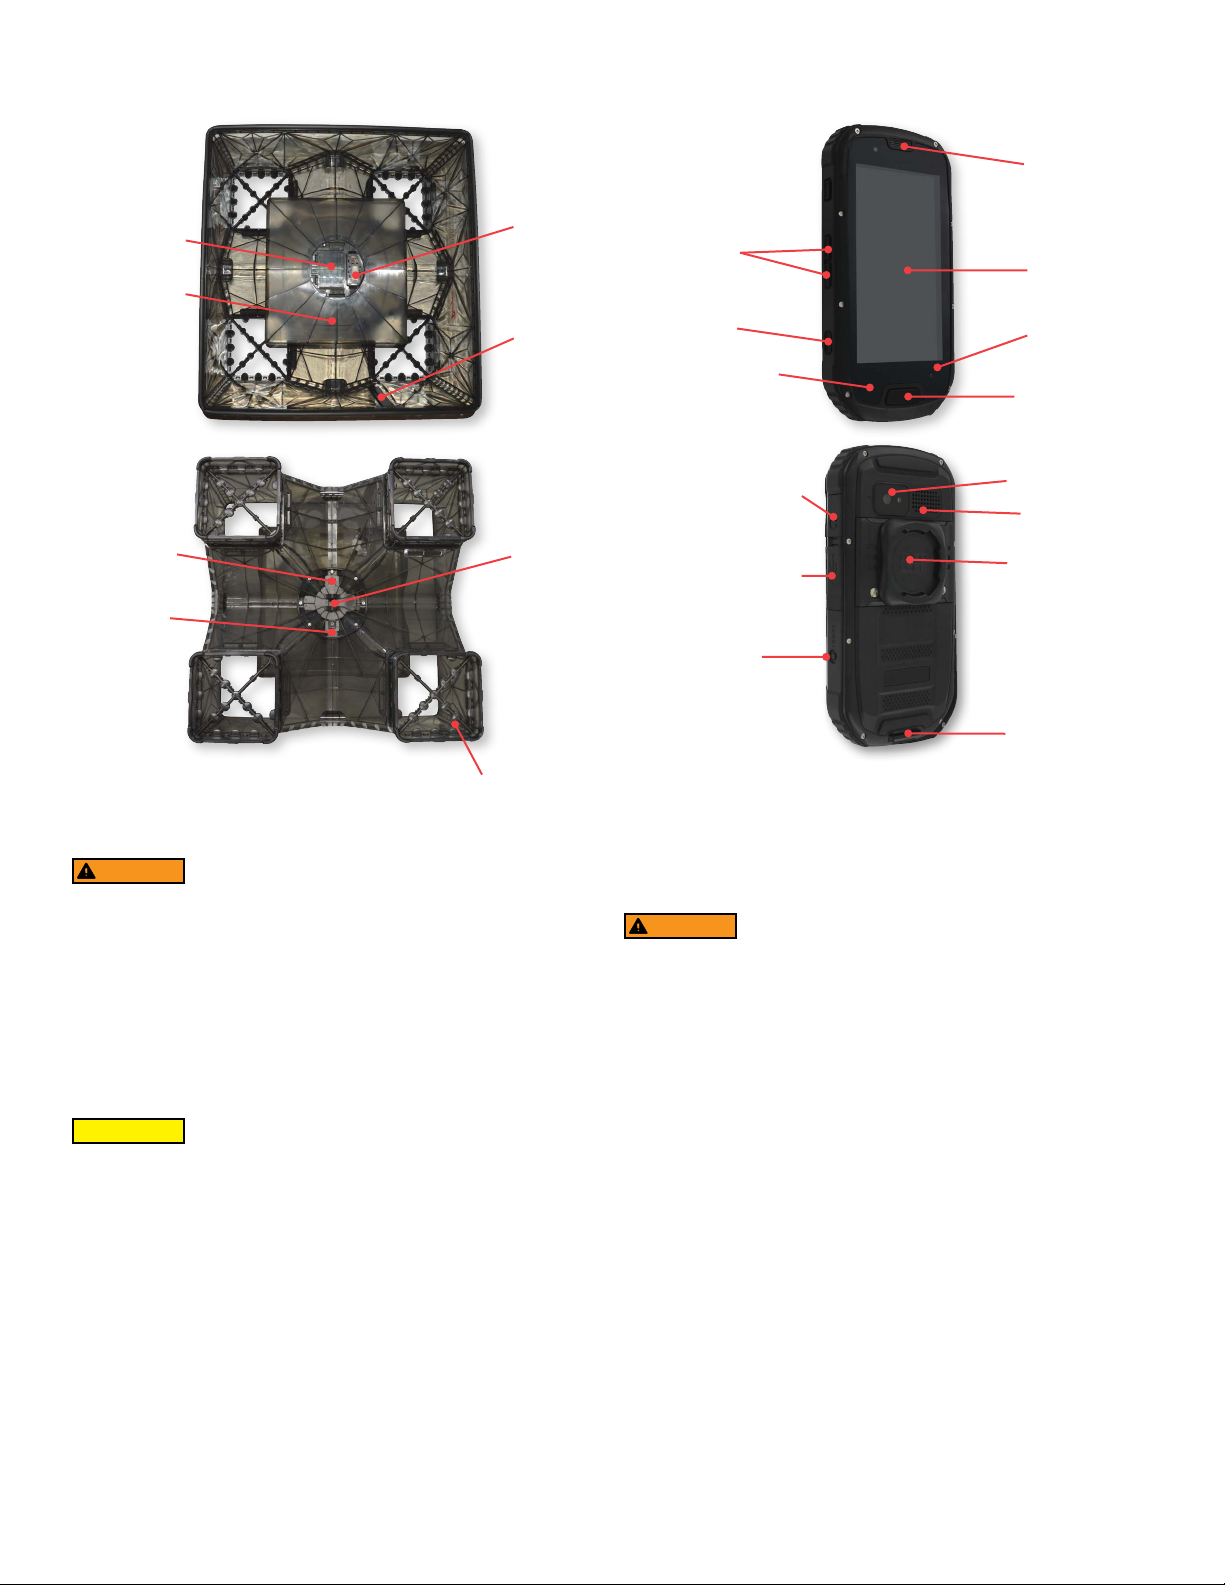
FEATURE OUTLINES
SAH Hood Handheld Instrument
Speaker
Battery
compartment
Diffuser cap
Charging port
Power button
Sensor module
Antenna
Pole
mounting
plate
Detachable quad ow
sensing grid x4
Volume buttons
Power/sleep
button
Menu button
Headphone connection
with integral protective
rubber cap
USB connection for data
transfer or recharging
with integral protective
rubber cap
Reset button
Backlit
touchscreen
LCD
Back button
Home button
Camera
Speaker
SD card access
Hand strap clip
INTRODUCTION
WARNING
Instruments, Inc. for any resulting damage to the unit or to the operator if it is used
with corrosive or dangerous or explosive gas mixtures. When using the handheld
instrument/hood to check air ow at ceiling diffusers, make certain that you can raise
and hold the unit safely during use. This instrument is not classied as ameproof or
intrinsically safe; therefore, it must not be used where an explosion hazard may exist.
The unit is not authorized for use on life support applications.
Note: Observe standard safety procedures when working on ladders and scaffolding.
Also, ensure the unit does not become caught in moving machinery or on sharp
objects.
CAUTION
the unit to stabilize at room conditions before use.
• Owing to its size and shape, take care when carrying the assembled unit from place
to place.
• Avoid people and nearby equipment.
• Avoid objects that may damage the capture hood.
• Turn the instrument off before storage or transportation and remove the batteries if
storing for long periods of time.
• Avoid subjecting the quad ow sensing grids to excessive loading during use or
assembly. Any air ow other than through the calibrated sensing holes, such as any
hair-line cracks, will seriously affect the sensitivity.
A damaged quad ow sensing grid must be replaced. It cannot be repaired.
• Do not disassemble the quad ow sensing grids from the capture hood while
taking readings or balancing. The retaining structure is specically designed to
accommodate loading due to normal operation.
• Under low humidity conditions, static electric charges may be encountered. These
can be avoided by applying a suitable anti-static solution.
Do not use the handheld instrument/hood unit for liquid or gas
mixtures other than air. No responsibility will be taken by Dwyer
• If stored under conditions outside normal operating range, allow
SETUP
Battery Requirements
SAH Battery
WARNING
Match the lithium-ion battery polarity symbols on the battery to the
polarity symbols inside the battery bracket. Failure to do so may result in personal
injury or property damage. The orientation of the polarity symbols on the battery
must match the orientation of the label inside the SAH battery bracket (+ to +, - to -).
The positive terminal of the NCR18650B battery is also marked by a wide black band
on the battery.
If a SAH-22-LB (less battery) was purchased, a 3.6 V NCR18650B lithium ion battery,
or the equivalent, needs to be purchased from a local supplier and installed properly
before the SMART Air Hood™ Balancing Instrument can be operational.
Before beginning use with the SAH, it is suggested that the unit be charged using the
included charging cable. Plug the mini-USB end of the cable into the unit’s charging
port and the USB end into the charging block. Ensure that correct polarity of the battery
is followed.
Handheld Instrument Battery
The handheld instrument utilizes an internal rechargeable battery. The battery symbol
in the top right of the screen shows the status of the battery.
When the handheld instrument is received, it will only have a partial charge. Use the
included USB charging cable and charging block to charge the unit to full battery
charge before using.
When the battery is low, the battery symbol will turn red. When this occurs, use the
included USB charging cable to charge the unit.
Fire Hazard While Charging Battery
Page 3

Battery Backup
Four AA batteries can be used as a backup for the lithium ion rechargeable battery, in
case it loses charge during a job.
Lithium Battery Status
The LED lights on the hood change color and pattern depending on the status of the
battery.
LED Location LED Color/Pattern Lithium Battery Status
Hood & Power Button
Hood & Power Button
Power Button
Power Button
Powering the Unit
The SMART Air Hood
Red (blink)
Red (on)
Red (on)
Green (on)
™
balancing instrument is ready to use directly out of the box.
Battery is critically low
Battery is low
Battery is charging
Battery is fully charged
No assembly process is required. The unit can be powered on by pushing the power
button, it should turn green when turned on.
INSTALLATION
Assembling Accessories
In order to place the hood onto a diffuser to measure air ow it needs to be mounted
to one of the two provided poles.
Before connecting the pole to the hood, the safety clamp must be slid onto the long
pole. The safety clamp is designed to stop the pole from sliding too far in the situation
that the pole sleeves are not correctly locked into position. This prevents the middle
pole sleeve from sliding down into the outer sleeve and allowing the hood to strike the
user in the head. Slide the locking collar into position at the top of the middle sleeve
of the pole and lock into place. The collar location will be dependent upon the height
of the user.
Safety Clamp
To connect the pole to the hood, align the hole at the end of the pole with the holes
in the mounting plate of the hood. Insert the provided locking pin through the holes in
order to lock the pole to the hood. When inserting the locking pin, start by placing it into
the alignment hole on the opposite side from the power button as illustrated below. In
order to insert or remove the pin, press in the button on the end of the pin.
To turn off the hood, press and hold the power button until the LEDs turn off.
Power on the handheld instrument device by pushing the power button. Wait
approximately 15 seconds for it to fully turn on. Swipe across the screen to unlock
the unit.
To turn off the handheld, press and hold the power/sleep button and press “Power Off”
when prompted on the screen.
When using the short pole or with the SAH adapter base kit for canvas hoods, the
stationary pole adapter should be used to keep the hood pole from pivoting. Place
the stationary pole adapter onto the SAH and attach using the screws and wing nuts
provided (below). Once secure to the SAH, insert the short pole and secure in place
using the locking pin.
Page 4

To attach the handheld to the pole secure the handheld locking device to the pole as
shown below. Secure handheld to pole using locking attachment on the back of the
handheld by inserting it into the locking device on the pole and rotating 1/4 turn.
™
Once the handheld is attached to the pole, the SMART Air Hood
balancing instrument
is now ready for use.
For shorter ceilings it is recommended to leave the top section of the pole inserted into
the pole and adjust the height with the middle section for greater stability.
OPERATION
Connecting the SMART Air Hood
™
Balancing Instrument to the PredictAir™
Application Software
The LED lights on the hood blink in certain patterns depending on its communication
with the handheld.
Blue LED State Red LED State Connection Status
50% duty cycle
20% duty cycle
5% duty cycle
Placing the SMART Air Hood
50% duty cycle
20% duty cycle
5% duty cycle
™
Not connected
Attempting to connect
Connected
Balancing Instrument on a Diffuser
Place the hood on the diffuser and ensure that there are no leaks by visually inspecting
that the hood seal completely surrounds the diffuser. Make sure to check every side
and corner of the hood and verify that it is sealed onto the diffuser.
FCC/INDUSTRY CANADA NOTICE
NOTICE
This device complies with Part 15 of the FCC rules.
Operation is subject to the following two conditions:
(1) This device may not cause harmful interference, and (2) this device must accept
any interference received, including interference that may cause undesired operation.
This equipment has been tested and found to comply with the limits for a Class B
digital device, pursuant to Part 15 of the FCC Rules. These limits are designed to
provide reasonable protection against harmful interference in a residential installation.
This equipment generates, uses, and can radiate radio frequency energy and, if not
installed and used in accordance with the instructions, may cause harmful interference
to radio communications. However, there is no guarantee that interference will not
occur in a particular installation. If this equipment does cause harmful interference to
radio or television reception, which can be determined by turning the equipment off
and on, the user is encouraged to try to correct the interference by one or more of the
following measures:
• Reorient or relocate the receiving antenna.
• Increase the separation between equipment and receiver.
• Connect the equipment to an outlet on a circuit different from that to which the
receiver is connected.
• Consult the dealer or an experienced radio/TV technician for help.
NOTICE
This device complies with Industry Canada license-exempt RSS
standard(s). Operation is subject to the following two conditions:
1. This device may not cause harmful interference;
2. This device must accept any interference received, including interference that may
cause undesired operation of the device.
CAUTION
Pursuant to FCC 15.21 of the FCC rules, changes or modications
not expressly approved by Dwyer Instruments, Inc. may void the
user’s authority to operate the equipment.
RF NOTICE
NOTICE
This product complies with FCC OED Bulletin 65 and Industry
Canada’s RSS-102 radiation exposure limits set forth for an
uncontrolled environment.
NOTICE
CAUTION
This Class B digital apparatus complies with Canadian ICES-003.
The antenna used for this transmitter must maintain a separation
of at least 20 cm from all persons and must not be co-located or
operating in conjunction with any other antenna or transmitter.
Once the hood is placed correctly, twist the pole to adjust the pole length so that it
reaches the oor supporting the hood itself. If the hood is not securely in place, then
re-adjust the pole length until it is free standing.
AVIS
Cet appareil est conforme á Industrie Canada une license
standard RSS exonérés (s). Son fonctionnement est soumis aux
deux conditions suivantes:
1. Cet appareil ne doit pas provoquer d’interférences,
2. Cet appareil doit accepter toute interférence reçue, y compris les interférences
pouvant provoquer un fonctionnement indésirable de l’appareil.
AVIS
Ce produit est conforme aux limites d’expositions aux
rayonnements dénies pour un environnement non contrôlé du
Bulletin 65 FCC OET et RSS-102 Industry Canada.
UHH2 RF Exposure Information
The SAR limit of USA (FCC) is 1.6 W/kg averaged over one gram of tissue. Device
types: S09 (FCC ID: ZHN-W63) has also been tested against this SAR limit. The
highest SAR value reported under this standard during product certication for use at
the ear is 0.430 W/kg and when properly worn on the body is 0.772 W/kg. This device
was tested for typical body-worn operations with the back of the handset kept 1.5
cm from the body. To maintain compliance with FCC RF exposure requirements, use
accessories that maintain a 1.5 cm separation distance between the user’s body and
the back of the handset. The use of belt clips, holsters, and similar accessories should
not contain metallic components in its assembly. The use of accessories that do not
satisfy these requirements may not comply with FCC RF exposure requirements and
should be avoided.
Page 5

TROUBLESHOOTING
Reported Problem Possible Solution
No or not changing data - Verify sensor module is plugged in
- Check for leaks in diffuser sealing tubing
- Verify SAH connection by looking at LED blinking
pattern
- Verify quad ow sensing grids are fully seated and not
damaged
- Verify the hood has a good seal with the diffuser/grille
- Check for any blockage in the inlets and outlets of the
hood
- Check for cracks in the hood body
Reading is too high or low - Verify quad ow sensing grids are fully seated and not
damaged
- Verify the hood has a good seal with the diffuser/grille
- Check for any blockage in the inlets and outlets of the
hood
- Check for cracks in the hood body
- Check for possible damage in the rubber seal
Cannot connect to hood - Verify the connection is attempted within the proximity
of the handheld instrument
- Restart the PredictAir™ application software
- Power cycle the hood and/or handheld instrument
- Check the battery status of both the hood and
handheld instrument
MAINTENANCE
Some simple routine maintenance after each use will ensure that the instrument will
function correctly for many years.
• Remove any moisture droplets using a clean, absorbent lint-free cloth/paper towel
before storing the unit.
• Remove all batteries if the unit is to be stored for an extended period of time.
• Always store and transport the unit carefully. Store in dry conditions.
• DO NOT immerse the hood in water.• DO NOT use abrasive cleaning products on
the hood. The hood can be wiped clean with a damp lint-free cloth.
• DO NOT use abrasive cleaning products on the quad ow sensing grids, which
may block or damage the grid. The grid may be CAREFULLY wiped clean with
a lint-free cloth. Ensure the air entry holes of the quad ow sensing grids are not
contaminated with moisture.
• Check periodically for damage or any visible cracks.
• Take care to not damage or obscure the air entry holes of the quad ow sensing
grids. This can seriously affect the measurements obtained.
Diffuser adapter hood fabric can be wiped clean with a damp cloth, if necessary, and
moisture droplets dried with an absorbent lint-free cloth/paper. Periodically, wash in
cool water using a mild detergent. Drip dry, ensuring it cannot become caught in any
sharp objects.
The fabric used is impermeable, tough, and very resistant under normal use. In the
event that the fabric becomes worn or torn, replace the fabric hood immediately. A
damaged hood will seriously affect the measurements taken.
Anti-static solution can be applied to the instrument by using a clean, lint-free cloth and
carefully rubbing it over the instrument.
Note: This is normally only necessary when working in low humidity conditions.
Annual Calibration
It is recommended to have the unit calibrated annually to ensure the accuracy of the
unit. For calibration purposes, all four quad ow sensing grids and the sensor module
must be sent to a Dwyer authorized service facility. Contact customer service for more
information.
REPAIR
The Series SAH SMART Air Hood
™
balancing instrument is not eld serviceable and
it is not possible to repair the unit. Field repair should not be attempted and may void
warranty.
WARRANTY/RETURN
Refer to “Terms and Conditions of Sale” in our catalog and on our website. Contact
customer service to receive a Return Materials Authorization number before shipping
the product back for repair. Be sure to include a brief description of the problem plus
any additional application notes.
Page 6

©Copyright 2016 Dwyer Instruments, Inc. Printed in U.S.A. 8/16 FR# 444357-00 Rev. 2
DWYER INSTRUMENTS, INC.
P.O. BOX 373 • MICHIGAN CITY, INDIANA 46360, U.S.A.
Phone: 219/879-8000
Fax: 219/872-9057
www.dwyer-inst.com
e-mail: info@dwyermail.com
 Loading...