

Page 1
Bulletin TE-SAH-AH
®
Series SAH SMART Air Hood™ Balancing Instrument - Adapter Hoods
Specications - Installation and Operating Instructions
The SERIES SAH SMART Air Hood™ balancing instrument is the most accurate and
easy to operate air ow hood on the market. By using the included hood stand and
wireless communications to the handheld, a single operator can balance a branch in
less time than traditional balancing teams. Besides being lighter than most traditional
capture hoods, the ergonomic design makes the Series SAH easy to maneuver, with
less physical stress. The rugged polypropylene base hood features patented Quad
Flow Design Technology for controlling air ow and minimizing back pressure, which
yields superior measurement accuracy. The Wi-Fi direct communication gives reliable
communication with a distance of up to 200 yards between the hood and the handheld
test instrument. The SMART Air Hood
application software which reduces the number of steps in the air ow balancing
process using Predictive Balancing’s Express Balance mode. Predictive Balancing
is a method of predicting the optimal ow set point for each register and the order in
which they should be adjusted.
™
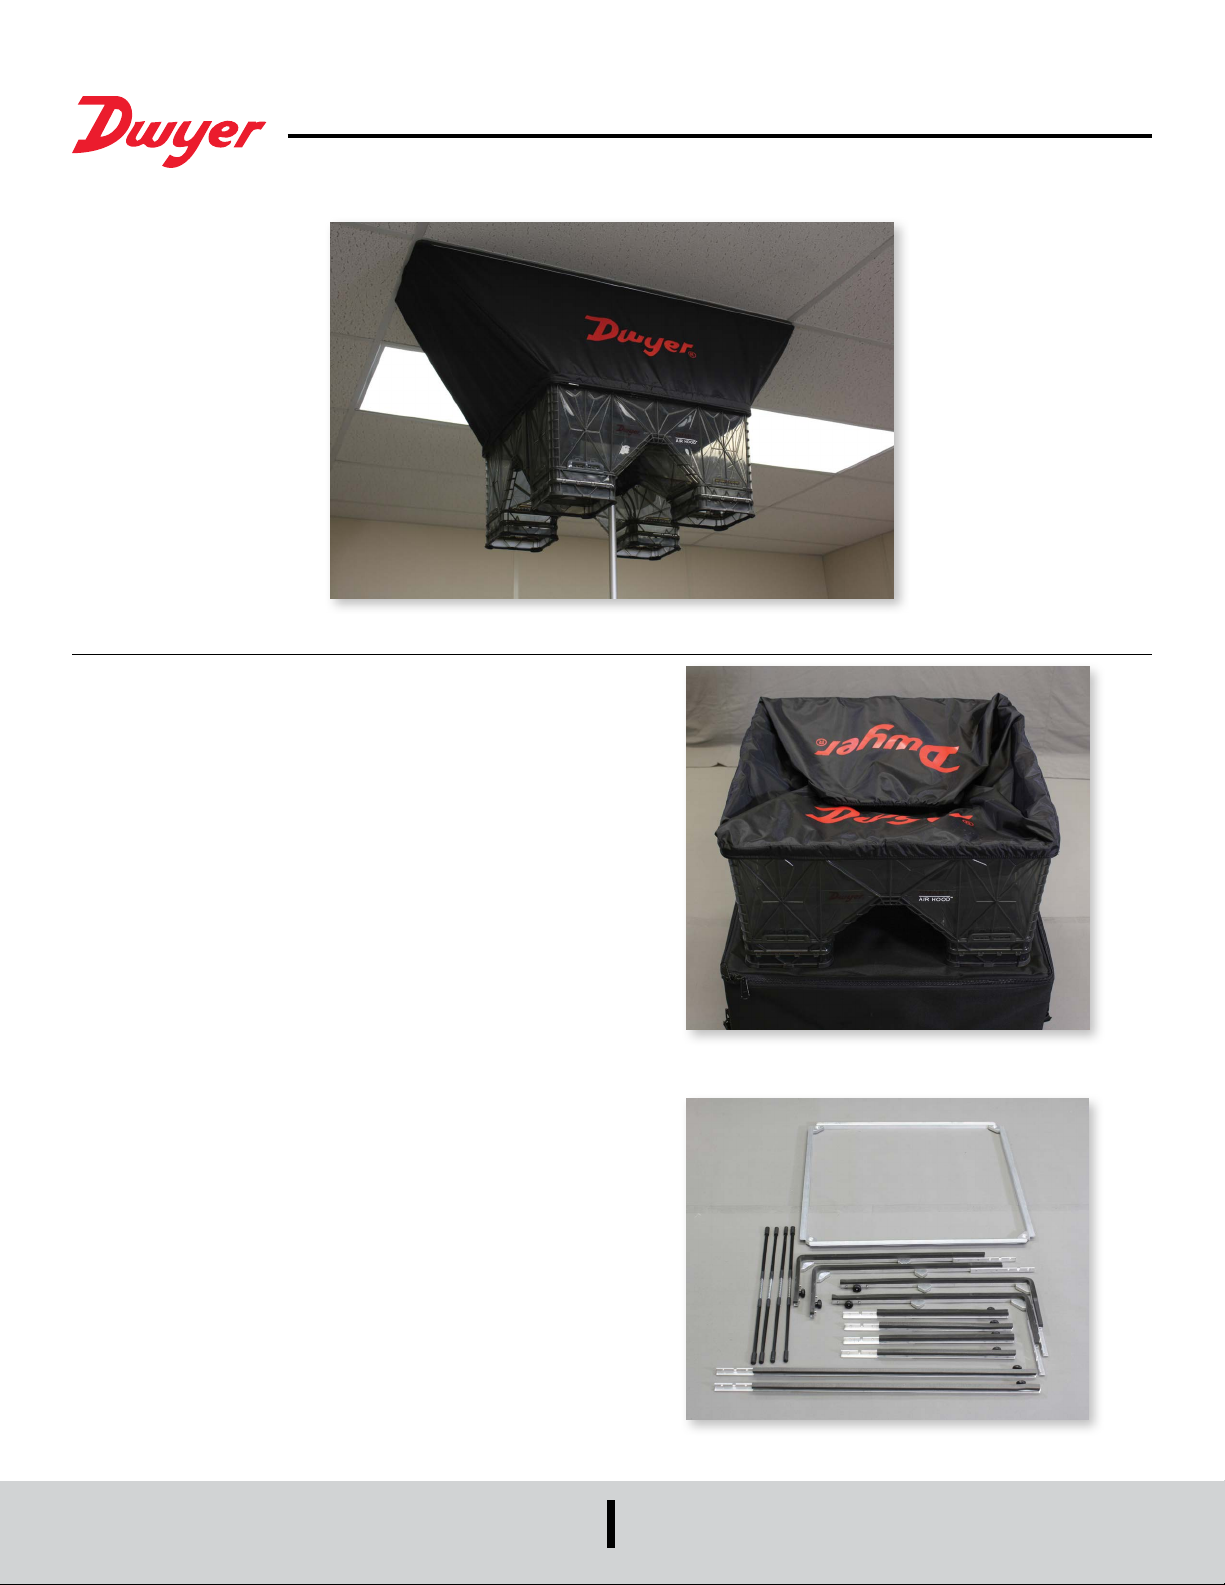
The SMART Air Hood
m x 0.6 m) opening but can also be used with other diffuser / register sizes using
an adapter base kit (A-SAH-BK) and various adapter hoods. Available adaptor hood
sizes, sold separately, include a 1 ft x 4 ft (0.3 m x 1.2 m) model A-SAH-14S, a 2 ft x
4 ft (0.6 m x 1.2 m) model A-SAH-24S, a 3 ft x 3 ft (0.9 m x 0.9 m) model A-SAH-33S
and a 1 ft x 5 ft (0.3 m x 1.5 m) model A-SAH-15S.
The assembly of the adapter hoods begins with the adapter base kit A-SAH-BK.
Only one adapter base kit is needed, as it can be used with any of the four adapter
hood sizes. To start, lay out the adapter base kit as shown in the photo. To assemble
the adapter base kit and the adapter hoods to the base, please follow the steps in a
sequential order. The number references will be a guide for the right adapter parts to
use.
balancing instrument comes standard with a 2 ft x 2 ft (0.6
™
balancing instrument includes the PredictAir™
Canvas Hood Adapter
(Variety of Sizes)
DWYER INSTRUMENTS, INC.
P.O. BOX 373 • MICHIGAN CITY, INDIANA 46360, U.S.A.
SAH Adapter Base Kit
Model A-SAH-BK
Phone: 219/879-8000
Fax: 219/872-9057
www.dwyer-inst.com
e-mail: info@dwyermail.com
Page 2
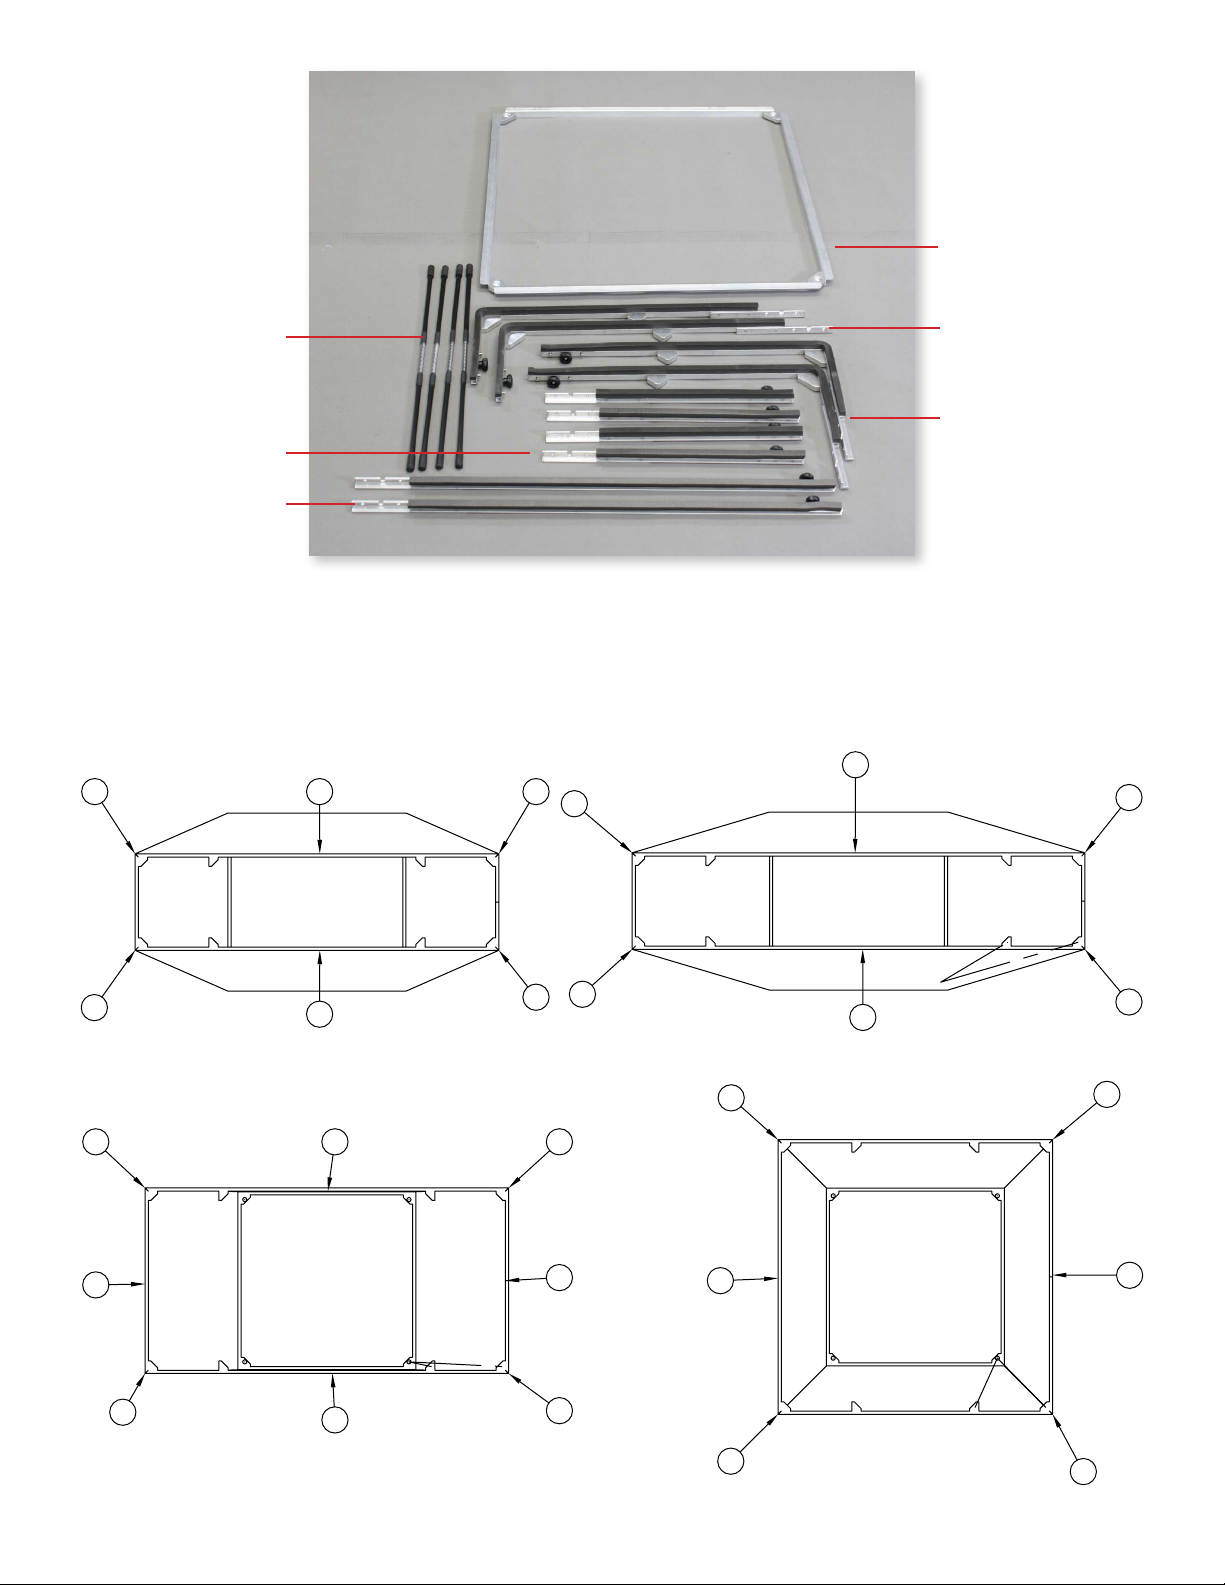
F
E (x4)
D (x4)
C (x2)
The adapter frame kit contains the following parts to build and install the 1´ x 4´ (0.3 m x 1.2
m), 1´ x 5´ (0.3 m x 1.5 m), 2´ x 4´ (0.6 m x 1.2 m) , and 3´ x 3´ (0.9 m x 0.9 m) hood adapters:
A = 18˝ x 6˝ corner bracket long side D = 12˝ long extension
B = 18˝ x 6˝ corner bracket short side E = Spring support poles
C = 24˝ long extension F = Bottom support frame
See the below diagrams for which parts are needed to assemble each hood adapter size.
C
A
D
1´ x 4´
B
A
1´ x 5´
A (x2)
B (x2)
B
B
B
1´ x 4´ (0.3 m x 1.2 m) Adapter Hood
A
D
B
2´ x 4´ (0.6 m x 1.2 m) Adapter Hood
D
D
2´ x 4´
D
A
C
1´ x 5´ (0.3 m x 1.5 m) Adapter Hood
A
B
D
A
C
B
3´ x 3´ (0.9 m x 0.9 m) Adapter Hood
3´ x 3´
A
B
C
A
Page 3

ASSEMBLY
To use the SAH with different diffuser sizes other than 2´ x 2´ (0.6 m x 0.6 m), use the
following instructions for how to attach adapter hoods.
1. Place the SAH on the oor or elevated work area with the top of the unit facing up
as shown in the photo below.
2. Hold the canvas hood in place by its top over the SAH with the Dwyer trademark
facing you and place the adapter hood into the main SAH body aligning the sewn
corner seams of the adapter hood to be approximately in line with the corner of the
SAH unit body to prepare for assembling it to the SAH body as shown below.
5. Place the lower 2´ x 2´ adapter frame into the SAH over the top of the inner cord
loop skirt trapping the cord inside the SAH and loosely close the hook and loop
straps over the adapter frame to hold it in place.
6. Assemble the required upper frame system that matches the adapter hood choice.
Details for which pieces are needed for each hood size are on page 2. Starting with
two pieces that t together, loosen the knob on the rst piece. Slide the second
piece so the grooves t around the knob on the rst piece. Tighten the knob to hold
in place. Continue until entire upper frame is assembled.
3. Stretch the outer cord hoop (the one without the hook and loop straps) over the
SAH top and place the cord into the outer top groove just below the top rubber seal.
Be sure to locate the sewn seams of the adapter at the corner of the SAH. (This
can be adjusted after the cord is stretched into place at this time. It is not necessary
to tuck the entire cord into the SAH slot in the straight sections.)
4. Fold the canvas hood inside out over the SAH, exposing the inner cord loop and
place that cord loop inside the SAH unit. Pay special attention to the corners. Open
the fabric hook and loop straps if they are closed.
7. Place the upper frame system on top of the SAH unit positioning the frame for
proper assembly as shown below. For all sizes (except 3´ x 3´), the long sides
should align with the logo sides of the canvas hood.
8. Stretch the top cord loop of the canvas hood onto the upper frame, aligning the
corners of the frame with the sewn seams of the canvas hood. Once they are
aligned, press the cord into the groove all the way around the frame.
Page 4

9. Place all spring poles inside the SAH unit for easy access for nal assembly.
10. While holding one spring pole at the end in one hand, lift the top frame using both
hands opposite and diagonal from each other until the adapter hood is fully open.
Place the spring pole into a bottom corner pocket of the lower frame, compress the
pole with your thumb and while still holding the upper frame with your ngers, slide
the top of the pole into the appropriate support frame bracket pocket.
11. Pick up another spring pole and install it in the position opposite diagonal from the
rst one. Install all spring poles by rst placing one end into a corner pocket of the
lower frame. Compress the spring pole by pushing downward onto the lower frame
until the spring pole top can be placed into the top frame support pocket. The unit
will now be stable and balanced enough to release it and place the 2 remaining
spring poles in place with the same procedure.
14. The SAH unit with the adapter base kit and canvas hood can now be used to
complete the balancing process.
MAINTENANCE
Some simple routine maintenance after each use will ensure that the instrument will
function correctly for many years.
• Remove any moisture droplets using a clean, absorbent lint-free cloth/paper towel
before storing the unit.
• Remove all batteries if the unit is to be stored for an extended period of time.
• Always store and transport the unit carefully. Store in dry conditions.
• DO NOT immerse the hood in water.
• DO NOT use abrasive cleaning products on the hood. The hood can be wiped clean
with a damp lint-free cloth.
• DO NOT use abrasive cleaning products on the quad ow sensing grids, which may
block or damage the grid. The grid may be CAREFULLY wiped clean with a lint-free
cloth. Ensure the air entry holes of the quad ow sensing grids are not contaminated
with moisture.
• Check periodically for damage or any visible cracks.
• Take care to not damage or obscure the air entry holes of the quad ow sensing
grids. This can seriously affect the measurements obtained.
12. Re-tuck the upper cord loop into the top frame if it came free during the assembly.
At this time, you can tuck the outer lower cord into the SAH unit along the straight
sections. It is not necessary that this be done for the cord to stay in place or for the
system to perform properly.
13. It will be necessary to use the stationary pole adapter attachment. Install this
according to the instructions on page 3 of Bulletin TE-SAH.
Diffuser adapter hood fabric can be wiped clean with a damp cloth, if necessary, and
moisture droplets dried with an absorbent lint-free cloth/paper. Periodically, wash in
cool water using a mild detergent. Drip dry, ensuring it cannot become caught in any
sharp objects.
The fabric used is impermeable, tough, and very resistant under normal use. In the
event that the fabric becomes worn or torn, replace the fabric hood immediately. A
damaged hood will seriously affect the measurements taken.
Anti-static solution can be applied to the instrument by using a clean, lint-free cloth and
carefully rubbing it over the instrument.
Note: This is normally only necessary when working in low humidity conditions.
WARRANTY/RETURN
Refer to “Terms and Conditions of Sale” in our catalog and on our website. Contact
customer service to receive a Return Materials Authorization number before shipping
the product back for repair. Be sure to include a brief description of the problem plus
any additional application notes.
©Copyright 2016 Dwyer Instruments, Inc. Printed in U.S.A. 7/16 FR# 444357-40
DWYER INSTRUMENTS, INC.
P.O. BOX 373 • MICHIGAN CITY, INDIANA 46360, U.S.A.
Phone: 219/879-8000
Fax: 219/872-9057
www.dwyer-inst.com
e-mail: info@dwyermail.com
 Loading...