

Page 1
Series SAH SMART Air Hood™ Balancing Instrument -
®
™
PredictAir
Specications - Installation and Operating Instructions
Application Software
Bulletin TE-SAH-SW
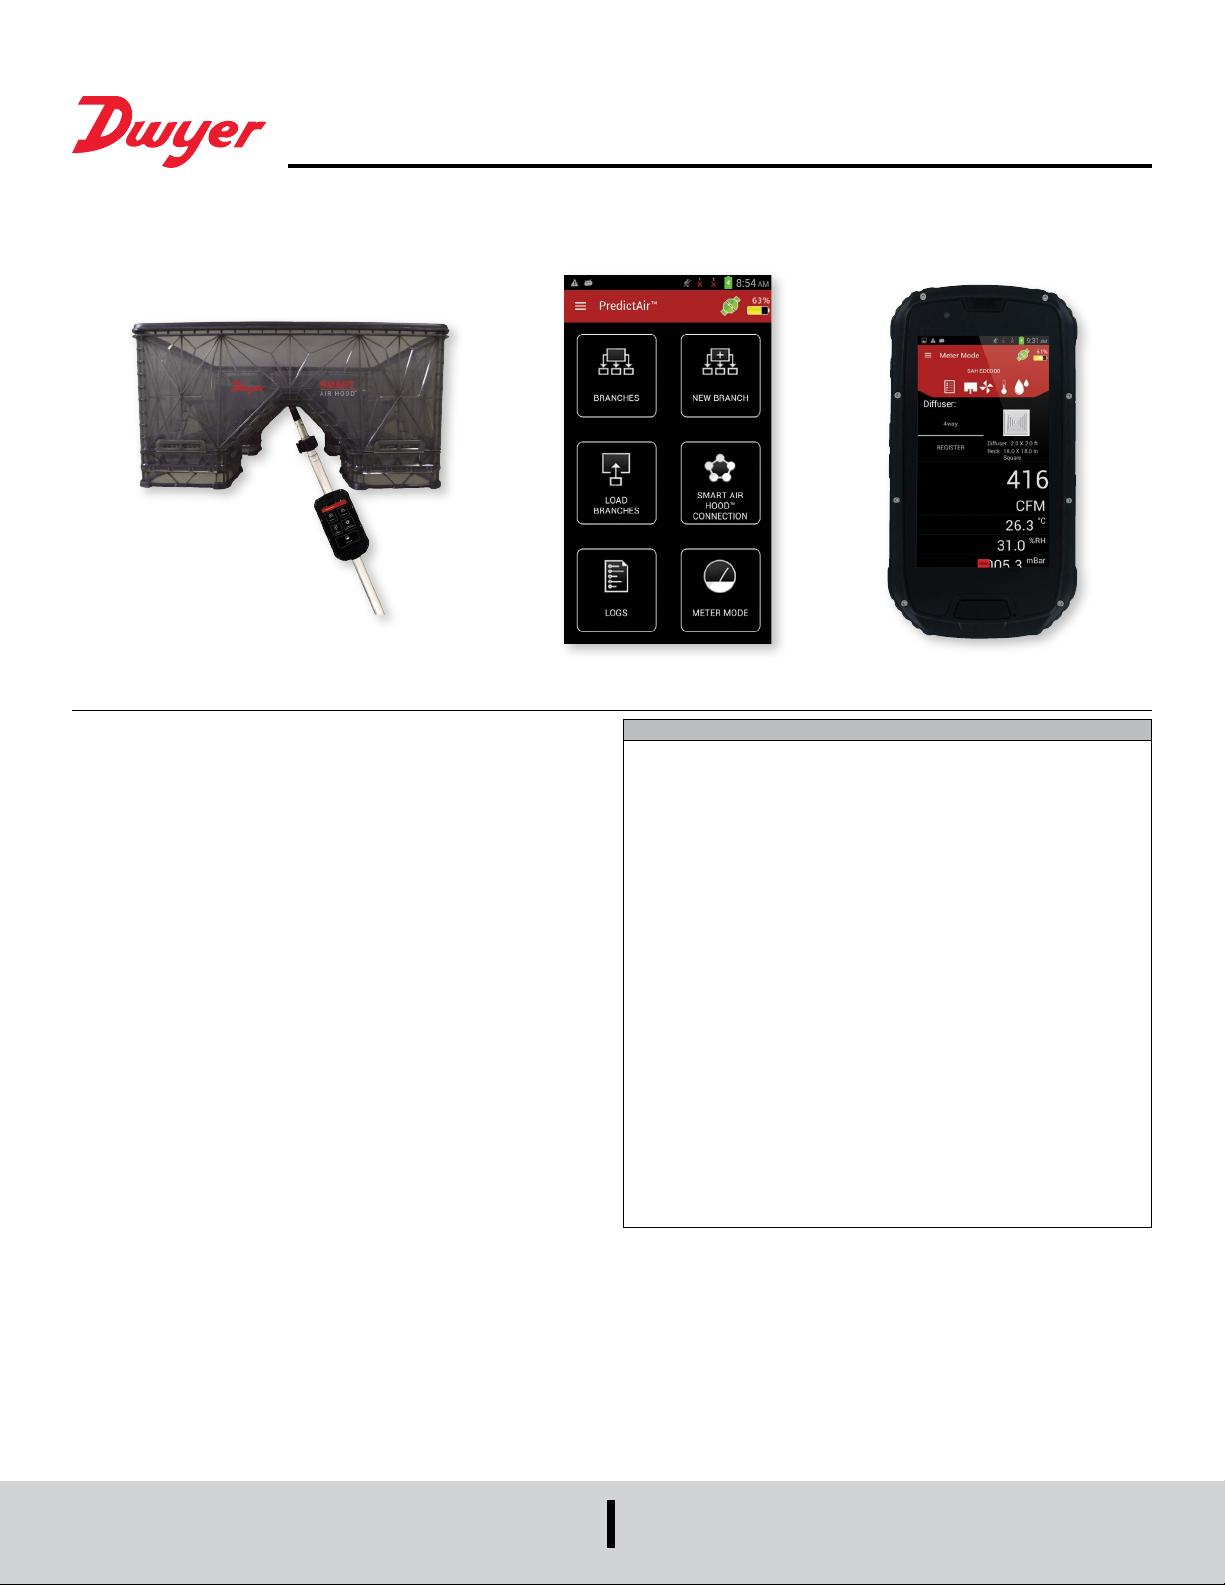
The SERIES SAH SMART Air Hood™ Balancing Instrument is the most accurate and
easy to operate air ow hood on the market. By using the included hood stand and
wireless communications to the handheld, a single operator can balance a branch in
less time than traditional balancing teams. Besides being lighter than most traditional
capture hoods, the ergonomic design makes the Series SAH easy to maneuver, with
less physical stress. The rugged polypropylene base hood features patented Quad
Flow Design Technology for controlling air ow and minimizing back pressure, which
yields superior measurement accuracy. The Wi-Fi direct communication gives reliable
communication with a distance of up to 200 yards between the hood and the handheld
test instrument. The SMART Air Hood
Application Software which reduces the number of steps in the air ow balancing
process using Predictive Balancing’s Express Balance mode. Predictive Balancing
is a method of predicting the optimal ow set point for each register and the order in
which they should be adjusted.
Please see Bulletin TE-SAH for general installation instructions.
™
Balancing Instrument includes the PredictAir™
TABLE OF CONTENTS
Setup ............................................................2
Connecting to a Wi-Fi Network......................................2
Setting up a Google Account .......................................3
Updating the PredictAir
Application Preferences ...........................................4
Connecting to the Hood ...........................................4
Importing a Diffuser ..............................................6
Meter Mode .......................................................7
Zeroing the Hood ................................................7
Selecting the Diffuser .............................................8
Manual K-Factor..............................................8
Preferences ....................................................9
Logging Preferences ..........................................9
Hood Information Preferences . . . . . . . . . . . . . . . . . . . . . . . . . . . . . . . . . . .9
Volume Airow Preferences . . . . . . . . . . . . . . . . . . . . . . . . . . . . . . . . . . . . .9
Temperature Preferences.......................................9
Humidity Preferences .........................................10
Barometer Preferences .......................................10
Overall Preferences ..........................................10
Logging.......................................................10
Predictive Balancing................................................12
Branches .....................................................12
Branches Menu .............................................13
Add Registers..................................................14
Balancing Procedure ............................................16
Final Results Menu...........................................18
FCC/Industry Canada Notice . . . . . . . . . . . . . . . . . . . . . . . . . . . . . . . . . . . . . . . . .19
™
Application Software..........................4
DWYER INSTRUMENTS, INC.
P.O. BOX 373 • MICHIGAN CITY, INDIANA 46360, U.S.A.
1
Phone: 219/879-8000
Fax: 219/872-9057
www.dwyer-inst.com
e-mail: info@dwyermail.com
Page 2
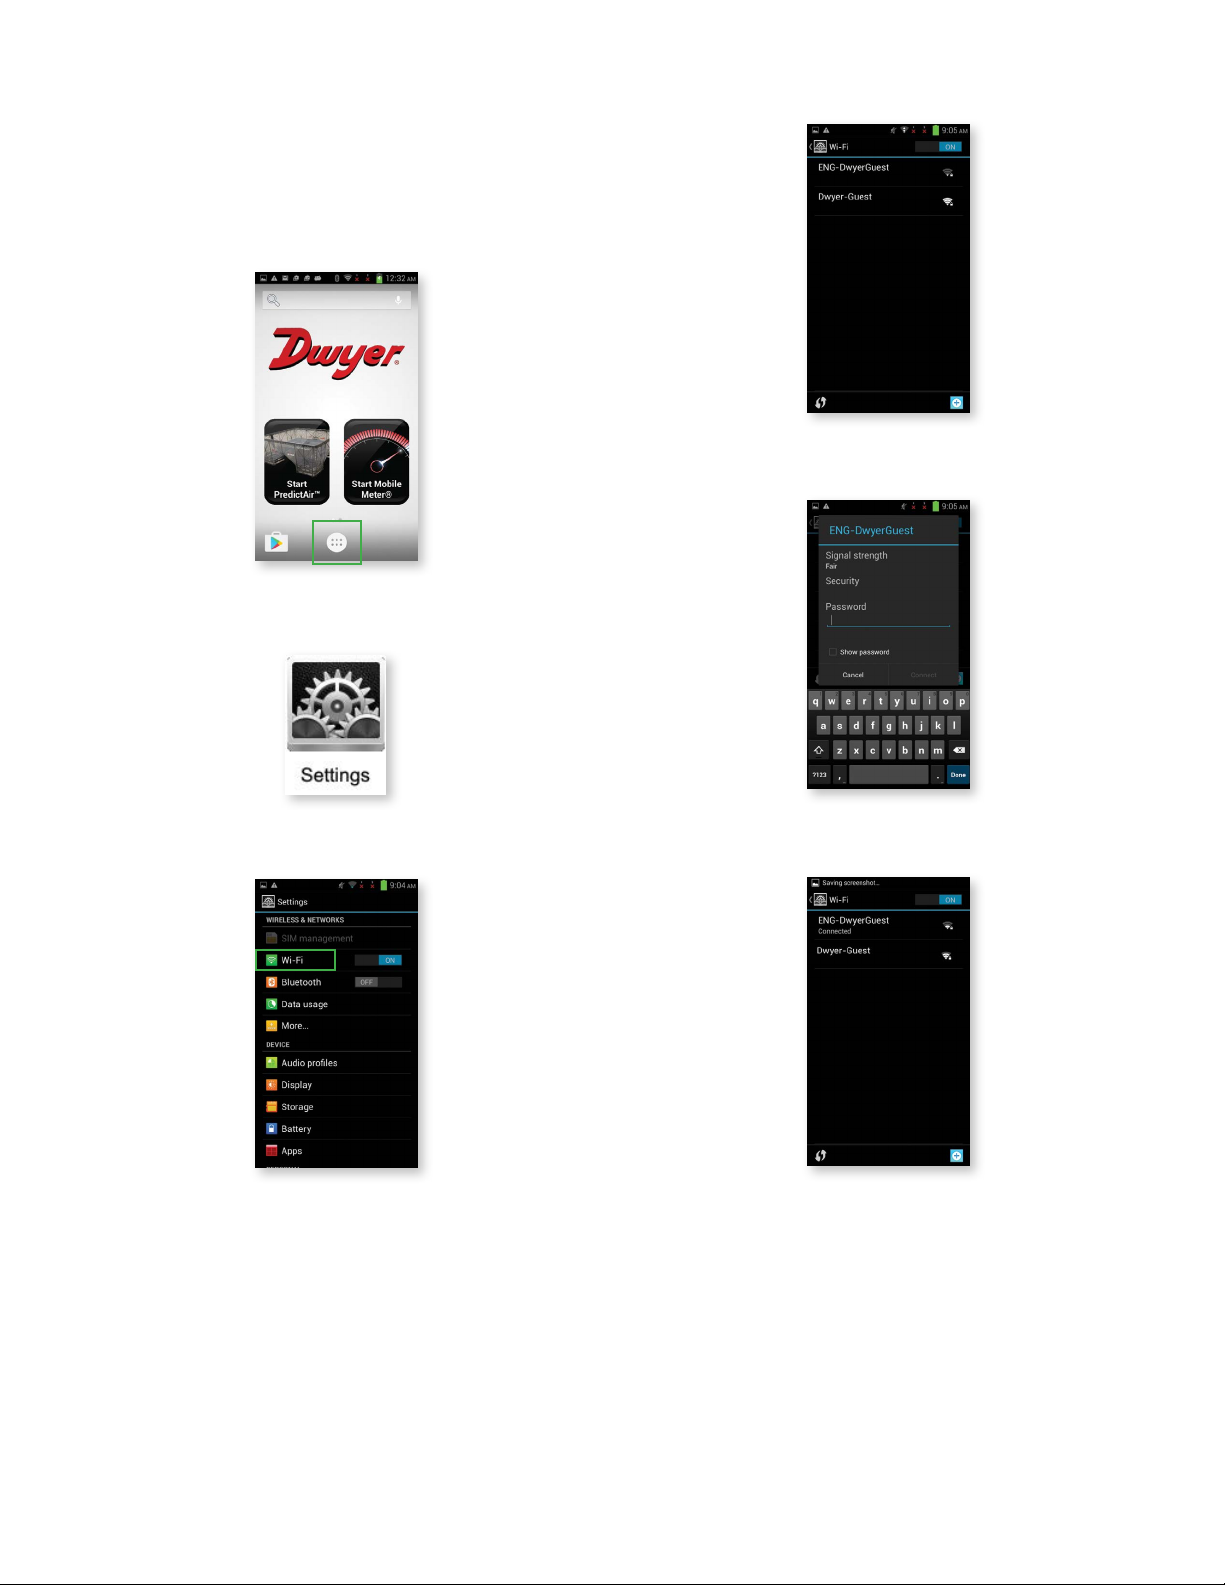
I. SETUP
To be able to update the PredictAir
created so that the application can be updated from Google Play
connect to Google Play
™
store a connection to a Wi-Fi network must be established.
™
Application Software, a Google account must be
™
store. To properly
CONNECTING TO A WI-FI NETWORK
First, press the application icon on the home screen (should look similar to the below
image).
Then nd the settings icon and click on it.
Next, choose a local Wi-Fi network to connect to.
Enter in the password to connect to the Wi-Fi access point.
Next, press Wi-Fi to enter into the Wi-Fi settings.
The handheld will now be connected to the Wi-Fi network.
2
Page 3
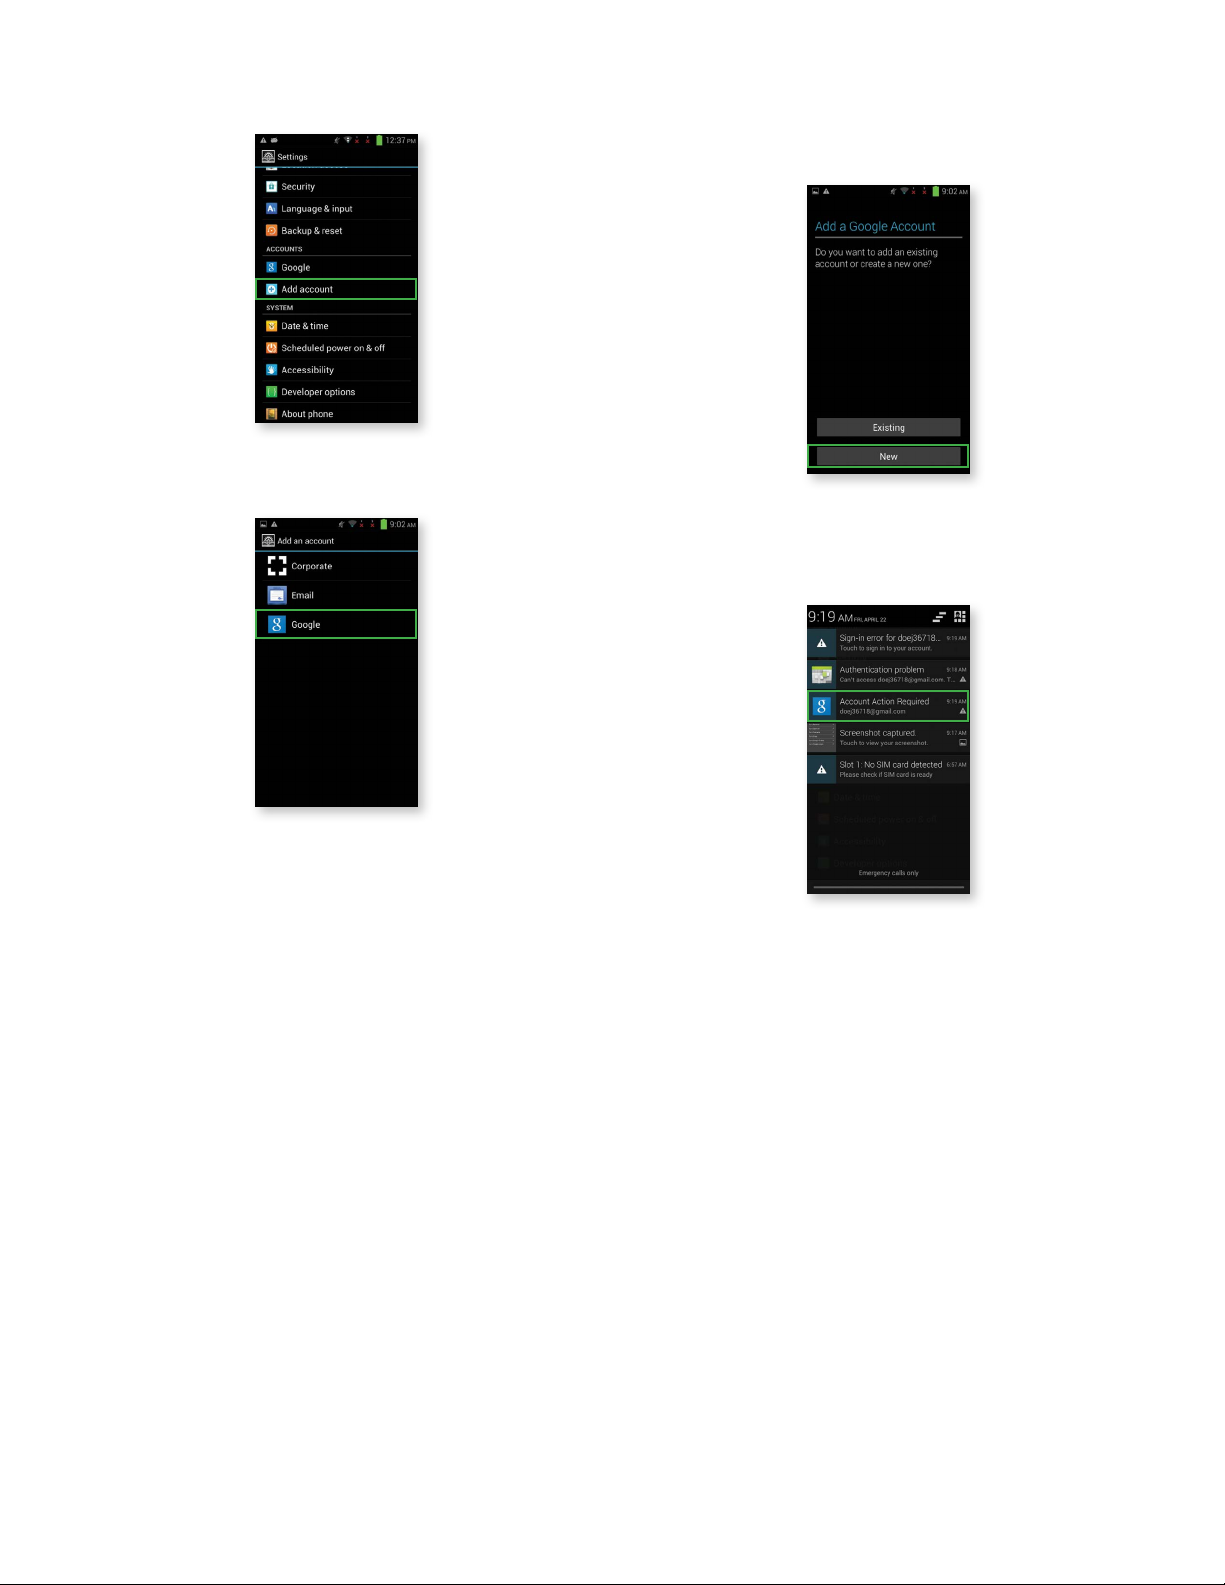
SETTING UP A GOOGLE ACCOUNT
First, go back to main Settings screen and choose the “Add account” option.
Select Google.
If you have a Google account select “Existing” and enter in your account information to
register your Google account to the device.
If you do not have a Google account follow the guide below to add one.
First, press “New” and follow the on screen prompts.
When the account is created you might need to do an authentication check to activate
the account. The notice will be in the pull down menu on the device. Press the
notication and follow the instructions to activate the account.
3
Page 4
If the account was created correctly the following screen will show your new account.
™
UPDATING THE PREDICTAIR
Now that a Wi-Fi connection is established and a Google account is tied to the
handheld instrument, the Google Play
Open Google Play
™
store from the applications.
APPLICATION SOFTWARE
™
store can now be accessed.
APPLICATION PREFERENCES
When the application is rst opened, the following screen will be shown.
Touch to edit the default units
of these elds
Touch to save the preferences
and go to the app’s main page
The “Show preferences on startup?” checkbox gives the choice for this screen to
continue being shown whenever the application is opened. If it’s not checked, then the
app will open directly to the main screen.
The “Pocket Protection” option prevents unwanted key presses. When activated, if
an object covers the screen then the screen will go black and any buttons become
inactive. When the object is pulled away from the screen, then the screen will return
back to its previous state. This should protect the work from being interrupted when the
device is placed in a pocket or other carrying method.
The Preferences can otherwise be located in the main menu by sliding a nger from
the left edge of the screen towards the right, pressing the menu button, or pressing the
3 lines at the top of the page and selecting “App Preferences”.
Search for PredictAir
™
Application Software and press it.
Press the “UPDATE” button to update the application.
CONNECTING TO THE HOOD
Once the handheld instrument is on, open the PredictAir
the main application screen, press the SMART AIR HOOD
connect to the air ow hood.
found
If no paired hoods
If paired hoods found
™
Application Software. From
™
CONNECTION button to
The PredictAir™ Application Software should now be up to date.
If no paired hoods are found the app will start searching for a hood to allow connection,
otherwise press the SEARCH button to search for hoods to allow pairing.
4
Page 5
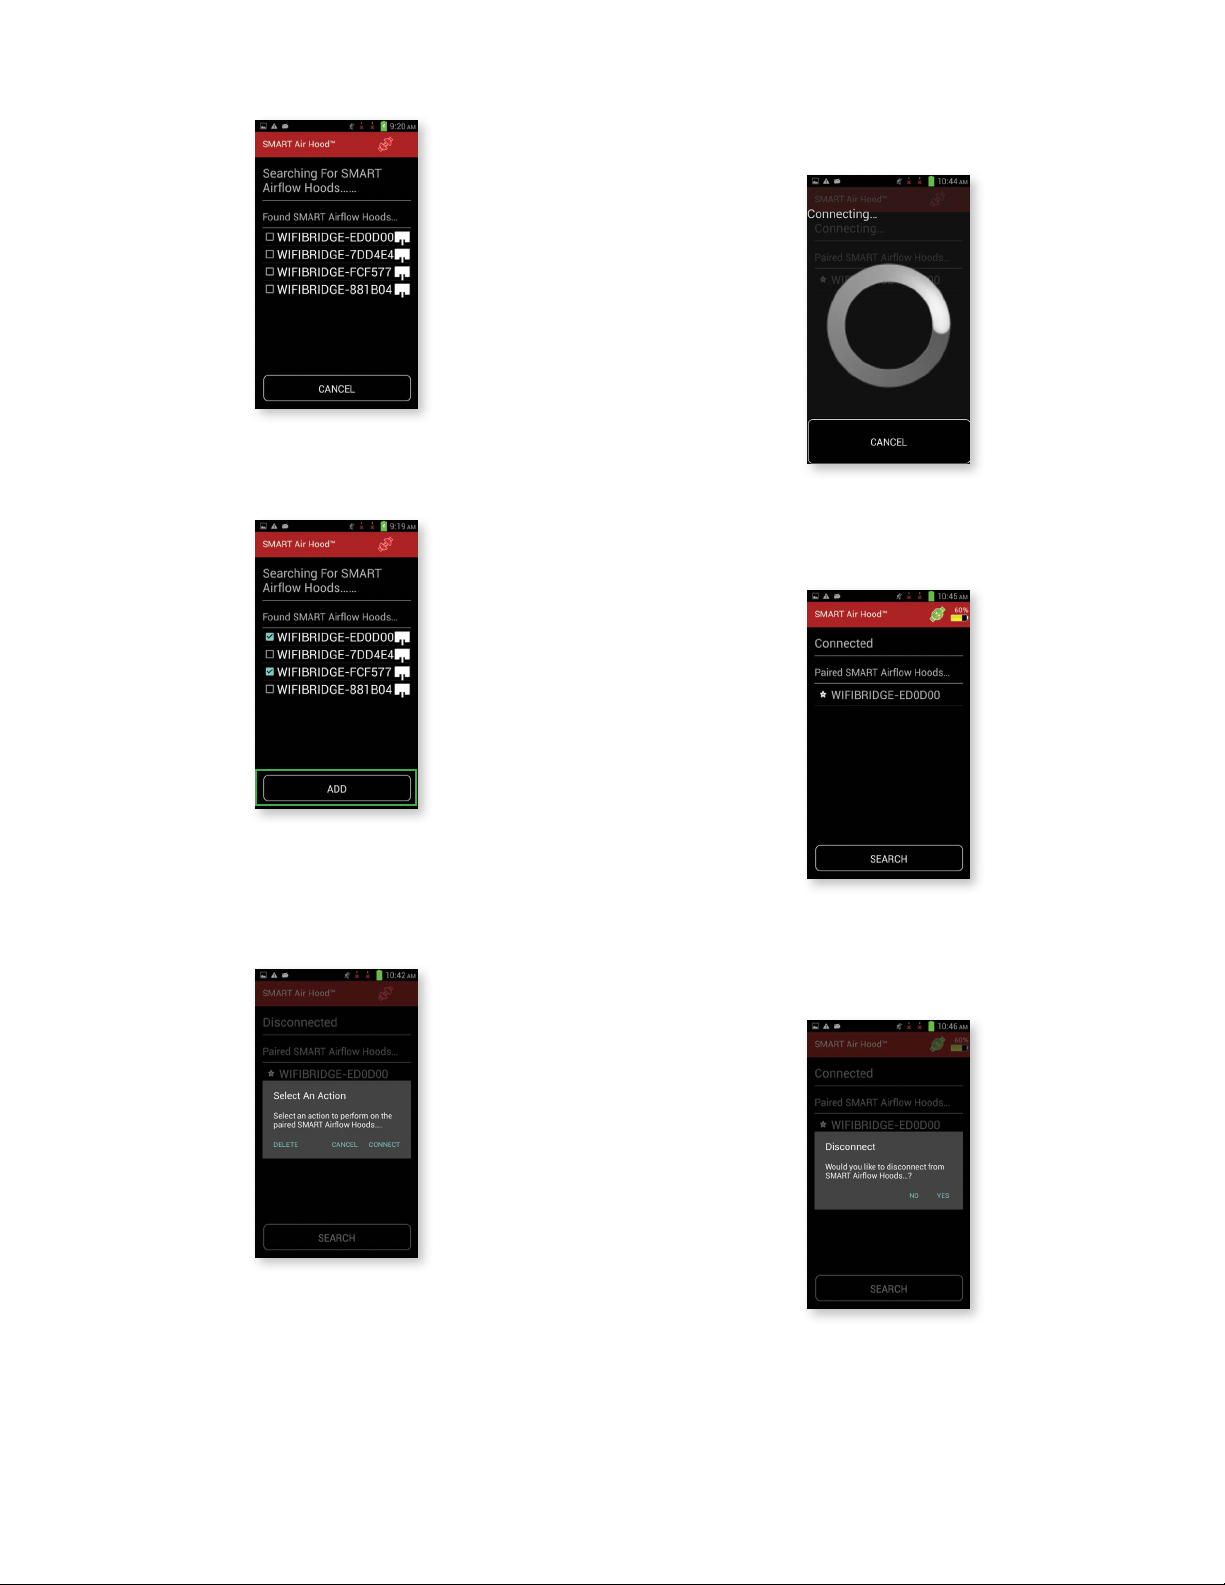
As the app discovers hoods, they will be added to the list under “Found SMART Airow
Hoods”.
Select the hood that is to be paired. Note: More than one line can be selected to pair
multiple hoods at the same time.
Press “CONNECT” to start the process of establishing the link between the handheld
device and the hood. This will bring up a dialog box while the process of establishing
the connection is performed. Pressing the cancel or back button will return to the
paired screen without establishing a connection.
Once the connection is established, the dialog will automatically close. This will return
the application back to the paired devices screen with a green icon and white star
(default hood) indicating the hood has been connected to the handheld.
Once the desired hood(s) are selected, press the ADD button.
To connect to the desired hood press the hood’s name in the Paired SMART Airow
Hoods list. This will bring up a dialog box that allows for the choice to connect, delete,
or cancel the action.
To disconnect from the current hood press on the white star. The Disconnect dialog
comes up, which allows for the hood to be disconnected. If “No” is selected, the dialog
will be closed without any other action being taken. If “Yes” is selected, the hood will
be disconnected, but still paired.
If a different hood is pressed, the Connection dialog box will appear. If “Connect” is
selected, the rst hood is disconnected and the second hood is connected. If “Delete”
is selected, that hood will be removed from the Paired SMART Airow Hoods list.
5
Page 6
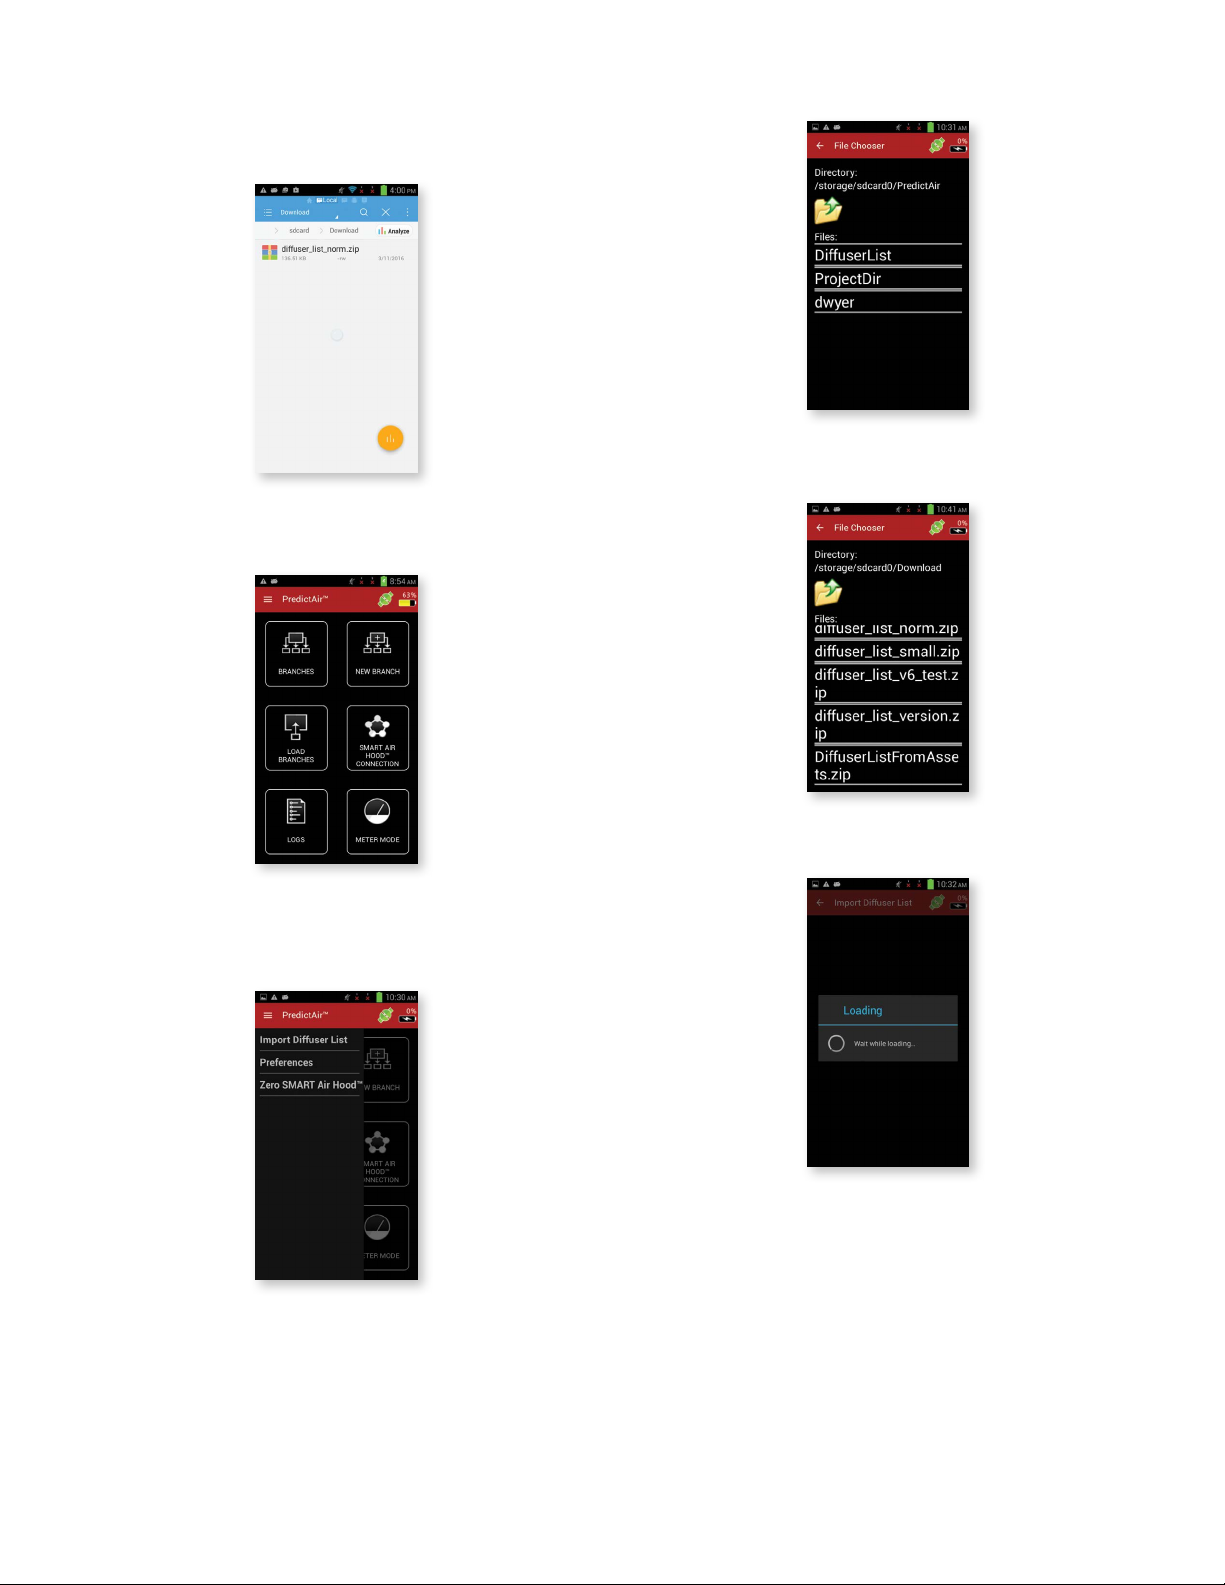
IMPORTING A DIFFUSER
Diffusers can be imported to the application by the following instructions.
Load the diffuser into a directory on the device. This has to be a zipped le obtained
from the Dwyer Instruments, Inc. website.
™
Open the PredictAir
Application Software.
Go to the directory where the diffuser list was put on the handheld instrument.
Select the diffuser list to import.
Slide a nger from the left edge of the screen towards the right, press the menu button,
or press the 3 lines at the top of the page to open the main menu’s options, and select
“Import Diffuser List”.
The app will import the diffuser list.
6
Page 7

If the diffuser list was set up correctly, and the version is current, then the app will give
the below message. If there isn’t a diffuser list loaded, then the app will generate a
diffuser list.
If a hood has not previously been connected or by pressing “Settings”, then see the
previous Connecting The Hood section.
II. METER MODE
To enter Meter Mode in the app, press the METER MODE button from the home
screen.
Once a connection has been established, the Meter Mode page will be displayed.
ZEROING THE HOOD
In order for the hood to be zeroed for taking readings on a side wall, place the top of
the hood against a wall as shown below. The hood should be away from any sources
of air ow like registers and returns. For the hood to be zeroed for taking overhead
readings, place the hood on the oor with the top facing up as show below.
Overhead
Side Wall
In order to zero the hood, press the three bars at the top of the screen or slide from the
left or press the menu button. Press the Zero Probe menu selection to zero the hood.
7
Page 8

Press the ZERO button. This will begin the zeroing process. When complete, it will
show the following screen.
Press on the diffuser to bring up the list of diffusers and select the diffuser that will be
used.
If there is too much air ow for the hood to be zeroed, then the following screen will be
displayed. Notice that the zero button is disabled if there is too much air ow.
SELECTING THE DIFFUSER
This screen displays the various readings from the sensors, along with a picture of
the diffuser of the register being measured. By pressing the diffuser, the “Add Edit
Register” will be brought up, which allows for the diffuser being measured to be
changed.
Manual K-Factor
In the case that the diffuser being used is not in the downloadable library, but the
K-factor of the diffuser is known, the K-factor can be manually entered into the
application.
While in meter mode, press on the diffuser to open the Diffuser list.
Find “Manual Register” in the list and press it to open the next screen.
8
Page 9

Dene it as a Register for supply ow or Return for return ow.
Hood Information Preferences
To view the hood information, press the hood icon.
Press on the K-Factor eld to enter the K-factor of the diffuser, then press “Done” to
return to the Meter Mode screen.
PREFERENCES
Logging Preferences
To view the logging subsection of the Preferences, press the page icon.
Press the hood icon to return to Meter Mode.
Volume Airow Preferences
To view the volume airow information, press the fan icon.
Touch to
select actual
or standard
ow
Touch to
change units
Temperature Preferences
To view the temperature information, press the thermometer icon.
Manual Mode indicates that points will only be logged when the user presses the
“LOG” button in Meter Mode. Duration Mode allows for points to be logged every
time a value is updated for the next X minutes after the “LOG” button in Meter Mode
is pressed.
“Duration” is the number of minutes that data will be logged.
Press the page icon again to return to Meter Mode.
Note: Pressing the “Back” will exit Meter Mode.
Touch to
change units
9
Page 10

Humidity Preferences
To view the humidity information, press the drops icon.
LOGGING
Log les can be generated from the Meter Mode screen. To start logging, slide up the
bottom tab to display the logging tile.
Touch to
change unit
type
Touch to
change units
Barometer Preferences
To view the barometer information, press the barometer icon.
Touch to
make primary
sensor
Touch to
change units
Overall Preferences
Sliding a nger from the left edge of the screen towards the right, pressing the menu
button, or pressing the 3 lines at the top of the page will open the Menu.
Pressing on “Preferences” will open up the Preferences screen, which contains all of
the preferences for the SMART Air Hood
™
Balancing Instrument. Press either the back
button or the arrow at the top to go back to the Meter Mode main screen.
Press the LOG button to start a new log. If the logging is manual (set in Preferences),
then only a single point will be logged, otherwise it will log points for the duration stated
in Preferences. The “Points Logged” will increase, indicating how many data points
exist in the log.
The SAVE LOG button will bring up a dialog with options to continue the current
logging session or to save and close the current log.
If the Save Log button is pressed, the dialog box below will appear.
Touch to close the
dialog and return
to Meter Mode
10
Name and le
path of the log
is displayed
in text
Page 11

Pressing the “Open Log” button will display the following screen.
This screen displays all the sensors raw data and display data. The raw data is the
data created using the default units. The display data is the data after converting the
raw data into the selected engineering units. Additional options to interact with the log
data are at the bottom of the list of sensors.
The VIEW CONFIGURATION DATA button will switch to a screen that displays the
hood information. This provides the hood’s version information, name, type, serial
number, and all the sensor’s information.
The VIEW RAW DATA button will open a new screen that is horizontally scrollable.
The VIEW COMMENTS button will open a text area showing any comments, along
with a button that allows for the comments to be edited.
Touch to select and
unselect rows
The VIEW LOG CHART button will open a chart of the logged points.
The chart area can be zoomed in and out
by using two ngers. Double press will
return chart area to default zoom.
11
Page 12

Press on the drop down menu to change which sensor is being displayed in the chart.
The SHARE DATA button will bring up the handheld instrument’s default selection to
share data. If no defaults have been chosen, then a dialog will be brought up with a
set of Android
®
applications that can handle the resulting activity. (In this case, a way
to share the le by email, saving it to a disk, etc.)
Next, press the desired branch. This will bring up a dialog with the available actions
for that branch. If the branch has been previously started, then the following menu will
be shown.
Touch to close window
without performing any
actions
“Resume” will continue the balancing process at whatever step it was at previously.
“Restart” will start the balancing process from the very beginning where registers are
added/edited. This will still retain any registers previously added.
“Edit” will bring up the “Add Edit Branch” screen.
III. PREDICTIVE BALANCING
BRANCHES
To access the Branches menu, press the BRANCHES button from the main screen.
Touch to edit any of
these elds except the
status eld (the app
controls this eld)
Touch to save any
changes made
“Delete” will bring up a dialog asking to conrm the deletion.
12
Page 13

“Export Branch” will bring up a le dialog.
“View Branch” will open a dialog box containing the information for the branch in a
non-editable form.
Press the “File Name” eld to enter the le name associated with this branch. This
eld can’t be blank or the below error message will appear. The folder icon with the
arrow will navigate up a folder. Folder names do not have extensions and le names
will have extensions.
Branches Menu
Sliding a nger from the left edge of the screen towards the right, pressing the menu
button, or pressing the 3 lines at the top of the page will open the Branches Menu.
“Load Branch From File” will allow you to select a le to choose which branch to load.
Note: This lters the le names to only show directories or les with the extension
“.brc”, indicating it is a branch le.
13
Page 14

Pressing the branch name loads that branch and adds it to the list of branches. Once
complete, the app will return to the Branches main page with the new branch added
to the list.
“Add Branch” will bring up the Add Edit Branch screen allowing addition of another
branch.
“Sort Branches” will bring up a dialog that contains the options to sort branches by
different methods.
Note that pressing on a branch that has never been started will open the same dialog
as editing an existing branch, except for that “Resume” and “Restart” are replaced
with “Start”. The “Start” option will start the balancing option from the very beginning.
Pressing “Start”, “Restart”, or if the process was paused while still loading registers,
the Load Registers screen will be brought up.
ADD REGISTERS
Since this is a new process, no registers have been loaded. Open the menu by sliding
a nger from the left edge of the screen towards the right, pressing the menu button, or
pressing the 3 lines at the top of the page. This shows options to modify the registers
used in the balancing process for this branch.
“Load From File” will allow a “.csv” le to be chosen. Note that some of the les might
not be a register le, which displays an error if selected.
14
Page 15

“Add Register” will bring up the Add Edit Register screen with nothing lled in except
for the default diffuser. As in Meter Mode, if the desired diffuser is not shown, press the
manual diffuser to create a diffuser with a known K-Factor.
Touch to change
diffuser
Pressing either the Name or Target eld will bring up a keyboard allowing values to be
entered. Note that the register name must be unique. If a register name is entered that
is already in the list, the following dialog will be shown.
“Clear Registers” will erase all the registers in the list for the selected branch.
“Export Registers” will allow the registers to be saved to the handheld instrument. Note
that the same dialog will come up asking to overwrite the le if a name is chosen that
is already in use.
“Set Keys” will bring up a dialog that allows the selection of which registers are
candidates to be the key (checked registers can be the key and unchecked cannot be
the key). At least one register must be selected.
Touch to check and
uncheck registers
Touch to close the
dialog and set which
registers can be
the key
“Pause” will bring up the Pause dialog box along with pressing the Back button.
Touch to go back and
enter a unique register
name
Both the name and the target elds must be lled in to create a register.
Touch to save the
Register’s information
and return to the
Branches screen
Touch to start the
balancing process
15
Page 16

BALANCING PROCEDURE
The START button will start the balancing process. The START button will only be
enabled if there are two or more registers in the register list.
The rst step of the balancing procedure is to take an initial sweep of all registers
within the selected branch with all dampers open.
Press the register button again to store the reading, at which point it will change from
white to green, indicating that a value has been stored for that register.
Repeat this procedure until all of the registers have been measured. Pressing on a
register again allows for a retaking of that register if needed.
Red indicates that a reading still needs to be taken from the register. After selecting
the register to measure, its button will turn from red to white, indicating that it is the
active register.
If the slide out menu is opened, the following choices will be shown.
“Screen Timed Out Settings” allows the hibernate mode to be turned on. If the option
is turned on, then the current screen will hibernate after timing out based on the
handheld instrument’s hibernate time in the Settings->Display->Sleep setting. If the
option is turned off, then the device will stay awake and not go into hibernation. This is
also available on the Initial Reading, Balancing, and Final Reading screens.
16
Page 17

To enter data for a register that cannot be measured by the hood use the “Manually
Enter Data” in the slide out menu. A register needs to be selected to enter data
manually.
Pressing on the EXPRESS button starts the Express balancing method, which starts
with the Place the Smart Hood dialog box. As shown in the below example, the app
will direct you to the register to measure:
If a register is selected and “Manually Enter Data” is pressed, then a dialog will appear
that allows for a value to be entered for the register.
Touch to close the
dialog and set the
register’s value
Once all of the registers have been measured, the NEXT button at the bottom will
become enabled. Press and hold that button until the balance method selection screen
appears.
Select a balancing method.
Press and hold the OK button to bring up the dialog box asking to conrm that the
hood is correctly placed.
Touch to close
the dialog without
storing the reading
If the YES button on the hood placement conrmation dialog was pressed then the app
will bring up the Adjust to Target screen.
Touch to close the
dialog and take a
pre-adjust reading
17
Page 18

“Manual Data” will bring up the Manual Data screen similar to the initial sweep manual
entry dialog. After the manual data is entered, another dialog will appear. This manual
entry dialog asks for the air ow of the register after adjusting (if it can be adjusted).
The dialog includes the target air ow that the register needs to reach to balance the
system.
Touch to enter
as the adjusted
value for that
register
If the CANCEL button is pressed, then a Pause Balancing screen will be brought up.
Pressing the PAUSE button in the pause dialog will store the current location and data
within the selected balancing method and return back to the Branches screen.
While in this screen, the damper needs to be adjusted to match the target. Press and
hold the NEXT button to bring up the next screen which will guide you to the next
register to measure and adjust. Once all registers except the key register are adjusted
the app will require a post reading from all the registers. The app will guide you through
the post reading process.
The options and controls of the Final Reading screen are the same as in the Initial
Readings screen. This screen is to gather readings to calculate the error ratio of the
balancing process which is displayed on the next screen.
Once all of the registers are measured, press and hold the NEXT button, to bring up
the Final Results screen. This screen displays how accurate the balancing method
was.
Key
Register
The last register measured will be the key register after which the adjust system
(shown below) will come up requesting to adjust the branch’s ow source to the given
target.
Press and hold
to go to the Final
Reading screen
Press and hold to close
the display and return to
the Branches screen
Final Results Menu
Sliding a nger from the left edge of the screen towards the right, pressing the menu
button, or pressing the 3 lines at the top of the page will open the Final Results Menu.
“Retake Readings” will return to the Final Readings screen so that one or more of the
register readings can be retaken.
Press and hold to save
the results. It also
provides a means to
share the results
18
Page 19

FCC/INDUSTRY CANADA NOTICE
NOTICE
cause harmful interference, and (2) this device must accept any interference received,
including interference that may
cause undesired operation.
This equipment has been tested and found to comply with the limits for a Class B
digital device, pursuant to Part 15 of the FCC Rules. These limits are designed to
provide reasonable protection against harmful interference in a residential installation.
This equipment generates, uses, and can radiate radio frequency energy and, if not
installed and used in accordance with the instructions, may cause harmful interference
to radio communications. However, there is no guarantee that interference will not
occur in a particular installation. If this equipment does cause harmful interference to
radio or television reception, which can be determined by turning the equipment off
and on, the user is encouraged to try to correct the interference by one or more of the
following measures:
• Reorient or relocate the receiving antenna.
• Increase the separation between equipment and receiver
• Connect the equipment to an outlet on a circuit different from that to which the
receiver is connected.
• Consult the dealer or an experienced radio/TV technician for help.
This device complies with Part 15 of the FCC rules. Operation is
subject to the following two conditions: (1) This device may not
NOTICE
1. This device may not cause harmful interference;
2. This device must accept any interference received, including interference that may
cause undesired operation of the device.
CAUTION
user’s authority to operate the equipment.
RF NOTICE
NOTICE
uncontrolled environment.
NOTICE
CAUTION
operating in conjunction with any other antenna or transmitter.
AVIS
deux conditions suivantes:
1. Cet appareil ne doit pas provoquer d’interférences,
2. Cet appareil doit accepter toute interférence reçue, y compris les interférences
pouvant provoquer un fonctionnement indésirable de l’appareil.
AVIS
Bulletin 65 FCC OET et RSS-102 Industry Canada.
This device complies with Industry Canada license-exempt RSS
standard(s). Operation is subject to the following two conditions:
Pursuant to FCC 15.21 of the FCC rules, changes or modications
not expressly approved by Dwyer Instruments, Inc. may void the
This product complies with FCC OED Bulletin 65 and Industry
Canada’s RSS-102 radiation exposure limits set forth for an
This Class B digital apparatus complies with Canadian ICES-003.
The antenna used for this transmitter must maintain a separation
of at least 20 cm from all persons and must not be co-located or
Cet appareil est conforme á Industrie Canada une license
standard RSS exonérés (s). Son fonctionnement est soumis aux
Ce produit est conforme aux limites d’expositions aux
rayonnements dénies pour un environnement non contrôlé du
19
Page 20

20
©Copyright 2016 Dwyer Instruments, Inc. Printed in U.S.A. 7/16 FR# 444357-10 Rev. 1
DWYER INSTRUMENTS, INC.
P.O. BOX 373 • MICHIGAN CITY, INDIANA 46360, U.S.A.
Phone: 219/879-8000
Fax: 219/872-9057
www.dwyer-inst.com
e-mail: info@dwyermail.com
 Loading...