

Page 1

Series DS-300 Flow Sensors
Installation and Operating Instructions Flow Calculations
1-15/16 (49.21)
1-5/8 (41.27) TYP
Bulletin F-50
Series DS-300 Flow Sensors are averaging pitot tubes
that provide accurate, convenient flow rate sensing. When
purchased with a Dwyer Capsuhelic®for liquid flow or
Magnehelic®for air flow, differential pressure gage of
appropriate range, the result is a flow-indicating system
delivered off the shelf at an economical price. Series DS-300
Flow Sensors are designed to be inserted in the pipeline
through a compression fitting and are furnished with
instrument shut-off valves on both pressure connections.
Valves are fitted with 1/8˝ female NPT connections.
Accessories include adapters with 1/4˝ SAE 45° flared ends
compatible with hoses supplied with the Model A-471
Portable Capsuhelic®kit. Standard valves are rated at 200°F
(93.3°C). Where valves are not required, they can be
omitted at reduced cost. Series DS-300 Flow Sensors are
available for pipe sizes from 1˝ to 10˝.
LP
HP
1/4 MALE NPT
1-3/4 (44.45)
1-11/16 (42.86)
5/16 (7.94)
Location - The sensor should be installed in the flowing line
with as much straight run of pipe upstream as possible. A
rule of thumb is to allow 10 - 15 pipe diameters upstream
and 5 downstream. The table below lists recommended up
and down piping.
PRESSURE AND TEMPERATURE
Maximum: 200 psig (13.78 bar) at 200°F (93.3°C).
Upstream and Downstream Dimensions in
*
Downstream
5
Upstream Condition
One Elbow or Tee
Terms of Internal Diameter of Pipe
Minimum Diameter of Straight Pipe
Upstream
In-Plane Out of Plane
7
9
INSPECTION
Inspect sensor upon receipt of shipment to be certain it is
as ordered and not damaged. If damaged, contact carrier.
Two 90° Bends in
Same Plane
Two 90° Bends in
Different Plane
8
18
12
24
5
5
INSTALLATION
General - The sensing ports of the flow sensor must be
Reducers or Expanders
8
8
5
correctly positioned for measurement accuracy. The
instrument connections on the sensor indicate correct
All Valves**
24
24
5
positioning. The side connection is for total or high pressure
and should be pointed upstream. The top connection is for
static or low pressure.
DWYER INSTRUMENTS, INC.
* Values shown are recommended spacing, in terms of internal diameter for normal industrial
metering requirements. For laboratory or high accuracy work, add 25% to values.
** Includes gate, globe, plug and other throttling valves that are only partially opened. If valve is to
be fully open, use values for pipe size change. CONTROL VALVES SHOULD BE LOCATED
AFTER THE FLOW SENSOR.
Phone: 219/879-8000 www.dwyer-inst.com
P.O. BOX 373 • MICHIGAN CITY, INDIANA 46361, U.S.A. Fax: 219/872-9057 e-mail: info@dwyer-inst.com
Find Quality Products Online at: sales@GlobalTestSupply.com
www.GlobalTestSupply.com
Page 2
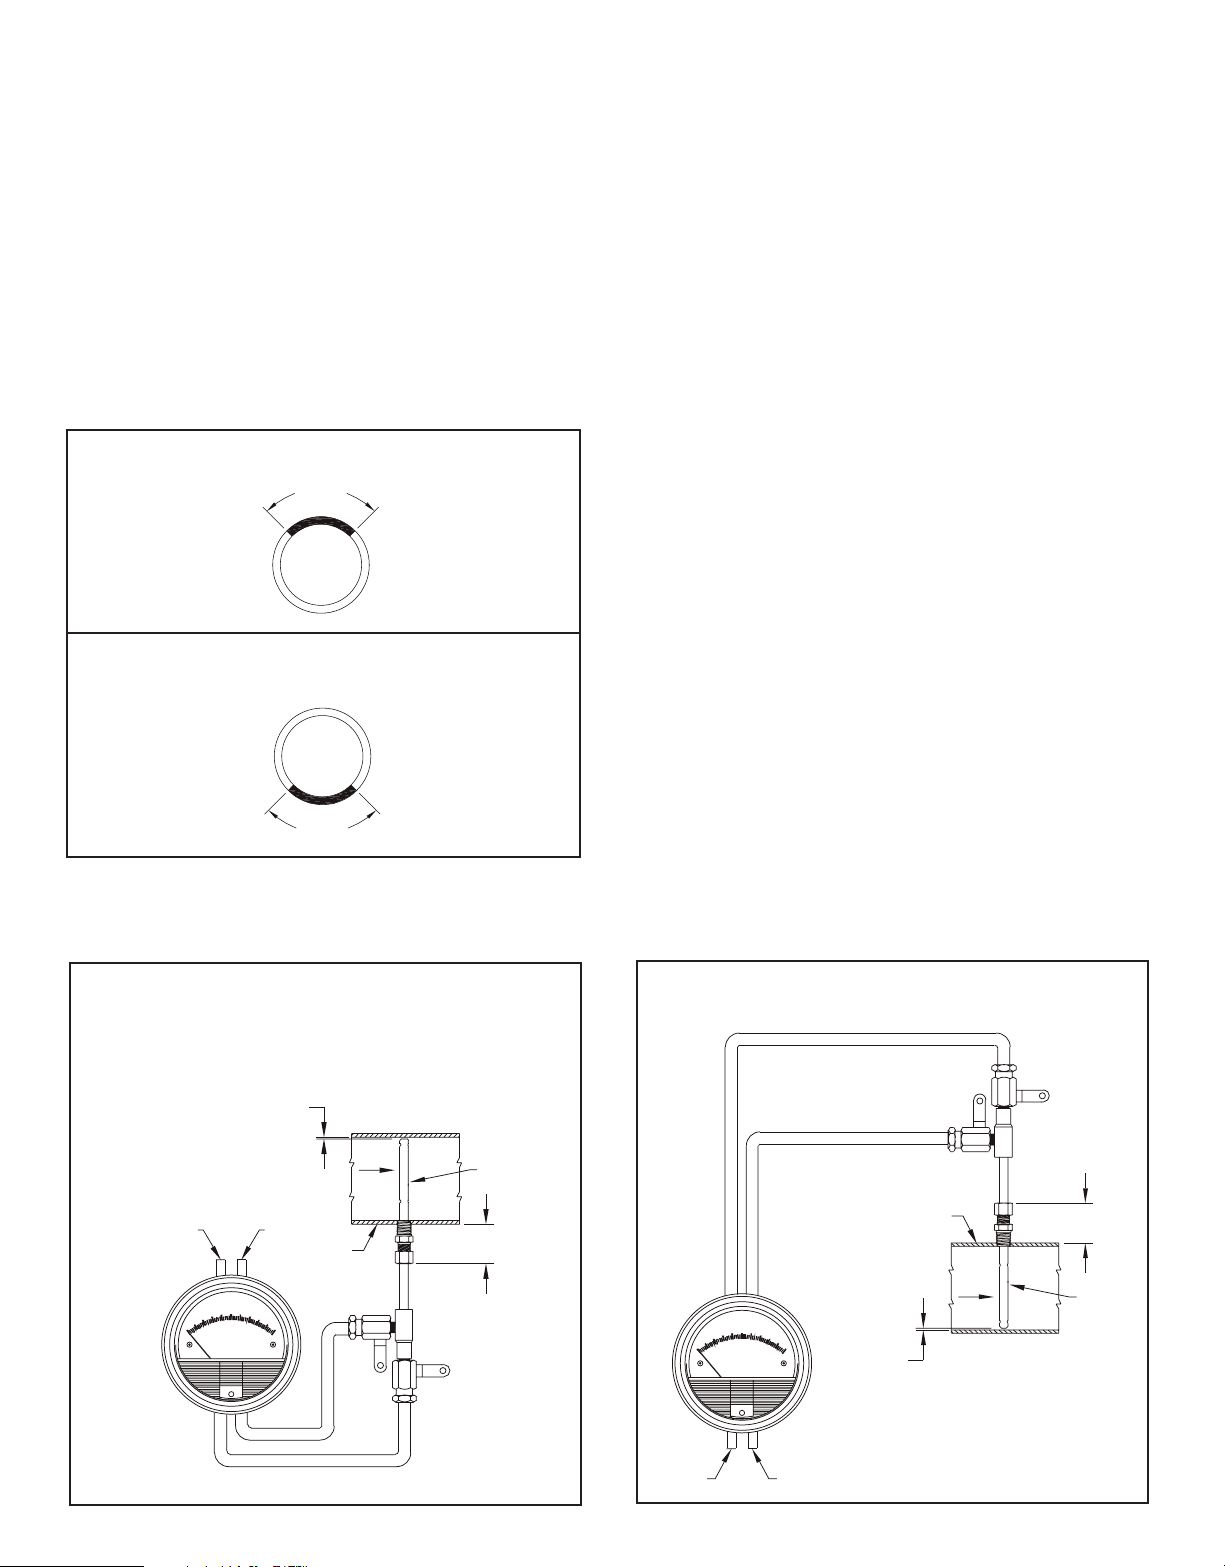
POSITION
Be certain there is sufficient clearance between the
mounting position and other pipes, walls, structures, etc, so
that the sensor can be inserted through the mounting unit
once the mounting unit has been installed onto the pipe.
Flow sensors should be positioned to keep air out of the
instrument connecting lines on liquid flows and condensate
out of the lines on gas flows. The easiest way to assure this
is to install the sensor into the pipe so that air will bleed into,
or condensate will drain back to, the pipe.
For Air or Gas Flow
UPPER PIPE
Install in upper
quadrant of pipe
QUADRANT
Condensate drains
back to pipe
For Liquid or Steam Flow
Install in lower
quadrant of pipe
Air bleeds
back to pipe
INSTALLATION
1. When using an A-160 thred-o-let, weld it to the pipe wall.
If replacing a DS-200 unit, an A-161 bushing (1/4˝ x 3/8˝) will
be needed.
2. Drill through center of the thred-o-let into the pipe with a
drill that is slightly larger than the flow sensor diameter.
3. Install the packing gland using proper pipe sealant. If the
packing gland is disassembled, note that the tapered end of
the ferrule goes into the fitting body.
4. Insert sensor until it bottoms against opposite wall of the
pipe, then withdraw 1/16˝ to allow for thermal expansion.
5. Tighten packing gland nut finger tight. Then tighten
nut with a wrench an additional 1-1/4 turns. Be sure to hold
the sensor body with a second wrench to prevent the
sensor from turning.
INSTRUMENT CONNECTION
Connect the slide pressure tap to the high pressure port of
the Magnehelic®(air only) or Capsuhelic®gage or
transmitting instrument and the top connection to the low
pressure port.
See the connection schematics below.
Bleed air from instrument piping on liquid flows. Drain any
condensate from the instrument piping on air and gas flows.
Water Flow
LP BLEED
INCHES OF WATER
.40
.20
0
CAPSUHELIC®
MAX. OPERATING PRESS. 500 PSIG
DWYER INSTRUMENTS, INC MICHIGAN CITY, INDIANA 46360 U.S.A.
ZERO SET
LP
LOWER PIPE
QUADRANT
1/16 (1.59)
CLEARANCE
HP BLEED
.60
.80
1.0
HP
PIPE
FLOW
HP
SENSOR
1-7/16 (36.53)
LP
Open valves to instrument to place flow meter into service.
For permanent installations, a 3-valve manifold is
recommended to allow the gage to be zero checked
without interrupting the flow. The Dwyer A-471 Portable
Te st Kit includes such a device.
Air or Gas Flow
LP
HP
LP
INCHES OF WATER
.40
.20
0
CAPSUHELIC®
MAX. OPERATING PRESS. 500 PSIG
DWYER INSTRUMENTS, INC. MICHIGAN CITY, INDIANA 46360 U.S.A.
ZERO SET
PIPE
HP
.60
.80
1.0
1/16 (1.59)
FLOW
CLEARANCE
1-7/16 (36.53)
SENSOR
LP DRAIN
Find Quality Products Online at: sales@GlobalTestSupply.com
www.GlobalTestSupply.com
HP DRAIN
Page 3

1/4 MALE NPT
1-15/16 (49.21)
LP
HP
5/16 (7.94)
1-5/8 (41.27) TYP
1-3/4 (44.45)
1-11/16 (42.86)
Flow Calculations and Charts
The following information contains tables and equations for
determining the differential pressure developed by the DS300 Flow Sensor for various flow rates of water, steam, air
or other gases in different pipe sizes.
This information can be used to prepare conversion charts
to translate the differential pressure readings being sensed
into the equivalent flow rate. When direct readout of flow is
required, use this information to calculate the full flow
differential pressure in order to specify the exact range of
Dwyer Magnehelic®or Capsuhelic®gage required. Special
ranges and calculations are available for these gages at
minimal extra cost. See bulletins A-30 and F-41 for
additional information on Magnehelic®and Capsuhelic
gages and DS-300 flow sensors.
For additional useful information on making flow
calculations, the following service is recommended: Crane
Valve Co. Technical Paper No. 410 “Flow of Fluids Through
Valves, Fittings and Pipe.” It is available from Crane Valve
Company, www.cranevalve.com.
®
Using the appropriate differential pressure equation from Page 4 of this bulletin,calculate the differential pressure generated by
the sensor under normal operating conditions of the system. Check the chart below to determine if this value is within the
recommended operating range for the sensor. Note that the data in this chart is limited to standard conditions of air at 60°F
(15.6°C) and 14.7 psia static line pressure or water at 70°F (21.1°C). To determine recommended operating ranges of other
gases, liquids an/or operating conditions, consult factory.
Note: the column on the right side of the chart which defines velocity ranges to avoid. Continuous operation within these
ranges can result in damage to the flow sensor caused by excess vibration.
Pipe Size
(Schedule 40)
1
1-1/4
1-1/2
2
2-1/2
3
4
6
Flow
Coefficient
“K”
0.52
0.58
0.58
0.64
0.62
0.67
0.67
0.71
Operating Ranges
Air @ 60°F & 14.7 psia
(D/P in. W.C.)
1.10 to 186
1.15 to 157
0.38 to 115
0.75 to 75
1.72 to 53
0.39 to 35
0.28 to 34
0.64 to 11
Operating Ranges
Water @ 70°F
(D/P in. W.C.)
4.00 to 675
4.18 to 568
1.36 to 417
2.72 to 271
6.22 to 193
1.43 to 127
1.02 to 123
2.31 to 40
Velocity Ranges
Not Recommended
(Feet per Second)
146 to 220
113 to 170
96 to 144
71 to 108
56 to 85
42 to 64
28 to 43
15 to 23
8
10
0.67
0.70
Find Quality Products Online at: sales@GlobalTestSupply.com
0.10 to 10
0.17 to 22
www.GlobalTestSupply.com
0.37 to 37
0.60 to 79
9.5 to 15
6.4 to 10
Page 4

FLOW EQUATIONS
DIFFERENTIAL PRESSURE EQUATIONS
1. Any Liquid
Q (GPM) = 5.668 x K x D2x ∆P/S
2. Steam or Any Gas
Q (lb/Hr) = 359.1 x K x D2x p x ∆P
3. Any Gas
Q (SCFM) = 128.8 x K x D2x P x ∆P
f
(T + 460) X S
S
Technical Notations
The following notations apply:
∆P = Differential pressure expressed in inches of water column
Q = Flow expressed in GPM, SCFM, or PPH as shown in equation
K = Flow coefficient— See values tabulated on Pg. 3.
D = Inside diameter of line size expressed in inches.
For square or rectangular ducts, use:
D = 4 x Height x Width
1. Any Liquid
P (in. WC) = Q
∆
2. Steam or Any Gas
∆P (in. WC) = Q
3. Any Gas
∆P (in. WC) = Q
π
2
x S
f
K2x D4x 32.14
2
K2x D4x p x 128,900
2
x SSx (T + 460)
K2x D4x P x 16,590
P = Static Line pressure (psia)
T = Temperature in degrees Fahrenheit (plus 460 = °Rankine)
p = Density of medium in pounds per square foot
Sf= Sp Gr at flowing conditions
SS= Sp Gr at 60°F (15.6°C)
SCFM TO ACFM EQUATION
SCFM = ACFM X
ACFM = SCFM X
POUNDS PER
CUBIC FOOT CUBIC FOOT
POUNDS PER
CUBIC FOOT CUBIC FOOT
1 Cubic foot of air = 0.076 pounds per cubic foot at 60° F (15.6°C) and 14.7 psia.
* (520°= 460 + 60°) Std. Temp. Rankine
STD. =
ACT. =
14.7 + PSIG
(
14.7 460 + °F
14.7
(
14.7+ PSIG 520
POUNDS PER
POUNDS PER
)(
)(
ACT. X
STD. X
520*
)
460 + °F
)
14.7
(
14.7 + PSIG 520*
14.7 + PSIG
(
14.7 460 + °F
)(
)(
460 + °F
520*
)
)
©Copyright 2004 Dwyer Instruments, Inc. Printed in U.S.A. 7/04 FR# 72-440451-01 Rev. 2
DWYER INSTRUMENTS, INC.
P.O. BOX 373 • MICHIGAN CITY, INDIANA 46361, U.S.A. Fax: 219/872-9057 e-mail: info@dwyer-inst.com
Find Quality Products Online at: sales@GlobalTestSupply.com
www.GlobalTestSupply.com
Phone: 219/879-8000 www.dwyer-inst.com
 Loading...