

Page 1
Bulletin TE-DDM-01
L
A
S
E
R
D
I
S
T
A
N
C
E
M
E
T
E
R
Laser
d
istance meter
DDM-01
S
+
/U
LED
/-
MEAS
2
[
51.75]
1
-1/4
[
31.88]
4
-5/8
[
116.69]
L
A
S
E
R
D
I
S
T
A
N
C
E
M
E
T
E
R
Laser
d
istance meter
D
DM-01
S
+/U
L
ED
/-
MEAS
A
B
C
D
E
F
G
H
I
J
K
L
max
min
ftinm
ftinm
ftinm
1
2
3
4
5
6
7
8
9
10
11
12
13
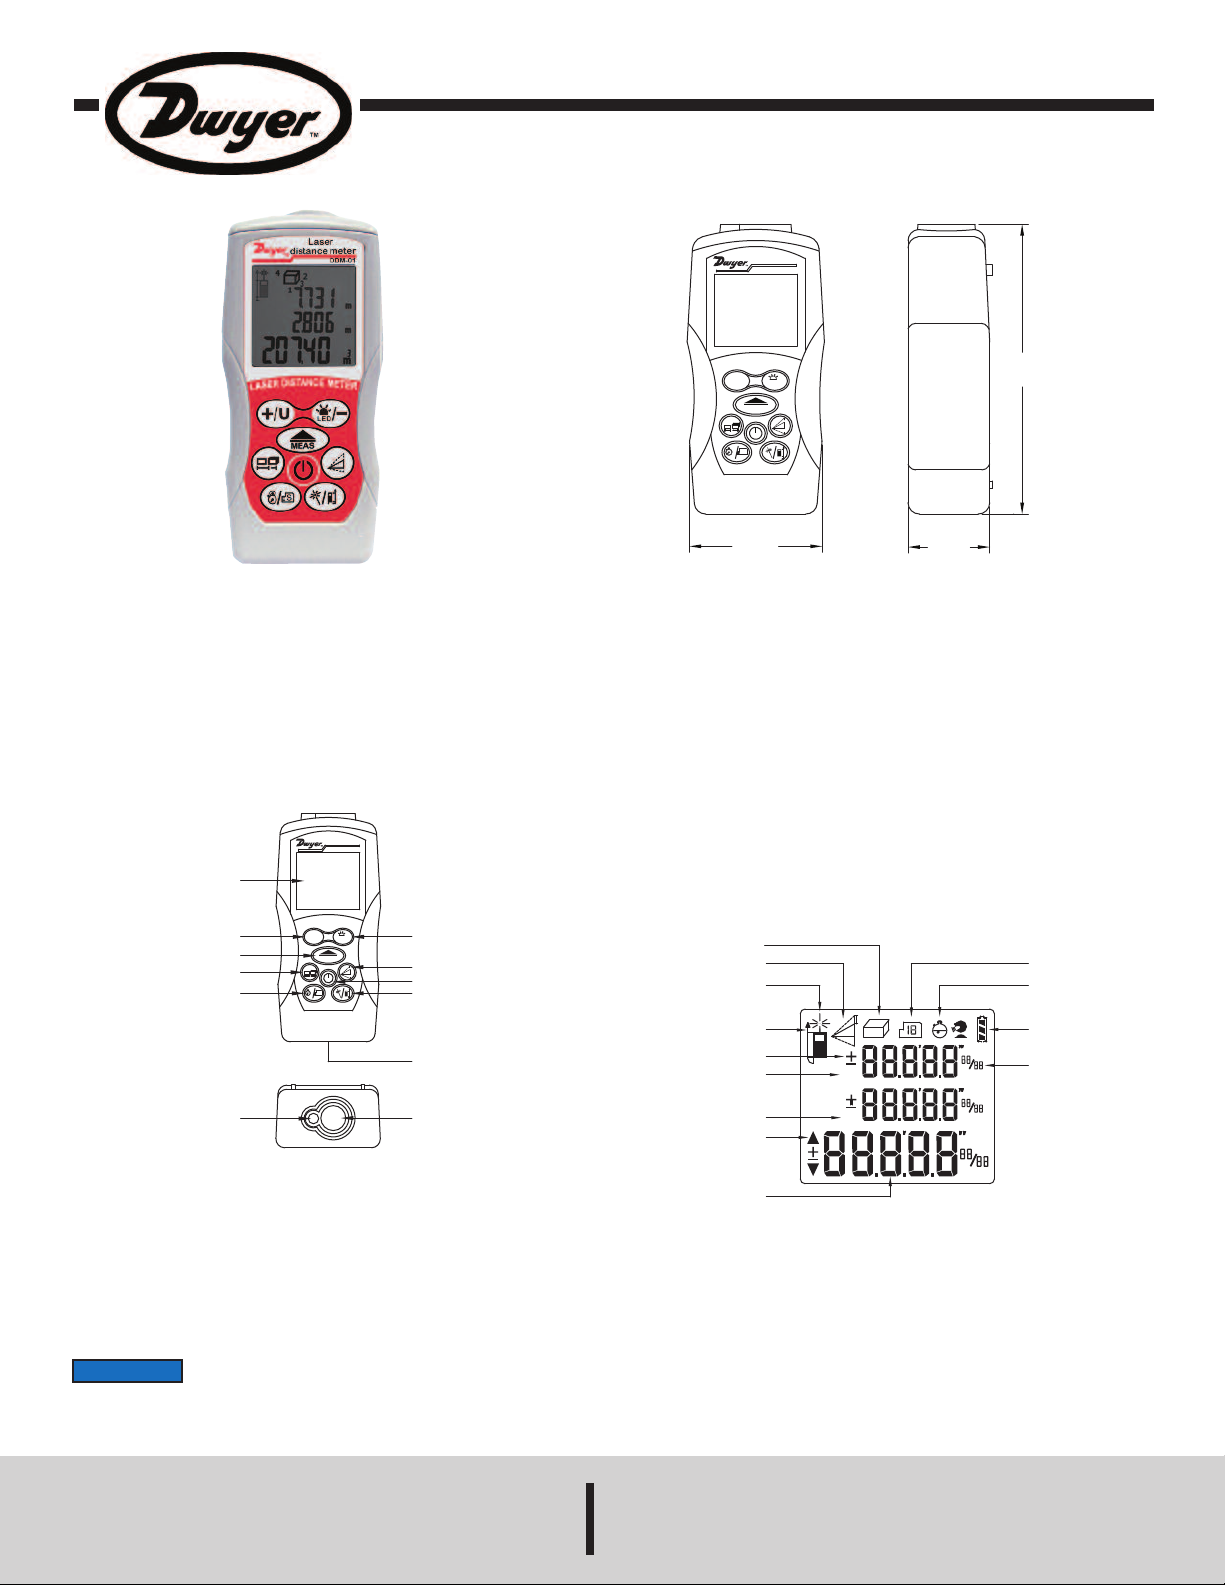
Model DDM-01 Laser Distance Meter
Specifications - Installation and Operating Instructions
The Model DDM-01 Laser Distance Meter offers quick measurement of
distances up to 229.7 feet (70 meters) with the click of a button. It is also
able to easily make area and space calculations and volume measurements from what it records. Another feature of the Model DDM-01 is that
it is able to use the Pythagorean Theorem to indirectly calculate the height
of an object. The meter can read out in feet, inches, or meters and includes a backlight for use in dark areas.
PRODUCT OVERVIEW
Figure 1
SPECIFICATIONS
Range: 0.16 to 229.7 feet (0.05 to 70 m).
Accuracy: ±0.005 feet (±1.5 mm).
Display: Three line LCD (top two with 4 digits/bottom with 5 digits).
Resolution: 0.001 feet (0.001 m).
Response Time: 0.5 s.
Laser Type: 650 nm, class 2, <1 mW.
Beam Size: 25 mm at 30 m.
Temperature Limits:
Operating: 23 to 104°F (-5 to 40°C);
Storage: -4 to 140°F (-20 to 60°C).
Power Requirements: (2) 1.5 V AA carbon zinc batteries, included,
user replaceable.
Weight: 21.6 oz (612.35 g).
Agency Approvals: CE, RoHS.
A. LCD G. Pythagorean I, II, & III
B. Add/Unit Switch H. Power Button/Clear
C. Measure/Continuous Measure I. Reference Switch/Laser Pointer
D. Measuring Function J. Battery Cover
(Area, Dimension, Stake Out)
E. Timer/Memory K. Laser Emitting Window
F. Subtract/Backlight L. Receiving Window
DWYER INSTRUMENTS, INC.
P.O. BOX 373 • MICHIGAN CITY, INDIANA 46360, U.S.A. Fax: 219/872-9057 e-mail: info@dwyermail.com
NOTICE
ton is pressed once. If it is listed after the slash, then it will be activated when the button is pressed and held.
If there are two settings separated by a “/” for one button, the setting that is listed before the slash will be activated when the but-
1. Measuring Function Area 7. Minimum Distance
Measuring Volume Measuring 8. Stakes Direction Indicator
2. Indirect Measuring Single Height 9. Main Display & Units
Sum of Two Heights 10. Memory
Difference of Two Heights 11. Countdown Measuring
3. Laser Indicator 12. Battery Status
4. Measuring Reference 13. Sub-Display & Units
5. Add and Subtract
6. Maximum Distance
Phone: 219/879-8000 www.dwyer-inst.com
Figure 2
Page 2
POWERING ON
NOTICE
cover, remove any batteries that are already installed, install the new batteries being
sure to observe correct polarity, and replace the lid.
efore turning on the meter, make sure the batteries are installed
B
properly. To install or change batteries, remove the back battery
To power on the meter, press the power button once. The initial screen will
flash for a few seconds to check the meter, and after checking, the meter
will display the standby screen.
AUTION
C
Laser will be emitted upon starting the meter. Do not look into the
beam. Permanent eye damage may occur.
MEASURING DISTANCE
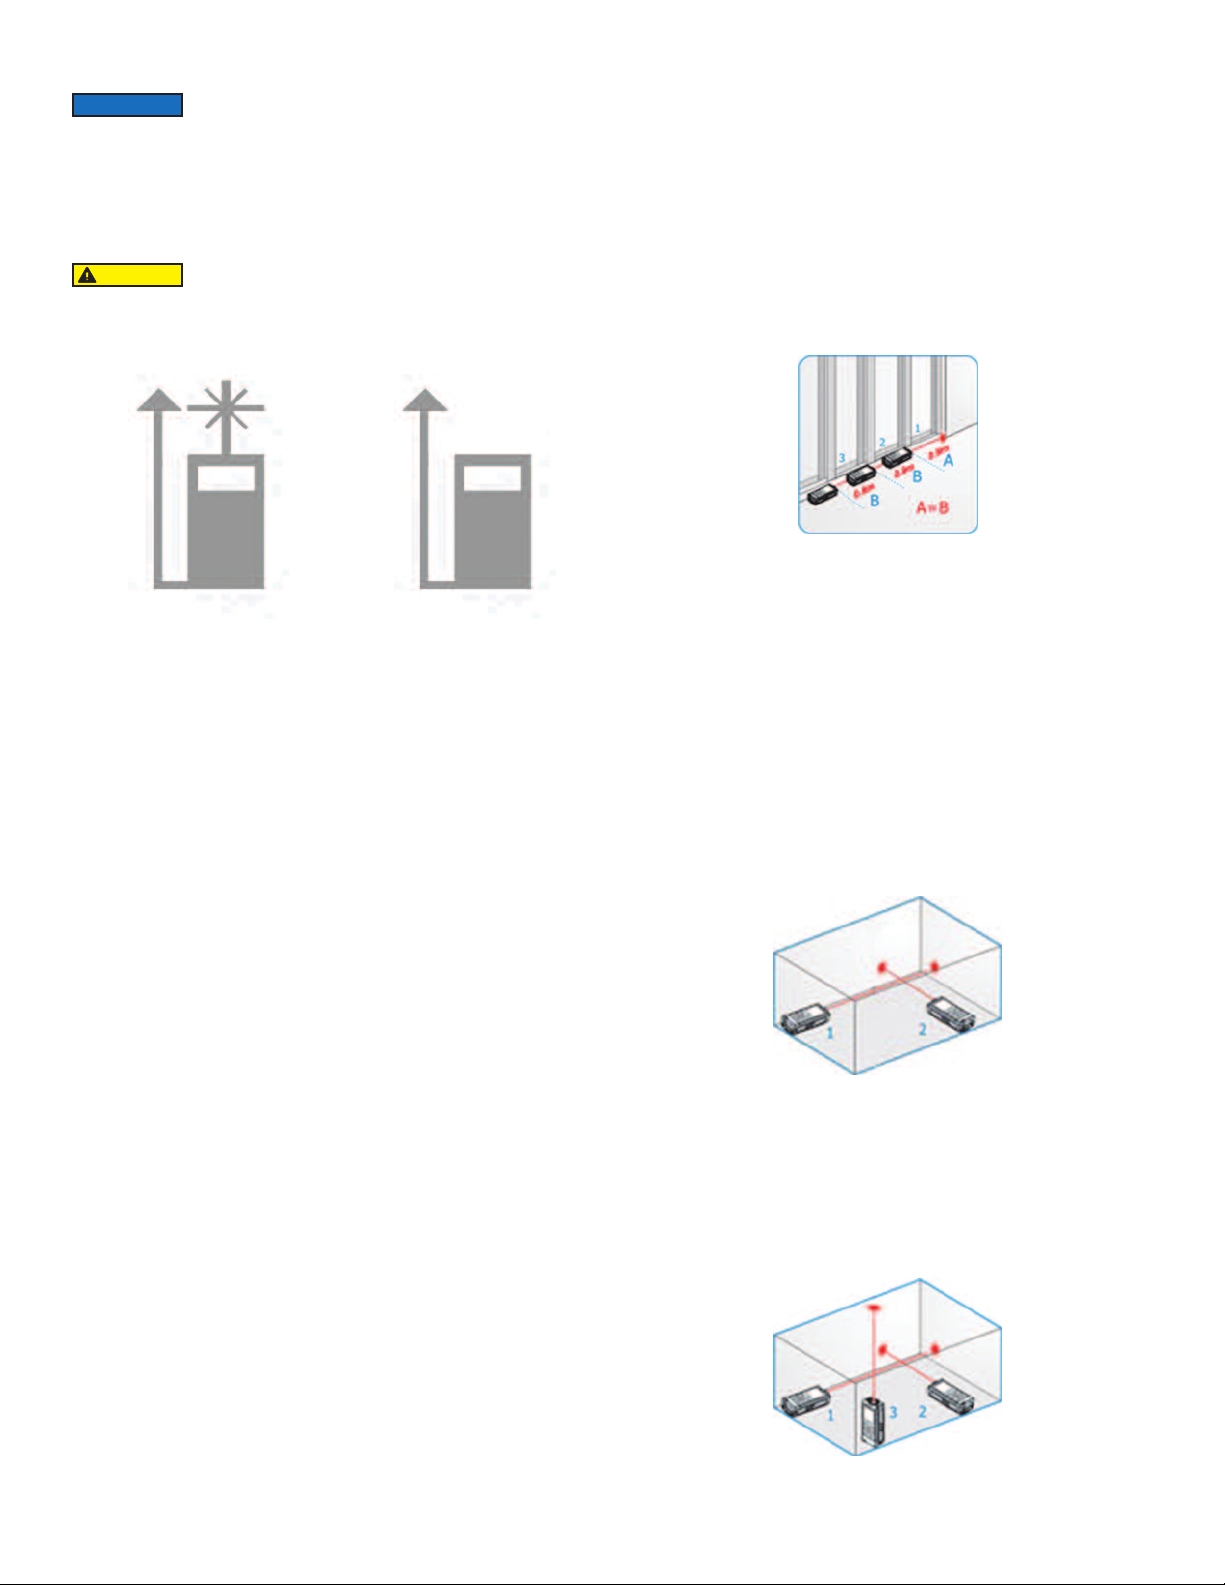
Check the icon in the upper left corner of the display to see if the laser is
emitted. See Figure 3.
Laser Emitted
Laser Not Emitted
Figure 3
If the laser is not activated, press the measure button to enable the laser.
Move the laser point onto the target, then press the measure button to take
measurement. Keep the dot on the target until a beep is heard, notifying
that the measuring is complete. The distance will then be shown on the
main display and the laser will be turned off.
Changing Unit of Measure
The default unit of measurement is meter. To change the unit of measurement, press and hold the unit switch button. The unit will be switched by
each press. Repeat until the required unit is displayed in the bottom right
corner. The available units are:
• Meters (m)
• Feet (ft)
• Inches (in)
• Feet and inches (ft & in, with tick marks also shown by numbers)
STAKE OUT FUNCTION
The meter includes a stake out function, which allows the user to set a specific distance needed, and the meter will notify the user when that distance
is reached during the continuous measuring setting. To set the stake out
distance, press the measuring function button three times. Then, press the
add or subtract button to increase or decrease the value. Press the measure button to shift between the whole number and decimal number. Press
the power button to return to zero. When the value is decided, press the
measuring function button to finish.
To measure with the set stake out point, activate continuous measuring.
As it measures, the meter will show arrows of whether the meter needs to
move closer to or farther from the object to reach the specified distance. It
will beep repeatedly when the set distance is reached. See Figure 4.
Figure 4
SETTING THE MEASUREMENT TIMER
There is a timer available in the meter to allow for a more stable measurement, which can be set from 3 to 15 seconds. To set the timer, press
the timer button until the desired time is shown at the top of the screen.
After the time is set, point the meter at the target and press the measure
button. The meter will beep when the measurement has been taken and
the result will be shown on the main display.
MEASURING AREA
To measure the area of a space, press the measuring function button once
to enable area measuring. The laser will be turned on upon beginning area
measuring. The measuring function icon on the display will blink to show
which measurement needs to be taken at each time. Measure the distance
of the length and width of the space as stated in “Measuring Distance.”
Once all distances have been measured, the area is shown on the main
display. See Figure 5.
Changing Reference Point
The default reference point is set to the rear of the meter. To change the
reference point for measuring, press the reference switch button. The available reference points are at the front of the meter and at the rear.
ADDING/SUBTRACTING MEASUREMENTS
Once the first distance is found, press the add or subtract button once.
Then find the next distance to be added or subtracted from the first distance and press the add or subtract button again. The result will be shown
on the main display.
CONTINUOUS MEASURING
To activate the continuous measuring setting, hold down the measure button. The laser will turn on when continuous measuring is activated. In this
setting, the meter will take continuous measurements, showing the most
recent measurement on the main display, and the maximum and minimum
measurements shown on each of their respective sub-displays. To pause
continuous measuring, press the measure button. To quit and go back to
the normal measuring mode, press the power button.
Figure 5
MEASURING VOLUME
To measure the volume of a space, press the measuring function button
twice to enable volume measuring. The laser will be turned on upon beginning volume measuring. The measuring function icon on the display will
blink to show which measurement needs to be taken at each time. Measure
the distance of the length, width, and height of the space as stated in
“Measuring Distance.” Once all distances have been measured, the volume is shown on the main display. See Figure 6.
Figure 6
Page 3

MEASURING HEIGHT (INDIRECT)
To measure the height of an object indirectly, press the Pythagorean button once to enable Pythagorean I (Single Height), twice to enable
Pythagorean II (Addition of Two Heights), and three times to enable
Pythagorean III (Subtraction of Two Heights). This setting uses the
Pythagorean theorem to find the distance between two points using a variation of methods. For all methods, the indirect measuring icon on the display will blink with which measurement needs to be taken at each time.
MEMORY RECALL
The meter includes a memory recall function that stores the last 20 measurements. To look up the records, press and hold the memory button until
the memory is shown on the display. Press the add button to move up the
list, and the subtract button to move down the list.
BACKLIGHT
To turn the backlight on and off, press and hold the backlight button.
Single Height
This setting is used to find a distance between two points using one height.
See Figure 7 below for further clarification. First, take the measurement at
the top distance (1). Then, take the distance at the horizontal (2). The meter
will then show the distance between points 1 and 2 on the main display.
Figure 7
Addition of Two Heights
This setting is used to find the distance between two points using the addition of two heights. See Figure 8 below for further clarification. First, take
the measurement at the top height (1). Then, take the horizontal measurement in between the two heights (2). Last, take the measurement at
the bottom point (3). The meter will then show the distance between points
1 and 3 on the main display.
Figure 8
Subtraction of Two Heights
This setting is used to find the distance between two points using the subtraction of two heights. See Figure 9 below for further clarification. First,
take the measurement at the top height (1). Then, take the measurement
at the second height (2). Last, take the measurement at the horizontal (3).
The meter will then show the distance between points 1 and 2 on the main
display.
LASER POINTER
To turn the laser pointer on and off, press and hold the laser pointer button. This will cause the laser icon to display on the screen.
ERROR CODES
Occasionally, the meter will display that an error has occurred. Refer to
Table 1 below if an error message is shown on the meter.
Code
Description
Err01
Out of Measuring Range
Err02
Reflected Signal is Too Weak
Err03
Out of Display Range
Err04
Pythagorean Calculation Error
Err05
Low Battery
Err06
Out of Working Temperature
Err07
Ambient Light is Too Strong
MAINTENANCE/REPAIR
Upon final installation of the Model DDM-01, no routine maintenance is
required besides changing the batteries. The Model DDM-01 is not field
serviceable and should be returned if repair is needed. Field repair
should not be attempted and may void warranty.
WARRANTY/RETURN
Refer to “Terms and Conditions of Sale” in our catalog and on our
website. Contact customer service to receive a Return Goods
Authorization number before shipping the product back for repair. Be
sure to include a brief description of the problem plus any additional
application notes.
Solution
Measure in a Proper Range
Select a Better Surface
Divide Calculation into
Intermediate Steps
Check and Verify Values and
Steps are Correct
Install a New Battery
Measure in an Environment
Within Specified Working
Temperature
Measure in a Darker Place or
at a Darker Time
Table 1
Figure 9
MEASURING IN BRIGHT AREAS
The working range and accuracy of the meter depend on how well the energy of the laser is reflected from the surface of the target back to the receiving window of the meter. When using the distance meter in bright ambient
areas, it may help to use a white target to increase the working range and
the stability of accuracy.
Page 4

©Copyright 2014 Dwyer Instruments, Inc. Printed in U.S.A. 4/14 FR# R7-444156-00 Rev. 2
DWYER INSTRUMENTS, INC.
P.O. BOX 373 • MICHIGAN CITY, INDIANA 46360, U.S.A. Fax: 219/872-9057 e-mail: info@dwyermail.com
Phone: 219/879-8000 www.dwyer-inst.com
 Loading...