

Page 1

Series CAM Compressed Air Meter
Specifications - Installation and Operating Instructions
4-3/8
3-1/32
[76.99]
[111.13]
3-15/16
[100.01]
Bulletin C-32
M12 x 1
The Series CAM Compressed Air Meter operates by the calorimetric
measuring principle to detect the standard volume flow of operating
compressed air. It is designed specifically to evaluate the current flow
rate and the current consumed quantity in compressed air systems. With
an easily programmable digital display, this unit offers a quick, accurate
readout. The Series CAM is constructed of high-grade materials and is
virtually maintenance free.
Read the product description before installing the unit, to ensure that the
product is suitable for your application without any restrictions. Suitably
qualified personnel must perform work on compressed air equipment.
Ensure that the installation is at a standstill, before mounting components into or removing them from compressed air equipment. Ensure
that neither people nor objects are endangered by moving parts before
commissioning / restart of the installation. Non-adherence to the operating instructions or technical data can lead to personal injury and/or damage to property. In all applications, check compliance of the product
materials with the media to be measured.
Class
1
2
3
4
5
6
Max. Oil
Content
Oil Content
3
mg/m
0.01
0.1
1
5
25
–
Dust Concentration
3
mg/m
0.1
1
5
8
10
–
Particle Size
mg/µm
0.1
1
5
15
40
–
Max. Residual WaterMax. Residual Dust
Residual
Water g/m
0.003
0.117
0.880
5.953
7.732
9.356
Pressure Dew
3
Point °C
-70
-40
-20
+3
+7
+10
Chart 1
C
E
A
B
C
DIMENSIONS
MODEL
CAM-10
CAM-20
CAM-30
A
10-53/64
[275.3]
8-9/32
[210.34]
14-49/64
[375.05]
B
18-45/64
[475.06]
11-13/16
[300.04]
18-45/64
[475.06]
C
2 NPT
1/2 NPT
1 NPT
D
5-1/4
[133.35]
3-1/32
[76.99]
3-31/64
[88.5]
E
Ø2-1/64
[Ø51.2]
Ø41/64
[Ø16.27]
Ø1-5/64
[Ø27.38]
SPECIFICATIONS
Service: Compressed air; Air quality (see chart 1).
Wetted Materials: Stainless Steel (304S15), ceramics, glass passivat-
ed, PEEK, polyester, Fluoroelastomer, anodized aluminum.
Response Time: < 0.1 seconds.
Temperature Limit: 32 to 140°F (0 to 60°C).
Accuracy*: 1.41 ±3% +0.3% FV; 3.44 ±6% MV +0.6% FV.
Pressure Limit: 232 psig (16 bar).
Humidity Limit: 90% RH.
Power Requirements: 19-30 DC.
Output Signal:
Output 1: PNP Open Collector: VOUT(max)=30 VDC /
ISINK(max)= 250mA
Output 2: 4-20mA (scalable) or PNP Open Collector.
Loop Resistance: 500 ohms.
Current Consumption: <100 mA.
Electrical Connections: 4 pin M12(Micro) Cable Connection.
Process Connections: 1/2˝ , 1˝ and 2˝ NPT.
Display: 4-digit alphanumeric red LED
Enclosure Rating: IP65 (NEMA 4X).
Mounting Orientation: Vertical, Horizontal, Side with pipe length fac-
ing left.
Ranges:
CAM-10: 1.4-412.0 SCFM;
CAM-20: 0.2-44.1 SCFM;
CAM-30: 1.0-132.4 SCFM.
Weight:
CAM-10: 12.5 lb;
CAM-20: 2.35 lb;
CAM-30: 4.16 lb.
Agency Approvals: CE.
*Ref. Chart 1 for DIN ISO 8573 Standards
e.g. 1.4.1. implies
1 = 0.01mg/m
4 = 15 µm particle size and 8 mg/m3particle density
1 = -70°C dew pt., 3 mg/m3residual water
3
oil content
DWYER INSTRUMENTS, INC.
Phone: 219/879-8000 www.dwyer-inst.com
P.O. Box 373 • Michigan City, IN 46361-0373, U.S.A. Fax: 219/872-9057 e-mail: info@dwyer-inst.com
Find Quality Products Online at: sales@GlobalTestSupply.com
www.GlobalTestSupply.com
Page 2
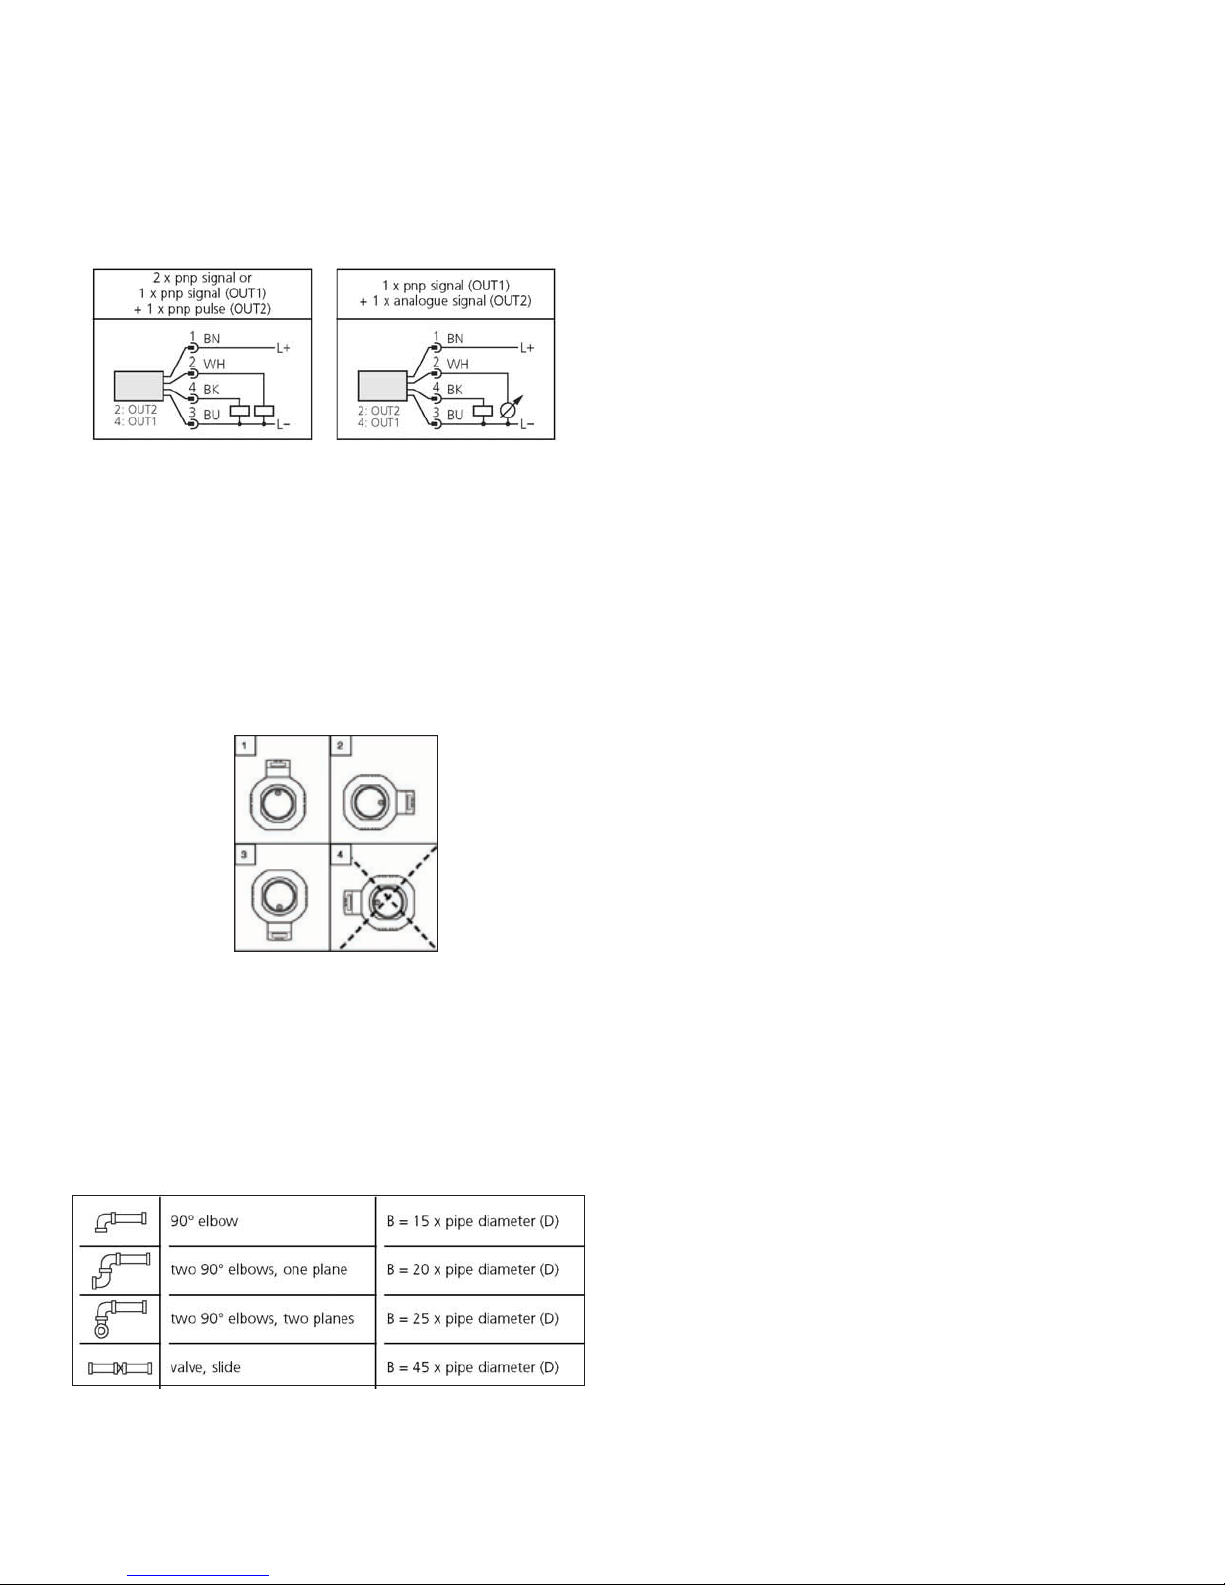
ELECTRICAL CONNECTION
A suitably qualified electrician must connect the unit. Voltage supplied
according to EN50178, SELV, PELV. The device shall be supplied from
an isolating source and protected by an overcurrent device such that the
limited voltage circuit requirements in accordance with UL 508 are met.
Disconnect power before connecting the unit as follows in Figure 2.
Disconnect power before connecting the unit as follows:
Core socket colors
1 = BN, 2 = WH (white), 3 = BU (blue), 4 = BK (black).
Figure 1
INSTALLATION
Location:
Select an area where the process temperature will remain between 32
and 140°F (0 to 60°C). Preferred mounting location is downstream from
the cold dryer, near the load. If compressed air is fed into the main pipe
through parallel pipes, the unit should be mounted in the main pipe.
Position: The unit may be positioned vertically, horizontally, and on its
side with the pipe length left. Avoid positioning the unit on its side with
the pipe length to the right. This may jeopardize the accuracy:
MAINTENANCE
After mounting, wiring and programming check whether unit operates
correctly. Unit is maintenance free for media which will not adhere to
measuring probes. Occasionally, probes should be visually checked for
build-up. If necessary, clean probes with a suitable liquid (e.g. alcoholic
solution). Avoid mechanical damage to measuring probes.
Figure 2
Mounting: To achieve the specified measurement accuracy, the follow-
ing mounting conditions must be adhered to: defined inflow/outflow pipe
lengths, defined flow cross-sectional area, fixed installation depth and
correct positioning of the measuring elements. Integrate the pipe length
so that the direction of flow and the marking arrow show in the same
direction. In case of disturbances at the inflow side additional baffled
pipes are recommended:
Figure 3
Find Quality Products Online at: sales@GlobalTestSupply.com
www.GlobalTestSupply.com
Page 3

Display Key Functions:
Chart 2
*To decrease the value, cycle past the maximum value, and the setting will restart
from the minimum.
Figure 4
Find Quality Products Online at: sales@GlobalTestSupply.com
www.GlobalTestSupply.com
Page 4

Find Quality Products Online at: sales@GlobalTestSupply.com
www.GlobalTestSupply.com
Page 5

PROGRAMMING
Select the display unit (Uni) before setting the values for the parameters.
This avoids rounding errors generated internally during the conversion of
the units and enables exact setting of the values. The setting at the factory is Uni=CFH.
If no button is pressed for 15 seconds during the setting procedure, the
unit returns to the Run Mode with unchanged values.
The unit can be electronically locked to prevent unwanted adjustment of
the set parameters by pressing both push buttons until “LOC” is displayed. With the unit in the locked state “LOC” is indicated briefly when
you try to change parameter values. To unlock press both push buttons
until “ULO” is displayed. Units are delivered from the factory in the
unlocked state.
OPERATING MODES
Run Mode:
Normal operating mode. Unit will perform its measurement and evaluation functions and provide output signals according to set parameters.
Totalizer adds pulses of consumed quantity and displays them as current consumption value since last reset. Totalizer stores intermediate
values every 10 minutes as well as elapsed time of set automatic reset.
After a voltage dip this value is available as the current count of the totalizer (possible data loss can be maximum 10 minutes). Display indicates
current measured values, yellow LED’s signal switching status of outputs. Display unit can be temporarily changed (press “Set” button briefly,
after 15 seconds unit returns to display unit set in menu point Uni).
Display Mode:
Indicates parameters and set parameter values. When “Mode/Enter”
button is pushed briefly, unit passes to Display mode, which allows parameter values to be read. Unit’s internal sensing, processing, and output
functions continue as if in Run mode. Parameter names are scrolled with
each press of “Mode/Enter” button. When “Set” button is pushed, corresponding parameter value is displayed for about 15 seconds. After
another 15 seconds, unit returns to Run mode.
ADJUSTABLE PARAMETERS
Programming Mode:
Setting parameter values: While viewing a parameter value pressing the
“Set” button for more than 5 seconds causes unit to enter programming
mode. Alter parameter by pressing “Set” button and confirm new value
by pressing “Mode/Enter” button. Internal sensing, processing, and output functions continue as if in Run mode with original parameter values
unless a new value is confirmed. Unit returns to Run mode when no button has been pressed for 15 seconds.
Find Quality Products Online at: sales@GlobalTestSupply.com
www.GlobalTestSupply.com
Page 6

Window Function:
Enables monitoring of a defined acceptable range. When flow rate varies
between switch-on point (SPx) and switch-off point (rPx), output is
switched (window function/NO) or not switched (window function/NC).
Width of window can be set by means of the difference between SPx and
rPx. SPx=upper value, rPx=lower value.
Figure 6
Scaling measuring range (analog output):
Analog start point (ASP) is the measured value at which the output signal 4 mA is defined. Analog end point (AEP) is the measured value at
which the output signal 20 mA is defined. Minimum distance between
ASP and AEP = 25% of final measuring range value. Output signal
ranges from 4 to 20 mA in set measuring range. Output is also indicated
by: flow rate above measuring range (output signal > 20 mA), or flow rate
below measuring range (output signal between 3.6 and 4 mA).
Chart 3
Hysteresis Function:
Keeps switching state of output stable if flow rate varies about preset
value. With flow rate rising, output switches when switch-on point has
been reached (SPx). With flow rate falling, output does not switch back
until switch-off point (rPx) has been reached. To adjust hysteresis: set
switch-on point, then set switch-off point at requested distance.
Figure 5
Figure 7
Fault Indication
OL: Detection range exceeded (flow rate > 120% of final value of measuring range)
SC 1: Flashing - short circuit in switching output 1*
SC 2: Flashing - short circuit in switching output 2*
SC: Flashing - short circuit in both switching output*
Err: Flashing - fault in measuring probe
*Concerned output is switched off as long as short circuit continues.
Faults are indicated even if display is deactivated.
©Copyright 2009 Dwyer Instruments, Inc. Printed in U.S.A. 9/09 FR# RA-443445-00 Rev. 2
DWYER INSTRUMENTS, INC.
Phone: 219/879-8000 www.dwyer-inst.com
P.O. Box 373 • Michigan City, IN 46361-0373, U.S.A. Fax: 219/872-9057 e-mail: info@dwyer-inst.com
Find Quality Products Online at: sales@GlobalTestSupply.com
www.GlobalTestSupply.com
 Loading...