

Page 1
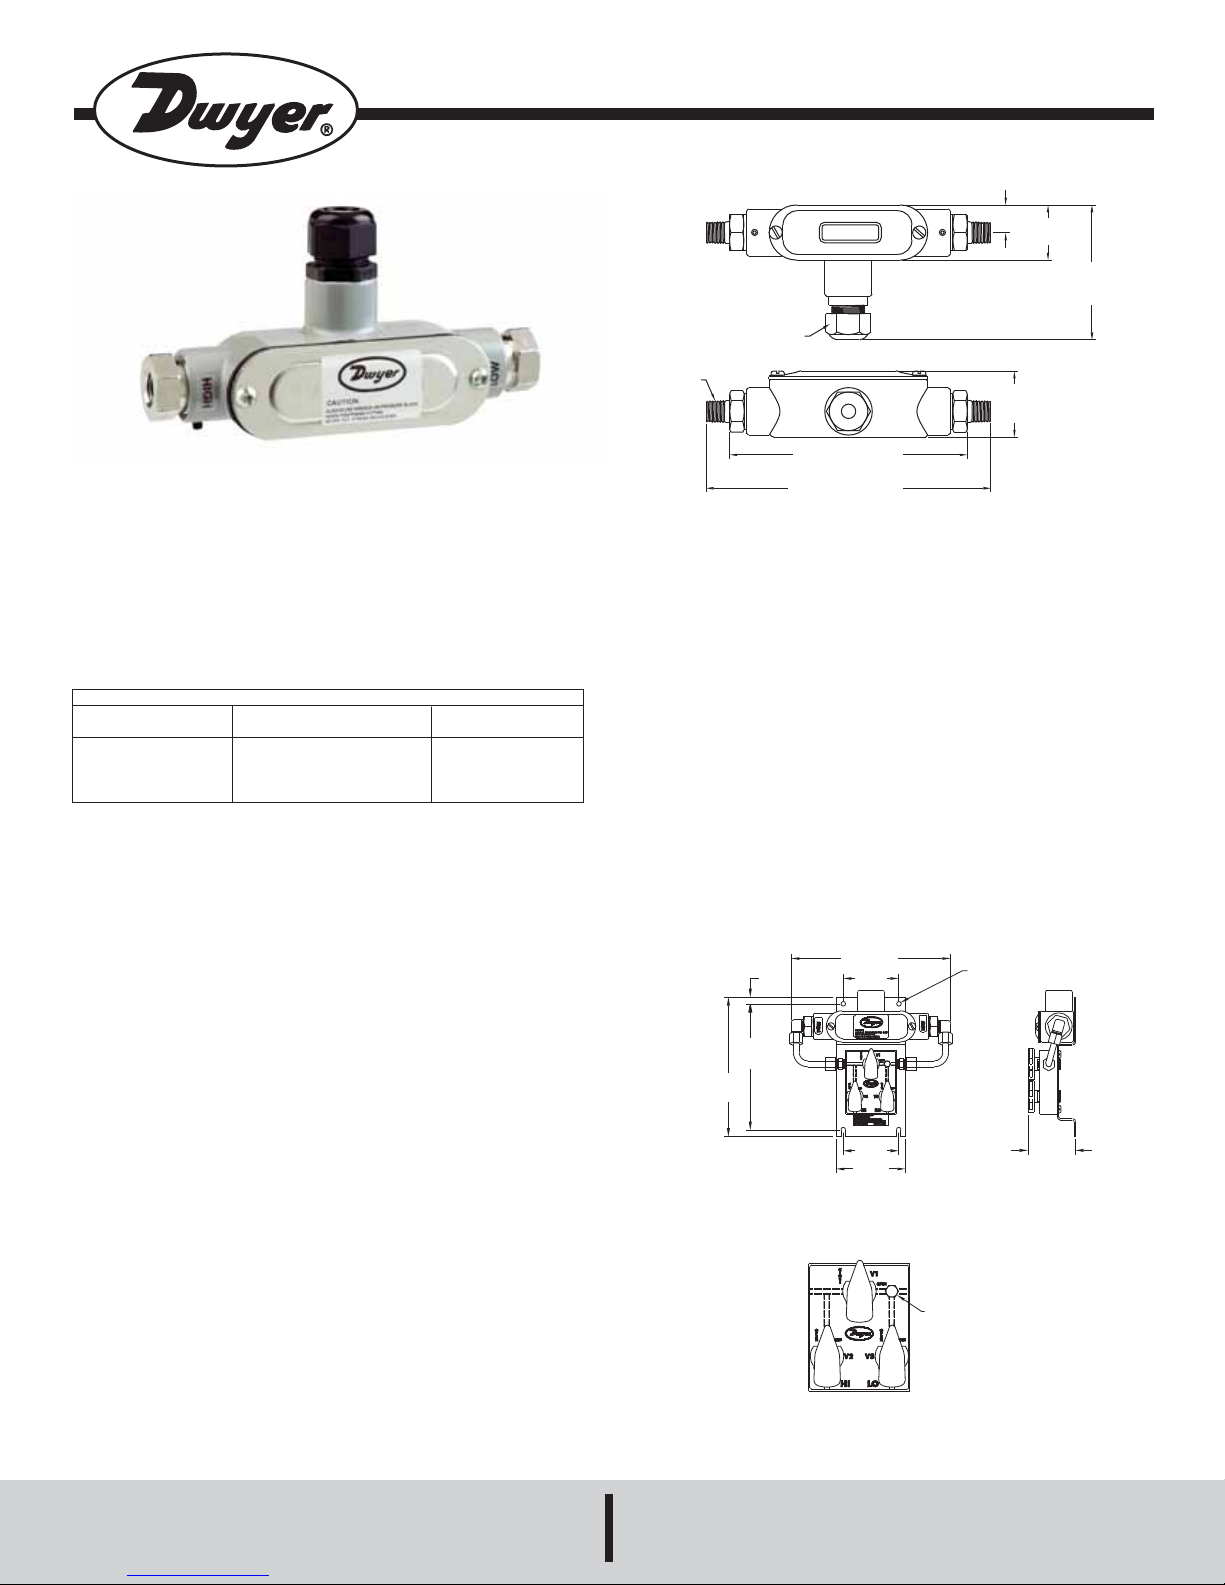
Series 629 Differential Pressure Transmitter
9/32
[7.14]
6-29/32
[175.42]
2.400
[60.69]
5-7/16
[138.11]
6-1/64
[152.81]
3
[76.20]
2.400
[60.69]
2-1/16
[52.39]
Ø13/64 [5.64] DIA
MOUNTING HOLES
TYP 4 PLACES
BLEED SCREW
Specifications - Installation and Operating Instructions
43/64
[17.07]
LIQUID TIGHT FITTING
CORD DIAMETER RANGE:
.200 TO .350 [5.06 TO 8.89]
1/4 NPT
TYP
[41.28]
5-25/32 [146.84]
629 shown with optional cable gland.
The Series 629 Differential Pressure Transmitter monitors differential pressure of
air and compatible gases and liquids with 0.5% accuracy. The design employs dual
pressure sensors converting pressure changes into a standard 4-20 mA output signal for two wire circuits. Small internal volume and minimum moving parts result in
exceptional response and reliability. Terminal block, zero and span adjustments are
easily accessed under the top cover. The Series 629 Differential Pressure Transmitter
is designed to meet NEMA-4X (IP66) construction.
Pressure Limits
Range (psid)
10
25
50
100
Working*
Pressure (psid)
20
50
100
200
Over
Pressure (psi)
100
250
250
500
* Pressures exceeding the working pressure limit may cause a
calibration shift of up to ±3% of full scale.
INSTALLATION
1. Location: Select a location where the temperature of the unit will be between 0°F
and 175°F. Distance from the receiver is limited only by total loop resistance (see electrical connections).The tubing feeding pressure to the instrument can be practically
any length required, but long lengths will increase the response time slightly. Mount
the instrument in a location that will not be subject to excessive temperature, shock
or vibration.
2. Position: A vertical position is recommended (pressure connections pointing horizontally) since that is how all standard models were originally spanned and zeroed at
the factory. They can be used at other angles, but may require final spanning and
zeroing.
3. Pressure Connection: Dual 1/4˝ female NPT pressure connections are provided.
Use pipe thread sealant tape or other suitable pipe joint compound when making
connection to the pressure source. Avoid excess sealant which could block the pressure passage. When monitoring liquid pressures, air trapped in the lines can cause
incorrect readings. Bleed fittings or similar mechanisms should be used to bleed off
any trapped air.
Optional 3-Way Valve
For applications where higher line pressures may be encountered at installation or
when it is necessary to remove the transmitter for maintenance without interrupting
the process, the optional three way valve is recommended (See Fig. A).
Begin with valve V1 open and valves V2 and V3 closed (See Fig. B). Slowly open
valves V2 and V3. Once the pressure has stabilized and is equal on the high and low
side of the transmitter, valve V1 can be closed and normal operation can proceed.
To ensure proper pressures will be detected by the 629 use the bleed fitting provided with this package to free media of bubbles. Before applying pressure to the
process connections, turn V1 to the open position and back off the bleed screw. Next
apply pressure. After the flowing liquid is free of bubbles, retighten the bleed screw.
Before removing the transmitter from operation, open valve V1 then close valves V2
and V3.
DWYER INSTRUMENTS, INC.
P.O. BOX 373 • MICHIGAN CITY, INDIANA 46361, U.S.A. Fax: 219/872-9057 e-mail: info@dwyer-inst.com
SPECIFICATIONS
Service: Compatible gases & liquids.
Wetted Materials: Types 316, 316L
SS.
Accuracy: +/- 0.5% F.S. (includes
linearity, hysteresis & repeatability).
Temperature Limits: 0 to 200°F
(-18 to 93°C).
Compensated Temperature Limits:
0 to 175°F (-18 to 79°C).
Pressure Limits: See chart.
Thermal Effect: 0.02%/°F (0.036%/°C)
includes zero & span.
Power Requirements: 13-30 VDC.
Output Signal: 4 to 20 mA. Optional
0-5, 1-5, 0-10, 1-6 or 2-10 VDC.
Zero & Span: Potentiometers inside
conduit enclosure
Response Time: 50 msec.
Loop Resistance: 0-1300 ohms maxi-
mum for current output. For voltage
outputs, minimum load resistance:
2000 ohms.
Phone: 219/879-8000 www.dwyer-inst.com
1/4 NPT FEMALE FITTING
6-59/64 [175.82]
OPTIONAL 1/4 NPT
MALE FITTING
Fig. A
Fig. B
Current Consumption: Transmitter:
40 mA max; Transmitter with optional
display: 140 mA max.
Electrical Connections: Terminal
block.
Process Connections: 1/4˝ female
NPT.
Display: Optional 4-1/2 digit 1/2˝ (12.7
mm) height LED.
Enclosure Rating: Designed to meet
NEMA 4X (IP66).
Mounting Orientation: Not position
sensitive.
Weight: 10.1 oz (286 g).
Agency Approvals: CE:
EN 61000-4-2
EN 61000-4-3
EN 61000-4-4
EN 61000-4-5
EN 61000-4-6
Bulletin E-112
1-11/32
[34.13]
3-9/32
[83.34]
1-5/8
Page 2
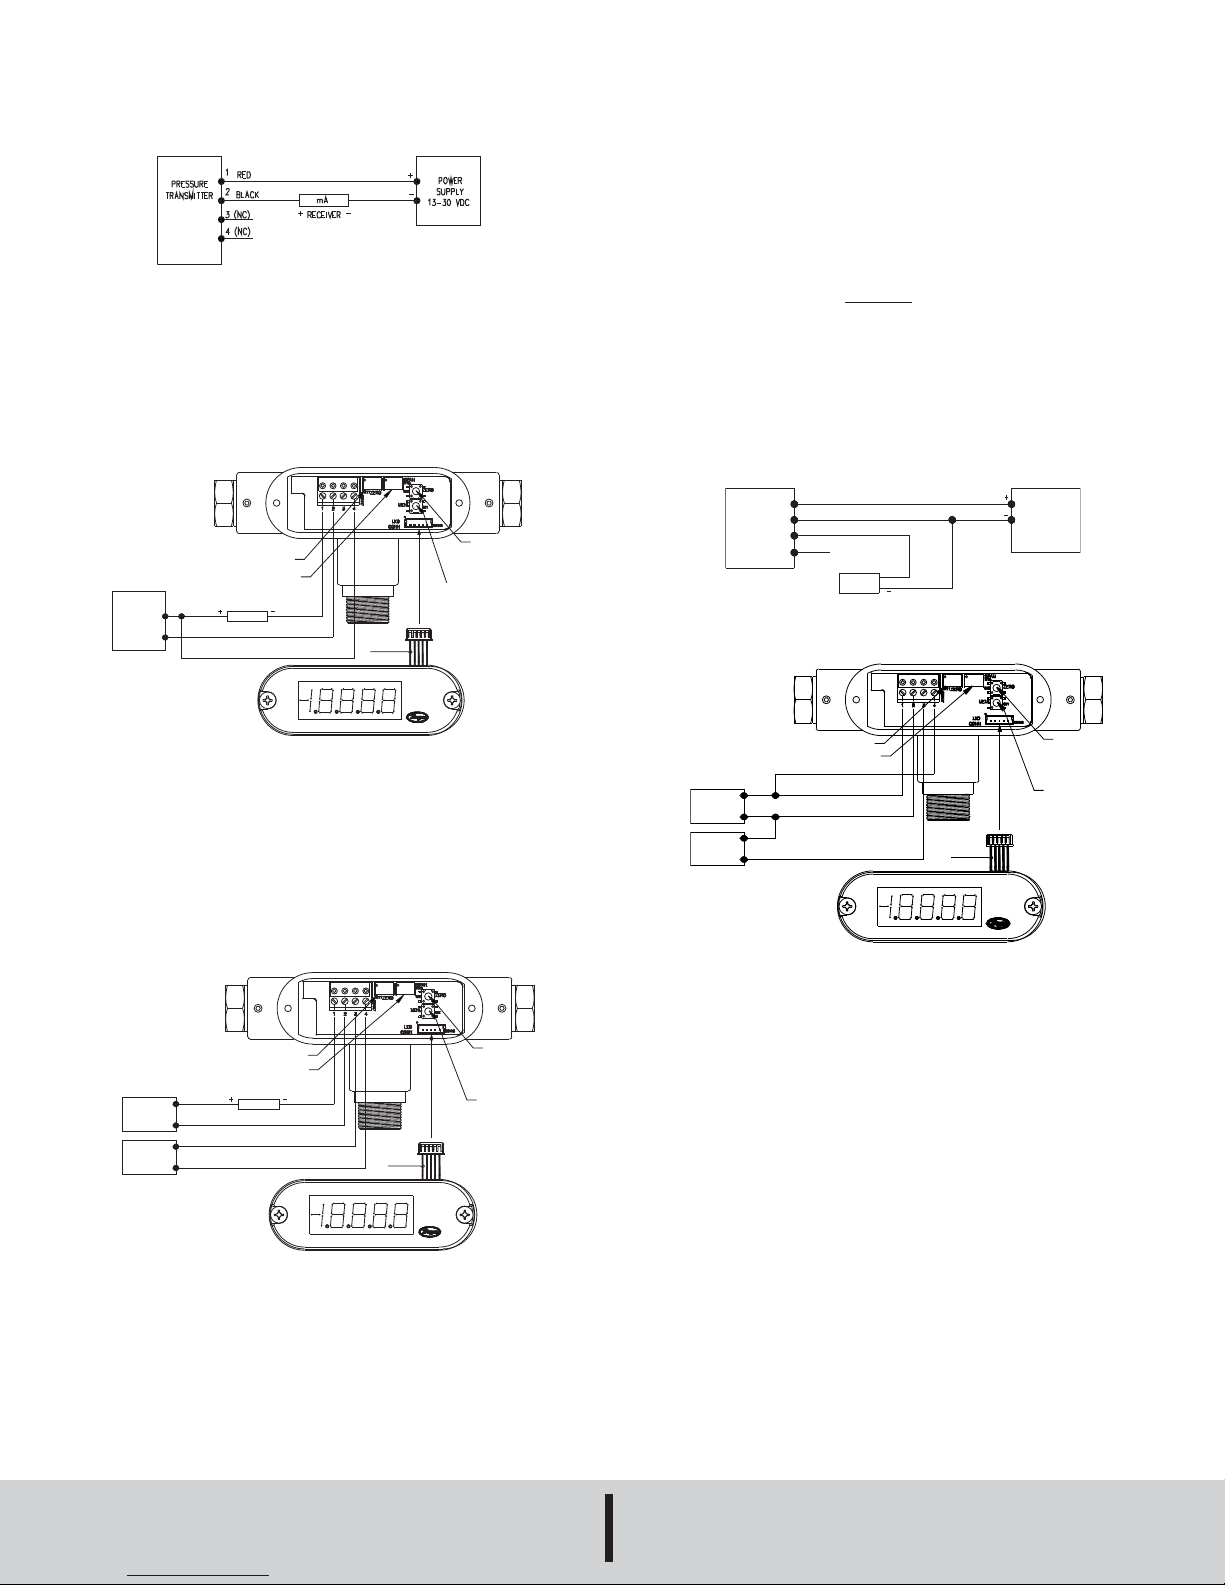
ELECTRICAL CONNECTIONS
PRESSURE
TRANSMITTER
1 RED
2 BLACK (COMMON)
3 WHITE (+V OUT)
4 (NC)
RECEIVER
+V in
POWER
SUPPLY
13-30 VDC
ZERO
PRESS AND
HOLD TO
ZERO THE
DISPLAY
PRESS TO
DISPLAY THE
GAGE’S
PRESSURE
RANGE
LED DISPLAY
CONNECTOR
YELLOW
OPTIONAL LED DISPLAY
BE SURE TO TURN OFF POWER WHEN
CONNECTING OR REMOVING THE
DISPLAY’S CONNECTOR. FAILURE TO DO
SO CAN RESULT IN THE GAGE DAMAGE.
VOLTAGE OUTPUT
TRANSMITTER CONNECTION:
- TURN OFF POWER
- CONNECT POWER SUPPLY
(+) TO TERMINAL 1
- CONNECT POWER SUPPLY
(-) TO TERMINAL 2 AND
THE RECEIVER (-)
- CONNECT THE RECEIVER
(+) TO TERMINAL 3
- CONNECT LED POWER SUPPLY
(+) TO TERMINAL 4
- INSTALL THE DISPLAY’S CONNECTOR
- TURN ON POWER
POWER
SUPPLY
13-30 VDC
(140 ma)
RECEIVER
+
-
+
V OUT
LED DISPLAY
POSITIVE SUPPLY
TERM 4 (+)
TERM 1 (+)
TERM 2 (-)
TERM 3 (-)
SPAN
Shielded cable is recommended for control loop wiring.
Current Output
Fig. C: Current output connection
Electrical connections to the Series 629 pressure transmitters are made to the terminal block located inside the housing. Remove the screws and lift off the cover. Wire
as shown in Fig. C, D or E. Use Fig. C for current output connection. Use Fig. D for
current output with optional LED display. Use Fig. E for current output with optional
LED display using two power supplies. If ordering pre-wired cable, black wire is negative (-) and red wire is positive (+).
PRESS AND
HOLD TO
ZERO THE
DISPLAY
PRESS TO DISPLAY
THE GAGE’S
PRESSURE RANGE
LED DISPLAY
CONNECTOR
POWER
SUPPLY
13-30 VDC
(140 ma)
+
RECEIVER
-
LED DISPLAY
POSITIVE SUPPLY
ZERO
SPAN
TERM
1 (+)
mA
TERM 2 (-)
TERM 4 (+)
YELLOW
Wire Length - The maximum length of wire connecting transmitter and receiver is a
function of wire size and receiver resistance. Wiring should not contribute to more
than 10% of receiver resistance to total loop resistance. For extremely long runs (over
1000 ft.), choose receivers with higher resistance to minimize size and cost of connecting leads. When the wiring length is under 100 feet, lead wire as small as 22 AWG
can be used.
Current (4-20 mA) Output Operation - An external power supply delivering 13-30
VDC with minimum current capability of 40 mA DC (per transmitter)is required to
power the control loop. See Fig. C for connection of the power supply, transmitter,
and receiver. The range of the appropriate receiver load resistance (R
power supply voltage available is expressed by the formula:
L
R
Max = Vps – 13
L
) for the DC
20 mA DC
VOLTAGE (0-5, 1-5, 0-10, 1-6 or 2-10 Volt) OUTPUT OPERATION
For voltage outputs, wire as shown in Fig. F or Fig. G. Use Fig. F for voltage output
connection. Use Fig. G for voltage output with optional LED display. Terminal 1 is positive (+), terminal 2 is negative (-), terminal 3 is +Vout, terminal 4 is LED positive supply. If ordering optional pre-wired cable, black wire is negative (-), red wire is positive
(+) and white wire is +Vout.
Voltage Output
Fig. F: Voltage output connection
TRANSMITTER CONNECTION:
- TURN OFF POWER
- CONNECT THE POWER
SUPPLY AND RECEIVER TO
TERM 1 AND TERM 2 OF THE
GAGE AS SHOWN
- CONNECT POWER SUPPLY
(+) TO TERMINAL 4 (REQUIRED
FOR THE OPTIONAL DISPLAY ONLY)
- INSTALL THE DISPLAY’S CONNECTOR
- TURN ON POWER
OPTIONAL LED DISPLAY
BE SURE TO TURN OFF POWER WHEN
CONNECTING OR REMOVING THE
DISPLAY’S CONNECTOR. FAILURE TO DO
SO CAN RESULT IN THE GAGE DAMAGE.
Fig. D: Current output with optional LED display
PRESS AND
HOLD TO
ZERO THE
DISPLAY
PRESS TO
DISPLAY THE
GAGE’S
PRESSURE
RANGE
LED DISPLAY
CONNECTOR
Fig. G: Voltage output with optional LED display
MULTIPLE RECEIVER INSTALLATION
An advantage of the standard 4-20 mA DC output signal provided by the Series 629
Differential Transmitter is that any number or receivers can be connected in series in
the current loop. Thus, an A-701 digital readout, an analog panel meter, a chart
recorder, process controlling equipment, or any combination of these devices can be
operated simultaneously. It is necessary only that each be equipped with a standard
POWER
SUPPLY
+
13-30 VDC
-
(40 ma)
-
13-30 VDC
+
(100 ma)
LED SUPPLY
POWER SUPPLY
RECEIVER
LED DISPLAY
NEGATIVE SUPPLY
LED DISPLAY
POSITIVE SUPPLY
ZERO
SPAN
TERM
1 (+)
mA
TERM 2 (-)
TERM 3 (-)
TERM 4 (+)
YELLOW
4-20 mA input and proper polarity of the input connections be observed when insert-
TRANSMITTER CONNECTION:
- TURN OFF POWER
- CONNECT THE POWER SUPPLY
AND RECEIVER TO TERM 1 AND
TERM 2 OF THE GAGE AS SHOWN
OPTIONAL DISPLAY CONNECTION:
- CONNECT LED POWER SUPPLY
(-) TO TERMINAL 3
Fig. E: Current output with optional LED display using two power supplies
©Copyright 2009 Dwyer Instruments, Inc. Printed in U.S.A. 7/09 FR# 01-443277-00 Rev. 8
DWYER INSTRUMENTS, INC.
P.O. BOX 373 • MICHIGAN CITY, INDIANA 46361, U.S.A. Fax: 219/872-9057 e-mail: info@dwyer-inst.com
- CONNECT LED POWER SUPPLY
(+) TO TERMINAL 4
- INSTALL THE DISPLAY’S CONNECTOR
- TURN ON POWER
OPTIONAL LED DISPLAY
BE SURE TO TURN OFF POWER WHEN
CONNECTING OR REMOVING THE
DISPLAY’S CONNECTOR. FAILURE TO DO
SO CAN RESULT IN THE GAGE DAMAGE.
ing the device into the current loop. If any of the receiving devices displays a negative
or downscale reading this indicates that the signal input leads are reversed.
MAINTENANCE
Upon final installation of the Series 629 Differential Pressure Transmitter and the companion receiver, no routine maintenance is required. A periodic check of the system
calibration is recommended. The Series 629 Differential Pressure Transmitter is not
field serviceable and should be returned if repair is needed (field repair should not be
attempted and may void warranty). Be sure to include a brief description of the problem plus any relevant application notes. Contact customer service to receive a return
goods authorization number before shipping.
Phone: 219/879-8000 www.dwyer-inst.com
 Loading...