Page 1

Series PE Orifice Plate Flow Meter
Specifications - Installation and Operating Instructions
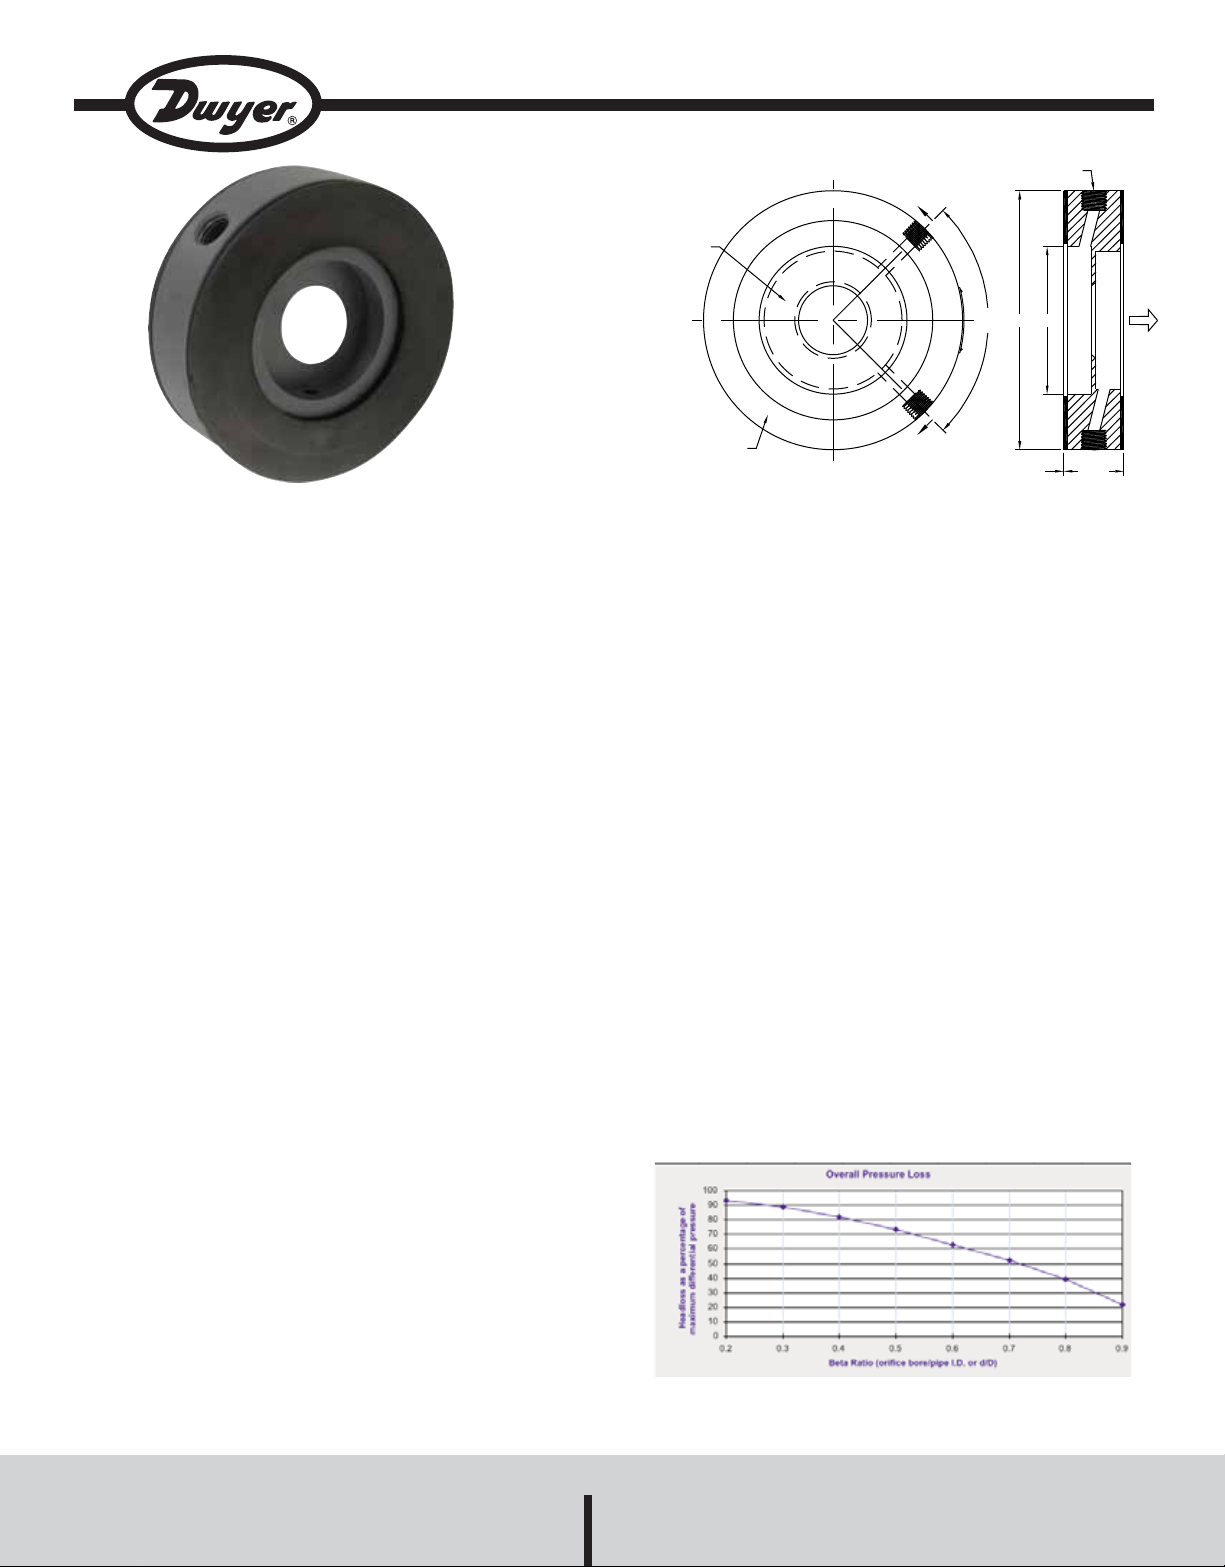
The Series PE Orifice Plate Flow Meter offers one-piece PVC
construction incorporating a unique holder or carrier ring containing
metering taps and integral gaskets. Unlike a standard orifice plate, the
Series PE is a true primary element including the various components
for differential pressure measurement. It was designed for use
wherever there is an application for a conventional flow orifice plate. It
can also be used in place of other primary differential producers for
efficiency and cost effectiveness. The Series PE is available in line sizes
from 1/2˝ to 24˝ and can be used with air and compatible gases. It
meets or exceeds ASME, AGA & ISO standards.
ACCURACY
The Series PE utilizes the corner tap proportions as defined in ISO
5167. While this code may not be referred to as International Standard
until accepted by the ISO Council, the ASME Fluid Meters Research
Committee has suggested that the dimensionless coefficient equation
developed by the International Standards Organization (ISO) and
presented in ISO 5167 is significantly better for the broad spectrum of
flow measurement applications throughout process industries.
Bulletin F-PE
1/4˝ NPT PRESSURE FITTING
C
L
A
HI
ORIFICE PLATE
1/8 (3.18)
THICK TYPICAL
(CARRIER RING)
BODY
SPECIFICA T IONS
Service: Clean air and compatible gases.
Wetted Material: Monolithic (single piece) constructed entirely of
gray PVC.
Accuracy: ±0.6% full scale flow (Beta = .2-.6) ±0.7% for Beta greater
than .6.
Temperature: 140°F max (60°C max).
Pressure: 150 psi max.
Head Loss: 1-Beta ratio
2
eg: 1 - 0.72= 1 - 0.49 = 51% of the d.p.
Line Sizes: 1/2˝ to 24˝.
Process Connections: 1/4˝ female NPT.
Installation: Standard flange 125#/150# rating.
Pipe Requirements: General requirements 10 diameter upstream
and 5 diameter downstream.
Weight: Varies with line size. See chart.
PRESSURE
4-1/2
OD
(114.3)
C
LOW
A
L
PRESSURE
INCLUDES RING GASKET
ADHERED TO FACES
ID
1-1/4
(31.75)
FLOW
The coefficient values used in the Series PE bore calculations
represent the same confidence level assigned to the flange and radius
taps widely accepted in fluid flow measurement.
The accuracy assigned to the coefficient values is ±0.6% full scale for
d/D (Beta) values 0.2 to 0.6 and ±0.7% for Beta values 0.7 to 0.75 (i.e.
ß of 0.7 would have an uncertainty value of ±0.7% full scale).
Accuracy of the differential signal produced by the PE equals that of a
properly manufactured and installed flange or radius tap orifice meter.
MOUNTING
The orifice metering primary shall be suitable for installation between
standard ANSI 125#/150# PVC or steel flanges mounted on HDPE,
PVC or steel pipe. The unit shall be "self centering" within the bolt
circle of the flanges. No alignment of the orifice shall be necessary.
Drilling and or tapping of the main or flanges will not be allowed or
required. The overall laying length shall be 1.25˝ including pre-attached
ring type 1/8˝ thick Buna "N" Gaskets. Flange bolts should be 1.25˝
longer than standard flange bolts.
Pipe Requirements: Upstream and downstream pipe requirements
are contingent upon two factors: (a) Beta Ratio-ratio of the orifice bore
to the pipe ID (d/D); (b) The type of fitting or disturbance upstream of
the PE. For most applications, 10 pipe dia. upstream & 5 dia.
downstream are sufficient. (5 pipe dia. up and 2 dia. down are
acceptable for non-critical applications.)
Installation Tips: (a) If possible, do not install a valve upstream if it is
going to be throttled. Install on the downstream a minimum of 6
diameters from the PE. (b) The use of straightening vanes is not
necessary for most applications.
Installation: (a) Insert bolts through bottom half of the flange bolt
circle. (b) Slide PE between flanges (make sure arrow on PE faces in
the direction of flow). (c) Make sure pressure connections are properly
positioned. For horizontal air or gas lines, install with the connections
on or above the horizontal center line. They should also be correctly
oriented so as to not be blocked by bolts when remainder of bolts are
inserted. (d) Add rest of bolts and nuts leaving all bolts loose so PE is
free to move. (e) If necessary, the PE can be centered using a steel
ruler to measure the total side to side movement and set PE at half
way point all around. (f) Lubricate & tighten bolts diametrically
alternating to recommend flange torque. (g) Check to insure the PE is
installed with the arrow facing in the same direction as flow.
OVERALL PRESSURE LOSS ACROSS SERIES PE ORIFICES
DWYER INSTRUMENTS, INC.
Phone: 219/879-8000 www.dwyer-inst.com
P.O. BOX 373 • MICHIGAN CITY, INDIANA 46361, U.S.A. Fax: 219/872-9057 e-mail: info@dwyer-inst.com
Page 2

The above curved graph shows pressure loss generated by the Series
PE Orifice Plate Flow Meter . For example, a 0.7 Beta Ratio (d/D) would
show a loss of 51%. This is also shown on the linear graph area ratio
2
(d/D)
=.38 with a loss of 62%.
As a quick check reference, you can use the formula:
Head loss =1-Beta Ratio
2
eg: 1-0.72or 1-0.49 = 51% of the d.p.
Source: ASME Research Report on Fluid Meters
Magnehelic
®
and Capsuhelic®gages from Dwyer read pressure drop
across the orifice plates.
For compatible gases a Dwyer Magnehelic
®
gage may be used to read
the differential pressure.
AIR AND GAS FLOW - CONCENTRIC BORE
SCFM BASE CONDITIONS 14.7 psia & 60°F
Conversion formula used to solve for flow rate based on plotting
changes in inlet pressure, temperature and/or differential pressure.
This formula is designed for use as a “quick check” reference only as
the results may differ from calculation values due to rounding,
combining of variables, and making certain assumptions in an effort to
keep the formula as abbreviated as possible.
Equation source Flow
Measurement Engineering Handbook by Richard Miller.
Input new differential pressure (h/w) as well as new pressures
and/or temperatures using the formula below:
5.9816 x (d2) x (K) x (Y) x h/w x (2.703 x PLx SG)/(460 + T
√
√
SCFM =
2.703 x 14.7 x SG
460 + T
Where:
b
5.9816 = physical constant
d = bore in inches
D = pipe inside diameter (inches)
K = flow coefficient
Y = expansion factor
h/w = differential pressure (inches w/c)
= line pressure (psia)
P
L
L = line temperature (°F)
T
Tb = base temperature (°F)
ß = beta ratio (d/D)
SG = specific gravity at line conditions (air=1.00)
SH = specific heat ratio cp/cv (air=1.4)
Rn = Reynolds number at max flow in pipe
4
K= C x ((1)/( 1-ß
Y= 1- (.41+.35ß
C= 0.5959 + 0.0312ß
))
√
4
) ((h/w x .0361)/ (PLx 1.4))
2.1
– 0.1840ß8+ 91.71ß
2.5
-0.75
R
n
If Reynolds number (Rn) is not known, “C” can be estimated as
0.6015. For convenience other factors can be combined to form
constants as the equation is developed.
Note: Differential pressure values should be less than 50% of the inlet absolute pressure.
MAINTENANCE
After final installation of the Series PE Orifice Plate Flow Meter, no
routine maintenance is required. A periodic check of system calibration
is suggested. With the exception of gasket replacement, these
devices are not field repairable and should be returned if repair is
needed (field repair should not be attempted and may void warranty).
Be sure to include a brief description of the problem plus any relevant
application notes. Contact customer service to receive a return goods
authorization number before shipping.
Series PE Orifice Plate Flow Meter
Air Capacity Structure
• Material PVC- Gaskets Buna "N"
• Based on 70°F, 14.7 psia (Base Conditions)
• Beta Value Based on Std Sch pipe I.D.
• 1.25˝ overall thickness
• Orifice plate thickness is 0.125˝
Model
#
PE-A-1
PE-A-2
PE-A-3
PE-B-1
PE-B-2
PE-B-3
PE-C-1
PE-C-2
PE-C-3
PE-D-1
PE-D-2
PE-D-3
PE-E-1
PE-E-2
PE-E-3
PE-F-1
PE-F-2
PE-F-3
PE-G-1
PE-G-2
)
L
PE-G-3
PE-H-1
PE-H-2
PE-H-3
PE-J-1
PE-J-2
PE-J-3
PE-K-1
PE-K-2
PE-K-3
PE-L-1
PE-L-2
PE-L-3
PE-M-1
PE-M-2
PE-M-3
PE-N-1
PE-N-2
PE-N-3
PE-O-1
PE-O-2
PE-O-3
PE-P-1
PE-P-2
PE-P-3
PE-Q-1
PE-Q-2
PE-Q-3
PE-R-1
PE-R-2
PE-R-3
PE-S-1
PE-S-2
PE-S-3
PE-T-1
PE-T-2
PE-T-3
Note: Differential pressure values should be less than 50% of the inlet absolute pressure.
Weight
(lbs)
1.00
1.00
1.00
1.00
1.00
1.00
1.00
1.00
1.00
1.00
1.00
1.00
2.00
2.00
2.00
2.00
2.00
2.00
2.00
2.00
2.00
2.00
2.00
2.00
3.00
3.00
3.00
3.00
3.00
3.00
4.00
4.00
4.00
5.00
5.00
5.00
6.00
6.00
6.00
7.00
7.00
7.00
9.00
9.00
9.00
10.00
10.00
10.00
12.00
12.00
12.00
14.00
14.00
14.00
16.00
16.00
16.00
Line
Size
1/2"
1/2"
1/2"
3/4"
3/4"
3/4"
1"
1"
1"
1.25"
1.25"
1.25"
1.5"
1.5"
1.5"
2"
2"
2"
2.5"
2.5"
2.5"
3"
3"
3"
4"
4"
4"
5"
5"
5"
6"
6"
6"
8"
8"
8"
10"
10"
10"
12"
12"
12"
14"
14"
14"
16"
16"
16"
18"
18"
18"
20"
20"
20"
24"
24"
24"
Bore
0.200"
0.310"
0.430"
0.250"
0.400"
0.580"
0.300"
0.520"
0.720"
0.400"
0.700"
1.00"
0.500"
0.800"
1.100"
0.600"
1.000"
1.450"
0.750"
1.250"
1.750"
0.920"
1.500"
2.150"
1.200"
2.000"
2.800"
1.500"
2.500"
3.500"
1.800"
3.000"
4.200"
2.400"
4.000"
5.600"
3.000"
5.000"
7.000"
3.600"
5.000"
8.400"
4.000"
6.600"
9.300"
4.500"
7.600"
10.700"
5.200"
8.600"
12.000"
5.780"
9.600"
13.500"
7.000"
11.700"
16.300"
Beta
0.32
0.5
0.69
0.3
0.49
0.7
0.29
0.49
0.69
0.29
0.51
0.72
0.31
0.5
0.68
0.29
0.48
0.7
0.3
0.5
0.7
0.3
0.49
0.7
0.3
0.5
0.7
0.3
0.5
0.69
0.3
0.49
0.69
0.3
0.5
0.7
0.3
0.5
0.7
0.3
0.5
0.7
0.3
0.5
0.7
0.3
0.5
0.7
0.3
0.5
0.7
0.3
0.5
0.7
0.3
0.5
0.7
AIR CAPACITY - Flow in SCFM
Inch d.p.
at 14.7 PSIA
W/C
(0 PSIG)
20
100
200
100
200
100
200
100
200
100
200
100
200
100
200
100
200
100
200
100
200
100
200
100
200
100
200
100
200
100
200
100
200
100
200
100
200
100
200
2.35
12.21
32.77
20
3.65
20.21
59.92
20
5.24
34.2
91.28
20
9.31
62.09
180
20
14.57
80.82
212.18
20
20.92
125.74
372.09
20
32.71
197.54
543.99
20
49.17
282.9
816.7
20
83.58
503.76
1,380.03
20
130.48
786.23
2,152.83
20
187.86
1,331.63
3,097.20
20
333.87
2,014.95
5,532.00
20
521.58
3,145.50
8,626.42
20
750.9
4,530
12,430.00
20
927.14
6,477.67
15,251.50
20
1,172.63
7,264.58
20,179.85
20
1,565.79
9,302.08
25,299.92
20
1,935.37
11,588.20
32,115.34
20
2,838.14
17,229.62
46,810.53
at 20 psig
3.63
19.58
56.15
5.66
32.44
102.91
8.11
54.92
156.51
14.41
99.75
309.97
22.55
129.68
363.93
32.38
202.03
639.87
50.64
317.58
936.56
76.13
454.77
1,404.95
129.44
810.06
2,373.02
202.11
1,264.42
3,701.57
291
1,820.05
5,325.20
517.25
3,241.45
9,525.43
808
5,060.38
14,846.80
1,163.44
7,288.16
21,397.00
1,436.59
8,812.87
28,262.66
1,817.05
11,688.26
34,749.32
2,426.34
14,966.93
43,535.32
2,999.11
18,645.74
55,303.34
4,398.25
27,726.33
80,610.19
at 100 psig
6.61
36.37
107.47
10.3
60.26
197.2
14.8
102.09
300
26.3
185.5
595.2
41.16
241.5
697.39
59.13
375.8
1,227.63
92.48
590.91
1,798.86
139.06
846.21
2,696.28
236.48
1,507.64
4,553.68
369.29
2,353.51
7,103.22
531.75
3,387.93
10,219.28
945.28
6,034.85
18,290.00
1,476.77
9,421.74
28,506.17
2,126.47
13,570.33
41,089.02
2,625.81
16,409.42
50,427.78
3,321.32
21,764.08
66,737.64
4,435.12
27,869.85
83,587.01
5,482.22
34,720.84
106,215.88
8,038.99
51,633.81
154,823.78
©Copyright 2009 Dwyer Instruments, Inc. Printed in U.S.A. 7/09 FR# 443397-00 Rev.2
DWYER INSTRUMENTS, INC.
Phone: 219/879-8000 www.dwyer-inst.com
 Loading...