

Page 1
Series PDWS
PADDLE WHEEL FLOW
SENSOR INSTRUCTIONS
F-PDWS
Page 2
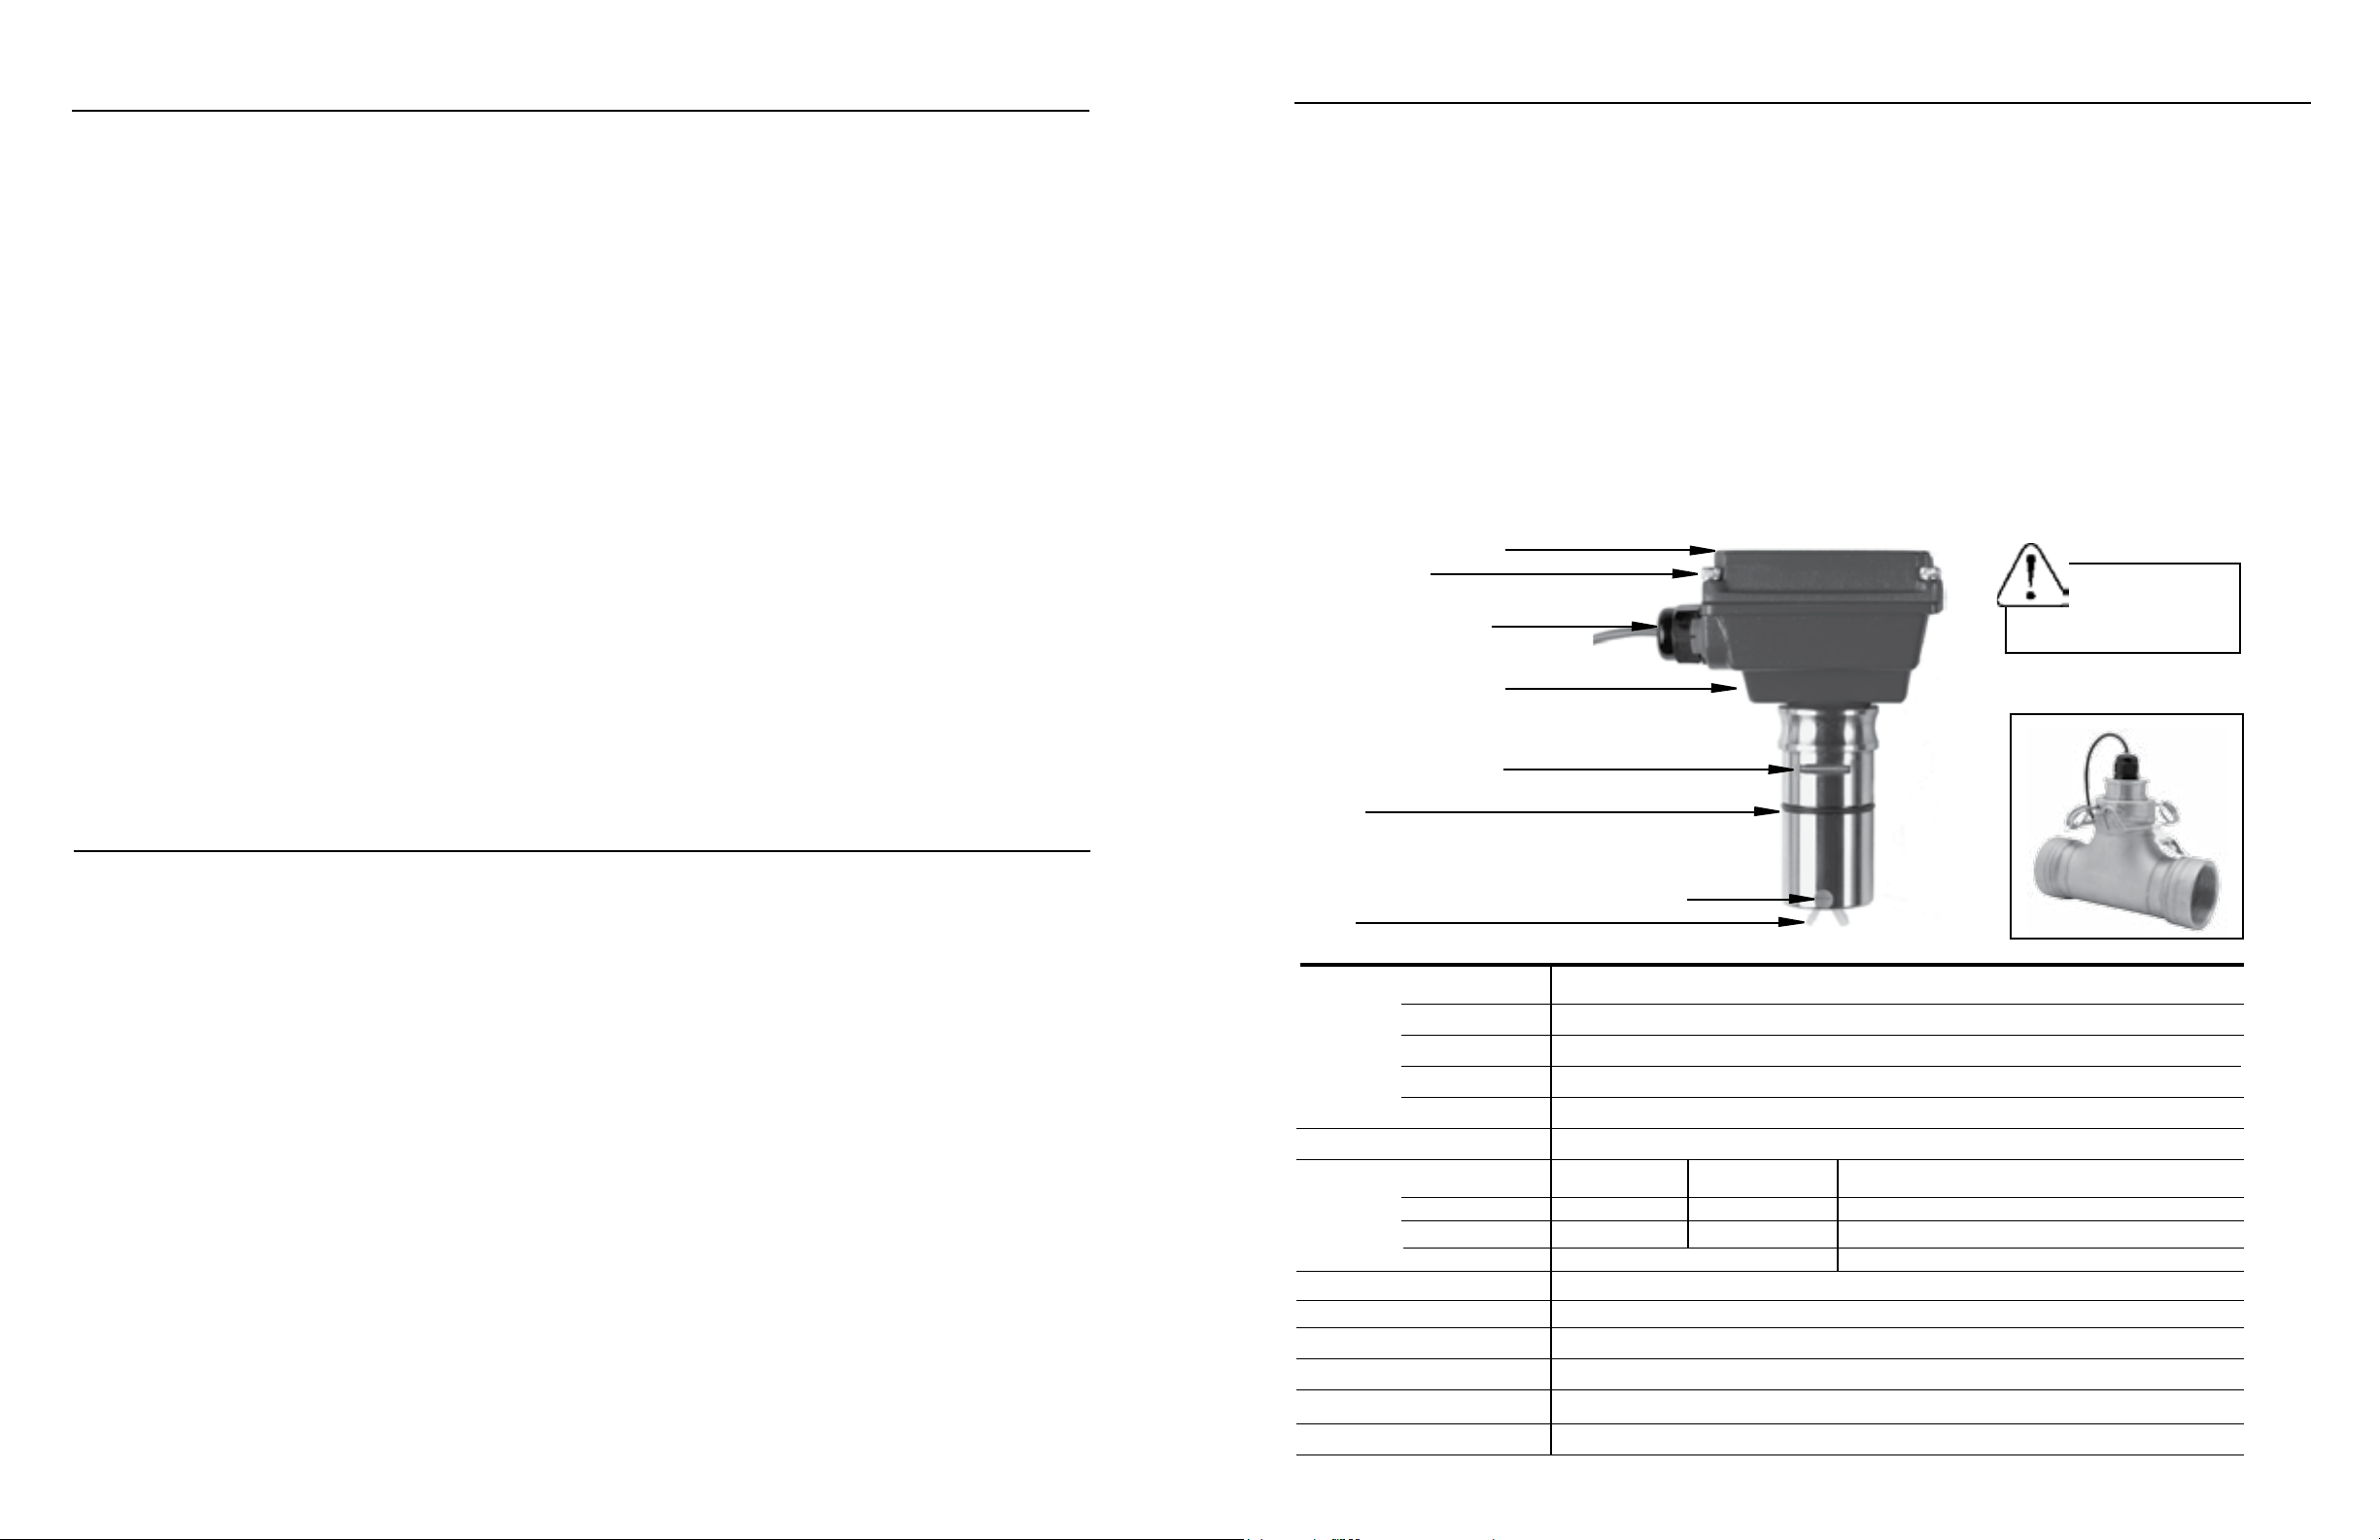
TABLE OF CONTENTS
GENERAL INFORMATION
General Information
Features, Specifications ........................................................................................................Page 3
Installation
Insertion Depth, Distorted Flows, Fitting Installation, Meter Installation, Positioning the Meter......................Page 4
Straight Pipe Recommendations .............................................................................................................
Page 5
Full Pipe Recommendations ..........................................................................................................Page 6
Connection Diagrams
RTI/BAT, Connecting to PLC's..............................................................................................................Page 7
Operation
Minimum Flow, Flow Range Table, Calibration (“K-Factor”), Field Calibration..................................................Page 8
Maintenance
Rotor Replacement, Signal Troubleshooting, Sensor Replacement .............................................................Page 9
Parts Explosion
Parts List ......................................................................................................................................................Page 10
Troubleshooting
Problems, Probable Causes, To Check, To Repair ..................................................................................Page 11
The PDWS Series are impeller (or “paddlewheel”) insertion meters designed for use with a wide variety of liquids in pipe sizes
1/2" to 8". Sensors are available in brass, 316 stainless steel,
PVC, and polypropylene. Bodies are machined from a solid rod
for maximum precision. High-quality jewel bearings and nickelbound tungsten carbide shafts are used for extreme low friction
and long life. Low-ow performance is good, although other
Dwyer Instruments Inc. ow meters are recommended where
extremely low ows are being measured.
The rotation of the rotor is detected by a non-drag Hall-effect
sensor. Output is a current-sinking pulse (square wave), which
can be sent long distances (up to 2,000 feet) without a transmitter. This signal can be connected directly to PLC's, counters,
and computer cards, as well as a variety of Dwyer Instruments
Inc. controls and displays.
FEATURES
Cover or Optional Module
Housing Screw
(connect ground to one)
Cable-Seal Strain Relief
Lower Housing (optional)
PDWS meters are ideal for chemical proportioning applications.
If no display is required, a simple divider such as the PWD
provides adjustable pump pacing. For rate and total display,
the Series RTI (loop powered) ow indicator can be mounted
directly on the Series PDWS meter, or remotely on a wall or
panel. The Series BAT blind analog transmitter can be used to
convert to a 4 to 20 mA output.
The Series PDWS require special ttings that ensure correct
depth placement in the pipe. Fittings come in a variety of ma-
terials for compatibility with specic applications. Tee ttings
are individually wet-calibrated at the factory and marked with
the K-factor (pulses per gallon). Saddle ttings must be eld-
installed on the pipe and do not come wet-calibrated. K-factors
for saddles are based on factory-testing. Please see Series PWF
for appropriate ttings.
Caution: Clip(s)
must be installed
before use.
High Pressure Model
TABLES AND DIAGRAMS
Specifications, Features ...............................................................................................................Page 3
Distorted Flows, Positioning the Meter .............................................................................................Page 4
Straight Pipe Recommendations .................................................................................................
Full Pipe Recommendations ...........................................................................................................Page 6
Connections Diagrams .......................................................................................................................Page 7
Flow Range Table, K-Factor Number on Tee Fitting, K-Factor Chart, Pressure vs. Temp Chart...................Page 8
Rotor and Sensor Replacement .............................................................................................................Page 9
Parts Explosion, Parts List ........................................................................................................................Page 10
Troubleshooting............................................................................................................................................Page 11
Page 2
Page 5
Retaining Slot (for U-Clip)
For easy installation at correct depth setting
O-Ring
Jewel Bearings for superior low-ow performance
Rotor
SPECIFICATIONS*
Materials Sensor Body
Rotor
Shaft
Bearings
O-Ring
Rotor Pickup
Maximum
Pressure
High Pressure
Flow Range
Accuracy
Signal
Power
Maximum Current
Cable
*Specications subject to change
Temperature
Brass, 316 Stainless Steel, PVC, or Polypropylene
PVDF
Nickel-bonded tungsten carbide (Ceramic optional)
Ruby jewel
EPDM (Fluoroelastomer optional)
GMR (Giant Magnetoresistive) Sensor
Brass 316 SS PVC or Polypropylene
(See Pressure vs. Temp. Chart)
200 PSI (14 bar) 250 PSI (17 bar) 175 PSI (12 bar) @ 75˚ F
Not Available 400 psi (28 bar) Not Available
200˚F (93˚C) 130˚F (55˚C)
0.3 to 30 ft/s
+/- 1.5% of full-scale
Hall-effect current sinking pulse
6-24 Vdc, 2 mA
20 mA
#22 AWG, 3 Cond, 18' (maximum 2000’ run)
Page 3
Page 3
INSTALLATION
INSTALLATION
Insertion Depth. The PDWS Series are xed-depth meters
that must be used with matched ttings appropriate to the
application and pipe size. This ensures that the ow sensor
is installed at the correct insertion depth to measure the av-
erage ow velocity of the stream.
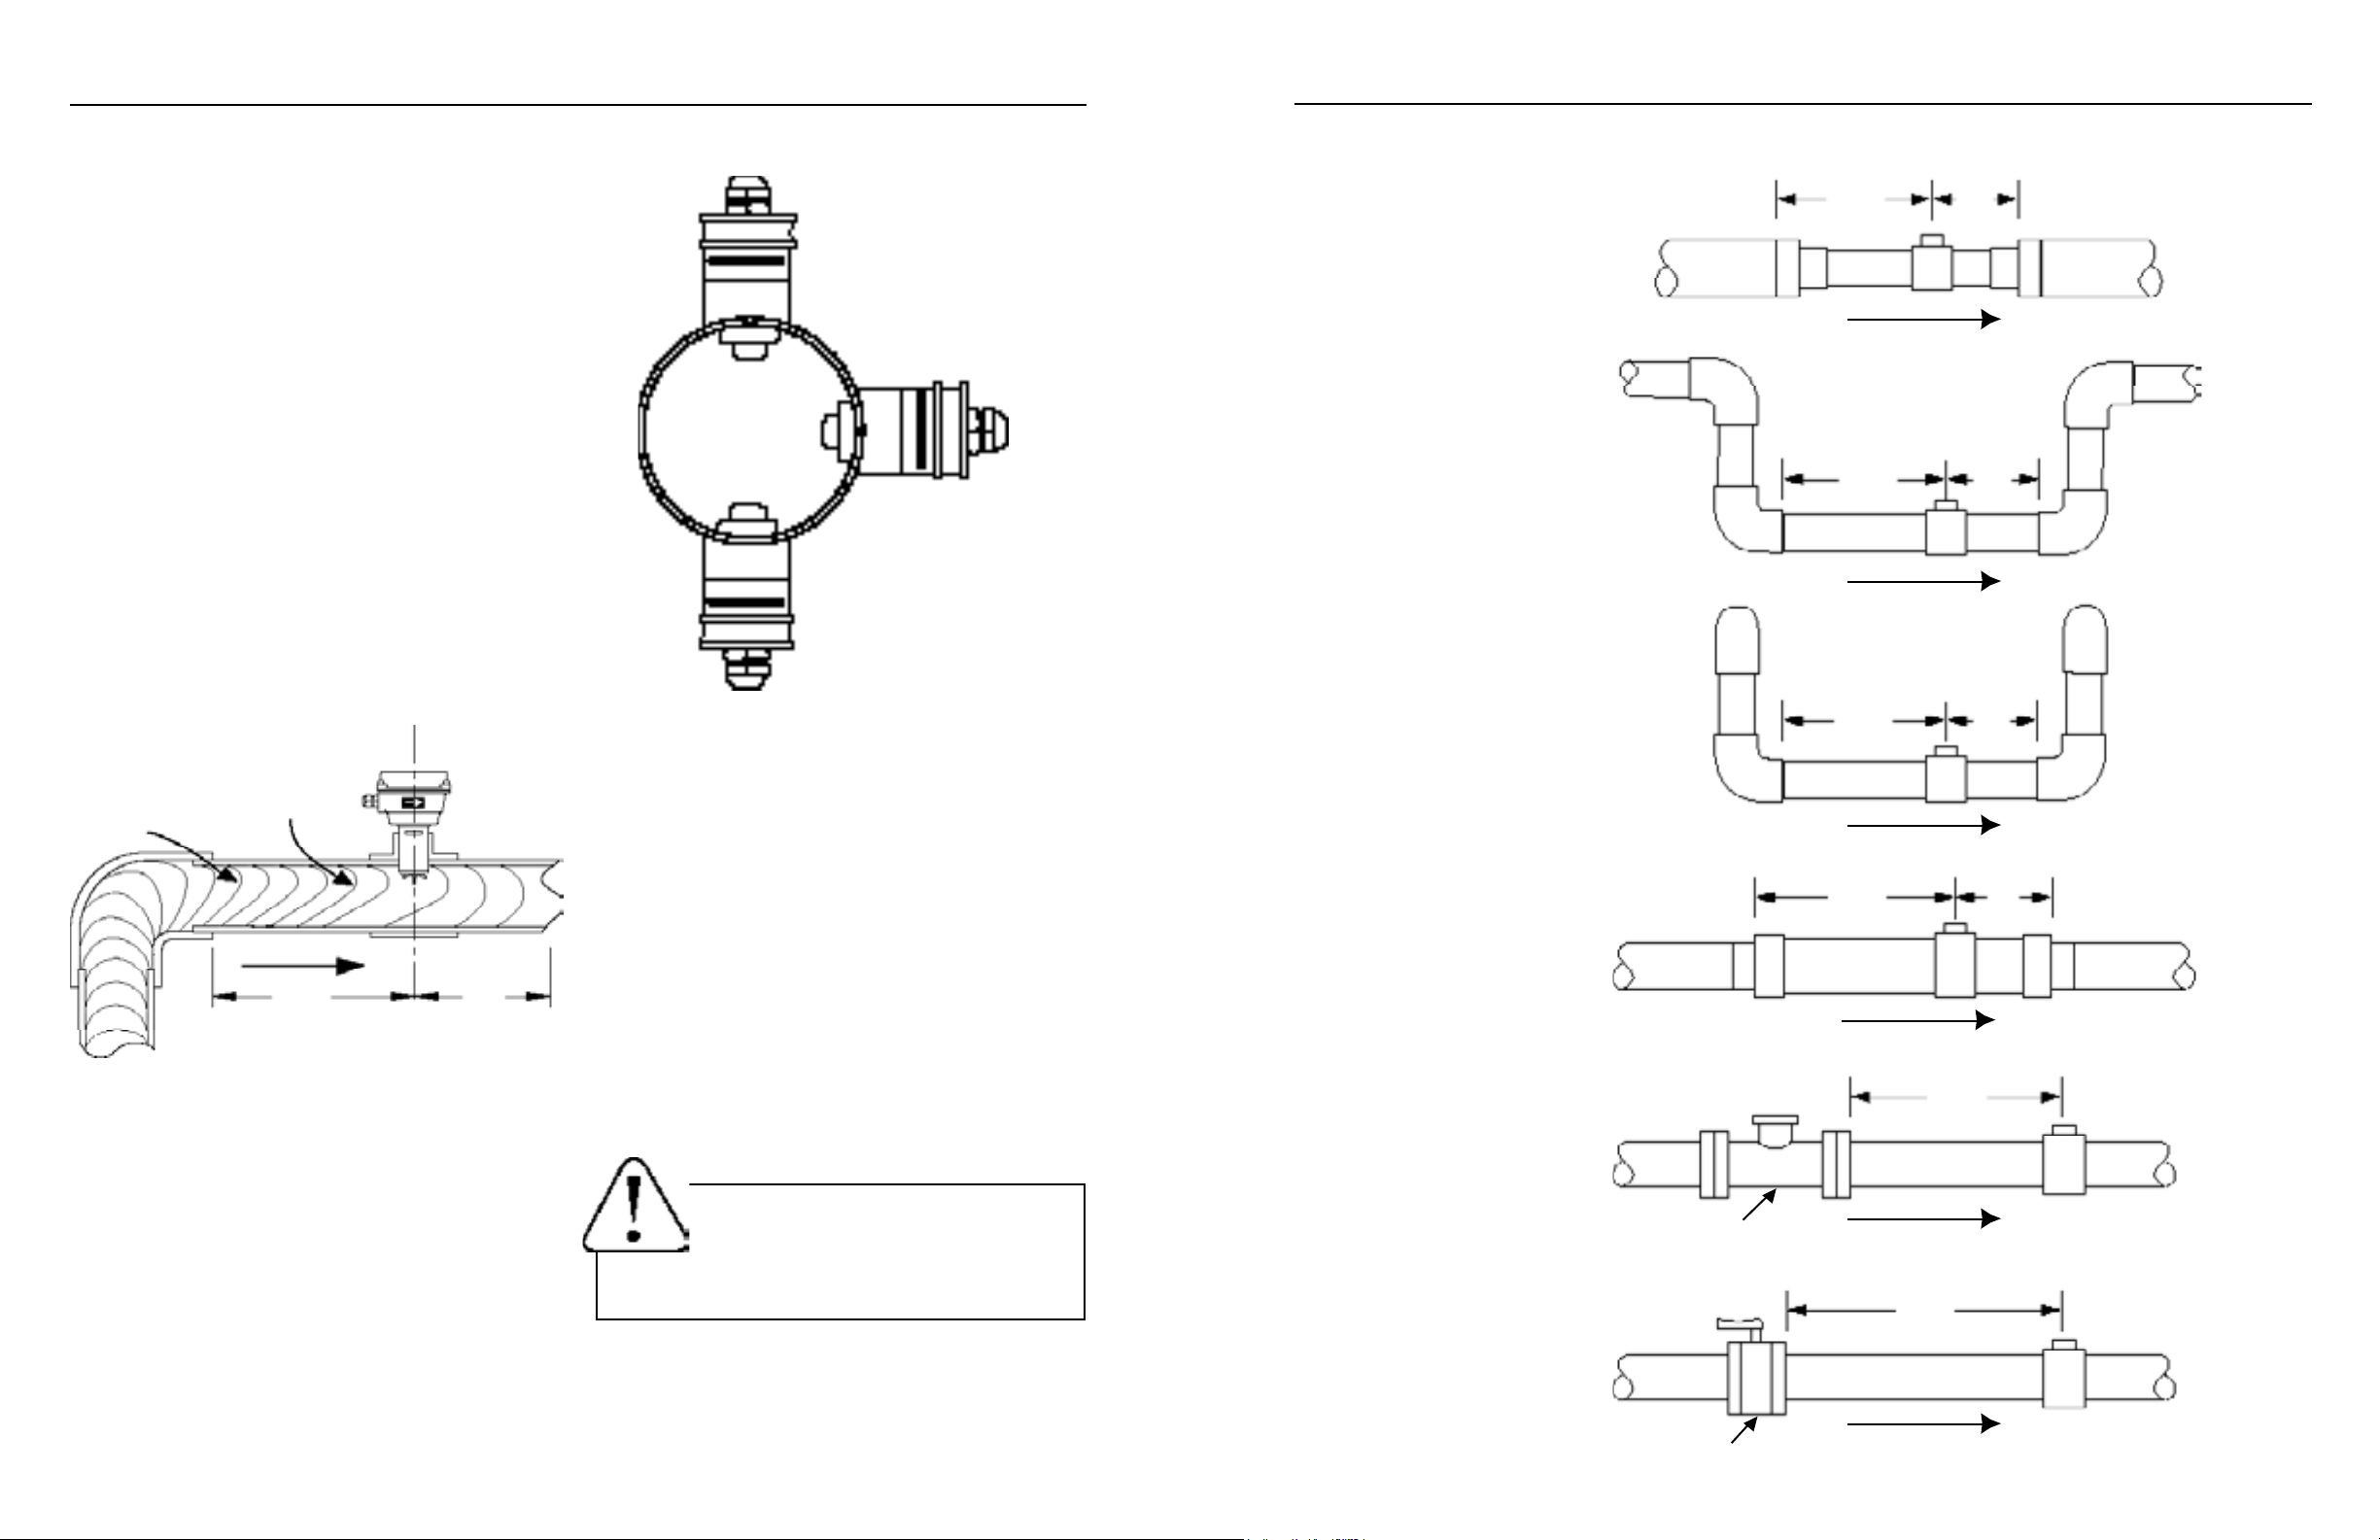
Straight Pipe. Straight pipe of at least 10 diameters up-
stream and ve diameters downstream of the meter is
strongly recommended for proper accuracy. This is neces-
sary because the shape of the velocity prole changes as the
rate increases around an elbow; placing the meter too near
the elbow causes a distorted reading. Additional straight run
may be needed under specic adverse circumstances (see
next page).
If you can’t provide enough straight run to smooth out the
velocity prole, some decrease in accuracy may result. This
does not mean the meter’s reading is meaningless, however.
In some applications (e.g., control system, valve operation)
a repeatable reading may be more important than a highly
accurate one.
POSITIONING THE METER
Okay, if no air in pipe
BEST
Okay, if no sediment in pipe.
STRAIGHT PIPE RECOMMENDATIONS
(X = diameter)
Reduced Pipe
Two Elbows In Plane
10X
5X
PDWS
5X10X
PDWS
DISTORTED FLOWS
Faster Flow
Causes Meter
Distorted
To Read High
Flow Prole
FLOW
10X
Diameter Minimum
(See Below)
Diameter Minimum
5X
(See Below)
Fitting Installation. Stainless steel and brass ttings have
female pipe threads, requiring the appropriate male thread-
ed ttings. Saddle ttings require a hole to be cut in the
pipe (recommended hole size is 1-3/4”). Before cutting into
the pipe, observe the drawing below to choose your meter
orientation.
PVC Fittings. A PVC tting is usually installed by solvent
welding. PVC tees are supplied with some upstream straight
pipe, less than the recommended straight pipe requirements. It is not advisable to connect directly to the end of
these ttings with a ow disturbing device (valve, elbow), but
rather add straight pipe to the end of these ttings to meet
the straight pipe requirements for your application.
Meter Installation. After the meter tting is installed in the
pipeline, the meter can be installed in the tting. Press the
meter into the tting as far as it will go. Retain the meter in
place by inserting the u-pin. The pin can be installed from
either side. It may be necessary to rotate the probe back
and forth slightly to start the pin into the slots on the probe.
Slide the pin in as far as it will go.
Caution: Never remove the u-clip retainer when
the pipe is under pressure. Always remove
pressure from the pipe before you attempt to
remove the meter. Removal under pressure
may result in damage or serious injury.
Two Elbows, Out Of Plane
Expanded Pipe
Spiral Flow
Propeller Meter
20X
20X
5X
PDWS
5X
PDWS
30X
PDWS
50X
Page 4
Swirling Flow
Partially Open
Buttery Valve
PDWS
Page 5
Page 4

INSTALLATION
CONNECTION DIAGRAMS
FULL PIPE RECOMMENDATIONS
Possible Problem:
Allows air pockets to form at sensor
PDWS
Better Installation:
Ensures full pipe
PDWS
SERIES RTI/BAT
Figure 1
PLC's and Controls
PDWS
Possible Problem:
Post-valve cavitation can create air pocket
PDWS
Possible Problem:
Air can be trapped
Caution: These ow sensors are not recommended for installation down-
stream of the boiler feedwater pump where installation fault may expose the
ow sensor to boiler pressure and temperature. Maximum recommended
temperature is 130°F (Plastic), 200°F (Metal).
PDWS
Better Installation:
Keeps pipe full at sensor
PDWS
Better Installation:
Allows air to bleed off
Page 6
Page 7
Page 5

OPERATION
MAINTENANCE
Minimum Flow. As with any other ow sensor, there is a rate
below which the Series PDWS sensor cannot read. Check the
ow rate table below for the minimum ow rate detectable by
the sensor for a given pipe size.
Flow Range (GPM)
1/2" 3/4" 1"
Min 0.28 0.5 0.8 1.9 3.1 6.9 12 27 46.8
Max 28 50 80 190 314 691 1190 2700 4680
1-1/2"
2" 3" 4" 6" 8"
Calibration (“K-factor”). The K-factor represents the number of
pulses per gallon the meter produces during a ow test. This
number must be entered into your electronic control to make
it read properly. If the PDWS Series meter is ordered with a
tee tting, it is factory-calibrated in the Series PWF tting and
the K-factor is indicated on the side (see below).
Find Your K-Factor Here
PRESSURE VS. TEMPERATURE PVC/Polypropylene)
If a saddle or weld-type tting has been ordered, see the
table below to determine the proper K-factor.
PDWS SERIES K-FACTORS
FOR SADDLE & WELDOLET FITTINGS
3" 4" 6" 8"
PVC/
Steel
Sch. 40
PVC/
Steel
Sch. 80
Stainless
Steel
(10S)
Stainless
Steel
(10S)
Copper
Tubing
(Type L)
Copper
Tubing
(Type K)
Brass
Pipe
Duct.
Iron
(Class
52)
28.92 16.790 7.412 4.275
32.368 18.591 8.215 4.684
25.614 14.996 6.747 3.926
28.920 16.790 7.412 4.275
31.386 17. 8 47 7.981 4.563
32.212 18.294 8.272 4.736
29.033 17.009 7.268 4.254
23.548 15.282 6.913 3.485
Caution: Never remove the u-clip retainer
when the pipe is under pressure. Always
remove pressure from the pipe before attempting to remove the meter. Removal
under pressure may result in damage or
serious injury.
Rotor Replacement. It is unusual for a rotor to require replacement due to damage sustained in normal service. More
commonly, the meter is dropped while it is out of the pipe.
Another reason for rotor replacement is shaft wear after long
service. Rotors are easily eld-replaced.
To install a rotor, follow these steps:
1. Unscrew the threaded bearing housings to expose
the shaft ends. If bearings are being replaced,
back them completely out.
2. Remove the rotor. Put the new rotor in its place.
3. Thread in one bearing housing part way, then the
other. Take care to start the end of the shaft into
the bearing hole before tightening further.
4. Screw in bearing housings until they bottom.
Note: Do not use excessive force.
5. Check for free spin. Blowing lightly on the rotor
should result in it spinning rapidly and coasting to a
smooth stop.
Sensor Replacement. It is very unusual for a sensor to require replacement in normal use. The primary cause of sensor
failure is overvoltage (inadvertent connection of high voltage,
for example) or incorrect polarity on hookup. The sensor is
replaced by removing the strain relief, then threading out
the sensor retainer plug. Remove the entire sensor capsule
by pulling on the cable. The new sensor capsule can then be
installed. Replace the retainer plug, and then replace and
tighten the strain relief.
Sensor Replacement
1) Loosen and unthread
Strain Relief
2) Remove Sensor Retainer
Plug by inserting a
screwdriver blade into
one side of the slot and
turning
3) Remove the Sensor
Capsule by pulling on
the cable
4) Reverse the process
to replace
Page 8
Field Calibration. It is possible to eld-calibrate a Series
PDWS ow sensor to determine an accurate K-factor in the
actual installation. The reason for doing this would be to
compensate for an unusual condition, for instance, applica-
tions with higher viscosity uid (PDWS meters are calibrated
for water use) or which lack adequate straight pipe ahead of
the meter.
˚F
Signal Troubleshooting. The ow sensor has only one mov-
ing part, the rotor. If this is turning properly and there is no
signal, the magnetic sensor is not operating properly. To check
the signal, apply 12 Vdc power to the red (+) and black (-)
leads. Set a multimeter to voltage reading. Put the positive
multimeter lead on the red wire and the negative lead on the
white wire. Slowly turn the rotor. Voltage reading should swing
between -12 Volts and 0 Volts as the rotor turns. If it does
not, the solid-state magnetic sensor is not working properly.
Checking for continuity is not a useful test of these sensors.
Page 9
Page 6

PARTS EXPLOSION
TROUBLESHOOTING
SERIES PDWS PARTS LISTING
Upper Housing
1
Problem
No signal
after installation
Inaccurate
metering
Probable Cause Try...
Insufcient ow
Bad connections to control electronics
Incompatible control
Damaged or missing rotor
Failed magnetic sensor
Not enough straight pipe between meter and
severe ow disturbance
Wrong K-Factor entered
Consult Flow Range Chart
Reduce pipe size or use different
sensor
Check connections at control;
Red (+), Black (-), White (signal)
Use 6 to 24 VDC power supply
Add pull up resistor, if using currentsourcing device
Remove ow sensor from tting and check
for free spinning; replace rotor
See signal troubleshooting; replace
magnetic sensor
Move meter away from ow disturbance, or
eld-calibrate
Check tting for K-Factor, check indicator to
see if it is entered properly ("Set K" on
RTI)
Gasket
2
Lower Housing
3
Housing Screw Assembly
4
Plug, Steel
5
Plug, Plastic
6
Strain Relief
7
Sensor Retainer
8
Sensor, Low Power
9
Body
10
O-Ring, EPDM
11
Bearing Screws (2)
12
Rotor (Nickel/Carbide Shaft)
13
Rotor (Ceramic Shaft)
Rotor Repair Kit (Kynar/Carbide)
14
Rotor Repair Kit (Kynar/Ceramic)
Standard Fitting
15
Magnetic sensor failing to pick up each blade
Wrong time units on ow indicator
Remove ow sensor from pipe. If indicator
is an RTI, set K to 1.00, turn rotor slowly by
hand, indicator should count each blade;
replace sensor
If using an RTI, check left side of
display (sec, min, hr, day); change to
desired unit
High Pressure Fitting
16
Page 10 Page 11
Page 7

WARRANTY/RETURN
Refer to "Terms and Conditions of Sale" in our catalog or on
our website. Contact customer service to receive a Returns
Goods Authorization number before shipping your product
back for repair. Be sure to include a brief description of the
problem plus any relevant applciation notes.
Dwyer Instruments, Inc. • 102 Indiana Highway 212 • Michigan City, IN 46360 • USA
(P) 219.879.8868 • (F) 219.872.9057 • 1.800.872.9141 • www.dwyer-inst.com
LT-65200388-082212
08/22/2012
 Loading...