Page 1

7.0 WARRANTY AND LIMITATION OF LIABILITY
DWYER warrants its products to be free from defects in materials and workmanship, subject to the following terms
and conditions: Without charge, DWYER will repair or replace products found to be defective in materials or
workmanship within the warranty period; provided that:
a) the product has not been subjected to abuse, neglect, accident, incorrect wiring not our own, improper
installation or servicing, or use in violation of instructions furnished by DWYER;
b) the product has not been repaired or altered by anyone except DWYER or its authorized service agencies;
c) the serial number or product code has not been removed, defaced, or otherwise changed; and
d) examination discloses, in the judgement of DWYER, the defect in materials or workmanship developed
under normal installation, use and service;
e) DWYER is notified in advance of and the product is returned to DWYER transportation prepaid.
Unless otherwise specified in a manual or warranty card, or agreed to in a writing signed by a DWYER officer, DWYER
pressure and acceleration products shall be warranted for one year from date of sale.
The foregoing warranty is in lieu of all warranties, express, implied or statutory, including but not limited to, any
implied warranty of merchantability for a particular purpose.
DWYER’s liability for breach of warranty is limited to repair or replacement, or if the goods cannot be repaired or
replaced, to a refund of the purchase price. DWYER’s liability for all other breaches is limited to a refund of the
purchase price. In no instance shall DWYER be liable for incidental or consequential damages arising from a breach of
warranty, or from the use or installation of its products.
No representative or person is authorized to give any warranty other than as set out above or to assume for DWYER
any other liability in connection with the sale of its products.
Dwyer Instruments, Inc.
P.O. Box 373
Michigan City, Indiana 46360, U.S.A.
Phone: 219/879-8000
Fax: 219/872-9057
Lit-By Fax: 888/891-4963
www.dwyer-inst.com
e-mail: info@dwyer-inst.com
SS2105 Rev.A 11/11/02
Installation Guide
Series 682
Pressure T ransducers
1.0 GENERAL INFORMATION
Every Series 682 pressure transducer has been tested and calibrated before
shipment. Specific performance specifications are shown on page 3 of this Guide.
Dwyer Series 682 pressure transducers sense gauge pressure and convert this
pressure difference to a proportional high level analog output. This pressure
transducer has the following excitation and output.
Excitation Output
9 to 30 VDC 4 to 20 mA - (Must Observe Polarity)
2.0 MECHANICAL INSTALLATION
2.1 Media Compatibility
Series 682 transducers are designed to be used with any gases or liquids
compatible with 17-4 PH Stainless Steel.
2.2 Environment
The operating temperature limits of the 682 are -40° to +260°F (-40 to
+127°C). The compensated temperature range is -4 to +176°F (-20 to +80°C).
2.3 Pressure Fittings
Typically, standard pipe fittings and procedures should be used. However, for
pressure ranges in excess of 500 psig, we suggest the use of a sealant such as
Loctite Hydraulic Sealant. Excessive torquing of metal fittings may cause a
slight zero shift. The use of plastic fittings typically results in no noticeable zero
shift. Torquing does not appreciably affect linearity or sensitivity.
2.4 Venting
Series 682 Venting Method
Because the reference pressure in a sealed gauge transducer will vary due to
changes in temperature, atmospheric pressure, etc. and will affect overall
accuracy, especially in units of less than 500 psig range, all Series 682
are vented to atmosphere.
The 682 is vented to atmosphere through the cable to achiev e b est accur acy.
Connection to the cable should be made in a junction box that is vented to
atmosphere, with care taken to insure that the end of the cable is not blocked
or sealed.
4
Page 2

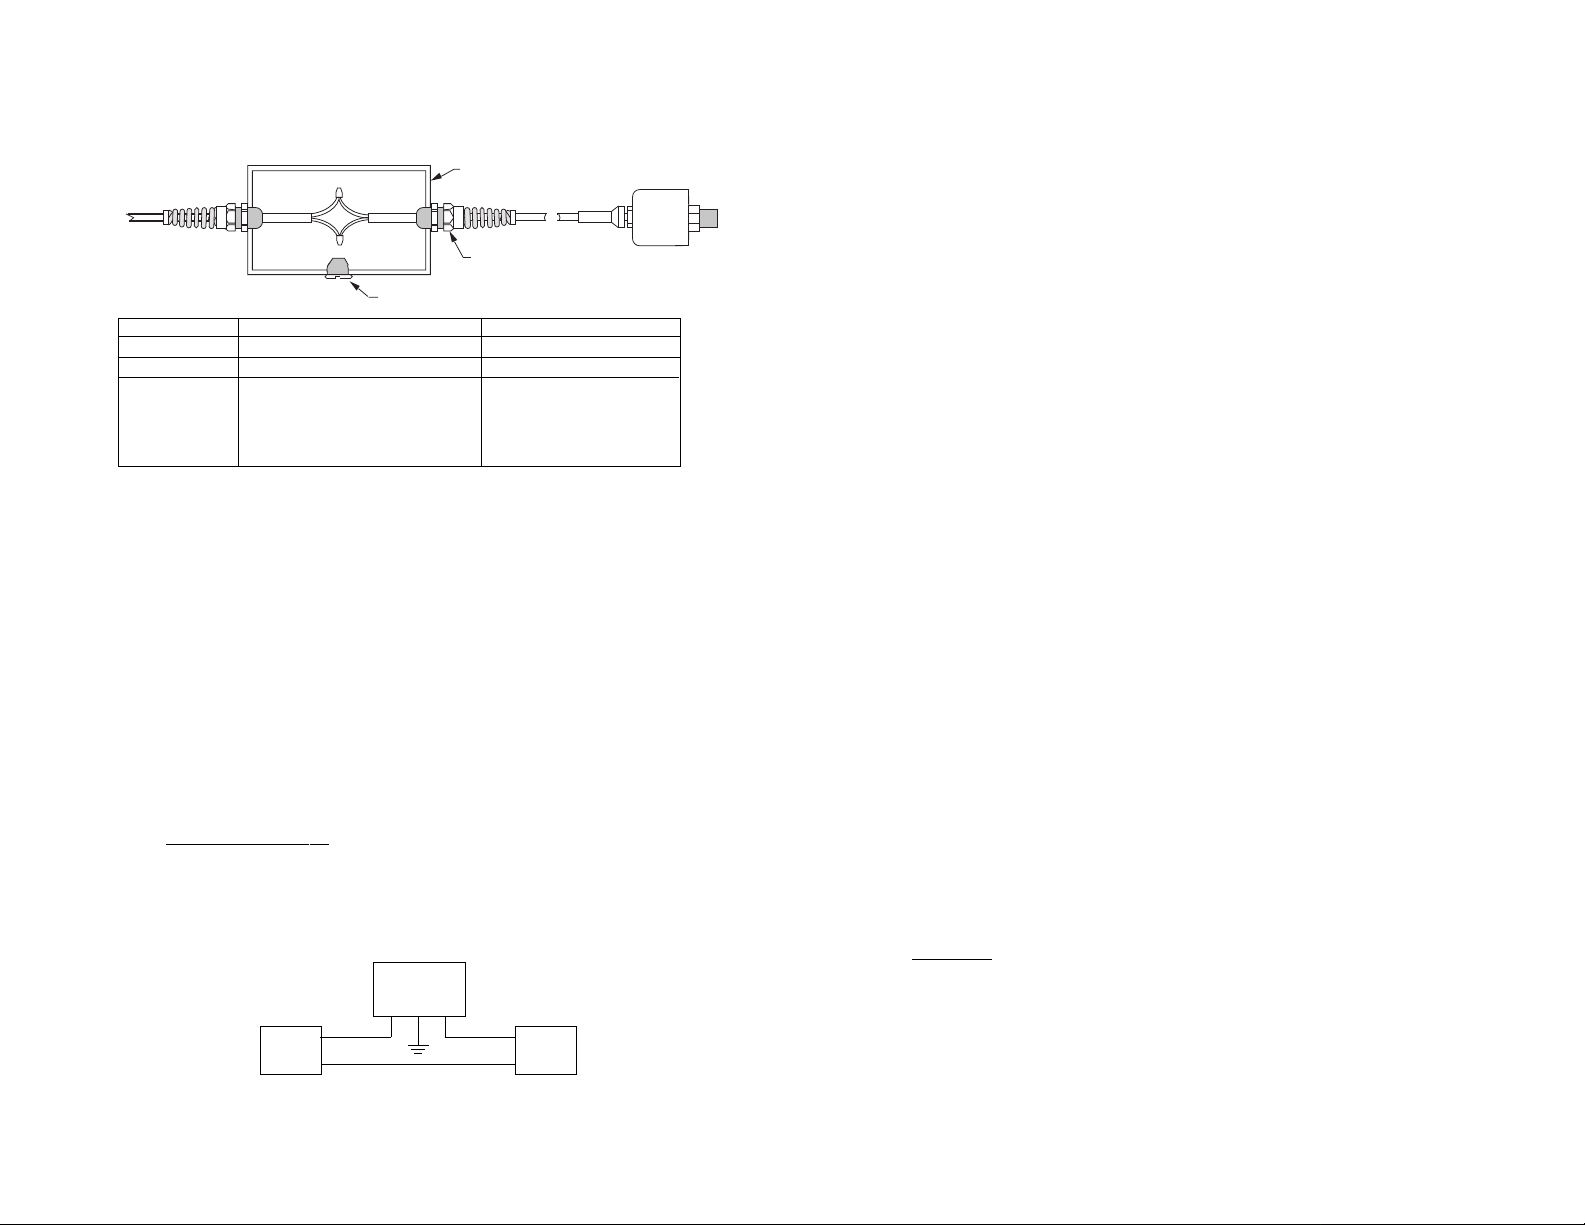
Junction Box Suggestion - The following junction box configuration is a
recommended method of terminating the 682 signal cable in order to achieve
a moisture resistant and vented connection.
Plastic Junction Box
Strain Relief
Vent Screw
Termination: Junction Box Cable Strain Relief
Part No. Q1388PCE 3237 Heyco Flex Fitting
Dimensions: 4.92” x 2.95” x 2.95” 2.50” Long
Manufacturer: Hoffman Engineering Co. Heyco
900 Ehlen Drive Kenilworth, NJ 07033
Anoka, MN 55303 (201) 245-0033
(612) 421-2240 (800) 526-4182
1. Drill one 1/2” dia. hole at each end of junction box for cable strain reliefs.
Note: If conduit is to be installed, omit one 1/2” hole and drill appropriate
hole for conduit.
2. Drill and tap one 1/2” - 13 NC hole in bottom of junction box and install
loosely one 1/2” - 13 NC plastic or stainless steel screw. The clearance
between threads serves as a vent for the box.
3. Install cable strain reliefs in 1/2” dia. holes. If using conduit at one end, be
sure it is sealed properly against moisture.
4. Mount junction box and install cables.
5. A desiccant pack can be placed in the junction box for additional protection.
3.0 ELECTRICAL INSTALLATION
The Series 682 is available with the following electrical termination:
2 foot Cable
206/C206
The 4-20 mA current output unit is designed to have current flow in one direction only PLEASE OBSERVE POLARITY. We suggest that the electrical cable shield be connected to
the system’s loop circuit ground to improve electrical noise rejection.
4.0 CALIBRATION
Every Series 682 is factory calibrated and should require no field adjustment
Whenever possible, any zero and/or span offsets should be corrected by software
adjustments in the user’s control system. However, both zero and span adjustments
are accessible by removing the pan head screws and turning the zero and span
potentiometer screw inside. Use zero and span adjustments on the 682 only if
absolutely necessary. Pan head screws should be replaced after adjustment to
maintain enclosure rating.
Current output units (4-20 mA) are factory calibrated with a 24 VDC loop supply
voltage and a 250 ohm load. The zero factory setting is ±0.08 mA. The span (full
scale) factory setting is ±0.16 mA. Zero and span adjustments are approximately
±1.0 mA.
5.0 MAINTENANCE/REPAIR
After final installation of the Series 682 pressure transducer no routine maintenance
is required. A periodic check of system calibration is recommended. These devices are
not field repairable and should be returned to the factory if recalibration or other
service is required. After first obtaining a Return Goods Authorization (RGA) number,
send the material, freight prepaid, to the following address. Please include a clear
description of the problem plus any application information available.
Dwyer Instruments
Attn: Repair Department
102 Indiana Highway 212
Michigan City, IN 46360
6.0 SERIES 682 PERFORMANCE SPECIFICATIONS
3.1 Series 682
Series 682 Current Unit
The Series 682 (current output) transducers are true 2-wire, 4-20 mA current output
devices and deliver rated current into any external load of 0-800 ohms. The 682 has a
2-wire cable where red is positive and black is negative. On the Hirschmann
Connector, Pin 1 is positive; Pin 2 is negative and Pin 4 is Ground/Shield.
Accuracy RSS
(at constant temperature)
Non-Linearity, BFSL ±0.1% FS
Hysteresis 0.08% FS
Non-Repeatability 0.02% FS
*RSS of Non-Linearity, Non-Repeatability and Hysteresis.
*
±0.13% FS
Thermal Effects
Series 682
Transducer (4-20
mA)
+
+
Power
Supply
__
_
+
Load
(Monitor)
Compensated Range °F(°C) -4 to +176 (-20 to +80)
Zero Shift %FS/°F(°C) ±1.0 (±0.9)
Span Shift %FS/°F(°C) ±1.5 (±1.4)
Stability 0.5% FS/YR
2 3
 Loading...