

Page 1
INSTALLATION INSTRUCTIONS
waclighting.com
Phone (800) 526.2588
Fax (800) 526.2585
Headquarters/Eastern Distribution Center
44 Harbor Park Drive
Port Washington, NY 11050
Central Distribution Center
1600 Distribution Ct
Lithia Springs, GA 30122
Western Distribution Center
1750 Archibald Avenue
Ontario, CA 91760
INSTALLATION INSTRUCTION
758 – LED Wall Sconce
WS-75818
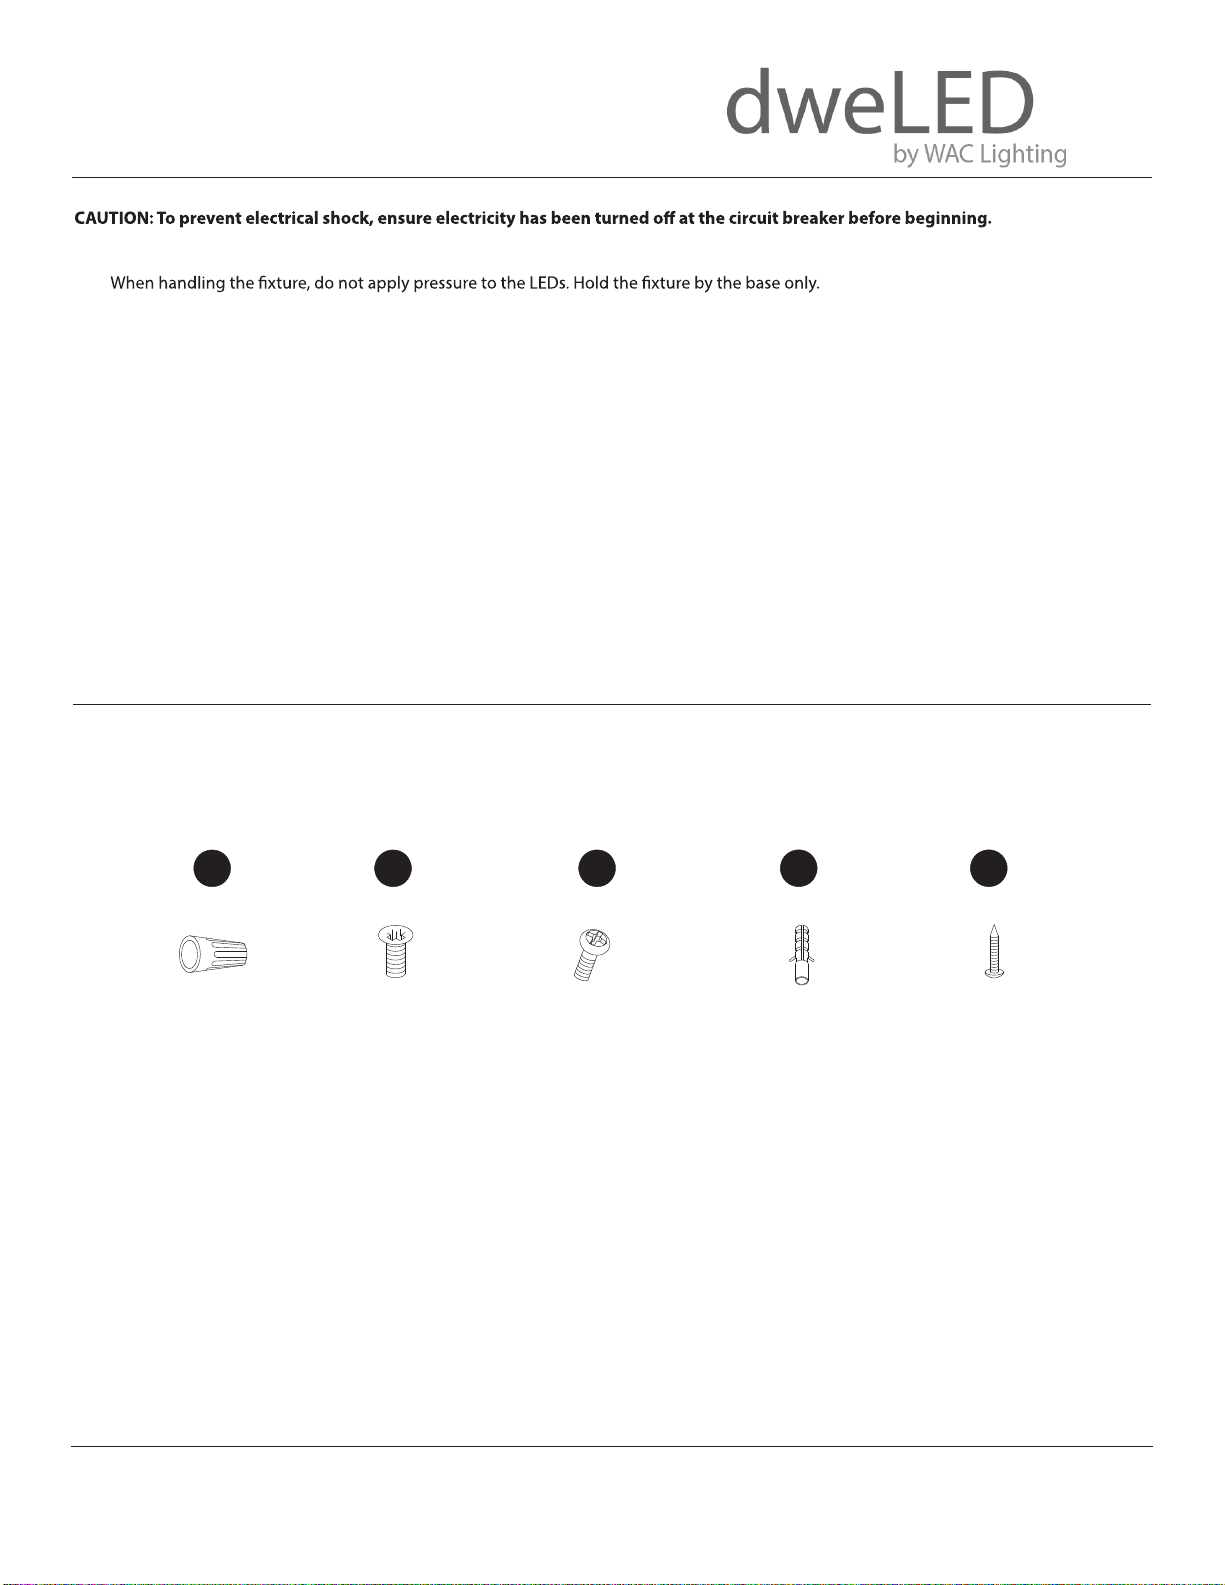
HARDWARE
A B C D E
Wire Connector
Qty: 3pcs+1 Extra
7EAC112201
Junction Box Screw
Qty: 2pcs+1 Extra
7MPF0820C1
#8-32x13/16
Nickel Plating
Wood Screw
Qty: 2pcs+1 Extra
7MPF2204J2
Ф4X22
Plastic Anchor
Qty: 2pcs+1 Extra
7TDD082401
Mounting Screw
Qty: 1 Extra
7MPF0412S1(AL)
5/32-32x1/2
Nickel Plating
WARNING
- Read all instructions before installing.
-
- Go to the main fuse box, or circuit breaker. Place the main power switch in the“OFF” position and unscrew the fuse(s) or switch ”OFF”
the circuit breaker switch(es) that c
- Place the wall switch in the“OFF” position.
CAUTION
- All parts must be used as indicated in these instructions. Do not substitute any parts, leave parts out, or use any parts that are
AVERTISSEMENT
IMPORTANT : Coupez l’électricité avant TOUTE manipulation.
- Lisez toutes les instructions avant d’installer.
-
règlements locaux.
- Accédez au panneau central de disjoncteurs ou de fusibles de votre demeure et placez l’interrupteur principal en position d’arrêt
(« OFF »).
- Placez l’interrupteur mural en position d’arrêt (« OFF »).
MISE EN GARDE
- Toutes les pièces doivent être utilisées tel qu’il est indiqué dans ces instructions. Ne remplacez pas les pièces, n’en laissez pas de côté
et ne les utilisez pas si elles sont usées ou brisées. Le non-respect de ces instructions peut annuler l’homologation ETL/CETL du
luminaire. MISE EN GARDE Ors de la manipulation de l’appareil, ne pas appliquer de pression à la LED, tenir l’appareil par la seule bas
ADVERTENCIA
IMPORTANTE: NUNCA intente hacer trabajos sin desconectar el suministro eléctrico.
- Lea y comprenda todas las instrucciones e ilustraciones por completo antes de proceder con el ensamblaje e insta lación de esta
lámpara.
- , de acuerdo con el código eléctrico nacional y las normas locale
- Diríjase a la caja de fusibles o a la caja del interruptor de circuito principal en su hogar. Coloque el interruptor de ali mentación
principal en la posición “OFF”(APAGADO).
- Coloque el interruptor de la pared en la posición“OFF”(APAGADO).
PRECAUCIÓN
- Todas las piezas deben usarse como lo indican estas instrucciones. No reemplace las piezas, noomita piezas durante la instalación ni
utilice piezas gastadas o rotas. El incumplimient
ETL/CETL esta lámpara. PRECAUCIÓN Al manipular el aparato, no aplique presión a los LED, mantenga el aparato en la base sólo.
329-LED Wall Sconce
758 – LED Wall Sconce
877-LED Pendant
278-LED Pendant
PD-87741
PD-27802
WS-75818
WS-32912
• Read all instructions before installing.
• System is intended for installation by a licensed electrician in accordance with the National Electrical Code (NEC) and local regulations.
•
• Retain installation instructions for future maintenance reference.
WARNING: All parts must be used as indicated in these instructions. This product is designed for use only with the supplied parts and/or acces-
sories designated for use by WAC Lighting/dweLED/Modern Forms. Substitution of parts or accessories not designated for use with this product
by WAC Lighting/dweLED/Modern Forms could result in personal injury or property damage, and will void the warranty. Contact an authorized
dealer or the manufacturer if any parts are damaged or missing.
MISE EN GARDE: Pour éviter tout choc électrique, assurez-vous que le disjoncteur soit mis hors tension avant de commencer.
• Lisez toutes les instructions avant l’installation.
• Le système doit être installé par un électricien licensié conformément au code national de l’électricité (NEC), et également aux règlements
locaux.
• Lors de la manipulation du luminaire, n’appuyez pas sur les LED. Tenez-le uniquement par la base.
ATTENTION: Toutes les pièces doivent être utilisées comme indiqué dans ces instructions. Ce produit est conçu pour être utilisé seulement
avec les pièces et/ou accessoires fournis pour être utilisés avec les produits WAC Lighting/dweLED/Modern Forms. Remplacer des pièces ou
accessoires non conçus pour ce produit WAC Lighting/dweLED/Modern Forms pourrait causer des dommages corporels ou matériels et pourrait
également causer l’annulation de la garantie
magées.
HARDWARE
. Veuillez contacter un revendeur autorisé ou le fabricant si des pièces manquent ou sont endom-
waclighting.com
waclighting.com
Phone (800) 526.2588
Phone (800) 526.2588
Fax (800) 526.2585
Fax (800) 526.2585
dweLED retains the right to modify the design of our products at any time as part of the company's continuous improvement program. JAN 2019
Qty: 3pcs+1 Extra
A
A B C D E
A
Wire Connector
Wire Connector
Wire Connector
Qty: 3pcs+1 Extra
Qty: 3pcs+1 Extra
P3
7EAC112201
A
B
B
Wire Connector
Junction Box Screw
Junction Box Screw
Qty: 3pcs+1 Extra
Qty: 2pcs+1 Extra
Mounting Screw
Qty: 2pcs+1 Extra
Qty:1 Extra
8#-32×13/16
7MPF0820C1
P3
#8-32x13/16
Nickel Plating
Nickel Plating
Headquarters/Eastern Distribution Center
Headquarters/Eastern Distribution Center
44 Harbor Park Drive
44 Harbor Park Drive
Port Washington, NY 11050
Port Washington, NY 11050
Mounting Screw
Junction Box Screw
Wood Screw
Fixture Screw
Qty: 2pcs+1 Extra
Qty:1 Extra
7MPF2204J2
Ф4X22
Chrome Plating
B
C
C
Qty:1 Extra
Qty: 2pcs+1 Extra
5/32"-32×1/2
8#-32×13/16
Nickel Plating
Central Distribution Center
Central Distribution Center
1600 Distribution Ct
1600 Distribution Ct
Lithia Springs, GA 30122
Lithia Springs, GA 30122
Screw
Plastic Anchor
Qty:1 Extra
Plastic Anchor
Qty: 2pcs+1 Extra
Qty: 2pcs+1 Extra
1/8"-40×1/2
7TDD082401
Chrome Plating
C
D
D
Mounting Screw
Qty:1 Extra
5/32"-32×1/2
Chrome
Optional Metal Cap
Mounting Screw
Qty: 1 Extra
Chrome Plating
7MPF0412S1(AL)
5/32-32x1/2
Plating
Nickel Plating
Western Distribution Center
1750 Archibald Avenue
Ontario, CA 91760
E
E
Qty:1 Extra
Wood Screw
Qty: 2pcs+1 Extra
Western Distribution Center
1750 Archibald Avenue
Ontario, CA 91760
1
Page 2
INSTALLATION INSTRUCTIONS
waclighting.com
Phone (800) 526.2588
Fax (800) 526.2585
Headquarters/Eastern Distribution Center
44 Harbor Park Drive
Port Washington, NY 11050
Central Distribution Center
1600 Distribution Ct
Lithia Springs, GA 30122
Western Distribution Center
1750 Archibald Avenue
Ontario, CA 91760
INSTALLATION INSTRUCTION
758 – LED Wall Sconce
WS-75818
HARDWARE
A B C D E
Wire Connector
Qty: 3pcs+1 Extra
7EAC112201
Junction Box Screw
Qty: 2pcs+1 Extra
7MPF0820C1
#8-32x13/16
Nickel Plating
Wood Screw
Qty: 2pcs+1 Extra
7MPF2204J2
Ф4X22
Plastic Anchor
Qty: 2pcs+1 Extra
7TDD082401
Mounting Screw
Qty: 1 Extra
7MPF0412S1(AL)
5/32-32x1/2
Nickel Plating
WARNING
- Read all instructions before installing.
-
- Go to the main fuse box, or circuit breaker. Place the main power switch in the“OFF” position and unscrew the fuse(s) or switch ”OFF”
the circuit breaker switch(es) that c
- Place the wall switch in the“OFF” position.
CAUTION
- All parts must be used as indicated in these instructions. Do not substitute any parts, leave parts out, or use any parts that are
AVERTISSEMENT
IMPORTANT : Coupez l’électricité avant TOUTE manipulation.
- Lisez toutes les instructions avant d’installer.
-
règlements locaux.
- Accédez au panneau central de disjoncteurs ou de fusibles de votre demeure et placez l’interrupteur principal en position d’arrêt
(« OFF »).
- Placez l’interrupteur mural en position d’arrêt (« OFF »).
MISE EN GARDE
- Toutes les pièces doivent être utilisées tel qu’il est indiqué dans ces instructions. Ne remplacez pas les pièces, n’en laissez pas de côté
et ne les utilisez pas si elles sont usées ou brisées. Le non-respect de ces instructions peut annuler l’homologation ETL/CETL du
luminaire. MISE EN GARDE Ors de la manipulation de l’appareil, ne pas appliquer de pression à la LED, tenir l’appareil par la seule base.
ADVERTENCIA
IMPORTANTE: NUNCA intente hacer trabajos sin desconectar el suministro eléctrico.
- Lea y comprenda todas las instrucciones e ilustraciones por completo antes de proceder con el ensamblaje e insta lación de esta
lámpara.
- , de acuerdo con el código eléctrico nacional y las normas locales.
- Diríjase a la caja de fusibles o a la caja del interruptor de circuito principal en su hogar. Coloque el interruptor de ali mentación
principal en la posición “OFF”(APAGADO).
- Coloque el interruptor de la pared en la posición“OFF”(APAGADO).
PRECAUCIÓN
- Todas las piezas deben usarse como lo indican estas instrucciones. No reemplace las piezas, noomita piezas durante la instalación ni
utilice piezas gastadas o rotas. El incumplimient
ETL/CETL esta lámpara. PRECAUCIÓN Al manipular el aparato, no aplique presión a los LED, mantenga el aparato en la base sólo.
INSTALLATION INSTRUCTION
758 – LED Wall Sconce
WS-75818
PD-87741
877-LED Pendant
INSTALLATION INSTRUCTION
758 – LED Wall Sconce
WS-75818
HARDWARE
A B C
D E
Wire Connector
Qty: 3pcs+1 Extra
7EAC112201
Junction Box Screw
Qty: 2pcs+1 Extra
7MPF0820C1
#8-32x13/16
Nickel Plating
Wood Scr
ew
Qty: 2pcs+1 E
xtra
7MPF2204J2
Ф4X22
Plastic Anchor
Qty: 2pcs+1 Extra
7TDD082401
Mounting Screw
Qty: 1 Extra
7MPF0412S1(AL)
5/32-32x1/2
Nickel Plating
WARNING
- Read all instructions before installing.
-
- Go to the main fuse box, or circuit breaker. Place the main power switch in the“OFF” position and unscrew the fuse(s) or switch ”OFF
the circuit breaker switch(es) that c
- Place the wall switch in the“OFF” position.
CAUTION
- All parts must be used as indicated in these instructions. Do not substitute any parts, leave parts out, or use any parts that are
AVERTISSEMENT
IMPORTANT : Coupez l’électricité avant TOUTE manipulation.
- Lisez toutes les instructions avant d’installer.
-
règlements locaux.
- Accédez au panneau central de disjoncteurs ou de fusibles de votre demeure et placez l’interrupteur principal en position d’arrêt
(« OFF »).
- Placez l’interrupteur mural en position d’arrêt (« OFF »).
MISE EN GARDE
- Toutes les pièces doivent être utilisées tel qu’il est indiqué dans ces instructions. Ne remplacez pas les pièces, n’en laissez pas de côt
et ne les utilisez pas si elles sont usées ou brisées. Le non-respect de ces instructions peut annuler l’homologation ETL/CETL du
luminaire. MISE EN GARDE Ors de la manipulation de l’appareil, ne pas appliquer de pression à la LED, tenir l’appareil par la seule bas
ADVERTENCIA
IMPORTANTE: NUNC
A intente hacer trabajos sin desconectar el suminist
ro eléctrico.
- Lea y comprenda todas las instrucciones e ilustraciones por completo antes de proceder con el ensamblaje e insta lación de esta
lámpara.
-
, de acuerdo con el código eléctrico nacional y las no
rmas locale
- Diríjase a la caja de fusibles o a la caja del interruptor de circuito principal en su hogar. Coloque el interruptor de ali me
ntación
principal en la posición “OFF”(APAGADO).
- Coloque el interruptor de la pared en la posición“OFF”(APAGADO).
PRECAUCIÓN
- Todas las piezas deben usarse como lo indican estas instrucciones. No reemplace las piezas, noomita piezas durante la instalación ni
utilice piezas gastadas o rotas. El incumplimient
ETL/CETL esta lámpara. PRECAUCIÓN Al manipular el aparato, no aplique presión a los LED, mantenga el aparato en la base sól
o.
PD-27802
278-LED Pendant
WS-32912
329-LED Wall Sconce
758 – LED Wall Sconce
877-LED Pendant
278-LED Pendant
329-LED Wall Sconce
PD-87741
PD-27802
WS-75818
WS-32912
Fig.1
FIG.1
B
RPL-GLA-32912
Plate
3 3/8" L X 2 3/8" W X 1 1/4" H
Driver
D
PREPARATION
C
Plastic
Junction Box Screw
B
Mounting Screw
A
A
B
B
C
Metal Shade
Mounting Plate
Driver
5 5/16"
L X 2 9/16" W X1/2" H
Wood Screw
C
E
Mounting Screw
Back
Plate
A
Wire Connector
Ground Wire Screw
Junction Box
Ground Wire Screw
3 3/8" L X 2 3/8" W X 1 1/4" H Driver
C
Driver
Ground Wire Screw
Plastic Anchor
D
Junction Box Screw
E
Wood Screw
Mounting
Plate
Wire Connector
A
D
Fixture
Plate
Ground Wire
Plastic Anchor
Screw
Black - Hot
White - Neutral
4 1/8”
Junction Box
Fig.3
Back Plate Dimensions
Back Plate Dimensions
10 5/16"
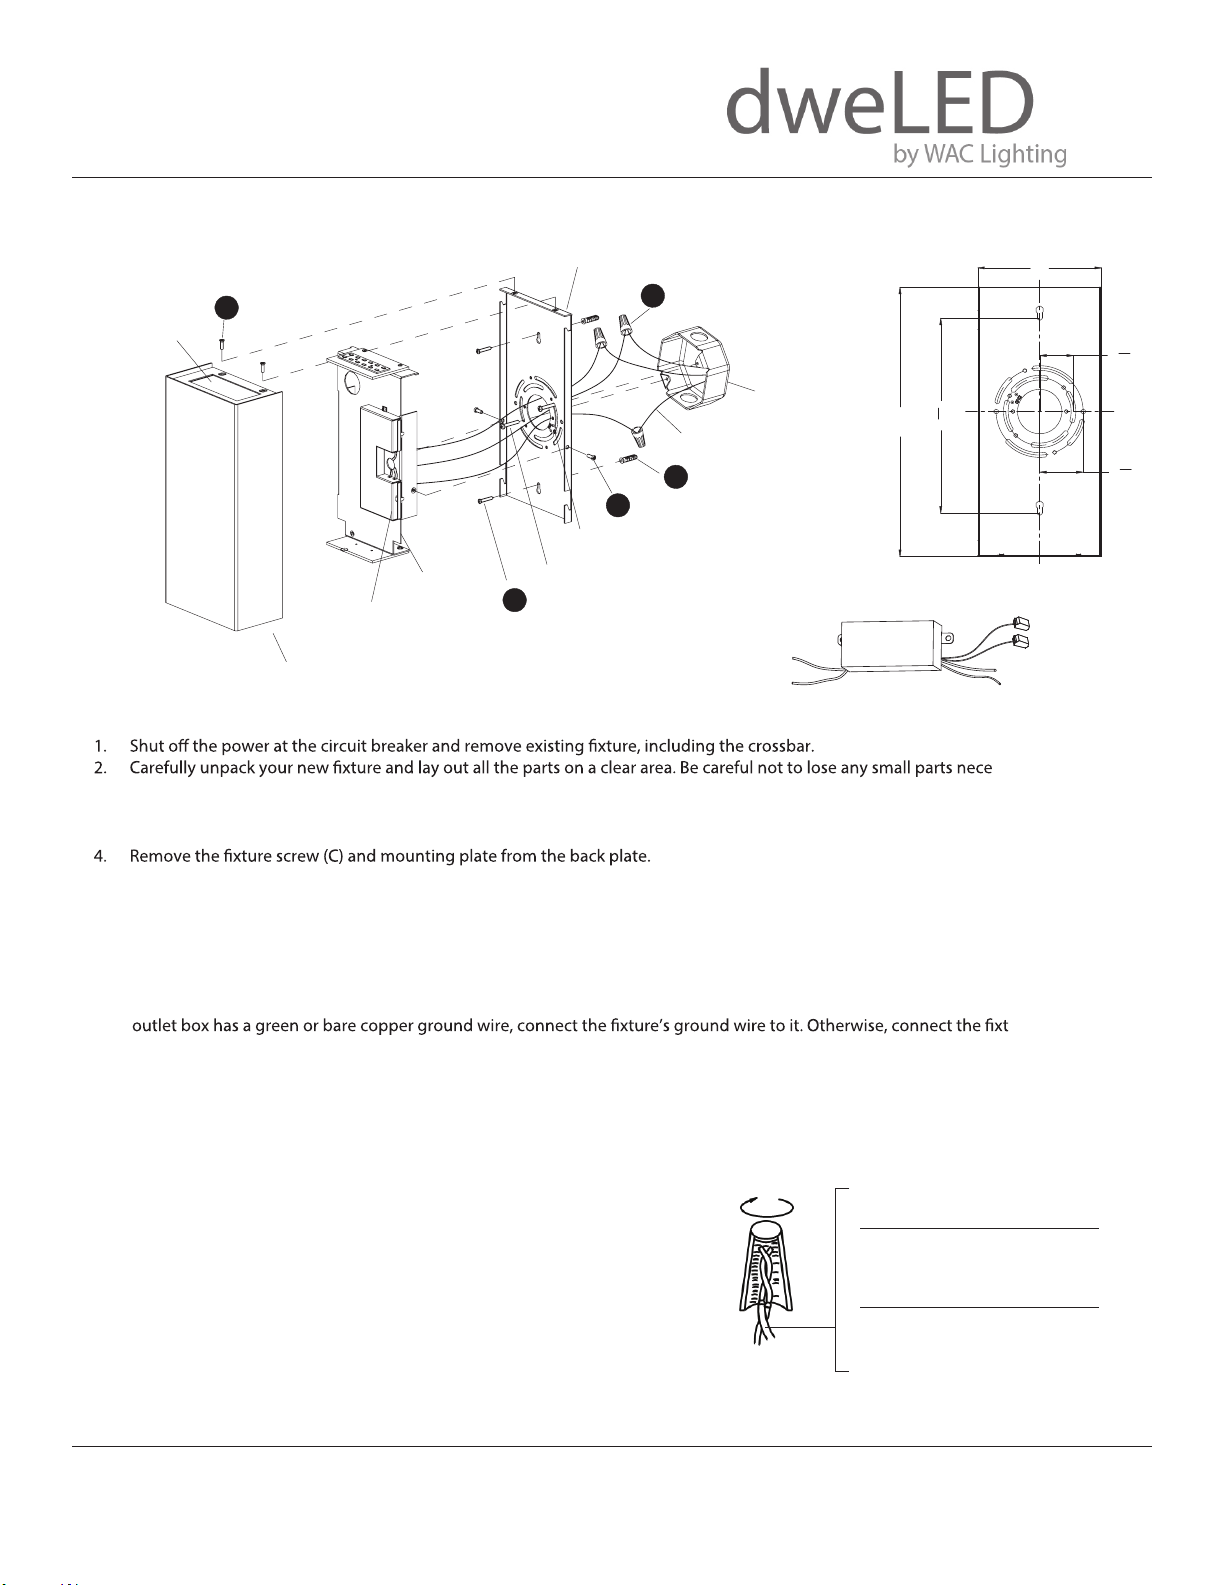
MOUNTING THE FIXTURE (Fig. 1)
3. Remove the mounting screw (B) and metal shade from the back plate.
5. Drill a hole in the wall aligned with the key-hole located in the back plate, insert the plastic anchor (D).
R
Secure the back plate to the junction box using the screws provided with the junction box. Fasten the back plate to the wall using the wood
6.
1.
screw (E).
P
P
NOTE: The side of the mounting plate marked “GND” must face out.
2.
CONNECTING THE WIRES (Fig. 2)
TING THE FIXTURE (Fig. 1)
Connect the driver’s input wires to junction box wires as shown (Fig. 2). Make sure that all wire connectors (A) are secure. If your
ECTING THE WIRES (Fig. 2)
ECTING THE WIRES (Fig. 2)
7.
3. Remove the mounting screw (E) from the mounting back plate.
Remove the mounting screw (C) from the canopy.
wire directly to the back plate using the green screw provided. After wires are connected, tuck them carefully inside the junction box.
g crew provided. After wires are connected, tuck them carefully
D in the mounting back plate, insert the plastic anchors (D).
C s shown in Fig. 2, making sure that all wire connectors (A) are
NOTE: This fixture features electronic low voltage (ELV or TRIAC) or 0-10V dimming capabilities. See notes below for specific dimming
wiring information.
COMPLETING THE INSTALLATION
Place the mounting plate to the back plate, secure it with fixture screw (C).
8.
9. Place the metal shade to the back plate, secure it with mounting screw (B).
.
t wn
e
u
e
Fi
Fi
Fi
FIG. 2 Wiring
Fig.2 Wiring
g.2 Wiring
g.2 Wiring
g.2 Wiring
NOTE: DIMMING WIRING INSTRUCTIONS (Fig. 3)
To utilize ELV or TRAIC dimming: use black (hot), white (neutral) and bare
10.
screws (B).The side of the mounting back plate marked “GND” must face out.
Requires Driver to be recessed within the junction box.
copper ground wires (ground).
Hook the safety cord to the mounting plate.
11.
To utilize 0-10V dimming:
8. Secure the canopy to the m
C PLETING THE INSTALLATION
Note: Make sure to connect 0-10V prior to powering up the fixture in order to
allow the 0-10V dimmer to function properly.
waclighting.com
waclighting.com
Phone (800) 526.2588
Phone (800) 526.2588
Fax (800) 526.2585
Fax (800) 526.2585
dweLED retains the right to modify the design of our products at any time as part of the company's continuous improvement program. JAN 2019
use purple (dim+), gray (dim-), black hot, white
(neutral) and bare copper ground wires (ground).
Headquarters/Eastern Distribution Center
Headquarters/Eastern Distribution Center
44 Harbor Park Drive
44 Harbor Park Drive
Port Washington, NY 11050
Port Washington, NY 11050
d,
Central Distribution Center
Central Distribution Center
1600 Distribution Ct
1600 Distribution Ct
Lithia Springs, GA 30122
Lithia Springs, GA 30122
Back Plate Dimensions
1 3/4"
"
7
8
7
11"
WS-75818
MOUNTING BACK PLATE
15”
11 3/4”
1 3/8”
ssary for installation.
1 3/4”
ary for installation.
ary for installation.
ure’s ground
(A) are secured.
wood screws (C). The side of
Fixture Wires
Black or
Smooth
Fixture Wires
Fixture Wires
Fixture Wires
Fixture Wires
Black or
Black or
Black or
Black or
Fixture Wires
Smooth
Smooth
Smooth
Smooth
White or
Ribbed
Fixture Wires
Fixture Wires
Fixture Wires
Fixture Wires
White or
White or
White or
White or
Fixture Wires
Ribbed
Ribbed
Ribbed
Ribbed
Bare wire
Fixture Wires
(Ground)
Fixture Wires
Fixture Wires
Fixture Wires
Bare wire
Bare wire
Bare wire
Bare wire
(Ground)
(Ground)
(Ground)
(Ground)
Western Distribution Center
1750 Archibald Avenue
Ontario, CA 91760
e wires are the
inside the junction box.
secured. If your
House Wires
Black
(Hot)
House Wires
House Wires
House Wires
House Wires
Black
Black
Black
Black
House Wires
(Hot)
(Hot)
(Hot)
(Hot)
White
(Neutral)
House Wires
House Wires
House Wires
House Wires
White
White
White
White
House Wires
(Neutral)
(Neutral)
(Neutral)
(Neutral)
Green or Bare Copper
House Wires
(Ground)
House Wires
House Wires
House Wires
Green or Bare Copper
Green or Bare Copper
Green or Bare Copper
Green or Bare Copper
(Ground)
(Ground)
(Ground)
(Ground)
Western Distribution Center
1750 Archibald Avenue
Ontario, CA 91760
5"
Purple - Dim+
Gray - Dim-
3
1
"
8
1 3/8"
3
1
"
4
2
 Loading...