

Page 1
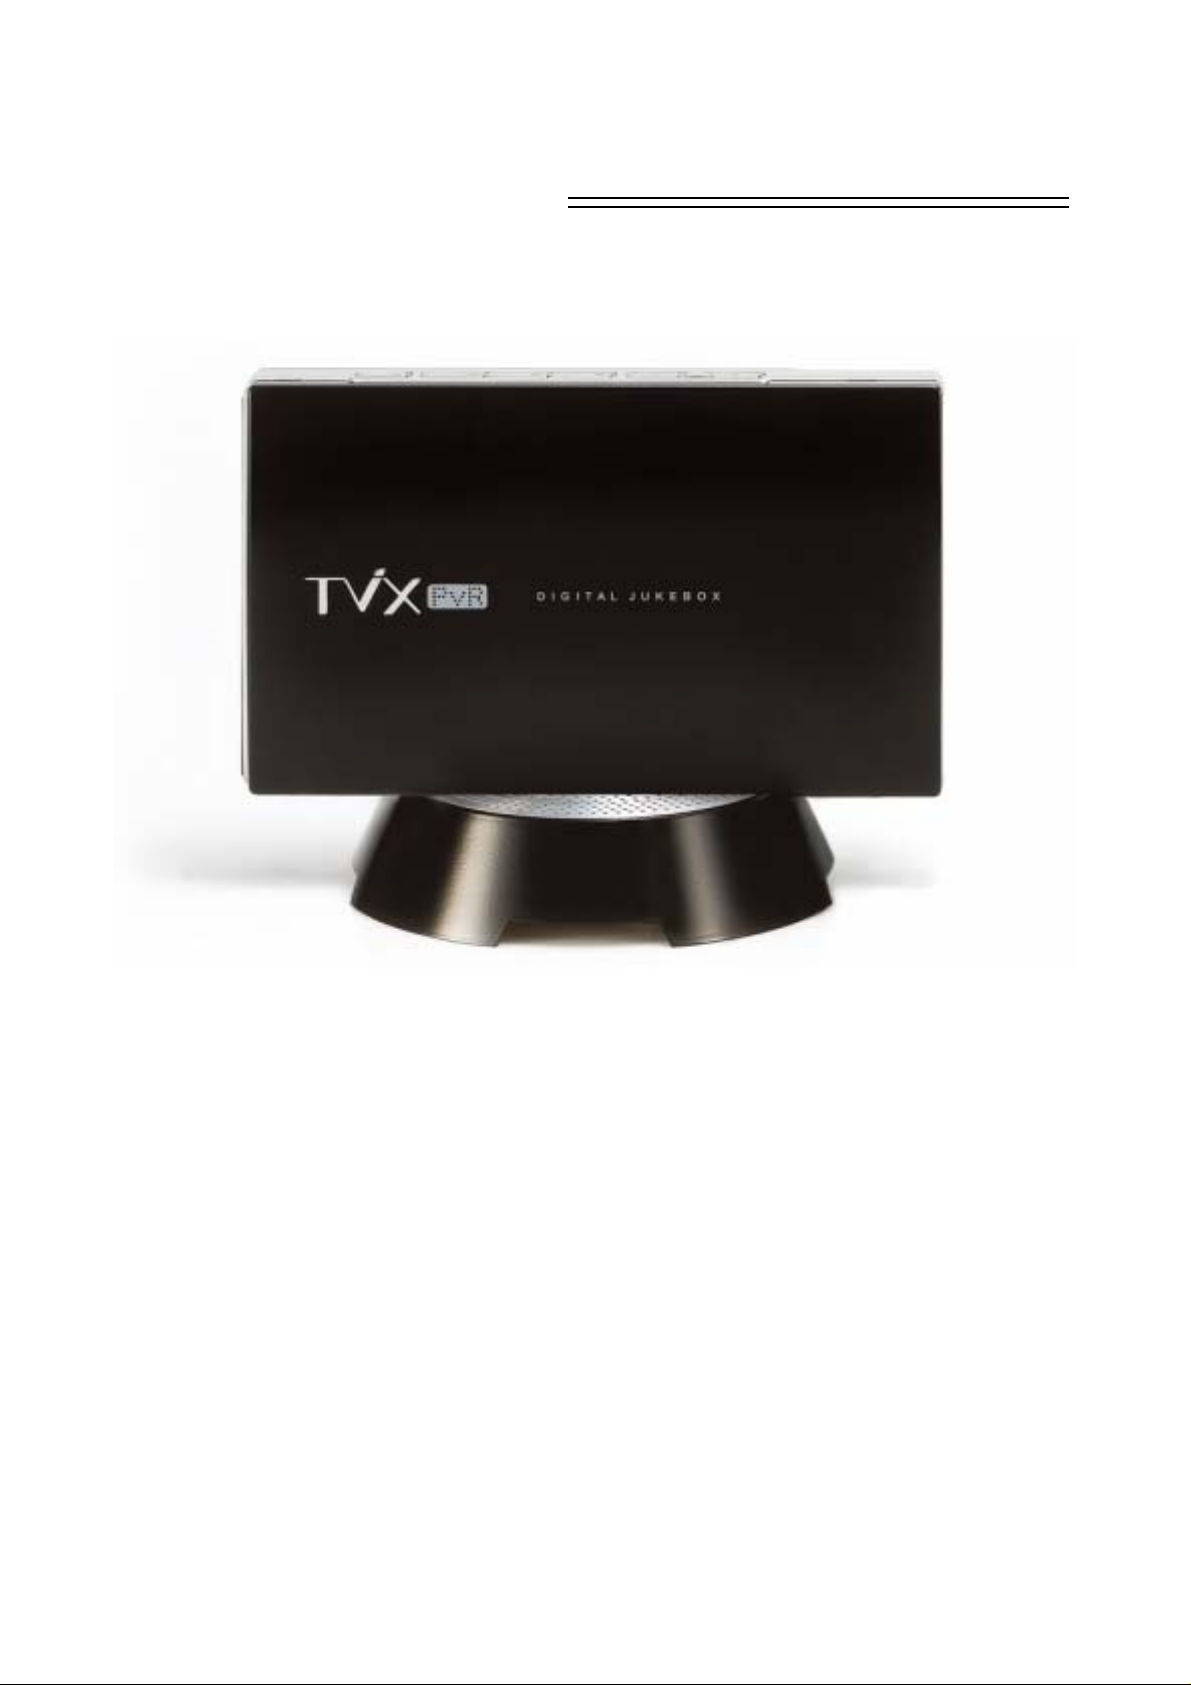
Quick Guide
TViX PVR R-2200 Series
Page 2

Ultimate PVR with HD Digital Jukebox
Federal Communications Commission (FCC) Statement
You are cautioned that changes or modifications not expressly approved by the part responsible for
compliance could void the user’s authority to operate the equipment
FCC- Class B
This equipment has been tested and found to comply with the limits for a Class B digital device,
pursuant to part 15 of the FCC Rules. These limits are designed to provide reasonable protection
against harmful interference in a communications. However, there is no guarantee that interference
will not occur in particular installation. If this equipment does cause harmful interference to radio or
television reception, which can be determined by turning the equipment off and on, the user is
encouraged to try to correct the interference by one or more of the following measures:
- Reorient or relocate the receiving antenna.
- Increase the separation between the equipment and receiver.
- Connect the equipment into an outlet on a circuit different from that to which the receiver is
connected.
- Consult the dealer or an experienced radio/TV technician for help.
** Some specifications could change according with new firmware versions. Please refer to the FAQ
on our homepage for further information- http://www.tvix.co.kr
** For detailed instructions, please refer to the enclosed TViX CD or the latest pdf file on the TViX Ho
mepage (www.tvix.co.kr
).
.
2
Page 3

Safety Notice
Ultimate PVR with HD Digital Jukebox
Do not try to disassemble or remodel
the TViX unit. Doing so may cause
malfunction or fire.
Do not Place the TViX . In places that are
exposed to oil, water, dust, humidity, rain
and wind.
Place all magnetized devices. Such as
speakers away from the TViX .It may erase or
cause damage to the data stored in the hard
disk.
Keep your TViX away from heated areas,
such as direct sunlight exposure, heaters
etc. Place it in a well ventilated location.
Ensure that a free airflow is maintained
around the appliance.
Do not touch the power plug with wet hands or
use defective power cables & electric outlets. It
may cause electric shocks or fire.
Do not drop the TViX from heights. Doing
so may cause critical damage to the hard
drive.
The socket-outlet shall be installed near the equipment and shall be easily accessible.
Unplug the power cable when you will not use the product for a long time.
3
Page 4
1 Introduction
1.1 TViX PVR Function
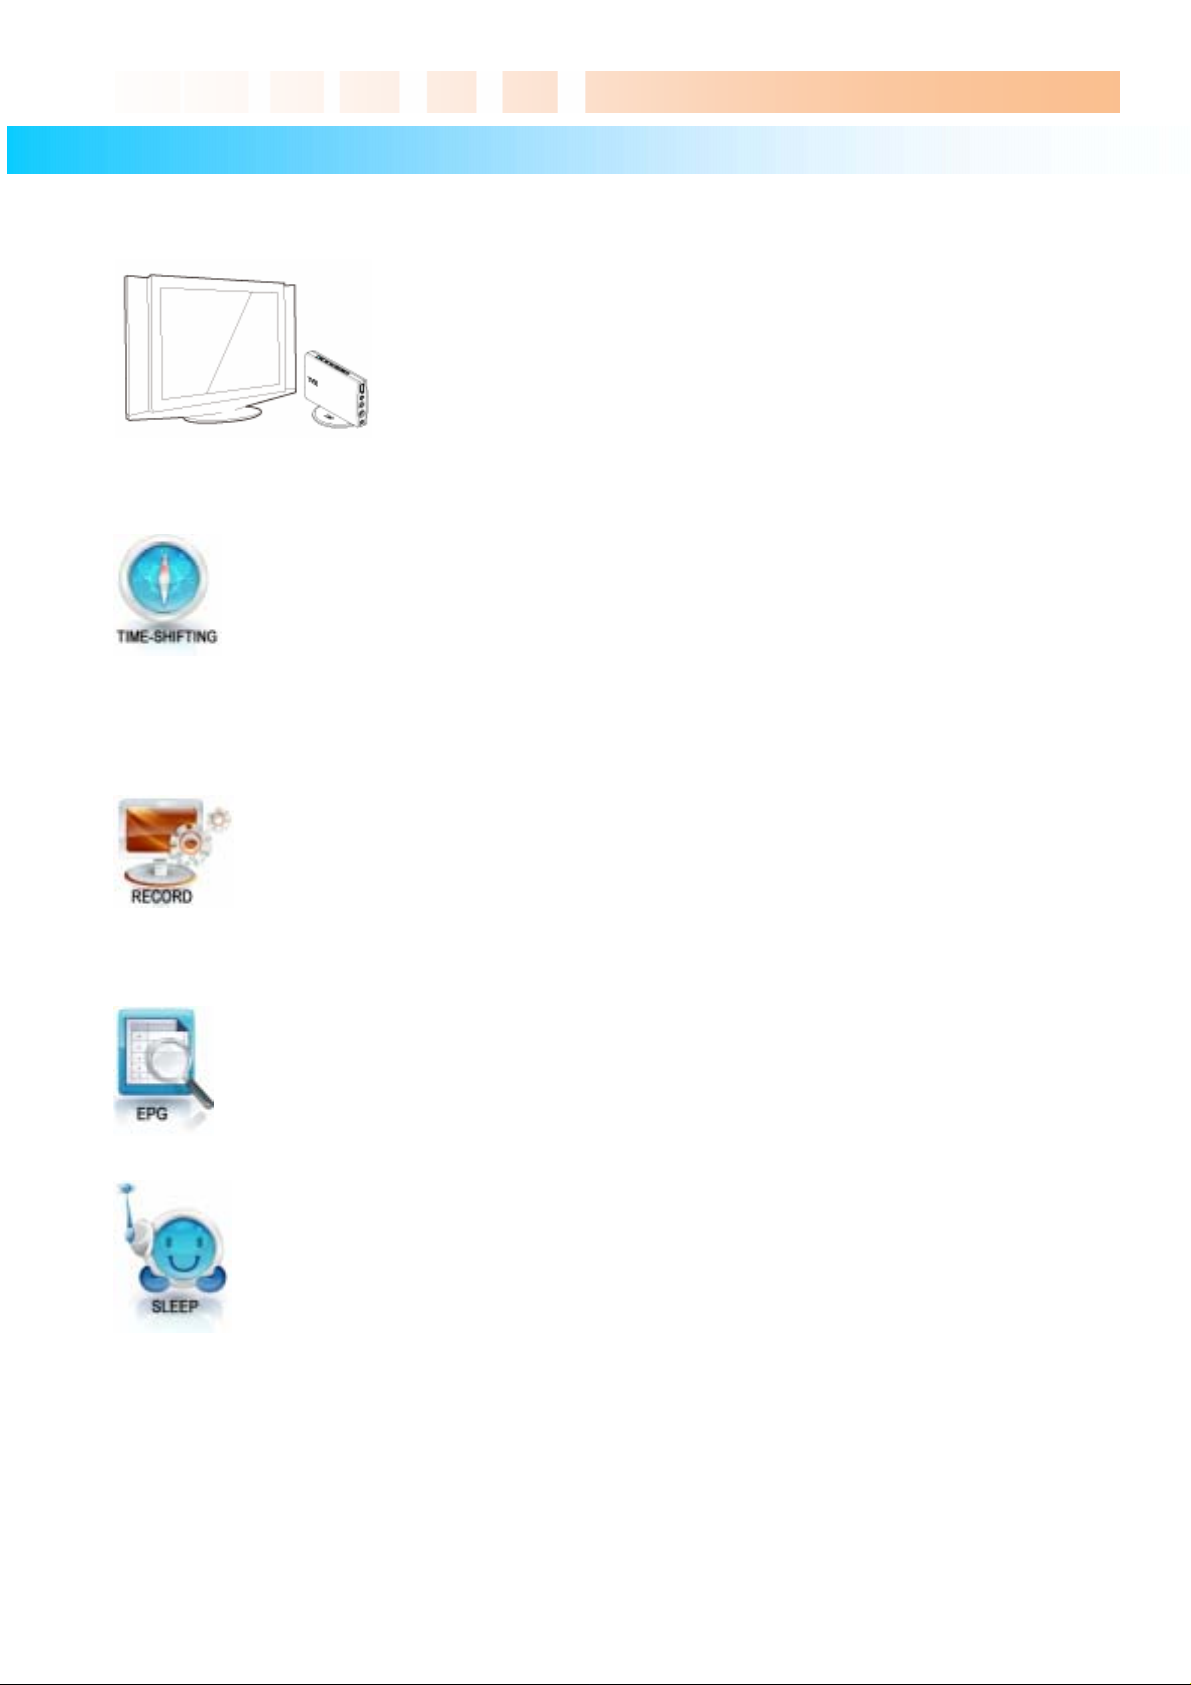
The TVIX PVR can play HDTV without a digital TV set-top box with excellent
and super-clear display on HDTV screens. The TViX PVR supports standard
DTV features, such as EPG and Time-shifting.
Time shifting is the recording of programming to a storage medium to be viewed or listened
to at a time more convenient to the consumer. Being interrupted while watching live TV
programs (such as pick up phone calls & answer the door), all you need to do is simply
press the OK button to freeze the picture for a period of time and then later press OK again
to pick up right where you left off. The Time-shifting maintains the scene when you change
the channel. Note: You cannot use the DTV time-shifting on FAT32 partitions, so we
recommend that you format your 2.5” SATA HDD to NTFS.
Ultimate PVR with HD Digital Jukebox
The TViX PVR has various recording features, including direct recording, scheduled
recording, and repeated manual recording, to enable the user not to miss a single program
of digital TV. It's a completely different type of PVR since you can easily upgrade and expand
the HDD capacity yourself, similar to PC upgrading. And you can back up the recorded file
to/from the PC. Also, it can capture external analog video as well as anal og TV signals.
The TViX PVR implements DTV features such as EPG-scheduled recording and PCconnectivity to let the user enjoy all the fruits of digital broadcasting as well as supreme
audio and video qualities. You can set up scheduled recording and scheduled watch using
the EPG window. Note: The EPG is not supported in analog TV or external input (A/V-in)
modes.
When using the DTV mode, you can easily configure the sleep time with the FUNCTION
key. If the sleep time is reached when a recording is in progress, the TViX will shut down
after finishing the recording. In the file list mode, the FUNCTION key performs the File
copy/delete and password functions.
DVICO Inc has no responsibility for recorded programs or files made or distributed for purposes of illegal,
commercial, or transactional activities. The party or parties who record or distribute the contents bear all
responsibility (Civil or Criminal) direct or indirect.
4
Page 5

1.2 Multimedia Player Function
The TViX is a standalone, multimedia hard disk player that plays digital
videos, digital music, digital still images and DVD files to a TV display and
home entertainment system. You can enjoy digital contents in your living
room without having to burn discs or having to play it back on a DVD or CD
player anymore.
TViX plays back DVD movies with the full functionality of DVD navigation. You can create
your own virtual DVD library by storing your personal collection of DVDs in .ISO or .IFO
format and watch them exactly as if they were running from the original DVDs (all original
features included: Menu, Chapter, Audio Stream, Subtitle, Fast Forward, Rewind, Slow,
Pause, Step Forward, Repeat, Search etc.).
TViX plays back high definition video (up to 1920x1080i) and still images. Pre-recorded
HDTV programs from a digital TV set-top box or personal digital video contents taken by a
camcorder can be played back with the TViX on a high definition display. The TViX
features a HDMI connector, which will match the high resolution of HD level video contents
Ultimate PVR with HD Digital Jukebox
HDMI provides unparalleled qualities to digital video and audio, while DVI only serves
digital video. You don’t have to mess around with several AV cables. It provides single,
pure and simple way to connect your display. It can deliver uncompressed digital video up
to 1080i as well as digital audio.
TViX supports DTS hardware decoder to mix DTS sound into 2 channels for a more
dynamic sound quality.
The TViX can be networked with a PC system using its optional wireless network. You are
able to navigate to a PC file through TViX’s wireless network and play the file from its
original destination without having to copy it into the TViX first. FTP is supporting the file
copy via LAN.
With two USB2.0 host ports, you can now attach additional external USB hard drives to
further extend the storage capacity. You can also playback files from a digital camera, USB
flash driver, USB flash card reader or a MP3 player.
Manufactured under license from Dolby Laboratories.
"Dolby" and the double-D symbol are trademarks of Dolby Laboratories.
5
Page 6
Ultimate PVR with HD Digital Jukebox
2 Name of Each Part
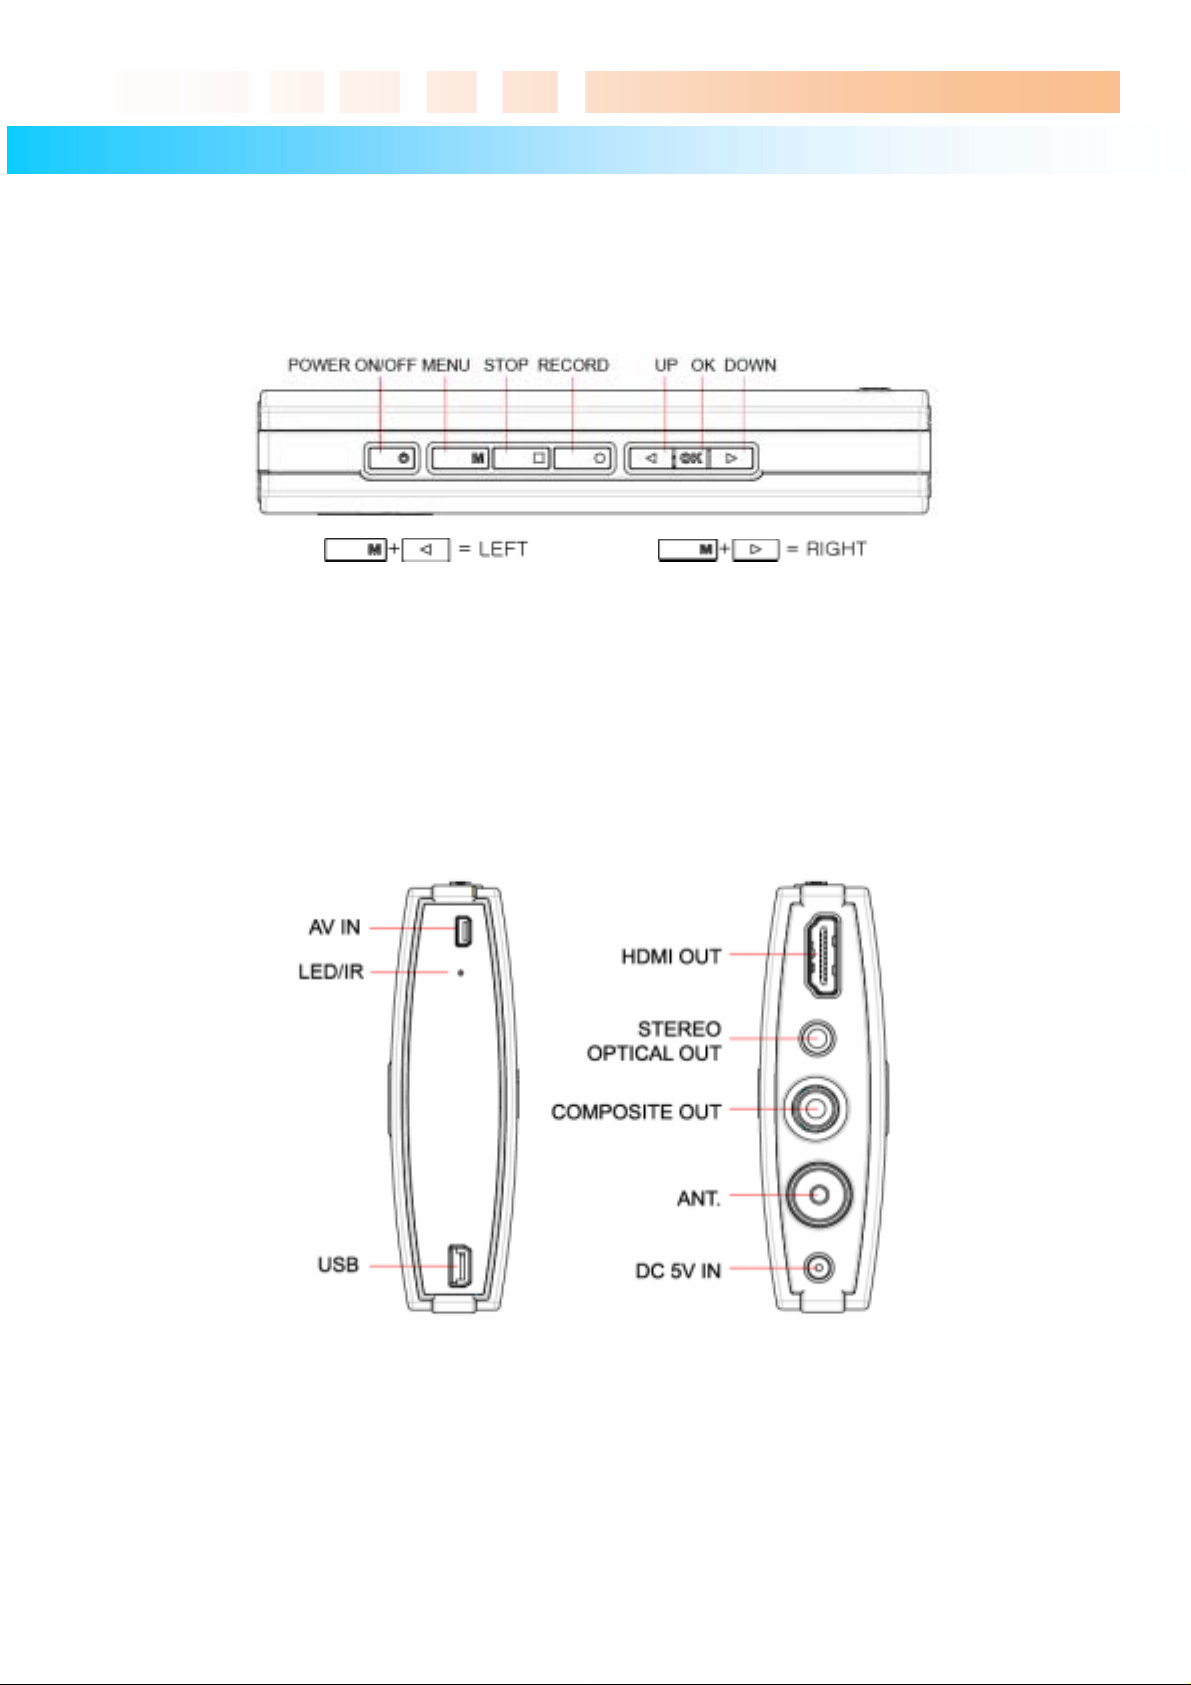
2.1 Unit Control button
The TViX was designed to be controlled by its buttons as well as with the remote controller.
2.2 Cable Connection
You can connect the TViX to an analog TV display or audio amplifier by the A/V cable.
With USB Host jack, you can connect an external hard disk or a memory stick.
Please use DC 5V adaptor included. If you use any other products, the TViX can be damaged.
◈ TViX PVR R-2200 – Analog TV tun er + A/V IN
◈ TViX PVR R-2210 – NTSC Analog TV & ATSC Digital TV + A/V IN
◈ TViX PVR R-2230 – DVB-T Digital TV + A/V IN
6
Page 7
Ultimate PVR with HD Digital Jukebox
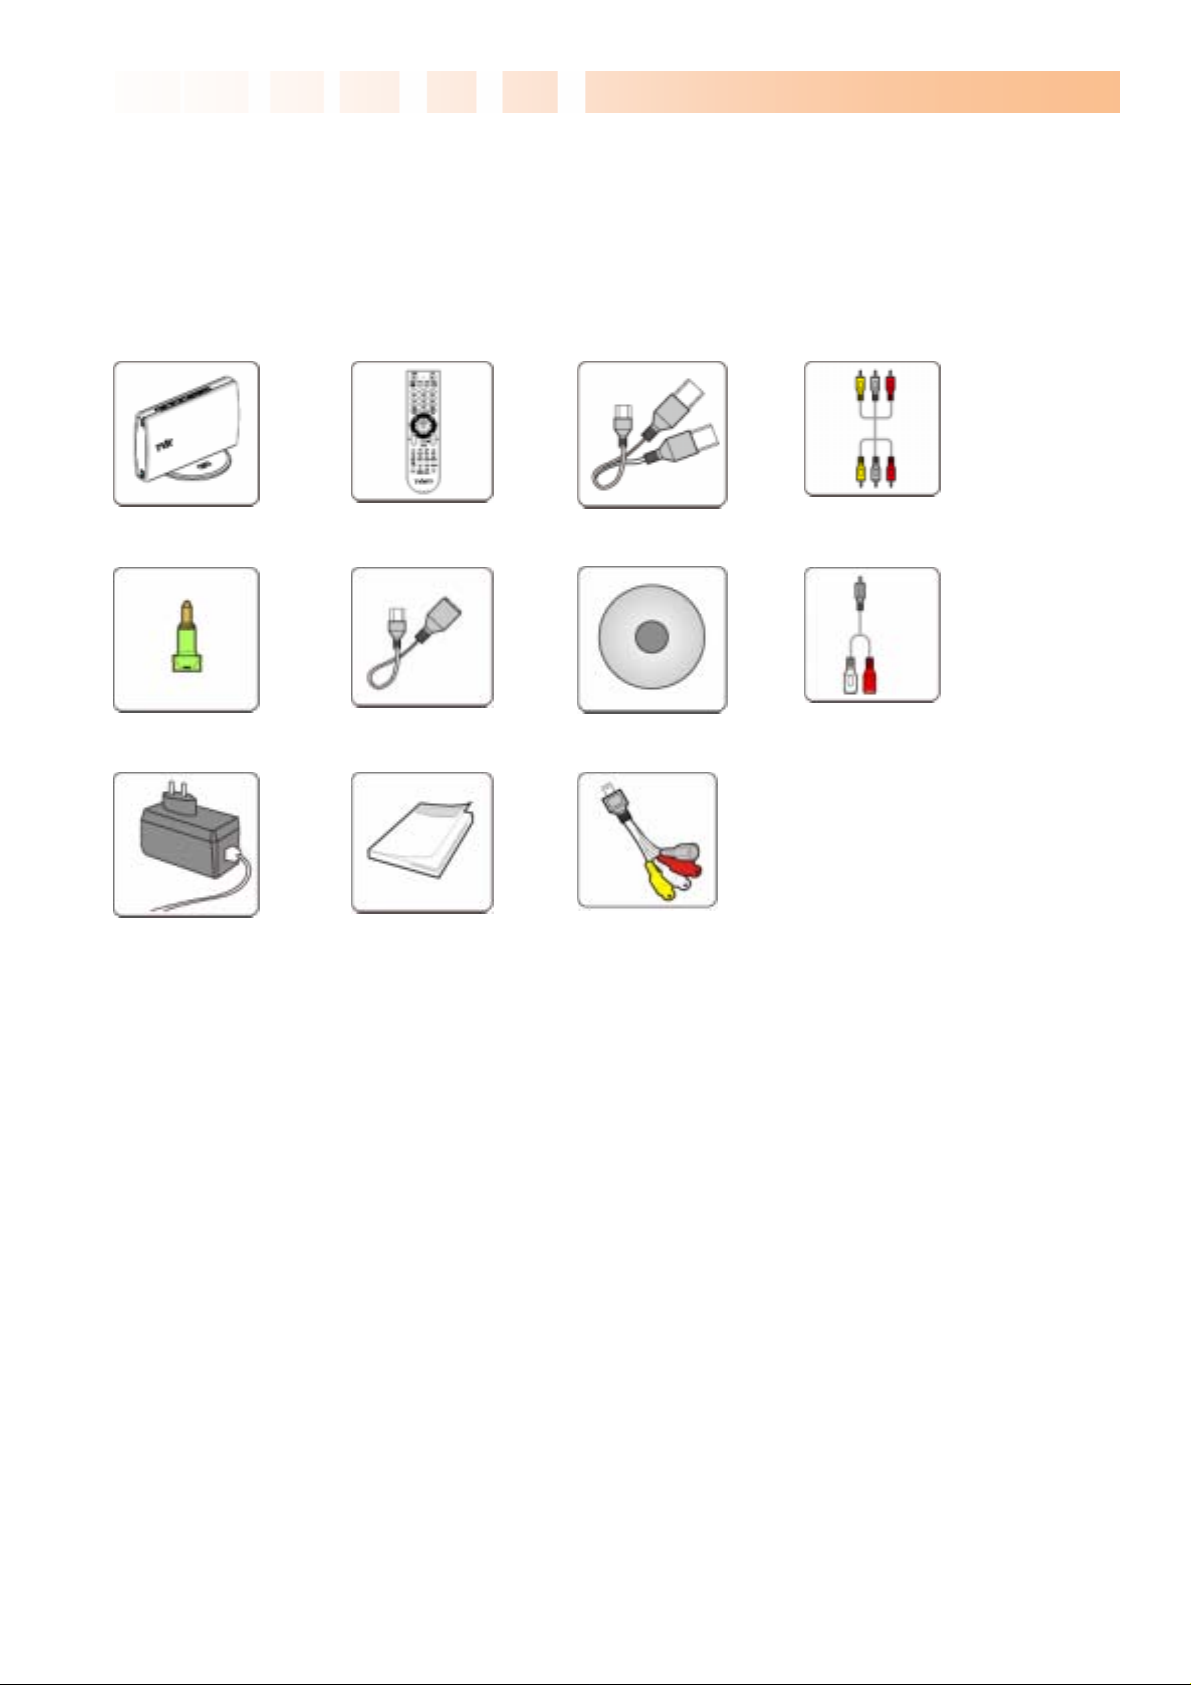
2.3 Package Contents
Thank you for choosing this TViX product.
The TViX PVR package contains the following items. The items described below may differ from the actual
contents.
TViX unit Remote Controller USB -Y Cable RCA Cable
Optical Jack USB HOST Cable Manual CD
Power Adaptor Quick Guide A/V IN Cable
** For detailed instructions, please refer to the TViX CD enclosed or the latest pdf file on the TViX
Homepage (www.tvix.co.kr).
Strereo Cable
* TViX automatically formats when you install an unformatted new hard disk. Do not shut the power down
when formatting the hard disk.
7
Page 8
Ultimate PVR with HD Digital Jukebox
2.4 HDD Installation/Exchange
** Installing or exchanging your HDD is very easy. Just follow up the instructions below. If you already
installed an HDD, you may skip this chapter.
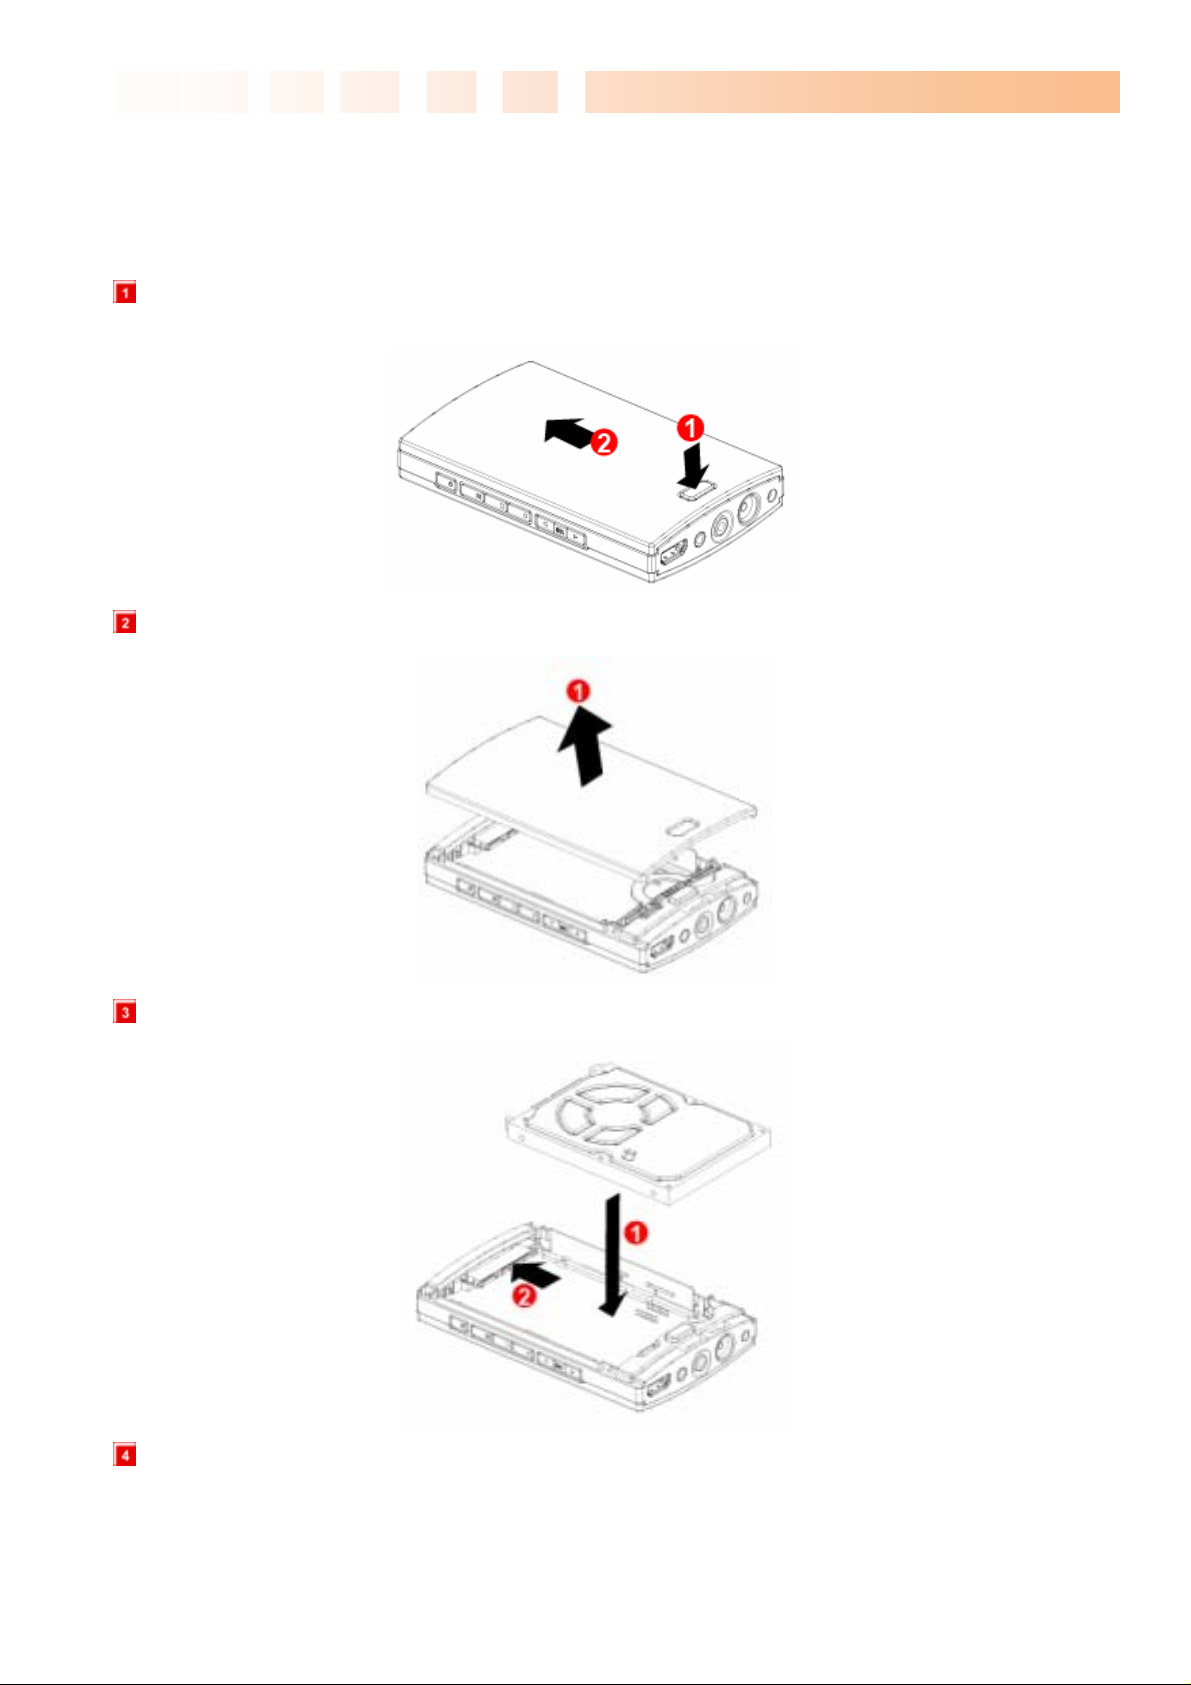
Press HDD lock button towards the direction of the ① arrow and then slide the casing cover towards the
direction of the ② arrow. Do not need any Screwdriver to install or exchange an HDD.
Open the TViX cover towards the direction of the ① arrow.
Put an HDD and push the HDD into the connector in the direction of the ② arrow.
Connect the hard disk guide between the HDD and unit like the picture below.
8
Page 9
Ultimate PVR with HD Digital Jukebox
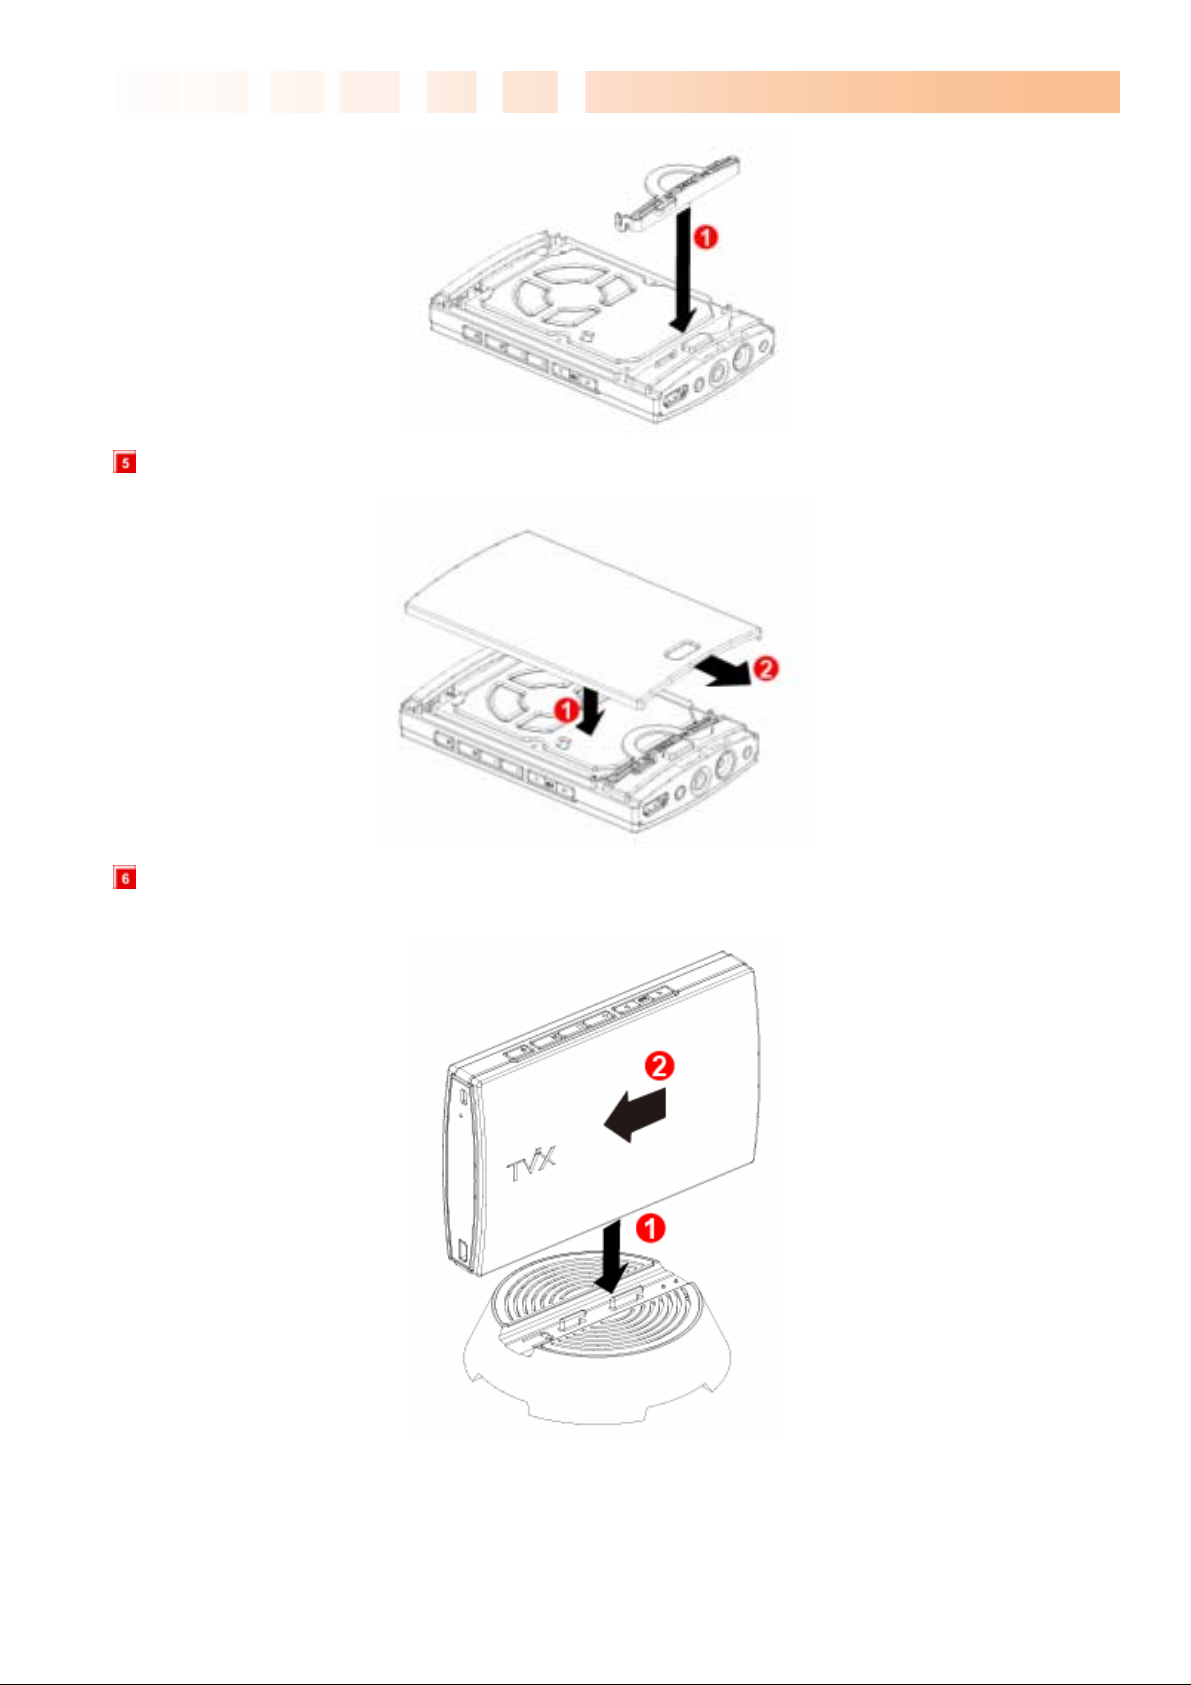
Put TViX cover back and push it to the direction of the ② arrow until you can hear ‘click’ sound.
After installing the hard disk, place the TViX unit on the cradle of cooling FAN, and push the body to the
direction of the ② arrow. The LED of FAN would be on when the unit works well.
9
Page 10
Ultimate PVR with HD Digital Jukebox
3 Installation and Connection
3.1 Connecting the Video
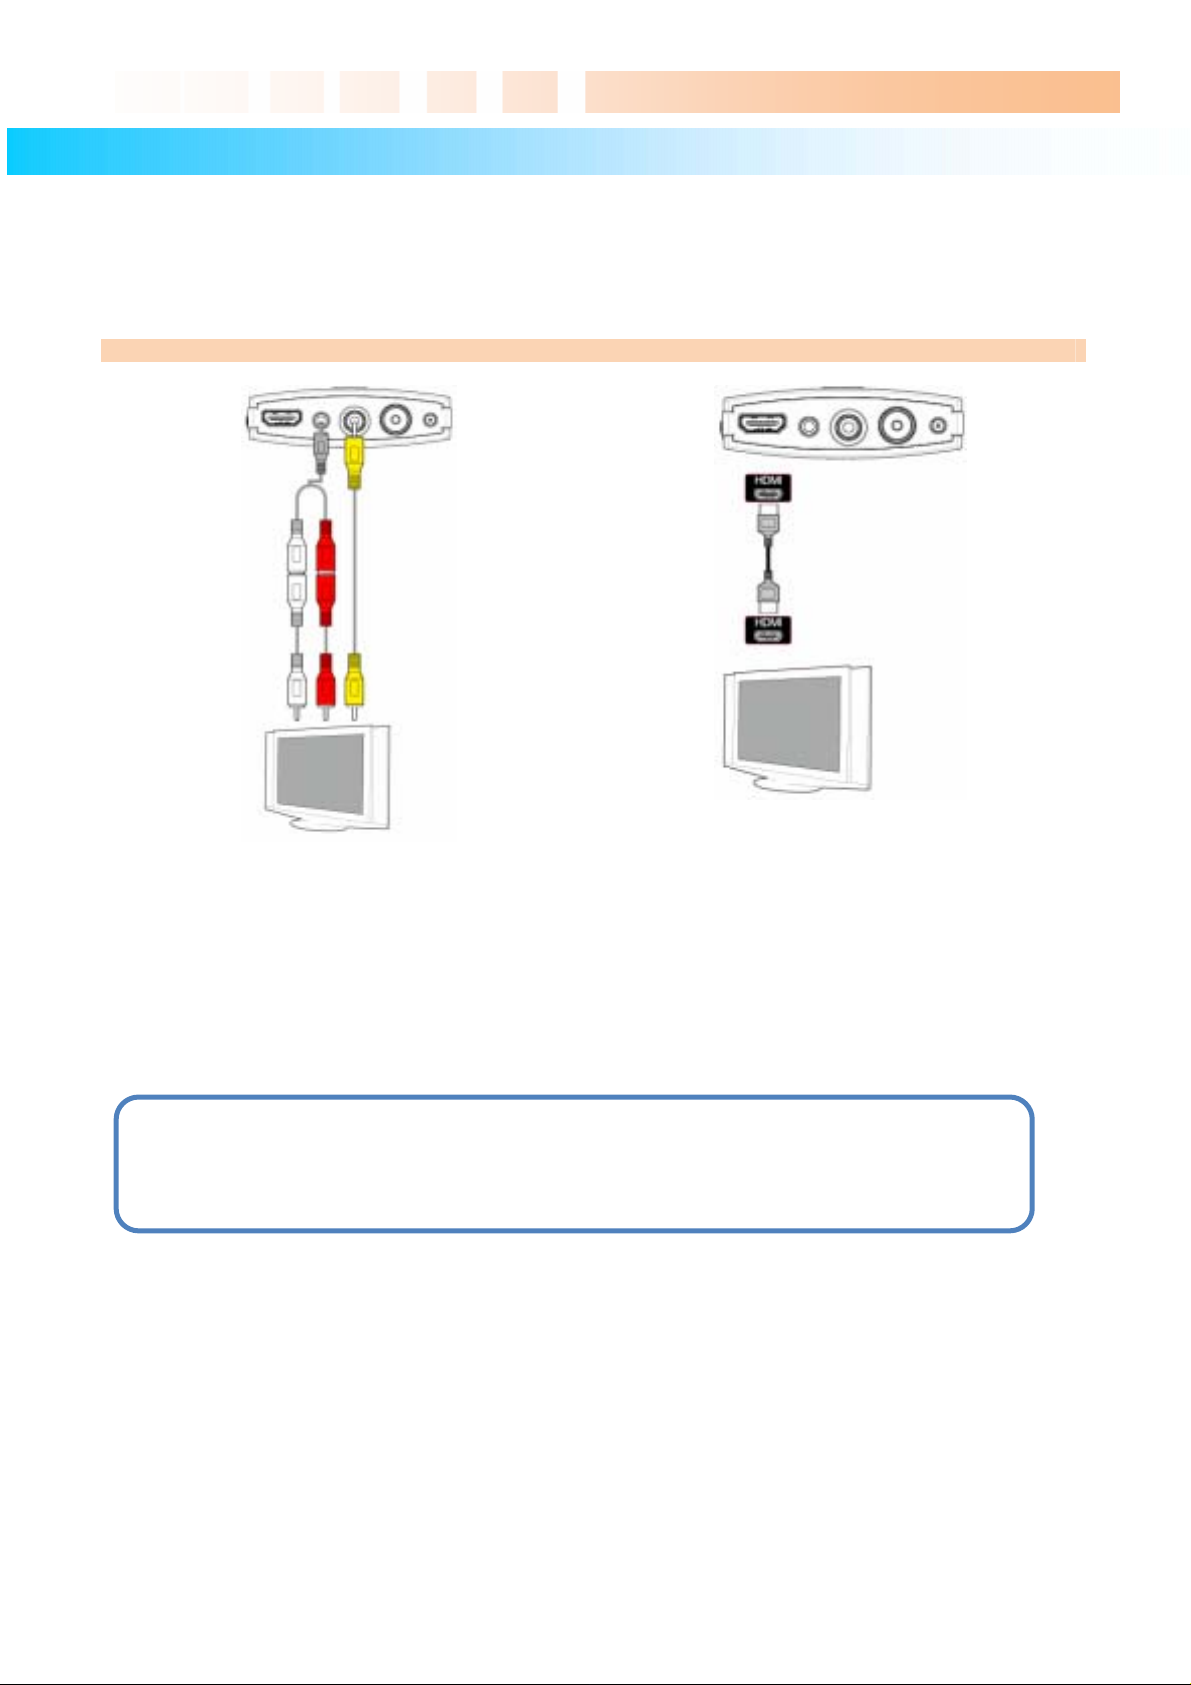
The TViX supports HDMI and Composite video output for connecting to a TV and each output needs to be
selected in the settings menu depending on the cable used.
Connection to Composite Connection to HDMI Output
Connect the TViX output to your TV using the
included Composite (yellow) video cable.
Select an appropriate video input mode on your TV
until you get the main page of the TViX
For the Audio, please connect the stereo cable
(red/White cable).
Connect the TViX output to your TV using a HDMI
cable.
TViX plays back high definition video (up to
1920x1080i) by using HDMI cables.
HDMI cable can transmit uncompressed audio and
video signals together. No additional cables are
necessary.
CAUTION:
After you connect the video cable to your TV, press the TV Out button repeatedly on your remote
controller until you see the main page of the TViX..
10
Page 11
Ultimate PVR with HD Digital Jukebox
3.2 Connecting the Audio
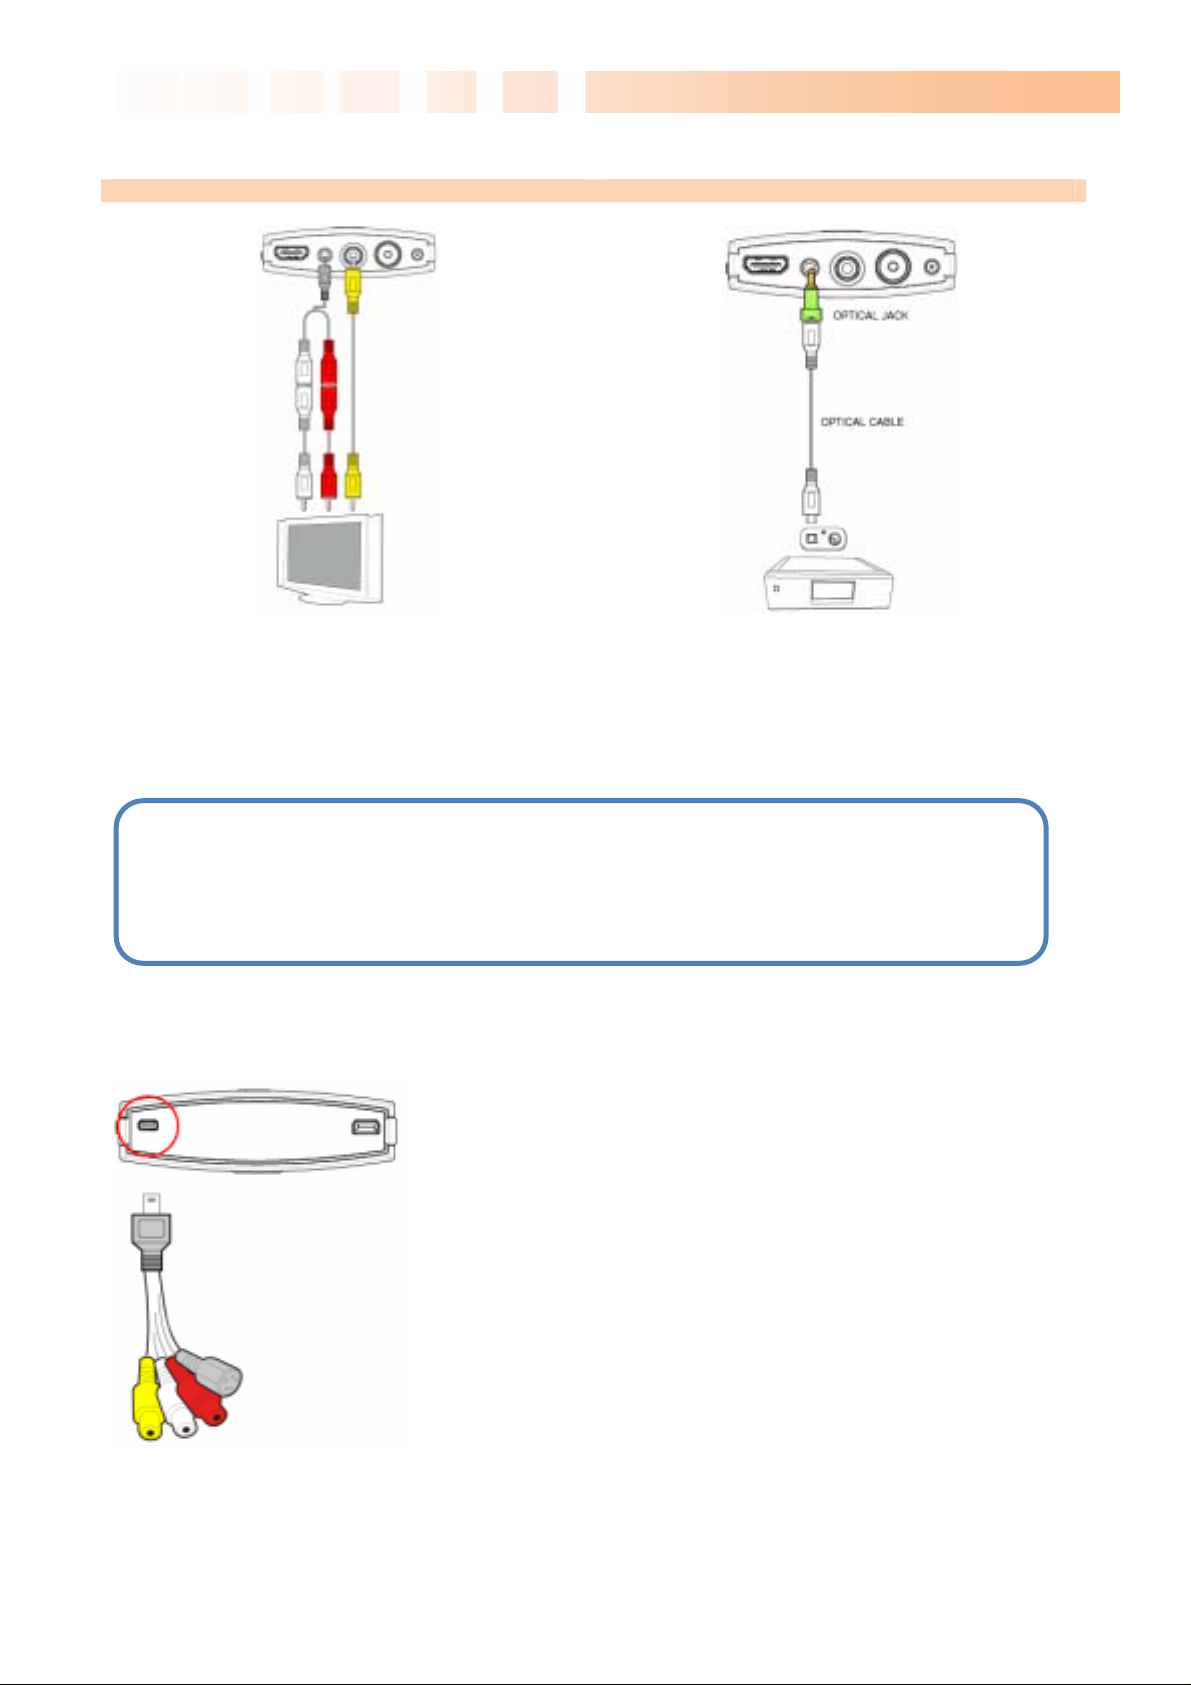
Connection to 2 CH Normal TV Connection to 5.1CH Amplifier (Digital)
Connect the two audio cables, the left (white) and
right (red), to the appropriate terminal of your TV or
Hi - Fi system for sound output.
If you have a multi-channel decoder/amplifier with an
optical input, you can enjoy 5.1 CH high-quality
sound through the optical cables.
The illustration above shows how to connect the
optical cable with included optical jack.
(These cables are not included in the package and
must be purchased separately.)
NOTE
If there is no sound after connecting the coaxial/Optical Cable, you have to change the audio setup
of TViX to Digital on the SETUP menu.
3.3 Connecting the External Input
The TViX provides a composite or S-VHS A/V input.
The TViX R2200 series also functions as a personal video
recorder or archiving machine, allowing you to capture
analog video and store it as a digital format. It can capture or
time-shift the external analog video as well as analog TV
signal, and then record it in superb high-quality digital format.
Connect the output of the external device to the dongle cables
included. Then connect this dongle cable to the TViX A/V IN
port. Do not connect this cable by force or you can damage
the TViX unit.
You should configure the external device’s A/V output to
NTSC(480i)/PAL(576i) and analog sound.
11
Page 12
Ultimate PVR with HD Digital Jukebox
3.4 Connecting the USB HOST
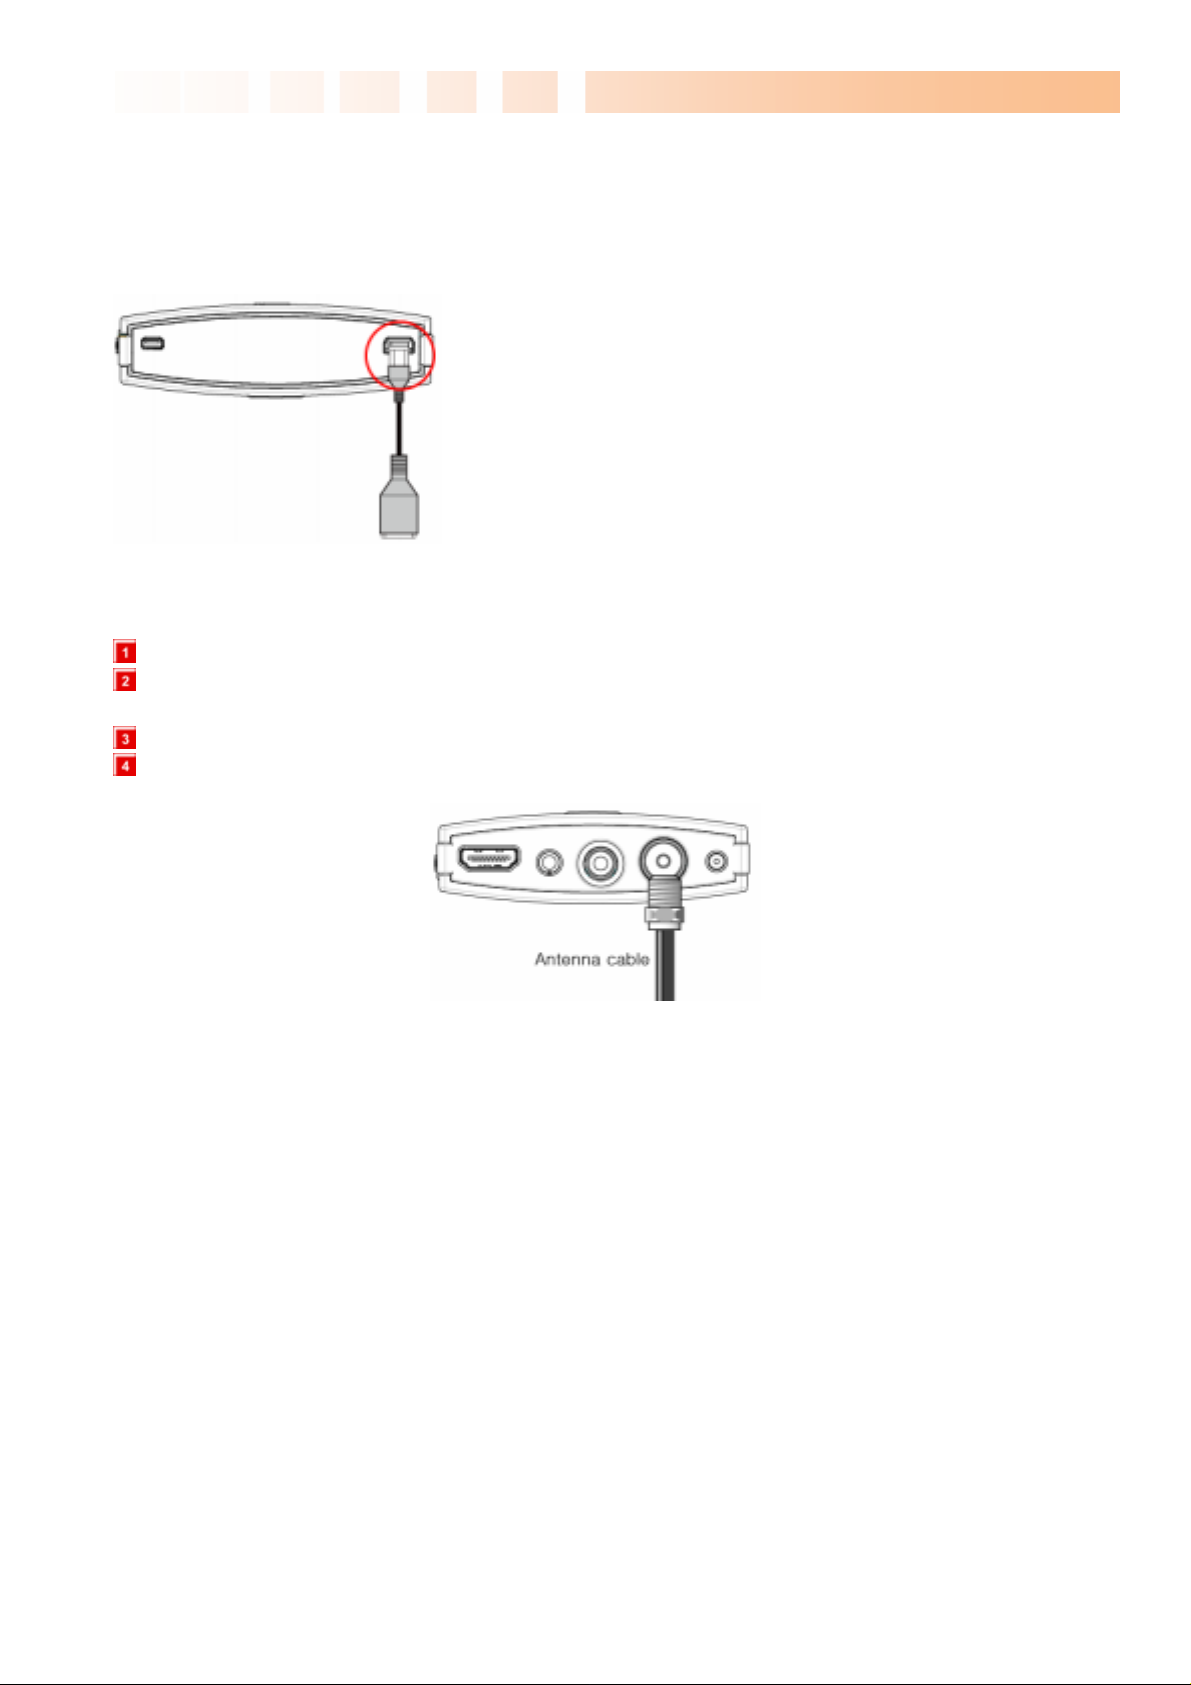
The TViX also provides a USB-host port with the USB host jack included, USB 2.0 compliant host/ function
processor.
USB-host allows communication between two USB devices.
You can connect any external storage device (e.g. memory
stick) or an external hard disk and play files stored on these
external devices. You can even connect your Digital Camera
directly to play digital images and pictures without any other
devices.
After connecting the client device, press the left-arrow button
on your remote controller and then navigate to the desired
storage unit. You can thereby change the location from
internal hard disk to external USB device and back.
3.5 Connecting the Antenna
Before connecting the Antenna, the power of TViX should be turned off.
To improve the picture quality in a poor signal area, please purchase a signal amplifier and install
properly.
We recommend using a threaded-type antenna connector. Move clockwise to tighten.
If signal strength meter indicates less than the middle of the scale, adjust your antenna to increase the
signal strength. Continue to adjust the antenna until you find the best position with the strongest signal.
◈ TViX PVR R-2200 – Analog TV only + A/V IN
◈ TViX PVR R-2210 – NTSC Analog TV & ATSC Digital TV + A/V IN.
◈ TViX PVR R-2230 – DVB-T Digital TV only+ A/V IN
Connect the included power adapter to the jack labeled DC-IN on the back of the TViX. Then plug the other
end of the power adapter into an available wall socket. Make sure that your TV is switched to the AV input to
which the TViX is connected (on the ba ck of the TV).
12
Page 13
Ultimate PVR with HD Digital Jukebox
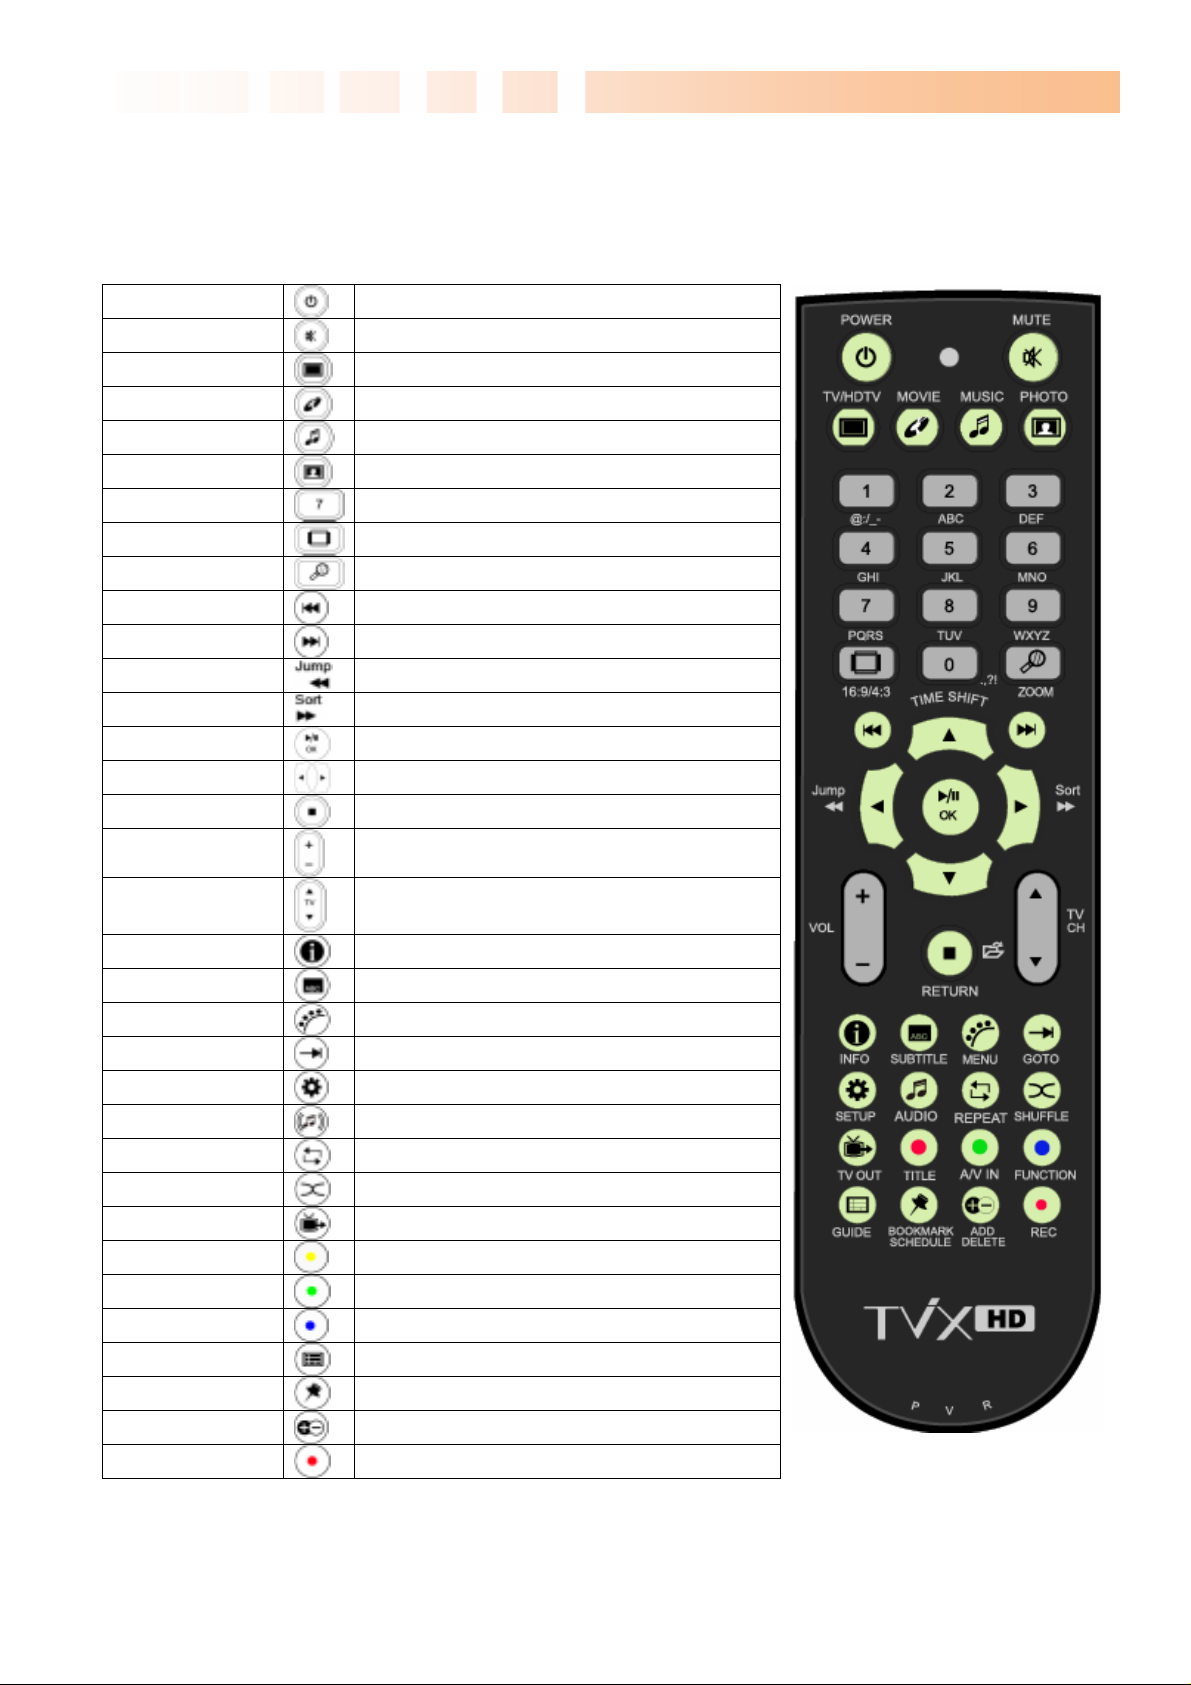
3.6 Using the remote control
This indicates Remote Buttons.
POWER Toggle Unit Power on / off
MUTE Stop Audio Output from the Player
TV/HDTV Switch between TV or DTV mode
MOVIE Go to Movie folder
MUSIC Go to Music folder
PHOTO Go to Photo folder
Numeric Key
16:9/4:3
ZOOM Zoom Video / Image Playback
PREV Previous Chapter / File / Page Up on List
Next Next Chapter / File / Page Down on List
JUMP/REW
SORT/FF
OK/TIMESHIFTING Selection/play/pause/time-shifting on/off
ARROW Cursor Navigation Arrow/Rewind / FF playback
RETURN Stop Playback/Return to Previous Screen / Folder
Insert number or text
Aspect ratio(16:9/4:3 letter box/4:3 Pan&Scan)
Jump to USB Host or network drive
File Sort or FF playback
VOL + / - Volume (Increase / Decrease)
CH + / - Switch TV channel/adjust subtitle sync
INFO Display Media File Information
SUBTITLE Subtitle ON / OFF, Change Settings
MENU Display Main Menu Screen/ DVD Title Screen
GOTO Time-Stamp based Search/TV chann el list
SETUP Enter Setup Menu, Apply/Confirm Setup Settings
AUDIO Select multi audio
REPEAT Repeat Media file(s) Playback
SHUFFLE
TV OUT Toggle Video Output Modes
TITLE Select subtitle file
A/V IN Switch between AV-in(Composite / S-VHS)
FUNCTION File copy/ folder password/ Sleep Timer
GUIDE Display DTV EPG Guide
BOOKMARK/SCH Bookmark / manual recording in TV mode
ADD/DELETE Add/Remove the recording list/ delete file
REC Instant recording in TV or AV-in
Switch between Random – Sequential Playback
Some buttons have different functions in PVR mode and file play mode.
13
Page 14
Ultimate PVR with HD Digital Jukebox
4 TViX Setup Menu
4.1 SYSTEM Setting
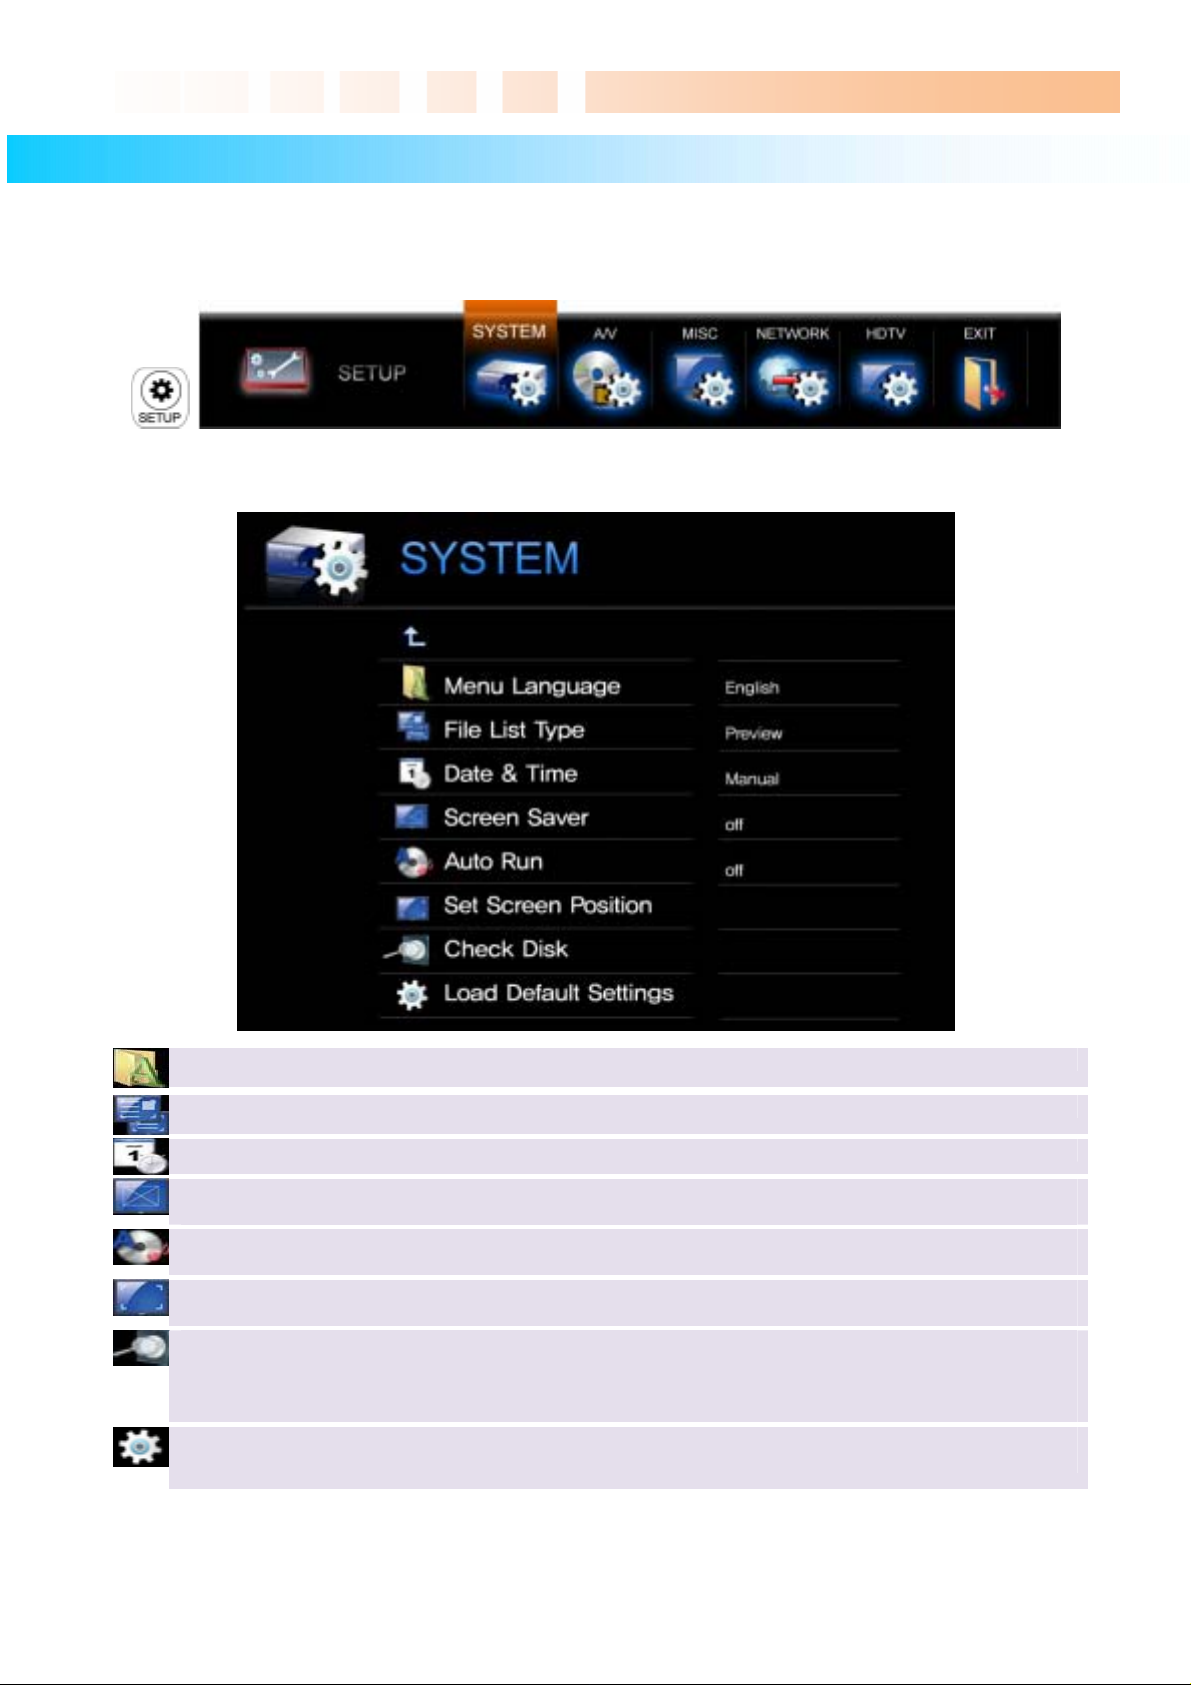
This section indicates the SYSTEM (Language or Time) settings. Press SETUP button on the remote
controller and select SYSTEM.
This screen allows you to adjust the SYSTEM settings of your TViX to your personal taste. Select ‘Up Folder’
menu to exit this SETUP.
Menu Language : Select your language preference from the options.
File List Type : Switch between File list mode and Preview.
Date/Time : Adjust the clock by using the arrow and numeric keys.
Screen Saver : If there is no activity the screen saver will start after a certain time. You can change
the Screen Saver time on this menu
Auto Run : You can play the files automatically when loading the TViX. If you select “random”, it
plays randomly.
Set Screen Position : Adjust the UI display position, so you can see exact main UI display on your
TV.
Check Disk : TViX provides the HDD check utility. If you have some problem with recording or file
playback, we recommend run this utility in advance.
TViX automatically formats when you connect an unformatted hard disk internally. Do not shut the
power down when formatting the hard disk.
Load Default Setting : In order to revert to the Default setting, Press this option. You will need to
configure the video and sound settings again.
4.2 Audio/Video Setting
14
Page 15
Ultimate PVR with HD Digital Jukebox
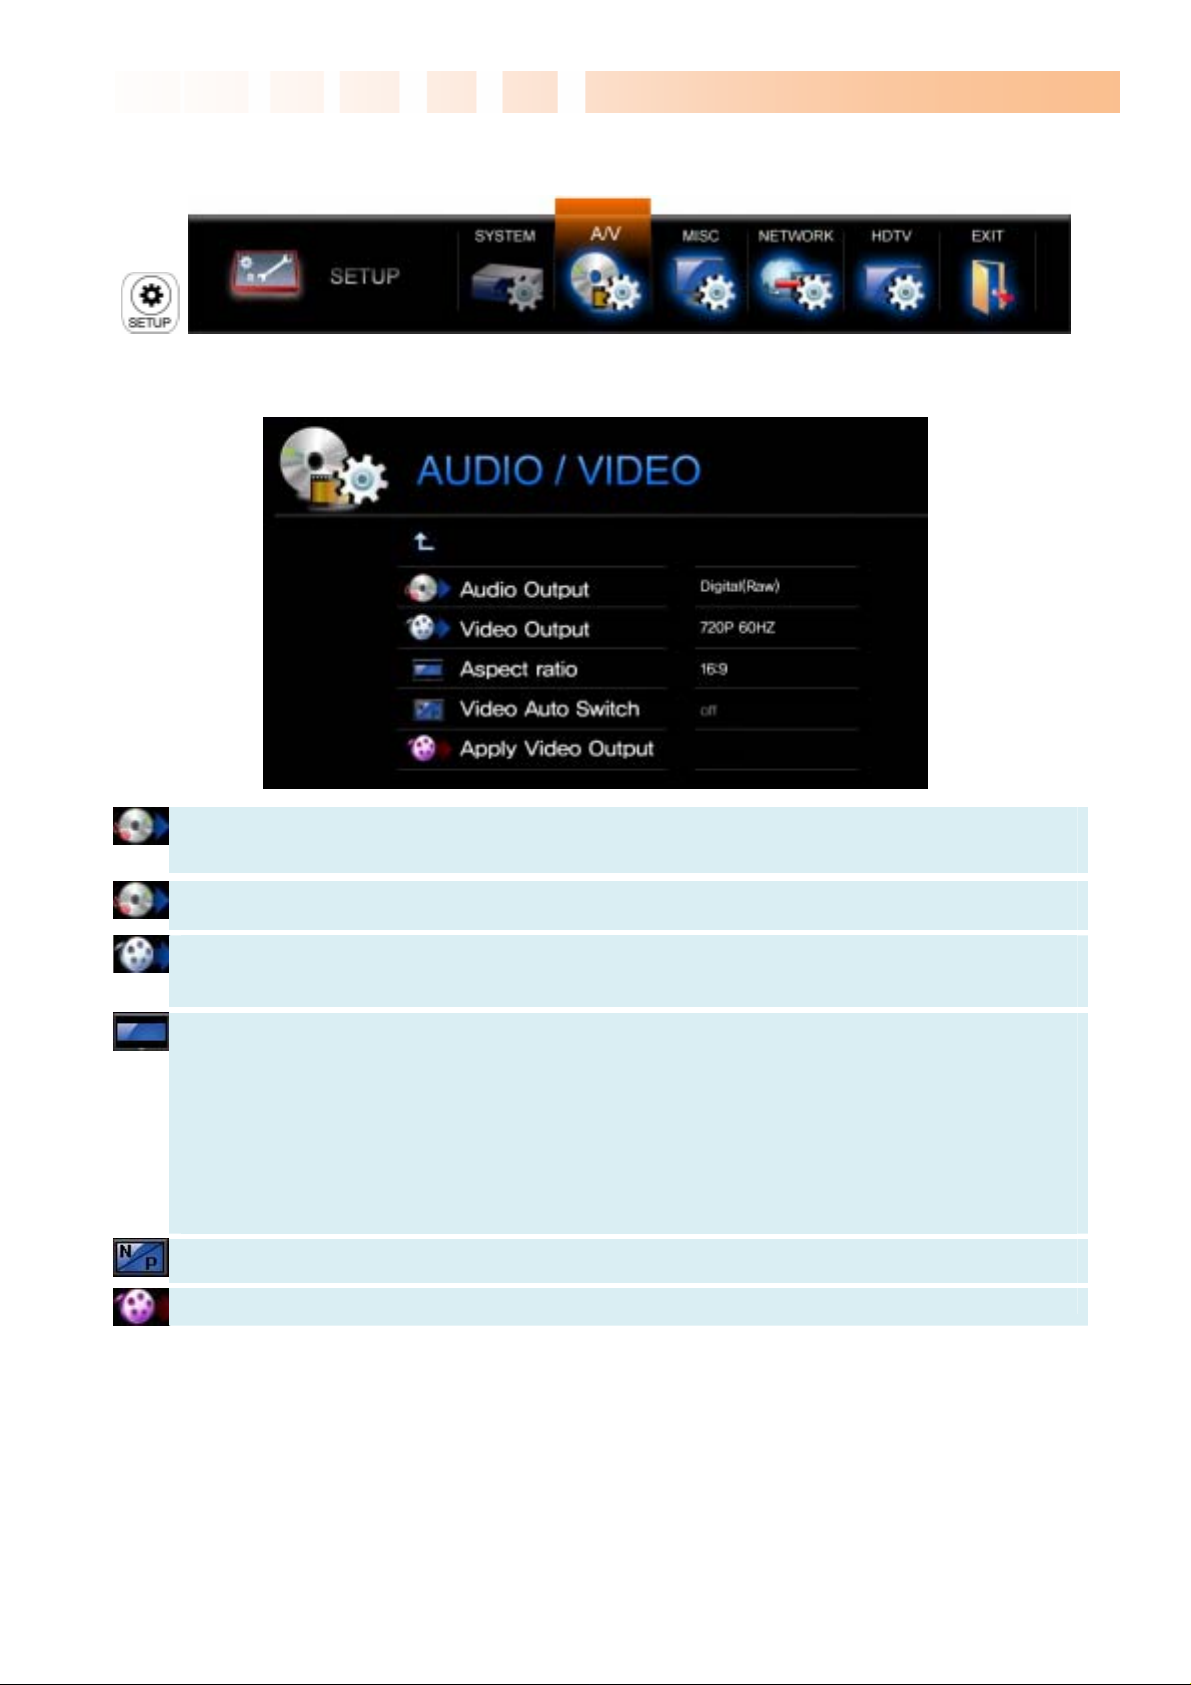
This section indicates the A/V (Video or Audio) settings. Press SETUP button on the remote controller and
select the A/V.
This screen allows you to adjust the A/V settings of your TViX to your personal taste. Select ‘Up Folder’
menu to exit this SETUP.
Analog Audio output : Select this when you connect the audio with a stereo RCA cable (the Red and
White cable)
Digital Audio output: Select this when you connect the audio with an optical cable for digital audio
connection to the Decoder/Amplifier .
Video Output : Select this when you connect the video through a composite or HDMI cable. With
HDMI setting, you can select the output resolution among 720p 50hz/60hz, 1080i 50hz/60hz. Setting
it to 1080i will work on all HD grade TVs.
Video Aspect Ratio : 4:3 Letter Box / 4:3 Pan & Scan for ord inar y TVs / 16:9 for Wide TVs like HDTV
or Plasma TV.
If the ratio of the TV is 4:3, select the 4:3 letter box or 4:3 Pan & Scan. If the ratio is 16:9, select 16:9.
* The 4:3 Letter box can show the original ratio of the multimedia file in 16:9.
* The 4:3 Pan & Scan will adjust the image of the 16:9 multimedia file to the 4:3 of the TV screen by
scaling the image. (Currently, not support this mode)
* 16:9 can adjust any ratio of the multimedia file to the TV screen with the original image.
Video Auto Switch : is used when the video out is changed according to the NTSC or PAL format.
Apply Video Output : press ‘Apply Video output’ to save current Video output mode.
15
Page 16
Ultimate PVR with HD Digital Jukebox
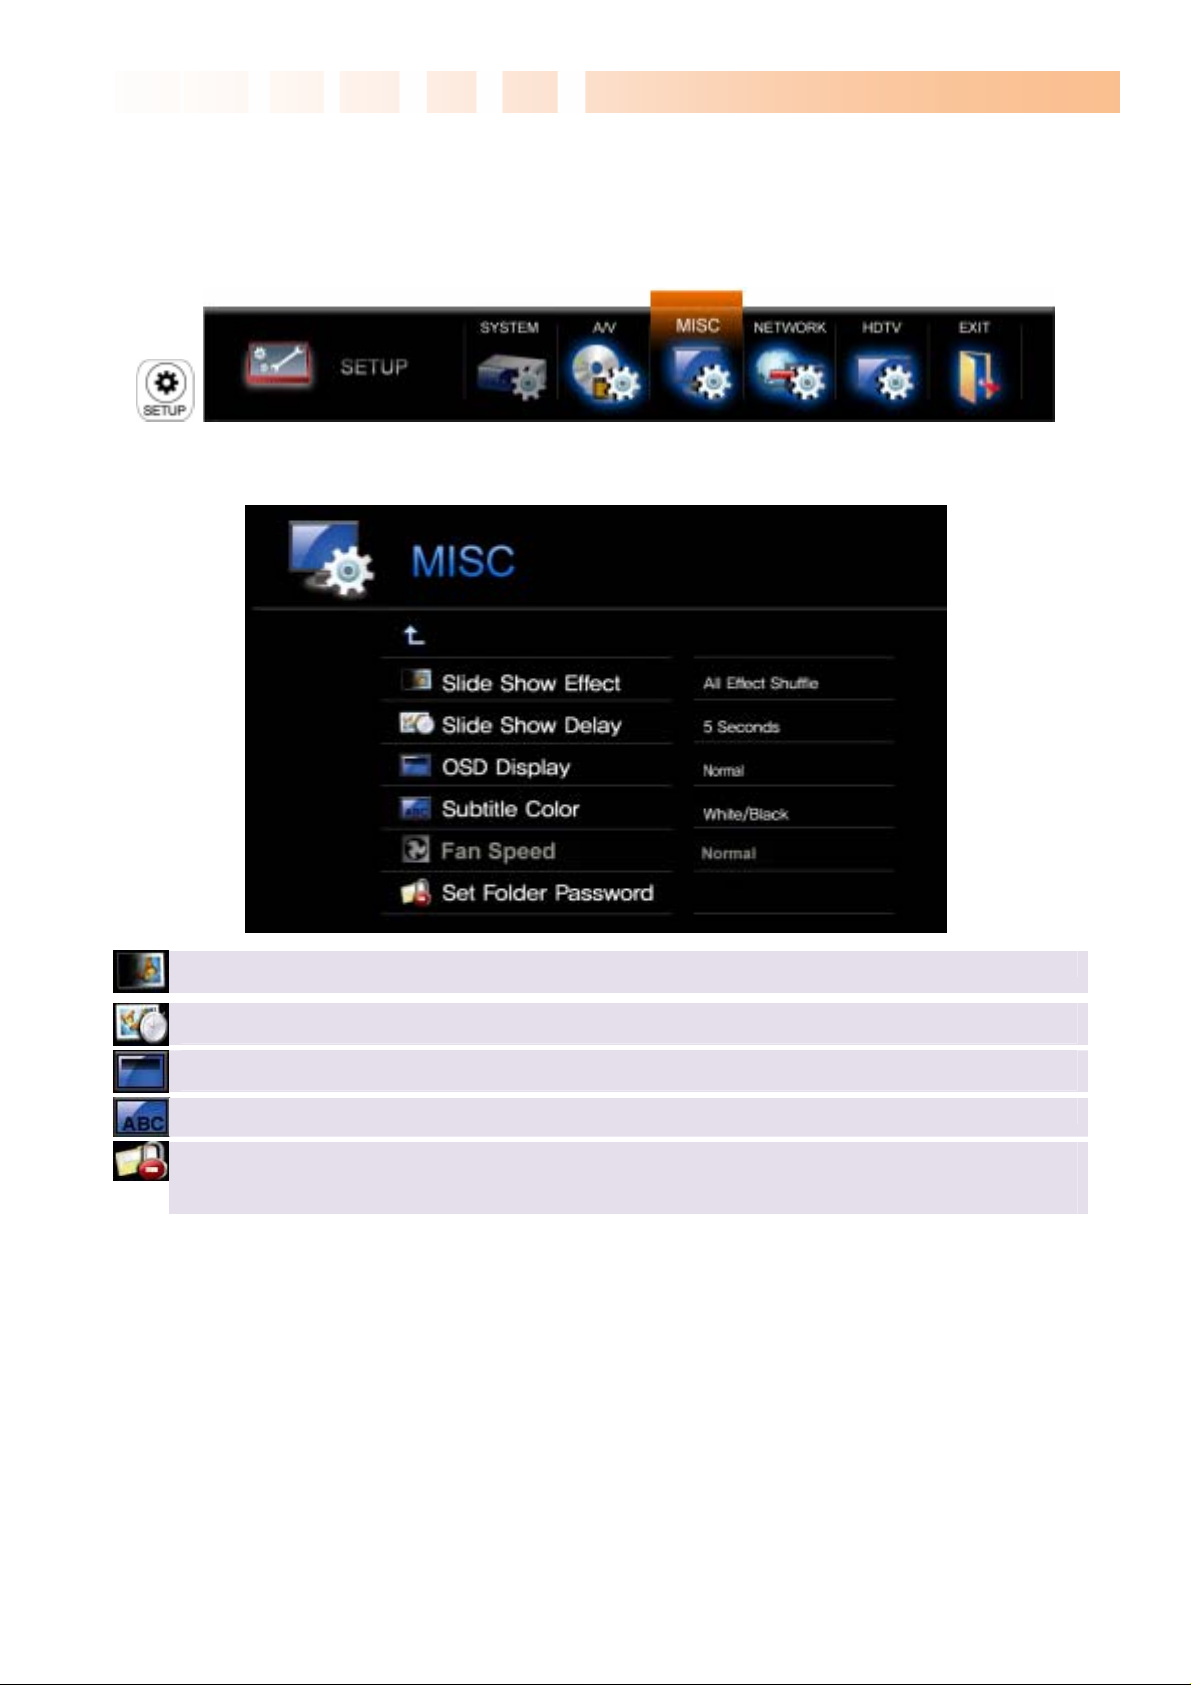
4.3 MISC Setting
This section indicates the MISC (Photo effect or Subtitle) settings. Press the SETUP button on the remote
controller and select MISC.
This screen allows you to adjust the MISC settings of your TViX to your personal taste. Select ‘Up Folder’
menu to exit this SETUP.
Slide Show Effect : is used when playing background music while watching picture sli deshows.
Slide Show Delay: Set the slide show time interval.
OSD Display : Select the type of OSD display. We recommend the Normal mode.
Subtitle Color : Change the color of the subtitle an d its outline.
Set Folder Password : In order to password-protect folders, you will first need to setup Admin
Password. Default Admin Password: 0000 (4-zeros). Perform the SETUP-SYSTEM-Load default
settings if Admin Password is lost.
16
Page 17
Ultimate PVR with HD Digital Jukebox
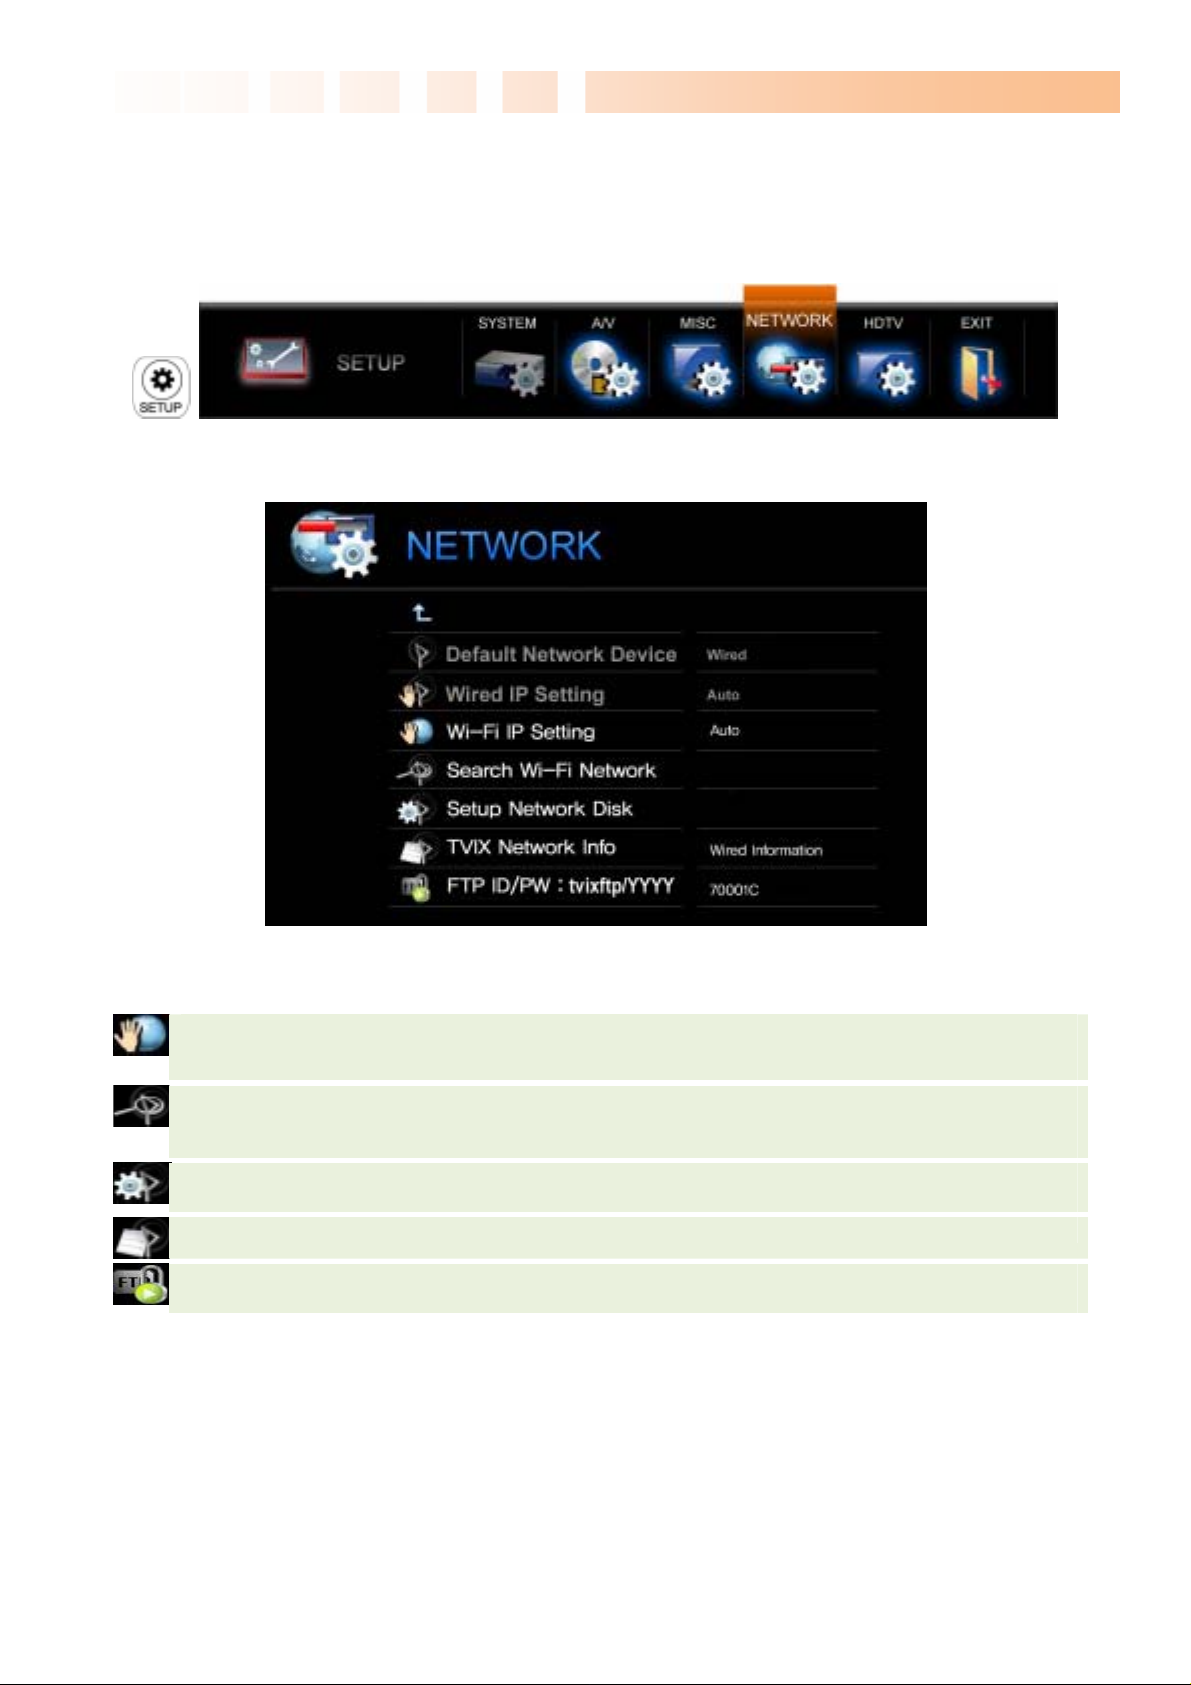
4.4 NETWORK Setting
This section indicates the NETWORK (Network or FTP) settings. Press the SETUP button on the remote
controller and select NETWORK.
This screen allows you to adjust the NETWORK settings of your TViX to your personal taste. Select ‘Up
Folder’ menu to exit this SETUP.
** For detailed Network instructions, please refer to the enclosed TViX CD or the latest pdf file on the
TViX Homepage (www.tvix.co.kr).
Wi-Fi Ip Setting : Default setting is DHCP. If you cannot access via LAN with DHCP setting, use the
Static IP setting.
Search Wi-Fi Network : Connect the USB module into enclosed cradle after connecting the AP
Router to a PC. Press “Search Wi-Fi Network” to search for your AP or AP router. After some interval
of searching, you can see the AP LIST popup menu. Select the AP that you want to connect to.
Setup Network Disk : Write the PC’s IP address in the Server IP. (ex: 192.168.001.128). Supports up
to 4 Network disk server.
TVIX Network Info : Y ou can see the information of TViX’s Network.
FTP ID/PW: to use FTP function, you must use the ID & password displayed on the Network Menu
within SETUP. The FTP ID is tvixftp.
17
Page 18
Ultimate PVR with HD Digital Jukebox
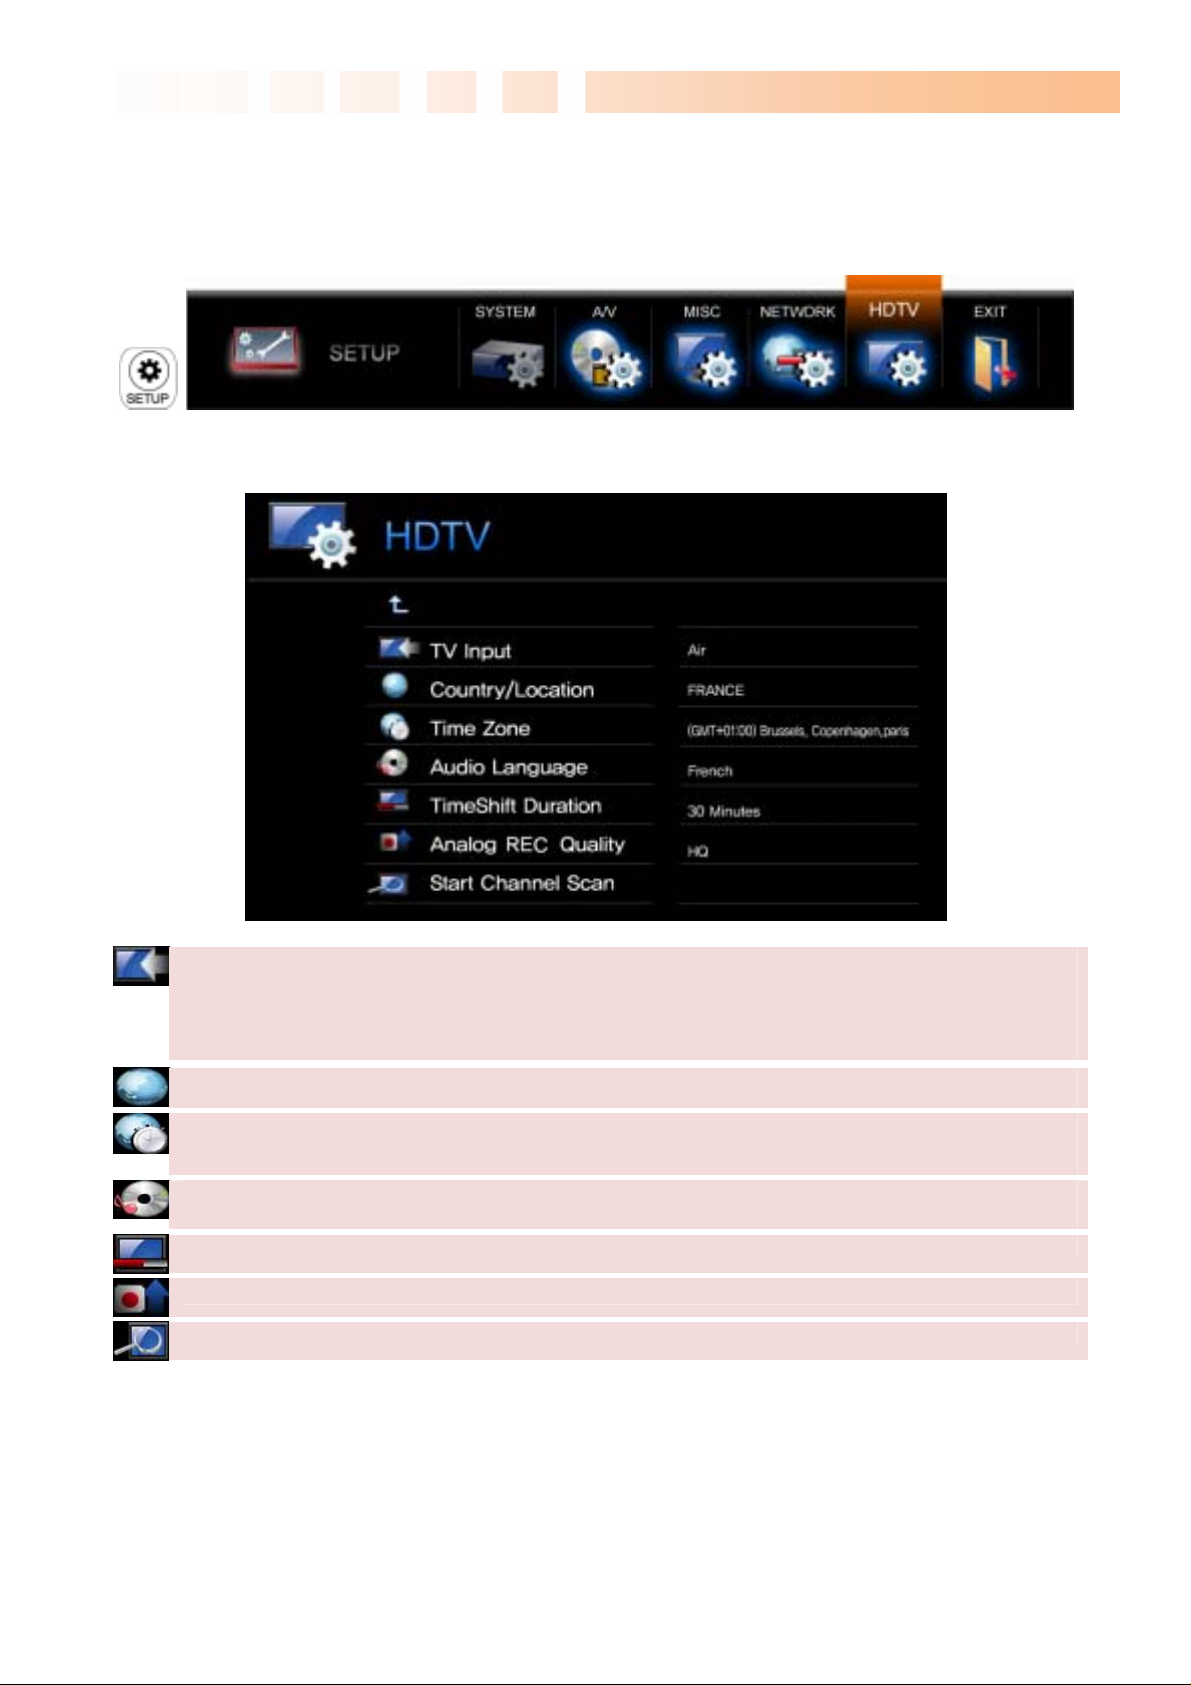
4.5 HDTV Setting
This section indicates the HDTV (TV or Time-shifting) settings. Press the SETUP button on the remote
controller and select HDTV.
This screen allows you to adjust the HDTV settings of your TViX to your personal taste. Select ‘Up Folder’
menu to exit this SETUP.
TV Input : Select your input. The TViX PVR R-2230 supports only DVB-T (Air 8VSB) signals.
TViX PVR R-2200 – Analog TV only (Air & Cable)
TViX PVR R-2210 – NTSC Analog TV & ATSC Digital TV (Air & Cable)
TViX PVR R-2230 – Free-to-Air DVB-T Digital TV (Air only)
Country/Location : Select your country or location.
Time Zone : to use the EPG guide with correct recording times, you have to configure your time
zone by using the arrow keys.
Audio Language : select default audio. To change the audio format, press the AUDIO button on the
remote.
TimeShift Duration : Set the maximum time-shifting interval.
Analog REC Quality : Set the analog recording quality.
Start Channel Scan : Press ‘Start Channel Scanning’ if you want to sca n the channel.
18
 Loading...