

Page 1

Fusion Remote User’s manual
1. Installing the Fusion Remote Software
2. Connecting the USB Receiver
3. Using Fusion Remote
All specifications and information are subject to changes without further notices
1
Page 2

1. Installing the Fusion Remote Software
Important: Installation on Windows 2000 Professional or Windows XP
Before you install Fusion remote software, be sure that you logged on as an account with
Administrator privileges.
1) Insert Fusion Remote Installation CD into the CD-ROM drive of the computer
2) Wait a few seconds and the installation program will start automatically. Click “Next” to start the
Remote transceiver installation.
3) The “Choose Destination Location” window will appear. Click on “Next” if you want to install the
Fusion Remote in the default directory. Otherwise, you can choose a different directory by clicking
on “Browse”
All specifications and information are subject to changes without further notices
2
Page 3

4) Click on the “OK” to restart and finish installation.
2. Connecting the USB Receiver
1) Connect the IR receiver module to the PC’s USB port.
2) After IR receiver and Fusion remote software is
installed, please reboot and start the configuration
by right clicking the Fusion Remote icon at the low
right bottom of the screen.
3) Please select the port that IR receiver module is attached and press the any button on the remote
transceiver. A Dialog box with the remote transceiver buttons will appear.
All specifications and information are subject to changes without further notices
3
Page 4

Tip Fusion Remote program will start automatically when the PC is booted. You can check the Fusion
Remote program availability at the Task Bar of Windows like the picture below.
Tip If connect Fusion Remote receiver, run Plug & Play. Right click the “My computer” icon Æ properties
Æ hardware Æ device manager to see receiver is properly installed
< Battery change>
- Use new batteries.( 2 AA size batteries are included in the package )
All specifications and information are subject to changes without further notices
4
Page 5
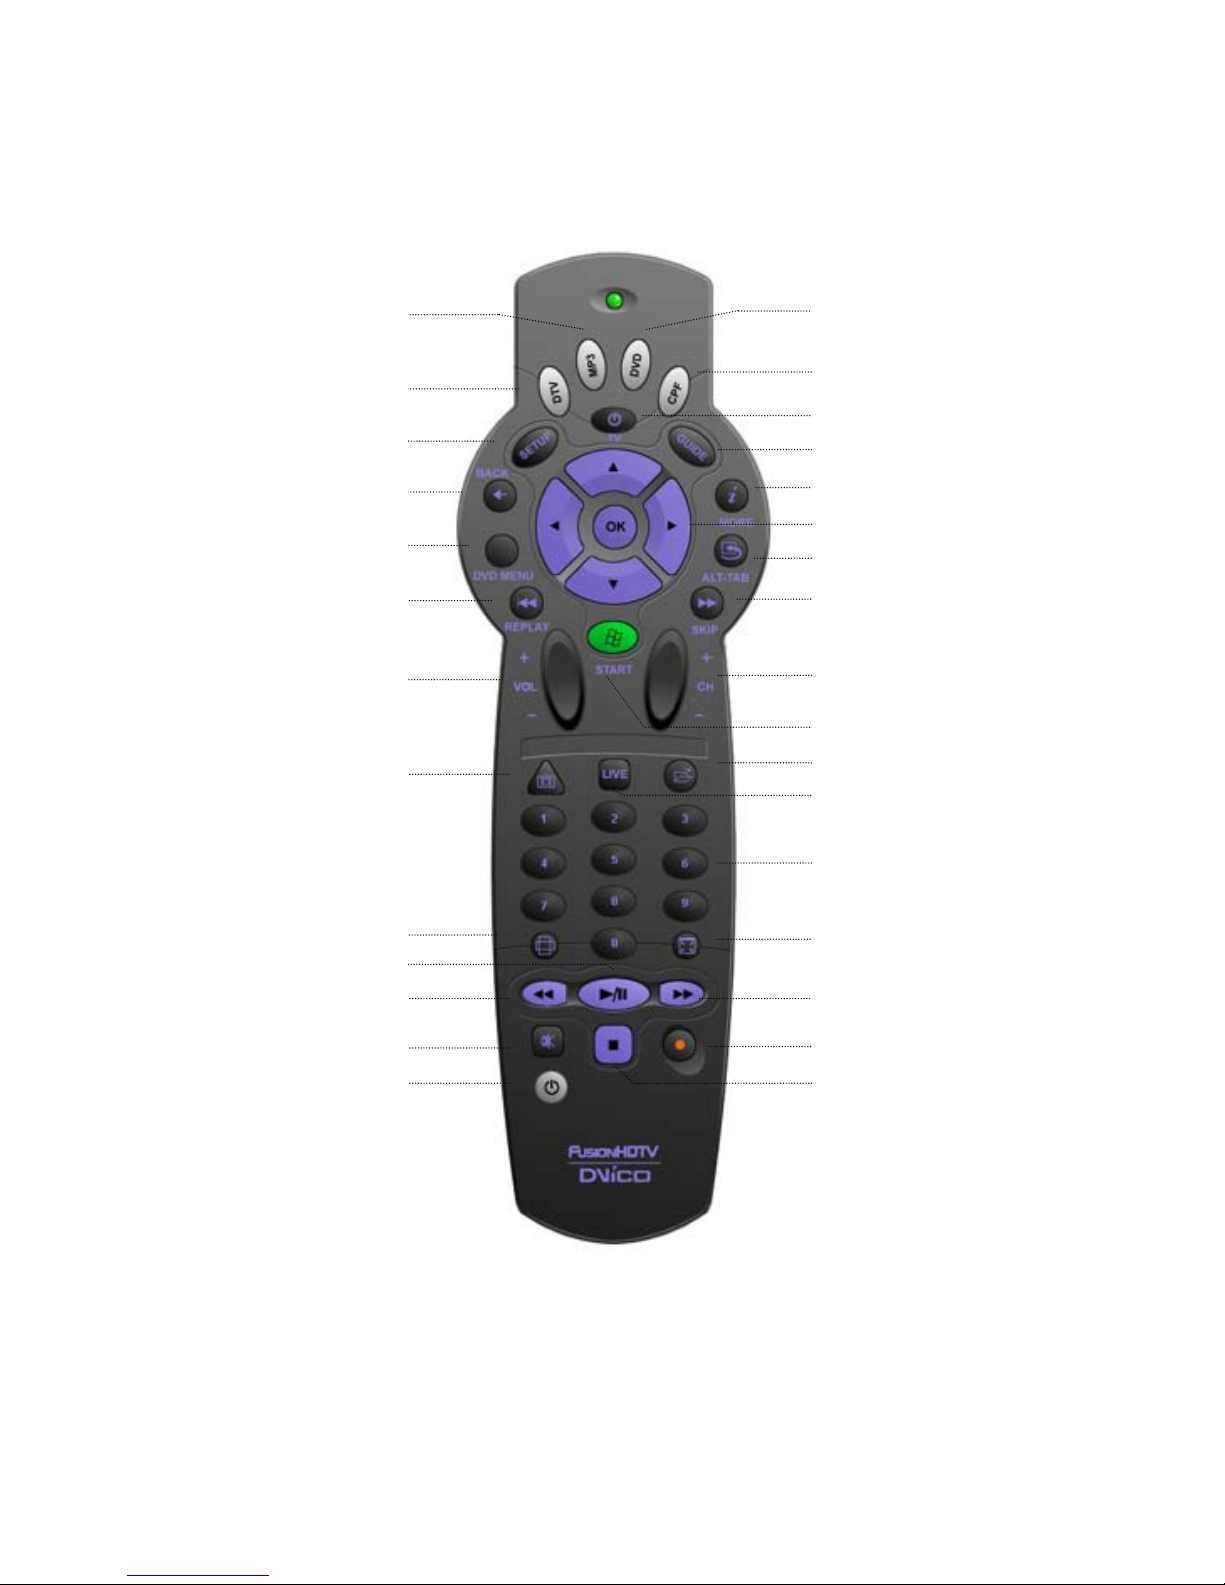
3. Using FusionRemote
This indicates Remote Buttons.
3.1 Using For FusionHDTV
WinAMP start
FusionHDTV start
Configuration
Before Channel
MCE DVD MENU
Instant replay
Vol um e Up /Do wn
Snapshot
PowerDVD start
User profile
Profile start
EPG
Input change
Direction/Enter
Alt-Tab
Instant forward
Channel Up/Down
MCE start/Exit
File Open
DTV/ATV or LiveTV
Numeric Key
Aspect ratio
PLAY/PAUSE
Rewind
MUTE
PC OFF
Display Size toggle
Fast Forward
Record
STOP
All specifications and information are subject to changes without further notices
5
Page 6
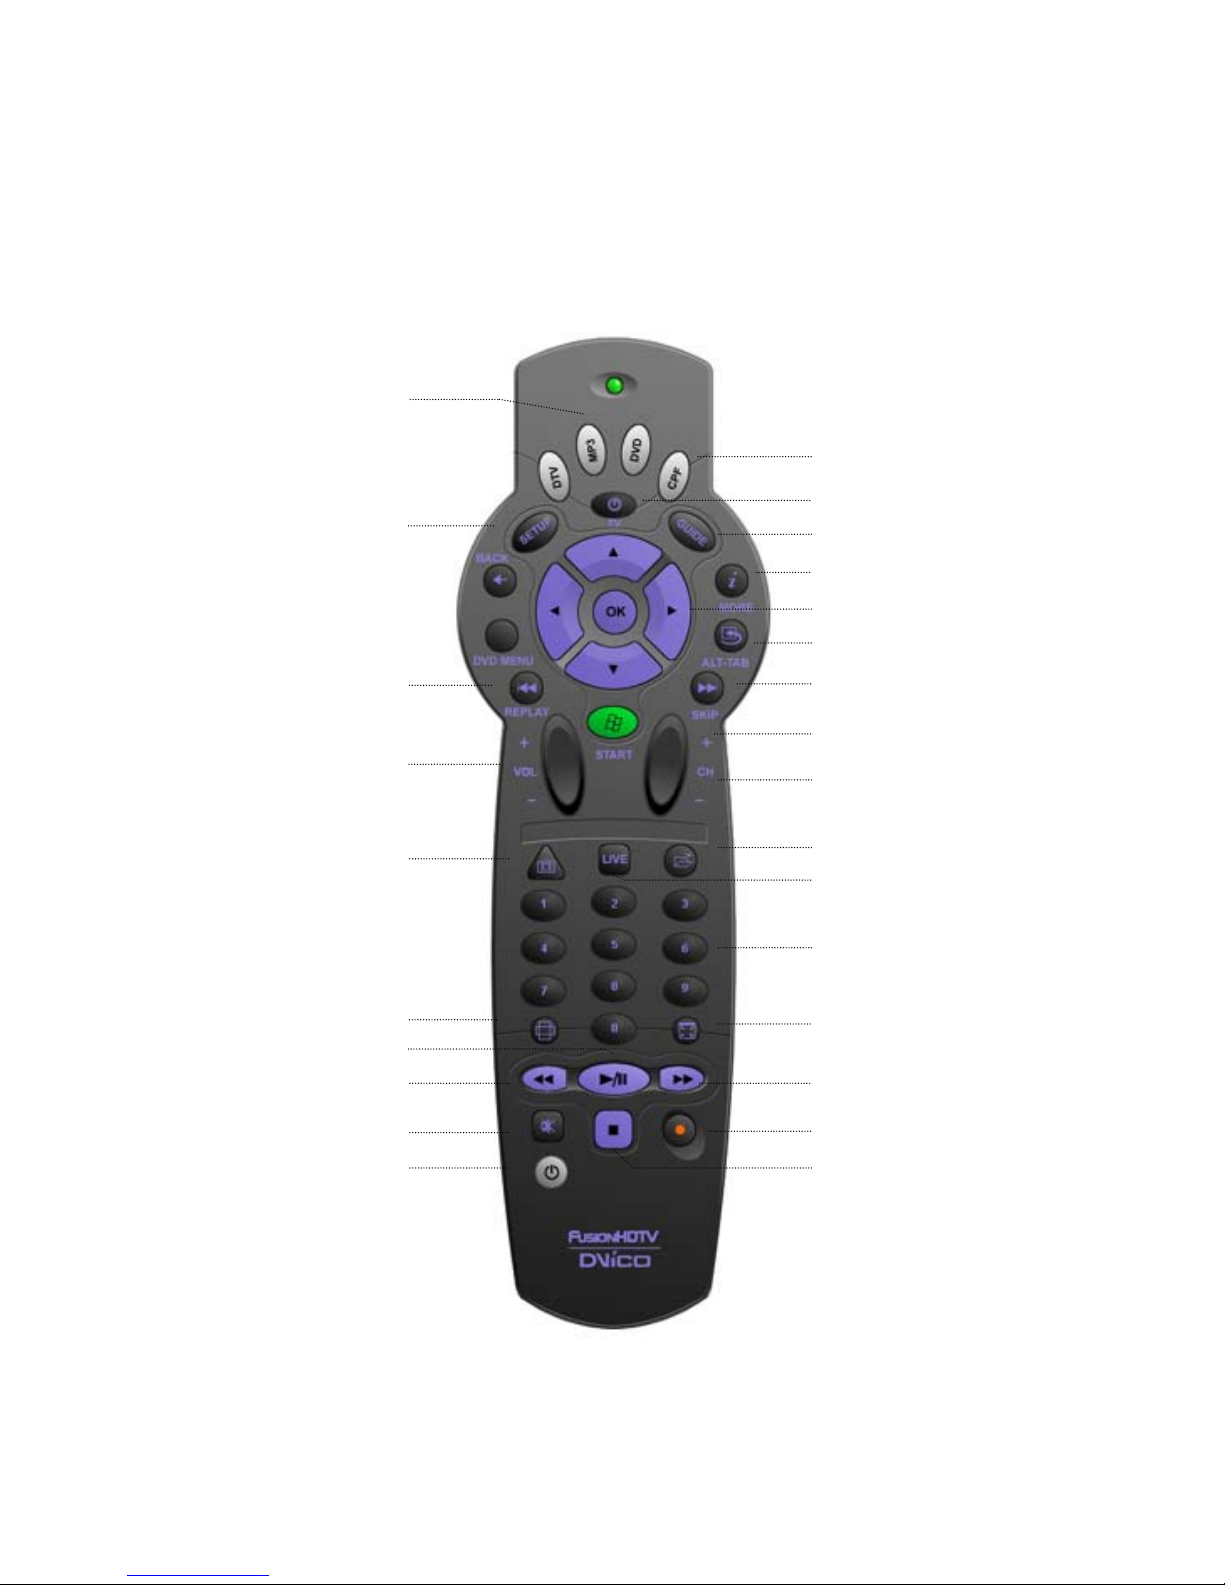
3.2 Using Remote profile program
1. WinAMP
You can use Fusion Remote as the simple replacement of the keyboard. Press the CPF button on the
remote transceiver for customizing the remote transceiver keys for the program you selected.
WinAMP Start
User Profile Change
Start profile
Show File information
Select Skin
TAB Key
Direction/Enter
(Alt-Tab
Instant replay
Volume Change
Open Directory
Repeat playback
Play
Rewind
Minimize
PC OFF
Instant Forward
Before Track
Next Track
Open File
Open URL
Numeric Key
Toggle Shuffle Play
Fast Forward
Exit WinAMP
Stop
All specifications and information are subject to changes without further notices
6
Page 7
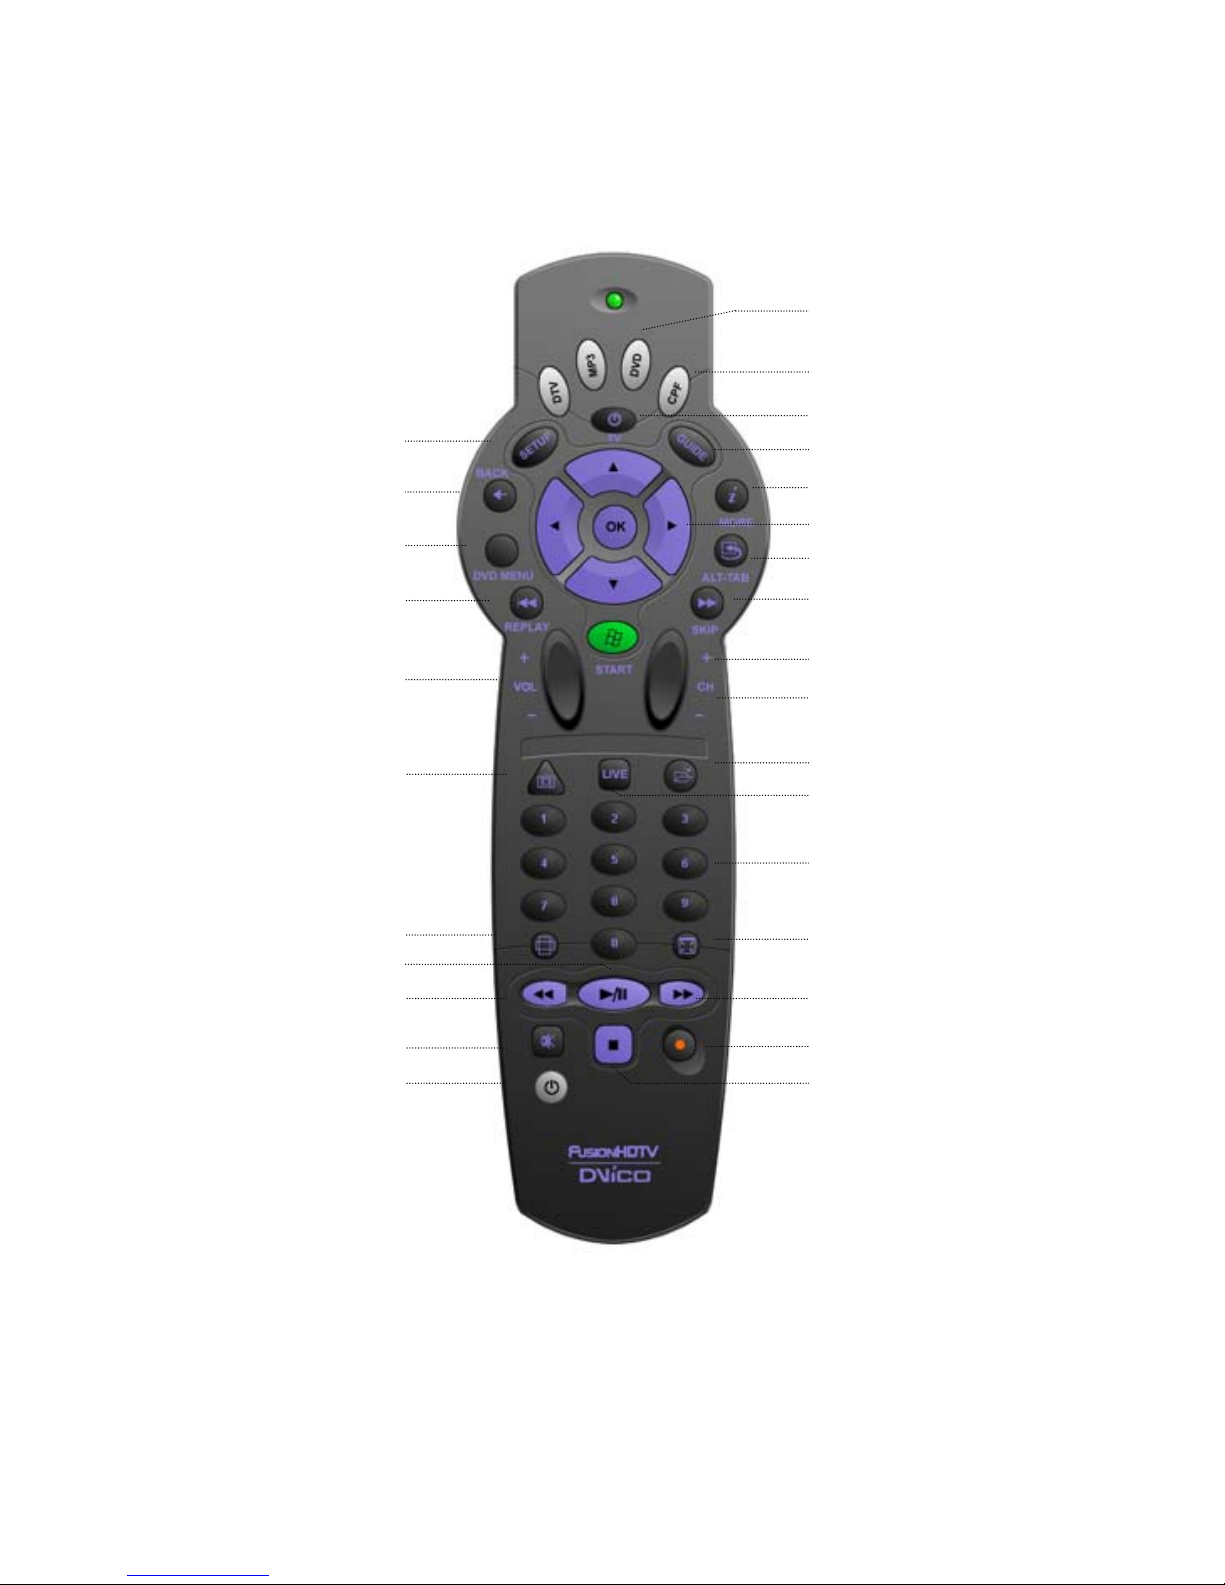
2. PowerDVD
You can use Fusion Remote as the simple replacement of the keyboard. Press the CPF button on the
remote transceiver for customizing the remote transceiver keys for the program you selected.
PowerDVD Start
User Profile Change
Profile Start
Configuration
Skin Toggle
Select Source
SPACE Key
Play Bookmark
Volume Change
Select Audio
Repeat Playback
Play/Pause
Rewind
Mute
PC OFF
TAB K e y
Direction/Enter
(Alt-Tab
Add Bookmark
Before Chapter
Next Chapter
Open Disk
SubTitle On/Off
Numeric Key
Display Size Change
Fast Forward
Exit PowerDVD
Stop
All specifications and information are subject to changes without further notices
7
Page 8
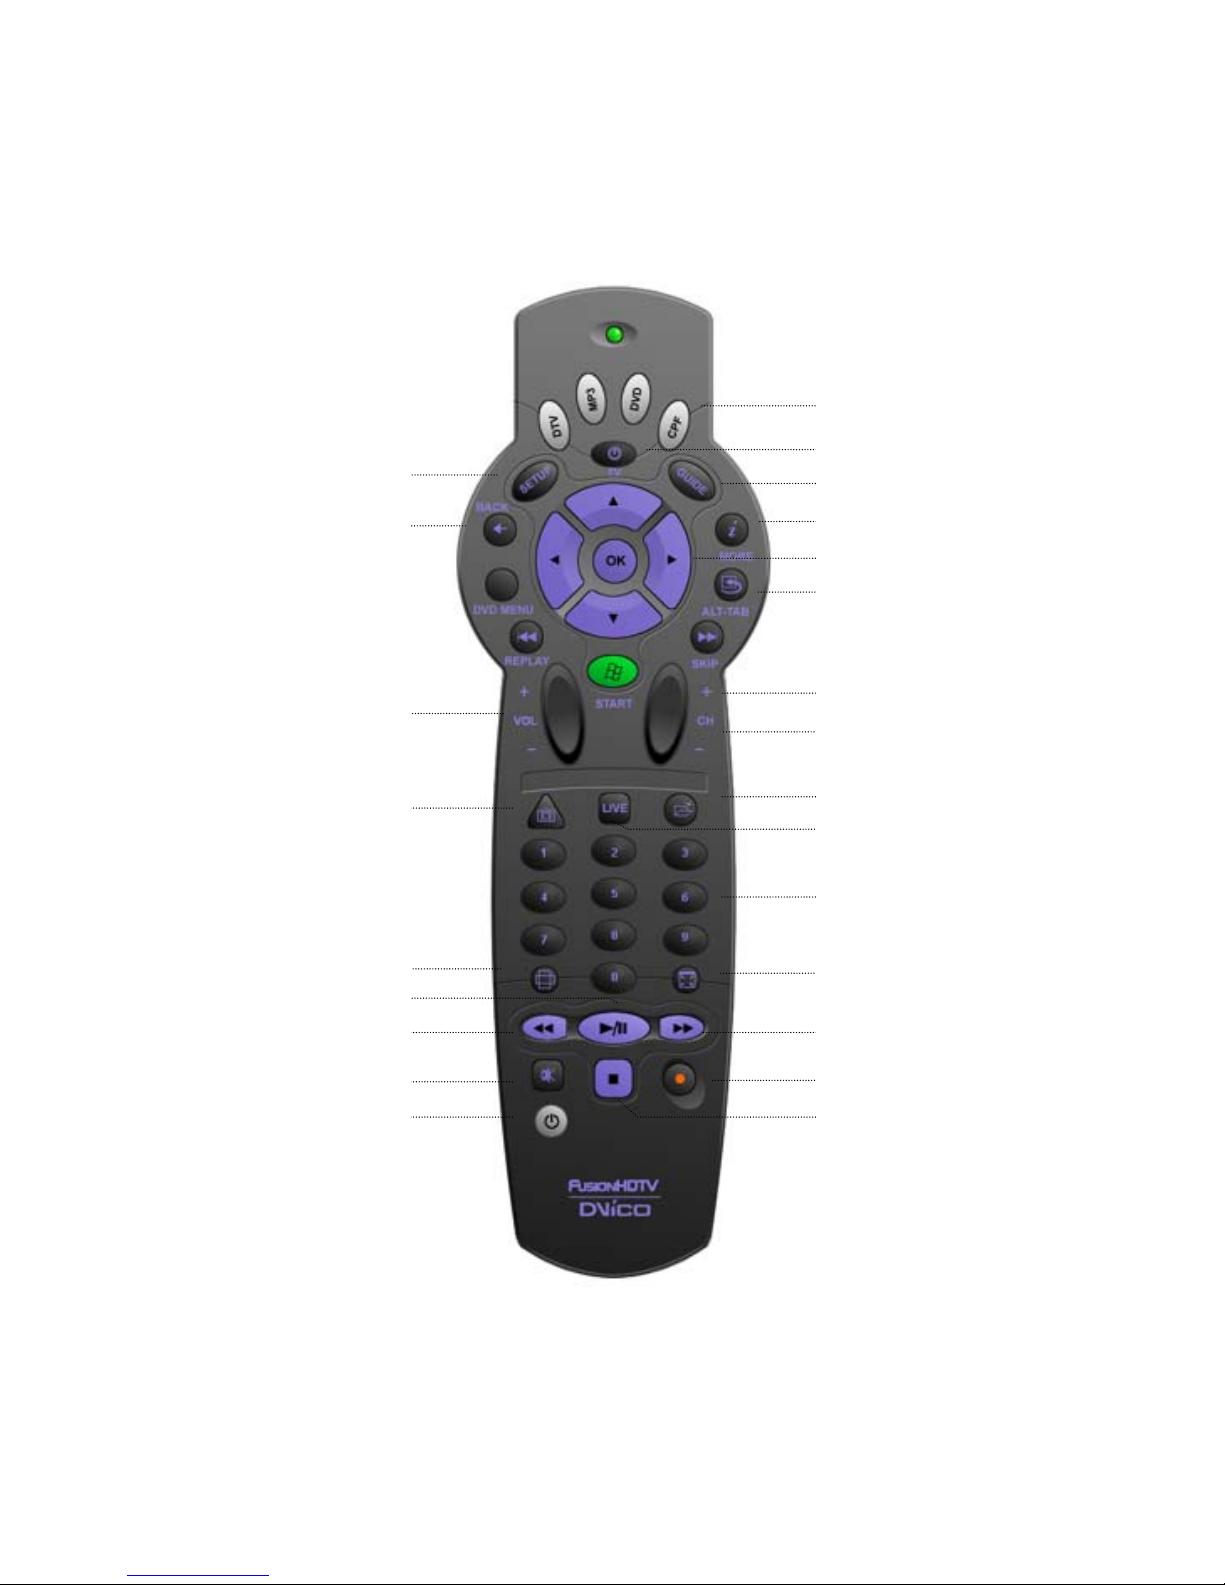
3. Window Media Player 9
You can use Fusion Remote as the simple replacement of the keyboard. Press the CPF button on the
remote transceiver for customizing the remote transceiver keys for the program you selected.
User profile Change
Profile Start
Configuration
Shuffle play
Skin Mode
TAB K ey
Direction/Enter
Alt-Tab
Volume Change
SnapShot
Full mode
Play/Pause
Rewind
Mute
PC OFF
Before File
Next File
File Open
SubTitle On/Off
Numeric Key
Display Size Toggle
Fast Forward
Exit Media Player
STOP
All specifications and information are subject to changes without further notices
8
Page 9
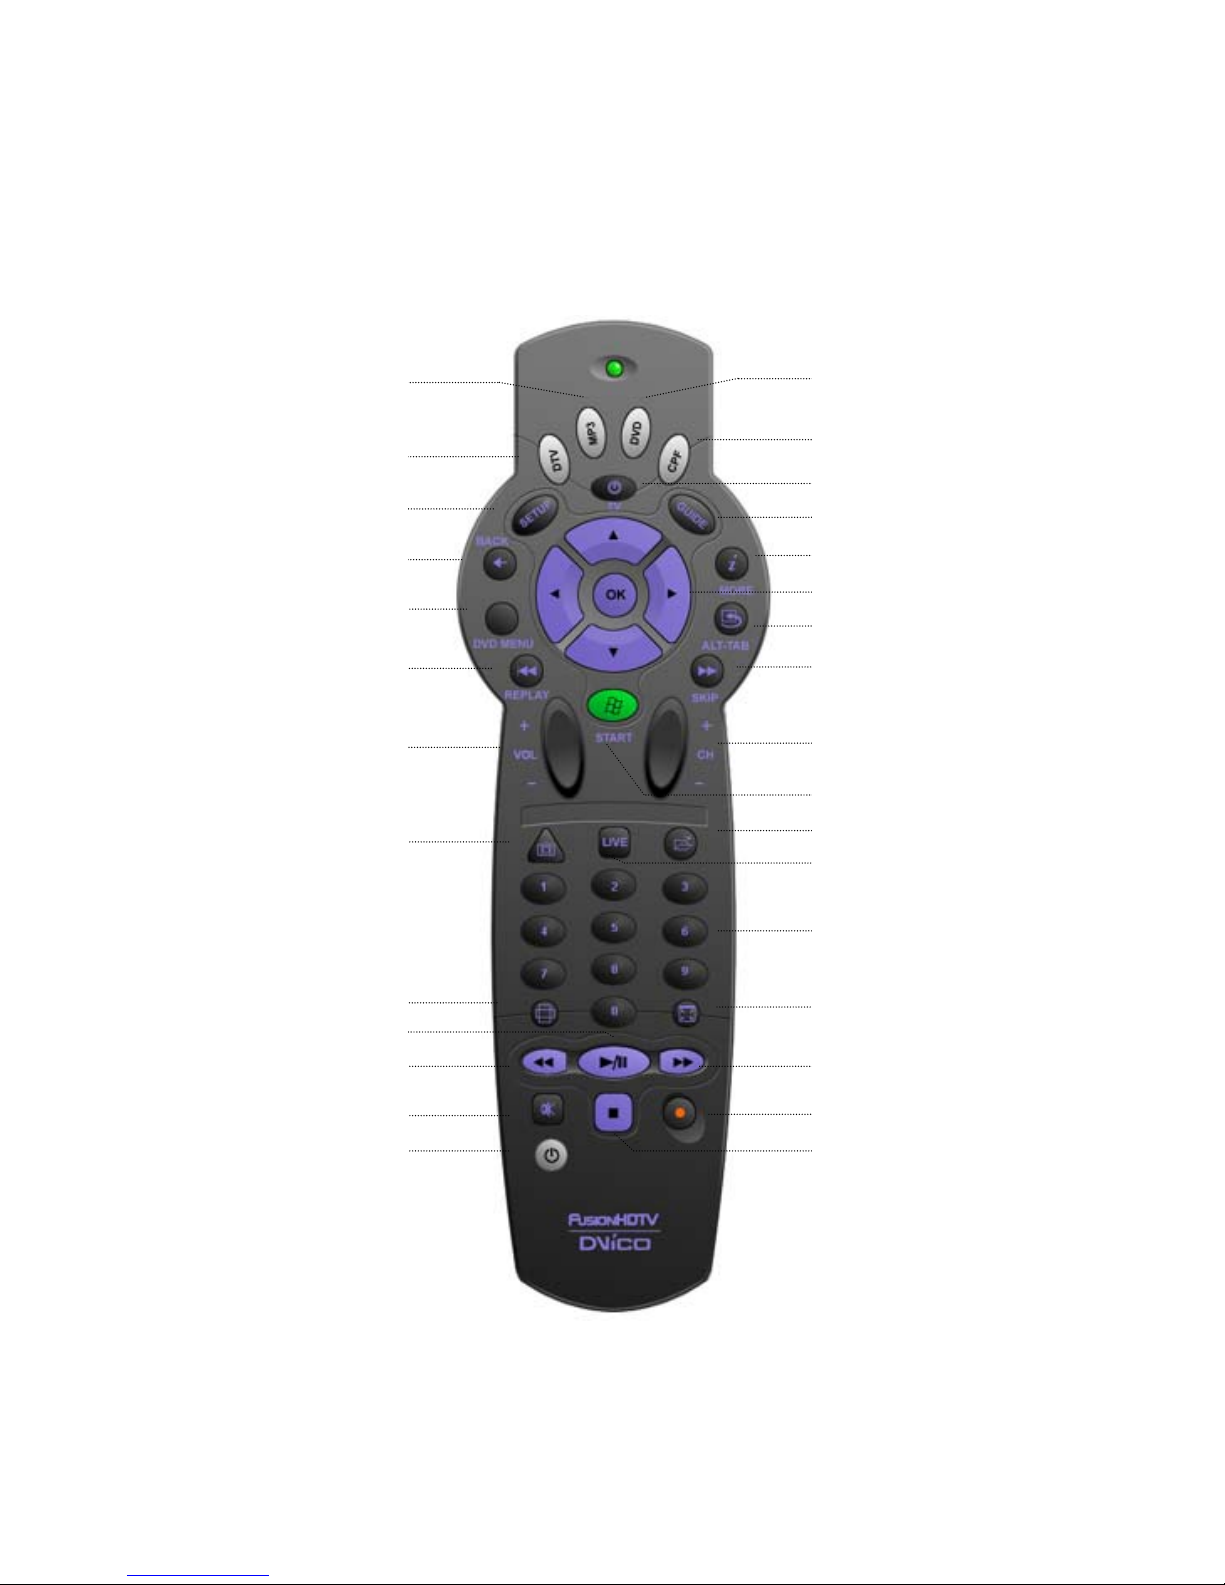
4. Window MCE 2005
You can use Fusion Remote as the simple replacement of the keyboard. Press the CPF button on the
remote transceiver for customizing the remote transceiver keys for the program you selected.
WinAMP Start
FusionHDTV Start
Main Menu
BACK
DVD MENU
REPLAY
Vol um e Up /Do wn
Snapshot
PowerDVD Start
User profile change
Profile Start
TV Guide
MORE info
Direction/Enter
Alt-Tab
SKIP
Channel Up/Down
MCE Start/Exit
Recorded File open
TV Start
Numeric key
Pause
Play
Rewind
Mute
PC Off
All specifications and information are subject to changes without further notices
Toggle Display Size
Fast Forward
Record
Stop
9
Page 10
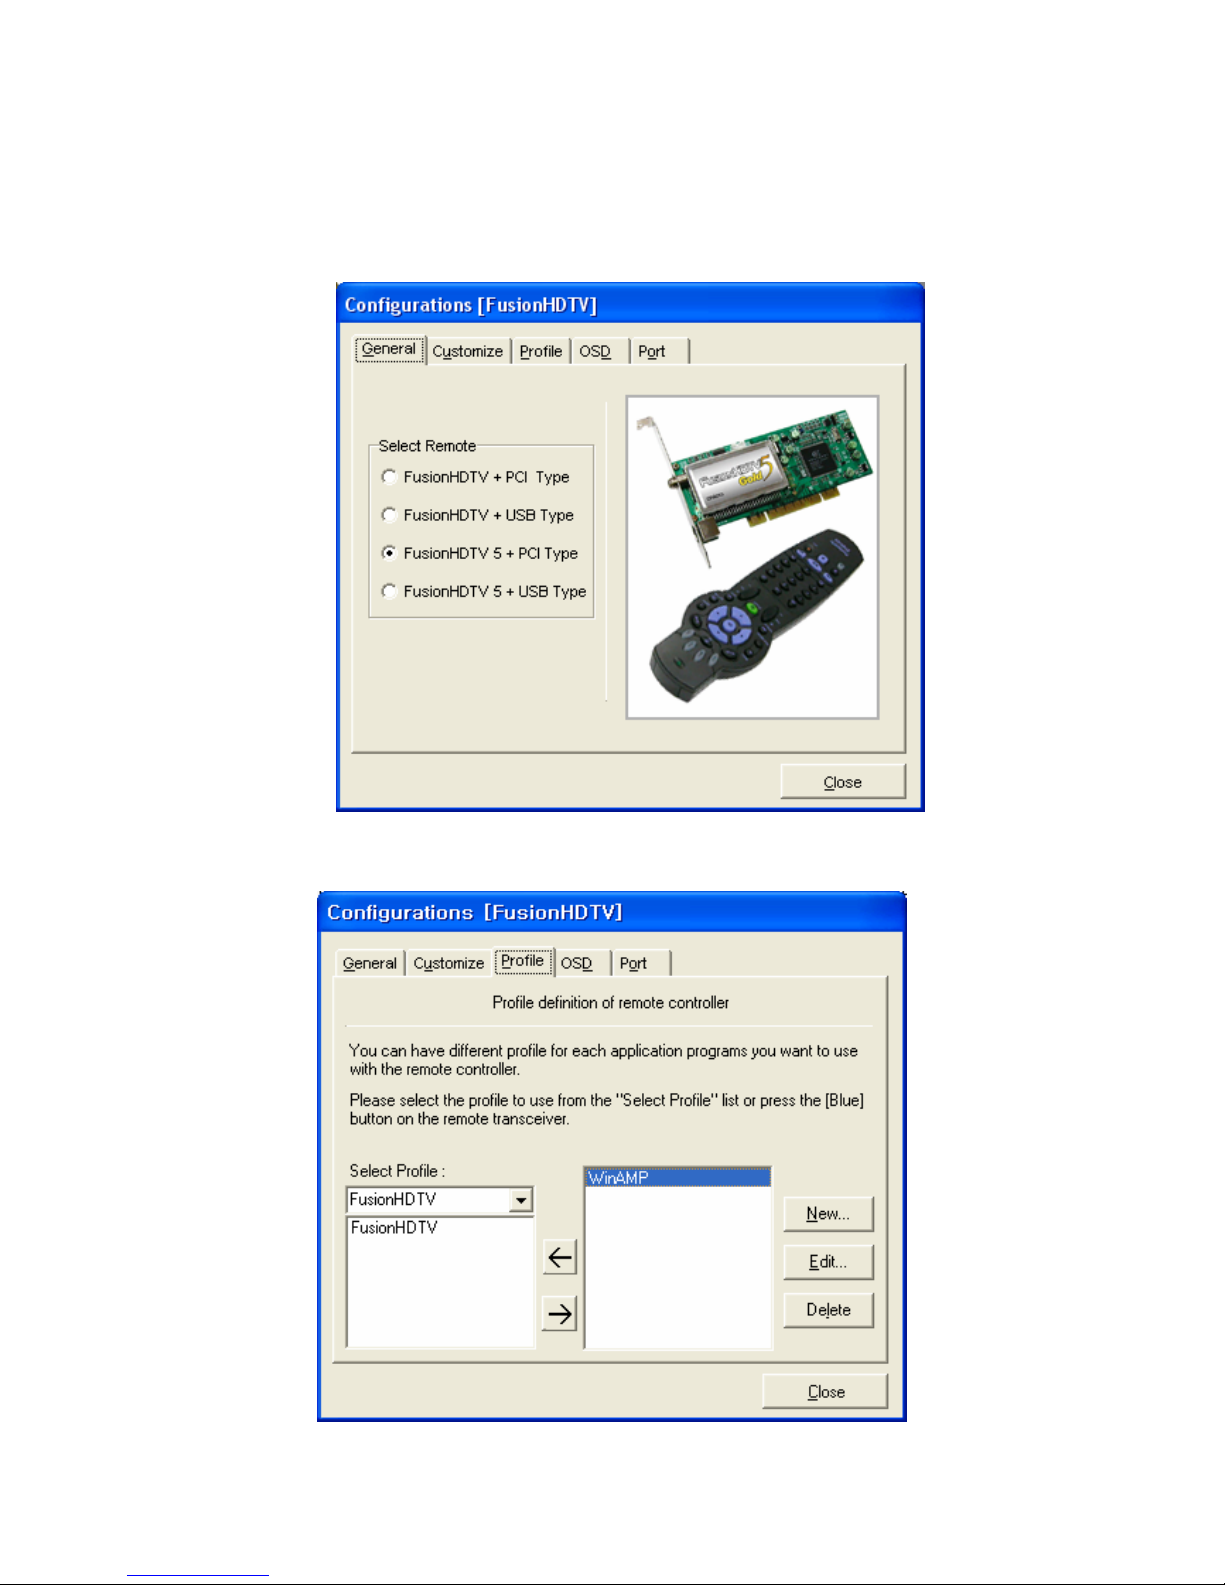
3.3 Using Customize mode
When you are not using the FusionHDTV, you can use Fusion Remote as the simple replacement of the
keyboard. You can define the key-button mapping of any program you want to use with the Fusion Remote.
Please refer to the instruction below.
1) Create the profile you want to define like the picture below.
All specifications and information are subject to changes without further notices
10
Page 11
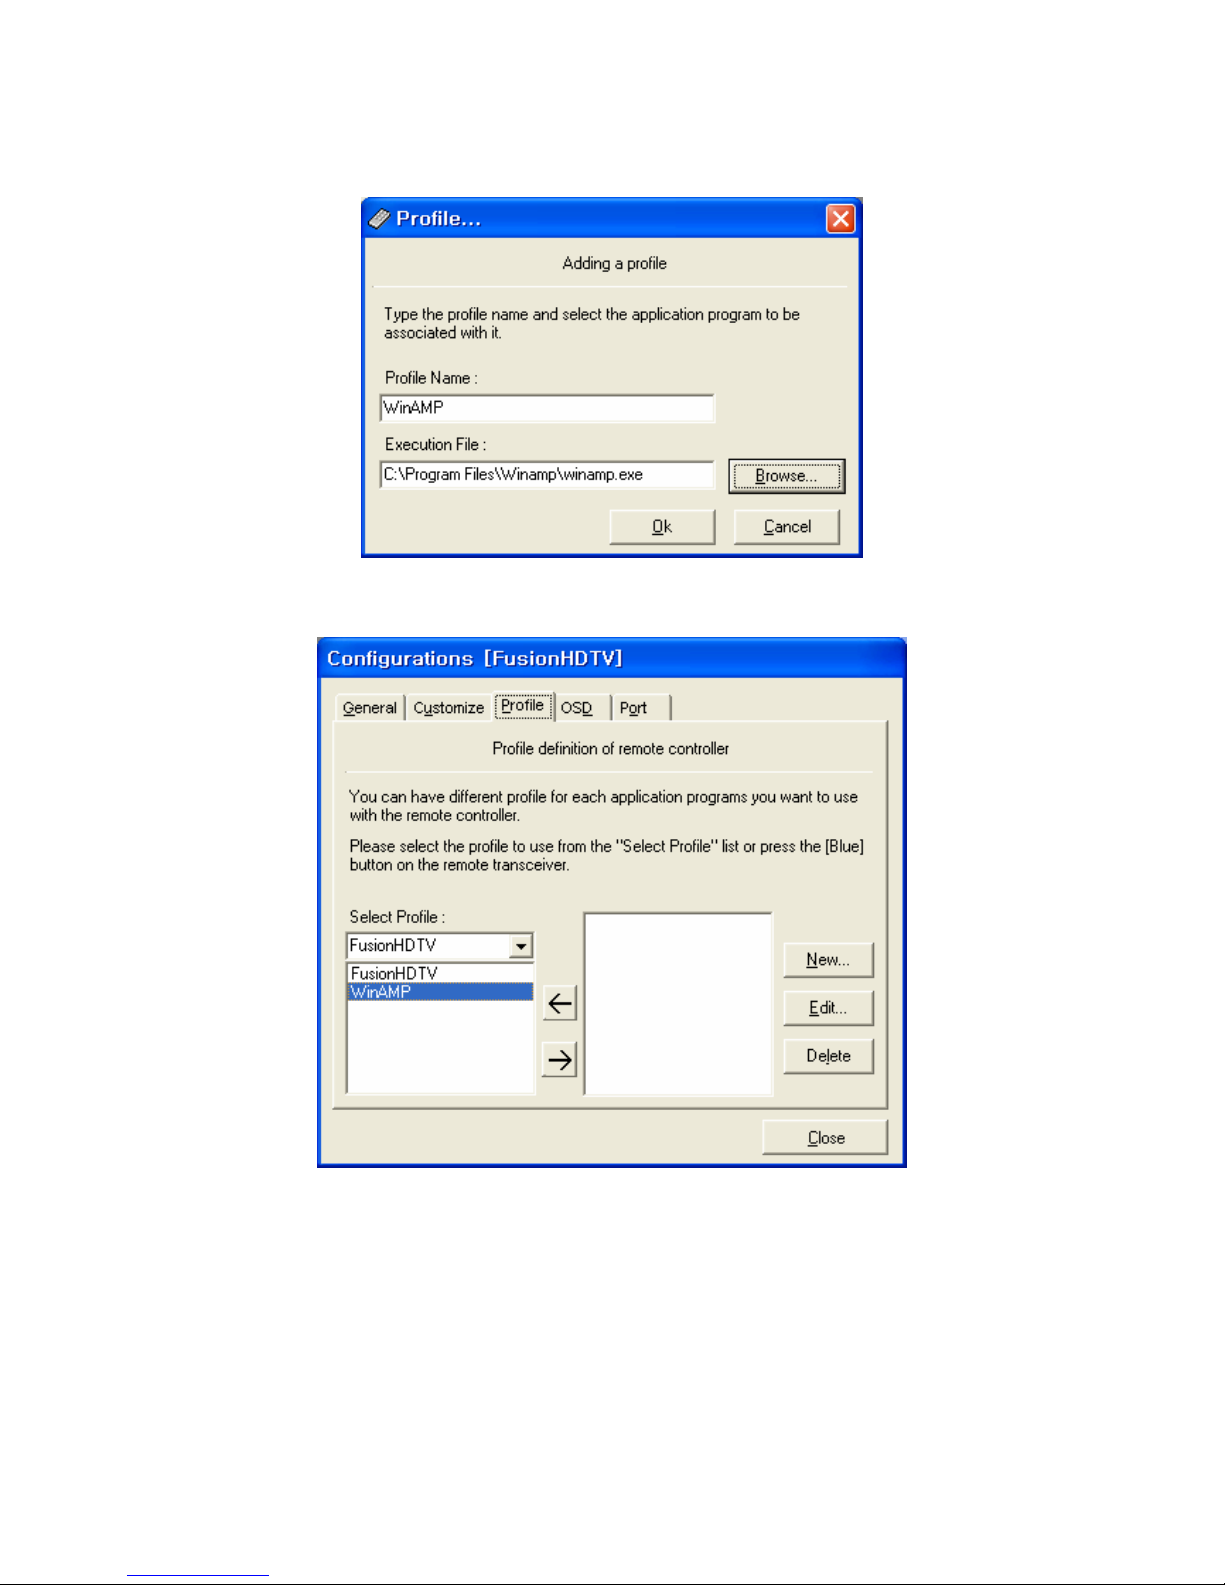
2) After pressing the New button input the profile name and the execution path of the program. The
program will be started by pressing the red start button of the remote transceiver.
3) After adding the profile please press the <- button to select the profile for key define.
4) Please press the blue button on the remote transceiver for customizing the remote transceiver keys
for the program you selected.
All specifications and information are subject to changes without further notices
11
Page 12
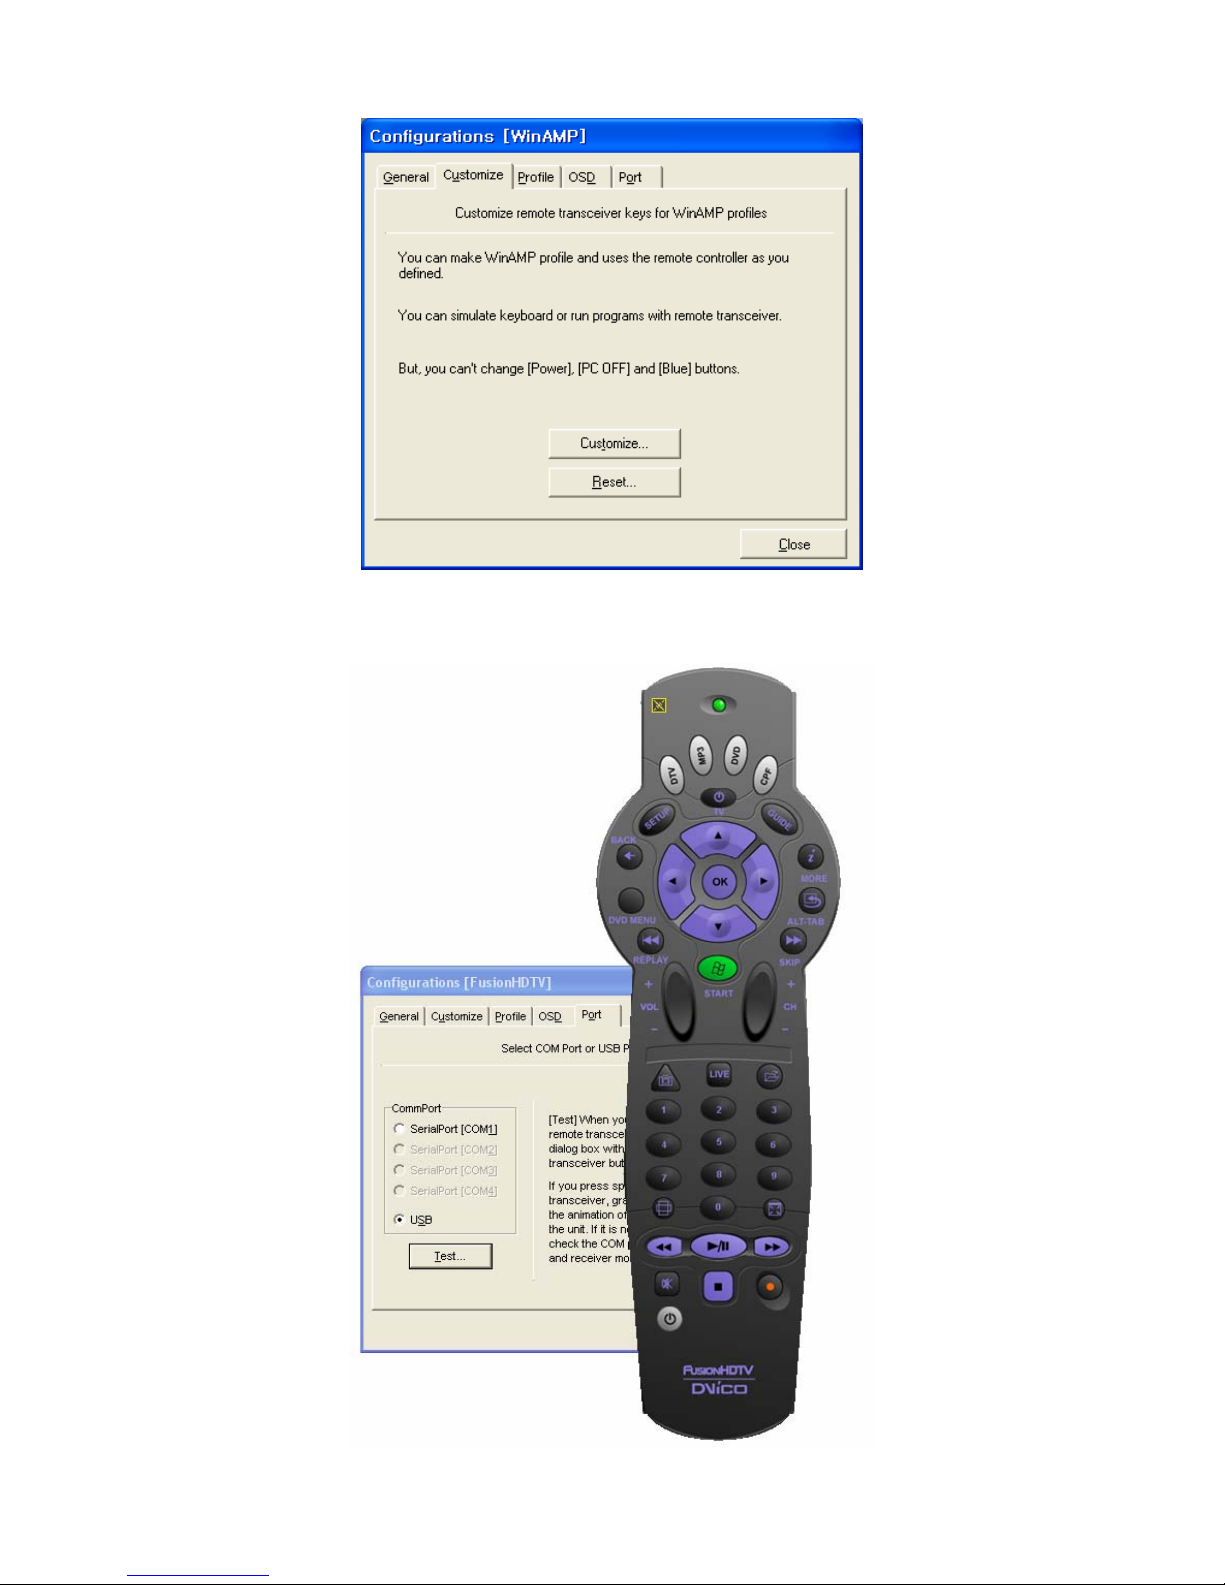
5) If you press the Customize… button on the picture above you will see the remote transceiver pop up.
All specifications and information are subject to changes without further notices
12
Page 13
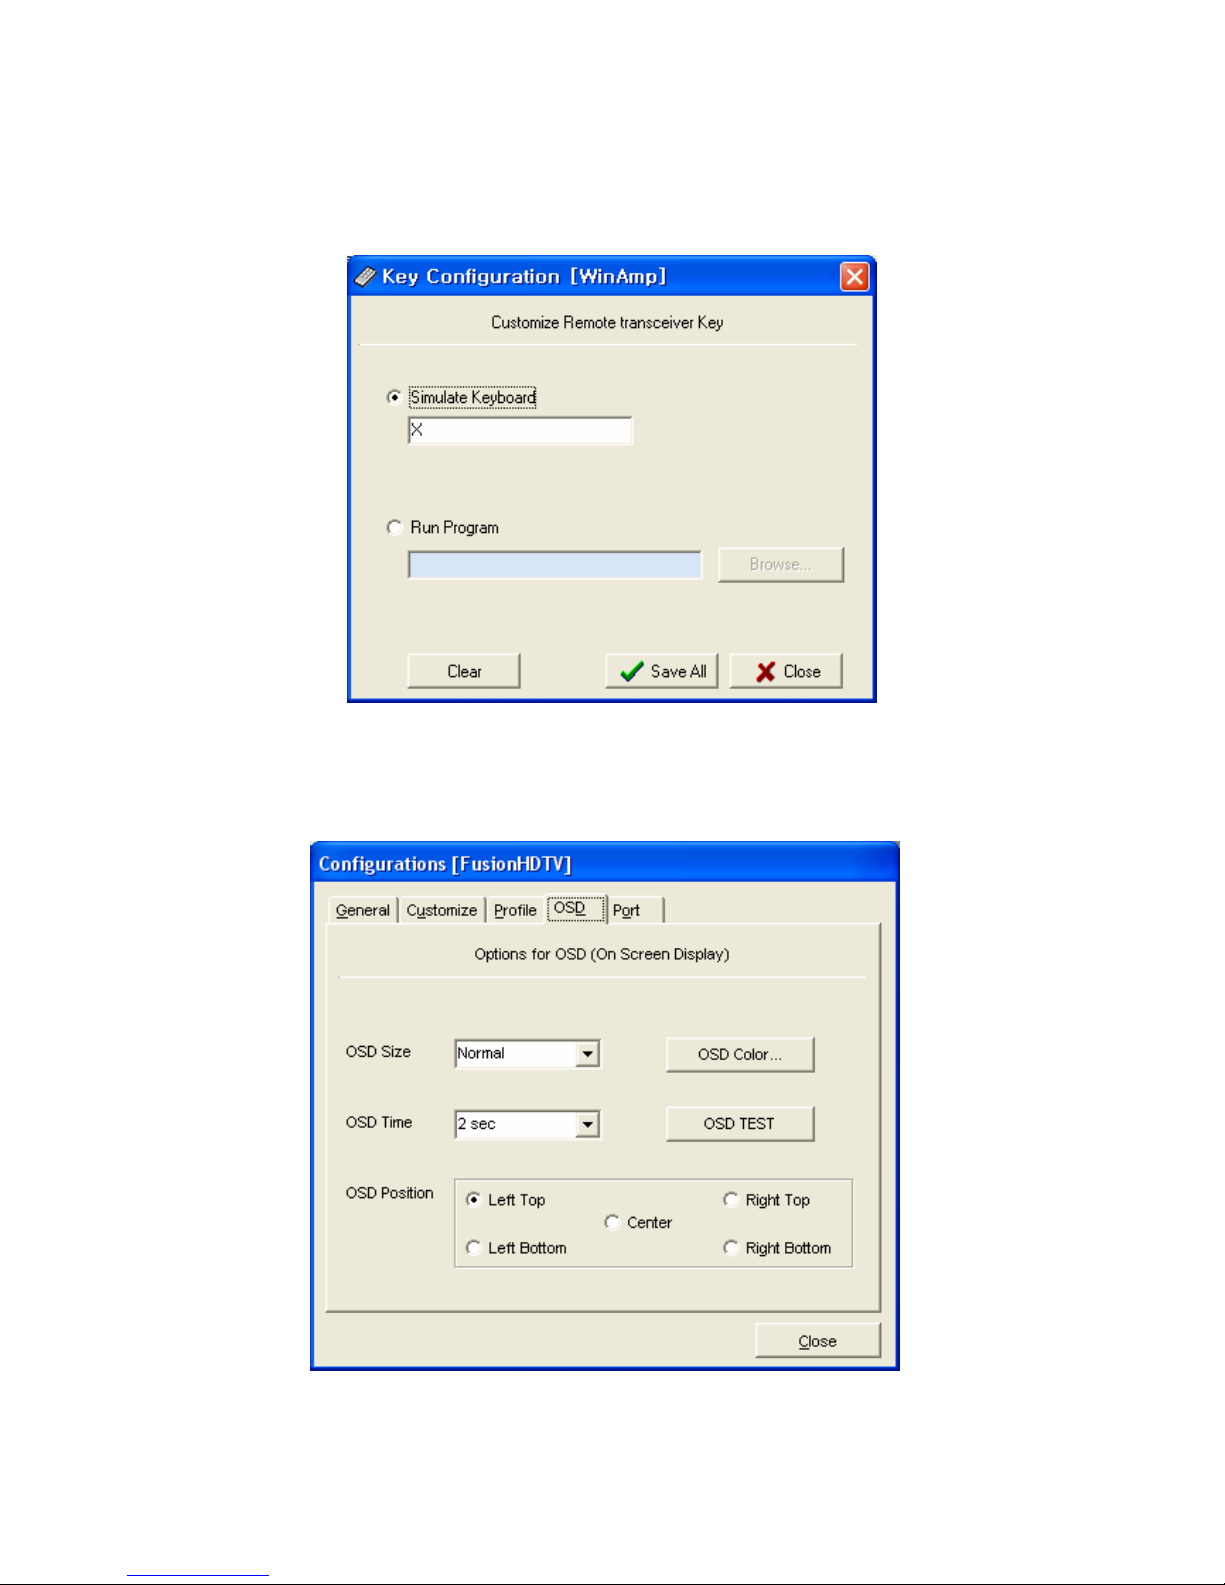
6) Please press button on the remote transceiver and input the keys or shortcut keys you want to map
to the button.
Press SaveAll button when you are done
7) Clear button clears the button defined.
8) You can set the OSD setting in accordance to each profile like the picture below.
All specifications and information are subject to changes without further notices
13
 Loading...