

Page 1
Quick Guide
1. Introduction
1
V150803-2
3. Connect the Device
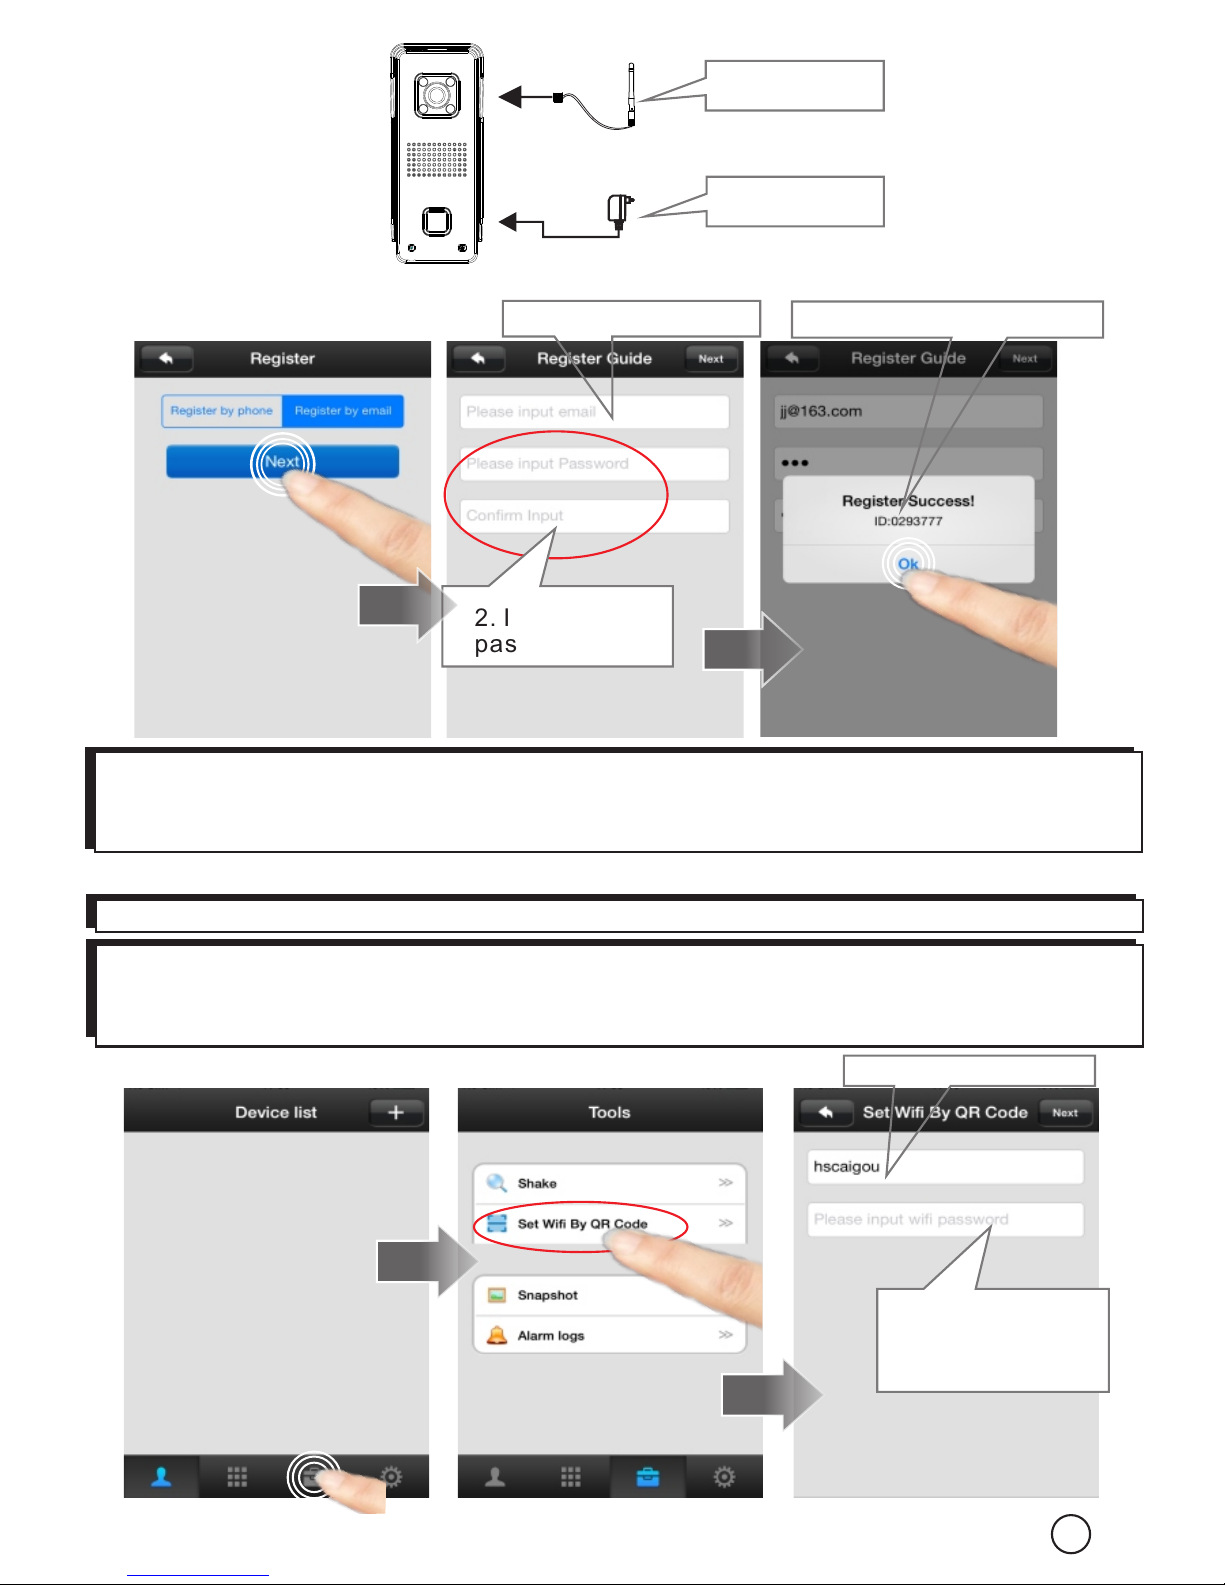
Insert TF memory card and fix antenna, connect power supply. It takes
30 seconds to start device.
Step 1:
2. Install the App
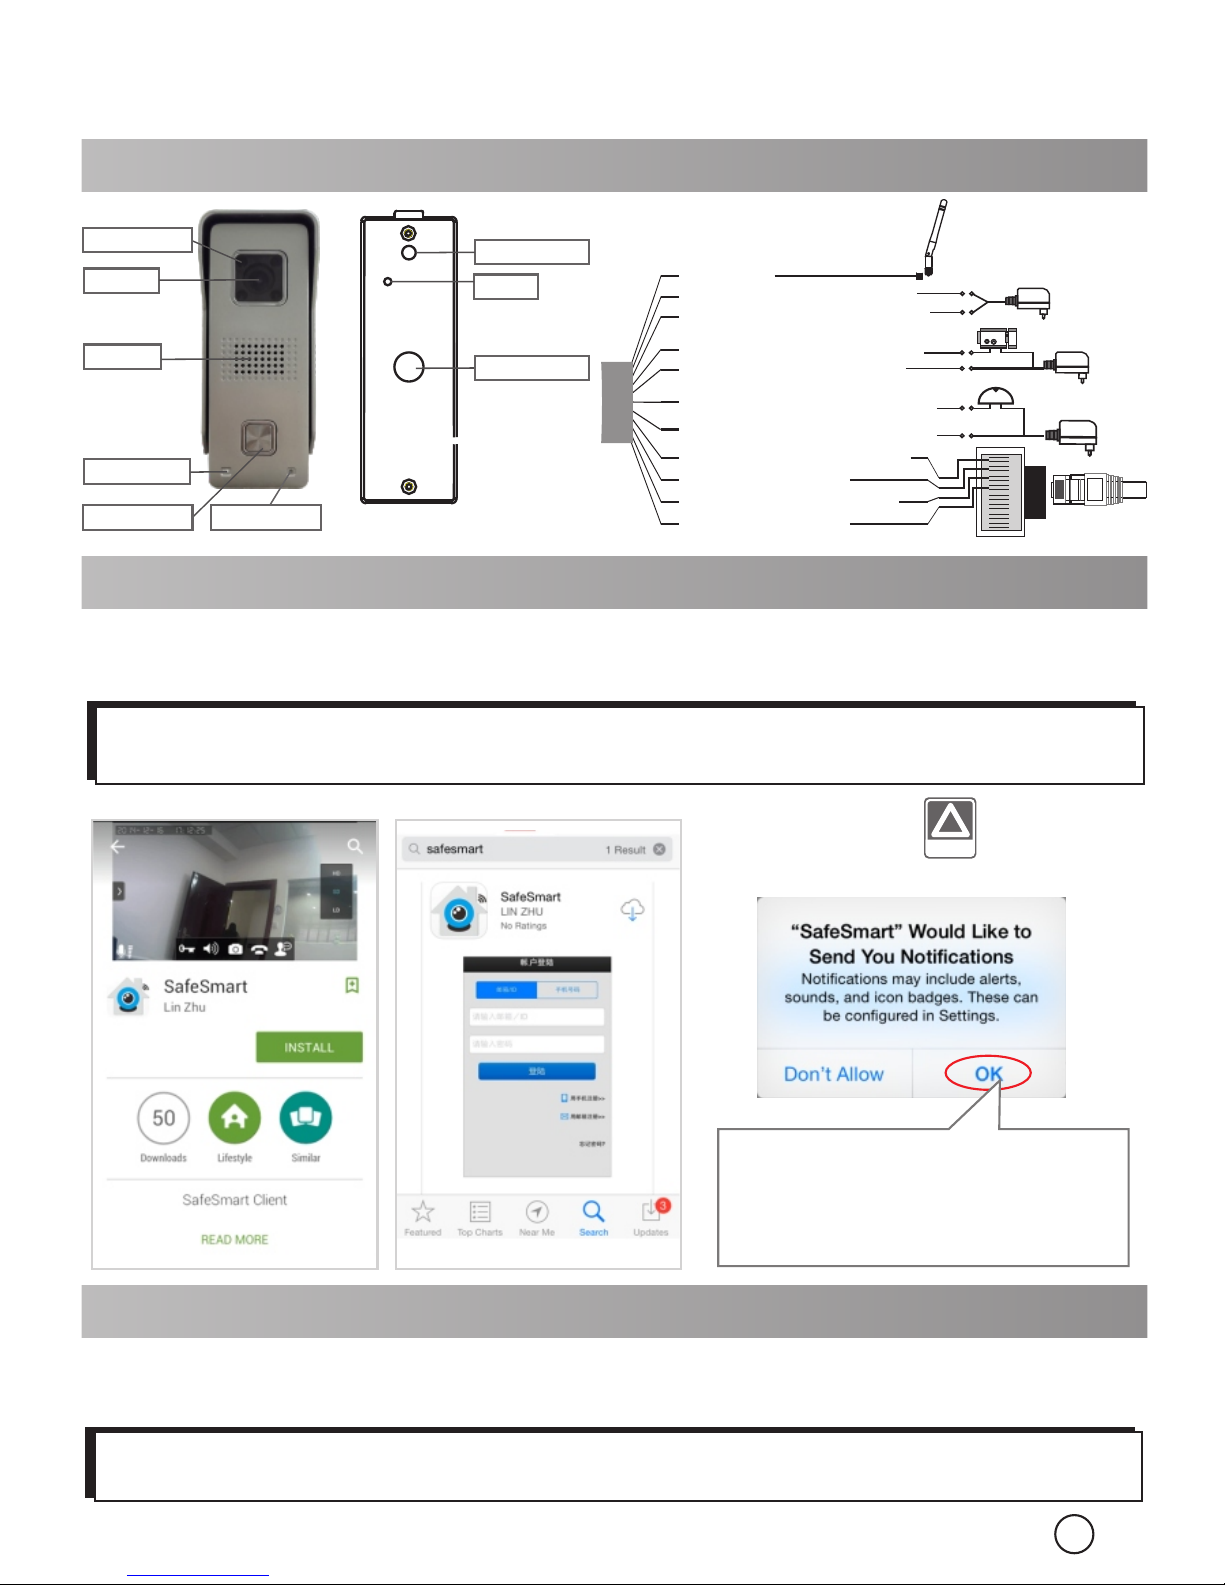
Download the App ‘SafeSmart’ from ‘Google Play Store’ or ‘App Store’, and install
on mobile phone.
iOS
!
NOT ICE :
NOTICE :
Android
Special Notice: When open the app, you will receive a tip. Please click ‘OK’ to
allow the notifications, otherwise, you cannot receive any notification.
Special Notice: Do not connect the network cable, otherwise, the device
cannot set the Wi-Fi by scanning QR code.
For the first time installation,
please tap ‘OK’. Otherwise
y o u c a n ’ t r e c e i v e a n y
notification.
Tamper switch
Reset
Thread hole
CDS Sensor
LENs
Speaker
Ring Button
Microphone
IR LED light
Doorb ell
Power in D C+ (1 2V )(Red)
Antenn a
Doorbe ll R el ay C OM(Gray)
Net RJ45( Or an ge &White)
Lock
Doorbe ll R el ay N O(White)
Net RJ45( Or an ge )
Net RJ45( Gr ee n& White)
Net RJ45( Gr ee n)
Lock Rel ay C OM (Ye llow)
Lock Rel ay N O( Pu rple)
Power in D C- (1 2V )(Black)
Door ph one
power s upply
Lock Po wer
suppl y
Doorb ell
Power s upply
1
2
3
6
4
5
7
8
(DC12 V 500mA )
Page 2
Step 3:
Connect your mobile phone to your router.
Set device’s wifi by scanning QR code.
Register by E-mail:
2. Input your ID
password
1. Input your e-mail
Please Remember your ID
Wifi name
Input your wifi
password, then
tap ‘Next’.
Step 2:
Connect your mobile phone to your router to register a user ID.
2
Special Notice: If 2 mobile phones use the same account ID to login at the same time, only 1
mobile phone can receive the push notification alarm ring. So if use 2 mobile phones to
connect the device, user should register 2 different account IDs for the 2 mobile phones.
Antenna
Power adaptar
Special Notice: Device don’t support 5Ghz WIFI,user should use 2.4GHz WIFI to connect.
Special Notice: Device don’t support WPA2-PSK (TKIP) and WPA-PSK/WPA2-PSK
(TKIP)encrypt mode, user should change to other encrypt modes like WPA-PSK(AES),
WPA2-PSK(AES), WPA-PSK(TKIP), WPA-PSK/WPA2-PSK(AES)or WEP.
Page 3
P
h
one 1
0
-
15
cm
ip
ad a
nd tab
l
et 2
0c
m
“DING”
Af te r y ou he ar
the sound ‘DING’
1
2
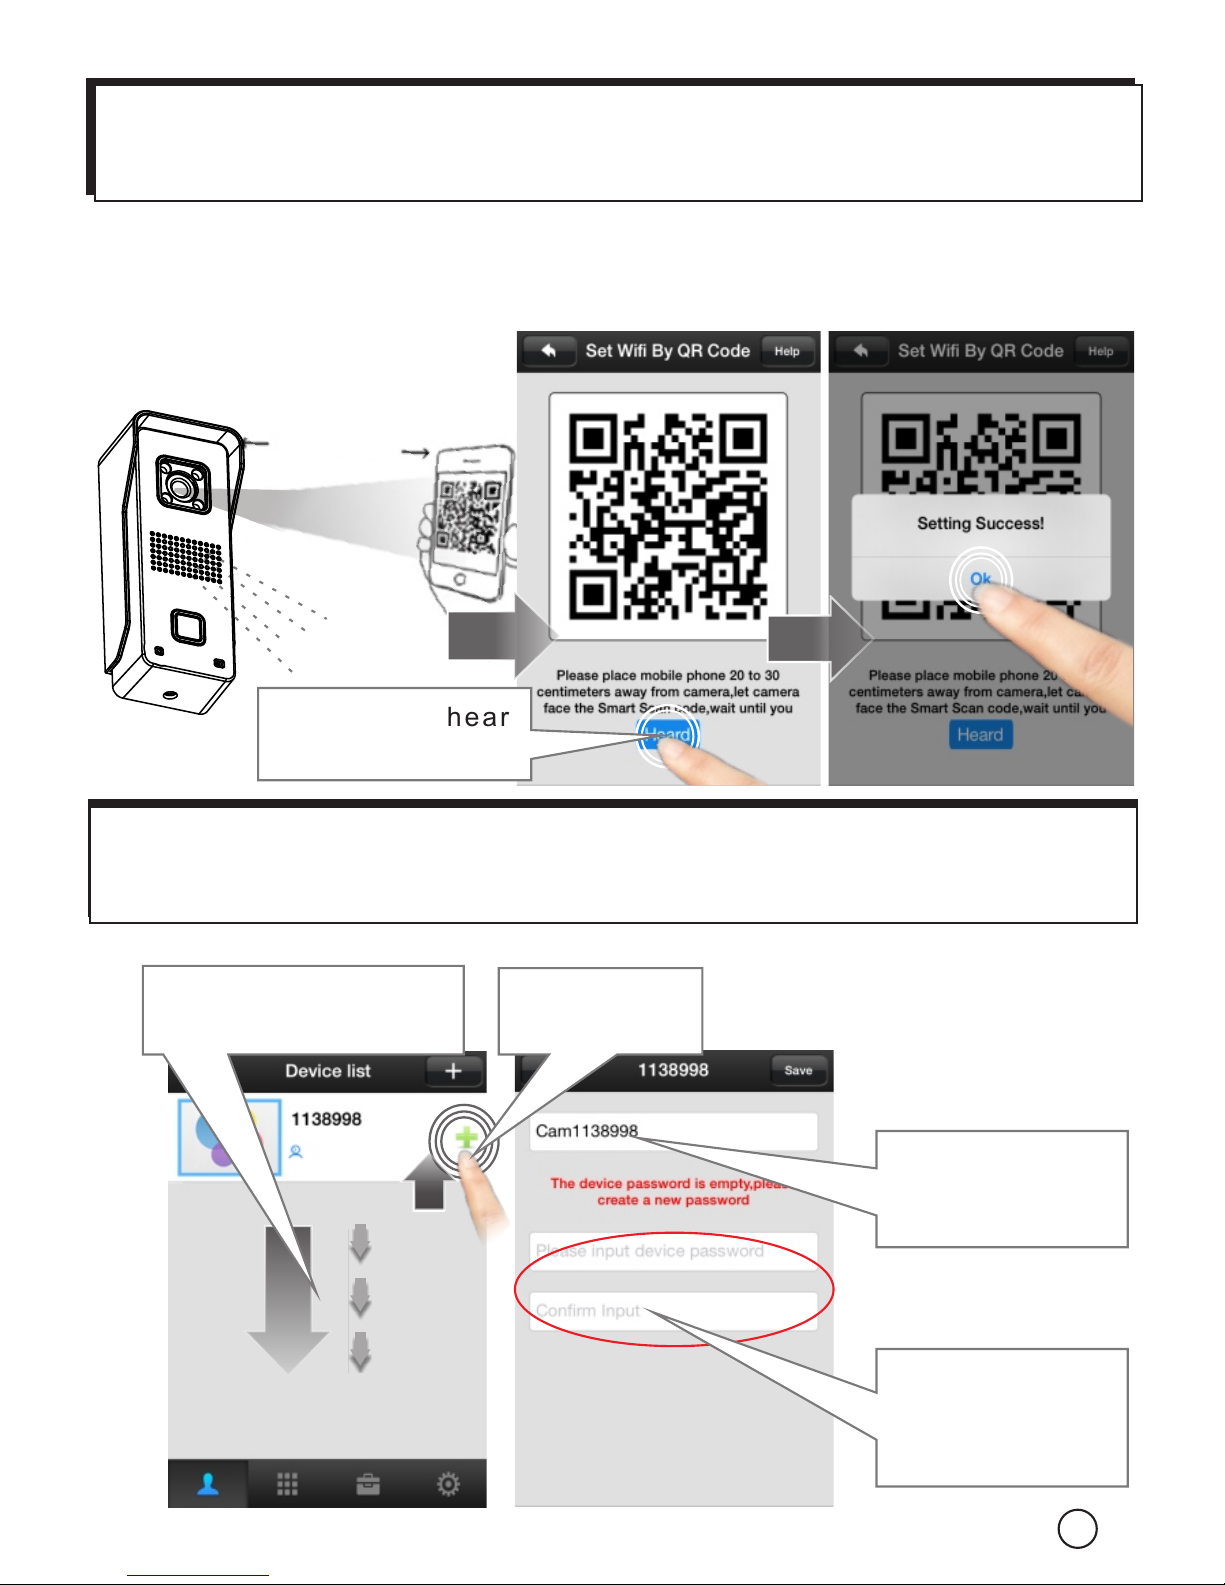
3. Input your
device name
4 . I n p u t y o u r
device password,
then tap ‘Save’.
Aim the device at your smart phone’s QR code in 10-15cm distance (iPad and
tablet are 20cm). Once hear the sound ‘DING’, click ‘Heard’, it shows ‘Setting
Success’, device is connected to the Wi-Fi.
2. Cl ick to
add device
1. Slide down to refresh
and find device.
3
Step 4:
Add device. In 'Device List', slide down to find device.
Special Notice: If device have no 'Di.Di.Di.Di....' sound means the device has
scanned before. User should press the reset button for 5 seconds until hear
‘KING’ and scan after hearing the 'Di.Di.Di.Di....' notice sound.
Special Notice: Device is designed not able to scan QR code for 2 times. If want
to change Wifi in another place, user should press the reset button for 5 seconds
until hear ‘KING’ and scan after hearing the 'Di.Di.Di.Di....' notice sound.
Device will have 'Di.Di.Di.Di....' sound noticing user to scan Wifi QR code.
Page 4
!
NO TIC E:
If fail to scan the QR code, you could reset the device and retry. Or
connect wifi by using network cable. More details please refer to
PART9 & PART10.
NO TICE:
5. Date and Time
4
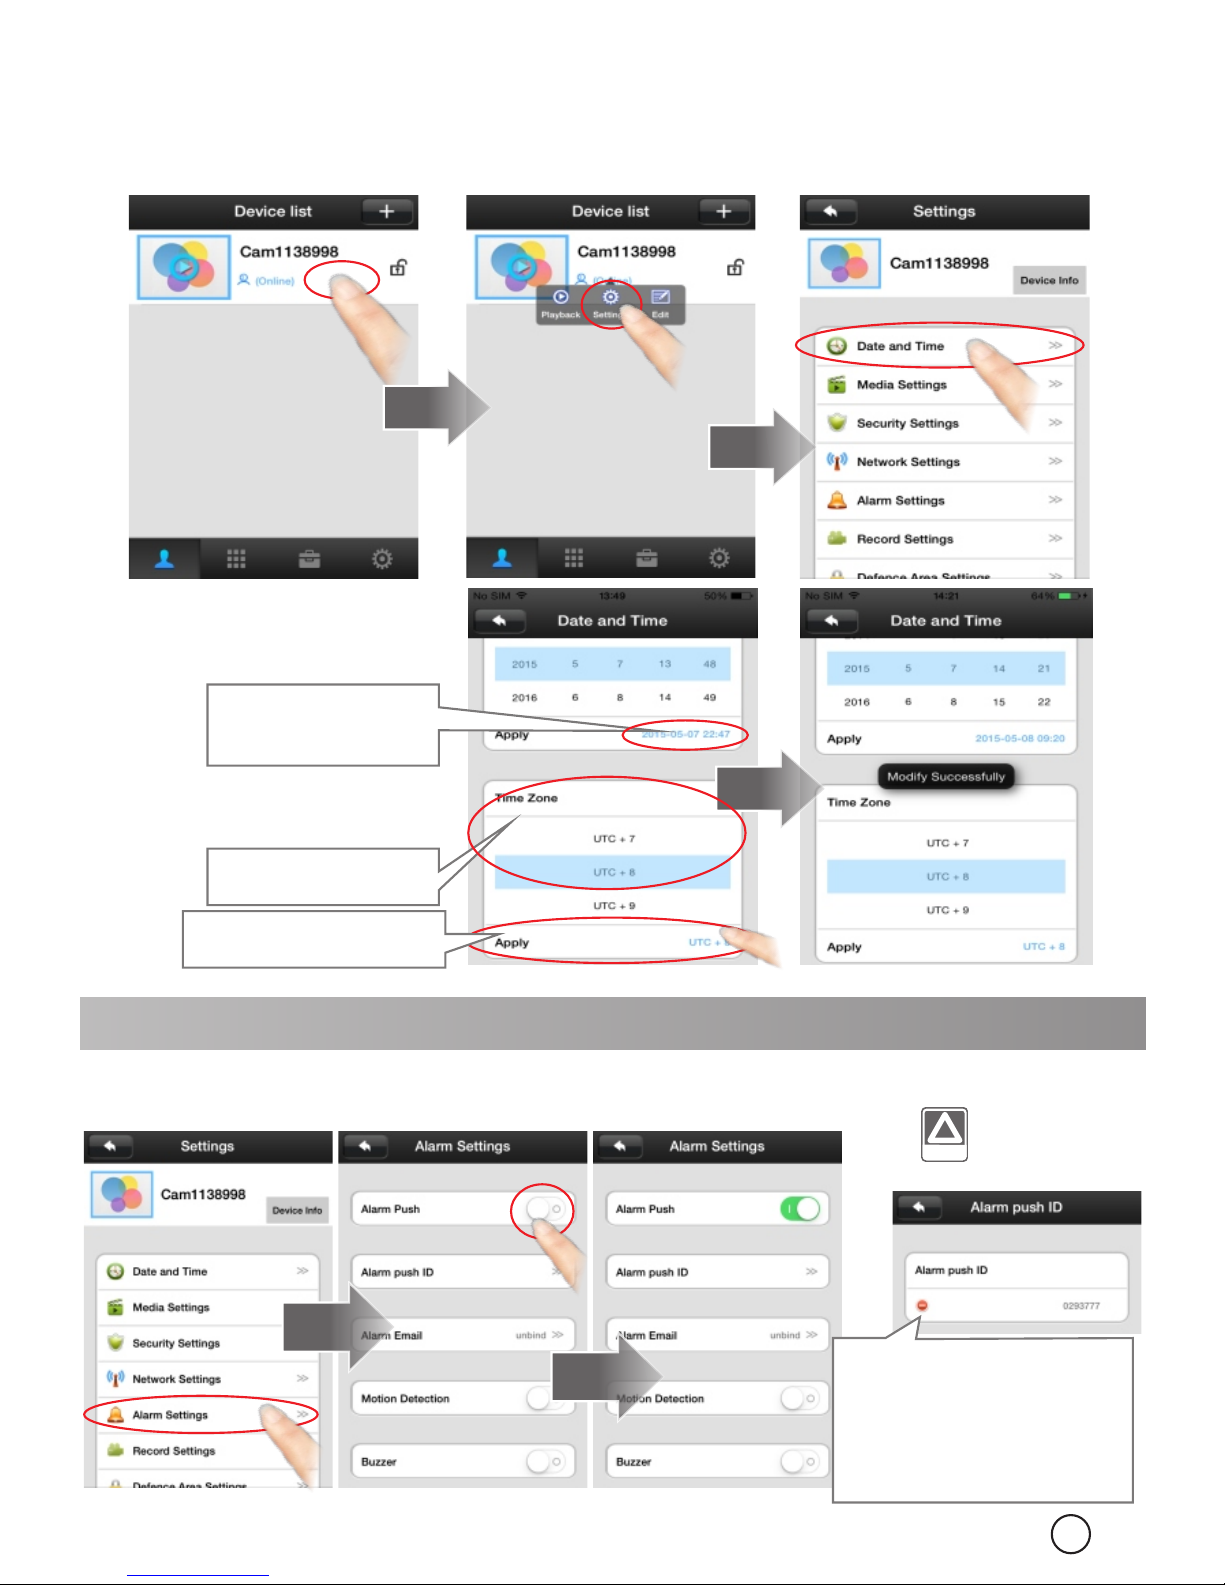
In “Device List-Device-Setting-Date and Time”, choose your Time Zone, and check if the
new time is right or not. If time is right, press apply to get network time automatically.
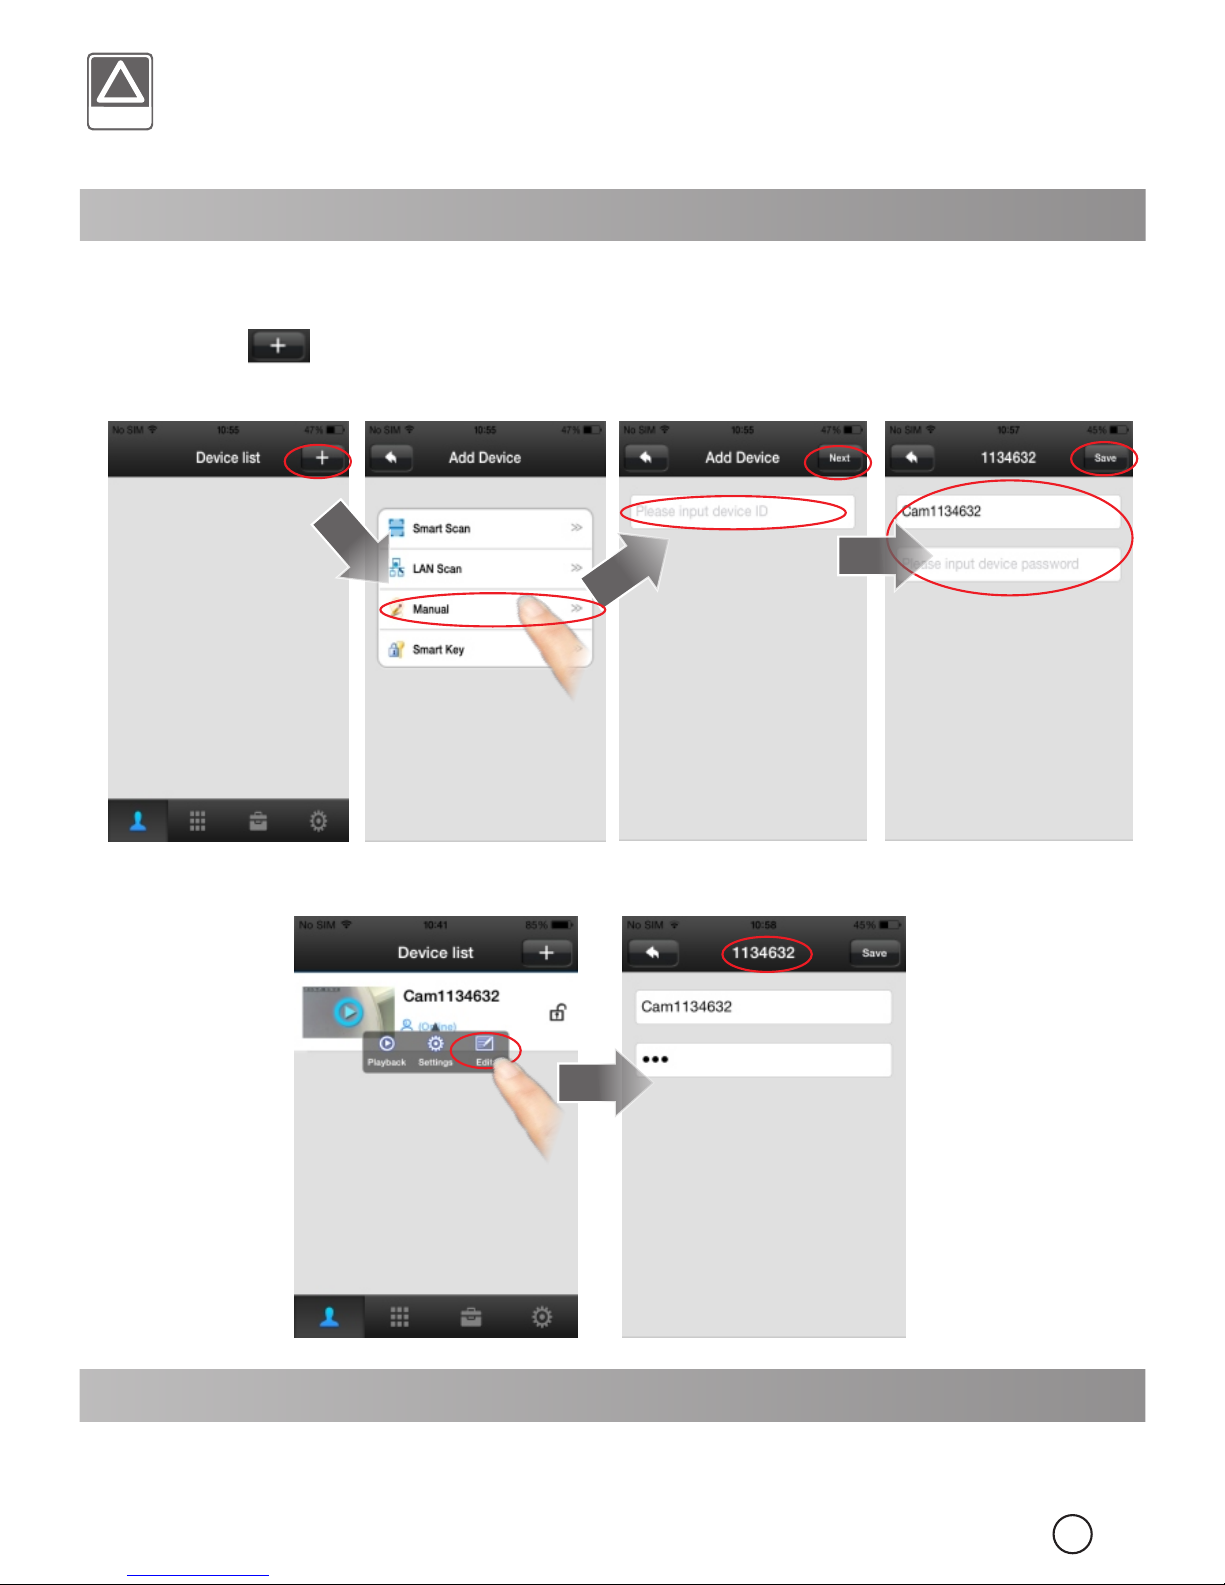
Scan QR code to set Wifi can be scanned only once. If user need to add device to
other mobile phones, user don’t need to scan Wifi QR code again. User should
press the button in the ‘device list’ to enter ‘Add Devices’ interface, press
‘Manual’ button and input device ID and password to add device.
4. Add device to another mobile phones.
Note: Device ID is in ‘Device List->Device->Edit’ as below.
Page 5
5
Remark:
1. Set Time Zone
2. Check time is
right or not
3. Click to confirm
Time zone example: China UTC+8
Germany/France/Spain/Poland/Italy/Netherlands/Norway/Sweden UTC+1
UK/Portugal/Ireland UTC+0 Turkey/Romania/Finland UTC+2
Mexico UTC-6 Colombia/Ecuador/Peru UTC-5
Venezuela/Chile/Manaus UTC-4 Agentina/Uruguay UTC-3
6. Push Notification Ring
In order to receive the push notification from the device, you should turn on ‘Alarm Push’.
Step 1:
!
NOT ICE:
NO TIC E:
By tapping this icon, you
can delete the ID which
no ne e d a l arm pu s h .
One d e v i c e can p u s h
alarm to 5 IDs at most.
Page 6
Step 2:
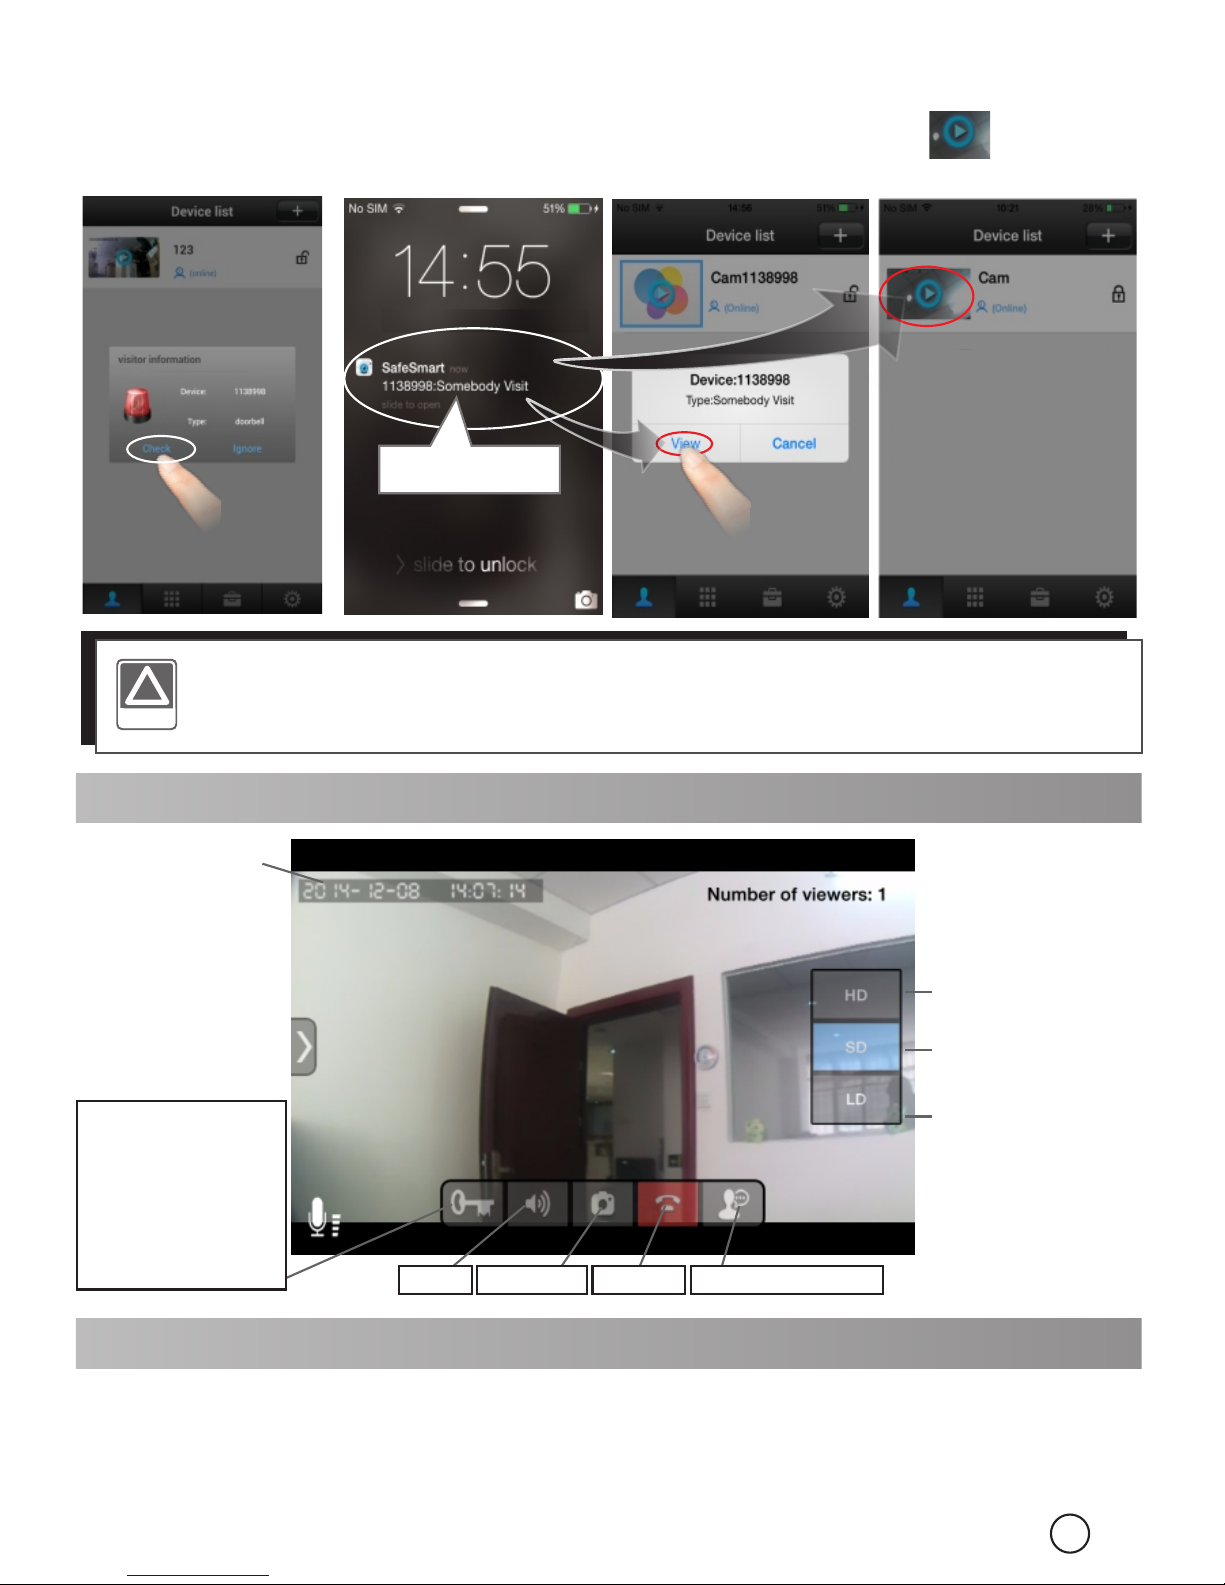
When people press the call button of the device or trigger the alarm, there
will be a notification received on the mobile phone screen. For Android,
press ‘check’ to view. For iphone, slide and press ‘view’ or to view.
!
NO TIC E:
NO TICE: User must keep the app running at phone's background, user
can't force stop the app in phone's application manager, otherwise
phone can't receive any push notification.
7. View Interface
Date and
Time
Press and hold
for 3 seconds to
unlock. Then you
had to wait for 6
s e c o n d s t o
unlock again.
View HD image at
1280*720
View clear image at
640*360
View smooth image at
320*180
8. Video Record and Playback
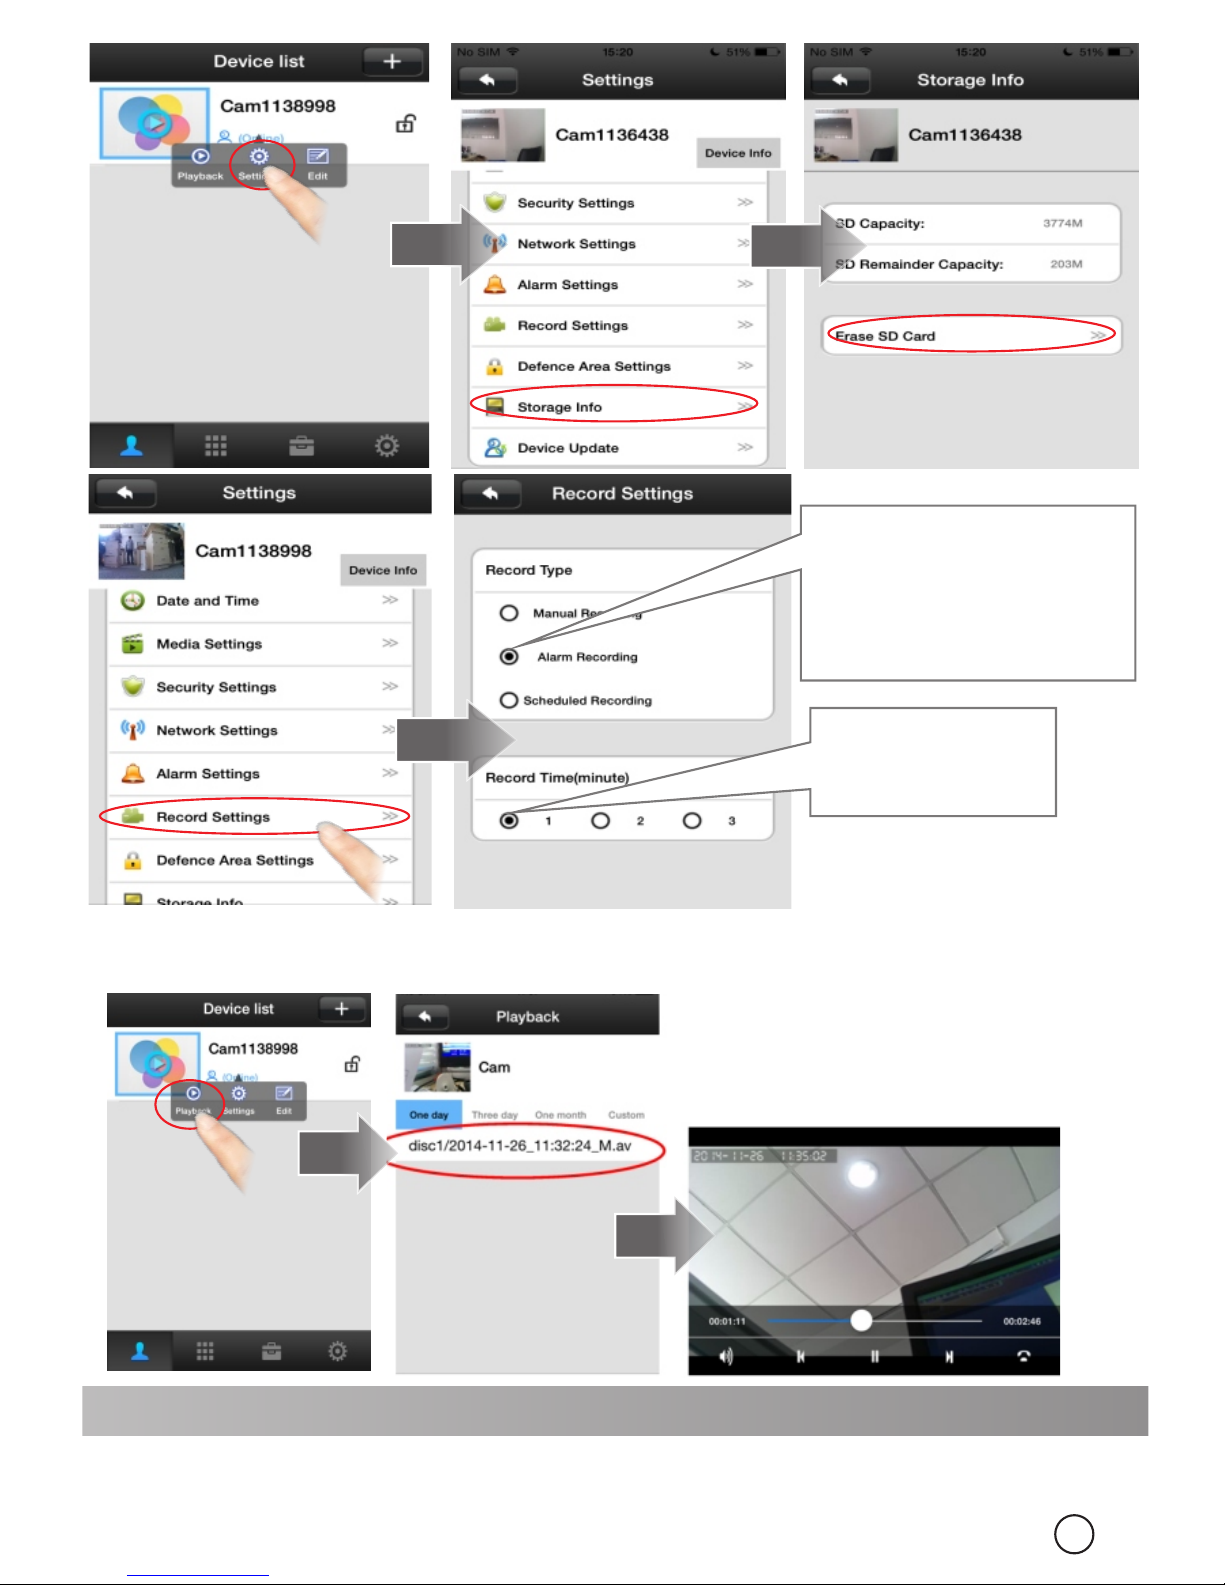
Start recording. Insert the TF card (DO NOT insert or remove TF card when
device is power on). Enter ‘Device list→ Device→ Setting→ Storage Info’
Click ‘Erase SD Card’ to format SD card. In ‘Device list→Device→Setting→
Record settings’ choose Record type and Record Time.
Step 1:
iOS
Android
6
Slide to view
Audio
Snapshot
Hangup
Hear/Talk Button
Page 7
7
Step 2: Playback.
view playback.
In ‘Device list→Device→Playback', chose the video file to
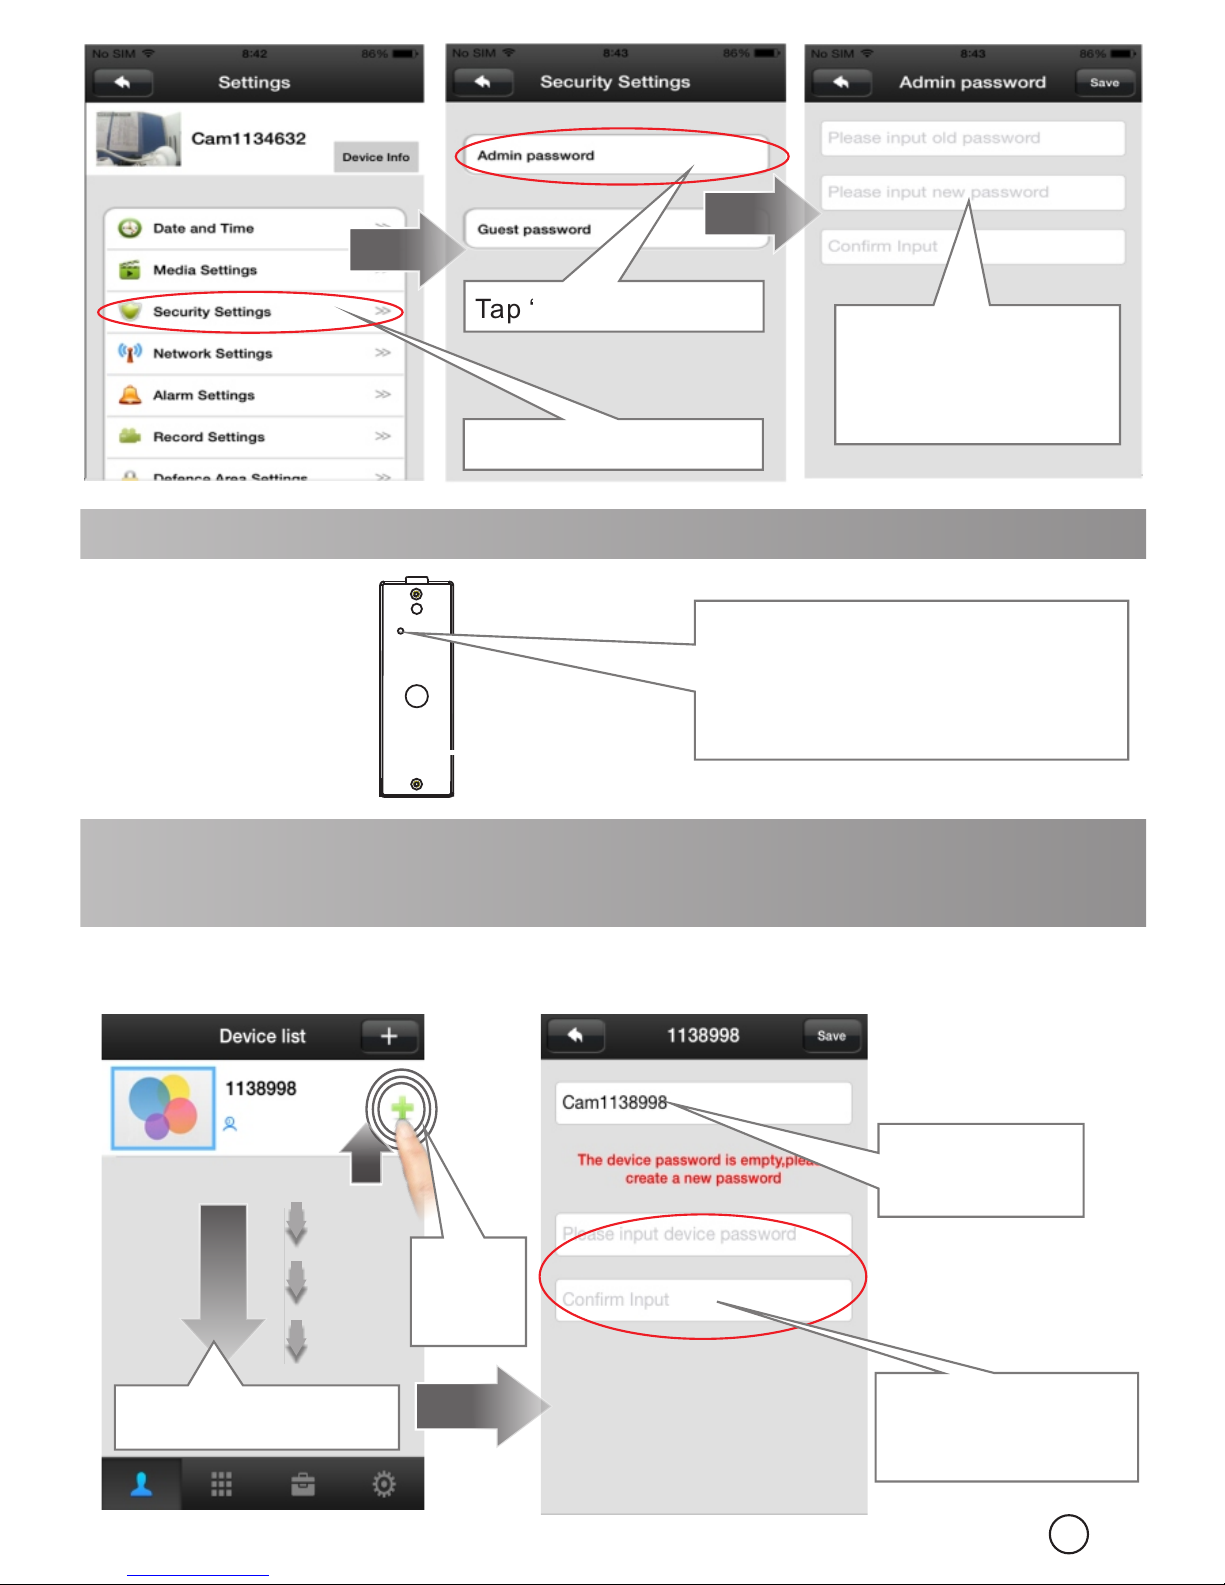
‘Device List→ Setting→ Security Settings’, choose ‘Admin password’ to modify
device’s password.
2 . C h o o s e t h e
recording time.
1 . C h o o s e ‘ A l a r m
Recordin g’ to record
when visitor press ring
b u t t o n o r s e n s o r s
triggered.
9. Modify device’s password
Page 8
8
10. Reset the device
Press and hold the reset button
for 5 seconds and you will hear
a voic e o f ‘KING ’, wait 3 0
seconds to restart the device.
11. Connect wifi by using network cable (Only used for the
QR code scanning is not available)
Step 1:
Plug in a network cable to the device and the LAN plug of the router.
Step 2: Add device. In ‘device list’ slide down to find device.
3. Input your
device name
1
2
1.Slide down to refresh
and find device
2.Click
to add
device
4. Input your device
password, then tap
‘Save’.
Tap ‘Admin password’
Tap ‘Secrity Setting’
I n p u t t h e o l d
password and the
new password, then
tap ‘Save’.
Page 9
Please confirm the correct Wi-Fi setting and insure the position with
good Wi-Fi signal before mounting on the wall. Otherwise, it needs to
relocate the router or the antenna direction to receive the good Wi-Fi
signal. If the Wi-Fi signal is still not strong enough, please add the Wi-Fi
repeater or use the network cable.Make a mounting hole similar size as
the back housing of the device. Drill a hole for the wires to go through
the wall.
Remark:
9
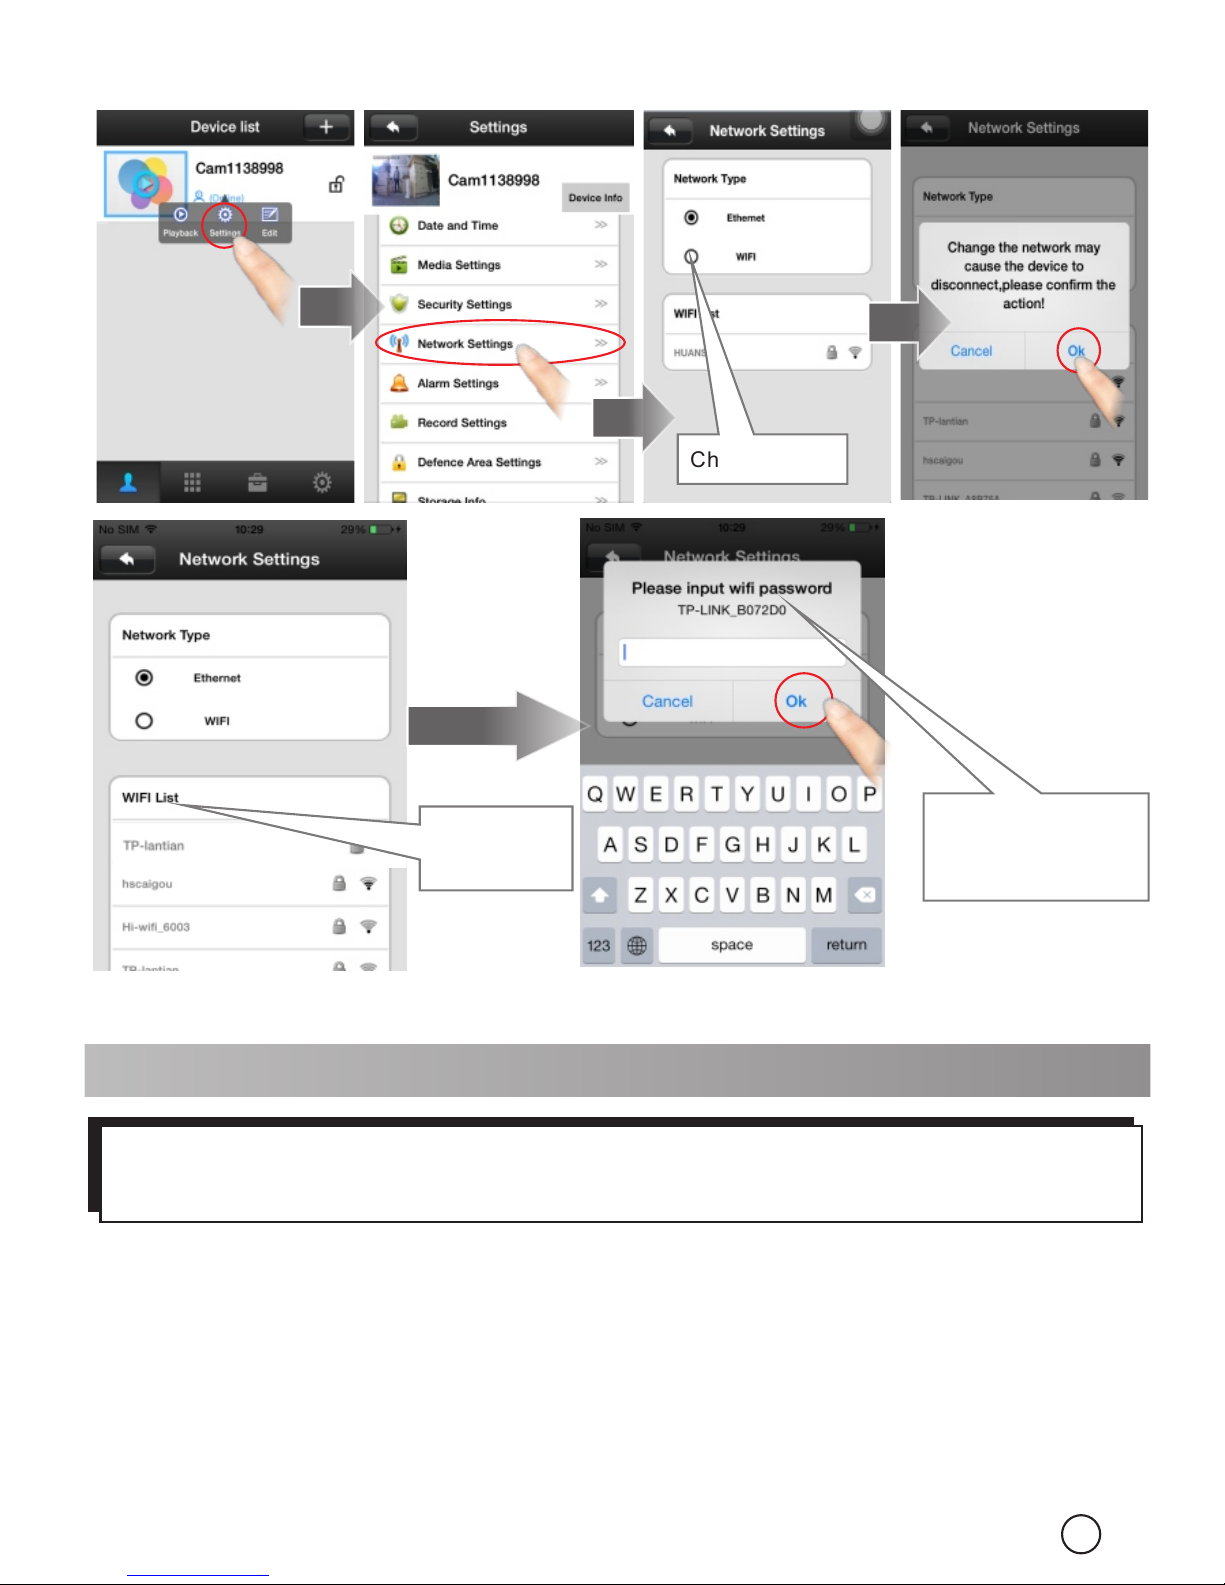
Choose ‘WIFI’
Choose the
WIFI
I n p u t w i f i
password and
tap ‘Ok’
Step 3: Set wifi. In
to set device WIFI.
‘Device list→Device→Setting→Network settings’ Choose ‘WIFI’
Notice: The wifi antenna should be installed inside the house to have better
signal.
12. Mount on the Wall
Page 10
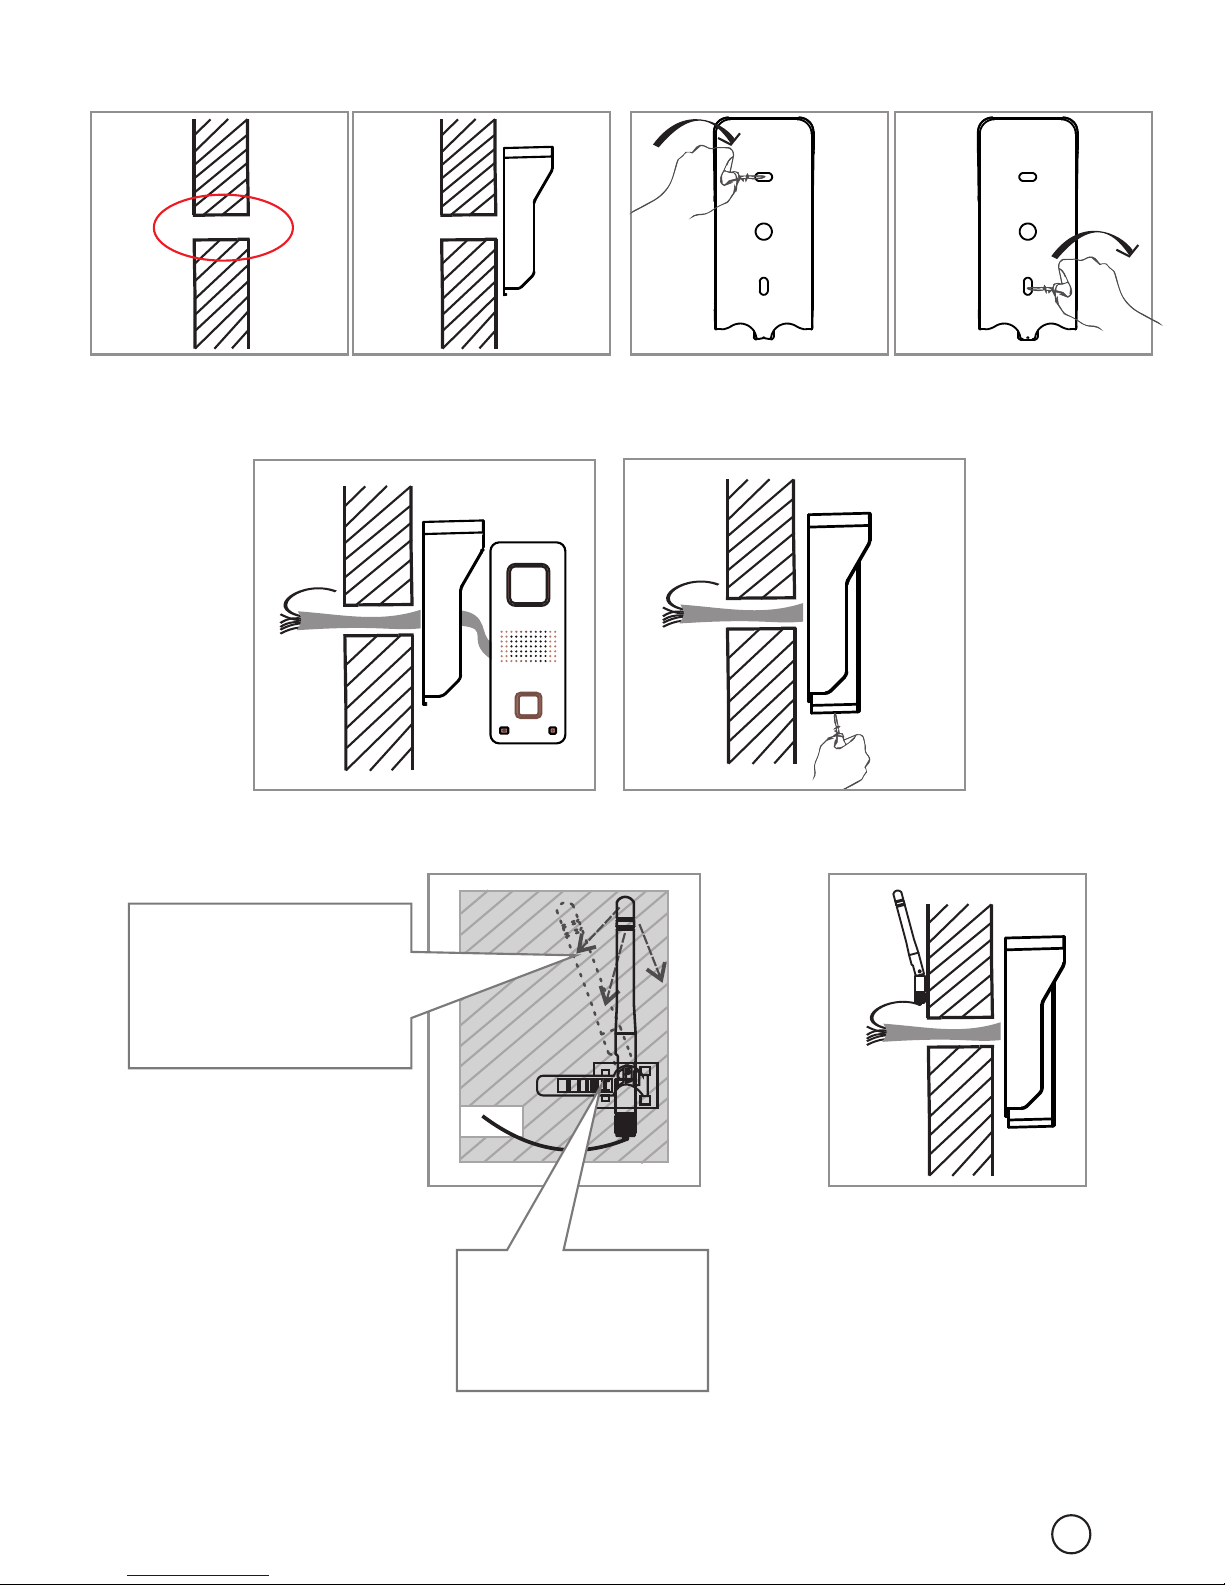
Step 3: Lead the wires through the hole in the wall, and put the device into the back
housing. Tighten the screw in the bottom.
Step 1: Drill a hole for the wires to go
through the wall
Step 2:
Fix the back housing on the wall
with two screws
Step 5: Connect the wires of power supply, unlock signal, antenna, etc. in other side
of the wall.
10
Step 4: Locate the antenna clip on the wall with screws.
A d j u s t t h e
a n t e n n a
direction to have
the good signal
L o c a t e t h e
antenna clip on
t h e w a l l w i t h
screws.
Page 11
11
FAQ
13. Tamper Alarm
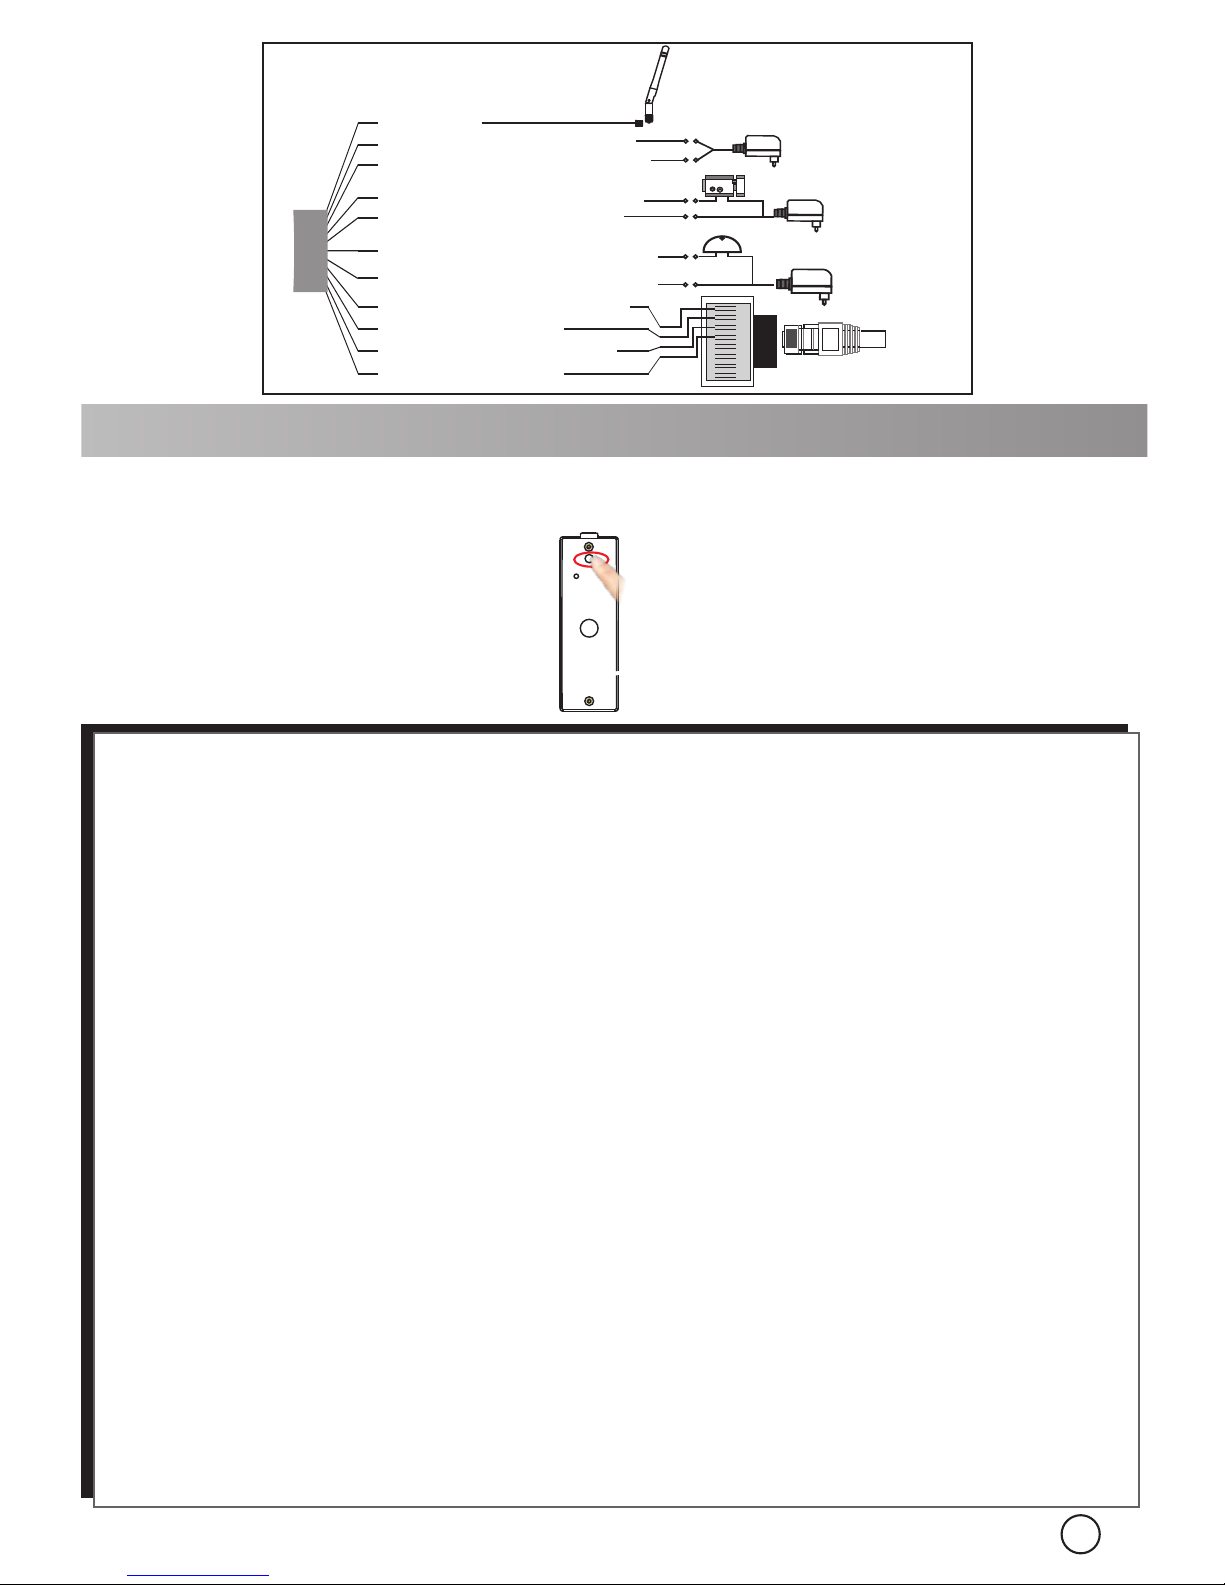
Doorb ell
Power in D C+ (1 2V)(Red)
Antenn a
Doorbe ll R el ay COM(Gray)
Net RJ45( Or an ge&White)
Lock
Doorbe ll R el ay NO(White)
Net RJ45( Or an ge)
Net RJ45( Gr ee n&White)
Net RJ45( Gr ee n)
Lock Rel ay C OM (Yellow)
Lock Rel ay N O( Purple)
Power in D C- (1 2V)(Black)
Door ph one
power s upply
Lock Po wer
suppl y
Doorb ell
Power s upply
1
2
3
6
4
5
7
8
(DC12 V 500mA )
When the thief open the device, it will have siren alarm, and your phone will receive
alarm too. (The tamper alarm will be last for 1 min.)
A:
Q1.
Why I can’t scan QR co de?
Device should have ‘ Di,Di,Di,Di….’ Sound to notice user scanning Wifi QR code. If device have
no 'D i.Di.Di.Di....' sound means the devi ce is not normal. User should press the reset button for
5 seconds until hear ‘KING’ and scan after hearing the 'Di.Di.Di.Di....' n otice sound.
Device is designe d not able to s can Q R code for 2 ti mes. If want to change Wifi in another place,
user shoul d press the reset button for 5 second s until hear ‘KIN G’ and scan after h earing the
'Di.Di.Di.Di....' notice sound.
If device is connected with RJ45 net cab le, it can’t scan QR code, user s hould re move net cable
and scan QR code.
Maybe you are using 5Ghz WIFI, device don’t support 5Ghz WIFI, user should use 2.4GHz WIFI
to connect.
Maybe your router is using WPA2-PSK (TKIP) or WPA-PSK/WPA2-PSK( TKIP)encrypt mode.
Device don’t support WPA2-PSK (TKIP) and WPA-PSK/WPA2-PSK(TKIP)encrypt mode, user
should ch ange to ot her encrypt m odes li ke WPA-PSK(AES) , WPA2-PSK(AES), W PAPSK(TKIP), WPA-PS K/WPA2-PSK(AES)or WEP.
1,
2,
3,
4,
5,
Why I can't receiv e push notification ring o n my phone?
Q2.
A:
Make sure app's ‘Device->Settings->A larm Settings->Receive alarm message’is enable.
Make sure the app is running at phone's background, and you haven't forc e stopped the a pp in
phone's appliction manager.
Make sure you had chosen ‘OK’to allow app to send you notific ation when you first inst all the
app. Or check your p hone's notification ce nter to enable receiving app's notification.
If 2 mo bile phon es use the same account ID to login at the same time, only 1 m obile phone can
receive t he push notification alarm ring. So if use 2 mobile ph ones to connect the d evice, user
should register 2 different account IDs for th e 2 mobile phones.
1,
2,
3,
4,
Why some time s after I received push notification ring on mobil e phone, it takes too long time to
connect to video o r fail to connect to video?
It is possibly because your mobile phone is using 3G network and at that place the 3G network
Q3.
A:
Page 12
12
Why I hear a shrill sound, too small sound or can't hear sound fr om the doorphone on my
Android phone?
Different pho ne model have differen t vo lume. User can adjust the vo lume of the phone to have
better sound.
iPhones, iPad and most Android phone's sound is good engouh. Only few special Android phone
models sound is not good, in this case user can press the ‘Hear/Talk Button' to hear
only and press again to talk.
Why the device hav e noise and echo.
Possiblel y because the mobi le phone is too clos ed to the device, move the phone far away and try.
A:
Q6.
A:
Q7.
A:
Q8.
Why I ca n't open the lo ck?
Poss iblely you ha ven't hold pr essing the un lock button e nough time, p ls hold press ing it for 3 seconds.
Poss iblely your c onnection t o the lock is wro ng, pls check t he lock's required signal.
1,
2,
1,
2,
How can I updated my app if I face problem?
Pls get in the app and go to 'System Settings' and cl ick 'Update' to update to newest version
How can I updated my device if I face problem?
Pls get in the app and go to 'Device List->Devic e->Settings' and click 'Device Update' to update
to newest versio n.
A:
Q9.
A:
Q10.
Possible there are too many other devices like computers on the same router, pls close
these devices or change to a bigger bandwith network.
A:
2,
Why Video and v oice delay when I mount the doorphone on the villa fencing or far o utside?
Possiblely because the distance and thi ckness of blocks exceeds the transmitting ability of
antenna. User can choose to use a 16DB fixed dir ection antenna to improve the wireless signal.
A:
Q5.
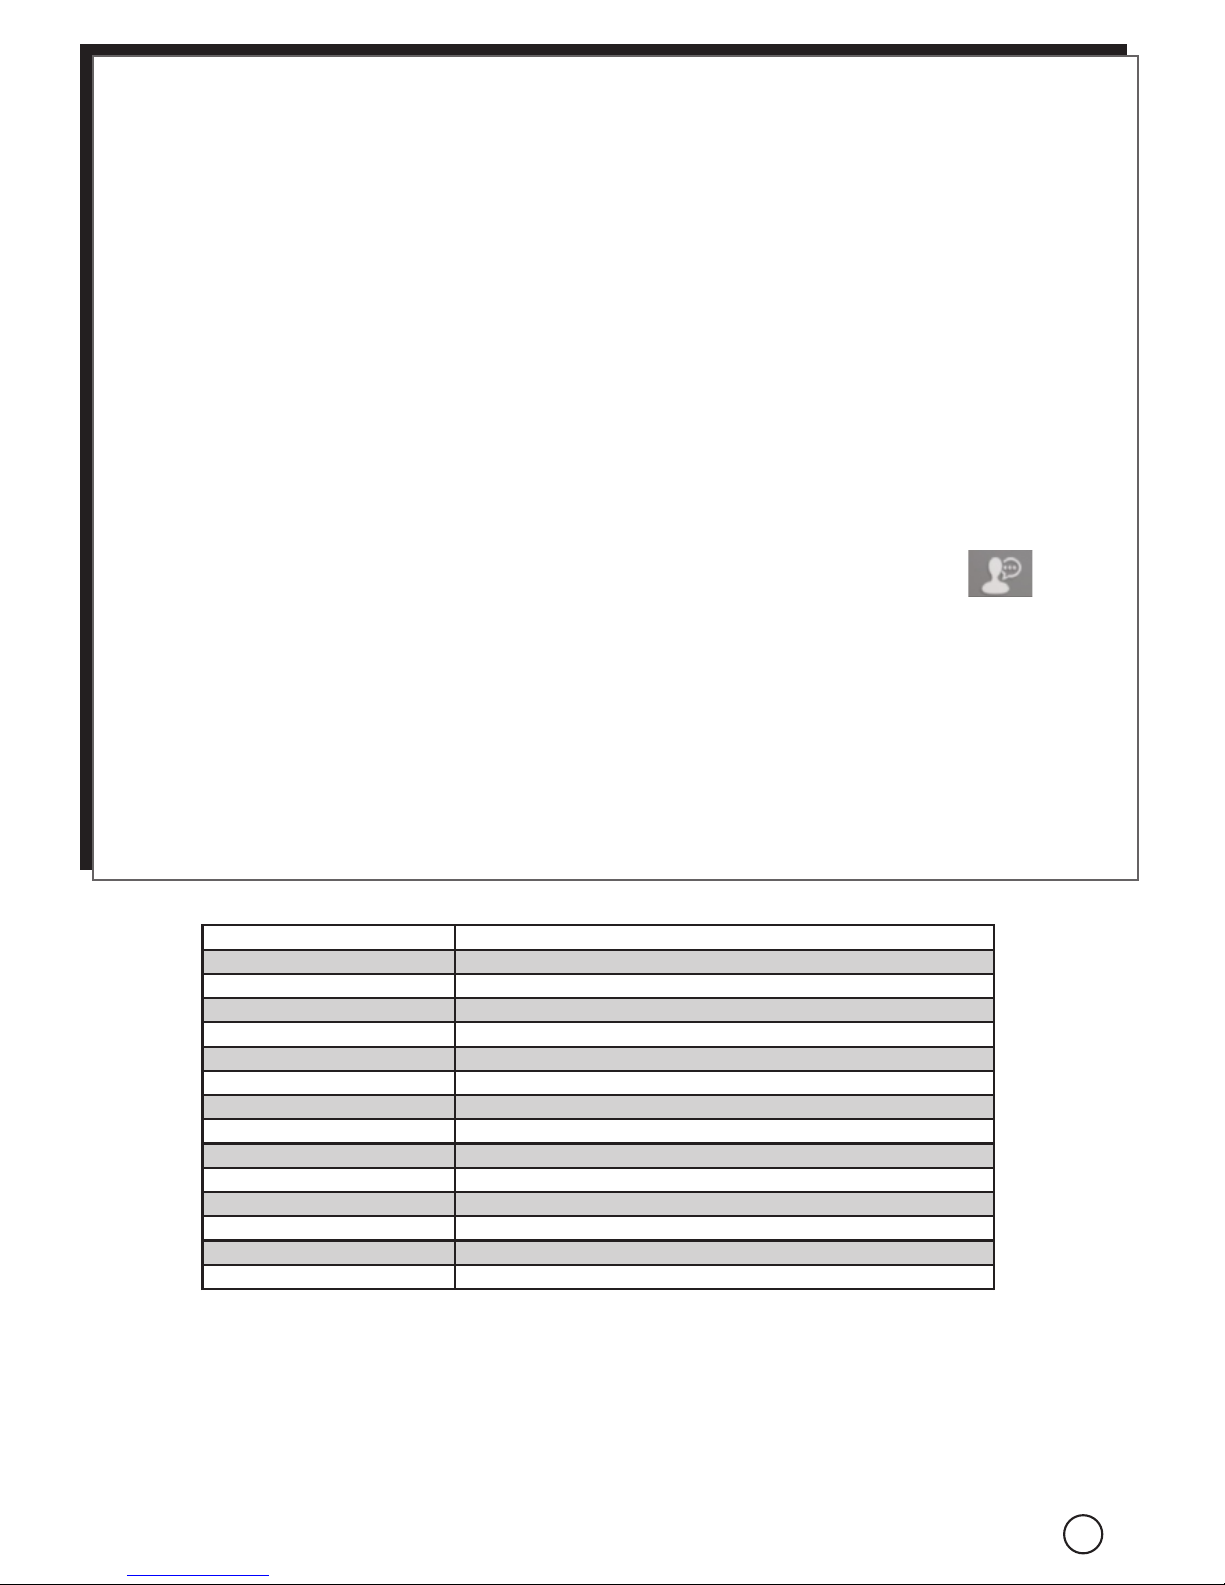
Model Specification
Image Sensor
Compression
Resolution
Memory
Lens
Sensitivity
IR LED
Night vision distance
IR-CUT
WiFi Antenna
Size
Power Supply
Working tempe ra tu re
Working humid it y
IP level
1/4" Color CMOS Sensor
H.264
HD:1280*720;SD:640*360;LD:320*180
8GB Memory inside. Optional , Ma x. 3 2G .
Fixed 2.1mm 110° /3 .6 mm 6 0°
0Lux ( IR ON ) / 0.5Lux ( Normal )
4 × Ф4
Max. 2 meters
Optional
3DB/6DB/10DB/16DB Optio na l
L55xW40xH129mm
DC 12V 500mA <12W
-20℃ ~ 50℃
10% ~ 80% no condensation
IP65
Why can’t hear the v oice clearly, picture delay, voice delay, halt or no sound.
Possiblely because network not good and stabl e. Choose the ‘LD’ mode to try or change a
better bandwidth network.
A:
Q4.
1,
signal is not good enoug h and percentag e is only 25% or 50%. If 3G network percent is below
75%, it is not good enough to transfer v ideo file, user should change to other place f or better
mobile 3G si gnal or change to use WIFI signal. Moreover, 1 device can send push notification
ring to max. 5 mobile phones at the same time, user should set more mobile p hones to receive
the push notification ring to avoid this 3G si gnal not good at some places problem.
 Loading...