

Dux AIROHEAT D2FHG4HW0C Installation And Owner's Manual
Heat Pump Water Heater
Specications and materials may change without notice.
Effective for Airoheat® water heaters manufactured and sold after 1st November 2016.
Installation and Owner’s Manual
Model: D2FHG4HW0C
H4120 025941 Rev. D
For advice, repairs and service, call:
1300 365 115 (Australia)
0800 729 389 (New Zealand)
Carefully remove all packaging and
transit protection from the heater before
installation. Dispose of the packaging
responsibly using re-cycling facilities
where they exist.
Installation Details
Owner’s Information
Warranty
IMPORTANT INFORMATION
Failure to follow these instructions may affect the Warranty

Installation and Owner’s Manual – Airoheat Heat Pump
H4120 025941 Rev. D
© Dux Manufacturing Limited 2016. All rights reserved.

Installation and Owner’s Manual – Airoheat Heat Pump
1
H4120 025941 Rev. D
Contents
Installation Requirements 2
Specications 4
Dielectric Fittings 5
Plumbing Connections 6
Filling and Draining 10
Electrical Connection 11
Commissioning 12
Safety Information 13
System Maintenance 15
Considering a Service Call? 16
Warranty 18

Installation and Owner’s Manual – Airoheat Heat Pump
2
H4120 025941 Rev. D
General:
This water heater must be installed
by a licensed tradesperson, and in
accordance with:
• AS/NZS 3500.4 Plumbing and
Drainage – Heated Water Services.
• Clause G12 of the NZ Building
Code (in New Zealand).
• AS/NZS 3000 Electrical Installations
(known as the Australian / New
Zealand Wiring Rules).
• Local authority regulations.
• Outside Australia and New Zealand,
please refer to local plumbing and
building codes and regulations.
Failure to comply with these
requirements may affect the warranty.
Note for Victoria:
This water heater must be installed by
a licensed person as required by the
Victorian Building Act (1993).
Only a licensed person will provide a
compliance certicate, showing that
the work complies with all the relevant
Standards. Only a licensed person
will have insurance protecting their
workmanship.
Pool Heating:
This water heater must
not
be used for
pool heating.
Location:
The water heater should not be installed
in small enclosed spaces. For efcient
operation, the water heater should be
located outdoors or in a space with a
volume of at least 200 cubic metres.
Ensure the compliance plate and
associated warnings are clearly visible.
The water heater must be accessible
without the use of a ladder or scaffold.
Adequate clearance must be available
for service to the electrical cover,
refrigeration components, Hotlogic
®
controller, relief valve and sacricial
anodes.
Avoid positioning the water heater near
bedrooms or neighbours’ bedrooms as
it can be expected that the water heater
will run during the night.
The water heater should be located as
close as possible to the most frequently
used hot water outlet.
Circulated Hot Water Systems:
This water heater should not be installed
as part of a circulated hot water ow
and return system.
If a circulated ow and return system
is required, Dux recommends that a
backup storage water heater is installed.
Please consult Dux After Sales and
Service for advice if required.
Installation Requirements

Installation and Owner’s Manual – Airoheat Heat Pump
3
H4120 025941 Rev. D
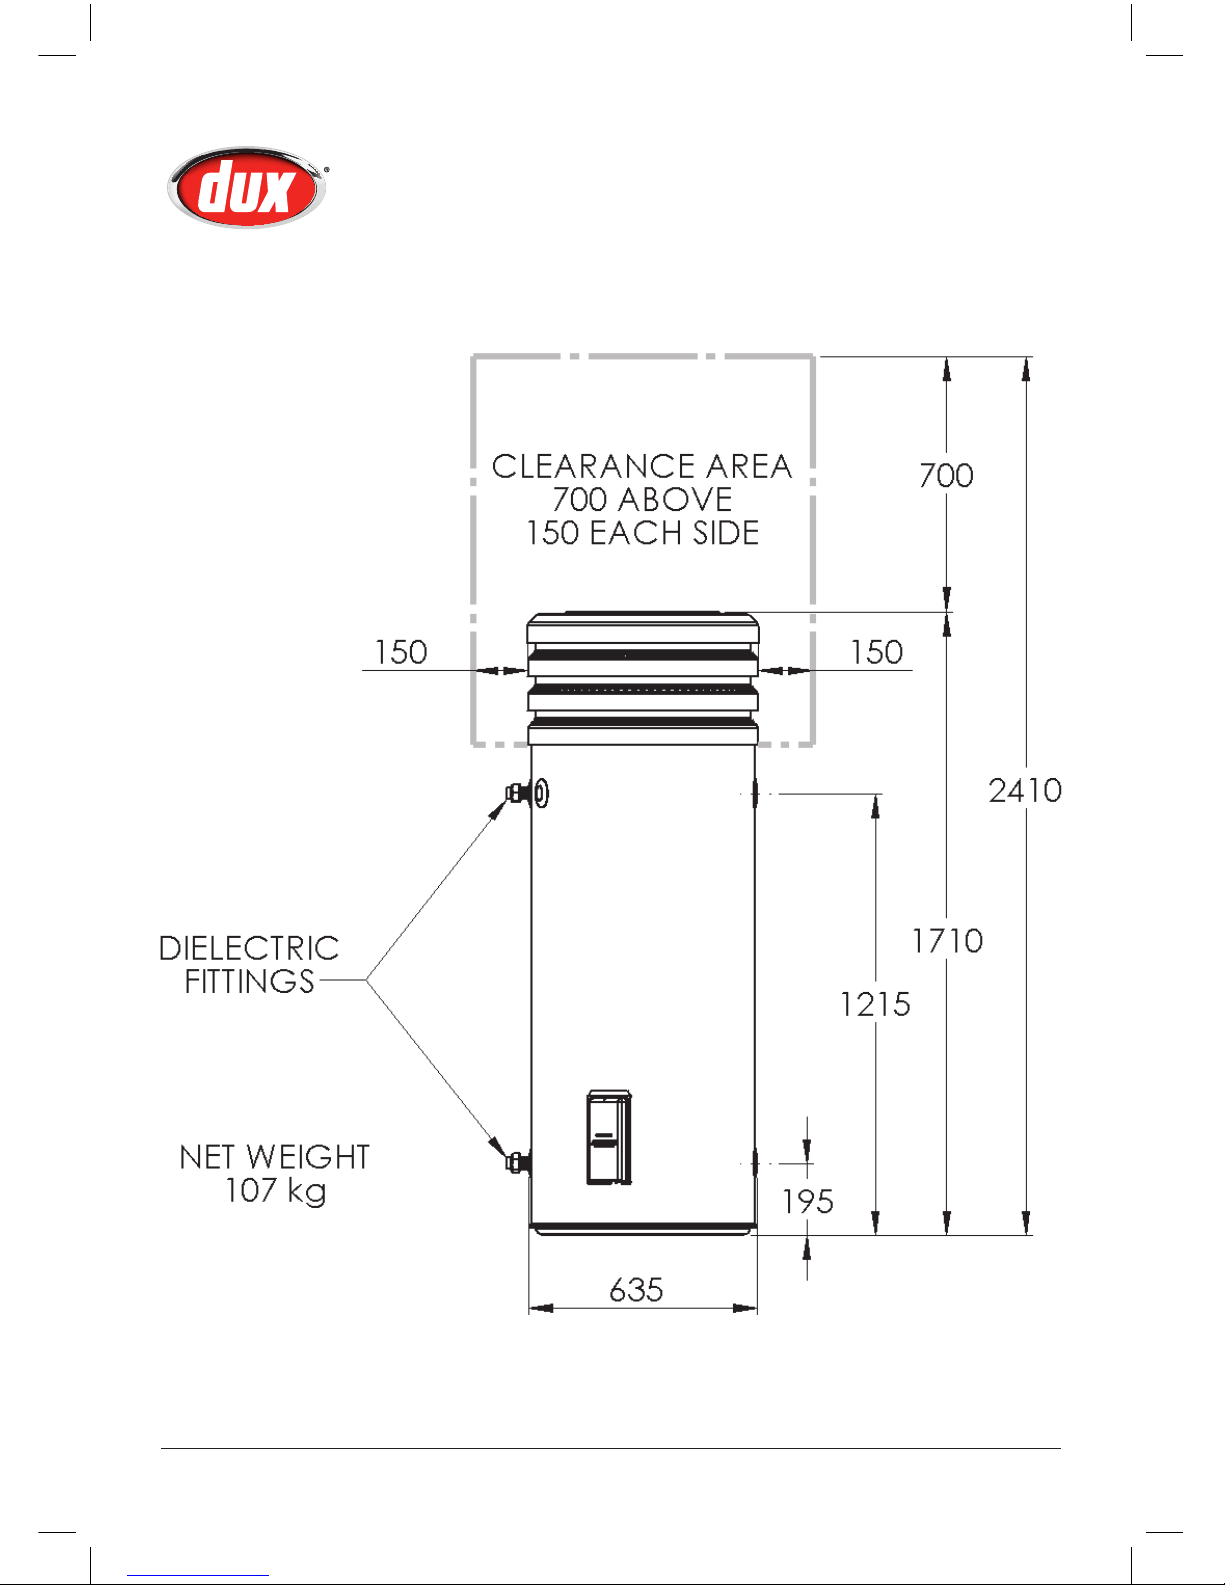
Clearances:
Allow at least 700 mm clearance above
and 150 mm clearance to either side
of the water heater. If possible, allow
1,000 mm above the water heater
to provide clearance to change the
anodes through the top cover. Refer to
Specications on page 4.
Ensure there are no obstructions placed
on top of the water heater. The area
must also be clear of debris such as
leaves and tree branches.
Water Heater Support:
The water heater must be installed on
a at, solid supporting surface. The
pipework must not be used to support
the water heater.
Where the water heater is subjected
to wet conditions, a plinth should be
installed under the water heater.
A properly drained safe tray must be
installed where property damage could
occur from water spillage. Refer to
AS/NZS 3500.4 for further information.
Note - the warranty will not cover
damage due to leakage of the water
heater if a properly drained safe tray has
not been installed.
Transport and Handling:
When moving the water heater, it must
be kept as close to vertical as possible
at all times.
Never tilt the water heater more
than 45° from vertical.
Tilting beyond 45° will severely affect the
operation of the water heater and may
void the warranty on the refrigeration
components.
Installation Requirements
Installation and Owner’s Manual – Airoheat Heat Pump
4
H4120 025941 Rev. D
Specifications
Installation and Owner’s Manual – Airoheat Heat Pump
5
H4120 025941 Rev. D
Dielectric Fittings
A Dielectric Fittings Kit (Part No H3189)
is included with the water heater.
It is essential that dielectric ttings are
installed in
both
the hot water outlet
and cold water inlet sockets. Dielectric
ttings do not need to be installed in the
unused hot water outlet or cold water
inlet sockets. Please also refer to the
Plumbing Connections section.
Failure to install both dielectric
ttings may void the warranty.
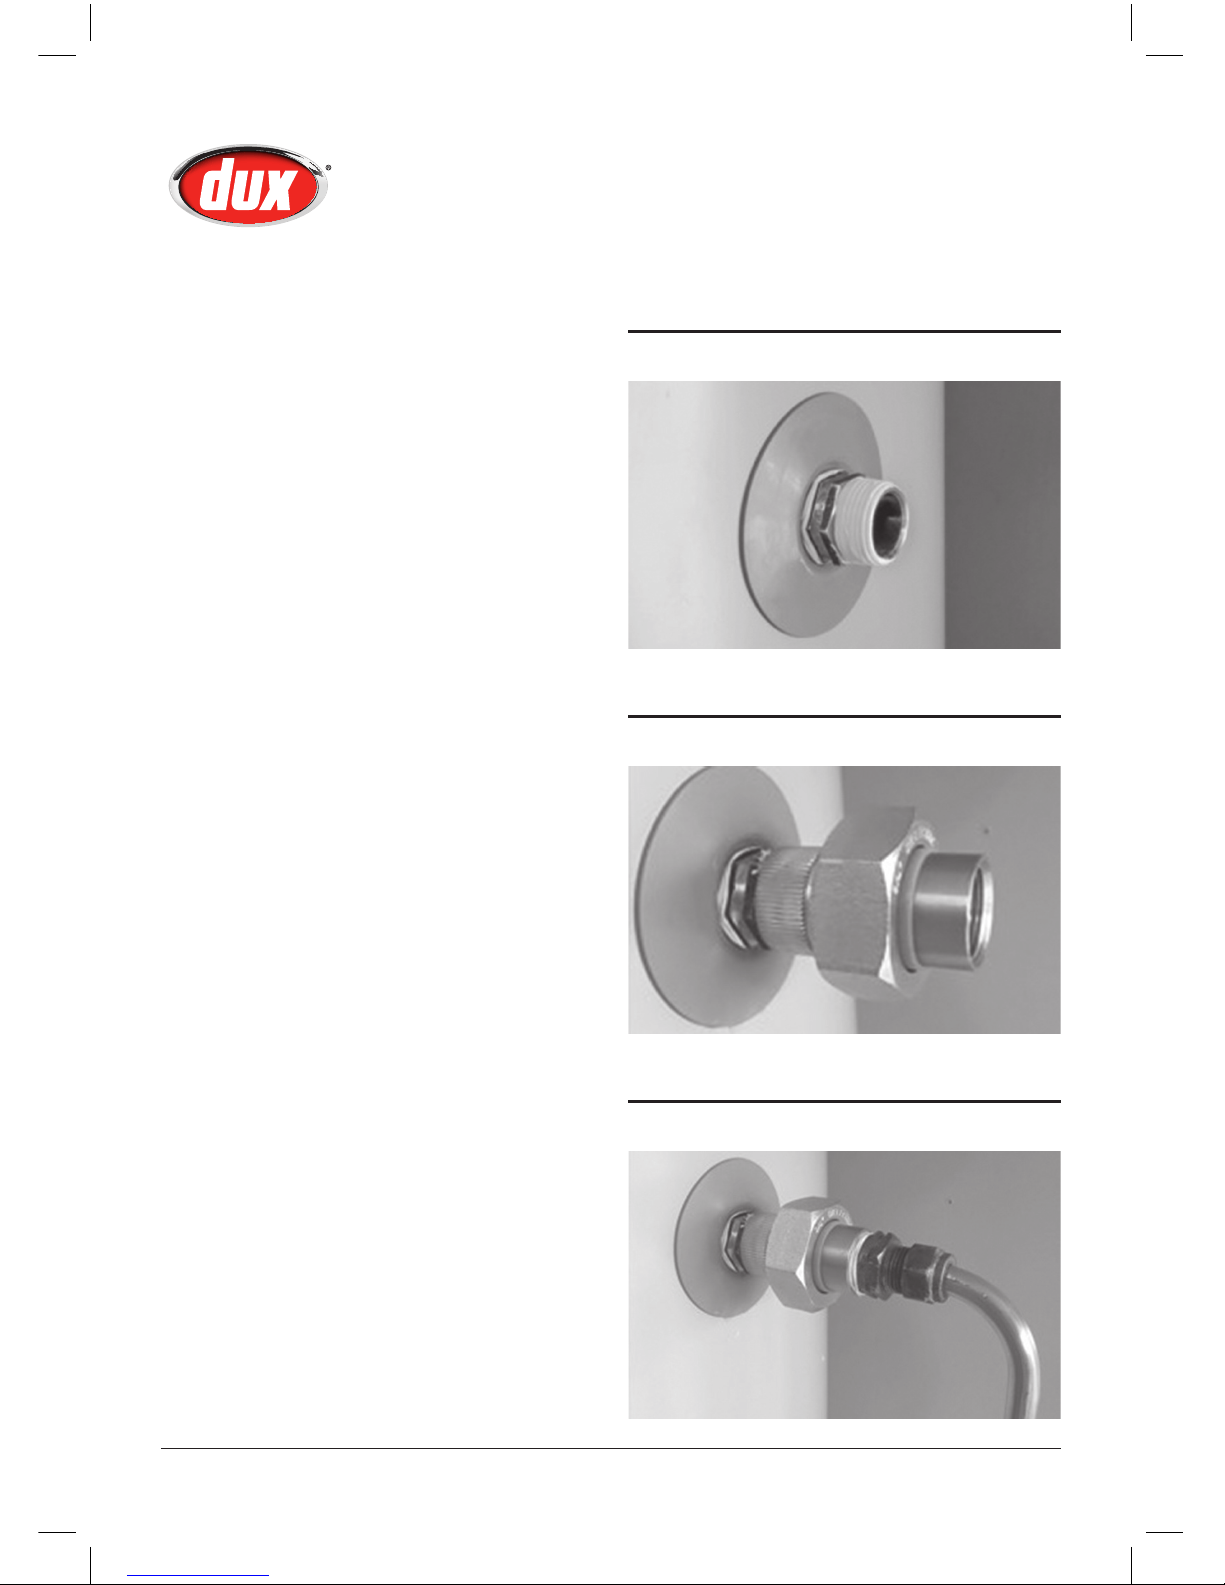
To install a dielectric tting:
1. Apply thread tape to both ends of
the brass nipple and install it into
the socket. Tighten the nipple to a
recommended torque of
~70 Nm
.
2. Install the dielectric tting to the
brass nipple, with the knurled end
toward the tank. Tighten the tting to
a recommended torque of
~40 Nm
.
3. Connect the pipework to the
dielectric tting. If brazed
connections are to be used, remove
all insulation components from the
dielectric tting to prevent damage.
Reassemble the tting once brazing
is complete and the ttings are cool.
Step 1
Brass Nipple Installed
Step 2
Dielectric Fitting Installed
Step 3
Pipework Connected
Installation and Owner’s Manual – Airoheat Heat Pump
6
H4120 025941 Rev. D
Water Supply:
This water heater has been
manufactured to suit the water
conditions of most Australian
metropolitan supplies.
Please note certain water supplies can
have a detrimental effect on the water
heater and its life expectancy. If you are
unsure about the water supply you can
obtain information from the local water
supply authority.
The water heater is designed for use in
areas where the Total Dissolved Solids
(TDS) content of the water supply is
less than 2500 mg/L. The Tank Failure
Warranty does not apply in areas where
the TDS exceeds 2500 mg/L.
In areas where the TDS exceeds
600 mg/L, it is possible the magnesium
alloy anodes (supplied in a standard
heat pump water heater) may become
over-reactive. To alleviate this, the
magnesium alloy anodes should be
replaced with aluminium alloy anodes.
Aluminium alloy anodes are available
from your local Dux Supplier.
Water can also be very corrosive, the
measure of this is the saturation index.
If the water saturation index is greater
than 0.40, an expansion control valve
should be tted. Please consult Dux
After Sales and Service for advice if
required.
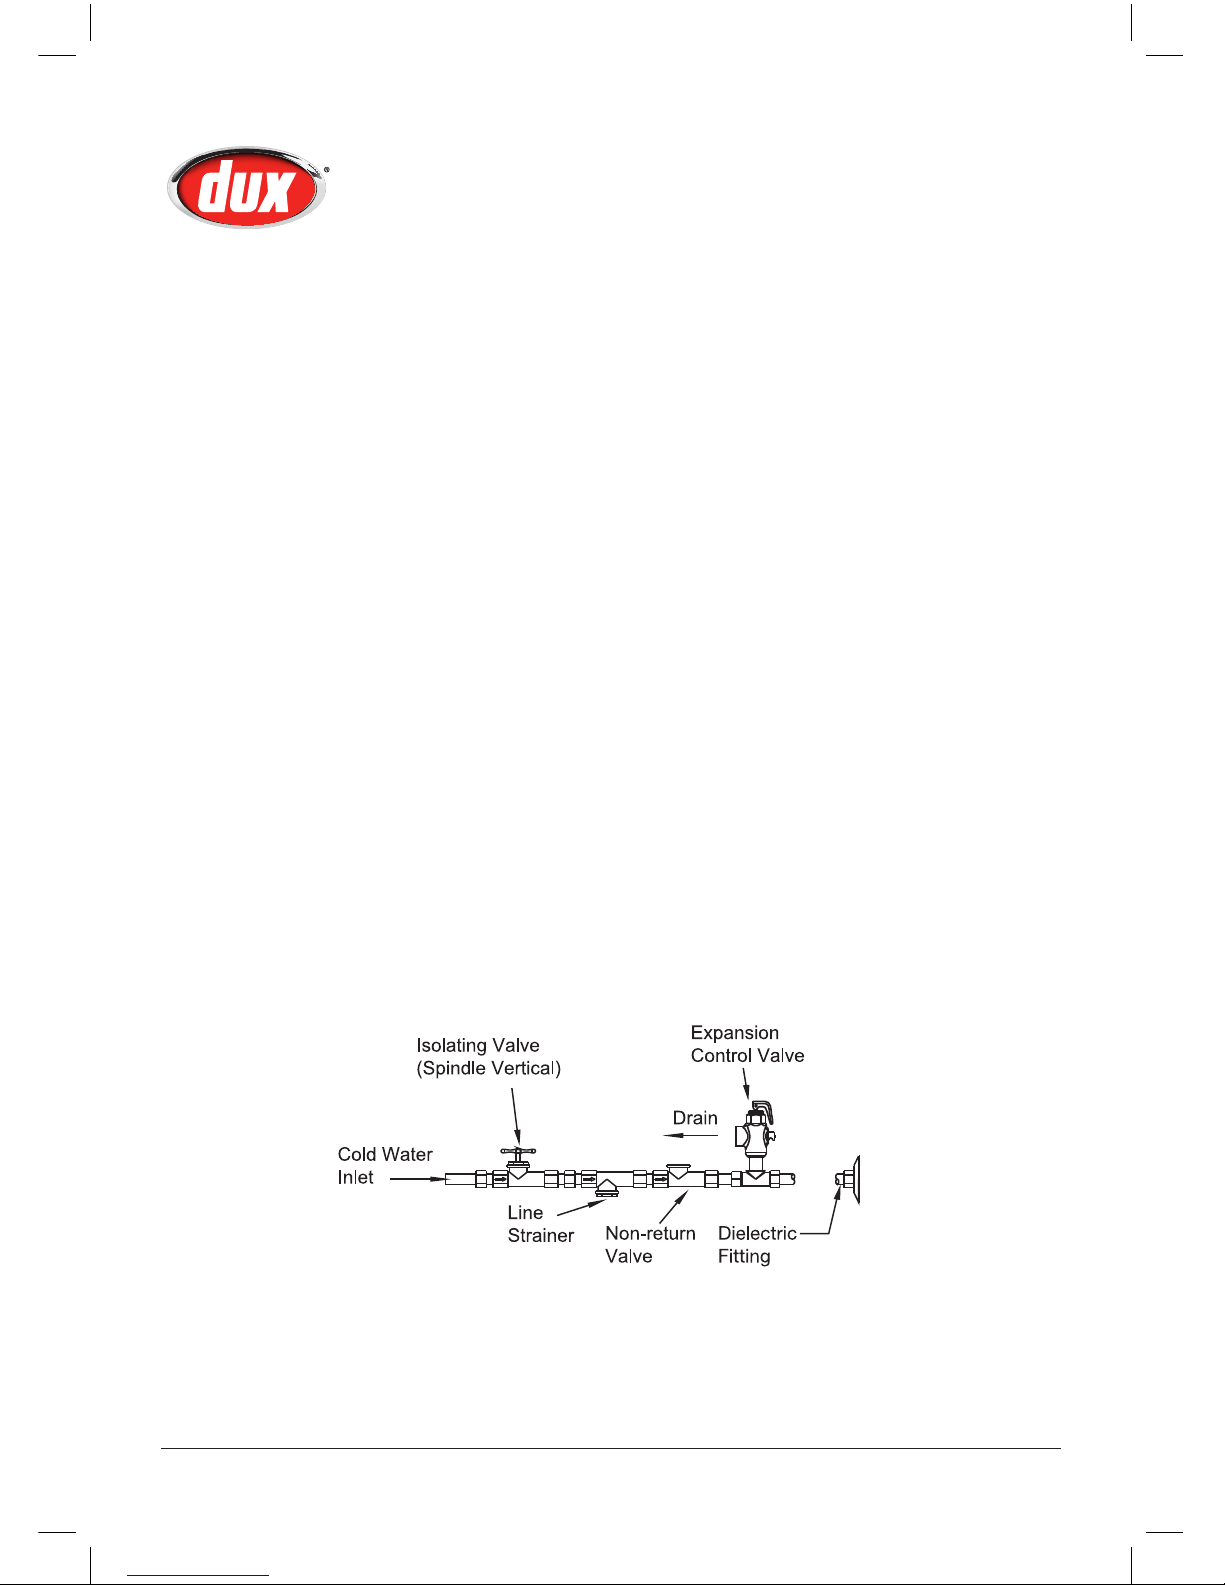
Plumbing Connections
Note: a combined isolating valve/non-return valve/line strainer may be used.
The expansion control valve is only required where local regulations demand,
although it is recommended in areas where the water saturation index is greater
than 0.40.
Cold Water Connection Diagram:
 Loading...