

Page 1
DuTCH audio IM2.1 manual
(v1.0 17-07-2018)
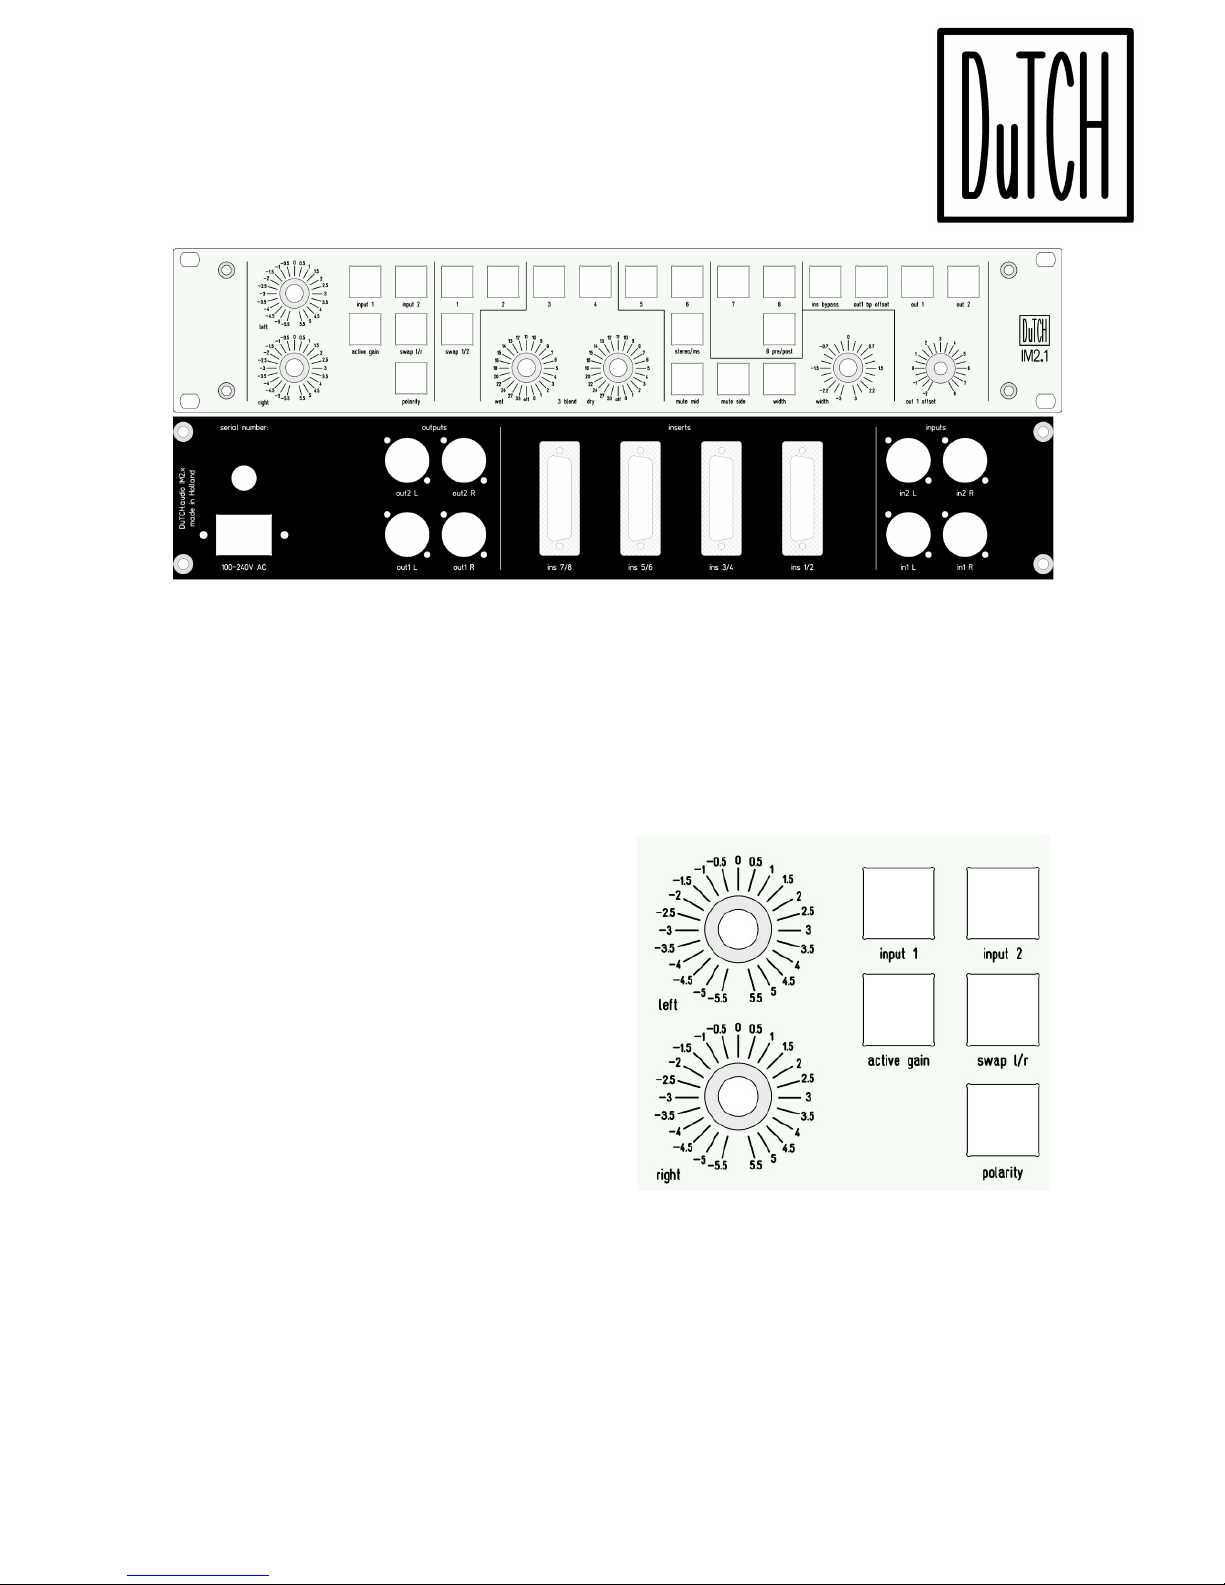
Thank you for purchasing the DuTCH audio mastering Insert Matrix IM2.1. In this manual I
will explain how this device works and how to use it. Since this is not really a beginner’s
device, I will skip the basics and focus on it’s functions. I will go from the inputs (left side),
to the inserts (middle) and to the outputs (right side), basically how the device handles
signals.
Inputs:
Input 1 / input 2:
You can choose between the 2 inputs
by
pushing the corresponding button. It’s
also
possible to use both inputs at the same
time,
but keep in mind that this could cause
some
impedance changes.
Swap L/R:
When you engage the ‘swap l/r’ button the
left
and right channel will be swapped in
order.
Sometimes this will bring things to the
surface
that you didn’t notice before because of
the
new listening approach.
Polarity:
The ‘polarity’ button will swap the polarity
of
both Left and Right. Sometimes
swapping
polarity will give a better response, mostly in the low frequencies. In most cases swapping
polarity is not needed, but in the cases where you want to, this button comes in very handy.
Keep in mind that obviously this only works with balanced signals.
Active gain:
Both inputs are passive with just relays, but by pushing the ‘active gain’ button you will
enable the active gain stage which enables you to change the input gain to your liking. In
the mid/0 position, there is no gain applied though it passes the active gain circuit. You can
change the gain in 23x0.5dB steps from +5.5dB to -5.5dB with stepped switches.
Page 2
Inserts:
Insert 1 and 2:
This is a 100% passive insert section with just relays. When disabled, it will directly pass
the signal internally to the next stage. When you enable the insert (1 and/or 2), it will pass
the signal to the corresponding send/return. It will first pass insert 1 and then it goes into
insert 2. When you push the ‘swap 1 /2’ button, it will swap the order of the inserts. So
instead of 1>2 it will become 2>1.
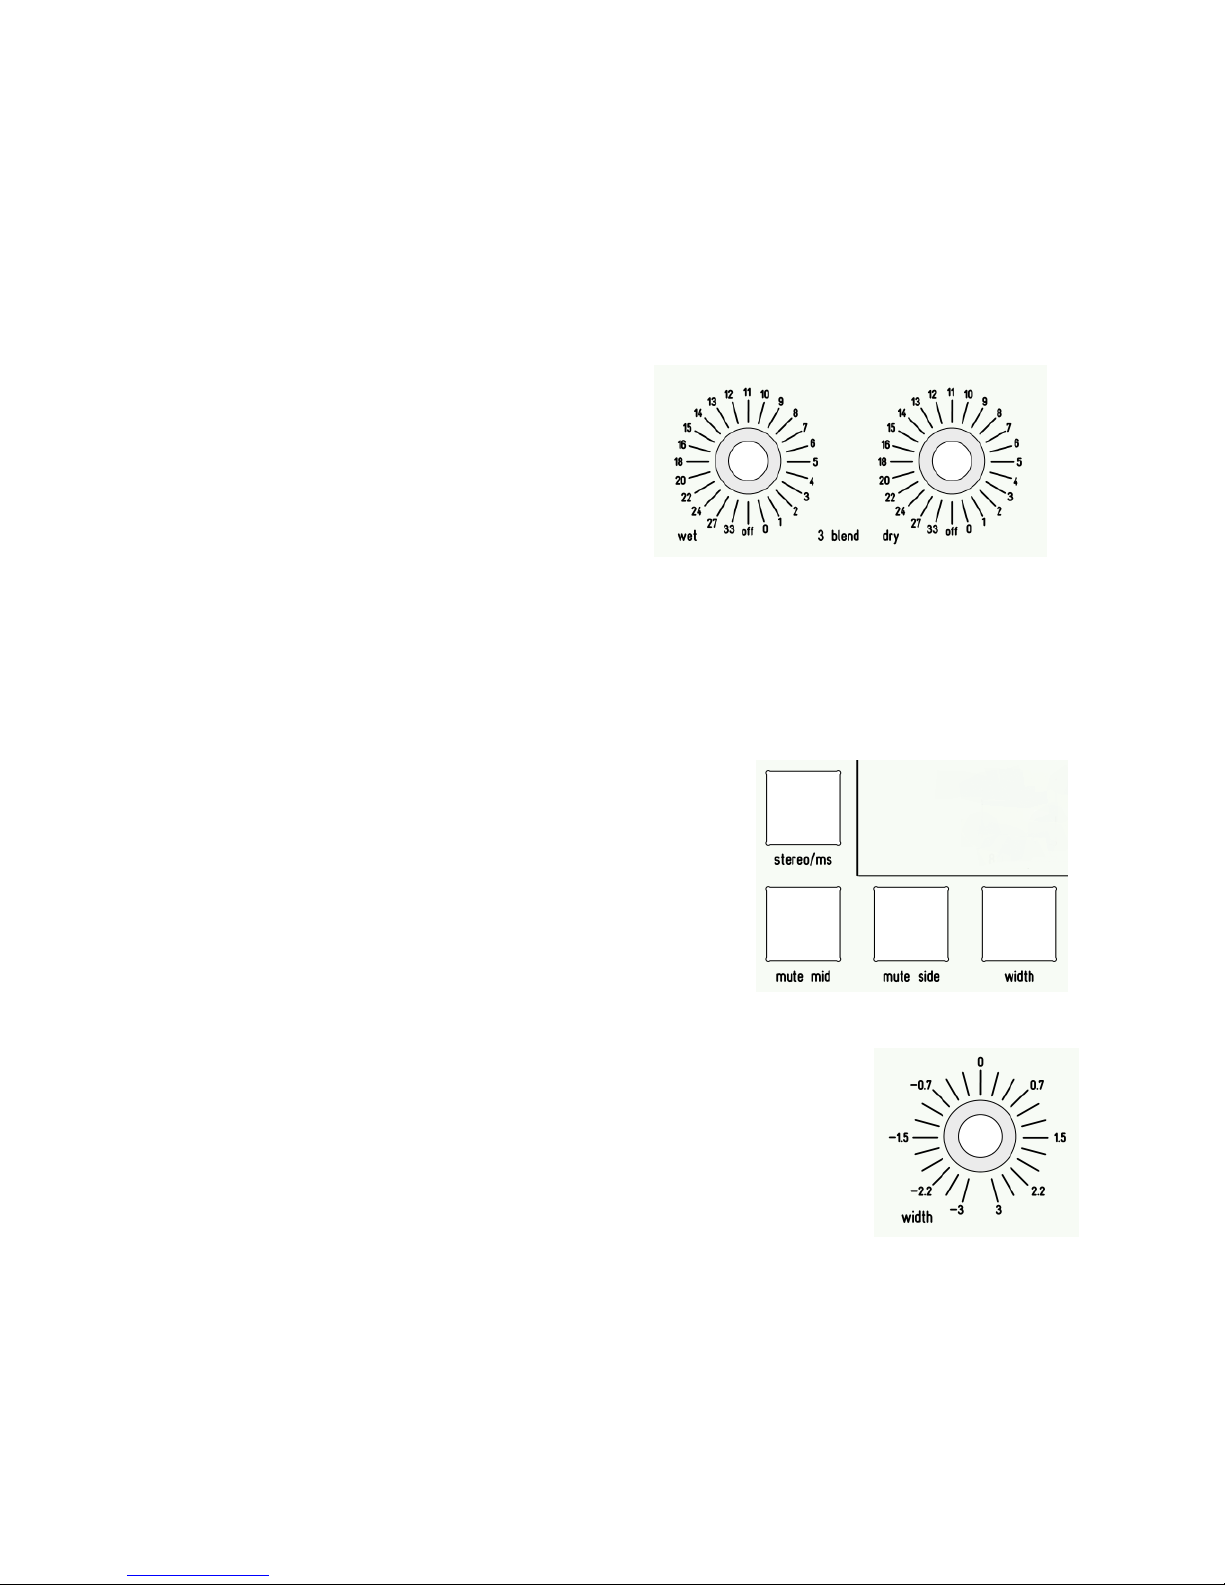
Insert 3 (blend):
Insert 3 has an active parallel/blend
function.
With insert 3 you can blend the dry and
wet
signal together. Most parallel processing
uses
one control for blending from wet to dry
and
uses a potmeter. The IM2.1 uses two
separate
controls for wet and dry with stepped
switches
instead of a potmeter. This way you don’t
have
channel imbalance, easy recall and way
better
control over what happens to the signal.
For
instance you can choose to compress the signal and blend in just a bit of dry signal. But
you also choose to use the dry signal and blend in a bit of quite aggressive compression.
The first steps on the stepped attenuators have 1 dB per step and the last steps have more
course steps, the lowest step is -33dB. The off position mutes the wet or dry signal.
Insert 4:
Insert 4 is a regular passive insert.
Insert 5 and 6 (mid/side):
Insert 5 and 6 can be used for Mid/Side processing.
When set to stereo, it will be 100% passive, when set
to
MS, it will pass the active mid/side circuit.
Mid Side:
When the ‘stereo/ms’ button is engaged, both inserts
5
and 6 will work in MS mode. Left channel is Mid
(sum),
Right channel is Side (diff). You should keep in mind
that
the sum will be louder then the diff channel because of
the
LR summing/gain buildup. So you should be a bit
careful
with ‘distortion sensitive equipment’ but in practice this will not lead to any problems.
Width:
When you enable the ‘width’ button, the width circuit becomes
active
and you can change the gain of the side channel and so, making
it
more wide or narrow. We chose to use a dedicated width enable
button
for A/B purposes. The width gain range is +/- 3dB with 23 steps.
This
way you have more precise control then with course steps and a
big
range you probably won’t need.
Mid / Side mute:
The ‘mute mid’ and ‘mute side’ buttons will let you mute mid or side so that you can listen
to just the sum (mid) or the diff (side).
Other MS functions:
When you don’t use inserts 5 and/or 6, you can still make use of the mid/side functionality.
When the ‘stereo/ms’ button is set to MS, it passes through the active MS circuit. This way
you can change the gain of the side channel and you can also listen to just the mid or side
channel by muting mid or side.
Page 3
Insert 7:
Insert 7 is a regular passive insert.
Insert 8:
With insert 8 you can swap the order of insert 8 from insert 8 to pre insert 1, so it basically
becomes insert 0. When you push the ‘8 pre/post’ button, this is what will happen:
8 pre/post off: inputs > 1>2>3>4>5>6>7>8 > outputs
8 pre/post on: inputs > 8>1>2>3>4>5>6>7 > outputs
Outputs:
Outputs:
You can choose between the 2 outputs
by
selecting the corresponding button. It’s
also
possible to use both outputs at the same
time,
but keep in mind that this could cause
some
impedance and so level changes.
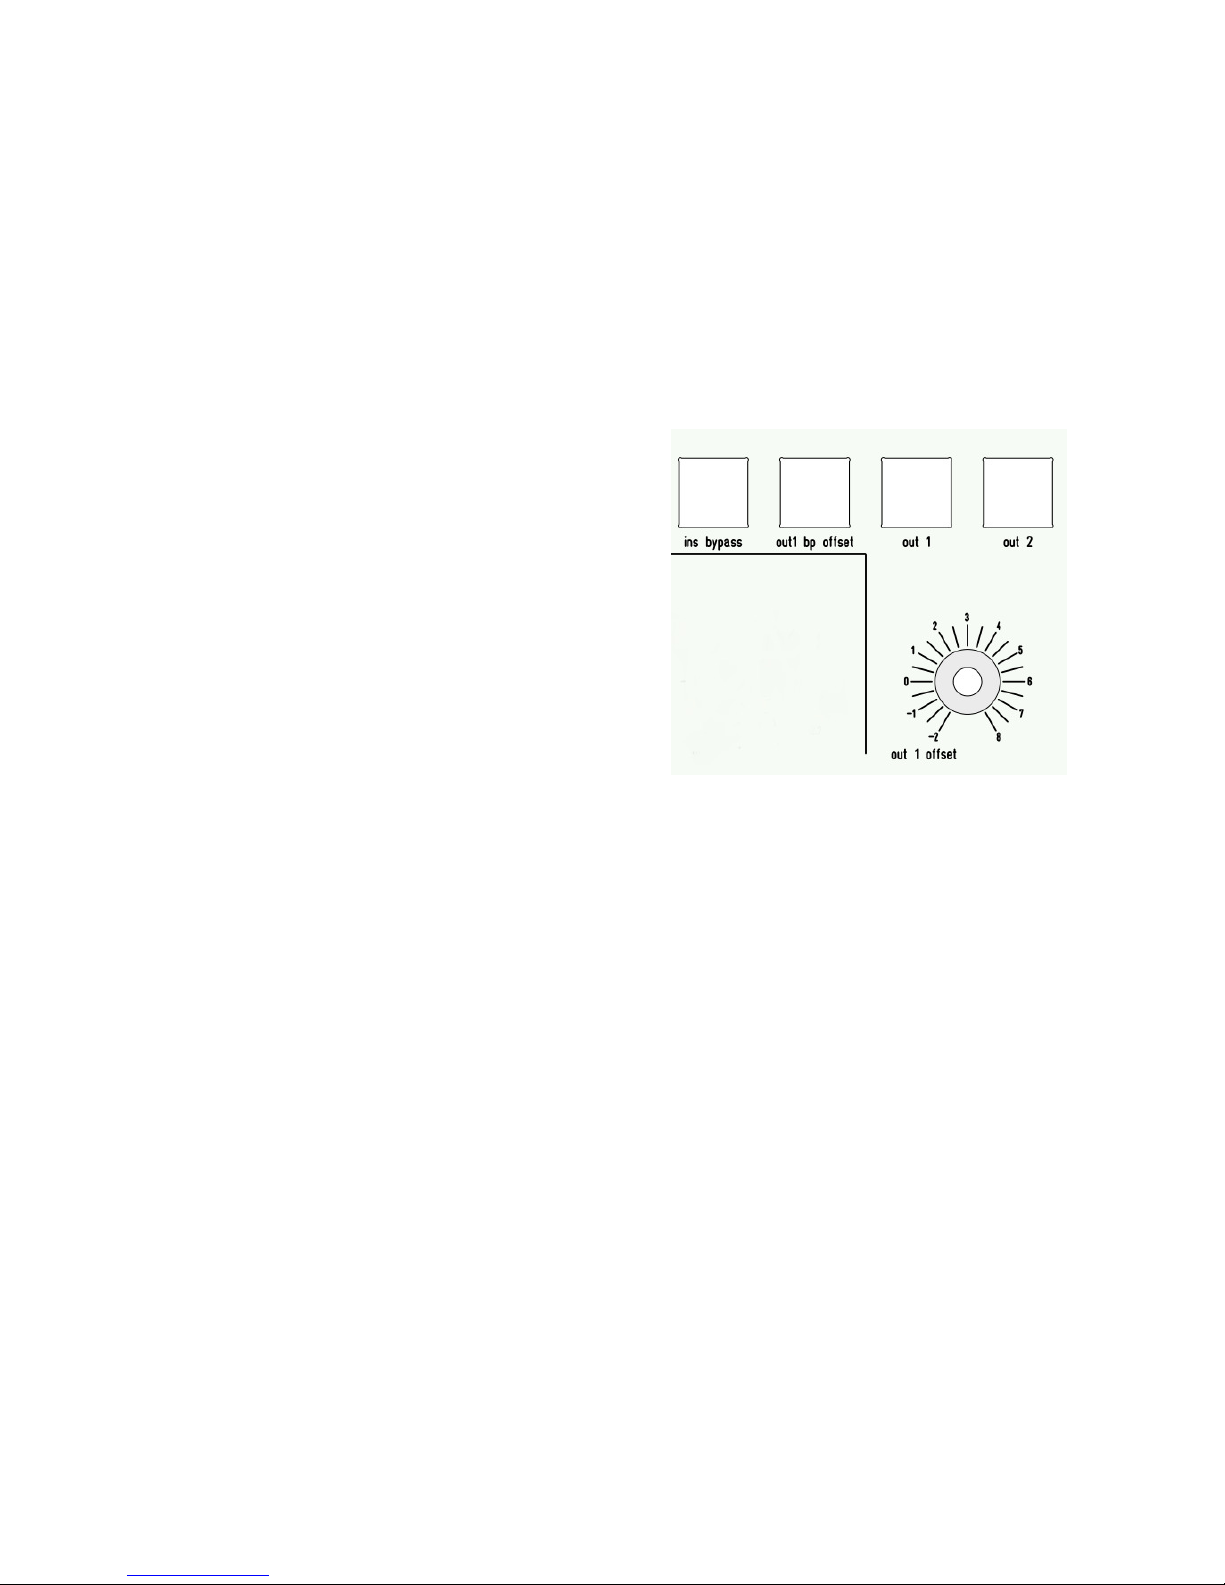
Ins bypass:
When you engage ‘ins bypass’ all inserts will
be
bypassed. You will see that all lights on the
insert
switches will go out, giving you extra
visual
feedback. Simply said, the input section will
go
directly to the output.
Out 1:
Out 1 is a passive output selector with just
relays,
so no active circuit. So basically, it’s passing the signal from the inserts straight into the
output. But when you push the ‘out 1 bp offset’, it will bypass all inserts and the active gain
stage ‘out 1 offset’ comes active. The monitor offset will allow you to change the bypass
gain to make up for the processing of the inserts. This way you can A/B between the analog
processing and level-matched bypassed signal. The gain range is set from -2dB to +8dB
done with a potmeter instead of a stepped switch for a more precise adjustment. And since
this is just an AB function no recall is needed. Internally the gain range of the monitor trim
can be calibrated with 2 multiturn trimmers.
Out 2:
Out 2 is a passive output selector with relays and no active stages.
Page 4
Rearpanel:
Inputs:
The IM2.1 has two balanced inputs. Both inputs consist of gold-plated Neutrik XLR’s.
Inserts:
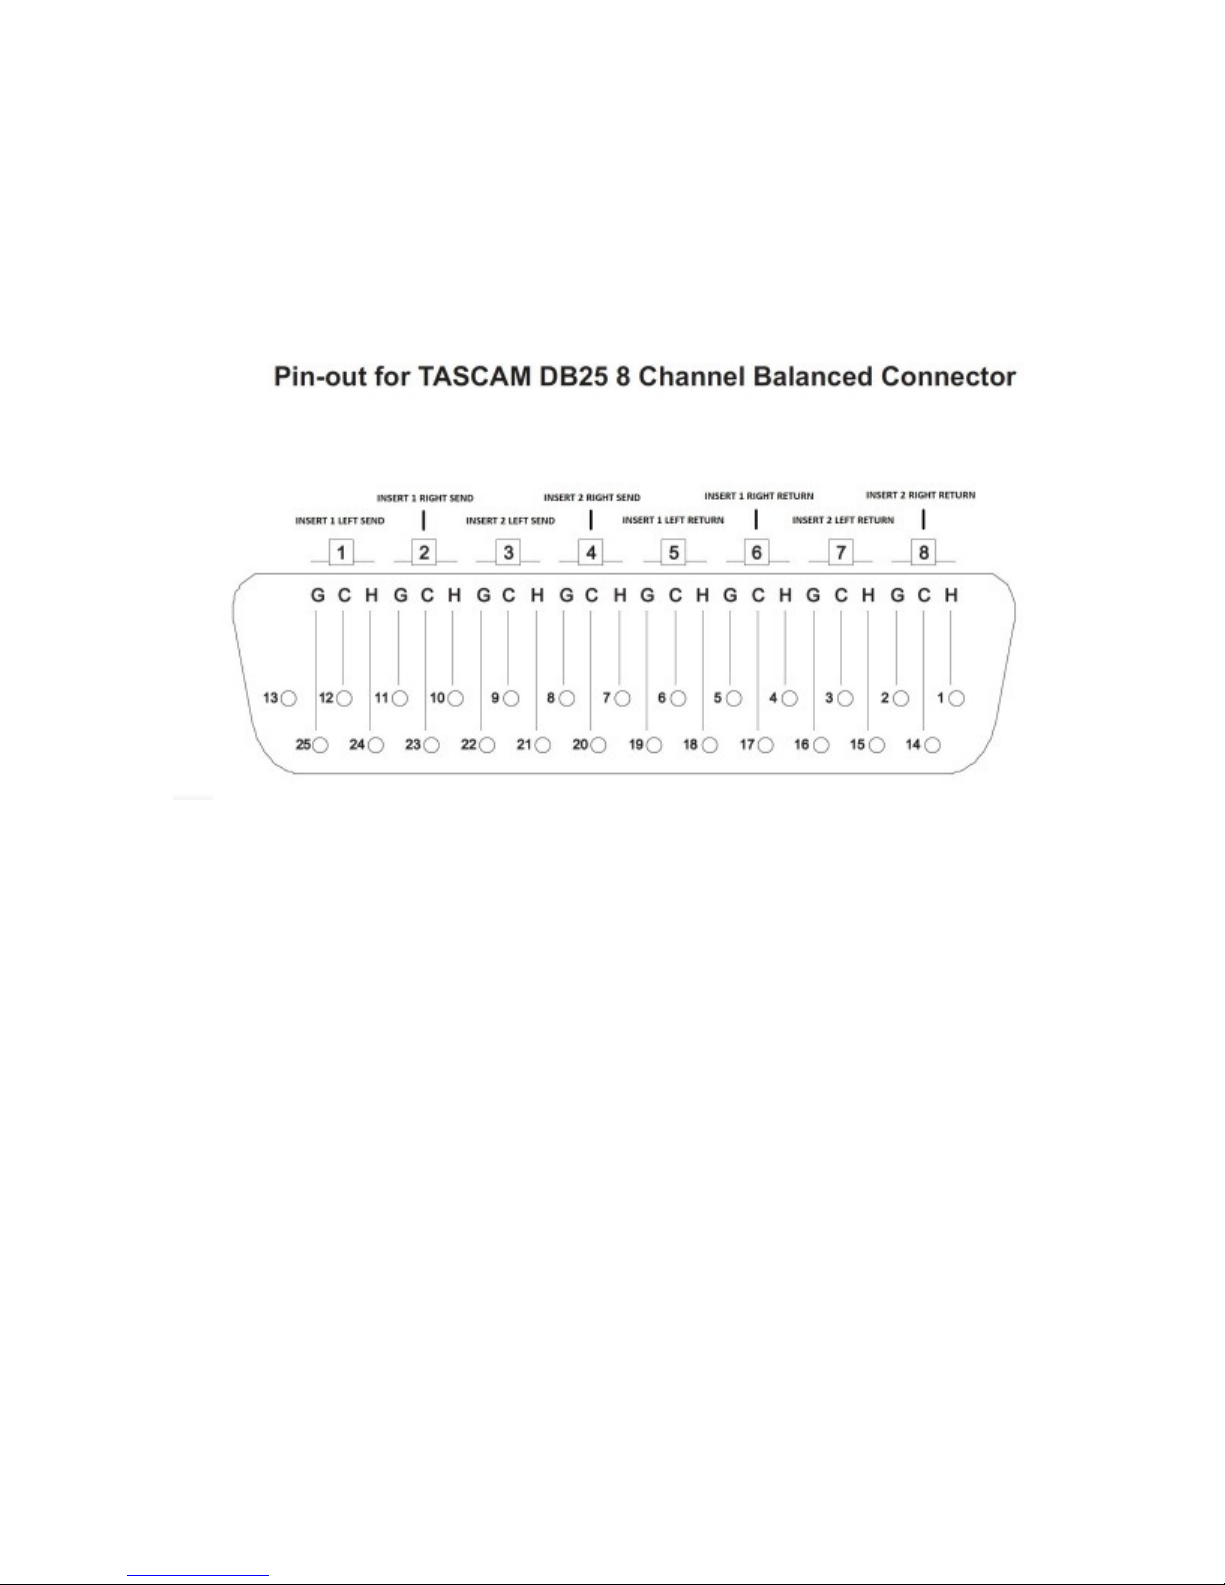
The IM2.1 has 8 balanced inserts connected on the back with industry standard Tascam
DB25 analog connectors. Each connector holds 2 inserts corresponding with the frontpanel
numbering.
Note: Be careful with DB25 tascam standard premade cables. The digital AES/EBU cables
like the Hosa AES-803T have their XLR’s connected in the wrong way which swaps
send/return. Though it’s an easy fix (swap all XLR male and female), you might want to
look at this carefully.
Outputs:
On the rearpanel you will find 2 outputs with balanced gold-plated Neutrik XLR’s.
Technical:
Hardware:
This device is built around mostly passive circuits, but some sections need to be active, but
always with transparency in mind. The sturdy frontpanel-switches have, depending on their
function, 2 color leds for visual feedback. All relays are high sensitive, long-life (15.000.000
cycles) Omron Relays.
Stepped switches are military grade Blore Edwards for long life and really nice mechanical
feel. In and output connectors are gold plated Neutrik and industrial DB25 connectors for
inserts. Active sections make use of SSM214x and Burr Brown drivers. Mid/Side section
makes use of THAT and Burr Brown drivers. The mid/side circuit is based on the well known
circuit from Wayne Kirkwood, but with additions/modifications.
PSU’s are build around long-life industrial Meanwell SMPS’s which run with way less noise
and way more efficient then linear PSU’s. Both the relays/leds and active circuit PSU’s are
running on their own separate PSU.
Page 5

When this device is used in passive mode, so without active stages, it’s 100% passive and
only relay-contacts are inline. This means it’s basically a straight wire.
Pushswitch labeling:
To have some extra visual feedback on the push-switches you can put labels under the
switch-covers. You can simply, but carefully, remove the switch cover with a small
screwdriver and put something like a transparent dymo letratag sticker on the white plastic
piece inside the switch-cover.
Specifications:
Some real-world measurement figures done with RMAA 6.0 on a Lynx Hilo at 24bit 96khz.
Straigth cable: input/output cables bridged, no IM2.1 in line
Passive mode: input to output, no inserts
Active gain on: active gain on input on at 0, no inserts
MS on: mid/side on
MS + width on: mid/side and width on set to 0
Parallel wet 100%: insert 3 on with wet set to 0 (with 3m db25 cable)
Parallel dry 100%: insert 3 on with dry set to 0 (with 3m db25 cable)
Ins 1 2 on: insert 1 and 2 on (with 3m db25 cable)
Ins 7 8 post: insert 7 and 8 on 8 set to post (with 3m db25 cable)
Ins 7 8 pre: insert 7 and 8 on set to pre (with 3m db25 cable)
Ins 5 6 MS: insert 5 6 on set to MS (with 3m db25 cable)
IM2.1
RMAA
straigth
cable
passive
mode
active
gain on
MS on
ms +
width on
parallel
wet 100%
parallel
dry 100%
Ins 1 2onins 7 8
post
ins 7 8
pre
ins 5 6
MS
Frequency
response
(from 40 Hz
to 15 kHz),
dB:
-0.01, -
0.02
-0.01, -
0.02
-0.01, -
0.03
+0.01, -
0.06
+0.01, -
0.06
+0.00, -
0.04
+0.00, -
0.05
-0.01, -
0.03
-0.01, -
0.03
-0.01, -
0.03
+0.01, -
0.05
Noise level,
dB (A):
-118.4 -118.4 -115.6 -115.4 -115.1 -116.3 -116.6 -118.2 -118.3 -118.3 -115.3
Dynamic
range, dB
(A):
118.1 118.2 115.5 115.3 115.0 116.2 116.6 118.2 -118.2 -118.1 -115.2
THD, %: 0.00042 0.00042 0.00045 0.00051 0.00051 0.00385 0.00064 0.00042 0.00042 0.00042 0.00051
IMD +
Noise, %:
0.00062 0.00061 0.00077 0.00088 0.00089 0.00368 0.00123 0.00061 0.00061 0.00061 0.00088
Stereo
crosstalk,
dB:
-115.9 -106.7 -97.4 -76.9 -65.9 -79.6 -81.6 -105.1 -104.6 -104.5 -75.5
Input voltage 100 to 240VAC 50/60HZ.
Power consumption minimum 5 watt
Power consumption maximum 30 watt
(Power consumption depends on the amount of inserts, input, output etc activated)
Unit size: standard 2u 19 inch, depth 25cm
Weight: approx 4kg
Specifications subject to change because always improving
© DuTCH.audio 2018
Handmade in Holland on Solarpower
[email protected]
https://dutch.audio
Phone: +31 6 53998686
 Loading...