

Dustless Turbo Drywall Sander User Manual
How to Order Repair Parts:
For nearest service center Call:
1-800-568-3949
or send sander to:
Love-Less Ash Company
600 South Nick Lane
Price, Utah 84501
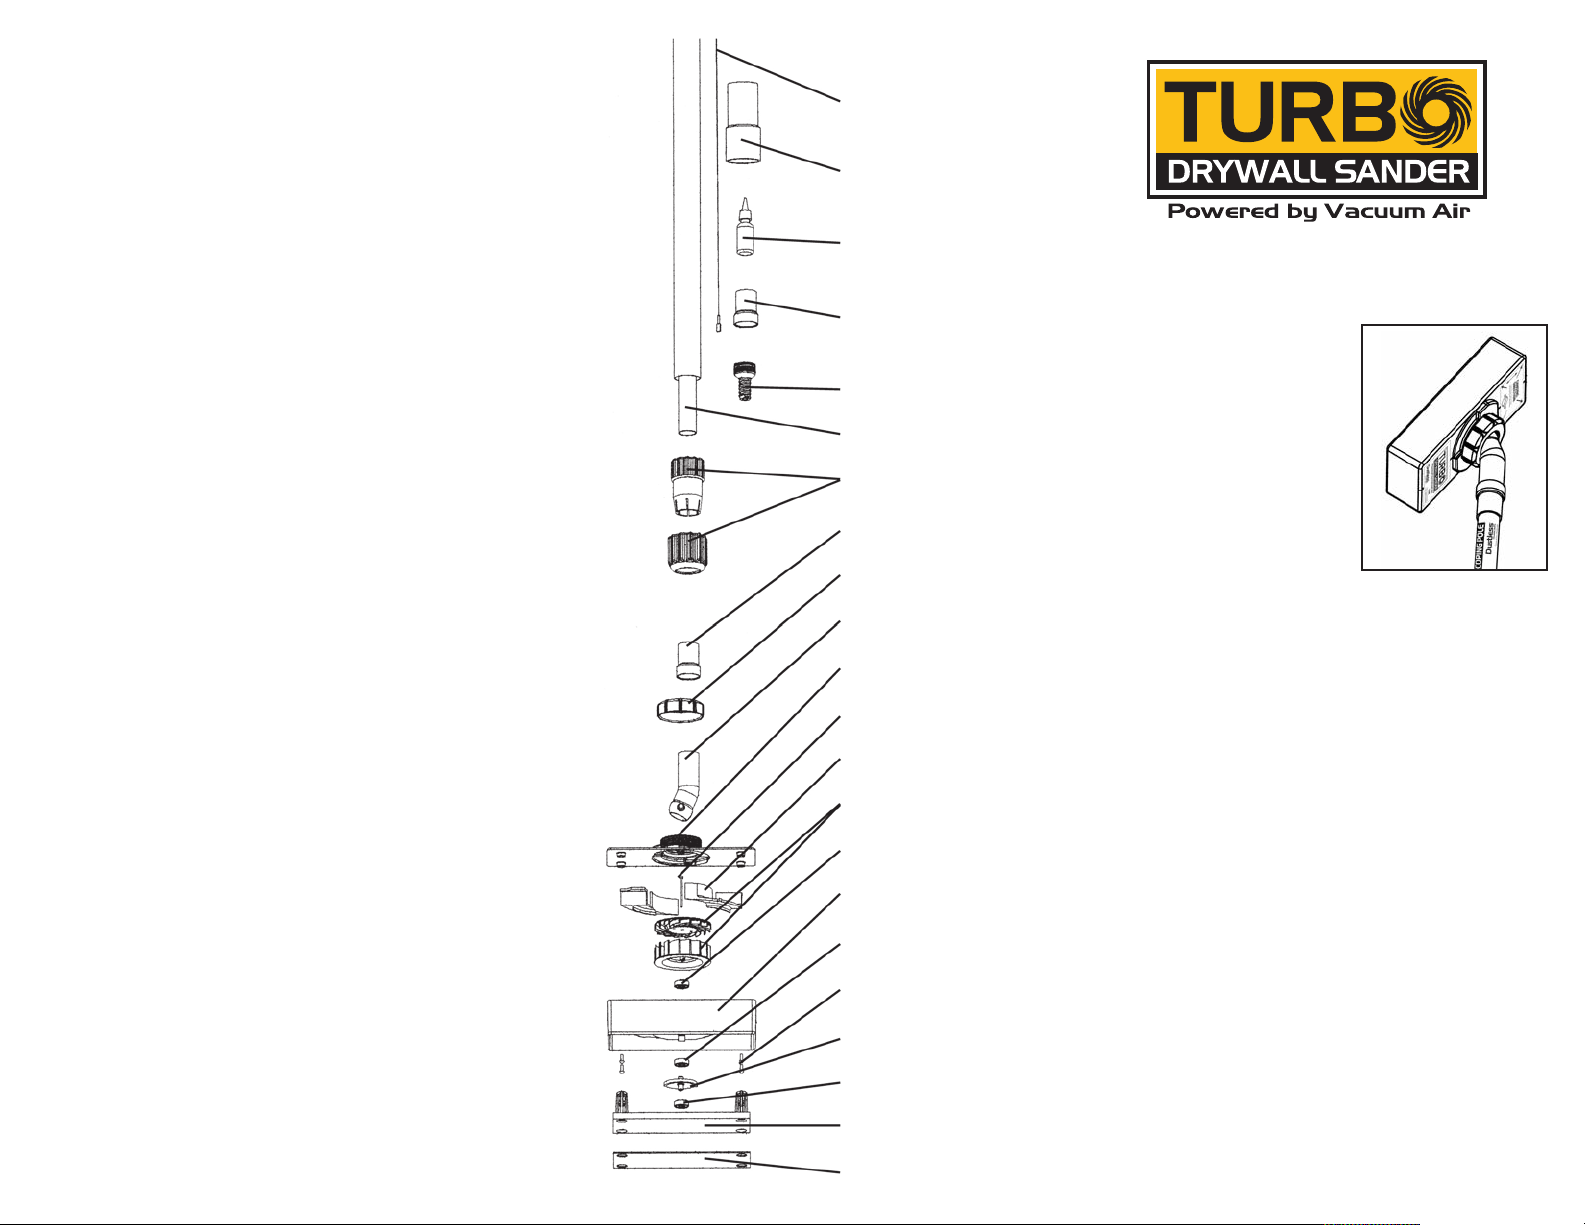
Parts List/Accessories
Item # Qty. Part # Description
1. 1 54501 Copper wire 18”
2. 1 14311 11/ 2” Soft Hose Adapter
3. 1 53351 1/ 2 oz Bearing Oil with spout
4. 2 56611 Sander Adapter for hand handing
5. 1 56112 Acme Thread Adapter
6. 1 57101 Extension Pole
7. 2 57102 Pole Locking Mechanism (2 parts)
8. 1 56631 Cap
9. 1 56621 Goose Neck
10. 1 56641 Power Head Block Cover
11. 1 51201 Turbine Screw 11/ 8”
12. 2 56651 Air Inserts
13. 2 55151 Turbine (2 parts)
14. 2 52251 Shielded Bearing
15. 1 53101 Power Head Block
16. 1 52101 Sealed Bearing
17. 4 51151 Sander Screws 3/ 8” (4)
18. 1 55131 Sander Counter Weight
19. 1 53131 Sanding Pad (Hard with Stand offs)
20. 1 53341 Velcro Pad
Sand Paper Qty Number Qty Number
220 Grit 5 54301 25 54302
180 Grit 5 54201 25 54202
120 Grit 5 54101 25 54102
100 Grit 5 54501 25 54502
80 Grit 5 54401 25 54402
1. 54501
2. 14311
3. 53351
4. 56611
5. 56112
6. 57101
7. 57102
4. 56611
8. 56631
9. 56621
10. 56641
11. 51201
12. 56651
13. 55151
14. 52251
15. 53101
16. 52101
17. 51151
18. 55131
14. 52251
19. 53131
20. 53341
INSTRUCTION MANUAL
Congratulations on your
purchase of this contractor
quality Turbo Drywall Sander.
Important:
Please read these instructions
completely and carefully before
operating your new Turbo Drywall
Sander. Keep this instruction
sheet for future reference.
Limited Warranty
Your Turbo Drywall Sander is warranted in normal use;
provided that use is in accordance with the Owner’s
Manual and the safety rules listed within, against original
defects in material and workmanship for a period of 30
days. Please note this warranty is limited to and applies
only to the original purchaser. Love-Less Ash Company is
not responsible and will not be held liable for statements
made by any person(s) as to operation of this unit that vary
from the terms of this limited warranty. Please read this
manual carefully for limitations. There are no warranties
express or implied written or verbal, which extend beyond
the description in this manual.
Simply return the complete unit or part, (transportation
prepaid), to Love-Less Ash Company, 600 South Nick Lane,
Price, Utah 84501. Love-Less Ash Company assumes no
responsibility for damage or faulty performance caused by
misuse or careless handling, or where repairs have been
made or attempted by others. Proof of purchase date is
required. This warranty gives you specific legal rights and
you may also have other rights, which may vary, from
state to state.
Model 50001

Important Safety Instructions:
1. Use Safety Glasses and Hearing Protection – Protection
for eyes and ears is always recommended.
2. Guard against electric shock- This tool is supplied with a
grounding strip inside the extension pole. Never use this
tool with out the grounding strip in place. This sander
does not have an electrical cord but the vacuum you will
use with it does. Always protect electrical cords and use
an appropriately grounded vacuum.
3. Observe OSHA Rule Avoid Power lines by 10 feet.
4. Use right tool –Don’t use tool for purpose not intended.
5. Don’t force tool – It will do the job better and safer at
the rate for which it was intended. Use a light touch.
6. Don’t overreach – Keep proper footing and balance at
all times.
7. Maintain tools with care – Keep tools clean for better
and safer performance. Follow instructions for
lubricating and changing sandpaper. Inspect tools
periodically and if damaged, have repaired by
authorized service facility.
8. Replacement parts – when servicing use only identical
replacement parts.
9. When extending or contracting the extension pole –
always have vacuum source turned off.
Additional Safety Rules
1. This Turbo Drywall Sander is specifically designed to
work with the Love-Less Ash Company Model 16004 QV
“Dustless” Drywall Vacuum. Love-Less Ash Company is
not responsible for the performance of this sander with
any other wet/dry vacuum.
2. Hold the tool firmly
3. Keep hands away from rotating parts or pinch points.
4. Do not leave the tool running when not in use.
5. Operate the tool only when hand-held.
SAVE THESE INSTRUCTIONS.
Set Up Instructions:
Attaching Abrasive Hook & Loop Sandpaper
Always make sure the sander is off before removing
sandpaper. The Turbo Drywall Sander is equipped with a
hook and loop sandpaper system. Align one edge of the
loopbacked sandpaper with the hook- topped sander pad.
Then align the opposite edge of the sandpaper and sander
pad. Push down and press paper firmly along the length of
the sandpaper until sandpaper is smooth and flat.
Note: Other types of regular or peel and stick
sandpaper will not work with this system.
Grounding
Due to static electricity that could build up from normal
sanding in dry conditions, this sander has been supplied
with a grounding strip. This grounding strip is installed
at the factory before shipping. It is located inside of the
gooseneck and extends down the inside of the
extendable pole.
NOTE: If static electric shock should occur, the
grounding strip may need to be reinstalled.
Extendable Pole – The extendable pole has a twist
and lock feature that allows the pole to be shortened or
lengthened for use. Twist the handle lock clockwise to
loosen, counter clockwise to tighten.
Vacuum Hose Adapter – A soft black 1-1/2” vinyl
hose adapter, part # 14311, is provided for connecting the
Turbo Drywall Sander to Model 16004QV “Dustless”
Wet/Dry Vacuum manufactured by Love-Less Ash Company. This adapter has left handed treads for connecting
to a 1-1/2” diameter hose. The non threaded end slips over
the end of the extendable pole.
Acme Thread Adapte – This is supplied so the exten-
sion pole may be used for universal purposes ie paint roller
or broom handle. Part # 56112
Lubricating Oil – This specially designed lubricating oil
will not attack plastic surfaces. It will evaporate and not
create buildup on the high-speed turbine. Minimum of 3-4
drops of oil should be applied every 30 minutes of actual
sanding. Apply oil while vacuum is on and attached to
sander. This will draw the oil into the sander bearings.
Oil Hole – Make sure the oil hole is facing away from
adjoining surfaces so clean air is drawn into the sander.
Helpful Hints:
1. The lubrication hole located on the side of the sander
must at all times be kept away from working surfaces
or walls. This allows the hole to breathe clean air and
reduces the amount of dust drawn into the bearings.
Do not cover the hole as it must remain open
at all times.
2. Use a light touch. This will allow the sander to sand and
not get bogged down. You can still move the power head
and help the sander to sand faster just use a light touch.
3. If the sander, with new sandpaper, is hard to maneuver
on the wall, simply turn off the sander and then rub
the sandpaper and sander 2-3 short swipes across a
concrete floor. This knocks off the high uneven edges
that may exist on new sandpaper.
4. The cap and gooseneck may be removed and the
gooseneck reinstalled in a different rocking position.
This allows the power head to rock at different angles
as needed.
5. With the hand adapter Part #56611 the power head
may be removed from the extension pole and used as a
hand sander for tight locations where the pole may be
cumbersome, ie halls or closets.
6. For best operation keep sander flat against the wall.
TROUBLE SHOOTING:
Hard to maneuver sander up and down the wall –
1. Pushing too hard. Sanding too hard will hinder the
sanding vibration. A light touch is needed.
2. New sandpaper (refer to Helpful hints #3)
3.Wrong angle of sander for working direction.
(refer to Helpful hints #4)
Chattering –
1. Pushing too hard. Sanding too hard will remove
the sanding vibration. A light touch is needed.
2. New sandpaper (refer to Helpful hints #3),
3. Wrong angle of sander for working direction,
(refer to Helpful hints for solution #4)
Sander stops working –
1. Bearings may be frozen up. Lubricate sander every 30
working minutes of use with minimum of 3-4 drops of
lubricating oil Part #53351. A large particle of material
may be lodged in the turbine. Remove cap and goose
neck and see that the turbine spins freely. Turbine
screw may have worked loose.
2. No Suction – Check suction on wet/dry vac. Hose may
be plugged – check for obstructions, check filters.
Dust is in the air –
1. Check wet/dry vac. Make sure the wet/dry vac is a
“Dustless” system.
OPERATION: Connect the sanding power head to
the gooseneck. The cap threads onto the block and holds
the gooseneck in place. Thread the gooseneck onto the
extension pole. Use the soft 11/2” adapter to connect the
end of the pole to the vacuum hose. Turn on your vacuum
and the sander power head will vibrate.
 Loading...