

Dustcontrol 14124x, 4123x, DC 11-Module XL Series, DC 11-Module Series, 1414Px Original Instructions Manual
...
DC 11- M odu le
Bruksanvisning i original
Original instructions
Originalbetriebsanleitung
Istruzioni tradotte dall’originale
Instructions originales
Instrucciones originales
Original brugsanvisning
Part No 94153-G
Руководство пользователя
Oryginalna instrukcja
Oorspronkelijke gebruiksaanwijzing
Alkuperäiset Ohjeet

VARNING! Läs bruksanvisningen före användning av maskinen.
WARNING! Read the instruction manual before using the machine.
ACHTUNG! Bitte lesen Sie die Betriebsanleitung vor Inbetriebnahme der Maschine
sorgfältig durch.
AVVERTENZA! Leggere attentamente il manuale istruzioni prima di utilizzare la
macchina.
ATTENTION! Lisez le manuel d’instructions avant d’utiliser la machine.
¡AVISO! lea el manual de instrucciones antes de utilizar el aparato.
ADVARSEL! Læs manualen, før du bruger maskinen.
ПРЕДУПРЕЖДЕНИЕ! Перед использованием внимательно прочитайте инструкцию
OSTRZEŻENIE! Przed rozpoczęciem użytkowania maszyny przeczytać instrukcję
obsługi.
WAARSCHUWING! Lees de gebruiksaanwijzing voor het gebruik van de
machine.
VAROITUS! Lue käyttöohjeet ennen laitteen käyttöä.

Dustcontrol reserverar sig för tryckfel och produktförändringar.
Dustcontrol reserves the right to change specifi cations without notice and is under no obligation to alter
previously delivered products. Dustcontrol is not responsible for errors or omissions in this catalogue.
Keine Gewähr für Druckfehler. Produktänderungen vorbehalten.
Dustcontrol si riserva il diritto di apportare modifi che alle specifi che senza preavviso e senza alcun obb-
ligo di modifi care i prodotti già forniti. Dustcontrol declina ogni responsabilità per eventuali errori oppure
omissioni in questo catalogo.
Dustcontrol se réserve le droit de modifi er les spécifi cations sans préavis et n’a aucunement tenu de
modifi er les produits précédemment livrés. Dustcontrol n’est pas responsable des erreurs ou omissions
de ce catalogue.
Dustcontrol se reserva el derecho a introducir cambios en las especifi caciones sin previo aviso y no
tiene ninguna obligación de modifi car los productos comercializados previamente. Dustcontrol no se
hace responsable de errores u omisiones en este catálogo.
Dustcontrol tager forbehold for trykfejl og produktændringer
Dustcontrol оставляет за собой право изменять спецификацию без предварительного
предупреждения и не несет ответственности за изменение продуктов поставленных ранее. Dustcontrol не отвечает за ошибки в данном документе.
Firma Dustcontrol zastrzega sobie prawo do zmiany danych technicznych bez powiadomienia i nie ma
obowiązku modyfi kacji dostarczonego wcze
śniej urządzenia. Dustcontrol nie odpowiada za błędy lub
braki w niniejszym katalogu.
Dustcontrol behoudt zich het recht voor specifi caties te wijzigen zonder voorafgaande kennisgeving en is
niet verplicht om eerder geleverde producten aan te passen.
Dustcontrol ei vastaa mahdollisista painovirheistä eikä tuotemuutoksista.
Tillverkare/Manufactured by/Hersteller/Prodotto da/Produit par/Fabricante/Producenter/
Производитель/Wyprodukowane prze/Ver-
Såld av/Sold by/Verkauft von/ Distribuito da/
Vendu par/Distribuidor/Sælges af/Продавец//
Sprzedawca/ Geleverd door/ Myyjä:
vaardigd door/Valmistaja:
Dustcontrol AB
Box 3088
Kumla Gårdsväg 14
SE-145 03 Norsborg
Tel: + 46 8 531 940 00
Fax: + 46 8 531 703 05
support@dustcontrol.scom
www.dustcontrol.com
Part No 94153-G DC 11-Module - 3

Innehållsförteckning
Säkerhetsföreskrifter ____________7-8
Funktionsbeskrivning ___________ 8-9
Drift ________________________ 9-11
Tekniska data ________________ 12-16
SVENSKA
Installation __________________ 17-19
Provkörning ___________________ 20
Underhåll ___________________21-24
Tillbehör ______________________ 25
Contents
Safety Considerations ________ 39-40
ENGLISH
System Description ___________40-41
Operation ___________________ 41- 43
Technical Data ______________ 44-48
Installation __________________49-51
Test Running ________________52-53
Service ___________________ 53-57
Accessories ___________________ 58
Warranty _____________________ 58
Garanti _______________________ 25
Felsökning __________________26-28
Justering av timer ___________ 29-33
Start Alarm ___________________ 34
Ändring av börvärde/max varvtal ___ 35
Säckbyte __________________ 36-38
Reservdelar _______________371-384
EG-försäkran _____________ 385-387
Dustcontrol Worldwide __________ 388
Trouble Shooting ____________ 59-61
Adjusting of the timer __________62-66
Start Alarm ___________________ 67
Changing the setpoint/max speed __ 68
Change of Discharge __________69-71
Spare Parts _______________371-384
EC-declaration ____________ 385 -387
Dustcontrol Worldwide __________ 388
DEUTSCH
ITALIANO
Inhaltsverzeichnis
Sicherheitsvorschriften ________72-73
Systembeschreibung __________73-74
Betrieb _____________________ 74-76
Technische Daten ____________77-81
Installation __________________82-84
Probelauf __________________ 85-86
Wartung ___________________ 86-90
Zubehör ______________________ 91
Gewährleistung ________________ 91
Indice
Norme di sicurezza _________105-106
Descrizione del sistema ______ 106-107
Funzionamento ____________ 107-109
Dati tecnici ________________ 110-114
Installazione _______________ 115-117
Prova di funzionamento ______ 118-119
Manutenzione _____________ 119-123
Accessori ____________________ 124
Garanzia ____________________ 124
2017-03-08
Fehlersuche _________________92-94
Einstellen des Timers_________ 95-99
Start Alarm __________________ 100
Change set point and max frequency 101
Change of Discharge ________ 102-104
Ersatzteile ________________371-384
EG-Konformitätserklärung ___ 385-387
Dustcontrol Worldwide __________ 388
Ricerca dei guasti __________ 125-127
Regolazione del timer _______ 128-132
Start Alarm __________________ 133
Change set point and max frequency 134
Sostituzione dello scarico ____135-137
Ricambi __________________371-384
Dichiarazione di conformità CE 385-387
Dustcontrol nel mondo __________ 388
DC 11-Module - 4 Part No 94153-G

Sommaire
Consignes de sécurité _______ 138-139
Description du systéme ______ 139-140
Utilisation _________________ 140-142
Caractéristiques techniques ___ 143-147
Installation ________________148-150
Essai de fonctionnement _____ 151-152
Entretien _________________ 152-156
Accessoires __________________ 157
Índice
Consideraciones de seguridad 171-172
Descripción _______________ 172-173
Funcionamiento ____________ 174-175
Datos técnicos _____________ 176-180
Instalación ________________ 181-183
Funcionamiento de prueba ___ 184-185
Mantenimiento _____________185-189
Accesorios ___________________ 190
Garantie _____________________ 157
Dépannage _______________158-160
Réglage de la minuterie ______ 161-165
Start Alarm __________________ 166
Change set point and max frequency 167
Changement de décharge ____ 168-170
Pièces détachées __________ 371-384
Déclaration CE ___________ 385-387
Dustcontrol dans le monde ______ 388
Garantía _____________________ 190
Solución de problemas ______ 191-193
Ajuste del temporizador ______194-198
Start Alarm __________________ 199
Change set point and max frequency 200
Cambio de la descarga ______ 201-203
Piezas de repuesto _________371-384
Declaración CE ___________ 385-387
Dustcontrol en el mundo ________ 388
FRANÇAIS
ESPAÑOL
Indholdsfortegnelse
Sikkerhedsforskrifter ________204-205
Funktionsbeskrivelse _______ 205-206
Drift ____________________ 206-208
Tekni ske sp eci fi kationer ______209-213
Installation ________________ 214-217
Prøvekørsel __________________ 218
Vedligeholdelse ____________219-223
Tilbehør _____________________ 224
Garanti ______________________ 224
Содержание
Меры безопасности ________238-239
Описание системы ________239-240
Эксплуатация _____________ 241-243
Технически е сведения _____244-248
Установка ________________249-252
Тес товый запуск ___________253-254
Обслуживание ____________254-258
Аксессуары__________________ 259
Га р а н ти я ____________________ 259
DANSK
Fejlsøgning _______________225-227
Justering af timer __________228-232
Start Alarm __________________ 233
Change set point and max frequency 234
Change of Discharge ________235-237
Reservedele ______________371-384
EG overemnsstemmelseerklæring ________________ 385-387
Dustcontrol Worldwide __________ 388
РУССКИЙ
Устранение неисправностей 260-262
Регулировка таймера ______263-267
Пуск аварийного сигнала ______ 268
Изменение режимов и макс.
частоты _____________________ 269
Замена разгрузочного сборного
мешка ___________________270-272
Запасные части ___________371-384
EG Декларация __________ 385-387
Dustcontrol в мире ____________ 388
Part No 94153-G DC 11-Module - 5

Safety Considerations
Read all instructions before the machine/installation is commissioning.
The equipment must be installed and maintained
properly by qualifi ed personnel who have study
this instruction. Dustcontrol does not take responsibility for defective installation or maintenance.
Warning! When using electric machines, basic
safety precautions should always be followed to
reduce the risk of fi re, electric shock and personal
injury, including the following:
1. Important!
No hot particles nor ignition sources are allowed
to be sucked into the unit. The machine should
not be used for explosives, unstable or pyrophoric particles or dust.
– WARNING! Operators shall
be adequately instructed on the use of these
machines.
– WARNING! This machine is for
dry use only.
– CAUTION! This machine is for
indoor use only.
– CAUTION! This machine shall
be stored indoors only.
DC Green System: DC Green System works
with a sleep mode that has lower pressure.
When a tap is opened, the pressure is fi rst low
and then increased 2-6 times at full operating
pressure.
5. Clamp risk
When emptying the container you normally
should put a trolley or moveable load bearing
item under the container before the eccentric
lock is released. Be aware of the clamp risk the container can be heavy.
Also, when transporting the whole machine,
especially when it is equipped with wheels,
please be careful. The unit is very heavy and
there can be be risk of an accident, especially
on sloping surfaces.
6. Electricity
When the unit is delivered without integrated
control panel and the panel is not then located
by the unit, an isolator should be fi tted next to
the unit. Do not repair the electric components
yourself, get a qualifi ed electrician. Faults may
cause injury. The electrical connections may
only be performed by a certifi ed electrician.
See also under section 8, ’Warning’.
7. Important measure
Never work with the dust extractor without fi rst
switching it off and locking the isolator.
ENGLISH
2. Work area environment
Keep the area around the central unit clean.
Do not store or work with fl ammable liquids or
gases near the machine.
3. Overload
If there is an alarm signal it should be care-
fully checked out to see that the machine is
un damaged. If there are any damaged parts
these should be repaired by a Dustcontrol
authorised service centre. Always follow the
regulations pertinent to the material you are
working with. Do not use the machine for purposes that it is not intended for.
4. Bodily injuries
Warning - High negative pressure
Do not start the fan without having it con-
nected to the duct work. Never let the suction
come in contact with parts of the body, for
example a hand. The pump generates a high
negative pressure, severe injury may result.
Warning - Very hot exhaust air
Exhaust air can be very hot.
8. Checking for damage
Check the machine regularly for damage. If
there are any damaged parts these should be
repaired by a Dustcontrol authorised service
centre.
If the supply cord is damaged, it must be re-
placed by the manufacturer, its service agent
or similarly qualifi ed persons in order to avoid
a hazard.
9. Warning
Use only accessories and replaceable parts
which are available in the Dustcontrol catalogue. When using non-genuine parts, especially fi lters and plastic sacks, dust leaks could
occur which may be hazardous to health.
This appliance is not intended for use by
persons (including children) with reduced
physical, sensory or mental capabilities, or
lack of experience and knowledge, unless they
have been given supervision or instruction
concerning use of the appliance by a person
Part No 94153-G DC 11-Module - 39

Safety Considerations
responsible for their safety. Children should be
supervised to ensure that they do not play with
the appliance.
This machine is intended for commercial use
only, for example in hotels, schools, hospitals,
factories, shops, offi ces and rental busines-
ses.
System Description DC 11-Module
Use
The DC 11-Module is a dust extractor which is
made for source extraction of dust and chips and
for cleaning. The dust extractor and the turbopump
are mounted on a common chassis. The unit can
be connected to a fi xed pipe system. As alterna-
tive or in combination with this you can use it as a
mobile unit. Then it must be equipped with 5 pin
Euro connection for the electrical connection and
wheels.
pallet trolley.
Choice
The product comprises a great number of different
choices according to the picture on the next page.
The machine can be used with turbopumps 5.5
- 18.5 kW, with or without integrated control box
and with several emptying alternatives such as
sacks or containers of different volumes and other
handling systems. It can be mobile with wheels or
stationary, automatic or manual fi lter cleaning and
equipped with or without HEPA micro fi lter.
You should move the unit with a fork lift or
Filter units
The fi lter cyclone cleans the air effi ciently. The
dust which is more heavy than the air is forced
against the walls of the cyclone by centrifugal
force and falls down to the cyclone bas, where
the outlet is. The air is forced to the middle of the
cyclone and upwards through a fi ne fi lter. The air
can then be transported out of the work shop to
exhaust outside or pass through a HEPA fi lter to
be exhausted back into the work area. The collected dust is dropped into a plastic sack or container.
The fi lter is cleaned by a compressed air pulse or
manually operated reverse pulse jet.
Turbopump
The negative pressure is made by a vacuum producing turbopump. It is normal that the turbopump
gets hot during operation due to its design.
The DC 11-Module is equipped with vacuum valve
(except the DC 11-Module S), which means that
the turbopump receives adequate cooling air even
when all outlets are closed.
System Description DC Green System
e DC Green System uses two operating modes for the
system:
1. In control mode, the speed is controlled such
that the negative pressure in the system is
kept constant. Note, however, that when
outlets are opened or closed, a brief variation
(5-15 sec) occurs in the pressure level with a
larger/smaller fl ow in the open outlets.
2017-03-08
DC 11-Module - 40 Part No 94153-G
2. In energy-saving mode, the system switches to
a lower pressure, often 20-40% of the operating pressure. Energy-saving mode starts, but
with a certain time delay, once all the outlets
are closed. As soon as an outlet is opened,
the system switches back to control mode.
During the transition, the negative pressure in
the system increases gradually over a period
of 5-20 sec.

System Description TPR
Regenerative blowers
Dustcontrol’s turbopumps are regenerative blowers. TPR has two impellers that are connected
for parallel fl ow. The impellers rotate in the blower
housing through extremely low tolerances. The
pump cannot tolerate contaminated airfl ow. TPR
compresses air and it is therefore natural that it
becomes hot while running.
Cooling air
Turbopumps with TPR designation are parallel
connected two stage belt driven units. Cooling air
is bled into the pump through a vacuum relief valve
which is adjustable. The vacuum pressure in the
system is thereby maintained at a constant level
even if the airfl ow changes.
The motor and vacuum relief valve receive cooling
air from the bottom of the unit housing. The free
passage of cooling air must be ensured. As standard screen skirts are delivered with the pump as
an protecting against leaves, papers etc.
Back fl ow valve
The pump is delivered standard with a back fl ow
relief valve. In multiple pump installations air will
not fl ow back through a non-operating pump.
Belt drive
The pump is belt driven. Drive ratio and motor size
determine the capacity of the pump.
If changes are to be made to performance characteristic of the pump, this can be done by changing
the motor and drive ratio. Contact Dustcontrol
and you will recieve more information. Please see
addresses and phone numbers on the last page of
this document.
Thermal overload protection
For protection on the pump bearings the pump has
thermal protection which will shut down the pump
O
at 120
nected to the control panel.
C. The thermal protection has to be con-
ENGLISH
Operation DC 11-Module
Start and stop (on standard integrated control
boxes)
The unit can be started and stopped manually by
push buttons on the box. After such start the unit
will work for a max of 2 hours and then it will stop
automatically. The max runtime can be adjusted,
see below.
When the work area/vacuum point is equipped
with a micro switch/pressostat you also have the
facility for remote on/off within the panel. When no
outlet is open the machine continue to work for 5
mins, then shut down. The time can be adjusted,
see below.
The unit can also be confi gured for clock control;
start/stop is controlled by a programmed clock.
Usually the unit would be set to run in accordance
with shifts then close down and fi lter clean during
rest periods. To adjust the clock, see below.
Filter cleaning (automatic)
After system shutdown the fi lter is cleaned by air
pulse over a 4 minute period. You can hear the air
pulses like strong punches inside the fi lter unit ap-
proximately every 20 seconds. The times for fi lter
cleaning can be adjusted, see below. Also automatic fi lter cleaning during operation can be specifi ed
for some installations. You can also manually start
the fi lter cleaning via a button on the control box.
Part No 94153-G DC 11-Module - 41

Operation DC Green System
Start and stop
The unit is started and stopped manually on the
display, see below: As an alternative to manual
starting, the outlets can be equipped with microswitches/pressure switches. If no outlet is open, the
unit will continue to run for 5 mins, before shutting down. The run-on time can be adjusted, see
below.
The system can also be confi gured for timer
control. This means that starting and stopping are
controlled by a programmed timer. This operation
is usually performed after a work shift, when the
system shuts down and cleans the fi lter during
work breaks. For details of setting the timer, see
below.
Note that if extraction equipment smaller than 38
is being used, the fl ap should be held open for a
short time before connecting the hose , so that
the system is able to switch to control mode. When
the equipment has a very small dimension, it may
occasionally be necessary to make a hole in the
hose connector or the hose to admit extra air. The
hole should be 15 - 20 mm.
The system can also be confi gured for fi lter clea-
ning during operation. In this case, the fi lters are
cleaned approximately once an hour, at a time
when the system is in energy-saving mode.
Operation DC 11-Module
Filter cleaning (manual)
The fi lter should be cleaned 1-2 times per day when
running continuously.
1. Start the machine.
2. Close the shutter valve on the machines inlet.
3. With slow, even motion open the pulse top by
lifting the handle. Repeat three to six times.
4. Open the shutter valve.
Emptying separated material
All separated material is collected under the cyclone in a plastic sack or container.
The plastic sack should be changed when the
dust level is about 5 cm under the outlet fl ap. The
plastic sack must be sealed after is has been taken
off the machine. Use only original plastic sacks.
2017-03-08
DC 11-Module - 42 Part No 94153-G
The container should be emptied when it is fi lled
to ca 3/4. Some containers have a sight glass so
the fi lllevel can be viewed from the outside. When
emptying the container you normally should put
a trolley or moveable load bearing item under the
container before the eccentric lock is released.
Alarm
When the alarm lamp is on the motor protection
has tripped. The fault should be investigated and
attended before the motor protection is restored
and the system can be started once again.

Operation DC 11-Module
ENGLISH
Part No 94153-G DC 11-Module - 43

Technical data DC 11-Module
Dimensions and arrangements:
With HEPA-Modul= 2100-2150
2017-03-08
DC 11-Module - 44 Part No 94153-G

Technical data DC 11-Module XL
5
226
21
ENGLISH
72
5
21
1553
Part No 94153-G DC 11-Module - 45

Technical data
TECHNICAL DATA
Part No 14123x 14124x 1412Fx 14146x 1414Px 14136x 1413Px
Turbopump TED 30 TED 30 TED 36 TPD 30 TPD 36 TSD 30 TSD 36
Motor 5.5 kW 7.5 kW 10 HP 11 kW P 15 HP P 11 kW S 15 HP S
Frequency 50 Hz 50 Hz 60 Hz 50 Hz 60 Hz 50 Hz 60 Hz
RPM 3000 rpm 3000 rpm 3600 rpm 3000 rpm 3600 rpm 3000 rpm 3600 rpm
In-/Outlet Ø 108/100 Ø 108/100 Ø 108/100 Ø 108/100 Ø 108/100 Ø 108/100 Ø 108/100
Max dp 22 kPa 22-18 kPa 22 kPa 22 kPa 20 kPa 40 kPa 43 kPa
Nominal
pressure
Max Q 450 m3/h 550 m3/h 500 m3/h 800 m3/h 850 m3/h 450 m3/h 560 m3/h
Weight 200 kg 225 kg 225 kg 260 kg 260 kg 250 kg 250 kg
Sound level
1 m
Sound level
1 m with
frequency
inverter
Security class IP54 IP54 IP54 IP54 IP54 IP54 IP54
18 kPa 18-17 kPa 18 kPa 18 kPa 18 kPa 30 kPa 32 kPa
60 dB(A)* 63 dB(A)* 63 dB(A)* 63 dB(A) 64 dB(A) 63 dB(A) 64 dB(A)
60-65 dB(A)* 61-67 dB(A)
61-67 dB(A)
* Sound level with extra silencer on the outlet 5 dB (A) lower the given gure.
Technical data DC 11-Module XL
TEKNISKA DATA DC 11-Module XL
15 kW 20 hp 18,5 kW 25 hp
Frequency 50 Hz 60 Hz 50 Hz 60 Hz
RPM 4000 rpm 4000 rpm 4300 rpm 4300 rpm
In-/Outlet Ø 108/108 Ø 108/108 Ø 108/108 Ø 108/108
Max dp 26 kPa* 26 kPa 28 kPa* 28 kPa
Nominal
pressure
Max Q 1000 m
Sound level
1 m
Weight 456 kg 456 kg 478 kg 478 kg
* DC Green System max 22 kPa
20 kPa 20 kPa 20 kPa 20 kPa
3
/h 1000 m3/h 1000 m3/h 1000 m3/h
66 dB(A)* 66 dB(A)* 66 dB(A)* 66 dB(A)
2017-03-08
DC 11-Module - 46 Part No 94153-G

Technical data DC Green System
TECHNICAL DATA
Part No 14124L/14124N 14146L/14146N 14136L/14136N 151/ 153/
Turbopump TED 30 TPD 30 TSD 30
Motor 7,5 kW 11 kW 11 kW 15 kW 18.5 kW
RPM 3000 - var var var
Inlet Ø 108 Ø 108 Ø 108
Max dp 22 kPa 22 kPa 22 kPa
Nominal pressure 18 kPa 18 kPa 18 kPa
Max Q 600 m3/h 1100 m3/h 600 m3/h
Weight 225 kg 270 kg 260 kg
Sound level 1 m 62 - 67 dB(A)* 63 - 69 dB(A)* 63 - 69 dB(A)*
Security class IP54 IP54 IP54
* Sound level with extra silencer on the outlet 5 dB (A) lower the given gure.
Technical data DC 11-Module/XL
Main Filter, standard
Type Pleated polyester
Part No 4292/ 4284
Total fi lter surface 8.4/12 m
2
Degree of separation
EN 60335-2-69 part 1 > 99.9 %
Main Filter, optional
Type PTFE coated pleated
Part No 429201/428401
Total fi lter surface 8.4/12 m
2
Degree of separation
EN 60335-2-69 part 1 > 99.9 %
HEPA fi lter (optional 2nd fi lter )
Part No 42807
Total fi lter surface 3.7 m
Degree of separation
EN 1822-1 HEPA H13 99.95%
Max temp fi lter 80
Air pulse fi lter cleaning
Air consumption 4 l/s, 4 bar
Hose connection 6 mm
Electric connection 24 VDC, 19A
ENGLISH
2
o
C
Technical data TPR/TSR
Description TPR 35 TPR 40 TPR 43 TSR 43 TPR 47 TSR 47 TPR 50 TSR 50
Motor kW 11 15 18,5 18,5 22 22 30 30
Pump RPM rpm 3500 4000 4300 4300 4700 4700 5000 5000
Weight kg 400 400 430 430 450 450 530 530
Max dP kPa 22 26 28 46 29 50 30 54
Nom. Pressure
Max Q m3/h 1000 1200 1400 650 1500 700 1600 800
Sound Level of
Unit 1m dB(A) 66 66 66 66 66 66 66 66
Inlet/O utlet Ømm 160/160 160/160 160/160 10 8/108 160/160 108/108 160/160 108/108
kPa 20 22 22 35 23 37 25 40
Part No 94153-G DC 11-Module - 47

Technical data TPR/TSR
POWER RATING
Hz TPR 35 TPR 40 TPR 43 TSR 43 TPR 47 TSR 47 TPR 50 TSR 50
V
11 kW 15 kW 18.5 kW 18.5 kW 22 kW 22 kW 30 kW 30 kW
220-240/
380-420 50 - 106802 107202 107252 107702 107752 109202 109252
380-420/
660 50 106600 106800 107200 107250 107700 107750 109200 109250
500 50 - 106801 107201 107251 107701 107751 109201 109251
575 60 - 106806 107206 107256 107706 107756 109206 109256
220/440 60 - 106804 107204 107254 107704 107754 109204 109254
Part No.
CAPACITY AND POWER CONSUMPTION
kPa Pu
60
50
40
30
20
10
0
10
20
30
kW P
6
8
4
2
7
5
3
1
200 400 600 800 1000 1200 1400 1600
6
1
2
4
8
TPR 35, TPR 40, TPR 43, TPR 47, TPR 50
3
5
7
1. TPR 35 11 kW
2. TPR 40 15 kW
3. TPR 43 18,5 kW
4. TSR 43 18,5 kW
5. TPR 47 22 kW
6. TSR 47 22 kW
7. TPR 50 30 kW
8. TSR 50 30 kW
The capacity curves for Dustcontrol vacuum producers have been measured and are stated empirically.
Outlet pressure losses from a normal outlet (silencer,
back-fl ow valve/bend) have been accounted for in the
Q
curve. Additional equipment such as a diffuser can
m3/h
result in increased pressure loss and must be taken
into consideration.
Stated air-fl ows are for standard air (101.3 kPa@ 20
C).
The stated curves are for negative application, all
pressures stated are assumed to be below relative atmospheric pressure at sea level. These devices can
also be used for positive pressure application and will
generate a greater pressure differential.
o
2017-03-08
DC 11-Module - 48 Part No 94153-G

Installation DC 11-Module
1
6
2
5
3
4
7
Connection points
1. Compressed air feed 4 l/s, 4 bar (for use with
automatic fi lter cleaning).
2. Electric feed (for use with integrated control
box).
3. Connection point for micro switch circuit(where
existing).
4. Connection of motor tension from a separate
control box (in some cases).
5. Inlet to cyclone (can be rotated for preferred
direction).
6. Exhaust.
7. Holes for fi tting the unit to the ground (where
existing).
The unit can be mounted on concrete surface/
fl oor of suitable thickness.
The electrical connection should be connected
to adequate starting equipment. A certifi ed elec-
trician should make the installation. 5 pin Euro
connection is available as an alternative.
The equipment is prepared to draw 3-phase
electric feed and low volt cabling into its enclosure.
Electric cables should be mounted to make it
possible to raise the unit 200 mm for potential
bearing changes; without that the electrical connection would need to be disconnected.
A separate, lockable disconnect must be installed where it is readily accessible to the pump.
Connect the pipe work to the inlet and possible
to the outlet. Never start the pump without the
correct cables and hoses being connected. If the
outlet is directed up it should be connected with
an exhaust diffuser, a bend or a fl ap so rainwater
and objects do not fall into the outlet. Exhaust
air can be between 100-150o C.
ENGLISH
Put the plastic bag under the cyclone or connect
the container.
Part No 94153-G DC 11-Module - 49

Installation DC 11-Module
When installing the unit against a wall, we recommend the arrangement shown in the illustration
above.
1. Collection sack change/container removal
2. Operator access to the control panel
3. Removable service panel (the other panels are
not removable)
Installation TPR
A. Allowed pressures during
installation.
B. Do not lift from this side.
2017-03-08
C. The pump should be installed on a concrete pad. A second pump may be mounted
on the top of the rst pump.
DC 11-Module - 50 Part No 94153-G

Installation TPR
1. Ancor the pump to the concrete pad.
2. Remove the pump covers and assemble the
protection screen skirt if this is required (A).
3. Connect the ducting to both the inlet and the
outlet. Do not start the pump without having it
connected to the ductwork.
4. The pump inlet should always be connected to a
separator with a fi lter unit (B). The pump cannot
tolerate contaminated airfl ow .
5. Extra silencing can be installed if the outlet
sound level is to be lowered from approximately
75 dB(A) to approximately 62-64 dB(A). See
Accessories.
6. If the outlet is vertical, and exposed to the elements, rain protection should be installed (C).
Exhaust air can be very hot, up to 150
O
C.
ENGLISH
7. Electrical connections may only be performed
by a certifi ed electrician. A separate lockable
disconnect should be installed where it is readily
accessible and within view of the pump.
8. Thermal overload protection must be installed to
validate the warranty.
9. The control panel must be equipped with an
overload protection that should be adjusted and
tested by a certifi ed electrician. Check for cor-
rect motor rotation.
Part No 94153-G DC 11-Module - 51

Test running DC 11-Module
The unit is normally adjusted to a nominal pres-
sure. The pressure can be changed by adjusting
the vacuum relief valve. Please note that it cannot be exceed the max pressure for the unit. For
the 7.5 kW DC 11-Module the pressure can be
adjusted over the stated max pressure 19 kPa,
up to 23 kPa, under the condition that the highest
rpm, level 3 (70 Hz) is blocked.
1. Verify that the power is locked out.
2. Check that no persons can be injured if the
pump starts and that all outlets are closed.
3. Connect a manometer for the negative
pressure calibrated to –50 kPa to the suction
side as close to the pump as possible.
4. Power up the pump and listen carefully for
the following sounds: A high-pitched whine
is normal from the impeller blades. As the
pump draws cooling air through the vacuum
relief valve a weak hissing should be heard.
Check the rotation direction of the pump.
5. Measure the pressure. Compare with the
dimension point. The pressure can be
adjusted by adjustment of the vacuum relief
valve.
6. Check the function and tightness of the
connected exhaust system.
7. It is normal that the pump gets hot during
operation
8. When the fi lter is being cleaned, a number of
powerful air pulses should be heard over a
four minute period with approx. 20 seconds
interval
Test running DC Green System
Constant speed:
The pressure can be adjusted by adjusting the
vacuum valve, see Maintenance.
To check the control function:
1. Make sure that all outlets are closed. Connect
the extraction equipment with the smallest
dimension/longest hose.
2. The system should then run up to speed and
set itself to the operating pressure.
3. Then remove the extraction equipment.
4. The system should then run down to energysaving mode after slightly more than one
minute.
2017-03-08
DC 11-Module - 52 Part No 94153-G

Test Running TPR
1. Verify that the power is locked out. Inspect the
belt tension (Figure B next page), rotate the
pump and listen for any sound indicating worn
bearings or misaligned impellers. Check that
the inlet and outlet are properly connected.
Also check that the vacuum relief valve is connected.
2. Mount the covering panels. Check that no persons can be hurt if the pump starts and that all
outlets are closed.
3. Connect a manometer for negative pressure
calibrated to min. -50 kPa to the suction side
as close to the pump as possible.
4. Power up the pump and listen carefully for the
following sounds; A high pitch whine is normal sound from the impeller blades. As pump
draws cooling air from the vacuum relief valve
a weak hissing should be heard.
5. Measure the pressure. Compare with the dimension point. The pressure can be adjusted
by adjustment of the vacuum relief valve. See
Adjusting the vacuum relief valve.
6. Check the function and tightness of the connected exhaust system.
7. Open the number of outlets the system is dimensioned for. The vacuum relief valve should
now be totally closed.
8. It is normal that the pump becomes hot during
operation.
ENGLISH
Service
Service points
1. Lubrication of lower bearing P and S models
(always)
2. Lubrication and review of vacuum valve (always)
(not fi tted to S models)
3. Filter change (fi ne fi lter, always)
4. Micro fi lter (optional)
Constant speed:
2a. Lubrication and inspection of vacuum valve
(not fi tted to S models) (always).
DC Green System:
2b. Checking of sensors
3. Filter replacement (fi ne fi lter, always)
4. Micro HEPA fi lter (optional)
Part No 94153-G DC 11-Module - 53

Service DC Green System
DC Green System (2b):
The function of the sensors should also be checked in conjunction with servicing of the pump.
1. Check the switchover between energy-saving
mode and control mode according to ”Test running” above.
2. Check the operating pressure when the system is in control mode (at least one outlet open).
Service DC 11-Module
Machine service
The DC 11-module should be tested and
maintained once a year. Worn parts must be
changed.
If the thermal sensor alarm occurs, the function of
the fl ow sensor should be investigated fi rst. If the
system does not switch to energy-saving mode
when all the outlets are closed the pump will overheat. This fault can be due to the failure of the fl ow
sensor to function as it should, to the presence of
e a major leak in the system, or to the extraction
equipment that is being used admitting too little air.
The fi ne fi lter should be changed at least once per
year. Only a Dustcontrol fi lter should be used. Use
breathing protection during the fi lter change. Do
not expose unprotected persons to harmful dust.
Do not jeopardise function and lifetime. Use only
Dustcontrol spare parts.
During maintenance and service the machine
must be switched off at the main switch.
Lubrication (1) (for the DC 11-Module S and
P models)
The turbopumps bearing should be lubricated
at least once a year with lithium saponifi cated
roller bearing grease, Part No 9683.
• Release rear bearing cooling fl ange.
• Check the grease condition and fi ll until 2/3
of the cover volume.
• Change the O-ring, Part No 4789, and re-
mount the cooling fl ange.
Filter change (3)
It is important that the fi lter is changed when it can
no longer clean effi ciently. The space between
the changes depends on which type of dust you
extract and the air fl ow the fi lter is exposed to.
1. Turn off and lock the power disconnect switch.
2. Use breathing protection
3. Disconnect the top of the cyclone
4. Disconnect the locking ring for the fi lter.
5. Lift out the fi ne fi lter and seal it in a plastic
bag.
6. Lift in the new fi lter cartridge
7. Re-connect the fi lter locking ring
8. Lift the top on and connect.
2017-03-08
DC 11-Module - 54 Part No 94153-G

Service DC 11-Module
Changing the HEPA lter:
Remove top (pos10) of cyclone by disassemble
locking ring.
Remove old outlet. Assemble new outlet (pos28).
Connect outlet with Hose d110 artnr 2030 to inlet
of pump. Use joint artnr 3031 to secure Hose d110
artnr 2030 to outlet and inlet of pump.
Remove funnel from solenoidvalve with hook
wrench or plumber wrench. Assemble tube (pos1)
on solenoid valve. Assemble funnel on tube (pos1).
Assemble lower fi lter (pos8) on fi ne fi lter in cyclone.
Assemble upper fi lter (pos8) on HEPA module
(pos3).
Assemble HEPA module (pos3) on outlet module.
Lock everything with locking ring(pos9).
Fasten the eight MRT 6*50 screws (pos4) that will
tighten both fi lter(pos8). Inspect from inside of HE-
PAmodule (pos3) that the fi lters (pos8) are secured.
Use Thread sealant Loctite542 or similar for the
eight MRT 6*50 screws (pos4).
Assembly the top (pos10) on the HEPAmodule
(pos3).
Lock everything with locking ring(pos9).
Max Q= 1000 m3/h
Max dp= 40kPa
ENGLISH
Part No 94153-G DC 11-Module - 55

Service TPR
The pump should be inspected at least twice a year
and lubricated according to the lubrication intervals
at the bottom of this page.
1. Start the pump and listen for abnormal sounds.
When all outlets are closed a weak hissing
sound should be heard from the vacuum relief
valve.
2. Shut off the pump and lock out the electrical
service.
3. Remove the protective panels from the pump.
4. Rotate the pump manually and listen for any
sounds indicating a worn bearing or misligned
impellers.
5. Check the condition and tension of the drive
belts. The drive belts are matched, therefore
new and old belts should never be used together. Always change the whole set. (A).
Changing the belts
- Lift the motor mounting plate with nut (1).
- Change belts.
- Tighten the belts with nut (2) and adjust to the
tension illustrated (B).
6. Check that the axles, pump and motor are parallel and the pulleys are true. The belts should not
run on an angle into the pulleys. The inclination
of the pump can be changed with screw (3), fi g
C.
Lubrication Interval
p TPR 43
22 kPa 1500 h
25 kPa 1500 h
28 kPa 1000 h
30 kPa 40 kPa -
Lubrication
- The front bearing should be
lubricated using
the grease nipple
(4), fi g (C). Press
grease in until it
comes out along
the axle.
- The back bearing
should be lubricated by removing
the fi nned bearing
cover plate (5)
and checking the
condition of the
grease. Fill the
cavity 2/3 full with
new grease.
- Exchange the
O-ring, Part No.
4789 and replace
the bearing cover
plate.
p TPR 40
22 kPa 1500 h
25 kPa 750 h
28 kPa 30 kPa 40 kPa -
7. The bearings of the turbopump should be
lubricated with Dustcontrol bearing grease for
turbopumps, Part No. 9928.
2017-03-08
DC 11-Module - 56 Part No 94153-G

Service
Constant Speed(2a):
D
2.
E
1.
4.
3.
Vacuum relief valve (not DC 11-Module S
models)
Disassemble the vacuum relief valve (D).
Clean and lubricate shaft and bearings. Check
the rubber gasket (E). Change if cracked or
harden ed (Part No. 4710).
ENGLISH
F
Constant Speed:
Check the function of the hydraulic damper (F).
Adjusting the vacuum relief valve (not DC
11-Module S models)
The valve is pre-adjusted with a negative pressure of
(18 kPa). If this needs to be adjusted the following procedure should be used:
- Connect a manometer to the suction side
and measure with a fully closed inlet.
- Shut down the pump and demount the
vacuum relief valve.
- Remove the damper cover (1) and measure distance A.
- Loosen the locking nut (3)
- Adjust the spring tension by turning the spring
plate (4).
The compression of the spring (2) determines the
opening pressure. Changing the distance A by 1.5
mm will give a corresponding change in pressure
of 1 kPa.
- Remount the valve after adjustment and test
the pressure.
- Inspect all cables and connections, repair if
neccessary.
- Remount the protective panels, power up the
pump and give it a test run.
Part No 94153-G DC 11-Module - 57

Accessories
Description Part No
Fine lter, polyester 4292
Fine lter, polyester DC 11-Module XL 4284
Plastic sack, 90 l 4714
Container 40 l 40070
Container, 60 l 40412
Container, 40 l, complete rustproof 40624
Description Part No
Counter balance foot valve 7462
Cone, bottom 40655
HEPA lter 42807
Adapter H = 90 4749
Other accessories, see Dustcontrol catalogue.
4030
Warranty
The warranty period is for one year for single
shift operation or equivalent time with multi shift
operation.
The warranty covers manufacturing defects. This
Warranty TPR
Thermal overload protection must be installed.
warranty is null and void for machines equipped
with non original spare parts. Warranty repairs
must be performed by Dustcontrol or their authorised agent. Unauthorised repairs forfeit this
warranty.
2017-03-08
DC 11-Module - 58 Part No 94153-G

Trouble Shooting
Problem
Filter cleaning does not function.
The red alarm lamp is on.
Motor will not run.
Fault
Compressed air supply
broken.
Electric supply broken.
The motor protection has
tripped.
Electrical supply is not connected.
Electrical power does not
reach the machine.
Electrical disconnect is
locked out.
Motor circuit breaker (Logo)
is in stop position.
Solution
Check solenoid valves, hoses, connection s and compressor.
Check solenoid valves, cables, connections, fusing and transformer.
Investigate what is wrong and reset
the motor protection.
Connect.
A qualifi ed electrician should check
the supply.
Find the person responsible for the
lock out and check to see if the system is clear for operation. Reverse
the lock out.
Switch on the circuit breaker.
ENGLISH
The motor stops directly after
starting.
Motor runs but no suction.
Thermal overload tripped.
Incorrect fuse.
The thermal overload is
incorrectly set.
Suction tubing not connected.
Blocked tubing or hoses.
There is no plastic sack or
container attached to the
fi ler unit.
Fan rotation is backwards.
Drive belt broken.
If the thermal overload protection
of the turbo pump is tripped, the
fault must be located and corrected
before operating the system. Thereafter, the indicator can be reset.
Change to correct fuse rating and
type.
Electrician should be called to
investigate.
Connect the tubing.
Clean.
Connect a plastic sack or a container.
Electrician should take care of this.
Change.
Pump runs but poor suction.
Leakage in the ductwork.
Locate and repair.
Part No 94153-G DC 11-Module - 59

Trouble Shooting
Problem Fault Solution
Abnormal sound from the
machine.
Machine blows dust.
Blocked fi lters.
Foreign debris in the machine.
Filter is damaged, perforated or
is not tightly mounted.
Check the fi lters and clean or
change if necessary.
Turn off the machine and order a
service
Check fi lter and change the cart-
ridge if necessary.
.
2017-03-08
DC 11-Module - 60 Part No 94153-G

Trouble Shooting DC Green System
Problem
Alarm codes
E.OHT
Other codes – see converter
manual
Poor suction at the outlet
Fault
Thermal sensor alarm
The fl ow sensor does not
detect the fl ow – the system
remains in energy- saving
mode.
Solution
Check the function of the fl ow
sensor. Replace the sensor if
necessary.
Check for leakage in the system.
Seal.
Check whether any extraction
equipment has an inlet with a
diameter of less than 32 or a
very long hose. If so, try making
a 15-20 mm hole in the hose
connector.
Check the function of the fl ow
sensor. Replace the sensor if
necessary.
Check whether any extraction
equipment has an inlet with a
diameter of less than 32 or a
very long hose. If so, try making
a 15-20 mm hole in the hose
connector.
ENGLISH
Speed of the pump fl uctuates
up at and down.
Adjustment
Natural vibration in the
system.
A small variation is normal.
If the variation is large, contact
Dustcontrol for details of how to
trim the system.
Part No 94153-G DC 11-Module - 61

Adjusting of the timerAdjusting of the timerAdjusting the timer
Timer
Settings
Keys:
Up
Left
Right
Down
We 15:51
2007-02-14
We 15:51
2007-02-14
Press:
Stop
set param
set...
Prg name
Press:
ESC + desired knapp
Keys:
Esc
OK
ESC
2017-03-08
Stop
set param
set...
Prg name
Press the key and then use the
to find the timer block that you want to change
B1
=05:00m
T
TA
=00:00m
Press the key to start making changes
Use the keys to move the cursor,
and the to change the value.
Press the key to finish making changes.
OK
Block number: B1
Run-on time:
05 min : 00 sek
OK
ESC
DC 11-Module - 62 Part No 94153-G

Adjusting the timer
OFF =00:00
Changes can be made to the following in the same way :
B2
=00:30m
B2 - Delay before filter cleaning
B3 - Filter cleaning time
T
TA =00:30m
B3
T
=04:00m
TA =00:00
ENGLISH
B4 - Filter cleaning pulses
TH = Pulse length
TL = Time between pulses
Remove bridge to activate lter
cleaning during operation
B5 - Timer for filter cleaning during
operation
TH = Filter cleaning time
TL =Time between cleanings
B6 - Max running time
B4
Th =00:30s
Tl =20:00s
TA =00:00
B5
=04:00m
Th
Tl =56:00m
TA =00:00
B6
T =02:00h
TA =00:00
Block number
B7, B8 and B9 - Weekly timer
B7 1
D =
-------
ON =00:00
Cam number
Day of the week: MTWTFSS
ON time
OFF time
Part No 94153-G DC 11-Module - 63

Adjusting the timer
Changing the weekly timer
B7 1
D = MTWTF--
ON = 06:00
OFF =
Press the key to start making changes
Use the keys to move the cursor
and the keys to change the value
Press the esc key to finish making changes
Press the
11:00
OK
ESC
key
B7 2
D = MTWTF--
ON = 11:30
OFF =
Press the key to start making changes
Use the keys to move the cursor
and the keys to change the value
15:00
OK
First ON time:
Monday to Friday
Start 06:00
Stop 11:00
Second ON time:
Monday to Friday
Start 11:30
Stop 15:00
Press the esc key to finish making changes
Press the
B7 3
D = MTWTF--
ON = 15:15
OFF =
Press the key to start making changes
Use the keys to move the cursor
and the keys to change the value
Press the esc key to finish making changes
You have 9 possible ON times.
B7 1 ,B8B7 2 , B7 3
1 , B8 2 , B8 3
B9 1 , B9 2 , B9 3
17:00
ESC
Third ON time:
Monday to Friday
Start 15:15
Stop 17:00
OK
ESC
2017-03-08
DC 11-Module - 64 Part No 94153-G

Adjusting the timer
Setting of time and date
We 15:51
2007-02-14
Press the key
Stop
set param
set...
Prg name
Press the key
Stop
set param
set...
Prg name
Press the key
Stop
set param
set...
Prg name
Press the key
clock
contrast
startscrn.
ESC
ENGLISH
OK
Press the key
OK
Set clock
s/w time..
sync
Press the key
OK
Set clock
su 00:00
yyyy-mm-dd
2003-01-01
Use the keys to edit
and
the keys to navigate
Press the key to finish making changes
ESC
Part No 94153-G DC 11-Module - 65

Adjusting the timer
Summer and winter time setting
We 15:51
2007-02-14
Press the key
ESC
Stop
set param
set...
Prg name
Press the key twice
Stop
set param
set...
Prg name
Press the key
clock
contrast
startscrn.
Press the key
OK
Set clock
s/w time..
sync
Press the key
OK
Set clock
s/w time..
sync
Press the key
OK
On
off
s/w time:
on -> eu
Press the key
OK
eu
Use the keys to select a time zone.[ EU, UK, US, AUS, AUS-TAS, NZ]
Press the key to finish making changes
2017-03-08
ESC
DC 11-Module - 66 Part No 94153-G

Start alarm
Green System - DC 11-Module
Start from the Speed Controller panel :
Operation
Press for more than 2 seconds
Press to select the PU
operation mode
Press to START the controller
Press to STOP the controller
FWD
STOP
R
ESET
Press for 2 sec
Display
0HLd
P
U
.
0
00
ENGLISH
Alarms
Thermal protection tripped
The pump is overheating.
Investigate why, and repair the fault
Press to RESET the alarm
STOP
R
ESET
Display
T
HOE.
Part No 94153-G DC 11-Module - 67

Changing the setpoint/max speed
Green System DC11-Module, description of display
Main Screen (F1)
Displays the current status of the machine.
Here you can start/stop the motor, perform a reset
after an alarm and do a fi lter clean. The F4 button
will take you to the ”Service” screen from where
you can access the other screens.To access the
”Service” menu, you have to enter a ”password”.
This is located on the rear of the display.
F4 takes you to the ”Language” screen where the
language is selected.
Please see the following images of the various
screens.
After RT (F2)
Filter clean (F3)
Service (F4)
Here you can change the system pressure. The
factory setting is 18kPa. The start and fi lter clea-
ning functions can be tested by pressing and
holding down the ”Start ” or ”Filter Clean” button
respectively.
F1 Return takes you back to the ”Main Screen”.
F2 takes you to the ”After RT” screen where the
desired after-run time is set.
F3 takes you to the ”Filter Clean” screen where the
desired times for fi lter cleaning are set.
2017-03-08
DC 11-Module - 68 Part No 94153-G
Language (F4)

Change of Discharge, collection sack
ENGLISH
Part No 94153-G DC 11-Module - 69

Change of Discharge, collection sack
2017-03-08
DC 11-Module - 70 Part No 94153-G

Change of Discharge, collection sack
ENGLISH
Part No 94153-G DC 11-Module - 71

Sikkerhedsforskrifter
Læs hele denne brugervejledning igennem, før
maskinen startes.
Skal installeres og drives udelukkende af autoriserede personer, der har taget en del af denne
publikation. Dustcontrol er ikke ansvarlig for skader
på udstyr, der har resulteret af forkert installation
eller forkert håndtering af udstyr.
Advarsel! Ved anvendelse af elektriske maskiner
skal grundlæggende sikkerhedsinstruktioner følges
for at minimere risiko for brand, elektrisk stød eller
personskade.
1. Vigtigt!
Ingen varme eller glødende partikler kan blive
suget med enheden. Maskinen bør ikke anvendes til sprængstoffer, ustabil eller pyrofore
stoffer.
- ADVARSEL! Brugeren bør
være tilstrækkeligt instrueret i brugen af disse
maskiner.
- ADVARSEL! Denne maskine
er kun til tørre brug.
- ADVARSEL! Denne maskine
må kun bruges indendørs.
- ADVARSEL! Denne maskine
bør kun opbevares indendørs.
2. Arbejdsmiljøet
Hold området omkring centralenheden rent.
Opbevar eller arbejd ikke med letantændelige
væsker eller gasser i nærheden af centralenheden.
3. Overbelastning
Ved alarm skal maskinen ikke genstartes, før
fejlen er fundet og udbedret. Benyt kun maskinen til det, maskinen er beregnet til og følg
anvisningerne for det materiale, som udsuges.
4. Kropsskader
Lad aldrig suget komme i kontakt med nogen
kropsdele. Afprøv aldrig sugestyrken med
håndfl aden eller andre kropsdele. Før aldrig
kropsdele som f.eks. en hånd ind i centralenheden – det høje undertryk kan forårsage
store skader.
DC Green System: DC Green System arbej-
der med en dvaletilstand, der har lavere tryk.
Når en hane åbnes, trykket er først lav og steg
derefter 2-6 gange ved fuld driftstryk.
2017-03-08
DC 11-Module - 204 Part No 94153-G
5. Risiko for klemskader
Ved tømning af beholderen bør man normalt
placere en palleløfter eller en truck under
beholderen, inden lukkebeslagene løsnes.
Var opmærksom på risikoen for klemskader –
beholderen kan være tung. Udvis også forsigtighed ved transport af maskinen især når den
er udstyret med hjul. Maskinen er meget tung
og kan forårsage ulykker, især på skrånende
overfl ader.
6. Elektricitet
I de tilfælde, hvor enheden ikke har integreret
eltavle med fi lterstyring med låsbar hovedaf-
bryder, skal en separat, låsbar serviceafbryder
installeres, og den skal placeres i umiddelbar
nærhed af enheden.
Forsøg aldrig selv at ændre på de elektriske
tilslutninger. Fejl kan medføre livsfare. Se også
punkt 10: Advarsel.
7. Vigtig foranstaltning
Arbejd aldrig med fi lteret uden at slukke og
låse hoved-/sikkerhedsafbryder.
8. Tømning af spand/plastsæk
Rens altid fi lteret, inden spanden/plastsæk-
ken løsnes fra cyklonen. Ved håndtering af
det opsamlede materiale, skal det opsamlede
materiales anvisninger følges.
9. Kontrol
Kontroller regelmæssigt maskinen for skader
og slitage. Skader og slidte dele skal udbedres/udskiftes af Dustcontrol eller af en autoriseret montør.
Hvis ledningen er beskadiget, må erstattes af
Dustcontrol eller et autoriseret servicecenter,
som er godkendt af Dustcontrol.
10. Advarsel
Anvend kun tilbehør og sliddele, som fi ndes i
denne manual. OBS! Ved brug af forkerte dele
eller uoriginale dele (især fi ltre og plastsække)
kan maskinen lække sundhedsskadeligt støv
med risiko for personskade.
Dette apparat er ikke beregnet til brug af per-
soner (herunder børn) med nedsatte fysiske,
sensoriske eller mentale evner eller manglende erfaring og viden, medmindre de er under
tilsyn eller vejledning i brugen af apparatet af
en person ansvarlig for deres sikkerhed. Børn
skal være under opsyn for at sikre, at de ikke
leger med apparatet.

Sikkerhedsforskrifter
Denne maskine er konstrueret til kommercielle
formål, såsom på hoteller, skoler, hospitaler,
fabrikker, butikker, kontorer og udlejning
Funktionsbeskrivelse DC 11-Module
Brug
DC 11-module er en støvudskiller, som er beregnet
til udsugning af støv og spåner samt til rengøring.
Støvudskiller og turbopumpe er monteret på et
stativ. Enheden kan tilsluttes et fast rørsystem.
Som alternativ eller i kombination med dette kan
DC 11-module anvendes som mobil enhed. DC
11-module skal i så fald være monteret med et
europæisk CEE-stik. DC 11-module kan enten
monteres med hjul eller fl yttes med truck eller pal-
leløfter.
Tilbehør
DC 11-module kan bygges i mange forskellige
kombinationer – se billede på næste side. DC
11-module kan bygges med turbopumper 5,5 18,5 kW, med eller uden indbygget styretavle, med
fl ere udtømningssystemer som f.eks. plastsæk, beholdere i forskellige størrelser, ekstern eller intern
afkast, automatisk eller manuel fi lterrensning samt
med eller uden mikrofi lter.
Filterenhed
Filtercyklonen renser luften effektivt. Den støvfyldte luft suges ind i maskinens cyklon, hvor den
cirkulerer kraftigt. Støvet, som er tungere end
luften, tvinges ud mod cyklonens vægge af centrifugalkraften og falder ned mod cyklonens bund.
Luften suges ind mod cyklonens midte og videre
gennem et fi nfi lter. Luften kan derefter ledes ud
af lokalet. Hvis DC 11-module anvendes som en
mobil enhed, kan luften ledes ud i lokalet (recirkulation – ikke tilladt i Danmark). Maskinen kan desuden udstyres med mikrofi lter. Støvet, som fi ltreres
fra, havner i spanden/plastsækken. Filteret renses
automatisk/manuelt med trykluftskud.
Turbopumpe
Undertrykket skabes af en elektrisk turbopumpe.
Turbopumpen er en såkaldt sidekanalventilator. Et
direkte drevet turbinehjul med skovle roterer i et
pumpehus. Tolerancerne er meget små, hvorved
man opnår den bedste virkningsgrad. Eftersom
pumpen komprimerer luft, er det helt normalt, at
den bliver varm under drift.
DC 11-module (undtagen DC 11-module S) er udstyret med vakuumventil, hvilket betyder, at turbopumpen får køleluft, selv når alle udtag er lukket.
DANSK
Funktionsbeskrivelse DC Green System
DC Green System bruger to driftsformer for systemet:
1. I kontrol-funktion, at den hastighed Controll
trykket i systemet holdes konstant. Men lige
når du åbner eller lukker socket, får du en kortsigtet afvigelse (5-15 sek) i trykniveauet med
større / mindre fl ow i de åbne forretninger.
2. I save mode, skifter systemet til et lavere
tryk, ofte 20-40% af arbejdstrykket. Den save
mode kommer med en vis forsinkelse, når alle
forretninger er lukket. Så snart en stikkontakt
åbnes, skifter systemet til kontrol tilstand. Under overgangen øger undertrykket i systemet
gradvist over en 5-20 sek periode.
Part No 94153-G DC 11-Module - 205

Funktionsbeskrivelse TPR
Sidekanalstype
Dustcontrol TPR er turbopumper af sidekanalstypen med to turbinehjul. Mellem indløb og udløb
løber der skovle gennem en passage med meget
små spil. Det er derfor vigtigt, at der ikke kommer
nogen partikler ind i pumpen – risiko for skade!
Turbopumpen komprimerer luft, og det er derfor
helt naturligt, at den bliver varm under drift.
Køleluft
Dustcontrol TPR turbopumper er remdrevne i to
parallelkoblede trin. Køleluft slippes ind gennem
en vakuumventil, hvis trykniveau kan justeres.
Anlæggets trykniveau kan da holdes konstant, selv
om luftstrømmen ændres.
Luft hentes fra pumpens bund. Luftens passage
må ikke hindres. Sikkerhedsgitter mod løv, papir
osv. medfølger som standard.
Returventil
TPR har returventil på indløbet for at forhindre
tilbagesug.
Remdrift
Pumpen er remdrevet. Udveksling og motorstørrelse bestemmer pumpens kapacitet.
Hvis man behøver at ændre kapaciteten, er det
muligt at udskifte motor, remskiver og kileremme.
Hvis det bliver aktuelt – kontakt Dustcontrol for
mere information. Se adresser og telefonnummer
bagest i denne vejledning.
Termoprotektor
Turbopumpen er udstyret med en termoprotektor.
Hvis det fritliggende lager bliver varmere end 120
OC, udløses termoprotektoren. Termoprotektoren
skal være forbundet med elskabet.
Drift DC 11-Module
Start og stop (beskrivelsen gælder integreret
standard-styretavle)
DC 11-module kan startes og stoppes manuelt på
trykknapper på styretavlen. Efter manuel start kører
modulet i maksimalt to timer og stopper derefter
automatisk. Maks-tiden kan justeres – se nedenfor.
DC 11-module kan startes og stoppes automatisk,
hvis udtag udstyres med mikroswitch/pressostat.
Således starter modulet, når man åbner et udtag.
Når sidste udtag lukkes, fortsætter DC 11-module
med at køre i fem minutter, hvorefter det stopper.
Efterløbstiden kan justeres, se nedenfor.
DC 11-module kan også konfi gureres til timer-styring.
Det betyder, at start og stop styres af et programmeret
ur. Almindeligvis vil uret følge arbejdstiden. Indstilling
af ur – se nedenfor.
Filterrensning (automatisk/trykluft)
Hver gang DC 11-module stopper, renses fi lteret med
trykluftskud i en periode på fi re minutter. Trykluftskud-
dene høres som kraftige slag inde i fi lterenheden med
cirka 20 sekunders mellemrum. Tiderne for fi lterrens-
ningen kan justeres – se nedenfor. DC 11-module
kan programmeres til også at fi lterrense under drift.
Man kan også starte fi lterrensning manuelt på en
knap på styretavlen.
2017-03-08
DC 11-Module - 206 Part No 94153-G

Drift DC Green System
Start og stop
Enheden startes og stoppes manuelt på skærmen,
se nedenfor: Som alternativ til manuel start kan
hævninger være udstyret med mikroafbrydere
/ trykkontakter. Når der ikke længere socket er
åben, fortsætter enheden at bevæge sig i
5 minutter, derefter slukke. Forsinkelsen kan justeres, se nedenfor.
Systemet kan også konfi gureres til ur kontrol.
Dette betyder, at starte og stoppe styret af en programmeret ur. Det er almindeligt, at operationen
følger de skift, hvor planten vender fi lteret renser i
pauserne. Indstilling af uret, se nedenfor.
Bemærk, at hvis du har en suge udstyr, der er mindre end 38, skal fl appen holdes åbne for en stund,
før du tilslutter slangen til systemet for at skifte
op til funktionsmåde. I alle tilfælde, hvor udstyret
har meget små dimensioner, kan blive tvunget til
at slangmuffen eller slange at lave et hul at lade i
ekstra luft. Hullet skal være 15 til 20 mm.
Systemet kan også konfi gureres til fi lterrensning
under drift. I dette tilfælde, renset fi ltrene omkring
1 gange i timen, når systemet er i dvaletilstand.
DANSK
Drift DC 11-Module
Filterrensning (manuel)
Filteret skal rystes 1-2 gange om dagen ved kontinuerlig drift.
1. Start maskinen.
2. Luk spjældet på cyklonens indløb.
3. Åbn og luk fi ltertoppen med fi lterrensnings-
håndtaget 3-6 gange.
4. Åbn spjældet på cyklonens indløb.
Tømning af udskilt materiale
Alt udskilt materiale bliver opsamlet under cyklonen
i spand/plastsæk. Kontroller regelmæssigt om der er
behov for tømning af spand/plastsæk.
Plastsækken skal tømmes, når støvniveauet ligger
cirka fem centimeter under udløbsklappen. Plastsækken skal lukkes, efter den er fjernet fra maskinen.
Anvend kun originale plastsække.
Spanden skal tømmes, når den er 3/4 fyldt. Spandene kan leveres med glasrude, så fyldningsgraden kan
kontrolleres udefra.
Ved tømning af spanden bør en palle, pallevogn eller
truck placeres under spanden, inden lukkebeslagene
løsnes. Vær opmærksom på risikoen for klemskader
– spanden kan være tung.
Alarm
Når alarmlampen lyser, er motorværnet udløst. Fejlen
skal undersøges og udbedres, inden systemet må
startes igen
Part No 94153-G DC 11-Module - 207

Drift DC 11-Module
2017-03-08
DC 11-Module - 208 Part No 94153-G

Tekniske specifi kationer DC 11-Module
Mål og opstilling:
DANSK
Med HEPA-Modul= 2100-2150
Part No 94153-G DC 11-Module - 209

Tekniske specifi kationer DC 11-Module XL
5
226
21
2017-03-08
5
21
72
1553
DC 11-Module - 210 Part No 94153-G

Tekniske specifi kationer
TEKNISKE SPECIFIKATIONER
Art. nr. 14123x 14124x 1412Fx 14146x 1414Px 14136x 1413Px
Turbopumpe TED 30 TED 30 TED 36 TPD 30 TPD 36 TSD 30 TSD 36
Motor 5,5 kW 7,5 kW 10 HP 11 kW P 15 HP P 11 kW S 15 HP S
Frekvens 50 Hz 50 Hz 60 Hz 50 Hz 60 Hz 50 Hz 60 Hz
Omdrejningstal 3000 rpm 3000 rpm 3600 rpm 3000 rpm 3600 rpm 3000 rpm 3600 rpm
Ind-/ udløb Ø 108/100 Ø 108/100 Ø 108/100 Ø 108/100 Ø 108/100 Ø 108/100 Ø 108/100
Maks dp 22 kPa 22-18 kPa 22 kPa 22 kPa 20 kPa 40 kPa 43 kPa
Nominelt tryk 18 kPa 18-17 kPa 18 kPa 18 kPa 18 kPa 30 kPa 32 kPa
Maks Q 450 m3/h 550 m3/h 500 m3/h 800 m3/h 850 m3/h 450 m3/h 560 m3/h
Vægt 200 kg 225 kg 225 kg 260 kg 260 kg 250 kg 250 kg
Støjniveau 1 m 60 dB(A)* 63 dB(A)* 63 dB(A)* 63 dB(A) 64 dB(A 63 dB(A) 64 dB(A)
Støjniveau
1 m sekvensen
kontrol 60-65 dB(A)* 61-67 dB(A)
Kapslingsklasse IP54 IP54 IP54 IP54 IP54 IP54 IP54
* Med lyddæmper på udløb. Støjniveauet ved diffust lyddæmpet udløb er 5 dB(A) højere end den angivne
værdi.
61-67 dB(A)
DANSK
Tekniske specifi kationer DC 11-Module XL
TEKNISKE SPECIFIKATIONER DC 11-Module XL
15 kW 20 hp 18,5 kW 25 hp
Frekvens 50 Hz 60 Hz 50 Hz 60 Hz
Omdrejningstal
Ind-/ udløb Ø 108/108 Ø 108/108 Ø 108/108 Ø 108/108
Maks dp 26 kPa* 26 kPa 28 kPa* 28 kPa
Nominelt tryk 20 kPa 20 kPa 20 kPa 20 kPa
Maks Q 1000 m
Støjniveau
1 m
Vægt 456 kg 456 kg 478 kg 478 kg
* DC Green System max 22 kPa
4000 rpm 4000 rpm 4300 rpm 4300 rpm
3
/h 1000 m3/h 1000 m3/h 1000 m3/h
66 dB(A)* 66 dB(A)* 66 dB(A)* 66 dB(A)
Part No 94153-G DC 11-Module - 211

Tekniske specifi kationer DC Green System
TEKNISKE SPECIFIKATIONER
Art. nr.
Turbopumpe TED 30 TPD 30 TSD 30
Motor 7,5 kW 11 kW 11 kW
Omdrejningstal 3000 - var var var
Indløb
Maks dp 22 kPa 22 kPa 22 kPa
Nominelt tryk
Max Q 600 m3/h 1100 m3/h 600 m3/h
Vægt
Støjniveau 1 m
Kapslingsklasse IP54 IP54 IP54
14124L/14124N 14146L/14146N 14136L/14136N
Ø 108 Ø 108 Ø 108
18 kPa 18 kPa 18 kPa
225 kg 270 kg 260 kg
62 - 67 dB(A)* 63 - 69 dB(A)* 63 - 69 dB(A)*
151/ 153/
15 kW 18.5 kW
* Med lyddæmper på udløb. Støjniveauet ved diffust lyddæmpet udløb er 5 dB(A) højere end den angivne
værdi.
Tekniske specifi kationer DC 11-Module/XL
Filterrensning med trykluftskud
Trykluftforbrug 4 l/s, 4 bar
Tilslutning, trykluftslange 6 mm
El-tilslutning 24 VDC, 19A
Finfi lter i plisseret polyester
Art. nr. 4292/ 4284
Filterareal, totalt 8,4/12 m
2
Udskilningsgrad iht.
EN 60335-2-69 del 1 > 99,9 %
Mikrofi lter (tilbehør, 2 st)
Art. nr. 42807
Filterareal, totalt 3,7 m
Udskilningsgrad iht. EN 1822-1
HEPA H13 99,95%
Max. temperatur 80 oC
Finfi lter i PTFE-belagt polyester
Art. nr. 429201/428401
Filterareal, totalt 8,4/12 m
2
Udskilningsgrad iht.
EN 60335-2-69 del 1 > 99,9 %
Tekniske specifi kationer TPR/TSR
Betegnelse TPR 35 TPR 40 TPR 43 TSR 43 TPR 47 TSR 47 TPR 50 TSR 50
Motor kW 11 15 18,5 18,5 22 22 30 30
Pumpe omdr./min. 3500 4000 4300 4300 4700 4700 5000 5000
Vægt kg 400 400 430 430 450 450 530 530
Max dP kPa 22 26 28 46 29 50 30 54
Nominelt tryk kPa 20 22 22 35 23 37 25 40
Max Q m
Støjniveau sugeenhed
kåpa 1m dB(A) 66 66 66 66 66 66 66 66
Indgang/udgang Ø mm
3
/h 1000 1200 1400 650 1500 700 1600 800
160/160 160/160 160/160 108/108 160/16 0 108/10 8 160/160 108/108
2
2017-03-08
DC 11-Module - 212 Part No 94153-G

Tekniske specifi kationer TPR/TSR
Nominel effekt
Hz TPR 35 TPR 40 TPR 43 TSR 43 TPR 47 TSR 47 TPR 50 TSR 50
V
11 kW 15 kW 18.5 kW 18.5 kW 22 kW 22 kW 30 kW 30 kW
220-240/
380-420 50 - 106802 107202 107252 107702 107752 109202 109252
380-420/
660 50 106 600 106 800 107200 107250 107700 107750 109200 109250
500 50 - 106801 107201 107251 107701 107751 109201 109251
575 6 0 - 10 6806 107206 107256 107706 107756 10920 6 109256
220/440 60 - 10680 4 10720 4 107254 10770 4 107754 109204 109254
Kapacitet og effektforbrug
kPa Pu
60
50
40
30
20
10
0
10
20
30
kW P
6
8
4
2
7
5
3
1
200 400 600 800 1000 1200 1400 1600
6
1
4
8
1. TPR 35 11 kW
2. TPR 40 15 kW
3. TPR 43 18,5 kW
4. TSR 43 18,5 kW
5. TPR 47 22 kW
6. TSR 47 22 kW
7. TPR 50 30 kW
8. TSR 50 30 kW
Q
m3/h
2
3
5
7
Diagrammet viser de reelt mulige kapaciteter for
sugesystemet. Der er taget højde for udgangstryktab
fra en almindelig udgang (lyddæmper, kontraventil/
bøjning). Undertrykket kan opretholdes ved montering af en diffusor i udgangen.
De angivne luftfl ow gælder for luft ved normalt tryk
(10 1,3 kPa) og n ormal temp eratu r (2 0
heden (vakuumfrembringe-ren) kan også anvendes
til generering af overtryk. Trykket vil her være højere
end sugetrykket.
Art. nr.
o
C). Vakuumen-
DANSK
TPR 35, TPR 40, TPR 43, TPR 47, TPR 50
Part No 94153-G DC 11-Module - 213

Installation DC 11-Module
1
6
2
5
3
4
7
Tilslutningspunkter
1. Trykluftstilslutning 4 l/s, 4 bar (med tilvalgt
automatisk fi lterrensning).
2. Elektrisk tilslutning (med tilvalgt integreret
styretavle).
3. Tilslutning af mikroswitch (hvis monteret).
4. Tilslutning af motorspænding fra separat
styretavle (ved visse tilbehør).
5. Indløbskanal (kan roteres i ønsket retning,
tilsluttes altid).
6. Udløbskanal/lyddæmper (hvis denne løsning er valgt).
7. Huller til fastgørelse af DC 11-module.
Det anbefales at fastgøre DC 11-module.
El-installation skal udføres af en autoriseret elektriker. Hvis DC 11-modulet gøres mobilt, skal DC
11-module forsynes med sikkerhedsafbryder og
europæisk CEE-stik.
DC 11-modul er forberedt til at man kan trække elkabler og mikroswitch kabel gennem pumpehuset.
El-kabler bør monteres, så det er muligt at løfte
udstyret 200 mm for udskiftning af lejer, uden at
den elektriske tilslutning skal afkobles.
Tilslut rørsystemet til maskinens indløb og til
afkast, hvis maskinen har eksternt afkast. Start
aldrig pumpen, uden at kabler (eller slanger) er
tilsluttet.
Udløbet kan udstyres med en lyddæmper for
dæmpning af støjniveauet i udløbet. Afkastet fra
DC 11-module skal føres til det fri og afsluttes
lodret i jethætte 1 m over det sted, hvor taget passeres.
Bemærk at afkastluften kan blive mellem 100150°C varm.
Monter spand/plastsæk under fi ltercyklonen.
2017-03-08
DC 11-Module - 214 Part No 94153-G

Installation DC 11-Module
Når enheden er monteret nær en væg anbefales
dreje tegningen
1. Udskiftning af plasticpose / tømning containere
2. Betjeningspanel
3. Tjenesten dør (De øvrige plader på inbyggnaden er fast.)
DANSK
Part No 94153-G DC 11-Module - 215

Installation TPR
A. Tilladt belastning ved installation.
B. Der må ikke løftes fra denne side.
C. Pumpen skal monteres på et betonfundament. To pumper kan stilles
ovenpå hinanden.
2017-03-08
DC 11-Module - 216 Part No 94153-G

Installation TPR
1. Skru pumpen fast i betonfundamentet.
2. Fjern dækpladerne. Sæt eventuelt beskyttelsesgitteret på (A).
3. Tilslut rørsystemet på ind- og udgangssiden.
Pumpen må aldrig startes uden tilsluttet rørsystem.
4. På indgangssiden skal der altid være tilsluttet en støvudskiller med fi lter (B), således at
pumpen ikke kan ansuge forurenet luft.
5. På udgangssiden kan monteres en lyddæmper, der sænker lydniveauet fra ca. 75 dB(A) til
ca. 62-64 dB(A). Se afsnittet om tilbehør.
6. Hvis udgangen vender opad og er udsat for
fugt og regn, skal der installeres en beskyttelsesindretning i røret (rørbøjning eller lign.) (Fig.
C). Afgangsluften kan blive meget varm – helt
op til 100-150
7. Den elektriske installation må kun udføres af
en autoriseret elinstallatør. I nærheden af pumpen skal der monteres en separat blokerbar
afbryderkontakt.
8. Pumpens termiske relæ, der forhindrer overophedning, skal være tilsluttet. Ellers gælder
garantien ikke!
9. Styreskabet skal forsynes med termisk motorrelæ. Installation og afprøvning af relæet skal
ske ved autoriseret elinstallatør. Kontroller at
pumpen drejer i den rigtige retning.
o
C.
DANSK
Part No 94153-G DC 11-Module - 217

Prøvekørsel DC 11-Module
DC 11-module er normalt justeret til nominelt tryk.
Trykket kan ændres ved, at vakuumventilen justeres. Bemærk dog, at trykket ikke må overskride
maks-trykket for det aktuelle DC 11-module.
1. Sørg for at strøm-/hovedafbryderen er slukket
og låst.
2. Kontroller at alt er monteret korrekt, så personskade ved opstart forhindres. Kontroller at alle
udtag i systemet er lukkede.
3. Tilslut et manometer, der tåler mindst 50 kPa,
til pumpens sugeside – så tæt på pumpen som
muligt.
4. Tænd for strøm-/hovedafbryderen. Start
pumpen og lyt efter mislyde. Følgende lyde
skal kunne høres: Høj tone fra skovlhjulenes
rotation og en hvislende lyd fra vakuumventilen, som suger køleluft til pumpen. Kontroller
pumpens rotationsretning.
5. Mål trykket på sugesiden. Sammenlign med
det tryk, som det aktuelle DC 11-module er
dimensioneret til. Trykket kan justeres ved at
justere vakuumventilen.
6. Kontroller rørsystem og afkast for korrekt montage.
7. Det er helt normalt, at pumpens udløb bliver
meget varmt efter nogle timers i drift.
8. Når fi lteret renses, høres tydelige trykluftskud
med ca. 20 sekunders mellemrum.
Prøvekørsel DC Green System
Constant speed:
Trykket kan justeres ved at justere vakuumventil se
Vedligeholdelse.
For at verifi cere styrefunktion:
1. Sørg for at alle forretninger er lukket. Slut
sugeudstyr, der har den mindste dimension /
længste slange.
2. Systemet vil derefter afvikle og justere for
presset.
3. Fjern derefter det samme udstyr.
4. Systemet vil så efter lidt mere end et minut at
slappe spare mode.
Prøvekørsel TPR
1. Kontroller at hovedafbryderen er slået fra og
blokeret. Kontroller remspændingen (fi g. B).
Drej pumpen og lyt efter, om der er ”forkerte”
lyde. Hvis noget lyder forkert, kan det tyde på
et slidt leje eller et forkert indstillet vingehjul.
Kontroller at vakuumventilen fungerer, og at
tilslutningerne på ind- og udgangs-siderne er
korrekte.
2. Sæt dækpladerne på. Kontroller, at pumpestart kan ske uden risiko for personskade, og at
alle udtag er lukket.
3. Tilslut et manometer på sugesiden så tæt på
pumpen som muligt. Manometeret skal være
kalibreret til mindst - 50 kPa.
4. Start anlægget på hovedkontakten. Start pum-
2017-03-08
DC 11-Module - 218 Part No 94153-G
pen og lyt. Rotorerne i vingehjulet udsender
en høj skarp lyd. Når pumpen ansuger luft fra
vakuumventilen, høres en svag hvæsende lyd.
5. Mål trykket på sugesiden. Sammenlign med
det tryk, som anlægget er dimensioneret til.
Trykket kan ændres ved at justere vakuumventilen. Se afsnittet om indstilling af vakuumventilen (undertryk).
6. Kontroller sugefunktionen.
7. Åbn det antal sugeudtag, som systemet er
dimensioneret til. Kontroller, at vakuumventilen
er lukket helt.
8. Det er helt normalt, at pumpeudgangen bliver
meget varm i drift.

Vedligeholdelse DC 11-Module
Servicepunkter
1. Smøring af nederste lejer P og S modeller
(altid)
2. Smøring og kontrol af vakuumventil P model
(altid)
3. Filterskift (fi nfi lter, altid)
4. Filterskift (mikrofi lter, altid/hvis tilvalgt) et)
Constant speed:
2a. Smøring og kontrol af vakuumventil P model
(altid)
DC Green System:
2b. Kontrol af sensorerne
3. Filterskift (fi nfi lter, altid)
4. Filterskift (mikrofi lter, altid/hvis tilvalgt) et)
DANSK
Part No 94153-G DC 11-Module - 219

Vedligeholdelse DC Green System
DC Green System (2b):
Sensorens funktion bør kontrolleres ved service af
pumpen.
1. Kontroller overgangen mellem sparefunktion
og driftsform i henhold til ”testkørsel”.
2. Kontrollér driftstrykket, når systemet er i funktion (mindst et udløb åbnes).
Hvis termo-protector alarm vises, du først bør undersøge funktionen af fl owmåleren. Hvis systemet
ikke skifter til energibesparende tilstand, når alle
forretninger er lukkede pumpen vil overophede.
Denne fejl kan opstå, hvis fl owmåleren er defekt,
det kunne være en stor utæthed i systemet, eller at
Sugeudstyret indrømme for lidt luft.
Vedligeholdelse DC 11-Module
Maskinservice
DC 11-module skal serviceres og funktionstestes
mindst én gang om året. Slidte dele skal udskiftes.
Sæt aldrig funktion og levetid på spil – brug kun
originale dele.
Filterbyte (3)
Det er vigtigt, at fi lteret skiftes, når det ikke længe-
re kan renses effektivt (differenstrykket måles).
Intervallet mellem fi lterskift er afhængig af, hvilket
materiale der fi ltreres, og hvilken luftmængde fi lte-
ret udsættes for.
Ved rengøring og vedligehold skal strøm-/hovedafbryderen slukkes og afl åses.
Smøring (1) (gælder DC 11-module S og P)
Turbopumpens lejer skal smøres mindst en gang
årligt med lejefedt, art.nr. 9683.
- Åbn gavlpladen.
- Løsn det bagerste lejes køle-fl ange.
- Check fedtets tilstand og påfyld fedt svarende
til 2/3 af lejehusets volumen.
- Skift O-ringen, art.nr. 4789, og sæt køle-fl ang-
en tilbage.
Finfi lteret skal skiftes mindst én gang årligt. Kun
originale fi ltre må anvendes. Brug åndedrætsværn
ved fi lterskift, og gør det, når der ikke er andre til
stede.
1. Strøm-/hovedafbryderen slukkes og afl åses.
2. Brug åndedrætsværn. Tilse at andre personer
uden behørig beskyttelse ikke bliver udsat for
støv.
3. Frigør det øverste spændebånd, som fastholder toppen af fi ltercyklonen, og løft den af.
4. Frigør fi lterets spændebånd.
5. Løft fi nfi lteret ud og læg det i en plastsæk,
som lukkes.
6. Sæt det nye fi lter i, og remonter toppen af
fi ltercyklonen.
7. Tænd for strøm-/hovedafbryderen og start
maskinen
.
2017-03-08
DC 11-Module - 220 Part No 94153-G

Vedligeholdelse DC 11-Module
Mikrofi lterskift:
Afmonter toppen (pos10) af cyklonen ved at afmontere låseringen.
Afmonter den gamle udgang. Monter den nye udgang (pos28). Forbind udgangen med slange d110
artnr 2030 til pumpens indgang. Brug forbindelse
artnr 3031 til at fastgøre slange d110 artnr 2030 til
pumpens ind- og udgang.
Afmonter tragten fra magnetventilen med hagenøgle
eller rørtang. Monter slange (pos1) på magnetventilen. Monter tragt på slange (pos1).
Monter nederste fi lter (pos8) på det fi ne fi lter i cy-
klon.
Monter øverste fi lter (pos8) på HEPA-modulet
(pos3).
Monter HEPA-modul (pos3) på udgangsmodulet.
Lås alt med låsering (pos9).
DANSK
Fastør de otte MRT 6*50 skruer (pos4), som spænder begge fi ltre (pos8). Efterse fra indersiden af
HEPA-modulet (pos3), at fi ltrene (pos8) er fastgjort.
Brug gevindtætning Loctite542 eller lignende til de
otte MRT 6*50 skruer (pos4).
Monter toppen (pos10) på HEPA-modulet (pos3).
Lås alt med låseringen (pos9).
Max Q= 1000 m3/h
Max dp= 40kPa
Part No 94153-G DC 11-Module - 221

Vedligeholdelse TPR
Pumpen skal efterses mindst to gange årligt og
smøres efter intervallerne nederst på siden.
1. Start pumpen og lyt efter eventuelt forkerte
lyde. Når alle sugeudtag er lukket, kommer der
en svag hvæsende lyd fra vakuumventilen.
2. Afbryd pumpen og bloker hovedafbryderen.
3. Tag pumpens dækplader af.
4. Drej remskiverne manuelt og lyt efter eventuelle mislyde.
5. Kontroller sliddet på remmene og skift dem
eventuelt ud. Remmene skal passe sammen,
så de skal alle udskiftes på én gang. (Fig. A).
Udskiftning af remme
- Løft motorpladen med møtrikken (1) og tag
remmene ud.
- Skift remmene ud.
- Stram remmene med møtrikken (2). Juster
spændingen (fi g. B).
6. Kontroller, at remskiverne er lige, og at akslerne er parallelle. Pumpens hældning kan
justeres med skruen (3), fi g. C.
7. Turbopumpens lejer skal smøres med Dustcontrol lejefedt til turbopumper, art.nr. 9928.
Smøring
- Smør frontlejerne ved at presse fedt ind i smøreniplen (4). Se fi g. C. Fortsæt med at fylde
fedt på, indtil det træder ud langs akslen.
- Fjern dækslet (5) over bageste leje og kontroller fedttilstanden. Fyld hullet 2/3 op med nyt
fedt.
- Udskift O-ringen, art.nr. 4789, og sæt dækslet
på igen.
Smøreintervaller
p TPR 40
22 kPa 1500 h
25 kPa 750 h
28 kPa -
30 kPa -
40 kPa -
p TPR 43
22 kPa 1500 h
25 kPa 1500 h
28 kPa 1000 h
30 kPa -
40 kPa -
2017-03-08
DC 11-Module - 222 Part No 94153-G

Vedligeholdelse
Constant Speed(2a):
D
E
2.
1.
4.
3.
Vakuumventil (2) (gælder ikke S model)
Frigør venstre dækplade (set fra cyklonen).
Afmonter vakuumventilen og rengør og smør
aksel og lejer (D). Kontroller gummipakningen
(E). Hvis den er revnet eller er blevet hård, skal
den udskiftes (art.nr. 4710).
Kontroller støddæmperens funktion (F).
DANSK
F
Constant Speed:
Ændring af vakuumventilens undertryk
(gælder ikke S model)
Vakuumventilen er indstillet til et nominelt undertryk (18 kPa). Hvis det er nødvendigt at ændre
undertrykket, gøres følgende:
- Tilslut et manometer til sugesiden af pumpen
og mål, mens alle indløb er helt lukkede.
- Sluk og afl ås strøm-/hovedafbryderen
- Frigør venstre dækplade (set fra cyklonen) og
afmonter vakuumventilen.
- Demonter dækslet (1) og mål afstand (A).
- Juster ved at løsne kontramøtrikken (3) og drej
derefter fjedertallerkenen (4).
En sammenpresning af fjederen (2) på 1,5 mm
giver en forhøjelse af undertrykket på ca. 1 kPa.
- Remonter venstre dækplade (set fra cyklonen).
- Remonter vakuumventilen og kontroller undertrykket.
- Remonter venstre dækplade, tilslut strømmen
og prøvekør pumpen.
Part No 94153-G DC 11-Module - 223

Tilbehør
Beskrivelse Art. nr.
Fin lter, polyester 4292
Finfi lter, polyester DC 11-Module XL 4284
Plastsæk, 90 l 4714
Spand, 40 l 40070
Spand, 60 l 40412
Spand, 40 l, rustfri 40624
Beskrivelse Art. nr.
Modvægt bundventil 7462
Udløbsadapter 40655
Mikro lter 42807
Grov lter 4080
Bottenkona H = 90 4749
Øvrigt tilbehør, se Dustcontrols katalog.
4030
Garanti DC 11-Module
Garantiperioden er 1 år ved anvendelse ved
etholdsskift eller tilsvarende beregnet tid ved
fl erholdsskift. Garantien dækker fabrikationsfejl
og dækker under forudsætning af, at udstyret
anvendes under normale driftsbetingelser og
vedligeholdes i henhold til serviceinstruktion.
Garanti TPR
Husk at der skal være installeret et relæ til beskyttelse imod overophedning.
Garantien bortfalder ved brug af uoriginale dele.
Service og reparation skal udføres af Dustcontrol eller af en autoriseret montør.
2017-03-08
DC 11-Module - 224 Part No 94153-G

Fejlsøgning
Problem
Filterrensningen fungerer ikke.
Den røde alarmlampe lyser.
Motoren kører ikke.
Årsag
Tryklufttilførslen er afbrudt.
El-tilførslen er afbrudt.
Motorværnet i styretavlen er
blevet udløst – motoren er
overbelastet.
Der er slukket for strømmen.
Strømmen når ikke frem til
motoren.
Sikkerhedsafbryderen er
slået fra.
Relæet (Logo) er slået fra.
Løsning
Kontroller magnetventil, ledninger og kompressor.
Kontroller magnetventil, ledninger, sikring og transformator.
Undersøg fejlen, udbedre fejlen
og slå motorværnet til igen.
Tænd for strømmen.
Lad en elektriker gennemgå
tilslutninger og kabler.
Undersøg, hvorfor den er slukket, og om pumpen er klar til
at blive startet. Tænd derefter
sikkerhedsafbryderen.
Slå relæet til.
DANSK
Motoren stopper straks efter
start.
Motoren kører, men anlægget
suger ikke..
Motoren kører, men anlægget
suger dårligt.
Termiske relæ slået fra.
Forkert sikring.
Motorværnet er indstillet for
lavt.
Rørsystemet er ikke tilsluttet.
Rør eller slanger er tilstoppede.
Der er ikke tilsluttet en
opsamlingsenhed (spand
eller sæk) til forudskillercyklonen.
Kileremmene er defekte.
Pumpen roterer den forkerte
vej.
Hvis relæet har slået pumpen
fra, skal problemet fi ndes og
løses, inden advarselsfunktionen resettes.
Skift til den rigtige sikring.
Lad en elektriker justere motorværnet.
Tilslut rørsystem.
Rens rørsystem eller slanger.
Tilslut en opsamlingsenhed
(spand eller sæk).
Skift remmene ud.
Lad en elektriker bytte faser.
Der er hul på slanger eller
rørsystem.
Find utæthed og tætne utætheden.
Part No 94153-G DC 11-Module - 225

Fejlsøgning
Problem Årsag Løsning
Unormal lyd fra pumpen.
Filteret er tilstoppet.
Partikler kan være kommet ind i
pumpen.
Rens eller udskift.
Sluk og bestil service.
2017-03-08
DC 11-Module - 226 Part No 94153-G

Fejlsøgning DC Green System
Problem
Alarmkoder
E.OHT
Andre koder - se konverter
manual
Bad sug i stikkontakten
Årsag
Thermowatch alarm
Flowsensoren ikke mærke
fl owet - Systemet står i
tilstand.
Løsning
Kontrollere funktion af fl owmåle-
ren. Skift føleren nødvendigt.
Kig i systemet for utætheder.
Spænd.
Kontroller om nogen sugeudstyr
har en mindre indløb end 32 mm
i diameter eller en meget lang
slange. Så prøv at lave et 15-20
mm hul i slangen ærmet.
DANSK
Kontrollere funktion af fl owmåle-
ren. Skift føleren nødvendigt.
Kontroller om nogen sugeudstyr
har en mindre indløb end 32 mm
i diameter eller en meget lang
slange. Så prøv at lave et 15-20
mm hul i slangen ærmet.
Rotationshastighed af pumpen
oscillerer upp og ned.
Justering
Naturlige vibrationer i systemet.
En lille variation er normal.
Hvis variationen er stærk, skal
du kontakte Dustcontrol for at
tune systemet.
Part No 94153-G DC 11-Module - 227

Justering af timer
Timer
indstillinger
We 15:51
2007-02-14
Taster:
Op
Venstre
Højre
Ned
ESC + ønskede tast
Taster:
Esc
OK
We 15:51
2007-02-14
Tryk på tast:
ESC
Stop
set param
set...
Prg name
Tryk på tast:
Stop
set param
set...
Prg name
Tryk på tast: OK Brug tasterne
at finde timer
B1
=05:00m
T
TA =00:00m
Tryk på tast: OK for at starte på ændringer.
Brug tasterne for at flytte markøren ,
og tasterne for at ændre værdien.
OK
blokke for at ændre
Blocknummer: B1
EftergÂngstid:
05 min : 00 sek
OK
2017-03-08
Tryk på tast: esc for at gemme ændringerne.
ESC
DC 11-Module - 228 Part No 94153-G

Justering af timer
På samme måde ændres:
B2 - Forsinkelse før filterrensningsstart
B3 - Filterrensningstid
B2
T
=00:30m
TA =00:30m
B3
=04:00m
T
TA =00:00
DANSK
B4 - Filterrensningskud
TH = Skudlængde
TL = Tidsinterval mellem skuddene
Lus fjernes for at aktivere
filterrensning under drift
B5 - Timer for filterrensning under drift
TH = Filterrensningstid
TL = Tid mellem rensninger
B6 - Maksimal køretid
Bloknummer
B7, B8 och B9 - Uge-ur
B4
Th =00:30s
Tl =20:00s
TA =00:00
B5
=04:00m
Th
Tl =56:00m
TA =00:00
B6
T =02:00h
TA =00:00
B7 1
D =
-------
ON =00:00
OFF =00:00
Drifttidsinterval nr.
Ugedag: MTWTFSS
Start tid
Slut tid
Part No 94153-G DC 11-Module - 229
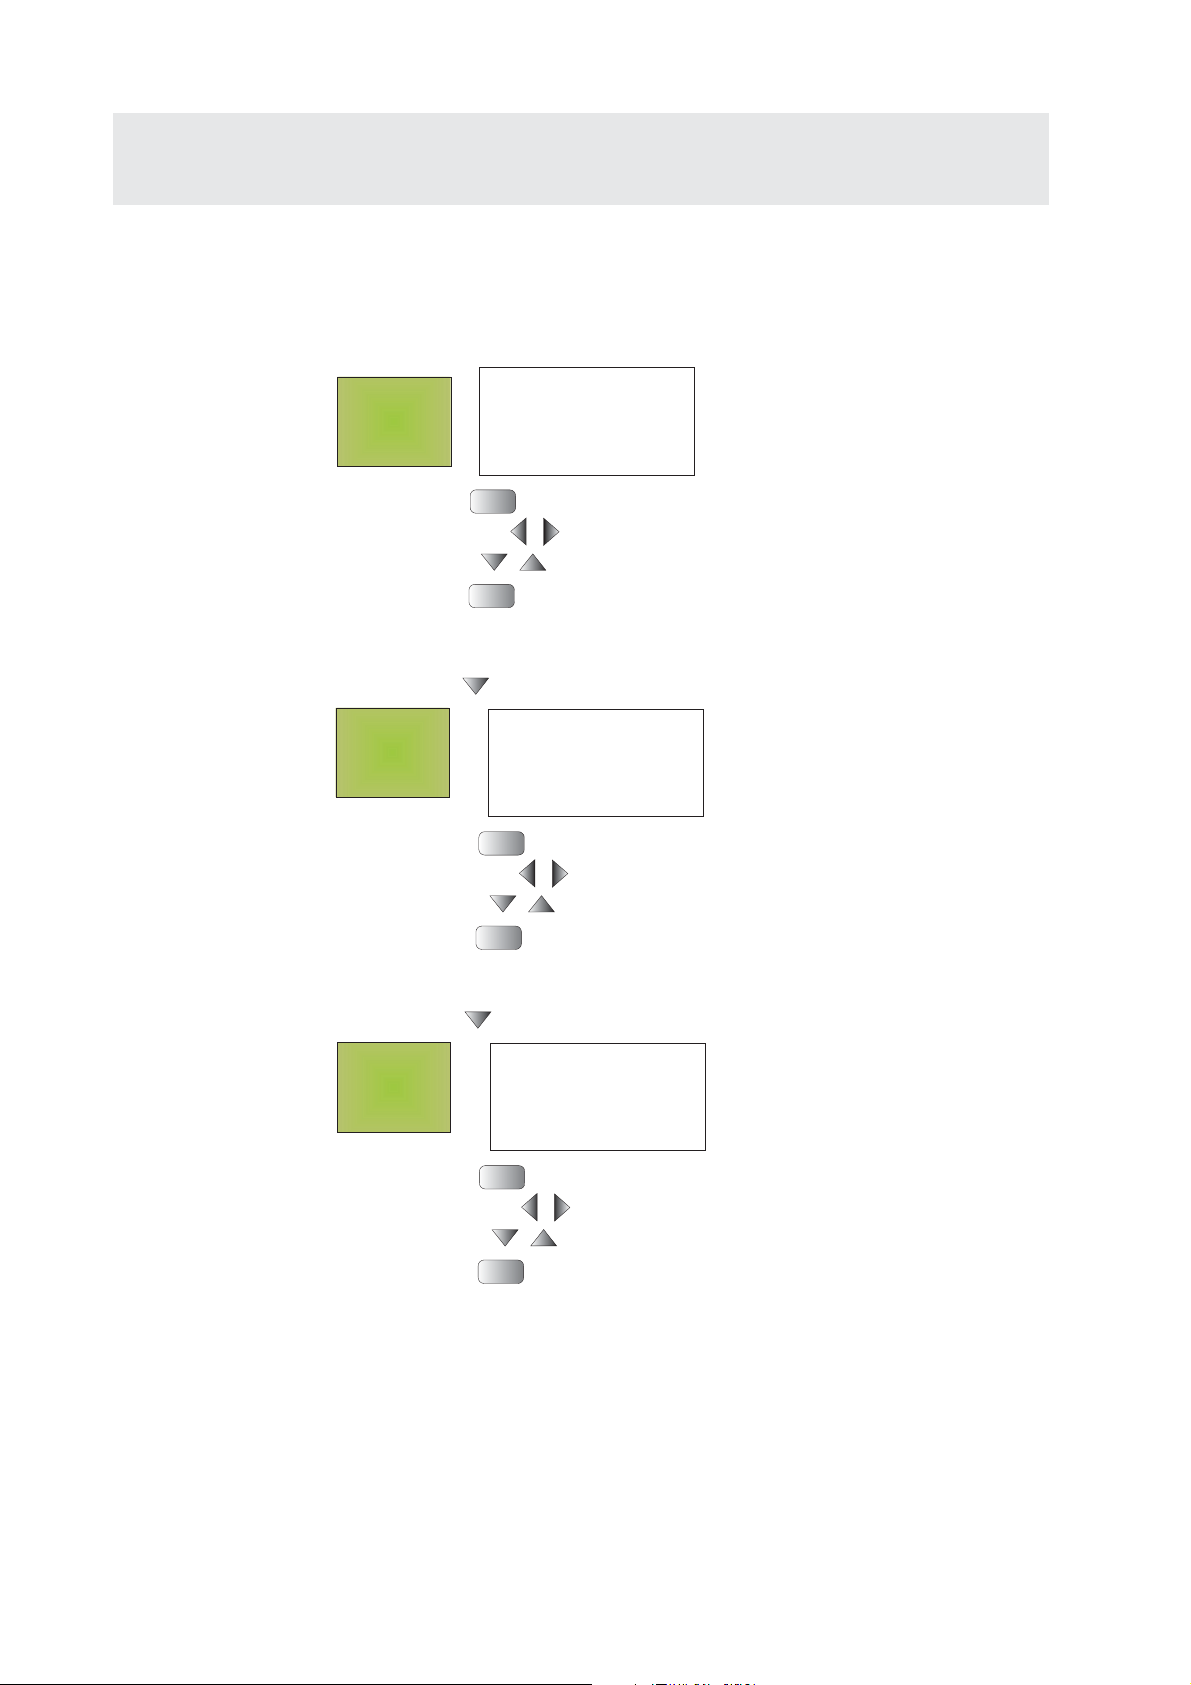
Justering af timer
Ændring af uge-ur
B7 1
D =
MTWTF--
ON = 06:00
= 11:00
OFF
Tryk på tasten: OK for at påbegynde ændringer.
Brug tasterne for at flytte markøren,
og tasterne for at ændre værdien.
Tryk på tasten: esc for at gemme ændringerne.
Tryk på tasten:
B7 2
MTWTF--
D =
ON = 11:30
= 15:00
OFF
Tryk på tasten: OK fˆr att pÂbˆrja ‰ndringar.
Brug tasterne for at flytte markøren,
og tasterne for at ændre værdien.
Tryk på tasten: esc for at gemme ændringerne.
Første drifttidsinterval:
Mandag-fredag
Start 06:00
Stop 11:00
OK
ESC
Anden drifttidsinterval:
Mandag-fredag
Start 11:30
Stop 15:00
OK
ESC
2017-03-08
Tryk på tasten:
B7 3
MTWTF--
D =
ON = 15:15
OFF =
Tryk på tasten: OK fˆr att pÂbˆrja ‰ndringar.
Brug tasterne for at flytte markøren,
og tasterne for at ændre værdien.
Tryk på tasten: esc for at gemme ændringerne.
Der er mulighed for 9 drifttidsintervaller.
B7 1 ,B8B7 2 , B7 3
B9 1 , B9 2 , B9 3
17:00
1 , B8 2 , B8 3
Tredje drifttidsinterval
Mandag-fredag
Start 15:15
Stop 17:00
OK
ESC
DC 11-Module - 230 Part No 94153-G

Justering af timer
Indstilling af tid og dato
We 15:51
2007-02-14
Tryk
Stop
set param
set...
Prg name
Tryk
Stop
set param
set...
Prg name
Tryk
Stop
set param
set...
Prg name
Tryk
clock
contrast
startscrn.
Tryk
ESC
DANSK
OK
OK
Set clock
s/w time..
sync
Tryk
OK
Set clock
su 00:00
yyyy-mm-dd
2003-01-01
Brug tasterne for redigering
og tasterne
for navigering
Tryk på tasten for at gemme ændringerne
ESC
Part No 94153-G DC 11-Module - 231

Justering af timer
Indstilling af sommer- og vintertid
We 15:51
2007-02-14
Tryk:
Stop
set param
set...
Prg name
Tryk: to gange
Stop
set param
set...
Prg name
Tryk:
clock
contrast
startscrn.
Tryk:
Set clock
s/w time..
sync
Tryk:
Set clock
s/w time..
sync
ESC
OK
OK
2017-03-08
Tryk:
OK
On
off
s/w time:
on -> eu
Tryk:
OK
eu
Brug tasterne for at vælge tidszone. [ EU, UK, US, AUS, AUS-TAS, NZ]
Tryk på tasten: or at gemme ændringerne
ESC
DC 11-Module - 232 Part No 94153-G

Start alarm
P
U
RESET
RESET
REV
REV
FWD
FWD
Green System - Dc11module
Start from Speed Controller’s panel :
Operation
Press for more than 2 seconds
Press to choose the PU
operation mode
Press to START the controller
Press to STOP the controller
FWD
STOP
Alarms
Press for 2s
Display
0HLd
Display
.
0
00
DANSK
Thermo protector tripped
The pump is overheating.
Check why, and repair the fault
Press to RESET the alarm
STOP
E
T
.
O
H
Part No 94153-G DC 11-Module - 233

Changing the setpoint/max speed
(()
)
Green System DC11-Module, beskrivelse af display
Hovedmenu (F1)
Viser maskinens aktuelle status. Her kan man
starte/stoppe motoren, resette efter alarm og foretage fi lterrensning. Tryk på knap F4 for at få vist
skærmbilledet ”Service”. Fra ”Service” kan man gå
videre til de andre skærmbilleder. For at få adgang
til servicemenuen skal man indtaste et password.
Det står på bagsiden af displayet
F4 fører til skærmbilledet ”Language”, hvor man
vælger sprog.
Se følgende billeder af de forskellige skærmbilleder.
After RT (F2)
Filter clean (F3)
Service (F4)
Her kan man ændre trykket i systemet, som er
fabriksindstillet til 18 kPa.
Ved at holde fi ngeren på knappen ”Start” og
knappen ”Filter Clean” kan man teste henholdsvis
funktionerne start og fi lterrensning.
F1 fører retur til hovedmenuen.
F2 fører til skærmbilledet ”After RT”, hvor ønsket
efterløbstid indstilles.
F3 fører til skærmbilledet ”Filter Clean”, hvor
ønskede rensetider angives.
2017-03-08
DC 11-Module - 234 Part No 94153-G
Language (F4)

Change of Discharge, collection sack
DANSK
Part No 94153-G DC 11-Module - 235

Change of Discharge, collection sack
2017-03-08
DC 11-Module - 236 Part No 94153-G

Change of Discharge, collection sack
DANSK
Part No 94153-G DC 11-Module - 237

Reservdelar Spare Parts Ersatzteile Ricambi Pièces détachées
Piezas de repuesto Reservedele Запасные части Części zamienne Reserveonderdelen Varaosat
84041
40443
4292
4706
Turbopumps
kW Nr kat.
5.5 42752
7.5 42758
11 P 42728
11 S 42494 UL/CSA
3361
3031
System Control Panel
42559
42741
INSTRUKTION
INSTRUCTION
BETRIEBS-
ANLEITUNG
94153-G
42742
42739
42736
3007
8001
42737
42738
Turbopump
4482
42739
42742
42736
42741
Part No 94153-G DC 11-Module - 371

Reservdelar Spare Parts Ersatzteile Ricambi Pièces détachées
Piezas de repuesto Reservedele Запасные части Części zamienne Reserveonderdelen Varaosat
Extra
module ring
Part no 43302
HEPA lter
Outlet module
Part no 43303
Part no 42807
4954
4926
495201
495202
TPR/TSR 11-30 kW
4789
*
4636
*
*
4905
4946
4936
*
4927
4635
4923
4943
4947
4906
8199
4928
4920
4922
4925
4921
*
Motor
(TPR)
4932
4926
4700/4701
4942
4931
4710
8001
3040
4756
4781
(TSR)
3031
4786
4763
4782
4949
4635
4762
*
4636
*
4757
492900
3007
4933
4934
476601
4777
4935
4775
4937
*
*
4760
471800
471801
494503
494502
494501
494500
494504
4737
4780 03
4780 02
4780 01
4780 00
2017-03-08
DC 11-Module - 372 Part No 94153-G

Reservdelar Spare Parts Ersatzteile Ricambi Pièces détachées
Piezas de repuesto Reservedele Запасные части Części zamienne Reserveonderdelen Varaosat
Art nr Benämning
3007 Skarv 76
3031 Rörskarv 108
3361 Böj, 90
40443 Trattdysa
42559 Täckbricka, gummi hål D = 20
42736 Ljudabsorbent, täckplåt
42737 Ljudabsorbent, topp
o
, D = 108
* ingår i reparationssats art nr 4164
Art. nr Benämning
4164 Reparationssats TPR/TSR 40-50
4635 Turbinhjul
4636 Turbinhus och kåpa
4756 Mellandel TPR
4757 Gavel
4760 Täcklock
4762 Axelpump
4763 Distansbricka
4781 Mellandel TSR
4782 Täckplåt, mellandel TPR
4905 Distansring
4906 Distansring
4954 Tätningslock
3007 Jetkoppling
3031 Jetkoppling
3040 Kona ø 110/108
4700 Turbopump TSR
4701 Turbopump TPR
4710 Gummipackning TPR
471800 Kilremshjul 50 Hz
471801 Kilremshjul 60 Hz
Art nr Benämning
42738 Ljudabsorbent, avskiljardel
42739 Ljudabsorbent, sida
42741 Täckplåt, sida
42742 Täckplåt, fram/bak
42807 HEPA- lter
4292 Filter
43302 Extra Modulering
Art. nr Benämning
4737 Remskiva TPR 35 11 kW
476601 Gummipackning
4775 A xel
4777 Stödskruv
478000 Remskiva TPR/TSR 40 15 kW
478001 Remskiva TPR/TSR 43 18,5 kW
478002 Remskiva TPR/TSR 47 22 kW
478003 Remskiva TPR/TSR 50 30 kW
4786 Vibratordämpare
4789 O-ring
4920 Stativsida, vänster
4921 Stativsida, höger
4922 Tvärstycke
4923 Takplåt
4925 Främre täckplåt TPR
4926 Sidoplåt
4927 Bottenplåt
4928 Bakre täckplåt
492900 Ljuddämpare TPR
4931 Pumpstativ
4932 Stos
Art nr Benämning
43303 Utloppsmodul
4482 Vibrationsdämpare
4706 Kona
8001 Vakuumventil 76
84041 Magnetventil DC
94153-G Bruksanvisning i original
DC 11-Module.
Art. nr Benämning
4933 Rörböj, höger
4934 Rörböj, vänster
4935 Ställskruv
4936 Luftkanal
4937 Motorhylla
4942 Ljuddämpare
4943 Lyftögla
494500 Kilrem 15 kW, 18,5 kW, 50 Hz
494501 Kilrem 30 kW, 50 Hz
15 kW, 18,5 kW, 60 Hz
494502 Kilrem 22 kW, 30 kW, 60 Hz
494503 Kilrem 11 kW, 50 Hz
494504 Kilrem 22 kW, 50 Hz
4946 Ventilationsgaller
4947 Ventilationsgaller
4949 Distansring 11-22 kW
495201 Kabelförskruvning 11-22 kW
495202 Kabelförskruvning 30 kW
8199 Termoprotektor komplett 120
Svenska
o
C
Part No Description
3007 Joint clamp 76
3031 Joint 108, nitrile
3361 Bend, 90
40443 Funnel nozzle, cleanings
42559 Cover plate, rubber hole
D = 20
42736 Sound absorbent, Cover plate
42737 Sound absorbent, top
o
, D = 108
Part No Description
42738 Sound absorbent, separator
42739 Sound absorbent, side
42741 Cover plate, side
42742 Cover plate, front/back
42807 HEPA- lter
4292 Filter
English
Part No Description
43302 Extra Modulering
43303 Outlet Module
4482 Vibration damper
4706 Bottomcone
8001 Vacuum relief valve 76
84041 Solenoid DC
94153-G Original instructions
DC 11-Module
Part No 94153-G DC 11-Module - 373

Reservdelar Spare Parts Ersatzteile Ricambi Pièces détachées
Piezas de repuesto Reservedele Запасные части Części zamienne Reserveonderdelen Varaosat
* included in repair kit part no. 4164
Part No Description
4164 Repair kit TPR/TSR 40-50
4635 Impeller
4636 Impeller housing
4756 Intermediate part TPR
4757 Cover
4760 Cover
4762 Pump Axle
4763 Spacer plate
4781 Intermediate part TSR
4782 Intermediate part TPR
4905 Spacer ring
4906 Spacer ring
4954 Bearing cover
3007 Clamp
3031 Joint clamp
3040 Steel cone ø 110/108
4700 Turbopump TSR
4701 Turbopump TPR
4710 Gasket TPR
471800 Pump pulley 50 Hz
471801 Pump pulley 60 Hz
4737 Motor pulley TPR 35, 11 kW
476601 Gasket
Art. Nr. Bezeichnung
Part No Description Part No Description
4775 Pivot shaft
4777 Support rod
478000 Motor pulley
TPR/TSR 40 15 kW
478001 Motor pulley
TPR/TSR 43 18,5 kW
478002 Motor pulley
TPR/TSR 47 22 kW
478003 Motor pulley
TPR/TSR 50 30 kW
4786 Isolating mounts
4789 Gasket
4920 Frame side, left
4921 Frame side, right
4922 Cross member
4923 Top cover panel
4925 Front cover panel TPR
4926 Side cover panel
4927 Bottom panel
4928 Back cover panel
492900 Silencer TPR
4931 Pump frame
4932 Intermediate piece
Art. Nr. Bezeichnung
4933 Flanged bend, right
4934 Flanged bend, left
4935 Adjusting screw
4936 Cooling air housing
4937 Motor Plate
4942 Silencer
4943 Lifting eye
494500 Drive belt set
15 kW, 18.5 kW, 50 Hz
494501 Drive belt set 30 kW, 50 Hz
15 kW, 18.5 kW, 60 Hz
494502 Drive belt set
22 kW, 30 kW, 60 Hz
494503 Drive belt set 11 kW, 50 Hz
494504 Drive belt set 22 kW, 50 Hz
4946 Screen skirt
4947 Screen skirt
4949 Spacer ring 11-22 kW
495201 Cable tting 11-22 kW
495202 Cable tting 30 kW
8199 Thermal protector
complete 120
Art. Nr. Bezeichnung
English
o
C
Deutsch
3007 Verbinder 76
3031 Verbinder 108
3361 Bogen, 90
40443 Trichterdüse
42559 Abdeckplatte, Gummi Loch D = 20
42736 Schallabsorber, Abdeck
o
, D = 108
platte
42737 Schallabsorbierendes
Material Top
42738 Schallabsorber, Abscheider
42739 Schallabsorber, Seite
42741 Abdeckplatte, Seite
42742 Abdeckplatte, vorne/hinten
* Teile des Reparatur- satzes Art Nr 4164
Art. Nr. Benennung
4164 Reparatursatz TPR/TSR 40-50
4635 Gebläserad
4636 Gehäuse und Deckel
für Gebläse
4756 Zwischenstück TPR
4757 Stirnwand
4760 Verschlußdeckel
4762 Pumpenwelle
4763 Distanzscheibe
4781 Zwischenstück TSR
4782 Abdeckbleck,
Zwischenstück TPR
4905 Distanzring
4906 Distanzring
4954 Dichtungsdeckel
3007 Verbinder
3031 Verbinder
3040 Konus ø 110/108
4700 Turbopumpe TSR
4701 Turbopumpe TPR
4710 Gummiabdichtung TPR
471800 Keilriemenrad 50 Hz
471801 Keilriemenrad 60 Hz
2017-03-08
Art. Nr. Benennung
4737 Riemenscheibe TPR 35 11 kW
476601 Gummiabdichtung
4775 Achse
4777 Stellschraube
478000 Riemenscheibe
TPR/TSR 40 15 kW
478001 Riemenscheibe
TPR/TSR 43 18,5 kW
478002 Riemenscheibe
TPR/TSR 47 22 kW
478003 Riemenscheibe
TPR/TSR 50 30 kW
4786 Vibratordämpfer
4789 O-ring
4920 Rahmen, links
4921 Rahmen, rechts
4922 Querstück
4923 Abdeckblech, vorne
4925 Abdeckblech, hinten TPR
4926 Seitenabdeckblech
4927 Grundblech
4928 Abdeckblech, hinteres
492900 Schalldämpfer TPR
4292 Filter
4482 Vibrationsdämpfer
4706 Bodenkonus
8001 Vakuumventil 76
84041 Magnetventil DC
94153-G Originalbetriebsanleitung
DC 11-Module
Art. Nr. Benennung
4931 Pumpenstativ
4932 Staßverbindung
4933 Rohrbogen, rechts
4934 Rohrbogen, links
4935 Stützschraube
4936 Luftkanal
4937 Motorgestell
4942 Schalldämpfer
4943 Hebeöse
494500 Keilriem 15 kW, 18,5 kW, 50 Hz
494501 Keilriem 30 kW, 50 Hz
15 kW, 18,5 kW, 60 Hz
494502 Keilriem 22 kW, 30 kW, 60 Hz
494503 Keilriem 11 kW, 50 Hz
494504 Keilriem 22 kW, 50 Hz
4946 Ventilationsgitter
4947 Ventilationsgitter
4949 Distanzring 11-22 kW
495201 Zugentlastung 11-22 kW
495202 Zugentlastung 30 kW
8199 Termoprotektor komplett
120
DC 11-Module - 374 Part No 94153-G
o
C

Reservdelar Spare Parts Ersatzteile Ricambi Pièces détachées
Piezas de repuesto Reservedele Запасные части Części zamienne Reserveonderdelen Varaosat
Codice Descrizione
3007 Giunto 76
3031 Giunto 108, nitrile
3361 Gomito a , 90
40443 Ugello a imbuto
42559 Lamiera di copertura, fori
gommati D = 20
42736 Pannello fonoisolante,
lamiera di copertura
o
, D = 108
Codice Descrizione
42737 Pannello fonoisolante,
coperchio
42738 Pannello fonoisolante,
separatore
42739 Pannello fonoisolante,
laterale
42741 Lamiera di copertura
laterale
42742 Lamiera di copertura ante
riore/posteriore
* inclusi nella riparazione kit Codice. 4164
Codice Descrizione
4292 Filtro
4482 Ammortizzatore
4706 Cono inferiore
8001 Valvola di scarico 76
84041 Solenoide DC
94153-G Istruzioni tradotte
dall’originale DC 11-Module
Italiano
Codice Descrizione
4164 Riparazione kit TPR/TSR 40-50
4635 Girante
4636 Girante alloggio
4756 Parte intermedia TPR
4757 Copertina
4760 Copertina
4762 Pompa asse
4763 Piastra spacer
4781 Parte intermedia TSR
4782 Parte intermedia TPR
4905 Anello distanziatore
4906 Anello distanziatore
4954 Coperchio cuscinetto
3007 Morsetto
3031 Morsetto comune
3040 Cono d’acciaio ø 110/108
4700 Pompa Turbo TSR
4701 Pompa Turbo TPR
4710 Guarnizione TPR
471800 Pompa puleggia 50 Hz
471801 Pompa puleggia 60 Hz
4737 Puleggia TPR 35, 11 kW
476601 Guarnizione
Codice Descrizione Codice Descrizione
4775 Albero Pivot
4777 Asta di supporto
478000 Puleggia TPR/TSR 40 15 kW
478001 Puleggia TPR/TSR 43 18,5 kW
478002 Puleggia TPR/TSR 47 22 kW
478003 Puleggia TPR/TSR 50 30 kW
4786 Supporti antivibranti
4789 Guarnizione
4920 Lato del telaio, a sinistra
4921 Lato Frame, destro
4922 Traversa
4923 Pannello di copertura
superiorel
4925 Pannello di copertura
superioreTPR
4926 Pannello di copertura laterale
4927 Pannello inferiore
4928 Pannello di copertura
posteriore
492900 SilenziatoreTPR
4931 Telaio Pump
4932 Pezzo intermedio
4933 Curva angiato, destra
4934 Curva angiato, sinistra
4935 Vite di regolazione
4936 Ra reddamento abitazioni
dell’aria
4937 Piastra motore
4942 Silenziatore
4943 Sollevamento occhio
494500 Set Cinghia di trasmissione
15 kW, 18.5 kW, 50 Hz
494501 Set Cinghia di trasmissione
30 kW, 50 Hz 15 kW, 18.5 kW,
60 Hz
494502 Set Cinghia di trasmissione
22 kW, 30 kW, 60 Hz
494503 Set Cinghia di trasmissione
11 kW, 50 Hz
494504 Set Cinghia di trasmissione
22 kW, 50 Hz
4946 Gonna schermo
4947 Gonna schermo
4949 Anello distanziatore 11-22 kW
495201 Cavo adatto 11-22 kW
495202 Cavo adatto 30 kW
8199 Protezione termica
completo 120
o
C
N° de réf. Description
3007 Pince à joint 76
3031 Joint 108, nitrile
3361 Coude, 90
40443 Buse entonnoir, nettoya
ges
42559 Plaque de couverture, trou
caoutchouc D = 20
42736 Absorbeurs acoustiques,
plaque de couverture
o
, D = 108
N° de réf. Description
42737 Absorbeur acoustique,
supérieur
42738 Absorbeur acoustique,
séparateur
42739 Absorbeur acoustique,
latéral
42741 Plaque de couverture,
latérale
Français
N° de réf. Description
42742 Plaque de couverture,
avant/arrière
4292 Filtre
4482 Amortisseur de vibrations
4706 Cône inférieur
8001 Soupape de dépression 76
84041 Électrovanne DC
94153-G Instructions originales
DC 11-Module
Part No 94153-G DC 11-Module - 375

Reservdelar Spare Parts Ersatzteile Ricambi Pièces détachées
Piezas de repuesto Reservedele Запасные части Części zamienne Reserveonderdelen Varaosat
* Compris dans la réparation
kit n° de la pièce.
Français
N° de réf. Description
4164 Kit de réparation
TPR/TSR 40-50
4635 Rotor
4636 Boîtier du rotor
4756 Pièce intermédiaire TPR
4757 Couvercle
4760 Couvercle
4762 Essieu de la pompe
4763 Plaque de calage
4781 Pièce intermédiaire TSR
4782 Pièce intermédiaire TPR
4905 Rondelle d’espacement
4906 Rondelle d’espacement
4954 Couvercle de roulement
3007 Serre-câble
3031 Serre-joint
3040 Cône en acier ø 110/108
4700 Turbopompe TSR
4701 Turbopompe TPR
4710 Joint d’étanchéité TPR
471800 Poulie de pompe 50 Hz
471801 Poulie de pompe 60 Hz
4737 Poulie de moteur
TPR 35, 11 kW
476601 Joint d’étanchéité
N° de réf. Description N° de réf. Description
4775 Arbre du pivot
4777 Tige de support
478000 Poulie de moteur
TPR/TSR 40 15 kW
478001 Poulie de moteur
TPR/TSR 43 18,5 kW
478002 Poulie de moteur
TPR/TSR 47 22 kW
478003 Poulie de moteur
TPR/TSR 50 30 kW
4786 Systèmes d’isolation
4789 Joint d’étanchéité
4920 Cadre du châssis, gauche
4921 Cadre du châssis, droit
4922 Traverse
4923 Panneau de protection
supérieur
4925 Panneau de protection frontal
TPR
4926 Panneau de protection latéral
4927 Panneau de protection
inférieur
4928 Panneau de protection arrière
492900 Silencieux TPR
4931 Cadre de la pompe
4932 Pièce intermédiaire
4933 Coude à brides, droit
4934 Coude à brides, gauche
4935 Vis de réglage
4936 Tuyau d’air de refroidissement
4937 Plaque du moteur
4942 Silencieux
4943 Anneau de levage
494500 Set de courroies
15 kW, 18.5 kW, 50 Hz
494501 Set de courroies 30 kW, 50 Hz
15 kW, 18.5 kW, 60 Hz
494502 Set de courroies
22 kW, 30 kW, 60 Hz
494503 Set de courroies 11 kW, 50 Hz
494504 Set de courroies 22 kW, 50 Hz
4946 Grille de protection
4947 Grille de protection
4949 Rondelle d’espacement
11-22 k W
495201 Raccords 11-22 kW
495202 Raccords 30 kW
8199 Dispositif de protection de
surcharge thermique réglé à
120
o
C
N.º de
referencia Description
3007 Pinza de unión 76
3031 Junta 108, nitrilo
3361 Curva 90
40443 Boquilla en abanico,
limpieza
42559 Placa de cubierta, ori cio
D = 20
42736 Absorbente sonoro, placa
de cubierta
o
, D = 108
N.º de
referencia Description
42737 Absorbente sonoro,
superior
42738 Absorbente sonoro,
separador
42739 Absorbente sonoro, lateral
42741 Placa de cubierta, lateral
42742 Placa de cubierta, anterior/
posterior
4292 Filtro
Español
N.º de
referencia Description
4482 Amortiguador de vibracio
nes
4706 Cono inferior
8001 Válvula de alivio de pre
sión 76
84041 Solenoide DC
94153-G Instrucciones originales
DC 11-Module
2017-03-08
DC 11-Module - 376 Part No 94153-G

Reservdelar Spare Parts Ersatzteile Ricambi Pièces détachées
Piezas de repuesto Reservedele Запасные части Części zamienne Reserveonderdelen Varaosat
* incluido en la reparación equipo N.º de referencia 4164
Español
N.º de
referencia Description
4164 Kit de reparación
TPR/TSR 40-50
4635 Impulsor
4636 Impulsor viviendas
4756 Parte intermedia TPR
4757 Cubierta
4760 Cubierta
4762 Bomba Eje
4763 Placa de distanciamiento
4781 Parte intermedia TSR
4782 Parte intermedia TPR
4905 Anillo distanciador
4906 Anillo distanciador
4954 Tapa del rodamiento
3007 Abrazadera
3031 Abrazadera de la junta
3040 Cono de acero ø 110/108
4700 Turbobomba TSR
4701 Turbobomba TPR
4710 Empaque TPR
471800 Polea de la bomba 50 Hz
471801 Polea de la bomba 60 Hz
4737 La polea del motor TPR 35,
11 kW
N.º de
referencia Description
476601 Empaque
4775 Eje pivote
4777 Barra de soporte
478000 La polea del motor
TPR/TSR 40 15 kW
478001 La polea del motor
TPR/TSR 43 18,5 kW
478002 La polea del motor
TPR/TSR 47 22 kW
478003 La polea del motor
TPR/TSR 50 30 kW
4786 Los tacos de aislamiento
4789 Empaque
4920 Lado del marco, dejó
4921 Lado del marco, a la derecha
4922 Miembro de la Cruz
4923 Panel de cubierta superior
4925 Panel de la cubierta frontal TPR
4926 Panel de la cubierta lateral
4927 Panel inferior
4928 Panel Contraportada
492900 Silenciador TPR
4931 Marco de la bomba
4932 Pieza intermedia
N.º de
referencia Description
4933 Curva con bridas, derecha
4934 Curva con bridas, izquierda
4935 Tornillo de ajuste
4936 El aire de refrigeración
vivienda
4937 Placa Motor
4942 Silenciador
4943 Argolla de elevación
494500 Set Correa de mando
15 kW, 18.5 kW, 50 Hz
494501 Set Correa de mando30 kW,
50 Hz 15 kW, 18.5 kW, 60 Hz
494502 Set Correa de mando
22 kW, 30 kW, 60 Hz
494503 Set Correa de mando 11 kW,
50 Hz
494504 Set Correa de mandot 22 kW,
50 Hz
4946 Falda de la pantalla
4947 Falda de la pantalla
4949 Anillo distanciador 11-22 kW
495201 Montaje de cable 11-22 kW
495202 Montaje de cable 30 kW
8199 Protector térmico
completo120
o
C
Art. nr. Betegnelse
3007 Rørsamling 76
3031 Rørsamling 108
3361 Bøjning, 90
40443 Tragtdyse
42559 Inddækning gummi hul D = 20
42736 Lydisolerende for-/bagplade
o
, D = 108
Art. nr. Betegnelse
42737 Lydisolerende topplade
42738 Lydisolerende skilleplade
42739 Lydisolerende sideplade
42741 Dækplade side
42742 Dækplade for/bag
4292 Filter
Art. nr. Betegnelse
4482 Vibrationsdæmper
4706 Udtømingsreduktion
8001 Vakuumventil 76
84041 Magnetventil DC
94153-G Original brugsanvisning
DC 11-Module.
Dansk
Part No 94153-G DC 11-Module - 377

Reservdelar Spare Parts Ersatzteile Ricambi Pièces détachées
Piezas de repuesto Reservedele Запасные части Części zamienne Reserveonderdelen Varaosat
*Inkluderet i reparationssæt Art. nr. 4164
Art. nr. Betegnelse
416 4
4635 Turbinehjul
4636 Turbine boliger og boliger
4756 Mellemliggende del TPR
4757 Hovedgærde
4760 Taecklock
4762 Aksel Pumpe
4763 Distans spændeskive
4781 Mellemliggende del TSR
4782 Dækplade, mellemliggende
TPR
4905 Distance opkald
4906 Distance opkald
4954 Forseglingshætte
3007 Jetkoppling
3031 Jetkoppling
3040 Kona ø 110/108
4700 Turbopump TSR
4701 Turbopump TPR
4710 Gummipakning TPR
471800 Kilremshjul 50 Hz
471801 Kilremshjul 60 Hz
Арт No Описание
3007 Хомут 76
3031 Хомут108
3361 Изгиб, 90
40443 Воронка, очистка
42559 Панель, отверстия D = 20
42736 Шумоизоляция, Стенка
Reparationssæt TPR/TSR 40-50
o
, D = 108
Art. nr. Betegnelse
4737 Remdisk TPR 35 11 kW
476601 Gummipakning
4775 Aksel
4777 Support skrue
478000 Remdisk TPR/TSR 40 15 kW
478001 Remdisk TPR/TSR 43 18,5 kW
478002 Remdisk TPR/TSR 47 22 kW
478003 Remdisk TPR/TSR 50 30 kW
4786 Vibrationsdæmpere
4789 O-ring
4920 Stativ side,venstre
4921 Stativ side, højre
4922 Tværstykke
4923 Loft plade
4925 Foran dækplade TPR
4926 Sidepladen
4927 Bundpladen
4928 Bakre dækplade
492900 Lyddæmper TPR
4931 Pumpe stativ
4932 Studs
Арт No Описание
42737 Шумоизоляция, крышка
42738 Шумоизоляция, сепаратор
42739 Шумоизоляция, боковая
42741 Стенка, боковая
42742 Стенка, передняя/задняя
4292 Фильтр
Dansk
Art. nr. Betegnelse
4933 Rørbøjning, højre
4934 Rørbøjning, venstre
4935 Sæt skrue
4936 Luftkanal
4937 Motor hylde
4942 Lyddæmper
4943 Løfteøje
494500 Kilerem 15 kW, 18,5 kW, 50 Hz
494501 Kilerem 30 kW, 50 Hz
15 kW, 18,5 kW, 60 Hz
494502 Kilerem 22 kW, 30 kW, 60 Hz
494503 Kilerem 11 kW, 50 Hz
494504 Kilerem 22 kW, 50 Hz
4946 Ventilations rist
4947 Ventilations rist
4949 Distance opkald 11-22 kW
495201 Kabelforskruning 11-22 kW
495202 Kabelforskruning 30 kW
8199 Termoprotektor fuldføre 120
Русский
Арт No Описание
4482 Амортизатор
4706 Разгруз. конус
8001 Клапан сброса вакуума
84041 Соленоид DC
94153-G Original instructions
DC 11-Module
o
C
* Включено в ремкомплект (артикул 4614)
Арт Описание
3007 Хомут
3031 Хомут
3040 Переходник ø 110/108
4164 Ремнабор TPR/TSR 40-50
4635 Импеллер
4636 Кожух импеллера
4700 Турбопомпа TSR
4701 Турбопомпа TPR
4710 Уплотнитель TPR
471800 Шкив 50 Гц
471801 Шкив 60 Гц
4737 Шкив двигателя TPR 35,
11 кВт
4756 Прокладка TPR
4757 Панель
4760 Панель
4762 Ось помпы
4763 Крепление прокладки
476601 Уплотнитель
4775 Ось
4777 Стойка
478000 Шкив двигателя
TPR/TSR 40 15 кВт
2017-03-08
Арт Описание
478001 Шкив двигателя
TPR/TSR 43 18,5 кВт
478002 Шкив двигателя
TPR/TSR 47 22 кВт
478003 Шкив двигателя
TPR/TSR 50 30 кВт
4781 Прокладка TSR
4782 Прокладка TPR
4786 Изолирующие крепления
4789 Кольцо-уплотнитель
4905 Кольцо-прокладка
4906 Кольцо-прокладка
4920 Рама, левая часть
4921 Рама, правая часть
4922 Рама, крепление
4923 Верхняя панель
4925 Передняя панель TPR
4926 Боковая панель
4927 Нижняя панель
4928 Задняя панель
492900 Глушитель TPR
4931 Рама помпы
4932 Промежуточное
соединение
Арт Описание
4933 Отвод с фланцем, правый
4934 Отвод с фланцем, левый
4935 Регулировочный винт
4936 Вентканал
4937 Крепление двигателя
4942 Глушитель
4943 Рым подъемный
494500 Ремень 15 кВт, 18,5 кВт, 50 Гц
494501 Ремень 30 кВт, 50 Гц 15кВт,
18,5 кВт, 60 Гц
494502 Ремень 22 кВт, 30 кВт, 60 Гц
494503 Ремень 11 кВт, 50 Гц
494504 Ремень 22 кВт, 50 Гц
4946 Вент. решетка
4947 Вент. решетка
4949 Кольцо-прокладка 11-22 кВт
495201 Фиттинг для кабеля 11-22 кВт
495202 Фиттинг для кабеля 30 кВт
4954 Крышка подшипника
8001 Клапан сброса вакуума 76
8199 Термозащита 120
9046 Руководство TPR 43, 18,5 кВт
DC 11-Module - 378 Part No 94153-G
o
C

Reservdelar Spare Parts Ersatzteile Ricambi Pièces détachées
Piezas de repuesto Reservedele Запасные части Części zamienne Reserveonderdelen Varaosat
Nr kat Opis
3007 Złącze 76
3031 Złącze 108
3361 Załamać, 90
40443 Końcówka lejka, sprzątanie
42559 Pokrywa, otwór gumy D = 20
42736 Tłumik, Osłona
42737 Top pochłaniającą dźwięk
o
, D = 108
* included in repair kit Nr kat 4164
Nr kat Opis
4164 Zestaw naprawczy
TPR/TSR 40-50
4635 Wirnik
4636 Wirnik obudowa
4756 Część pośrednia TPR
4757 Okładka
4760 Okładka
4762 Pompa Oś
4763 Płyta dystansowa
4781 Część pośrednia TSR
4782 Część pośrednia TPR
4905 Pierścień dystansowy
4906 Pierścień dystansowy
4954 Pokrywa łożyska
3007 Zacisk
3031 Wspólny zacisk
3040 Stożek Stal ø 110/108
4700 Turbopompa TSR
4701 Turbopompa TPR
4710 UszczelkaTPR
471800 Koło pasowe pompy 50 Hz
471801 Koło pasowe pompy 60 Hz
4737 Koło pasowe silnika TPR 35,
11 k W
476601 Uszczelka
Nr kat Opis
42738 Separator pochłaniającą
dźwiękl
42739 Dźwięk chłonny, jedwab
42741 Pokrywa, jedwab
42742 Pokrywa, przód / tył
4292 Filtr EX
4482 Tłumik drgań
Nr kat Opis Nr kat Opis
4775 Wał przegubowy
4777 Pręt Pomoc
478000 Koło pasowe silnika
TPR/TSR 40 15 kW
478001 Koło pasowe silnika
TPR/TSR 43 18,5 kW
478002 Koło pasowe silnika
TPR/TSR 47 22 kW
478003 Koło pasowe silnika
TPR/TSR 50 30 kW
4786 Izolowanie wierzchowce
4789 Uszczelka
4920 Ramki bocznej, lewej
4921 Stronę ramy, tuż
4922 Krzyż członkiem
4923 Panel górny pokrywy
4925 Przedni panel pokrywyTPR
4926 Panel boczny Osłona
4927 Panel dolny
4928 Tylna pokrywa
492900 Tłumik TPR
4931 Rama pompy
4932 Pośredni element
4933 Zgiecie kołnierzowe, tuż
4934 Zgiecie kołnierzowe, w lewo
Nr kat Opis
4706 Stożek
8001 Próżniowy zawór
bezpieczeństwa 76
84041 Solenoid DC EX
94153-G Oryginalna instrukcja
DC 11-Module.
4935 Śruba regulacyjna
4936 Chłodzenie obudowy
powietrza
4937 Płyta silnika
4942 Tłumik
4943 Podnoszenie oczu
494500 Zestaw paska napędowego
15 kW, 18.5 kW, 50 Hz
494501 Zestaw paska napędowego
30 kW, 50 Hz, 15 kW, 18.5 kW,
60 Hz
494502 Zestaw paska napędowegoet
22 kW, 30 kW, 60 Hz
494503 Zestaw paska napędowego
11 kW, 50 Hz
494504 Zestaw paska napędowego
22 kW, 50 Hz
4946 Spódnica ekranu
4947 Spódnica ekranu
4949 Pierścień dystansowy
11-22 k W
495201 Złączki kablowe 11-22 kW
495202 Złączki kablowe 30 kW
8199 zabezpieczenie termiczne
kompletny 120
Polski
o
C
Art. nr. Omschrijving
3007 Gezamenlijke klem 76
3031 Verbindingstuk 108
3361 Elleboog, 90
40443 Trechter
42559 Afdekplaat, rubber gat D = 20
42736 Geluidsabsorberend, Afdek
plaat
o
, D = 108
Art. nr. Omschrijving
42737 Geluidsabsorberend top
42738 Geluidsabsorberend
separator
42739 Geluidsabsorberend, kant
42741
Afdekplaat, kant
42742
Afdekplaat, voor/achter
Nederlands
Art. nr. Omschrijving
4292 Filter
4482 Trillingsdemper
4706 Onderkegel
8001 Vacuümontlastingsklep 76
84041 Magneetventiel DC
94153-G Oorspronkelijke gebruiksaan
wijzing DC 11-Module
Part No 94153-G DC 11-Module - 379

Reservdelar Spare Parts Ersatzteile Ricambi Pièces détachées
Piezas de repuesto Reservedele Запасные части Części zamienne Reserveonderdelen Varaosat
Nederlands
* opgenomen in reparatie uitrusting
Art. nr.
4164
Art. nr. Omschrijving
4164 Reparatieset TPR/TSR 40-50
4635 Impeller
4636 Impeller behuizing
4756 Tussenstuk TPR
4757 Deksel
4760 Deksel
4762 Pomp Axle
4763 Spacer plaat
4781 Tussenstuk TSR
4782 Tussenstuk TPR
4905 Spacer ring
4906 Spacer ring
4954 Lagerdeksel
3007 Klem
3031 Joint klem
3040 Stalen kegel ø 110/108
4700 Turbopump TSR
4701 Turbopump TPR
4710 Pakking TPR
471800 Pomppoelie 50 Hz
471801 Pomppoelie 60 Hz
4737 Motorpoelie TPR 35, 11 kW
476601 Pakking
Art. nr. Omschrijving
4775 Spilschacht
4777 Steunstang
478000 Motorpoelie
TPR/TSR 40 15 kW
478001 Motorpoelie
TPR/TSR 43 18,5 kW
478002 Motorpoelie
TPR/TSR 47 22 kW
478003 Motorpoelie
TPR/TSR 50 30 kW
4786 Rubberen dempers
4789 Pakking
4920 Raamzijde, links
4921 Raamzijde, rechts
4922 Dwarsbalk
4923 Top afdekplaat
4925 Voorkap panel TPR
4926 Zijpaneel panel
4927 Onderste paneel
4928 Rugdekking panel
492900 Geluiddemper TPR
4931 Pomp frame
4932 Tussenstuk
Art. nr. Omschrijving
4933 Van een ens bocht, rechts
4934 Van een ens bocht, links
4935 Stelschroef
4936 Koellucht huisvesting
4937 Motor Plate
4942 Geluiddemper
4943 Hijsoog
494500 Aandrijfriem set
15 kW, 18.5 kW, 50 Hz
494501 Aandrijfriem set30 kW, 50 Hz
15 kW, 18.5 kW, 60 Hz
494502 Aandrijfriem set
22 kW, 30 kW, 60 Hz
494503 Aandrijfriem set 11 kW, 50 Hz
494504 Aandrijfriem set 22 kW, 50 Hz
4946 Screen rok
4947 Screen rok
4949 Spacer ring 11-22 kW
495201 Kabelgarnituur 11-22 kW
495202 Kabelgarnituur 30 kW
8199 Thermische beveiliging
compleet120
o
C
Art. nro Nimike
3007 Jatke 76
3031 Jatke 108, nitriili
3361 Mutka, 90
40443 Suppilo suutin, puhdistus
42559 Peitelevy, kumi reikä D = 20
42736 Ääni imukykyinen, Peitelevy
2017-03-08
o
, D = 108
Art. nro Nimike
42737 Ääni imukykyinen, alkuun
42738 Ääni imukykyinen, erotin
42739 Ääni imukykyinen, puoli
42741 Peitelevy, puoli
42742 Peitelevy, etu/taka
4292 Suodatin
DC 11-Module - 380 Part No 94153-G
Suomi
Art. nro Nimike
4482 Värähtelynvaimennin
4706 Pohjakar tio
8001 Alipaineventtiili D=76
84041 Solenoidi DC
94153-G Alkuperäiset Ohjeet
DC 11-Module

Reservdelar Spare Parts Ersatzteile Ricambi Pièces détachées
Piezas de repuesto Reservedele Запасные части Części zamienne Reserveonderdelen Varaosat
* sisältyy korjaussarjaan art nr 4164
Art. nr Nimike
4164 Korjaussarja TPR/TSR 40-50
4635 Turbiinipyörä
4636 Turbiinikotelo ja kansi
4756 Väliosa TPR
4757 Päätylaippa
4760 Peitekansi
4762 Pumppuakseli
4763 Välilevy
4781 Väliosa TSR
4782 Peitelevy, väliosa TPR
4905 Välirengas
4906 Välirengas
4954 Tiivistekansi
3007 Liitospanta
3031 Liitospanta
3040 Kartio ø 110/108
4700 Turbopumppu TSR
4701 Turbopumppu TPR
4710 Kumitiiviste TPR
471800 Kiilahihnapyörä 50 Hz
471801 Kiilahihnapyörä60 Hz
4737 Hihnapyörä TPR 35, 11 kW
476601 Kumitiiviste
Art. nr Nimike Art. nr Nimike
4775 Akseli
4777 Tukiruuvi
478000 Hihnapyörä
TPR/TSR 40 15 kW
478001 Hihnapyörä
TPR/TSR 43 18,5 kW
478002 Hihnapyörä
TPR/TSR 47 22 kW
478003 Hihnapyörä
TPR/TSR 50 30 kW
4786 Tärinänvaimennin
4789 O-rengas
4920 Kehys, vasen
4921 Kehys, oikea
4922 Poikkikappale
4923 Kattolevy
4925 Etupeitelevy TPR
4926 Sivulevy
4927 Pohjalevy
4928 Takapeitelevy
492900 Äänenvaimennin TPR
4931 Pumppujalusta
4932 Liitososa
4933 Putkikäyrä, oikea
4934 Putkikäyrä, vasen
4935 Asetusruuvi
4936 Ilmakanava
4937 Moottorihylly
4942 Äänenvaimennin
4943 Nostokorvake
494500 Kiilahihna
15 kW, 18.5 kW, 50 Hz
494501 Kiilahihna 30 kW, 50 Hz
15 kW, 18.5 kW, 60 Hz
494502 Kiilahihna
22 kW, 30 kW, 60 Hz
494503 Kiilahihna 11 kW, 50 Hz
494504 Kiilahihna 22 kW, 50 Hz
4946 Tuuletusritilä
4947 Tuuletusritilä
4949 Välirengas 11-22 kW
495201 Vedonpoistin 11-22 kW
495202 Vedonpoistin 30 kW
8199 Lämpösuoja, täyd. 120
Suomi
o
C
Part No 94153-G DC 11-Module - 381

Reservdelar Spare Parts Ersatzteile Ricambi Pièces détachées
Piezas de repuesto Reservedele Запасные части Części zamienne Reserveonderdelen Varaosat
Vakuumventil Vacuum Relief Valve Unterdruckventil La valvola
di sicurezza Vacuum Soupape Válvula de alivio de vacío
Vakuumventil Клапан сброса вакуума
Onderdrukklep Alipaineventtiili
4450
98001-06
4167
4710
98001-01
Zawór próżniowy
4452
98001-06
98001-02
98001-03
98001-05
Art nr Benämning
4167 Reparationssats, vakuum
ventil
4450 Stötdämpare
4452 Axel
Part No Description
4167 Repair kit Vacuum valve
4450 Hydraulic damper
4452 Axle
4453
Art nr Benämning
4453 Tätningsplatta
4710 Gummipackning
98001-01 Kona 76, vakuumventil
Part No Description
4453 Valve plate
4710 Rubber seal
98001-01 Cone 76
Svenska
Art nr Benämning
98001-02 Axelhatt, vakuumventil
98001-03 Tryckplatta, vakuumventil
98001-05 Ventilhus, vakuumventil
98001-06 Bricka, vakuumventil
English
Part No Description
98001-02 Axle lid
98001-03 Pressure plate
98001-05 Valve housing
98001-06 Plate
2017-03-08
DC 11-Module - 382 Part No 94153-G

Reservdelar Spare Parts Ersatzteile Ricambi Pièces détachées
Piezas de repuesto Reservedele Запасные части Części zamienne Reserveonderdelen Varaosat
Vakuumventil Vacuum Relief Valve Unterdruckventil La valvola
di sicurezza Vacuum Soupape Válvula de alivio de vacío
Vakuumventil Клапан сброса вакуума Zawór próżniowy
Onderdrukklep Alipaineventtiili
Deutsch
Art. Nr. Benennung
4167 Reparatursatz Vakuum
ventil
4450 Stoßdämpfer
4452 Achse
Codice Descrizione
4167 Riparazione della valvola
Kit vuoto
4450 Ammortizzatore idraulico
N° de réf. Description
4167 Kit de réparation de la
soupape de régulation
4450 Amortisseur hydraulique
Art. Nr. Benennung
4453 Dichtungsscheibe
4710 Gummidichtung
98001-01 Konus ø76
98001-02 Achsendeckel
Codice Descrizione
4452 Asse
4453 Otturatore piastra
4710 Guarnizione in gomma
98001-01 Cono 76
N° de réf. Description
4452 Essieu
4453 Plaque porte-vanne
4710 Joint en caoutchouc
98001-01 Cône 76
Art. Nr. Benennung
98001-03 Druckplatte, Vakuumven
til
98001-05 Ventilgehäuse
98001-06 Scheibe
Italiano
Codice Descrizione
98001-02 Asse coperchio
98001-03 Piastra di pressione
98001-05 Otturatore alloggiamento
98001-06 Piastra
Francais
N° de réf. Description
98001-02 Essieu
98001-03 Plaque de pression
98001-05 Tuyau de la vanne
98001-06 Plaque
N.º de
referencia Description
4167 Reparación de la válvula
kit de vacío
4450 Amortiguador hidráulico
4452 Eje
Art. nr. Betegnelse
4167 Reparationssats, vakuum
ventil
4450 Støddæmpere
4452 Aksel
N.º de
referencia Description
4453 La placa de válvula
4710 Junta de goma
98001-01 Cono 76
Art. nr. Betegnelse
4453 Tætning plade
4710 Gummipakning
98001-01 Kona 76, vakuumventil
Español
N.º de
referencia Description
98001-02 Tapa Eje
98001-03 Placa de presión
98001-05 Alojamiento de la válvula
98001-06 Placa
Dansk
Art. nr. Betegnelse
98001-02 Aksel hat, vakuumventil
98001-03 Ankerskive, vakuumventil
98001-05 Ventilhus, vakuumventil
98001-06 Bakke, vakuumventil
Part No 94153-G DC 11-Module - 383

Reservdelar Spare Parts Ersatzteile Ricambi Pièces détachées
Piezas de repuesto Reservedele Запасные части Części zamienne Reserveonderdelen Varaosat
Vakuumventil Vacuum Relief Valve Unterdruckventil La valvola
di sicurezza Vacuum Soupape Válvula de alivio de vacío
Vakuumventil Клапан сброса вакуума Zawór próżniowy
Onderdrukklep Alipaineventtiili
Русский
Артикул Описание
4167 Ремнабор
4450 Демпфер
4452 Ось
Nr kat Opis
4167 Zestaw naprawczy za
woru próżniowe
4450 Amortyzator hydrau
liczny
Art. nr. Omschrijving
4167 Reparatieset Vacuum
ventiel
4450 Hydraulische demper
Артикул Описание
4453 Пластина клапана
4710 Резиновый уплотнитель
98001-01 Конус 76
98001-02 Кoлпачoк ocи
Nr kat Opis
4452 Oś
4453 Płytka zaworu
4710 Gumowa uszczelka
98001-01 Stożek 76
Art. nr. Omschrijving
4452 Axle
4453 Ventielplaat
4710 Rubberen afdichting
98001-01 Kegel 76
Артикул Описание
98001-03 Пластина
98001-05 Кожух
98001-06 Пластина
Polski
Nr kat Opis
98001-02 Oś pokrywa
98001-03 Płyta dociskowa
98001-05 Klapa obudowa
98001-06 Płyta
Nederlands
Art. nr. Omschrijving
98001-02 Axle deksel
98001-03 Drukplaat
98001-05 Klephuis
98001-06 Plaat
Art. nr Nimike
4167 Korjaussarja, alipaine
venttiili
4450 Iskunvaimennin
4452 Akseli
2017-03-08
Art. nr Nimike
4453 Venttiililevy
4710 Kumitiiviste
98001-01 Kartio 76, alipaineventtiili
98001-02 Akselihattu, alipainevent
tiili
DC 11-Module - 384 Part No 94153-G
Suomi
Art. nr Nimike
98001-03 Painelevy, alipaineventtiili
98001-05 Venttiilikotelo, alipaine
venttiili
98001-06 Aluslevy, alipaineventtiili
Svenska
EG-försäkran om överensstämmelse
Vi försäkrar härmed att DC 11-Module är i överensstämmelse med följande bestämmelser och standarder; 2006/42/EC, 2014/35/EC, 2014/30/EC, EN 60204-1.
Serienummer och tillverkningsår indikeras på märkplåt på maskinen.
Dustcontrol AB
Nina Uggowitzer
CEO
EC-Declaration of conformity
We declare that DC 11-Module is in conformity with following directives and standards;
2006/42/EC, 2014/35/EC, 2014/30/EC, EN 60204-1.
Serial Number and manufacturing year are indicated in a rating plate on the machine.
Dustcontrol AB
Nina Uggowitzer
CEO
English
Deutsch
EG-Konformitätserklärung
Wir deklarieren daß DC 11-Module mit den folgenden aufgeführten Standards oder standardisierten
Dokumenten, übereinstimmt; 2006/42/EC, 2014/35/EC, 2014/30/EC, EN 60204-1.
Serienummer und Herstellungsjahr werden auf einer Plakette an der Maschine eingeprägt.
Dustcontrol AB
Nina Uggowitzer
CEO
Dichiarazione di conformità CE
Noi dichiariamo che DC 11-Module è conforme alle seguenti Direttive e norme: 2006/42/EC,
2014/35/EC, 2014/30/EC, EN 60204-1.
Il numero di serie e l’anno di produzione sono riportati sulla targhetta dei dati nominali della macchina.
Dustcontrol AB
Nina Uggowitzer
CEO
Dustcontrol AB, Box 3088, Kumla Gårdsväg 14, SE-145 03 Norsborg, Tel: + 46 8 531 940 00,
support@dustcontrol.se, www.dustcontrol.com
Part No 94153-G DC 11-Module - 385
Italiano

Français
Déclaration CE de conformité
Nous déclarons que le DC 11-Module est conforme aux directives et normes suivantes ;
2006/42/CE, 2014/35/CE, 2014/30/CE, EN 60204-1.
Le numéro de série et l’année de fabrication sont indiqués sur la plaque signalétique de la machine.
Dustcontrol AB
Nina Uggowitzer
CEO
Español
Declaración CE de conformidad
Declaramos que el DC 11-Module ecumple las siguientes directivas y normas:
2006/42/EC, 2014/35/EC, 2014/30/EC, EN 60204-1.
El número de serie y el año de fabricación se indican en una placa de especifi caciones en la unidad.
Dustcontrol AB
Nina Uggowitzer
CEO
Dansk
EG overensstemmelseserklæring
Vi erklærer hermed, at DC 11-Module i overensstemmelse med følgende forskrifter og standarder:
2006/42/EC, 2014/35/EC, 2014/30/EC, EN 60204-1.
Serienummer og produktionsår er angivet på typeskiltet på maskinen
Dustcontrol AB
Nina Uggowitzer
CEO
Русский
Декларация о соответствии нормам ЕС
Заявляем, что DC 11-Module соответствует следующим директивам и стандартам;
2006/42/EC, 2014/35/EC, 2014/30/EC, EN 60204-1.
Заводской номер и год изготовления указаны на паспортной табличке, расположенной на машине.
Dustcontrol AB
Nina Uggowitzer
CEO
Dustcontrol AB, Box 3088, Kumla Gårdsväg 14, SE-145 03 Norsborg, Tel: + 46 8 531 940 00,
2017-03-08
support@dustcontrol.se, www.dustcontrol.com
DC 11-Module - 386 Part No 94153-G

Polski
Deklaracja zgodności
Oświadczamy, że urządzenie DC 11-Module spełnia wymagania następujących dyrektyw i norm:
2006/42/WE, 2014/35/WE, 2014/30/WE, EN 60204-1.
Numer seryjny i rok produkcji są podane na tabliczce znamionowej maszyny.
Dustcontrol AB
Nina Uggowitzer
CEO
Nederlands
EG-verklaring van overeenstemming
Wij verklaren hiermee dat DC 11-Module in overeenstemming is met en voldoet aan de volgende standaard en richtlijnen: 2006/42/EC, 2014/35/EC, 2014/30/EC, EN 60204-1.
Serienummer en productiedatum staan vermeld op het typeplaatje op de machine.
Dustcontrol AB
Nina Uggowitzer
CEO
EY vaatimuksenmukaisuus todistus DC 11-Module
Vakuutamme että tuote täyttää seuraavat direktiivit ja vaatimukset:
2006/42/EC, 2014/35/EC, 2014/30/EC, EN 60204-1.
Sarjanumero ja valmistusvuosi on merkittynä konekilvessä.
Dustcontrol AB
Nina Uggowitzer
CEO
Suomi
Dustcontrol AB, Box 3088, Kumla Gårdsväg 14, SE-145 03 Norsborg, Tel: + 46 8 531 940 00,
support@dustcontrol.se, www.dustcontrol.com
Part No 94153-G DC 11-Module - 387

DUSTCONTROL WORLDWIDE
Dustcontrol AB
Box 3088
Kumla Gårdsväg 14
SE-145 03 Norsborg
Tel: +46 8 531 940 00
Fax: +46 8 531 703 05
support@dustcontrol.se
www.dustcontrol.com
AT
Dustcontrol Ges.m.b.H.
Gradnerstrasse 120-124
AT-805 4 Gra z
Tel: +43 316 428 081
info@dustcontrol.at
www.dustcontrol.at
AU
Archquip - All Preparation
Equipment
130 Lytton Rd
AU-4171 Bulimba QLD
Tel: +61 7 3217 9877
www.allpreparationequipment.com.au
BENELUX
Dustsolutions B.V.
Eiffelstraat 44
NL-8013 RT Zwolle
Tel : +31(0)38-20 20154
sales@dustsolutions.nl
www.dustsolutions.nl
BG
Metaltech14 Ltd
7 Parva str
BG-4207 Kadievo
Tel: +359 888 255 102,
+359 889 999 593
metaltex14@abv.bg
www.dustcontrolbg.com
CA
Dustcontrol Canada Inc.
664 Welham Road
CA-Barrie, Ontario L4N 9A1
Tel: +1 877 844 8784
info@dustcontrol.ca
www.dustcontrol.ca
CH
Rosset Technik
Maschinen Werkzeuge AG
Ebersmoos
CH-6204 Sempach-Stadt
Tel: +41 41 462 50 70
info@rosset-technik.ch
www.rosset-technik.ch
CN
Suzhou DustCollect Filtration
Technology Co., Ltd.
Room 218, Building B, No.1368,
Wuzhong Avenue/ District
CN-Suzhou City,
Jiangsu Province
Tel: +86 180 6800 0359
sale@dustcollect.cn
www.dustcollect.cn
DE
Dustcontrol GmbH
Siedlerstraße 2
DE-71126 GäufeldenNebringen
Tel: +49 70 32-97 56 0
info@dustcontrol.de
www.dustcontrol.de
2017-03-08
DK
Erenfred Pedersen A/S
- Construction
Rebslagervej 7
DK-9000 Aalborg
Tel +45 98 13 77 22
info@ep.dk
www.ep.dk
Dansk Procesventilation ApS
- Industry
Vangeleddet 73
DK-2670 Greve
Tel: +45 61 270 870
info@dansk-procesventilation.dk
www.dansk-procesventilation.dk
EE
G-Color Baltic OÜ
Ülase 13
EE-10613 Tallinn
Tel: +372 682 5919
sales@g-color.ee
www.g-color.ee
ES
Barin, s.a.
C/ Cañamarejo, N
Poligono Industrial
Rio de Janeiro
ES-28110 Algete - Madrid
Tel: +34 91 6281428
info@barin.es
www.barin.es
FI
Dustcontrol FIN OY
Valuraudankuja 6
FI-00700 Helsinki
Tel: +358 9-682 4330
dc@dustcontrol.fi
www.dustcontrol.fi
FR
SMH Equipements-Construction
Lieu Dit « La Fontaine »
FR-28630 Berchères Les Pierres
Tel: +33 (0)2 37 26 00 25
info@abequipements.com
www.smhequipements.com
Dustcontrol AB France- Industry
Box 3088
Kumla Gårdsväg 14
SE-145 03 Norsborg
Tel: +46 8 53194016
hk@dustcontrol.se
www.dustcontrol.com
HU
Vandras Kft
Kossuth L. u. 65 III.29
HU-1211 Budapest
Tel : +3 6 -1- 427- 0322
Mobile: +36-20-9310-349
vandras@t-online.hu
www.vandras.hu
IN
Advance Ventilation Pvt. Limited
th
8
Floor, NDM-2, Building
D-1,2,&3, Netaji Subhash Place
IN-Pitampura, New Delhi-110034
Tel: +91 47243296-298
sales@advanceventilation.com
www.advanceventilation.com
o
1
www.dustcontrol.com
DC 11-Module - 388 Part No 94153-G
IR
BioMedoc International Group
Rutherford House, Pencroft way,
Manchester Science Park,
UK - Manchester, M15 6SZ
Tel: +44 161 820 8441
info@biomedoc.com
www.biomedoc.com
IT
Airum srl
via Maestri del Lavoro 18
Roveri-2
IT - 40138 Bologna
Tel: +39 (0)516 025 072
info@airum.com
www.airum.com
KR
E. S. H Engineering Co.
671-267 Sungsu1ga 1dong
Sungdonggu (P.O)133-112
KR-Seoul Korea
Tel: +82 (0)2 466 7966
k.u.lee@hanmail.net
www.esheng.co.kr
LT
UAB Hidromega
Mainų g. 23
LT - 94101 Klaipèda
Tel : +370 677 10254
info@hidromega.lt
www.hidromega.lt
LV
SIA Reaktivs
Rigas iela 113,
Salapils, LV-2169
Tel : +371 202 8220 0
reaktivs@reaktivs.lv
www.reaktivs.lv
MY, ID
Blöndal Städa (M) Sdn. Bhd.
Blöndal Building, Jalan Penyair,
Section U1, Off jalan Glenmarie,
MY-40150 Shah Alam
Tel: +60 603 5569 1006
info@stada.com.my
www.stada.com.my
NO
Teijo Norge A.S
Husebysletta 21
Postboks 561
NO-3412 Lierstranda
Tel: +47 3222 6565
fi rmapost@teijo.no
www.teijo.no
PE
Efi xo
Calle 3 MZ. N LT. 15
Parque Industrial El Asesor
Ate, Lima, PE – Perú
Tel: (00511) 583-8541
Cel: (0051) 968-140-066
contacto@efi xo.pe
http://www.efi xo.pe
PL
Bart Sp. z. o.o.
ul. Będzińska 41/1
PL-41-205 Sosnowiec
Tel: +48 32 256 22 33
info@bart-vent.pl
www.bart-vent.pl
PT
Metec-Mecano Técnica, Lda.
Lugar da Cova da Raposa Sete
Casas
PT-2670-570 Loures
Tel : +351 21 797 02 91
geral@metec.pt
www.metec.pt
RU
SovPlym Ltd
Revolution Highway, 102-2
RU-195279, St Petersburg
Tel : +7- 812-3 3 - 5 0 0 - 3 3
mau@sovplym.spb.ru
www.sovplym.com
SG
Blondal (S) Pte Ltd
52 Ubi Ave 3
Frontier Building
#03-29
SG-Singapore 408867
Tel: +65 6741 7277
Info@stada.com.my
www.stada.com.my
TR
Ventek Mühendislik Ltd
Adnan Kahveci Bulvari
Ünverdi Iş merkezi Nr 73
Dr: 30 Bahçelievler
TR-Istanbul
Tel : +90 212 4415596-97
info@ventek.com.tr
www.ventek.com.tr
UAE
Global Enterprises Trading Co
Mussafah M14
AE-Abu Dhabi/Alain
Tel: +971-2-555 4733
global@globalentco.com
www.globalentco.com
GEM Industrial Equipment
Tra din g Co
DIP-1, Greens Community
AE-Dubai, Mena region
Tel: +971-4-8840 474
gemuae@eim.ae
UK
Dustcontrol UK Ltd.
7 Beaufort Court,
Roebuck Way, Knowlhill
Milton Keynes MK5 8HL
England - GB
Tel: +44 1327 858001
sales@dustcontrol.co.uk
www.dustcontrol.co.uk
US
Dustcontrol Inc.
6720 Amsterdam Way
US-Wilmington NC 28405
Tel : +1 910-395-18 0 8
info@dustcontrolusa.com
www.dustcontrol.us
 Loading...