

Duronic JE2 Instruction Manual

JE2 - Slow Juicer

2

3
English Manual
Manuel d’utilisation en français
Gebrauchsanleitung auf Deutsch
Manual de Instrucciones en Español
Manuale D’istruzioni In Italiano
5
13
21
29
37
Contents

4

5
English Manual

6
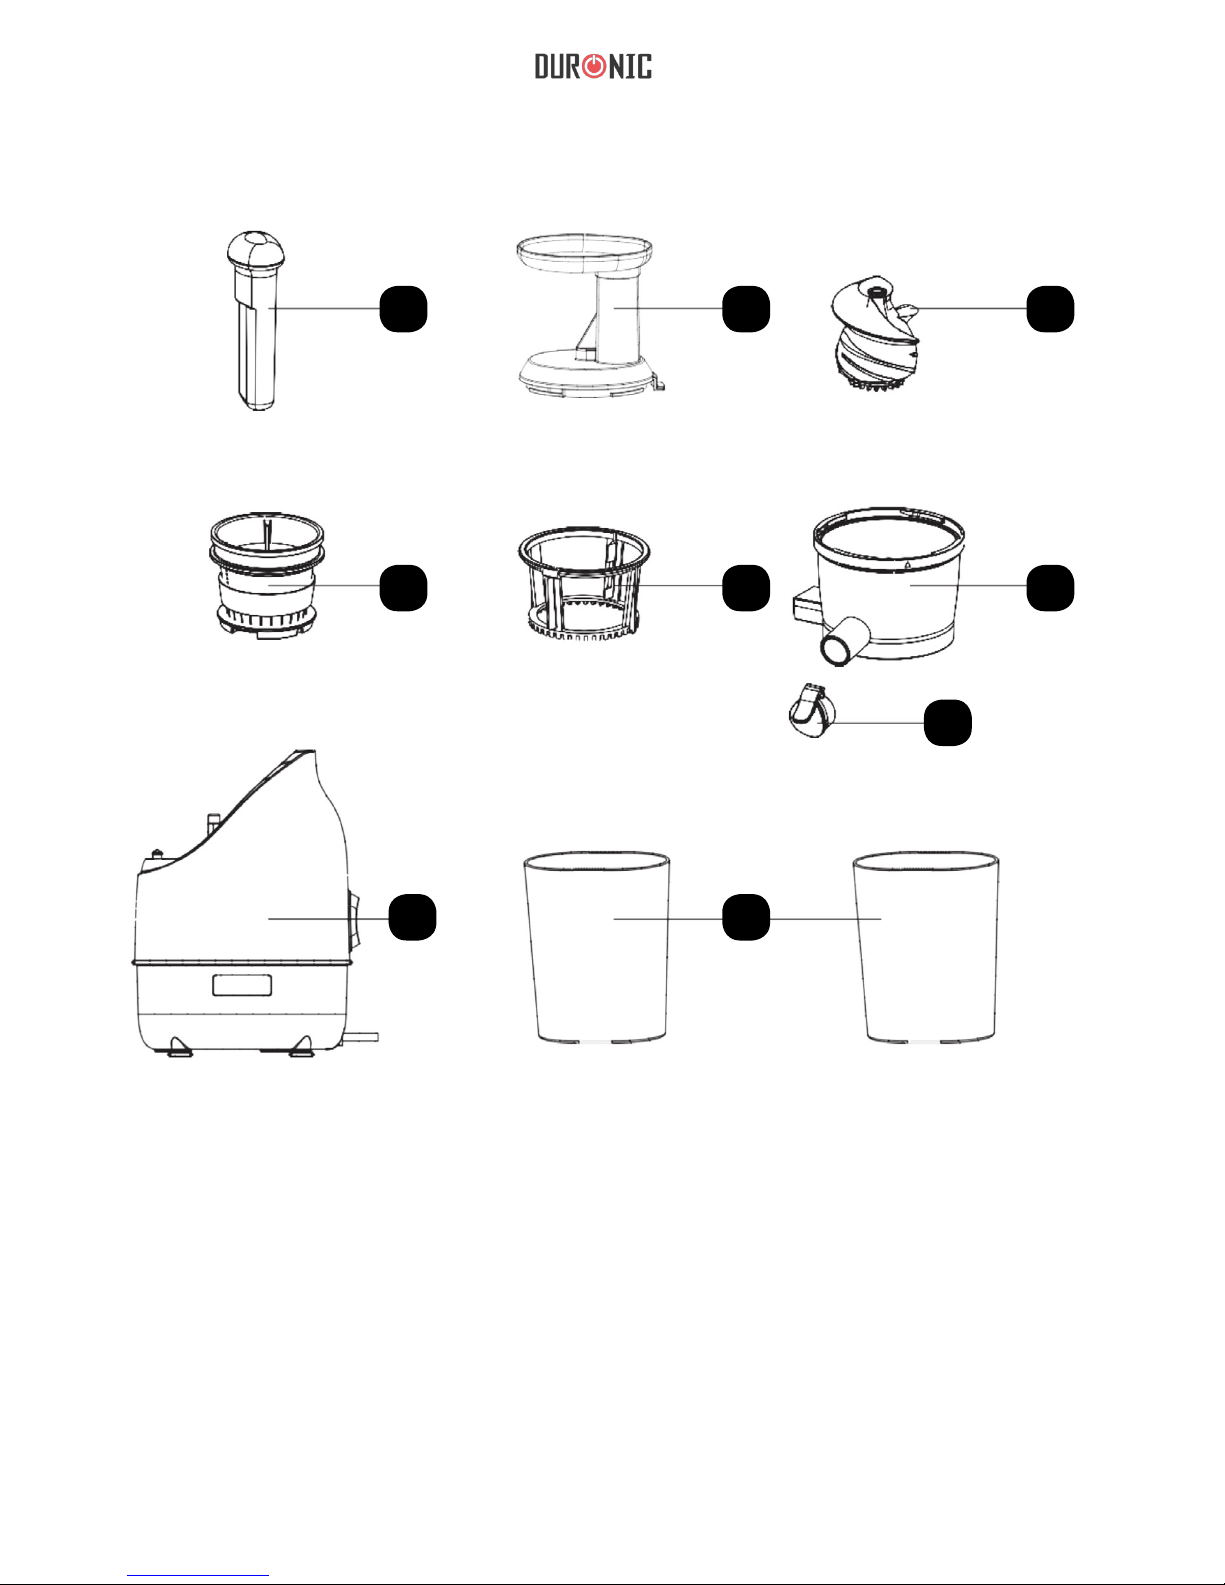
Parts & Assembly
1. Pusher
2. Feed in let
3. Rotor
4. Screening cylinder
5. Spinning brush
6. Juicing bowl
7. Juice-extracting spout
8. Juice/Pulp container
9. Juicer body
1 2 3
4 5 6
7
89

7
First use
I. Remove all packaging and check that all parts are included.
II. Wash all removable parts and accessories in warm water and dry them
thoroughly. To prevent electric shock and damage, do not immerse the
main machine in water.
III. Before assembling the machine, make sure that the plug has inserted into
the socket and that the switch at the back is in the ‘O’-Assembly.
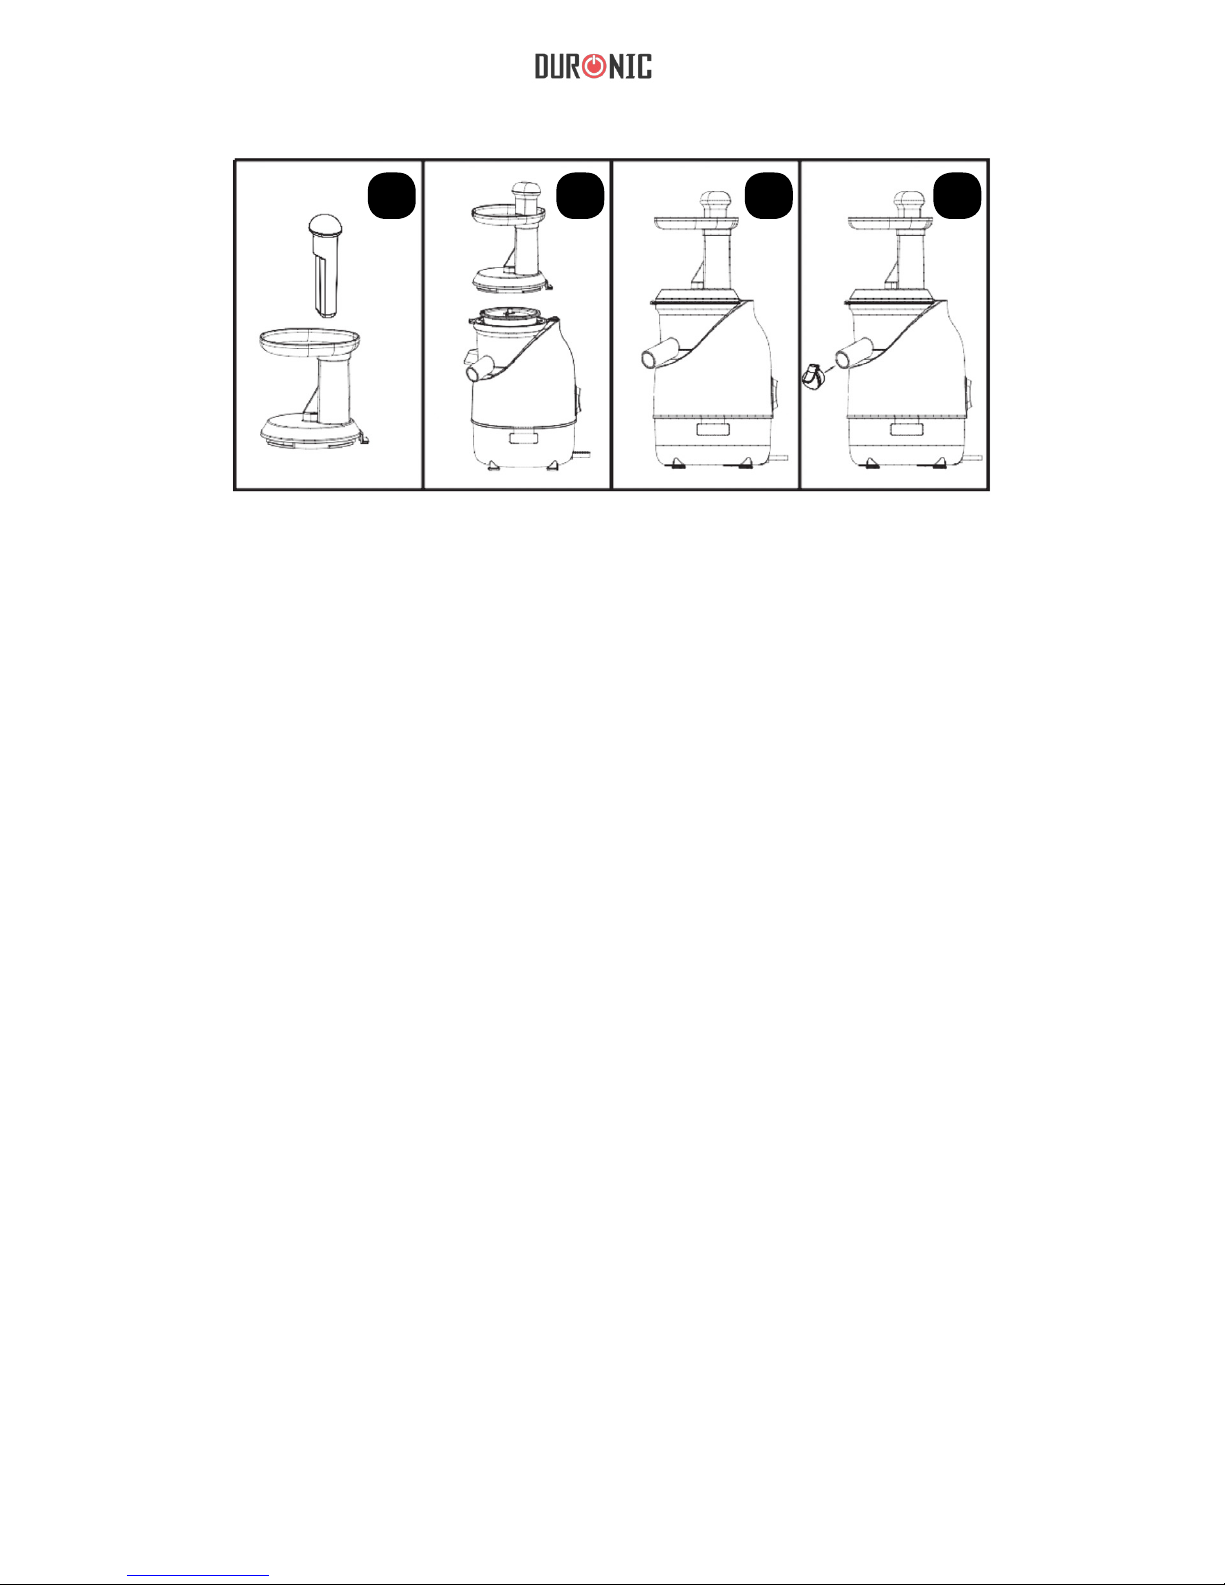
Make sure that all parts are installed correctly as follows:
1. Place the juicing bowl into the machine and make sure it cannot
move sideways (fig. 1)
2. Push the screening cylinder all the way into the spinning brush
locked into place (fig. 2
3. Align the spinning brush inside juicing bowl by matching the triangles
the top front (fig. 3
4. Push the rotor into the screening cylinder until it sits on the bottom
and only the little metal top sticks out of the cylinder (fig 4)
5. Insert the pusher into the feed inlet (fig 5)
6. Align the unlock-mark on feed inlet with the triangle on the juicing (fig 6)
7. A subtle rotation clockwise will close the cover (fig 7)
8. Attach the spout to the juicing bowl (fig 8)
1 2 3 4
8
Operation instruction
1. Once all parts are correctly installed, place the juice and pulp container
under the outlets of the juicing bowl and put the plug into the socket.
2. Prepare the fruit and vegetables:
A. Remove all non-edible parts: stones (e.g. cherry stone), cores (e.g.
of a pineapple), pits (of lemon and grapes) as well as solid skins
(e.g. from an orange).
B. If the ingredient is too large cut it into chunks.
C. Avoid fruits with little juice, rich in fibre, nuts, cocoa beans, as
they will cause damage to the machine.
3. Turn the machine into the ‘ON’-Position and insert ingredients into the feed
inlet. Move the pusher down slowly and evenly to extract the maximum
juice. In case food gets stuck in the feed inlet, stop the machine and empty
the channel of any pulp before continuing. If too many ingredients have
been inserted, push the ‘REV’-button and the rotor will operate in the
reversed direction to clear the excess food.
4. Empty the juice container and remove the pulp before it is filled u
completely to prevent overflowing, as well as after each cycle. Operatio
time should not exceed 20 minutes or 2-3 cycles, afterwards the machine
will need to cool down before the next use.
5 6 7 8

9
Product features:
1. Extracts the juice from fruits and vegetables, such as apple, carrots,
cucumber, celery, orange, and many more.
2. Separates the pulp from the juice, so both can be used for different
purposes.
3. Includes transparent accessories to view the process throughout.
4. Easy cleaning thanks to removable accessories.
5. Large containers for big batches of juice.
6. Easy to pour spout.
7. Adjustable juicing direction.
8. Juicing efficiency though low rate spinning prevents oxidization and keeps
the juice fresh and tasty.
9. DC motor drive, low output rotational speed;
10. Rated voltage: 220-240V; frequency: 50Hz; rated power: 220W;
5. Turn the machine off by selecting the ‘O’-Position at the back
of the machine.
6. After juicing, turn switch to the ‘O’-position. Wait until the motor stopped
spinning completely before removing any parts.
7. The product is not intended for a person with disability, or sense, or mental
disorder or those without relevant experience and knowledge (including
children).
8. This product has been designed for household use only and not suitable
for commercial purposes.
9. Do not leave the machine unattended whilst in use.
10. To prevent damage to the product do not insert hard foods, eg. fiber-rich
foods, eg. sugar cane, little-juice foods, such as banana food objects. If
foods get stuck use the pushing rod and not your hands to prevent injury
and damage.

10
Precautions:
Pay attention to the following whilst using the electric appliance:
1. Read the instruction carefully before use and keep them for future
reference.
2. Before use, ensure the local power voltage is consistent with the rated
voltage indicated on the product.
3. Before dismantle or installing any part of the product, disconnect it from
the power supply.
4. Before use, check the cable, plug and all loose parts for damage. Should
there be any damage or deformation, do not use the product. Contact the
customer service department for a repair or replacement.
5. To prevent damage or the cause of fire, do not use this product with a
timer.
6. To prevent the risk of electric shock and damage do not immerse the
machine in water. Use a soft cloth for cleaning.
7. Keep all your body parts as well as hard objects out of the feed inlet during
the operation. Do not use any other objects instead of the pushing rod to
push the food down. The contact with the rotor would cause injury and/or
damage. Use only original parts provided by manufacturer.
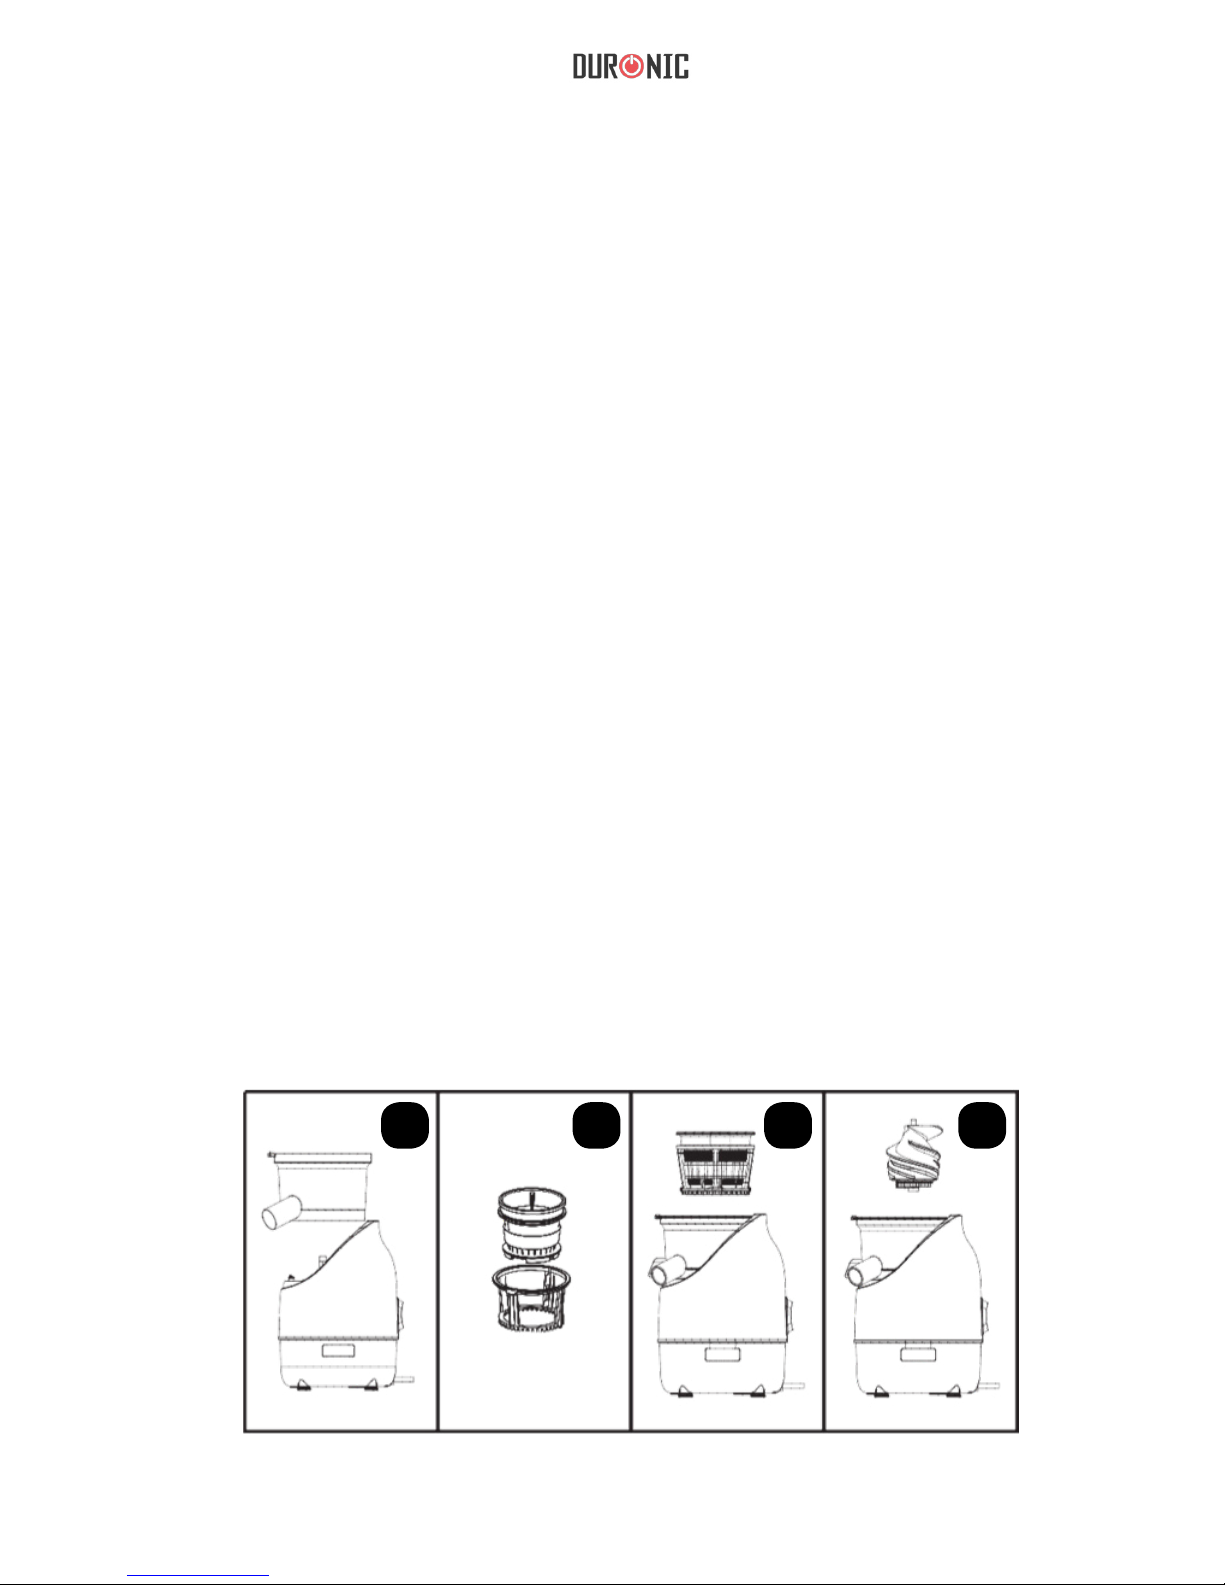
1. After use, unplug the machine and wait
until it has cooled off completely.
2. Clean all removable parts in warm,
soapy water. Clean the main body with
a soft wet cloth. Dry everything fully.
Cleaning and maintenance

11
Storage
1. The product should be kept away from children.
2. Store the product in a dry place away from direct irradiation
of ultraviolet light.
Problem Solution
Machine does not
turn on.
Check power plugs and that the
product is correctly assembled.
Failure to operate.
Make sure the parts have been
installed in the machine correctly.
Operation stopped
during use.
Too much food has been inserted;
remove some of it.
Food has not been prepared correctly,
e.g. not pitted, stoned, skinned; remove
any non-edible, hard parts of the food. If
the machine is blocked, use the reverse
function to clear it, remove all food and
pulp and clean the machine afterwards.
Noise occurs during
juicing.
Squeezing ingredients can cause noise,
which is normal condition. Do not use
frozen ingredients, all food must be
thawed before juicing.
Description of parts:
Product name: Slow Juicer
Product model: JE2
Rated voltage: 220-240V~
Frequency: 50/60Hz
Rated power: 200W

12
Warranty
1 Year Guarantee from Shine-Mart Ltd, Trademark owners of Duronic Products.
NOTE: THESE STATEMENTS DO NOT AFFECT YOUR STATUTORY RIGHTS AS A
CONSUMER
This product has been manufactured under the strictest or quality control procedures, and
using the highest quality of materials, to ensure excellent performance and reliability. It will
give very good and long lasting service, provided it is properly used and maintained. The
product is guaranteed for 1 years from the date of original purchase. If any defect arises due
to a faulty materials or poor workmanship, the faulty product must be returned to the original
place of purchase. Refund or replacement is at the discretion of that company.
Duronic Products are offered with a 1 year guarantee under the following conditions:
1. The product must be returned to the retailer with original proof of purchase.
2
. T
he product must be installed and used in accordance with the instruction
s
c
ontained in this operating manual.
3
. I
t must be used only for domestic purposes.
4. It does not cover wear and tear, malicious damage, misuse, neglect,
inexpert repairs or consumable parts.
5
. S
hine-Mart Ltd has no responsibilities for accidental or consequential loss or damage.
6
. S
hine-Mart Ltd are not liable to carry out any type of servicing work
,
u
nder the guarantee
7
. V
alid in the UK only
This product is tted with CE:1363 plug and fuse
Imported by Shine-Mart Ltd, RM3 8SB
Information on waste Disposal for Consumers of
Electrical & Electronic Equipment.
This mark on a product and/or accompanying documents indicates that when it
is to be disposed of, it must be treated as Waste
Electrical & Electronic Equipment, (WEEE).
Any WEEE marked products must not be mixed with general household waste,
but kept separate for the treatment, recovery and recycling of the materials used.
For proper treatment, recovery and recycling; please take all WEEE marked
waste to your Local Authority Civic waste site,
where it will be accepted free of charge.
If customers dispose of Waste Electrical & Electronic Equipment correctly, they
will be helping to save valuable resources and preventing any potential negative
effects upon human health and the environment, of any hazardous materials that
the waste may contain.

13
Manuel d’utilisation en français
14
Aperçu du produit
1 2 3
4 5 6
7
89
1.
Poussoir
2.
Entonnoir
3.
Coupleur
4.
Filtre
5.
Grattoir
6.
Anneau central
7.
Bec verseur
8.
Réservoir à pulpes/carafe
9.
Moteur
15
Première utilisation
1. Retirez l’emballage et vérifiez que tous les éléments sont bien inclus.
2. Nettoyez toutes les pièces démontables et accessoires puis séchez-les
convenablement. Pour éviter tout risque d’électrocution, n’immergez pas le
moteur dans l’eau.
3. Avant d’assembler l’appareil, assurez-vous que la prise soit bien insérée et
que l’interrupteur soit placé sur la position « O ».
Assurez-vous que tous les éléments soient bien insérés :
1. Placez l’anneau central sur le moteur et vérifiez qu’il soit bien verrouillé.
2. Placez le filtre dans le grattoir.
3. Alignez la flèche présente sur le grattoir avec la flèche présente sur le moteur.
4. Enfoncez le coupleur dans le grattoir jusqu’il soit bien enclenché.
5. Insérez le poussoir sur l’anneau central.
6. Verrouillez le poussoir sur l’anneau central.
7. Assurez-vous que le cadenas présent sur le poussoir s’aligne avec la flèche
présente sur l’anneau central.
8. Placez le réservoir à pulpes et la carafe devant les sorties correspondantes.
1 2 3 4
 Loading...