

BL91 Soup Maker
PLEASE READ ALL THE INSTRUCTIONS BEFORE USE
Creative
Consumer
Products

2

3
English Manual
Manuel d’utilisation en français
Gebrauchsanleitung auf Deutsch
Manual de Instrucciones en Español
Manuale D’istruzioni In Italiano
5
19
33
47
61
Contents

4

5
English Manual
6
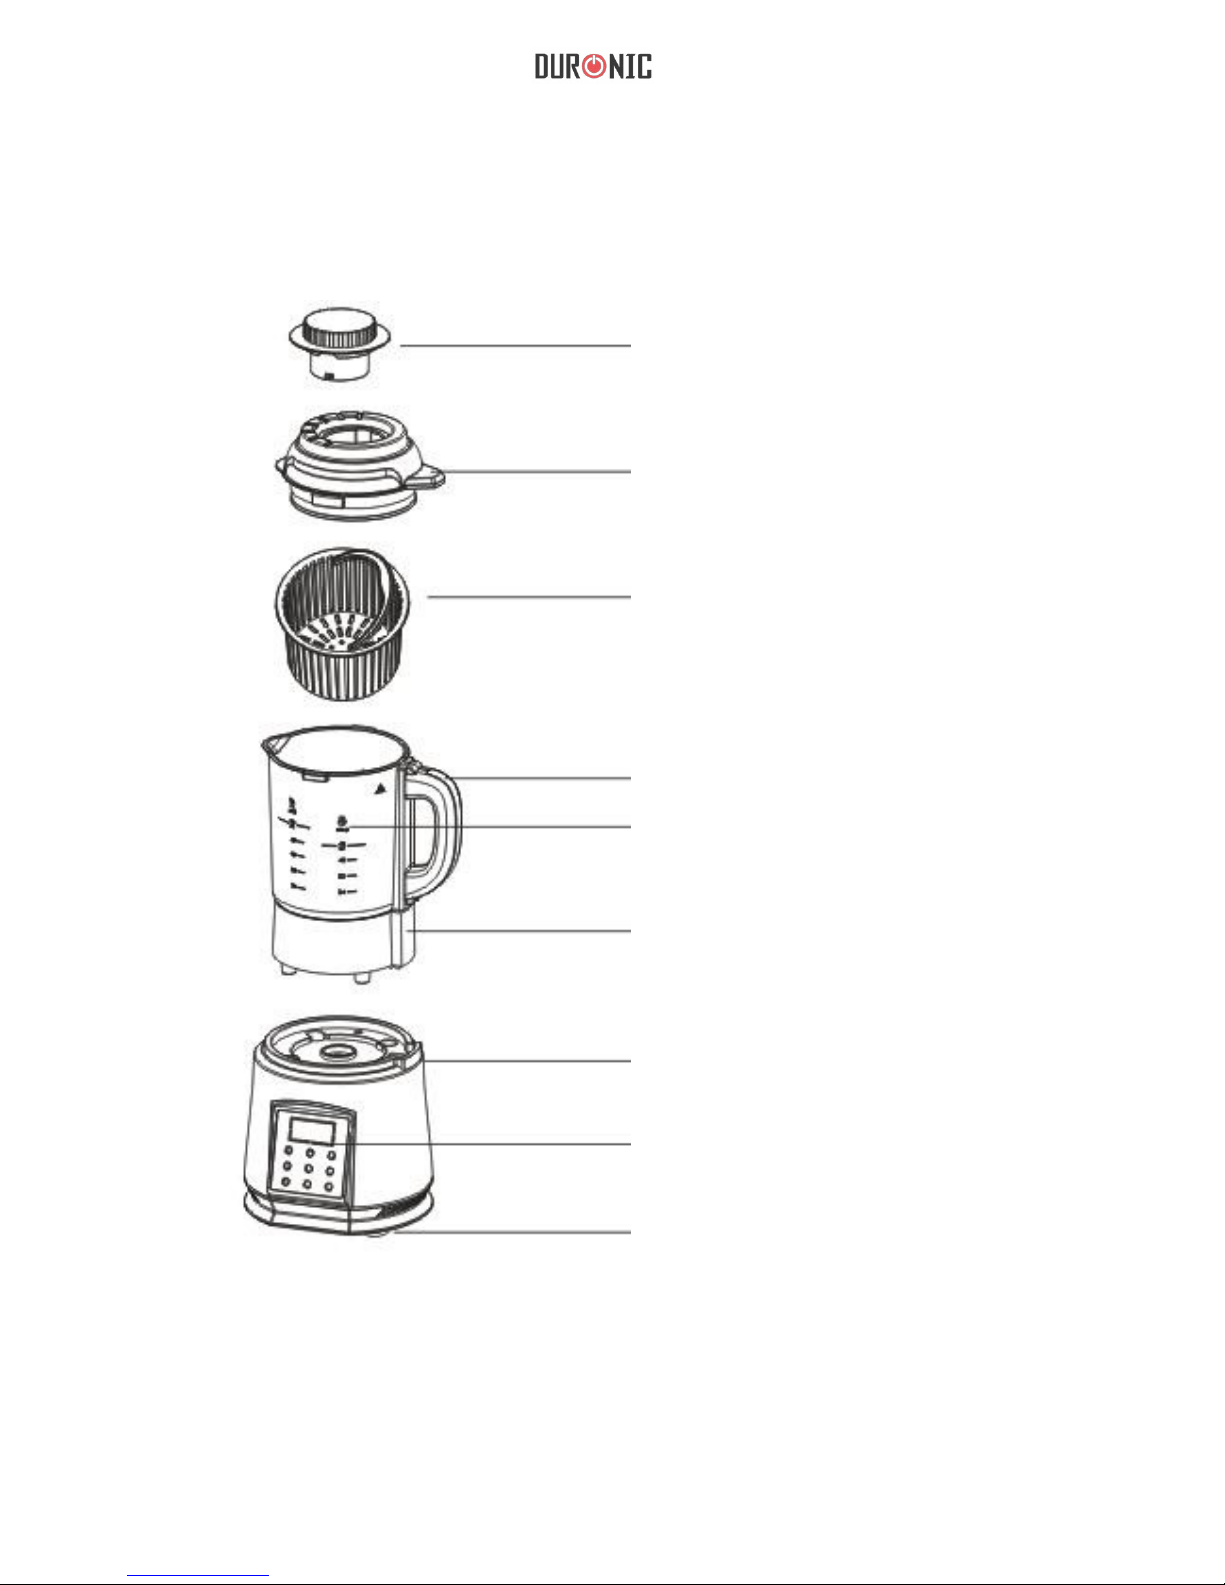
Diagram
Measuring Cup
Jug Lid
Steam Basket (Optional)
Jug Handle
High/Low Water Level
Electrical Socket
Bottom Cover
Control Panel
Rubber Feet

7
Getting Started
Features
Unbox your product and remove any packaging from your Soup Maker.
• Smooth Soup
• Chunky Soup Steam/Boil Pulse
• Non slip rubber feet
• Built in blending/mixing blade
• Blend Function
• Juice function
• Sauce and Ice Crushing function
• Audible warnings
• Locking lid with food chute
• Timed alarm for programmes
Inside the box:
Soup Maker power base
Soup Maker jug with lid
Measuring cup
Steam Basket
Food Pusher
Sponge & Brush
Instruction Manual

8
Safety Instructions
• Check the voltage indicated on the rating label so that it corresponds with
your household voltage.
• This soup maker is not intended for use by anyone with reduced physical,
sensory or mental capabilities or lack of experiences or knowledge, unless
adequate supervision and instruction is provided by a responsible adult in
regards to the use of the appliance.
• Children should be supervised to ensure that they do not play with the soup
maker.
• If the supply cord is damaged, a qualied engineer must replace it in order to
avoid a hazard, or send the unit to the authorized after-sales service center for
repair.
• Precaution must be taken when handling the blades as they are sharp.
• Do not use the soup maker if the rotating blade is damaged.
• Do not use the soup maker without the lid being secured in place.
• Do not immerse the soup maker (Jug, cord or power base) in water or any
other liquids.
• This appliance contains no user-serviceable parts. All repairs should only be
carried out by a qualied engineer. Improper repairs may place the user at risk
of harm.
• Do not operate the soup maker after a malfunction or if it has been dropped
or damaged in any way.
• Do not leave the soup maker unattended while it is in operation.
• This appliance must be unplugged from the socket after use and whilst any
maintenance such as cleaning is carried out.
• Always use the soup maker on a at, stable and heat-resistant surface.
• Ensure there is sufcient space around the soup maker to allow ventilation.

9
Instructions For Use
• The jug body becomes hot during use, always hold using the handle
provided.
• Do not use the soup maker for any purpose other than that for which it was
designed.
• Ensure that the supply cord is kept away from heat or sharp edges that could
cause damage.
• Do not allow the supply cord to hang over the edge of the work surface or
tabletops.
• The soup maker is intended for domestic use only. It should not be used for
commercial purposes.
• Do not use any accessories or attachments with this appliance other than
those recommended by the supplier.
• Please clean regularly after use in order to prolong the lifespan of your Soup
Maker.
The Soup Maker has been designed to create Soups, Steam Food and blend
all kinds of vegetable and fruit. It is tted with several safety features including
an interlocking lid cut-out; temperature sensor; and a safety micro-switch
cut-off on the motor base. The built in blade inside the jug is designed to be
versatile, so it can also be used to allow the Soup Maker to be used as a
blender to make smoothies, purees, dips and dressings.
To begin use:
• Place the base unit of the Soup Maker on a heat-resistant, stable surface.
Carefully place the jug unit on to the power base. The jug should sit securely
on top of the base unit.
• Fit the lid to the Soup Maker by aligning the ‘lock open’ symbol on the lid with
the handle.
• Ensure the measuring cup is tted at the top of the lid.

10
Safety Instructions
When everything is positioned correctly, connect the
Soup Maker to the mains power supply and press
the Start/Stop button to turn the Soup Maker on. The
button will illuminate indicating that the power is on.
If at this point the alarm sounds, take the jug off the
base and disconnect the Soup Maker from the mains
power supply and check that the lid is properly tted.
Once checked, reconnect to the mains and power up.
11
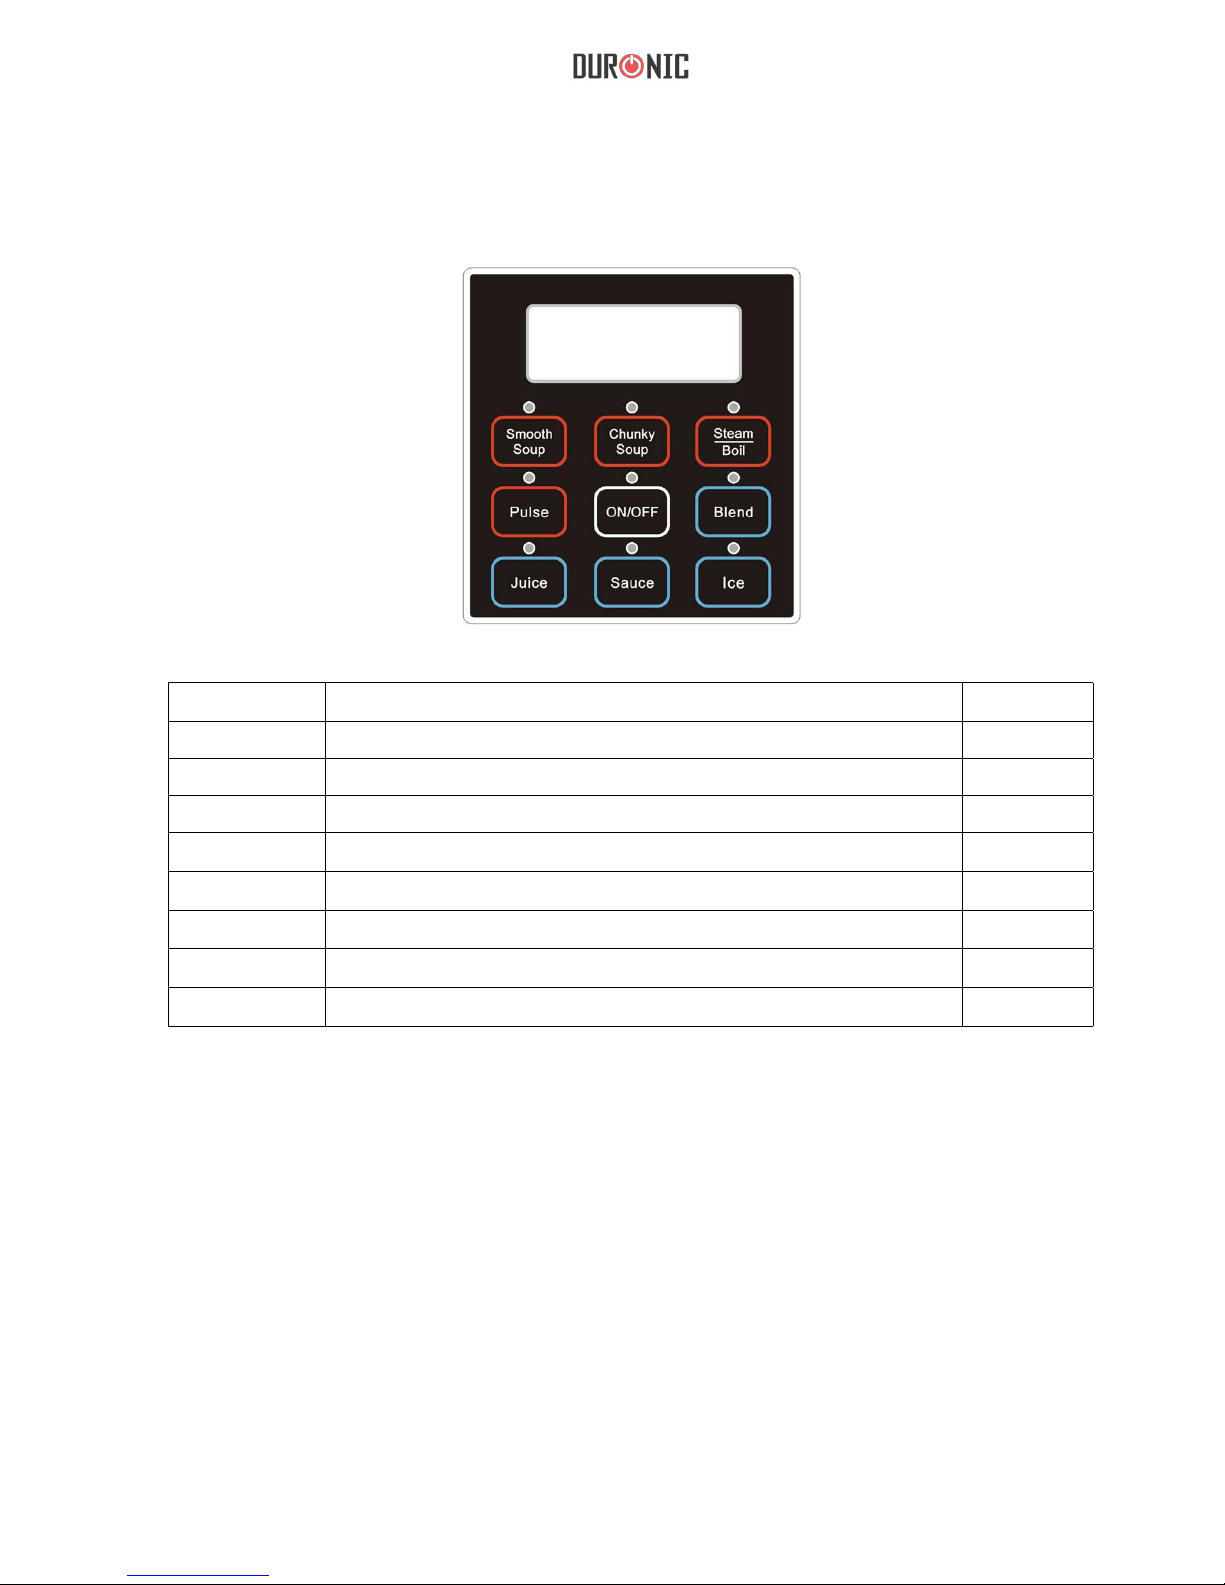
To start the cooking process, choose the function you require. There are 8
functions to choose from, as shown below:
Note: Cooking times may vary for the user. The cooking times shown above
should be used as reference only.
The above pre-set programs rely on uninterrupted operation. Any interruptions
will result in the cancellation of the program. Restarting will result in the
cooking stages being repeated which may affect the nished result.
If you need to add additional ingredients during the cooking process you can
remove the measuring cup on the lid and insert food without interrupting the
program.
Option Description Time
Smooth Soup Fruit and Vegetables can be blended to a hot, smooth texture. 30<mins
Chunky Soup Fruit and Vegetables can be blended to a hot, chunky texture. 30<mins
Steam/Boil Steam and boil food, such as egg, vegetables etc. 20<mins
Pulse Allows you to create recipes to your own desired texture.
Blend Blend fruit and vegetable into a smoothie 100 sec
Juice Allows you to blend until your recipe is super smooth like juice. 150 sec
Sauce You can blend beans and herbs to create a variety of sauces. 200 sec
Ice Allows you to crush dry ice cubes 50 sec

12
• The soup maker has been designed with simplicity in mind, therefore it is
very easy to operate: After pressing the “Start/Stop” button, the indicators will
ash, after which you may choose the function you require, allowing the Soup
Maker to begin operation.
• Making Soup would take around 20-30 minutes when the cooking or
blending is completed, the Soup Maker will make a “beeping” sound several
times.
• During the cooking process, if the indicators blink and beep continuously
during operation, it means there is a mistake with the operation or that
something wrong.
Check the following:
1) If the Lid is properly locked
2) If the Jug is properly placed in the power base.
Making soup (making soup for Hard and soft food)
Chop all of your ingredients into approximately 2-3cm cubes and add them
into the jug.
Caution: It is not recommended to use raw meats. Any meat or
sh must be pre-cooked. Do not add any frozen ingredients.
Ensure all ingredients are at room temperature.
WARNING: Ingredients that contain high levels of starch or sugar
can easily stick to the heating plate and burn.
Using Your Soup Maker
Note: All liquids added to the Soup Maker must be at room temperature, and
must not be above the minimum and maximum marks indicated on of the jug.
Do not use the Soup functions to reheat the soup.

13
- Steam/Boil: Pour water into the jug until you reach the 24 OZ mark, then use
the steam basket for your ingredients.
- Pulse: Hold down the “Pulse” function to blend. Release the button to stop.
- Blend: Put your ingredients inside the jug and press “Blend”, it will start
medium speed blending to make the ingredients into a smoothie.
- Juice: Put the fruit inside the jug and press “Juice”, it will start high speed
blending to nely cut through the fruit and make juice.
- Sauce: Put the tomato, beans or other ingredients into the jug and press
”Sauce”, the blender will begin operation your sauce will be ready.
- Ice Crushing: Put the dry ice into the jug and press “Ice”, the ice will be
crushed in seconds
Note: the above sequences rely on uninterrupted operation. Restarting will
result in the cooking stages being repeated which may affect the nal result.
Any ingredients to be added during the cooking process can be added
through the food chute in the center of the lid. Do not unlock or remove the
lid, as this will stop the program. To completely stop the program at any time,
simply press the“Start/Stop”button.
Once the program has nished, the Soup Maker will sound an audible alarm
and stop heating.
Be careful when removing the lid from the jug as it will be very hot.
WARNING: heat/steam will be emitted from the lid. Care must be taken when
removing the lid and food chute.

14
• Do not clean the Soup Maker in a dishwasher.
• Always disconnect the Soup Maker from the mains power supply before
cleaning.
• Do not immerse the Soup Maker in water or any liquids.
• Clean the surface of the base unit and the outside of the jug with a soft,
damp cloth. Rinse the lid in warm, soapy water.
• To clean the inside of the jug, rinse to remove any remaining soup or large
food particles. Wipe away any food remains using a soft cloth and mild
detergent before rinsing again.
• Caution: the blades inside the jug are not removable and are very sharp;
extreme caution must be taken when cleaning the inside of the jug.
• You may use the Soup Maker’s programs to aid the removal of stubborn
stains.
• Simply assemble the Soup Maker as previously described and add 800ml
of water and a small amount of mild detergent. Fit the lid and switch the
Soup Maker on. Press the “BLEND” button and the blades will rotate to clean
the jug. You can stop the cleaning process at any time by switching off the
appliance.
Cleaning and Maintenance
15
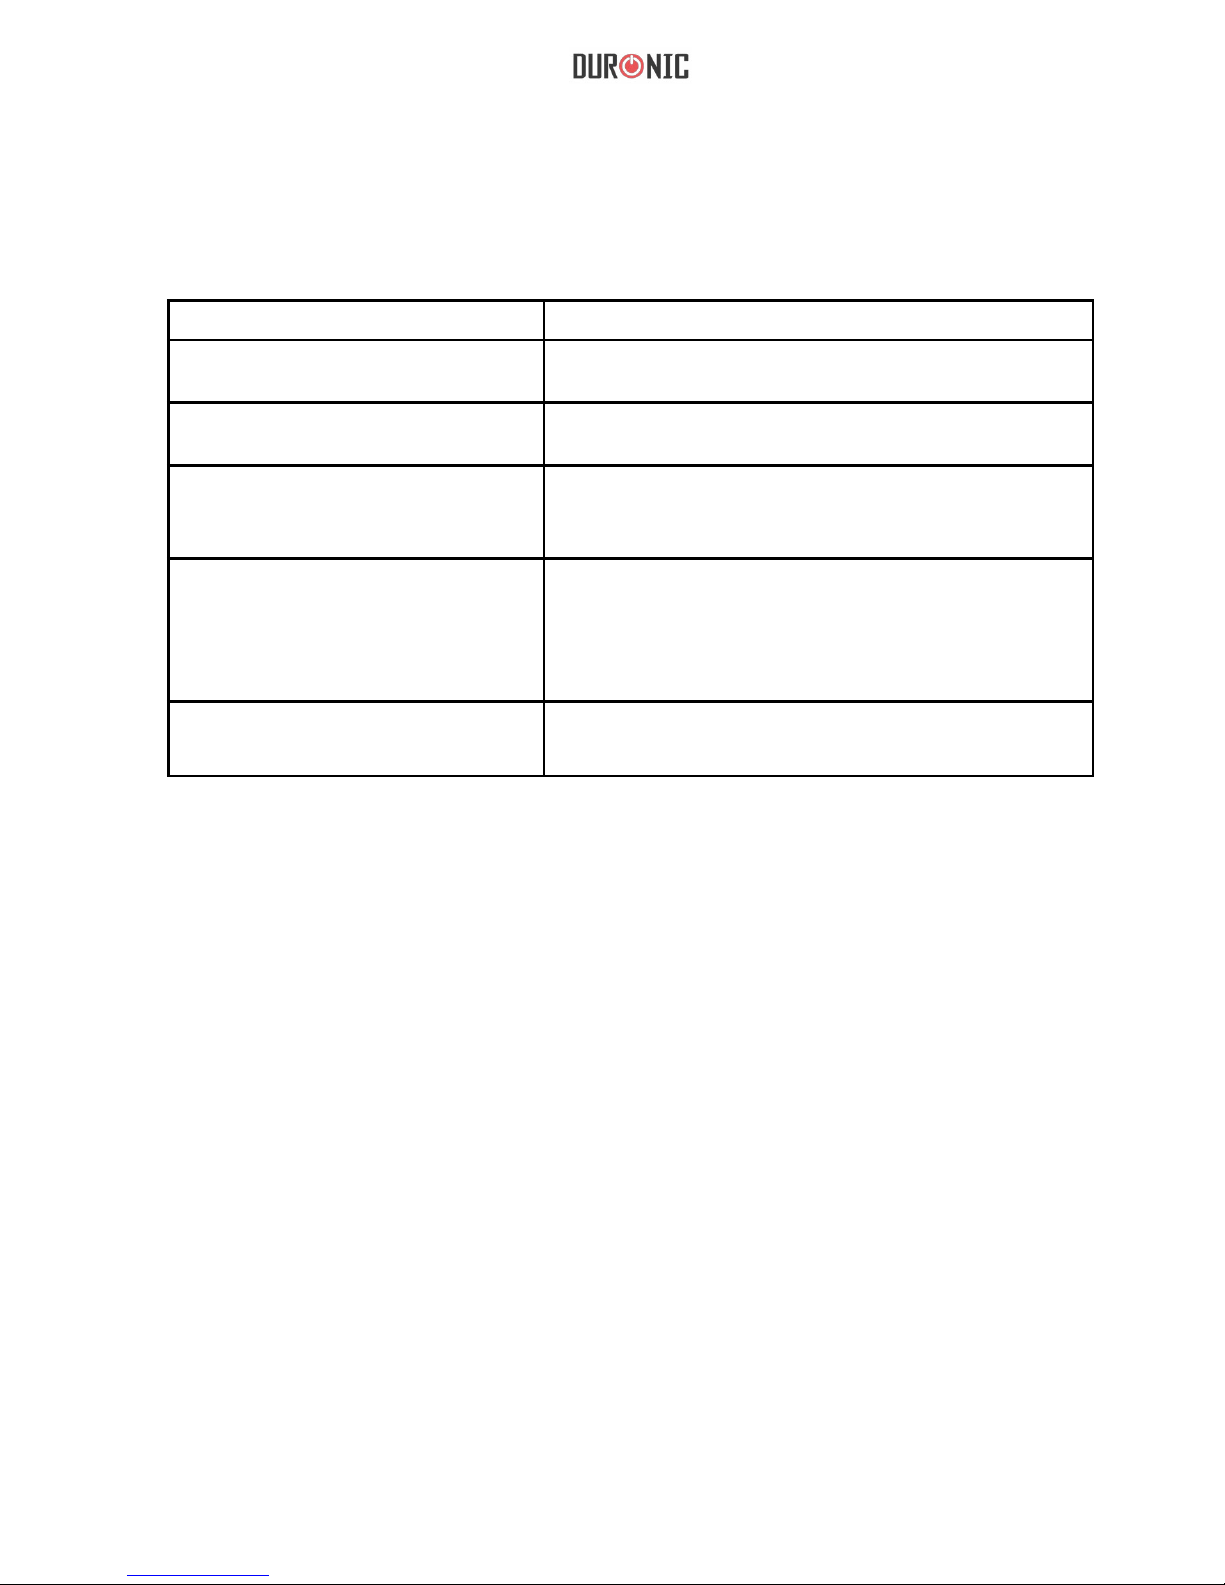
Troubleshooting
Problem Solution
The unit is not working but beeps
continuously.
1. The jug is not fitted to the base properl .
2. The lid is not fitted correctl .
The unit has stopped suddenly during
operation.
1. The lid has loosened.
2. The jug is loosely connected with the base.
The ingredients were not blended
properly.
1. The wrong function was selected, try another
function. Once the user is familiar with all functions,
recipes will be perfect every time.
The ingredients are not as soft as I
wanted.
1. Chop the ingredients into small pieces before adding.
2. The wrong function has been used for the volume
added.
3. Some food requires longer cooking: select any
heating function till food is fully cooked.
Food is burnt, and stuck to the
bottom.
1. This is caused by ingredients with high sugar/starch.
2. Too much food and too little liquid.
16
Warranty
1 Year Guarantee from Shine-Mart Ltd, Trademark owners of Duronic Products.
NOTE: THESE STATEMENTS DO NOT AFFECT YOUR STATUTORY RIGHTS AS A
CONSUMER
This product has been manufactured under the strictest or quality control procedures, and
using the highest quality of materials, to ensure excellent performance and reliability. It will
give very good and long lasting service, provided it is properly used and maintained. The
product is guaranteed for 1 years from the date of original purchase. If any defect arises due
to a faulty materials or poor workmanship, the faulty product must be returned to the original
place of purchase. Refund or replacement is at the discretion of that company.
Duronic Products are offered with a 1 year guarantee under the following conditions:
1
. T
he product must be returned to the retailer with original proof of purchase.
2. The product must be installed and used in accordance with the instructions contained in
th
is operating manual.
3
. I
t must be used only for domestic purposes.
4. I
t does not cover wear and tear, malicious damage, misuse, neglect, inexpert repairs o
r
consumable parts.
5
. S
hine-Mart Ltd has no responsibilities for accidental or consequential loss or damage.
6
. S
hine-Mart Ltd are not liable to carry out any type of servicing work, under the guarantee
7
. V
alid in the UK only
This product is tted with CE:1363 plug and fuse
Imported by Shine-Mart Ltd, RM3 8SB
Information on waste Disposal for Consumers of
Electrical & Electronic Equipment.
This mark on a product and/or accompanying documents indicates that when it
is to be disposed of, it must be treated as Waste
Electrical & Electronic Equipment, (WEEE).
Any WEEE marked products must not be mixed with general household waste,
but kept separate for the treatment, recovery and recycling of the materials used.
For proper treatment, recovery and recycling; please take all WEEE marked
waste to your Local Authority Civic waste site,
where it will be accepted free of charge.
If customers dispose of Waste Electrical & Electronic Equipment correctly, they
will be helping to save valuable resources and preventing any potential negative
effects upon human health and the environment, of any hazardous materials that
the waste may contain.

17

18

19
Manuel d’utilisation en français

20
Aperçu du produit
Verre doseur / Entonnoir
Couvercle
Panier à vapeur
Poignée de la carafe
Niveau minimum et maximum d'eau
Connecteurs électriques
Base
Panneau de contrôle
Pieds anti-dérapants

21
Inventaire
Spécifications
Déballez l’appareil et retirez toutes les protections enveloppant l’appareil.
•
Soupe crémeuse (Smooth Soup)
Soupe veloutée (Chunky Soup)
Cuisson vapeur (Steam)
Bouillir de l’eau (Boil)
Mixage (Blend)
Pieds anti dérapants
Lames en acier inoxydable
Fonction Smoothie
Fonction pilage de glace et préparation de sauce
Signals sonores
Couvercle verrouillable
Minuterie et affichage de la température sur écran
•
•
•
•
•
•
•
•
•
L’appareil se compose de :
La base
La carafe et son couvercle
Le verre doseur (entonnoir)
Le panier pour cuisson vapeur
Poussoir
Eponge et brosse
Manuel d’utilisation
•
•

22
Instructions de sécurité
•
Vérifiez que le voltage indiqué sur l’étiquette corresponde au voltage utilisé
dans votre pays.
•
Ce blender chauffant n’est pas destiné à être utilisé par des personnes
(y compris les enfants) dont les capacités physiques, sensorielles ou
mentales sont réduites, sauf si celles-ci sont sous la surveillance ou ont
reçu les instructions d’utilisation appropriées de la personne responsable
de leur sécurité.
•
Les enfants doivent être surveillés afin de s’assurer qu’ils ne jouent pas
avec cet appareil.
•
Si le câble d’alimentation est endommagé, celui-ci doit être réparé par un
technicien qualifié afin d'éviter tout danger. Veuillez autrement contacter
Duronic ou votre revendeur.
•
Soyez vigilent lorsque vous manipulez les lames, celles-ci sont très aiguisées.
•
Veuillez éviter d'utiliser cet appareil si les lames sont endommagées.
•
N’utilisez pas ce blender si le couvercle n’est pas correctement inséré et verrouillé.
•
N’immergez pas le blender chauffant (carafe, cordon, base) dans l’eau ou
dans d’autres liquides.
•
Cet appareil ne contient aucune pièce réparable par l’utilisateur. Toutes les
réparations doivent être effectuées par un technicien qualifié. Une réparation
mal effectuée peut engendrer un risque de blessure pour l’utilisateur.
•
N’utilisez pas le blender chauffant si l'appareil est tombé, s'il est tombé ou
endommagé.
•
Ne laissez pas le blender chauffant sans surveillance si celui-ci est branché.
•
Ce produit doit être débranché après chaque utilisation et avant de procéder au
nettoyage
•
Utilisez toujours le blender chauffant sur une surface stable et résistante à la chaleur.
•
Assurez-vous que l'appareil ait assez d'espace pour permettre à la vapeur de
s'échapper.

23
Instructions d’utilisation
•
La carafe chauffe durant son utilisation, utilisez par conséquent toujours
la poignée lorsque vous déplacez la carafe.
•
N’utilisez pas ce blender chauffant pour d’autres utilisations que celles décrites
dans ce
manuel.
•
Assurez-vous que le câble d’alimentation soit hors de portée de toute source
de chaleur ou de tout meuble aux bords coupants pouvant endommager le
câble.
•
Ne laissez pas le cordon d’alimentation pendre par-dessus le plan de travail.
•
Ce blender chauffant est destiné à un usage privé uniquement. Il n’est pas
destiné à un usage commercial.
•
N’utilisez pas d’autres accessoires que ceux fournies par le fabricant.
•
Nettoyez correctement les résidus projetés autour de la carafe y compris le
filtre après chaque utilisation.
Cet appareil a été conçu pour préparer des soupes crémeuses ou veloutées, il
inclut néanmoins d'autres fonctions, y compris la possibilité de réchauffer une
soupe préalablement cuite ou la préparation de smoothies. Cet appareil
incorpore également plusieurs mécanismes de sécurité, tel qu’un couvercle
verrouillable arrêtant le blender s’il est déverrouillé, un thermostat pour réguler la
température et un interrupteur de sécurité sur la base pour éviter toute danger si
la carafe était retirée lorsque le moteur est en fonctionnement. Ce blender peut,
en plus de cuire des soupes, être utilisé pour préparer des sauces, de la purée,
des assaisonnements, etc.
Pour assembler l'appareil, veuillez suivre les consignes suivantes:
•
Placez la base sur une surface stable et résistante à la chaleur puis insérez
attentivement la carafe sur la base en alignant les connections de la carafe
avec celles de la base.
•
Insérez ensuitre le couvercle en alignant le symbole de verrouillage du
couvercle avec celui de la poignée.
•
Assurez-vous que le verre doseur soit inséré.

24
Lorsque tout est correctement positionné, branchez
l'appareil puis pressez la touche START / STOP
pour allumer le blender. Un indicateur lumineux
s'allumera pour indiquer que l'appareil est en veille.
Important:
Assurez-vous que la fléche visible sur la poignée
s'aligne avec le symbôle visible sur le couvercle. Si
le couvercle est positionné à l'envers, la fonction de
sécurité s'activera, un indicateur sonore retentira et
les témoins lumineux clignoteront. Le blender ne
peut pas fonctionner si le couvercle est placée
incorrectement.

25
Pour démarrer le processus de cuisson, choisissez le programme désiré en
fonction du type de préparation.
Par simple pression d’une touche, vous avez le choix entre 8 options comme
l’illustre le diagramme ci-contre :
Programme Description Durée
Smooth soup / Soupe
Crémeuse
Chauffe et cuit la soupe pour
un résultat homogène.
< 30 m
in.
Chunky soup /
Soupe
veloutée
Chauffe et cuit la soupe pour
un résultat velouté,
grossièrement mixé.
< 22-30 m
in.
Steam - Boil /
Cuisson vapeur Bouillon
Cuisson à la vapeur ou à
ébulition d'ingrédients tels que
des oeufs, des pommes de
terre, etc.
< 20 min.
Ice / Pilage de glac
e
Permet de mixer de la glace
pilée ou toute autre
préparation à base de glace
50 sec.
Sauce / Cuisson de sauce
P
ermet de mixer et cuire à
faible température des sauces
200 sec
.
Blend / Mix
age
Fonction d
e mixage prolongée 100 sec.
Pulse / Mixage rapide
Fonction de mixage rapide
Aussi longtemps que la touche
est pressée
Smoothie
Préparation de smoothie par
mixages succins et
consécutifs
2 min. et 3
0 sec.

26
•
Cet appareil a été conçu avec simplicité, il est par conséquent très facile à utiliser.
Après avoir appuyé sur la touche « Start / Stop », les indicateurs lumineux
s’allumeront. Choisissez le programme souhaité, « Smooth soup » pour une soupe
crémeuse et « Chunky soup » pour une soupe veloutée, afin de commencer son
utilisation.
•
Pour la préparation d’une soupe, la cuisson et le mixage des ingrédients prend
environ 20-30 minutes. Au terme du programme, l’appareil émettra un signal
sonore.
•
Si un signal sonore et lumineux s’allume durant le programme, veuillez vérifier les
éléments suivants :
1)
- le couvercle doit être correctement inséré et verrouillé. Veuillez-vous assurer
que la flèche visible sur le couvercle s’aligne avec la flèche visible sur la poignée.
2)
- la carafe doit être correctement insérée sur la base.
Instructions d'utilisation
Le couvercle comme la carafe intègrent des fonctions de sécurité qui
empêchent le fonctionnement de l’appareil si l’un ou l’autre élément n’est pas
correctement positionné, inséré et verrouillé. Veuillez noter que les durées
présentées pour chaque programmes sont approximatives et dépendent de la
recette et de la quantité.
Veuillez noter que les durées présentées pour chaque programmes sont
approximatives et dépendent de la recette et de la quantité.
Les programmes préprogrammés ci-dessus ne fonctionnent que pour les
cuissons ininterrompues. Toute interruption d’un programme se traduira par
l’annulation du programme, redémarrer le programme relancera par
conséquent la cuisson depuis le début ce qui peut affecter le résultat final.
S
i vous avez besoin d’ajouter des ingrédients additionnels durant le
processus de cuisson, vous pouvez enlever le verre doseur et insérez des
aliments sans interrompre le programme.
Avertissement :
- Ne faites pas cuire de viande crue dans cet appareil. Tout type
de viande ou poisson doit être précuit au préalable pour éviter
toute contamination bactérienne.
- Laissez vos légumes congelés dégeler à température ambiante
avant de les ajouter.

27
- Programme de cuisson à la vapeur « Steam » et « Boil » :
Versez de l’eau en vous fiant à l’indicateur de niveau d’eau. L’eau versée doit
atteindre le niveau minimum et ne pas excéder le niveau maximum (STEAM
ou BOIL MAX). Placez ensuite vos aliments dans le panier à vapeur que
vous placez dans la carafe. Ce type de cuisson prendra environ 15 minutes.
- Programme « Pulse » :
Appuyez sur la touche « Start/Stop » afin de mettre l'appareil en veille puis
maintenez la touche « Pulse » enclenchée. Relâchez cette touche pour
interrompre le fonctionnement.
- Blend - Mixer des ingrédients
Branchez l’appareil puis pressez la touche « Start / Stop » puis appuyez sur
la touche « Blend » pour démarrer le programme. L'appareil mixera le
contenu pendant 20-25 secondes puis ralentira. Cette séquence se répétera
jusqu’à ce que vous interrompiez ce programme en pressant la touche
« Start / Stop ».
- Programme Smoothie :
Ce programme est conçu pour la préparation de jus de fruits et légumes et
obtenir un résultat homogène. Versez vos ingrédients ainsi que du jus si
nécessaire dans la carafe puis lancer ce programme. Pour interrompre le
cycle à n’importe quel moment, pressez la touche Smoothie à nouveau ou
pressez la touche « Start / Stop ».
- Programme de préparation de sauce « Sauce » :
Ajoutez vos ingrédients dans la carafe puis démarrez le programme « Sauce
». Ce programme mélangera et cuira votre sauce à faible température
(environ 40°C).
Note : les ingrédients à forte teneur en sucre ou amidon pourraient bruler
rapidement et coller à la plaque. Veuillez surveiller votre préparation
attentivement.
Avertissement : Les ingrédients qui contiennent une haute teneur
en amidon ou sucre peuvent facilement bruler et coller au fond
de la plaque chauffante.
Note :
Les liquides ajoutés doivent être à température ambiante et ne doivent pas
excéder le repère MIN ou MAX indiqué sur la carafe. N’utilisez pas la
fonction « Smooth / Chunky soup » pour réchauffer une soupe. Utilisez plutôt
la fonction « Reheat ».

29
Dépannage
Problèmes
Solution
L'appareil ne fonctionne pas et
émet un signal sonore
1. Assurez-vous que la carafe soit correctement insérée dans la base.
2. Assurez-vous que le couvercle soit correctement inséré.
L’appareil s’est interrompu
en milieu de programme
1. Assurez-vous que la carafe soit correctement insérée dans la base.
2. Assurez-vous que le couvercle soit correctement inséré.
Les ingrédients ne sont pas
correctement mixés
1. Les ingrédients ajoutés étaient trop larges. Utilisez la fonction « Blend »
après avoir terminé le programme de cuisson.
2. Veuillez choisir le programme « Smooth Soup ».
3. Versez plus d’eau.
Les ingrédients ne sont pas assez
cuits au terme de la cuisson
1. Découpez les ingrédients en petits morceaux avant de les ajouter.
2. Le mauvais programme a été choisi par rapport au volume d'eau
ajouté, essayez « Smooth Soup ».
3. Il y a trop d’eau ou d'ingrédients.
4. Certains aliments nécessitent un temps de cuisson supérieur. Utilisez
la fonction « Boil ».
Les ingrédients ont brulés et collent
à la plaque chauffante
1. Les ingrédients ajoutés ont une forte teneur en amidon et sucre.
Réduisez les quantités de ce type d’ingrédients.
2. Le mélange contient trop d’aliments et trop peu de liquide. Ajoutez plus
d'eau.
- Programme de pilage de glace « Ice Crush » :
Placez des glaçons secs dans la carafe et démarrez le programme « Ice
Crush » afin d’obtenir de la glace pilée. Afin de fonctionner correctement et
d’obtenir des flocons, il est important de mixer des glaçons secs et durs.
Note : ces programmes ne doivent pas être redémarrés. Tout redémarrage
du programme provoquerait une répétition des programmes de cuisson ce
qui pourrait affecter le résultat final.
Tout ingrédient ajouté après que le programme a été démarré devrait être
inséré via l’entonnoir prévu sur le couvercle. Ne retirez pas le couvercle
sous peine d’interrompre le programme. Pour arrêter un programme déjà
lancé, appuyez simplement sur la touche « Start / Stop ».
Une fois que le programme sélectionné s’est achevé, l’appareil émettra un
signal sonore et interrompra le fonctionnement du programme.
Soyez vigilent lorsque vous retirez le couvercle de la carafe, des émanations
de vapeur très chaudes pourraient s’échapper.
Avertissement : le couvercle et l’entonnoir sont soumis à une chaleur et
des vapeurs chaudes considérable, soyez vigilent lorsque vous retirez l’un
ou l’autre élément.

28
Nettoyage et maintenance
- Cet appareil ne convient pas au lave-vaisselle. Débranchez toujours
l'appareil avant d’entreprendre son nettoyage et n'immergez pas cet appareil
dans l’eau ou dans tout autre liquide.
- Nettoyez les parois extérieures avec un tissu humide et doux puis rincez le
couvercle avec de l’eau chaude savonneuse. Pour nettoyer l’intérieur de la
carafe, rincez-la pour enlever les restes puis
utilisez la brosse pour atteindre
chaque recoin.
- Alternativement, vous pouvez utiliser n’importe quel programme pour
procéder au nettoyage en profondeur. Assemblez simplement le blender
chauffant comme décrit précédemment, ajoutez 800ml d’eau et une petite
quantité de détergent. Placez le couvercle puis allumez le blender.
Démarrez le programme soupe ou « Smoothie » afin de ramollir les résidus
et faciliter le nettoyage en rinçant ensuite simplement la carafe. Vous
pouvez interrompre le processus de nettoyage à tout moment en appuyez
sur « Start / Stop » ou en débranchant la prise.
Avertissement:
- Les lames situées à l’intérieur de la carafe ne sont pas détachables et sont
très aiguisées. Soyez vigilent lorsque vous procédez au nettoyage de la
carafe.
- Si de l'eau entre en contact avec la base de la carafe, veuillez vous assurer
que les connecteurs soient secs avant de réutiliser la carafe. Si les
connecteurs sont humides, les connexions électriques pourraient soit être
endommagées soit provoquer un dysfonctionnement électrique lors de
l'utilisation du produit (dysjonction des plombs).

30
Garantie et service après-vente
1 an de garantie de la part de Shine-Mart Ltd, propriétaire de la marque Duronic.
NOTE : CES DÉCLARATIONS N’AFFECTENT EN RIEN VOTRE DROIT STATUTAIRE EN
TANT QUE CONSOMMATEUR
Ce produit a été produit en suivant les procédures de contrôle de qualité les plus strictes en
utilisant des matériaux de qualité pour assurer une excellente durabilité et performance. Cet
appareil vous offrira de longues années de service tant que vous utilisez correctement cette
machine et suivez les instructions de maintenance contenues dans ce manuel. Ce produit est
garanti pour 1 an à partir de la date originelle d’achat. Si ce produit était endommagée en
raison d’un problème électrique ou d’une fabrication imparfaite,
le produit défectueux peut être remplacé au vendeur à la discrétion de la marque sous
conditions:
1. Le produit doit être retourné avec la preuve originale d’achat.
2. Le produit doit être installé et utilisé en accord avec les instructions contenues dans ce
manuel d’utilisation.
3. Le produit doit être réservé à un usage privé.
4. La garantie ne protège pas contre les dommages dus à l’usure normale, l’utilisation
malveillante, la mauvaise utilisation, la négligence, les réparations conduites par des
non-experts ainsi que les pièces consommables.
5. Shine-Mart Ltd ne porte pas de responsabilité pour tout dommage ou perte accidentel ou
conséquent causé par ce produit.
6. Shine-Mart Ltd se dégage de toute responsabilité en matière de réparation durant la
période de garantie.
7. Valide dans toute l’Union Européenne.
Ce produit est fourni avec une prise européenne
Importé par Shine-Mart Ltd, RM3 8SB.
Ce symbole apparaît sur le produit et/ou les documents accompagnant ce
produit pour indiquer que pour procéder à la destruction de ce produit, celui-ci
doit être traité comme un déchet électrique et électronique (WEEE).
Les produits marqués WEEE ne doivent être mélangés avec les déchets
ménagers et doivent être séparés pour traitement et recyclage des composants.
An de traiter et recycler ce produit, veuillez déposer tous les composants
marqués WEEE au site de recyclage le plus proche où ce produit sera repris
gratuitement. Si les clients jettent les déchets électriques et électroniques
WEEE correctement, ce geste aidera la préservation de ressources précieuses
et prévient les potentiels effets négatifs que ces composants ou tout autre
composant dangereux ont sur la santé humaine et l’environnement.
Garantie
Suivez-nous sur
www.duronic.com @Duronic_FranceDuronic France@duronic_france

31

32

33
Gebrauchsanleitung auf Deutsch

34
Informationen
Messbecher
Deckel des Krugs
Dampfkorb (Optional)
Griff des Krugs
Wasserstandsanzeiger
elektronische Verbindung
Bodendeckel
Bedienfeld
Gummifüße

35
Vor dem ersten Gebrauch
Eigenschaften
Entnehmen Sie den Suppenbereiter aus seinem Karton und entfernen Sie
jeglicheVerpackung.
•
Glatte Suppe und Suppe mit Stückchen
•
Dampfen und Kochen
•
Rutschfeste Gummifüße
•
Eingebaute Klingen zum Mixen
•
Pulsieren und Mixen
•
Saft-Funktion
•
Soße and Eis-Crushing-Function
•
Akustische Signale
•
Verschließbarer Deckel mit Einfülltrichter
•
Integrierter Timer
Inhalt:
Suppenbereiter
Krug mit Deckel
Messbecher
Dampfkorb
Essenzerkleinerer
Bürste und Schwamm
Bedienungsanleitung

36
Sicherheitshinweise
•
Prüfen Sie, dass die Voltzahl auf dem Etikett der örtlichen Netzspannung
entspricht, bevor Sie das Gerät einstecken.
•
Dieses Gerät ist nicht für die Verwendung von Personen vorgesehen
(Kinder eingeschlossen), die verminderte körperliche, sensorische oder
geistige Fähigkeiten haben oder nicht über ausreichende Erfahrung und
Kenntnisse verfügen, außer sie haben von einer Person, die für Ihre
Sicherheit verantwortlich ist, Anweisungen für den Gebrauch des Geräts
erhalten oder werden von dieser beaufsichtigt.
•
Lassen Sie Kinder nicht mit dem Gerät spielen.
•
Wenn das Kabel beschädigt ist, muss es vom Hersteller, dessen
Kundendienst oder anderem qualifizierten Personal ausgetauscht werden, um
Gefahren zu vermeiden.
•
Geben Sie Acht im Umgang mit den Klingen, da diese äußerst scharf sind.
•
Benutzen Sie das Gerät nicht, wenn die Klingen beschädigt sind.
•
Benutzen Sie das Gerät nicht, wenn der Deckel nicht richtig aufsitzt.
•
Tauchen Sie der Suppenbereiter, den Krug, das Kabel oder den Motor nicht
ins Wasser oder andere Flüssigkeiten.
•
Dieses Gerät enthält keine vom Benutzer zu wartenden Teile. Alle Reparaturen
sollten von einem qualifizierten Techniker durgeführt werden. Unsachgemäße
Reparaturen können zu Schäden u
nd Verletzungen führen.
•
Verwenden Sie das Gerät nicht nach einer Fehlfunktion oder wenn es
beschädigt ist.
•
Lassen Sie dieses Gerät während des Betriebes nicht unbeaufsichtigt.
•
Dieses Gerät muss nach dem Gebrauch, vor der Reinigung und während der
t
Wartung ausgesteckt werden.
•
Verwenden Sie der Suppenbereiter auf ebenen, hitzebeständigen Oberflächen.
•
Stellen Sie sicher, dass der Suppenbereiter ausreichend Raum zur Belüftung hat.

37
Anleitung
•
Der Krug kann während des Betriebs heiß werden. Bewegen Sie ihn nur mit
Hilfe seines Griffes.
•
Verwenden Sie den Suppenbereiter ausschließlich für seinen vorgesehenen
Verwendungszweck.
•
Stellen Sie sicher, dass das Kabel fern von Hitze und scharfen Kanten gehalten
wird, um Beschädigungen zu vermeiden.
•
Stellen Sie sicher, dass das Kabel von heißen und scharfen Kanten
ferngehalten wird, welche Schäden anrichten können.
•
Dieses Gerät ist ausschließlich für den Heimgebrauch. Es ist nicht für einen
kommerziellen Gebrauch vorgesehen.
•
Verwenden Sie kein Zubehör, das nicht von der Hersteller empfohlen wurde
•
Reinigen Sie das Gerät regelmäßig nach dem Gebrauch, um seine Lebens-
erwartung zu verlängern.
Dieser Suppenbereiter kann glatte, gleichmäßige Suppe und solche mit
Stückchen herstellen. Mit der Aufwärmfunktion werden vorgekochte Suppen
ganz schnell wieder heiß. Er hat mehrere eingebaute Sicherheitsfunktionen
einschließlich eines verriegelnden Deckels, einem Temperatursensor und
einem Schutzausschalter im Motorgehäuse.
Dank seines eingebauten Messers kann der Suppenbereiter auch als
Standmixer verwendet werden, um Smoothies, Püree, Dips und Soßen zu
machen.
Vor der Nutzung:
•
Platzieren Sie den Suppenbereiter auf einer hitzbeständigen, stabilen
Oberfläche. Setzen Sie den Krug auf das Gerät und stellen Sie sicher,
dass Sie die elektrische Verbindung auf der Unterseite des Kruggriffes auf
die des Hauptgerätes ausrichten.
•
Stellen Sie sicher, dass das 'Geöffnete Schloss'- Symbol auf dem
Deckel auf den Pfeil des Kruges ausgerichtet ist.
•
Stellen Sie sicher, dass der Messbecher im Deckel eingesteckt ist.

38
Sicherheitshinweise
Wenn alles korrekt positioniert wurde, stecken Sie
den Stecker ein und drücken Sie den Start/StopKnopf, um den Suppenbereiter einzuschalten. Der
Knopf wird aufleuchten um zu signalisieren, dass das
Gerät betriebsfähig ist.
Sollte der Alarm ertönen, wurden die einzelnen Teile
nicht richtig monitert. Überprüfen Sie die
Markierungen an Krug und Deckel und korrigieren
Sie deren Position.

39
Um mit dem Kochen zu beginnen, wählen Sie eine Funktion. Es gibt acht
verschiedene Funktionen, siehe unten:
Hinweis: Die genannten Kochzeiten können je nach Zutaten varieren und
dienen nur als Referenz.
Die oben genannten Einstellungen benötigen Dauerbetrieb. Eine
Unterbrechung wird die Einstellung stornieren. Wenn Sie eine Einstellung neu
starten, kann dies Auswirkugen auf das Endergebnis haben.
Wenn Sie weitere Zutaten während des Kochprozess hinzugeben möchten,
entfernen Sie den Messbecher und geben die Zutaten durch die Öffnung,
ohne den Kochprozess zu u
nterbrechen.
Option
Beschreibung Dauer
Smooth Soup
Glatte Suppe: Obst und Gemüse glatt kochen und mischen
<30mins
Chunky Soup
Suppe mit Stückchen: Obst und Gemüse kochen und grob mixen
<30mins
Steam/Boil
Essen dünsten und kochen: z.B. Eier, Gemüse u.ä.
<20mins
Pulse
Pulsieren: Gerichte in gewünschter Konsistenz kreieren
Blend
Mixen: Obst und Gemüse zu einem Smoothie mixen
100 sec
Juice
Saft: Die Zutaten dünnflüssig mixen
150 sec
Sauce
Hülsenfrüchte und Kräuter zu einer Vielzahl an Soßen vermischen
200 sec
Ice
Eis: Zum Zerkleinern von Einwürfeln
50 sec

40
•
Der Suppenbereiter ist sehr einfach zu bedienen:
Drücken Sie die Start/ Stop-Taste, um das Gerät einzuschalten. Der Indikator
wird blinken. Wählen Sie das geeignete Programm und der Suppenbereiter
wird den Betrieb aufnehmen.
•
Glatte Suppen und solche mit Stückchen werden etwa 22-30 Minuten
Kochzeit benötigen. Wenn das Gericht fertig ist wird das Gerät für einige
Sekunden piepen und der Indikator blinken.
•
Wenn die Indikatoren während des Kochprozesses kontinuierlich piepen und
blinken, ist ein Fehler aufgetreten:
Überpüfen Sie,
1)
dass der Deckel korrekt befestigt ist.
2)
dass der Krug korrekt auf den Körper aufgesetzt wurde.
Suppe zubereiten:
Schneiden Sie alle Zutaten in etwa 2-3cm große Würfel und geben Sie
sie in den Krug.
Vorsicht: Es wird nicht empfohlen rohes Fleisch oder rohen
Fisch in dem Suppenbereiter zu kochen. Fisch und Fleisch
muss vorgekocht werden. Verwenden Sie keine gefroren
Zutaten. Stellen Sie sicher, dass alle Zutaten Raumtemperatur
haben.
VORSICHT: Zutaten, die einen hohen Stärke- oder Zuckergehalt
haben, können leicht anbrennen. Seien Sie extra vorsichtig.
Benutzung
Hinweis: Alle Flüssigkeiten müssen Raumtemperatur haben und weder die
Maximummarkierung des Kruges über- noch die Minimummarkierung
unterschreiten. Verwenden Sie die 'Smooth'- oder 'Chunky'-Funktionen nicht,
um Ihre Suppe aufzuwärmen.

41
- Dünsten: Füllen Sie den Krug mit ausreichend Wasser, bis es das Minimum
erreicht und 'Steam Max.' nicht überschreitet. Verwenden Sie den Korb.
Achten Sie darauf, dass sich das Essen über dem Wasserpegel befindet.
- Kochen: Füllen Sie den Krug mit Wasser und setzen Sie den Korb ein.
Achten Sie darauf, dass sich das Essen zum Teil unter Wasser befindet.
Pulsieren-Funktion: Drücken Sie die Pulse-Taste.
- Blend: Geben Sie Ihre Zutaten in den Krug, um Sie bei mittlerer
Geschwindigkeit zu einer Smoothie-Konsistenz zu mixen
- Juice: Geben Sie die Zutaten in den Krug, um Sie bei schneller
Geschwindigkeit dünnflüssig zu mixen
- Soße: Geben Sie Tomaten, Hülsenfrüchte oder andere Zutaten in den
Krug, um Sie zu einer Soße zu verrühren.
- Ice Crushing: Geben Sie Eiswürfel in den Krug um sie zu Crushed
Eis zu zerkleinern.
Hinweis: Diese Kochzeit berüht auf einem ungestörten Betrieb. Ein Neustart
der Einstellung wird zu einer Wiederholung der Kochphasen führen und
somit das Endergebnis beeinflussen.
Wenn Sie weitere Zutaten während des Kochprozesses hinzufügen
möchten, entfernen Sie den Messbecher und werfen die Zutaten ein.
Entfernen Sie den Deckel nicht, da dies zu einer Unterbrechung des
Kochprozesses führt. Um den Kochprozess komplett zu beenden, drücken
Sie jederzeit die Start/Stop Taste.
Wenn das Gericht fertig ist, piept der Suppenbereiter und wird nicht weiter
heizen.
Seien Sie vorsichtig, wenn Sie den Deckel entnehmen, da dieser heiß sein
wird.
WARNUNG: Hitze und Dampf werden bei Betrieb entstehen, seien Sie
vorsichtig, wenn Sie den Deckel entfernen.

42
•
Der Suppenbereiter ist nicht spülmaschinenfest.
•
Entnehmen Sie den Stecker, bevor Sie das Gerät reinigen.
•
Halten Sie das Gerät nicht unter Wasser oder andere Flüssigkeiten.
•
Reinigen Sie die Außenseite des Gerätes und den Kruges mit einem weichen,
feuchten Tuch. Reinigen Sie den Deckel in warmem Seifenwasser.
•
Spülen Sie die Innenseite des Krugs aus, um Essensreste zu entfernen. Reinigen
Sie es mit einem weichen, feuchten Tuch und mildem Reinigungsmittel, bevor Sie
es erneut ausspülen.
•
Vorsicht: Das Messer ist sehr scharf. Es muss mit äußerster Vorsicht gereinigt
werden.
•
Sie können die 'Blend-Funktion' zur Reinigung des Kruges verwenden. Füllen Sie
hierzu das Gerät mit 800ml Wasser und ein bischen Spülmittel. Setzen Sie den
Deckel auf und wählen d
ie 'Blend-Funktionen'. Schalten Sie den Suppenbereiter
aus, wenn die Reinigung vollendet ist.
Reinigung und Instandhaltung

43
Fehlersuche
Problem
Lösung
Der Suppenbereiter funktioniert
nicht und piept.
1.
Der Krug ist nicht richtig aufgesetzt.
2.
Der Deckel sitzt nicht richtig auf.
Der Suppenbereiter schaltet sich
während des Betriebs aus.
1.
Der Deckel sitzt locker.
2.
Der Krug ist sitzt lose auf dem Gerät
Die Zutaten sind nicht richig
vermischt.
1.
Es wurde die falsche Funktion ausgewählt.
Versuchen Sie eine andere Funktion.
Die Zutaten wurden nicht so weich
gekocht wie gewünscht.
1.
Schneiden Sie die Zutaten kleiner.
2.
Die falsche Funktion wurde für das hinzugefügte
Volumen ausgewählt..
3.
Manches Nahrungsmittel brauchen länger zum Kochen.
Wählen Sie zusätzlich die Wärmefunktion.
Die Suppe ist angebrannt
1.
Zucker- oder Stärkegehalt des Essens ist sehr hoch.
2.
zu viel Essen für zu wenig Flüßigkeit

44
1 Jahr Gewährleistung von Shine-Mart Ltd, der Markeninhaber von Duronic Produkte.
ZUR BEACHTUNG : DIESE BEDINGUNGEN HABEN KEINE BEEINFLUSSUNG AUF IHRE
GESETZLICHE RECHTE ALS VERBRAUCHER
Dieses Produkt wurde unter strengen Qualitätskontrollen hergestellt, und wurde aus
hochwertigen Werkstoffen produziert, um ausgezeichnete Leistung und Zuverlässigkeit zu
gewährleisten. Sorfern das Produkt korrekt benutzt und gewartet wird, wird eine langlebige
Lebensdauer garantiert.
Das Produkt ist für 1 Jahr, ab dem Kaufdatum, gewährleistet. Beim Auftreten eines
Schadens, durch schlechten Werkstoffe oder Verarbeitung, sollte das fehlerhafte Produkt
an den ursprünglichen Verkäufer zurückgegeben werden. Eine Rückerstättung oder einen
Umtausch erfolgt nach Vorschriften des Unternehmens.
Duronic Produkte haben 1 Jahr Gewährleistung unter folgenden Bedingungen :
1. Das Produkt sollte mit dem ursprünglichen Kaufnachweis zurückgegeben werden.
2. Das Produkt sollte unter den Anweisungen und Anleitungen installiert und benutzt worden
sein.
3. Die Produkte sind nur für den Hausgebrauch geeignet.
4. Natürliche Abnutzung oder Schäden, böswillige Beschädigung, Missbrauch,
unsachgemäße Reparaturen von Verschleißteile sind von der Gewährleistung
ausgeschlossen.
5. Shine-Mart Ltd hat keine Verantwortung für indirekte Verluste oder Folgeschäden.
6. Shine-Mart Ltd ist nicht für Wartungsarbeiten zuständig. Diese fallen nicht unter die
Gewährleistung.
7. Gültig in der EU
Dieses Produkt ist mit tted CE geprüfte Typ-F
Euro Stecker/BS Stecker ausgestattet
Von Shine-Mart Ltd, RM3 8SB importiert
Information über Abfalllagerung für Verbraucher von elektronischen Geräten.
Dieses Zeichen auf dem Produkt und/oder auf mitgelieferte Dokumenten zeigt,
dass wenn eine Beseitigung erfolgt, diese an Elektro-Altgeräte (WEEE)- Stellen
beseitigt werden muss. Für weitere Behandlungen und Weiterverarbeitung der
Werkstoffe, dürfen diese WEEE- markierte Produkte nicht mit dem Hausmüll
vermischt werden.
Für die korrekte Behandlung, Aufbereitung und Wiederverwendung bitte alle
WEEE -markierten Produkte zu Ihren kommunalen Abfallbeseitigungsanlage
nehmen. Dort können Sie diese kostenlos abgeben.
Wenn die Beseitigung von Elektro-und Elektronik-Altgeräten richtig beseitigt
wird, werden Sie helfen, wertvolle Ressourcen zu gewinnen und mögliche
negative Auswirkungen auf Gesundheit und der Umwelt zu vermeiden.
Gewährleistung
Folgen Sie Uns

45

46

47
Manual De Instrucciones En Español

48
Diagrama
Taza de medición
Tapa de la jarra
Cesta del vapor (Opcional)
Mango del jarro
Nivel de agua – Alto y Bajo
Toma de corriente
Cubierta inferior
Tablero de control
Pies de goma

49
Introducción
Característica
Saque el robot de cocina de la caja. Retire cualquier embalaje del producto.
•
Sopas suaves, lizas
•
Sopas gruesas Pulso de Vapor/Hervir
•
Pies de goma antideslizante
•
Cuchillas incorporadas
•
Función de mezcla/licuar
•
Función de zumo
•
Función de salsas y picar hielo
•
Advertencias audibles
•
Tapa de cierre con la tolva de alimentos
•
Alarma temporizada para programas
En el embalaje
Base de la energía
Jarra con tapa
Taza de medición
Cesta de vapor
Empujador de alimentos
Esponja y Cepillo
Manual de Instrucciones

50
Instrucciones de seguridad
•
Verifique que el voltaje indicado en la etiqueta de clasificación corresponda
a la de la red local antes de la conexión del aparato a la red de alimentación.
•
No está diseñada para su uso por personas (incluidos los niños)
con discapacidad física o sensorial reducida o falta de experiencia o
conocimiento, deben ser supervisados e instruidos del uso de este robot
de cocina por una persona que se responsabilice de su seguridad.
•
Los niños deben ser supervisados para asegurarse que no jueguen con
este aparato.
•
Si el cable de alimentación está dañado, debe ser reemplazado por un
técnico calificado, con el fin de evitar situaciones de peligro, o enviar la unidad
al distribuidor autorizado de los servicios de reparación.
•
Debe tenerse precaución al manipular las cuchillas ya que son muy filosas.
•
No utilice si la cuchilla giratoria está dañada.
•
No utilice sin que la tapa esté asegurada en su lugar.
•
NO sumerja la (Jarra, cable, carcasa del motor) en agua o cualquier otro líquido.
•
Este aparato no contiene piezas que puedan ser reparables por el usuario.
Todas las reparaciones deben llevarse a cabo por un ingeniero calificado
solamente. Reparaciones inadecuadas pueden poner al usuario en
r
iesgo de daños.
•
NO utilice este aparato después de un mal funcionamiento o si se ha caído
dañado de alguna manera.
•
NO descuide el aparato mientras que esté conectado a la red eléctrica.
•
Este aparato debe estar desconectado de la fuente de alimentación después de
cada uso y mientras que cualquier operación de mantenimiento, como la limpieza
se lleva a cabo.
•
Utilice siempre el aparato sobre una superficie plana, estable y resistente al calor.
•
Asegúrese de que haya suficiente espacio alrededor para permitir ventilación.

51
Instrucciones de uso
•
La jarra se calentara durante su uso, asegúrese de siempre sostener del
manguito de la jarra.
•
NO utilice este aparato para otros propósitos distintos para el cual fue
diseñado.
•
Asegúrese de que el cable de alimentación se mantiene alejado del calor o
bordes afilados que podrían causar daños.
•
NO permita que el cable de alimentación cuelgue sobre el borde de la
superficie de trabajo o mesas.
•
Solamente para el uso doméstico. NO debe ser utilizado para fines
comerciales.
•
NO utilice ningún otro accesorio en este aparato que no sean los
recomendados por el proveedor.
•
Limpie los derrames alrededor de la jarra incluyendo el filtro después de su
uso.
Este aparato ha sido diseñada para crear sopas, alimentos de vapor y mezcla
las diferente clases de frutas y verduras. Está equipado con varias
características de seguridad incluyendo un enclavamiento tapa corte; sensor de
temperatura; y un mecanismo de micro interruptor de seguridad en la base del
motor. La cuchilla de dentro de la jarra está diseñada para ser versátil, por lo
que también puede ser utilizado para que el aparato de sopa pueda ser utilizado
como una licuadora para hacer smoothies, purés, salsas y aderezos.
Para empezar a utilizar:
• Coloque la unidad sobre una superficie estable resistente al calor
Cuidadosamente coloque la jarra sobre la base de alimentación. La jarra debe
quedar firmemente sobre la base de la unidad.
•
Encaje la tapa alineando con el símbolo de bloqueo al manguito de la jarra.
•
Asegúrese de colocar la taza de medición en la parte superior de la tapa de la
jarra.

52
Instrucciones de seguridad
Cuando todo esté colocado correctamente, conecte
a la toma corriente de alimentación y pulse el botón
Start/Stop para encender. El botón iluminará
indicando que el aparato está encendido.
Si en este momento suena la alarma, retire la jarra
de la base y desenchufe desde la toma corriente y
compruebe que la tapa este correctamente montada,
luego volver a conectar a la toma corriente y
encienda.

53
Para iniciar el proceso de cocción, seleccione la función que necesita.
Hay 8 funciones para elegir, como se muestra a continuación:
Nota: Tiempos de cocción pueden variar para el usuario. Los tiempos de
cocción indicados deben usarse como referencia solamente.
Los programas preestablecidos no pueden ser interrumpidos de lo contrario
resultara a la cancelación del programa. Reiniciar resultará en las etapas de
cocción repetidas que pueden afectar el resultado final.
Si necesita agregar ingredientes adicionales durante el proceso de cocción
puede quitar la taza medidora de la tapa e insertar alimentos sin interrumpir
el programa.
Opción D
escripción Tiempo
Smooth Soup
Frutas y vegetales pueden ser mezcladas a una textura suave y caliente.
30<mins
Chunky Soup
Frutas y vegetales pueden ser mezcladas a una textura gruesa y caliente.
30<mins
Steam/Boil
Vapor y hervir los alimentos, tales como el huevo, verduras, etc.
20<mins
Pulse
Le permite crear recetas a su propia textura deseada.
Blend
Mezcla de frutas y hortalizas a deliciosos batidos.
100 sec
Juice
Permite mezclar hasta que tu receta sea de textura suave como zumo.
150 sec
Sauce
Usted puede mezclar frijoles y hierbas para crear una variedad de salsas.
200 sec
Ice
Permite triturar cubitos de hielo seco
50 sec

54
• El aparato ha sido diseñado pensando en la sencillez, por lo que es muy fácil de
manejar: después de pulsar el botón "Start/Stop", los indicadores parpadearan,
después de lo cual usted puede elegir la función que requiera, permitiendo
comenzar la operación.
• Hacer sopa tardaría alrededor de 20-30 minutos cuando la cocción o la mezcla se
han completado, hará un "beep" el sonido en varias ocasiones.
• Durante el proceso de cocción si los indicadores parpadean y hay un pitido
continuo durante la operación, significa que hay un error con la operación o que
algo marcha mal.
Verifique lo siguiente:
1) Si la tapa está cerrada correctamente.
2) Si la jarra se ha colocado correctamente en la base.
Hacer sopas (gruesas y blandas)
Picar todos los ingredientes en cubos de aproximadamente 2-3cm y
agregarlos a la jarra.
PRECAUCIÓN: Se recomienda no utilizar carnes crudas.
Cualquier carne o pescado debe estar previamente cocido. No
agregue ingredientes congelados. Asegúrese de que todos los
ingredientes estén a temperatura ambiente.
ADVERTENCIA: Los ingredientes que contienen altos niveles de
almidón o azúcar pueden pegarse a la placa calefactora y
quemarse fácilmente.
Uso del aparato
Nota: Todos los líquidos añadidos deben estar a una temperatura ambiente,
y no debe estar por encima de las marcas de mínimo y máximo indicado en
la jarra. No utilice el aparato para recalentar la sopa.

55
- Steam/Boil: Vierta agua en la jarra hasta la marca de 24 OZ, luego use la
cesta de vapor para sus ingredientes.
- Pulse: Mantenga pulsado la función "Pulse" para mezclar. Suelte el botón para
terminar.
- Blend: Inserte los ingredientes en la jarra y pulse "Blend", empezará a batir a
una velocidad mediana hasta hacer un batido de los ingredientes.
- Juice: Inserte la fruta en la jarra y presione 'Juice', comenzará a una alta
velocidad para finalmente cortar la fruta y hacer zumo.
- Sauce: Inserte el tomate, frijoles u otros ingredientes en la jarra y
presione "Sauce", luego empezará a operar y su salsa estará lista.
- Ice Crushing: Inserte el los cubos de hielo en la jarra y presione "Ice",
el hielo será triturado en segundos.
Note: Las secuencias mencionadas se basan en funcionamiento que no puede
ser interrumpido. Reiniciar resultará que atapas de cocción se repitan que
pueden afectar el resultado final.
Puede añadir cualquier ingrediente durante el proceso de cocción a través
de la tolva de alimentos en el centro de la tapa. No retire la tapa, ya que esto
detendría el programa. Para parar completamente el programa en cualquier
momento, simplemente presione el botón "Start/Stop".
Una vez finalizado el programa, sonará una alarma audible y dejará de
calentar.
Tenga cuidado al quitar la tapa de la jarra ya que estará muy caliente.
ADVERTENCIA: Se emitirá calor/vapor desde la tapa. Debe tener cuidado al
retirar la tolva de la comida y la tapa.

56
• No sumerja la máquina en un lavavajillas.
• Desconecte siempre la máquina de sopa de la fuente de alimentación antes de
limpiar.
• No sumerja la máquina en agua o en cualquier líquido.
• Limpie la superficie de la unidad y el exterior de la jarra con un paño suave y
húmedo. Lave la tapa en agua tibia y jabón.
• Para limpiar el interior de la jarra, enjuague para eliminar restos de sopa o
partículas grandes de alimentos. Limpie restos de alimentos utilizando un paño
suave y detergente antes de enjuagar nuevamente.
• PRECAUCIÓN: Las cuchillas dentro de la jarra no son removibles y están muy
afiladas; debe tener extrema precaución cuando limpie el interior de la jarra.
• Use los programas de la máquina para facilitar la limpieza de manchas difíciles.
• Monte todas las piezas en la unidad como se describió anteriormente e agregue
800ml de agua y una pequeña cantidad de detergente. Encaje la tapa y encienda
la máquina. Presione BLEND y las cuchillas girarán para limpiar la jarra. Puede
parar el proceso de limpieza en cualquier momento apagando el aparato.
Limpieza y Mantenimiento

57
Solución de Problemas
Problemas Solución
La unidad no funciona pero
suena continuamente.
1. La jarra no encaja en la base correctamente.
2. La tapa no encaja correctamente.
La unidad se ha detenido de repente
durante la operación.
1. La tapa se aflojado.
2. La jarra está un poco aflojado.
Los ingredientes no estaban
licuados correctamente.
1.
La función equivocada fue seleccionada, pruebe con otra
función. Una vez que el usuario está familiarizado con todas las
funciones, recetas será perfecta en todo momento.
Los ingredientes no están suaves
como yo los quería.
1.
Corte los ingredientes en trozos pequeños antes de agregar.
2. La función incorrecta se ha utilizado para el volumen
añadido.
3.
Algunos alimentos requiere más cocción: Seleccione cualquier función de
calefacción hasta que los alimentos estén completamente cocinados.
La comida esta quemada, y
pegado a la parte inferior.
1.
Esto es causado por ingredientes con alto contenido en azúcar y almidón.
2. Demasiada comida y muy poco líquido.

58
Síguenos
NOTA: ESTAS DECLARACIONES NO AFECTAN SUS DERECHOS LEGALES COMO
CONSUMIDOR
Este producto ha sido fabricado bajo las más estrictas control de calidad y utilizando
materiales de
alta calidad para asegurar conabilidad y excelente funcionamiento. Le dará buen servicio y
una larga duración, siempre y cuando se utilice correctamente y sea bien mantenido.
El producto está garantizado por 1 año desde la fecha de compra original. Si surge
cualquier defecto debido a un error/defecto de fábrica o mano de obra, entonces el producto
debe ser devuelto al lugar original de compra. Reembolso o reemplazo es a discreción de la
compañía.
Productos Duronic se ofrecen con una garantía de 1 año bajo las siguientes condiciones:
1
. E
l producto debe ser devuelto al vendedor con comprobante de compra original.
2. El producto debe instalarse y usarlo según las instrucciones contenidas en este manual.
3
. E
ste aparato es únicamente de uso doméstico.
4
. N
o cubre desgaste, daños maliciosos, uso indebido, negligencia, reparaciones inexperta
s
o
partes consumibles.
5
. S
hine-Mart Ltd no será responsable por cualquier daño consecuente, accidente
s o
p
érdidas.
6
. S
hine-Mart Ltd no es responsable ah llevar a cabo cualquier tipo de servicio, bajo l
a
ga
rantía.
7. Valido solamente dentro de la (EU).
Este producto esta equipado con enchufe/fusible Europeo
Importado por Shine-Mart Ltd, RM3 8SB
Información sobre la eliminación de residuos para los consumidores
de equipos eléctricos y eléctricos:
Esta marca en un producto y/o documentos adjuntos indica que cuando se va a
desechar, se debe tratar como equipos residuos eléctricos y electrónicos (RAEE)
Cualquier producto marcado (RAEE) no debe ser mezclado con la basura
doméstica, sino separado para el tratamiento, recuperación y reciclaje
de los materiales utilizados.
Para el tratamiento adecuado, recuperación y reciclaje; por favor, tome todos los
productos (RAEE) y llévelo al sitio de residuos de su
Autoridad Local, donde será aceptado de forma gratuita.
Si los clientes desechan los residuos eléctricos y electrónicos correctamente,
ayudar a ahorrar valiosos recursos y prevenir los efectos negativos sobre la salud
humana y el medio ambiente, de materiales peligrosos que pueden
contener los residuos
Garantía

59

60

61
Manuale D’istruzioni In Italiano

62
Componenti del prodotto
M
isurino
Coperchio della caraffa
Cestello per l’ebollizione
M
anico
Livello dell’acqua
Connetori elettrici
B
ase
Pannello dei c
ontrolli
P
iedini di gomma

63
Per cominciare
Caratteristiche
Aprire la confezione e imuovere il prodotto dall’imballo
•
Vellutate
•
Cottura Minestroni
•
Piedini in gomma antiscivolo
•
Lame incorporate alla caraffa
•
Funzione mixer
•
Funzione smoothie
•
Tritaghiaccio
•
A
llarme sonoro
•
Coperchio con apertura per l’inserimento di ingredienti
•
P
rogrammi con timer e allarme
Contenuto della confezione:
Unità motore del soup maker
Caraffa del m
ixer con coperchio
Misurino
Cestello per la cottura a vapore
Pestello
Spugna e spazzola
Manuale di istruzioni

64
Istruzioni di sicurezza
• Assicurarsi che il voltaggio indicato sull’etichetta di classificazione energetica
corrisponda con il voltaggio delle prese di corrente del proprio paese.
• Questo apparecchio non è stato inteso per l’uso di persone(inclusi bambini)
disabili, con capacità mentali ridotte, o con mancanza di esperienza. È permesso
l’uso dell’apparecchio alle suddette persone solo in presenza di un supervisore
responsabile per la loro sicurezza.
• Bambini vanno supervisionati per assicurarsi che non giochino con il presente
apparecchio.
• Se il cavo di alimentazione è danneggiato, deve essere cambiato da una persona
qualificata, per evitare un pericolo, o portato ad un centro di riparazione autorizzato
per essere cambiato o riparato.
• Maneggiare le lame con estrema cautela in quanto molto affilate.
• Non utilizzare il soup maker senza che il coperchio sia correttamente posizionato
al suo posto.
• Non immergere il soup maker (caraffa, cavo, unità motore) in acqua o qualsiasi
altro liquido.
• Questo apparecchio non contiene parti modificabili dall’utente. Tutte le riparazioni
vanno effettuate da parte di un ingegnere qualificato. Tentativi di Riparazionie non
autorizzati potrebbero esporre a rischi di danni l’utente.
• Non utilizzare l’apparecchio dopo un malfunzionamento dello stesso, o dopo che
subisce accidentalmente un urto o viene danneggiato in qualsiasi maniera.
• Non lasciare l’apparecchio non supervisionato quando connesso alla presa di
corrente.
• Questo apparecchio va sempre staccato dalla presa di corrente dopo l’utilizzo, e
pulito prima di essere riposto.
• Utilizzare l’apparecchio sempre su di una superficie stabile, e resistente al calore.
• Assicurarsi che ci sia sufficiente ventilazione intorno al soup maker per permettere
al vapore bollente di disperdersi.

65
Istruzioni per l’uso
• La caraffa diventerà sempre calda durante l’uso, afferrarla sempre utilizzando
la maniglia.
• Non utilizzare il soup maker per qualsiasi altro proposito oltre a quello per cui è
stato inteso.
• Assicurarsi che il cavo di alimentazione venga tenuto lontano da superfici calde
o spigoli appuntiti per evitare che venga danneggiato.
• Assicurarsi che il cavo d’alimentazione non si attorcigli a mobili o oggetti.
• Il soup maker è da utilizzarsi esclusivamente in ambiente domestico. Non va
utilizzato per scopi commerciali.
• Non utilizzare nessun accessorio con questo apparecchio, a parte quelli
raccomandati dal produttore.
• Pulire a fondo tutta la caraffa incluso il suo filtro dopo l’uso.
Il soup maker è stato progettato per preparare sia zuppe che vellutate. E’ dotato
anche di una funzione riscaldamento che permette di riscaldare zuppe preparate
in precedenza. E’ dotato di moltissimi sistemi di sicurezza inclusi: un coperchio a
incastro, sensore di temperatura, ed un micro-interruttore di sicurezza sulla base
motore. Le lame incorporate permetteranno di utilizzare il soup maker come
frullatore per creare frullati, smoothies, puree e salse.
Per iniziare:
Posizionare la caraffa sopra la base, facendo attenzione ad allineare le
scanalature tra la base della caraffa e quelle dell’unità motore. La caraffa deve
essere assicurata sopra la base dell’unità motore.
Posizionare il coperchio sulla caraffa facendo coincidere il simbolo del blocco
con quello sul manico della caraffa.
Assicurarasi che il misurino sia correttamente bloccato sul coperchio.

66
Istruzioni di sicurezza
Quando tutto sarà posizionato correttamente, collegare il
soup maker alla presa di corrente e premere il pulsante
Start/Stop per avviare il soup maker. Il pulsante si
illuminerà indicando che l’apparecchio è acceso.
Se a questo punto scatta l’allarme, togliere la caraffa,
staccare il soup maker dalla presa di corrente e
controllare che il coperchio sia correttamente sigillato.
Dopo averlo controllato, ricollegare alla presa di corrente
ed accendere l’apparecchio.

67
Per iniziare il processo di cottura, selezionare una funzione basata sul tipo
di zuppa che si desidera preparare. Si potrà selezionare tra 8 programmi
diversi come mostrato di seguito:
NB: La durata dei programmi è solo indicativa.
I sopracitati programmi sono operazioni continue. Qualsiasi interruzione
risulterà nel reset del programma. Riselezionando un programma, il
processo di cottura si riavvierà il che potrebbe influire sui tempi di cottura.
Se si necessita di aggiungere ulteriori ingredienti quando il mixer è già stato
azionato, si può rimuovere il misurino ed inserire gli ingredienti senza
interrompere il programma pre-impostato.
Option
Descrizione Durata
Smooth Soup
Cuoce e frulla frutta e verdura morbida per vellutate 30<min
Chunky Soup
Cuoce e miscela carne e verdure per zuppe, minestroni ecc. 30<min
Steam/Boil
Cuoce a vapore o bolle gli alimenti come uova ecc 20<min
Pulse
Mescola e permette di ottenere la consistenza desiderata.
Blend
Funzione Mixer, frulla frutta, verdura, ecc.
100 sec
Juice
Frulla il contenuto fino a farne uno smoothie
150 sec
Sauce
E’ possibile miscelare gli ingredienti per creare salse e sughi.
200 sec
Ice
Funzione tritaghiaccio
50 sec

68
• Il soup maker BL78 è stato progettato per essere semplice da utilizzare; dopo aver
premuto il pulsante "Start/Stop", gli indicatori lampeggiano, dopo che si può
scegliere la funzione desiderata, consentendo al soup maker di entrare in funzione.
• Il tempo di preparazione per una zuppa è di circa 20-30 minuti. Quando la cottura
o la miscelazione saranno completati, l’apparecchio emetterà un segnale acustico a
ripetizione.
• Se durante la cottura gli indicatori lampeggiano e l’allarme suona, significa che c'è
un errore con il programma selezionato o l’apparecchio non è stato inizializzato
correttamente.
Controllare che:
1) Il coperchio sia correttamente bloccato
2) La caraffa sia posizionata correttamente nella base di alimentazione.
Preparare una zuppa (vellutata o zuppa/minestrone)
Tritare tutti gli ingredienti in cubetti di circa 2-3cm e aggiungerli nella caraffa.
Attenzione: Non si raccomanda l’uso di carne cruda con questo
soup maker. Qualsiasi carne o pesce va pre-cotta. Non
aggiungere alcun ingrediente surgelato. Assicurarsi che tutti gli
ingredienti siano a temperatura ambiente.
ATTENZIONE: Ingredienti che hanno un alto contenuto di
zuccheri o amidi potrebbero attaccarsi alla piastra riscaldante e
bruciare.
Utilizzare il soup maker
NB: Qualsiasi liquido aggiunto nella caraffa deve essere a temperatura ambiente, e non deve superare il livello massimo nè essere inferiore al livello
minimo segnati sulla superficie della caraffa. Non utilizzare le funzioni
“chunky” o “smooth” per riscaldare il contenuto della caraffa.

69
- Cottura a vapore: Versare acqua nella caraffa fino a raggiungere il livello 24
OZ, poi mettere gli ingredienti dentro al cestello.
- Pulse: Tenere premuto la funzione "Pulse" per mescolare gli ingredienti.
Rilasciare il pulsante per interrompere.
- Mixer: Versare gli ingredienti dentro la caraffa e premere "Blend", che
miscelerà il contenuto della caraffa.
- Smoothie: Mettere la frutta all'interno della caraffa e premere
"smoothie"; il frullatore miscelerà gli ingredienti roteando le lame ad alta
velocità formando così una purea..
- Salsa: Mettere il pomodoro, fagioli o altri ingredienti nella caraffa e
premere "Sauce", il frullatore inizierà a miscelare gli ingredienti.
- Tritaghiaccio: Mettere il ghiaccio nella caraffa e premere "Ice", il
ghiaccio sarà tritato in poc
hi secondi
NB: le sequenze sopra descritte si basano su un funzionamento ininterrotto.
Il riavvio risulterà nella ripetizione delle operazioni influendo sul risultato
finale.
Qualsiasi ingrediente da aggiungere durante la cottura può essere aggiunto
attraverso l’apertur
a al centro del coperchio. Non sbloccare o rimuovere il
coperchio durante il funzionamento, in quanto ciò interromperà l’azione del
frullatore. Per interrompere completamente il programma in qualsiasi
momento, basta premere il pulsante "Start/Stop".
Una volta che la funzione selezionata è terminata, il soup maker emetterà
un allarme acustico interrompendo la cottura.
Prestare attenzione quando si toglie il coperchio dalla caraffa in quanto verranno
emessi vapori bollenti.
ATTENZIONE: Sarà rilasciato vapore bollente dal centro del coperchio. Fare
molta attenzione quando si rimuove il coperchio.

70
• Non lavare il soup maker nella lavastoviglie.
• Disconnettere sempre il soup maker dalla presa di corrente prima della pulizia.
• Non immergere il soup maker in acqua o qualsiasi altro liquido.
• Pulire la superficie della base e la superficie esterna della caraffa con un panno
umido. Risciacquare il coperchio in acqua tiepida.
• Per pulire l’interno della caraffa, risciacquare per rimuovere tutti i residui di cibo.
Pulire il resto con un panno e un detergente prima di risciacquare definitivamente.
• Attenzione: Le lame all’interno della caraffa non sono rimovibili e sono molto
affilate. Porre estrema attenzione durante la pulizia dell’interno della caraffa.
• Utilizzare qualsiasi programma preimpostato del soup maker per rimuovere lo
sporco ostinato.
• Semplicemente assemblare la caraffa come descritto precedentemente,
aggiungere 800ml di acqua e una piccola quantità di detergente. posizionare il
coperchio e accendere il soup maker. Premere qualsiasi programma e le lame
siattiveranno per pulire la caraffa. Si può fermare il processo di pulizia in qualsiasi
momento spegnendo l’apparecchio.
Lavaggio e manutenzione

71
Risoluzione dei problemi
Problemi Soluzione
Il soup maker non funziona ed
emette un segnale acustico
1. La caraffa non è correttamente posizionata
2. Il coperchio non è correttamente assicurato
l’unità si è arrestata durante l’esecuzione
di un programma pre impostato.
1. Il coperchio si è allentato.
2. La caraffa non è collegata correttamente alla base.
Gli ingredienti non sono stati
miscelati correttamente.
1.
È stata selezionata la funzione errata, provare con
un altra funzione.
Gli ingredineti sono troppo duri
dopo il ciclo di cottura.
1.
Tritare gli ingredienti a pezzetti prima di cuocerli
2. E' stata utilizzata la funzione errata per la quantità
di ingredienti aggiunta.
3.
Alcuni alimenti necessitano di una cottura prolungata:
cuocere utelriormente gli ingredienti
Il cibo è bruciato e bloccato
sul fondo della caraffa.
1. Igredienti con alto contenuto di zucchero/amido.
2.
Presenza di troppi ingredienti solidi e poco liquido.

72
Questo prodotto è garantito per una durata determinata con il distributore a partire dalla data
di acquisto contro ogni difetto derivante da difetti di fabbricazione o dei materiali. Questa
garanzia non copre difetti o danni derivanti da installazione impropria, uso improprio o usura
anomala del prodotto.
L’apparecchio deve essere restituito nella sua confezione originale e accompagnato dalla
ricevuta e deve essere stato utilizzato in modo corretto. È importante rispettare le istruzioni
per l’uso e le precauzioni di sicurezza indicate di seguito. Inoltre, non possiamo garantire
l’apparecchio se è stato modicato o riparato dall’acquirente o da terzi.
1 anno di garanzia da Shine-Mart Ltd, proprietari del marchio commerciale Duronic.
NOTA: QUESTE DICHIARAZIONI NON INFLUISCONO SUI DIRITTI LEGALI DEL
CONSUMATO RE
Questo prodotto è stato realizzato con le rigorose procedure del controllo qualità, e
utilizzando materiali di altissima qualità, per garantire afdabilità e prestazioni eccellenti.
Vi regalerà un servizio ottimo e a lungo termine, purchè venga opportunamente usata e
mantenuta. Il prodotto è garantito per 1 anno dalla data di acquisto. Se sorge qualche
difetto a causa di materiali difettosi o scarsa manodopera, il prodotto difettoso dovrà essere
restituito al luogo originale di acquisto. Il rimborso o la sostituzione sono a discrezione
dell’azienda. I prodotti Duronic offrono 1 anno di garanzia alle seguenti condizioni:
1. Il prodotto deve essere restituito al rivenditore con la prova d’acquisto originale
2. Il prodotto deve essere installato e usato seguendo le istruzioni contenute nel manuale.
3. Il prodotto va utilizzato solo per scopi domestici. Non è da utilizzarsi per uso commerciale.
4. La garanzia non copre usura, danni volontari, abuso, negligenza, riparazioni
inesperte o consumo dei materiali.
5. Shine-Mart Ltd non è responsabile per Danni accidentali o consequenziali.
6. Shine-Mart Ltd non è tenuta a eseguire qualsiasi tipo di riparazione, ai sensi
della garanzia.
7. Termini validi in tutta l’unione europea *Ci riserviamo il diritto di modicare le sopracitate
condizioni Per parti di ricambio si prega di consultare il sito www.duronic.com
Corretto smaltimento del prodotto.
Qusto prodotto è inclusivo di spina certicata CE
importata da Shine-Mart Ltd, RM3 8SB
Questo segno su un prodotto o su documenti indica che quando deve essere
smaltito, deve essere trattato come i riuti elettrici ed elettronici (WEEE)
Tutti I prodotti marcati WEEE non devono essere buttati nei riuti domenistici
generici, ma separati per il trattamento, il recupero
e il riciclaggio dei materiali utilizzati.
Per un corretto trattamento, recupero e riciclaggio; si prega di portare tutti I
prodotti marcati WEEE al Vostro centro smaltimenti riuti autorizzato, dove
saranno accettati gratuitamente.
Se i consumatori sono propensi allo smaltimento corretto di riuti elettrici ed
elettronici, aiuteranno a salvare risorse importanti e a prevenire i potenziali
effetti negativi sulla salute umana e sull’ambiente di tutti i materiali pericolosi
che i riuti possono contenere.
Garanzia
Seguici

73

74

75

 Loading...