

Duronic BL4 User Manual

Kitchen Blender - BL4
PLEASE READ ALL THE INSTRUCTIONS BEFORE USE
Creative
Consumer
Products

2

3
English Manual
Manuel d’utilisation en Français
Gebrauchsanleitung auf Deutsch
Manual de Instrucciones en Español
Manuale D’istruzioni In Italiano
5
19
31
45
59
Contents

4

5
English Manual

6
General Safety
When using electrical appliances. Basic safety precautions should always be
followed including the following:
1. Read all instructions.
2. Do not let the cord hang over edge of table or counter.
3. Do not operate the appliance with a damaged cord or plug. If the appliance
has been damaged in any way, please contact Duronic for support.
4. Close supervision is necessary when the appliance is used by or near
children.
5. Do not touch the blade during use. The blade is very sharp, so please make
sure the machine is switched off before handling the blade.
6. Never use hot liquids or operate the blender when empty.
7. Please do not use any third-party accessories which are not originally
supplied with the blender, as this will result in misuse and void the warranty.。
8. The blender cannot be used for blending hard ingredients, otherwise the
blade could be blunted. However, it can be used for blending ice cubes.
Please use the grinder instead for all hard substances such as seeds or coffee
beans.
9. Please unplug the blender when it not in use, before dismantling the parts
for cleaning.
10. To protect against the risk of electrical shock do not submerge the motor in
water or other liquids.
11. Make sure the lid is locked into place before operating the blender.

7
12. Keep hands and utensils out of jug while blending or grinding to reduce the
risk of severe injury to the user or damage to the blender. A scraper may be
used but must be used only when the blender is not in operation.
13. Children should be supervised to ensure that they do not play with the
appliance.
14. Do not use outdoors.
15. Save these instructions.
Household Use only
8
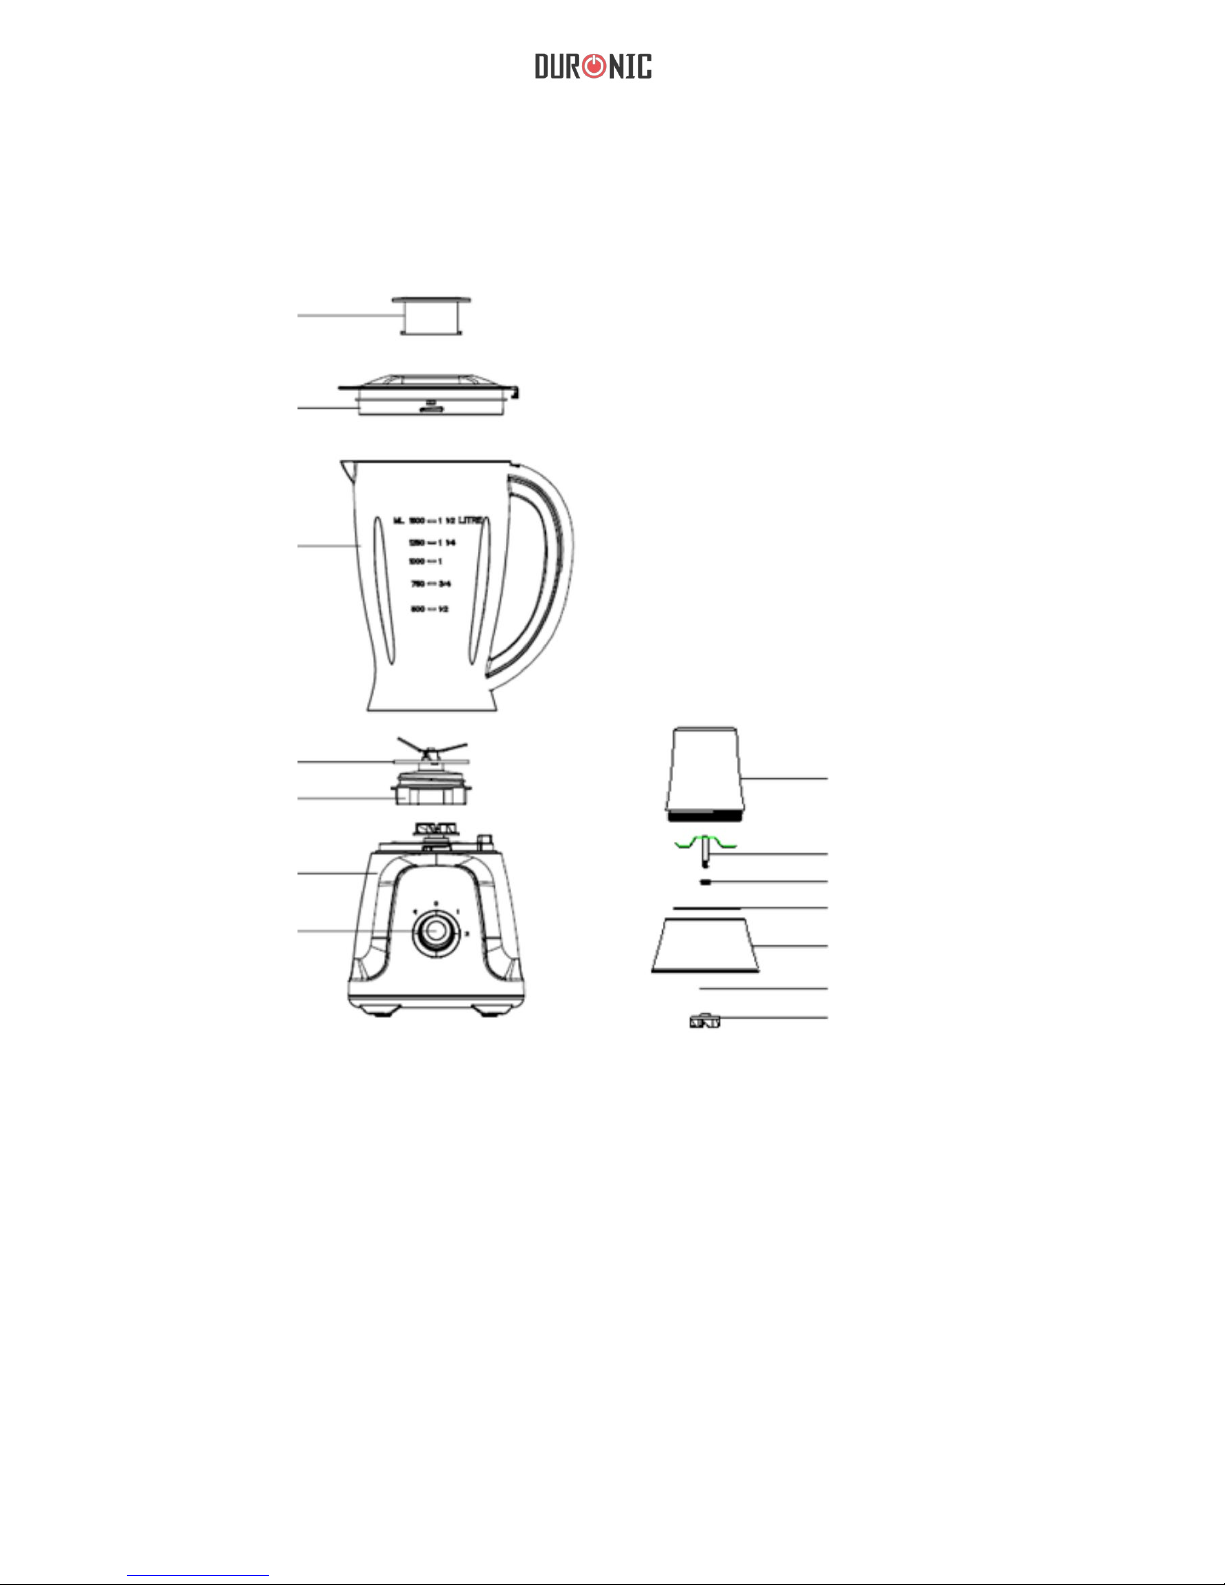
Information
Before Use
Measuring Cup
Lid
Jug
Seal Ring
Grinding Cup
Blade Arm
Blade Shaft Seal Ring
Jug Base Seal Ring
Jug Base
Washer
Top Connector
Blade Assembly
Motor Unit
Speed Knob
Check that all parts are complete and not damaged. Choose the appropriate
attachment to perform your desired task. The blending attachment is
suitable for blending fruits or vegetables and crushing ice, while the grinding
attachment is for grinding coffee beans or other granular beans, herbs and
spices. Clean the attachment according to the section “CLEANING AND
MAINTENANCE”.
9
Using Your Blender
Lock Position
For Blending Operation
1. Place the motor unit on a at horizontal surface and make sure it is
unplugged.
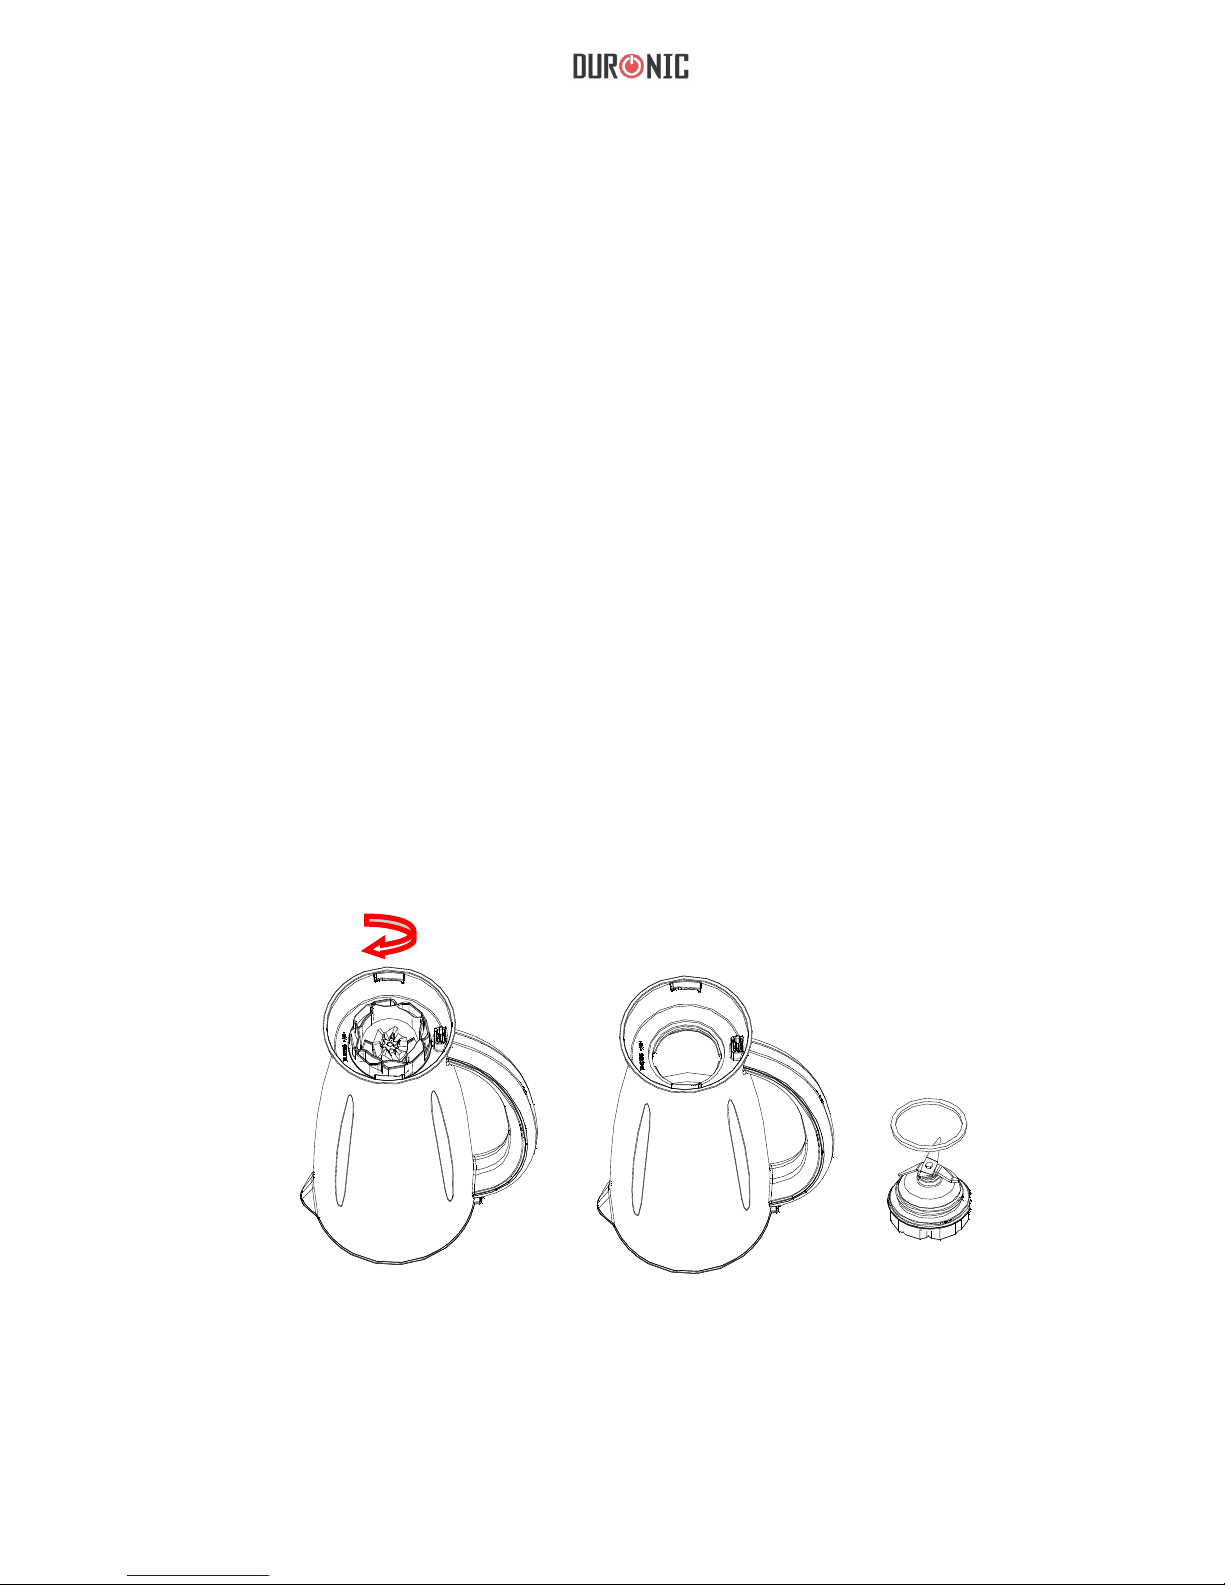
2. Place the Jug on the Motor Unit, let the triangle almost align with the word
“UNLOCK ” on jug base and then turn the jug clockwise until the triangle
aligns with the word “ LOCK ”, a click will be heard when locked into position
properly. Please see Fig.1.
NOTE: There is a safety feature at the bottom of the jug, if the jug is not
assembled in place, the blender will not operate.
3. Open the jug cover by turning anticlockwise and place it on the surface.
Peel and core the fruits/vegetables and then cut it into small pieces, then put
them into the jug. Usually certain amount of puried water has to be added to
facilitate the smooth running of appliance. The amount of mixture should not
exceed the max level as indicated on the jug, nor sit lower the min level. The
best proportion of the fruits or vegetables and water is 2:3.
NOTE: The blender is not applicable for beating egg white, mashing potatoes,
mixing dough, extracting juice from fruit and vegetable.
Lock Position
Unlock Position

10
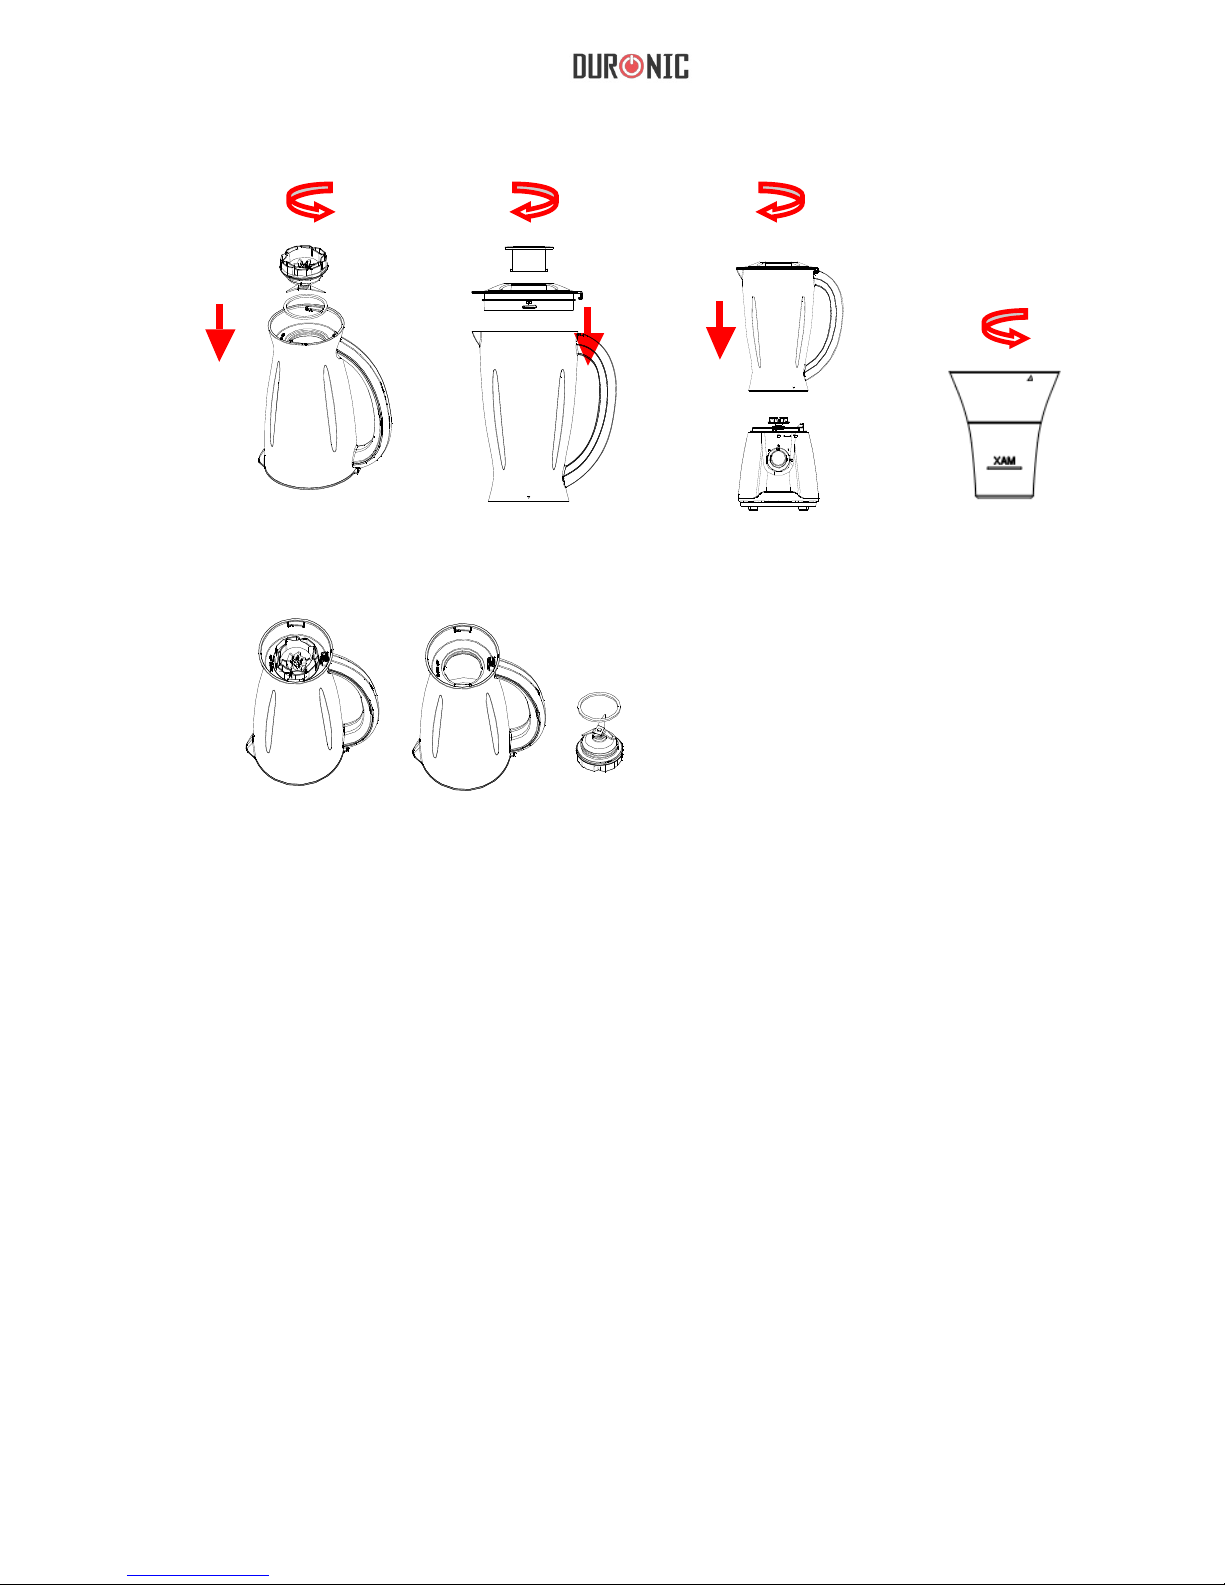
How To Use
1. Peeled or core the fruit/vegetables and then cut it into small pieces.
2. Place the food to be blended into the jug See Fig.7. Usually, certain amount
of puried water has to be added to facilitate the smooth running of appliance.
The proportion of the food and water is 2:3. The amount of mixture should not
exceed the max level as indicated on the jug.
3. Fill the grinding bowl with proper bean (such as coffee bean), then
assemble the grinding blade assembly and grinding bowl together.
NOTE: The mill cannot exceed 35g of content. Please only operate the mill for
30 seconds.
4. Replace jug cover on the jug and turn it clockwise.
NOTE: There is a safety interlock device at the side of jug cover, if the jug
cover is not assembled in place, the blender will not operate.
5. The ingredients may be added into the jug through the centre opening of
the lid.
6. Make sure the operational knob is at “O” then plug into power outlet and
turn the operational knob to the desired setting. There are four settings: 0, 1,
2, PULSE. The “1” setting is the low speed, the “2” setting is the high speed.
During blending, you may turn the operational knob to “Pulse” position without
releasing it if you want to accelerate the process of blending.
7. Do not run the appliance for more than 3 minutes at a time and only wait
until the unit is cooled to room temperature before performing next operation
cycle.
8. Turn the Speed Selector to “0” position
once the mixture has been blended to your
desired consistency.
9. Turn the jug anti-clockwise and remove it
from the motor unit, carefully take down the
jug cover, then pour and serve.
11
Note: Never use boiling liquids or run the appliance empty.
4. Put the lid on the jug and be sure the measuring cup is in place.
5. Plug the power cord into a standard wall outlet and turn the speed knob to
the appropriate speed setting for your task.
6. For quick or delicate blending tasks, turn the speed knob to P position and
hold for a few seconds and then release, the knob will reset to O position
automatically. Operate several times until the consistence you want is
obtained
7. If you want to add ingredients while the blender is working, remove the
measuring cup and place through the lid opening. See Fig.8
8. When crushing ice or hard food, keep one hand rmly on the lid.
9. When the consistence you desire is obtained, turn the knob to O position.
Fig 3. Fig 5.
Fig 6.
Fig 4.
12
Important Operating Tips
· For best blending results of food that require liquids, pour the liquid into the
jug rst, then add ingredients.
·The following items should never be placed in the unit as they may cause
damage: bones, large pieces of solid food, frozen food, or hard foods such as
turnips.
·To crush ice, add small quantities . If more ice is needed, remove the cup and
add cubes one by one through the lid opening.
Note:
1) For each use, the consecutive operation time should not exceed 3 minutes.
at least 10 minutes rest time must be maintained between two continuous
cycles, let the unit cool to room temperature before performing next operation
cycle.
2) For each use, the consecutive operation time of Grinding cup should
not exceed 30 Seconds. at least 10 minutes rest time must be maintained
between two continuous cycles, let the unit cool to room temperature before
performing next operation cycle.
3) If you want to stop the machine during operation, turn the knob to O
position anytime.
Before blending, add
food to be blended
into the jug.
Fi g.7. Fig.8.
During blending,
add the ingredient
through the lid
opening.
13
Care And Cleaning
This product contains no user serviceable parts. Refer service to qualied
service personnel.
1. Before cleaning, unplug the blender.
2. Always wash immediately after use for easier cleaning. Don’t let food dry on
the jug assembly as this will make cleaning difcult.
3. Pour a little warm soapy water into the jug and turn the knob to P position
for a few seconds. And then empty the jug.
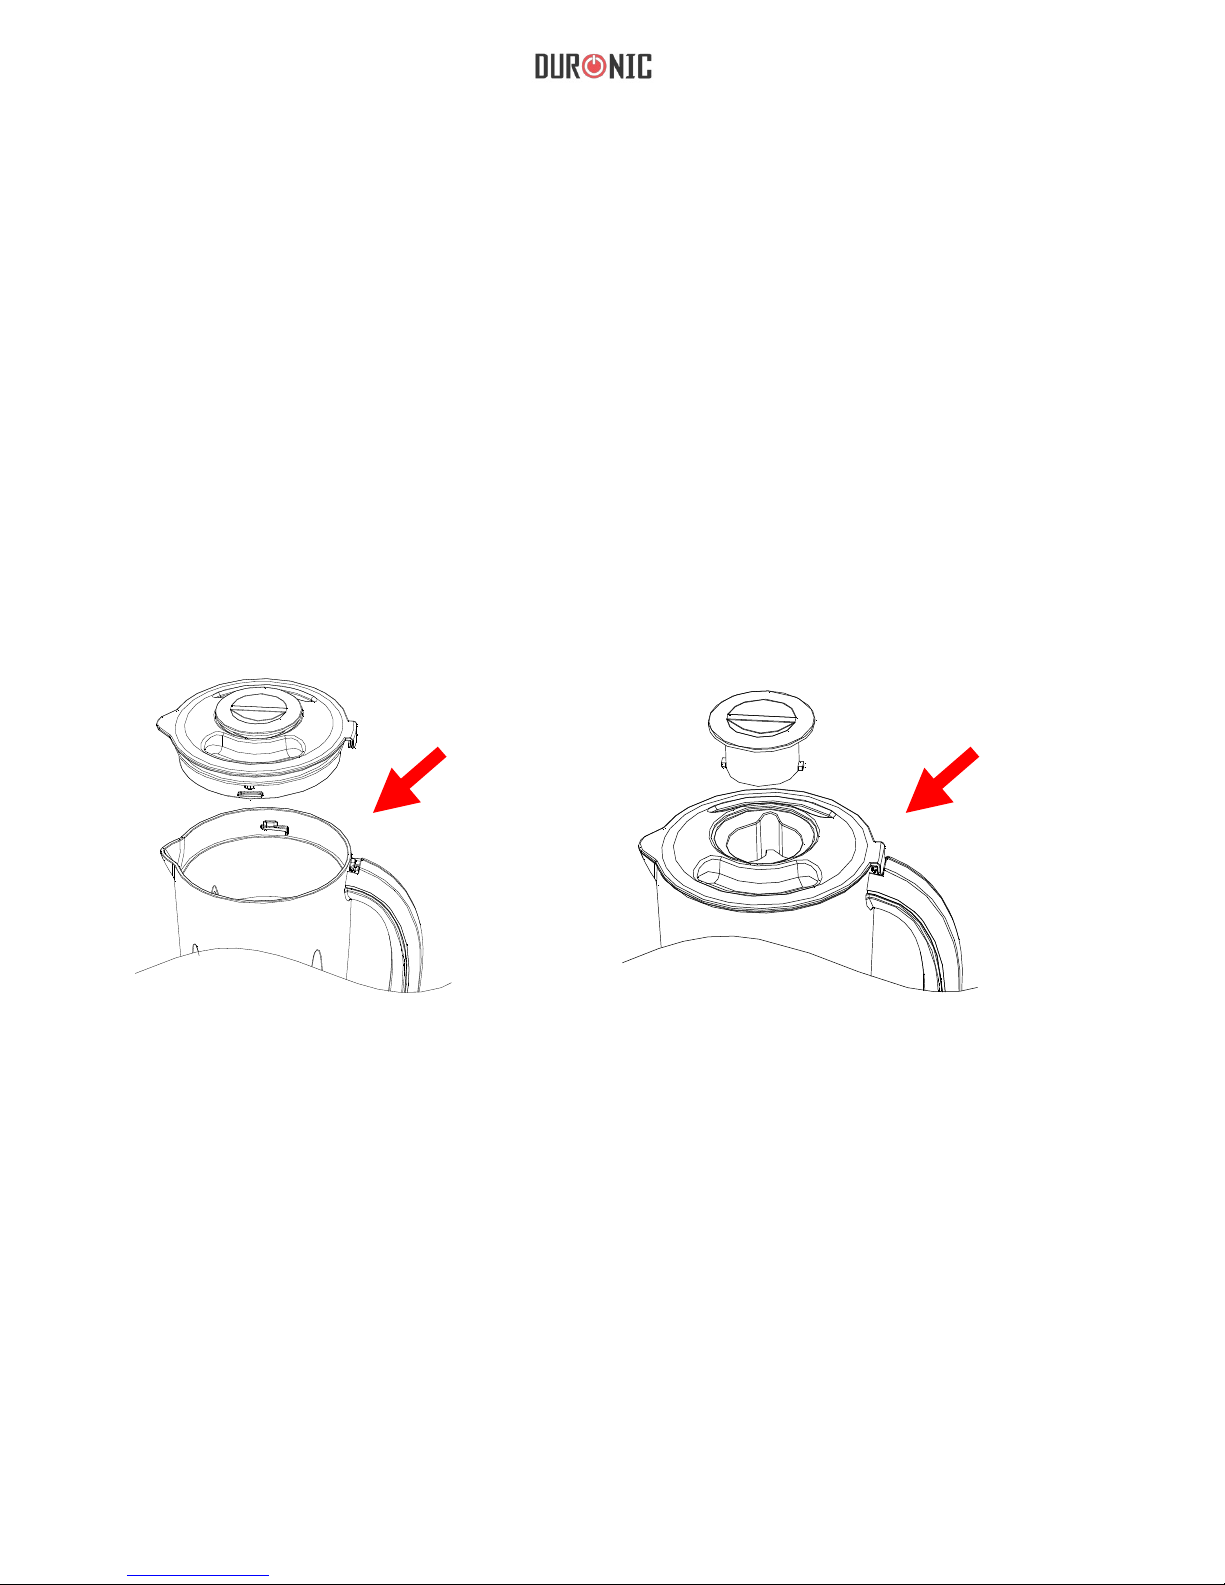
4. Dismantle all detachable parts. Lift the jug assembly off the motor unit.
Detach the blade assembly by turning it clockwise from the jug base, and
remove the seal ring 2 and blade assembly (see g.9). In addition, detach the
jug cover seal ring 1 from the jug cover.
Fig. 9.

14
5. Rinse the measure cup, lid, seal ring 1, jug, seal ring 2 and blade assembly
by hands or in a dishwasher and then dry. All parts except the motor base, the
blade part including the rubber seal are dishwasher safe components, but the
temperature setting shall not exceed 70℃.
6. Brush the blade clean using warm soapy water, then rinse thoroughly under
the tap. Don’t touch the sharp blades, handle carefully. Don’t immerse the
blade assembly in water as this could damage the lubrication of the blade.
Leave to dry upside down away from children.
7. Wipe the motor unit with a damp cloth and dry thoroughly. Remove the
stubborn spots by rubbing with non-abrasive cleaner. If liquids spill into
the motor unit; rst unplug the unit, then wipe with a damp cloth and dry
thoroughly.
CAUTION
1) In order to prevent the risk of an electric shock, do not immerse the motor in
water.
2) In order to maintain the cosmetic nish, do not use rough scouring pads or
wires on the white nish.
15
Warranty
1 Year Guarantee from Shine-Mart Ltd, Trademark owners of Duronic Products.
NOTE: THESE STATEMENTS DO NOT AFFECT YOUR STATUTORY RIGHTS AS A
CONSUMER
This product has been manufactured under the strictest or quality control procedures, and
using the highest quality of materials, to ensure excellent performance and reliability. It will
give very good and long lasting service, provided it is properly used and maintained. The
product is guaranteed for 1 years from the date of original purchase. If any defect arises due
to a faulty materials or poor workmanship, the faulty product must be returned to the original
place of purchase. Refund or replacement is at the discretion of that company.
Duronic Products are offered with a 1 year guarantee under the following conditions:
1
. T
he product must be returned to the retailer with original proof of purchase.
2
. T
he product must be installed and used in accordance with the instructions contained i
n
th
is operating manual.
3
. I
t must be used only for domestic purposes.
4
. I
t does not cover wear and tear, malicious damage, misuse, neglect, inexpert repairs o
r
consumable parts.
5
. S
hine-Mart Ltd has no responsibilities for accidental or consequential loss or damage.
6
. S
hine-Mart Ltd are not liable to carry out any type of servicing work, under the guarantee
7
. V
alid in the UK only
This product is tted with BS:1363 plug and fuse
Imported by Shine-Mart Ltd, RM3 8SB
Information on waste Disposal for Consumers of
Electrical & Electronic Equipment.
This mark on a product and/or accompanying documents indicates that when it
is to be disposed of, it must be treated as Waste
Electrical & Electronic Equipment, (WEEE).
Any WEEE marked products must not be mixed with general household waste,
but kept separate for the treatment, recovery and recycling of the materials used.
For proper treatment, recovery and recycling; please take all WEEE marked
waste to your Local Authority Civic waste site,
where it will be accepted free of charge.
If customers dispose of Waste Electrical & Electronic Equipment correctly, they
will be helping to save valuable resources and preventing any potential negative
effects upon human health and the environment, of any hazardous materials that
the waste may contain.

16

17
Manuel d’utilisation en français

18
Avertissements de sécurité
Lorsque vous utilisez des produits électriques, des précautions basiques de
sécurités doivent être observées. Celles-ci incluent :
1. Il est nécessaire de lire toutes les instructions contenues dans ce manuel.
2. Avant d’utiliser ce produit, veuillez vérier que le voltage correspond à celui
utilisé dans votre localité.
3. Ne laissez pas le cordon d’alimentation pendre ou trainer sur la table ou le
plan de travail.
4. N’utilisez pas ce produit si le câble d’alimentation est endommagé ou si le
produit dysfonctionne. Retournez le produit auprès du service après-vente le
plus proche pour analyse ou réparation.
5. Si le cordon d’alimentation est endommagé, celui-ci doit être remplacé par
le fabricant ou tout autre technicien qualié an d’éviter tout danger.
6. Gardez ce produit sous supervision lorsque ce produit est utilisé à proximité
d’enfants.
7. Evitez tout contact avec les parties mobiles.
8. Les lames sont aiguisées, veuillez les manipuler avec précaution.
9. N’utilisez jamais de liquide chauds et n’utilisez pas le produit à vide.
10. L’utilisation d’accessoires non recommandés ou vendus par le fabricant
peut provoquer un risque d’incendie, d’électrocution ou de blessure.
11. La carafe ne peut pas être utilisée pour mouliner des ingrédients durs, ceci
pourrait autrement émousser la lame. Ce blender peut toutefois être utilisé
pour piler de la glace. Utilisez le moulin pour mixer les ingrédients durs, tels
que des graines ou du café.
12. Débranchez le blender lorsqu’il n’est pas utilisé.

19
13. An d’éviter tout risque d’électrocution, ne mettez pas d’eau ou tout autre
liquide dans la base.
14. Assez-vous que le couvercle de la carafe soit correctement insérée avant
d’allumer ce produit.
15. N’insérez pas vos mains ou tout autre ustensile de cuisine lorsque le
produit est en fonctionnement, ceci pourrait autrement endommager le
blender ou blesser l’utilisateur.
16. Pour réduire le risque de blessure, ne placez jamais les lames sur la lame
sans la carafe ou si celle-ci n’est pas correctement insérée.
17. Les enfants doivent rester sous surveillance pour s’assurer qu’ils ne jouent
pas avec l’appareil.
18. N’immergez pas le moteur dans l’eau ou tout autre liquide.
19. N’utilisez pas ce produit à l’extérieur.
20. Veuillez conserver ce manuel.
USAGE DOMESTIQUE UNIQUEMENT

20
Liste des éléments
Avant d’utiliser ce produit pour la première fois
Verre doseur
Couvercle
Carafe
Moulin
Lame
Anneau
Joint d'étanchéité
S
ocle
Boulon
E
ntraineur
Joint d'étanchéité
Groupe lam
e
Moteur
Contrôle de la vitesse
Veuillez vérier que tous les éléments soient inclus et intacts. Utilisez
l’accessoire adéquat en fonction de l’ingrédient à mixer. La carafe convient
aux moulinages de fruits, légumes et de glace. Le moulin à café permet
de mixer des graines et du café. Nettoyez ces accessoires en suivant les
instructions décrites dans la section « nettoyage et maintenance ».
 Loading...