

Page 1
M-TYPE
PREMIUM
COMMANDER
USER
TRAINING
Page 2

Agenda Operator Training - 2 days (DAY 1)
09:00 - 09:15 Introduction, Overview of training program
09:15 - 10:00 Presentation of advantages and differences vs traditional machine (CLASSIC)
New features and functions
Advantages, Opportunities for customer
10:00 - 10:30 Machine Components
• Explication
• Differences vs CLASSIC machine
10:30 - 10:45 Break
10:45 - 12:15 Push Buttons
• Function Explication
• Favourite Button
Control Panel Commander Pro / Commander Basic
• Navigation
• Explication of the Main screen
• Explication of the function tiles
12:15 - 13:15 Lunch
2
Page 3

Agenda Operator Training - 2 days (DAY 1)
13:15 - 13:45 Operating modes, explication
Manual Mode
• Configuration of the main screen and status bar
• Description of the help button
• Explication of the parameter view
• Explication and settings of start and end backtack
• Exercise: Sewing in manual mode and backtack with pedal stop
14:00 - 14:45 • Explication of the function material thickness detection, specific settings
• Exercises:
Parameter settings, changing between the 1st and 2nd parameter values
of base parameters
• Explication of the navigation menu
14:45 - 15:00 Break
3
Page 4

Agenda Operator Training - 2 days (DAY 1)
15:00 - 16:15 Automatic mode
• Explication of mode and seam program
• Explication of the main screen and program selection
• Explication of the correction factors
• Exercises:
Sewing in automatic mode, select a predefined program, identify and
modify parameter settings
16:15 - 16:45 Conclusion, Questions
4
Page 5

Agenda Operator Training - 2 days (DAY 2)
09:00 - 09:30 Recapitulation of the 1st day
Questions
09:30 - 10:30 Programming
• Explication of program management
• Edit a program
• Settings of base parameters
• Explication of global program parameters
• Explication of specific parameters in the seam section
• Explication of additional parameters in automatic mode
(Segment end modes, stitch counting)
10:30 - 10:45 Break
10:45 - 12:15 • Automatic mode – Main screen
• Modify a program
• Exercises: Modification of parameter settings, sewing in automatic mode,
get used to navigation in the different menu levels
12:15 - 13:15 Lunch
5
Page 6

Agenda Operator Training - 2 days (DAY 2)
13:15 - 14:45 Programming Mode, creation of programs
• Create a new program
• Exercises: Creation of simple programs
14:45 - 15:00 Break
14:30 - 16:15 Programming Mode (cont.)
Exercises:
• Creation of complex programs comprising multiple seam sections,
forward/backward sewing in program, parameter settings in program
16:15 - 16:45 Conclusion, Questions
6
Page 7

Why M-TYPE PREMIUM?
• Productivity
• Higher efficiency due to programming functionality /
increased no. of operations per machine.
• Better Quality Results
• Automatic and more precise adjustment / finer calibration tuning
• Facility to reproduce parameter settings (more precise results)
• Impressive new features and settings not feasible with traditional machine
• Saving Time
• Rapid variation between programs
• Reduced machine set-up times
• Flexibility
• Positive impact on environment
• No compressed air needed (except some optional equipment)
• Universal and identical installation of software/programs
• Quick and easy program transfer with USB
• M2M (data transfer through network, LAN or WLAN)
7
Page 8
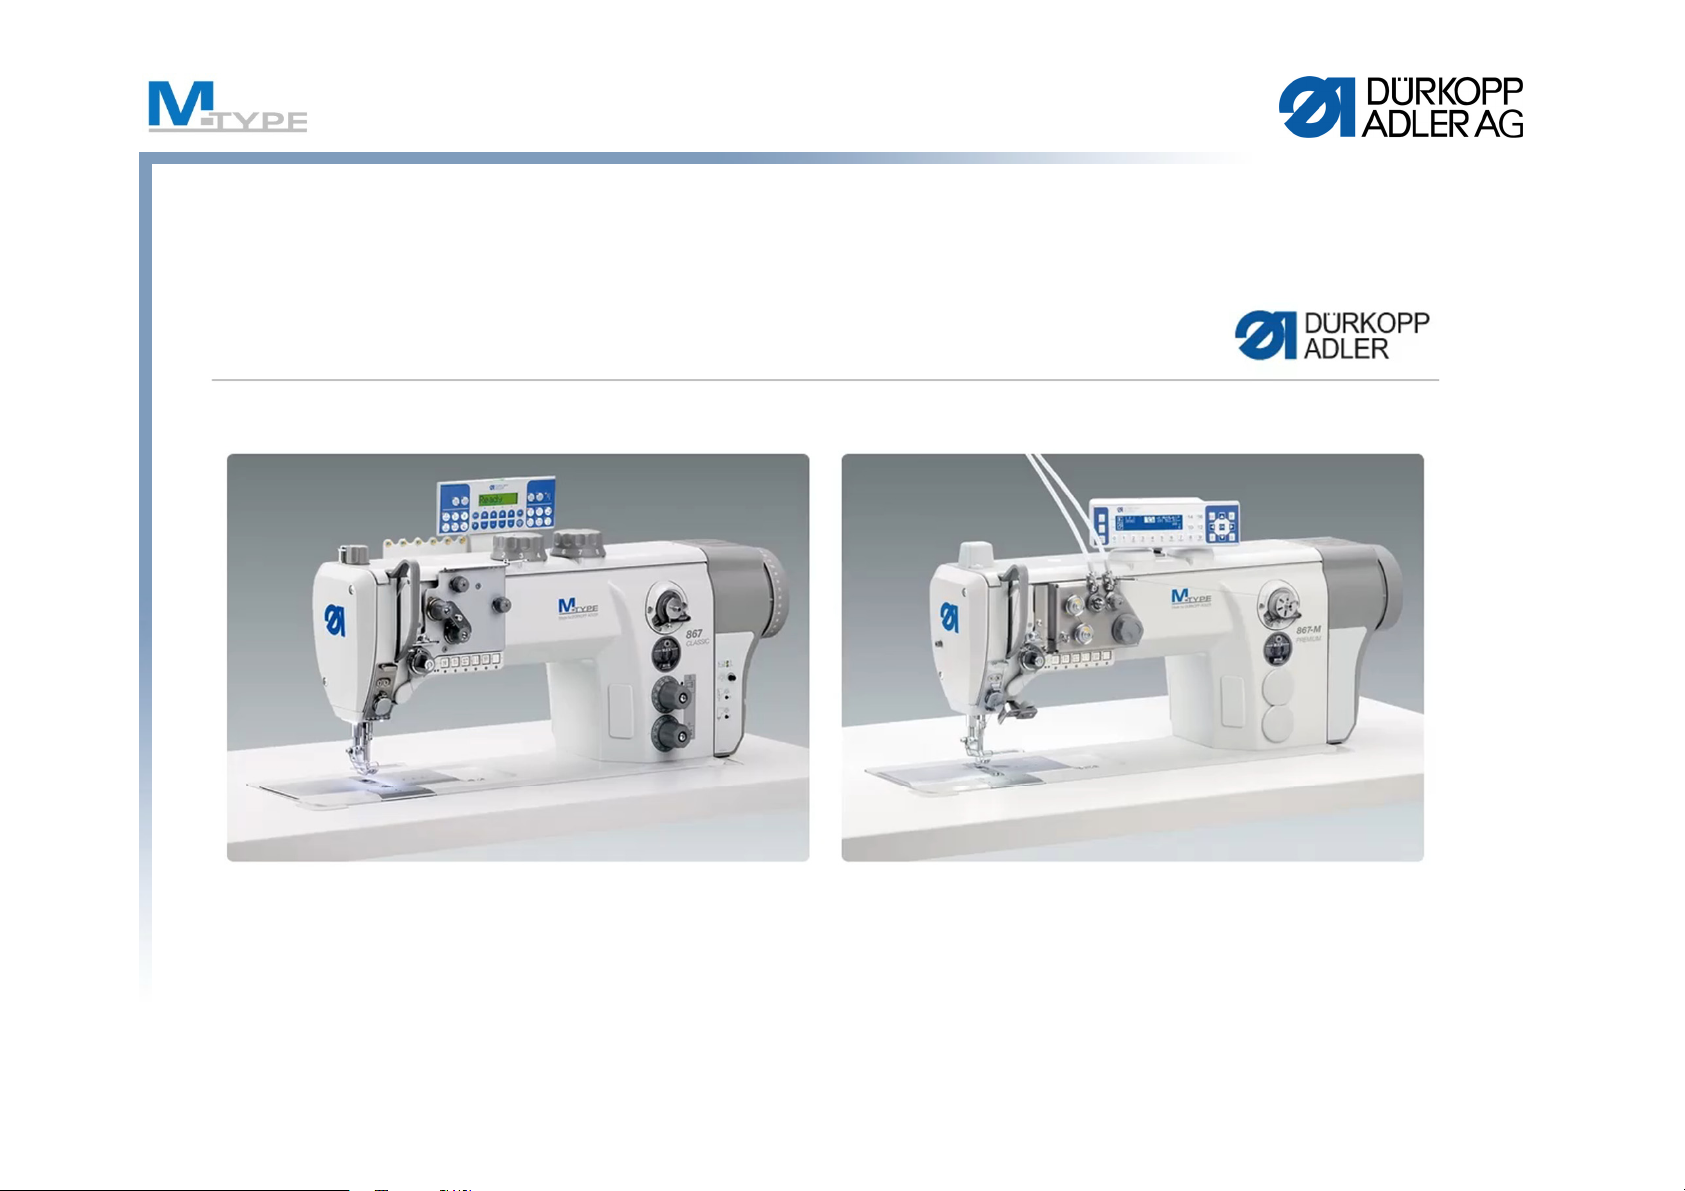
Differences PREMIUM vs. CLASSIC
NEW
• Digital function control with panel Commander
Pro
• Reproducible and reusable parameter
adjustment
• Creation of automated programs
• Automation of seam sections
• End backtack settings can vary from
adjustments of start backtack
• Sewing foot lift height adjustment (max. 20 mm)
• Automatic material thickness detection
• Jog Dial (electronic handwheel)
8
Page 9
Video
Stitch LengthThread TensionFoot Pressure
Footstroke
9
Page 10
Advantages/Opportunities
Problem:
• Small volume lot sizes
• Numerous models
• Dynamic model line
Solution/Opportunity:
• Programmable sewing machine
• Execution of different seam
operations using the same machine
• long setup times
10
Page 11
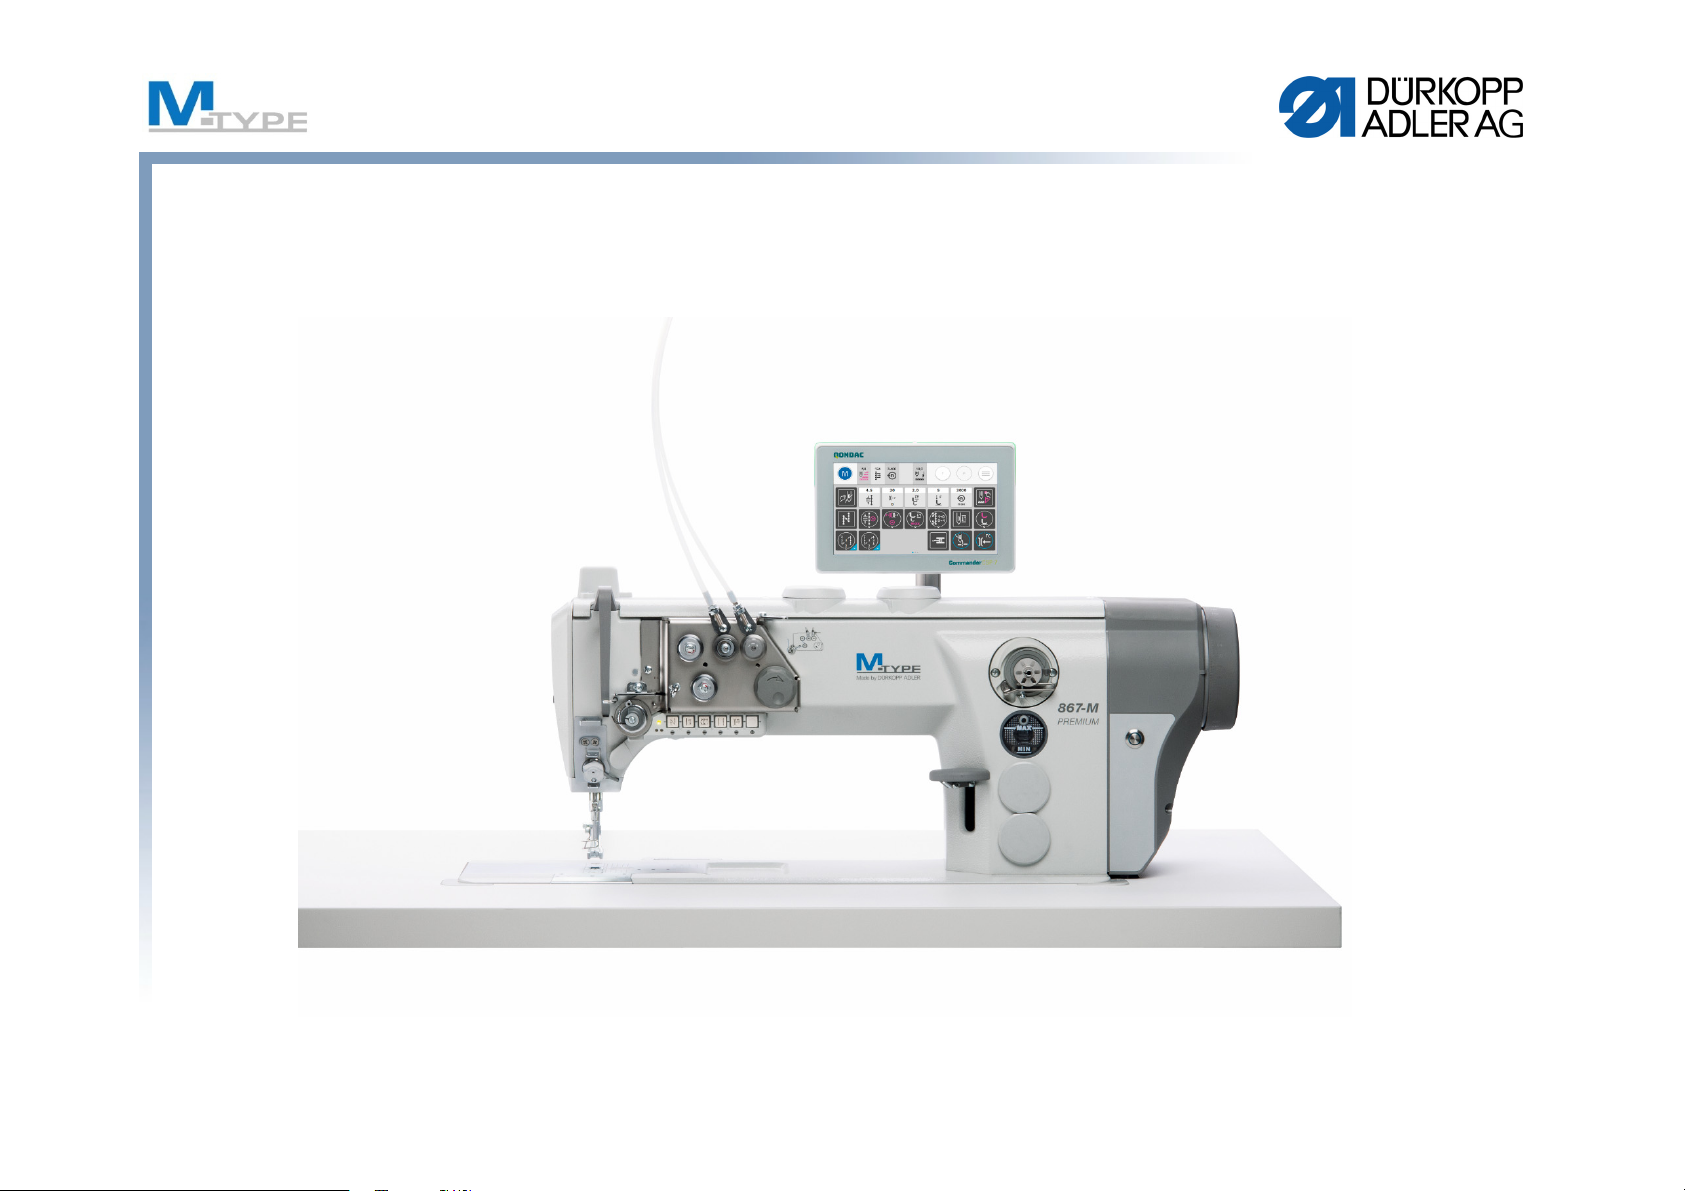
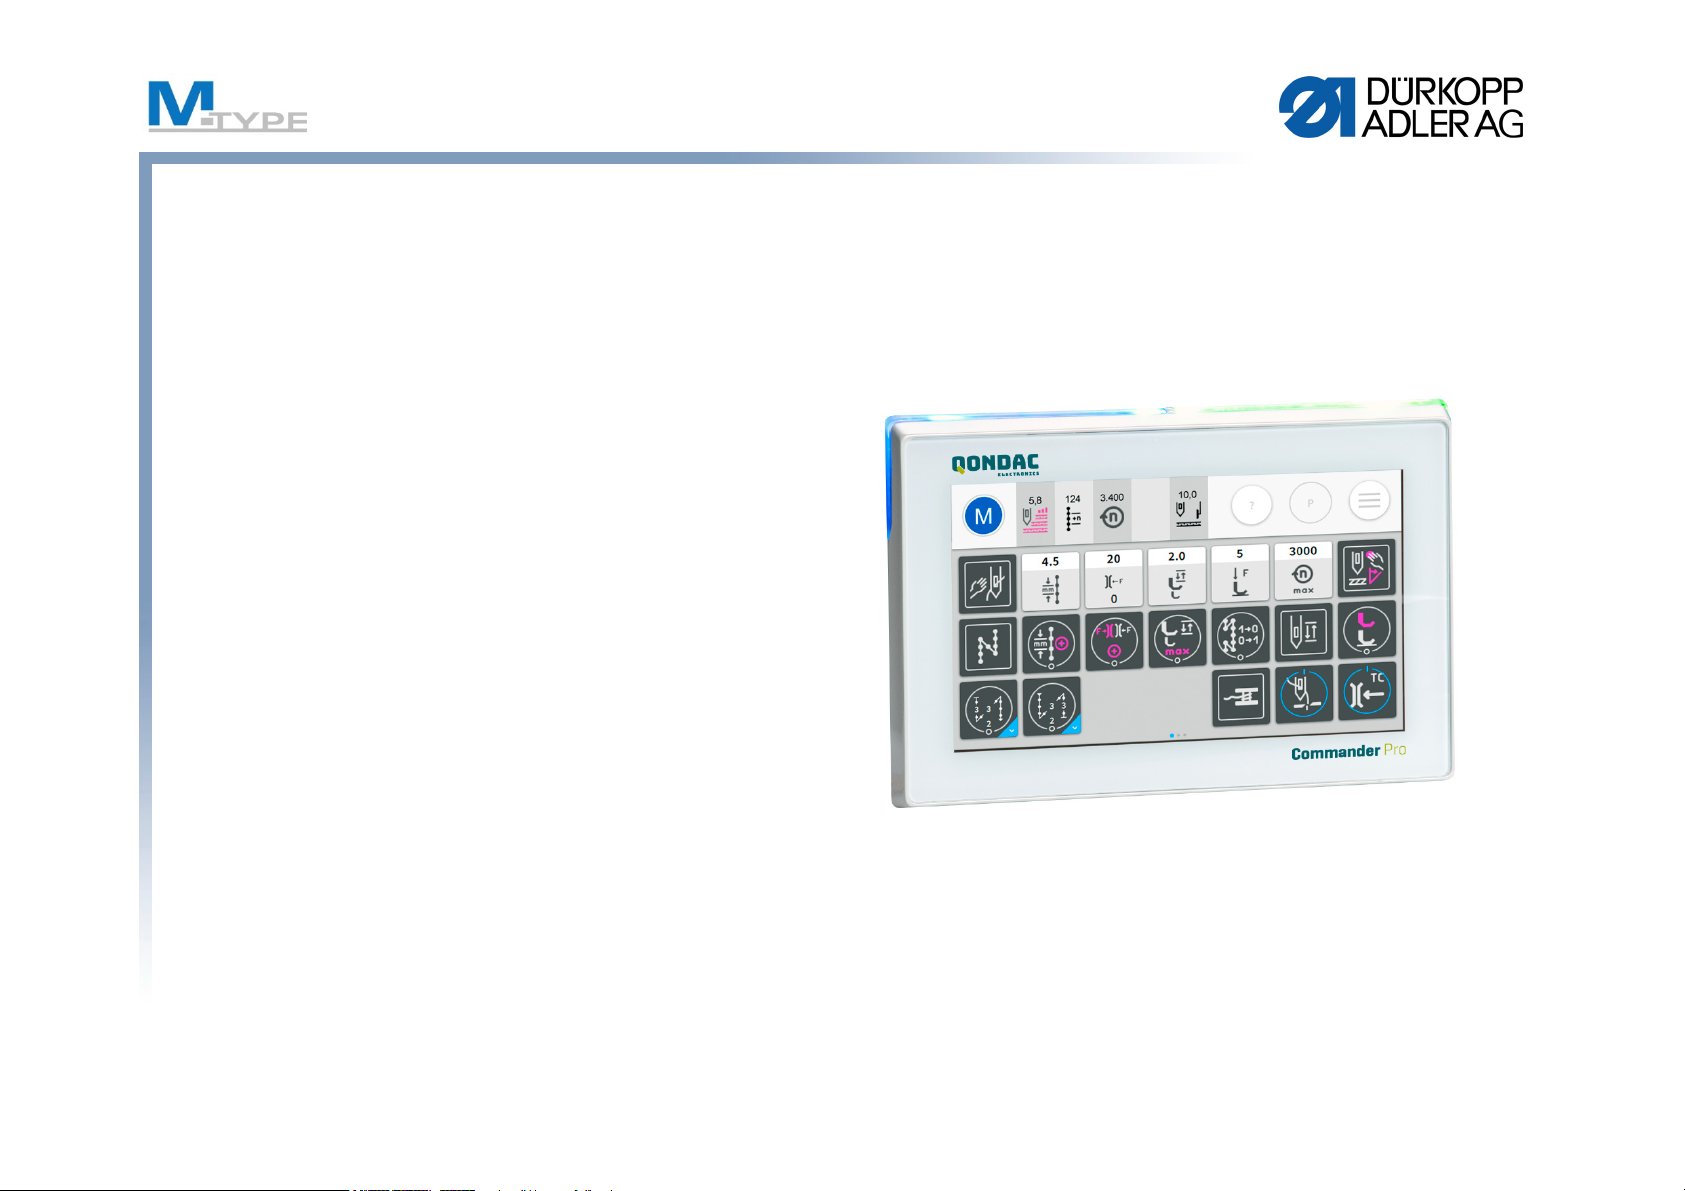
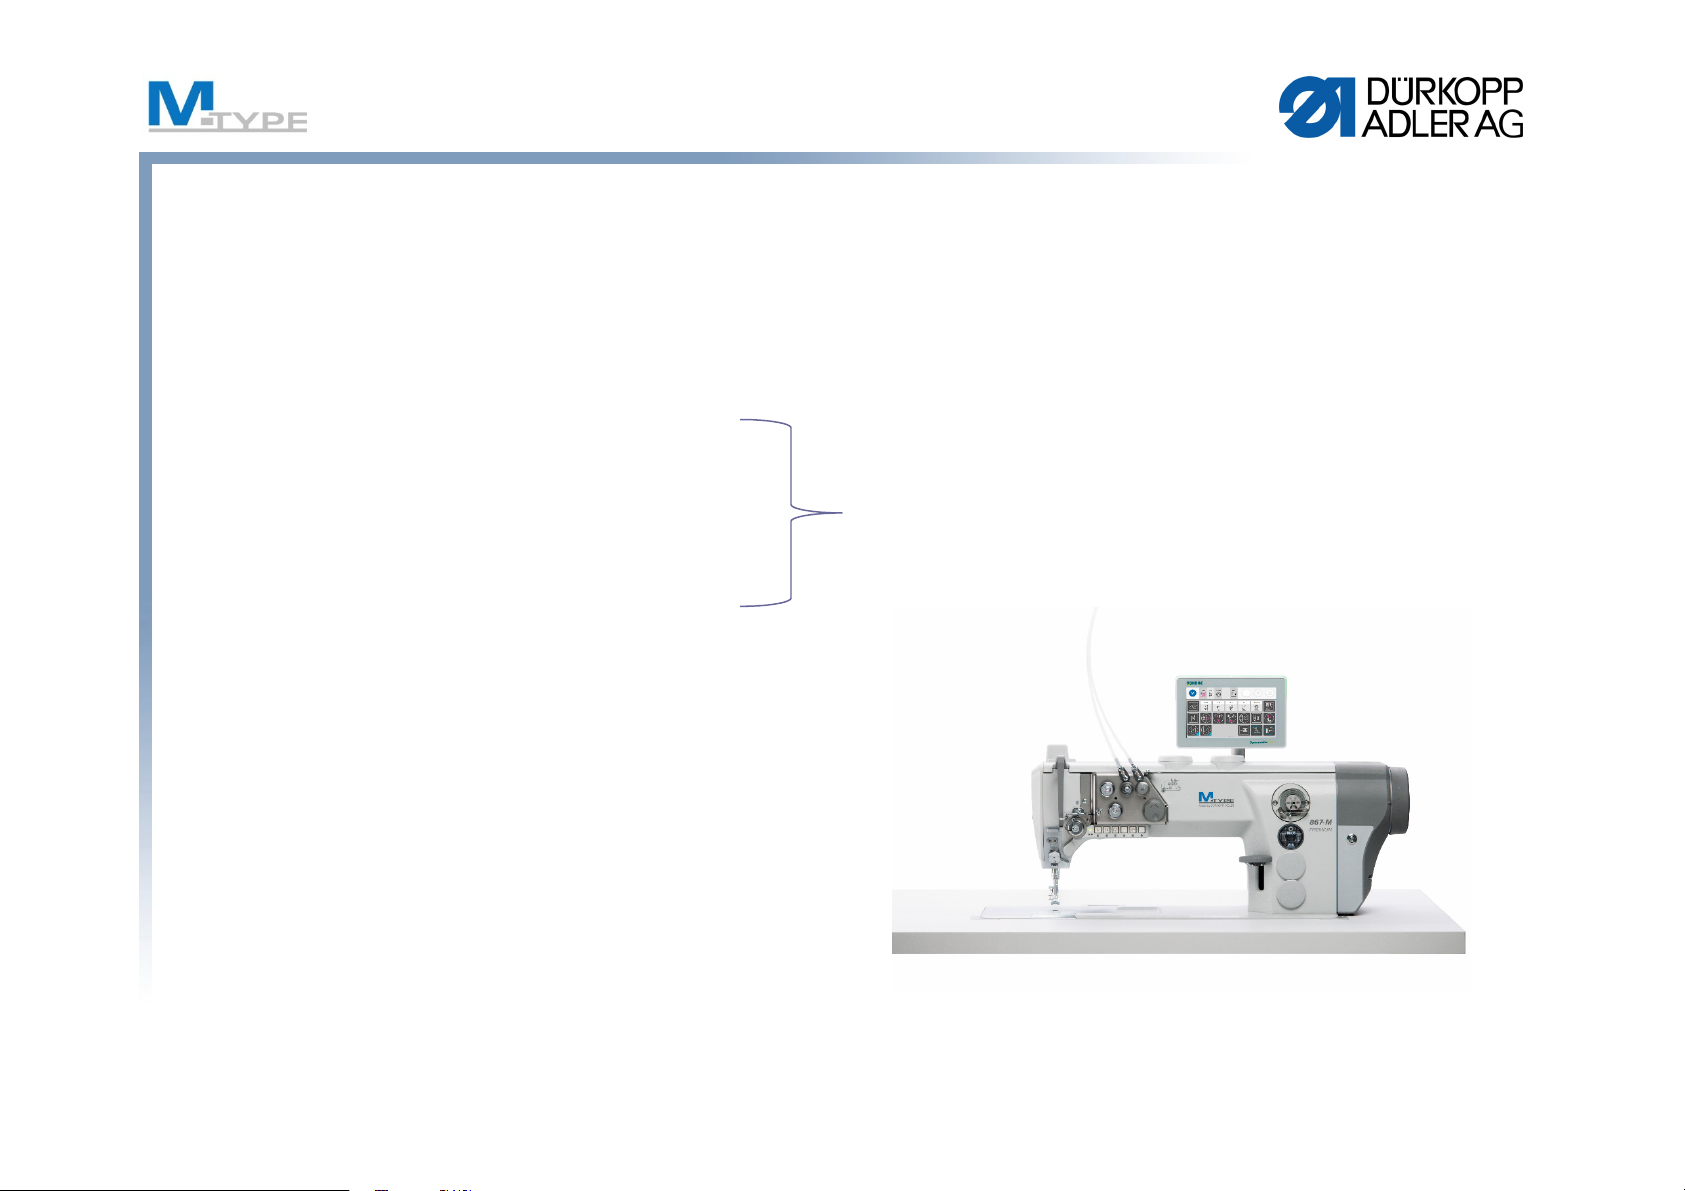
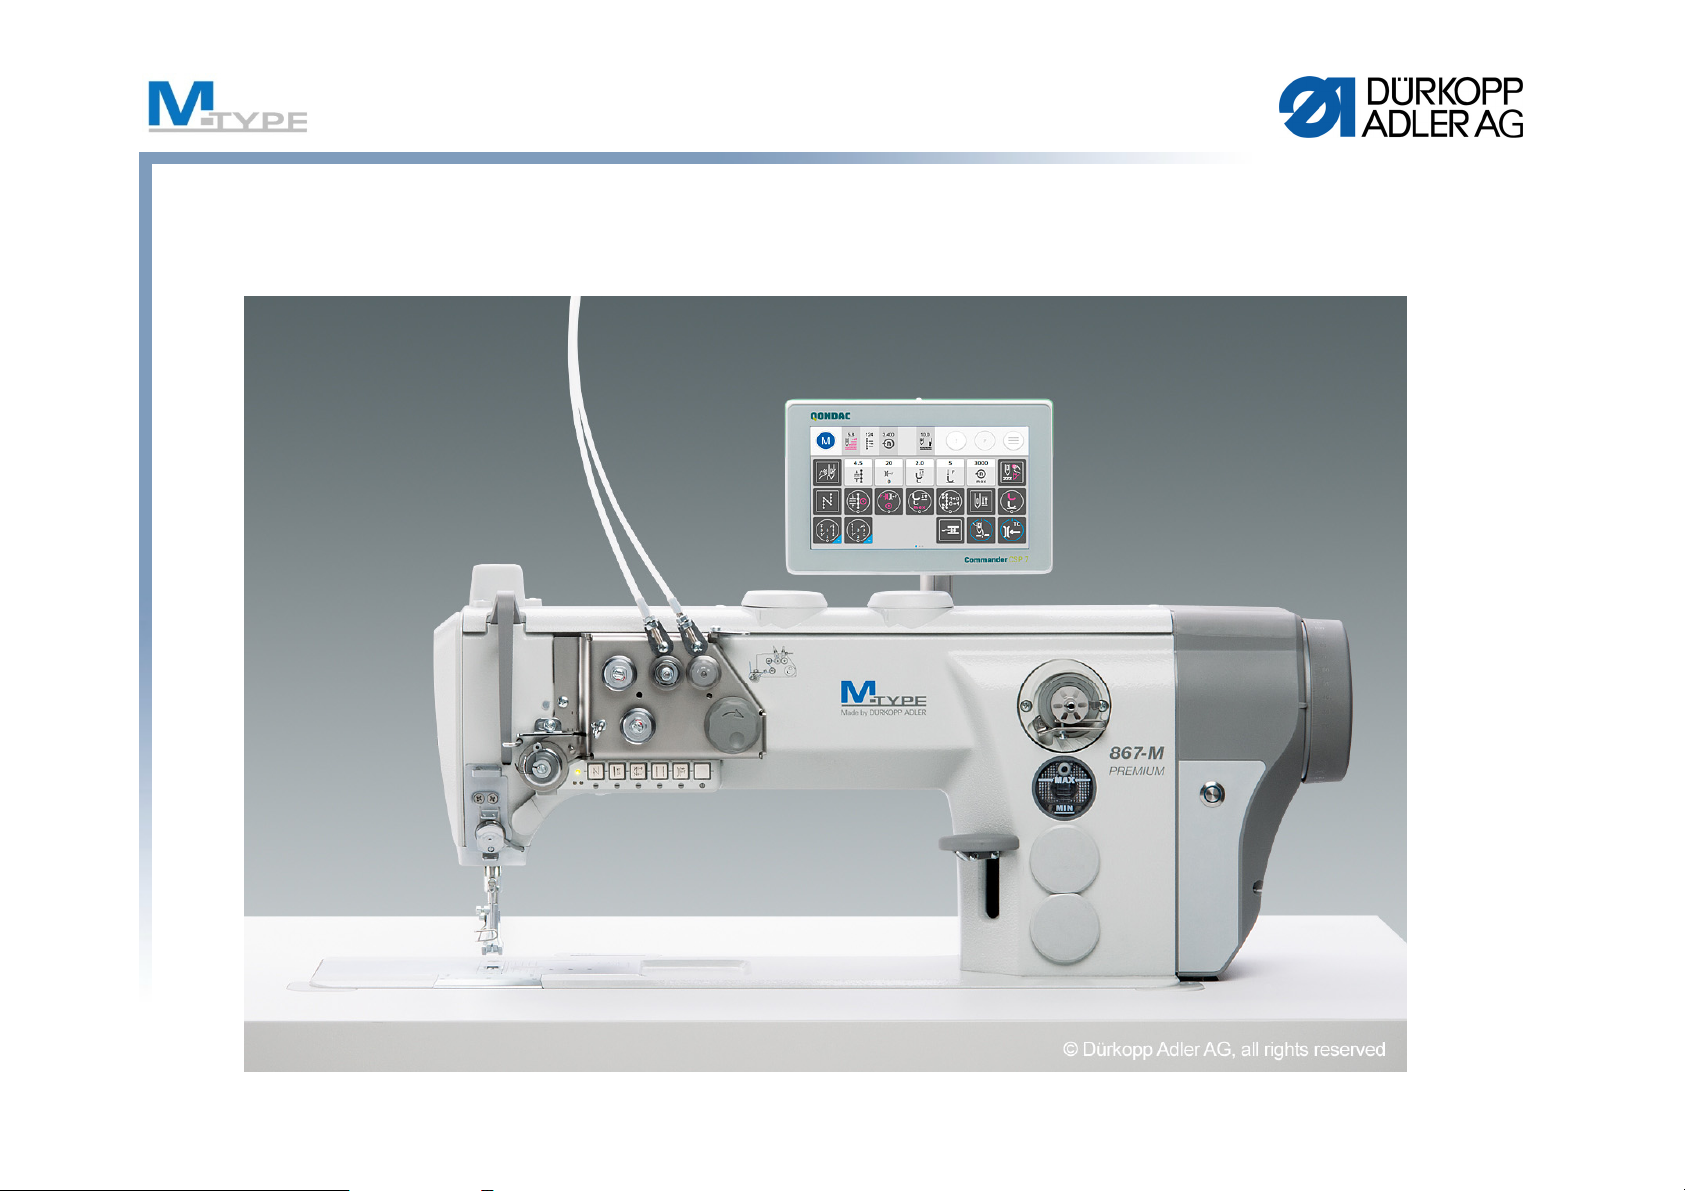
M-TYPE PREMIUM
Operation panel Commander Basic / Commander Pro
11
Page 12
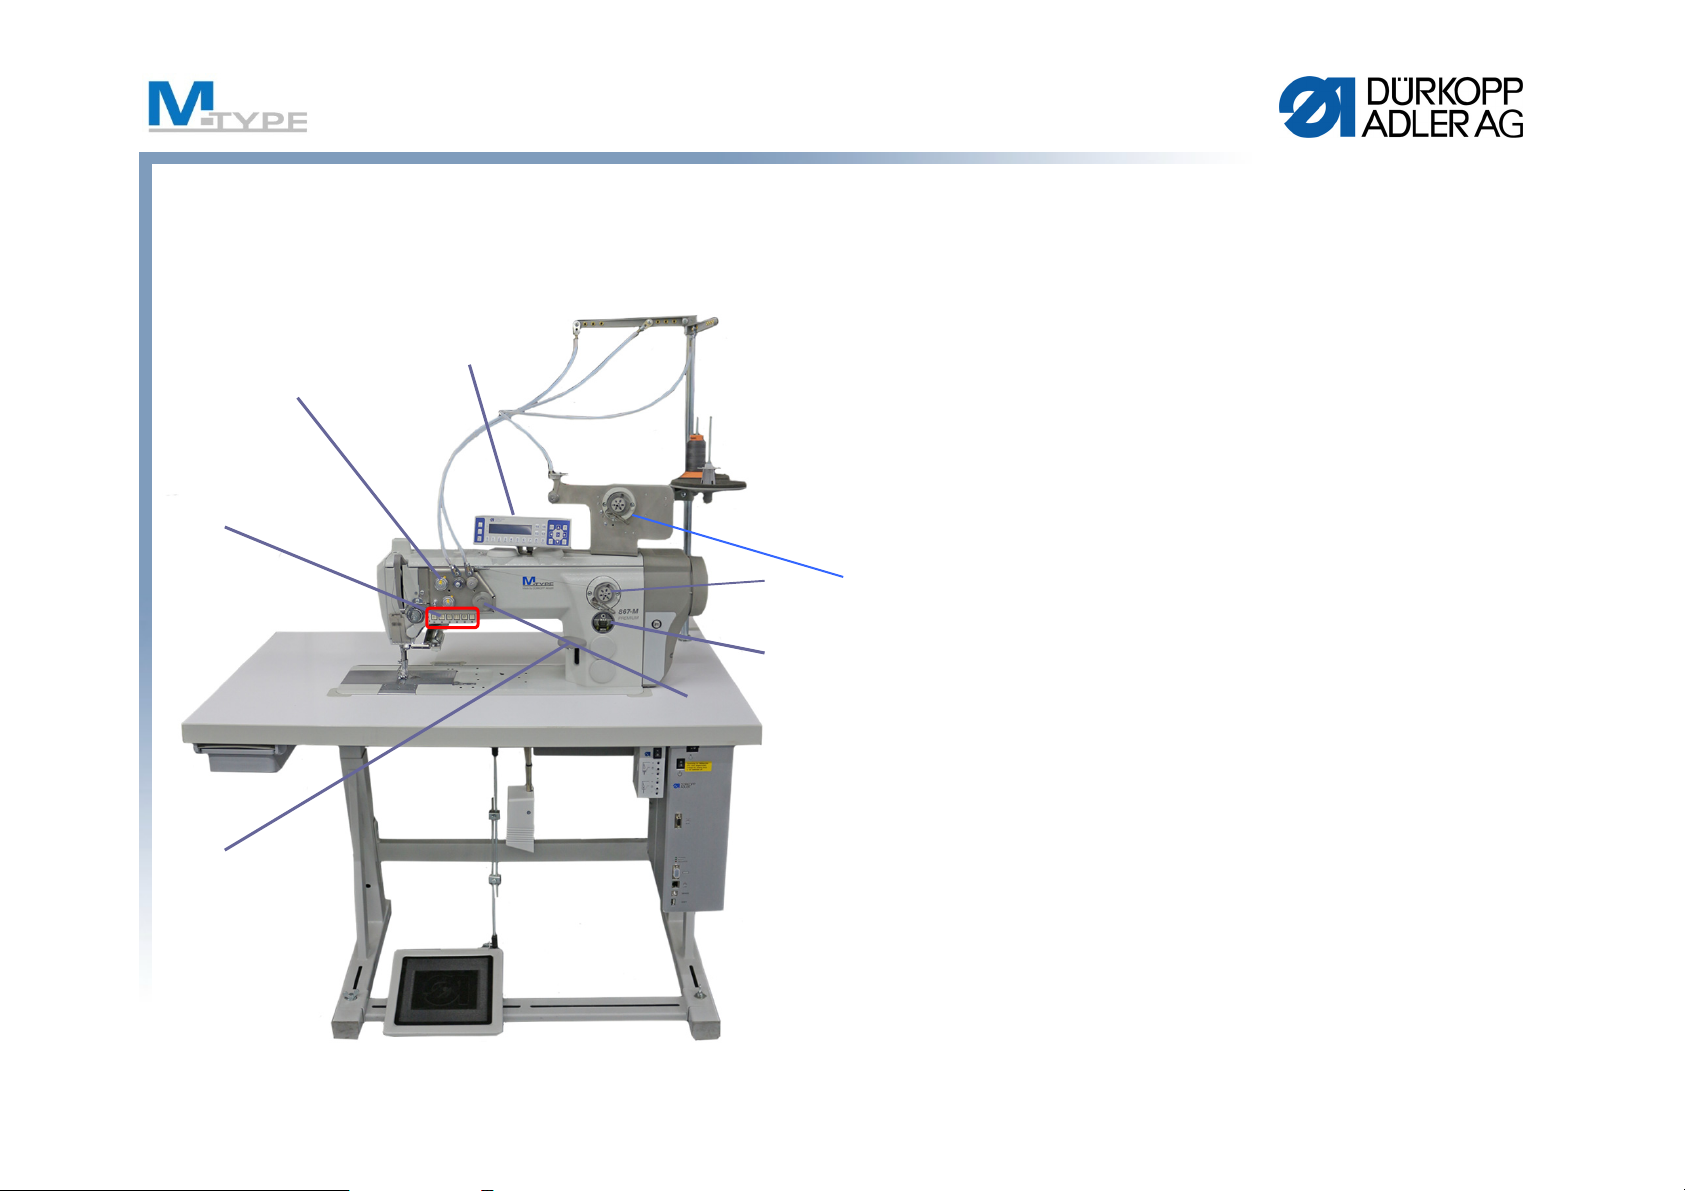
Machine Components
(1) Programmable thread tension
(2) Push buttons
(3) Stitch adjustment lever
(4) Bobbin winder /
(4a) motorized winder
(5) Oil level indicator
(6) Jog Dial (electronic hand wheel)
(7) Control panel OP3000 (standard)
Optional Commander Basic / Pro
(8) Hose guide
(9) Thread guide
12
Page 13
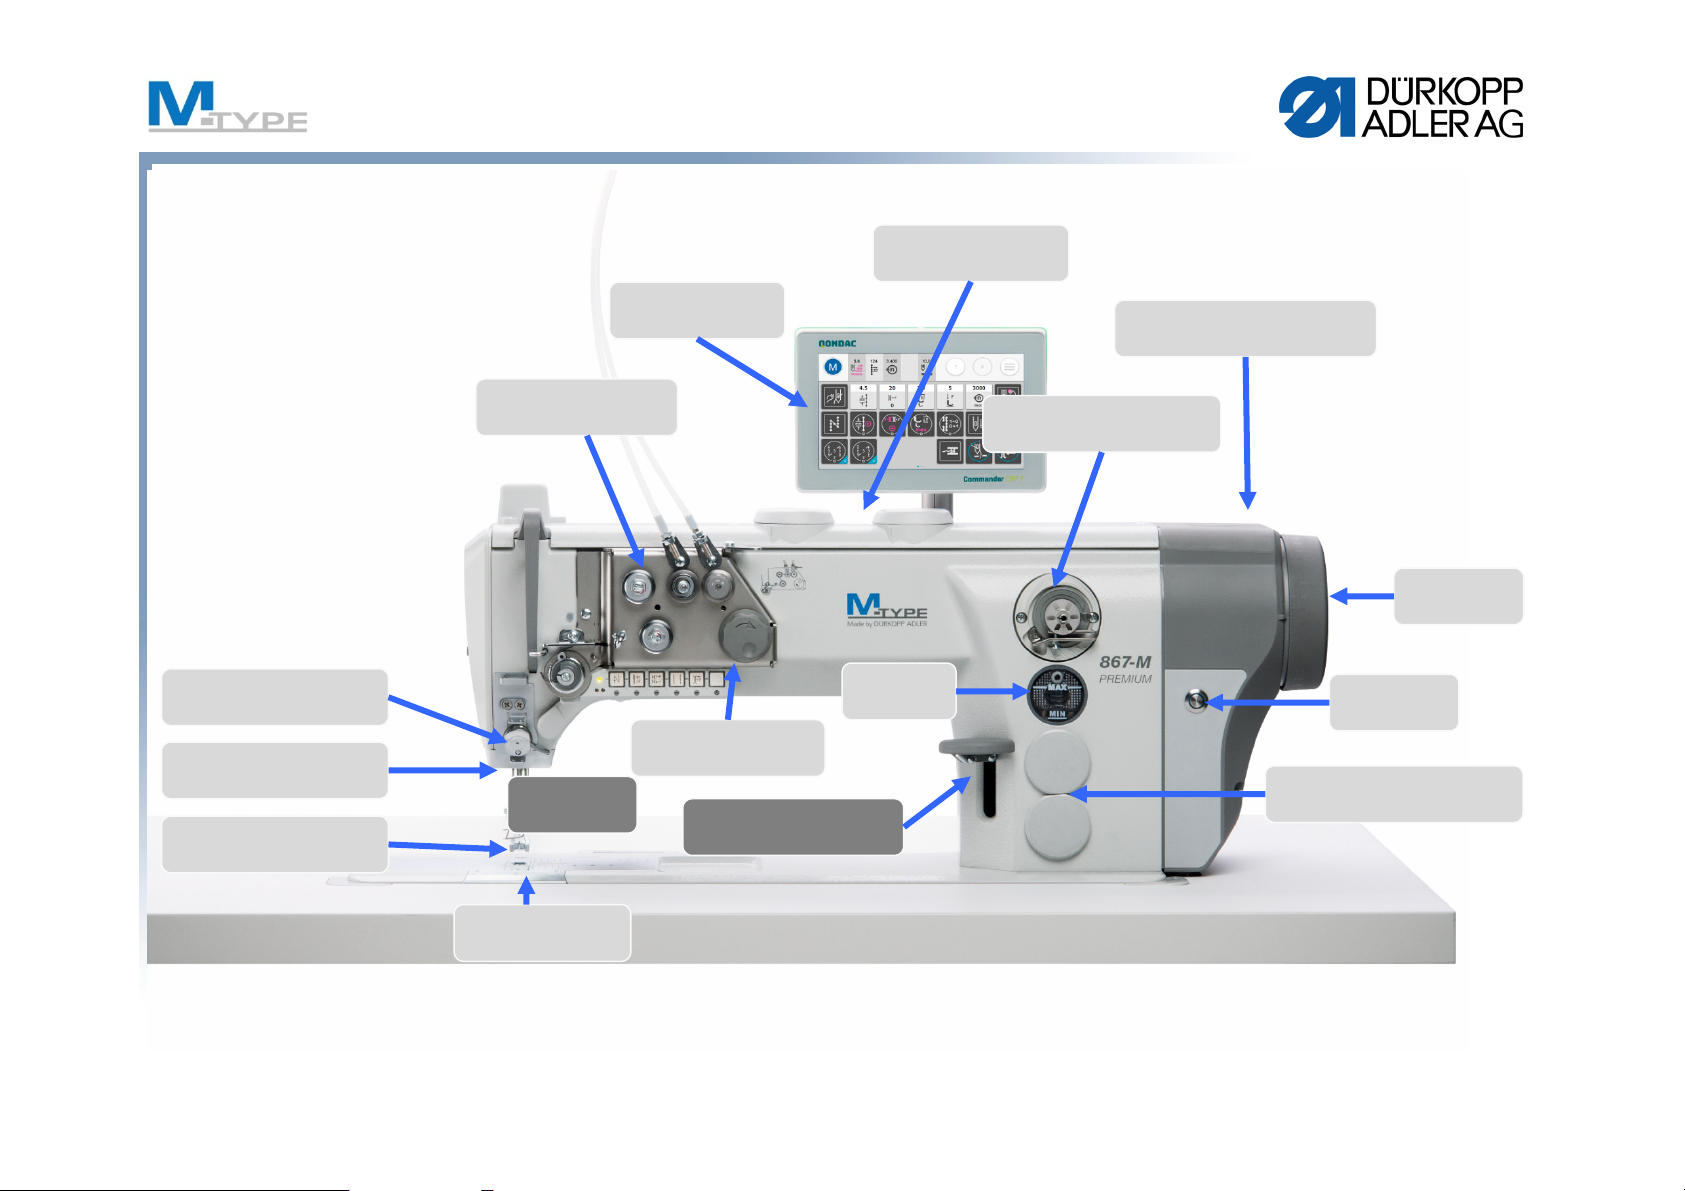
Machine Components
Control Panel
Commander Pro
Programmable foot
stroke (max. 9 mm)
Sewing machine motor
integrated in machine head
Thread Clamp
(optional equipment)
Sewing lamp LED
with dimmer
Programmable foot lift
(max. 20 mm)
Programmable
thread tension
Electronic
edge guide
Thread cutter and
vertical hook
Electronic hand
wheel (Jog Dial)
manual Stitch regulator
lever (optional)
Oil level
indicator
Bobbin winder with bobbin
winding mechanism
Hand wheel
Service Stop
Button
Programmable stitch length
(
max. 12 mm)
13
Page 14
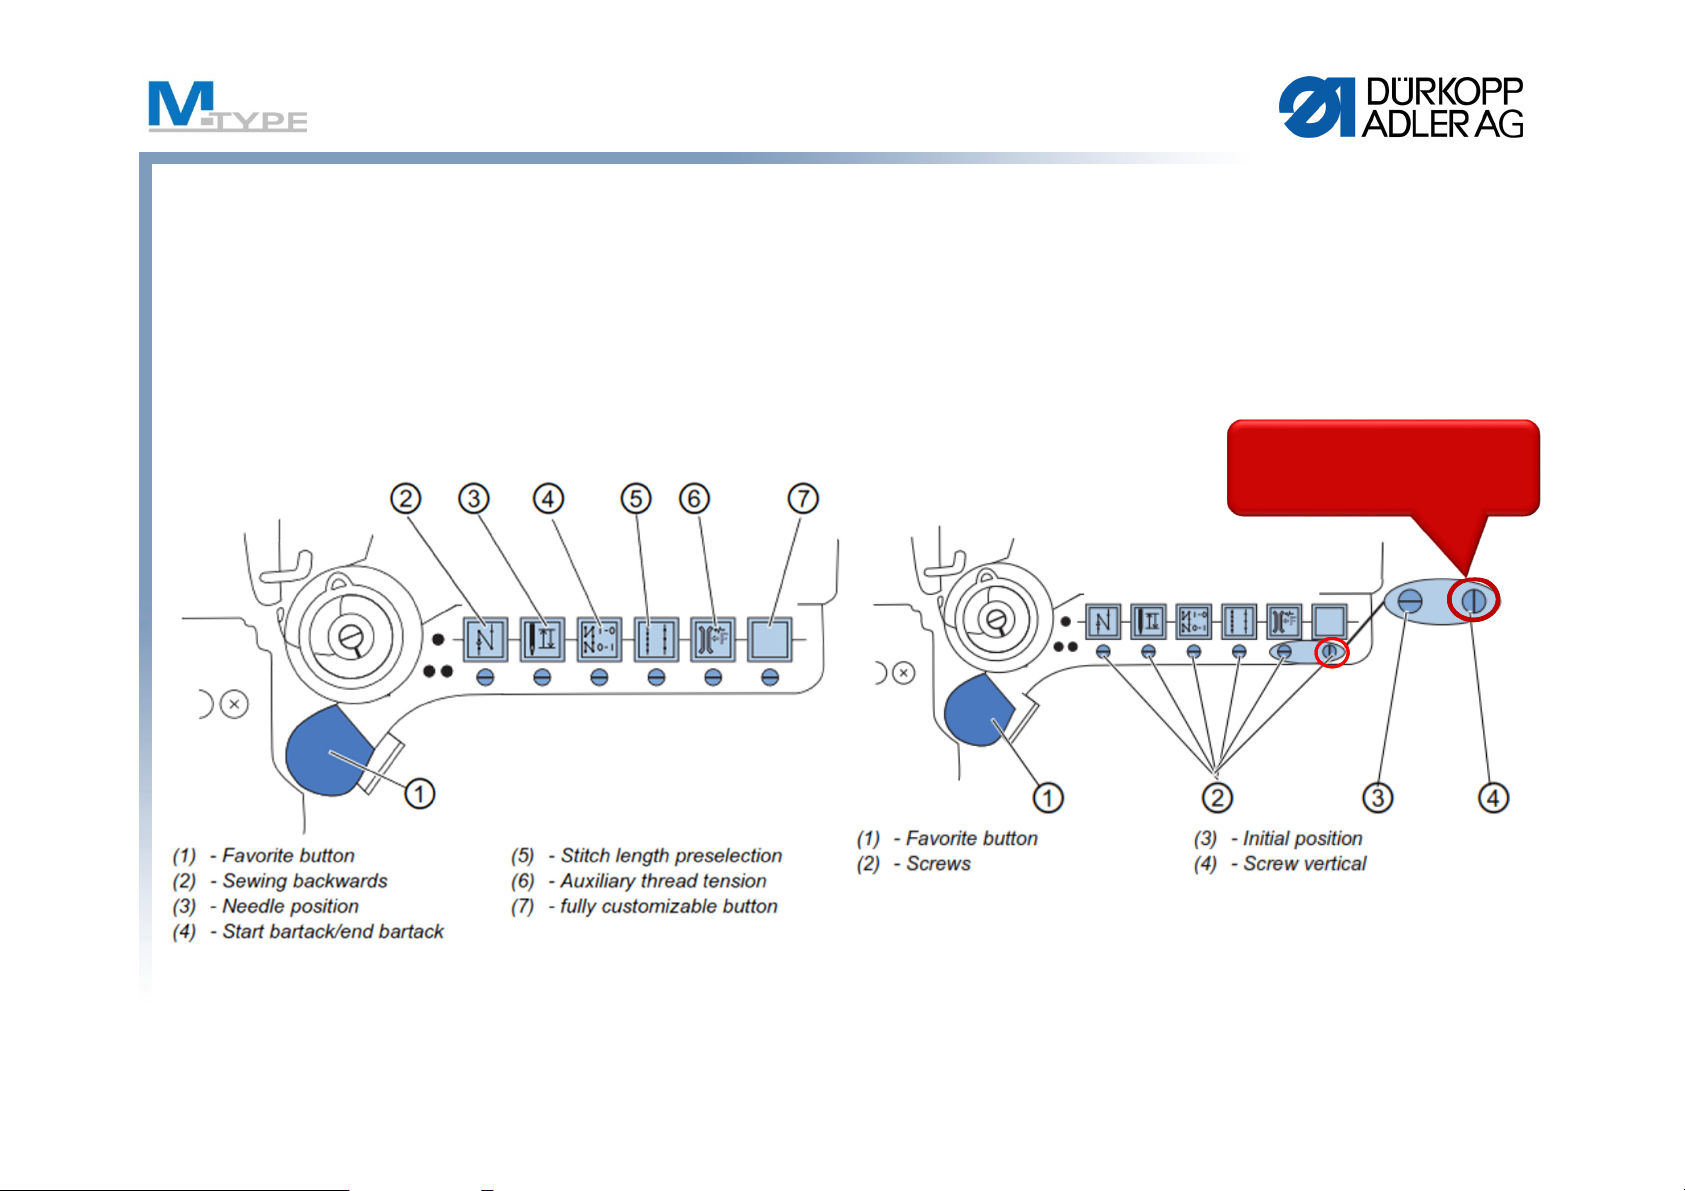
Push buttons (soft keys)
Function Buttons Favorite Button
press and turn
vertically!
14
Page 15
M-TYPE PREMIUM
Operation panel Commander Basic / Commander Pro
15
Page 16

Operation panel Commander Basic / Commander Pro
Commander Basic:
• 7” touch screen
• 4 GB Internal storage capacity
• Media formats: PDF / WebM VP8
• LED status indicator
• 2 USB ports
Commander Pro:
• In addition to the basic features, the
Commander Pro has an Ethernet interface
(for easy communication with QONDAC) and
an NFC-module
16
Page 17
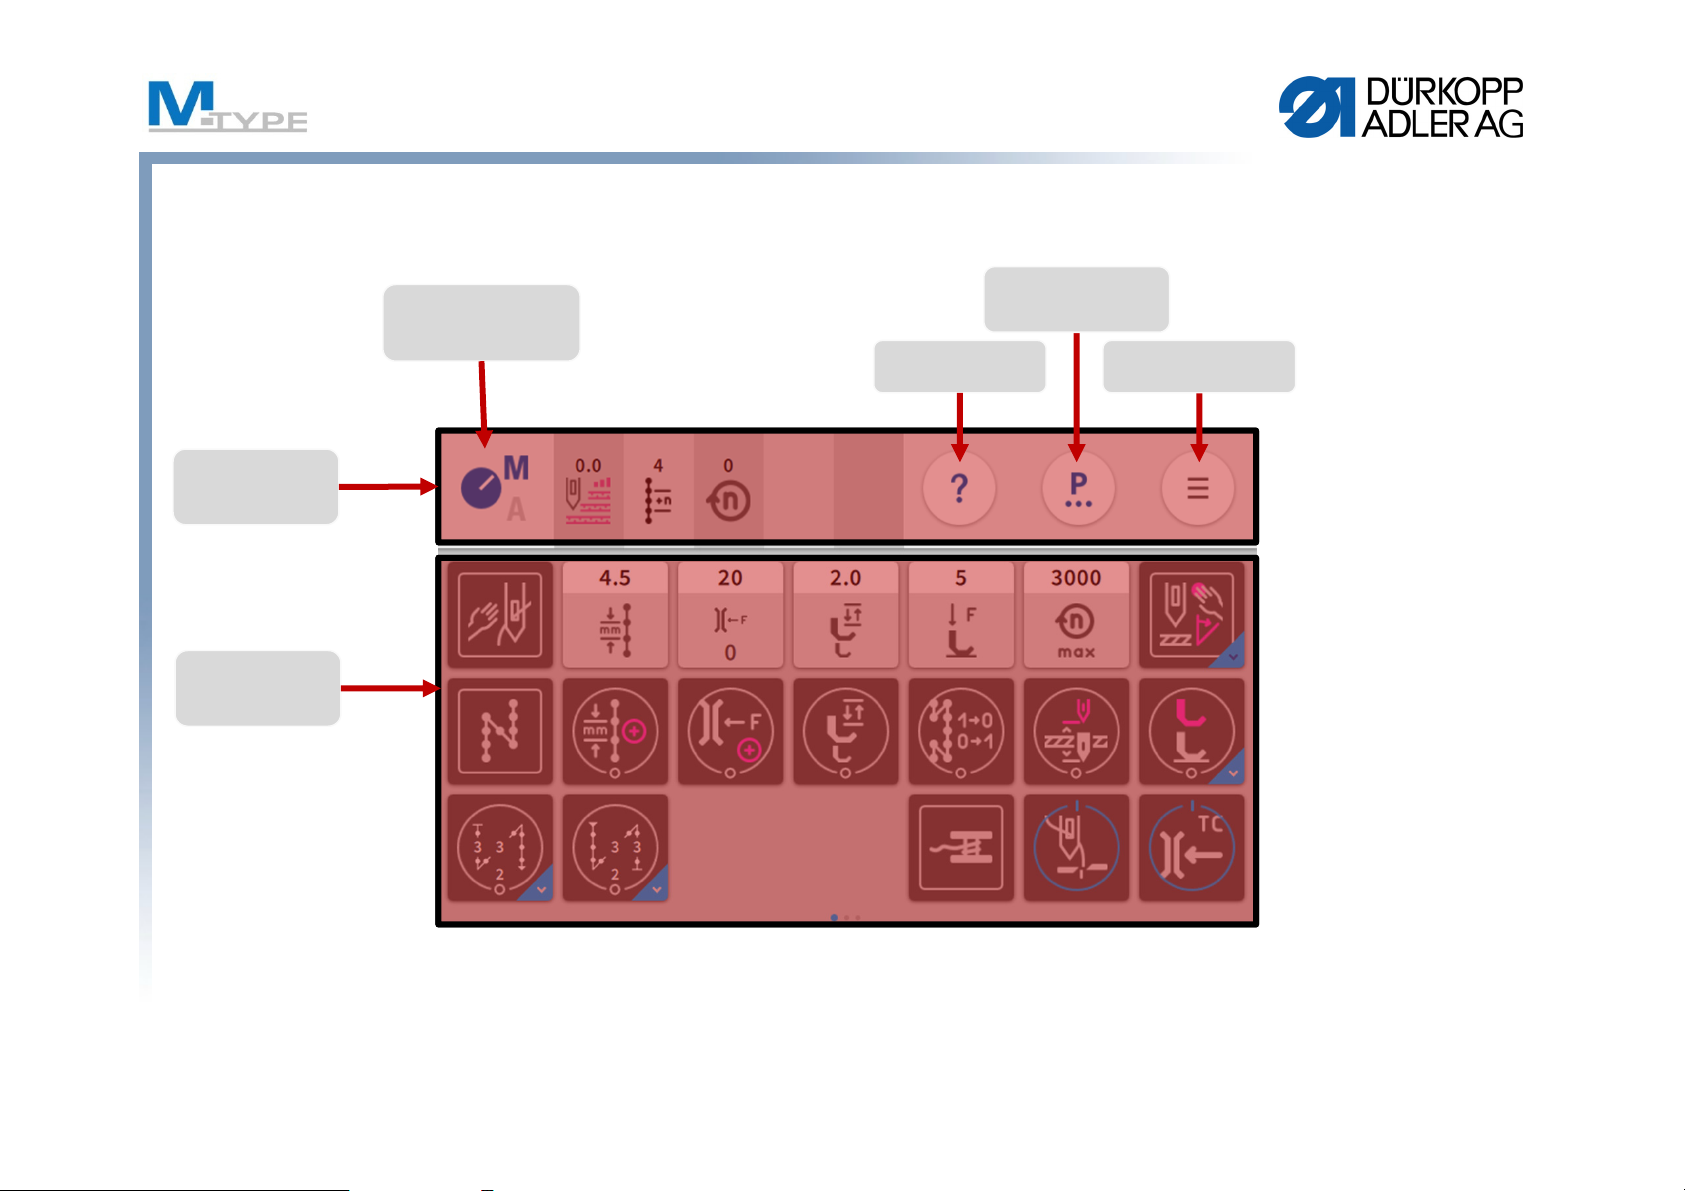
Main screen – Manual Mode
Status bar
Main screen
Manual/
Automatic-Modus
Parameterview
Help button
Navigation
17
Page 18
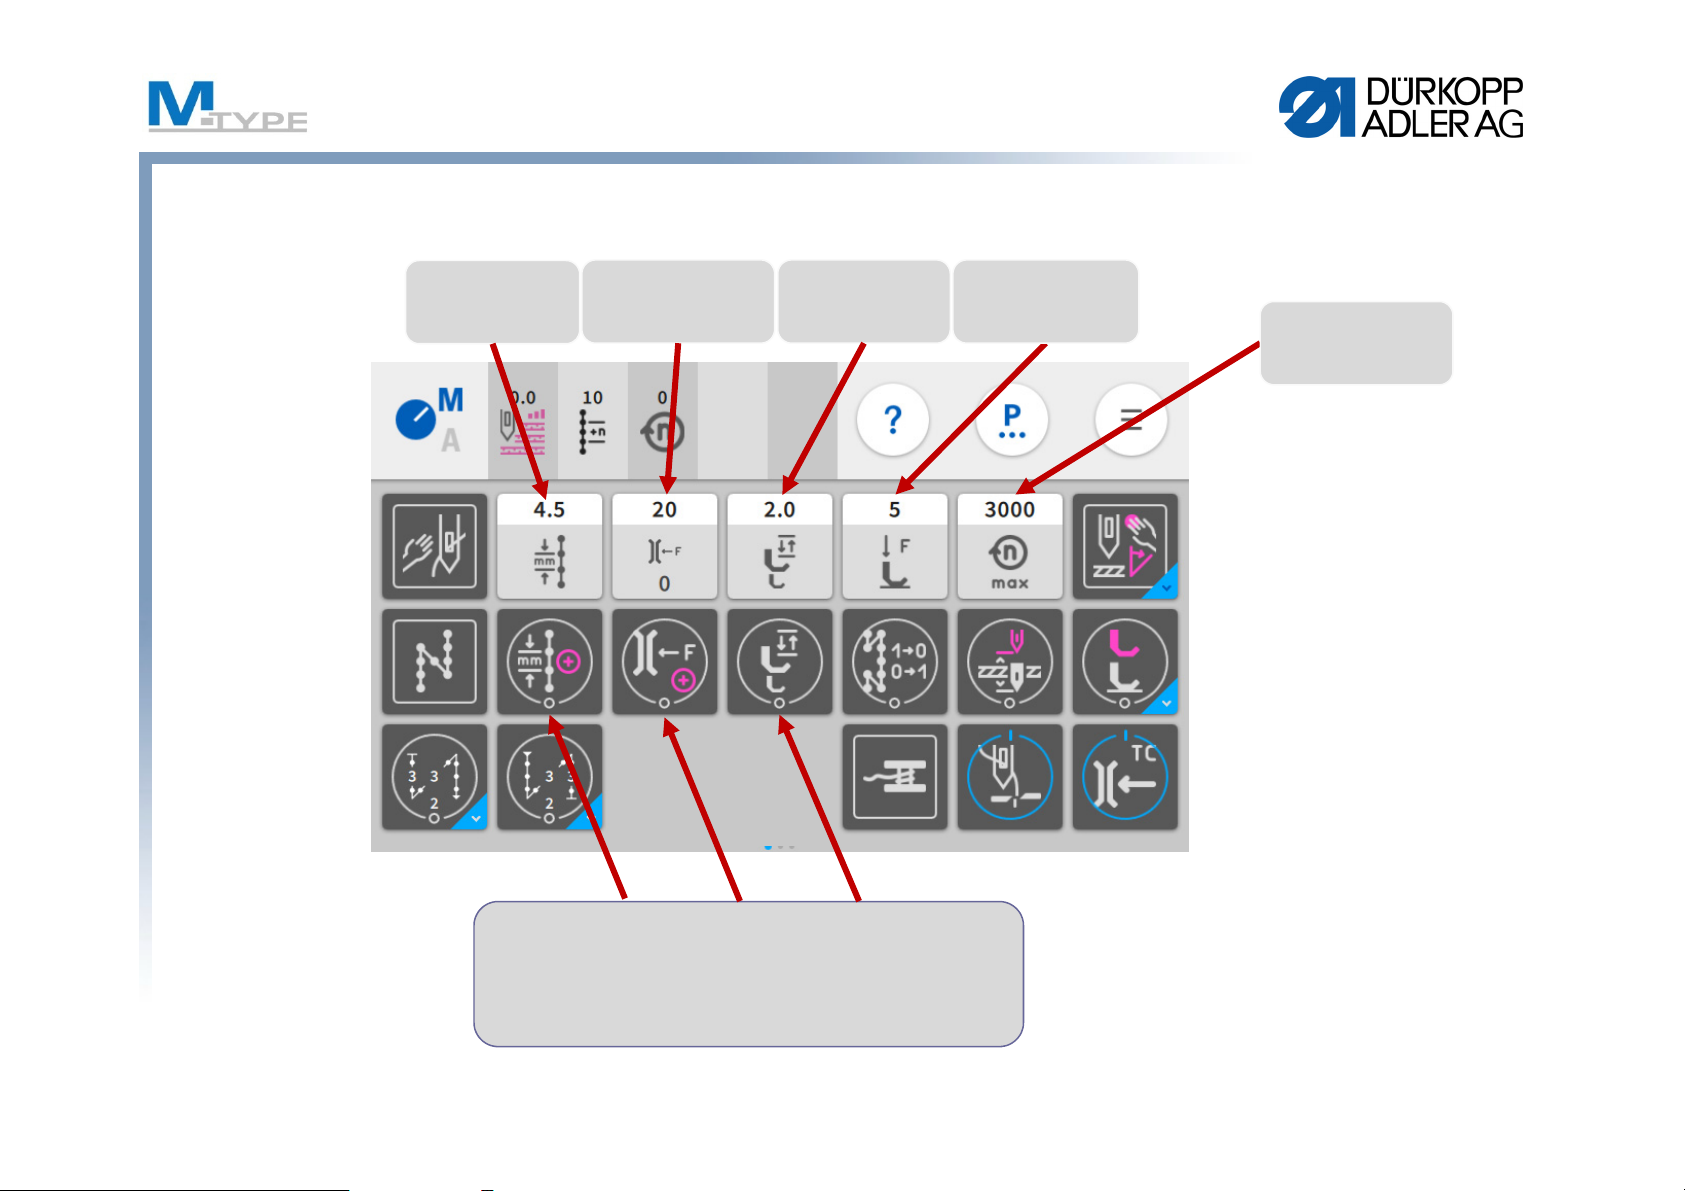
Commander Basic / Pro – Main screen
Stitch length
Thread tension
Sewing foot
stroke
Foot pressure
Max. Speed
the additional parameters
are indicated with the + sign
18
Page 19
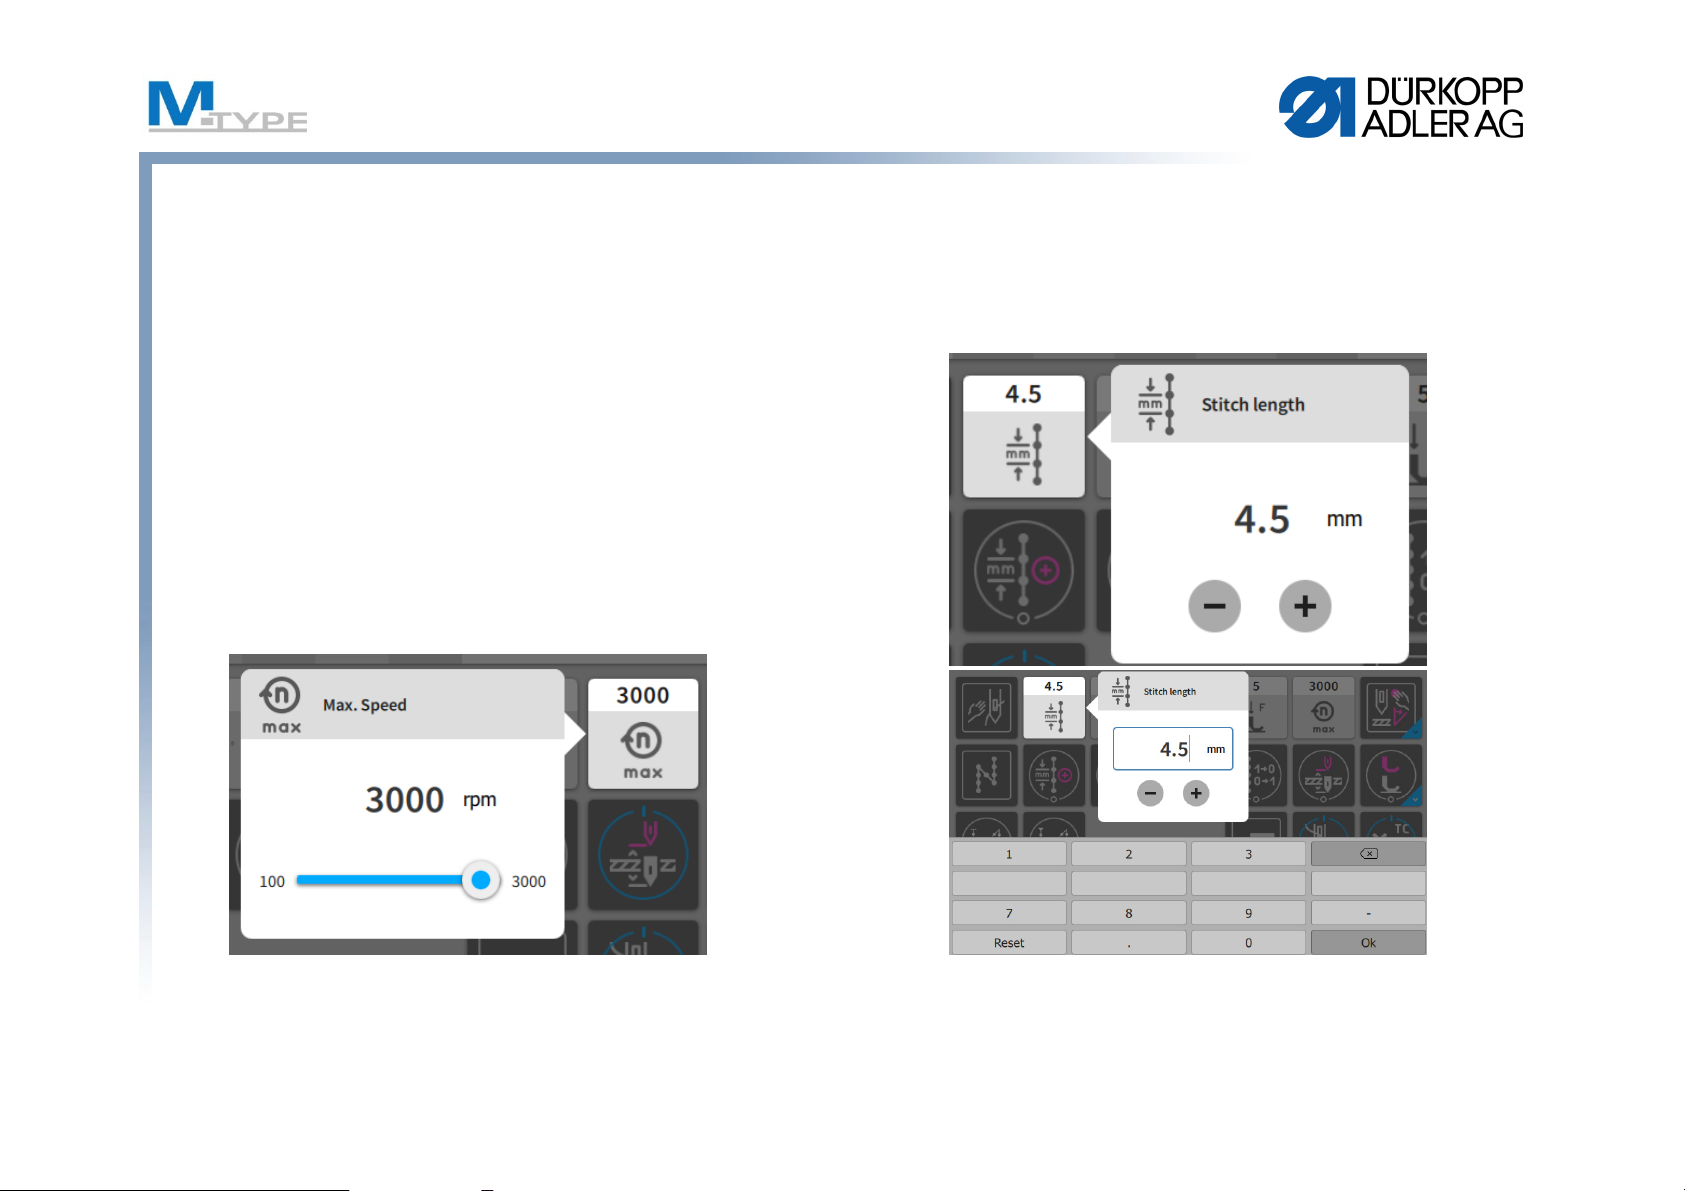
Value Tiles with popover menu
• Settings of parameters which are
used often (light grey buttons)
• Adjustment in steps (plus and
minus button), overwriting the
value directly or continuous
adjustment (Slide bar)
19
Page 20
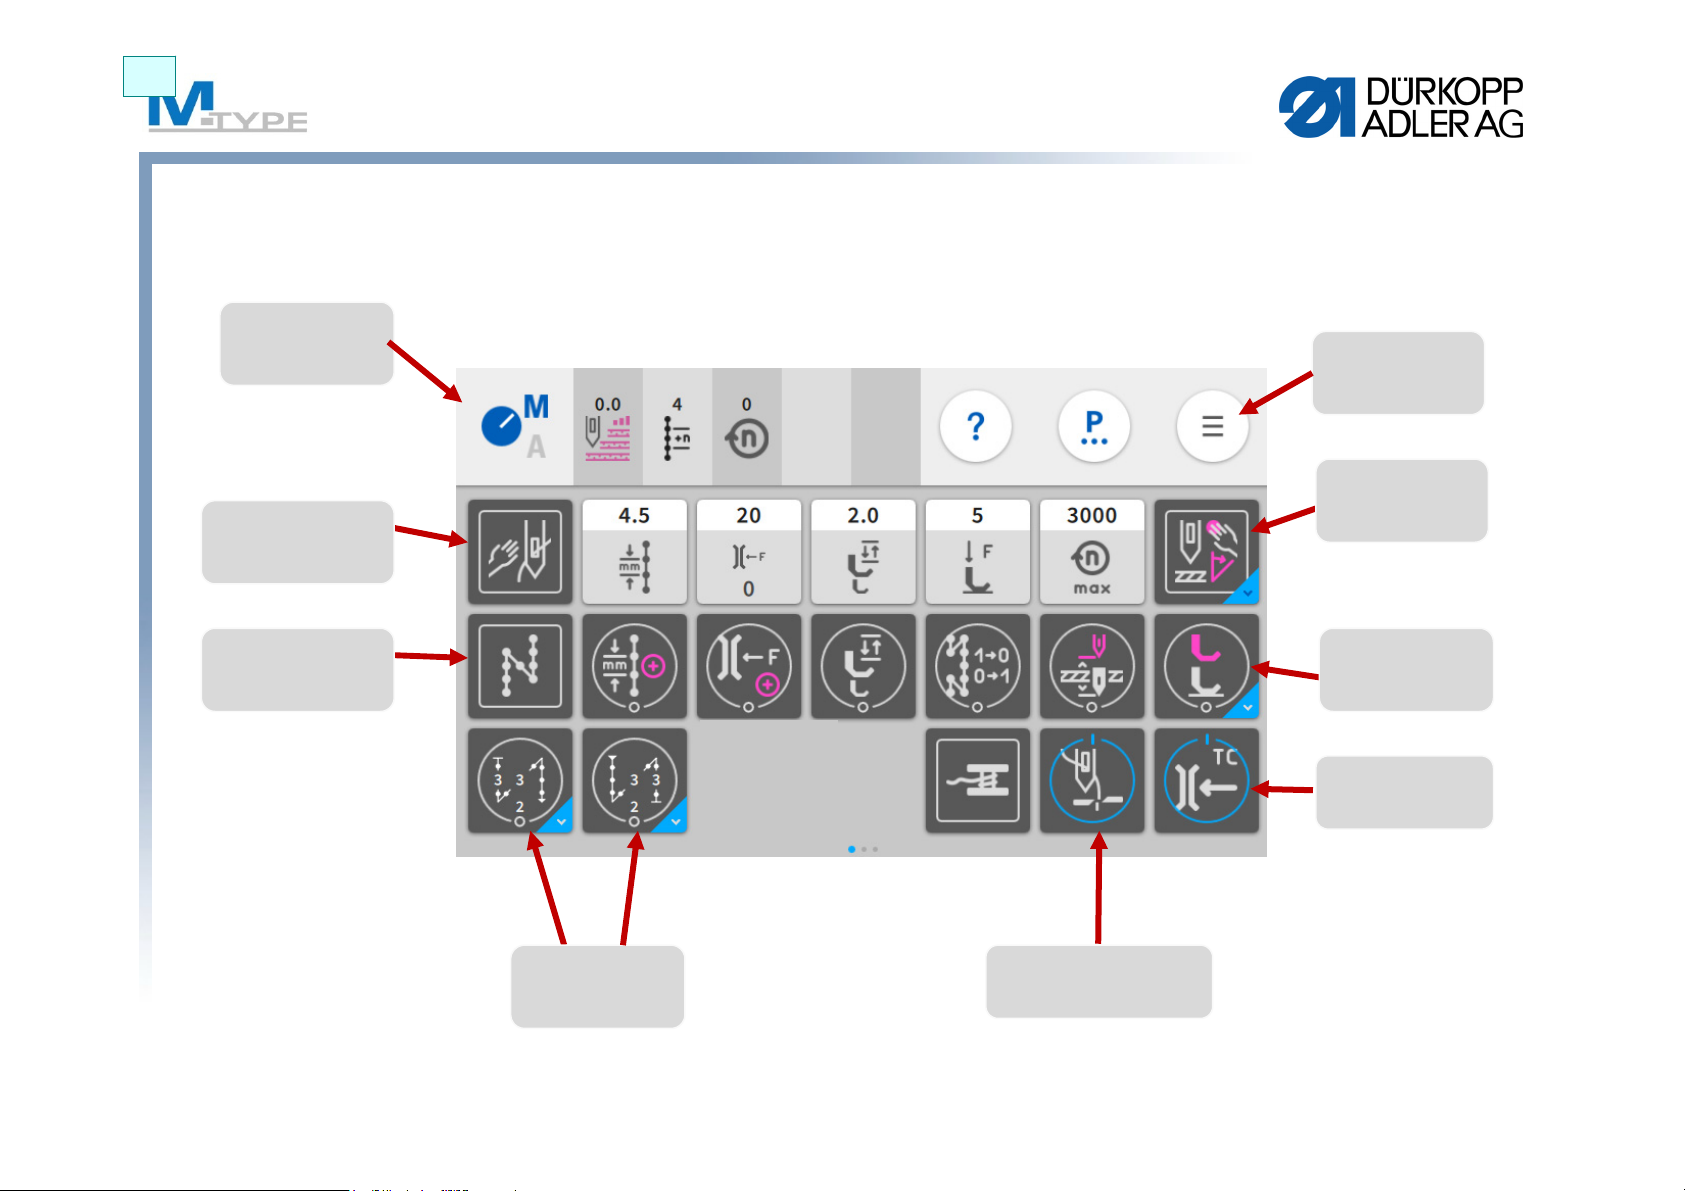
HS1
Functional Tiles (resting/tentative) – Freely configurable
Manual/
Automatic-
mode
Point position
Threading mode
Navigation
Manual backtack
Seam begin
and seam end
backtack
Sewing foot lift
Thread clamp
Thread trimmer
20
Page 21

Folie 20
HS1 neuer Screenshot mit 0 Stichen benötigt
Henrik Schuette; 06.02.2019
Page 22
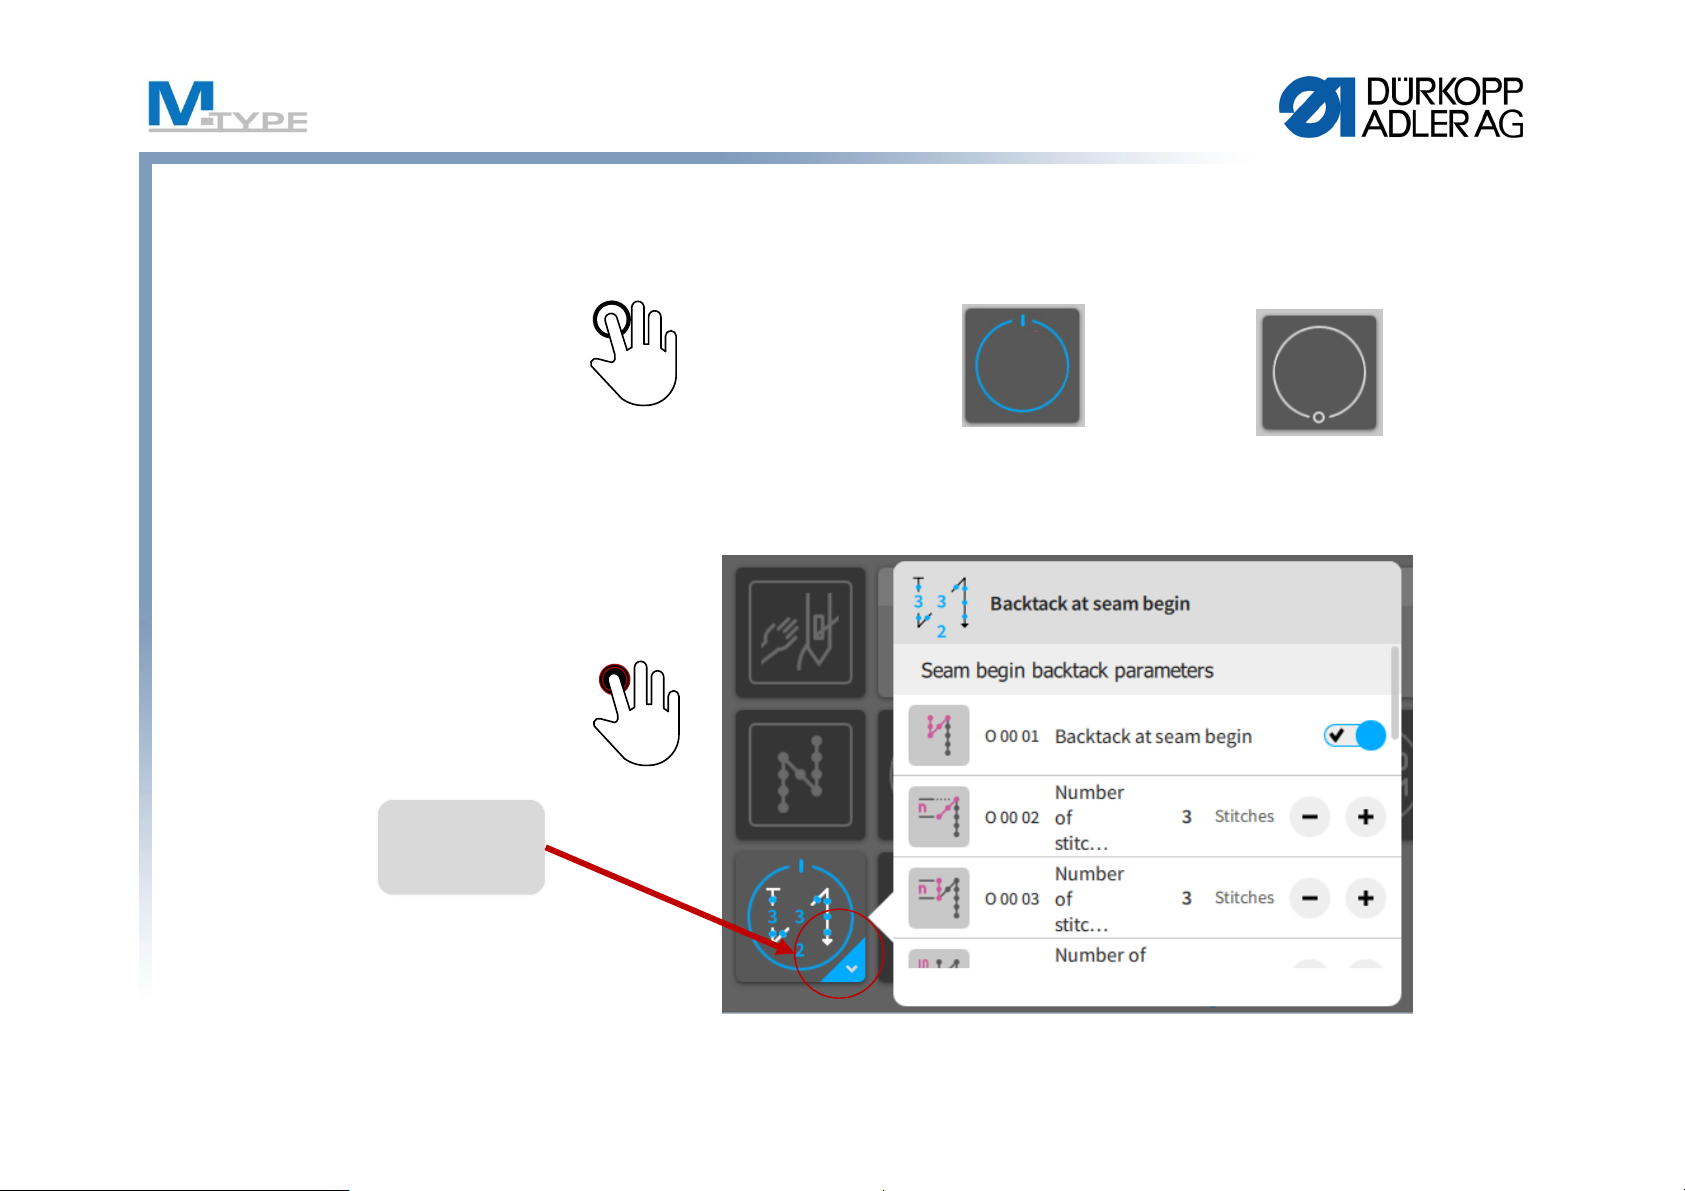
Multi-Functional Tiles with popover menu
On Off
• SingleTap
• Longpress
(1s press and hold)
Opening of backtack
popover
Indicator for
Longpress-
Popover
1s
21
Page 23
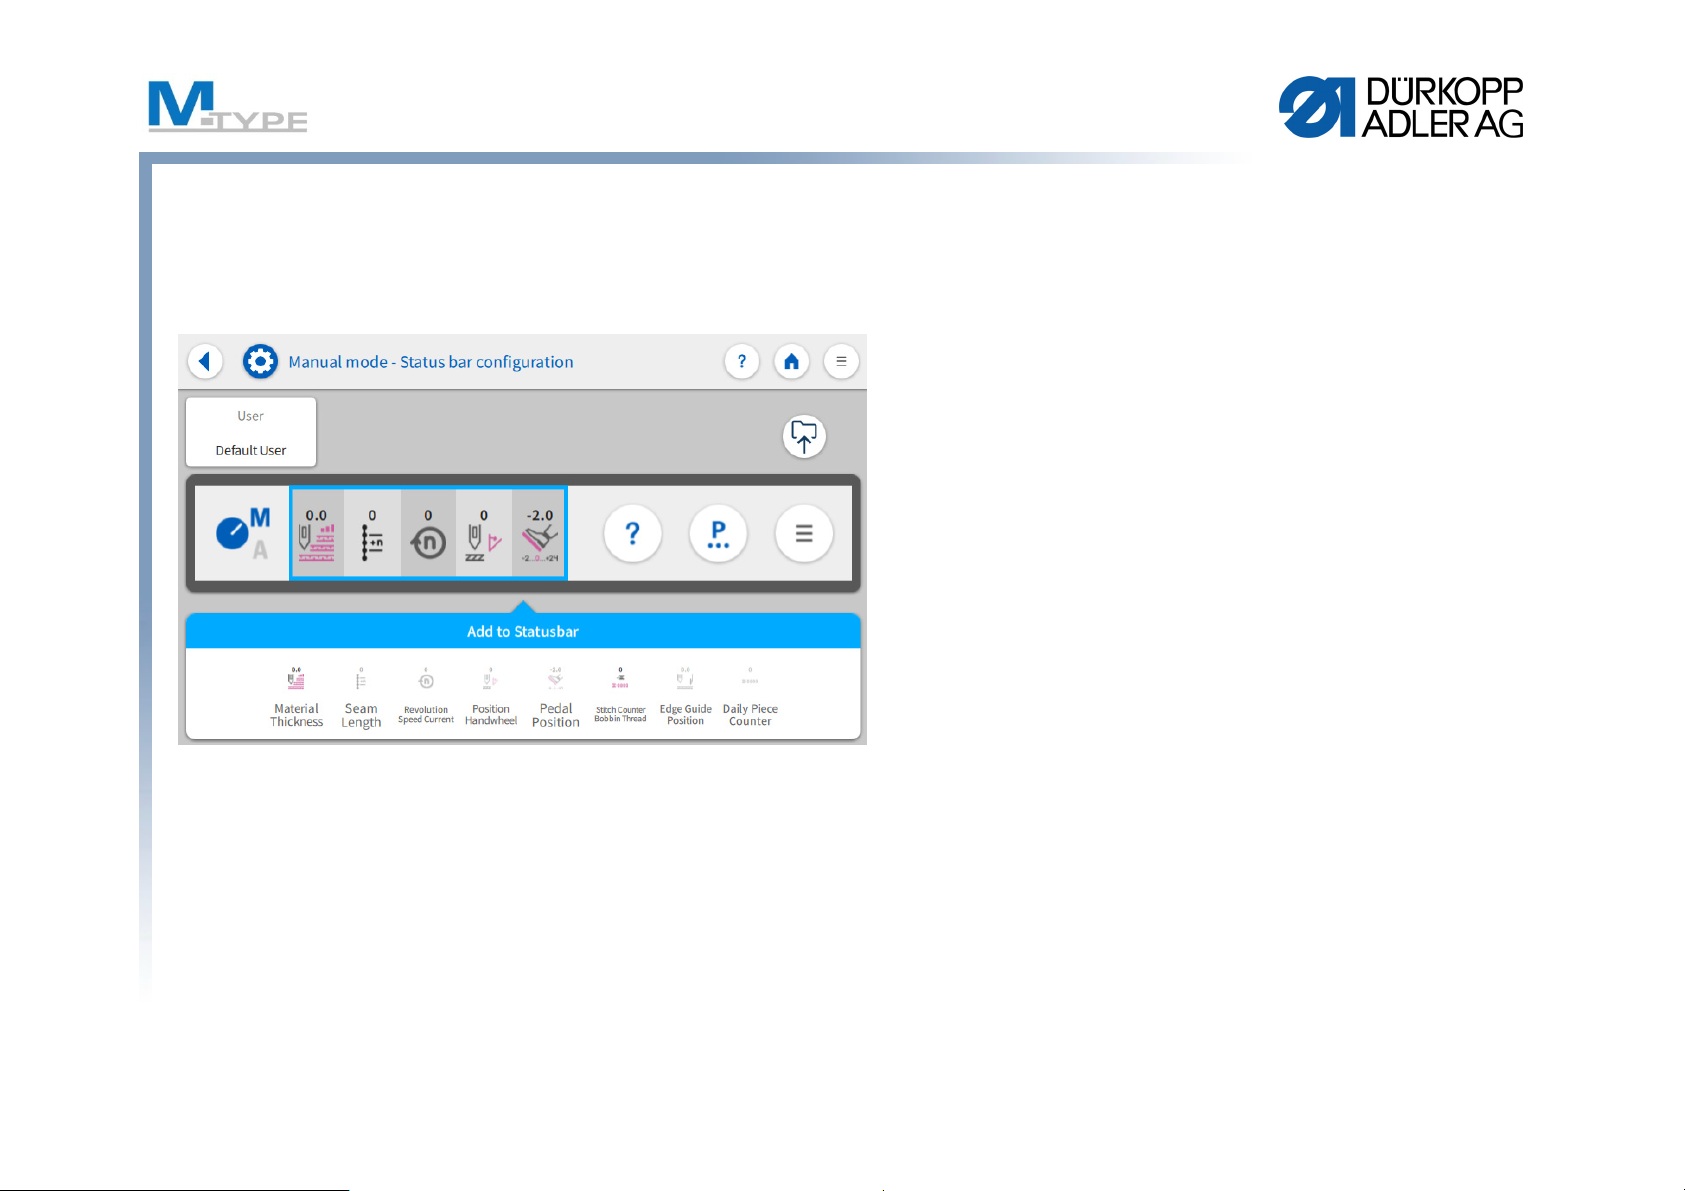
Status bar - Configuration
• Material thickness
• Seam length (Number of
stitches)
• Speed
• Handwheel position
• Pedal position
• Stitch Counter Bobbin
Thread
Select tiles via Drag and Drop
• Edge Guide Position
• Daily Piece Counter
22
Page 24

Main screen - Configuration
Select tiles via Drag and Drop
• Freely configurable
• 3 pages
• Every user can configure his
own main screen
• Function tiles for each
function
23
Page 25

Help Button
Help Button
Single Tap: Help mode is actived for single function.
Next tap opens an information advice.
Closing of the information window deactivates the help
button.
Long Press: Demo mode
No automatical deactivation of the help button after closing
of information advice.
Every following tap on functions opens information advices.
24
Page 26

Parameter view
Seam Begin
Seam
Global
Parameter
Seam End
25
Page 27

Parameter view – Segment
26
Page 28

Parameter view – Parameter
• Additional values (+)
• Stitch length
• Sewing foot stroke
• Needle
• Main parameter
• Bobbin monitor mode
• Point position
• Correction speed effect
• Correction material
thickness effect
27
Page 29

Parameter Seam begin / Seam end
Seam begin
Seam end
28
Page 30

Settings seam begin backtack / seam end backtack
On/Off
Single tap onto value opens
numerical keyboard
Increase or decrease value
If the function „Stitch
length default“ is activated,
the same stitch length is
used in the backtack as in
the seam
Indicator for Drop-Down
menue, opens further
settings
29
Page 31

Settings backtack
Speed of automatical
backtack
Single stitches per
pedal during backtack
0 = Off
1 = Single stitches with
backtack speed
2 = Single stitches with
pedal-dependent
sewing speed
Modification of number
of stitches in first or last
backtack section
If the function „Needle
thread tension default“ is
activated, then the same
tensionisusedin the
backtack as in the seam
Additional backtack
sequence before proper
backtack
Invert the direction of the
backtack
30
Page 32

Start backtack - Repetitions
1 Repetition
backtack
starts
backward
seam
2 Repetitions
backtack
starts
forward
seam
3 Repetitions
seam
4 Repetitions
seam
Impair Pair
31
Page 33

Exercise: Sewing in Manual Mode, other parameters
Pre-setting in Manual Mode
• modify the base parameters:
• stitch length 5.0 mm
• needle thread tension 25%
• sewing foot pressure 5
• sewing foot stroke 1,5 mm
• modify the other parameters
• Thread Trim active On
• Start bartack active (On)
• Number of backward stitches (3 points)
• Number of forward stitches (3 points)
• St.Len.Def – Default stitch length active (On)
• End bartack active (On)
• Number of backward stitches (4 points)
• Number of forward stitches (4 points)
• St.Len.Def – Default stitch length inactive (Off)
– backward stitch length (2.5 mm)
– forward stitch lengths (2.5 mm)
During sewing process
•start sewing
(automatic start backtack)
• activate/deactivate the auxiliary values:
•activate 2ndstitch length
nd
•activate 2
•activate 2
• deactivate the secondary values
• interrupt the sewing process (pedal)
• lift your foot from pedal
• continue sewing process / resume
• stop sewing, end of seam (pedal -2)
(automatic end backtack)
foot stroke
nd
thread tension
• Gap (edge guide): 10 mm
32
Page 34

Exercise: Backtack with Pedal Stop
Adjustment of backtacks
• other parameters P…
• Start backtack active (On)
• Number of backward stitches (3 points)
• Number of forward stitches (3 points)
• St.Len.Def – Default stitch length active (On)
• reduced Speed: 200
• Pedal Stop active (On)
• End backtack active (On)
• Number of backward stitches (3 points)
• Number of forward stitches (3 points)
• St.Len.Def – Default stitch length active (Off)
• Backward stitch length (3 mm)
• Forward stitch length(3 mm)
• reduced Speed: 200
• Pedal Stop active (On)
During sewing process
• start sewing
(automatic start backtack)
• interrupt the sewing process (pedal)
• lift you foot from pedal
• continue sewing process / resume
• stop sewing, end of seam (pedal -2)
(automatic end backtack)
With Pedal Stop you
can stop sewing during
bartack execution.
33
Page 35

Parameter Material thickness detection
• Material thickness detection On/Off
Goal:
Goal:
– Sewing foot stroke
consistent good
consistent good
sewing results
sewing results
Material
Material
Thickness
Thickness
Detection
Detection
– Stitch length
– Needle thread tension
– Sewing foot pressure
– Max. Speed – Maximum speed
• Modes
– linear
– 2. Value On/Off
– 2. Value On
34
Page 36

Example: Material thickness - Foot Stroke
9
8
7
6
Max. Thickness
Min. Thickness
5
4
3
2
1
2143
Min. Value (Seam parameter) Max. Stroke
5879
6
35
Page 37

Exercises: Adjustment Material thickness detection
Mode linear
• Active (On)
• Stroke
• Mode linear
• Sewing foot stroke 8.0
• Min. Material thickness 2.0 mm
• Max. Material thickness 5.0 mm
• Stitch length
• Mode linear
• Stitch length (10 %)
• Min. Material thickness 2.0 mm
• Max. Material thickness 5.0 mm
Mode 2. Value On/Off
• Stitch length
• Mode 2. Value On/Off
• Min. Material thickness 3.0 mm
Mode 2. Value On
• Stitch length
• Mode 2. Value On
• Min. Material thickness 2.0 mm
36
Page 38

Exercise: Sewing in Manual Mode, Gap and Gap+
Pre-setting in Manual Mode
• modify the base parameters :
• stitch length 3.8 mm
• thread tension 25%
• sewing foot pressure 5
• sewing foot stroke 3 mm
• modify the other parameters P…
• Thread trimmer active (On)
• Backtack at seam begin active (On)
• Number of stitches backward (3 points)
• Number of stitches forward (3 points)
• Stich length default active (On)
• End backtack active (On)
• Number of backward stitches (3 points)
• Number of forward stitches(3 points)
• Stich length default active (On)
• Gap (edge guide): 10 mm
During Sewing Process
•start sewing
(automatic start backtack)
• activate/deactivate the additional values
activate 2ndstitch length
nd
•activate 2
•activate 2
• activate 2
• deactivate the secondary values
• stop sewing, end of seam (pedal -2)
(automatic end backtack)
foot stroke
nd
thread tension
nd
gap (gap+)
• adjust the additional values:
•2ndstitch length 6.0 mm
nd
•2
• 2
thread tension 30%
nd
gap (edge guide distance) 20 mm
37
Page 39

Navigation Mode
Program-Management
to create, delete, copy
or edit programs
All types of settings
(depends of access
level)
Tutorials: PDFs
and videos
Logout and
opening of
Login-Screens
38
Page 40

Automatic mode
• Program selection
• Select from the program
list or search for the right
program by clicking on
the magnifying glass.
39
Page 41

Automatic mode
• During sewing process
• Indication of actual seam section
• Display of parameter values defined
in the seam section
• Program progress (program bar)
• Predefined number of stitches per
section
• Backtacks
• Switch between two seam sections with
a stop and with/without thread cutting
• Switch between two seam sections without stopping
• Cut off the program (pedal fully back, Pos. -2)
• Backtack and thread trim, if set in program
40
Page 42

Automatic mode: Main screen
Current seam-
progress
Switch to
previous or
next section
Pop over
tiles:
correction
parameters
could be
changed
Sketch of sewing
progress
Predefined number of stitches
per section
Threading
mode
Information tiles:
Preset value
Current value e.g.
Speed Correction /
Material Thickness
41
Page 43

Automatic Mode: Correction actors
• correction %age for stitch length and thread tension
•Test results
• Due to the influence
of different material
GOAL REALITY
Test the correction values
and adjust alteration %age
42
Page 44

Exercise: Identify configurations / settings
• Selection of programme no.10 SEAM 10 MANUEL
• Which program settings can you identify?
– Number of seam sections ?
– Backtacks ?
– Thread Trim ?
– Stop between seam sections ?
– Predefined number of stitches ?
43
Page 45

Automatic Mode: Sewing a program
• Program Selection
• Start sewing process
• Switch to previous and following seam section
• Function Button no. 6
• USEFUL! Favourite button (assign feature of function buttons)
• Skip a seam section of the program
• Cut off or cancel the program in the seam
and resume sewing process
• Pedal -1 (program remains stopped at cut off point)
• Pedal -2 (complete cancellation of program and return to starting point) /
or switch to following seam section (program switch by pedal)
44
Page 46

Exercise: Sewing in Automatic Mode
• Utilise a program consisting of several seam sections
– Select a program using the program selection:
Program 10 – SEAM 10 MANUEL
– Sew the program
• start backtack automatically executed
• switch to next seam section (function button no. 6 or )
• stop sewing in the program (foot lift)
• resume sewing process / continue
– Terminate program (Pedal -2)
• end backtack automatically executed
• thread trim
– Cancel the program
45
Page 47

Exercise: Sewing in Automatic Mode
• Sewing of a program consisting of several seam sections
and specific number of stitches per section
– Select a program using the program selection:
Program 20 – SEAM 20 AUTOMATIC
– Sew the program
• Start backtack automatically executed
• Automatic stop at the end of the section (after specific number of
stitches)
• Change to next section by sewing again after stopping at end of
section
– Terminate program (pedal -2)
• End backtack automatically executed
• Thread trim
46
Page 48

Conclusion Day 1
• Introduction to the M-TYPE PREMIUM machine
• Advantages, new functions
• Components of the machine
• Control Panel Commander Basic / Pro
• Manual Mode
• Parameter adjustment
• Start backtack / end backtack
• Material thickness detection
• Automatic Mode
• Sewing in automatic mode
• Correction Factors
47
Page 49

QUESTIONS?
48
Page 50

THANK YOU
FOR YOUR ATTENTION
49
Page 51

Recapitulation of First Day
• Control panel Commander Pro
• How to navigate in the menus
• Use of Softkey Menu, favourite button
• Manual Mode
• Adjustment of base parameters
• Adjustment of other parameters
• Thread trimmer
• Start backtack / End backtack
• Edge guide
• Parameter material thickness detection
• Automatic Mode
• Selection of a program
• Sewing in automatic mode
50
Page 52

Program management
51
Page 53

Program management
Create a new
program
Available programs
Delete highlighted
program
Copy highlighted
program
Searching function
52
Page 54

Program management
Create a seam
Delete a seam
Seam sketch
Configuration of main
screen and status bar
Copy a seam
Home button
-
Back to Main screen
Play button
-
Play selected Program
Seam settings
Available seams in
segment
53
Page 55

Edit a program
Back to program
management
1. Segment
(Sketch)
A seam segment
consist of segment
begin, segment and
segment end
Global seam
parameter
Switch between
Seams
Thread cutting is
only available in
the end of seams
54
Page 56

Segment parameter – Seam begin
Backtack activated
Segment
number
Backtack
deactivated for
segment end
Seam begin
Thread clamp
activated
Number of stitches
Sewing stop in the
end of segment
Backtack parameters are
similar to manual mode
in segment
55
Page 57

Segment parameter – Seam end – Sewing stop
Segment end
Stop at segment
end
+
Function at
segment end
Seam end (last segment)
Backtack activated
for seam end
Sewing Stop &
Thread Trimming
56
Page 58

Segment parameter
57
Page 59

Global seam parameters
• Additional values(+):
• Stitch length(+)
• Needle Thread tension(+)
• Sewing foot stroke(+)
• Program Cycle
• Next program
• Program cycle
• Main Parameters
• Needle thread clamp
• Bobbin monitor mode
• Counter mode (Daily piece counter)
• Point position
• Correction speed effect
• Correction material thickness
58
Page 60

Automatic mode: Main Screen
Switch to
previous or
next section
Pop over
tiles:
Parameters
could be
changed
Threading
mode
Sketch of sewing
progress
Bobbin wind
mode
Information tiles:
Preset value
Current value e.g.
Speed Correction /
Material Thickness
59
Page 61

Exercise: Edit Mode – Modify program P10
1. Select the program P 10 – SEAM 10 Manuel and press
2. Select segment 1.
3. Modify the following parameter settings:
• Segment 1:
• stitch length 6 mm
• sewing foot stroke 2.5 mm
• thread tension 30
• stitch count : mode 1 (count stitches), number of stitches 10
• Segment End Mode : Stop active On, Thread trim inactive Off, Needle Up inactive Off, Foot lifted inactive Off
• start backtack: inactive Off
• end backtack: inactive Off
• Foot lifted: when sewing stops on the seam: inactive Off
• Segment 2:
• stitch length 3 mm
• sewing foot stroke 5 mm
• stitch count: mode 0 (not counted)
• Segment End Mode: Stop active On, Thread trim active On, Needle Up active On, Foot lifted active On
• start backtack: inactive Off
• end backtack: active On
• Global parameters of program:
• name of the program: TEST TRAINING
• FabricThickness: active On
• Sewing foot stroke: Mode 2.Value On/Off, Min. Material thickness: 3 mm
• stitch lengths: Mode linear, Stitch Length 6mm, Min. Material thickness: 2 mm, Max.Material thickness: 5 mm
60
Page 62

Programming Mode: Create a program
• Open the navigation and press „Programming“
• Press in the left box
• Edit the name of the program via double tap on the name
• Press (in the right box) to edit the first seam in the
program.
• Set the parameters for the seam segment (Field „Segment“)
• Adjust the global parameters of the program (Field „Program
parameters“ (vertical bar)
• Add a new seam segment via pushing
• Delete a seam section with
• Press or to save program and quit programming mode.
61
Page 63

Exercise: Create a Simple Program
Create a program consisting of one seam section only
• Create program P 7 PROGRAM SIMPLE
• Add a segment
• Set the seam section parameters:
• stitch length 4 mm
• sewing foot stroke 3 mm
• needle thread tension 25
• Segment End Modes:
Stop active On, Thread trim active On, Needle Up inactive Off, Foot lifted inactive Off
• start backtack: active On
• end backtack: active On
• Foot lifted: inactive Off
• Adjust the global parameters of the program:
• Program Name: P 7 PROGRAM SIMPLE
• Bobbin: Mode Software, counter 500 points, MotorStop active On, Reset necessary active On
• Counter Mode: On, Up.
• Sew the program (test with material)
• Modify any parameter settings in the edit mode if necessary
62
Page 64

Exercise: Create a complex Program
Create a program consisting of several seam sections
• Create the program
P 8 COMPLEX PROGRAM
• Segment 1:
• stitch length 3.8 mm
• sewing foot stroke 1.5 mm
• needle thread tension 25
• stitch count: number of stitches 12
• Seg.End Mode: Stop active On, Thread
Trim inactive Off, Needle Up inactive Off,
Foot lifted inactive Off
• start backtack: active On
• end backtack: inactive Off
• Foot lifted: Off
(foot lift at sewing stop on the seam)
• Segment 2:
• stitch length 6 mm
• sewing foot stroke 5 mm
• stitch count: mode 0 (not counted)
• Seg.End Mode: Stop active On,
Thread Trim active On,
Needle Up active On, Foot lifted On
• start backtack: inactive Off
• end backtack: active On
• Global parameters of program:
• program name: COMPLEX PROGRAM
• FabricThickness: active On
• Stroke: Mode 2.Value On/Off,
Min. Material thickness 3 mm
• stitch lengths: Mode linear,
Min. Material thickness: 2 mm,
Max. Material thickness: 5 mm
63
Page 65

Exercise: Create a program BACKTACK
Creation of a program with backward sewing
• Create the program
P 9 BACKTACK
• Segment 1:
• stitch length 4 mm
• sewing foot stroke 4 mm
• sewing foot pressure 3
• thread tension 25%
• maximum speed: 200
• Foot lifted: inactive Off
• Seg.End Mode: Stop On, Thread Trim
Off, Needle Up Off, Foot lifted Off
• number of stitches backward: 2 pt
• Segment 2:
• Stitch count.: number of stitches 4 pt
• Segment 3:
• number of stitches backwards: 2 pt
64
Page 66

Exercise: Programme « Cross »
1
2
3
4
5
6
stitch length: 3,5 mm
sewing foot stroke 3 mm
sewing foot pressure 3
thread tension 20%
maximum speed: 200
Segment 1: 2 forward stitches
Segment 2: 4 backward stitches
Segment 3: 2 forward stitches, Foot lifted active On
--> turn the material 90°
Segment 4: 2 forward stitches,
Foot lifted inactive Off
Segment 5: 4 backward stitches
Segment 6: 2 forward stitches
4
Starting point
turn point
3
1
6
5
2
65
Page 67

Practice various programs
• Basic parameters
• stitch length: 3,4 mm
• thread tension: 20
• sewing foot pressure: 2
• sewing foot stroke: 10
• Programs for chapes (bag handles, etc.)
• Backtacks
66
Page 68

Exercise: Create a complex program
Create a program consisting of divers seam sections
• Create the program
P 30 SEWING TEST
• Section 1:
• stitch length 4 mm
• sewing foot stroke 4 mm
• sewing foot pressure 3
• thread tension 25
• number of stitches: 0 pt
• maximum speed: 200 rmp
• Segment End: Stop active On, Thread Trim
inactive Off, Needle Up inactive Off,
Foot lifted active On, H. Foot lifted 13 mm
• start backtack: inactive Off
• end backtack: inactive Off
• Foot lifted (at stop in the seam): inactive Off
• Guide: Gap 3 mm
Start
sewing
• stitch count: number of stitches 7
• Section 3:
• stitch count: number of stitches 7
• Section 4:
• stitch count: number of stitches 0
• Section 5:
• stitch count: number of stitches 7
• Section 6:
• stitch count: number of stitches 7
• Section 7:
• stitch count: number of stitches 2
• Segment End: Thread Trim inactive Off,
Needle Up inactive Off,
Foot lifted inactive Off
• Section 2:
67
Page 69

Programming Mode: Copy / Delete a program
1. Select the program you want to copy
2. Press
3. Press to adjust a seam in the program and adjust the
parameters of the selected section
4. To delete a program press button in the program
management
68
Page 70

Conclusion Day 2
• Edit Mode: Modify / Edit programs
• Global program parameters
• Parameters of seam section
• Programming Mode
• Create programs
• Adjust basic parameters, parameters for the seam sections and
global program parameters
• Copy / Delete a program
69
Page 71

BEST PRACTICE
• Useful sequence for creation of programs
(Adding a new section in the program copies the values of
the previous section)
• Pre-set of default values for programs in technical mode
(values used for first section)
• Copy a program and modify settings
70
Page 72

QUESTIONS?
71
Page 73

THANK YOU
FOR YOUR ATTENTION
72
Page 74

33719 Bielefeld
Allemagne
Tél. : +49 (0) 521 925 00
E-Mail: service@duerkopp-adler.com
www.duerkopp-adler.com
DÜRKOPP ADLER AG
Potsdamer Str. 190
Subject to design changes - Part of the machines shown with additional equipment - Printed in Germany
© Dürkopp Adler AG – Additional Instructions – 0791 867729 EN - 00.0 - 04/2019
 Loading...