

Page 1

DAC eco M-Type
Instructions for use
Page 2
IMPORTANT:
READ CAREFULLY BEFORE USE
KEEP FOR LATER REFERENCE
All rights reserved.
Property of Dürkopp Adler AG and protected by copyrig
of these contents, including excerpts, is prohibited without the prior
written consent of Dürkopp Adler AG.
Copyright © Dürkopp Adler AG 2015
ht. Any reuse
Page 3

Table of Contents
1 About these instructions....................................................................3
1.1 Target group of these instructions.........................................................3
1.2 Representation conventions – symbols and characters........................3
1.3 Other documents..................................... ... ... ........................................5
1.4 Liability ..................................................................................................5
2 Performance description........................................................... ... .. .... 7
2.1 Characteristics.......................................................................................7
2.2 Declaration of conformity.......................................................................7
2.3 Technical data.......................................................................................7
3 Safety....................................................................................................9
3.1 Basic safety instructions........................................................................9
3.2 Signal words and symbols used in warnings.......................................10
4 Components and functions................................ ..............................13
4.1 Controller.............................................................................................13
4.2 Setpoint device........................................... .........................................14
4.3 Proper use....................................... ....................................................15
5 Operation ...........................................................................................17
5.1 Initial start-up........................................... ... .........................................17
5.2 Basic operation....................................................................................17
5.2.1 Switching the controller on and off......................................................17
5.2.2 Using buttons ......................................................................................19
5.2.3 Using the potentiometer......................................................................20
5.3 Programming.......................................................................................20
5.3.1 Setting the soft start stitch count.........................................................21
5.3.2 Setting the speed ................................................................................22
5.3.3 Set maximum speed............................................................................22
5.3.4 Setting the holding force......................................................................23
5.3.5 Setting positions..................................................................................24
6 Electrical connection........................................................................27
6.1 Connecting the power supply..............................................................27
7 Troubleshooting................................................................................29
7.1 Customer service ................................................................................29
7.2 Error messages...................................................................................29
8 Glossary.............................................................................................33
9 Appendix............................................................................................35
Instructions for use DAC eco M-Type - 01.0 - 10/2015 1
Page 4

Table of Contents
Instructions for use DAC eco M-Type - 01.0 - 10/20152
Page 5
About these instructions
1 About these instructions
These instructions for the DAC eco M-Type controller were compiled with the utmost care. They contain information and notes to
enable long-term and reliable operation.
Should you notice any discrepancies or if you have improvement
req
Customer service ( S. 30).
Consider these instructions part of the p
at all times.
1.1 Target group of these instructions
These instructions are intended for:
With regard to minimum qualification
be met by personnel, please also follow chapter Safety ( S. 9).
uests, we would be glad to receive your feedback through
roduct and keep it on hand
• Operating personnel:
This group is familiar with the co
the instructions for use.
Specifically, chapter Op
this group of employees.
• Technicians:
This group has the appropriate technical training for performing maintenance or repairing malfunctions.
Specifically, chapter Programmin
for this group of employees.
eration ( S. 17) is important for
ntroller and has access to
g ( S. 20) is important
and other requirements to
1.2 Representation conventions – symbols and characters
Various information in these instruction is represented or highlighted by the following characters in order to facilitate easy and
quick understanding:
Proper setting
Indicates proper setting.
Malfunctions
Specifies the faults that can occur due to an incorrect setting.
Instructions for use DAC eco M-Type - 01.0 - 10/2015 3
Page 6
About these instructions
1.
2.
etc.
•
Cover
Specifies which covers have to be removed in order to access the
mponents to be set.
co
Steps to be performed when operating the machine (sewing
and equipping)
Steps to be performed for service, maintenance, and
stallation
in
Steps to be performed via the software control panel
The individual steps are numbered:
1. First step
2. Second step
The sequence of the steps must always be followed.
Lists are identified by bullet points.
Result of performing an operation
Change to the machine or on the display/control panel.
Important
Special attention must be paid to
this point when performing a step.
Information
Additional information, e.g. on alternative operating options.
Order
Specifies the work to be performed before or after a setting.
References
Reference to another section in the instructions.
Instructions for use DAC eco M-Type - 01.0 - 10/20154
Page 7

About these instructions
Safety Important warnings for the machine operator are specially desig-
nated. Since safety is of particular importance, hazard symbols,
levels of danger and their signal words are described separately
in the chapter Safety ( S. 9).
Orientation If the figure is unclear, indications of right or left ar
the operator's point of view.
1.3 Other documents
The controller includes components from other manufacturers.
Each manufacturer has performed a hazard assessment for these
purchased parts and confirmed their design compliance with applicable European and national regulations. The proper use of
se components is described in each manufacturer's instruc-
the
tions.
1.4 Liability
All information in these instructions were compiled with consideration to the state of the art, and applicable standards and regulations.
Dürkopp Adler cannot be held liable for damages resulting from:
• Breakage and transport damages
• Failure to follow the instructions provided
• Improper use
• Unauthorized modifications to the controller
• Use of untrained personnel
• Use of unapproved replacement parts
e always from
Transport
Dürkopp Adler will not be held liable for any damage during transport. Inspect the delivery immediately upon receiving it. Report
ny damage to the last transport manager. This applies even if
a
the packaging is undamaged.
Leave controllers, equipment and packaging material in the condition in which they were found when the damage was discovered.
his will ensure any claims against the transport company.
T
Instructions for use DAC eco M-Type - 01.0 - 10/2015 5
Page 8

About these instructions
Report all other complaints to Dürkopp Adler immediately after
receiving the product.
Instructions for use DAC eco M-Type - 01.0 - 10/20156
Page 9
Performance description
2 Performance description
2.1 Characteristics
• Positioning drive for M-Type sewing motor
• Integration in the machine head of the M-Type
• Programmable parameters
• Transfer of machine-specific parameters during start-up
di
of the machine
2.2 Declaration of conformity
The DAC eco M-Type complies with European regulations ensuring health, safety, and environmental protection as specified
in the declaration of conformity or low voltage directive.
rectl
y from the machine identification memory (machine ID)
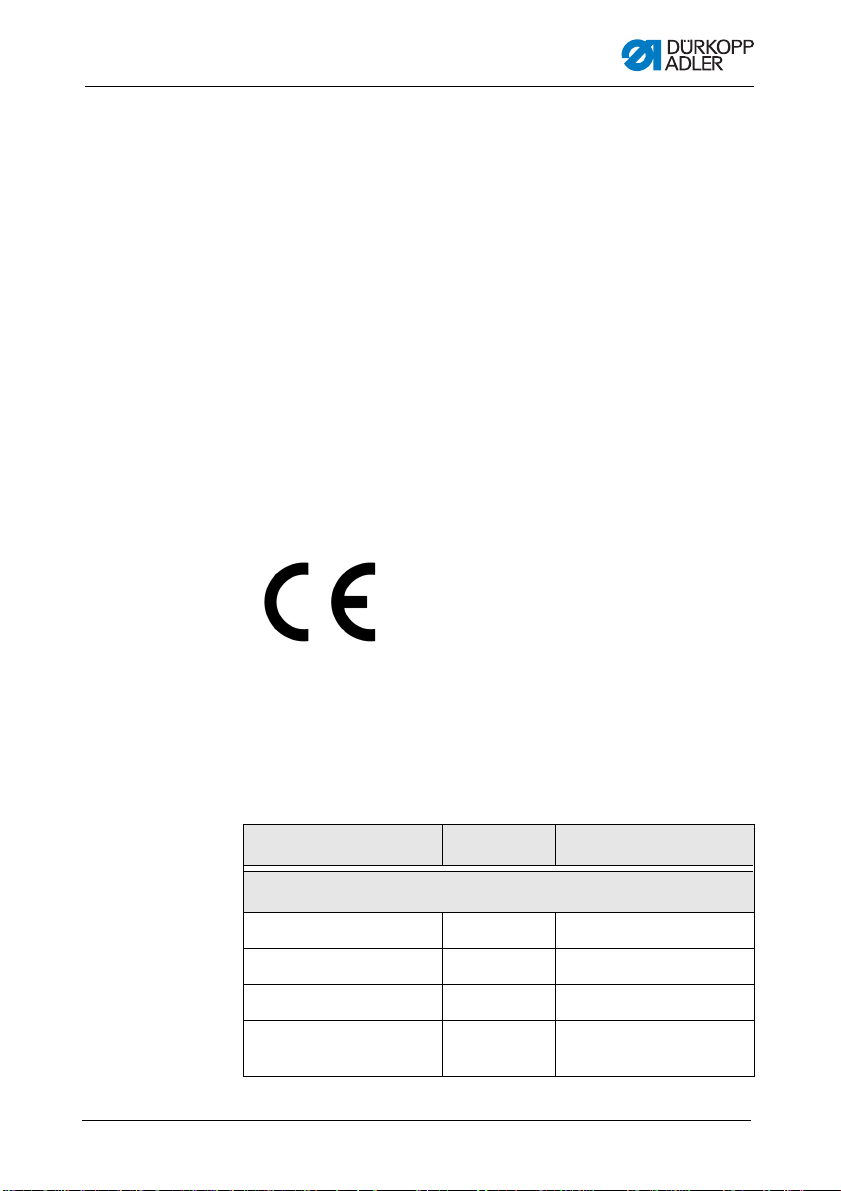
2.3 Technical data
Rating and usage conditions
Data / motor type Unit Built-in motor
Rating
Line voltage [V] 190 – 250, single phase
Line frequency [Hz] 50/60
Rated power [W] 600
Speed
of the motor
Instructions for use DAC eco M-Type - 01.0 - 10/2015 7
[min
-1
]
3400
Page 10
Performance description
Data / motor type Unit Built-in motor
Operating mode S5
(Intermittent periodic duty with electric
braking,
relative duty cycle 40%, length 2.5 s)
IP class IP40
Insulation class
Usage conditions
Ambient temperature [°C] + 5 –
E
50
Instructions for use DAC eco M-Type - 01.0 - 10/20158
Page 11

Safety
3 Safety
This chapter contains basic information for your safety. Read the
instructions carefully before setting up or operating the controller.
Make sure to follow the information included in this chapter. Failure
to do so can result in serious injury and damage to the machine.
3.1 Basic safety instructions
The DAC eco M-Type controller may only be used as described
in these instructions.
The instructions should be available at
all times.
Work on live components is prohibited.
The controller was built and tested in compliance with all valid
rdinance and safety regulations, and left the factory in proper
o
working order.
The controller will only work safely and reliably when it is used as
ntended ( 4.3 Proper use, S. 15).
i
the controller's location at
Before leaving the workplace:
• Switch off the controller
• Wait until the machine stops
• Wait until the LEDs go out
Obligations
of the operator
Requirements to
met by the
be
personnel
Instructions for use DAC eco M-Type - 01.0 - 10/2015 9
Observe the country-specific safety and accident prevention regulations and the legal regulations concerning industrial safety and
protection of the environment.
the
All warnings and safety signs on the controller must always be in
egible condition and may not be removed. Missing or damaged
l
labels should be replaced immediately.
The controller may only be set up by qualified technicians. Qualified technicians are personnel with electronics and mechanical
training.
Page 12

Safety
The following work may only be performed by qualified technicians.
• Maintenance work
•Repairs
• Work on electrical equipment
Only authorized persons may work on the machine. Anyone working on the machine belongs to the operating personnel. Operating
ersonnel must have read and understand the instructions before
p
working on the system.
Setup Controller setup and start-up must be performed carefully by
qualified technicians to
sonnel.
The power cable must have a plug authori
which the machine is being used. The power plug may only be
connected to the power cable by a qualified specialist.
Operation Inspect the controller while in use for any externally visible dam-
age.
Stop working if you notice any changes. Report any changes to
your supervisor.
A damaged controller should no longer be used.
Conversions or changes to the controller are prohibited.
ensure no health risks for operating per-
zed for the country in
3.2 Signal words and symbols used in warnings
Warnings in the text are distinguished by color bars. The color
scheme is oriented towards the severity of the danger. Signal
words indicate the degree of risk:
Instructions for use DAC eco M-Type - 01.0 - 10/201510
Page 13

Safety
Signal words Signal words and the hazard that they describe:
Signal word Hazard
WARNING Performing an action can have se
consequences.
CAUTION Performing an action can have undesirable conse-
quences, such as loss of data or damage to hardware.
NOTE Tips or more detailed information
to make operation easier for the user.
rious or hazardous
Symbols The following symbols indicate the type of risk to personnel:
Symbol Type of danger
General risk
Electric shock
Puncturing
Crushing
Environmental damage
Instructions for use DAC eco M-Type - 01.0 - 10/2015 11
Page 14

Examples Examples of the layout of the warnings in the text:
Type and source of risk
Consequences of non-compliance.
Measures for avoiding the risk.
WARNING
Type and source of risk
Consequences of non-compliance.
Measures for avoiding the risk.
CAUTION
Tip.
NOTE
This is what a warning looks like where non-compliance
could result in serious or hazardous consequences.
is is what a warning looks like where non-compliance
Th
could result undesirable consequences, such as loss of data
or damage to hardware.
Safety
is is the more detailed information to simplify operation for
Th
the user.
Instructions for use DAC eco M-Type - 01.0 - 10/201512
Page 15

Components and functions
(1) - Button S1
(2) - Button S2
(3) - Potentiometer
②
③
①
4 Components and functions
When delivered the DAC eco M-Type consists of:
• Foot pedal rods
• Setpoint device
• Controller
4.1 Controller
Fig. 1: Controller front
Instructions for use DAC eco M-Type - 01.0 - 10/2015 13
Page 16

Components and functions
Buttons and functions
No. Button Function
Referenc
e
①
②
③
S1 Sewing mode
• Select needle stop
sition
po
Programming mode
• Confirm input
• Increase values
S2 Sewing mode
• Switch on soft start
Programming mode
• Terminate input
• Reduce values
Potentiometer • Adapt maximum
speed
S. 19
S. 19
S. 20
4.2 Setpoint device
The setpoint device converts the values from the foot pedal into
voltage values. The setpoint device indicates the speed.
The setpoint device is attached und
bracket.
The setpoint device includes:
• a push/pull rod (1) that is connected to the machine foot pedal
through the set of rods.
• a spring preload (2), enabling 3 settings for the push/pull rod
ne, 1/8, or 1/4 rotation)
(no
er the frame with a mounting
Instructions for use DAC eco M-Type - 01.0 - 10/201514
Page 17

Components and functions
(1) - Push/pull rod
(2) - Spring pre-load
(3) - Mounting parts
①
③
②
Improper use can result in hardware damage.
Follow all instructions provided.
CAUTION
Fig. 2: Setpoint device
4.3 Proper use
The DAC eco M-Type controller is not a standalone unit; instead,
it is intended for installation in a machine of the class M-Type with
the subclass’ suffix M. For additional information refer to
2.2 Declaration of conformity, S. 7.
The controller is intended for industrial use.
The controller may only operate in rooms that are clean and dry.
Do not operate the controller when ae
is in use.
Proper use includes compliance with
and repair conditions as specified by the manufacturer.
Only authorized persons may work on
3 Safety, S. 9).
rosols (sprays) or oxygen
the operating, maintenance,
the controller (chapter
Instructions for use DAC eco M-Type - 01.0 - 10/2015 15
Page 18

Components and functions
Instructions for use DAC eco M-Type - 01.0 - 10/201516
Page 19

Operation
CAUTION
Hardware damage due to faulty connecti on.
An overload is possible due to a faulty connection.
Only qualified technicians may perform the
connection.
5 Operation
Operation of the DAC eco M-Type controller is provided exclusively by using buttons S1 and S2 as well as the potentiometer.
You set the foundation for the sewing process with the settings
the controller.
on
5.1 Initial start-up
Before initial start-up of the controller, make sure to follow all
information in chapter 3 Safety, S. 9.
Ensure the following:
• Setting the positions ( S. 24)
5.2 Basic operation
In this section you will learn the basics for working with the controller. These basics are:
• Switching the controller on and off ( S. 17)
• Using buttons ( S. 19)
• Using the potentiometer ( S. 20)
5.2.1 Switching the controller on and off
Important
Before operating the controller, make sure to follow all information
in chapter 3 Safety, S
Instructions for use DAC eco M-Type - 01.0 - 10/2015 17
. 9.
Page 20

Risk of injury by the needle tip.
Accidentally switching on the system may result in
minor puncture injuries.
When there are longer standstill periods,
disconnect the power cable before leaving the
workplace.
WARNING
(1) - POWER-LED
(2) - MESSAGE-LED
(3) - Main switch
(4) - LED S2
(5) - LED S1
①
⑤
②
③
④
Operation
The controller is located below the tabletop of the frame.
Fig. 3: Switching the controller on and off
Instructions for use DAC eco M-Type - 01.0 - 10/201518
Page 21

Operation
Switching on the controller
1. Press the main switch (3) down to position I.
e POWER LED (1) illuminates green.
Th
You can begin sewing and pushing the foot pedal forward.
Switching off the controller
When you are finished your work switch off the controller.
1. Press the main switch (3) up to position 0.
The M
ESSAGE LED (2) illuminates red.
5.2.2 Using buttons
While in sewing mode, you can select the following machine
functions with the buttons:
Buttons and use
Button Use
S1 • Select needle stop position:
up = LED illuminates
down = LED off
S2 • Switch on soft start
To select a machine function:
1. Briefly press the corresponding button.
e machine beeps briefly.
Th
You will recognize whether a machine function has been
activated by the LED in the respective button.
When the POWER LED is on you can sew. Pro
gramming is
possible outside of sewing only ( S. 20).
Instructions for use DAC eco M-Type - 01.0 - 10/2015 19
Page 22

Operation
5.2.3 Using the potentiometer
You can use the potentiometer to adjust the maximum speed of
the current sewing process. The set values are retained, even
when you switch off the controller.
To adjust the maximum speed:
1. Turn the potentiometer:
• Clockwise = increase speed
• Counterclockwise = decrease speed
5.3 Programming
You can program the controller within a reduced scope using
buttons S1 and S2.
Buttons and use
Button Use
S1 • Confirm input (press and hold)
• Increase values (press briefly)
S2 • Terminate input (press and hold)
• Reduce values (press briefly)
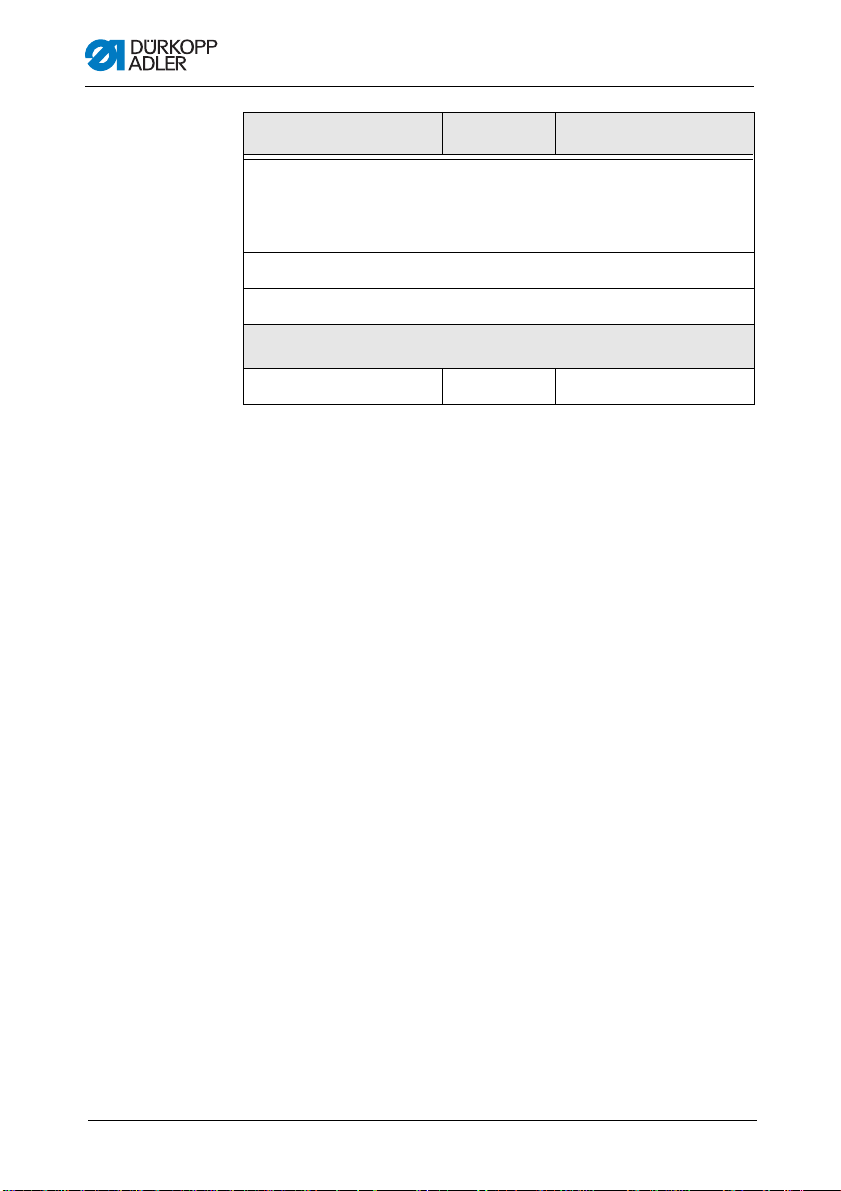
Programmable parameters
No. Parameters Min. Max.
1 Soft start stitch count 1 20 10 1
2 Soft start speed 100 1000 100 [rpm]
3 Max. speed 100 3400 1000 100 [rpm]
4 Holding force 0 6 0.1 1 [A]
5 Needle position
Instructions for use DAC eco M-Type - 01.0 - 10/201520
Flashing
LED
S1 ≙
Flashing
S2 ≙
LED
Unit
Page 23

Operation
Important
The programming mode has to be activated first.
To activate the programming mode:
1. When switching on the controller press and hold button S1
until
the machine beeps a second time.
The M
ESSAGE LED flashes.
Select the corresponding parameter by
briefly pressing button S1.
The S1 LED indicates which parameter has been preselected
through frequent flashing.
5.3.1 Setting the soft start stitch count
Soft start refers to starting the machine at a slower speed. This
machine function prevents the motor from overheating during long
work processes. After a certain stitch count, the machine runs at
the set soft start speed ( S. 22).
You set the stitch count for s
1. Briefly press button S1 once.
LED S1 fl
ashes briefly once.
2. Press and hold button S1.
The M
ESSAGE LED illuminates.
3. Press button S1
obtained.
You can reduce the value by briefly pressing button S2.
e value increases or decreases incrementally by one
Th
step.
LED S1 fl
ashes for the tens digit, and LED S2 for the units
digit.
4. Press and hold button S1 t
oft start as follows:
repeatedly until the required value is
o confirm input.
Press and hold button S2 t
Instructions for use DAC eco M-Type - 01.0 - 10/2015 21
o return to sewing mode.
Page 24

5.3.2 Setting the speed
You can also set the speed for soft start.
To set the soft start speed:
Operation
1. Briefly press button S1 twice
LED S1 fl
2. Press and hold button S1.
The M
3. Press button S1
obtained.
You can reduce the value by briefly pressing button S2.
Th
one-hundredth step.
LED S1
units digit.
4. Press and hold button S1 t
Press and hold button S2 t
ashes briefly twice.
ESSAGE LED illuminates.
repeatedly until the required value is
e value increases or decreases incrementally by one
flashes for the hundreds digit, and LED S2 for the
.
o confirm input.
o return to sewing mode.
5.3.3 Set maximum speed
A reduced speed protects the sewing motor with an ongoing lower
speed. The maximum speed depends on the machine class.
To set the speed:
1. Briefly press button S1 three times.
LED S1 fl
2. Press and hold button S1.
The M
3. Press button S1
obtained.
You can reduce the value by briefly pressing button S2.
Th
one-hundredth step.
LED S1 fl
hundreds digit.
4. Press and hold button S1 t
ashes briefly three times.
ESSAGE LED illuminates.
repeatedly until the required value is
e value increases or decreases incrementally by one
ashes for the thousands digit, and LED S2 for the
o confirm input.
Instructions for use DAC eco M-Type - 01.0 - 10/201522
Page 25

Operation
Hardware damage due to incorrect setting.
Setting too strong a holding force can overheat the
sewing motor.
Only qualified technicians may make this setting.
CAUTION
Press and hold button S2 to return to sewing mode.
Example for setting the speed
The value is set by pressing the button (button S1 or
button S2).
The following example assumes an initial value of 3400 rpm :
To set the speed to 1700 rpm (
1. Briefly press button S2
LED S1 fl
ashes once, LED S2 7 times.
2. Press and hold button S1 t
= 3400 - 1700):
17 times ( ≙ 1700 / 100).
o confirm input.
5.3.4 Setting the holding force
This function prevents unintended needle movement when the
machine is stopped. You can check whether it is working by turning
the handwheel.
Holding force works when the machine is stopped:
• when stopping during sewing
• at the end of sewing
The effect can be adjusted.
To set the holding force:
1. Briefly press button S1 four
LED S1 fl
ashes briefly four times.
times.
2. Press and hold button S1.
ESSAGE LED illuminates.
eatedly until the required holding force is
obtained.
The M
3. Press button S1 rep
Instructions for use DAC eco M-Type - 01.0 - 10/2015 23
Page 26

Operation
Hardware damage due to incorrect setting.
An incorrect setting can cause problems in the
sewing process.
Only qualified technicians may make this setting.
CAUTION
You can reduce the holding force by briefly pressing
button S2.
e holding force increases or decreases in increments of
Th
0.5 A.
LED S1 fl
ashes for the digit before the decimal point, and
LED S2 for the decimal digit.
The higher the set value, the stronger the holding force.
4. Press and hold button S1 t
o confirm input.
5.3.5 Setting positions
The following positions can be set:
• Reference position
• Position 1
• Position 2
The positions have to be set once:
• during initial start-up ( S. 17)
• after replacing the controller
• after replacing the motor or setpoint device
Setting the reference position
The reference position establishes a reference between the synchronizer and the actual mechanical position.
To set the reference position:
1. Briefly press button S1 five
LED S1 fl
ashes briefly five times.
2. Press and hold button S1.
The M
ESSAGE LED, LED S1, and LED S2 illuminate.
Instructions for use DAC eco M-Type - 01.0 - 10/201524
times.
Page 27

Operation
Risk of injury by the needle tip.
Accidentally pressing the foot pedal may result in
minor puncture injuries.
Secure the sewing area.
WARNING
3. Press the foot pedal forward.
LEDs S1 and S2 flash.
4. Turn the handwheel until the needle tip
is on the throat plate.
5. Press and hold button S1 to confirm input.
LED S2 fl
ashes.
Either continue by setting position 1 or exit the parameter while
eping button S2 pressed.
ke
Setting the position 1
Position 1 (lower dead center) indicates the position where it
needle is at its lowest point.
To set the position 1:
1. Turn handwheel until the needle below changes direction.
2. Press and hold button S1 t
o confirm input.
LED S1 flashes.
Either continue by setting position 2 or exit the parameter while
eping button S2 pressed.
ke
Instructions for use DAC eco M-Type - 01.0 - 10/2015 25
Page 28

Operation
Setting the position 2
Position 2 (upper dead center) indicates the position where it
eedle is at its highest point.
n
To set the position 2:
1. Turn handwheel until the needle above changes direction.
2. Press and hold button S1 t
Press and hold button S2 t
o return to sewing mode.
o confirm input.
Instructions for use DAC eco M-Type - 01.0 - 10/201526
Page 29

Electrical connection
Electric shock due to live parts.
Serious or fatal injuries possible.
Work on the electrical system must ONLY be
performed by technicians or appropriately trained
and authorized personnel.
WARNING
6 Electrical connection
6.1 Connecting the power supply
1. Connect the controller to grounded AC line power per the wiring
diagram ( 9 Appendix, S. 35). Always use a multi-prong
plug with protective ground co ntact.
The following are suitable power supply nets:
• TN net
•TT net
•IT net
Instructions for use DAC eco M-Type - 01.0 - 10/2015 27
Page 30

Electrical connection
Instructions for use DAC eco M-Type - 01.0 - 10/201528
Page 31

Troubleshooting
7 Troubleshooting
7.1 Customer service
Contact for problems, repairs, or if the controller is damaged:
Dürkopp Adler AG
Potsdamer Str. 190
33719 Bielefeld, Germany
Tel: +49 (0) 180 5 383 756
Fax: +49 (0) 521 925 2594
E-Mail: service@duerkopp-adler.com
Internet: www.duerkopp-adler.com
7.2 Error messages
The DAC eco M-Type controller has 3 types of error messages
displayed with the MESSAGE LED. The codes are displayed by
means of the MESSAGE LED flashing for an appropriate period
at specific intervals. After a brief pause the flashing repeats.
Instructions for use DAC eco M-Type - 01.0 - 10/2015 29
Page 32

Types of error messages
Type Description Remedial action
Troubleshooting
Error Serious error:
Work cannot be continued
Warning Error
Work cannot be continued
Information Information:
Work can be continued
• Switch off the controller
• Correct the state that resulted in
he error
t
• If nec., contact customer service
• Correct the state that resulted in
he error
t
• Switch the controller off and on
gain
a
• If nec., correct the state that
esulted in the message
r
Listing of codes
Code Type Description Remedial action
1 Warning Operation lock • Check tilt sensor on
machine
2 Information Low voltage warning
3 Warning Foot pedal not in 0
shold):
(1st thre
Live voltage < 180 V
AC
position
• Check the line voltage
• Stabilize the line
age
volt
• Use generator
• Remove foot from
edal
foot p
4 Error Foot pedal not con-
nected
5 Error Sewing motor
encoder plug (
9 pin) is not connected
6 Error Sewing motor
blocked
7 Error Sewing motor over-
load
Instructions for use DAC eco M-Type - 01.0 - 10/201530
sub D,
• Connect foot pedal
• Connect encoder
to the control
cable
system, use the correct connector
• Eliminate stiff movement in the machine
• Eliminate stiff movement in the machine
Page 33

Troubleshooting
Code Type Description Remedial action
8 Error Sewing motor not
connected
9 Error Sewing motor insula-
10 Error High-voltage error:
11 Error EEprom communica-
tion error
Live voltage for
nded period >
exte
290 V
tion error
• Check the connection
• Test sewing motor
phases (R = 2.8 Ω,
high impedance to
PE)
• Replace sewing
motor
• Replace controller
• Check motor phase
and PE for
impedance connection
• Replace sewing
motor
• Check line voltage,
if line volt
exceeds continuously:
• Stabilize or use generator
• Check machine ID
connection
• Switch off the controller, wait until the
LEDs are
then switch on
again
low-
age
off and
12 Information No valid data on
rnal
exte
EEprom
13 Error Low voltage warning
reshold):
(2nd th
Live voltage < 150 V
AC
Instructions for use DAC eco M-Type - 01.0 - 10/2015 31
• Check machine ID
connection
• Switch off the controller, wait until the
LEDs are
then switch on
again
• Update the software
• Check the line voltage
• Stabilize the line
volt
• Use generator
off and
age
Page 34

Troubleshooting
Code Type Description Remedial action
14 Error Incorrect sewing
motor direction of
rotation
15 Error Sewing motor over-
16 Error Maximum speed
17 Error AC-RDY Timeout:
18 Information No valid data on
current:
Internal current rise >
25 A
exceeded
intermediate circuit
age did not reach
volt
the defined threshold
in the specified time
rnal
exte
EEprom
• Exchange encoder
• Check motor plug
assignment and
change, if necessary
• Check wiring on
machine distributor
and change if necessary
• Test motor phases
and check for correct value
• Replace controller
• Replace encoder
• Check the line voltage
• If the line voltage is
OK, replace the
controller
• Check machine ID
connection
• Switch off the controller, wait until the
LEDs are
then switch on
again
• Update the software
off and
19 Information No valid data on
Instructions for use DAC eco M-Type - 01.0 - 10/201532
rnal
exte
EEprom
• Check machine ID
connection
• Switch off the controller, wait until the
LEDs are
then switch on
again
• Update the software
off and
Page 35

Glossary
8 Glossary
Term Explanation
Machine function Identifies an equipment feature of a machine
Parameters Numerical values that activate or set a machine
function
Potentiometer Continuous adjustment wheel for setting the maxi-
mum speed
Soft start Machine starts at a lower speed
Setpoint device Converts the values from the foot pedal into volt-
Stitch count Indicates the number of stitches per minute
age values
Instructions for use DAC eco M-Type - 01.0 - 10/2015 33
Page 36

Glossary
Instructions for use DAC eco M-Type - 01.0 - 10/201534
Page 37

Appendix
9 Appendix
Fig. 4: TN net wiring diagram
Fig. 5: TT net wiring diagram
Instructions for use DAC eco M-Type - 01.0 - 10/2015 35
Page 38

Fig. 6: IT net wiring diagram
Appendix
Instructions for use DAC eco M-Type - 01.0 - 10/201536
Page 39

Page 40

DÜRKOPP ADLER AG
Potsdamer Str. 190
33719 Bielefeld, Germany
Germany
Phone: +49 (0) 521 925 00
E-Mail: service@duerkopp-adler.com
www.duerkopp-adler.com
Subject to design changes - Printed in Germany - © Dürkopp Adler AG - Original instructions - 0791 100632 EN - 01.0 - 10/2015
 Loading...