

Page 1
Anbauanleitung für Teilesatz "Sauberer Nahtanfang"
0867 591004
Fitting Instruction for "Neat Seam Beginning"
0867 591004
1 Komponenten des Bausatzes
Bevor Sie mit dem Einbau beginnen:
Bitte überprüfen Sie, ob alle Bauteile des Teilesatzes in dem
Lieferumfang enthalten sind.
Der Teilesatz 0867 591004 besteht aus folgenden Komponenten.
Bauteil Teilenummer
1 x Spannungsplatte 0867 591014
2 x Senkschraube M4 x 12 9225 201770
1 x Kabelbaum 9870 867012
1 x Halter M-Control 0867 490154
2 x Spanplattenschraube 3,5 x 17 9207 170227
Teile-Nr./ Part-No.:
0791 867708
2 Kurzbeschreibung
3
1
2
Der Teilesatz “Sauberer Nahtanfang” sorgt für einen kurzen und
sauber vernähten Nadelfaden am Nahtanfang.
Nach dem ersten Stich am Nahtanfang wird der Nadelfaden 3 von der
Fadenklemme 1 geklemmt und vom Fadenzieher 2 zurückgezogen, so
dass der Nadelfaden am Nahtanfang kurz aus dem Nähgut
heraussteht.
Die Länge des zurückgezogenen Nadelfadens kann eingestellt
werden.
Ausgabe/Edition:
06.2010
Änderungsindex
Rev. index: 00.0
Printed in Germany
Blatt: von
Sheet: 1 from 24
Page 2
Anbauanleitung für Teilesatz "Sauberer Nahtanfang"
0867 591004
Fitting Instruction for "Neat Seam Beginning"
0867 591004
3 Umbau
Vorsicht Verletzungsgefahr!
Schalten Sie den Hauptschalter aus und ziehen Sie den
Netzstecker, bevor sie mit dem Einbau beginnen.
Der Einbau darf nur von qualifizierten Technikern durchgeführt
werden.
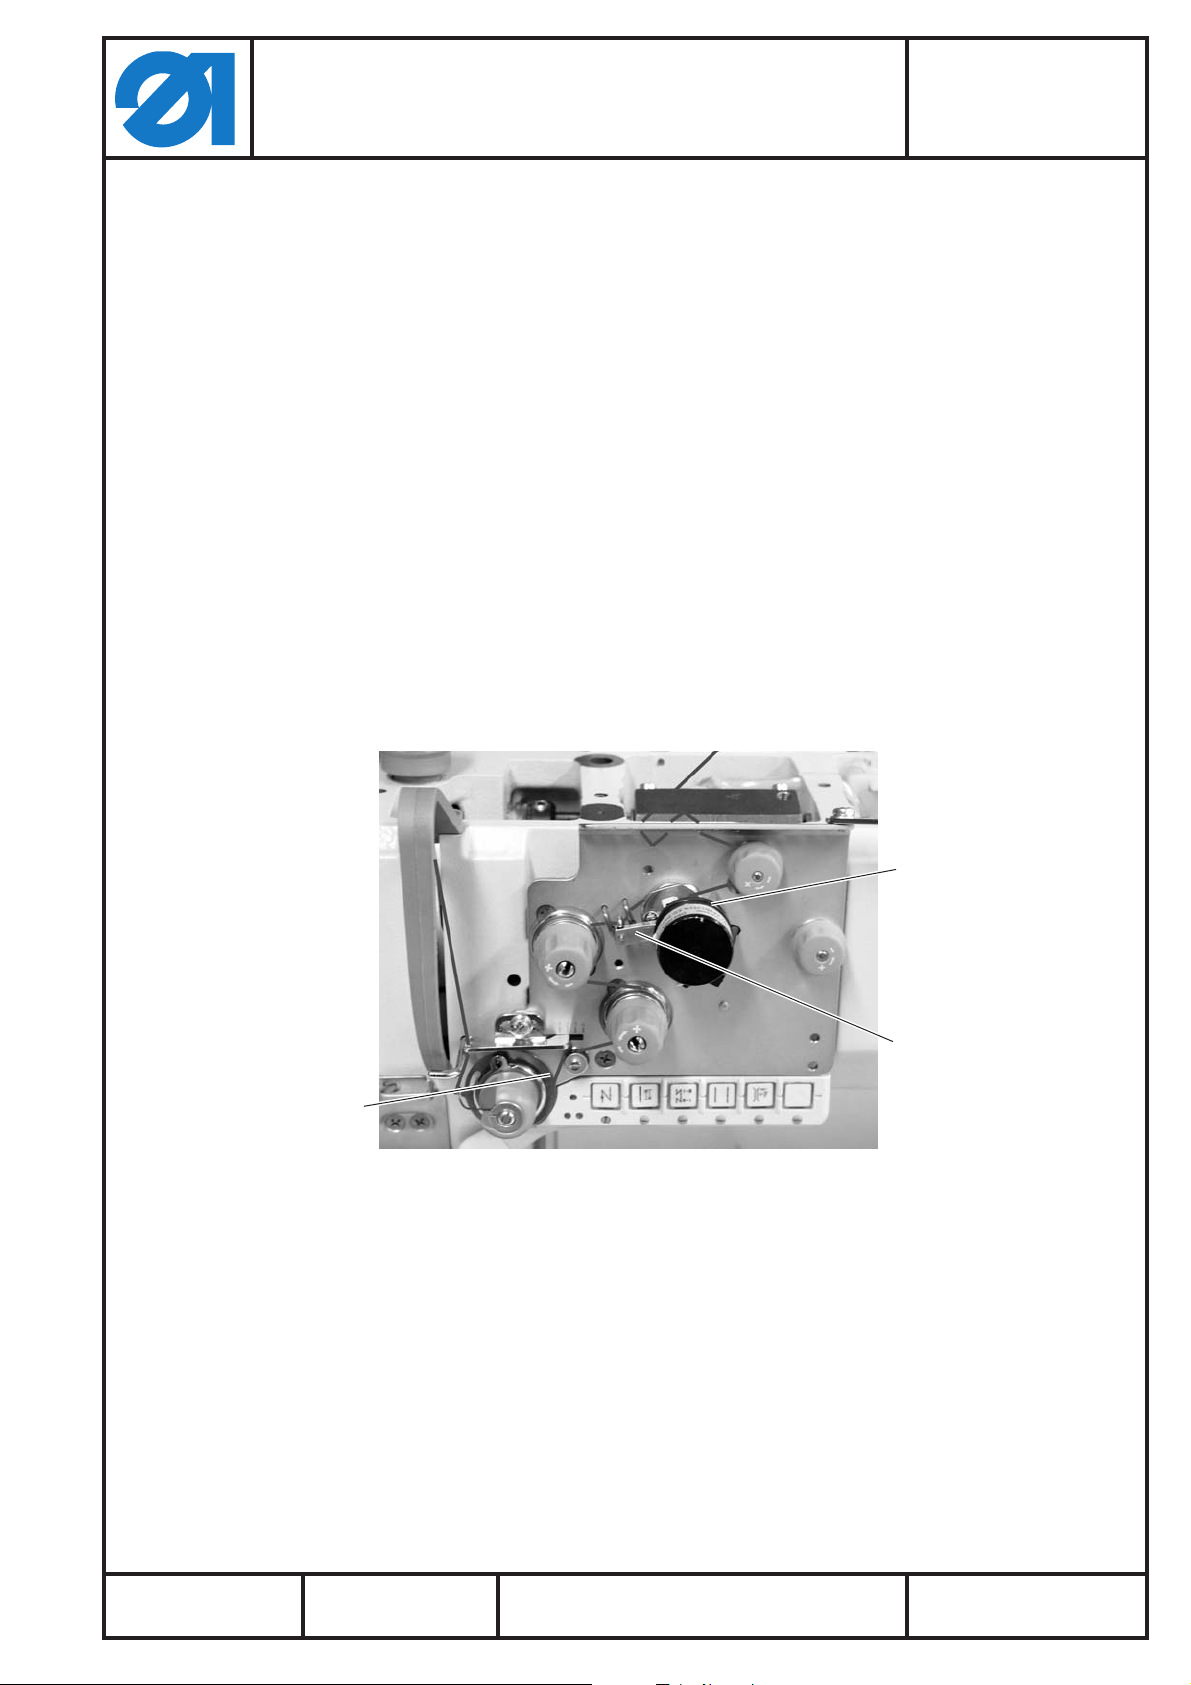
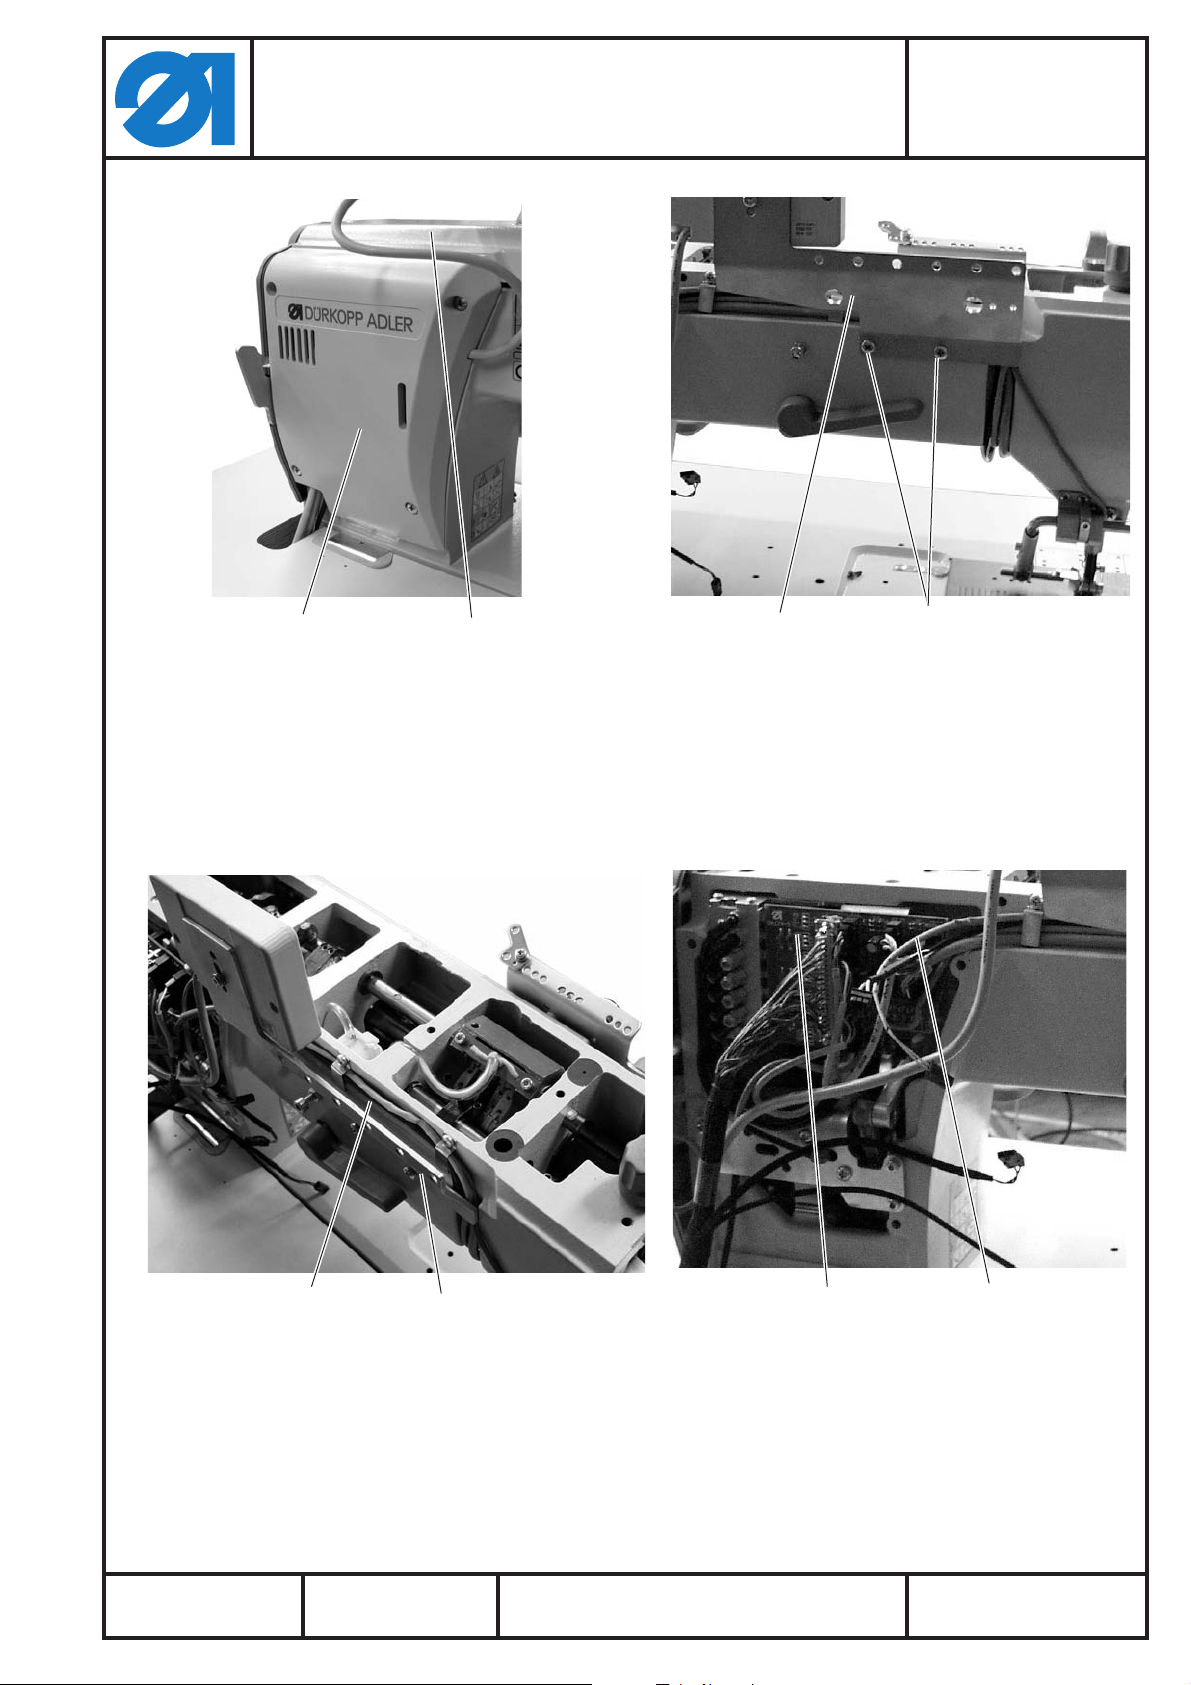
3.1 Fadenspannungsplatte abnehmen
Teile-Nr./ Part-No.:
0791 867708
21
– Schrauben 2 herausdrehen.
– Fadenspannungsplatte 1 abklappen.
– Druckluftschläuche 3 und 4 abziehen.
43
Ausgabe/Edition:
06.2010
Änderungsindex
Rev. index: 00.0
Printed in Germany
Blatt: von
Sheet: 2 from 24
Page 3
Anbauanleitung für Teilesatz "Sauberer Nahtanfang"
0867 591004
Fitting Instruction for "Neat Seam Beginning"
0867 591004
3.2 Aussparung im Taster anbringen
Teile-Nr./ Part-No.:
0791 867708
21
– Schrauben 1 herausdrehen.
– Tasterleiste 2 abnehmen.
– Aufsparung 3 am Taster herstellen (siehe Skizze).
3
Ausgabe/Edition:
06.2010
Änderungsindex
Rev. index: 00.0
Printed in Germany
Blatt: von
Sheet: 3 from 24
Page 4
Anbauanleitung für Teilesatz "Sauberer Nahtanfang"
0867 591004
Fitting Instruction for "Neat Seam Beginning"
0867 591004
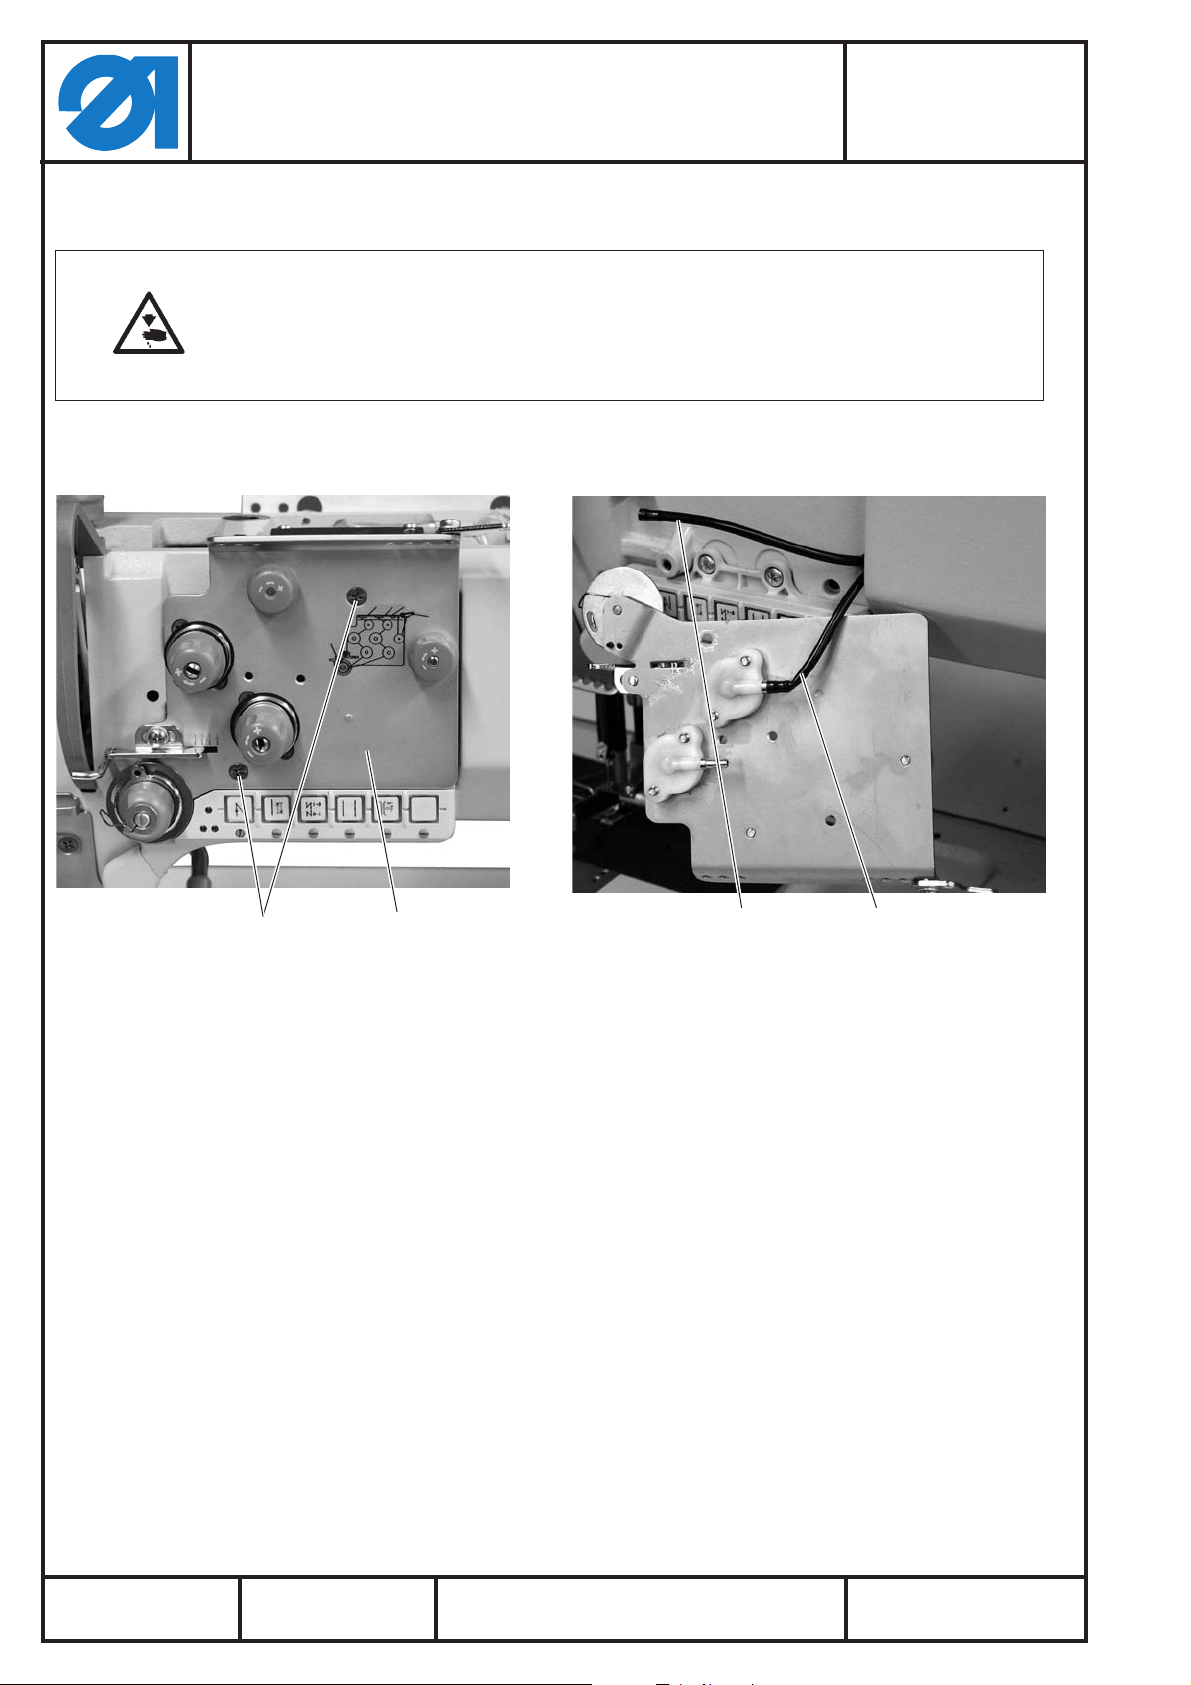
3.3 Taster und neue Fadenspannungsplatte montieren
Teile-Nr./ Part-No.:
0791 867708
43 2 1
– Leitungen 2 und 3 im Taster 1 verlegen.
– Leitungen mit Kabelbinder 4 bündeln.
– Druckluftschläuche 5 und 6 an der neuen
Fadenspannungsplatte 7 anschließen.
76 5
Ausgabe/Edition:
06.2010
98
– Tasterleiste8mitdendreiSchrauben9montieren.
–
Neue Fadenspannungsplatte 11 mit den Schrauben 10 und 12
anschrauben.
Änderungsindex
Rev. index: 00.0
12 11 10
Printed in Germany
Blatt: von
Sheet: 4 from 24
Page 5
Anbauanleitung für Teilesatz "Sauberer Nahtanfang"
0867 591004
Fitting Instruction for "Neat Seam Beginning"
0867 591004
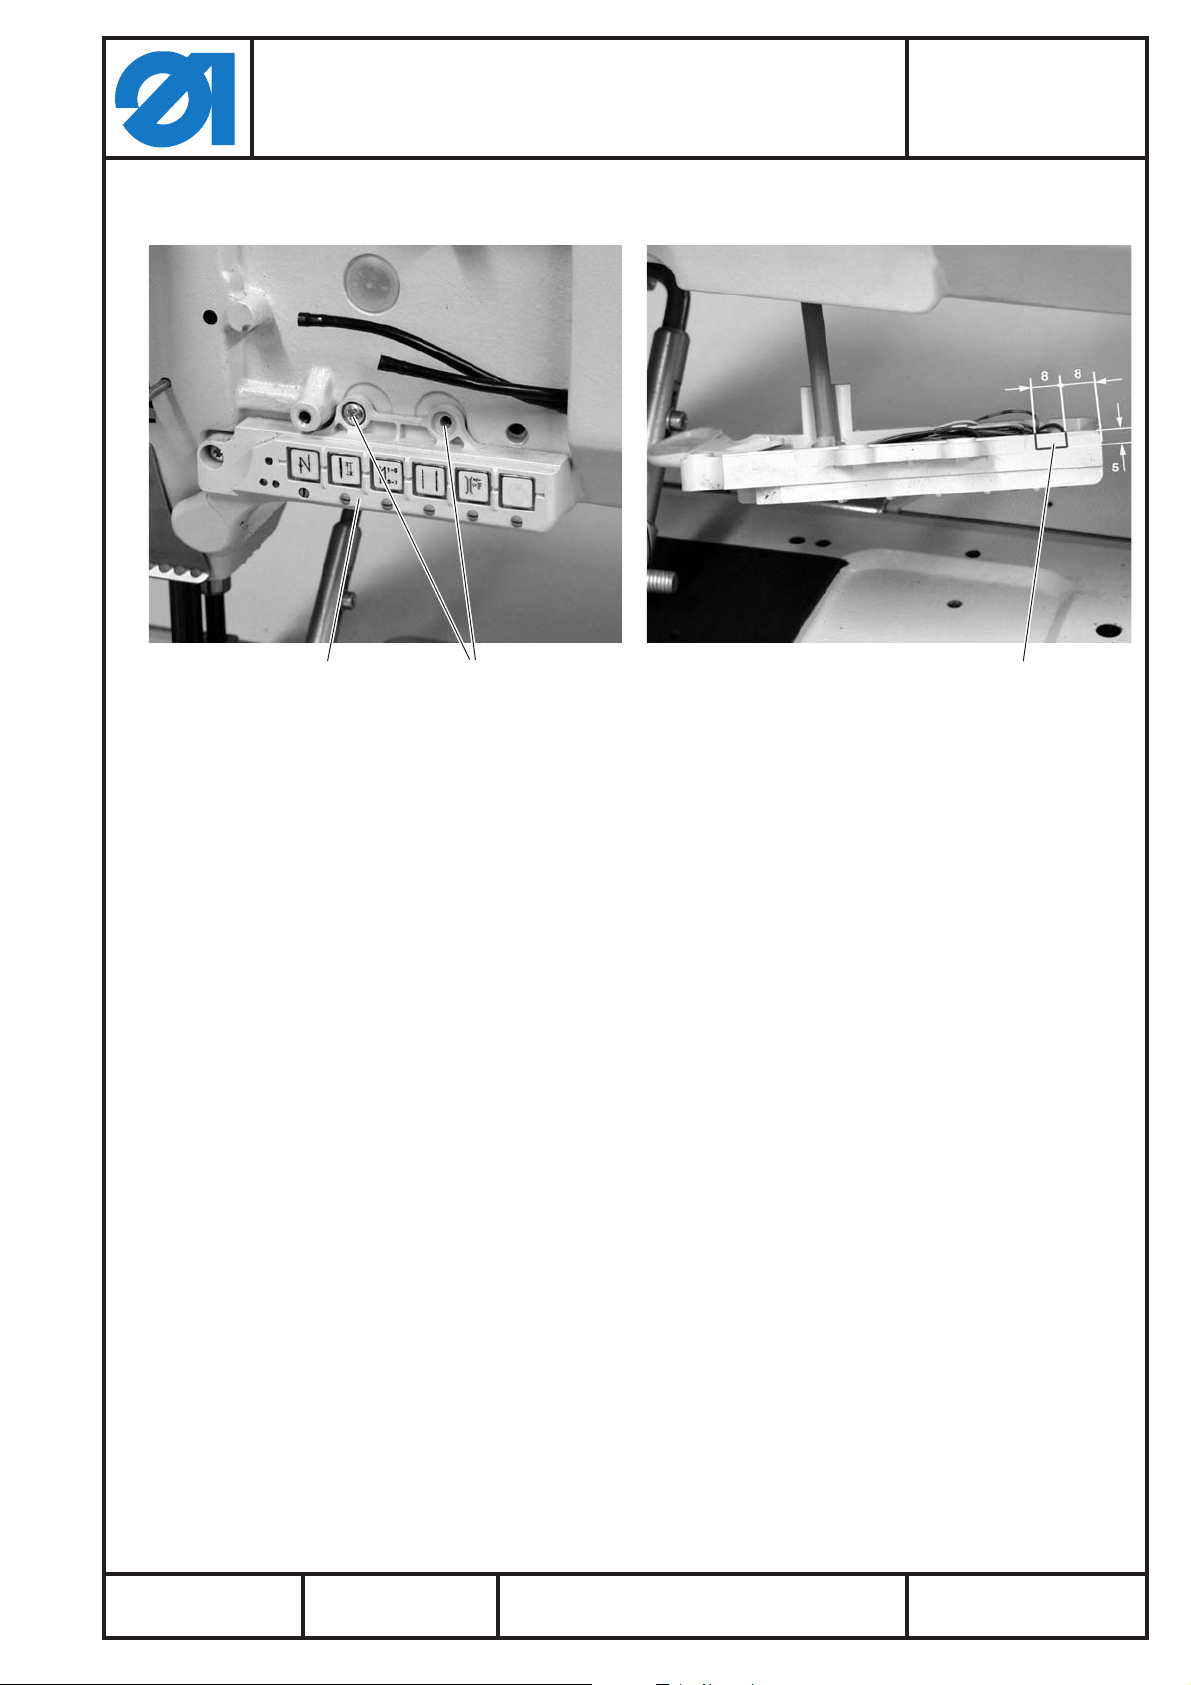
Teile-Nr./ Part-No.:
0791 867708
21
– Deckel 2 abschrauben.
– Armdeckel 1 abschrauben.
– Schrauben 3 am Bedienfeldhalter 4 lösen.
– Kabel 5 von der Spannungsplatte hinter dem Bedienfeld zur
Platine 6 verlegen.
– Schrauben 3 am Bedienfeldhalter 4 wieder festdrehen.
43
Ausgabe/Edition:
06.2010
54
Änderungsindex
Rev. index: 00.0
Printed in Germany
65
Blatt: von
Sheet: 5 from 24
Page 6
Anbauanleitung für Teilesatz "Sauberer Nahtanfang"
Fitting Instruction for "Neat Seam Beginning"
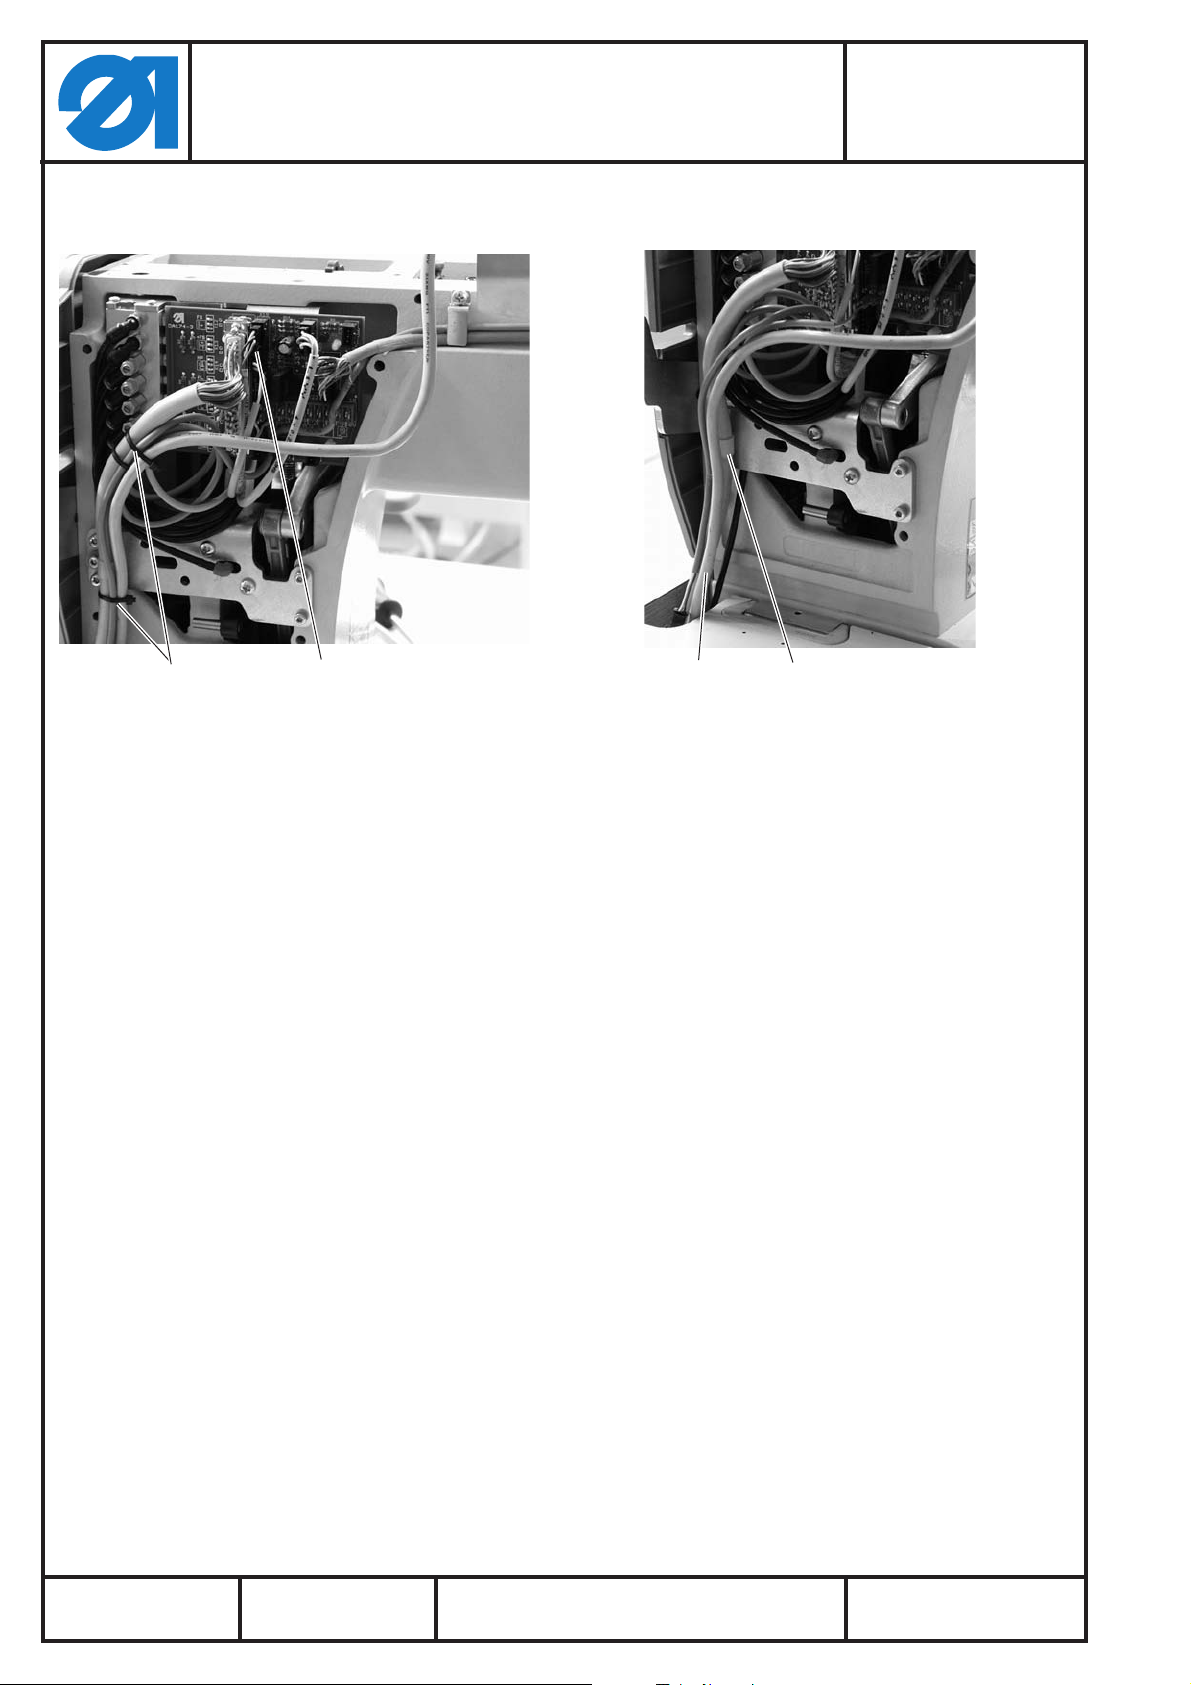
3.4 Kabel entfernen
Teile-Nr./ Part-No.:
0867 591004
0791 867708
0867 591004
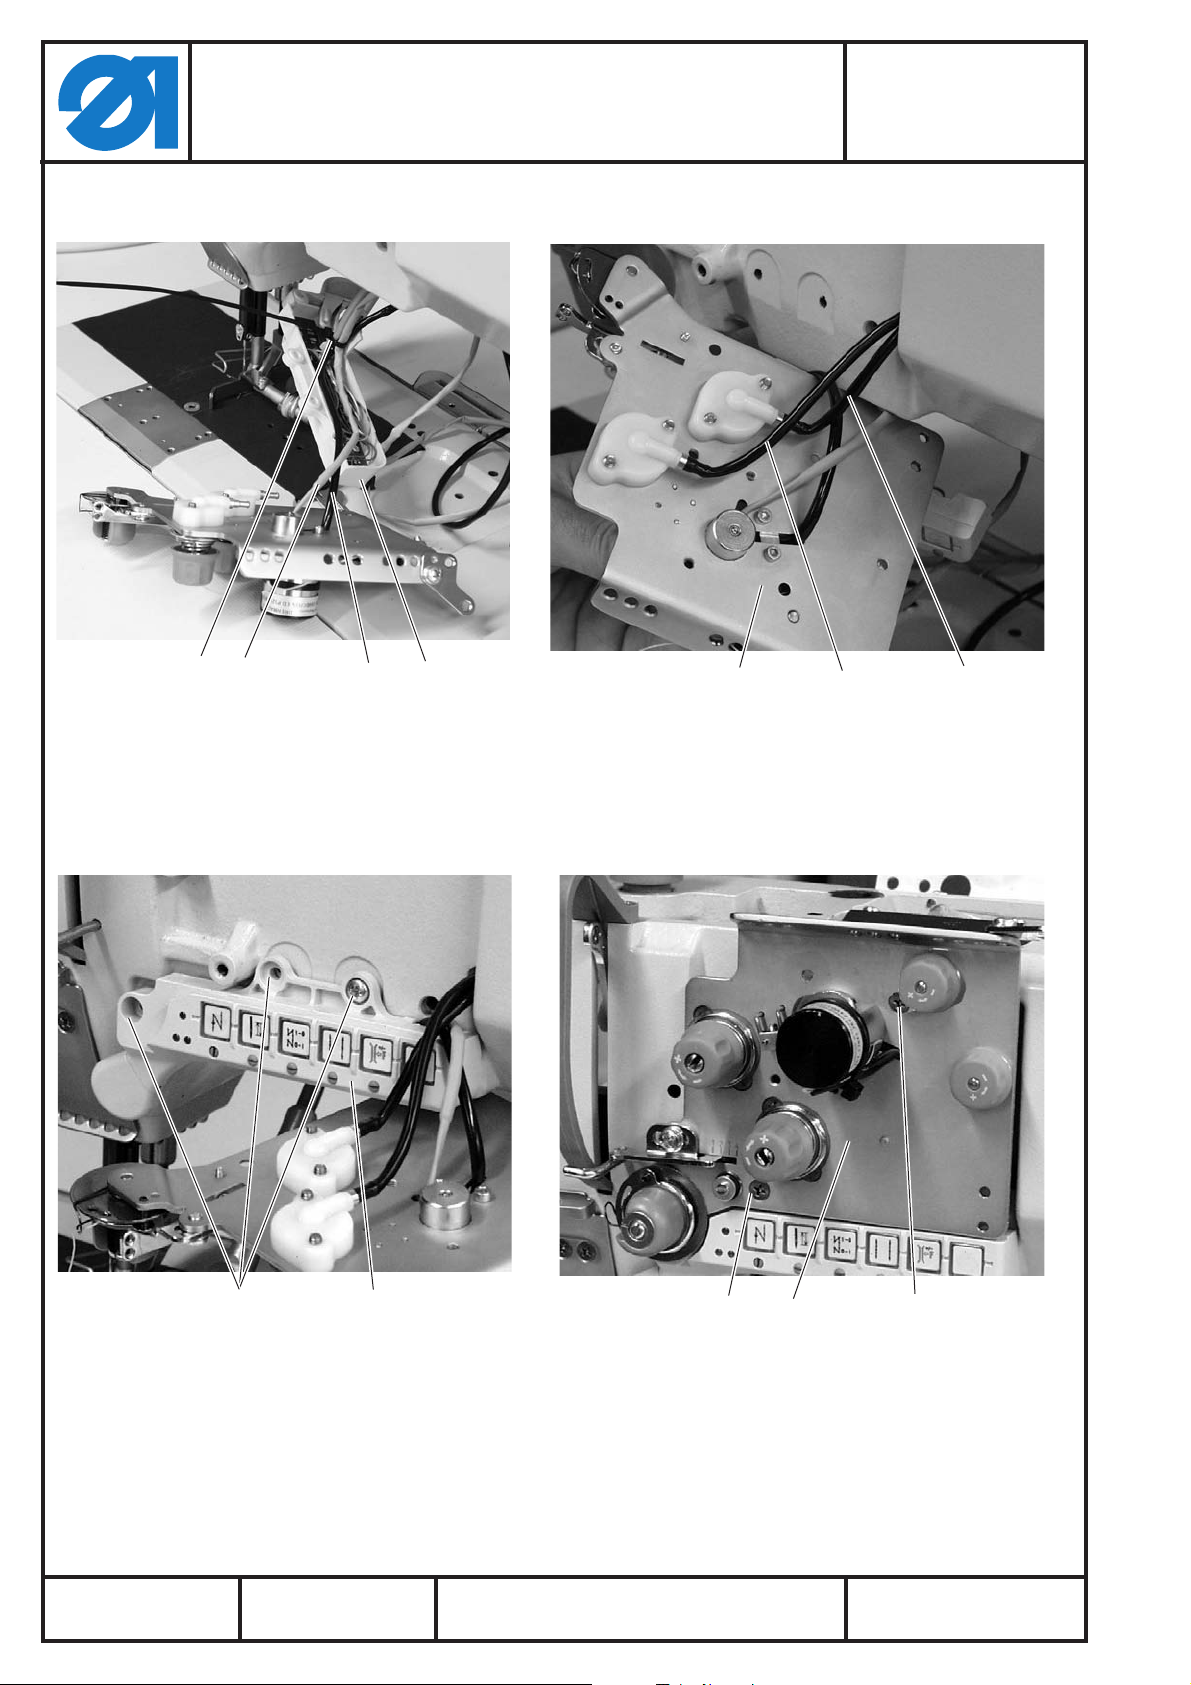
12
Das Kabel vom Anschluss “ST2” an der Steuerung zum Anschluss
“X11” auf der Leiterplatte muss demontiert und durch den
mitgelieferten Kabelbaum ersetzt werden.
– Kabelbinder 1 entfernen.
– Schelle 4 abschrauben.
– Stecker 2 von der Platine abziehen.
– Kabel 4 durch die Tischplatte nach unten ziehen.
– Stecker des Kabels von der Steuerung abziehen.
43
Ausgabe/Edition:
06.2010
Änderungsindex
Rev. index: 00.0
Printed in Germany
Blatt: von
Sheet: 6 from 24
Page 7
Anbauanleitung für Teilesatz "Sauberer Nahtanfang"
0867 591004
Fitting Instruction for "Neat Seam Beginning"
0867 591004
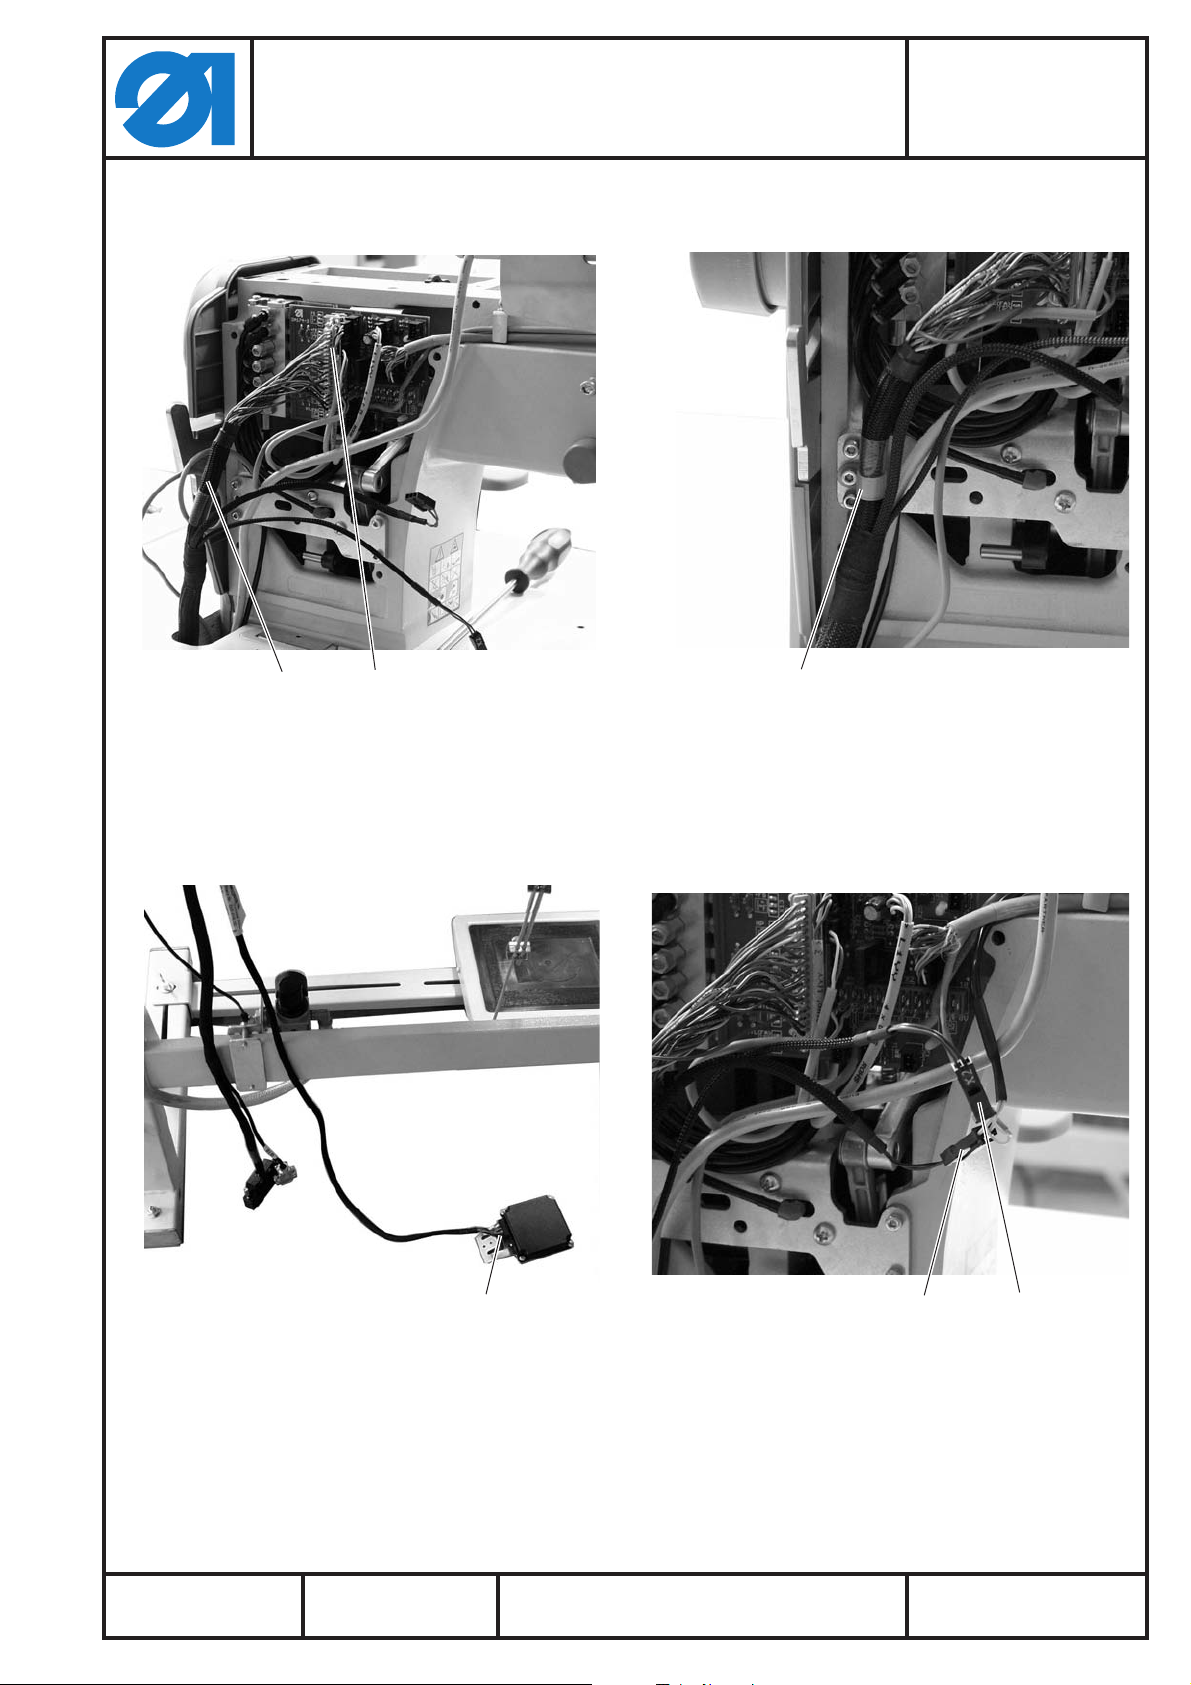
3.5 Neuen Kabelbaum montieren
Teile-Nr./ Part-No.:
0791 867708
21
3
– Neuen Kabelbaum 2 durch den Tischplattenausschnitt zum
Oberteil verlegen.
Der Stecker x1 muss unter der Tischplatte liegen.
– Stecker 1 an der Platine anschließen.
– Kabelbaum mit Schelle 3 am Oberteil befestigen.
Ausgabe/Edition:
06.2010
x1
Änderungsindex
Rev. index: 00.0
X3 X2
–
Fadenklemme am Stecker X2 des Kabelbaums anschließen.
–
Drehmagneten am Stecker X3 des Kabelbaums anschließen.
Printed in Germany
Blatt: von
Sheet: 7 from 24
Page 8
Anbauanleitung für Teilesatz "Sauberer Nahtanfang"
B 7 7 6
V 8 . .
B 1 8
L S M . . .
B 2
M
B 8 0
E B . . .
B 4 1
M
A
0867 591004
Fitting Instruction for "Neat Seam Beginning"
0867 591004
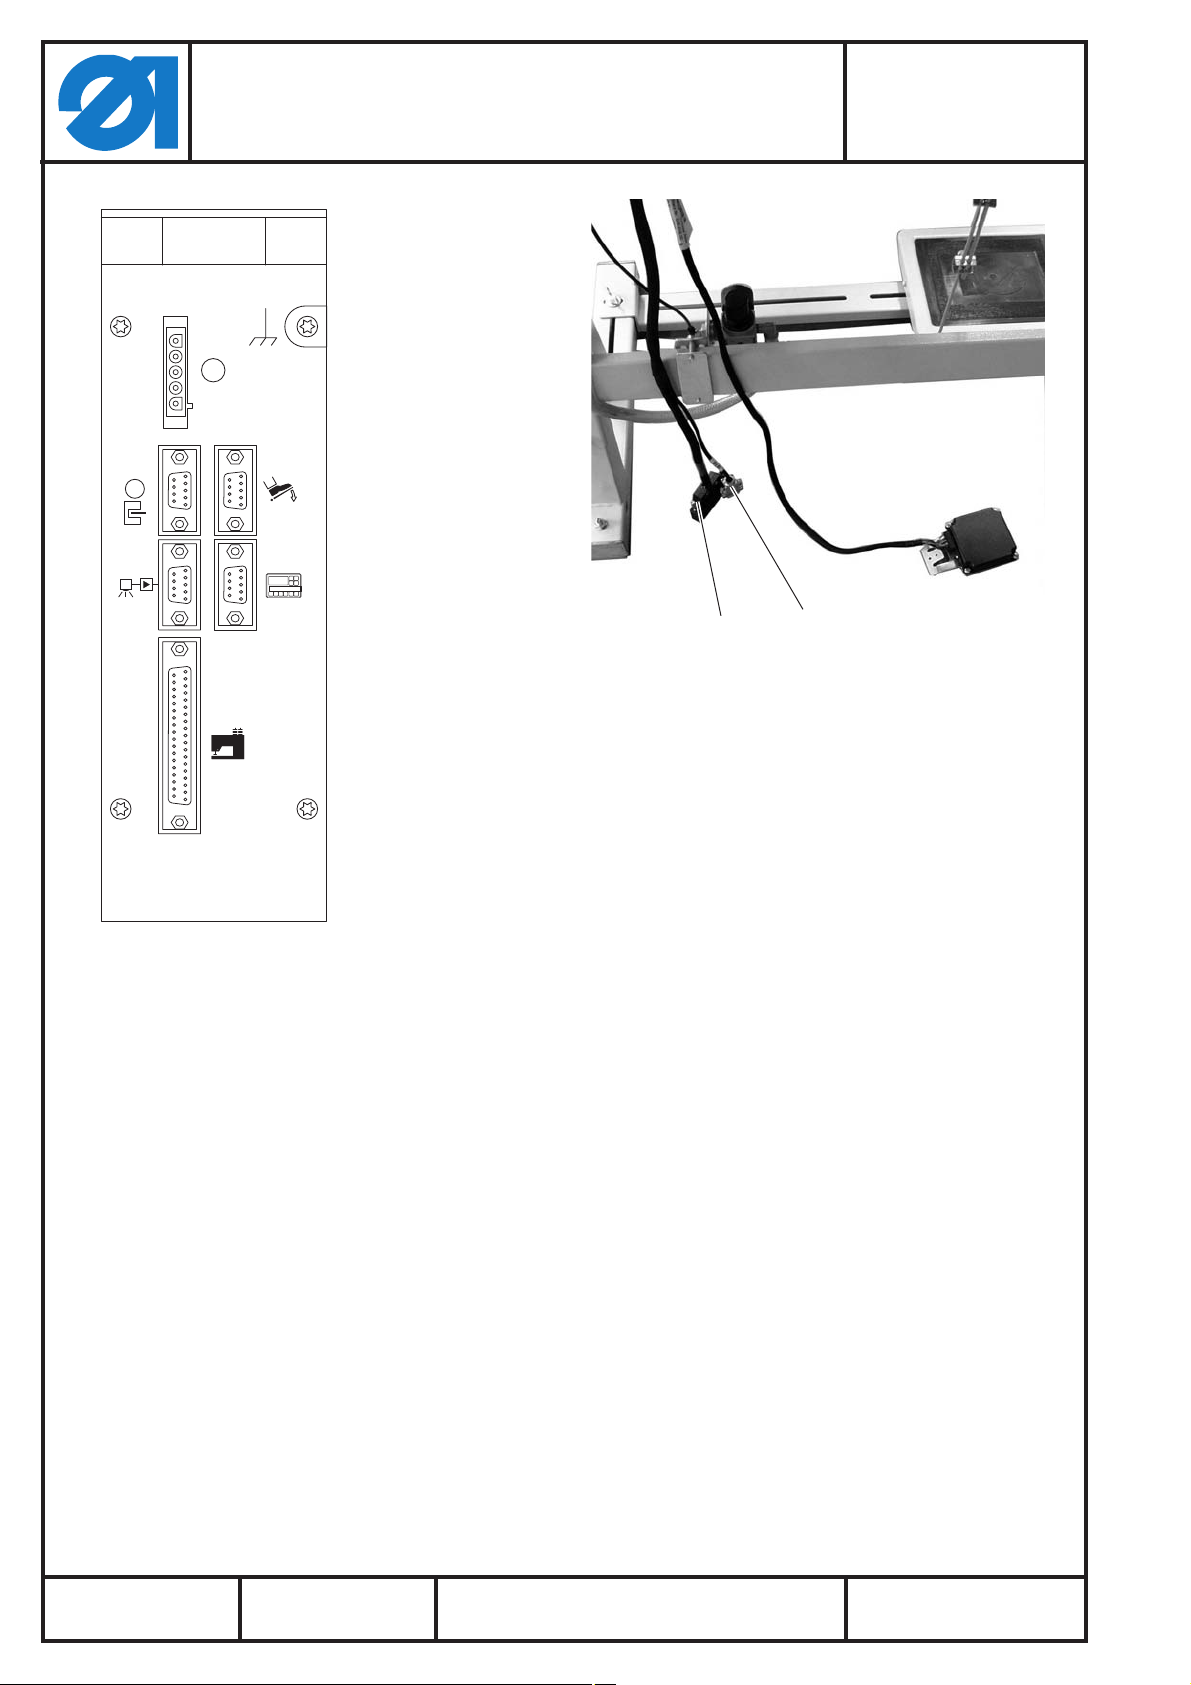
ST2 B18
Teile-Nr./ Part-No.:
0791 867708
– Den großen Stecker ST2 an Buchse A der Steuerung
anschließen.
– Den kleinen Stecker B18 an der Buchse B18 anschließen.
Ausgabe/Edition:
06.2010
Änderungsindex
Rev. index: 00.0
Printed in Germany
Blatt: von
Sheet: 8 from 24
Page 9

Anbauanleitung für Teilesatz "Sauberer Nahtanfang"
Fitting Instruction for "Neat Seam Beginning"
3.6 Steuerungsbox montieren
Teile-Nr./ Part-No.:
0867 591004
0791 867708
0867 591004
21
– Zuleitung 1 zur Steuerung 5 durch den Kabelkanal 2 verlegen.
– Drehschalter 4 in der Box auf Stellung “2" einstellen.
– Stecker x1 an Buchse 3 der Steuerbox anschließen.
– Box 5 mit der Zusatzsteuerung unter die Tischplatte
schrauben.
543
5
Ausgabe/Edition:
06.2010
Änderungsindex
Rev. index: 00.0
Printed in Germany
Blatt: von
Sheet: 9 from 24
Page 10

Anbauanleitung für Teilesatz "Sauberer Nahtanfang"
Fitting Instruction for "Neat Seam Beginning"
4 Nadelfaden einfädeln
Teile-Nr./ Part-No.:
0867 591004
0791 867708
0867 591004
8
7
6
5
– Nadelfaden durch die Führung 1 fädeln.
– Faden durch die Vorspannung 2 fädeln.
– Faden durch die Fadenklemme 3 führen.
– Faden durch die Führung 4 am Fadenrückzieher und Ösen 8 auf
der Spannungsplatte fädeln.
– Faden durch die Hauptspannungen 7 und 6 fädeln.
– Faden von oben durch die Spannungsscheiben 5 fädeln.
1
2
3
4
Ausgabe/Edition:
06.2010
Änderungsindex
Rev. index: 00.0
Printed in Germany
Blatt: von
Sheet: 10 from 24
Page 11

Anbauanleitung für Teilesatz "Sauberer Nahtanfang"
Fitting Instruction for "Neat Seam Beginning"
5 Fadenlänge einstellen
Teile-Nr./ Part-No.:
0867 591004
0791 867708
0867 591004
1
2
Die Länge des aus dem Nähgut herausstehenden Oberfadens ist
mit dem Wegbegrenzer 1 einstellbar.
Die Länge soll ca 5 - 6 mm betragen.
– Schraube 2 lösen.
– Begrenzung 1 einstellen.
(Wegbegrenzer nach rechts schieben, Faden am Nahtanfang
länger)
– Schraube 2 festdrehen.
Ausgabe/Edition:
06.2010
Änderungsindex
Rev. index: 00.0
Printed in Germany
Blatt: von
Sheet: 11 from 24
Page 12

Anbauanleitung für Teilesatz "Sauberer Nahtanfang"
0867 591004
Fitting Instruction for "Neat Seam Beginning"
0867 591004
6 Einstellungen an der Steuerung vornehmen
Voraussetzung: Softwarestand 5321 K oder höher
Kann über den Parameter 179 abgefragt werden.
Falls der Softwarestand geringer ist als K, eine neue
Steuerungssoftware aufspielen (siehe Bedienungsanleitung zum
Nähantrieb).
Die folgenden Parameter müssen an der Steuerung eingestellt sein:
F-13 =1 Fadenabschneider ein/aus
F-100= 2 Anzahl Softstartstiche (von 1 in 2 ändern)
F-115=250 Softstart Drehzahl (von 400 in 250 ändern)
F-116=140 Abschneiddrehzahl (von 150 in 140 ändern)
F-134=1 Softstart ein/aus
F-136=2 Kurz-FA Stich
F-154=8 Funktion Fadenklemme
F-180=45 Anzahl Rückdrehschritte
F-181=20 Einschaltverzögerung für das Rückdrehen
(von0in20ändern)
F-182=1 Rückdrehen ein/aus
Teile-Nr./ Part-No.:
0791 867708
Hinweis:
Beim ersten Annähen nach dem Einschalten der Steuerung,
werden die Funktionen “Fadenklemme” und “sauberer Nahtanfang”
nicht angesteuert. Erst nach dem ersten Fadenabschneiden ist die
Funktion aktiv.
Ausgabe/Edition:
06.2010
Änderungsindex
Rev. index: 00.0
Printed in Germany
Blatt: von
Sheet: 12 from 24
Page 13

Anbauanleitung für Teilesatz "Sauberer Nahtanfang"
Fitting Instruction for "Neat Seam Beginning"
1 Kit components
Teile-Nr./ Part-No.:
0867 591004
0791 867708
0867 591004
Before beginning the installation:
Please check whether all the components of the kit have been
correctly delivered.
The kit 0867 591004 consists of the following components:
Component Parts number
1 x Thread tensioner plate 0867 591014
2 x Countersunk screw M4 x 12 9225 201770
1 x Cable harness 9870 867012
1 x Holder M-Control 0867 490154
2 x Chip board screw 3.5 x 17 9207 170227
2 Short description
3
1
2
The kit “Neat Seam Beginning” ensures a short and neatly sewn
needle thread at the seam beginning.
After the first stitch at the seam beginning the needle thread 3 is
locked by the thread clamp 1 and pulled back by the thread puller 2 so
that the needle thread protrudes the material a little bit.
It is possible to set how far the needle thread is being pulled back.
Ausgabe/Edition:
06.2010
Änderungsindex
Rev. index: 00.0
Printed in Germany
Blatt: von
Sheet: 13 from 24
Page 14

Anbauanleitung für Teilesatz "Sauberer Nahtanfang"
0867 591004
Fitting Instruction for "Neat Seam Beginning"
0867 591004
3 Conversion
Caution: Risk of injury!
Turn off the main switch and pull out the mains plug before
performing the conversion task.
The fitting of the kit must be carried out by qualified technicians
only.
3.1 Dismantling the thread tensioner plate
Teile-Nr./ Part-No.:
0791 867708
21
– Unscrew screws 2.
– Fold down the thread tensioner plate 1
– Pull off the compressed-air hoses 3 and 4.
43
Ausgabe/Edition:
06.2010
Änderungsindex
Rev. index: 00.0
Printed in Germany
Blatt: von
Sheet: 14 from 24
Page 15

Anbauanleitung für Teilesatz "Sauberer Nahtanfang"
0867 591004
Fitting Instruction for "Neat Seam Beginning"
0867 591004
3.2 Effectuating a notch on the keypad
Teile-Nr./ Part-No.:
0791 867708
21
– Unscrew screws 1.
– Take off the keypad 2.
– Effectuate the notch 3 on the keypad (see sketch).
3
Ausgabe/Edition:
06.2010
Änderungsindex
Rev. index: 00.0
Printed in Germany
Blatt: von
Sheet: 15 from 24
Page 16

Anbauanleitung für Teilesatz "Sauberer Nahtanfang"
0867 591004
Fitting Instruction for "Neat Seam Beginning"
0867 591004
3.3 Mounting the keypad and the new thread tensioner plate
Teile-Nr./ Part-No.:
0791 867708
43 2 1
– Run the cables 2 and 3 through the keypad 1.
– Tie the cables with the cable tie 4.
– Connect the compressed-air hoses 5 and 6 to the new thread
tensioner plate 7.
76 5
Ausgabe/Edition:
06.2010
98
– Fix the keypad 8 using the three screws 9.
–
Fix the new thread tensioner plate 11 using the screws 10
and 12.
Änderungsindex
Rev. index: 00.0
12 11 10
Printed in Germany
Blatt: von
Sheet: 16 from 24
Page 17

Anbauanleitung für Teilesatz "Sauberer Nahtanfang"
0867 591004
Fitting Instruction for "Neat Seam Beginning"
0867 591004
Teile-Nr./ Part-No.:
0791 867708
21
– Unscrew the cover 2.
– Unscrew the arm cover 1.
– Loosen the screws 3 on the operating panel holder 4.
– Run the cable 5 from the thread tensioner plate behind the
operating panel to the PCB 6.
– Tighten the screws 3 on the operating panel holder 4.
43
Ausgabe/Edition:
06.2010
54
Änderungsindex
Rev. index: 00.0
Printed in Germany
65
Blatt: von
Sheet: 17 from 24
Page 18

Anbauanleitung für Teilesatz "Sauberer Nahtanfang"
Fitting Instruction for "Neat Seam Beginning"
3.4 Removing the cable
Teile-Nr./ Part-No.:
0867 591004
0791 867708
0867 591004
12
The cable that runs from the output “ST2” on the control unit to the
input “X11” on the PCB must be dismantled and replaced by the
cable harness that is part of the kit.
– Remove the cable tie 1.
– Unscrew the clip 4.
– Pull the plug 2 off the PCB.
– Run the cable 4 downwards through the table top.
– Pull the cable’s plug off the control unit.
43
Ausgabe/Edition:
06.2010
Änderungsindex
Rev. index: 00.0
Printed in Germany
Blatt: von
Sheet: 18 from 24
Page 19

Anbauanleitung für Teilesatz "Sauberer Nahtanfang"
0867 591004
Fitting Instruction for "Neat Seam Beginning"
0867 591004
3.5 Mounting the new cable harness
Teile-Nr./ Part-No.:
0791 867708
21
3
– Run the new cable harness 2 through the table top cutout to
the machine head.
The plug x1 has to be underneath the table top.
– Connect the plug 1 on the PCB.
– Fix the cable harness onto the machine head by using the
clip 3.
Ausgabe/Edition:
06.2010
x1
Änderungsindex
Rev. index: 00.0
X3 X2
–
Connect the thread clamp to the socket X2 of the cable
harness.
–
Connect the rotary solenoid to the socket X3 of the cable
harness.
Printed in Germany
Blatt: von
Sheet: 19 from 24
Page 20

Anbauanleitung für Teilesatz "Sauberer Nahtanfang"
B 7 7 6
V 8 . .
B 1 8
L S M . . .
B 2
M
B 8 0
E B . . .
B 4 1
M
A
0867 591004
Fitting Instruction for "Neat Seam Beginning"
0867 591004
ST2 B18
Teile-Nr./ Part-No.:
0791 867708
– Connect the big plug ST2 to the bush A of the control unit.
– Connect the small plug B18 to the bush B18.
Ausgabe/Edition:
06.2010
Änderungsindex
Rev. index: 00.0
Printed in Germany
Blatt: von
Sheet: 20 from 24
Page 21

Anbauanleitung für Teilesatz "Sauberer Nahtanfang"
Fitting Instruction for "Neat Seam Beginning"
3.6 Mounting the control box
Teile-Nr./ Part-No.:
0867 591004
0791 867708
0867 591004
21
– Run the cable 1 to the control unit 5 trough the cable
channel 2.
– Set the rotary switch 4 inside the box to position “2".
– Connect the plug x1 to the bush 3 on the control box.
– Fix the the box 5 with the additional control by screwing it
underneath the table plate.
543
5
Ausgabe/Edition:
06.2010
Änderungsindex
Rev. index: 00.0
Printed in Germany
Blatt: von
Sheet: 21 from 24
Page 22

Anbauanleitung für Teilesatz "Sauberer Nahtanfang"
0867 591004
Fitting Instruction for "Neat Seam Beginning"
0867 591004
4 Threading the needle thread
Teile-Nr./ Part-No.:
0791 867708
8
7
6
5
– Thread in the needle thread through threading guide 1.
– Conduct the through the pre-tensioner 2.
– Conduct the thread through the thread clamp 3.
– Conduct the thread through the threading guide 4 on the thread
puller and the eyelets 8 on the thread tensioner plate.
– Conduct the thread though the main tensioners 7 and 6.
– Conduct the thread from above through the tension discs 5.
1
2
3
4
Ausgabe/Edition:
06.2010
Änderungsindex
Rev. index: 00.0
Printed in Germany
Blatt: von
Sheet: 22 from 24
Page 23

Anbauanleitung für Teilesatz "Sauberer Nahtanfang"
0867 591004
Fitting Instruction for "Neat Seam Beginning"
0867 591004
5 Setting the thread length
Teile-Nr./ Part-No.:
0791 867708
1
2
The length of the protruding needle thread can be set with the
stroke limitator 1.
The length should be about 5 to 6 mm.
– Loosen screw 2.
– Set the limitation 1.
(Push the stroke limitator to the right, longer thread at seam
beginning)
– Tighten screw 2.
Ausgabe/Edition:
06.2010
Änderungsindex
Rev. index: 00.0
Printed in Germany
Blatt: von
Sheet: 23 from 24
Page 24

Anbauanleitung für Teilesatz "Sauberer Nahtanfang"
0867 591004
Fitting Instruction for "Neat Seam Beginning"
0867 591004
6 Effectuating the settings on the control unit
Prerequisite: Software level 5321 K or higher
Can be checked with parameter 179.
In case the software level is lower than K load a new control
software (see operating instructions for the sewing drive).
The following parameters have to be set on the control unit:
F-13 =1 Thread trimmer on/off
F-100= 2 Number of soft start stitches (change
from 1 to 2)
F-115=250 Softstart speed (change from 400 to 250)
F-116=140 Trimming speed (change from 150 to 140)
F-134 =1 Soft start on/off
F-136=2 Short thread trimmer stitch
F-154=8 Function thread clamp
F-180=45 Reversing angle
F-181=20 Switch-on delay of reverse motor rotation
(change from 0 to 20)
F-182=1 Reverse motor rotation on/off
Teile-Nr./ Part-No.:
0791 867708
Note:
The functions “thread clamp” and “neat seam beginning” are not
yet active at the first sewing start after switching on the control
unit.
The functions are activated only after the first thread trimming.
Ausgabe/Edition:
06.2010
Änderungsindex
Rev. index: 00.0
Printed in Germany
Blatt: von
Sheet: 24 from 24
 Loading...