

Page 1

Quick Start Guide
Rugged Tablet
Page 2

Page 3

3
EN
Table of contents
As we are often updating and improving our products, your device’s software may have a slightly
dierent appearance or modied functionality than presented in this Quick Start Guide.
Package Contents 4
Description of the tablet 5
Replacing the battery 8
Inserting mini SIM & Micro-SD cards 10
Windows
Getting started 12
Connecting to a WiFi 14
Getting familiar with Windows 10 15
The Windows 10 interface 16
Windows notication center 18
Android
Getting started 20
4G & WiFi connections 22
Google & Contacts 24
Hints & tips 26
Windows operating instructions of special function module 27
Android operating instructions of special function module 34
Product accessiries 43
Page 4

4
Package Contents
Check your product box for the following items:
- 10.1“ Rugged tablet with hand strap and battery
- Active Stylus pen
- Battery for stylus pen
- Micro USB cable
- USB host cable
- AC adapter with EU, UK and US plug
The items supplied with your device and available accessories may vary depending on
your region or service provider.
The supplied items are designed only for your device and may not be compatible with
other devices.
Unapproved accessories may cause your device to malfunction.
Page 5
5
EN
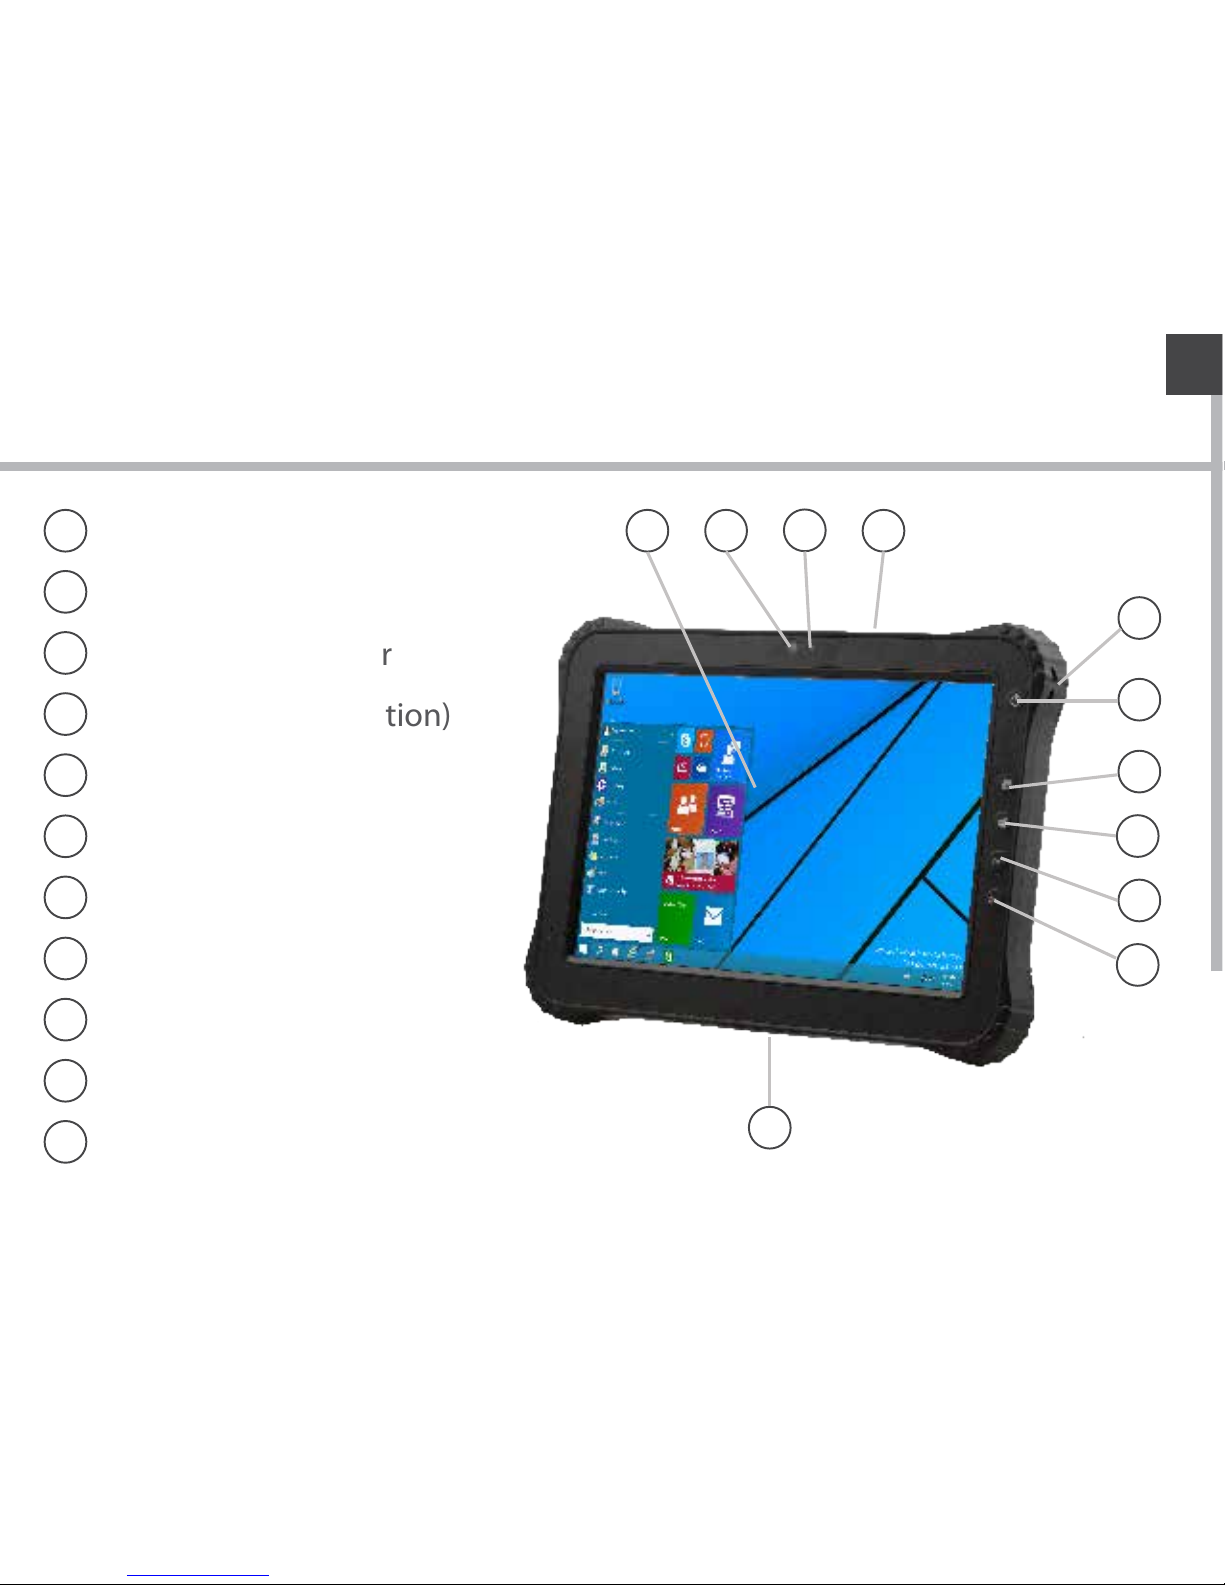
Description of the tablet
1
2
3
4
5
6
7
8
Trouchscreen
Webcam
Ambient light sensor
Barcode scanner (option)
Tether xation
Power button
Barcode button
Windows button
9
10
11
Volume +
Volume -
Docking connector
1 2
3
4
5
6
7
8
9
10
11
Page 6
6
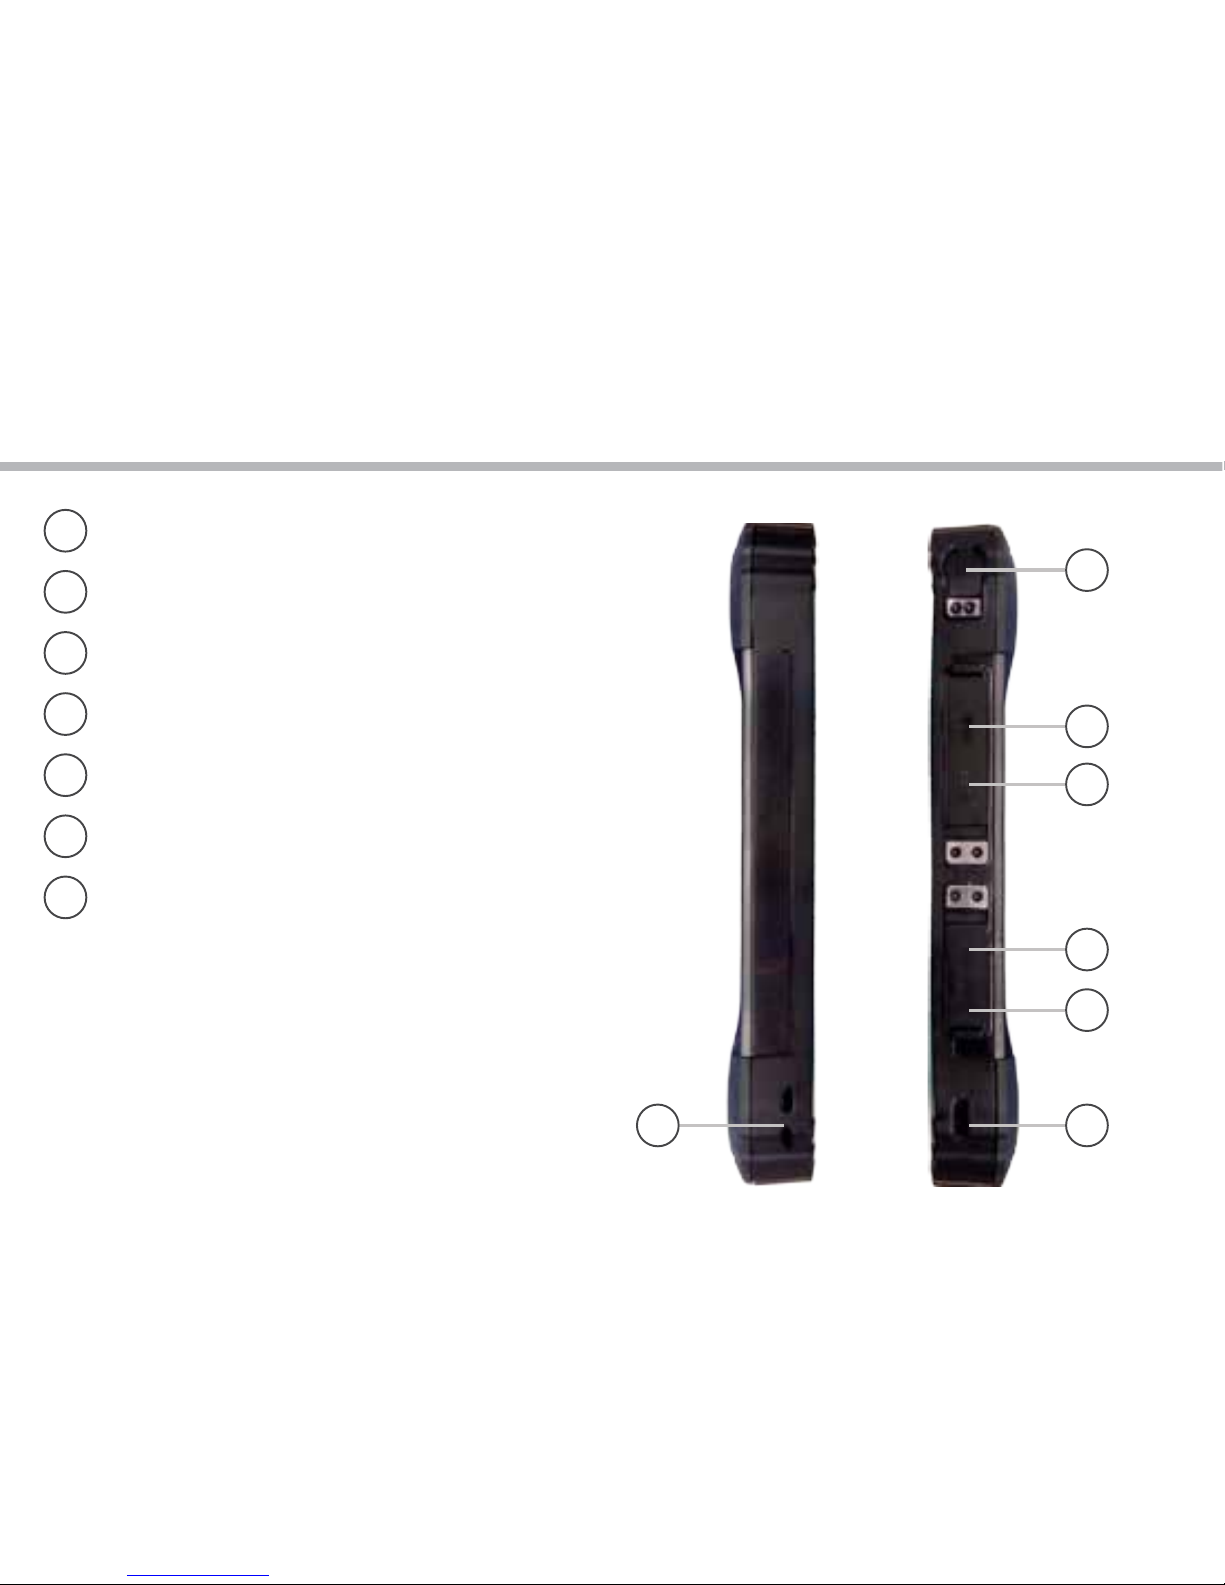
Description of the tablet
12
13
14
15
16
17
18
DC-In
USB port
Micro USB port
HDMI port
Headphone
Kensington Lock
Tether xation
12
13
14
15
16
1718
Page 7
7
EN
19
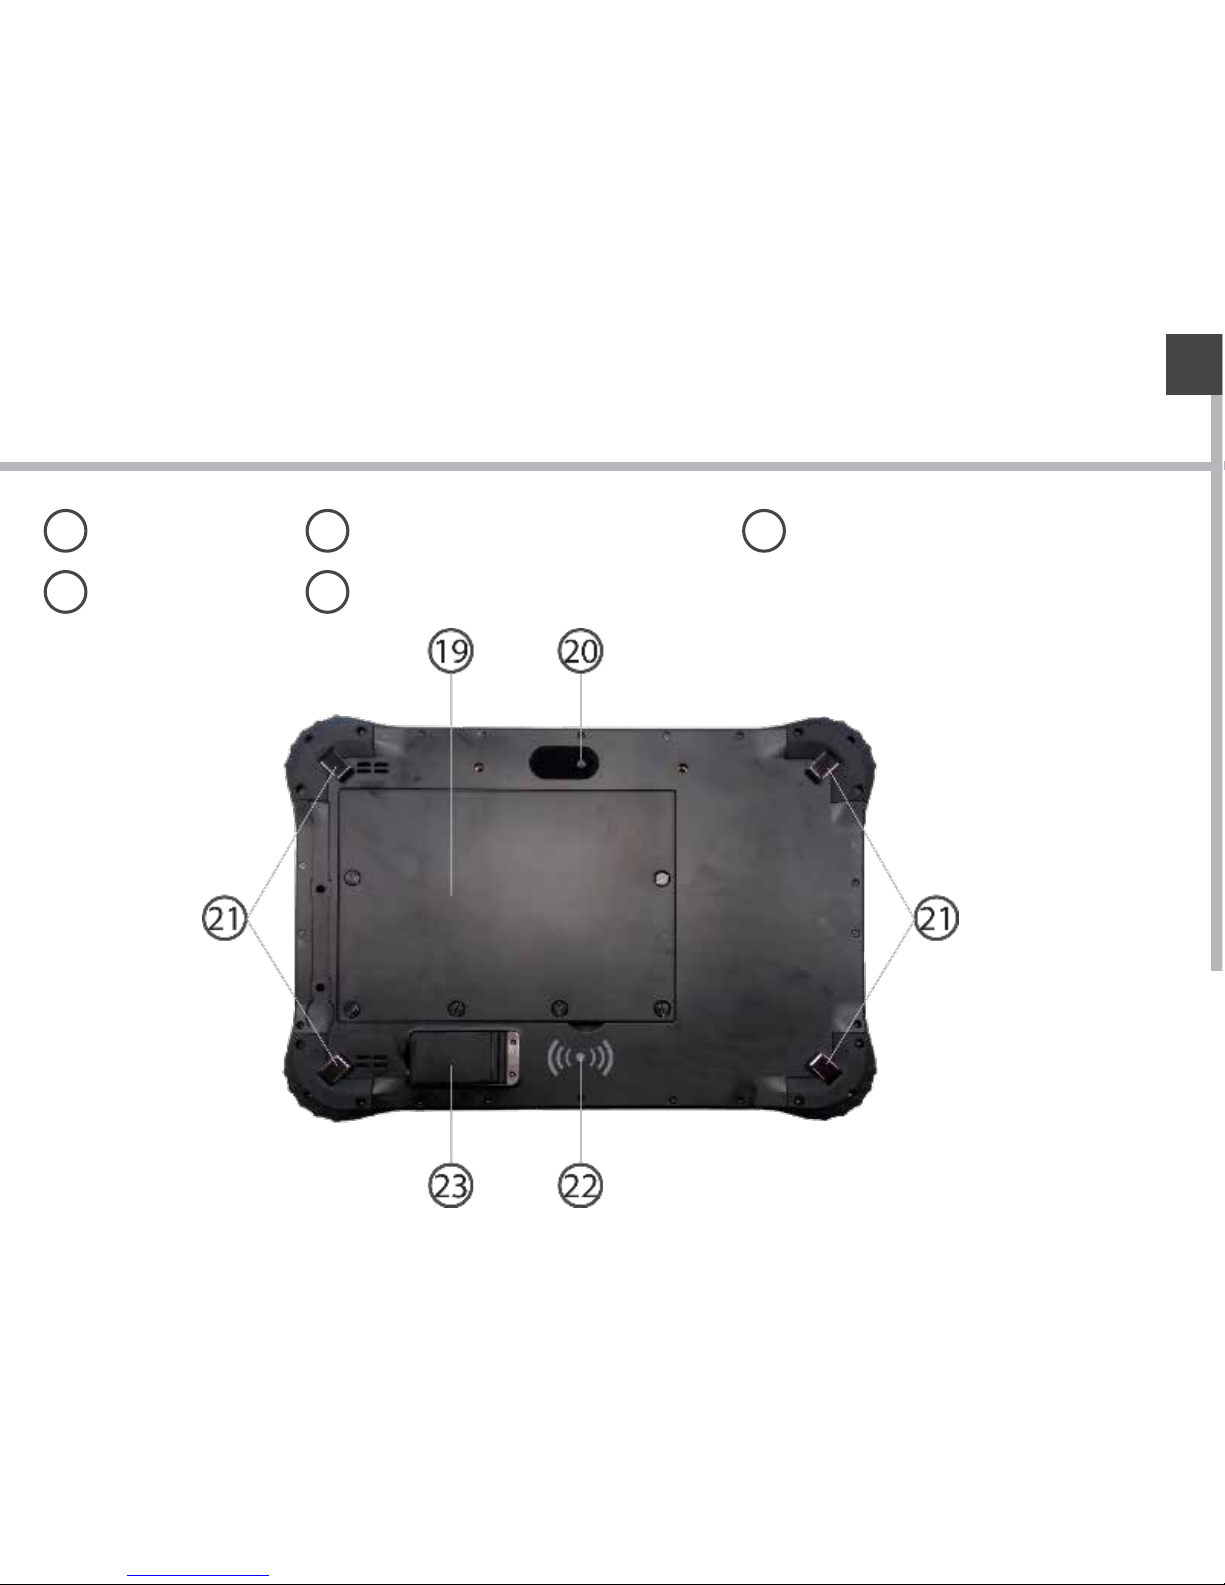
Battery cover
20
Camera
21
Hand strap xation points
22
RFID reading zone
23
Fingerprint reader
Description of the tablet
Page 8
8
Replacing the battery
WARNING: Make sure to turn o your Fieldbook before removing the battery.
Removing the battery
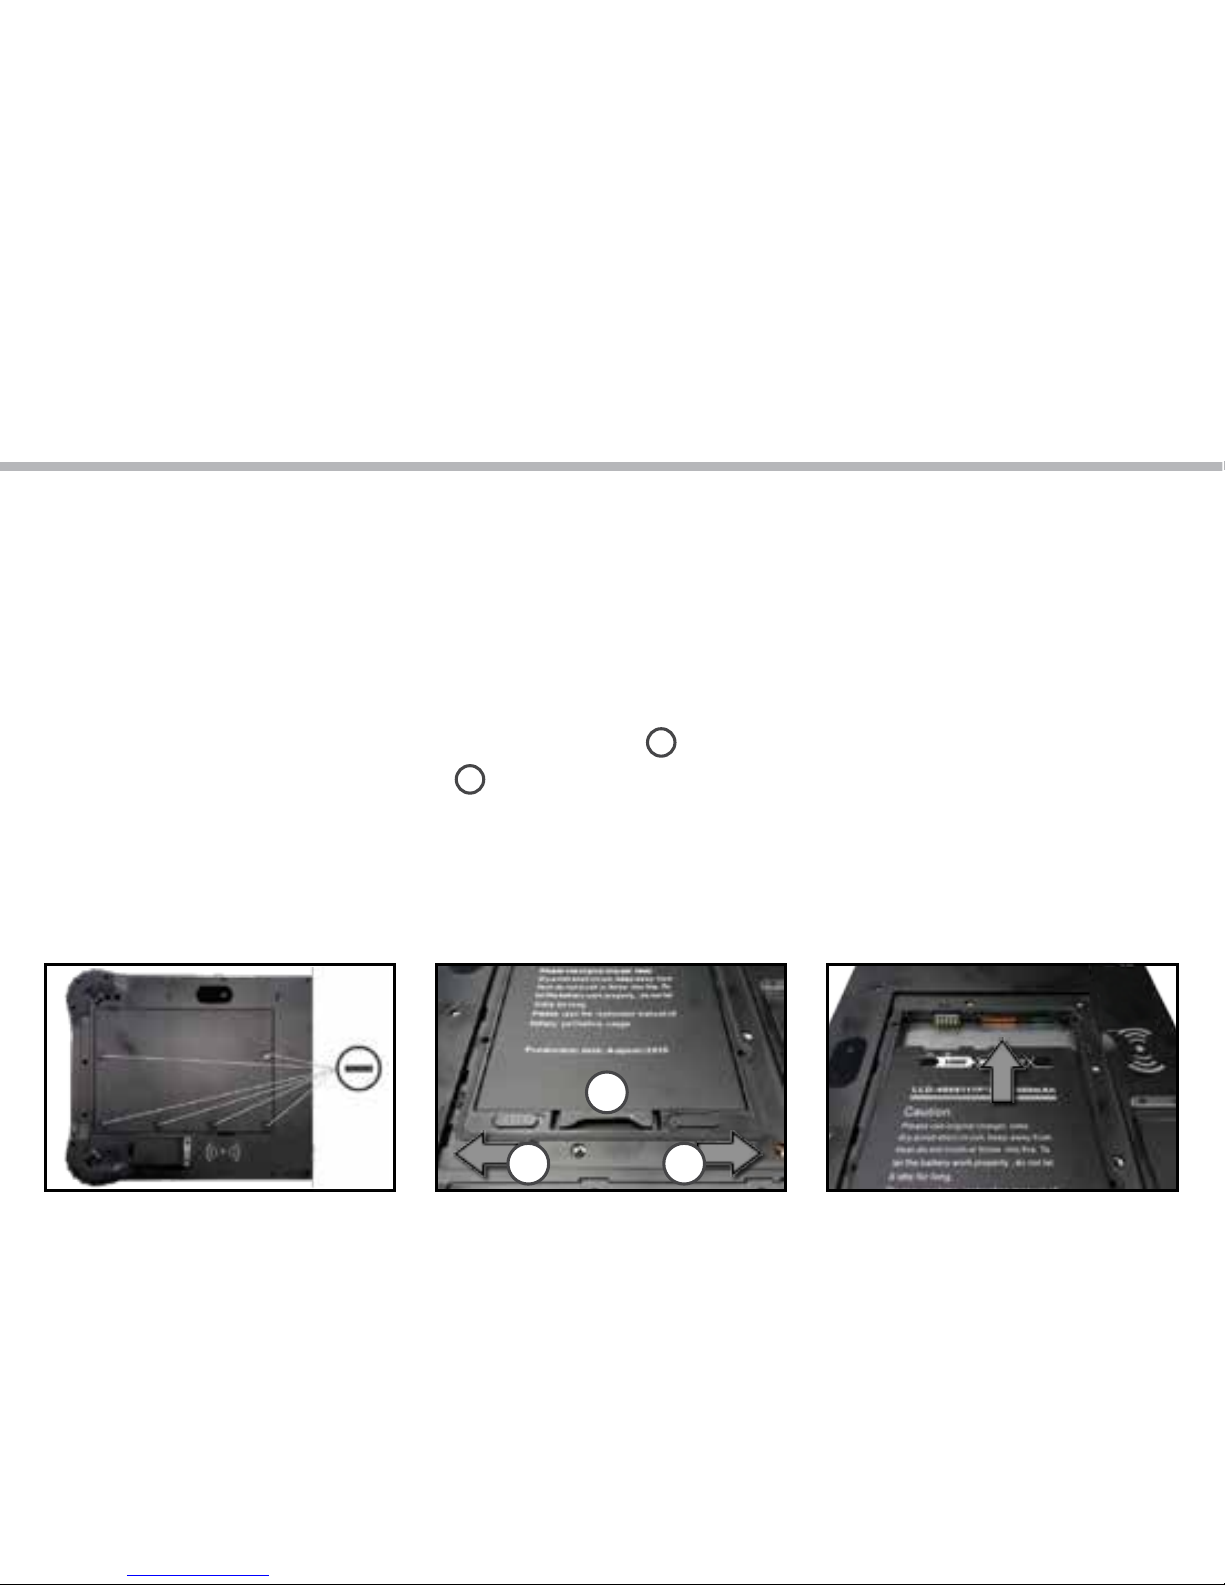
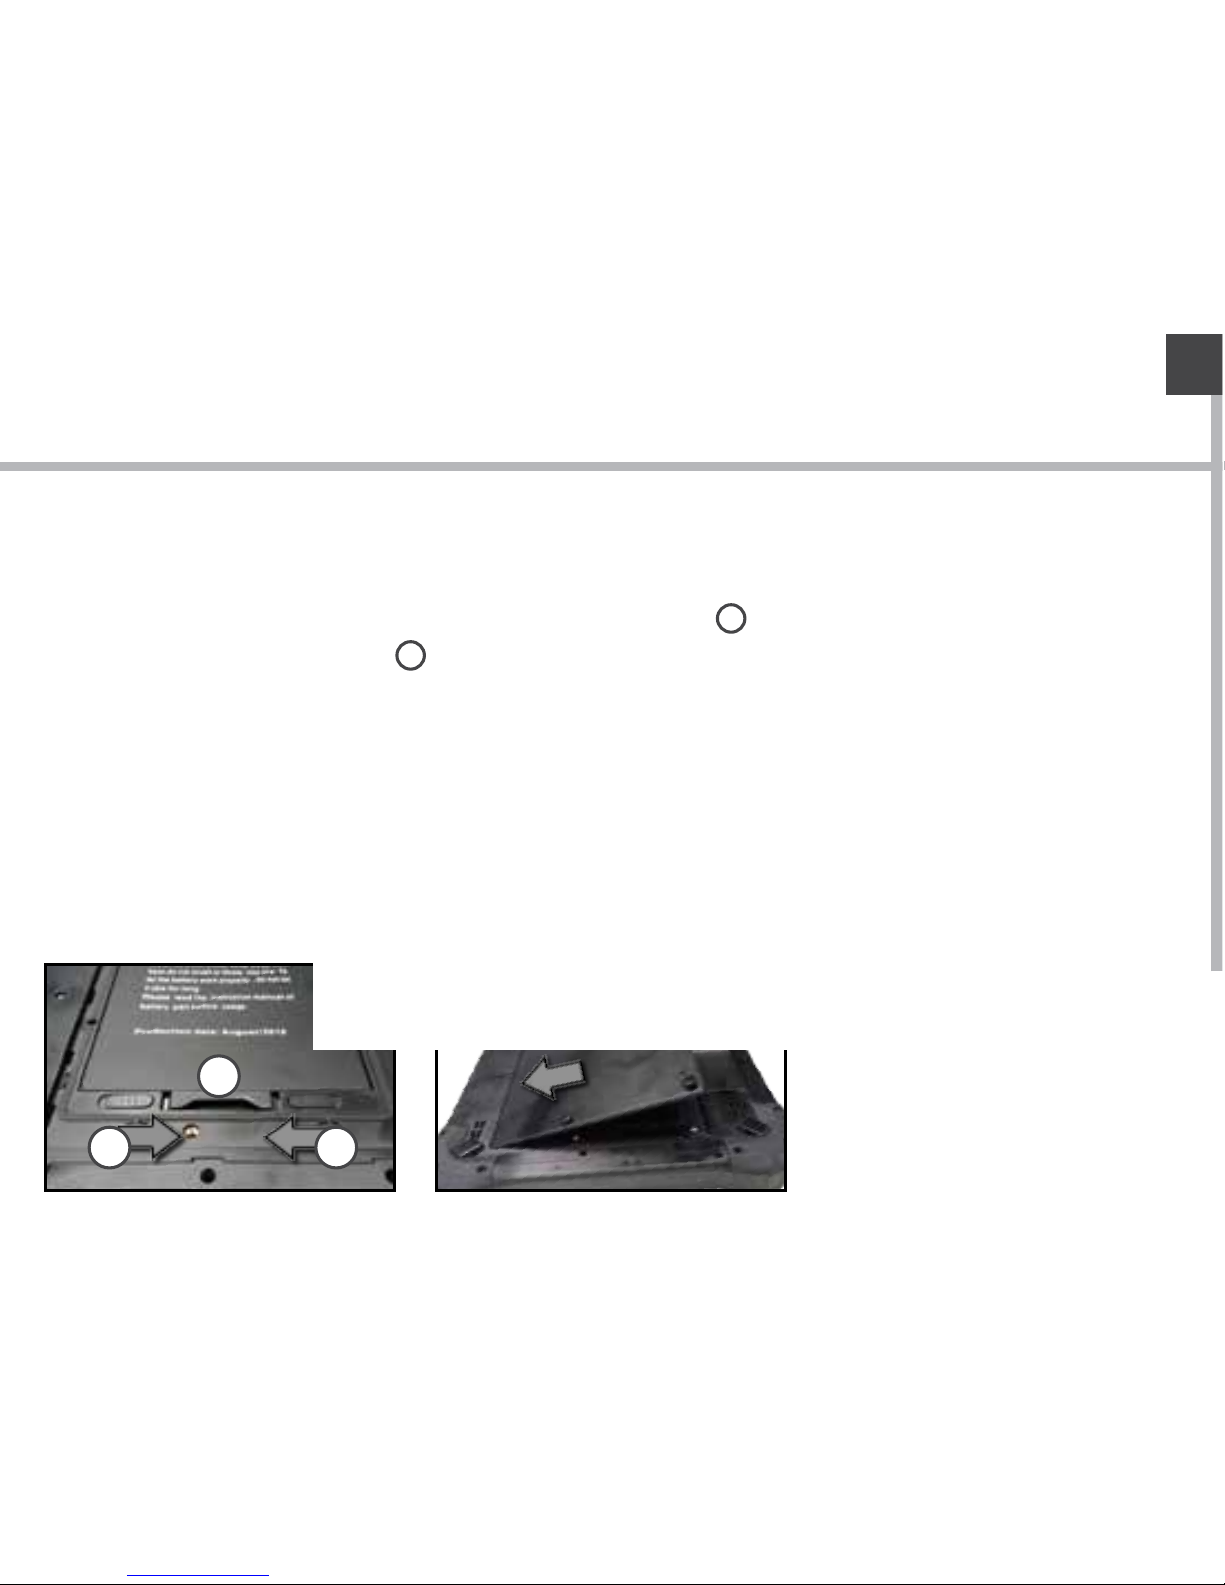
1. Unscrew the six battery cover screws on the back of the tablet.
2. Lift up the cover using the opening above the RFID reading area.
3. Remove the cover.
4. Slide open the two battery latches (Picture 8.2 1)
5. Pull out the battery (Picture 8.2 2)
Picture 8.1 Picture 8.2
1 1
2
Picture 8.3
Page 9
9
EN
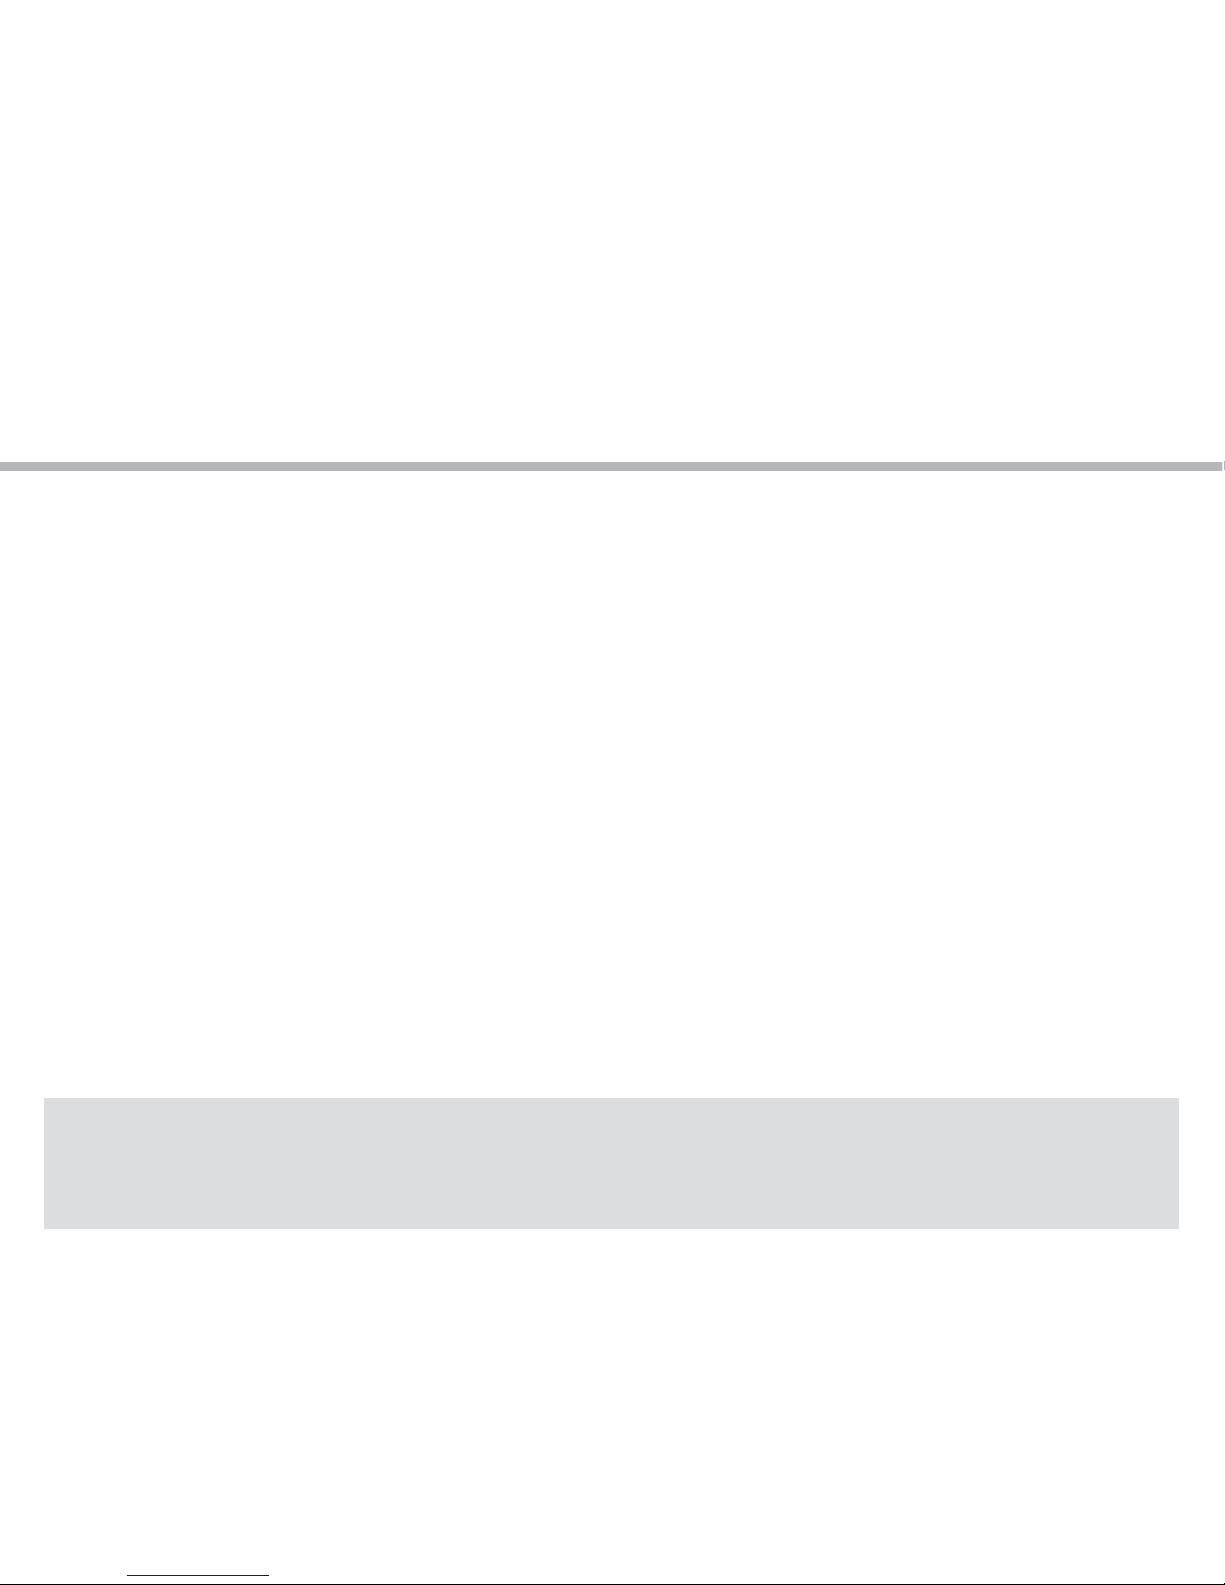
Picture 9.1
2 2
1
Picture 9.2
Inserting the battery
1. Insert the battery with the contact side rst into the battery compartment and slide
the battery to the end (Picture 8.3)
2. Push down the other side of the battery (Picture 9.1 1) and close the two
battery latches (Picture 9.1 2)
3. Put the battery cover back into place (side with latches rst) (Picture 9.2)
4. Push the battery cover down and tighten the six battery cover screws (Picture 8.1)
Replacing the battery
Page 10
10
Inserting mini SIM & Micro-SD cards
WARNING: Make sure to turn o your device before inserting a SIM or memory card.
To install or remove a SIM or SD card, the battery has to be removed rst.
Please refer to “Removing the battery” on page 8.
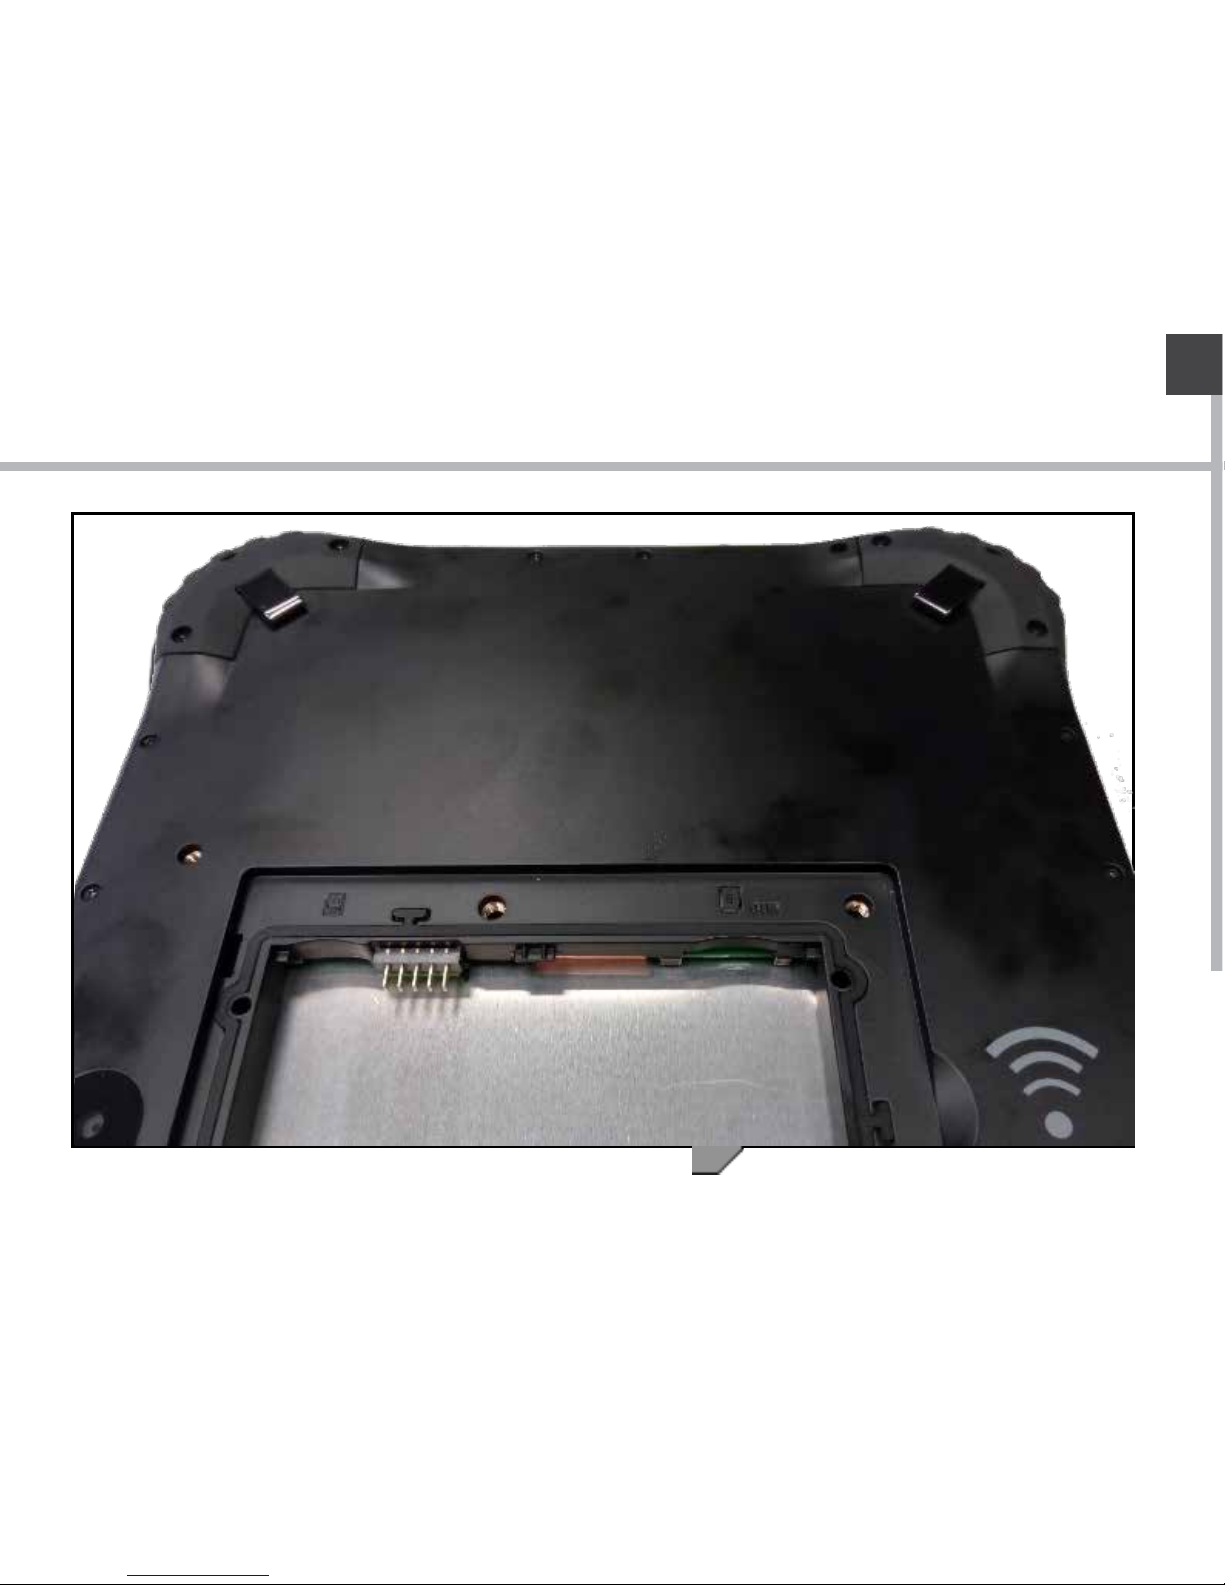
Inserting the mini SIM card
The slot accepts only mini SIM cards. Insert the card into the SIM slots like shown in the
picture on the right.
Inserting a SD card
Insert the micro SD card like show in the picture on the right.
Closing
Please refer to “Inserting the battery” on page 9.
Tip:
For the SIM card, a Pin number may be requested. Enter the SIM card pin number and
tap OK.
Page 11
11
EN
Inserting mini SIM & Micro-SD cards
Page 12
12
Turn ON
1. Press and hold the ON/OFF button to turn on the device.
Turn OFF
1. Click on the Windows symbol on the lower left corner of the screen.
2. Select the Power button , then select Shut down.
Initial setup
The rst time you start up your device, the Windows Startup Screen will be the rst
screen displayed. Follow the on-screen instructions on each screen in order to properly
install the operating system. We strongly recommend that you create a Microsoft
account, so you can enjoy more features.
Windows // Getting started
Tip:
If the Fieldbook is used by more than one person, it is recommended to create an user
account for each person. Every user can set its default parameters to his needs.
Page 13
13
EN
Microsoft account
A Microsoft account is an email address and password that you use to sign in to
Windows. It’s free and easy to set up, and you can do so with any email address you
choose, or get a new email address (for example, you can use an Outlook.com, Gmail, or
Yahoo! address for your Microsoft account.). With a Microsoft account, you can:
- get apps from the Windows Store
- back up all your important data and les using free cloud storage
- link your social networking accounts to the People app, and you’ll see
your friends’ contact info and status updates in one place
For detailed information about how to use Windows 10, please visit:
http://windows.microsoft.com/en-us/windows-10/getstarted-get-to-know-windows-10
Windows // Getting started
Page 14
14
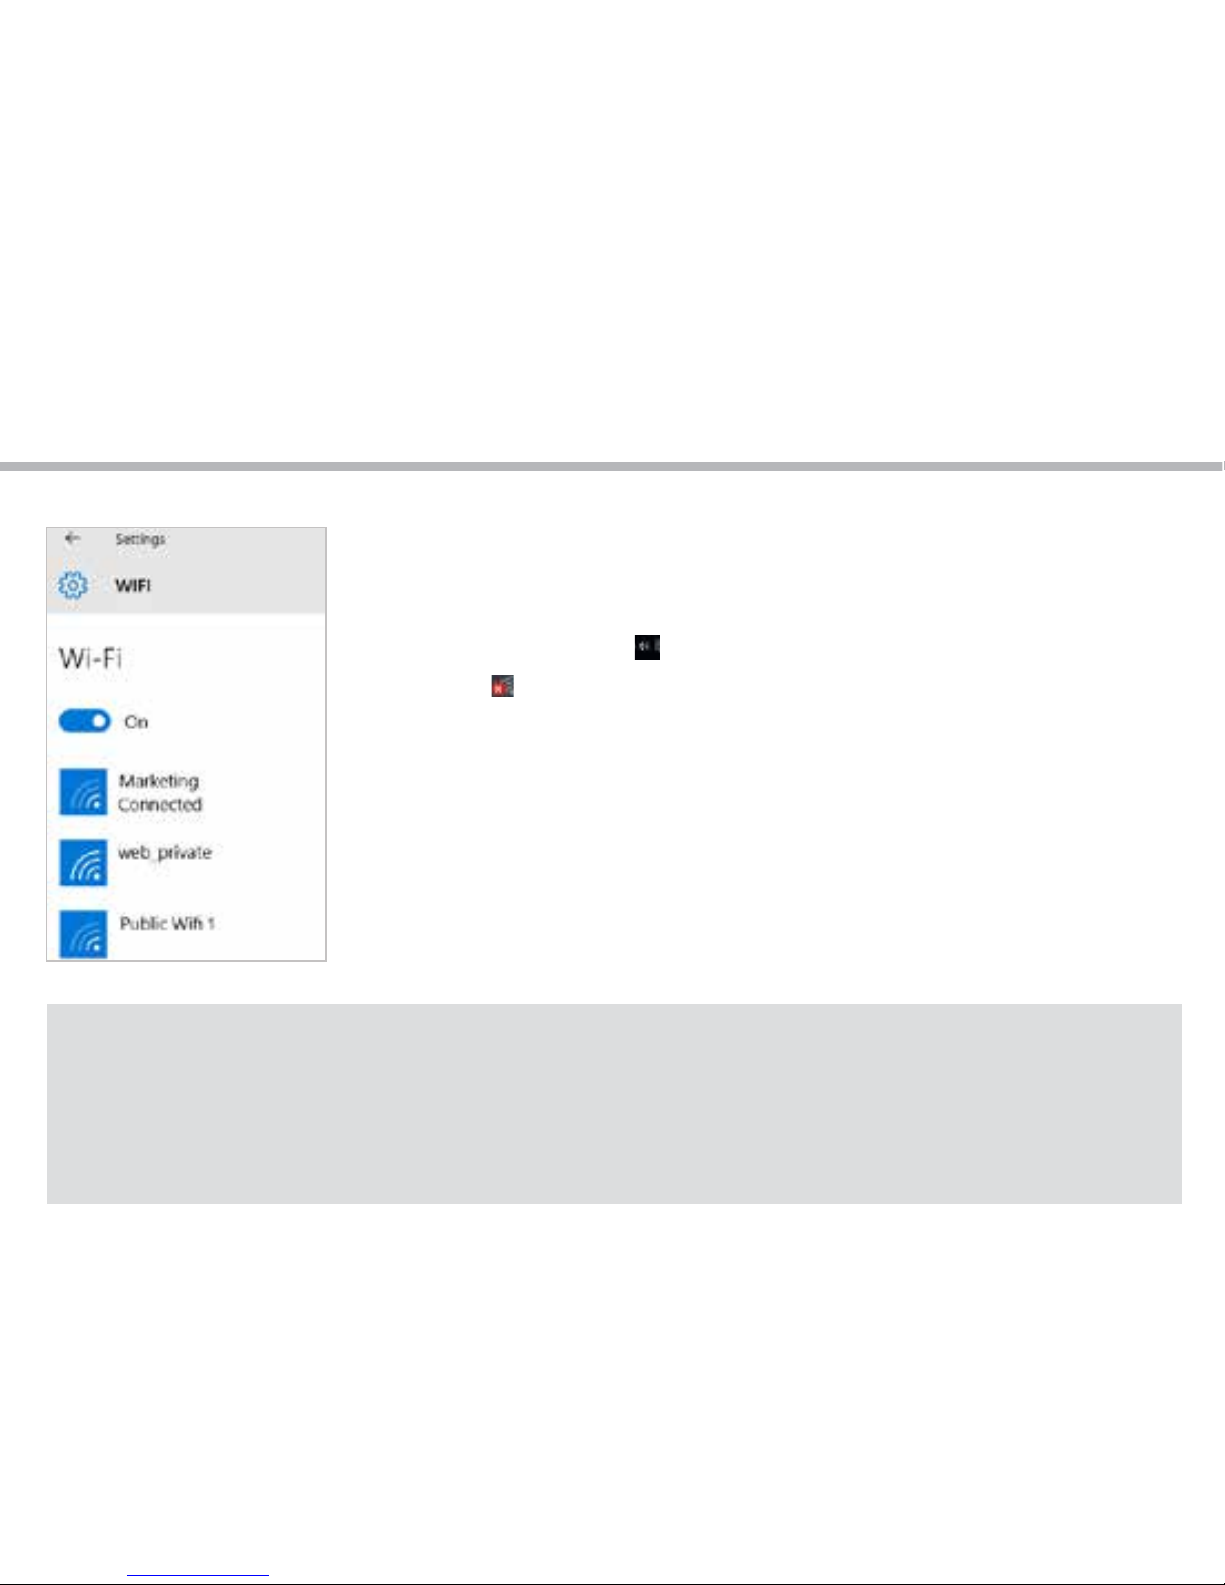
Make sure that you are in a WiFi zone.
1. Click on the arrow on the lower right corner and select the
WiFi icon .
2. Select the name of network you want to connect to, tap on
Connect and enter a password if required.
Windows // Connecting to a WiFi network
Tip:
- To get the correct WiFi password (or settings) for the network, contact
the WiFi network provider.
- If you want to connect to this network every time it’s in range, select
the ‘Connect automatically’ check box.
Page 15

15
EN
Turning the device o
In Shut Down Mode, no data will be saved and the tablet will boot to the operating system’s
main screen the next time it is turned on. If you have entered data, either save it to the internal
storage or to other storage media.
1. On the left side of the screen, select the Windows button.
2. Select the Power button , then select Shut down.
Or press and hold the power button for about 2-10 seconds till the screen ‘Slide to shut down
your PC’ appears and then use the touchpad to slide down the screen.
Start screen tiles customisation
Pinning icons: Use the touchpad and the touchpad buttons to select the icon you want to
move from your apps list to the Start screen.
Moving icons: If you want to move an icon, Use the touchpad and the touchpad buttons to
select the icon and drag it to where you want it and drop it.
More options for icons: Use the touchpad and the right touchpad button to click a tile and
show options.
Windows // Getting familiar with Windows 10
Page 16
16
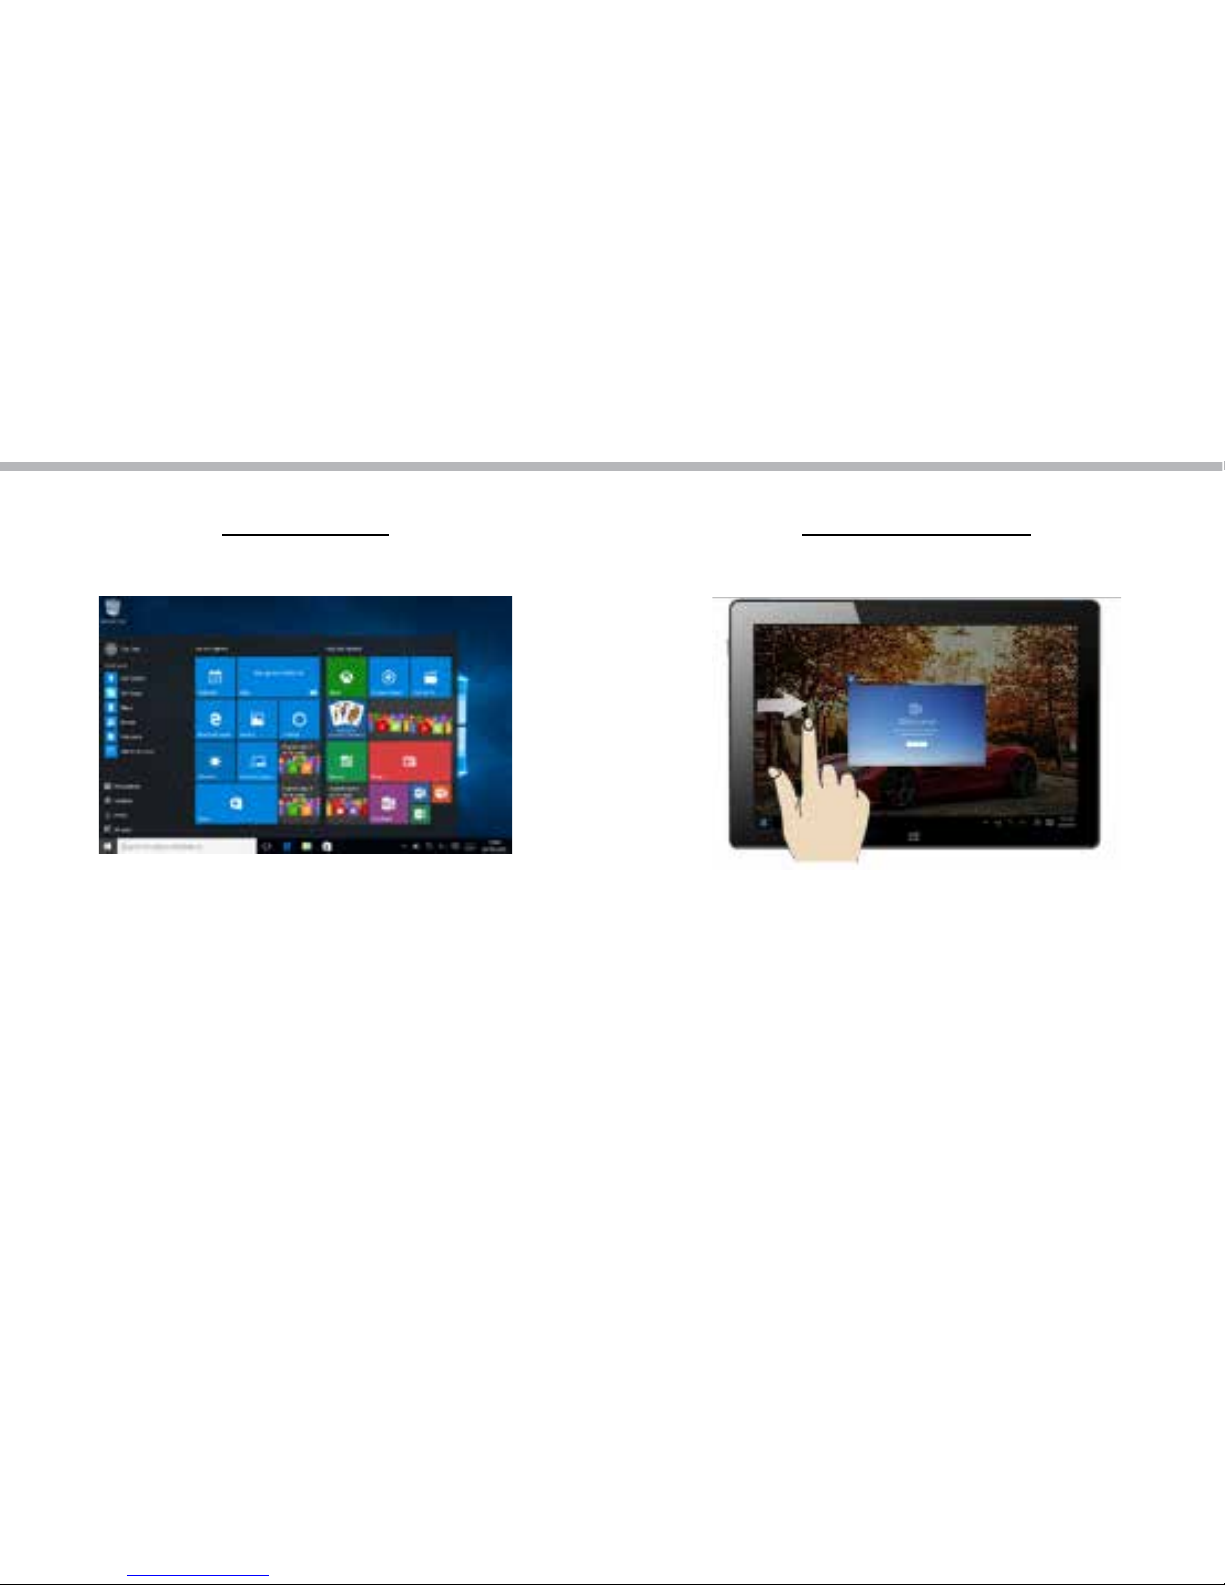
Windows // The Windows 10 interface
Slide to the right
Slide from the left side of the
screen to the right to open the
running programs
Start Screen
The “Start” screen is the
launching pad to access your
favourite apps and websites
with only one click. To access
this screen, click the Windows
button on the lower left corner
of the screen.
Page 17
17
EN
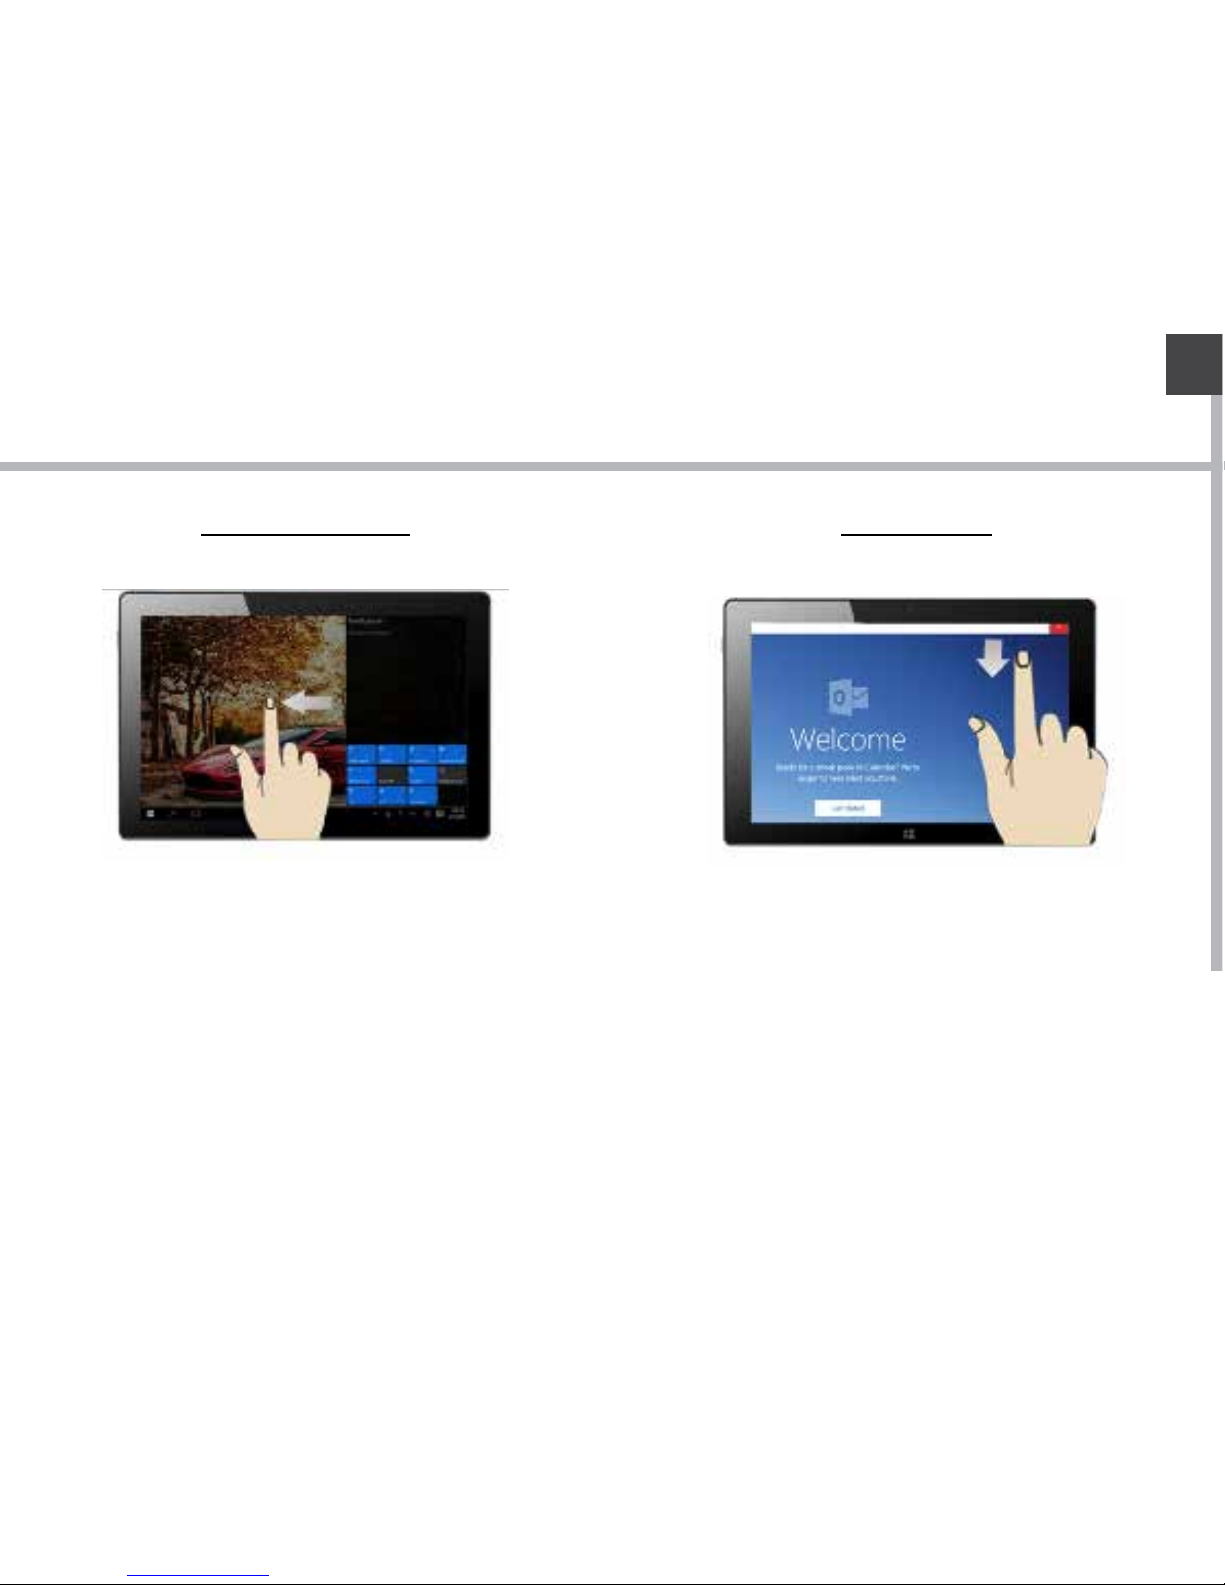
Slide to the left
Slide from the right side of
the screen to the left to open
the notication center
Slide down
Slide down from the upper
side of the screen while a
window is open. You can then
place the window on either
side to start the split screen.
Windows // The Windows 10 interface
Page 18
18
Windows // Windows notication center
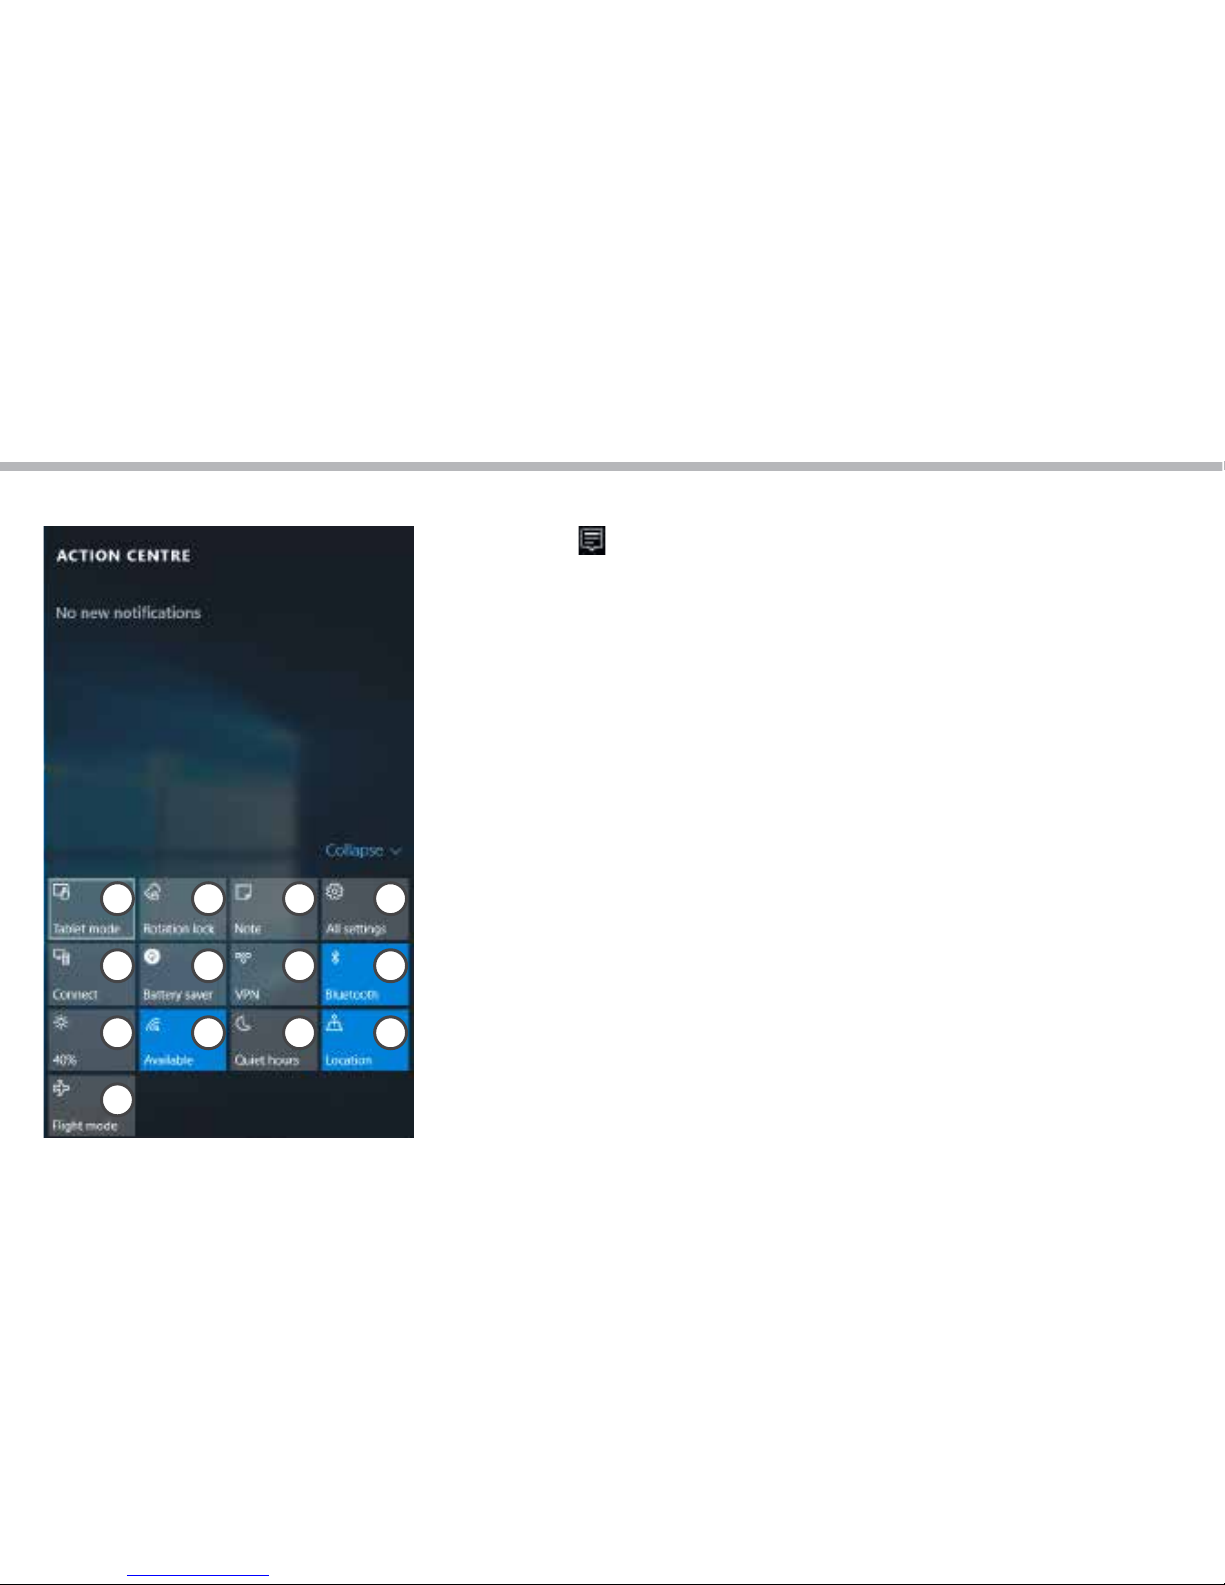
Click the icon in lower right corner of the screen to
display the notication center.
1 - To change from PC mode to tablet mode
2 - To turn on/o the screen rotation
3 - To take notes
4 - To access all settings
5 - To connect other devices
6 - To manage the device’s battery
7 - To make a VPN connection
8 - To turn on/o the Bluetooth connection
9 - To adjust the screen brightness
10 - To turn on/o the WiFi connection
11 - To turn on/o the Quiet hours option
12 - To turn on/o location services
13 - To turn on/o the ight mode
1 2 3 4
5 6 7 8
9 10 11 12
13
Page 19
19
EN
Turn ON
1. Press and hold the ON/OFF button to turn on the device.
When you turn on your device, a PIN code may be requested.
2. Type the PIN code supplied with your SIM card.
Beware of typing a wrong PIN code.
3. Select ‘OK’.
Turn OFF
To turn o your device, press and hold the ON/OFF button, and then select Power o >
OK.
Sound & Notication proles
1. When the device is turned on, press the Volume Up/Down button.
2. Select an option.
Android // Getting started
Tip:
Your device goes in standby mode when you do not use it for a specified period of
time. To wake up your device, press the ON/OFF button.
To set the duration, go to Settings > Display > Sleep.
Page 20

20
Through the wizard
The rst time you start up your Fieldbook, the installation wizard will help you set up
your device:
- Language
- Date & time
- WiFi connection
- Location service options
Touch screen actions:
Tap: Touch once to select or launch a menu, option, or application.
Tap and hold: Tap an item and hold it for more than 2 seconds.
Drag: Tap an item and move it to a new location.
Double-tap: Tap an item twice quickly.
Flick: Briskly scroll up, down, left, or right to move through lists or screens.
Pinch: Place two of your ngers far apart, and then pinch them together.
Android // Getting started
Page 21
21
EN
Android // 4G & WiFi connections
4G connection
With your SIM card, you should be connected to the Internet without any further setup.
The Fieldbook will only have signal if you are in an area covered by your provider’s
network. When connected to the 4G network, the 4G icon is displayed in the status bar.
Activating the mobile data
To be able to access Internet, mobile data must be activated.
1. Drag down the status bar.
2. Tap the “Settings” icon to open the settings menu.
3. Tap “SIM cards”
4. Tap “Mobile data” to activate it.
Page 22

22
WiFi connection
Make sure that you are in a WiFi zone. You can access the WiFi settings quickly from the
status bar.
1. Drag down the status bar.
2. The status dashboard is displayed.
3. Tap the “Settings” icon to open the settings menu.
4. Tap “Wi-Fi”
5. If Wi-Fi is o, slide the Wi-Fi switch to the “ON” position. Once the WiFi is on, the
Fieldbook will scan and display the Wi-Fi networks in range.
6. Tap the name of the network you want to connect to.
Private networks are shown with a lock icon and will require to enter your password.
Android // 4G & WiFi connections
Page 23

23
EN
Adding a Google account
A Google account lets you take full advantage of Google apps and services
1. Go to “Settings” > “Accounts” > “Add account”.
2. Select the account type “Google” to add.
3. Follow the onscreen instructions to enter information about the account.
Once the account is created, you can access Play Store, Gmail, Hangouts, Maps and many
other apps.
Synchronizing info
Information must be sync to be saved. Your data are backed up on Google servers.
1. Go to “Settings” > “Accounts” > “Google”.
2. Select your account.
The list of information that can be sync are displayed.
3. Check all information in order to sync them.
You can get them back in case of loss of your device or SIM card.
When your Google account is added to a new device, all your saved information are
collected.
Android // Google & Contacts
Page 24

24
Saving your contacts
When your contacts are saved, they are always available on the web and can be synced
to any Android phone that’s set up with your Google account.
1. Install the SIM card with your contacts in your phone.
2. Tap on the All Apps screen,
3. Tap “Contacs”
4. Tap the Menu button > “Import/Export”.
5. In Import/export contacts, select “Import from SIM card”.
6. Select your Google account.
7. Check contacts to be imported and validate.
8. Once the contacts are imported in the Google account, go to “Settings” > “Accounts” >
“Google”.
9. Select you Google account. Make sure “Contacts” is checked.
10. Select the Menu button, then “Sync now”.
Your contacts are saved to via your Google account.
Android // Google & Contacts
Page 25

25
EN
The extended home screen:
Navigate between dierent home screen panels by swiping left and right.
Home button
Short press the Home button to go back to the main screen.
Tap and hold the Home button to display all the apps you have opened. Swipe any app
left or right to close it.
Moving a home screen item:
Tap and hold an item until the positioning gridlines appear, then slide it to the desired
location, and release your nger.
Removing a home screen item:
Tap and hold the item you wish to delete. Slide your nger towards the top of the screen
and drop it over the "Remove" icon.
Uninstalling an item:
From the "All apps" screens, tap and hold an item, slide your nger towards the top of
the screen and drop it over "Uninstall" bin.
Creating application folders:
Drop one app icon over another on a home screen and the two icons will be combined
in a folder.
Android // Hints & tips
Page 26

26
Widgets:
Tap the “Menu” button > tap “Widgets”. From the main Widget screen, you can move
around widgets just as you do for app icons.
Changing your wallpaper:
Tap the “Menu” button > tap “Wallpapers”.
Locking the touchscreen:
From the quick settings dashboard in the status bar, touch “Settings”. In “Settings”,
scroll down and touch “Security”. Touch “Screen lock”. Touch the type of lock you would
like to use. After you set a lock, a lock screen is displayed whenever your screen wakes
up, requesting the pattern, pin or other specied key.
Android // Hints & tips
Page 27
27
EN
Windows operating instructions of
special function module
1. U-blox GPS
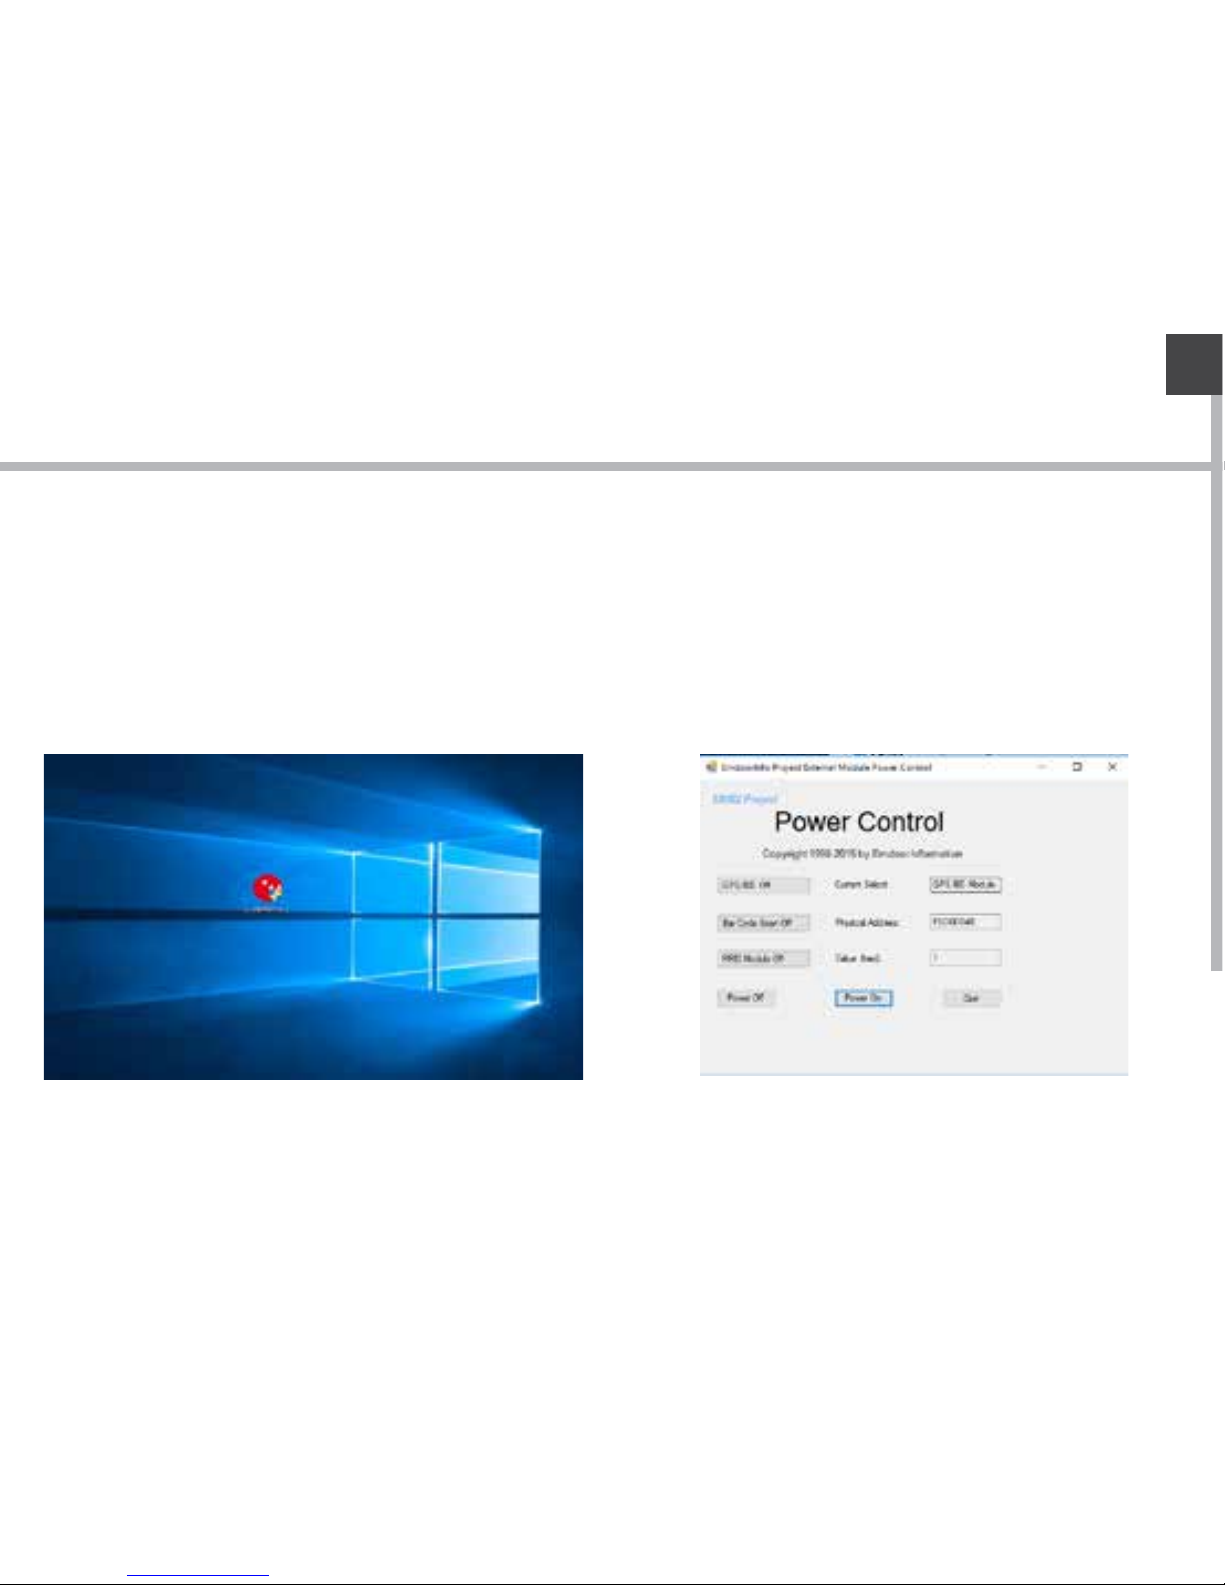
(1). The software bundled with this
product includes software les subject
to certain open .
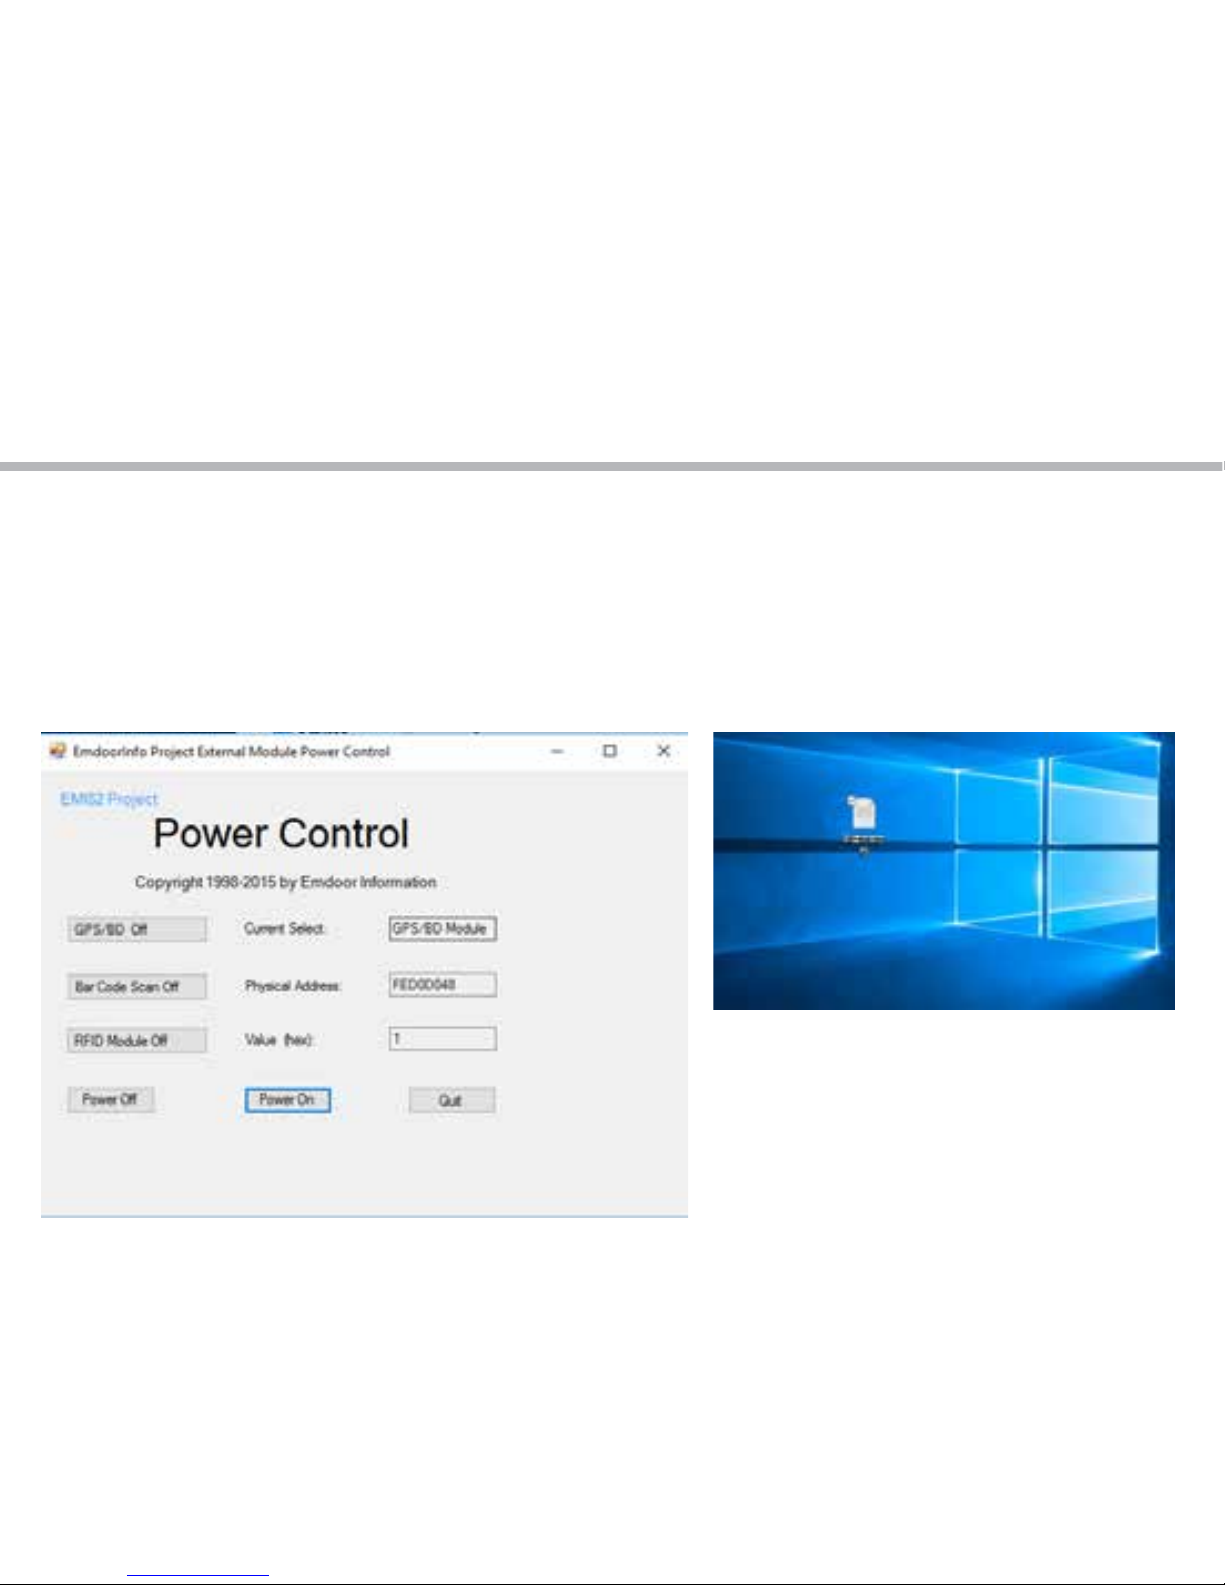
(2). Use power control tool and
make it power on.
Page 28
28
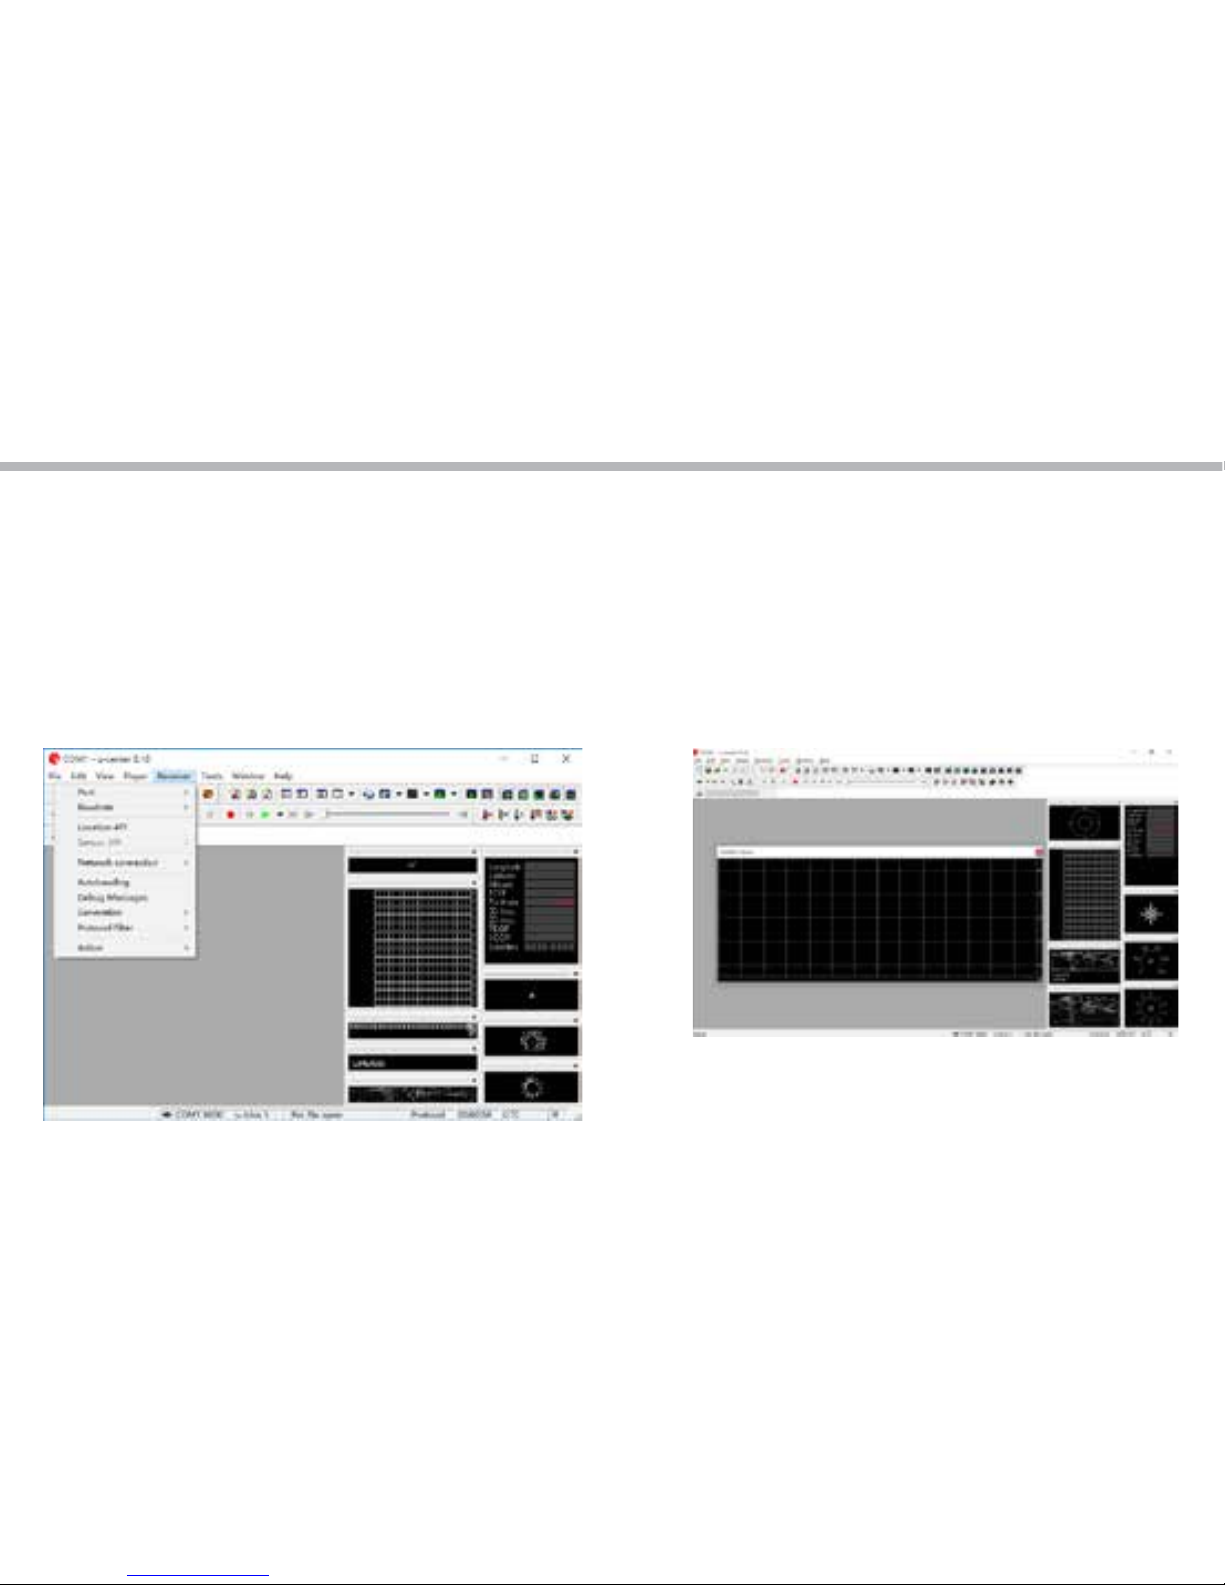
(3). Open the software, chose receiver,
and chose port again, click COM1.
(4). In the same way for receiver,
chose Baudrate, click 9600.
(5). As below picture, double click
the satellites model picture to
enlarge.
Windows operating instructions of
special function module
Page 29
29
EN
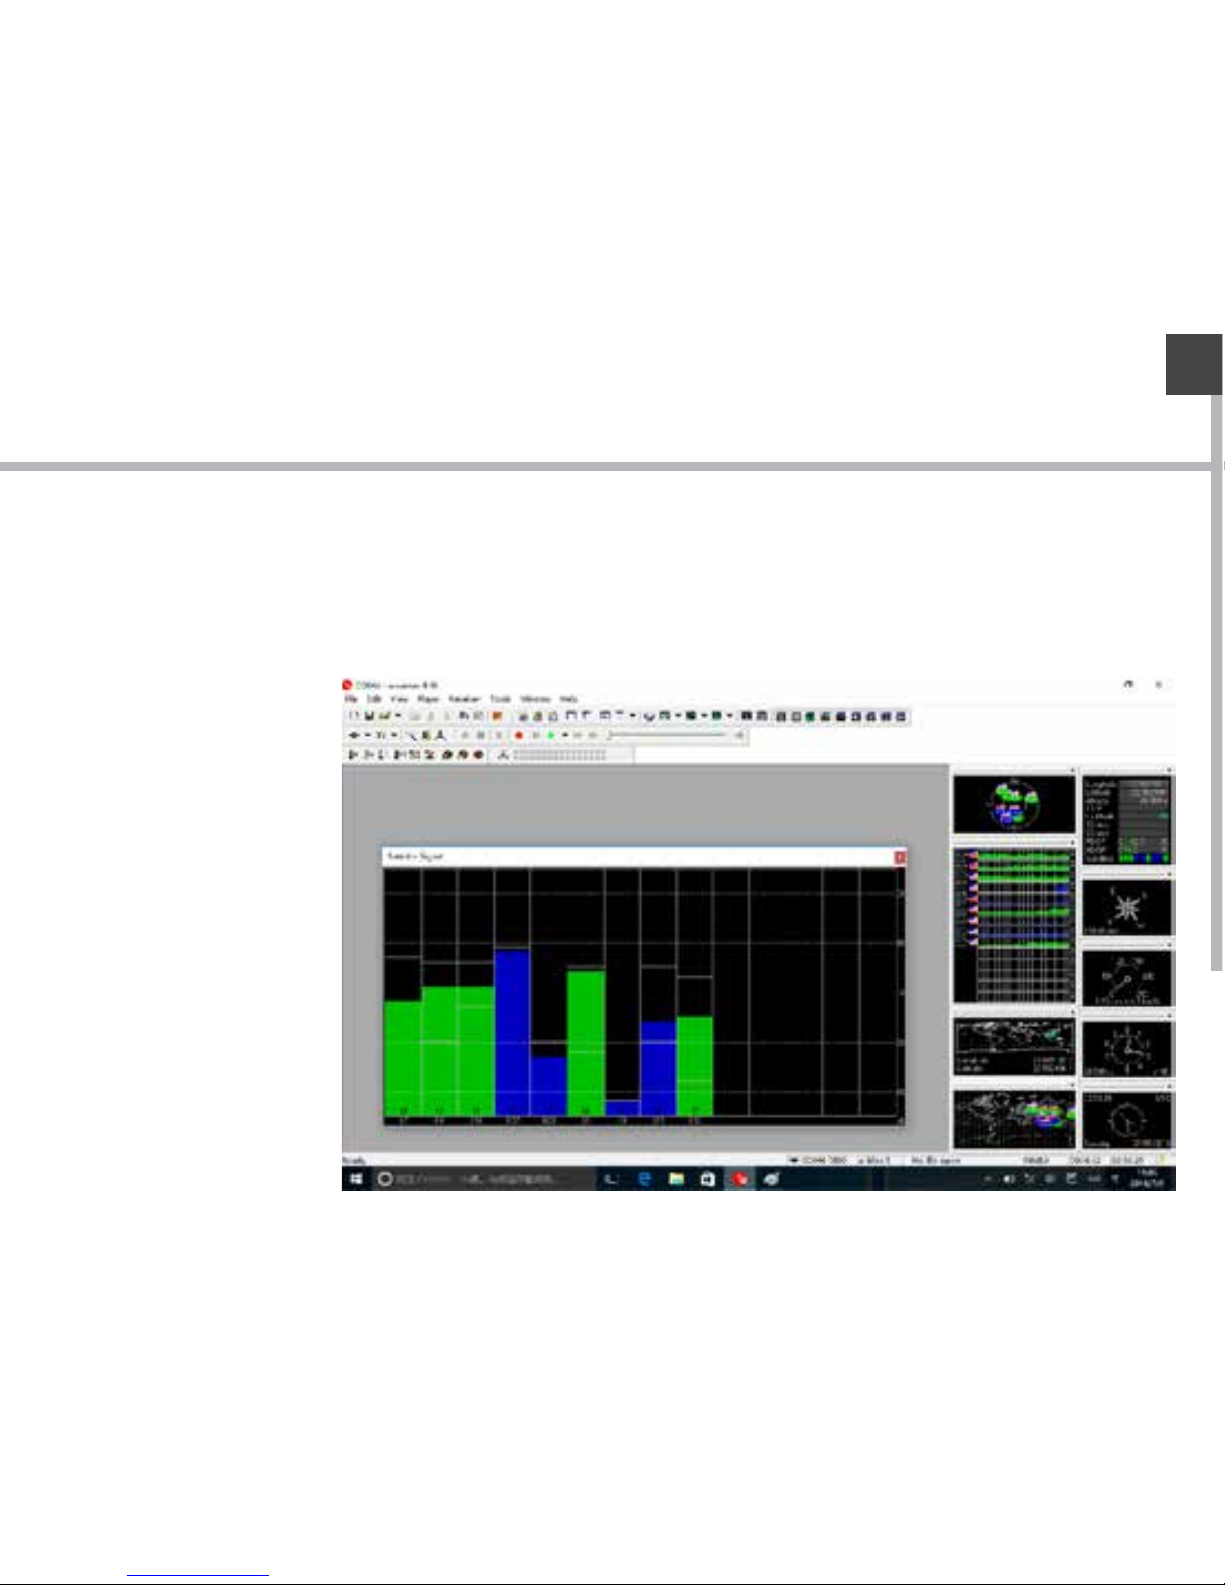
(6). The blue colors are the satellites that searched, green color are eective
satellites. The numbers in the right are signal value.
Standard:
Enviroment: in open
eld, no metal in around,
no obstacles. Sunny
weather, no clouds
covering.
Condition: can see
satellites above 12
pieces, eective
satellites above 10
pieces. Have2-3pieces
satellites value reach to
above 40 dB.
Windows operating instructions of
special function module
Page 30
30
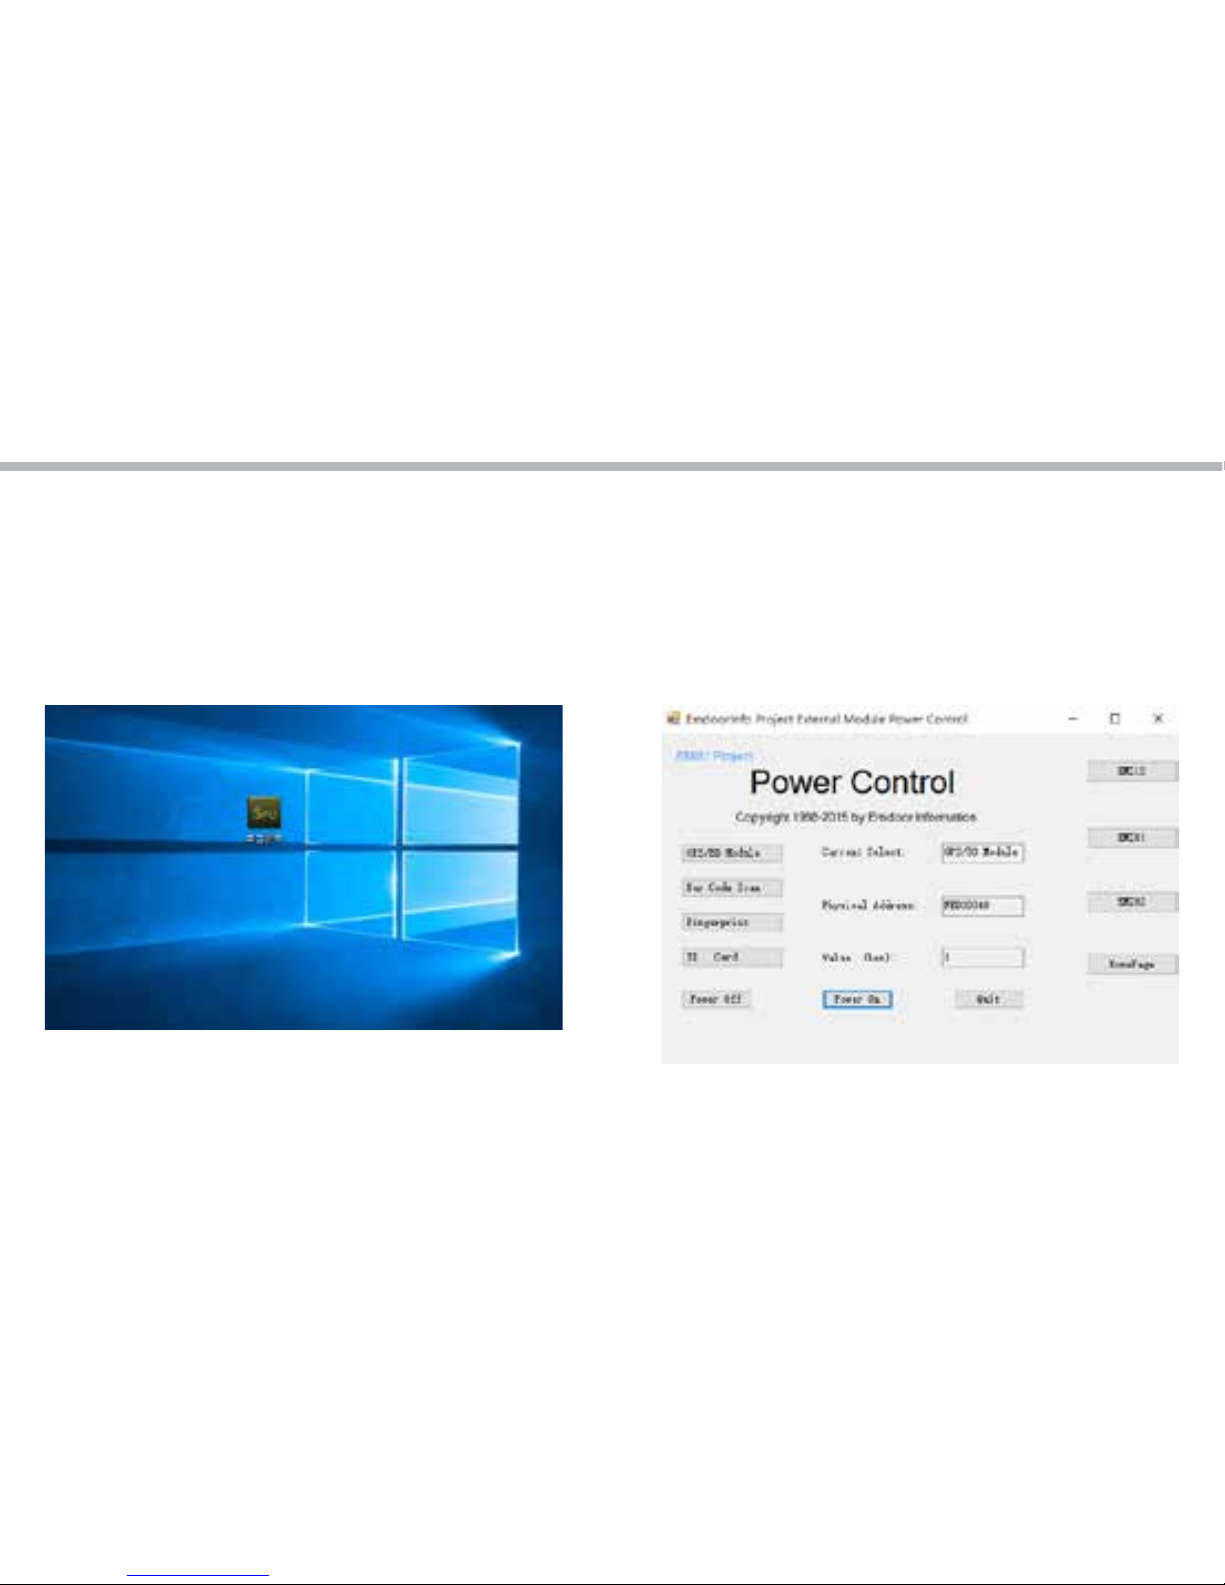
(1). Copy the serial assistant ( SPU)
on the desktop.
2. 1D module operation
(2). Use power control tool and
make it power on.
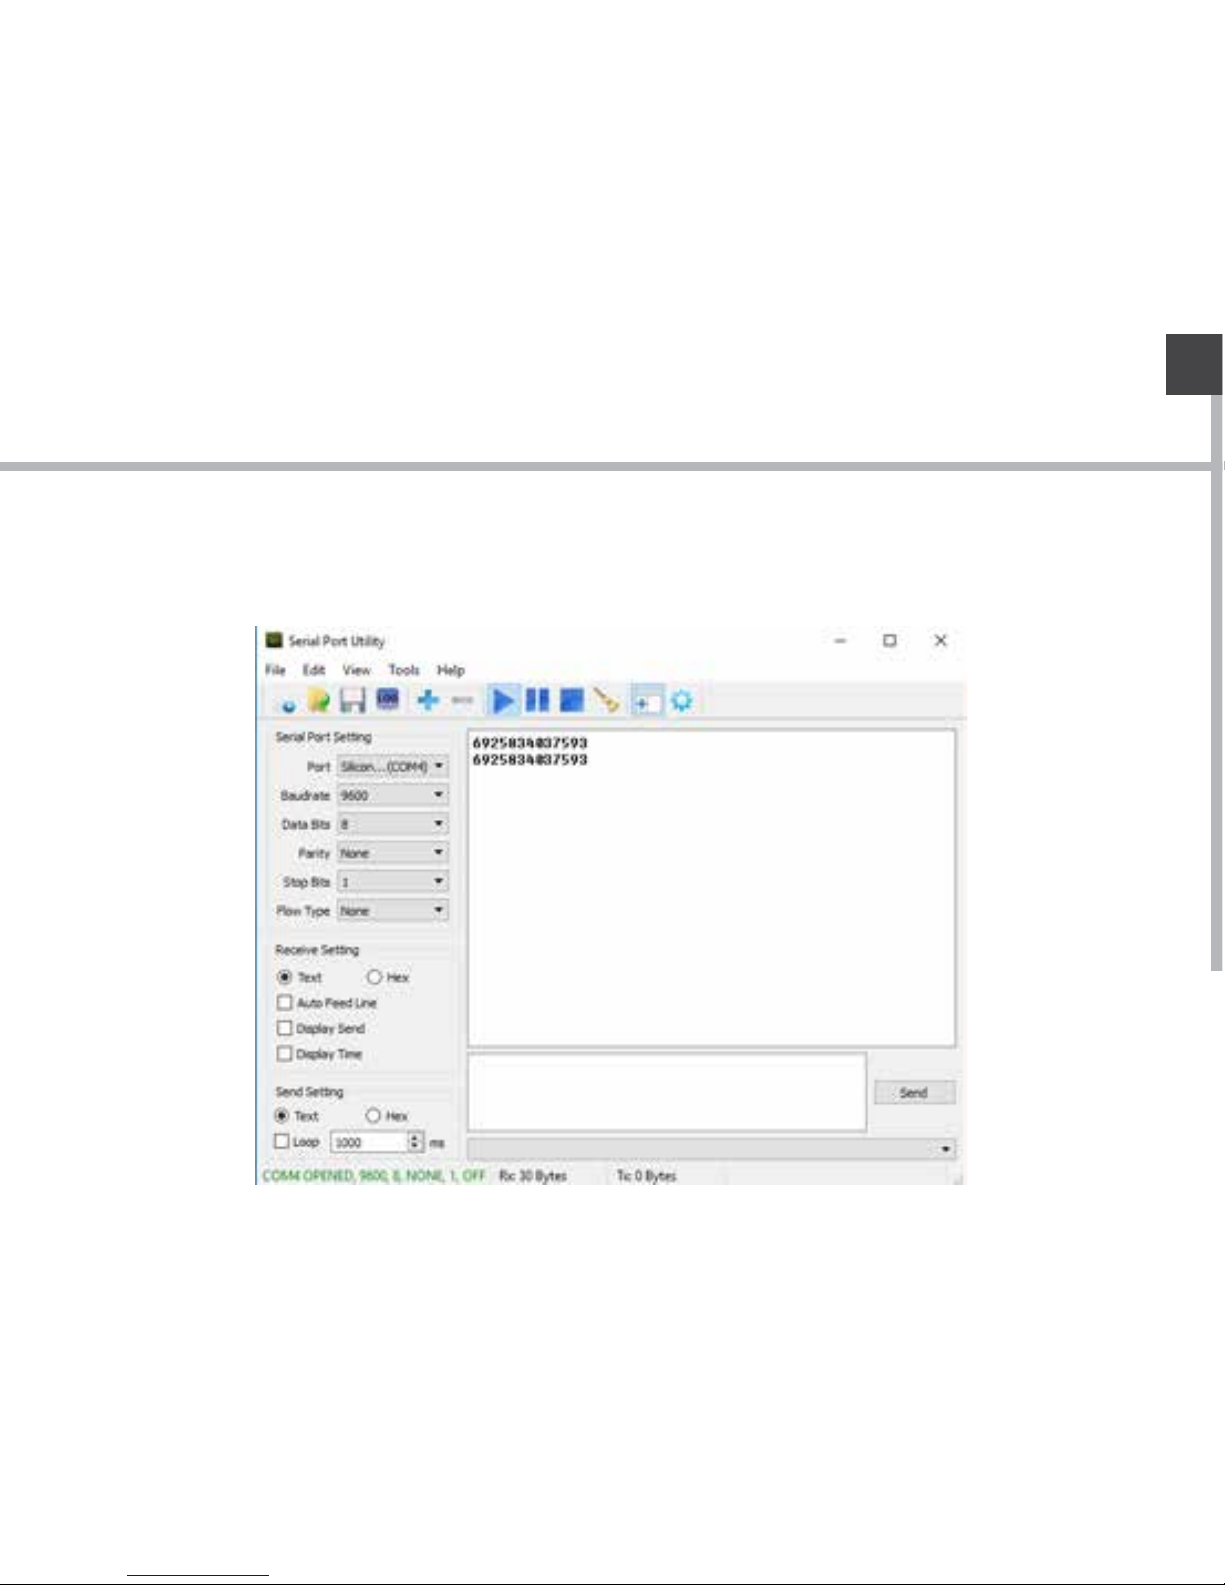
(3). Install the opened software, chose
corresponding serial port, Baud rate
chose 9600.
(4). Click start key, press the
scanner key on the PAD and start
to scan.
Windows operating instructions of
special function module
Page 31
31
EN
(5). Ok ! after scan successful, the result will show on the frame automatically.
Windows operating instructions of
special function module
Page 32
32
(1). Use power control tool and make It power on.
3. 2D module operation
(2). Create a text document.
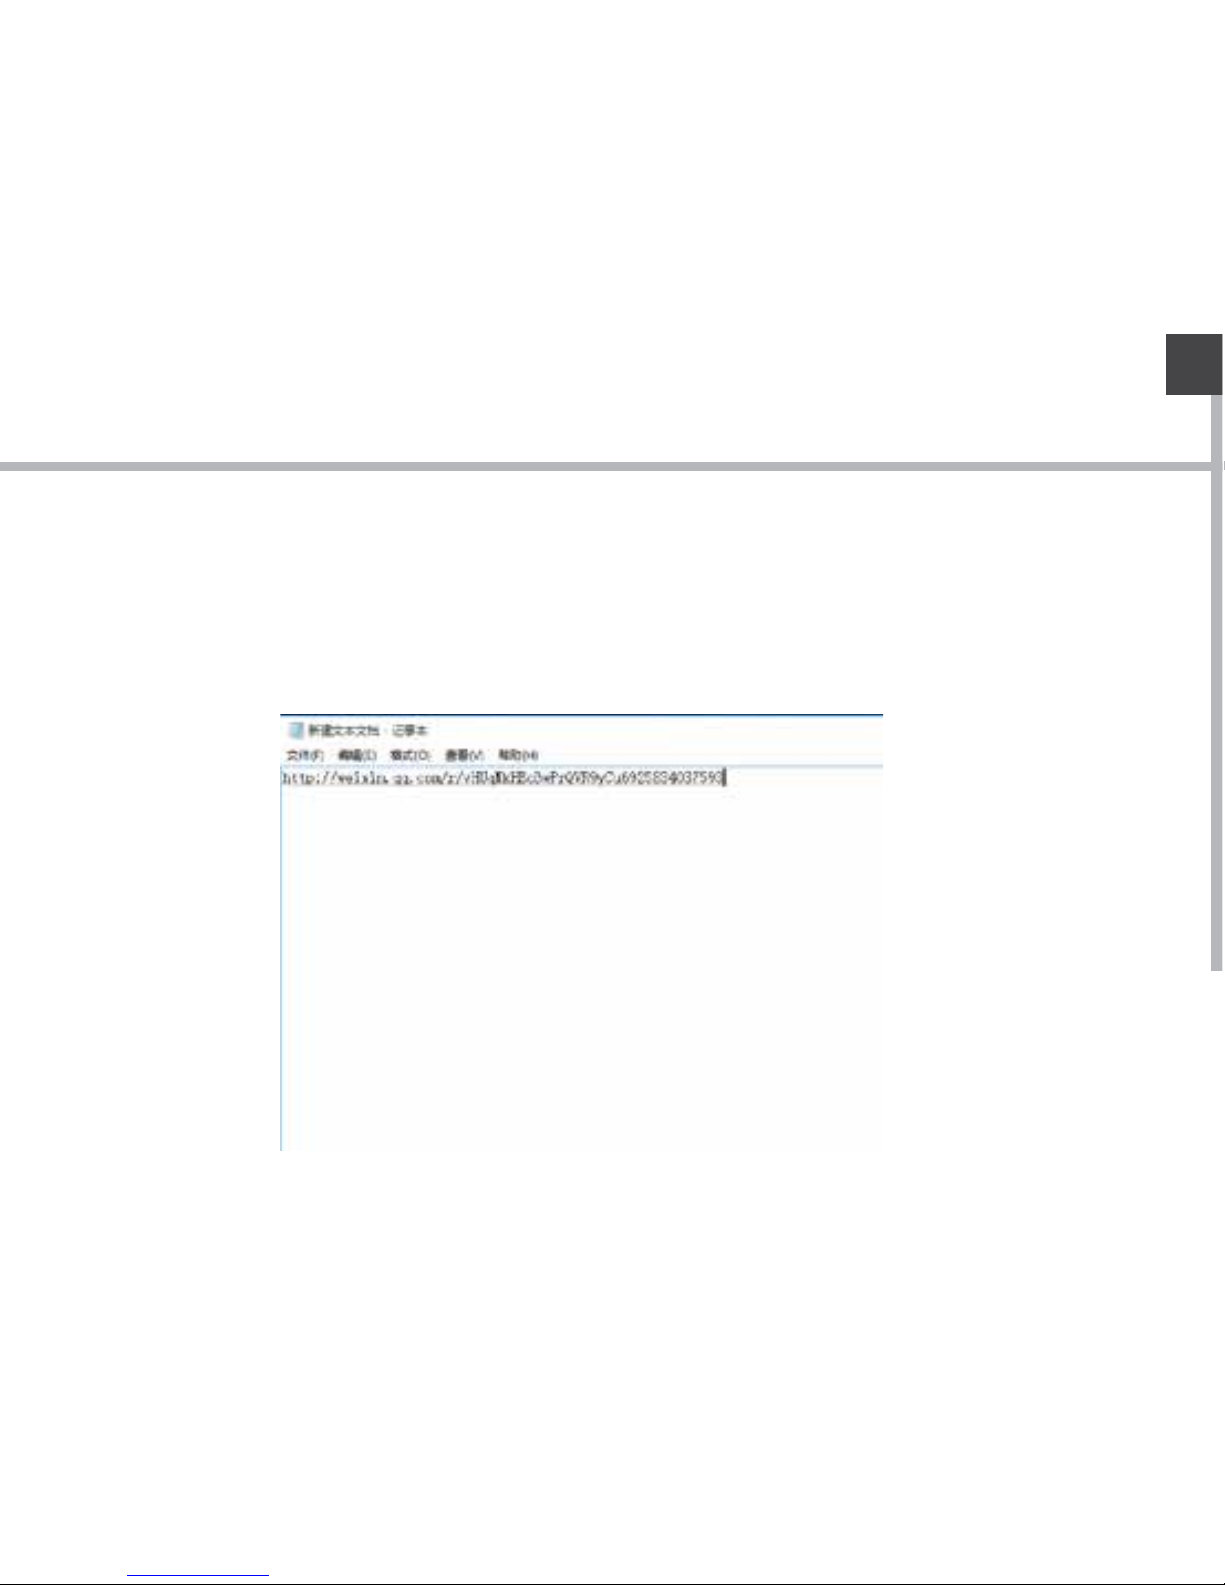
Windows operating instructions of
special function module
Page 33
33
EN
(3). Open the text document, click the blank place, press the scan key on the PAD
and start to scan.
(4). The result of scanner will show automatically.
Windows operating instructions of
special function module
Page 34
34
Android operating instructions of
special function module
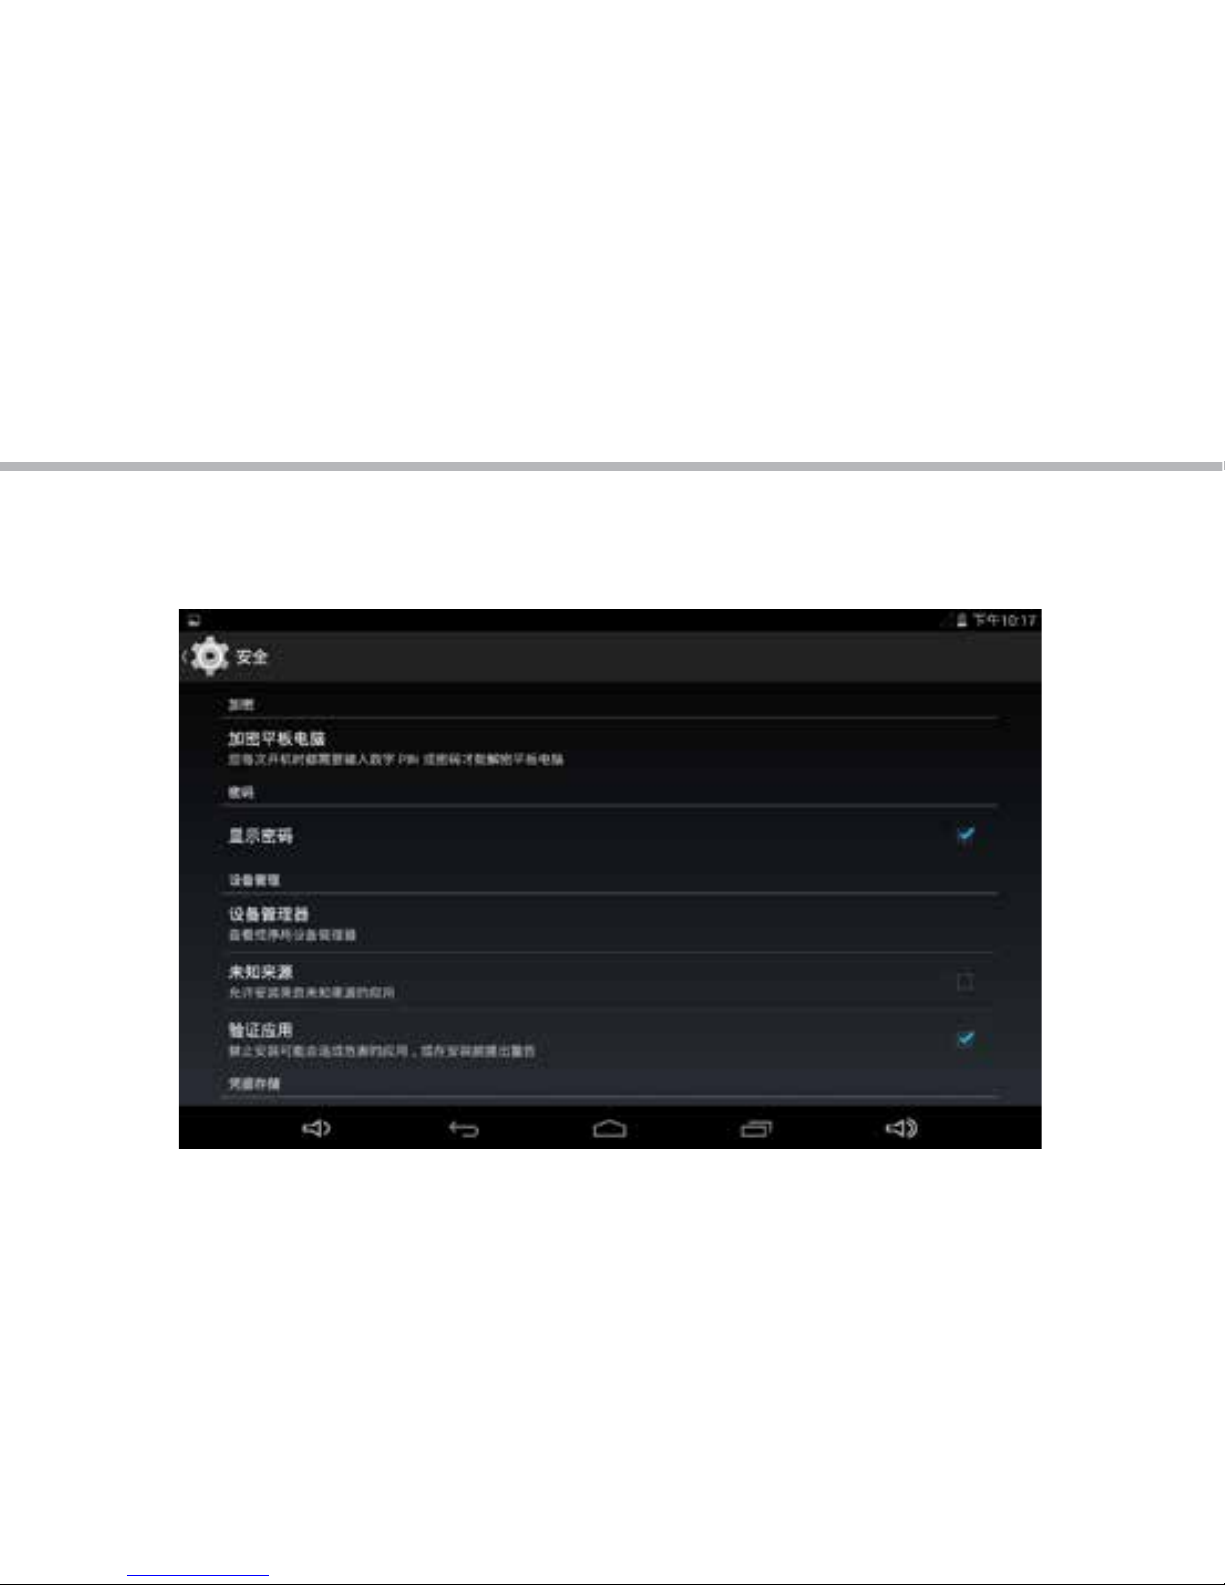
(note: please allow installation of unknow source before software installation)
Check: setting—security- unknown source.
Page 35
35
EN
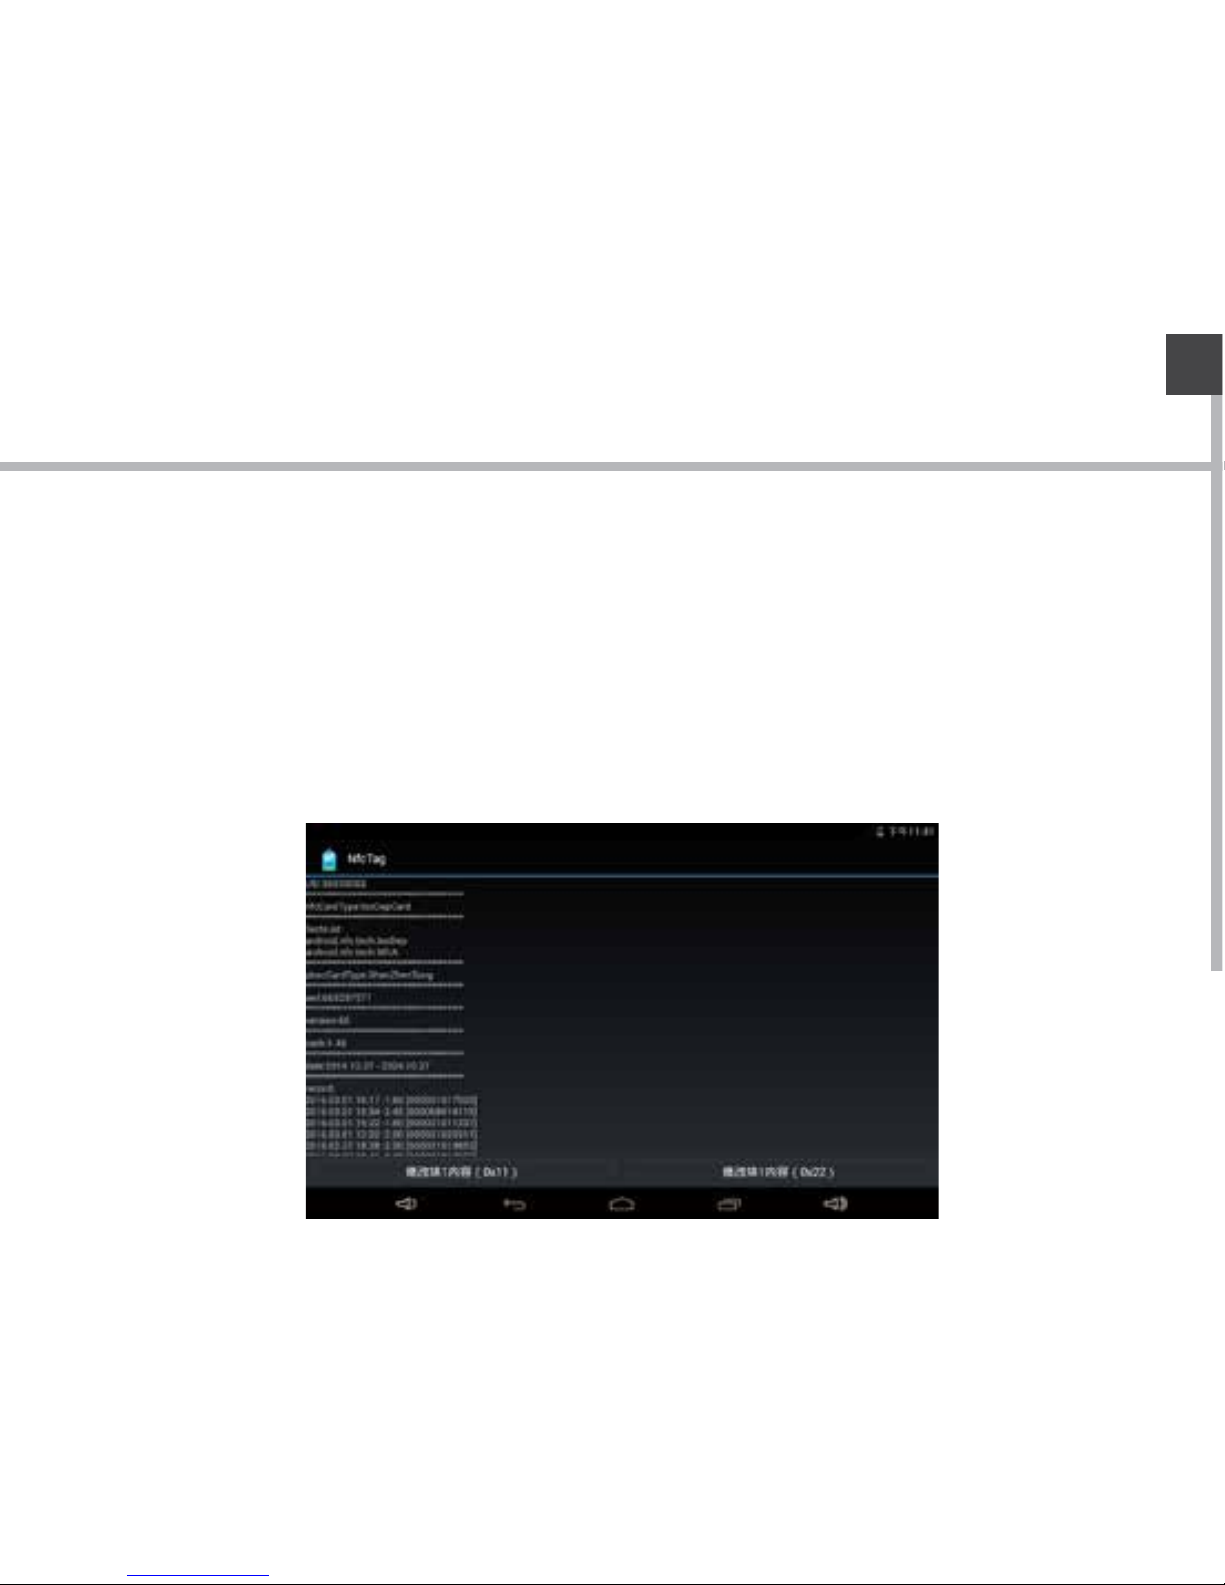
(1). Copy NFC testing software on the local.
1. NFC Module operation
(2). Click install, and open.
(3). Put NFC card on the induction area.
(4).OK! Read information, OK!
Standard :
Android operating instructions of
special function module
Page 36
36
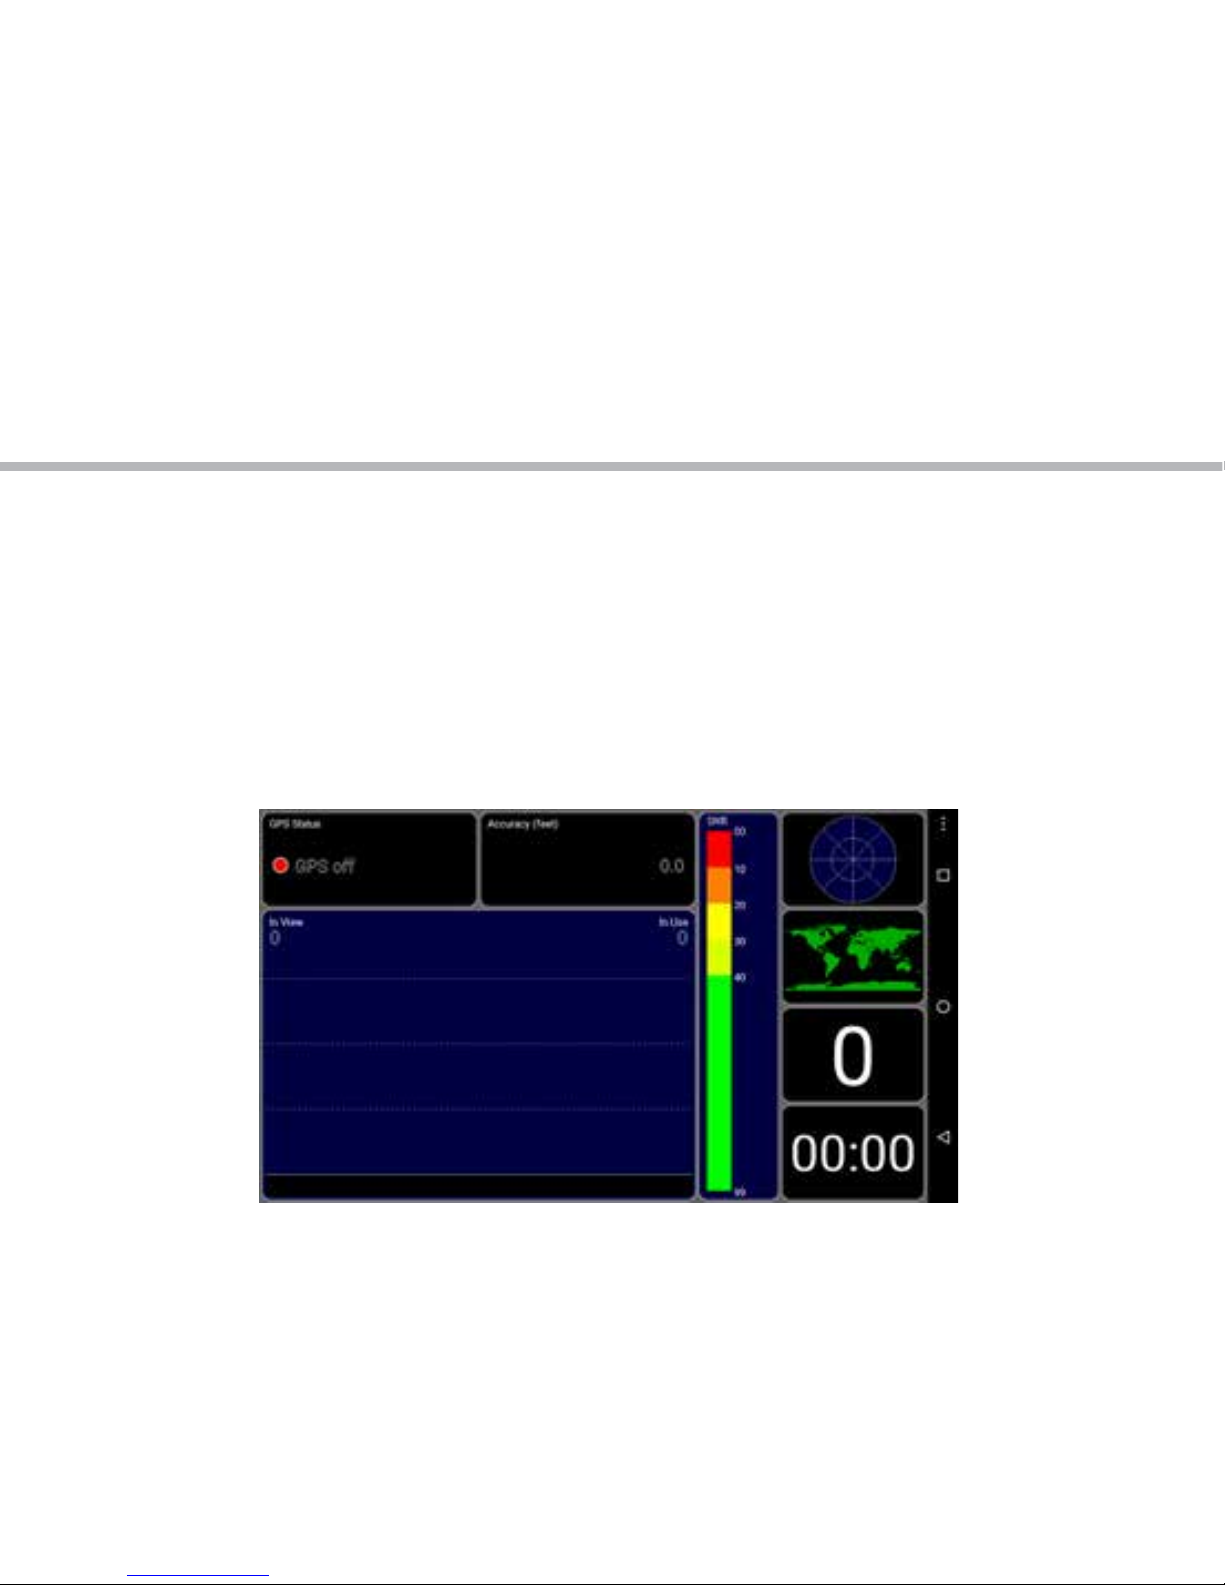
(1). Copy GPS testing software on the local.
2. GPS Module operation
(2). Click install, and open.
(3). See the GPS status shows o on the top left corner. Click o and enter into set
interface.
Android operating instructions of
special function module
Page 37
37
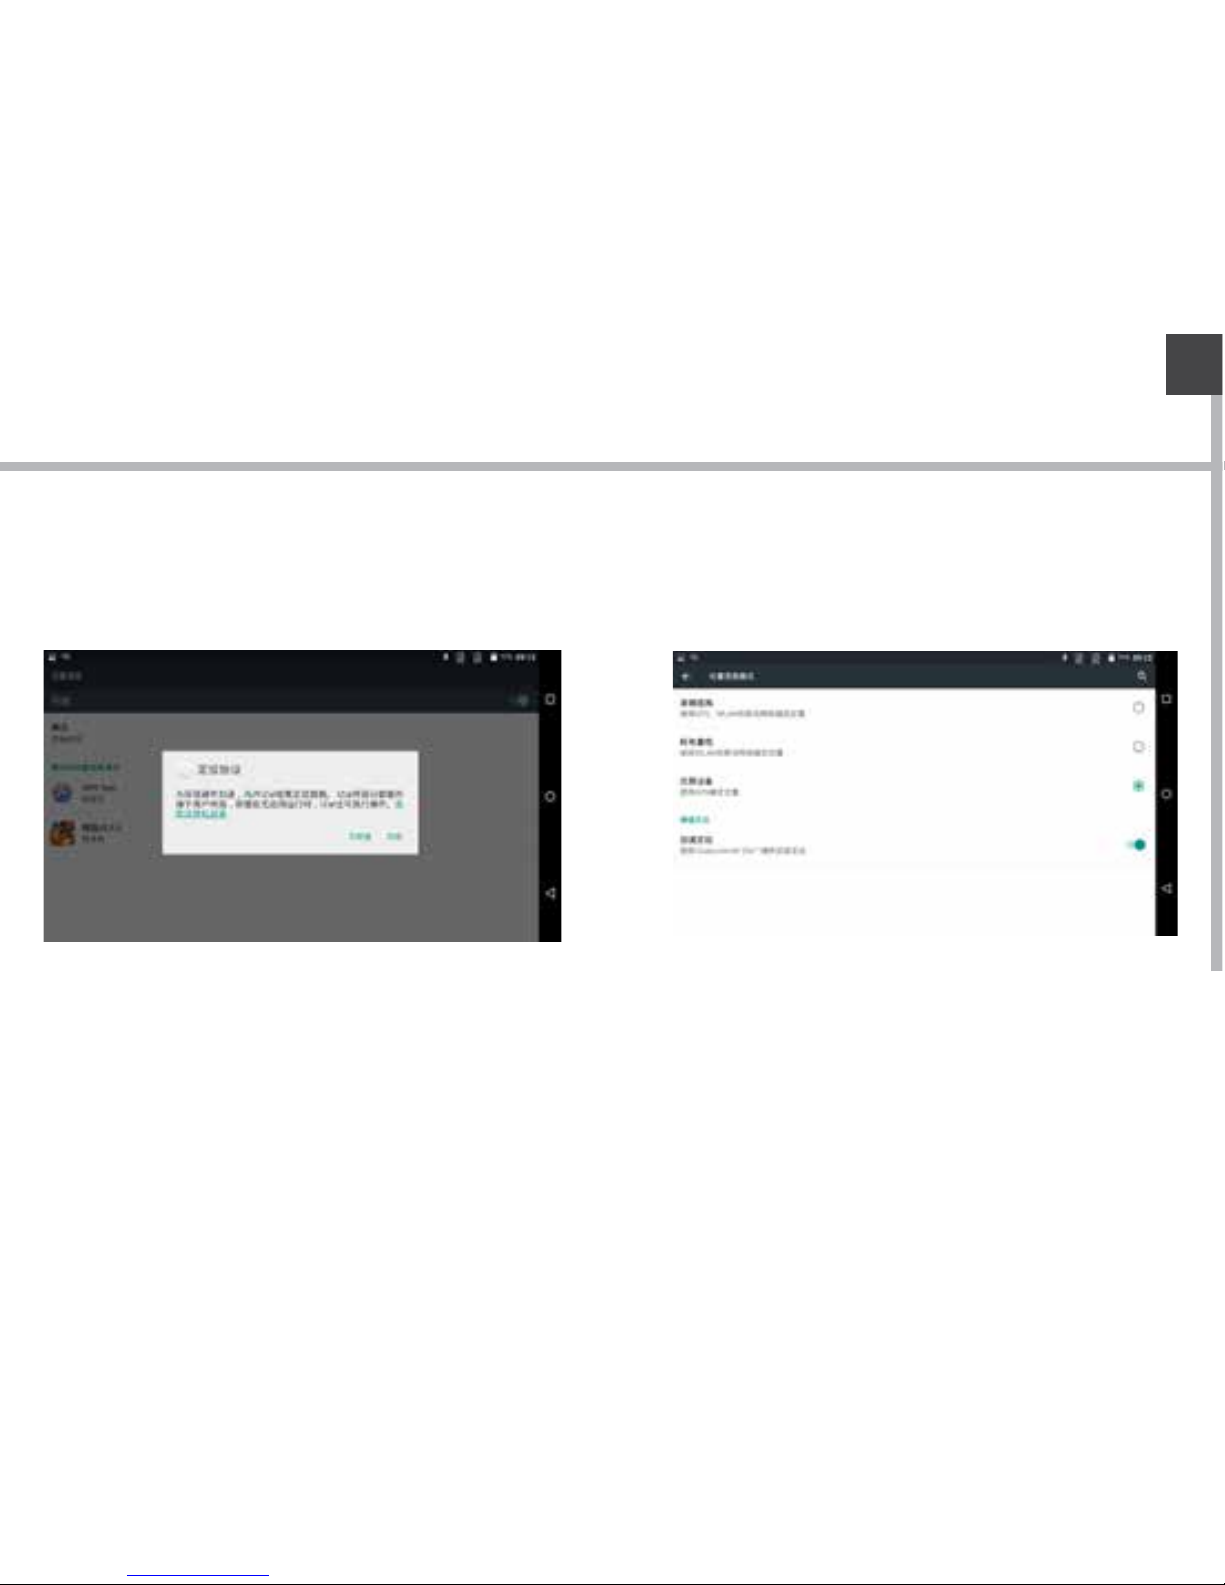
EN
(4).open the switch on the top right
corner, and chose agree again.
(5). Chose mode, click device only.
(6).Finally return GPS main interface. Can see GPS Status shows on.
Android operating instructions of
special function module
Page 38
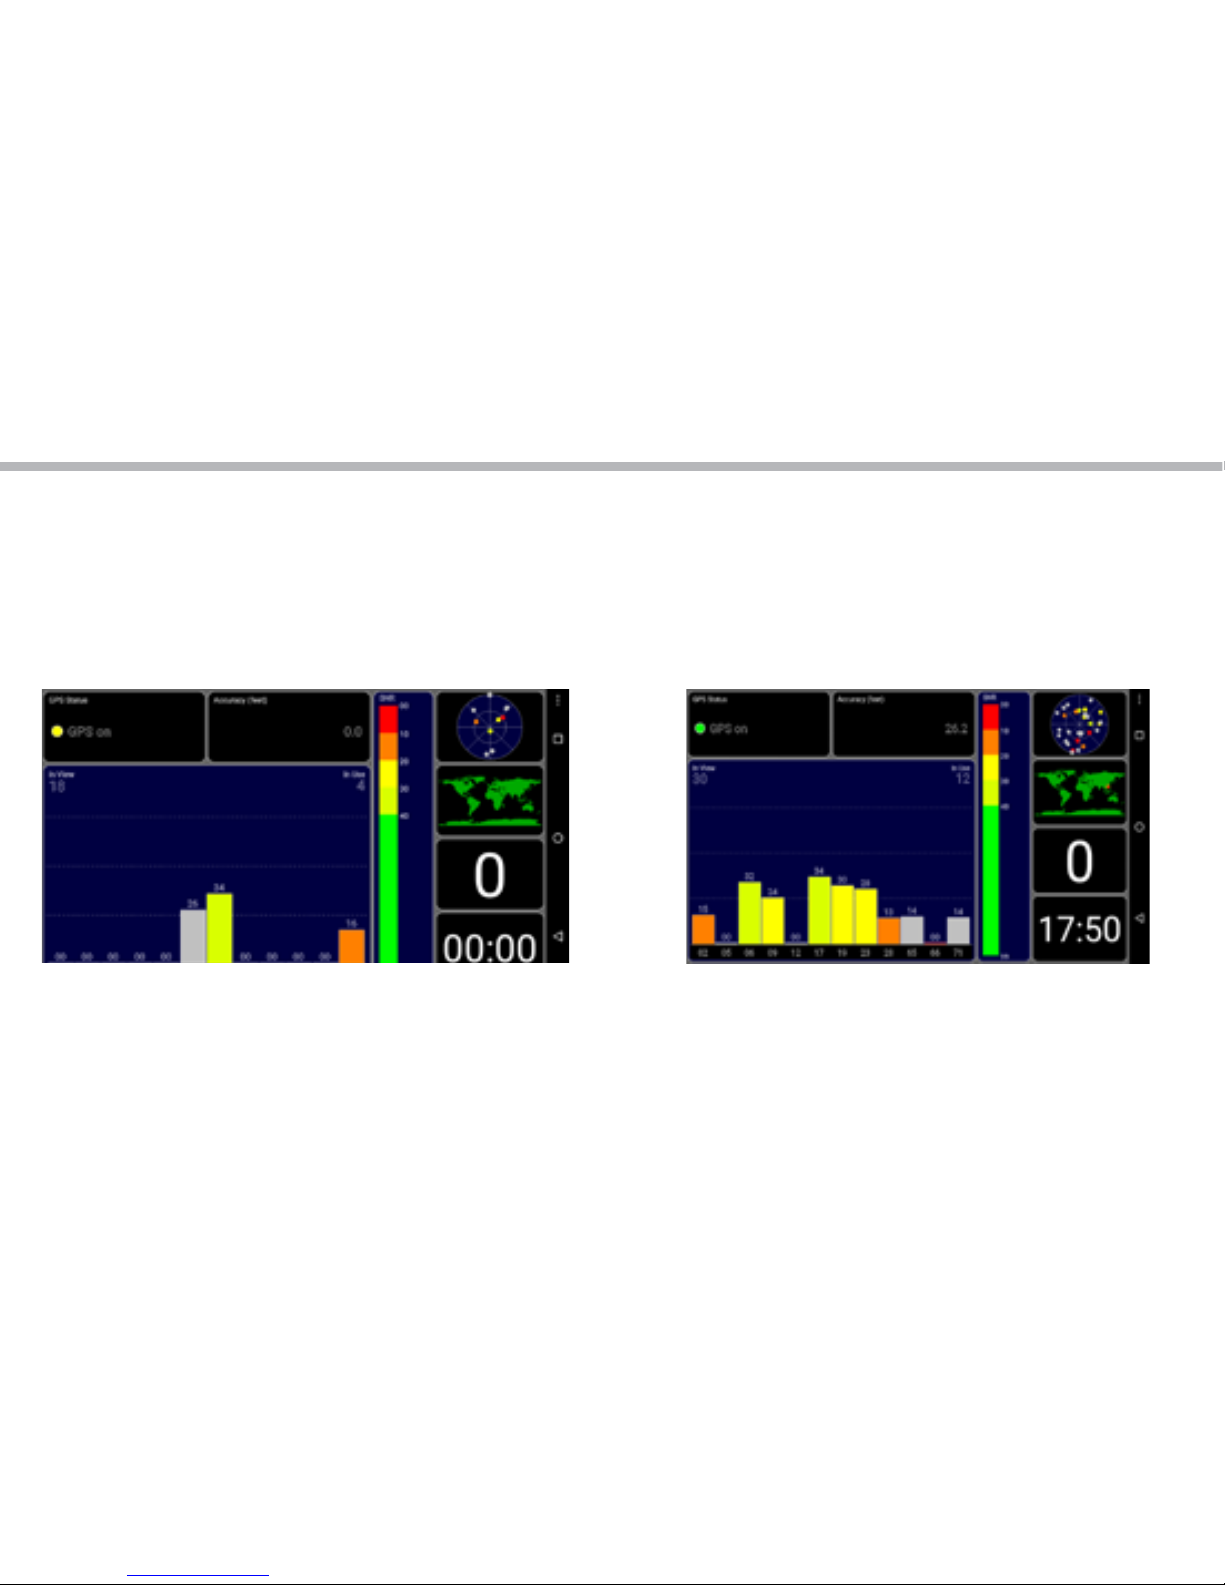
38
(7).In open eld and waiting for 1min
and check if there is a satellite.
(8). OK! wait for 3 mins and check
if satellites value, quantity meet
standard.
Standard:
Enviroment: in open eld, no metal in around, no obstacles. Sunny weather, no clouds
covering.
Condition: can see satellites above 12 pieces, eective satellites above 10 pieces. Have2-3
pieces satellites value reach to above 40 dB.
Android operating instructions of
special function module
Page 39
39
EN
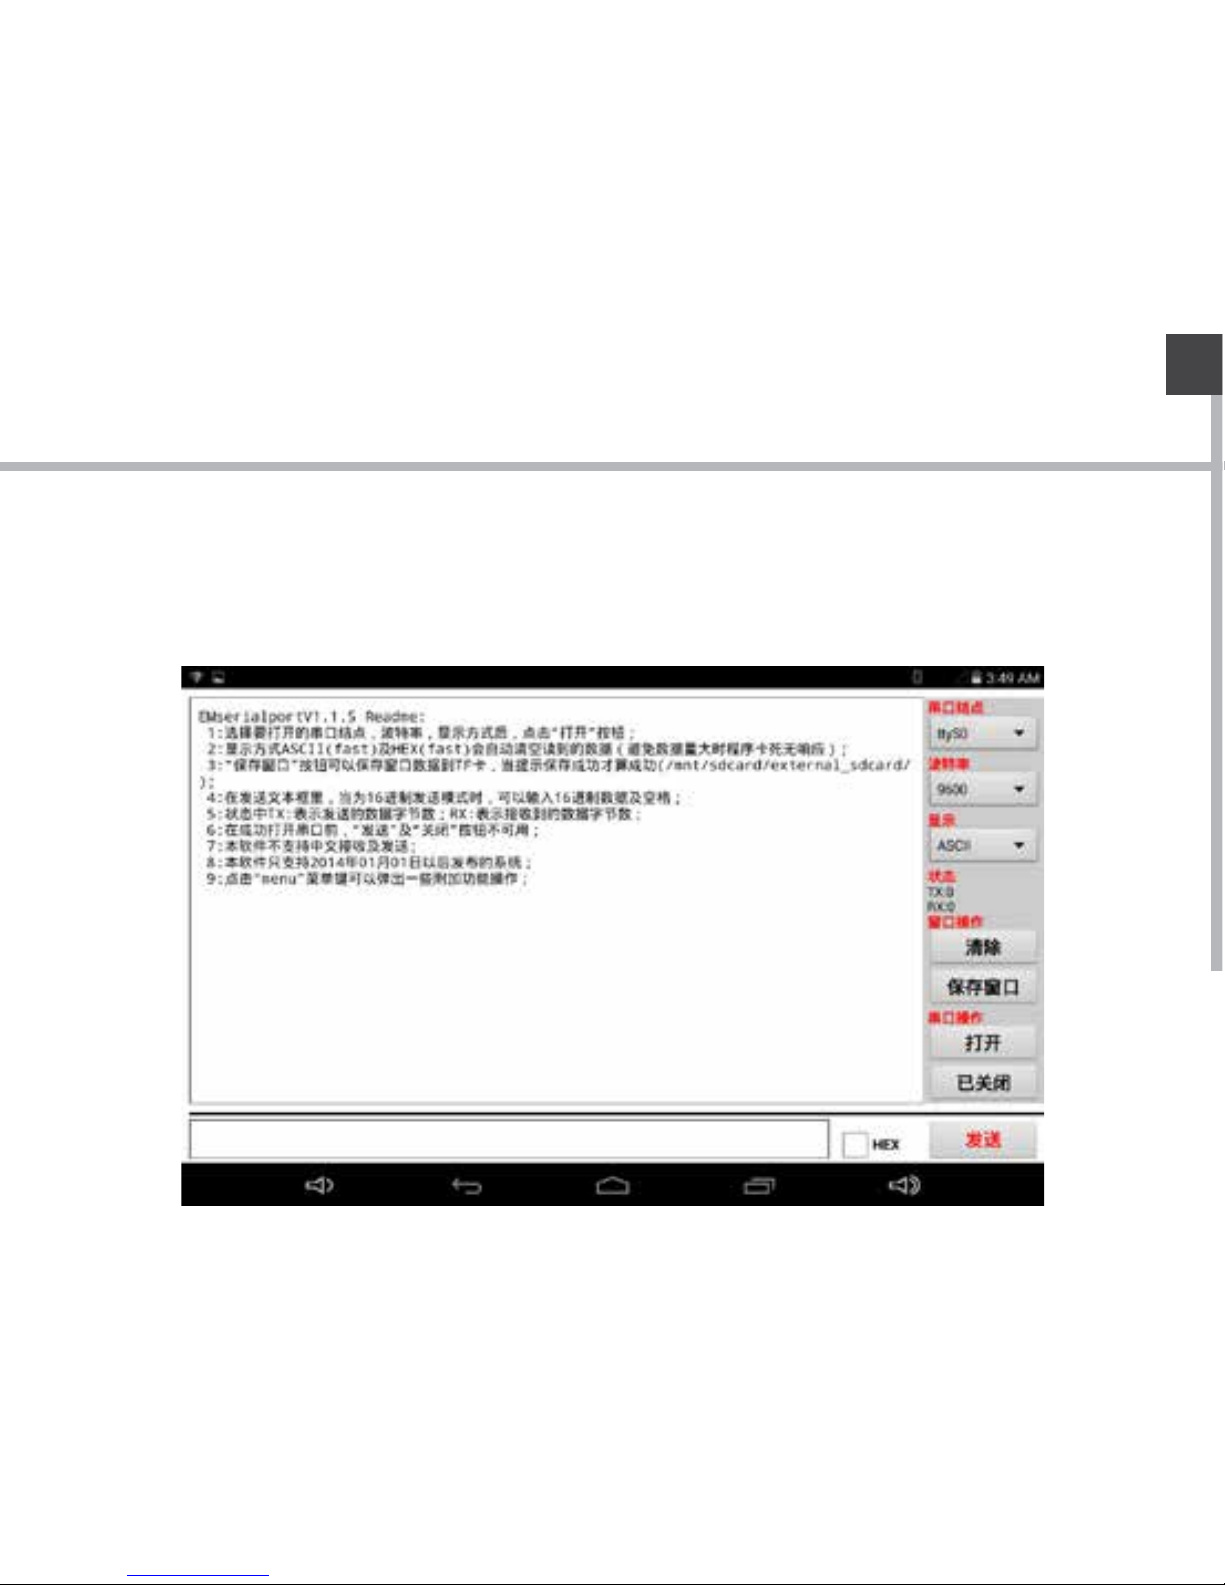
open testing software will have operating instruction as below:
3. 1D Module operation
Android operating instructions of
special function module
Page 40
40
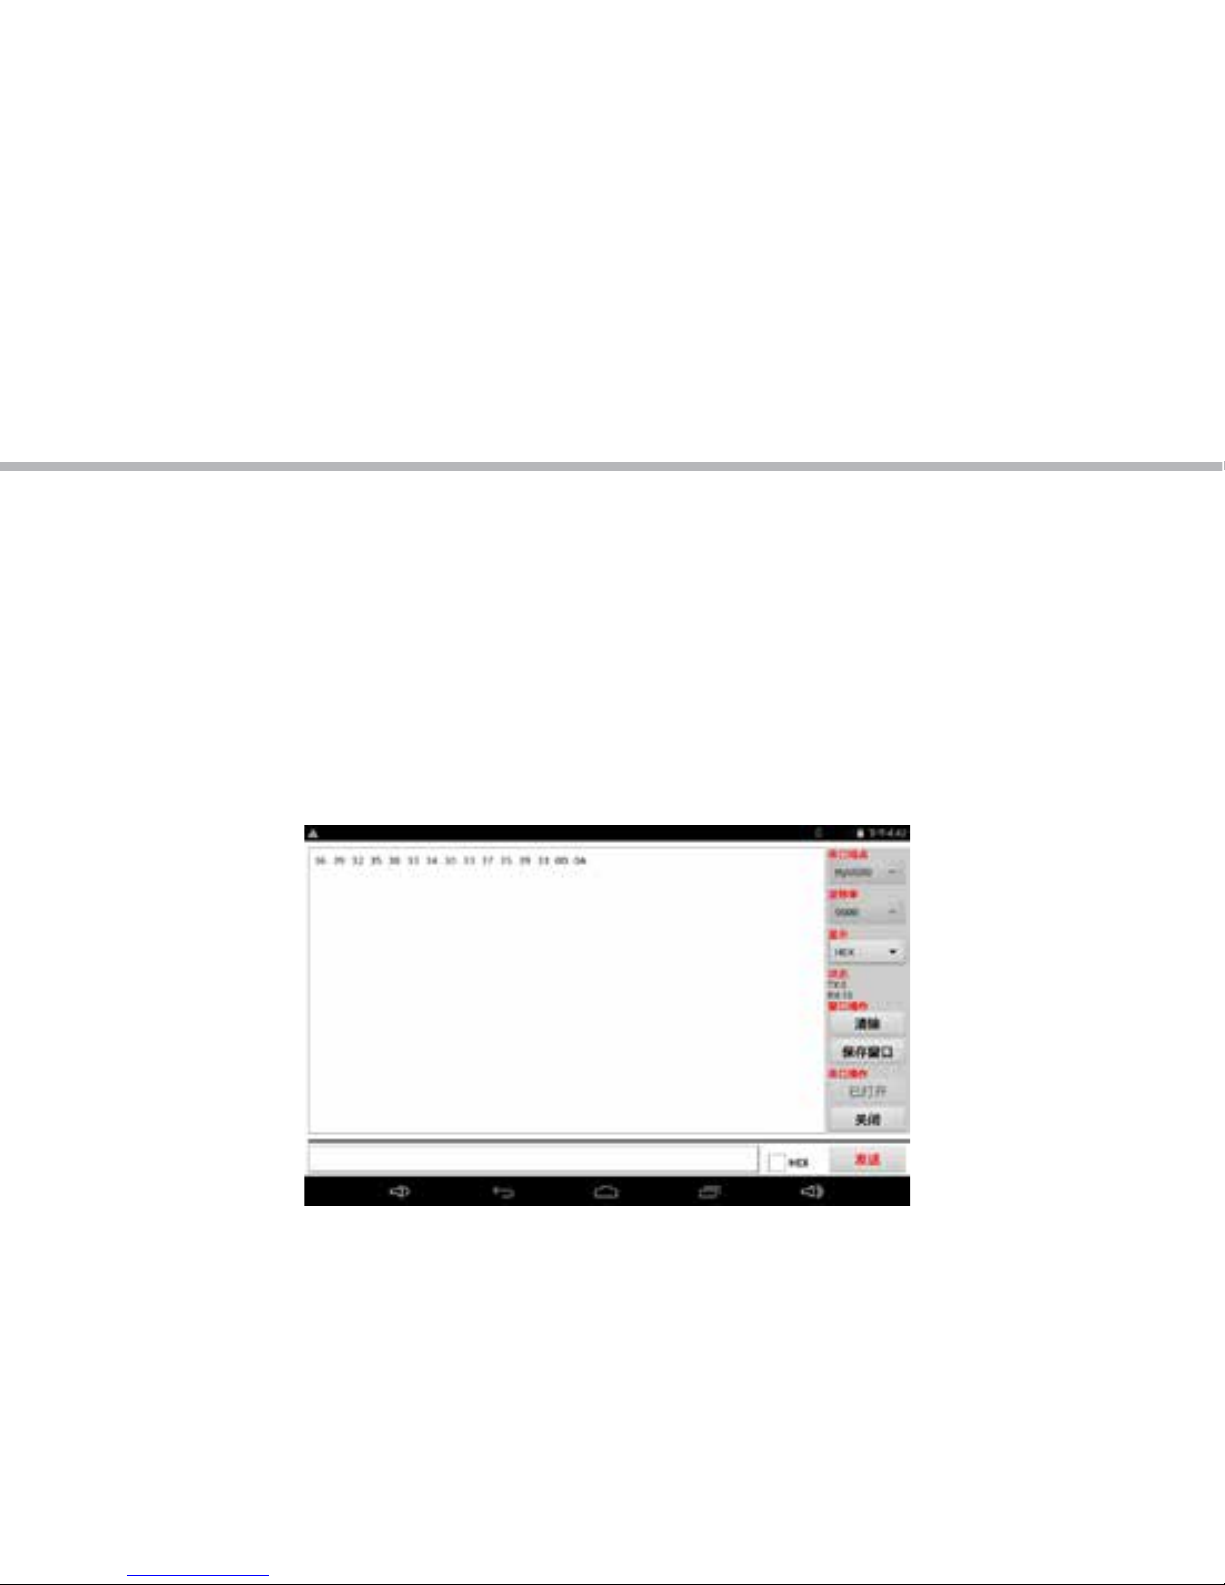
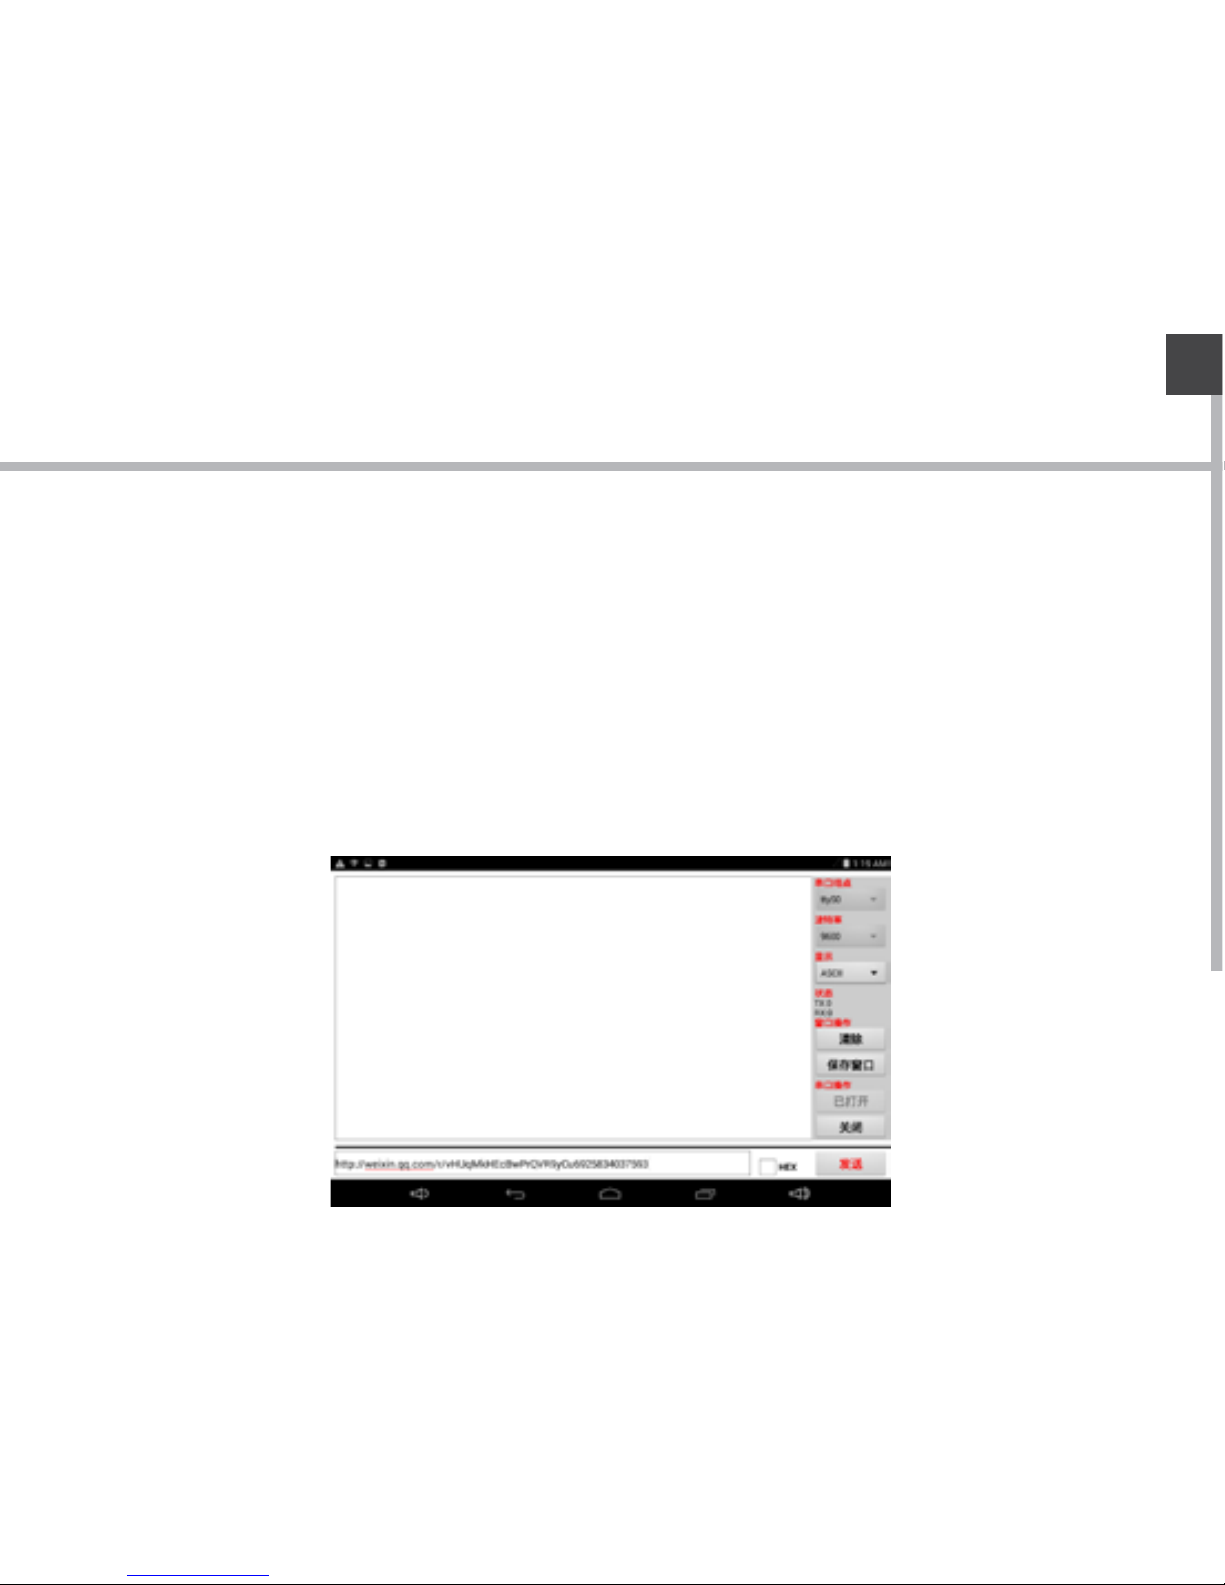
(1). Copy scan testing software to
local.
(2). Click install, and open.
(3). Chose ttyUSB0 on the serial
port node, chose 9600 or 115200 on
Baud rate options, shows HEX.
(4). Click Serial port operation open
options, press Scan key on Pad to
scan relevant barcode.
(5). OK! after successfully, will show the right characters on the frame.
Android operating instructions of
special function module
Page 41
41
EN
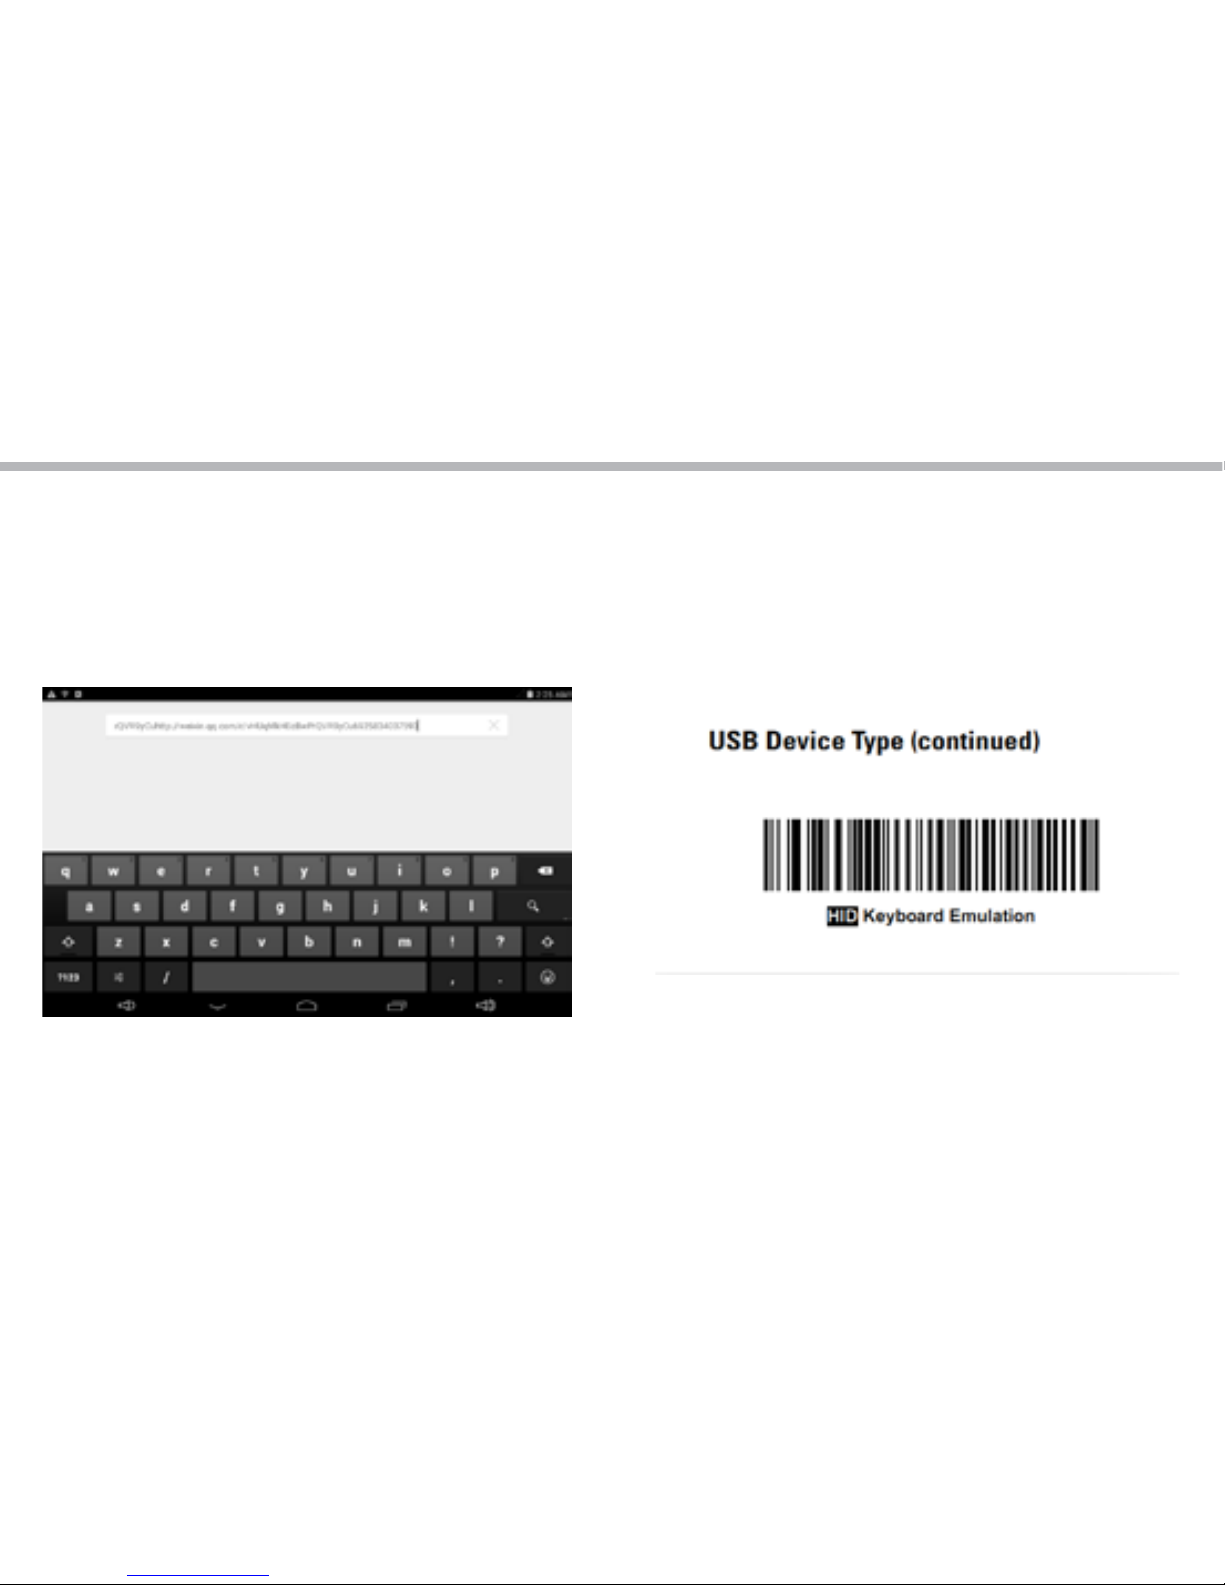
4. 2D Module operation
(1). Copy scan code testing software
to local.
(2). Click install, and open.
(3). Click the frame in the below, press the scan key and aim at the barcode which
need to scan.
(4). OK! after scan successfully, will show the right characters on the below frame.
Android operating instructions of
special function module
Page 42
42
(5). also can press scanner key to
scan directly and will show as below.
(6). If scanner can not work, you
can try scan the below USB switch
code.
Android operating instructions of
special function module
Page 43
43
EN
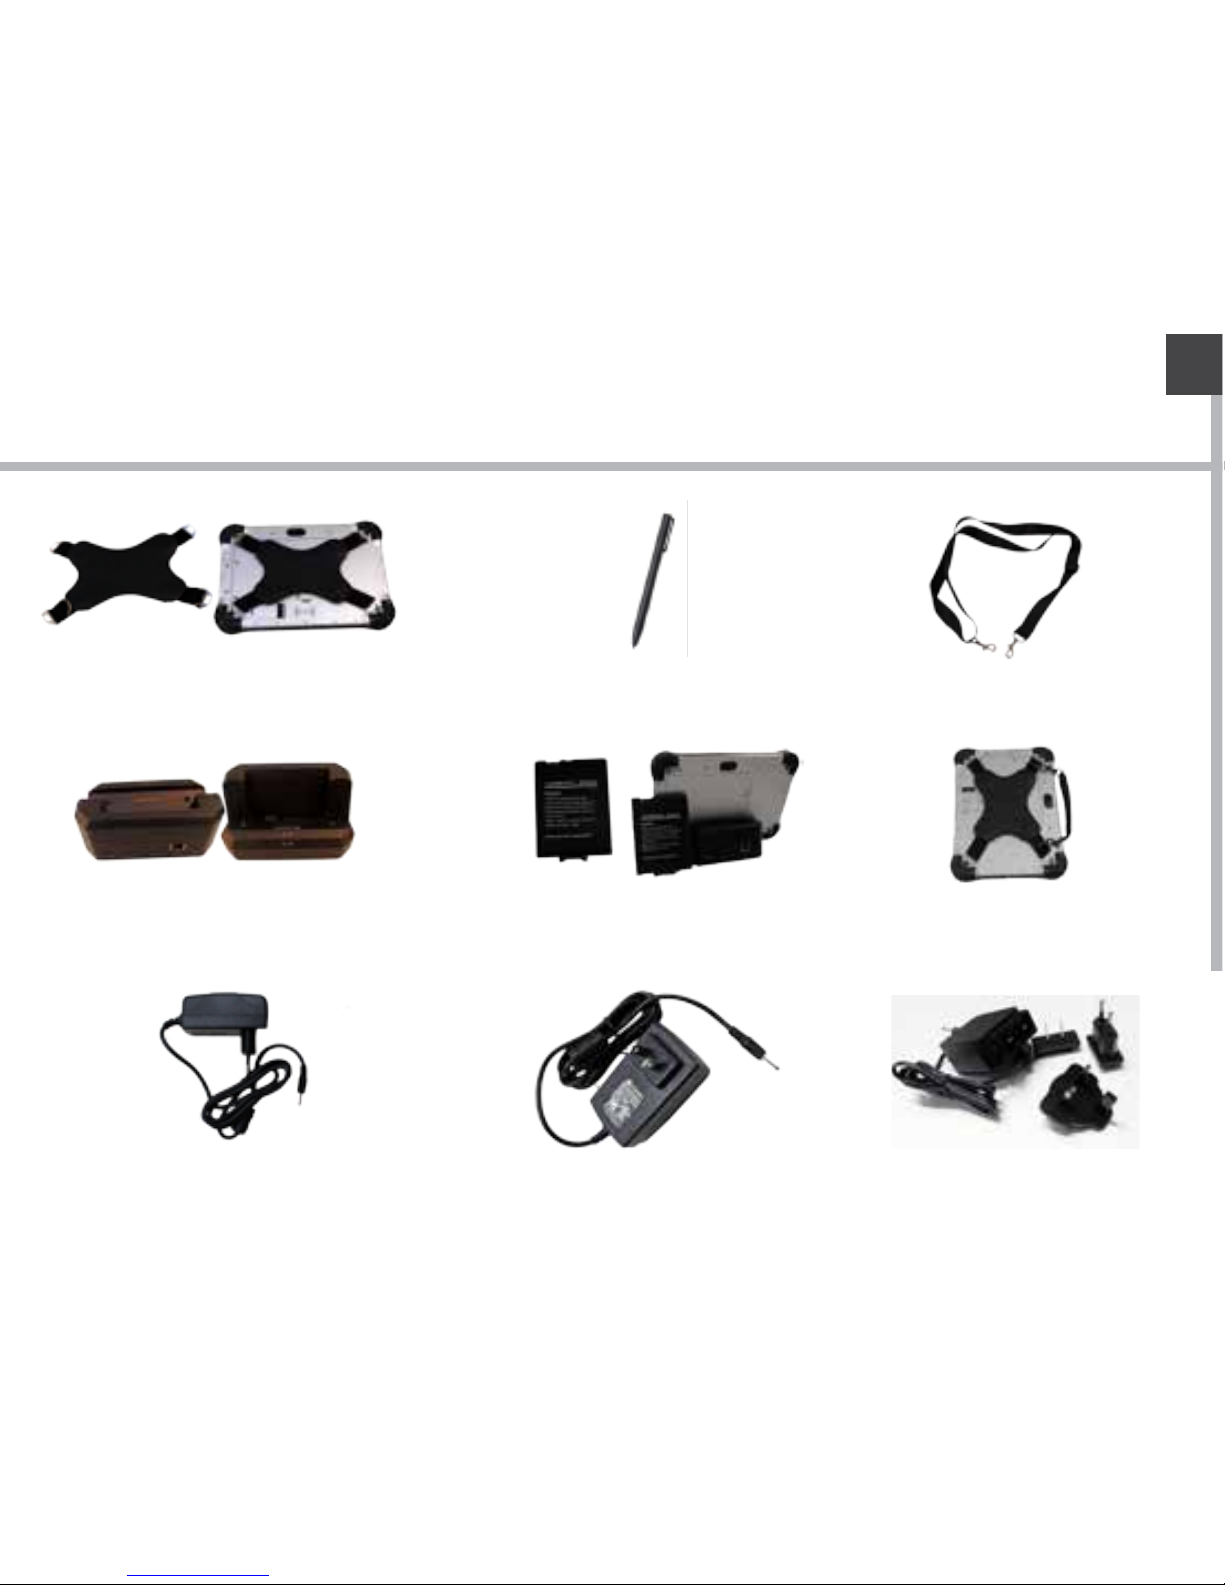
Product accessories
Strap
Hand writing pen
Shoulder girdle
Charging docking
Battery
Hand split
Europe standard adaptor
US standard adaptor
three-in-one adaptor
Page 44
44
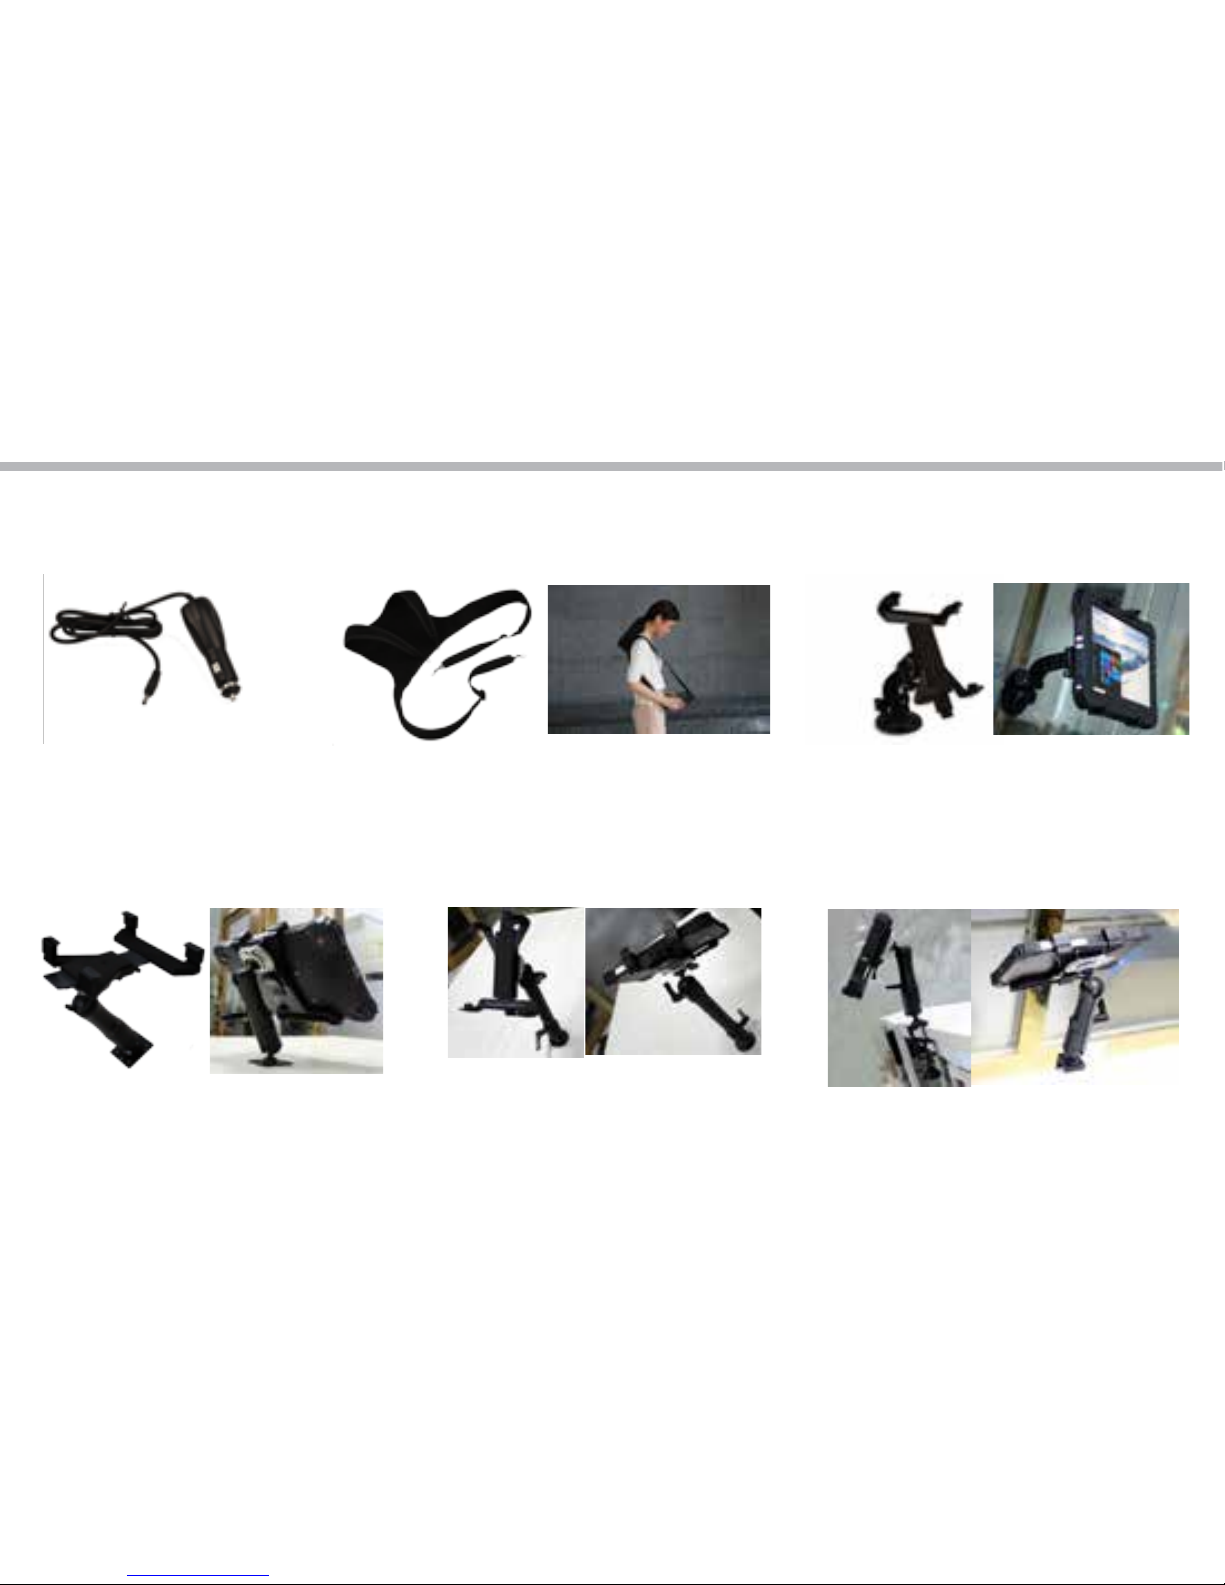
Product accessories
Car holder
Bracket 1
Bracket 2
Bracket 3
Car charger
Straps
Page 45

Page 46

 Loading...