

Page 1

DURIOS A7 ULTIMATE Tablet PC
Windows 7
User Guide
Version 2.00
Revision A
May 2013
Page 2

Durios A7 UltimateTablet PC
User Guide
1
Contents
Chapter 1: Safety Information
Exposure to Radio Use ........................................................................................ 4
RF Exposure Information ...................................................................................... 4
Safety Precautions ................................................................................................ 5
Battery Safety Information ..................................................................................... 5
Electrostatic Discharge ......................................................................................... 5
Driving................................................................................................................... 5
Chapter 2: About DURIOS A7 ULTIMATE Tablet PC
About DURIOS A7 ULTIMATE
....................................................................................................... 6
Features ............................................................................................................... 6
Getting started....................................................................................................... 7
SIM Card and SD Card Installation .................................................................. 8
Secondary Battery Installation ......................................................................... 8
Battery Charging ........................................................................................... 10
Turning On and Off the Device ............................................................................ 10
Turning the DURIOS A7 ULTIMATE On
.................................................................................. 10
Turning the DURIOS A7 ULTIMATE Off
.................................................................................. 11
Chapter 3: Operating DURIOS A7 ULTIMATE Tablet PC
Using Touch Screen............................................................................................ 12
Using Input Panel ............................................................................................... 13
Open Input Panel .......................................................................................... 13
Move Input Panel .......................................................................................... 13
Adjust Input Panel Size.................................................................................. 14
Using Control Panel ............................................................................................ 14
Hot tab key function....................................................................................... 15
Hot tab software utility function ...................................................................... 15
Utilities........................................................................................................... 16
F1 and F2 shortcut function key..................................................................... 16
Performance.................................................................................................. 17
Touch Lock.................................................................................................... 17
Page 3

Durios A7 UltimateTablet PC
User Guide
2
Chapter 4: Connecting to Network and Devices
Connecting to Bluetooth device ........................................................................... 18
Using Bluetooth feature ................................................................................. 18
Connect to Bluetooth device .......................................................................... 18
Disconnect from Bluetooth device ................................................................. 18
Connecting to Wi-Fi ............................................................................................ 19
Using 3G function................................................................................................ 19
Chapter 5: Power Management
About AC Adapter .............................................................................................. 20
Charging status ................................................................................................... 20
Charging the battery pack.............................................................................. 20
Charging Approaches .................................................................................... 21
Checking the battery level ............................................................................. 21
Battery low signals and actions...................................................................... 21
Power Management ............................................................................................ 22
Chapter 6: Expanding DURIOS A7 ULTIMATE Tablet PC
Connecting to USB device................................................................................... 23
Connecting to Audio device................................................................................. 23
Chapter 7: Using BIOS Setup
To use BIOS setup ............................................................................................. 24
BIOS function ..................................................................................................... 24
Main Menu .................................................................................................... 24
Advance Menu .............................................................................................. 25
Chipset Menu ................................................................................................ 25
Boot Menu ..................................................................................................... 25
Security Menu ............................................................................................... 26
Save and Exit Menu ...................................................................................... 26
Chapter 8: Using Recovery DVD
Hardware preparation ......................................................................................... 28
Start to recover the system by recovery DVD ...................................................... 28
Page 4

Durios A7 UltimateTablet PC
User Guide
3
Chapter 9: Using the Camera
Open Camera ..................................................................................................... 29
Take a Picture ..................................................................................................... 29
Shoot a Video...................................................................................................... 29
Camera Control Buttons ...................................................................................... 30
Chapter 10: Accessories
DURIOS A7 ULTIMATE Standard Accessories
............................................................................ 31
DURIOS A7 ULTIMATE Optional Accessories
............................................................................. 31
Page 5

Durios A7 UltimateTablet PC
User Guide
4
Chapter 1: Safety Information
Exposure to Radio Use
DURIOS A7 ULTIMATE series is equipped with Bluetooth, WI-Fi and Cellular modem radio. In
some situation or area, user may be required to turn off the radios. For example;
User’s needs to turn the phone OFF when in an area posted “TURN OFF RADIO
SIGNAL.” to avoid interfering with blasting operations.
User needs to turn OFF the radio signal in health care facilities. Hospitals or health
care facilities may be using devices that sensitive to Radio Frequency energy.
Aviation authority regulations prohibit user from using phone while in the aircraft.
In order to prevent the handheld from emitting radio signals, do the following step:
To turn off the device:
Press and hold the power button to display the Phone Options menu for 3 sec then
tap the Power Off or
Tap Windows and select Shut down in Windows 7 operating system
RF Exposure Information
This Tablet PC meets the government’s requirement for exposure to radio waves. This
Tablet PC is designed and manufactured not to exceed the emission limits for exposure to
radio frequency (RF) energy set by the Federal Communications Commission of the U.S.
Government. The exposure standard for wireless devices employs a unit of measurement
known as the Specific Absorption Rate (SAR). The SAR limit set by the FCC is 1.6W/Kg.
Test for SAR are conducted using standard operating positions accepted by the FCC with
the device transmitting at its highest certified power level in all tested frequency bands.
Although SAR is determined at the highest certified power level, the actual SAR level of the
device while operating can be well below the maximum value. This is because the Tablet PC
is designed to operate at multiple power levels so as to use only the poser required to reach
the network. In general, the closer user to a wireless base station antenna, the lower the
power output.
For body worn operation, this Tablet PC has been tested and meets the FCC RF exposure
guidelines for use with an accessory that contains no metal and the positions of the handset
minimum of 1.5 cm from the body. User of other enhancements may not ensure compliance
with FCC RF exposure guidelines. If user do not use a body-worn accessory and are not
holding the PDA at the ear, position the handset a minimum of 1.5 cm from your body when
the device is switched on.
Page 6
Durios A7 UltimateTablet PC
User Guide
5
Safety Precautions
Always completely disconnect the power cord from your device whenever you
work with the hardware. Sensitive electronic components can be damaged by
sudden power surges
Modern electronic devices are very sensitive to static electric charges. Always
ground yourself to remove any static charge before touching the CPU Card.
Battery Safety Information
Do not use other battery which is not intended for the product. Use only the
battery compatible for the device and follow battery usage, storage, and charging
guidelines in this user guide.
A damage rechargeable Lithium-ion polymer battery can cause explosion or fire.
To prevent personal injury and/or property damage:
Do not open, disassemble, puncture, or crush the battery
Do not leave or store the device in an area which is near a heat source
such as vehicle dashboard, dryer or other heat source.
Do not attempt to insert foreign object into the battery or allow conductive
objects to contact the battery
In the event of battery leak:
Do not have any contact with the battery fluid
If battery fluid leaks onto the skin or cloth, wash the affected area with
clean water
Please contact your current distributor or local vendor if you suspect damage
to your Tablet PC or battery for inspection and reparation.
Electrostatic Discharge
Please follow proper electrostatic discharge precaution to prevent static damage
that can harm electronic components inside your device
Driving
Using mobile device or accessory while driving may cause distraction and maybe
illegal in some areas where you drive. Please obey the laws and regulations on
the use of mobile device
Page 7
Durios A7 UltimateTablet PC
User Guide
6
Chapter 2: About DURIOS A7 ULTIMATE Tablet PC
About DURIOS A7 ULTIMATE
DURIOS A7 ULTIMATE Tablet PC is powered by a 1.6GHz dual-core Intel Atom N2600
processor. This device is capable of running Windows 7 and has 7-inch capacitive multitouch display offers 1024 x 600 pixel TFT LCD display resolution. Other new era tech
includes Built-in WLAN 802.11 2.4GHz a/b/g/n, Bluetooth 2.1+EDR, built-in Neo-6 GPS
module, and optional
3G Module.
Features
This section provides the features of the DURIOS A7 ULTIMATE and describes how to set
this device for the first time
Page 8

Durios A7 UltimateTablet PC
User Guide
7
Features
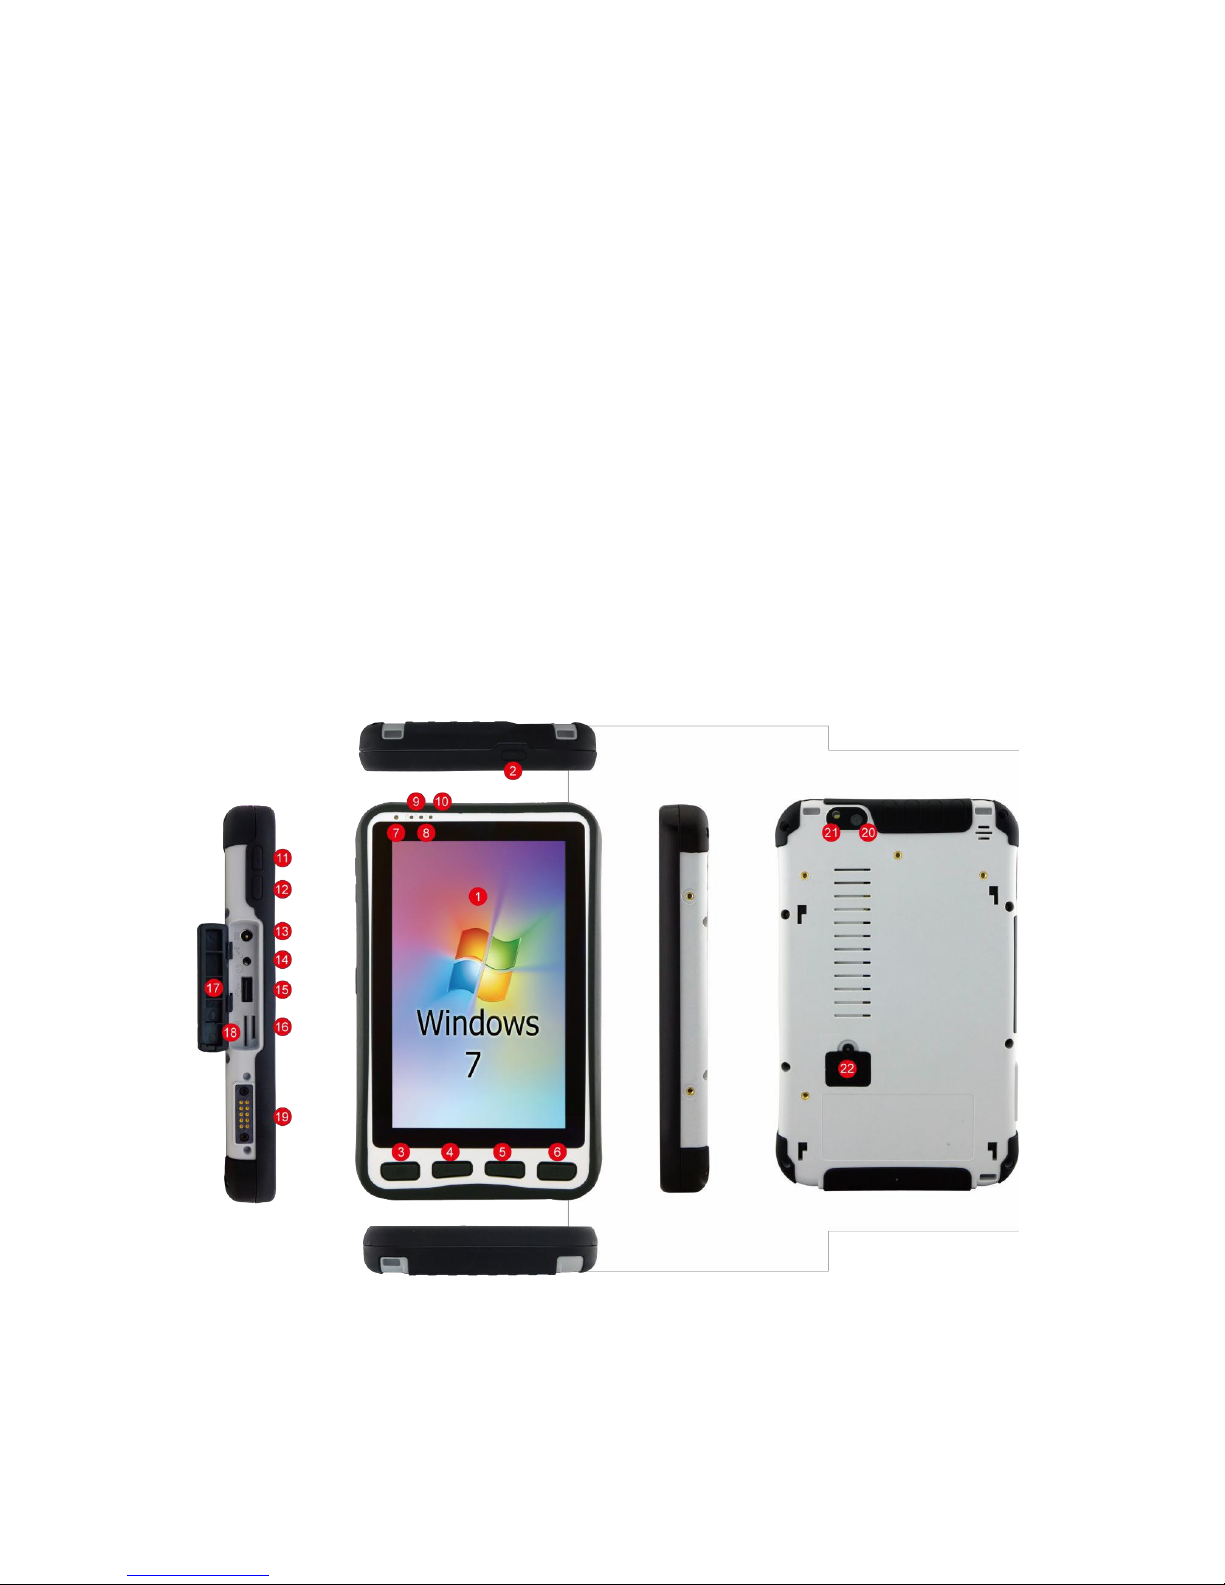
1 7” Touch Screen
Projected Capacitive touch screen
2
Power Button
Continuously press the button for 3 seconds to turn on the PC
Continuously press the button for more than 8 seconds to
force the Tablet PC turn off immediately
3 Home
To open Windows Start button
4
F1
1 programmable Hot-key to be set up to perform a task
specified by user / to start a specific application
5
F2
1 programmable Hot-key to be set up to perform a task
specified by user / to start a specific application
6
Menu
Press to open Brightness, Volume, Battery and WiFi / Bluetooth
status
7 LED indicator
To indicate the status of the device
8
Battery 2 Status
Orange light : Indicates the device is under charging
Green light : Indicates the battery is on the using stage
Red light : Indicates low battery
No light : indicates the battery is fully charged
9
Battery 1 Status
Orange light : Indicates the device is under charging
Green light : Indicates the device is fully charged
Red light : Indicates low battery
No light : indicates the battery is fully charged
10 Power Mode Status
Blue light : indicates Power On
No light : indicates Power Off
11
Volume Up
Increase the volume of music or radio
12
Volume Down
Decrease the volume of music or radio
13
DC Jack
12 V DC In
14 Audio Jack
To connect a set of headphones, external speakers, or an audio
device
15
USB Ports
To connect USB flash drive 2.0 / mouse / printer / keyboard, etc
16
SD Card Slot
To store all the information
17
Rubber Bumper
To give IP65 protection for the I/O Interface
18
SIM Card Slot
Accepts 3G SIM card to provide 3G data connection
19
Docking connector
To connect the device to docking station
20
2 MP Rear Camera
To take photo or video
21
LED Auxiliary Light
To provide lighting while using the camera
22
Battery Port
For secondary battery
Getting started
To start using the DURIOS A7 ULTIMATE for the first time:
Install SIM Card and SD Card
Secondary battery installation
Charging the Battery
Page 9
Durios A7 UltimateTablet PC
User Guide
8
Sim Card and SD Card Installation
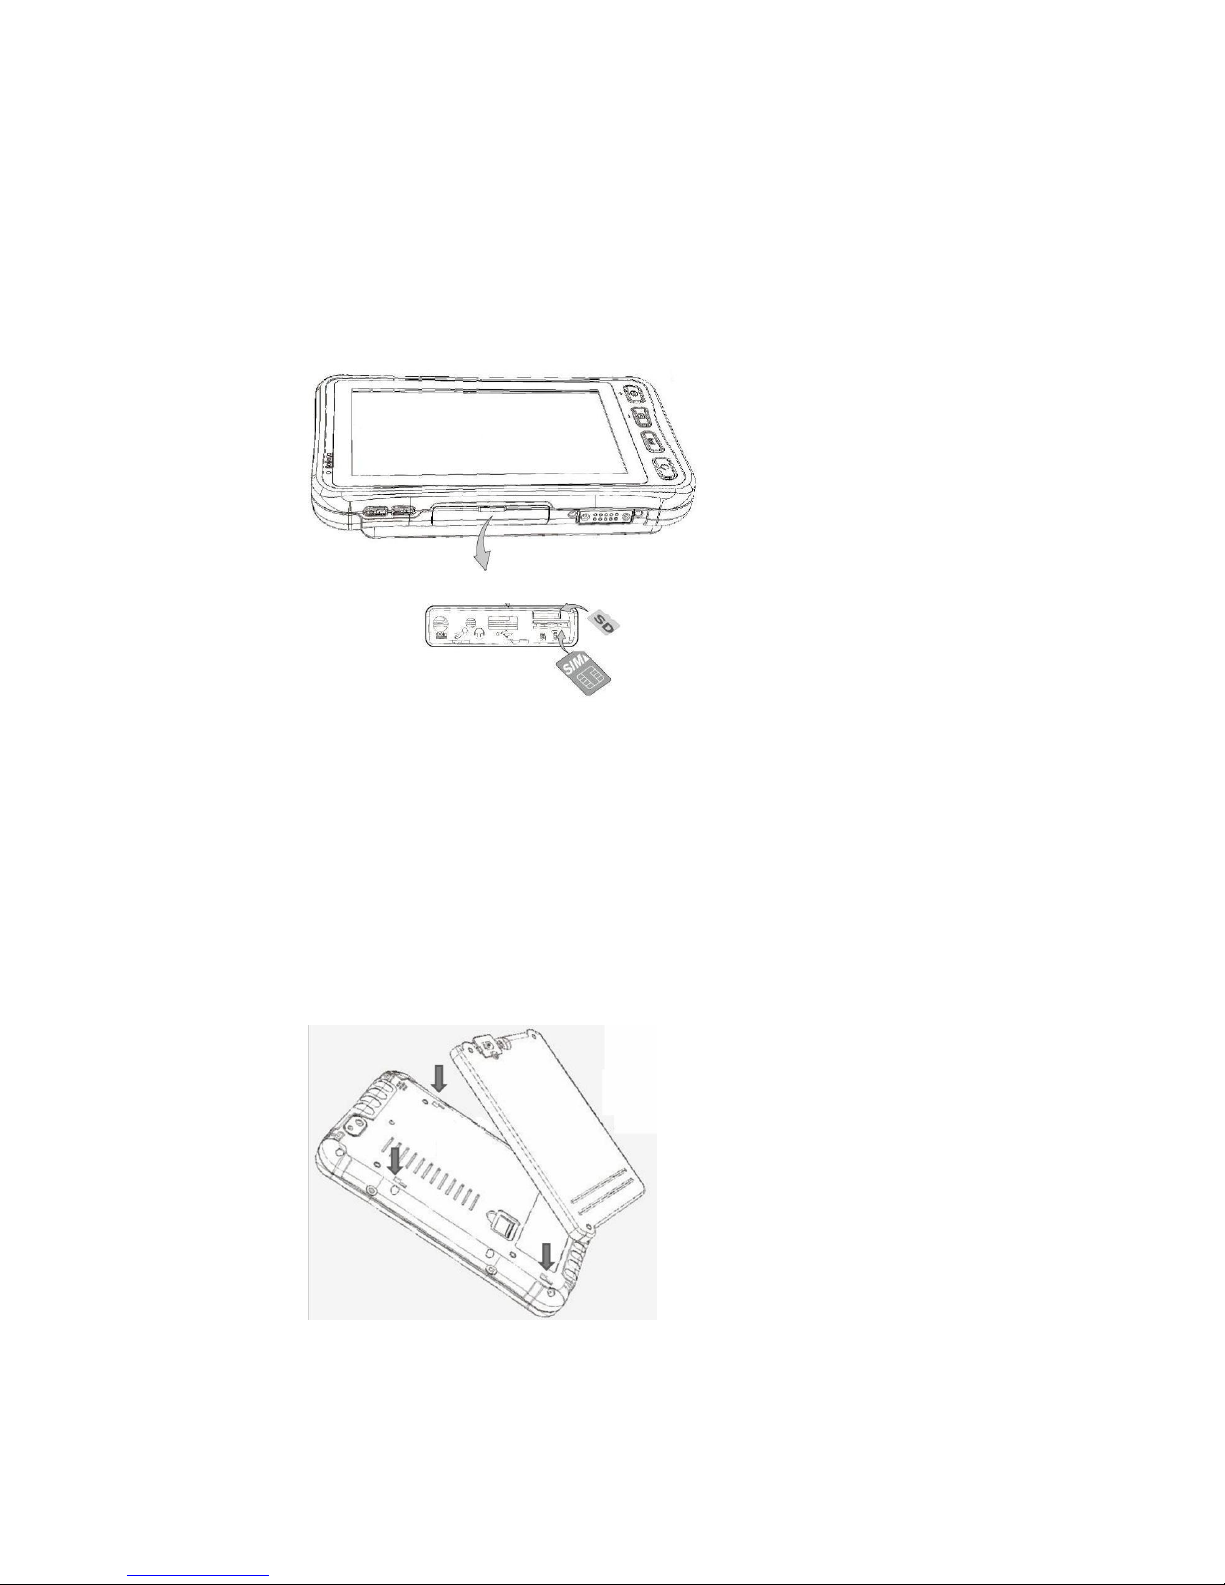
To Install the SIM Card and SD Card:
1. Place the DURIOS A7 ULTIMATE facing up and then locate the protective rubber
bumper
2. Open the protective rubbed bumper
3. Locate the SD and SIM Card as follows
4. Insert the SIM card (with the gold parts facing up and cut-off corner facing out)
and push it in the direction of the arrow as shown in the figure
5. Push the SD card holder in the direction of the arrow to insert it.
Secondary Battery Installation
DURIOS A7 ULTIMATE is equipped with Secondary battery, to install the Secondary
battery:
1. Place the secondary battery facing down and then locate the port on the back
side of the device, as shown in the following pictures
2. Place the secondary battery and the device and pull it downward
Page 10
Durios A7 UltimateTablet PC
User Guide
9
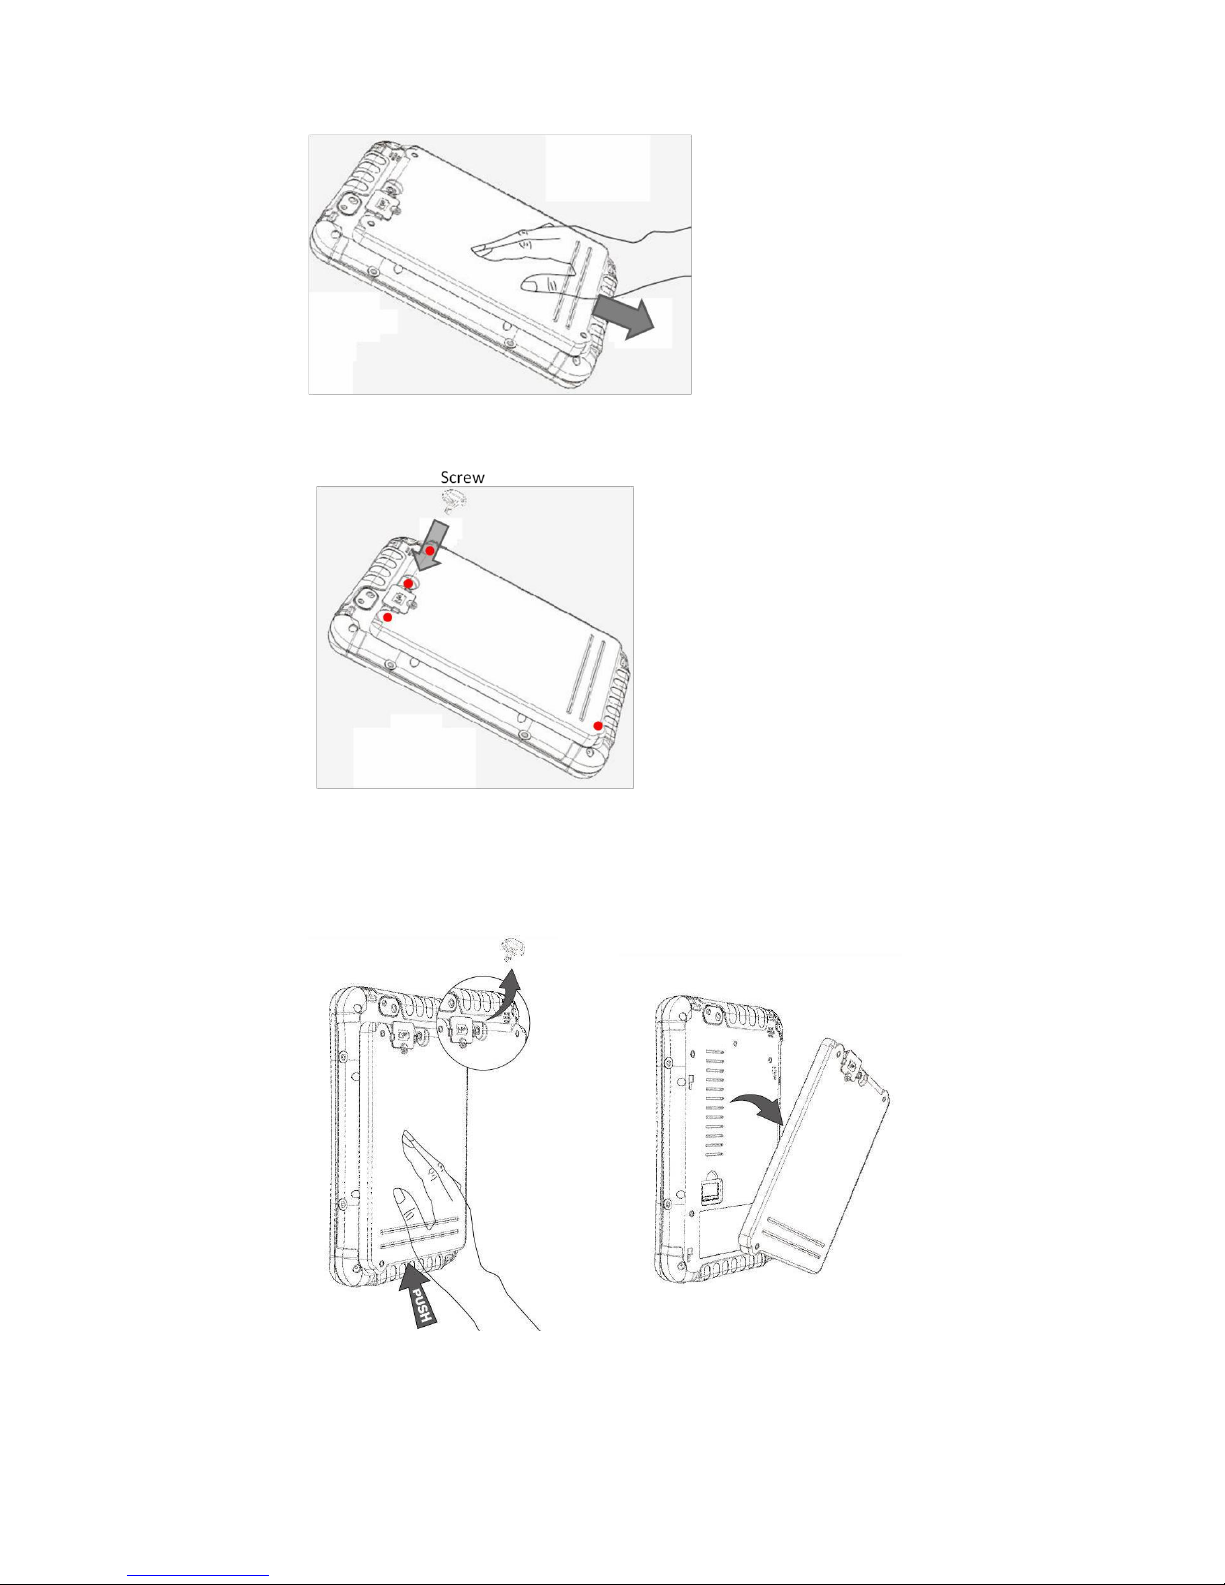
3. Secure the secondary by screw it within 4 points (marked in red)
To remove the Secondary battery:
1. Unscrew the battery from the back side of the device
2. Push it upwards
3. Remove the secondary battery from the device
Page 11
Durios A7 UltimateTablet PC
User Guide
10
Battery charging
DURIOS A7 ULTIMATE can operate either on the external AC power adapter or internal
battery power. It is suggested that user use AC Power when charge the Tablet PC for
the first time.
Please charge the battery before using the Tablet PC for the first time, charge the battery
until the LED indicator turns solid green. To charge the DURIOS A7 ULTIMATE, use a
cable or a docking with appropriate power supply. For more information about Power
management, see chapter xxx.
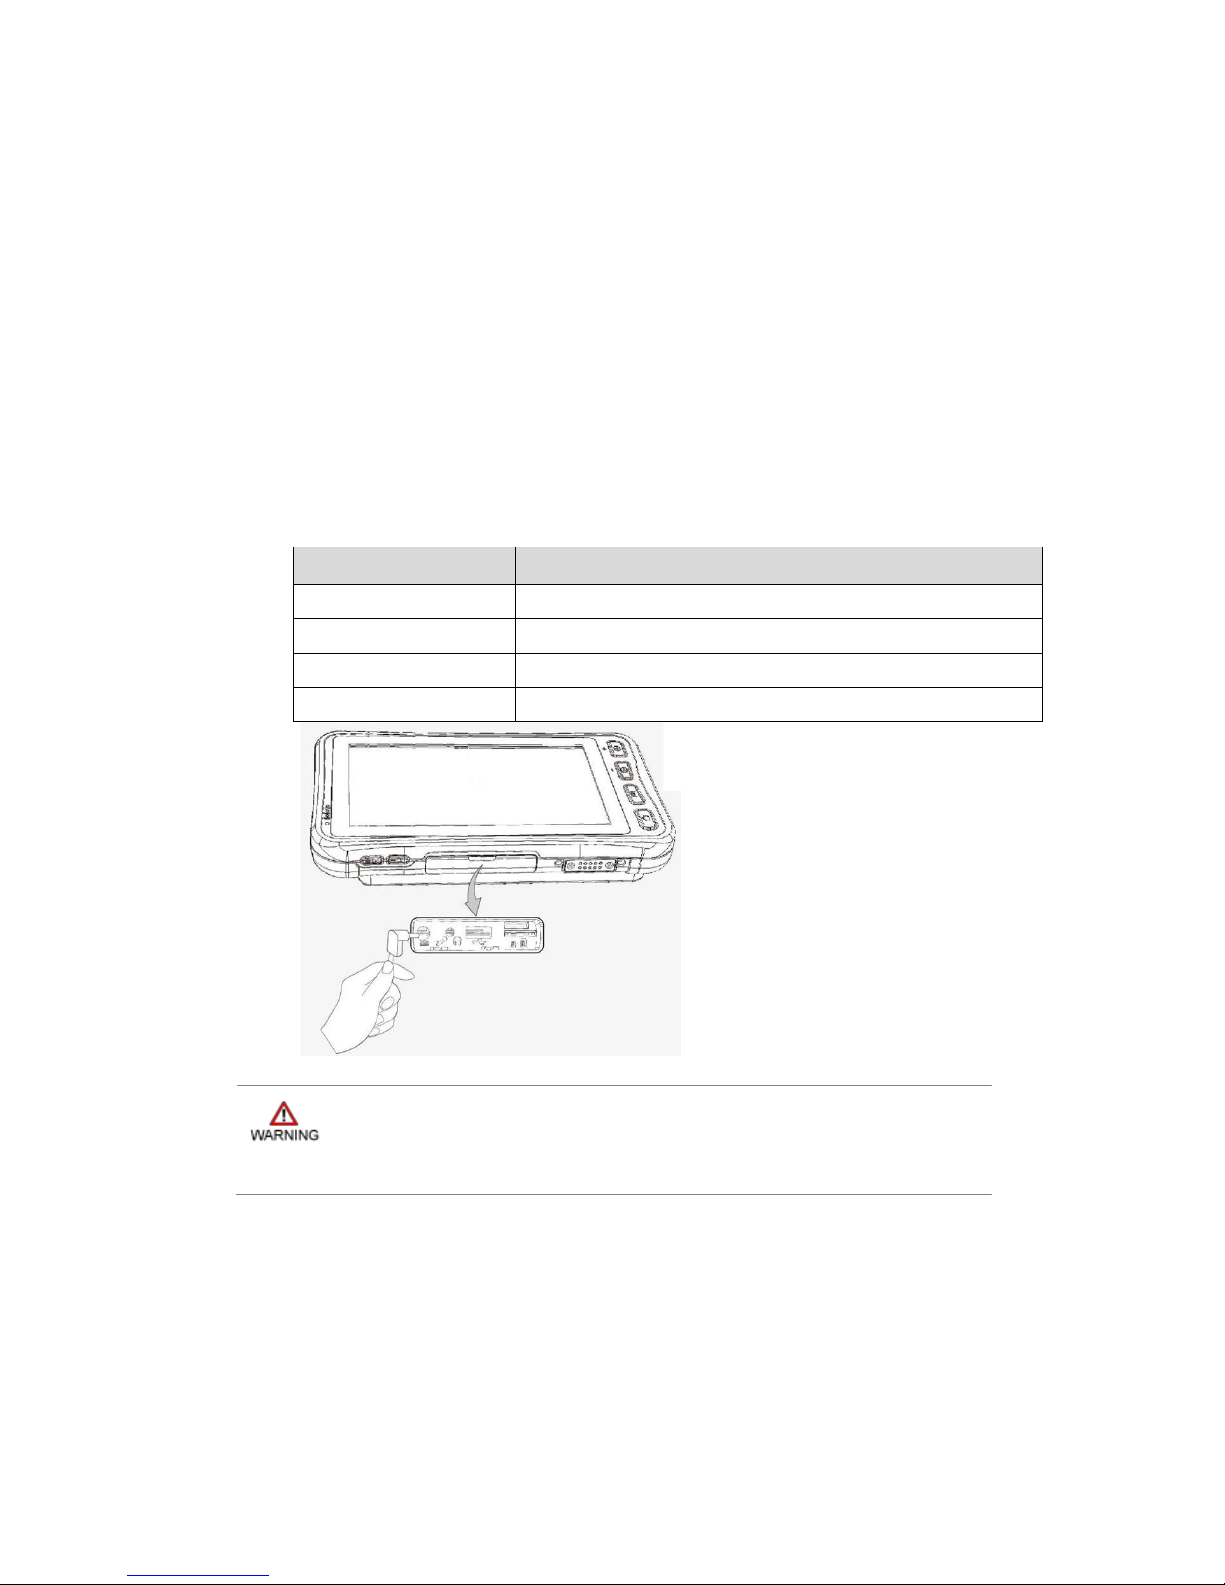
To charge the battery using 12V DC in:
1. Remove the protective rubbed bumper on the side of the device
2. Locate the DC Jack
3. Connect the power supply output connector to the input power port on the Device
4. The battery charge LED indicates the battery charging status
LED Status
Indication
OFF
DURIOS A7 ULTIMATE is not charging or not properly
Solid Red
Low battery
Solid Orange
Charging in progress
Solid Green
Charging is completed
Use only the AC adapter included with DURIOS A7 ULTIMATE. Using
other AC
adapters may damage the Tablet PC
Turning On and Off the Device
Turning the DURIOS A7 ULTIMATE On
1. Place the device on a flat and stable surface or hold it
2. Make sure the device is either connected to AC power or to the battery pack
with power
Page 12
Durios A7 UltimateTablet PC
User Guide
11
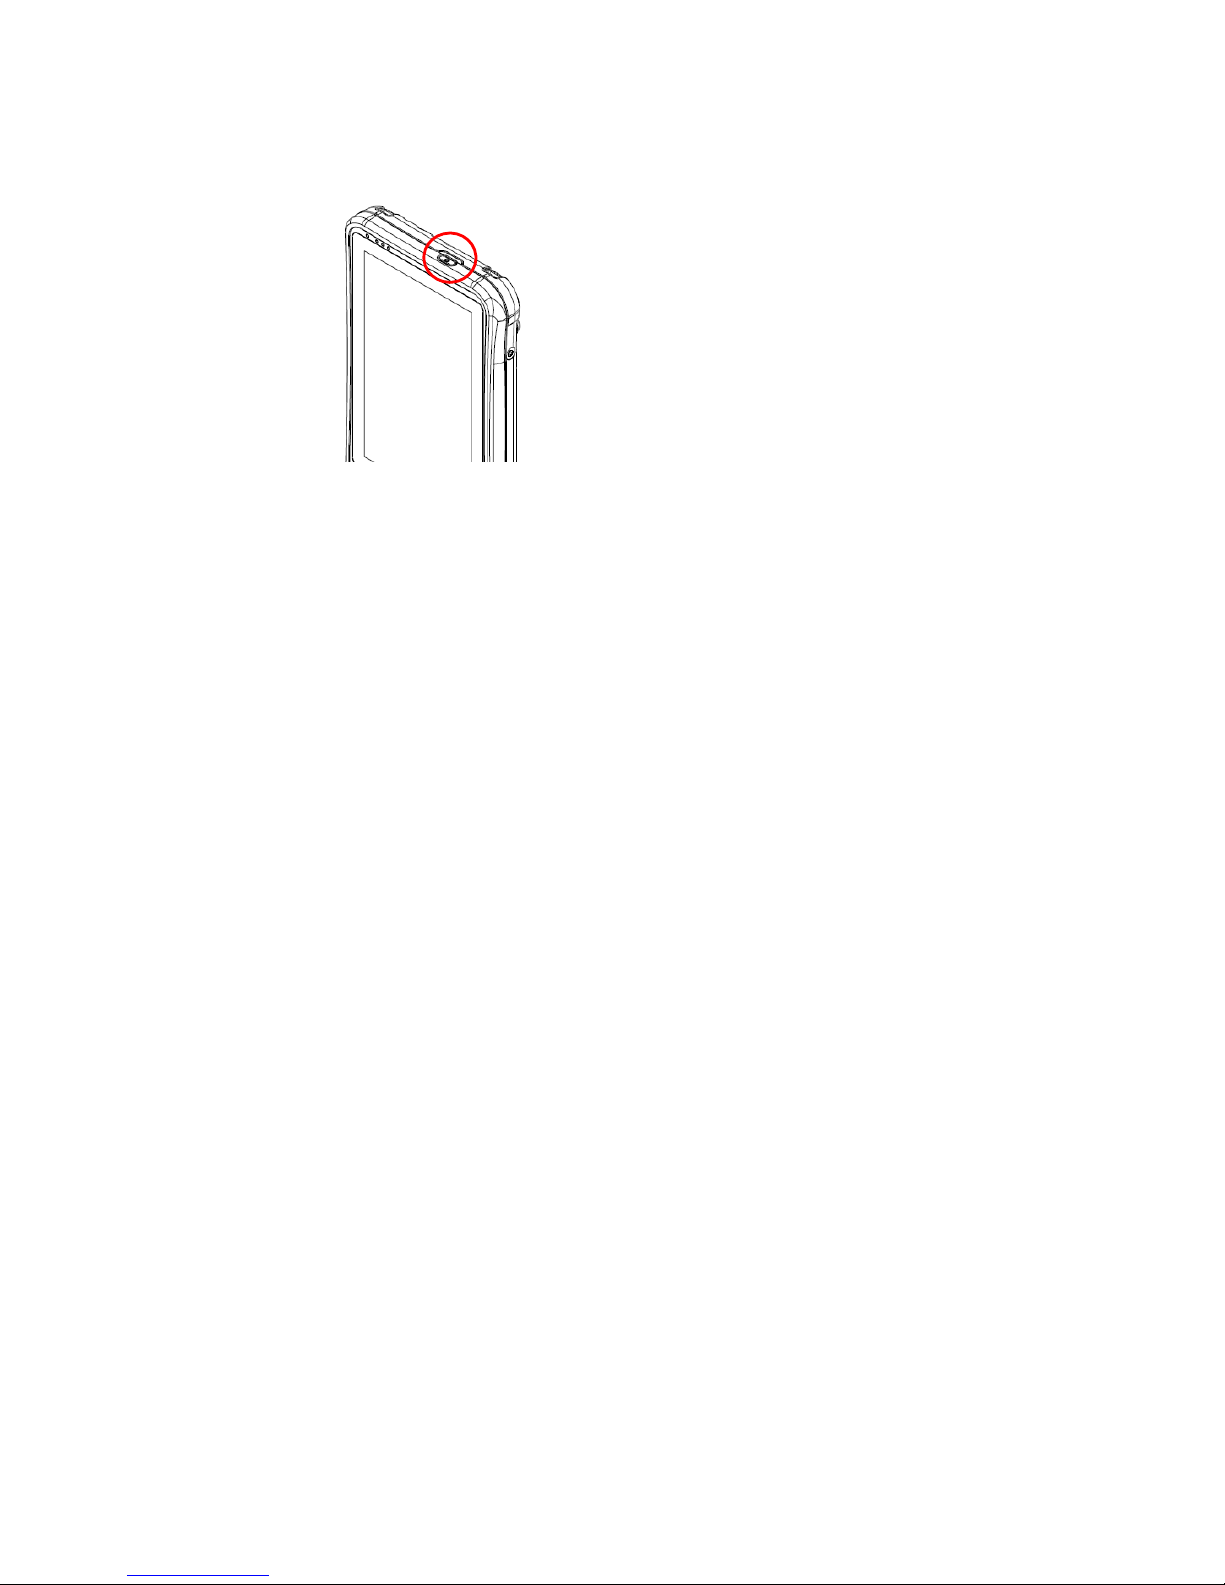
3. Press and hold the power button for 3 seconds, located on the right side of the
unit
Turning the DURIOS A7 ULTIMATE Off
1. To turn off the device, select the “shut down” command from the Windows
operating system. Or,
2. Continuously press the button for more than 8 seconds to force the Tablet PC
turn off immediately
Page 13
12
Durios A7 Ultimate
Tablet PC
ON
User
Guide
Chapter 3: Operating DURIOS A7
ULTIMATE Tablet
PC
Using the Touch
Screen
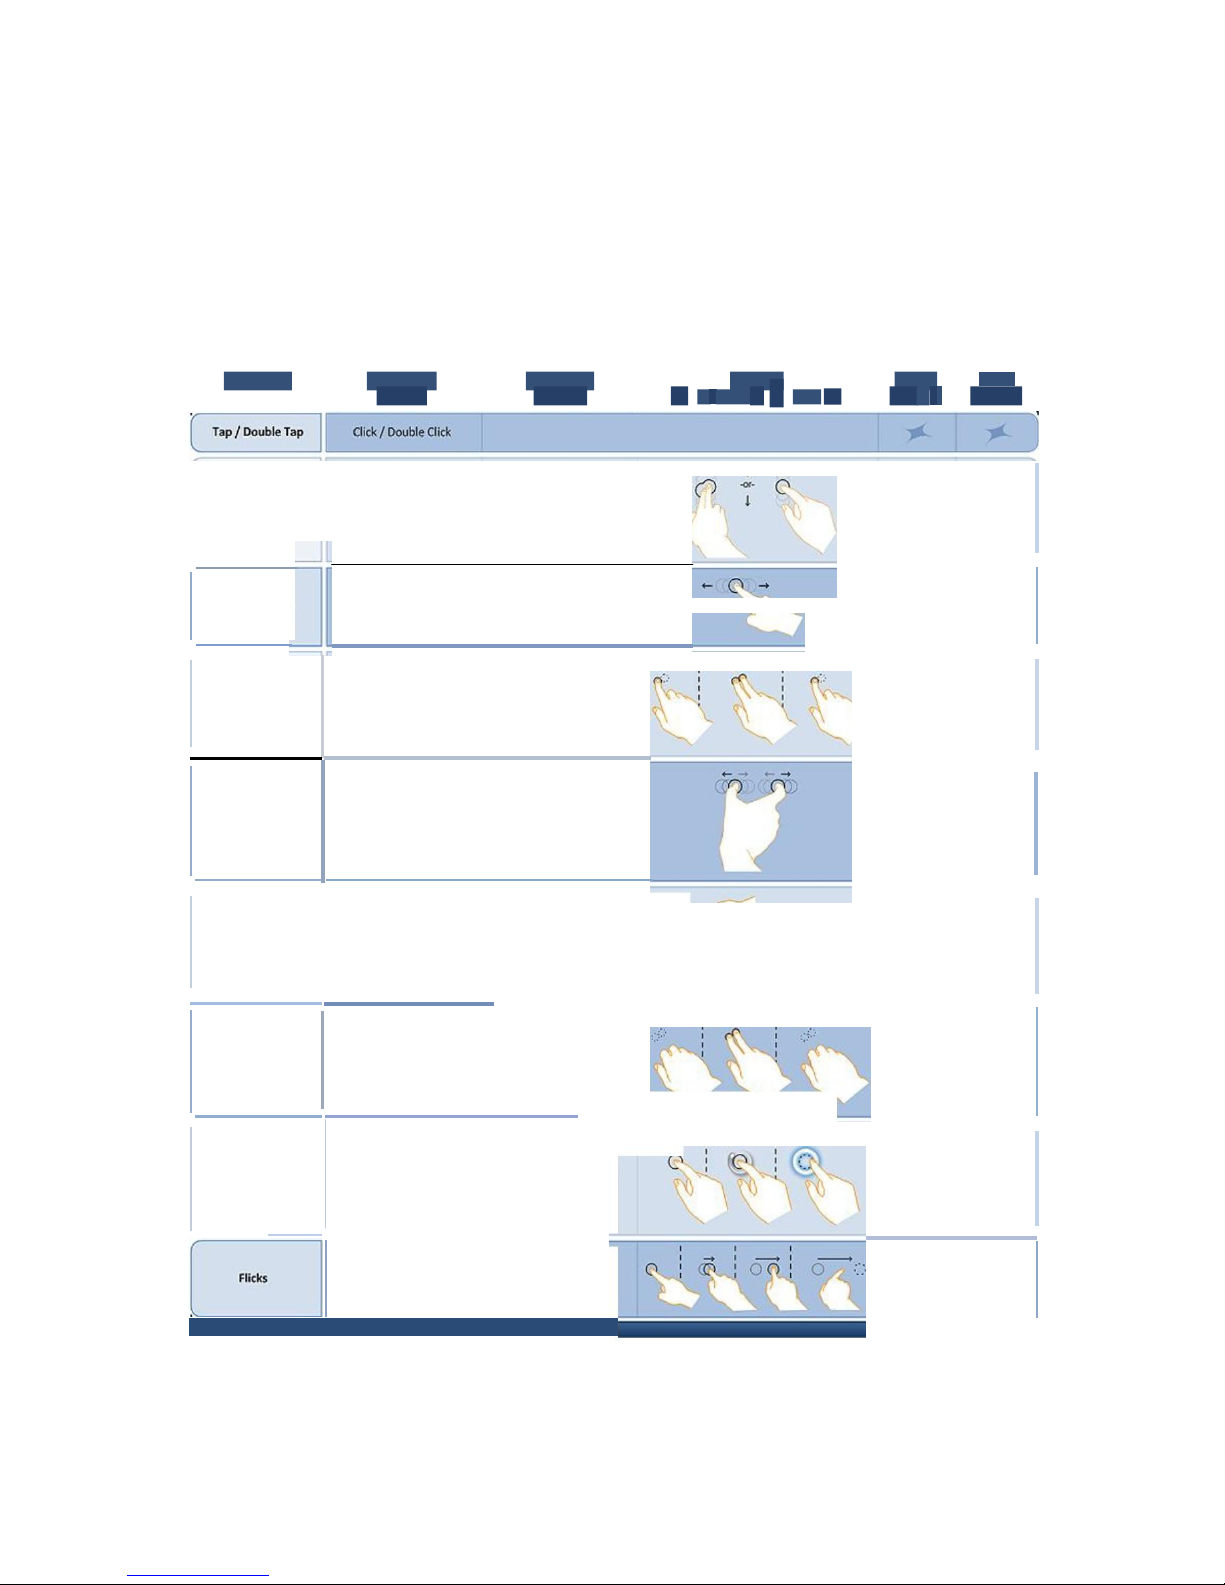
To gain full access of the Windows interface is by using your finger to manipulate icons,
on
screen keyboard, menu items, and other items on the touch
screen.
GESTURE WINDOWS GESTURE \ ACTI
I
Single
I
Multi
USAGE ACTION
(0•
fingerdown
1
z::
• finger up)
Contact Conta
ct
Pannni g withlnertia
Drag 1or 2 fingers up and
Scrolling
down
Selectoi n
I
Drag
(left
to ri
ght with
one flnger)
Mouse Drag
I
Sel
ection
Dragone finger left
I
right
P
ress
and Tap
Rlght-dick
Press on target and ta
p
using a second finger
Zoom
Zoom (defaults to
CTRL
key +Scroll
wlleel)
Move
two
fin
gersapart
I
toward
each other
No
system
default unless
Move
two
fingers in
opposing
dir
ections
(c
Q
Rot.lte
handled
by
Application
-or-
o.J
-()1·
\..
:5> -
(using
WM_GESTURE API)
Use
one
finger
to pivot
around anoth
er
N
/A-Expo
sed
through
Tap two fingers at the
Two-Finger Tap
Gesture
API,used
by
sametime (wllere the
Appl
ication dlscretol n.
target is
the
midponi t
between the fin
gers)
press
hold
r
eleose
Press andHodl
Press,wait
for blue ri
ng
Right-
click
animatoi n to
complete
,
then rel
ease
Defautl :
Pan up/ Pa
n
Down/
Back,and
Forward
Make quick drag
gest
uresin
the desire
d
dir
ection
Reference from Mi
crosoft
Page 14
13
Durios A7 Ultimate Tablet PC
User Guide
Using Input Panel
Tablet PC Input panel is an accessory included in Microsoft Windows that allows input of text
using stylus, touch screen, on screen soft keyboard or mouse. User can access Tablet PC
input panel in several ways and then move it so that it appears in a convenient location on
the screen
Open Input Panel
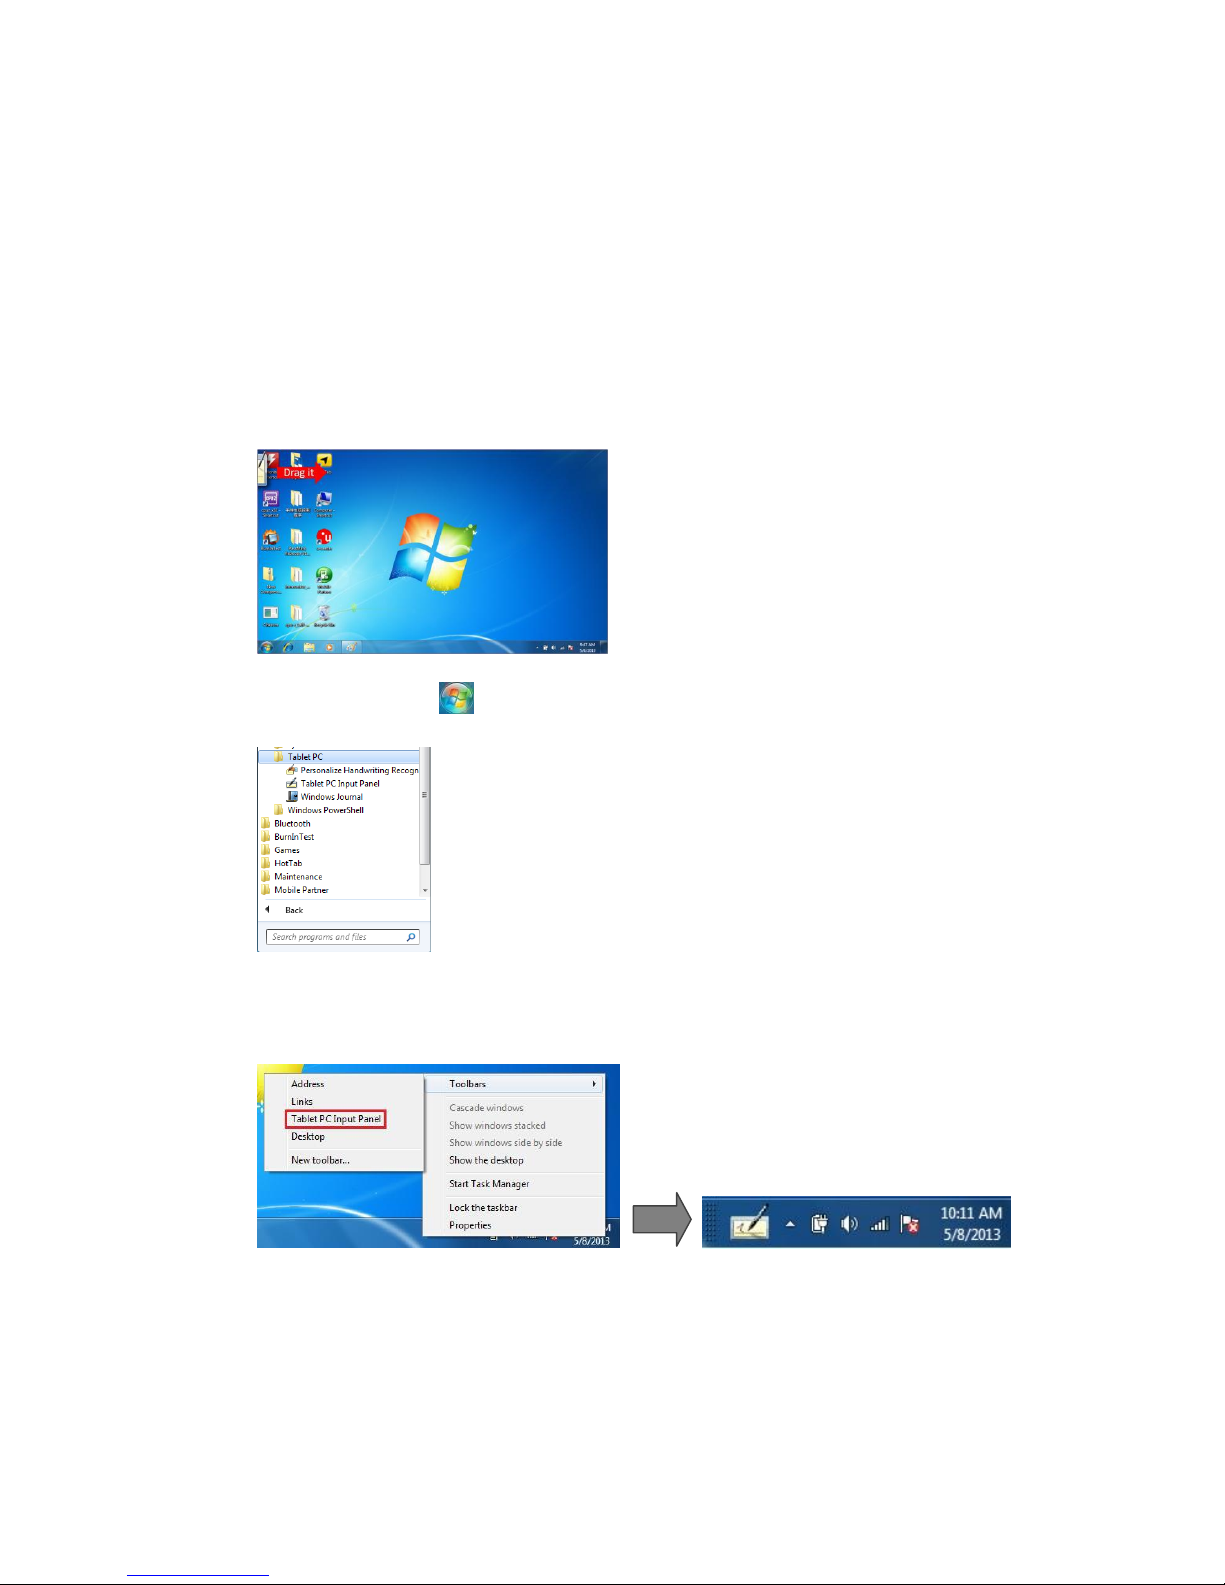
There are three different ways to open Input Panel:
1. Tap the input panel tab, which appears by default on the left edge of the screen.
From the left side of the screen, drag the edge of the input panel to the center.
Or
2. Tap the start button , select All Programs, select Accessories, select Tablet PC,
and then select Input Panel
Or
3. Tap the Tablet PC Input Panel icon on the windows task bar. The Input Panel Icon
does not appear on the taskbar by default. To make it appear, right click the taskbar,
tap Toolbars, and then tap Tablet PC Input Panel.
Move Input Panel
After user open Input Panel, user can move it so that it doesn’t cover certain area of the
screen that you want to use and so that it’s in a comfortable place for user to write. To
move Input Panel when it is open:
Page 15
14
Durios A7 Ultimate Tablet PC
User Guide
1. Place user tablet pen on the title bar and drag Input Panel to the location of your
choice
To move input panel when it is closed:
1. Place user tablet pen on the Input Panel tab, and move it up or down along the edge
of the screen.
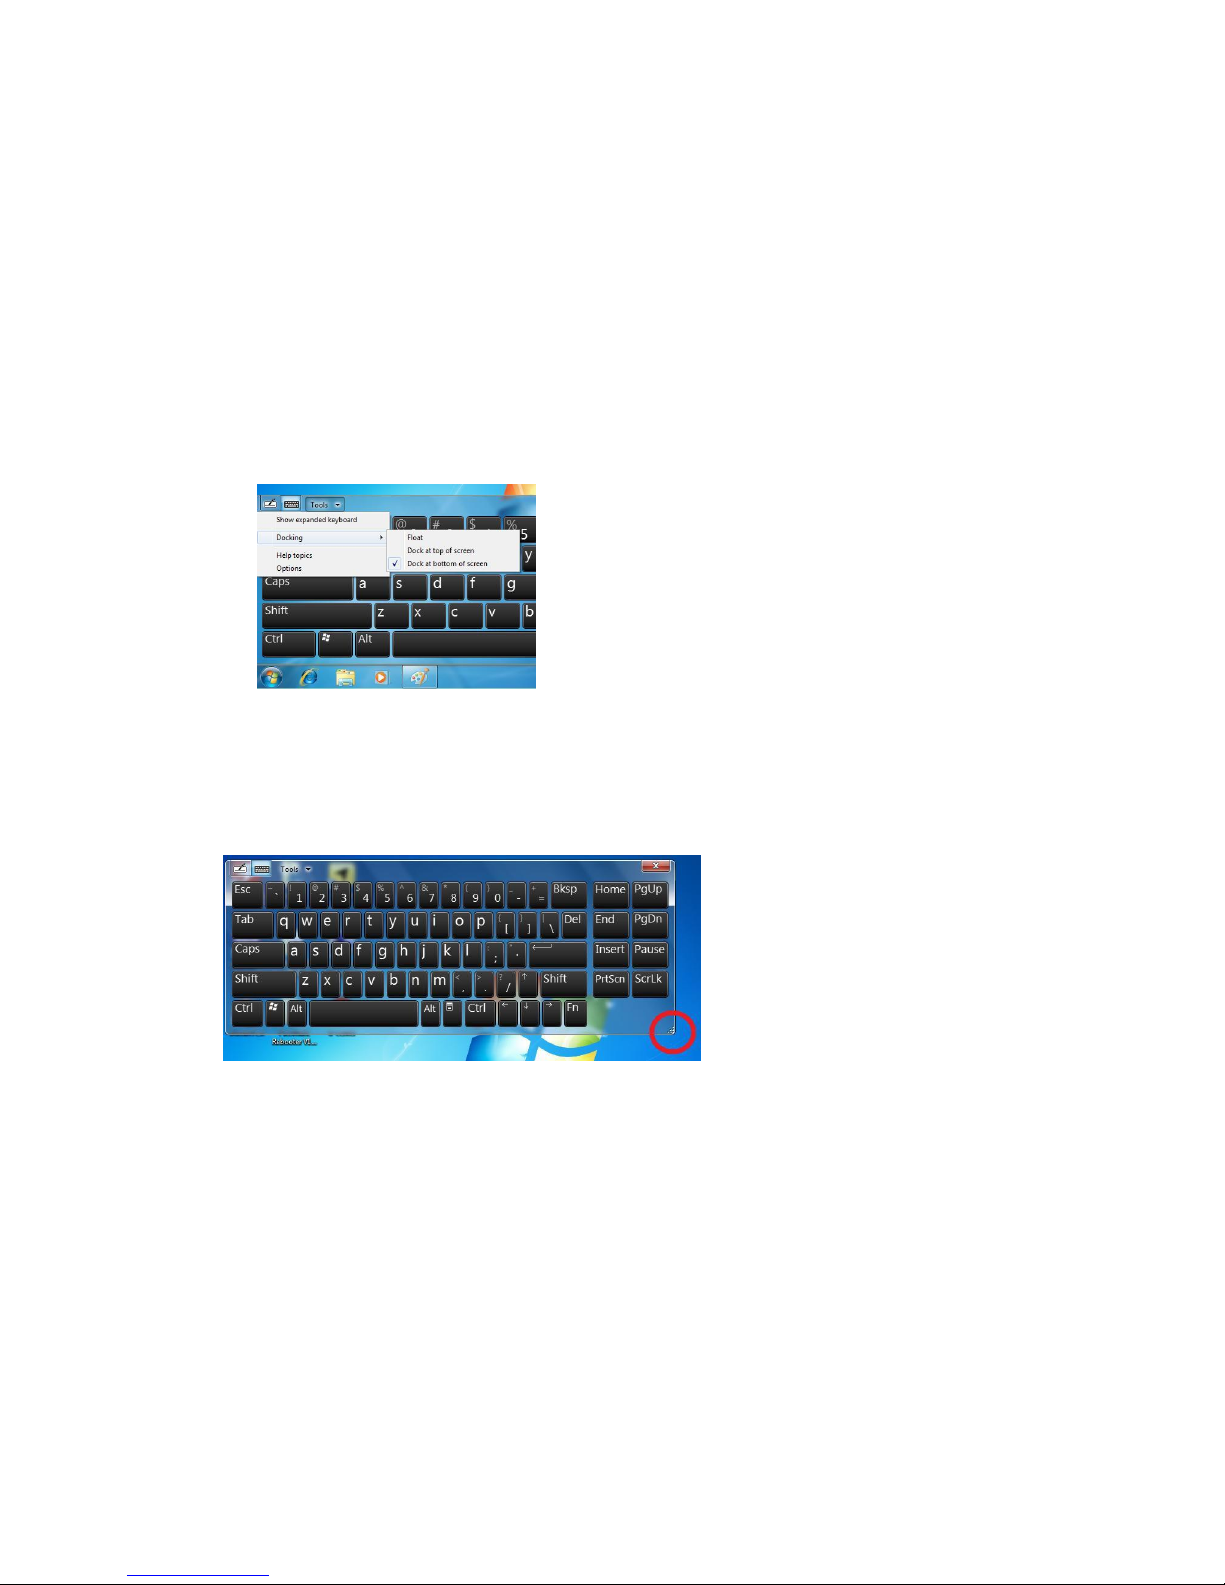
User can dock Input Panel so that it is anchored at the top or the bottom of the screen.
When user docks Input Panel, it doesn’t float on top of any open windows. To dock Input
Panel:
1. Open Tablet PC Input Panel
2. Tap Tools and then tap Dock at Top of Screen or Dock at Bottom of Screen
Adjust Input Panel Size
To enlarge the size of Input Panel, please select the lower right corner of the input panel
and then drag it
Using Control Panel
The Control Panel provides shortcuts for user to utilize the applications and functions, e.g
opening certain application, adjusting brightness, volume, lock the screen and others.
Page 16
15
Durios A7 Ultimate Tablet PC
User Guide
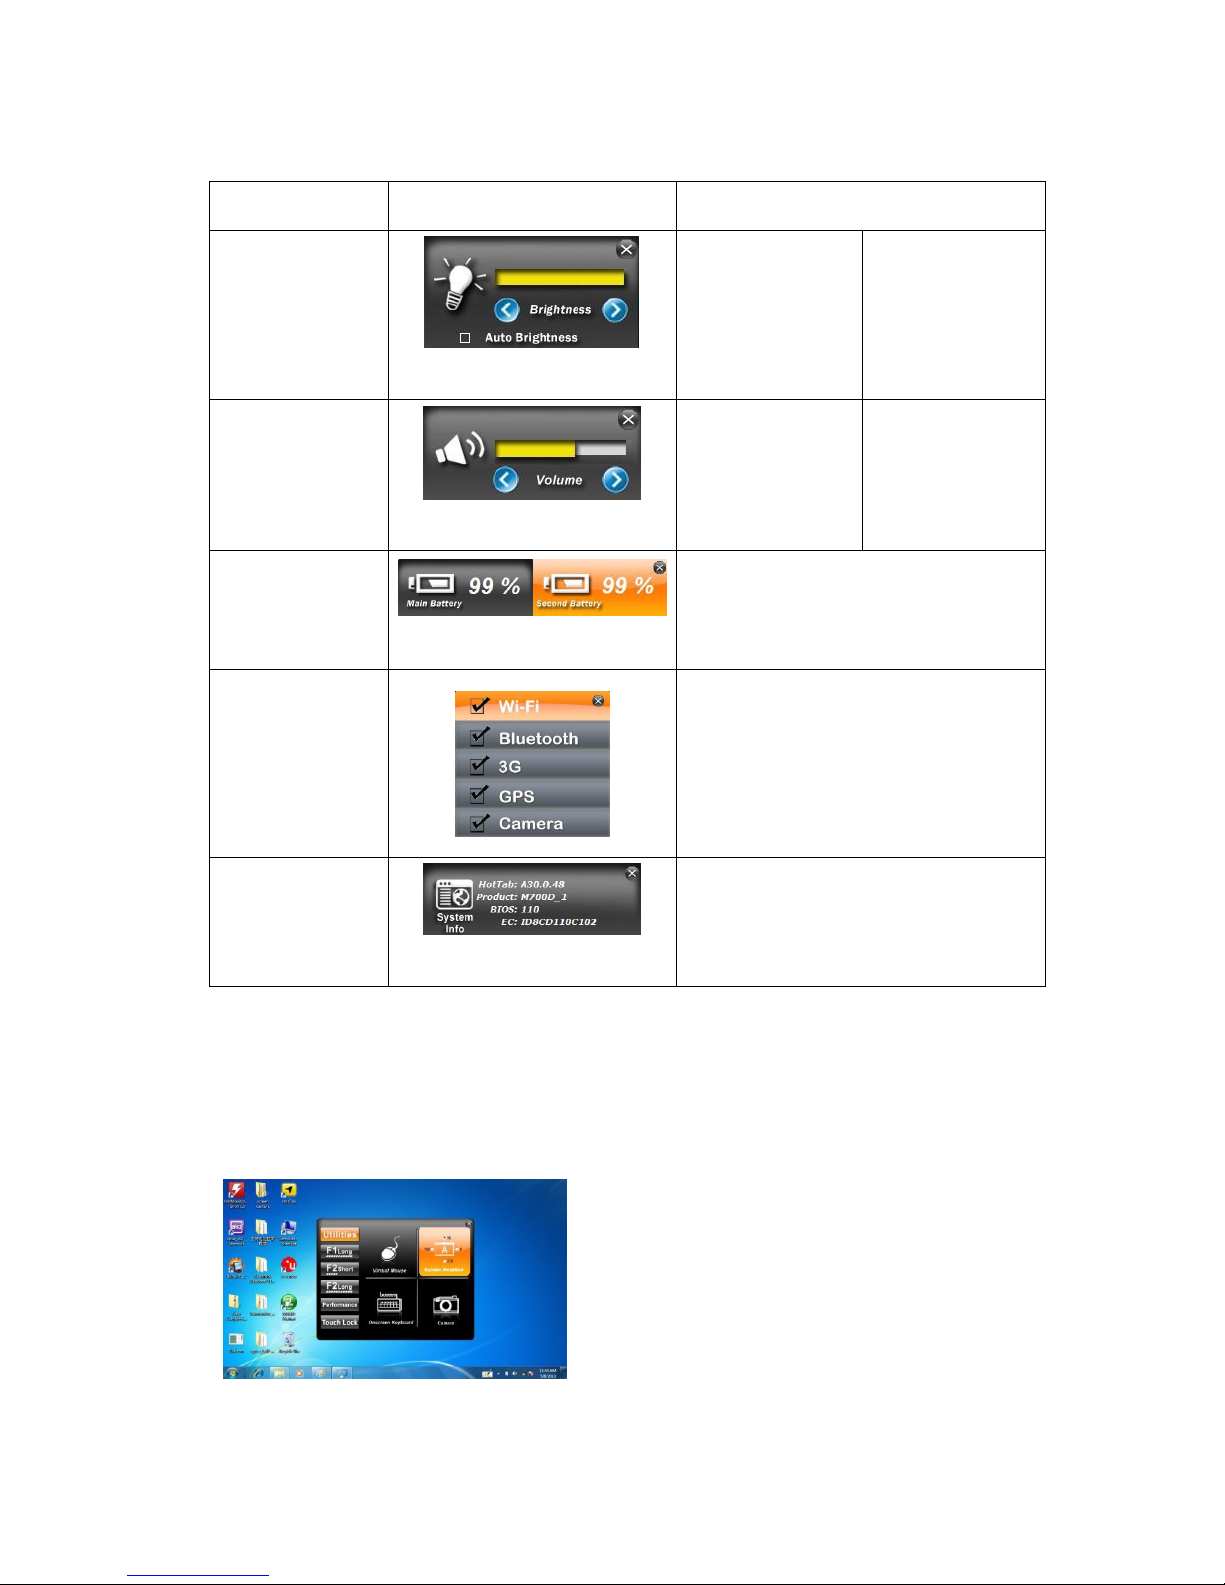
Hot-Tab hotkeys Functions
Press Menu
Button
Function Description
Function adjustment
1
st
Time
Show Current Brightness
Press “Vol+” button
to enhance
brightness (Or drag
by touch) Tap
Close to save the
change and exit UI
Press “Vol-” button
to reduce
brightness (Or
drag by touch) Tap
Close to save the
change and exit UI
2
nd
Time
Show Current Volume
Press “Vol+” button
to increase the
volume (Or drag by
touch) Tap Close to
save the change
and exit UI
Press “Vol-” button
to decrease the
volume (Or drag by
touch) Tap Close
to save the change
and exit UI
3
rd
Time
Show Current Battery Status
4
th
Time
Use the touch button to select the
wireless communication. Then select
enable/disable
1. WiFi on/off
2. Bluetooth on/off
3. 3G on/off (Optional 3G)
4. GPS on/off
5. Camera on/off
5
th
Time
Show the system information
show the:
1. HotTab version
2. Product ID
3. BIOS version
4. EC version
Hot-Tab software Utility Functions
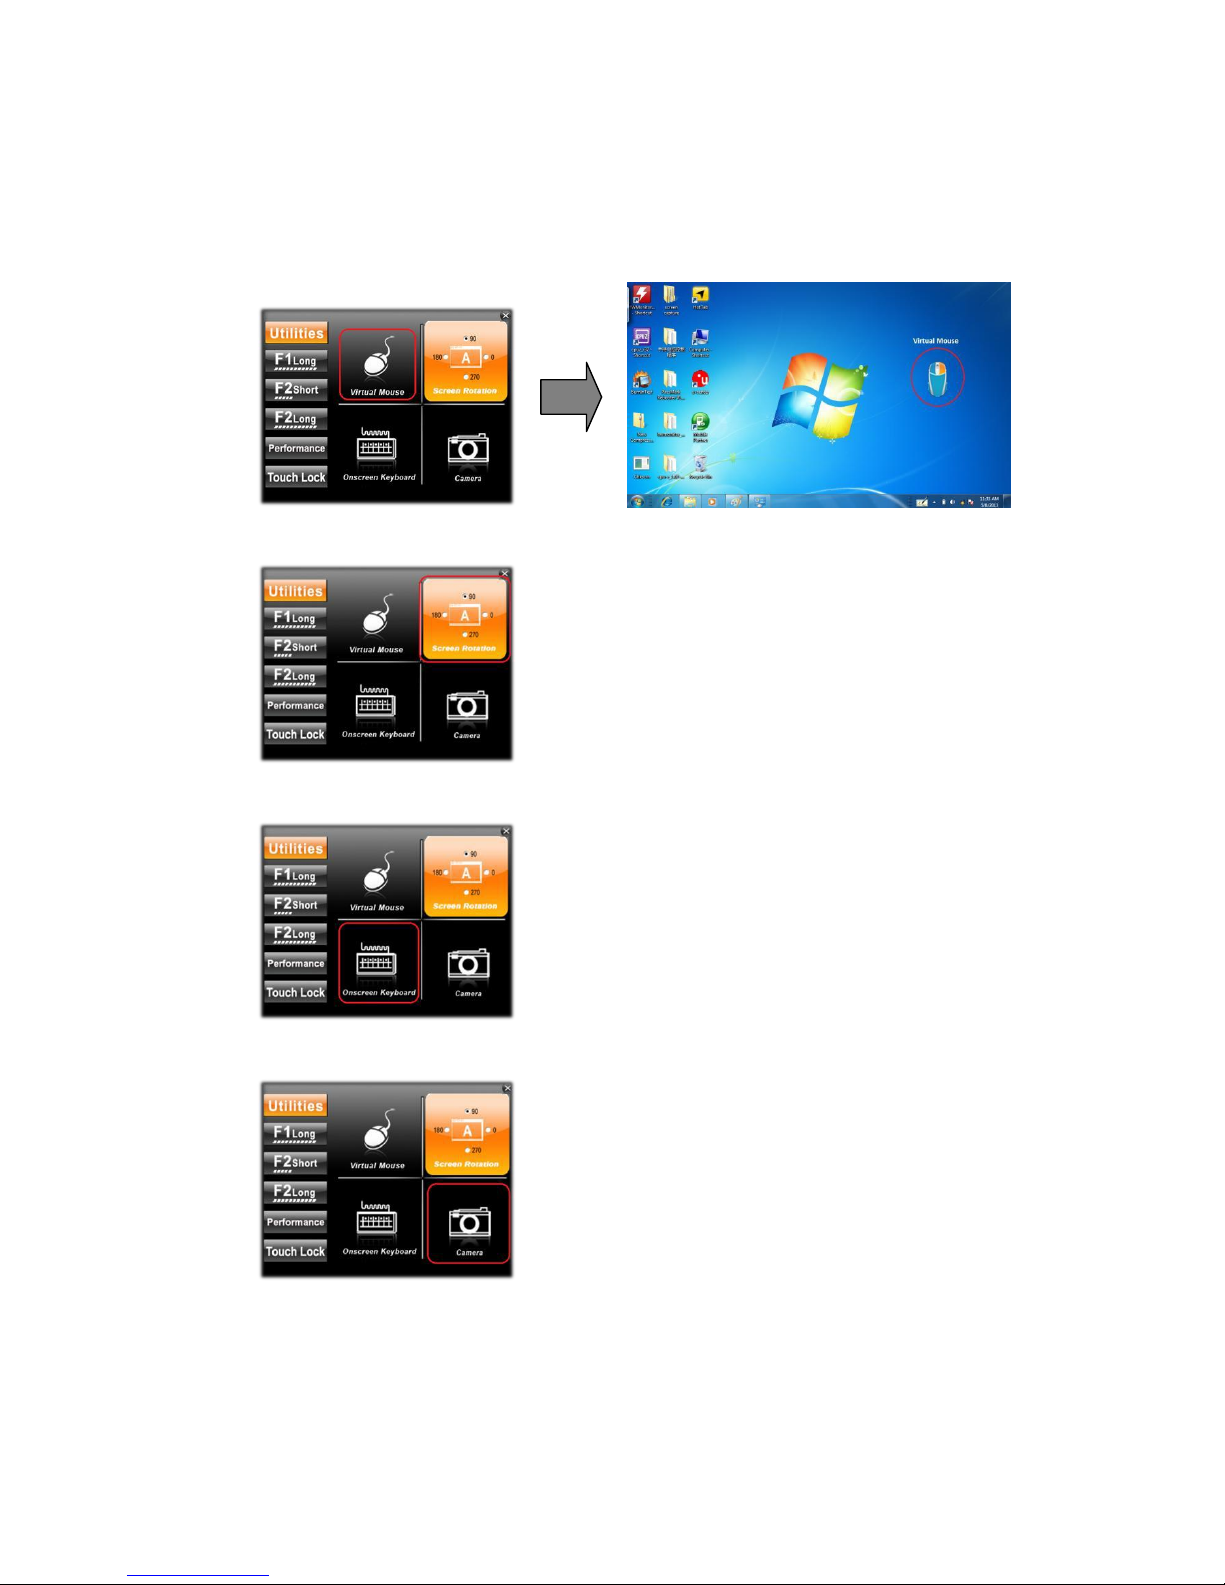
Use the Hot-Tab software utility to make it easy to program and define hot key user’s
most frequent application. Long press the F1 button on the DURIOS A7 ULTIMATE and
the utilities menu will appear at the center of desktop.
Page 17
16
Durios A7 Ultimate Tablet PC
User Guide
Utilities
There are four utilities functions which are:
1. Virtual Mouse
Tap the virtual mouse and it will appears instantly on the desktop
2. Screen Rotation.
3. Onscreen keyboard
4. Camera
F1 and F2 Shortcut Function Key
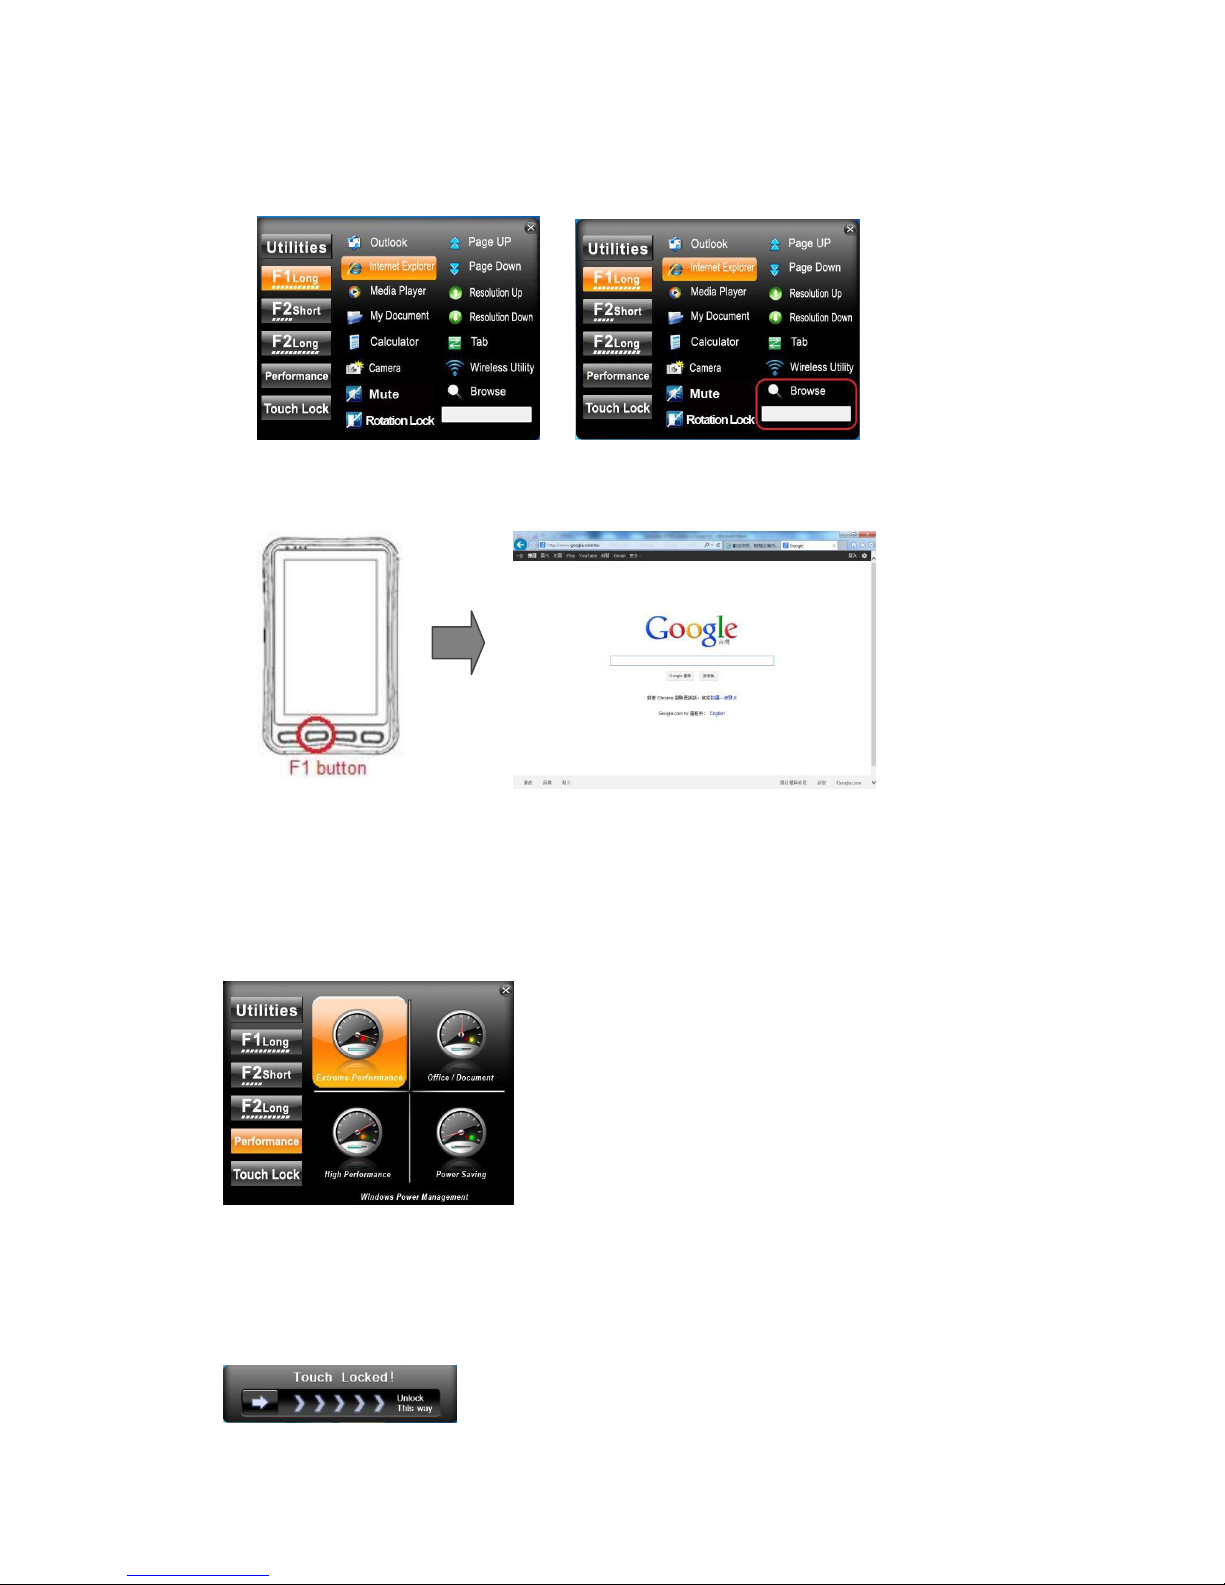
To suit users’ need, users can modify or assign the associated applications or
commands to these buttons using Hotkey software program. To assign these hotkey:
1. Tap F1 Long menu on the left side of utilities function
Page 18
17
Durios A7 Ultimate Tablet PC
User Guide
2. Select one application or software as hotkey function
User can set F1 button as a hotkey to open the programs listed on the menu or use
“Browse” and choose the execution program file
Or
3. After selected, the assigned software or application will be open immediately when
user Long press F1 button (in this example the assigned software / application is
Internet Explorer)
4. Repeat the same step to assign F2 Short and F2 Long for short function key
Performance
There are four performances:
1. Extreme Performance
2. Office / Document
3. High Performance
4. Power Saving
Touch Lock
To lock the touch screen and all buttons on the tablet
Page 19
18
Durios A7 Ultimate Tablet PC
User Guide
Chapter 4: Connecting to Network and Devices
Connecting to Bluetooth Devices
Using Bluetooth Feature
DURIOS A7 ULTIMATE is equipped with Bluetooth 2.1 + EDR module for default function
of the Tablet PC series. Depending on the application, Bluetooth module can give user
capability for short range wireless communications between devices without requiring a
cable connection. The transmission is able to go through walls, pockets and briefcases
as long as two devices are within 10 meters range.
Connect to a Bluetooth device
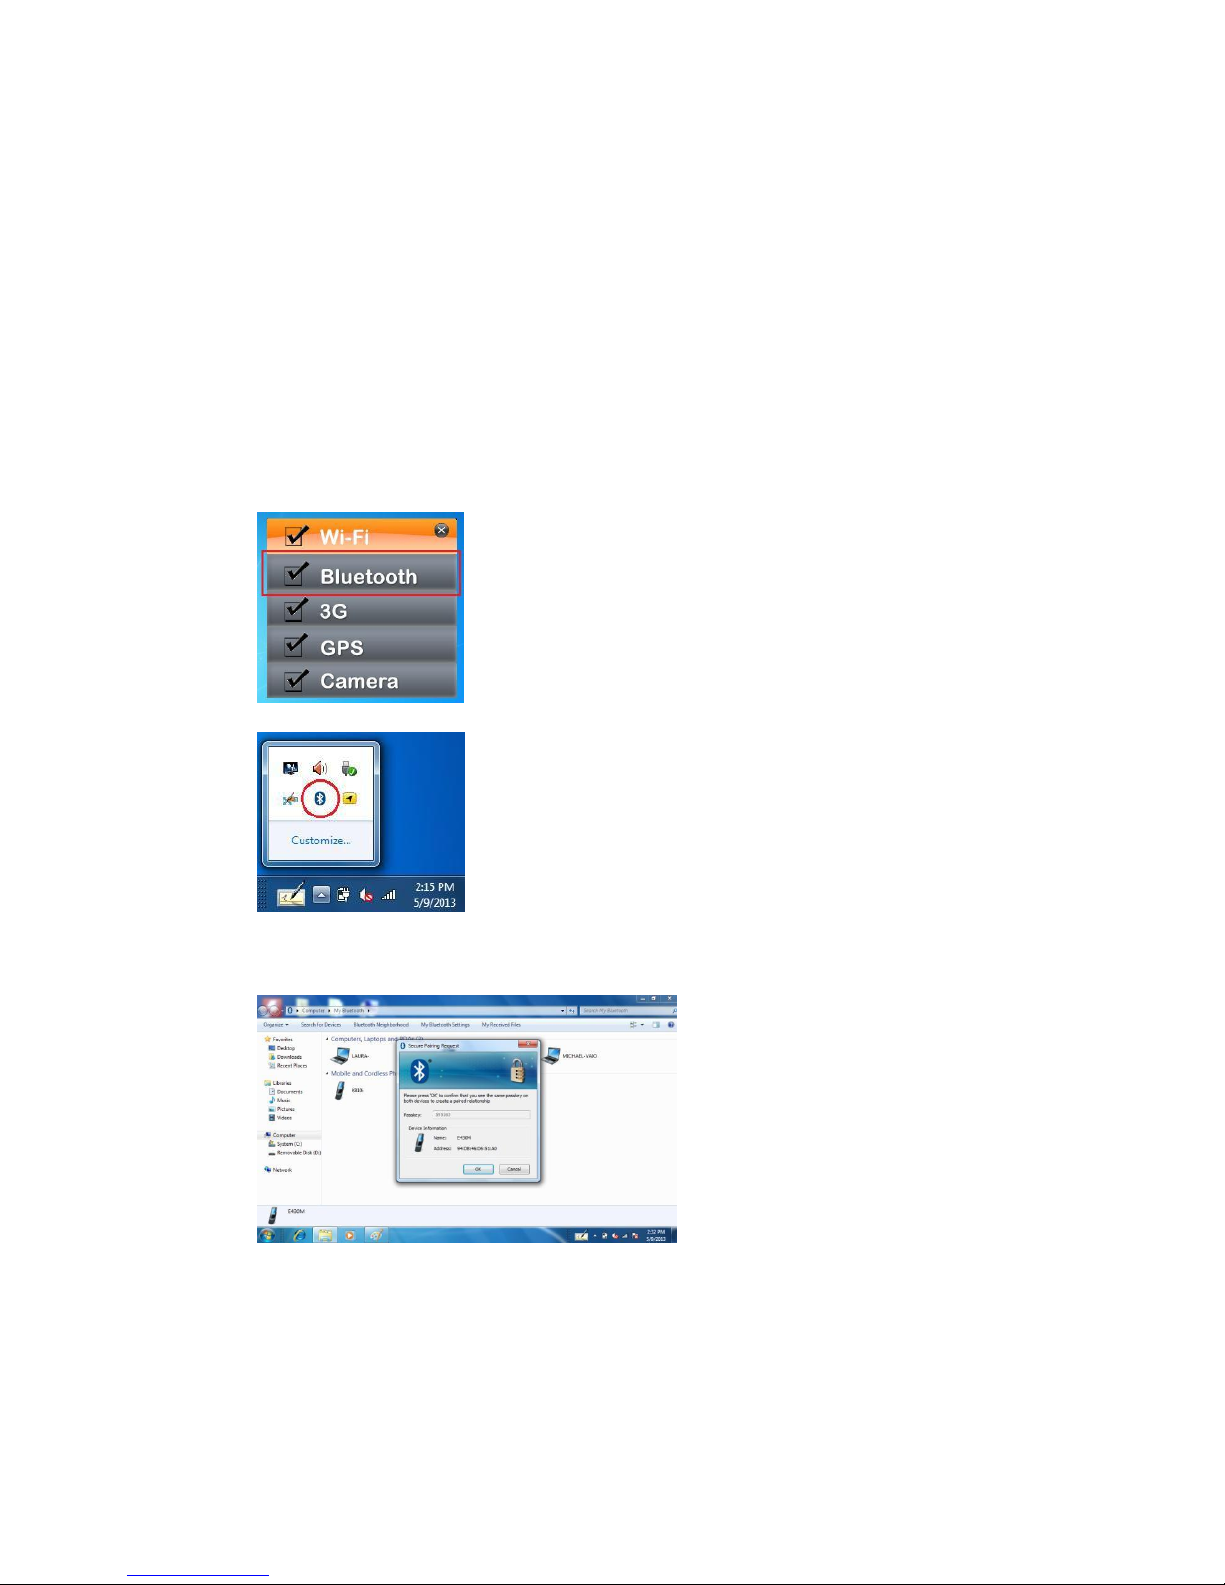
1. Push Menu button 4 times and make sure the Bluetooth function is “On”
2. Double click the Bluetooth shortcut in the task bar
3. Tap Search for Devices and it will search any Bluetooth device automatically
4. Choose the Bluetooth device that user wants to connect and right click to choose
Secure Pair… then the device will be connected to the module
Disconnect from a Bluetooth device
1. Tap the device in the Bluetooth settings screen
2. Tap Unpair
Page 20
19
Durios A7 Ultimate Tablet PC
User Guide
Connecting to Wi-Fi
To connect to Wi-Fi:
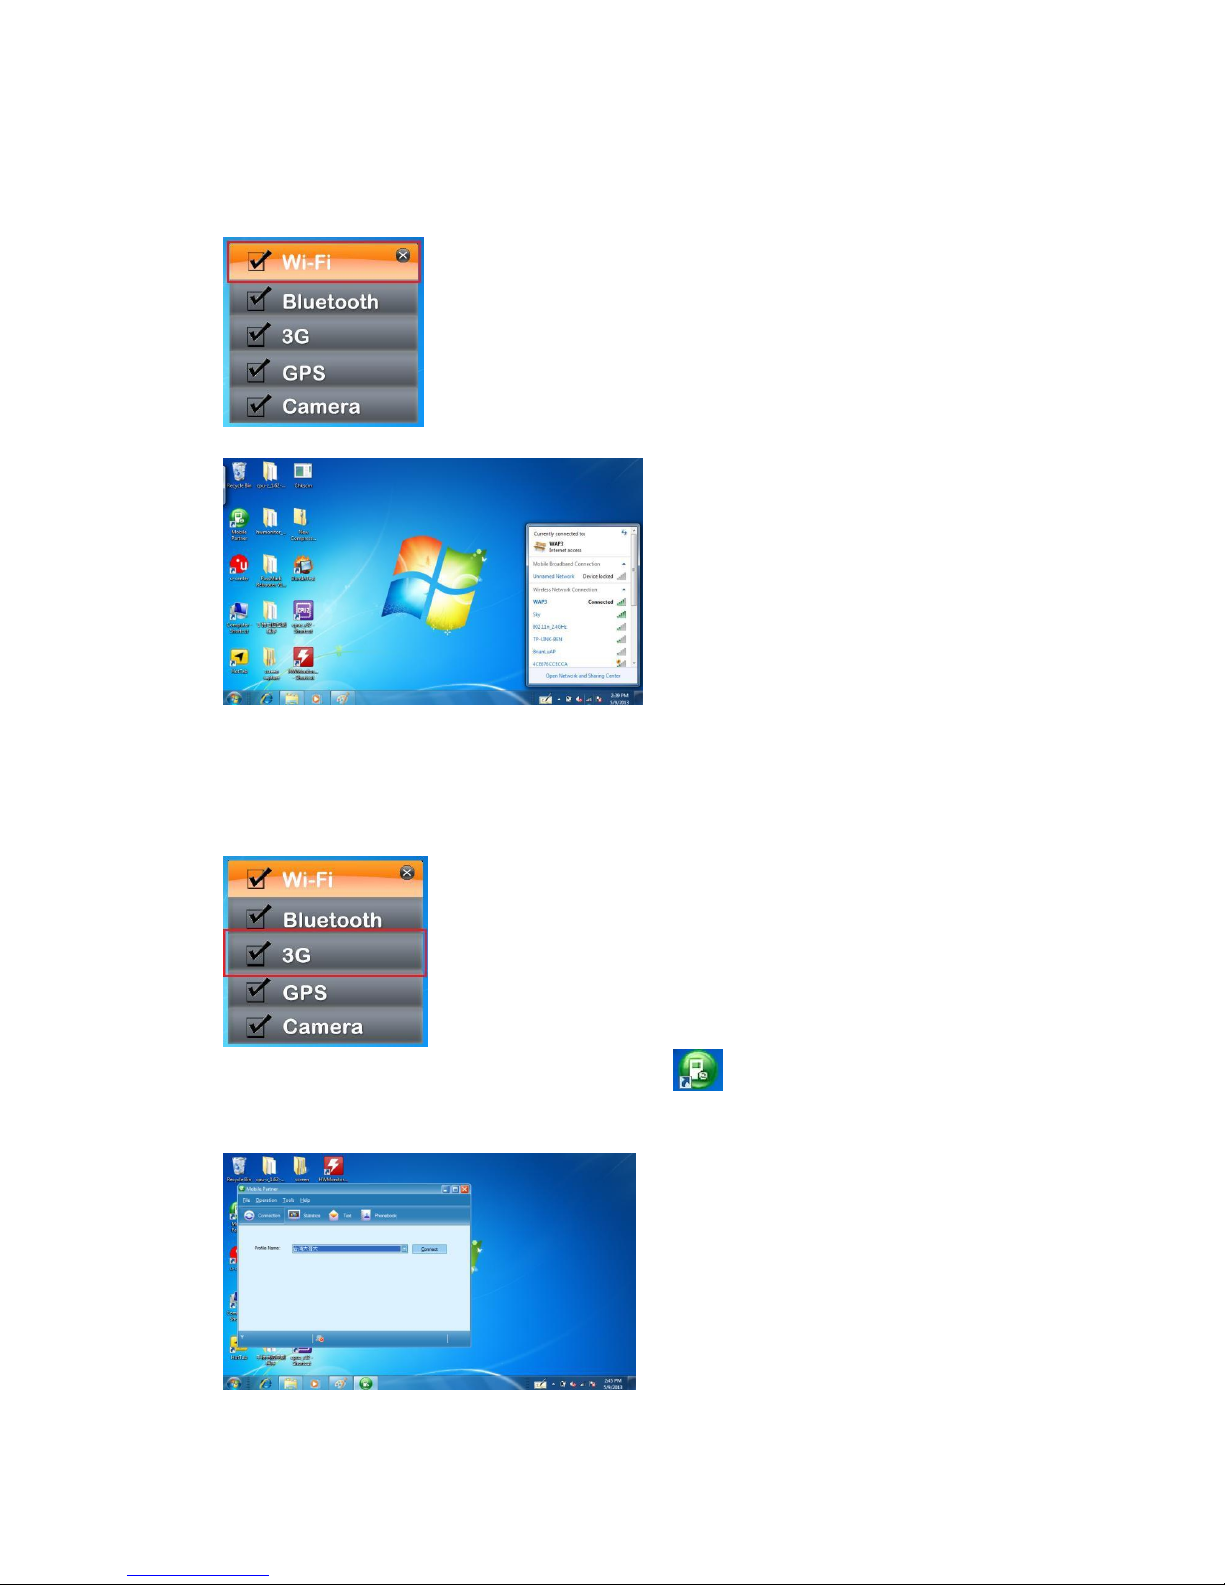
1. Push Menu Button 4 times and make sure the Wi-Fi function is “On”
2. Please use the default Windows Wireless Network Connection utility
Using 3G Function
1. Insert the SIM Card into SIM Card Slot
2. Push Menu Button 4 times and make sure the 3G function is “On”
3. Tap the 3G application program (Mobile Partner)
4. Confirm whether to detect the telecommunications system operators and then press
connect to connect to 3G network
Page 21
20
Durios A7 Ultimate Tablet PC
User Guide
Chapter 5: Power Management
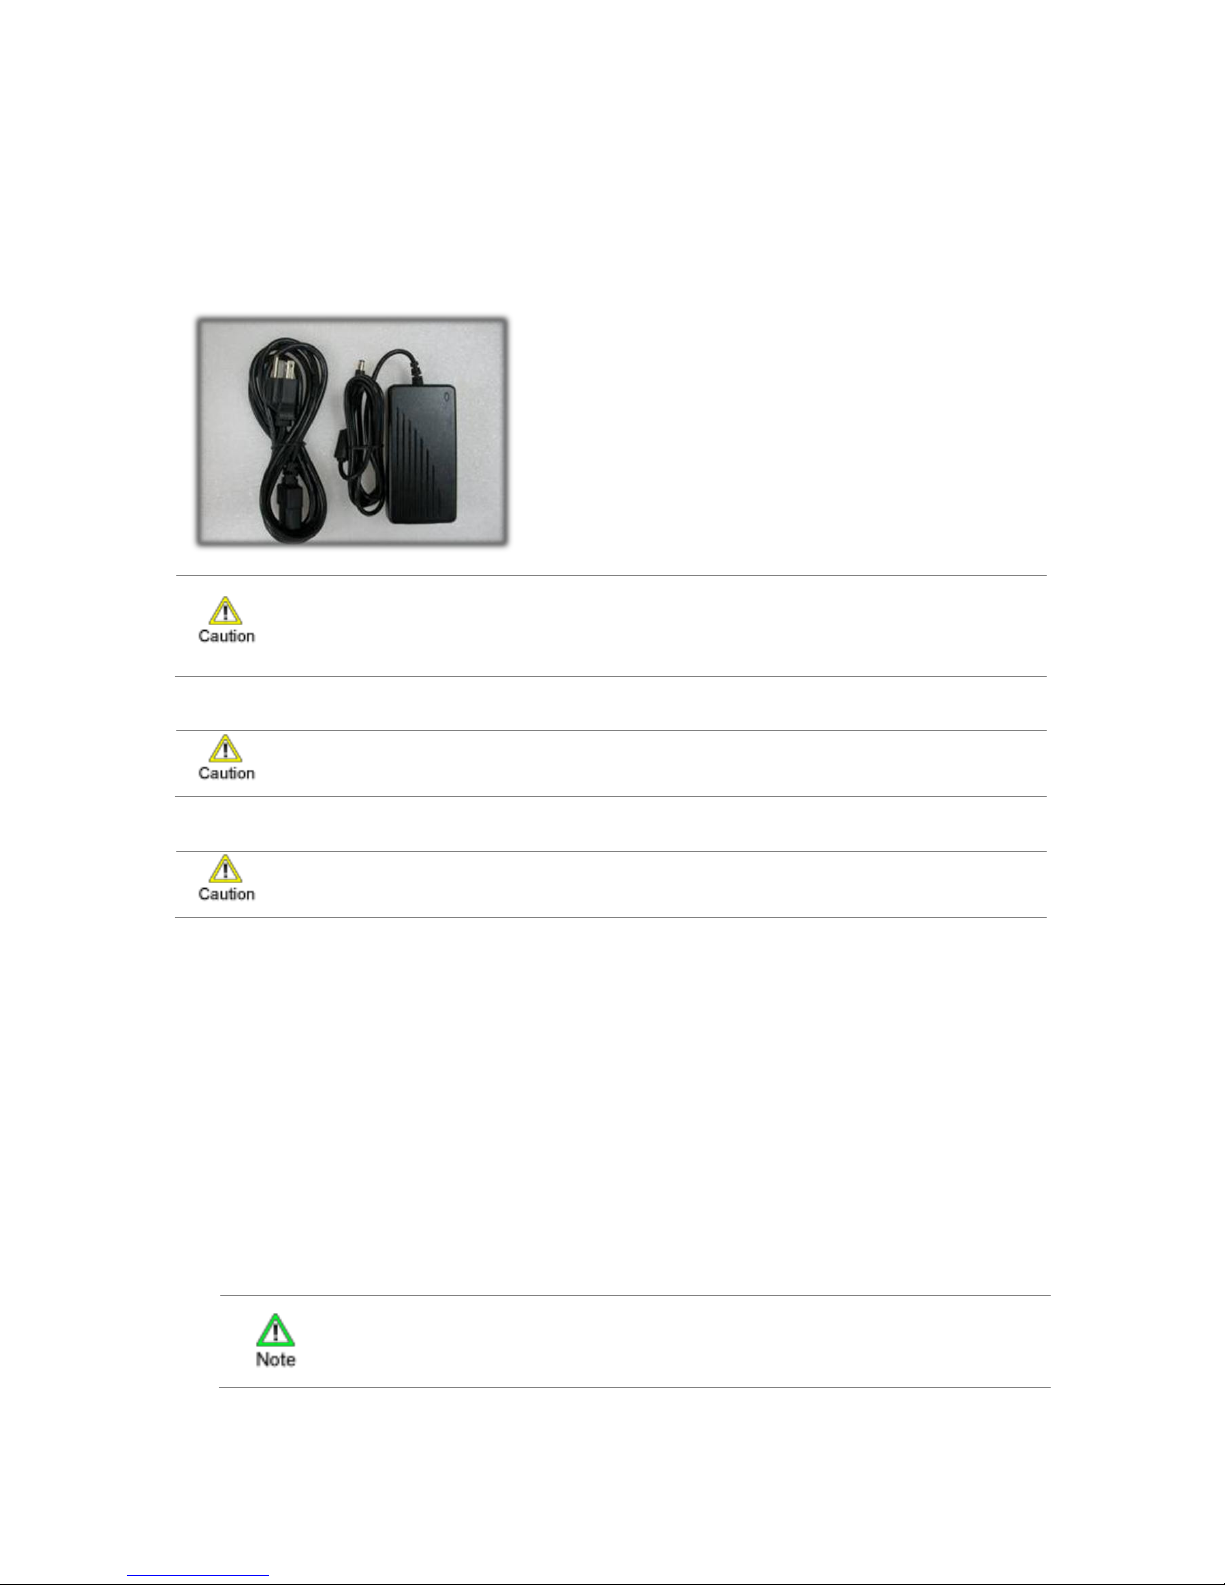
Our Tablet PC support one set of AC adapter and power cord by country area, please
contact your dealer for appropriate power cord based on country area.
About AC Adaptor
The adapter operates in the range of 100~240 V
AC. The AC adapter serves as a converter from
Alternating Current to Direct Current power
because the Tablet PC runs on DC power input
(however, an electrical outlet usually provides AC
power)
To disconnect the AC adapter, disconnect the electrical outlet first and then follow
by the plug from the Tablet PC. Reverse procedure may cause damage the AC
adapter or Tablet PC
Always hold the plug when unplug the connector. Never pull out the cord
AC adapter is designed to use with Tablet PC only, connecting the AC adapter to
other devices may damage the adapter
Charging Status
The battery LED Indicator indicates the charging status, DURIOS A7 ULTIMATE charges one
battery pack at a time. After the first battery is fully charged, it charges the secondary battery
pack.
Charging the Battery Pack
The battery Pack is the internal power source for the Tablet PC. It is rechargeable using
the AC adapter. The operating time of a fully charged battery pack depends on how
users using the device. When users’ applications often access peripherals, it will lead a
shorter operating time
Charging process will not start if the battery’s temperature below 0oC
(32oF). It is also recommended not to charge the battery when the
temperature is above 45oC (113oF).
Page 22
21
Durios A7 Ultimate Tablet PC
User Guide
To prevent damage, the charging process may stop and the battery charge
indicator will flash red light when the environmental temperature exceed
55oC (131oF)
Charging Approaches
By connecting the AC adapter to the Tablet PC and an electrical outlet, the battery
charge indicator on the tablet PC will turn orange to indicate the charging is in progress.
When the battery is fully charged, the battery indicator will turn green.
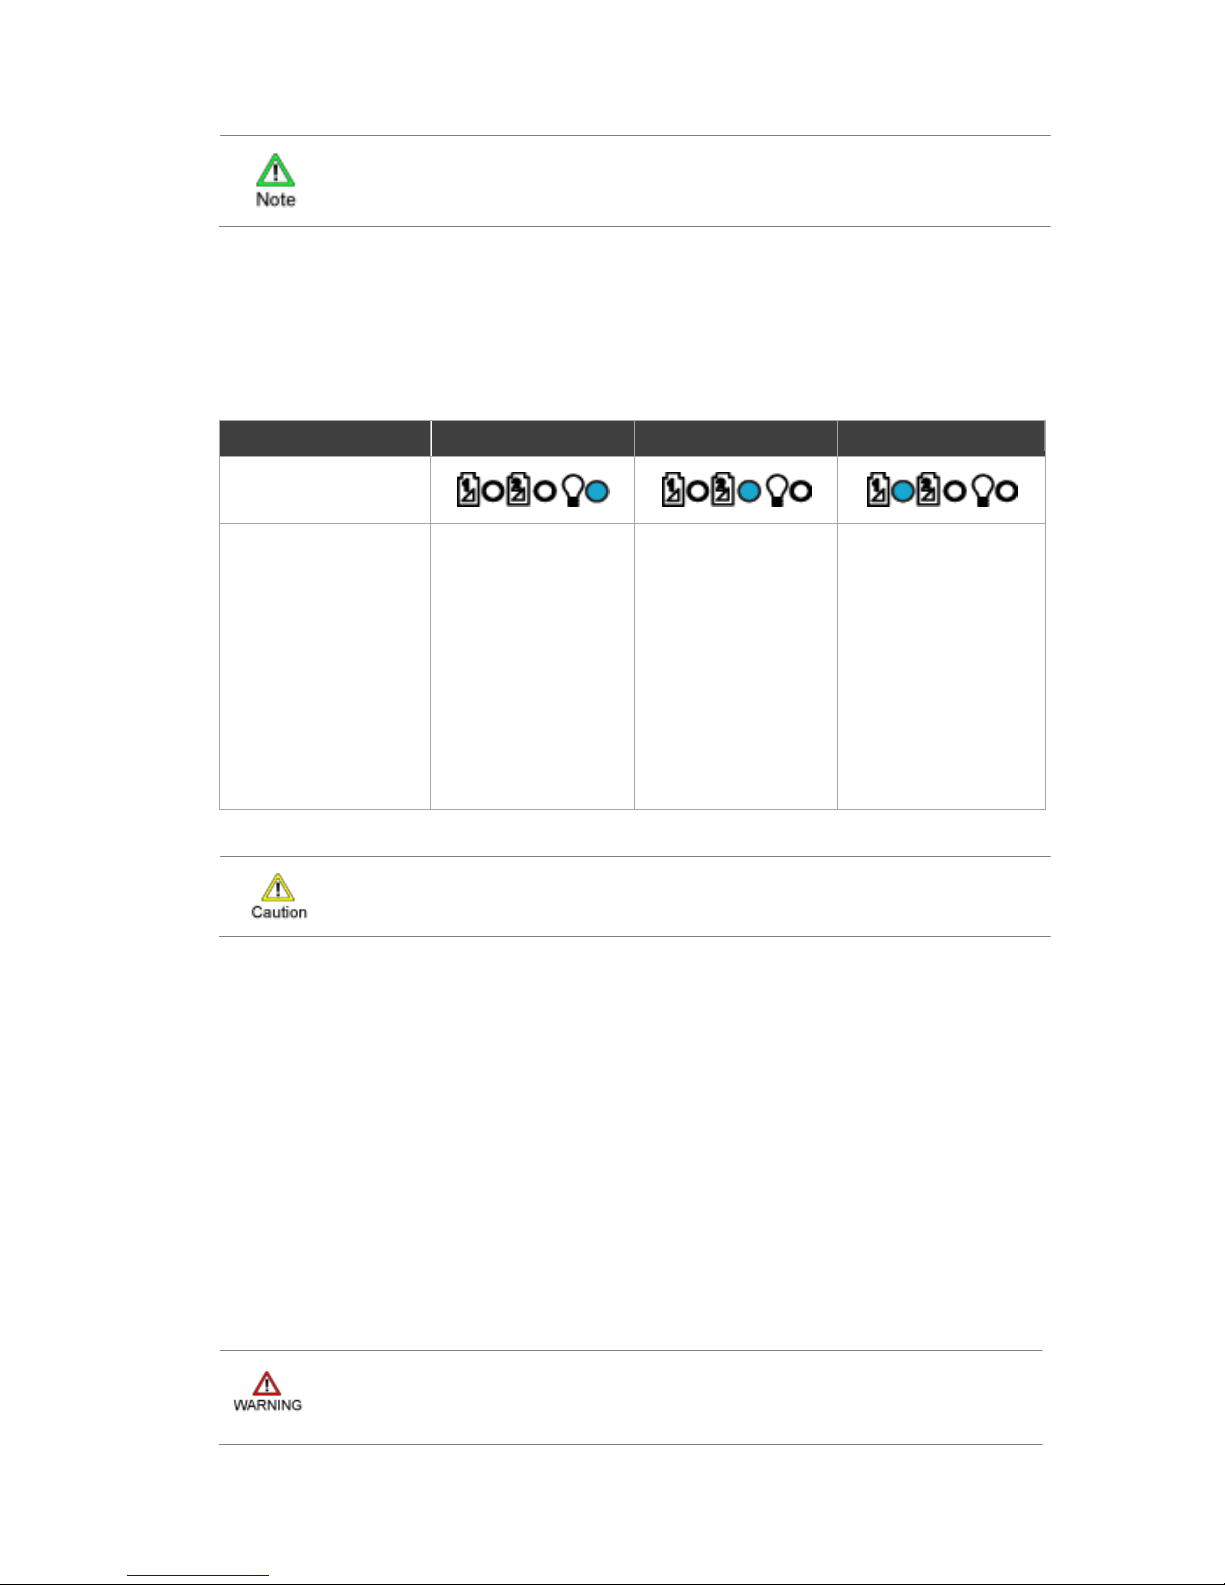
Power Mode
Battery 1 Status
Battery 2 Status
LED Indicator
Indicator Status
Description
Blue light:
When Power On
No light:
When Power Off
Red light:
Low battery
Orange Light:
Under charging
No Light
Fully charged
Green Light
On Using
Red light:
Low battery
Orange Light:
Under charging
No Light:
Fully charged
Green Light
On Using
During the charging process, do not disconnect the AC adapter before the
battery has been fully charged to prevent prematurely charged battery
Checking the Battery Level
In Windows operating system, user can check the approximate battery level using the
battery meter function. To check the battery level:
1. Click the battery icon on the task bar
2. Click the outlet icon if the tablet PC using AC power
Battery Low Signals and Actions
When the battery has approximately 10% of its charge remaining, the battery charge
indicator will blink red light to alert the users. User can set up the battery threshold and
signals under Windows operating systems.
The remaining operating time depends on how users are using the Tablet
PC. If users are using audio subsystem or any wireless communication, the
battery might run out of charge very quick
Page 23

22
Durios A7 Ultimate Tablet PC
User Guide
Immediately save the data, if user fail to save the data when the battery
completely runs of charge, user will lose their data
Power Management
DURIOS A7 ULTIMATE Tablet PC supports ACPI (Advance configuration and Power
Interface) for power management. The power management features allows user to
reduce the power consumption for energy saving. With and ACPI-compliant operating
system such as
Windows XP, power supply to different Tablet PC components is controlled on an as-needed
basis. This allows maximum power conservation and performance at the same time. In
general, windows power management works in following state:
Occurrence
Condition
Power to the Hard Disk is turned off
When the hard disk has been idle for a set of
period
Power to the display is turned off
When the display has been idle for a set
period.
When the entire system has been idle for a
set of period.
Tablet PC enters the standby mode.
Hard disk and display are turned off and the
entire system consume less power
When the display has been idle for a set of
period.
When user press the power button
Tablet PC enters the hibernation mode
When the entire system has been idle for a
set of period.
When user press the power button.
For detailed information on power management, please refer to Help Windows
Page 24
23
Durios A7 Ultimate Tablet PC
User Guide
Chapter 6: Expanding DURIOS A7 ULTIMATE Tablet PC
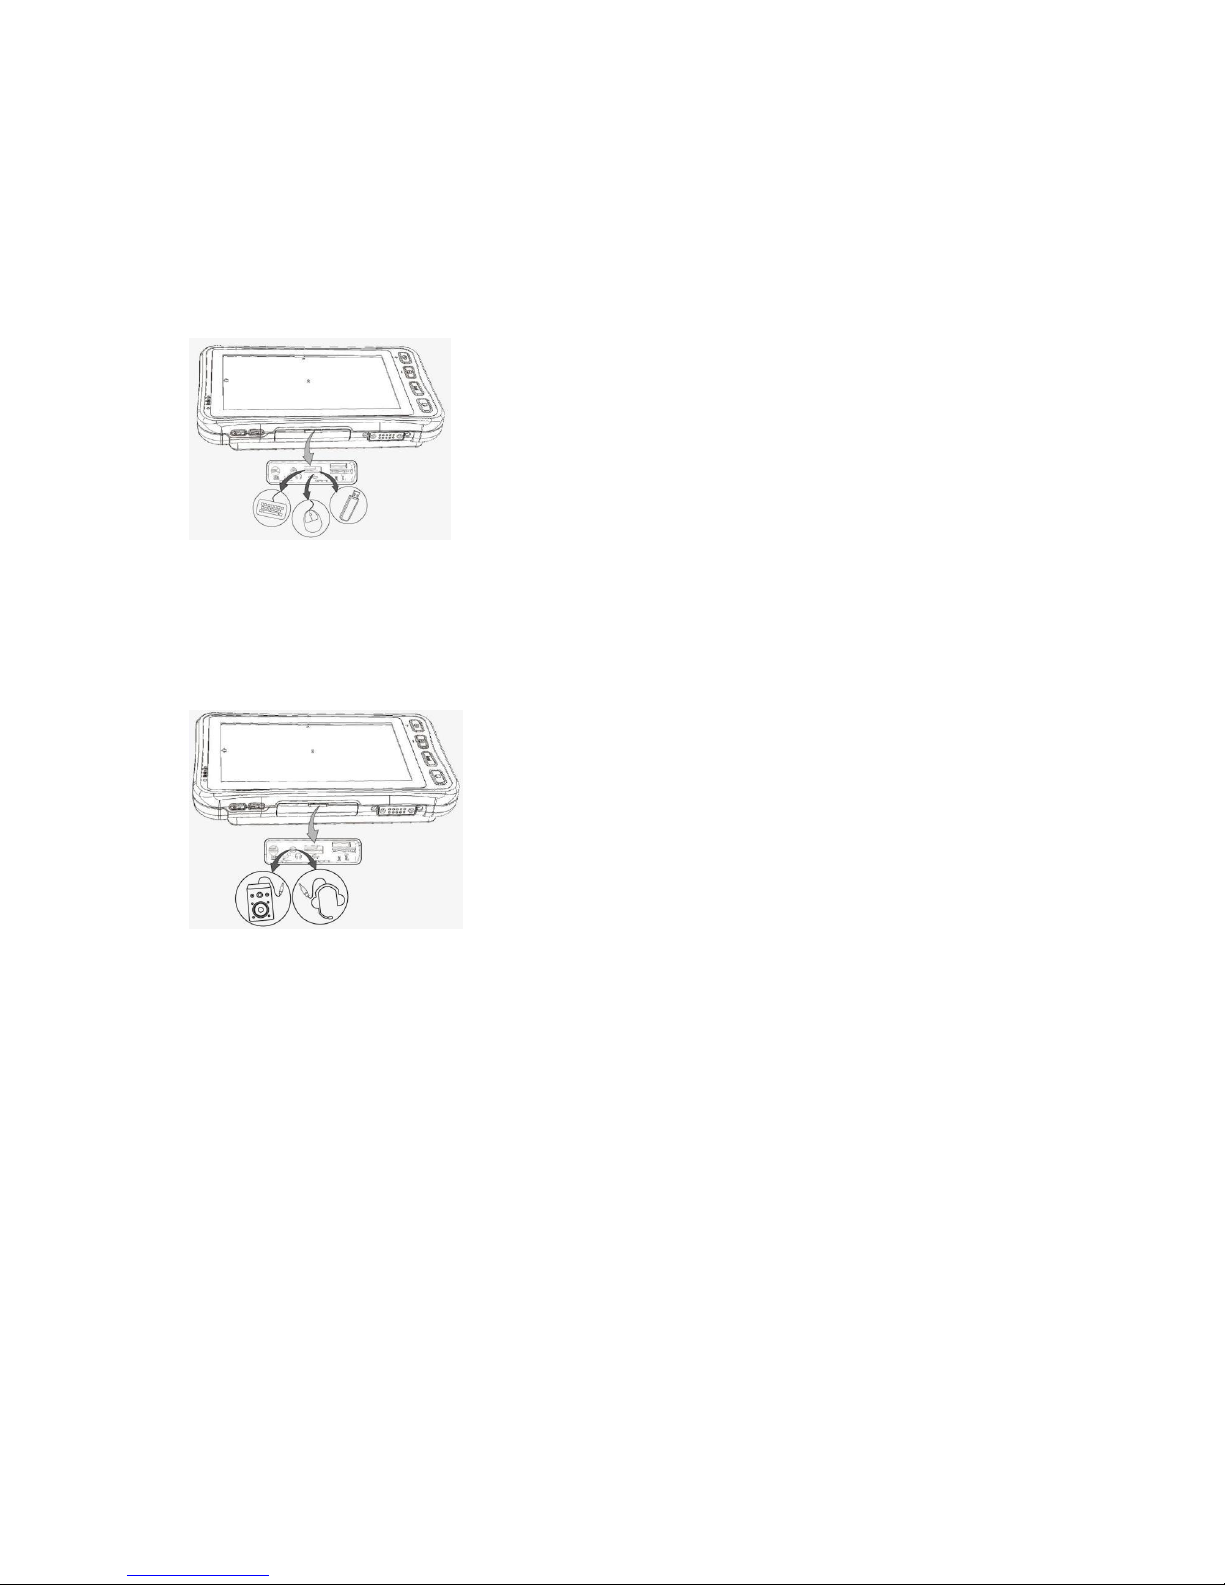
Connecting USB Device
DURIOS A7 ULTIMATE has USB ports for connecting USB devices such as a flash disk
drive, scanner, printer, keyboard, or mouse. To connect USB device, plug the device cable
into USB port of DURIOS A7 ULTIMATE.
Connecting Audio Devices
DURIOS A7 ULTIMATE has audio connector that supports both audio in and audio out
devices. User can connect speakers, headphones, or earphone set. To connect an audio
device, plug the device cable into the audio connector of DURIOS A7 ULTIMATE
Page 25
24
Durios A7 Ultimate Tablet PC
User Guide
Chapter 7: Using BIOS Setup
To use BIOS setup
To enter the Tablet PC BIOS setup, user need to connect DURIOS A7 ULTIMATE with an
external keyboard. Press “Del” key when the prompt appears on the screen during start up.
The prompt screen shows only few seconds so user need to press “Del” key immediately.
Updated BIOS version may be published after the manual is released.
Please check for the latest version on the website
User may need to run BIOS setup utility for a number of reasons such as:
1. Error message on screen, indicate to check BIOS setup
2. Restoring the factory default settings
3. Modifying the specific hardware specification
4. Want to optimize the specification
In order to control the keyboard to select BIOS utility setup, user need
Keyboard Icon
Function Description
to select a menu title
to select an item or option
Enter
to go to the sub menu when available
to open or close the option window when an item is selected
Esc
to leave sub-menu and return to main menu
BIOS Functions
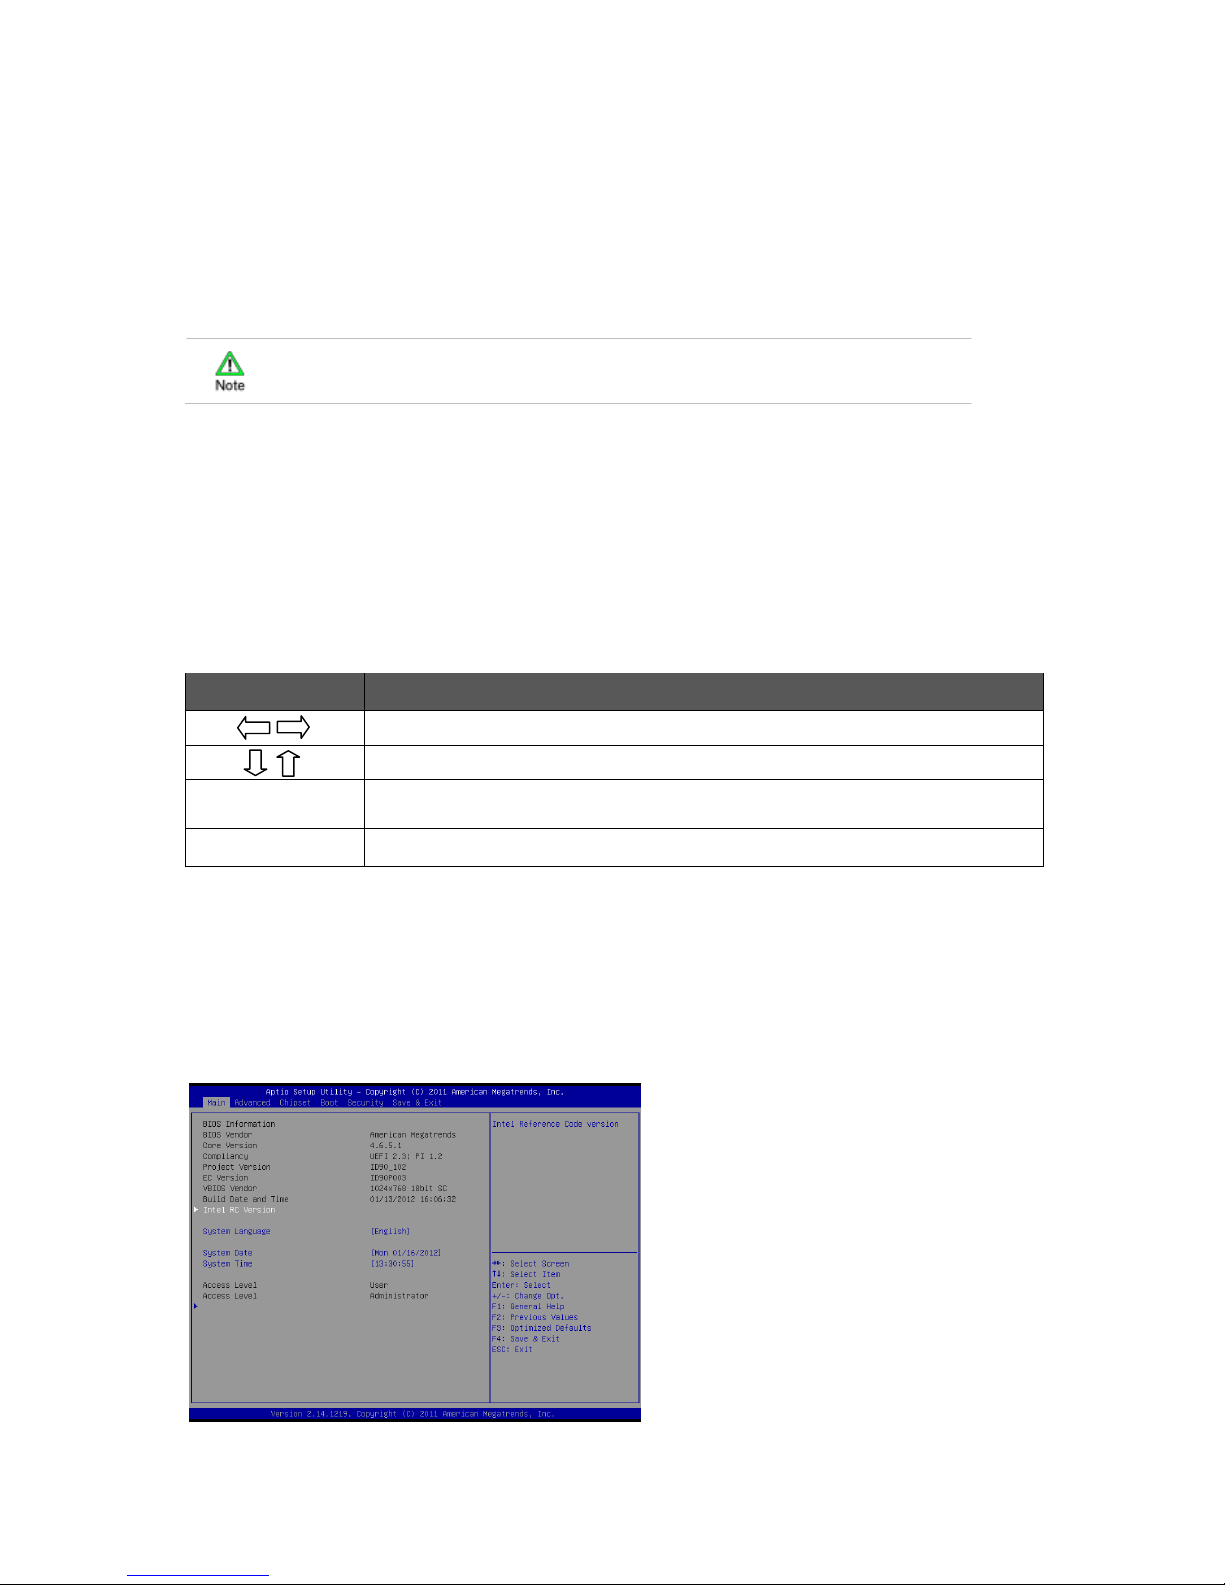
Main Menu
Main menu consists of the information of the Tablet system including BIOS version,
processor RC version, system language, time and date.
Page 26
25
Durios A7 Ultimate Tablet PC
User Guide
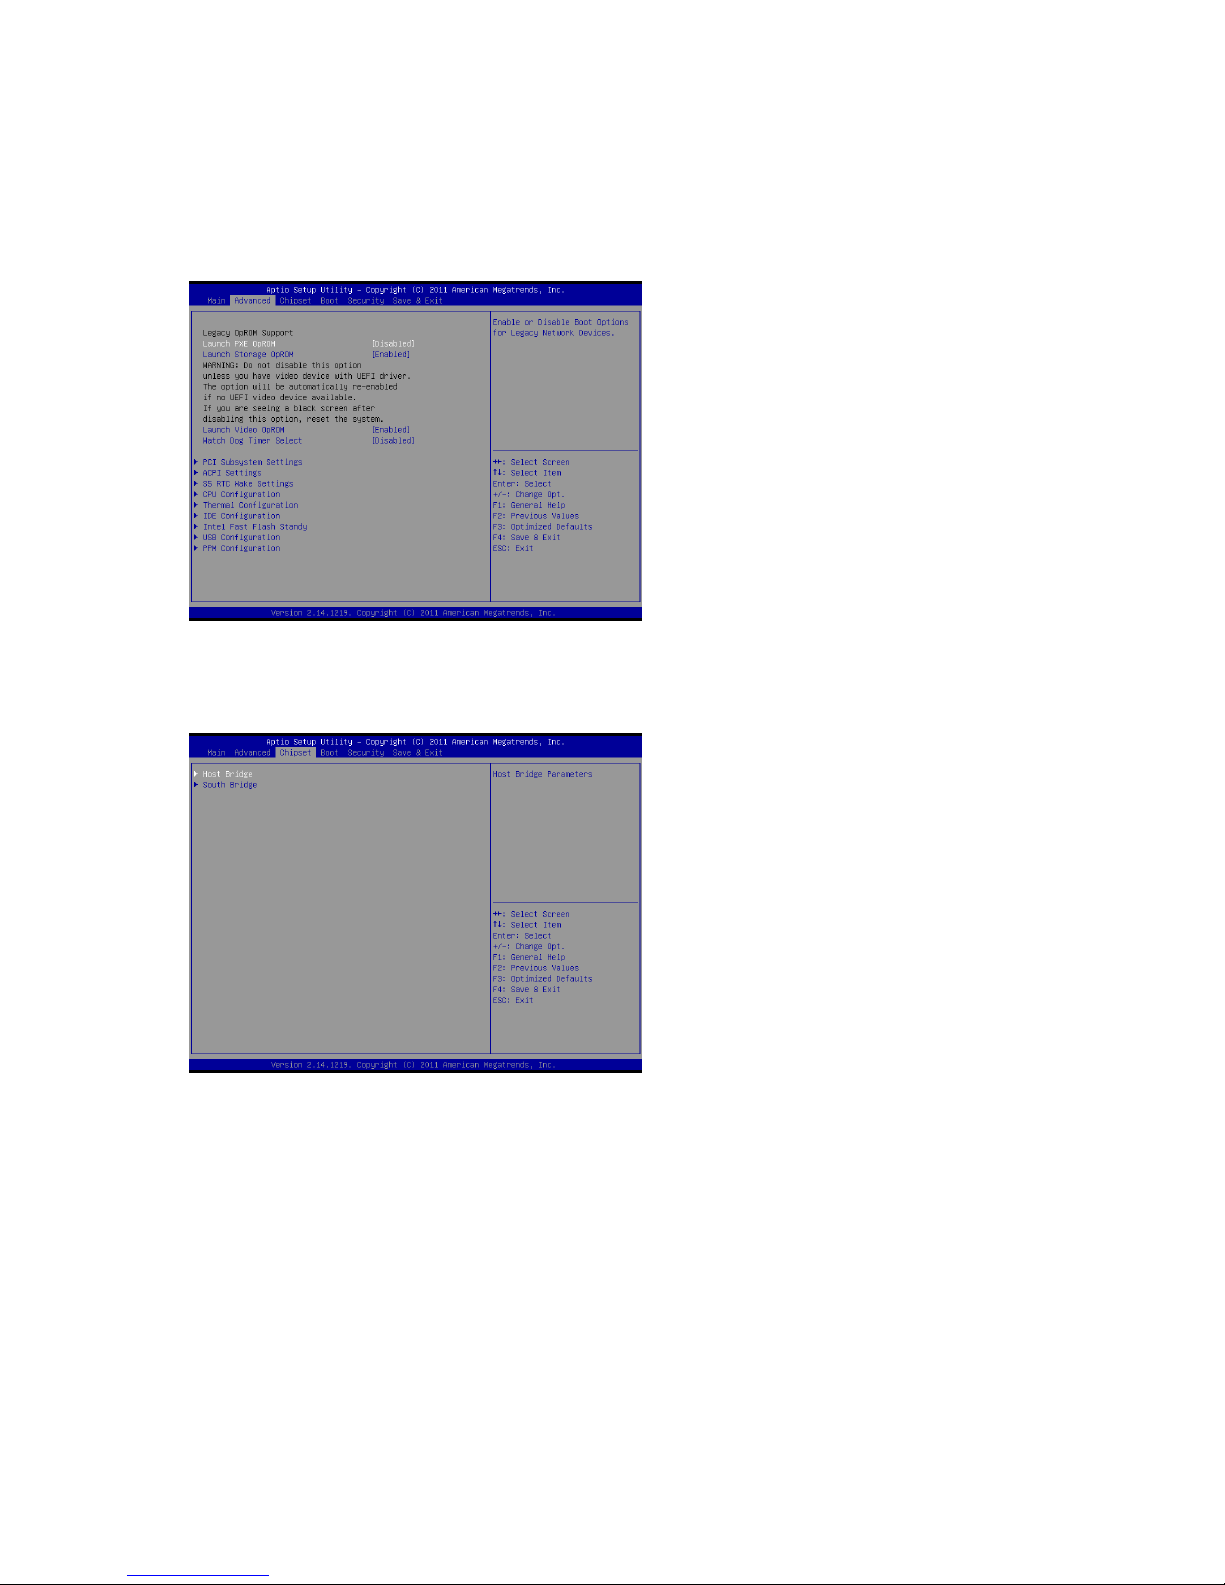
Advance Menu
Advanced menu consists of the selection of PXE OpROM and Watch Dog Timer, settings of
PCI Subsystem, ACPI, and S5 RTC Wake. It also consists of the configuration information of
CPU, Thermal, IDE/SATA, USB, and PPM Configuration.
Chipset Menu
The Chipset menu consists of the information for Host Bridge and South Bridge
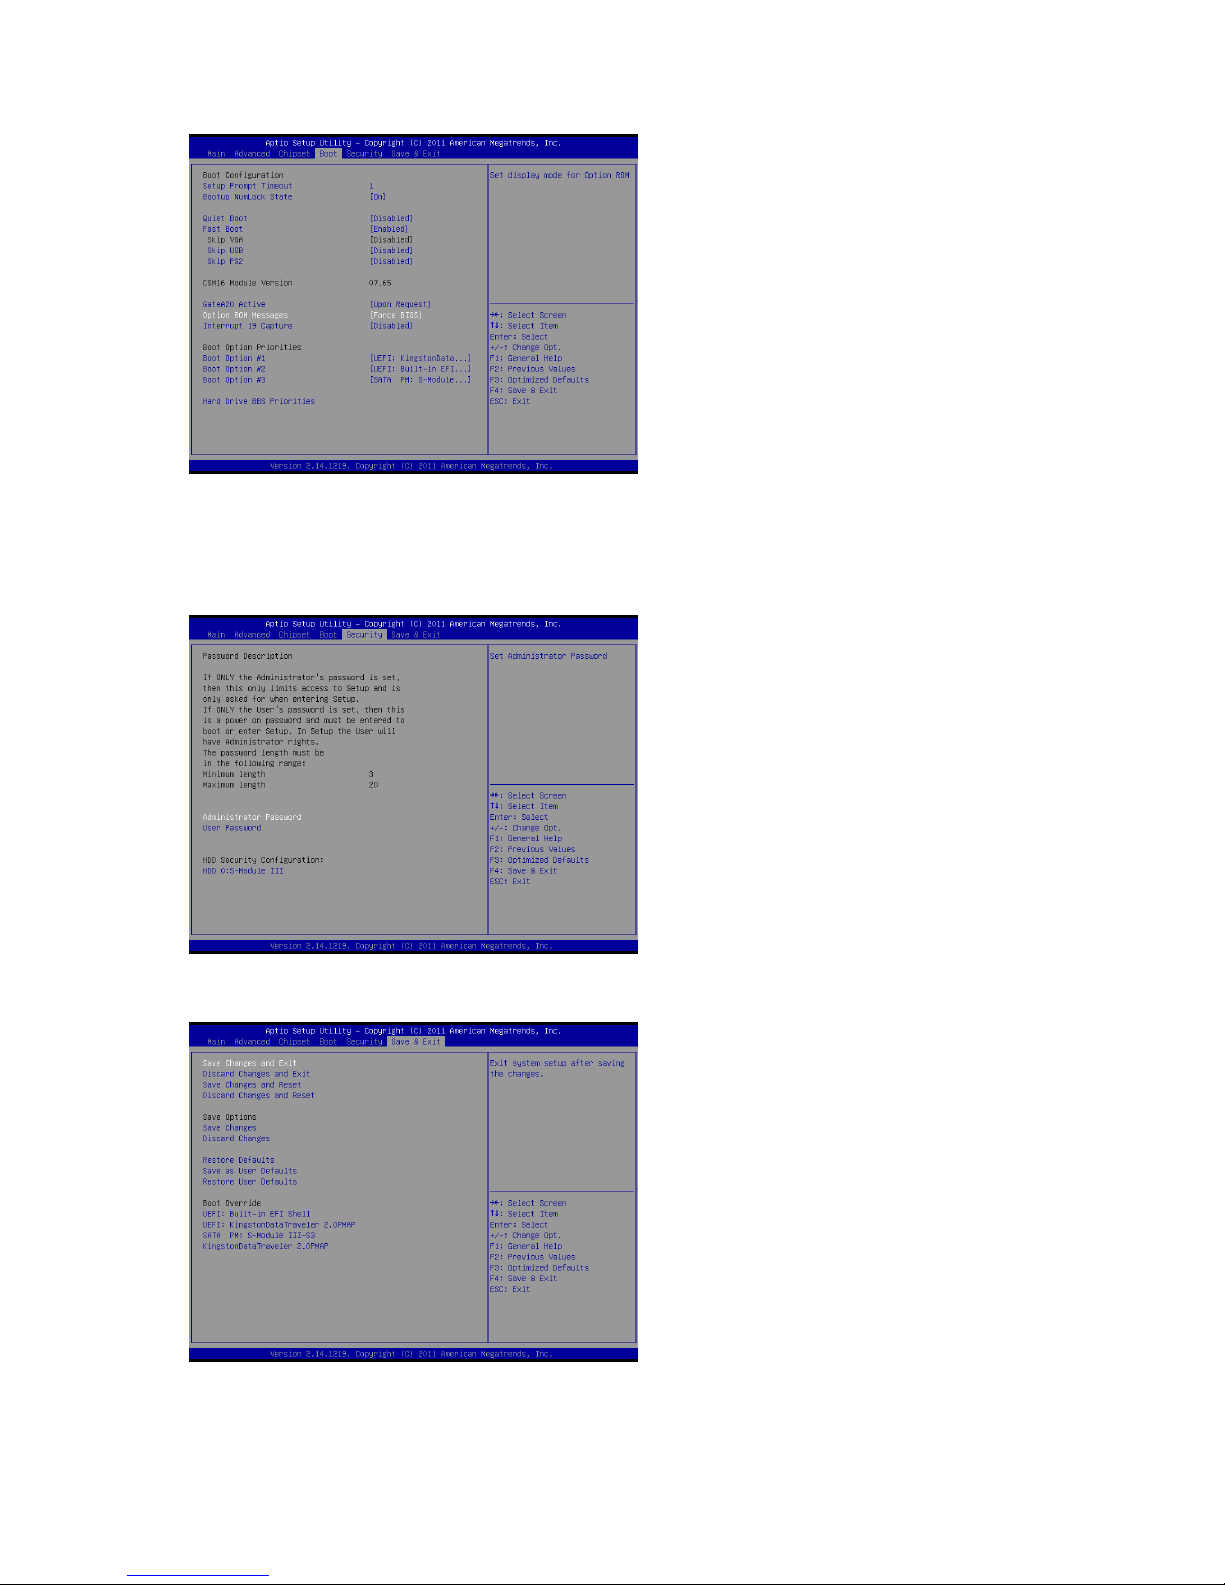
Boot Menu
The boot menu sets the sequence of the devices to be searched for the operating system.
The bootable devices will be automatically detected during POST and shown here, allowing
user to set the sequence that the BIOS uses to look for a boot device from which to load the
operating system. A brief description of button usage is listed here:
Page 27
26
Durios A7 Ultimate Tablet PC
User Guide
Security Menu
In the security menu, users can set Administrator password, User password, and HDD
security configuration.
Save and Exit Menu
The Exit menu displays ways of existing BIOS Setup utility. After finishing with the settings,
user needs to save and exit so that the changes can take effect.
Page 28

27
Durios A7 Ultimate Tablet PC
User Guide
Save & Exit options
Function
Save changes and Exit
Saves the changes and exit BIOS setup utility
Discard changes and Exit
Exit BIOS setup utility without saving the changes
Save Changes and Reset
Saves the changes and reset BIOS system
Discarding Changes and Reset
Reset BIOS system without saving the changes
Save Changes
Done so far to any of the setup options
Discard Changes
Done so far to any of the setup options
Restore Defaults
Loads / restore the factory default values for all the items
Save as User Defaults
Saves the changes done so far as User Defaults
Restore User Defaults
Loads/ restore the User Default values for all the items
Page 29

28
Durios A7 Ultimate Tablet PC
User Guide
Chapter 8: Using Recovery DVD
Hardware Preparation
User need to prepare following items before start to recover the Tablet
1. USB keyboard
2. USB DVD-ROM Driver
3. USB HUB
Connect DVD-ROM Driver and Keyboard through USB Hub
Connect the USB Hub to DURIOS A7 ULTIMATE’s USB port
Make sure the DVD-ROM driver has been recognized by the DURIOS A7 ULTIMATE
tablet.
Start to recover the system by recovery DVD
To recover the system:
1. Reboot the tablet, then press ”Del” key on the keyboard to get into the BIOS setup
mode
2. Set DVD-ROM driver as the first priority of the boot device
3. Choose “Save Changes and Reset” under “Save & Exit” tag.
4. The tablet will reboot again and then press any key on the keyboard when there is a
following message “Press any key to boot from CD or DVD”
5. DOS windows will open and please type reccf
6. The recovery process will be started automatically
Page 30
29
Durios A7 Ultimate Tablet PC
User Guide
Chapter 9: Using Camera
DURIOS A7 ULTIMATE is equipped with 2 MP on the rear side, which user can use to
capture photos or video
Open Camera
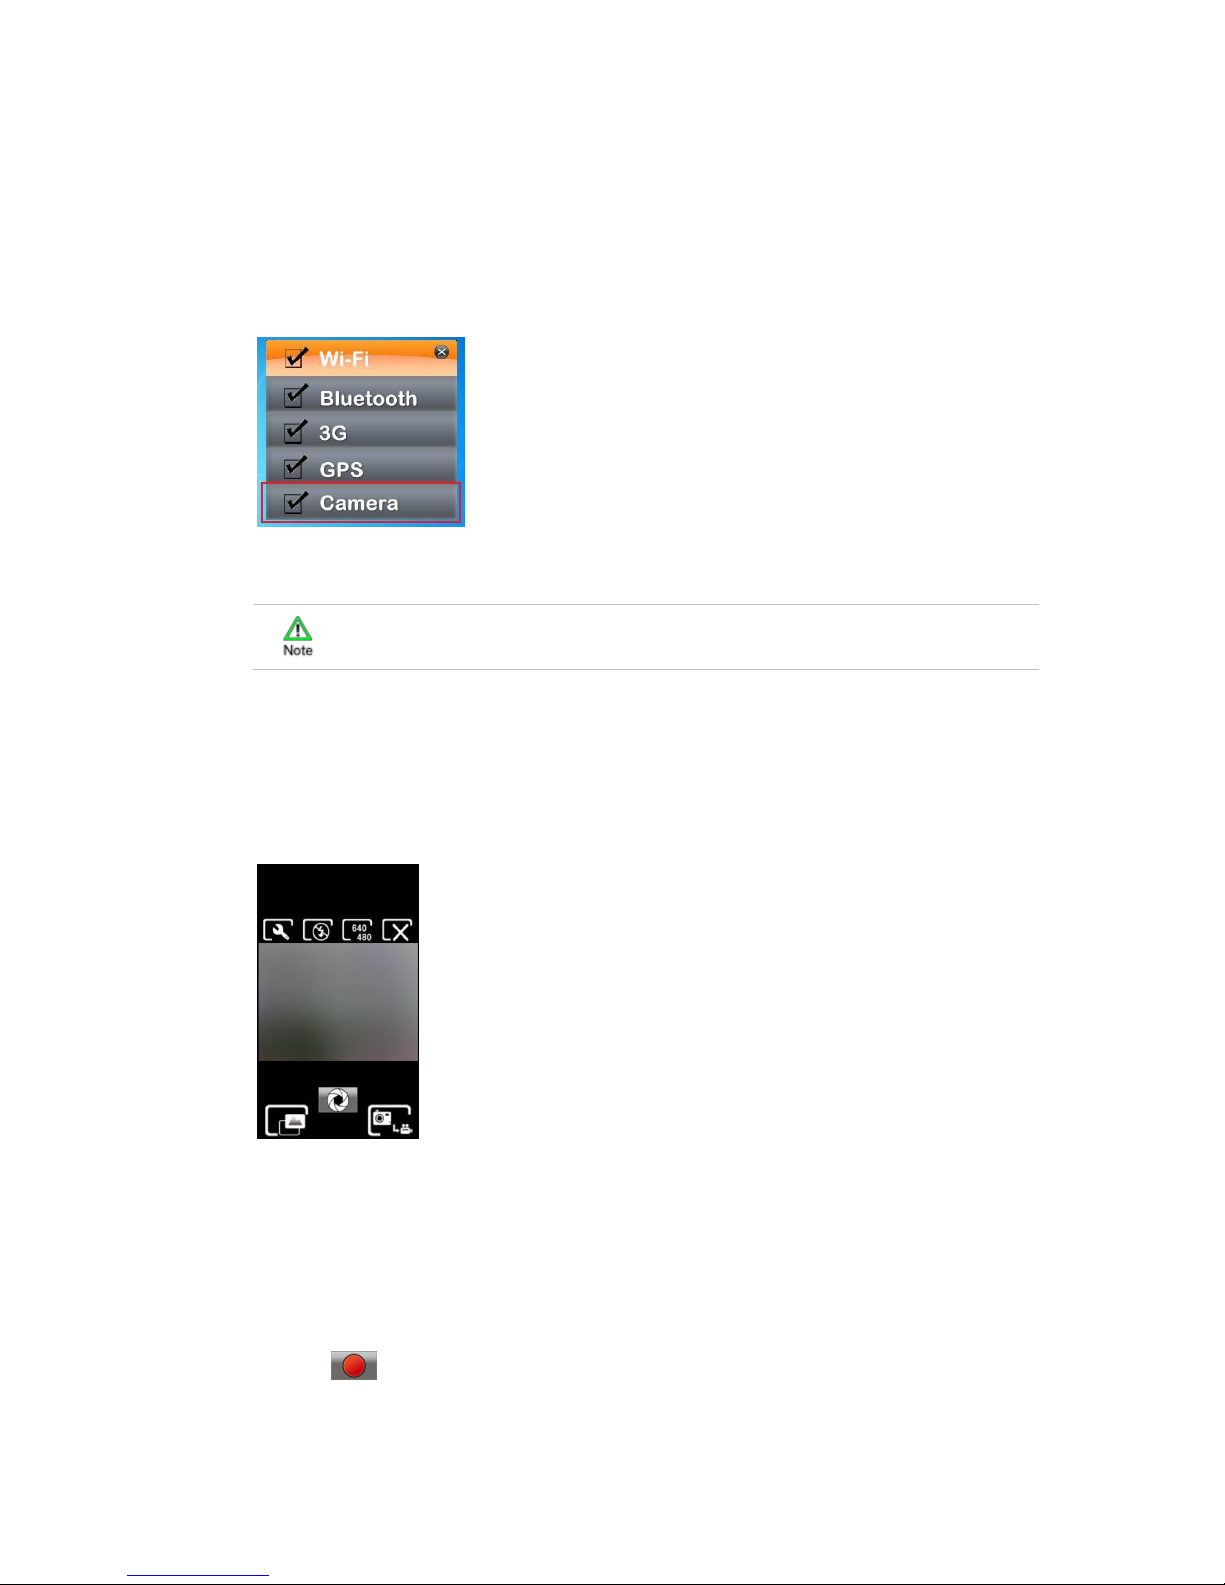
1. Push Menu Button 4 times and make sure the 3G function is “On”
2. Push F1 Button and in the utilities, tap Camera
Camera opens in Portrait Mode, ready to take a picture or shoot a video
Make sure the protective lens cover is clean before taking pictures. A
lens cover with smudges from fingers can cause blurry picture
Take a picture
1. Adjust the exposure, flash, and other necessary settings. Or leave it automatic.
2. Frame your subject / object on screen
3. Tap the On Screen Shutter icon
4. Touch the thumbnail to view, share, or work with your pictures in Gallery
Shoot a video
1. Tap to switch from camera to video mode
2. Point the lens to record the scene where you want to start
3. Tap the On Screen Start Video icon
The time remaining to shoot counts down at the left; when less than a minute is left,
the countdown turns red
4. Tap the icon again to stop shooting
Page 31
30
Durios A7 Ultimate Tablet PC
User Guide
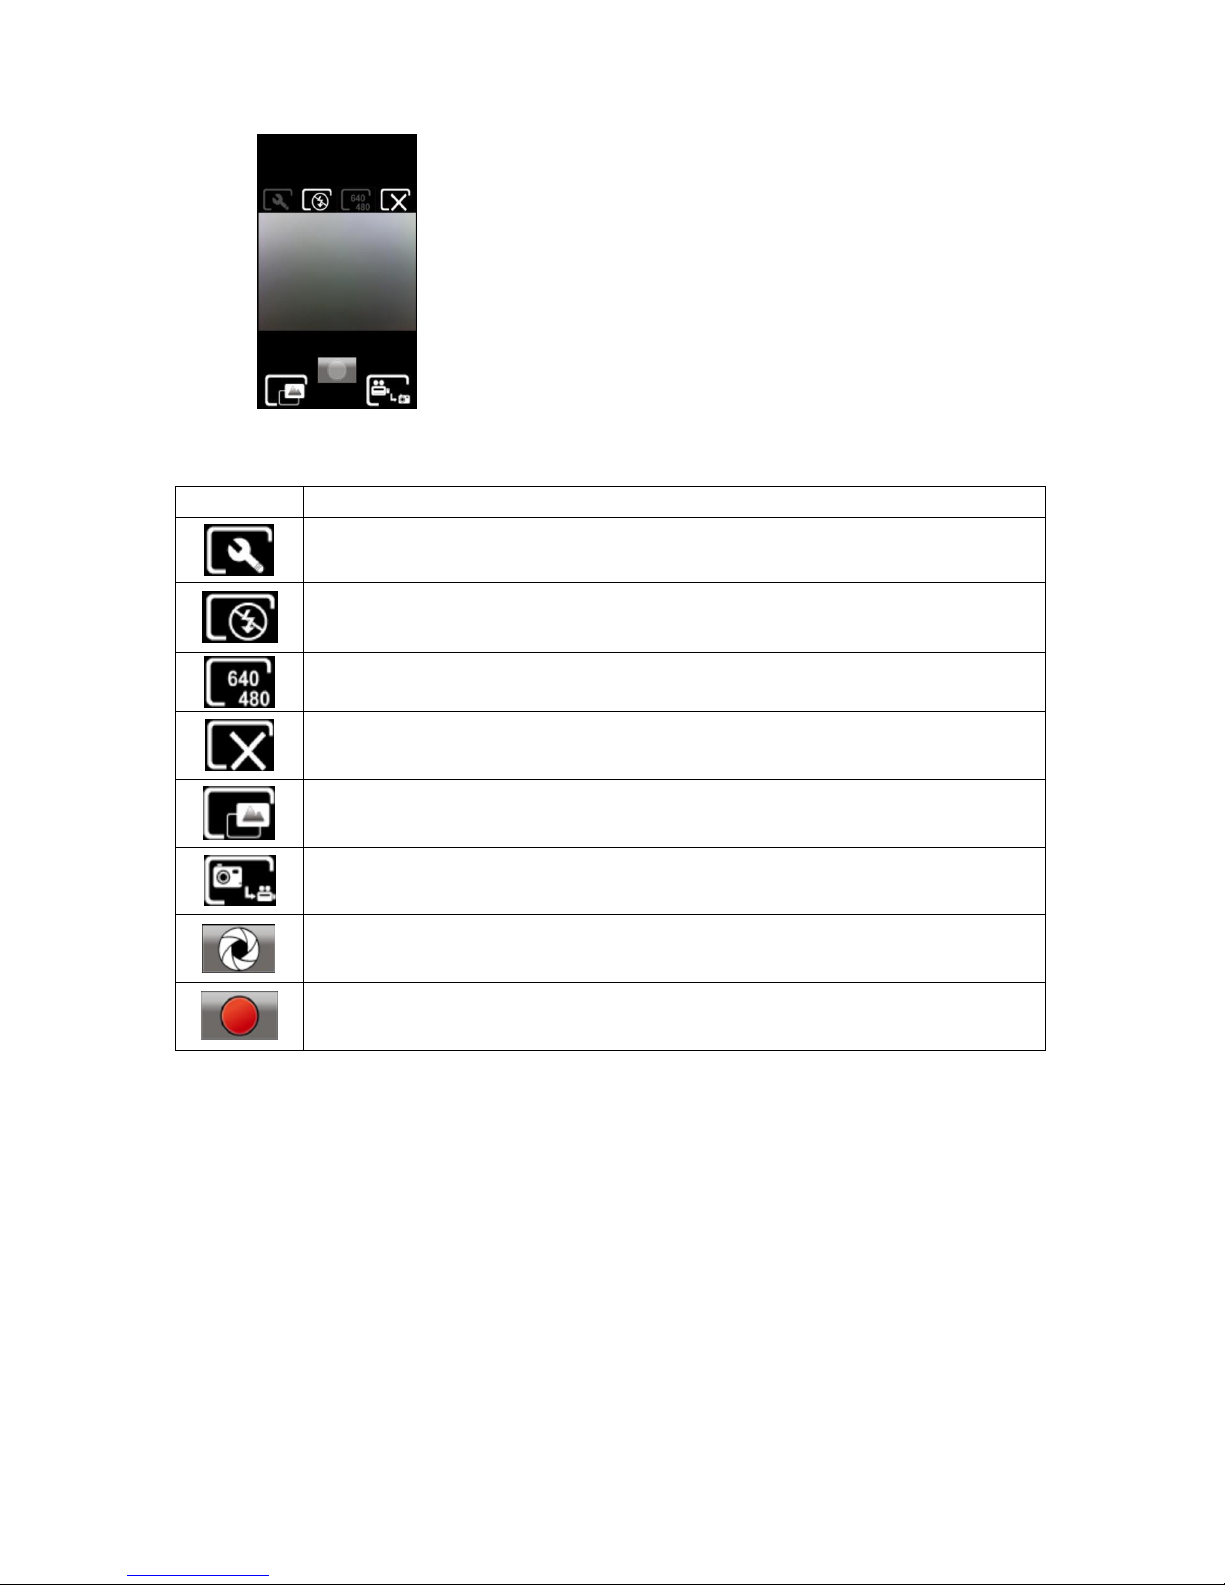
The Camera Control Buttons
Icon
Description
To select the save location of the Picture and Video
To select the Picture Quality [ Low, Medium, High, or Best]
To adjust the Flash (Turn ON or OFF the flash)
To adjust the Picture resolution, user can select (1024 x 768) or (1600 x 1200)
To close the Camera function
To go to the file folder where user save all the pictures or videos
To change the Camera into Video mode or vice versa
Snap button in camera mode
Record button in video mode
Page 32

31
Durios A7 Ultimate Tablet PC
User Guide
Chapter 10: Accessories
DURIOS A7 ULTIMATE Standard Accessories
Standard Accessory
Details
Adapter with Standard Power Cord
(Euro / US standard type, 1.8 m)
Input : AC 100-240V 50/60 Hz
Output : 12V DC
DURIOS A7 ULTIMATE Manual &
Driver CD
Allows user to make an update
Recovery CD
Allows users to make a recovery
DURIOS A7 ULTIMATE Optional Accessories
Optional Accessory
Details
Docking
Docking cradle for DURIOS A7
ULTIMATE
Hold the tablet tightly on the
moving vehicle
Support both terminal block & 2.5Ψ
Power jack input
9~36 V DC-in wide range DC input
IP52 design (Rain prove)
Hand Strap
to secure the device when using it
Capacitive Touch Stylus
to use it as a mouse or as a finger to
perform regular touch functions and
to write in application where
applicable
Vehicle Adapter
Input 5V DC cigarette lighter socket
USB car charger
Secondary Battery
Li-Polymer Battery 5200mAh
 Loading...