

Page 1

Leben im Bad
Living bathrooms
DuraStyle
Mounting instructions Two-piece water toilet
Instrucciones de montaje Inodoro de dos piezas
τሔනଃٺ฿ቝѓఝ
# 2160010000
# 0935200005
Page 2
Index
English
Technical information
Content of packaging .................... 3
Assembly dimensions ................... 4
Mounting instructions
Installation of the toilet ................ 5
Further information
Safety instructions ........................ 9
Replacement parts ....................... 9
Trouble shooting guide ................. 9
Español
Información técnica
Contenido de la caja .....................3
Medidas de montaje ..................... 4
Instrucciones de montaje
Instalación del inodoro ................. 5
Información adicional
Instrucciones de seguridad ........10
Repuestos ................................... 10
Guía para la eliminación
de fallos ...................................... 10
ᇖ
࠶ඓྗ༖
Ўሔୄಿ ....................................... 3
ሔԋձ ....................................... 4
τሔනଃඇ
ቝѓఝτሔ .................................... 5
۾ئ֬ྗ༖
τࣁജ ..................................... 11
۾ߗҍࡸ ..................................... 11
ܪᅷࢺպ ..................................... 11
We reserve the right to make technical improvements and enhance the appearance of the products shown.
Nos reservamos el derecho de realizar modificaciones técnicas y de aspecto de los productos representados.
Ⴕ࠶ඓۆ࣐ƗГۆєӈ݆۳නଃ֬ಊ৭è
2 MAL_56800/05.13.1
Page 3
# 2160010000 # 0935200005 # 0060510000
# 0060590000
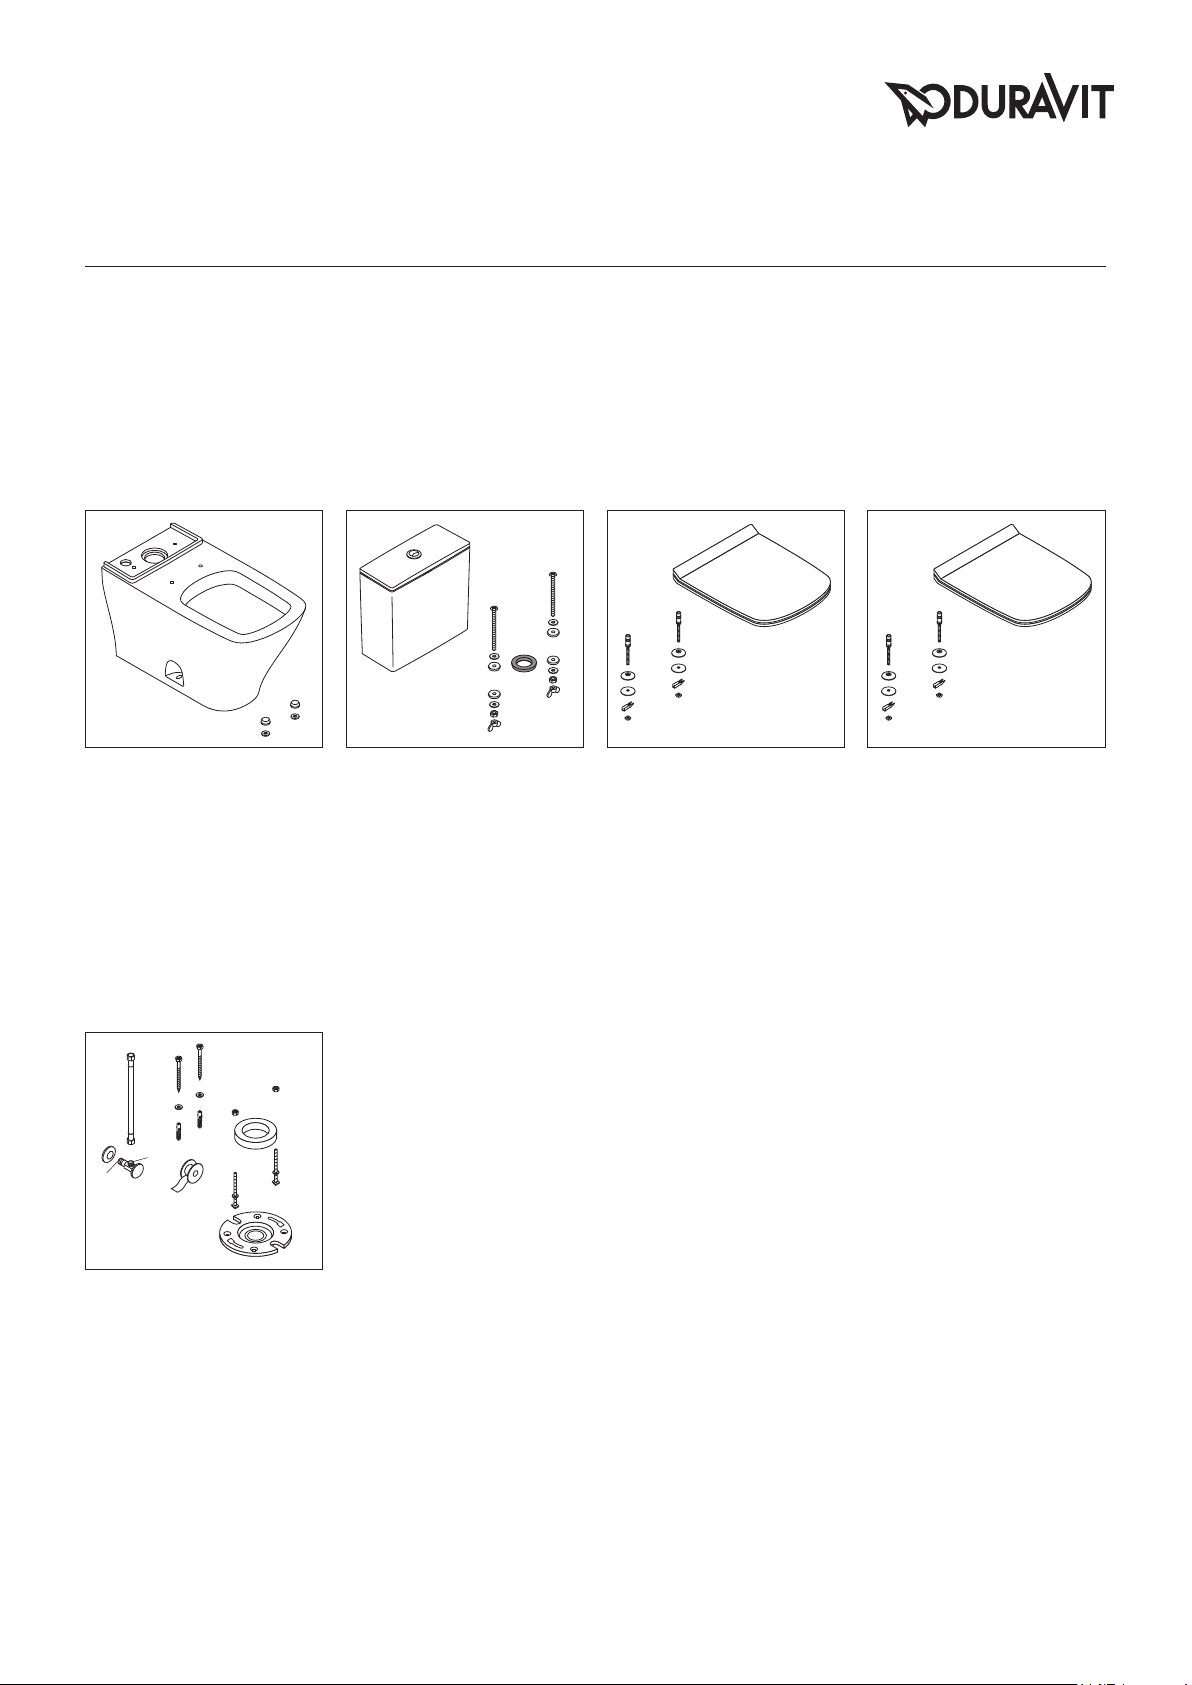
THIS CARTON CONTAINS:
1. Two-piece water toilet
2. Tank supplied with fill valve and
3“ dual - flush piston valve
3. Installation manual
4. To be ordered separately:
Tank supplied with complete
mechanism # 0935200005
Seat and cover (incl. mounting
set) # 0060510000,
# 0060590000
1
/
2"
1
/
2"
# 0014180096
IN ADDITION YOU WILL NEED:
Installation kit # 0014180096
- wax-ring
- flange (incl. mounting set)
- flexible water supply line and
water shut-off valve
- silicone sealant
ESTE CARTÓN CONTIENE:
1. Un inodoro de dos piezas
2. La cisterna se suministra con la
válvula de llenado y una descarga
dual flush de 3“.
3. Manual de instalación
4. Para pedirlo por separado:
cisterna con válvula de llenado
y mecanisimo de descarga
# 0935200005
asiento y tapa (incl. juego de
montaje) # 0060510000,
# 0060590000
TAMBIÉN SE NECESITA:
kit de instalación # 0014180096
- una junta
- brida (incl. juego de montaje)
- tubo flexible de alimentación y
llave de paso.
- sellador de silicona
མୄЎচ༅
1. ٺ฿ቝѓఝ
2. ւ࣐ඪًދႎձටԑࠊೝ൛ඪ
ً
3. τሔ൴ү
4. ֍؆ׯܚ"
Ⴜ࣐ඪࠪԑ༨ً֬ඪམ
# 0935200005
ቝѓఝۉϷࠪಈݪሔࡸЎ
# 0060510000, # 0060590000
ບ୍ߕྺး"
τሔ܄#0014180096
- ড૨چಈ
- ٌমݪሔࡸЎ
- ܉ඪܼࠪ܉ඪًè
- ݈૨چ
MAL_56800/05.13.1 3
Page 4
3
/
6
4
1
/
15
8
"
3
/
28
8
"
"
"
8
/
7
30
"-9"
4
/
1
8
7
3
/
/
9
8
"-11
8
"
"
8
/
5
14
1
/
18
2
"
8
/
5
"
2
/
1
5
"
4
/
3
15
"
12"
7
/
20
8
"
3
/
4
"
385
785
210-230
250-290
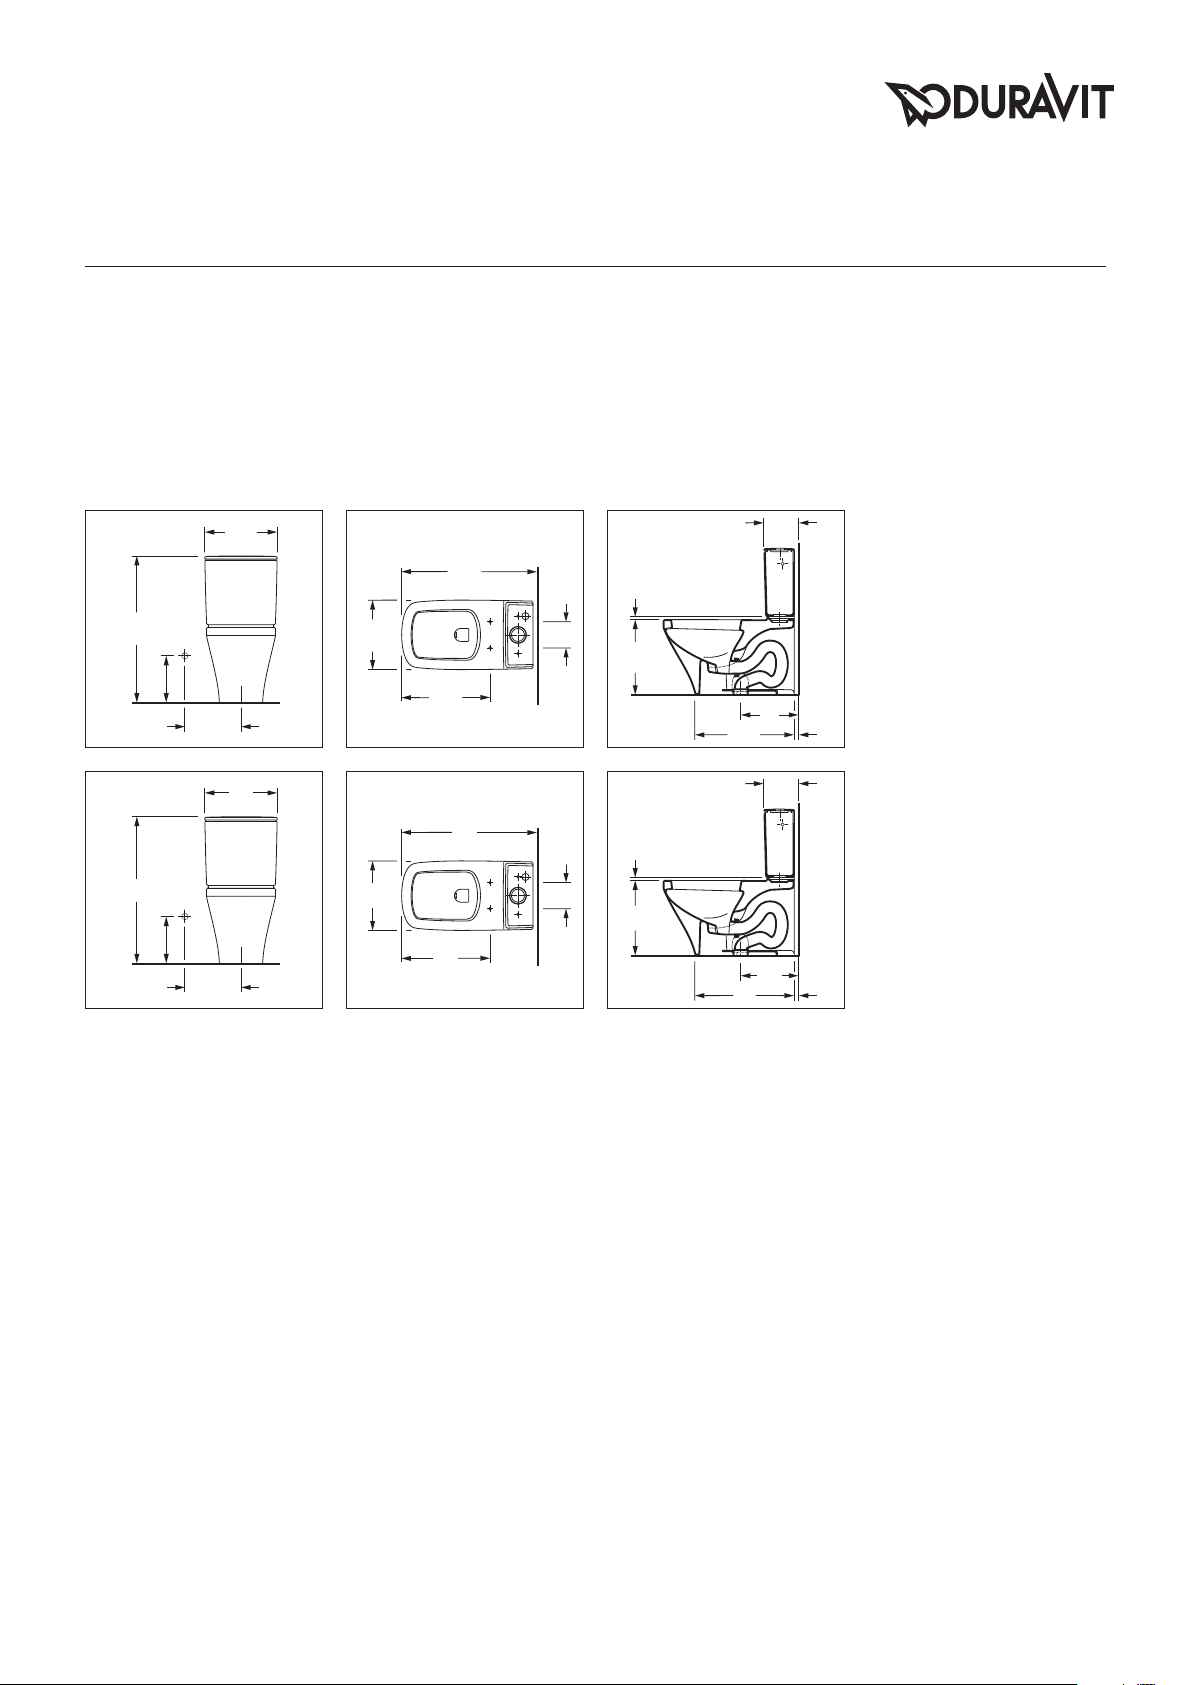
BEFORE YOU START:
Please take a few minutes to read
the following installation instructions.
Your new two-piece water toilet is a
(HET) high-efficiency toilet (1.32 gpf /
0.92 gpf; 5.0 lpf / 3.5 lpf).
For a safe and efficient operation of
the two-piece water toilet a water
pressure between minimum 20 psi
(140kPa) and maximum 80 psi
(550kPa) must be respected. When
installed in accordance with these
restrictions it meets the perfomance
requirements of ASME Specification
A 112.19.2 - 2008; 112.19.14 2006 / CSA B 45.1 - 08 GB 6952 -
2005.
720
370
140
470
ANTES DE EMPEZAR:
Tómese algunos minutos para leer
las siguientes instrucciones de instalación.
Su nuevo inodoro de dos pieza es
un inodoro de elevada eficiencia
(HET - high efficiency toilet, 5.0 lpf /
3.5 lpf).
Para que el inodoro de dos piezas
funcione de forma segura y eficiente,
se requiere una presión mínima de
agua de 20 psi (140 kPa) y máxima
de 80 psi (550kPa). Si se instala
conforme a estas especificaciones,
se cumplirán los requerimientos
establecidos en la especificación
ASME A 112.19.2 - 2008; 112.19.14
- 2006 / CSA B 45.1 - 08 GB 6952-
2005.
170
15
400
305
530
20
୍൚τሔఴ"
൚ఴ౯୍߄࠲ٺᇙ൏࡞ᄎ؇ၢ༶
τሔනଃඇ"
୍ܚઠ֬ྔٺ฿ቝѓఝ၉ংۡཹ
ቝѓఝ(1.32 gpf / 0.92 gpf; 5.0 lpf /
3.5 lpf).
ເГᆪٺ฿ቝѓఝ֬τࠪႼཹ֬
ҧቛƗ࣐ඪ৶шᇌᄤቒֵເ
20Ї١ႎձ(140kPa)თቒۡເ
80Ї١ႎձ(550kPa)ᆴ࡞è
֙નቇၢഏඔ֬း౷൏Ɨӈ
֬ྦࢃչ֥ASME A 112.19.2 -
2008; 112.194 - 2006 / CSA B
45.1 - 08 GB 6952-2005݆֬း
౷
4 MAL_56800/05.13.1
Page 5
Shut-off valve
Llave de paso
4"-9"
ܸхً
7
3
/
8"-11
/
9
250-290 mm
8"
180°
1
/
8
210-230 mm
305 mm
12"
1 2 3 4
max. / máx.
1
/
4" / 6,5 mm
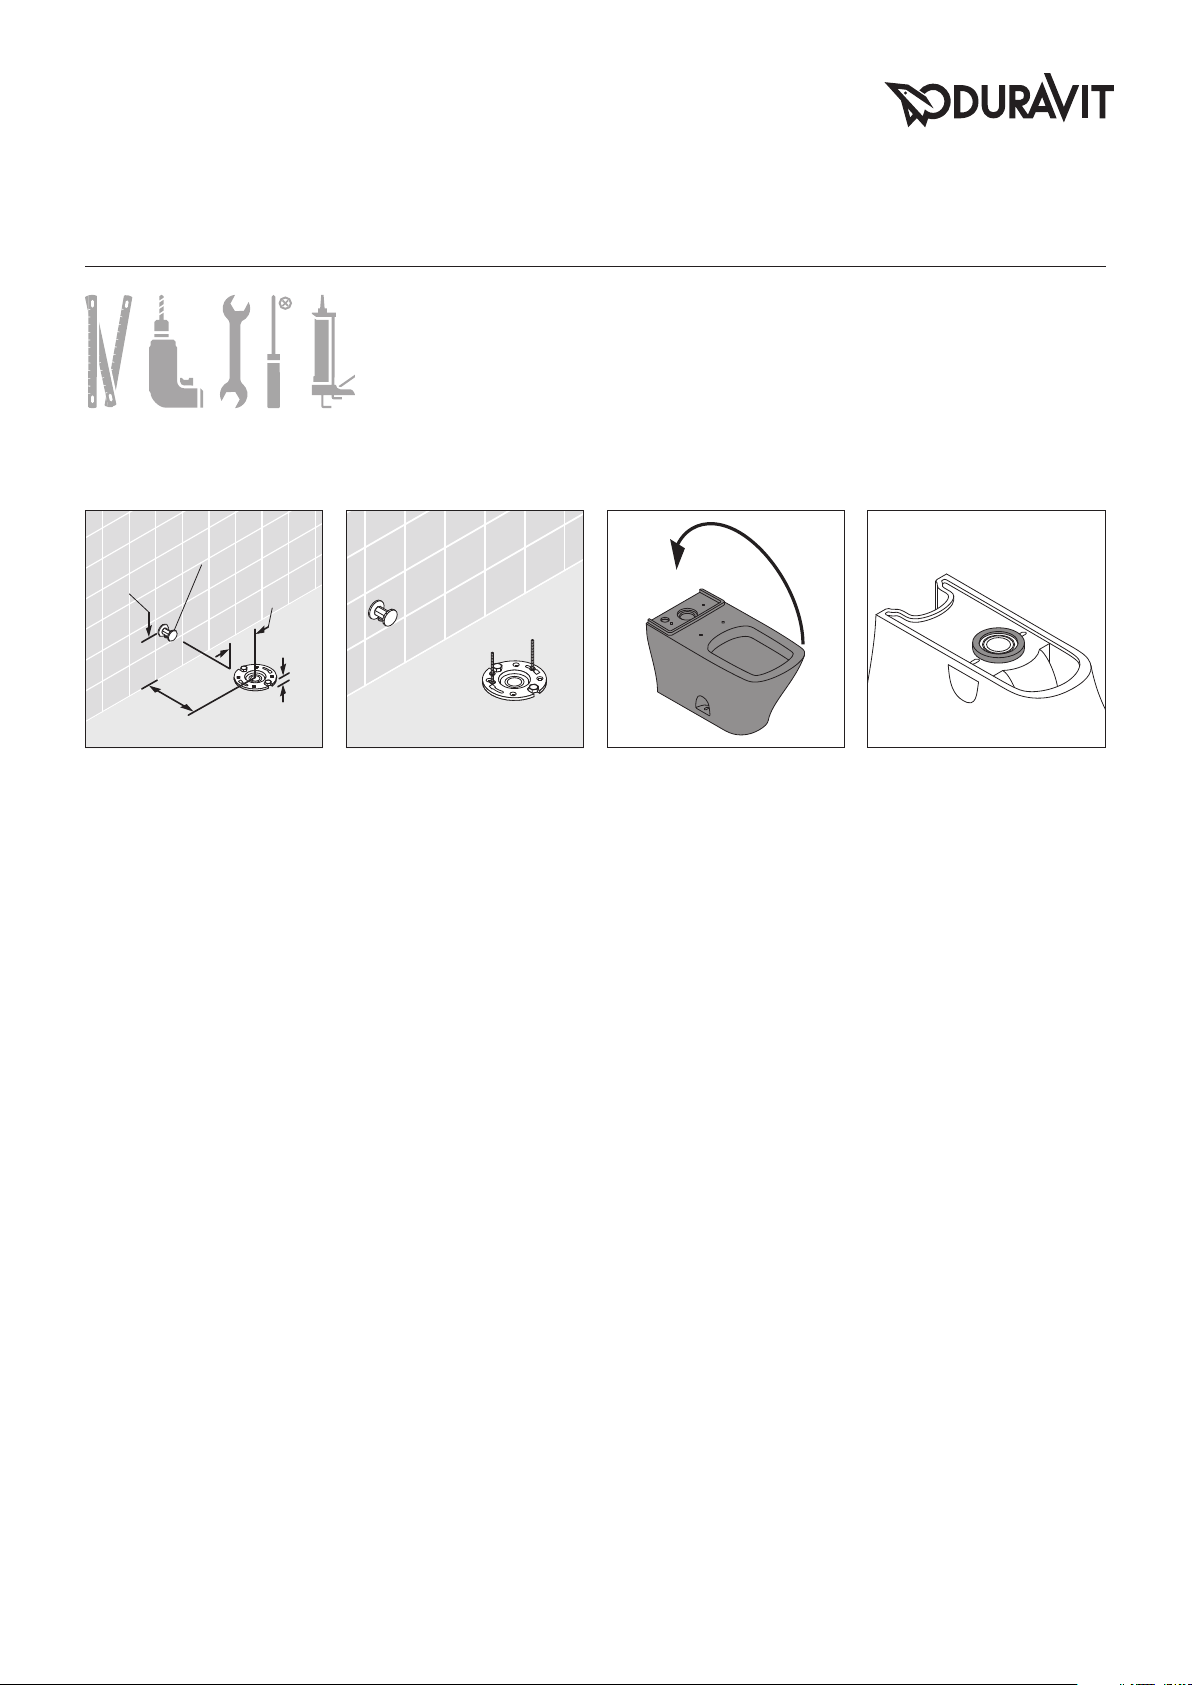
INSTALLATION OF THE TOILET
Standard US installation dimensions are indicated above.
1
The flange must not exceed
/4"/
6.5 mm above the finished floor.
INSTALACIÓN DEL INODORO
Las dimensiones estándar de instalación para los Estados Unidos
están indicadas arriba.
La brida no debe sobresalir más de
1
/4” / 6.5 mm sobre el suelo aca-
bado.
ቝѓఝτሔ"
њሠૌ൛ቝѓఝτሔԋձഏ
൜è
ٌম၉҉Әݝຢӵޱ֬׀ၢ
1
/4"/6.5mm.
ഏ
If the floor flange has not been secured to the building structure affix it accordingly using screws and
fasteners.
Install the toilet bolts at the 3 and
9 o‘clock position, equally spaced
from the finish wall.
Si la brida del inodoro no se ha asegurado a la estructura de la edificación, fíjela debidamente usando
tornillos y sujetadores.
Coloque los pernos del inodoro en
las posiciones correspondientes a
las 3 y 9 horas, con igual separación a la pared acabada.
ݛ׀ٌমેႼᄤ٣ࢀሄ൏ܬ
ƗᄼႯઋරދࡸࢃఊཔ႒ܬ
èᄤ3ᇙދ9ᇙ֬໑ᇉτሔቝ
ѓఝઋඤƗൗఊთຢӵు֬ঢ়
པְè
Put the toilet upside-down.
Coloque el inodoro en su posición
en el suelo.
ّሎቝѓఝ
Place the new wax-ring around the
outlet hole of the toilet.
Coloque la nueva junta alrededor
del desagüe del inodoro.
ᄤቝѓఝᇢຽ٩ᇉড૨چ
ߓè
MAL_56800/05.13.1 5
Page 6
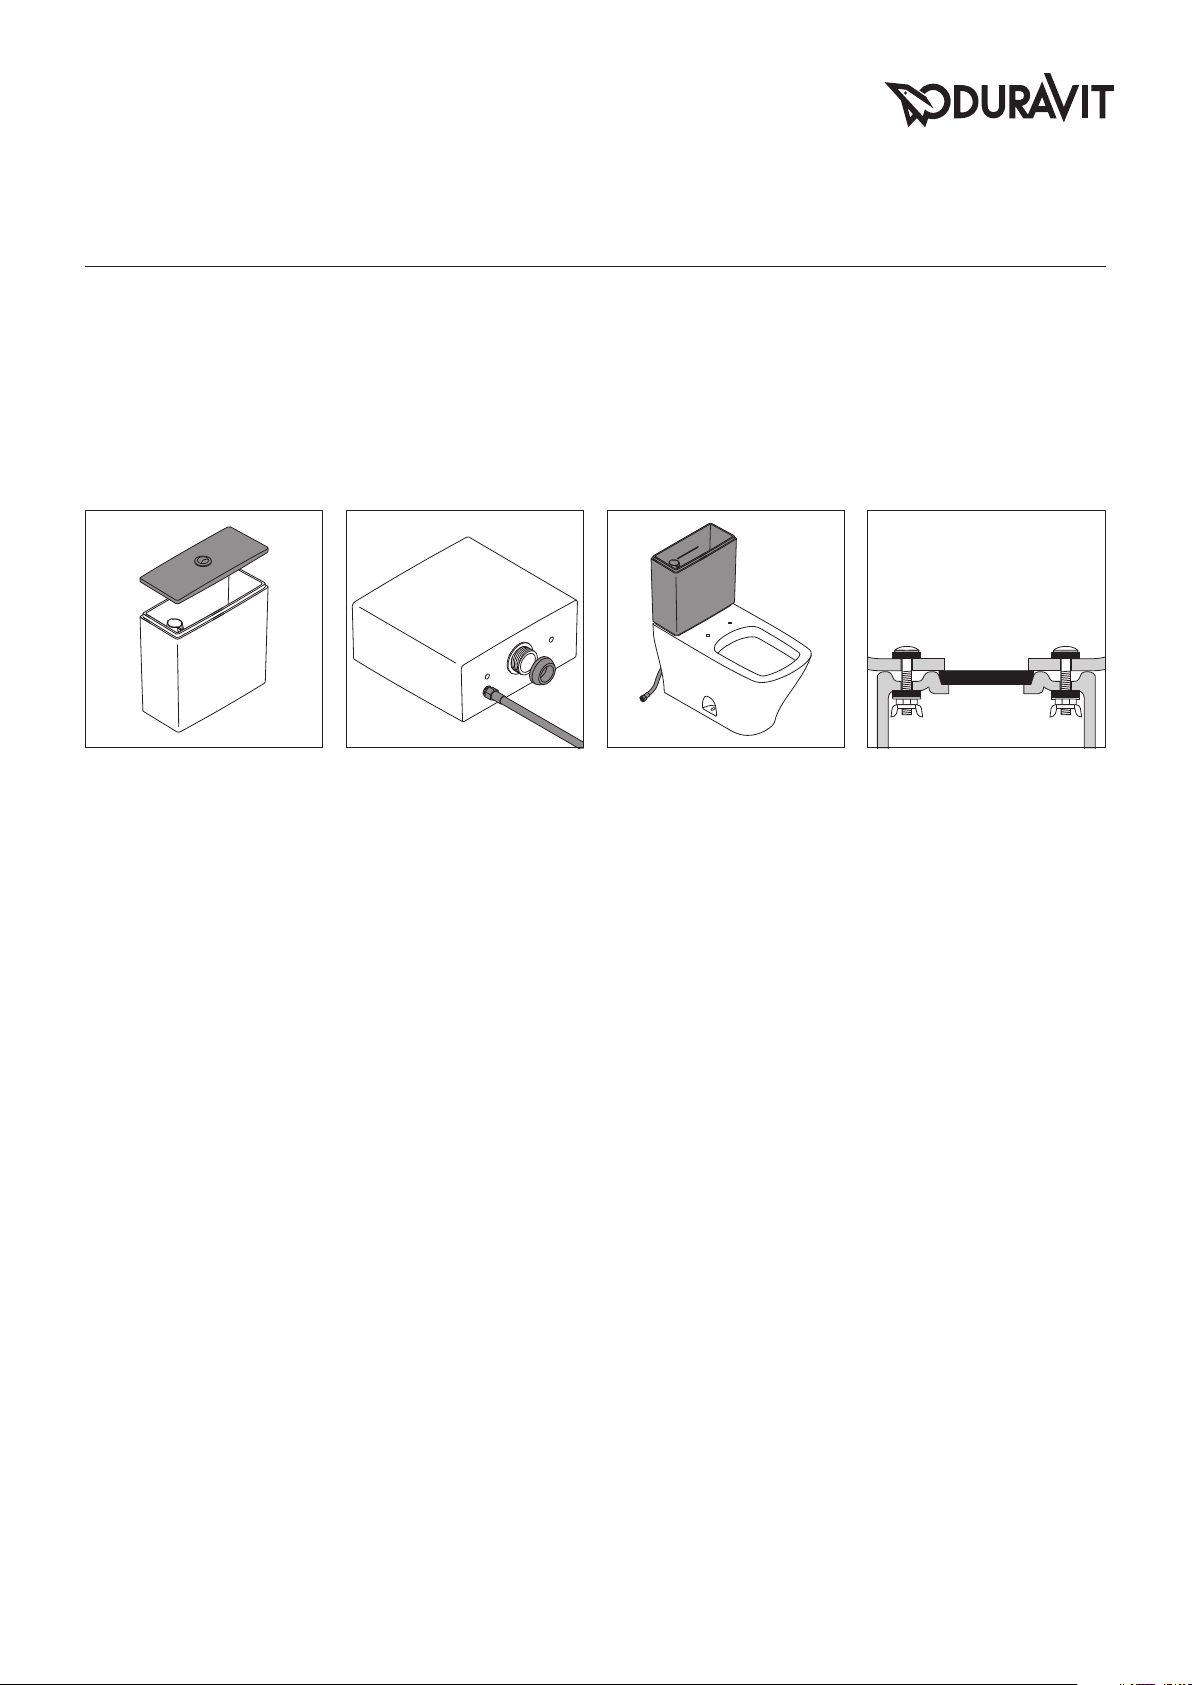
5 6 7 8
Open the tank cover carefully.
Abre la tapa de la cisterna con
cuidado.
ཱིྖռඪམۉè
Install large rubber gasket over
threaded outlet on bottom of tank.
Connect the water supply line with
the tank.
Instale una junta de goma sobre
el tubo con rosca en el fondo de la
cisterna.
Conecte el tubo de alimentación de
agua a la cisterna.
սཤಈτሔᄤඪམֿҍ֬ઋໜ
ܼԢ
Ⴏ܉ඪܼთඪམৼࢫè
Slip water supply line trough the holes (above and left side of the bowl).
Slip rubber washers over the two tank bolts. Insert the bolts through the
holes in the bottom of the tank. Lift tank onto bowl, carefully aligning the
tank bolts with the holes in the bowl. Set tank in place. From beneath the
bowl assembly the rubber washers, metal washers and nuts onto the tank
bolts. Push down on one side of the tank and tighten the nut on that side.
Do the same on the other side.
Coloque el tubo de alimentación a través del agujero (arriba y lado
izquierda del inodoro). Coloque la junta de goma en los tornillos de la
cisterna. Inserte los tornillos a través de los agujeros en el fondo de la
cisterna. Coloque la cisterna sobre el inodoro de forma que los tornillos
de la cisterna entran en los agujeros del inodoro. Desde abajo del inodoro
coloque sobre el tornillo la junta de goma, la arandela metálica y la tuerca.
Empuje la cisterna hacia abajo y atornille la tuerca en un lado. Después
haga lo mismo en el otro lado.
ࢃ܉ඪܼԳݝቝѓఝഏ֬ಓދҮ֬èಃ༶ඪམઋඤ֬ཤಈè
ࢃઋඤҳ್ඪམֿҍ֬ઋඤèࢃඪམ٩ᇉᄤቝѓఝഏƗሴ༬ؚઋඤࠪઋ
ඤè՝༶སഏᄤઋඤഏ၎τሔƥཤಈƗࣈඒಈၢࠪઋઽèট༶ઋ
ඤѰ୩࣌ઋઽƗບ၉яဩՕè
6 MAL_56800/05.13.1
Page 7
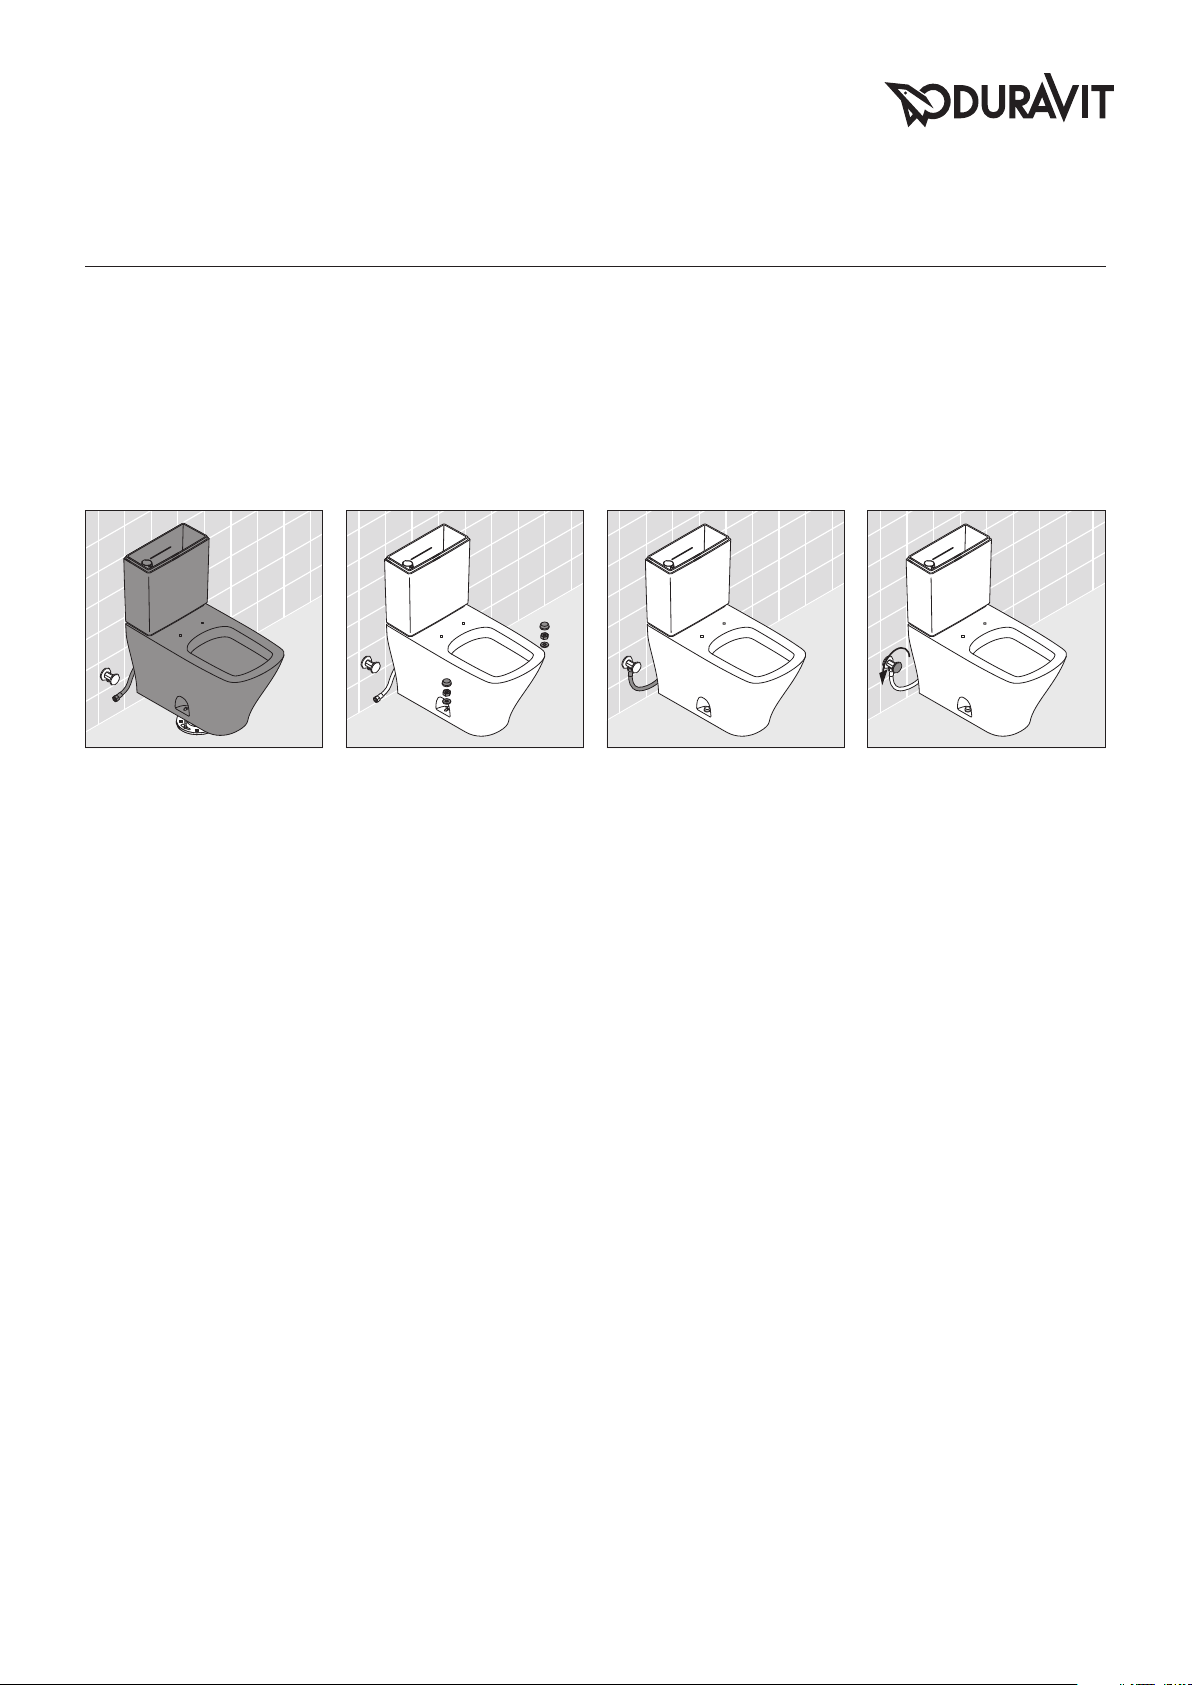
9 10 11 12
Position toilet with a rocking motion,
press bowl down fully on wax-ring
and flange.
Coloque el inodoro con un movimiento giratorio y empújelo dentro
la junta y la brida.
ࢃቝѓఝؚሠ໑ᇉƗѰߪቝѓ
ఝƗൗড૨چߓԐٺ࣌׀
ٌমè
Alternately tighten nuts until toilet
is firmly seated on floor.
Apriete de forma alternativa las
tuercas hasta que el inodoro queda
firmemente sentado en el suelo.
เഏ࣌ઋઽᆷ֥ቝѓఝໞܬ׀ሔ
ᄤ׀ഏè
Connect the water supply line with
the shut-off valve.
Conecte el tubo de alimentación de
agua a la llave de paso.
ࢃ܉ඪܼთ܉ඪًৼࢫè
Turn on the water at the shut-off
valve.
Abra la alimentación de agua con la
llave de paso.
ռ܉ඪً
MAL_56800/05.13.1 7
Page 8
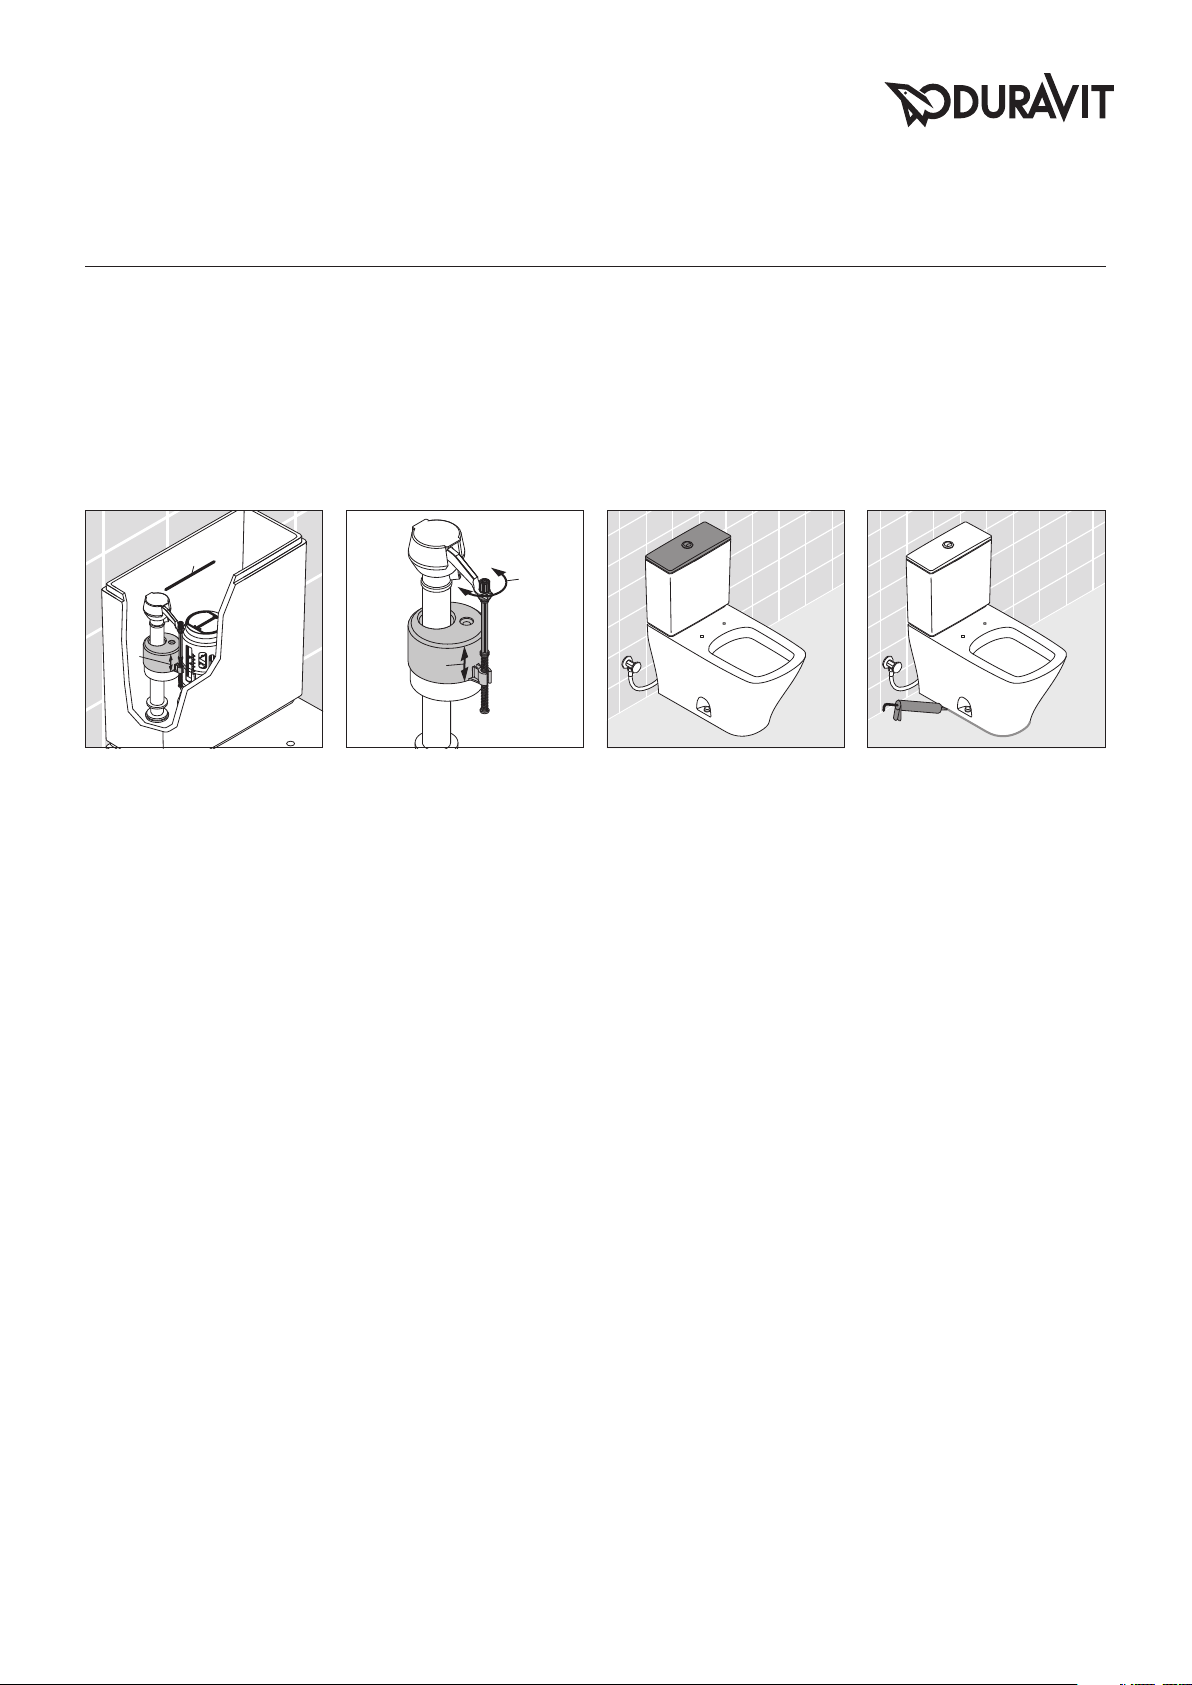
1
1
2
13 1514 16
The tank water level is factory set and should rise to the water level mark (1).
If it is not at this level, adjust the fill valve (2) to set the water line to the
indicated mark.
El nivel de agua de la cisterna viene ajustado de fábrico y debe llegar hasta
la demarcación (1). Si no está a este nivel, use el dispositivo de ajuste (2)
de la válvula de llenado para que llegue a la marca indicada.
ඪམ֬ඪ໑ན(1)܄ӓന֬႒չ֥ඪ໑њࡁ໑ᇉݛ҉ᄤඪ໑ནןࢲ
Ԑඪً(2)ࢃఊനᄤᆾ֬ඪ໑ནഏè
2
Flush the tank at least three times
and check it for leaks. Also check if
the flush mechanism works properly.
Rellenar el tanque por lo menos
tres veces y controlar si pierde
agua. También hay que comprobar
si el mecanismo funciona correctamente.
ᇇങԑ༨ቝѓఝƗࡦҷڕ
ඪèࡦҷԑ༨ሔᇉڕ܄ቛᆥӏè
It is recommended that the fixture
be sealed around its base using silicone sealant.
Es recomendable sellar el inodoro
alrededor de su base usando silicona.
ࢀၷӈֿቝᇢຽႯѱ৷૨چè
8 MAL_56800/05.13.1
Page 9
WARNING!
- Product is fragile. To avoid personal injury or breakage, handle with
care.
- Carefully inspect the new toilet for damage before installation.
- Risk of product damage. Overtightening may cause breakage or chipping
of vitreous china.
- Risk of external leakage. Do not lift or rock the bowl after placement. If
you break the watertight seal, you must install a new wax seal.
IF AN OLD TOILET HAS TO BE REMOVED:
- Close toilet supply valve and flush tank completely. Towel or sponge
remaining water from tank and bowl.
- Disconnect and remove supply line. If replacing valve, shut off main
water supply, firstly!
- Flush the toilet.
- Sponge out all remaining water from the tank.
- Remove the old tank and bowl.
- Plug floor waste opening to prevent escaping sewer gases.
- Remove toilet bolts from flange and clean away old wax, putty etc.
from base area. Mounting surface must be clean and level before
new toilet is installed.
- Toilet flange must be clear of all debris, etc.
- Drain pipe must be clear of obstructions.
- Floor and wall must be clean.
DO NOT USE IN-TANK BOWL CLEANERS
The use of high concentration of chlorine or chlorine related products
can seriously damage fittings in the tank. This damage can cause leakage
and property damage.
DURAVIT shall not be responsible or liable for any tank fitting failure or
damage caused by the use of in-tank bowl cleaner.
TROUBLE SHOOTING GUIDE
-Probable Cause
FILL VALVE TURNS ON/OFF
WITHOUT TOILET BEING FLUSHED
- Piston valve dirty
FILL VALVE CONTINUOUS RUNNING
- Dirty fill valve seal
- Piston valve does not seat
properly
POOR FLUSH
- Trapway is obstructed
- Supply stop is partially closed
- Venting is obstructed
- Water supply is low
- Water level is too low
NO FLUSHING
- Supply stop is closed
X Solution
X Inspect and clean
X Shut off water supply.
Open fill valve cap and clean
valve seal
X Inspect, clean or adjust piston
position
X Unclog trapway
X Open supply stop
X Clear venting pipe
X The minimum required supply
pressure is 20 psi.
Consult your plumber
X Increase water level in tank
X Open supply stop
REPLACEMENT PARTS
Fill valve # 0074116800 in combination with 3” piston valve # 0074139400
(including push button # 0075781000), hinge set for toilet seat and cover
elongated # 0061761000, SlowClose hinge set for toilet seat and cover #
0061761000, pair of bolt caps white # 0067150000, DURAVIT toilet seat
and cover elongated # 0060510000 and toilet seat and cover elongated
SlowClose # 0060590000 can be obtained from your local DURAVIT representative. Please have the model number of your water toilet available when
speaking to your Duravit representative.
CARE INSTRUCTION
For ceramic use water and a mild detergent to clean surface.
- No water in tank
X Open angle valve
MAL_56800/05.13.1 9
Page 10
ADVERTENCIA!
- El producto es frágil. Por favor, advierte que hay que tratarlo con cuidado.
- Inspeccione detenidamente el nuevo inodoro sobre posibles desperfectos antes de instalarlo.
- Riesgos de desperfectos del producto. Apretar los tornillos demasiado
puede causar desperfectos en el vitrificado.
- Riesgos de perdida de agua. No se debe tirar hacia arriba o balancear
el inodoro, una vez colocado. Si se rompe la junta debe instalarse una
nueva junta.
EN CASO DE QUITAR ANTES UN VIEJO INODORO
- Cierre la válvula escuadra y la cisterna. Quite el agua del inodoro o cisterna con un trapo o esponja.
- Desconecte y quite el tubo de alimentación. En caso de reemplazar la
válvula escuadra debe cerrar la llave principal de agua.
- Accione la descarga.
- Quite todo el agua restante de la cisterna.
- En caso de quitar antes un viejo inodoro.
- Cierre el agujero en el suelo para evitar que escapen gases de las alcantarillas.
- Quite los tornillos de fijación de la brida y limpie la vieja junta, masilla
etc. en el suelo. La superficie para instalar el nuevo inodoro debe ser
limpia y nivelada.
- La junta de cierre debe ser limpia y sin suciedad etc.
- El tubo de desagüe debe estar limpio y sin obstrucciones.
- La pared y el suelo deben estar limpios.
GUÍA PARA LA ELIMINACIÓN DE FALLOS
-Causa probable
LA VÁLVULA DE LLENADO SE
CIERRA/ABRE SIN HABERSE
ACCIONADO EL LAVADO
- La válvula de descarga está
sucia.
LA VÁLVULA DE LLENADO NO
CIERRA
- Junta de la válvula de llenado
sucia
- La válvula de descarga no cierra
debidamente
DESCARGA DEFICIENTE
- El conducto de descarga está
obstruido
- El obturador de la alimentación
está parcialmente cerrado
X Solución
X Revisar y limpiar
X Cierre la alimentación de agua.
Abra la cubierta de la válvula de
llenado y limpie la junta de la
válvula
XRevise, limpie y ajuste la posición
de la válvula de descarga
XDesatasque el conducto de
descarga
XAbra el obturador de
alimentación
NO USE PRODUCTOS LIMPIADORES QUE SE COLOCAN DENTRO DE LA
CISTERNA DEL INODORO.
La utilización de productos con una alta concentración de cloro o productos
clorados pueden dañar gravemente las griferías en la cisterna. Esto puede
causar fugas de agua y daños a la propiedad.
DURAVIT no se responsabiliza por fallos en las griferías de la cisterna ni
por daños ocasionados por el uso de productos limpiadores de inodoros en
el interior de la cisterna.
REPUESTOS
La válvula de llenado # 0074116800 en combinación con válvula de
descarga 3“ # 0074139400, (incluido el pulsador # 0075781000),
set de bisagras para asiento y tapa alargada # 0061761000 de inodoro, el
kit de SlowClose para fijar la tapa y el asiento del inodoro # 0061761000
y dos tornillos con embellecedores blancos # 0067150000 pueden adquirirse
en el establecimiento del agente comercial local de DURAVIT.
Tenga a mano el número del modelo de su inodoro al dirigirse a su representante DURAVIT.
INSTRUCCIONES PARA EL CUIDADO
Para limpiar las superficies cerámicas use agua y un detergente suave.
- El sistema de ventilación está
obstruido
- La alimentación de agua es
deficiente
- El nivel del agua es demasiado
bajo
LA DESCARGA NO FUNCIONA
- El obturador de la alimentación
está cerrado
- Sin agua en el tanque
XLimpie la tubería de ventilación
XLa presión mínima de alimenta-
ción requerida debe ser igual a
20 psi.
Consulte a su fontanero
XAumentar el nivel de agua en el
tanque
XAbra el obturador de
alimentación
XAbrir la válvula ángular
10 MAL_56800/05.13.1
Page 11
ࣥۨ
- ӈၥèເь૮ӈ௬෬ѰഋࠪಭഭτƗ౯ཱིྖϳ
- τሔఴ౯ሴ༬ࡦҷӈႼ෬ߑ
- ݝ؎୩࣌ઋර֤ᇈฯՓ௬
- ເь૮സƗ౯༆ᄤτሔຢпޱုࠎ൲ϳቝѓఝèݛ૨چಈ҉
ཱིྖ෬ߑƗш۾ྔ
Ҿྈࣿ֬ቝѓఝ
- ܸх܉ඪࠪԑඪًƗՕ൏ቝѓఝୄಶಝႼඪ
- Ҿ༶܉ඪܼࠪৼࢫࡸ
- ԑࣱቝѓఝ
- Ⴏݡ૬༒ۋඪམുඪځ
- Ҿྈඪམࠪቝѓఝ
- ؈ഏ༶ඪ֨ၢ૮ఞບྋ
- Ҿ༶ٌমഏ֬τሔઋඤѰ౩ԩ૨چডèᄤτሔྔ֬ቝѓఝᆴఴƗτሔѝ
шຢ౩ࢸࠪᆣ
- ౩ࢸτሔٌম
- ౩ԩඪܼୄ༅
- ౩ࢸ׀ࠪు
ܪᅷࢺպ
-نഺܪᅷࠪჷႀ
Ԑඪًܸؾቝѓఝેԑඪ
- ࠊೝ൛ඪًᄪ
Ԑඪًৼ࿊Ԑඪ
- Ԑඪً૨چᄪ
- ඪًߴڶ҉֥໑
ԑඪྦҼ
- ඪ֨ቌೝ
- ܉ඪًҍځܸх
- ֨ൺቌ
XࢺϾٌ
Xࡦҷދ౩ࢸඪً
Xܸх܉ඪًռԐඪًઽѰ౩ࢸ
ً૨چè
Xࡦҷç౩ࢸދןᆣඪً໑ᇉ
X౩ԩඪ֨ᅷο
Xռ܉ඪً
X౩ԩ֨ᅷο
҉ൗႯམୄቝѓఝ౩ࢸ࠻
ඪམୄൗႯۡ୰؎֬ࠪఊཔܸӈ߽ᇞ෬ߑࡸ ۅ෬ߑ߽ᄶӵඪࠪ
၉Ӹ؎֬௬ߑè
؋টໂาؚൗႯۅᇜቝѓఝ౩ࢸ࠻ᄶӵ֬ರތࡸ҉܄ቛࠎ෬ߑ҉ڼᄺ
ರè
۾ߗҍࡸ
Ԑඪً#0074116800Ɨ3õࠊೝ൛ඪً#0074139400ƓЎݪ φ ୭
#0075781000Ɨಈۉ࢚֬ัࡸ#0061761000,ቝѓఝۉϷ #0061761000
ߖ࢚ሔᇉ၉ؚϩ೫ઋඤઽۉ#0067150000Ɨၢࠪ؋টໂาቝѓఝۉ
Ϸࠪಈ#0060510000ދ #0060590000՝֙׀؋টໂาࣣഌࠎքѝ
ࠍ֫èࣄ൏౯ሆଃ୍ྺ֬ྟރè
Г߀නଃ
ؚՓࡸӈႯඪࠪ໘ދ֬౩࠻౩༨ѝè
- ܉ඪฅֵ
- ඪ໑ནฅֵè
҉ԑඪ
- ܉ඪًܸх
- ඪམৡඪè
Xቒֵး౷ඪເX[Q৺༩୍ܼ֬
ళ܄
Xןᅀඪམඪ໑è
Xռ܉ඪً
Xచً࢟è
MAL_56800/05.13.1 11
Page 12

Duravit AG
Werderstr. 36
78132 Hornberg
Germany
Phone +49 78 33 70 0
Fax +49 78 33 70 289
[email protected]
www.duravit.de
Duravit USA, Inc.
2205 Northmont Parkway
Suite 200
Duluth, GA 30096
Phone +1 770 931 3575
Fax +1 770 931 8454
[email protected]
www.duravit.us
Duravit Shanghai Sales Center
Suite B-d, 10/F Jiu Shi Tower
No. 28 Zhongshan Road South
Shanghai P.C. 200010
Phone +86 21 63309922
Fax +86 21 63304808
[email protected]
www.duravit.cn
Best.-Nr. 56800/05.13.1 We reserve the right to make technical improvements and enhance the appearance of the products shown.
 Loading...