

Page 1
Leben im Bad
Living bathrooms
DuraStyle
# DS 6380
Installation instructions
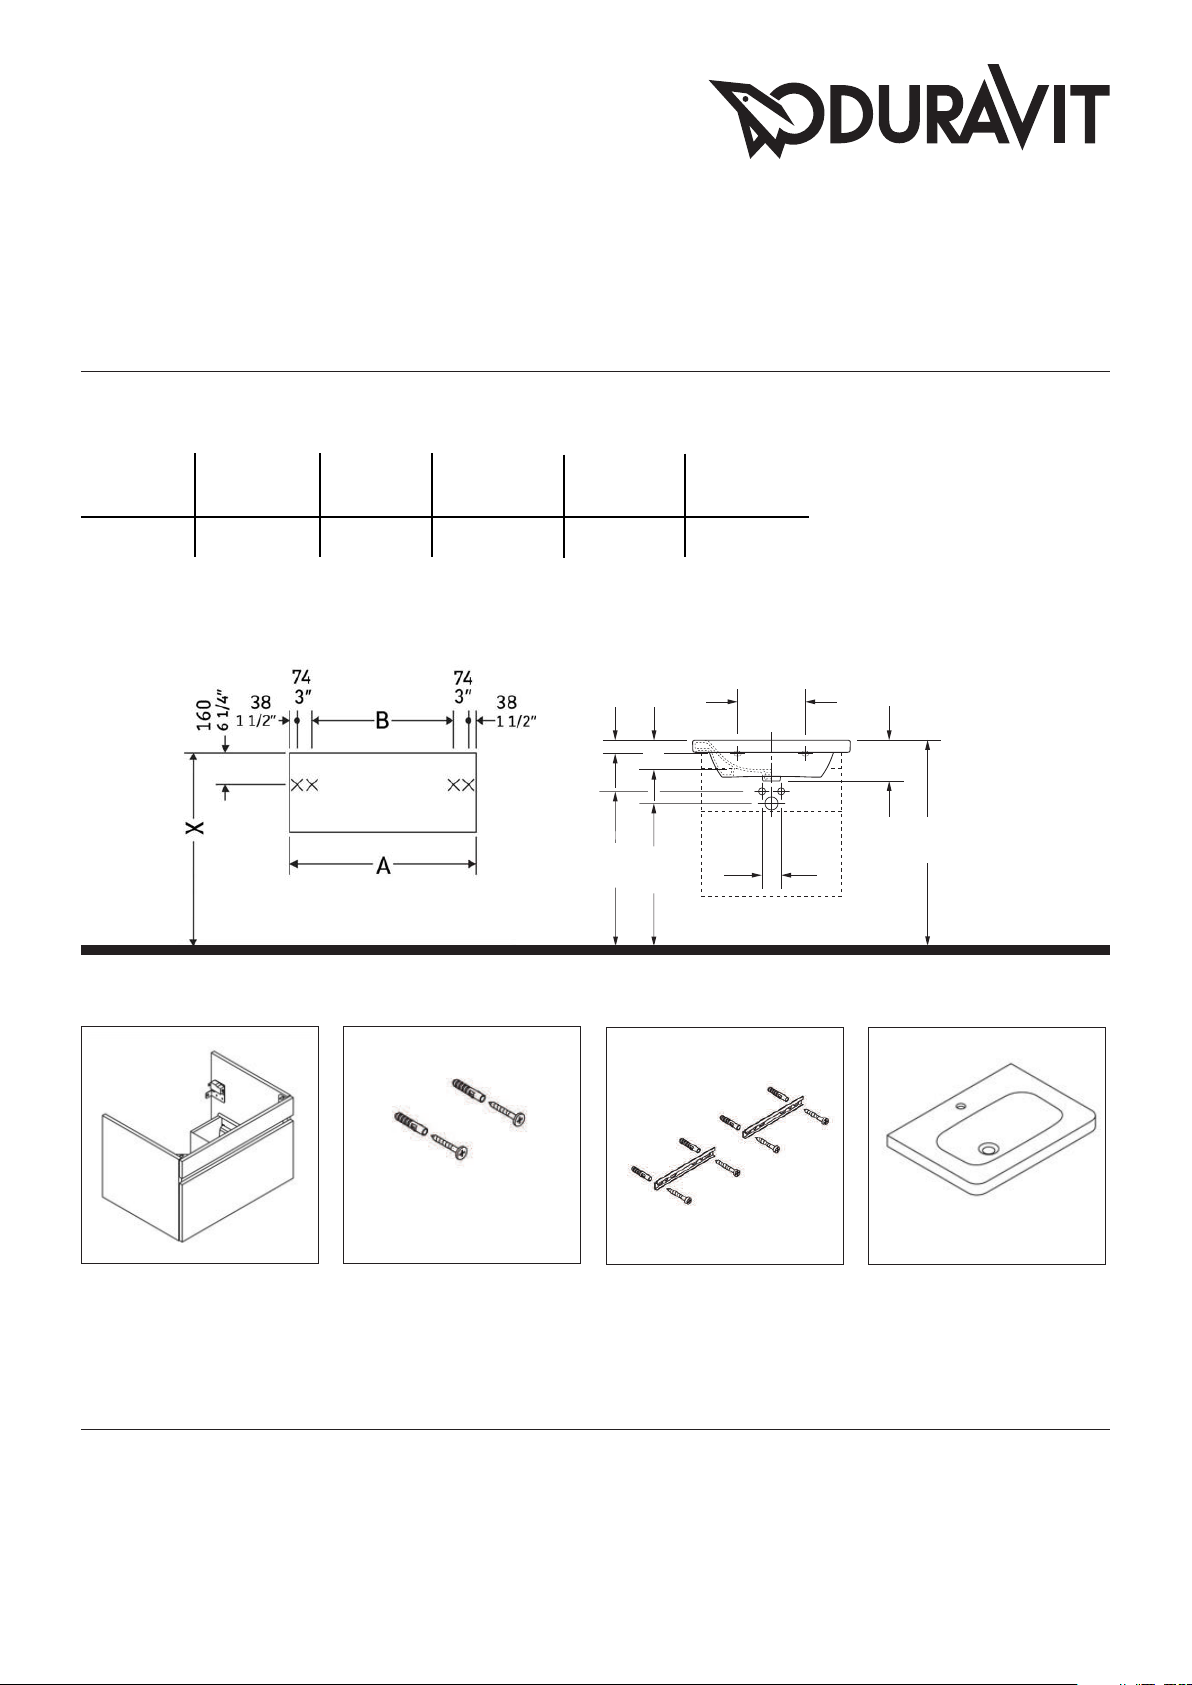
A A B B X X
mm inch mm inch mm inch
580 22 7/8” 355 14” 790 31 1/8”
4 3/4”
120
2 3/8”
60
640
25 1/4”
23 1/4”
590
280
11”
80
3 1/8”
165
6 1/2”
850
33 1/2”
# 232065
2x S8
2x 5,5x50
Instructions for use
The bathroom furniture range complies with the standards and guidelines applicable at the time of delivery and is designed for use in bathrooms.
Though designed for the wet environment, direct contact with water should be avoided, for example, when showering.
We reserve the right to make technical improvments and design modifications to the products illustrated.
# F23628
2x 100
4x S8
4x 5,5x50
# F30368
# 232065
MAL_DuraStyle_DS6380/15.04.1
Page 2
1 2 3
4
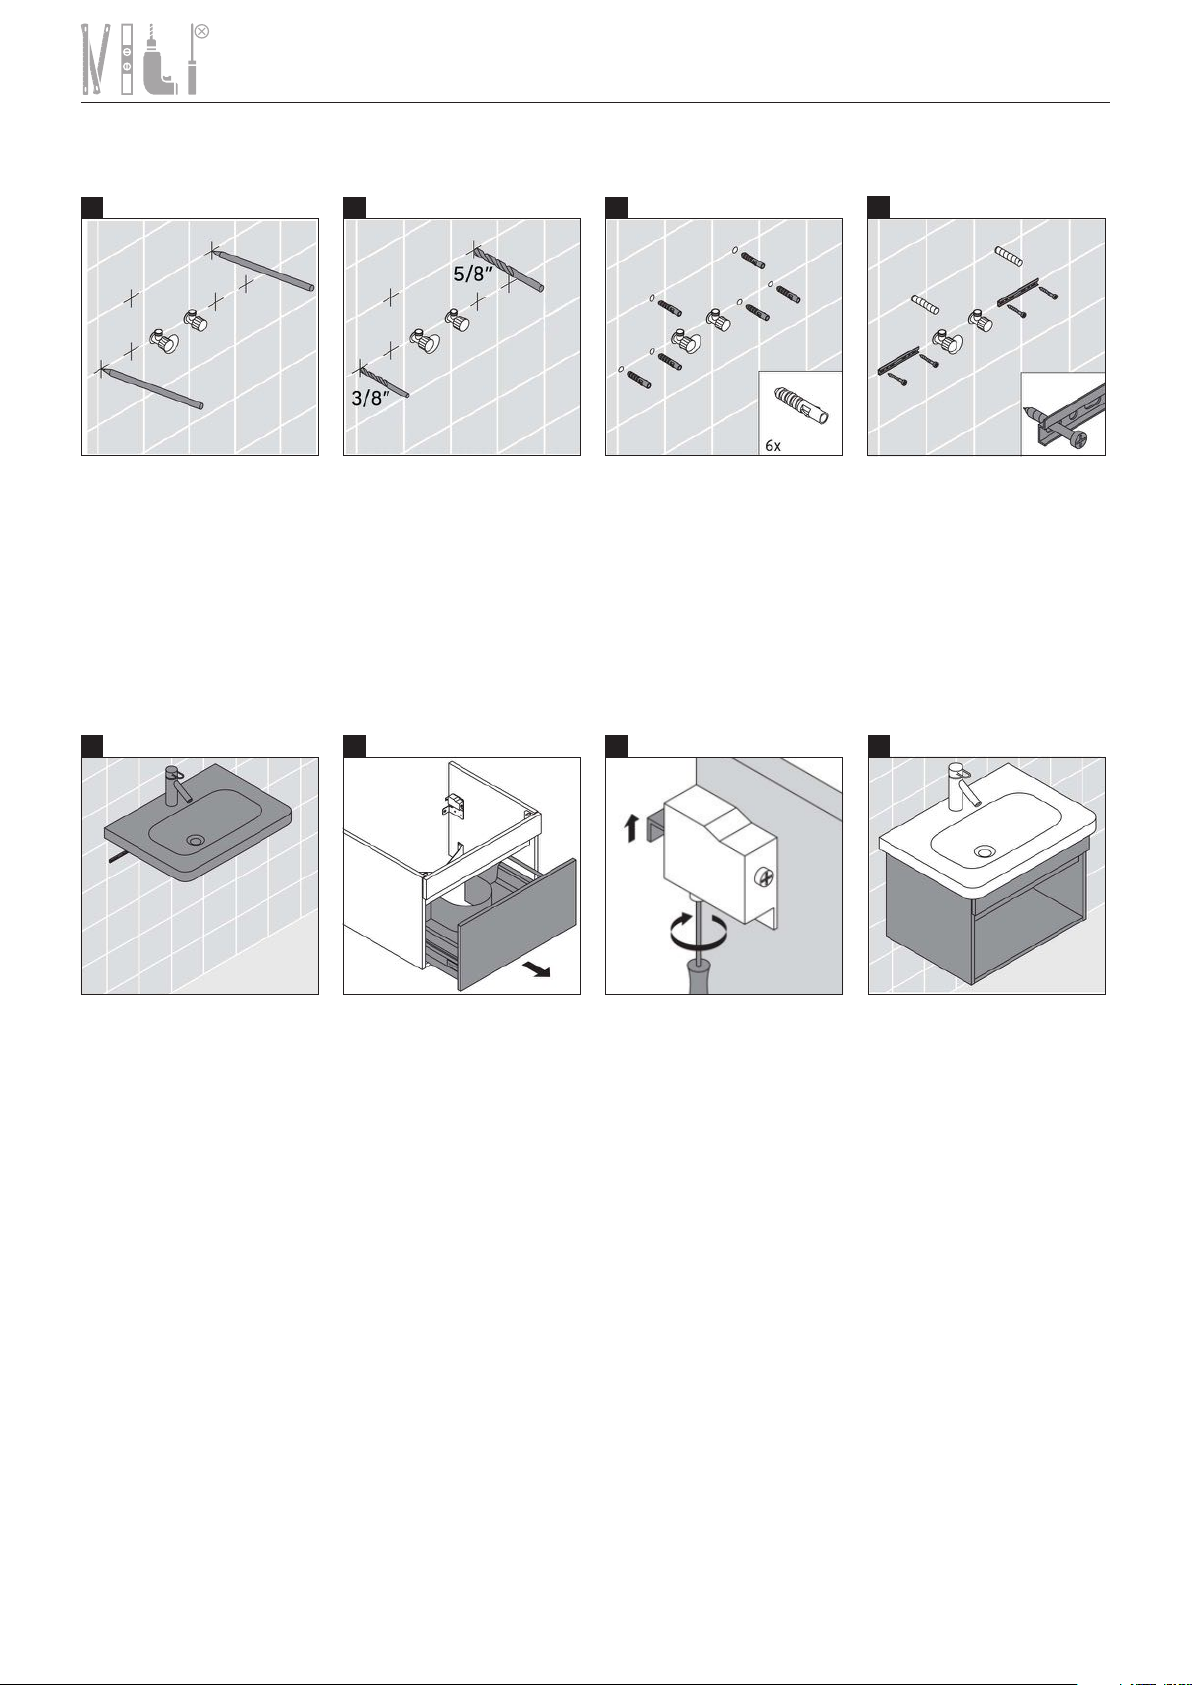
Reference the washbasin
specification to establish the
position of mounting bolts,
mark the holes to be drilled for
Using a 3/8“ and 5/8“ drill bit,
drill the anchor holes that
have been marked.
the anchors.
5 6 7
When mounting the washbasin
Remove the vanity drawer. Using a screwdriver, adjust
into a wood stud wall, there
must be adequate bracing. We
recommend doubling up 2 x 6’s
or 2 x 8’s between the studs to
form a solid anchoring point.
Screw mounting bolts into the
pre drilled holes with an
adjustable wrench. Screw in
the full length of the mounting
bolt, so that the lag thread is
no longer visible. Carefully slide
washbasin onto the mounting
bolts. Insert the white plastic
sleeve over bolt and into the
hole in the washbasin. Install
provided washer and nut.
Hand tighten the nut,
so the washbasin is secure.
Install the siphon.
The plastic anchors provided
are for concrete wall
applications.
the vanity mounting hinge
system clockwise.
For wood stud walls, bolts
should be screwed into wood
backing.
8
Slide the vanity under the
washbasin.
Tighten mounting bolts with a
wrench until the washbasin
is stable.
MAL_DuraStyle_DS6380/15.04.1
Page 3
9 10 11
12
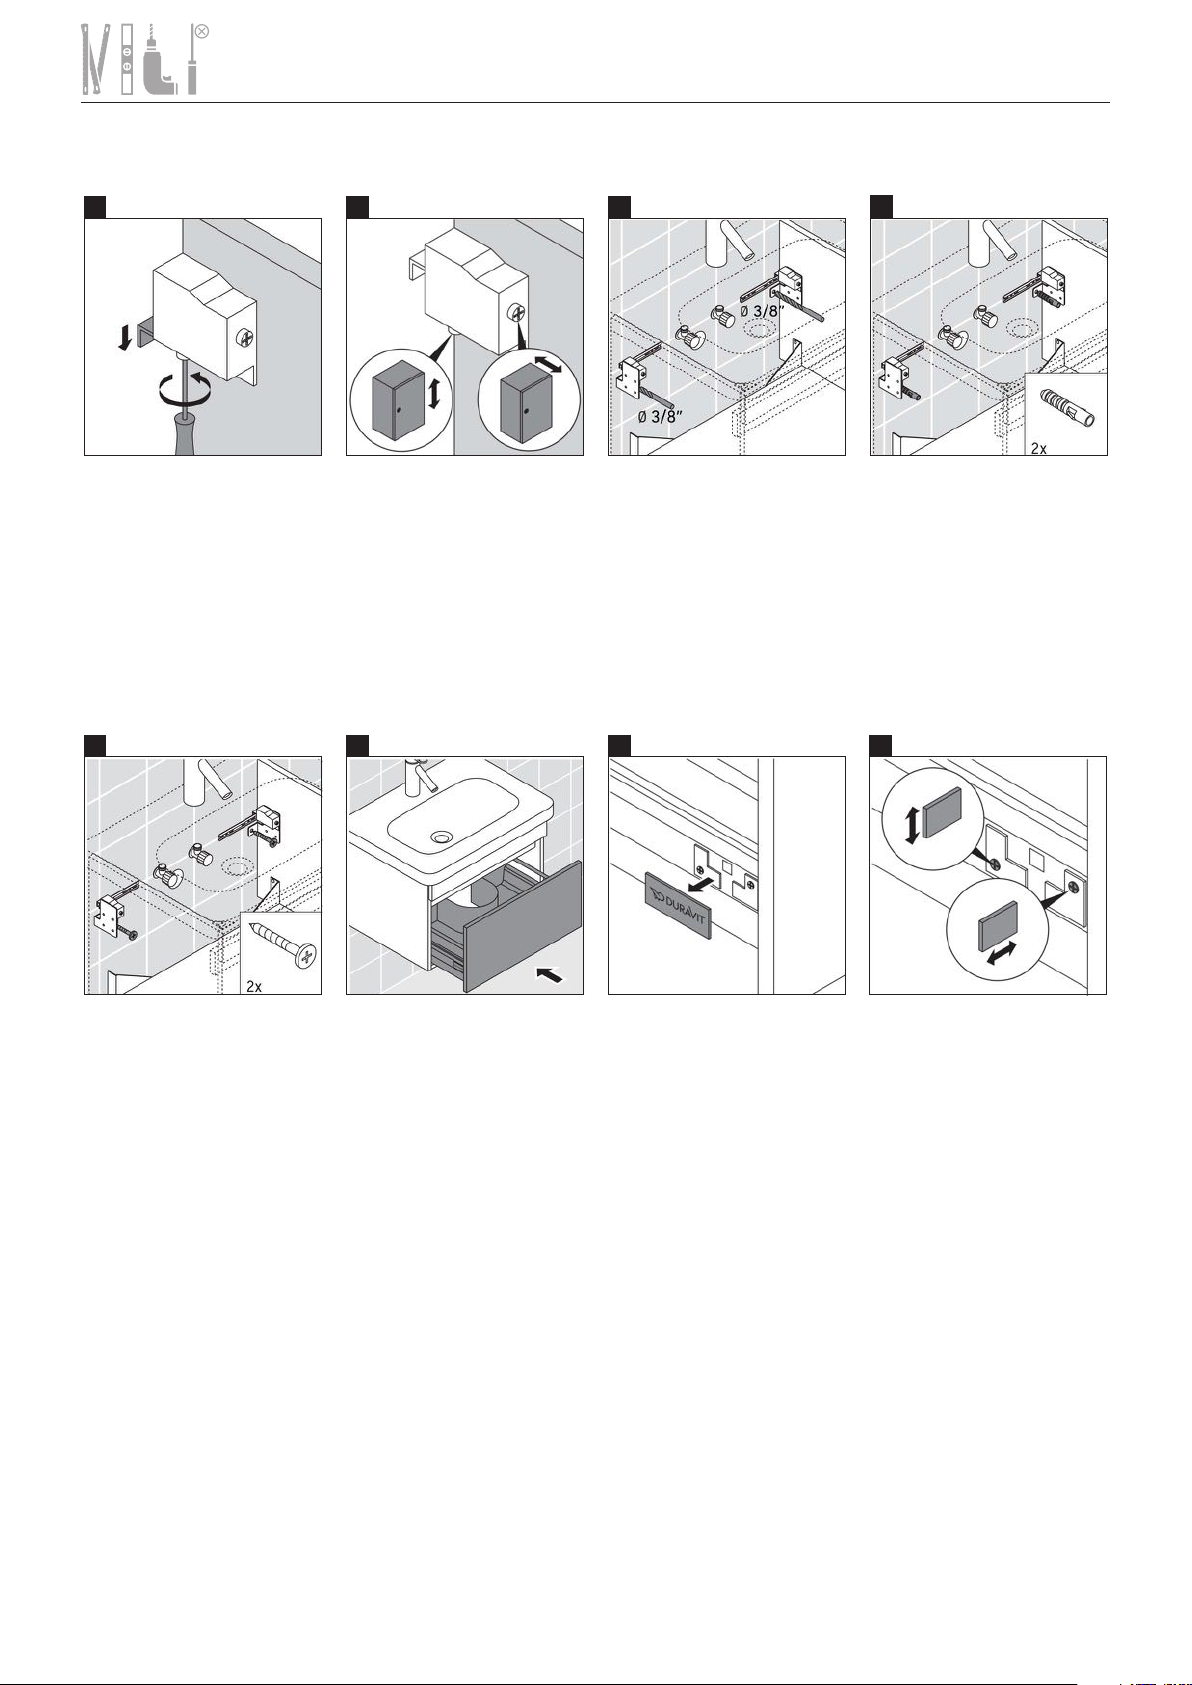
Using a crewdriver adjust the
vanity mounting hinge system
counter-clockwise.
13 14 15
For wood stud walls, bolts should
Screw two set screws until
desired leveling of the vanity
has been reached.
Install the vanity drawer. Remove plate with Duravit logo.
be screwed into wood backing.
Using the appropriate bit for
the wall material, drill pilot
holes.
The plastic anchors provided
are for concrete wall
applications.
16
Level the vanity drawer by
adjusting the two screws.
MAL_DuraStyle_DS6380/15.04.1
Page 4
17 18
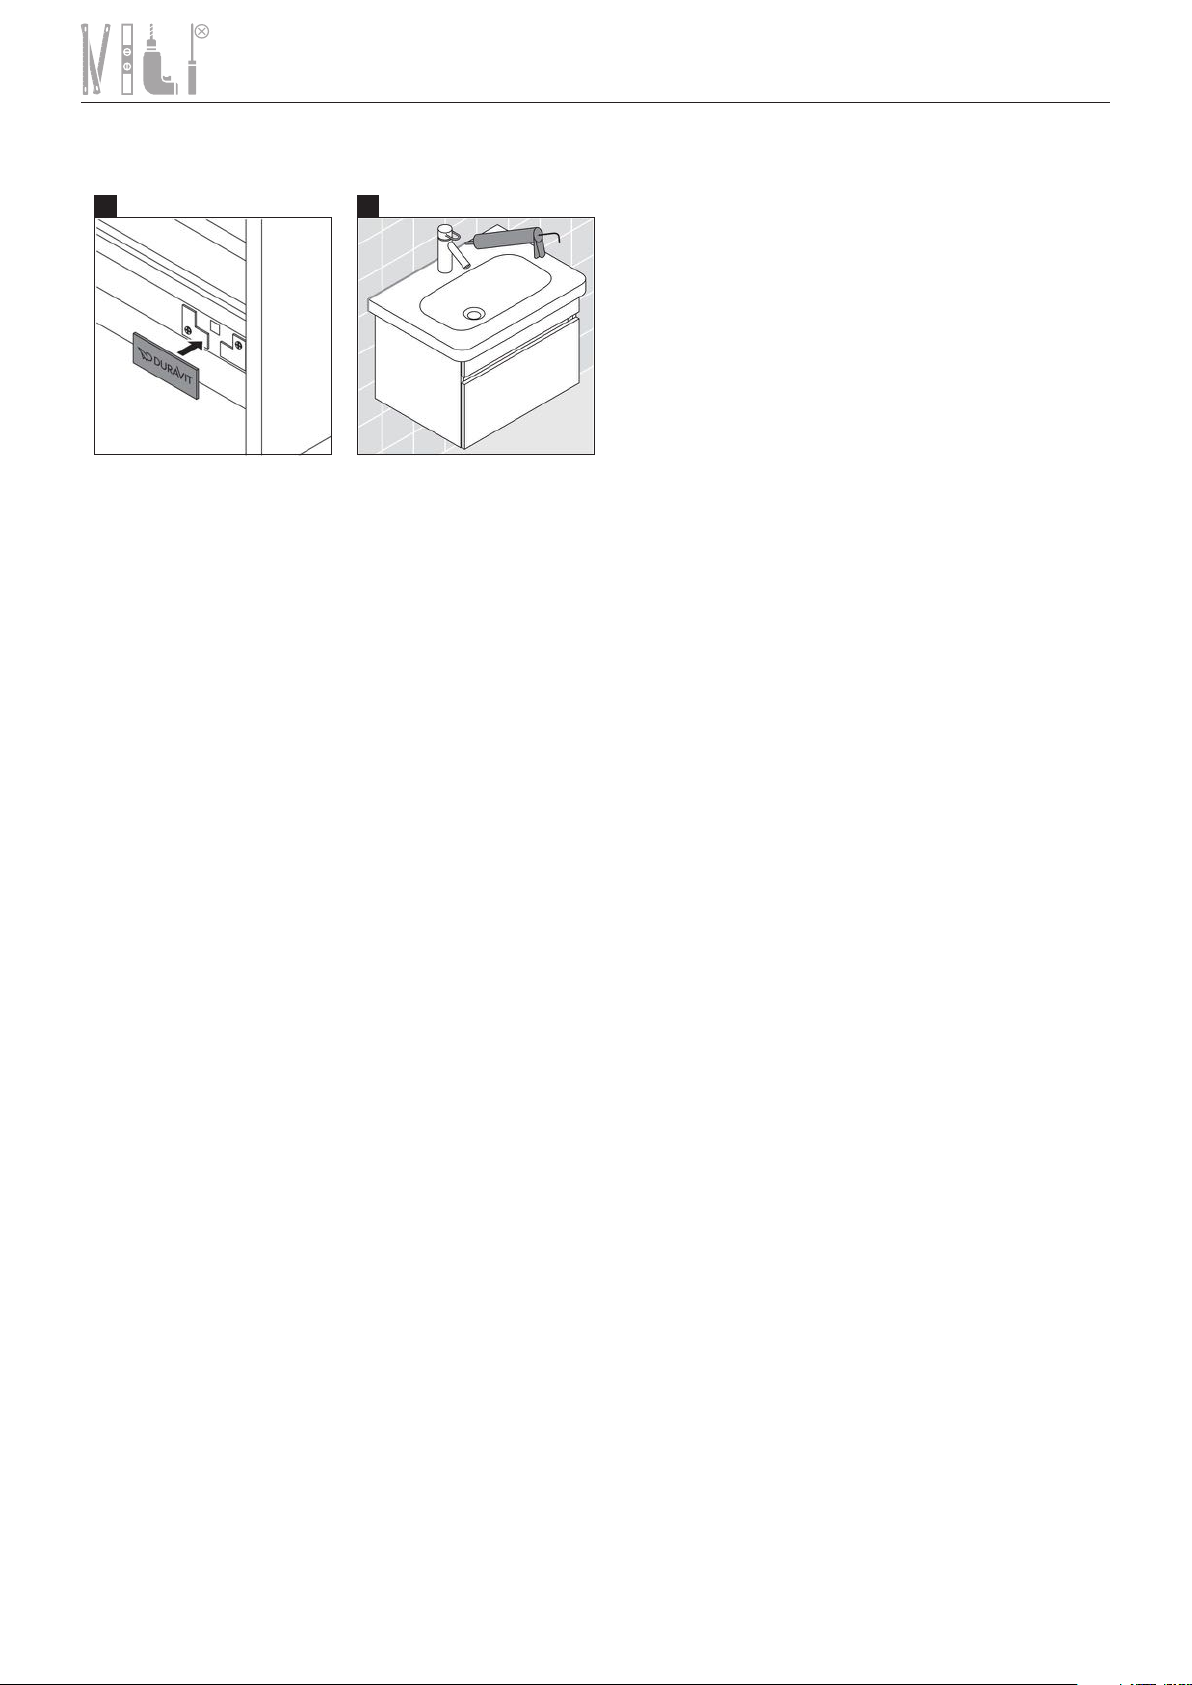
Re-attach plate with Duravit
logo.
Apply silicon bead between
washbasin and the wall.
MAL_DuraStyle_DS6380/15.04.1
Page 5

Furniture complies with applicable requirements of the referenced standard(s):
Safety Household and Commercial Furnishings (UL 962, 3rd ed. Issued: 07/07/08, Revised: 08/05/13)
Portable Luminaires CSA C22.2 No. 12 - 1982 (R2004)
IMPORTANT SAFETY INSTRUCTIONS
When using an electrical furnishing, basic precautions should always be followed, including the following:
Read all instructions before using this furnishing.
DANGER To reduce the risk of electric shock:
1. Always power down all circuits before cleaning.
WARNING To reduce the risk of burns, fire, electric shock, or injury to persons:
1.Disconnect from power before putting on or taking off parts. A minimum of two people is required to remove and
replace cabinet doors.
2. Close supervision is necessary when this furnishing is used by, or near children, invalids, or disabled persons.
3. Use this furnishing only for its intended use as described in these instructions. Do not use attachments not
recommended by the manufacture.
4. Never operate this furnishing if it has a damaged cord or plug, if it is not working properly, if it has been dropped
or damaged, or dropped into water. Return the furnishing to a service center for examination and repair.
5. Never drop or insert any object into any opening.
6. Do not use outdoors.
7. Do not operate where aerosol (spray) products are being used or where oxygen is being administered.
8. For loading always put heavier items at the bottom and not near the top in order to help prevent the
possibility of the furnishing tipping over.
MAXIMUM SHELF LOAD IN POUNDS ALLOWED: 6.61 lbs
9. To disconnect, power down all circuits.
10. Risk of Injury to Persons - do not place video equipment such as televisions or computer monitors on
furnishing.
GROUNDING INSTRUCTIONS
This product must be connected to a grounded metal, permanent wiring system, or an equipment - grounding
conductor must be run with the circuit conductors and connected to the equipment grounding terminal or lead
on the product.
ABOUT THE PRODUCT
Products requiring electricity are designed to be switched at the wall and hardwired to a circuit provided by
the customer. Product should be installed according to electrical code by a qualified technician. Read important
safety instructions carefully. Direct wetting should be avoided. This products is intended for household/residential
use only. We reserve the right to make technical improvements and to enhance the appearance of the products
shown.
SAVE THESE INSTRUCTIONS
MAL_DuraStyle_DS6380/15.04.1
Page 6

Duravit NYC
105 Madison Avenue
New York, NY 10016
Toll Free 888-DURAVIT
Phone 212-686-0033
Fax 212-686-8033
[email protected]
www.duravit.nyc
Duravit USA, Inc.
2205 Northmont Pkwy., Ste. 200
Duluth, GA 30096
Toll Free 888-DURAVIT
Phone 770-931-3575
Fax 770-931-8454
[email protected]
www.duravit.us
Best. -Nr. DS6380/15.04.1
 Loading...