

Page 1
HEAT PUMP FOR SWIMMING POOL
Installation and Instruction Manual
SCHWIMMBAD-WÄRMEPUMPE
Installations-und Bedienungsanleitung
ТЕПЛОВІ НАСОСИ ДЛЯ БАСЕЙНІВ
Інструкція з монтажу та експлуатації
POMPY CIEPŁA DO BASENÓW
Instrukcja montażu i obsługi
402-0106-170905
www.sunspring.eu
1
Page 2

Specifications / Spezifikationen / / Specyfikacje
Model Sun Spring 5 Sun Spring 7 Sun Spring 10 Sun Spring 14
Heating capacity
Power input
Maximum pool volume*
’ *
Running current
COP ** 4,75 5,6 5,2 4,75
Power supply
Moc grzewcza
Heizleistung
Moc wejściowa
Leistungsaufnahme
Maksymalna objętość basenu*
Maximale Inhalt Bad *
Prąd roboczy
Betriebsstrom
Zasilanie
Stromversorgung
kW 4,85 6,7 10,1 14,1
kW 0,8 1,05 1,7 2,65
3
m
A 4,7 5,3 8,6 13,5
V/Ph/Hz 220-240/1/50
12 20 30 45
Controller
Heat exchanger
Compressor quantity
Type compressor
Refrigerant
Refrigerant quantity
Fan quantity
Fan input power
.
Fan speed
Fan direction
Noise at 2m
2
Water connection
Water ow
Pressure drop (max.)
(.)
Protection
RCD protection
Dimensions
Unit shipping dimensions
Net/shipping weight
/
Sterownik
Regler
Wymiennik ciepła
Wärmetauscher
Liczba sprężarek
Kompressor Menge
Typ sprężarki
Kompressor
Czynnik chłodniczy
Kältemittel
Ilość czynnika chłodniczego
Kältemittelmenge
Liczba wentylatorów
Lüfter Anzahl
Moc wejściowa wentylatora
Lüfter Eingangsleistung
Prędkość wentylatora
Lüftergeschwindigkeit
Kierunek wentylatora
Lüfter Richtung
Hałas w odległości 2 m
Lärm bei 2m
Przyłącze wody
Wasseranschluss
Przepływ wody
Nennwasserdurchsatz
Spadek ciśnienia (maks.)
Wasser-Druckverlust (max.)
Stopień ochrony
Abschirmung
Zabezpieczenie RCD
Leckstrom
Wymiary
Geräteabmessungen
Wymiary opakowania
Einheit Versand-Dimensionen
Masa netto / masa brutto
Netto / Bruttogewicht
Digital with built-in diagnostics – Digital mit integrierten Diagnose –
Цифровий з вбудованою діагностикою – Cyfrowy ze wbudowaną diagnostyką
Titanium
1 1 1 1
rotary rotary rotary rotary
R410A
kg 0,60 0,90 0,90 1,7
1 1 1 1
W 70 70 80 80
tpm 950 950 1200 1200
vertical vertical vertical vertical
dB(A) 53 54 57 59
“ 1,5 1,5 1,5 1,5
m3/h
kPa 11 13 15 15
mA 10 10 30 30
L/W/H (mm) 458/472/530 458/472/530 458/472/750 458/472/750
L/W/H (mm) 500/510/580 500/510/580 500/510/800 500/510/800
kg 27/28 29/30 37/39 43/45
3 – 12 4 – 12 5 – 12 5 - 12
IP x4
* Maximum pool volume when completely insulated, with pool cover, out of the wind and in the sun.
* ’ , , , .
* Maksymalna objętość basenu chronionego przed wiatrem i słońcem, przy pełnej izolacji, z przykryciem.
* Maximale Inhalt des Pools wenn völlig isoliert, mit Pool-Abdeckung, aus dem Wind und in der Sonne.
** Measurement conditions: ambient temperature 25°C, water temperature 25°C, relative humidity 70%
** : 25°C, 25°C,
відносна вологість 70%
** Warunki pomiaru: temperatura otoczenia 25°C, temperatura wody 25°C, wilgotność względna 70%
** Messbedingungen: Umgebungstemperatur 25°C, Wassertemperatur 25 ° C, relative Feuchtigkeit 70%
2
Page 3

Table of content
1. Preface..........................................................................................................................................
2. Installation and connections..........................................................................................................
2.1 Box content.................................................................................................................................
2.2 Heat pump location....................................................................................................................
2.3 Water connections.....................................................................................................................
2.4 Electrical connection..................................................................................................................
2.5 Initial startup of the heat pump...................................................................................................
2.6 Condensation.............................................................................................................................
3. Usage and operation....................................................................................................................
3.1 The display. ..............................................................................................................................................................................
3.2 Settings of the wanted temperature...........................................................................................
3.3 The ow bar..............................................................................................................................................................
4. Maintenance and inspection........................................................................................................
4.1 Maintenance..............................................................................................................................
4.2 Trouble shooting guide.............................................................................................................
4.3 Error messaegs.........................................................................................................................
4.4 Water chemistry.....................................................................................................................................................................
4.5 Winterizing.................................................................................................................................
4.6 Spring startup............................................................................................................................
5. Warranty.......................................................................................................................................................................................
1. Preface
In order to provide our customers with quality, reliability and versatility, this product has been
made to strict producing standards. This manual includes all necessary information about
installation, debugging, discharging and maintenance. Please read this manual carefully before
you open or maintain the unit. Failure to comply with these recommendations will void warranty.
The manufacturer of this product will not be held responsible if someone is injured or the unit is
damaged, as a result of improper installation, debugging or unnecessary maintenance.
The Swimming Pool Heat Pump Unit heats the swimming pool water and keeps the temperature
constant. Our Sun Spring heat pumps have the following characteristics:
1. Durable
The heating exchanger is made of PVC & Titanium tube, which can withstand prolonged exposure
to swimming pool water.
3
3
3
4
4
4
.5
.5
.5
.5
.5
.6
.6
.6
.6
.6
.7
..7
..7
..8
2. Flexible installation
All our heat pumps are fully tested and ready for use when they leave our factory.
Simply connect swimming pool water to the heat pump en insert the electrical plug into a wall
socket.
3. Quiet operation
The unit comprises an efcient rotary compressor and a low-noise fan motor, which guarantees its
quiet operation.
4. Easy operation
The electronic control panel permits easy setting of the desired temperature. All relevant
information regarding the heat pump’s operation can be read on this display.
2. Installation and connections
2.1 Box content
The box contains the heat pump, 2 water connections and this manual. Other parts, including a
by-pass must be provided by the user/installer.
Attention: Always keep the unit straight up. If the unit has been tilted or put on his
side, allow 24h before starting the unit.
3
Page 4
2.2 Installation and connections
Install the unit outside as you can see on page 27.
The Sun Spring heat pumps are designed and constructed to provide long performance life when installed and operated properly under normal conditions. Periodic inspections are important to keep your
heat pump running safely and efciently through the years.
The following basic guidelines are suggested for your inspection:
• Make sure the front of the unit is accessible for future service.
• Keep the surrounding areas of the heat pump clear of all debris.
• Keep all plants and shrubs trimmed and away from the heat pump.
• Keep lawn sprinkler heads from spraying on the heat pump to prevent corrosion
and damage. Use a deector if needed.
• If the unit is installed under a very sharp roof pitch or under a roof without a gutter, a gutter
or diverter should be tted to prevent excessive water from pouring down onto the unit.
• Do not use the heat pump if any part has been under water. Immediately call a qualied
professional technician to inspect the heat pump and replace any part of the control system,
which has been submerged.
2.3 Water connections
The piping to and from the heat pump need to have a 50mm outer diameter and need to be glued or
clamed onto the water connections that came with the heat pump.
These pipes can be hard PVC or exible. Always install piping intended for swimming pool use and
use the correct glue to put them together.
2.4 Electrical connection
Always check if the voltage from the network corresponds with the operating voltage of the unit.
The heat pump must only operate together with the lter pump. Both should always be powered
together. Therefore, connect them to the same circuit breaker type D. The heat pump will get dama-
ged when operated without water ow and will void warranty.
Please adhere to the following guidelines for the rest of the electrical installation:
Model Power supply Circuit
breaker
Running current Cable section for
15m of cable
Cable section for
50m of cable
TYPE D
Sun Spring 5 220-240V 16A 3,5A 2,5mm
Sun Spring 7 220-240V 16A 4,6A 2,5mm
Sun Spring 10 220-240V 20A 7,6A 2,5mm
Sun Spring 14 220-240V 20A 13,5A 2,5mm
2
2
2
2
2,5mm
4mm
4mm
6mm
Values in this table are only guidelines. Check your local regulations.
Attention: Ensure good grounding
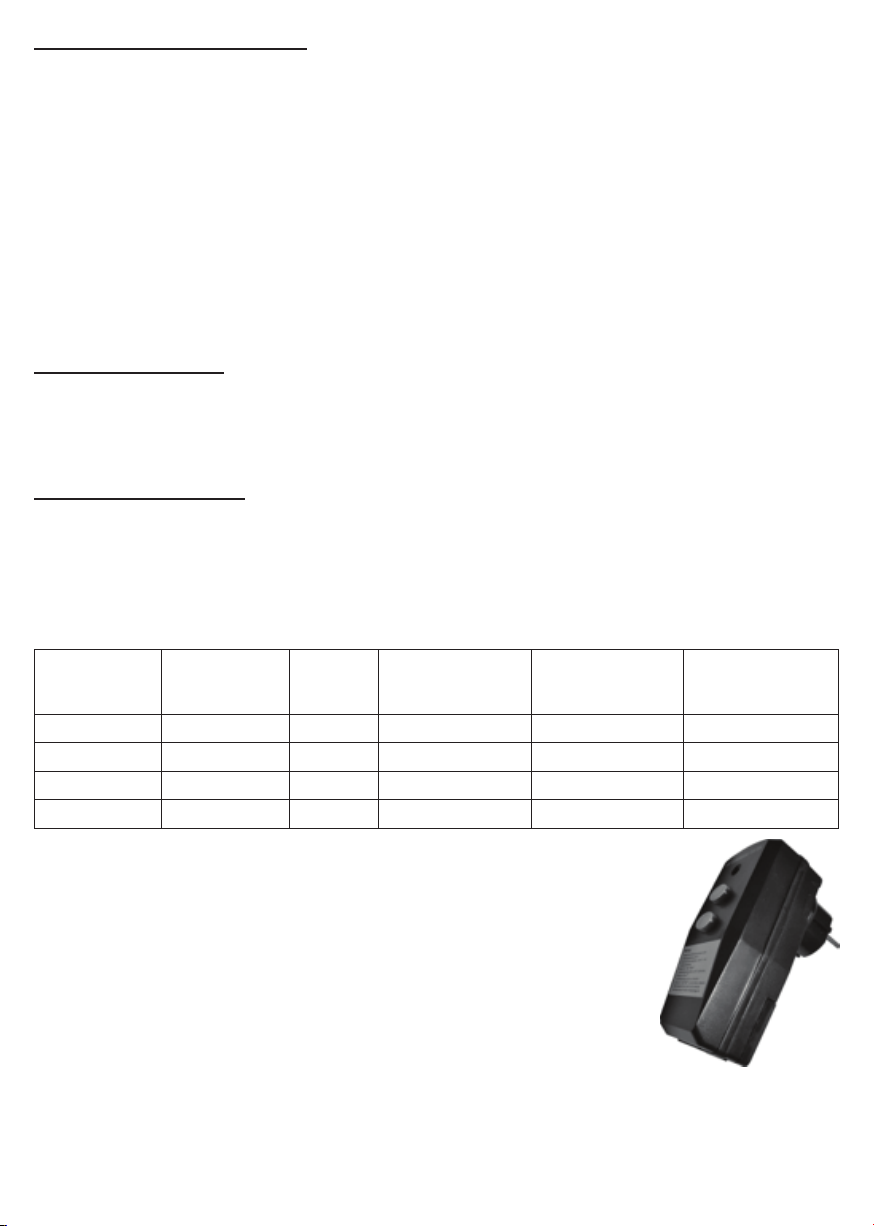
The heat pump is supplied with a connection cable and can
be plugged directly into an outlet. The cable has standard a 30mA RCD.
Attention: test the RCD before usage as follows:
1. Plug the RCD into a xed socket
2. Press the “RESET” button. The indicator should be “ON”.
3. Press the “TEST” button. The indicator should be “OFF”.
4. Press the “RESET” button again to start using the heat pump.
You should always switch off the heat pump immediately when the RCD indicator is turned “OFF”.
Be extremely careful when pressing “RESET” after a failure because there might still be a problem.
4
2
2
2
2
Page 5

2.5 Initial startup of the heat pump
The following steps need to be taken at startup (after verication that all the connections are made
according the specications:
• Turn on the lter pump. Check for possible water leakage and water ow to and from the
• Put the power plug into the outlet and switch the heat pump ON. The unit will start after the
• Verify after a few minutes that the air exhausted by the heat pump is becoming cooler.
• Allow the unit and pool pump to run 24 hours per day until desired pool water temperature is
Several days will be needed to bring the temperature of the swimming pool water to its required value, depending on the initial water temperature and the ambient temperature. A good pool cover and
insulation of the piping can shorten this period considerably.
swimming pool.
time delay (see further).
reached. When the set temperature is reached, the unit just shuts off. The unit will now
automatically restart when the pool temperature drops 1 degree Celsius below set
temperature.
Attention: Time delay - the unit is equipped with a 3-minute built-in delay to protect control
2.6 Condensation
By its operation of heating the swimming pool water, the air taken by the unit is cooled down and
water may condense on the ns of the evaporator. If the relative humidity is very high, this could
be as much as several liters an hour. Sometimes this condensation water is wrongly considered as
swimming pool water.
Attention: A quick way to verify that the water running trough the drain is condensation
circuit components and to eliminate restart cycling and contactor chatter.
This time delay will automatically restart the unit approximately 3 minutes after
each circuit interruption. Even a brief power interruption will activate this delay
and prevent the unit from starting until the 3-minute countdown is completed.
water is to shut off the unit and keep the pool pump running. If the water stops
running out of the base pan, it is condensation water. AN EVEN QUICKER WAY
- TEST THE DRAIN WATER FOR CHLORINE - if there is no chlorine present, then
it’s condensation.
3. Usage and operation
3.1 The display
See page 28
The heat pump can be turned on or off with the ON/OFF button.
When OFF the display is showing the following information:
• The indication ‘OFF’ at the location of the pool water temperature
• The temperature wanted for heating
• Eventual error messages
When ON the display is showing the following information:
• The temperature wanted for heating
• The pool water temperature
• The indication ‘Heating’ when the unit is heating the water
• A graphical representation of the water ow: the ow bar (see further)
3.2 Setting of the desired temperature
The desired temperature can directly be set with the arrow keys. The setting will automatically be
stored in memory.
A choice can be made between °C and °F as follows:
• Cut electrical power to the unit
• Press both arrow keys at the same time and restore electrical power to the unit, than
release the keys.
5
Page 6

3.3 The ow bar
The ow bar is a graphical representation of the water volume through the unit. The heat pumps has
it best performance when the ow bar is in the green zone. The graph is only valid after at least 30
minutes of operation. The ow bar also represents the three-minute time delay before the actual start
of the unit. The indication “ow” is not visible; the small block at the very right end of the ow bar is
ickering and disappears after a while. When they are all gone, the unit will start.
4. Maintenance and inspection
4.1 Maintenance
• Check the water supply to the unit often. Low water ow and air entering into the system
• The area around the unit should be dry, clean and well ventilated. Clean the side
• Check the power supply and cable connection often. Should the unit begin to operate
4.2 Trouble shooting guide
Improper installation will create an electrical hazard, which could result in death or serious injury to
pool users, installers, or others due to electrical shock, and may also cause damage to property.
Attention: DO NOT attempt any internal adjustments inside the heater.
Attention: Keep your hands and hair clear of the fan blades to avoid injury.
Attention: If you are not familiar with the pool ltering system and heater:
Attention: Turn off power to the unit prior to attempt service or repair.
should be avoided, as this will diminish the units’ performance and reliability. You should
clean the pool/spa lter regularly to avoid damage to the unit as a result of the dirty or
clogged lter.
heating exchanger regularly to maintain good heat exchange and to save energy.
abnormally or do you smell something unusual around the electrical compartment,
switch off the heat pump and have it replaced on a timely manner.
• Do not attempt to adjust or service without consulting your dealer,
professional pool or air conditioning contractor.
• Read the entire installation and users guide before attempting to use,
service or adjust the heater or pool ltering system.
• Do not start the heat pump until 24 hours after installation to
avoid damaging the compressor.
Problem Cause Solution
Heat pump not running 1. No electricity 1. Switch on the electrical power
2. Unit not turned on 2. Switch on the heat pump
3. Wrong temperature settingr 3. Adjust the temperature setting
4. Time delay still activated 4. Wait 3 min for unit to start
5. Air temperature below 8°C 5. Wait until temperature has
6. Other 6. See further under ‘error mes-
Insufcient heating 1. Obstacles blocking air ow 1. Remove obstacles
2. Ice on the evaporator 2. Turn of the unit (air too cold)
4.3 Error messages
The heat pump will show an error message in case of a problem. The following messages can
occur:
Error message Oorzaak Oplossing
Low air temp The heat pump will not start when
the ambient air temperature is
below 8°C.
risen
sages’
the unit will start as soon as the
ambient temperature reaches
8°C.
6
Page 7

Overheat The heat pump is not capable of
transferring all the heat it has generated.
High airtemp The unit is indicating that the
ambient air temperature is high
enough to operate without its fan.
The fan is being switched off.
low ow Insufcient water ow. The fan
has stopped but the compressor
is still running.
Flow error Check/restore the water ow. The
heat pump will start after 3 minu-
tes delay when the ow is the unit
is sufcient again.
more information: www.sunspring.eu
4.4 Water chemistry
Special care should be taken to keep the chemical balance of your swimming pool within following
limits:
check the water ow.
check the water ow.
check the water ow.
Min. Max.
pH 7,0 7,8
Free chlorine (mg/l) 0,5 1,5
TAC (mg/l)
TAC (°F)
80
10
150
30
Salt (g/l) 8
Attention: failure to keep the swimming pool water between above limits will void
the warranty
Attention: when the concentration of one or more products mentioned above becomes too
high, irrevocable damage to your heat pump may occur. Make sure that you
always install water treatment equipment after the heat pump. When an auto matic chemical feeder is installed in the plumbing, it must be installe down stream of the heat pump. A check valve must be installed between the heat pump
and the chemical feeder to prevent back siphoning of chemically saturated water
into the heat pump where it will damage the components.
4.5 Winterizing
Although our Sun Spring heat pumps are protected against freezing, it is good practice to drain the
complete installation. Perform the following actions to completely drain the heat pump:
• Turn off the electrical power to the heat pump at the main breaker panel.
• Shut off the water supply to the heat pump.
• Disconnect the water inlet and outlet and let the water drain from the heat pump.
• Re-connect the water inlet and outlet loosely to prevent debris entering the connections.
Attention: failure to winterize could cause damage to the heat pump and will void warranty
4.6 Spring startup
If your heat pump has been winterized, perform the following steps when starting the system in the
spring:
• Inspect the system for any debris or structural problems.
• Connect the water inlet and outlet unions rmly.
• Turn on the lter pump to supply water to the heat pump.
• Restore electrical power to the heat pump and switch it ON.
7
Page 8

5. Warranty
LIMITED WARRANTY
Thank you for purchasing our heat pump.
We warrant all parts to be free from manufacturing defects in materials and workmanship for a period
of two years from the date of retail purchase.
This warranty is limited to the rst retail purchaser, is not transferable, and does not apply to products
that have been moved from their original installation sites. The liability of the Manufacturer shall not
exceed the repair or replacement of defective parts and does not include any costs for labour to
remove and reinstall the defective part, transportation to or from the factory, and any other materials
required to make the repair. This warranty does not cover failures or malfunctions resulting from the
following:
1. Failure to properly install, operate or maintain the product in accordance with our published
“Installation & Instruction Manual” provided with the product.
2. The workmanship of any installer of the product.
3. Not maintaining a proper chemical balance in your pool [pH level between 7,0 and 7,8. Total
Alkalinity (TA) between 80 to 150 ppm. Free Chlorine between 0,5 – 1,5mg/l. Total
Dissolved Solids (TDS) less than 1200 ppm. Salt maximum 8g/l]
4. Abuse, alteration, accident, re, ood, lightning, rodents, insects, negligence or acts of
Gods.
5. Scaling, freezing or other conditions causing inadequate water circulation.
6. Operating the product at water ow rates outside the published minimum and maximum
specications.
7. Use of non-factory authorized parts or accessories in conjunction with the product.
8. Chemical contamination of combustion air or improper use of sanitizing chemicals, such as
introducing sanitizing chemicals upstream of the heater and cleaner hose or through the
skimmer.
9. Overheating, incorrect wire runs, improper electrical supply, collateral damage caused by
failure of O-rings, DE grids or cartridge elements, or damage caused by running the pump
with insufcient quantities of water.
LIMITATION OF LIABILITY
This is the only warranty given by Manufacturer. No one is authorized to make any other warranties
on our behalf.
THIS WARRANTY IS IN LIEU OF ALL OTHER WARRANTIES, EXPRESSED OR IMPLIED,
INCLUDING BUT NOT LIMITED TO ANY IMPLIED WARRANTY OF FITNESS FOR A PARTICULAR
PURPOSE AND MERCHANTABILITY. WE EXPRESSLY DISCLAIM AND EXCLUDE ANY LIABILITY
FOR CONSEQUENTIAL, INCIDENTAL, INDIRECT OR PUNITIVE DAMAGES FOR BREACH OF
ANY EXPRESSED OR IMPLIED WARRANTY.
This warranty gives you specic legal rights, which may vary, by country.
WARRANTY CLAIMS
For prompt warranty consideration, contact your dealer and provide the following information: proof
of purchase, model number, serial number and date of installation. The installer will contact the
factory for instructions regarding the claim and to determine the location of the nearest service
center.
8
Page 9

INHALTSVERZEICHNIS
1. Vorwort........................................................................................................................................
2. Montage und Anschlüsse...........................................................................................................
2.1 Lieferumfang..............................................................................................................................
2.2 Wärmepumpen-Standort...........................................................................................................
2.3 Wasseranschlüsse....................................................................................................................
2.4 Elektrischer Anschluss..............................................................................................................
2.5 Erstinbetriebnahme des Gerätes..............................................................................................
2.6 Kondensierung..........................................................................................................................
3. Unterhalt und Betrieb..................................................................................................................
3.1 Die Anzeige.................................................................................................................................
3.2 Die Einstellung der gewünschten Temperatur. .............................................................................................
3.3 Die Durchussanzeige..............................................................................................................
4. Wartung und Inspektion..............................................................................................................
4.1 Wartung.....................................................................................................................................
4.2 Leitfaden zur Fehlersuche.........................................................................................................
4.3 Fehlermeldungen......................................................................................................................
4.4 Wasserchemie...........................................................................................................................
4.5 Überwintern der Wärmepumpe.................................................................................................
4.6 Inbetriebnahme im Frühling......................................................................................................
5. Garantie......................................................................................................................................
9
9
9
10
10
10
11
11
11
11
11
12
12
12
12
12
13
13
13
14
1. Vorwort
Um unseren Kunden Qualität, Zuverlässigkeit und Vielseitigkeit zu bieten, ist dieses Produkt unter
strengen Normen erstellt worden. Dieses Handbuch enthält alle notwendigen Informationen zur
Installation, Debugging-, Entlade- und Wartungsarbeiten. Bitte lesen Sie diese Anleitung
sorgfältig, bevor Sie das Gerät öffnen oder warten. Die Nichtbeachtung dieser Empfehlungen
führt zum Verfall des Garantieanspruchs.Der Hersteller dieses Produkts kann nicht verantwortlich
gemacht werden, wenn jemand als Folge von falscher Installation, Debugging oder unnötiger
Wartung verletzt oder das Gerät beschädigt wird.Die Schwimmbad-Wärmepumpe heizt das
Schwimmbad-Wasser und hält die Temperatur konstant.
Unsere Sun Spring Wärmepumpen haben die folgenden Eigenschaften:
1. Langlebig
Der Wärmetauscher besteht aus einem PVC- und Titaniumrohr, das längerer Exposition mit
Schwimmbadwasser widerstehen kann.
2. Flexible Installation
Alle unsere Wärmepumpen sind vollständig getestet und einsatzbereit, wenn sie unser Haus
verlassen. Verbinden Sie die Wärmepumpe einfach an das Schwimmbadwasser und stecken Sie
den Netzstecker ein.
3. Leiser Betrieb
Die Einheit besteht aus einer efzienten Rotationskompressor und einem geräuscharmen
Lüftermotor, der einen leisen Betrieb garantiert.
4. Einfache Bedienung
Das elektronische Bedienfeld ermöglicht eine einfache Einstellung der gewünschten Temperatur.
Alle relevanten Informationen über den Wärmepumpen-Betrieb können auf diesem Display a
bgelesen werden.
2. Montage und Anschlüsse
2.1 Lieferumfang
Die Box enthält die Wärmepumpe, 2 Wasseranschlüsse und dieses Handbuch. Andere Teile,
darunter ein By-Pass, muss vom Anwender / Installateur bereitgestellt werden.
Wichtig: Halten Sie das Gerät gerade nach oben. Wenn das Gerät gekippt wurde,
oder auf die Seite gestellt wurde, warten Sie 24 Stunden vor dem Start der
Einheit.
9
Page 10

2.2 Wärmepumpen-Standort
Verlassen Sie die Wärmepumpe. Seite 27.
Die Sun Spring Wärmepumpen werden für eine lange Lebensdauer entwickelt und gebaut, wenn sie
auf die richtige Weise installiert werden und unter normalen Umständen arbeiten können. Regelmäßige
Kontrolle ist wichtig, um Ihre Wärmepumpe einige Jahre sicher und efzient arbeiten zu lassen. Die
folgenden Richtlinien können Ihnen dabei helfen:
• Sorgen Sie für einen unkomplizierten Zugang zur Konsole an der Vorderseite.
• Halten Sie die Umgebung der Wärmepumpe von eventuellem Grünabfall frei.
• Schneiden Sie die Bepanzung rund um die Wärmepumpe frei, um ausreichend Platz zu garantieren.
• Entfernen Sie eventuelle Wasserfontänen rund um die Wärmepumpe. Sie können
• Wird das Gerät unter einem sehr hohen Dachneigung oder unter einem Dach ohne Dachrinne
• Verwenden Sie die Wärmepumpe nicht, wenn irgendein Teil unter Wasser gestanden hat.
die Wärmepumpe beschädigen. Verwenden Sie einen Deektor, wenn nötig.
installiert, sollte es mit einer Rinne oder Umsteller ausgerüstet sein, um Wasserabuss auf das Gerät
zu verhindern.
Kontaktieren Sie unmittelbar einen qualizierten Techniker, um die Wärmepumpe zu
inspizieren und eventuell Teil der Steuerung auszutauschen, die überschwemmt worden sind.
2.3 Wasseranschlüsse
Die Rohrleitungen zu und von der Wärmepumpe müssen einen Außendurchmesser von 50 mm
aufweisen, und müssen mit dem Wasseranschluss, der mit der Wärmepumpe geliefert wurde, fest
verklebt werden. Diese Rohre können aus hartem oder exiblen PVC bestehen. Installieren Sie
immer Rohre für Swimmingpools und verwenden Sie den richtigen Klebstoff für die Verbindung.
2.4 Elektrischer Anschluss
Obwohl die Wärmepumpe elektrisch von der Swimmingpool-Installation isoliert ist, betrifft dies nur den elektrische
Strom zu oder vom Schwimmbad-Wasser. Die Erdung der Wärmepumpe wird benötigt, um Sie vor einem elektrischen Schlag durch einen eventuellen Kurzschluss im Inneren des Gerätes zu schützen. Vergewissern Sie sich,
dass eine solide Grundlage vorhanden ist. Die Wärmepumpe darf nur zusammen mit der Filterpumpe betreiben
werden. Beide sollten immer gemeinsam mit Strom versorgt werden. Deshalb schließen diese zusammen an
denselben Schutzschalter type D an. Die Wärmepumpe wird beschädigt, wenn sie ohne Wasserdurchuss
betrieben wird und die Garantie wird verfallen.
Überprüfen Sie immer, ob die Netzspannung der Betriebsspannung des Gerätes entspricht.
Model
Sun Spring 5 220-240V 16A 3,5A 2,5mm
Sun Spring 7 220-240V 16A 4,6A 2,5mm
Sun Spring 10 220-240V 20A 7,6A 2,5mm
Sun Spring 14 220-240V 20A 13,5A 2,5mm
Aansluiting Zekering
TYPE D
Nominale stroom Kabeldoorsnede
voor 15m lengte
2
2
2
2
Kabeldiameter
voor 50m lengte
Die Werte in dieser Tabellesind nur Richtwerte. Überprüfen Sie Ihre
lokalen Vorschriften.
Wichtig: Gewährleistung einer guten Erdung
Die Wärmepumpe wird mit einem Anschlusskabel und 30mA Fehlerstromschutz
geliefert und kann direkt in eine Steckdose eingesteckt werden.
Wichtig: Vorher Sie die Wärmepumpe einschalten,
Testen Sie die Wirkung der Fehlerstromschutz, wie folgt:
1. Stecken Sie den Stecker in die Steckdose.
2. Drücken Sie die Taste “RESET”. Die LED-Anzeige leuchtet auf.
3. Drücken Sie die Taste “TEST”. Die LED-Anzeige leuchtet nicht mehr auf.
4. Drücken Sie auf “RESET”, um die Wärmepumpe zu verwenden.
Wenn während der Verwendung, die Anzeige ausschaltet, was hinweist auf eine elektrische
Fehlfunktion, sollten Sie sofort das Gerät ausschalten und Ihren Lieferant informieren.
10
2,5mm
4mm
4mm
6mm
2
2
2
2
Page 11

Wenn gewünscht, drücken Sie “RESET”-Taste, um das Gerät neu zu starten, aber seien Sie Vorsicht
da er ein Fehler vorabgegangen hat.
2.5 Erstinbetriebnahme des Gerätes
Die folgenden Schritte müssen beim Start (nach Überprüfung, ob alle Verbindungen entsprechend
der Spezikationen hergestellt wurden) unternommen werden:
•
und zum Schwimmbad.
• Stecken Sie den Netzstecker in die Steckdose und schalten Sie die Wärmepumpe an.
• Überprüfen Sie nach einigen Minuten, ob die Luft durch die Wärmepumpe kühler wird.
• Lassen Sie das Gerät und die Pool-Pumpe 24 Stunden pro Tag laufen, bis die gewünschte
Beckenwasser-Temperatur erreicht ist. Wenn die eingestellte Temperatur erreicht ist,
Schalten Sie die Filterpumpe an. Überprüfen Sie mögliche Wasserschäden und Wasserzuuss vom
Das Gerät wird nach einer Verzögerung starten (siehe unten).
schaltet das Gerät von selbst aus. Das Gerät wird nun automatisch neu gestartet, wenn
die Temperatur im Pool um 1 Grad Celsius unterhalb der eingestellten Temperatur absinkt.
Einige Tage werden benötigt, um die Temperatur des Schwimmbadwassers auf seinen gewünschten
Wert zu bringen, abhängig von der Vorlauftemperatur und der Umgebungstemperatur. Eine gute
Pool-Abdeckung und Isolierung der Rohre kann diese Frist verkürzen.
Wichtig: Zeitverzögerung - das Gerät ist mit einer 3-minütigen eingebaute Verzögerung
ausgestattet, um die Komponenten des Steuerkreises zu schützen und
Restart-Zyklen und Kurzschluss zu vermeiden. Diese Zeitverzögerung wird das
Gerät ca. 3 Minuten nach jeder Unterbrechung automatisch neu starten. Schon
eine kurze Unterbrechung der Stromversorgung wird diese Verzögerung aktivieren,
um zu verhindern, dass das Gerät gestartet wird, bevor der 3-Minuten-Countdown
abgeschlossen ist.
2.6 Kondensierung
Durch den Betrieb zum Erwärmen des Schwimmbadwasser wird die aufgenommene Luft von der
Einheit abgekühlt und Wasser kann auf den Rippen des Verdampfers kondensieren. Wenn die
relative Feuchtigkeit sehr hoch ist, könnte dies mehreren Litern pro Stunde ergeben. Manchmal wird
Kondenswasser fälschlicherweise als Schwimmbadwasser betrachtet.
Wichtig: Eine schnelle Weise, um zu kontrollieren, ob das Wasser von der Kondensation kommt, ist
es, das Gerät auszustellen und die Schwimmbadpumpe laufen zu lassen. Wenn kein Wasser
mehr aus dem Kondensationsabuss austritt, ist es Kondensation. EINE NOCH SCHNELLERE
METHODE – TESTEN SIE DAS ABFLUSSWASSER AUF CHLOR – wenn kein Chlor vorliegt,
dann ist es Kondensation.
3. Unterhalb und Betrieb
3.1 Die Anzeige
Abbildung am seite 28
Die Wärmepumpe kann mit der ON- / OFF-Taste ein- oder ausgeschaltet werden.
Bei OFF (aus) werden die folgenden Informationen angezeigt:
• Die Anzeige “OFF” an der Stelle der Poolwasser-Temperatur
• Die gewünschte Heizungstemperatur
• Etwaige Fehlermeldungen
Bei ON (an) werden die folgenden Informationen angezeigt:
• Die gewünschte Heizungstemperatur
• Die Poolwasser-Temperatur
• Die Angabe “Heizung”, wenn das Gerät das Wasser erhitzt wird
• Eine grasche Darstellung des Wasserusses: der Fluss-Bar (siehe weiter unten)
3.2 Die Einstellung der gewünschten Temperatur
Die gewünschte Temperatur kann direkt mit den Pfeiltasten eingestellt werden. Die Einstellung wird
automatisch gespeichert.
Es kann zwischen °C und °F wie folgt ausgewählt werden:
• Den Strom des Gerätes ausschalten
• Drücken Sie beide Pfeiltasten gleichzeitig, stellen die Stromversorgung wieder her und
lassen dann die Tasten wieder los.
11
Page 12

3.3 Die Durchussanzeige
Die Durchussanzeige ist eine grasche Darstellung der durch das Gerät ießenden Wassermenge.
Die Wärmepumpen weist die beste Leistung auf, wenn die Durchussanzeige im grünen Bereich
liegt. Die Grak ist nur nach mindestens 30 Minuten Betrieb gültig.Der Durchussanzeige stellt auch
die Drei-Minuten Zeitverzögerung vor dem eigentlichen Start des Geräts dar. Die Anzeige “Flow” ist
nicht sichtbar; der kleine Block ganz am rechten Ende des Flow-Bar blinkt und verschwindet nach
einer Weile. Wenn sie alle weg sind, wird das Gerät neu starten.
4. Wartung und Inspektion
4.1 Wartung
• Überprüfen Sie die Wasserversorgung der Einheit regelmäßig. Sie müssen dafür sorgen,
• Der Bereich um das Gerät sollte trocken, sauber und gut belüftet sein. Reinigen Sie
• Überprüfen Sie das Netzteil und die Kabelverbindung regelmäßig. Sollte eine abnormaler Vorgang
4.2 Leitfaden zur Fehlersuche
Eine unsachgemäße Installation stellt eine elektrische Gefahr dar, die zum Tod oder zu schweren
Verletzungen von Pool-Benutzern, Installateuren, oder andere Personen führen aber auch
Sachschäden verursachen kann.
Wichtig: Auf keinen Fall dürfen interne Anpassungen innerhalb des Heizsystems vorgenommen werden.
Wichtig: Halten Sie Hände und Haare von Ventilatorschrauben weg, um Verwundungen zu
Wichtig: Wenn Sie nicht mit Ihrem Filtersystem und der Wärmepumpe vertraut sind:
Wichtig: Schalten Sie den Strom aus, bevor Sie das Gerät warten oder reparieren.
Wärmepumpe läuft nicht
Ungenügende Heizung
dass genug Wasser und Luft in das System gelangen kann, sonst werden die Leistungen
und die Zuverlässigkeit Ihres Systems beeinusst. Sie müssen den Schwimmbadlter
regelmäßig reinigen, um Schaden durch Filterblockade zu vermeiden.
regelmäßig die Seitenwände der Wärmepumpe, um eine gute Funktion zu garantieren und
Energie zu sparen.
vorliegen oder ein schlechter Geruch bei den elektrischen Komponenten auftreten,ersetzen Sie das
rechtzeitig
vermeiden.
• Verrichten Sie keine Veränderung oder Wartung, ohne Ihren Händler,
Schwimmbad- oder Klimaanlagenhersteller zu Rate zu ziehen.
• Lesen Sie die Installations- und Gebrauchsanweisung vollständig durch,
bevor Sie versuchen, das Gerät zu verwenden, zu warten oder umzurüsten.
• Starten Sie die Wärmepumpe frühestens 24 Stunden nach der Installation,
um Beschädigung der Kompressoren zu vermeiden.
Problem
Ursache
1. Kein Strom
2. Gerät nicht eingeschaltet 2. Schalten Sie die Wärmepumpe
3. Falsche Temperatureinstellung 3. Stellen Sie die Temperatur-Einstellung
4. Zeitverzögerung noch aktiviert 4. Warten Sie 3 Minuten für die Einheit zu
5. Die Lufttemperatur unter 8 ° C 5. Warten Sie, bis Temperatur gestiegen
6. Andere 6. Siehe weiter unter "Fehlermeldungen"
1. Hindernisse für Luftstrom 1. Entfernen Sie Hindernisse
2. Eis auf dem Verdampfer 2. Drehen des Geräts (Luft zu kalt)
1. Schalten Sie den Strom
starten
Lösung
4.3 Fehlermeldungen
Die Wärmepumpe zeigt im Falle eines Problems eine Fehlermeldung. Die folgenden Meldungen
können auftreten:
Problem Ursache Lösung
Low air temp Die Wärmepumpe startet nicht,
wenn die Temperatur der
Umgebungsluft unter 8 °C liegt
Das Gerät wird gestartet, sobald
die Umgebungstemperatur 8 °C
erreicht.
und dies anzeigt.
12
Page 13

Overheat
High airtemp
low ow
Flow error
Die Wärmepumpe ist nicht in der
Lage, die gesamte Wärme zu übertragen.
Das Gerät wird anzeigen, dass die
Umgebungstemperatur hoch genug
ist, um ohne Lüfter zu arbeiten. Der
Lüfter wird
ausgeschaltet.
Zu wenig Wasser ießt. Der Lüfter
läuft nicht, aber der Kompressor läuft
noch.
Es ießt zu wenig Wasser durch die
Wärmepumpe und das Gerät ist ausgeschaltet
Überprüfen Sie den Wasserzuuss.
Überprüfen Sie den Wasserzuuss.
Überprüfen Sie den Wasserzuuss.
Die Wärmepumpe startet nach 3
Minuten Verzögerung, wenn die
Strömung ausreichend wiederhergestellt ist.
Weitere Informationen unter www.sunspring.eu
4.4 Wasserchemie
Besondere Vorsicht ist geboten, um das chemische Gleichgewicht Ihres Schwimmbades innerhalb
folgender Grenzen zu halten:
Min. Max.
pH 7,0 7,8
Freies Chlor (mg/l) 0,5 1,5
TAC (mg/l)
TAC (°F)
Salz (g/l) 8
80
10
150
30
Wichtig: Wenn das Schwimmbadwasser nicht zwischen den oben angegebenen Grenzen
gehalten wird, erlischt die Garantie
Wichtig: Wenn die Konzentration von einem oder mehreren der oben genannten Produkte
zu hoch ist, entstehen unwiderruiche Schäden an Ihrer Wärmepumpe. Stellen Sie
sicher, dass Sie immer die Wasseraufbereitungsanlagen nach der Wärmepumpe
installieren. Wenn eine automatische Chemikalienzuführvorrichtung im Sanitär-
bereich installiert werden soll, muss sie hinter der Wärmepumpe installiert werden.
Ein Rückschlagventil muss zwischen der Wärmepumpe und der
Chemikalienzuführvorrichtung installiert werden, um Rücklauf von chemisch
gesättigt Wasser in die Wärmepumpe zu verhindern, wo sie die Komponenten beschädigen.
4.5 Überwintern der Wärmepumpe
Obwohl unsere SunSpring Wärmepumpen gegen Einfrieren geschützt sind, ist es eine gute Praxis,
die komplette Installation entwässern zu lassen. Führen Sie die folgenden Schritte aus, um
sämtliches Wasser aus der Wärmepumpe zu entfernen:
• Zet de elektrische stroom naar de warmtepomp uit
• Sluit de watertoevoer naar de warmtepomp
• Ontkoppel de wateraansluitingen aan de warmtepomp en laat het water wegvloeien
• Koppel de wateraansluitingen opnieuw aan de warmtepomp om te verhinderen dat er vuil in
de leidingen zou komen.
Wichtig: Die Nichtberücksichtigung der notwendigen Vorsorgemaßnahmen für die
Überwinterung kann Schäden an der Wasserpumpe verursachen
4.6 Opstarten na de winter
Indien uw warmtepomp werd klaargemaakt voor overwintering, dient U de volgende stappen te
ondernemen voor het opstarten in de lente:
• Schalten Sie den Strom der Wärmepumpe am Hauptschutzschalter aus.
• Schalten Sie die Wasserzufuhr zur Wärmepumpe aus.
• Entkoppeln Sie die Wasseranschlüsse an die Wärmepumpe und lassen Sie das Wasser
abießen.
• Koppeln Sie die Wasseranschlüsse erneut locker an die Wärmepumpe, um zu verhindern,
dass Verschmutzungen in die Leitungen gelangen.
13
Page 14

5. Garantie
GARANTIEBESCHRÄNKUNG
Wir danken Ihnen für den Kauf unserer Wärmepumpe.
Wir garantieren, dass alle Teile frei von Herstellungsfehlern bei Materialien und Verarbeitung für
einen Zeitraum von zwei Jahren ab Kaufdatum sind.
Diese Garantie ist auf den Erstkäufer beschränkt, ist nicht übertragbar, und gilt nicht für Produkte, die
von ihren ursprünglichen Montageorten entfernt worden sind. Die Haftung für Schwimmbad-Produkte
vom Hersteller soll die Reparatur oder Ersatz von defekten Teilen nicht überschreiten und schließt
keine Kosten für Arbeiten ein, um ein defektes Teil zu entfernen und wieder zu installieren, Transport
zu oder von der Fabrik, und sämtliches weitere Material, dass man für die Reparatur benötigt. Diese
Garantie beinhaltet nicht Betriebsausfälle oder Fehlfunktionen aus folgenden Gründen:
1. Das Versäumnis, das Produkt in Übereinstimmung mit unserer veröffentlichten
„Installations- und Gebrauchsanleitung“, die mit dem Produkt geliefert wurde, richtig zu
installieren, zu verwenden oder zu pegen.
2. Die Ausführungen eines Produkt-Installateurs.
3. Fehlende Aufrechterhaltung des chemischen Gleichgewichts in Ihrem Pool [pH-Niveau zwischen 7,0 und 7,8. Alkalinität (TA) zwischen 80 bis 150 ppm. Freies Chlor zwischen 0,5 –
1,2mg/l. Gesamtzahl gelöster Festkörper (TDS) weniger als 1200 ppm. Salz max. 8 g/l]
4. Missbrauch, Änderung, Unfall, Feuer, Flut, Gewitter, Nagetiere, Insekten, Nachlässigkeit
oder höhere Gewalt.
5. Verkleinerung, Einfrieren oder andere Bedingungen, die ungenügenden
Wasseraustausch verursachen.
6. Betrieb des Produkts mit Wasserdurchussraten außerhalb der veröffentlichten minimalen
und maximalen Spezikationen.
7. Verwendung von nicht zugelassenen Teilen oder Zubehör mit dem Produkt.
8. Chemische Verunreinigung von Verbrennungsluft oder missbräuchliche Verwendung von
Reinigungschemikalien, wie z. B. dem Zusatz von Reinigungschemikalien vor dem Erhitzer
und Reinigungsschlauch oder durch den Schaumlöffel einzuführen.
9. Überhitzung, inkorrekte Kabelverläufe, ungenügende Elektrizitätsversorgung, Kollateralschäden durch fehlende Dichtungsringe, defekte Gitter oder Einsätze, oder Schäden, die
durch den Pumpenbetrieb mit ungenügenden Wassermengen entstehen.
HAFTUNGSBESCHRÄNKUNG
Dies ist die einzige vom Hersteller gegebene Garantie. Kein anderer ist dazu autorisiert, zusätzliche
Garantien in unserem Namen zu erteilen.
DIESE GARANTIE STEHT ANSTELLE ALLER ANDEREN GARANTIEN, EXPLIZIT ODER
IMPLIZIT, EINSCHLIESSLICH, ABER NICHT BESCHRÄNKT AUF, EINE IMPLIZITE GARANTIE
FÜR DIE EIGNUNG FÜR EINEN BESONDEREN ZWECK UND GEBRAUCHSTAUGLICHKEIT.
WIR SCHLIESSEN EINE HAFTUNG FÜR NACHFOLGENDE, ZUFÄLLIGE, INDIREKTE SCHÄDEN
ODER SCHADENSERSATZ FÜR DEN BRUCH EINER EXPLIZITEN ODER IMPLIZITEN
GARANTIE AUSDRÜCKLICH AUS.
Diese Garantie erteilt Ihnen spezische gesetzliche Rechte, die von Land zu Land variieren können.
GARANTIEANSPRUCH
Für eine schnelle Garantiebearbeitung kontaktieren Sie bitte Ihren Händler und geben folgende
Informationen an: Kaufnachweis, Modellnummer, Seriennummer und Installationsdatum. Der
Installateur soll sich mit der Fabrik für Anweisungen für die Berücksichtigung des Anspruchs in
Verbindung setzen und um den Standort des nächsten Servicezentrums anzugeben.
14
Page 15

1. . ..................................................................................................................................
2. ...................................................................................................
2.1 ............................................................................................................................
2.2 . ..........................................................................................
2.3 . ..................................................................................................
2.4 .........................................................................................................
2.5 . ....................................................................................
2.6 ..............................................................................................................................
3. . ................................................................................................
3.1 .......................................................................................................................................
3.2 . ..................................................................................
3.3 ......................................................................................................................
4. ...........................................................................................
4.1 . ......................................................................................................
4.2 ...................................................................................
4.3 ....................................................................................................
4.4 .......................................................................................................................
4.5 ..................................................................................................................
4.6 . .....................................................................................................................
5. ............................................................................................................................................
15
15
15
16
16
16
17
17
17
17
17
18
18
18
18
18
19
19
19
20
1.
, ,
.
, , . ,
, .
.
, .
.
Sun Spring :
1.
,
2.
. .
3.
,
.
4.
.
.
2.
2.1
, 2 . ,
, /.
: .
, 24 .
15
Page 16
2.2
, 27.
Sun Spring
.
.
:
• ,
.
• .
•
.
• ,
. .
• ,
,
.
• , - .
- , .
2.3
50
’, .
. ,
, ’.
2.4
, .
.
. D.
, , .
, :
.
D
Sun Spring 5 220-240V 16A 3,5A 2,5
Sun Spring 7 220-240V 16A 4,6A 2,5
Sun Spring 10 220-240V 20A 7,6A 2,5
Sun Spring 14 220-240V 20A 13,5A 2,5
15
2
2
2
2
50
2
2,5
2
4
2
4
2
6
. .
:
,
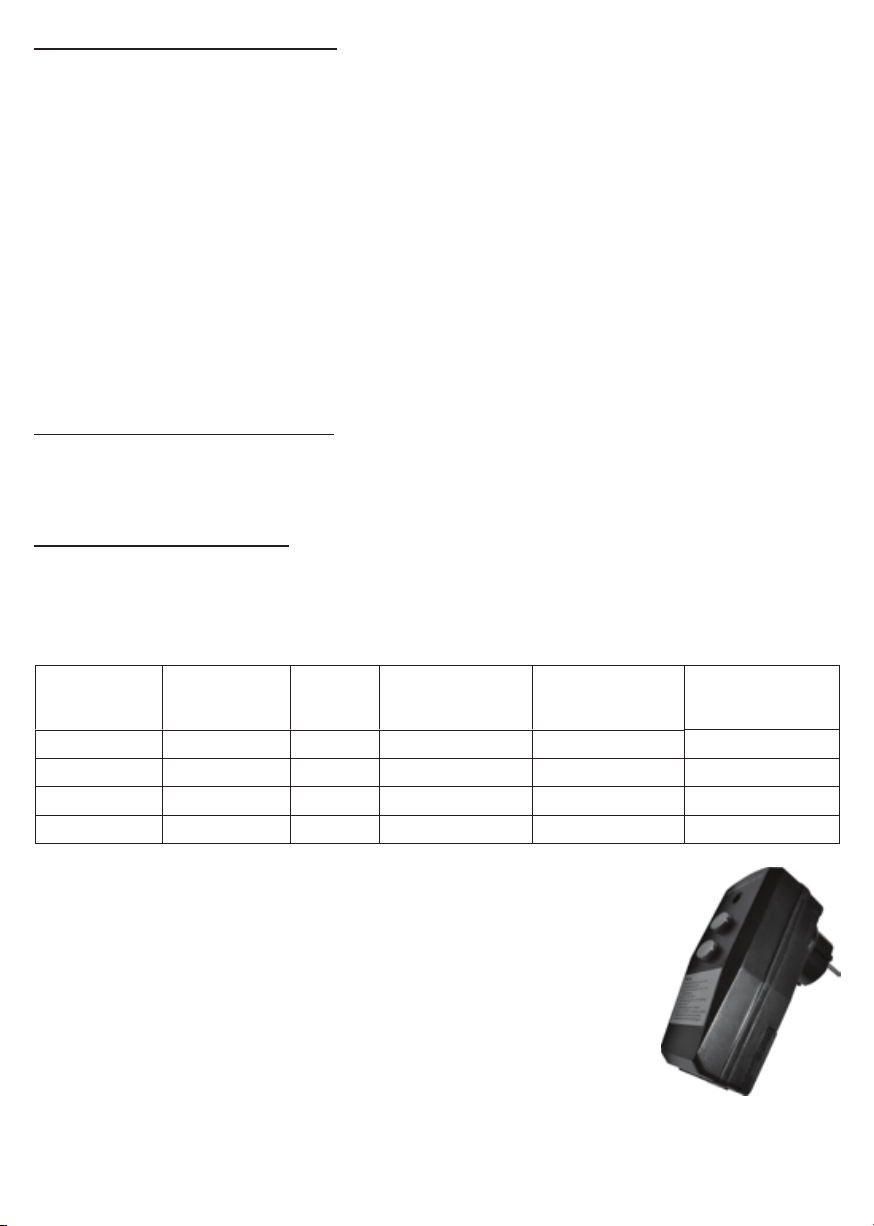
.
30 .
: :
1. .
2. “RESET”. “”.
3. “TEST”. “”.
4. “RESET”, .
, RCD .
, “RESET” , .
16
Page 17

2.5
( ) :
• .
• .
• , , ,
• 24 ,
, ,
.
.
: – 3-
.
(. ).
.
. ,
. ,
1 .
.
3
.
, 3-
.
2.6
, , ,
. ,
. .
: , , , –
.
, . –
– , .
3.
3.1
. 28
/.
, :
• ””
•
•
, :
•
•
• ‘Heating’,
• : (. )
3.2
.
’.
°C °F :
•
• ,
.
17
Page 18

3.3
– ’ , .
, .
30 .
. “flow” ;
. , .
4.
4.1
• .
• , .
• .
4.2
,
, ,
.
: - .
: , .
: :
: .
1. 1.
, .
/,
.
, .
, .
•
, .
• ,
, .
• 24
.
1. 1.
2. 2.
3. . 3.
4. 4. 3
5. 8°C 5. ,
6. 6. . ”
2. 2. ( )
”
4.3
.
’ :
,
8°C
,
8°C
18
Page 19

,
,
.
.
,
/ .
3 ,
: www.sunspring.eu
4.4
:
.
.
pH
(/)
TAC (/)
TAC (°F)
7,0
0,5
80
10
7,8
1,5
150
30
(/) 8
: , , .
: ,
4.5
Sun Spring ,
. , :
• .
• .
• ’ .
• ’ ,
:
4.6
, :
• - .
• ’ .
• .
• .
.
.
,
.
, ,
, . .
’.
.
19
Page 20

5.
.
.
,
, .
-
,
, - , .
, :
1. ,
« », .
2. .
3. [ pH 7,0 7,8.
(TA) 80 150 ppm. 0,5 1,5 /.
(TDS) 1200 ppm. 8 /].
4. , , , , , , , ,
.
5. , , .
6. ,
.
7. , .
8. ,
.
9. , , ,
, , DE
, ,
.
, . -
.
, , -
.
- , ,
-
.
, .
: , , .
’ -,
.
20
Page 21

Spis treści
1. Wstęp ................................................................................................................................................21
2. Instalacja i podłączenie .....................................................................................................................21
2.1 Zawartość opakowania ....................................................................................................................21
2.2 Instalacja i podłączenie....................................................................................................................22
2.3 Podłączenie do instalacji wodnej .....................................................................................................22
2.4 Podłączenie elektryczne ..................................................................................................................22
2.5 Pierwsze uruchomienie pompy ciepła ..............................................................................................23
2.6 Kondensacja ....................................................................................................................................23
3. Użycie i eksploatacja .........................................................................................................................23
3.1 Wyświetlacz .....................................................................................................................................23
3.2 Ustawianie żądanej temperatury......................................................................................................23
3.3 Wskaźnik przepływu ................................................................................................ ........................24
4. Konserwacja i przeglądy ....................................................................................................................24
4.1 Konserwacja ....................................................................................................................................24
4.2 Instrukcja rozwiązywania problemów ...............................................................................................24
4.3 Komunikaty o błędach .....................................................................................................................24
4.4 Skład chemiczny wody ....................................................................................................................25
4.5 Przygotowanie do zimy ....................................................................................................................25
4.6 Wiosenne uruchomienie ..................................................................................................................26
5. Gwarancja .........................................................................................................................................26
1.
Wstęp
Aby zapewnić naszym klientom jakość, niezawodność i uniwersalność, ten produkt został
wyprodukowany zgodnie z rygorystycznymi normami produkcyjnymi. Instrukcja zawiera wszystkie
niezbędne informacje dotyczące instalacji, uruchomienia, opróżniania i konserwacji urządzenia. Prosimy
o uważne przeczytanie niniejszej instrukcji przed otwarciem lub serwisowaniem urządzenia.
Nieprzestrzeganie tych zaleceń spowoduje utratę gwarancji.
Producent tego produktu nie ponosi odpowiedzialności za obrażenia ciała lub uszkodzenie urządzenia
wynikające z nieprawidłowej instalacji, uruchomienia lub niepotrzebnej konserwacji. Pompa ciepła
podgrzewa wodę w basenie i utrzymuje stałą temperaturę. Nasze pompy ciepła Sun Spring
charakteryzują się następującymi cechami:
1. Trwałość
miennik ciepła wykonany z PVC i rurki tytanowej wytrzymuje długotrwałe oddziaływanie wody
Wy
basenowej.
2. Elastyczna instalacja
Wszystkie nasze pompy ciepła są w pełni przetestowane i gotowe do użycia po opuszczeniu naszej
fabryki. Wystarczy podłączyć wodę z basenu do pompy ciepła i włożyć wtyczkę do gniazdka.
3. Cicha praca
Urządzenie jest wyposażone w wydajną sprężarkę rotacyjną i wentylator o niskim poziomie hałasu, co
gwarantuje jego bezgłośne działanie.
4. Łatwa obsługa
Elektroniczny panel sterowania umożliwia łatwe ustawienie żądanej temperatury. Wszystkie niezbędne
informacje dotyczące pracy pompy ciepła można odczytać na tym wyświetlaczu.
2. Instalacja i podłączenie
Zawartość opakowania
2.1
Zestaw zawiera pompę ciepła, 2 króćce wodne oraz niniejszą instrukcję. Inne elementy, w tym zawór
obejściowy (bypass), powinny być dostarczone przez użytkownika/instalatora.
Uwaga: zawsze utrzymuj urządzenie w pozycji pionowej. Jeśli urządzenie było ustawione
w pozycji pochylonej lub poziomej, odczekaj 24 godziny przed je
go uruchomieniem.
21
Page 22
2.2 Instalacja i podłączenie
Zainstaluj urządzenie na zewnątrz, jak pokazano na stronie 27.
Pompy ciepła Sun Spring zostały zaprojektowane i wyprodukowane tak, aby zapewnić długi okres użytkowania
pod warunkiem prawidłowej instalacji i eksploatacji w normalnych warunkach. Okresowe kontrole są ważne dla
bezpiecznej i wydajnej pracy pompy ciepła przez wiele lat.
Poniżej przedstawiono podstawowe zalecenia dotyczące kontroli:
• Upewnij się, że przednia część urządzenia jest łatwo dostępna dla przyszłych prac
konserwacyjnych.
• Utrzymuj czystość w obszarach wokół pompy ciepła.
• Wszystkie rośliny i krzewy powinny być przycięte i znajdować się w pewnej odległości od pompy
ciepła.
• Nie dopuszczaj do rozpylania wody na pompę ciepła z systemów nawadniających, aby zapobiec
korozji i uszkodzeniom. W razie potrzeby użyj deflektora.
• Jeśli urządzenie jest zainstalowane pod dachem o bardzo stromym nachyleniu lub bez rynny,
należy zainstalować rynnę lub rurę odprowadzającą, aby zapobiec nadmiernemu dostawaniu się
wody na urządzenie.
• Nie używaj pompy ciepła, jeśli jakakolwiek jej część znajdowała się pod wodą. Natychmiast
skontaktuj się z wykwalifikowanym technikiem w celu sprawdzenia pompy ciepła i wymiany
wszelkich części systemu sterowania, które miały kontakt z wodą.
2.3 Podłączenie do instalacji wodnej
Rury doprowadzające i odprowadzające wodę do pompy ciepła powinny mieć zewnętrzną średnicę 50 mm
i być mocno przyklejone do złączki wodnej dostarczonej z pompą ciepła.
Rury te mogą być wykonane z twardego PVC lub elastyczne. Zawsze instaluj rury przeznaczone do użytku
basenowego i używaj odpowiedniego kleju do ich łączenia.
2.4 Podłączenie elektryczne
Zawsze sprawdzaj, czy napięcie sieciowe odpowiada napięciu roboczemu urządzenia.
Pompa ciepła powinna działać tylko razem z pompą filtrującą. Obie powinny być zawsze zasilane razem.
Dlatego podłącz je do tego samego wyłącznika automatycznego typu D. Pompa ciepła ulegnie
uszkodzeniu, jeśli będzie pracować bez przepływu wody, a gwarancja zostanie unieważniona.
Prosimy o przestrzeganie następujących zaleceń dotyczących pozostałej instalacji elektrycznej:
Model
Zasilanie
Wyłącznik
autom.
Prąd roboczy
Przekrój dla kabla o
długości 15 m
Przekrój dla kabla o
długości 50 m
typu D
Sun Spring 5 220-240V 16A 3,5A 2,5 mm
Sun Spring 7 220-240V 16A 4,6A 2,5 mm
Sun Spring 10 220-240V 20A 7,6A 2,5 mm
Sun Spring 14 220-240V 20A 13,5A 2,5 mm
2
2
2
2
2,5 mm
4 mm
4 mm
6 mm
2
2
2
2
Wartości w powyższej tabeli są jedynie zaleceniami. Sprawdź lokalne przepisy.
Uwaga: zapewnij niezawodne uziemienie.
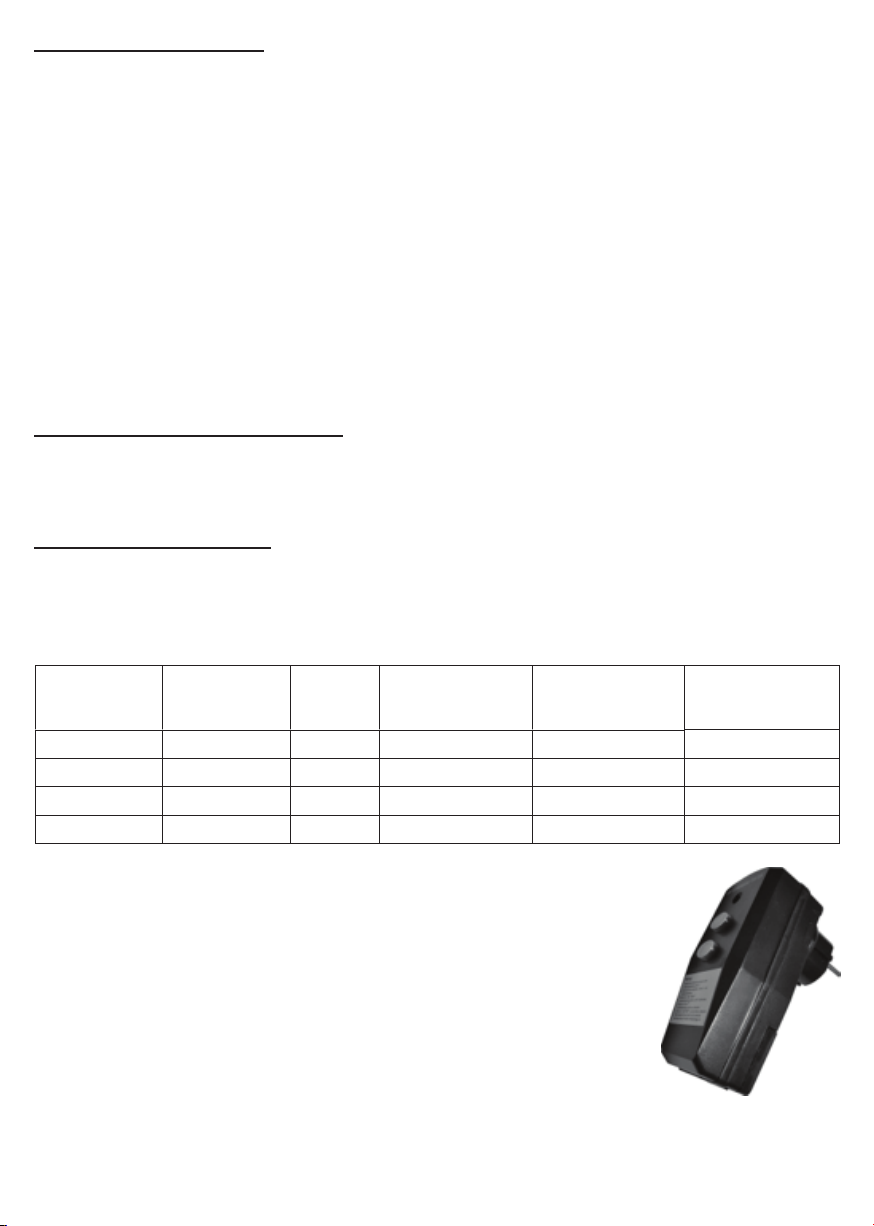
Pompa ciepła jest dostarczana z kablem podłączeniowym, który można
podłączyć bezpośrednio do gniazdka. Kabel standardowo posiada wyłącznik
różnicowoprądowy (RCD) o prądzie upływu 30 mA.
Uwaga: przed użyciem sprawdź RCD w następujący sposób:
1. Podłącz RCD do stałego gniazdka.
2. Naciśnij przycisk „RESET”. Wskaźnik powinien być „WŁ.”.
3. Naciśnij przycisk „TEST”. Wskaźnik powinien być „WYŁ.”.
4. Ponownie naciśnij przycisk „RESET”, aby rozpocząć korzystanie z pompy ciepła.
Zawsze należy natychmiast wyłączyć pompę ciepła, gdy wskaźnik RCD jest wyłączony. Zachowaj szczególną
ostrożność podczas naciskania przycisku „RESET” po awarii, ponieważ problem może nadal występować.
22
Page 23

2.5 Pierwsze uruchomienie pompy ciepła
Podczas uruchamiania (po sprawdzeniu wszystkich podłączeń) należy wykonać następujące kroki:
• Włącz pompę filtrującą. Sprawdź, czy nie ma wycieków wody oraz czy przepływ wody do i z
• Włóż wtyczkę zasilającą do gniazdka i włącz pompę ciepła. Urządzenie uruchomi się po upływie
• Po kilku minutach upewnij się, że powietrze wydobywające się z pompy ciepła jest chłodne.
• Ustaw urządzenie i pompę basenową na pracę przez 24 godziny na dobę, aż do osiągnięcia
Osiągnięcie pożądanej temperatury wody w basenie zajmie kilka dni, w zależności od początkowej
temperatury wody i temperatury otoczenia. Dobre przykrycie basenu i izolacja rurociągów mogą znacznie
skrócić ten okres.
Uwaga: opóźnienie czasowe – urządzenie jest wyposażone we wbudowane 3-minutowe
basenu jest prawidłowy.
opóźnienia czasowego (patrz poniżej).
pożądanej temperatury wody w basenie. Gdy ustawiona temperatura zostanie osiągnięta,
urządzenie po prostu wyłączy się. Następnym razem urządzenie automatycznie uruchomi się
ponownie, gdy temperatura wody w basenie spadnie o 1 stopień Celsjusza poniżej ustawionej
wartości.
opóźnienie, mające na celu ochronę elementów obwodu sterującego oraz eliminację
cyklicznego ponownego uruchamiania i wibracji stycznika.
To opóźnienie czasowe automatycznie ponownie uruchomi urządzenie po około 3
minutach od każdego przerwania obwodu. Nawet krótkotrwałe przerwanie zasilania
aktywuje to opóźnienie i uniemożliwi uruchomienie urządzenia do momentu zakończenia
3-minutowego odliczania.
2.6 Kondensacja
Podczas podgrzewania wody w basenie, powietrze zasysane przez urządzenie jest schładzane, a woda
może skraplać się na lamelach parownika. Jeśli wilgotność względna jest bardzo wysoka, może to wynosić
nawet kilka litrów na godzinę. Czasami ta skondensowana woda jest błędnie uważana za wodę z basenu.
Uwaga: szybki sposób na sprawdzenie, czy woda spływająca przez odpływ jest kondensatem,
polega na wyłączeniu urządzenia i pozostawieniu pompy basenowej włączonej. Jeśli
woda przestanie wyciekać z tacy ociekowej, jest to kondensat. JESZCZE SZYBSZY
SPOSÓB TO SPRAWDZENIE WODY Z ODPŁYWU NA OBECNOŚĆ CHLORU – jeśli nie
ma chloru, jest to kondensat.
3. Użycie i eksploatacja
3.1 Wyświetlacz
Patrz strona 28.
Pompę ciepła można włączyć lub wyłączyć za pomocą przycisku WŁĄCZ/WYŁĄCZ.
Gdy wyświetlacz jest WYŁĄCZONY, wyświetlane są następujące informacje:
• Wskaźnik „WYŁ.” w miejscu pomiaru temperatury wody w basenie
• Żądana temperatura do podgrzewania
• Komunikaty o możliwych błędach
Gdy wyświetlacz jest WŁĄCZONY, wyświetlane są następujące informacje:
• Żądana temperatura do podgrzewania
• Temperatura wody w basenie
• Wskaźnik „Heating” (Grzanie), gdy urządzenie podgrzewa wodę
• Graficzne przedstawienie przepływu wody: skala przepływu (patrz dalej)
3.2 Ustawianie żądanej temperatury
Żądaną temperaturę można ustawić bezpośrednio za pomocą strzałek. Ustawienie zostanie
automatycznie zapisane w pamięci.
Wyboru między °C a °F można dokonać w następujący sposób:
• Odłącz zasilanie urządzenia.
• Naciśnij oba klawisze strzałek jednocześnie i włącz urządzenie, a następnie zwolnij klawisze.
23
Page 24

3.3 Wskaźnik przepływu
Wskaźnik przepływu to graficzne przedstawienie objętości wody przepływającej przez urządzenie. Pompy
ciepła działają najlepiej, gdy wskaźnik przepływu znajduje się w zielonej strefie. Wykres jest ważny
dopiero po co najmniej 30 minutach pracy. Wskaźnik przepływu wyświetla również trzyminutowe
opóźnienie przed faktycznym uruchomieniem urządzenia. Wskaźnik „flow” nie jest widoczny; mały blok na
końcu skali przepływu po prawej stronie miga i po pewnym czasie znika. Gdy wszystkie one znikną,
urządzenie uruchomi się.
4. Konserwacja i przeglądy
4.1 Konserwacja
• Regularnie sprawdzaj dopływ wody do urządzenia. Należy unikać niskiego przepływu wody i
dostawania się powietrza do systemu, ponieważ obniży to wydajność i niezawodność urządzenia.
Filtr basenu/SPA powinien być regularnie czyszczony, aby uniknąć uszkodzenia urządzenia w
wyniku zabrudzenia lub zatkania filtra.
• Obszar wokół urządzenia powinien być suchy, czysty i dobrze wentylowany. Regularnie czyść
boczny wymiennik ciepła, aby utrzymać dobrą wymianę ciepła i oszczędzać energię.
• Regularnie sprawdzaj zasilanie i połączenia kablowe. Jeśli urządzenie zacznie działać
nieprawidłowo lub poczujesz nietypowy zapach wokół komory elektrycznej, wyłącz pompę ciepła i
w odpowiednim czasie zleć jej wymianę.
4.2 Instrukcja rozwiązywania problemów
Nieprawidłowy montaż stworzy niebezpieczeństwo porażenia prądem, które może prowadzić do śmierci
lub poważnych obrażeń użytkowników basenu, instalatorów lub innych osób, a także może spowodować
szkody materialne.
Uwaga: NIE próbuj wykonywać żadnych wewnętrznych regulacji wewnątrz grzejnika.
Uwaga: trzymaj ręce i włosy z dala od łopatek wentylatora, aby uniknąć obrażeń.
Uwaga: jeśli nie znasz systemu filtracji basenu i grzejnika:
• Nie próbuj wykonywać regulacji ani konserwacji bez konsultacji z dealerem, profesjonalnym
wykonawcą serwisu basenowego lub klimatyzacyjnego.
• Przed użyciem, serwisowaniem lub regulacją grzejnika, lub systemu filtracji basenu, uważnie
przeczytaj całą instrukcję montażu i użytkowania.
• Nie uruchamiaj pompy ciepła wcześniej niż 24 godziny po instalacji, aby uniknąć uszkodzenia
Uwaga: przed rozpoczęciem konserwacji lub naprawy wyłącz zasilanie urządzenia.
Pompa ciepła nie działa
sprężarki.
Problem
Niewystarczające ogrzewanie
Przyczyna
1. Brak zasilania 1. Włącz zasilanie
2. Urządzenie nie jest włączone 2. Włącz pompę ciepła
3. Nieprawidłowe ustawienie temp. 3. Wyreguluj temperaturę
4. Opóźnienie czasowe jest aktywne 4. Poczekaj 3 minuty
5. Temperatura powietrza jest
niższa niż 8°C
6. Inne 6. Patrz dalej rozdział „komunikaty
1. Przeszkody blokują przepływ powietrza
2. Lód na parowniku
5. Poczekaj, aż temperatura
wzrośnie
o błędach”
1. Usuń przeszkody
2. Wy
Rozwiązanie
łącz pompę (powietrze jest za zimne)
4.3 Komunikaty o błędach
Pompa ciepła wyświetli komunikat o błędzie w przypadku wystąpienia problemu.
Mogą pojawić się następujące komunikaty:
Komunikat o błędzie
Niska temperatura
powietrza
Pompa ciepła nie uruchomi się, jeśli
temperatura otoczenia jest niższa
niż 8°C
Przyczyna
Urządzenie uruchomi się, gdy
tylko temperatura otoczenia
osiągnie 8°C
24
Rozwiązanie
Page 25

Przegrzanie
Wysoka temperatura
powietrza
Słaby przepływ
Pompa ciepła nie jest w
stanie przekazać całego
ciepła, które wytwarza
Urządzenie wskazuje, że temperatura
otoczenia jest wystarczająco wysoka
do pracy bez wentylatora. Wentylator
wyłącza się
Niewystarczający przepływ
Sprawdź przepływ wody
Sprawdź przepływ wody
wody. Wentylator zatrzymał się,
ale sprężarka nadal działa
Błąd przepływu
Więcej informacji: www.sunspring.eu
Sprawdź/przywróć przepływ wody.
Pompa ciepła uruchomi się po 3
minutach, gdy przepływ w urządzeniu
znów stanie się wystarczający
Sprawdź przepływ wody
4.4 Skład chemiczny wody
Należy zwrócić szczególną uwagę na utrzymanie równowagi chemicznej wody w basenie w
następujących granicach:
Min.
Maks.
pH
Wolny chlor (mg/l)
TAC (mg/l)
TAC (°F)
7,0
0,5
80
10
7,8
1,5
150
30
Sól (g/l) 8
Uwaga: nieprzestrzeganie wartości podanych powyżej spowoduje unieważnienie gwarancji.
Uwaga: zbyt wysokie stężenie jednego lub kilku z powyższych produktów może doprowadzić do
4.5 Przygotowanie do zimy
Chociaż nasze pompy ciepła Sun Spring są zabezpieczone przed zamarzaniem, zalecamy całkowite
spuszczenie wody z instalacji. Wykonaj następujące kroki, aby całkowicie spuścić wodę z pompy ciepła:
• Wyłącz zasilanie pompy ciepła w głównej szafce bezpieczników.
• Odłącz dopływ wody do pompy ciepła.
• Odłącz króćce wlotowy i wylotowy wody i pozwól wodzie spłynąć z pompy ciepła.
• Ponownie luźno podłącz króćce wlotowy i wylotowy, aby zapobiec dostawaniu się
Uwaga: niewłaściwe przygotowanie pompy ciepła do zimy może spowodować jej uszkodzenie i
4.6 Wiosenne uruchomienie
Jeśli Twoja pompa ciepła została przygotowana do zimy, wykonaj następujące kroki podczas uruchamiania
systemu wiosną:
• Sprawdź system pod kątem wszelkich zanieczyszczeń i problemów strukturalnych.
• Szczelnie pod
• Włącz pompę filtrującą, aby doprowadzić wodę do pompy ciepła.
• Przywróć zasilanie elektryczne pompy ciepła i włącz ją.
nieodwracalnego uszkodzenia pompy ciepła. Zawsze należy instalować urządzenia do
uzdatniania wody za pompą ciepła. Jeśli w instalacji wodnej zainstalowany jest automatyczny
dozownik środków chemicznych, powinien on znajdować się za pompą ciepła. Pomiędzy
pompą ciepła a dozownikiem środków chemicznych należy zainstalować zawór zwrotny, aby
zapobiec cofaniu się wody nasyconej środkami chemicznymi do pompy ciepła. Może to
spowodować uszkodzenie podzespołów.
zanieczyszczeń do połączeń.
utratę gwarancji.
łącz złączki wlotu i wylotu wody.
25
Page 26

5. Gwarancja
OGRANICZONA GWARANCJA
Dziękujemy za zakup naszej pompy ciepła.
Gwarantujemy brak wad produkcyjnych materiałów i wykonania wszystkich części przez dwa lata od
daty zakupu detalicznego.
Niniejsza gwarancja obejmuje wyłącznie pierwszego nabywcę detalicznego, nie podlega
przeniesieniu i nie ma zastosowania do produktów, które zostały przeniesione z miejsca ich
pierwotnej instalacji. Odpowiedzialność producenta nie przekracza kosztu naprawy lub wymiany
wadliwych części i nie obejmuje żadnych kosztów robocizny związanej z usunięciem i ponowną
instalacją wadliwej części, transportu do i z fabryki, ani jakichkolwiek innych materiałów niezbędnych
do naprawy. Niniejsza gwarancja nie obejmuje awarii lub usterek wynikających z poniższych
przyczyn:
1. Nieprawidłowa instalacja, eksploatacja lub konserwacja produktu niezgodna z naszą „Instrukcją
montażu i obsługi”, dostarczoną wraz z produktem.
2. Fachowość specjalistów od montażu urządzenia.
3. Brak właściwej równowagi chemicznej wody
zasadowość (TA) od 80 do 150 ppm. Wolny chlor od 0,5 do 1,5 mg/l. Całkowita zawartość
rozpuszczonych substancji stałych (TDS) poniżej 1200 ppm. Maksymalna zawartość soli 8 g/l).
4. Nadużycie, modyfikacja, wypadek, pożar, powódź, uderzenie pioruna, gryzonie, owady,
zaniedbanie lub klęski żywiołowe.
5. Kamień, zamarzanie lub inne warunki powodujące niewystarczającą cyrkulację wody.
6. Eksploatacja produktu przy przepływach wody przekraczających opublikowane minimalne i
maksymalne parametry techniczne.
7. Użycie części lub akcesoriów niezatwierdzonych przez producenta wraz z produktem.
8. Zanieczyszczenie chemiczne powietrza lub niewłaściwe użycie środków dezynfekujących, takich
jak wprowadzanie środków dezynfekujących przed grzejnikiem i wężem odkurzacza lub przez
skimmer.
9. Przegrzanie, nieprawidłowe podłączenie, niewłaściwe zasilanie, przypadkowe uszkodzenia
spowodowane awarią pierścieni uszczelniających, sit DE lub elementów wkładu, bądź
uszkodzenia powstałe na skutek pracy pompy przy niewystarczającej ilości wody.
w basenie (poziom pH od 7,0 do 7,8. Całkowita
OGRANICZENIE ODPOWIEDZIALNOŚCI
Jest to jedyna gwarancja udzielana przez Producenta. Nikt nie jest upoważniony do udzielania
jakichkolwiek innych gwarancji w naszym imieniu.
NINIEJSZA GWARANCJA ZASTĘPUJE WSZELKIE INNE GWARANCJE, WYRAŹNE LUB
DOROZUMIANE, W TYM WSZELKIE GWARANCJE PRZYDATNOŚCI DO OKREŚLONEGO CELU
ORAZ PRZYDATNOŚCI HANDLOWEJ. WYRAŹNIE ZRZEKAMY SIĘ WSZELKIEJ
ODPOWIEDZIALNOŚCI ZA SZKODY POŚREDNIE, PRZYPADKOWE, WYNIKOWE LUB KARNE
WYNIKAJĄCE Z NARUSZENIA JAKIEJKOLWIEK GWARANCJI, WYRAŹNEJ LUB DOROZUMIANEJ.
Niniejsza gwarancja przyznaje Ci określone prawa, które mogą różnić się w zależności od kraju.
ROSZCZENIA GWARANCYJNE
Aby szybko złożyć reklamację, skontaktuj się ze sprzedawcą i podaj następujące informacje: dowód
zakupu, numer modelu, numer seryjny oraz datę instalacji. Instalator skontaktuje się z producentem w
celu uzyskania instrukcji dotyczących reklamacji i zlokalizowania najbliższego punktu serwisowego.
26
Page 27
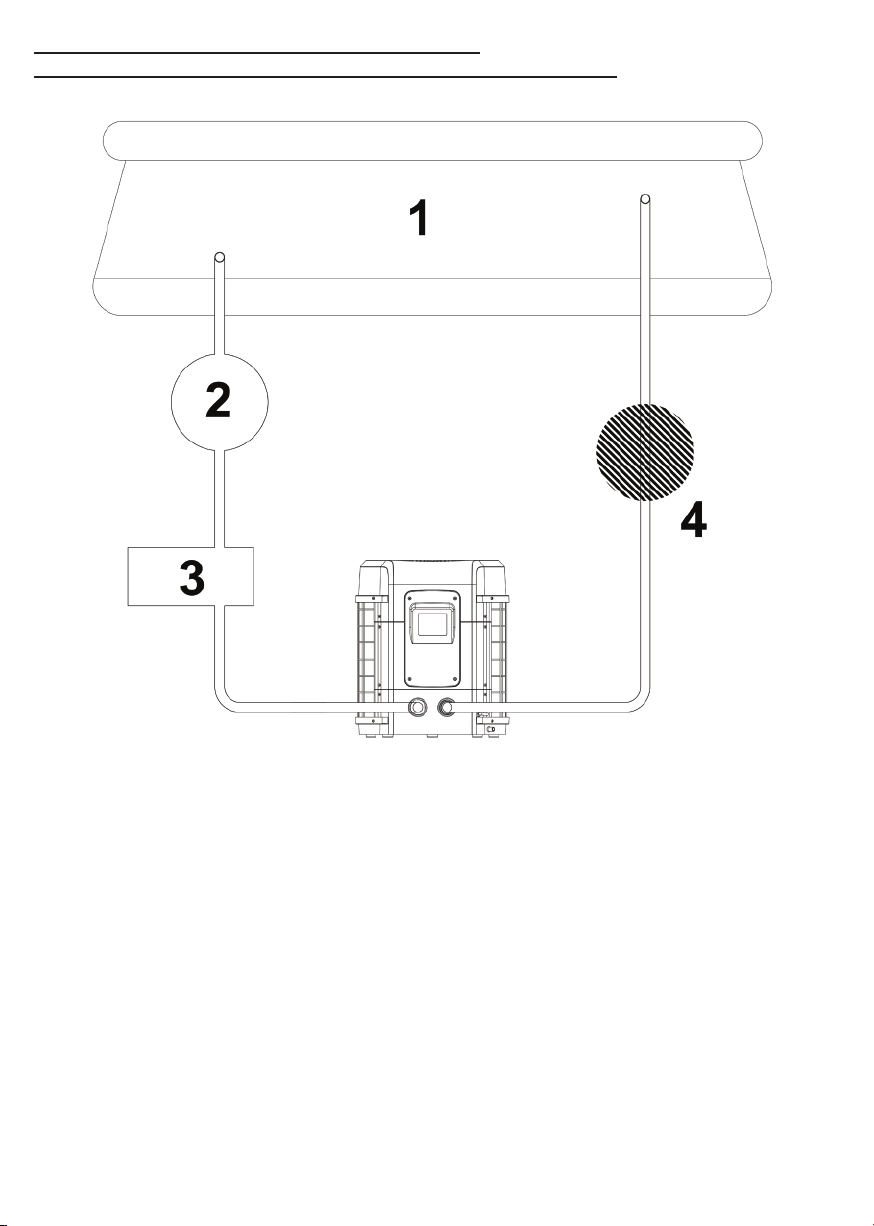
Heat pump location / Wärmepumpen-Standort /
/ Lokalizacja pompy ciepła
1:
Swimming pool
Schwimmbad
Басейн
Basen
2:
Water pump
Wasserpumpe
Циркуляційний насос
Pompa obiegowa
Attention: Distance to the swimming pool: 2 m
Wichtig: Entfernung zum Schwimmbad: 2 m
3:
Filter
Filter
Фільтр
Filtr
4:
Water treatment
Wasseraufbereitung
Очищення води
Oczyszczanie wody
: : 2
Uwaga: Odległość do basenu: 2 m
27
Page 28
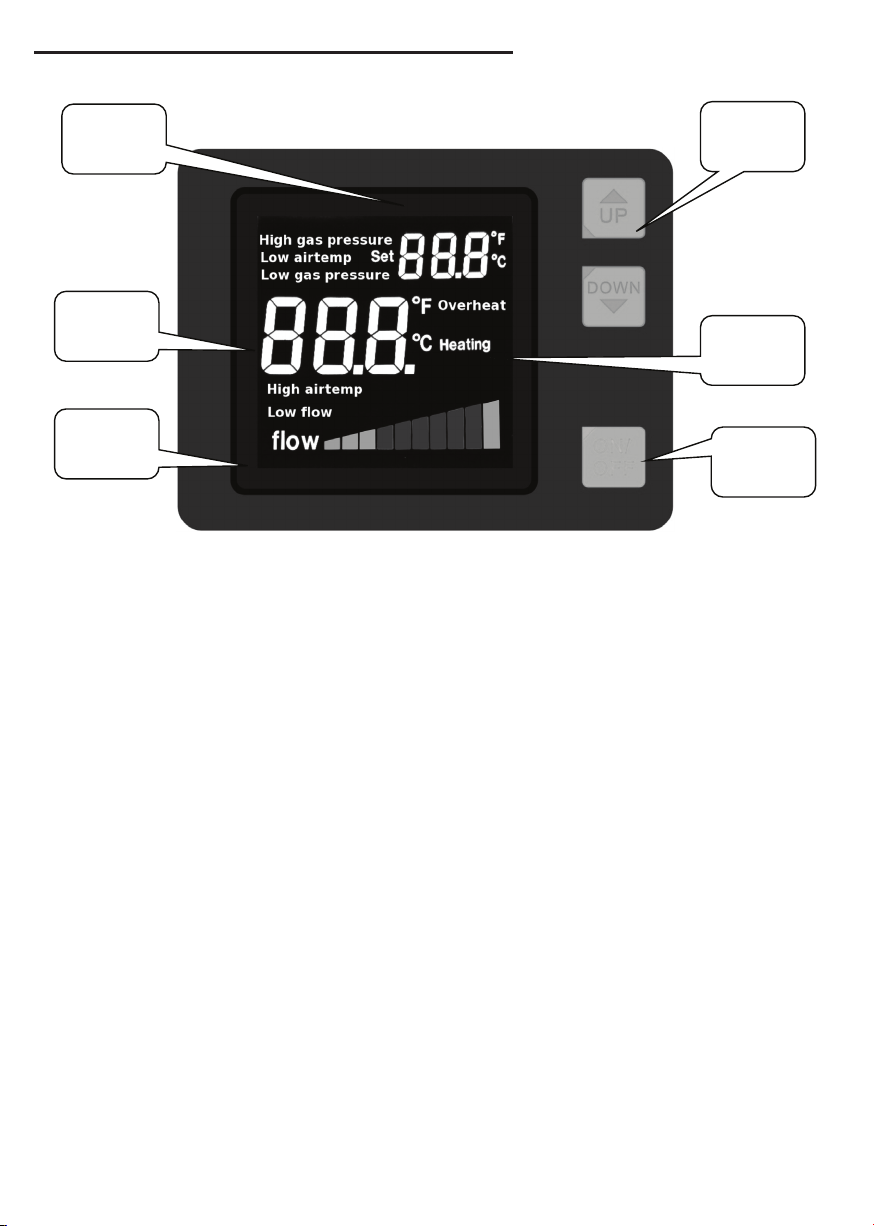
The Display / Die Anzeige / / Wyświetlacz
654
3
2
1
1:
ON / OFF switch
AN / AUS Schalter
Перемикач УВІМК / ВИМК
Przełącznik WŁ./WYŁ.
2:
Operation mode
Betriebsart
Режим роботи
Tryb pracy
3:
Arrow keys
Pfeil-Tasten
Клавіші зі стрілками
Klawisze strzałek
4:
Set water temperature
Gewünschte Temperatuur
Встановлення температури води
Ustaw temperaturę wody
5:
Pool temperature
Schwimmbad Temperatur
Температура басейну
Temperatura basenu
6:
Display water flow
Anzeige des Wasserflusses
Відображення потоку води
Wyświetl przepływ wody
28
 Loading...