

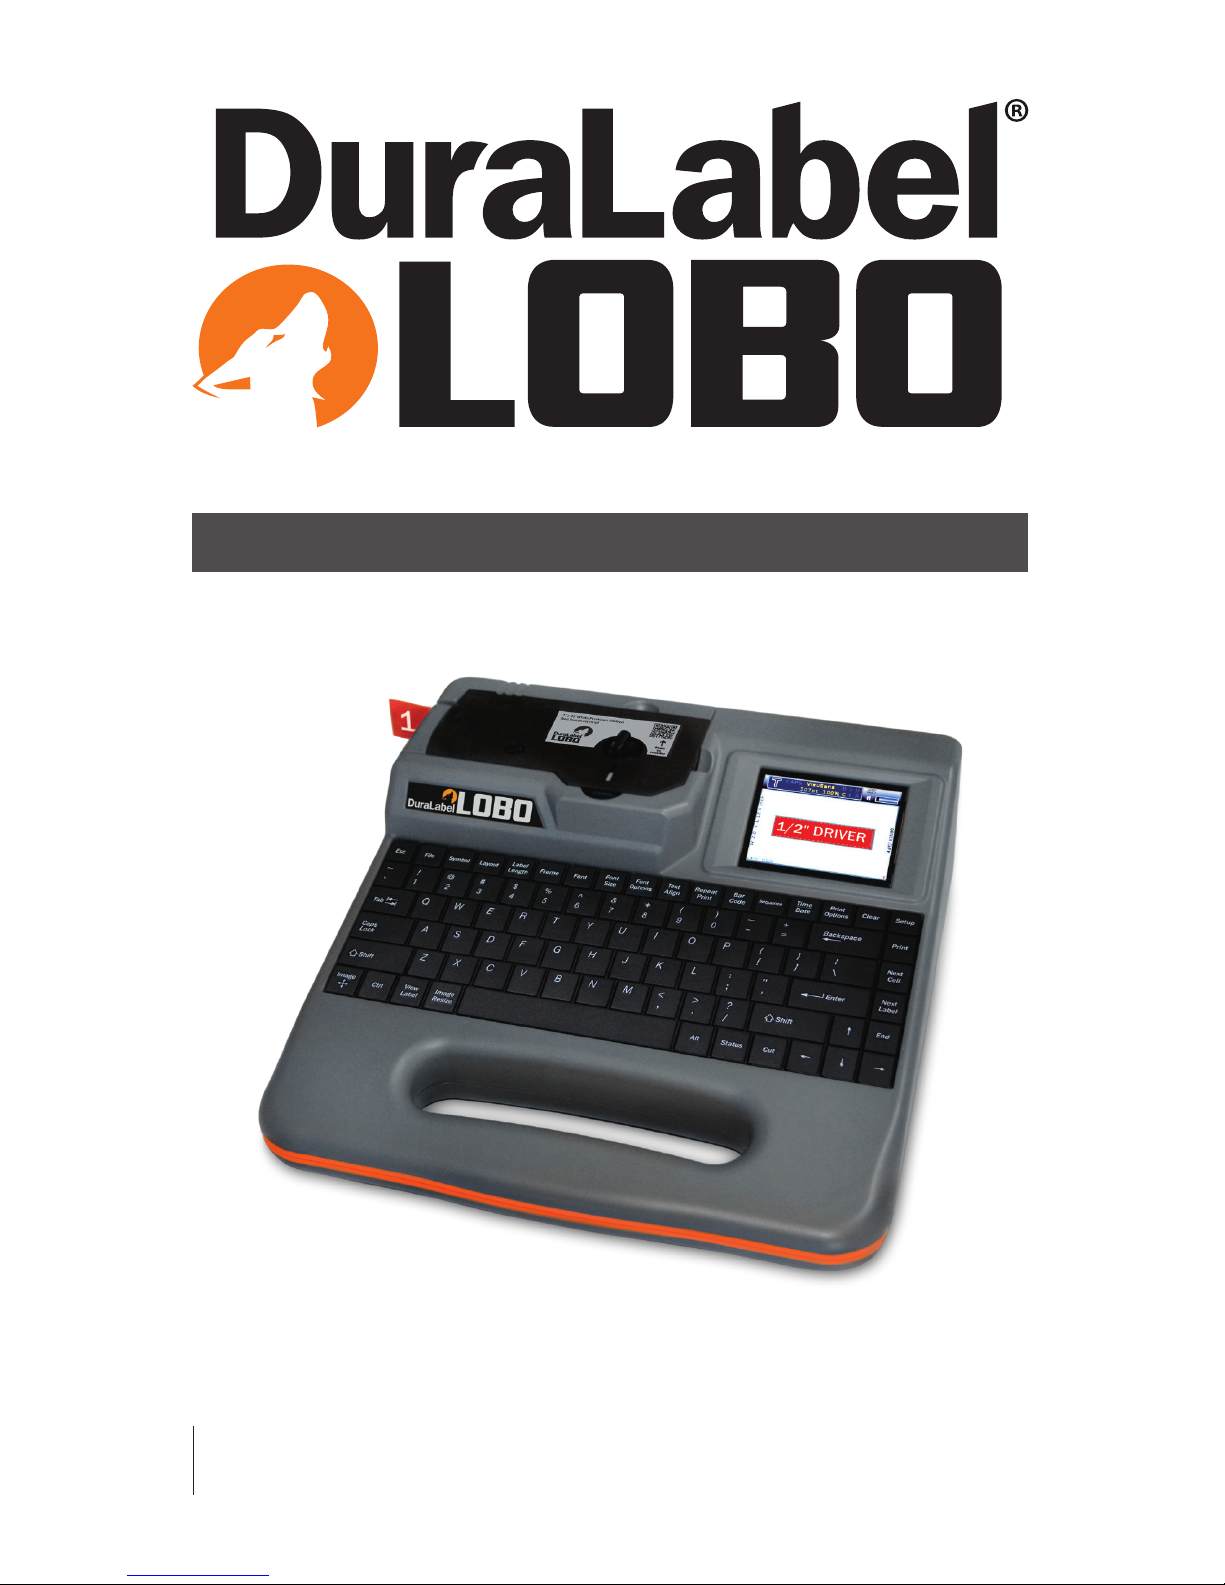
USER GUIDE
800.788.5572
DuraLabel.com

Graphic Products®, DuraLabel®, PathFinder®, Toro® and Lobo® are Registered Trademarks of Graphic Products, Inc.
© 2013, 2014 Graphic Products, Inc.
Copyright Information
No part of this manual, including the products and software described in it, may be
reproduced, transmitted, transcribed, stored in a retrieval system, or translated into any
language in any form or by any means, except documentation kept by the purchaser for
backup purposes, without the express written permission of Graphic Products, Inc.
Products and corporate names appearing in this manual may or may not be registered
trademarks or copyrights of their respective companies, and are used only for
identification or explanation and to the owners’ benefit, without intent to infringe.
Specifications and information contained in this manual are furnished for informational
use only, and are subject to change at any time without notice, and should not be
construed as a commitment by Graphic Products. Graphic Products assumes no
responsibility or liability for any errors or inaccuracies that may appear in this manual.
DuraLabel.com | 800.788.5572
| 1
Contents
1. Introduction
4
2. Warranties
5
2.1 5-Year DuraLabel Printer Warranty
5
2.1.1 Repairs
5
2.1.2 Batteries
5
2.1.3 Warranty Details
5
2.2 5-Year DuraLabel Premium Vinyl Warranty
6
3. Safety Instructions
7
4. Batteries, Certifications, Declaration of Conformity
9
4.1 Batteries
9
4.2 Certifications
9
4.3 Declaration of Conformity
9
5. What’s in the Box?
10
6. Lobo Diagram
11
7. Power
12
8. Battery
13
8.1 Battery Installation
13
8.2 Battery Charging
13
8.3 Improving Long-Term Battery Life
13
9. Print Cartridge
14
9.1 Loading Cartridge
14
9.2 Removing Cartridge
15
9.3 Switching Cartridges
15
10. Making labels
16
10.1 Label-Making Basics
16
10.1.1 Content Types
16
10.1.2 Fields
16
10.1.3 Cells
17
10.1.4 Multiple-Label Projects
17
10.1.5 Function Keys
17
10.2 Label-Making Lessons
18
10.2.1 Lesson 1: Simple Label with Text and Symbol
18
10.2.2 Lesson 2: Multi-Cell Label
19
10.2.3 Lesson 3: Barcode Label with Sequence
21
11. Label Canvas Display
22
11.1 Status Indicators
22
11.1.1 Content Status Box
22

2 |
DuraLabel.com | 800.788.5572
CONTENTS
12. Navigation
25
12.1 Label Navigation
25
12.1.1 Moving the Cursor Between Fields
25
12.1.2 Moving the Cursor Inside a Text Field
25
12.1.3 Moving Between Cells
25
12.1.4 Moving Between Labels
25
12.2 Control Screen Navigation
25
12.2.1 Entry and Exit
25
12.2.2 Structure
25
12.2.3 Editing Settings
26
13. Label-Editing Function Keys
27
13.1 File
27
13.2 Symbol
28
13.3 Layout
28
13.4 Label Length
29
13.5 Frame
30
13.6 Font
30
13.7 Font Size
30
13.8 Font Options
31
13.9 Text Align
32
13.10 Repeat Print
32
13.11 Barcode
33
13.12 Sequence
34
13.13 Time/Date
35
13.14 Print Options
36
13.15 Clear
37
13.16 Setup
37
13.17 Print
39
13.17.1 Printing a Sequence
39
13.17.2 Printing a Multiple-Label Project
39
13.18 Next Cell
39
13.19 Next Label
39
13.20 End
40
13.21 Directional Arrows and Enter
40
13.22 Cut
40
13.23 Status
40
13.24 Image Resize
40
13.25 View Label
41
13.26 Image Move
41
14. Printing From a Computer (optional)
42
14.1 Installing Printer Driver
42
14.2 Upgrading a Driver
45
DuraLabel.com | 800.788.5572
| 3
CONTENTS
15. Cleaning Instructions
46
15.1 Cutter
46
15.2 Printhead
47
15.3 Polyester Printhead Shield
47
15.4 Platen Roller
48
16. Troubleshooting
49
16.1 Printer has No Power
49
16.2 Printer Doesn’t Respond to Commands
49
16.3 Cartridge Lock will not Lock
49
16.4 Canceling a Print Job
50
16.5 Label Doesn’t Feed When Print is Attempted
50
16.6 Label Print is Not Lined up Correctly
50
16.7 SD Card Isn’t Working
50
16.8 Saved Label is Blank
51
16.9 Labels are Wrinkled or Missing Ink
51
16.10 Label File Doesn’t Match Cartridge Type
51
16.11 Error Message: Cutter Jam
52
16.12 Error Message: Please Insert Supply Cartridge
52
16.13 Error Message: Printer Not Ready, Please Secure Cartridge Lock
53
16.14 Error Message: Supply Out
53
17. Specifications
54
18. Symbols
56
4 |
DuraLabel.com | 800.788.55724 |
DuraLabel.com | 800.788.55724 |
DuraLabel.com | 800.788.5572
1. Introduction
The Lobo is a self-contained thermal transfer printer used to make labels for a wide
range of applications. The Lobo Reference Card (located on the bottom of the Lobo)
is designed to get you labeling as quickly as possible. For more detailed information,
please refer to this user guide.

DuraLabel.com | 800.788.5572
2.1 5-Year DuraLabel Printer Warranty | 5
2. Warranties
2.1 5-Year DuraLabel Printer Warranty
Graphic Products’ DuraLabel printers are warrantied to be
free from defects in materials and workmanship for a period
of ve (5) years from the date of purchase. Within this period,
Graphic Products, Inc. will, at its sole option, repair or replace
any components which fail in normal use. Such repairs or
replacement will be made at no charge to the purchaser for parts or labor, provided that
the purchaser shall be responsible for any transportation cost. This warranty does not
cover loss, damages from accident, or equipment or parts which have been misused,
altered, neglected, carelessly handled, used for purpose other than those for which the
printer was manufactured, or damages resulting from unauthorized service.
2.1.1 REPAIRS
Repairs are warrantied for 90 days. If the original warranty is still in effect, repaired
units will remain under their original warranty or for 90 days from the date of service,
whichever is longer.
2.1.2 BATTERIES
The optional battery packs for the DuraLabel Toro and Lobo portable systems are
warrantied for three years from the date of purchase.
The battery for the DuraLabel 2000 PLUS system is warrantied for one year from the
date of purchase.
2.1.3 WARRANTY DETAILS
The warranties and remedies contained herein are exclusive and in lieu of all other
warranties whether express, implied, or statutory, including any liability arising under any
warranty of merchantability or tness for a particular purpose, statutory or otherwise. This
warranty gives the purchaser specic legal rights, which may vary from state to state.
In no event shall Graphic Products be liable for any incidental, special, indirect, or
consequential damages, whether resulting from the use, misuse, or inability to use
the product for any reason including defect. Some states do not allow the exclusion of
incidental or consequential damages, so the above limitation may not apply in all areas.
Graphic Products retains the exclusive right within all warranty periods to repair, replace,
or offer a full refund of the purchase price at its sole discretion. Such remedy shall be
the purchaser’s sole and exclusive remedy for any breach of warranty.

6 | 2.2 5-Year DuraLabel Premium Vinyl Warranty
DuraLabel.com | 800.788.5572
WARRANTIES
General maintenance and cleaning of the DuraLabel printer is the purchaser’s
responsibility and is not covered by the warranty. Expendable items or parts such as
label supply and ribbon are not covered by this warranty.
NOTE: Specic preparation may be required before shipping. Please contact your
Graphic Products representative to ensure correct return procedure: please call
800.788.5572 for details. Graphic Products, Inc. shall not be responsible for any loss
or damages incurred during shipping.
2.2 5-Year DuraLabel Premium Vinyl Warranty
DuraLabel supplies are tested for durability under various conditions, including UV
exposure, moisture, heating and cooling cycles, abrasion, and chemical exposures.
Graphic Products warranties labels made from its Premium vinyl supplies for a period of
ve (5) years.
Within ve years of purchase and after proper application, Graphic Products will replace
labels made with DuraLabel Premium Vinyl which become unreadable or fail to maintain
adhesion with the labeled surface. In such instance, Graphic Products, Inc. will provide
a one-time replacement roll of the same supply.
To prevent damage to the Lobo and to prevent nullifying the
Lobo warranty, please adhere to these rules:
• Only use official Graphic Products print cartridges in the Lobo printer.
• Read all instructions and rules in this manual completely.
• If something seems to be wrong with the Lobo, first refer to the Troubleshooting
section at the back of this guide for help. If your problem is not resolved by reading
the Troubleshooting section, please contact Graphic Products for assistance.

DuraLabel.com | 800.788.5572
3. Safety Instructions | 7
3. Safety Instructions
Please review the following safety instructions before using the Lobo:
• Keep the printer away from humidity and prolonged exposure to direct sunlight. The
Lobo is intended for indoor use only.
• Use the Lobo only with the provided 19V DC power supply, model EA10953.
• Check the power source voltage before connecting the printer to a power outlet.
• Disconnect the printer from the power outlet when not using the printer or charging
the battery.
• Before plugging the power cord into the Lobo, make sure the On/Off switch is set to Off.
• DO NOT pour liquid onto the printer or printer parts.
• ONLY qualified service personnel should attempt to perform maintenance on the printer.
• The printer MUST be turned off before any type of maintenance work is done.
• The Lobo may build a small static charge in static-sensitive environments. Do not
operate the Lobo near flammable materials.
• The power outlet should be near the printer and easily accessible for quick power
disconnection.
• Remove the battery and unplug the printer from the wall socket to completely
disconnect power.
• Never throw the Lobo battery into a fire as it could explode.
• Never disassemble the Lobo battery, as leakage and damage may occur.
• Puncturing the Lobo battery may result in fire.
• Do not step or stand on the Lobo battery.
• Do not bring the Lobo battery terminals into contact with another metal object.
• Do not expose the Lobo battery to any liquid or direct sunlight.
• Do not store the battery in a locked or unventilated vehicle where extreme
temperatures may be experienced.
• Always keep the Lobo battery out of reach of infants or small children.
• Dispose of the Lobo battery in accordance with local regulations regarding
battery disposal.
8 | 3. Safety Instructions
DuraLabel.com | 800.788.5572
SAFETY INSTRUCTIONS
DANGER: Risk of explosion if battery is replaced by an incorrect type. Dispose of used
batteries according to their instructions.
NOTE: Changes or modications not expressly approved by the party responsible for
compliance could void the user’s authority to operate the equipment.
WARNING: Do not place your ngers between the label cutting blades. If you must
clear a label jam, use a tool; do not use your fingers.
The label cutting blade is located on the inside of the printing unit,
where the print cartridge label material exits the printer. The cutting
blade is sharp and cycles automatically after a label is printed.
Under normal operating conditions, the blade poses no harm to a user. The Lobo is
designed so that the blade cannot cycle unless a print cartridge is sensed in the printing
compartment. Also, the blade mechanism is equipped with an over-torque circuit that is
meant to shut off the blade if too much resistance is sensed.
But you should be aware that the blade still has the potential to cause injury. Never
place your fingers between the blades at any time. If you must clear a label jam from
between the blades, use a tool, such as a pen, pencil, or pliers. Be sure to turn the
printer off before attempting to clear a jam.
WARNING: The Lobo is shipped with the battery removed.
Don’t use in static-sensitive environments.
DuraLabel.com | 800.788.5572
4.3 Declaration of Conformity | 9
4. Batteries, Certications, Declaration
of Conformity
4.1 Batteries
Information for EU-member states only: The following symbol, of a crossed out
wheeled bin indicates that the Lobo battery must be disposed of properly and not
treated as general waste. Incorrect disposal could have a negative impact on human
health and the environment. For more information on the correct disposal/recycling of
this battery, please contact Graphic Products at +1.503.644.5572.
Lobo battery conforms to the following transportation testing and European standards:
This Lithium polymer battery pack has been tested and passed with the requirements of
UN 38.3, IEC 60950-1:2005(2nd Edition) and/or EN 60950-1:2006.
4.2 Certications
FCC Compliance: This equipment has been tested and found to comply with the limits
for a CLASS A digital device, pursuant to Part 15 of the FCC Rules. Operation is subject
to the following two conditions: (1) This device may not cause harmful interference, and
(2) this device must accept any interference received, including interference that may
cause undesired operation. These limits are designed to provide reasonable protection
against harmful interference when the equipment is operated in a commercial
environment. This equipment generates, uses, and can radiate radio frequency energy,
and if not installed and used in accordance with instructions may cause harmful
interference to radio communications. Changes and modifications could void the user’s
authority to operate this equipment.
• Canada: This device complies with Canada ICES-003 Class A. IC: 10524A-2012003.
• Lobo conforms to the following US, Canadian and European EMC and EMI
standards: This equipment has been tested and passed with the requirements
relating to electromagnetic compliance based on the standards RSS-Gen:2010,
FCC 15.225:2011, ANSI C63.4:2003, EN 60950-1:2006 + A11:2009 + A1:2010 +
A12:2011.
• Lobo CE Eligibility: Eligible to bear
certification mark. See aforementioned bullet
for further details.
4.3 Declaration of Conformity
The Declaration of Conformity can be obtained from:
Graphic Products, Inc.
Engineering Department
6445 SW Fallbrook Place
Beaverton, Oregon 97008 USA
Phone: +1.503.644.5572 | Fax: +1.503.646.0183
info@graphicproducts.com | GraphicProducts.com
10 | 5. What’s in the Box?
DuraLabel.com | 800.788.5572
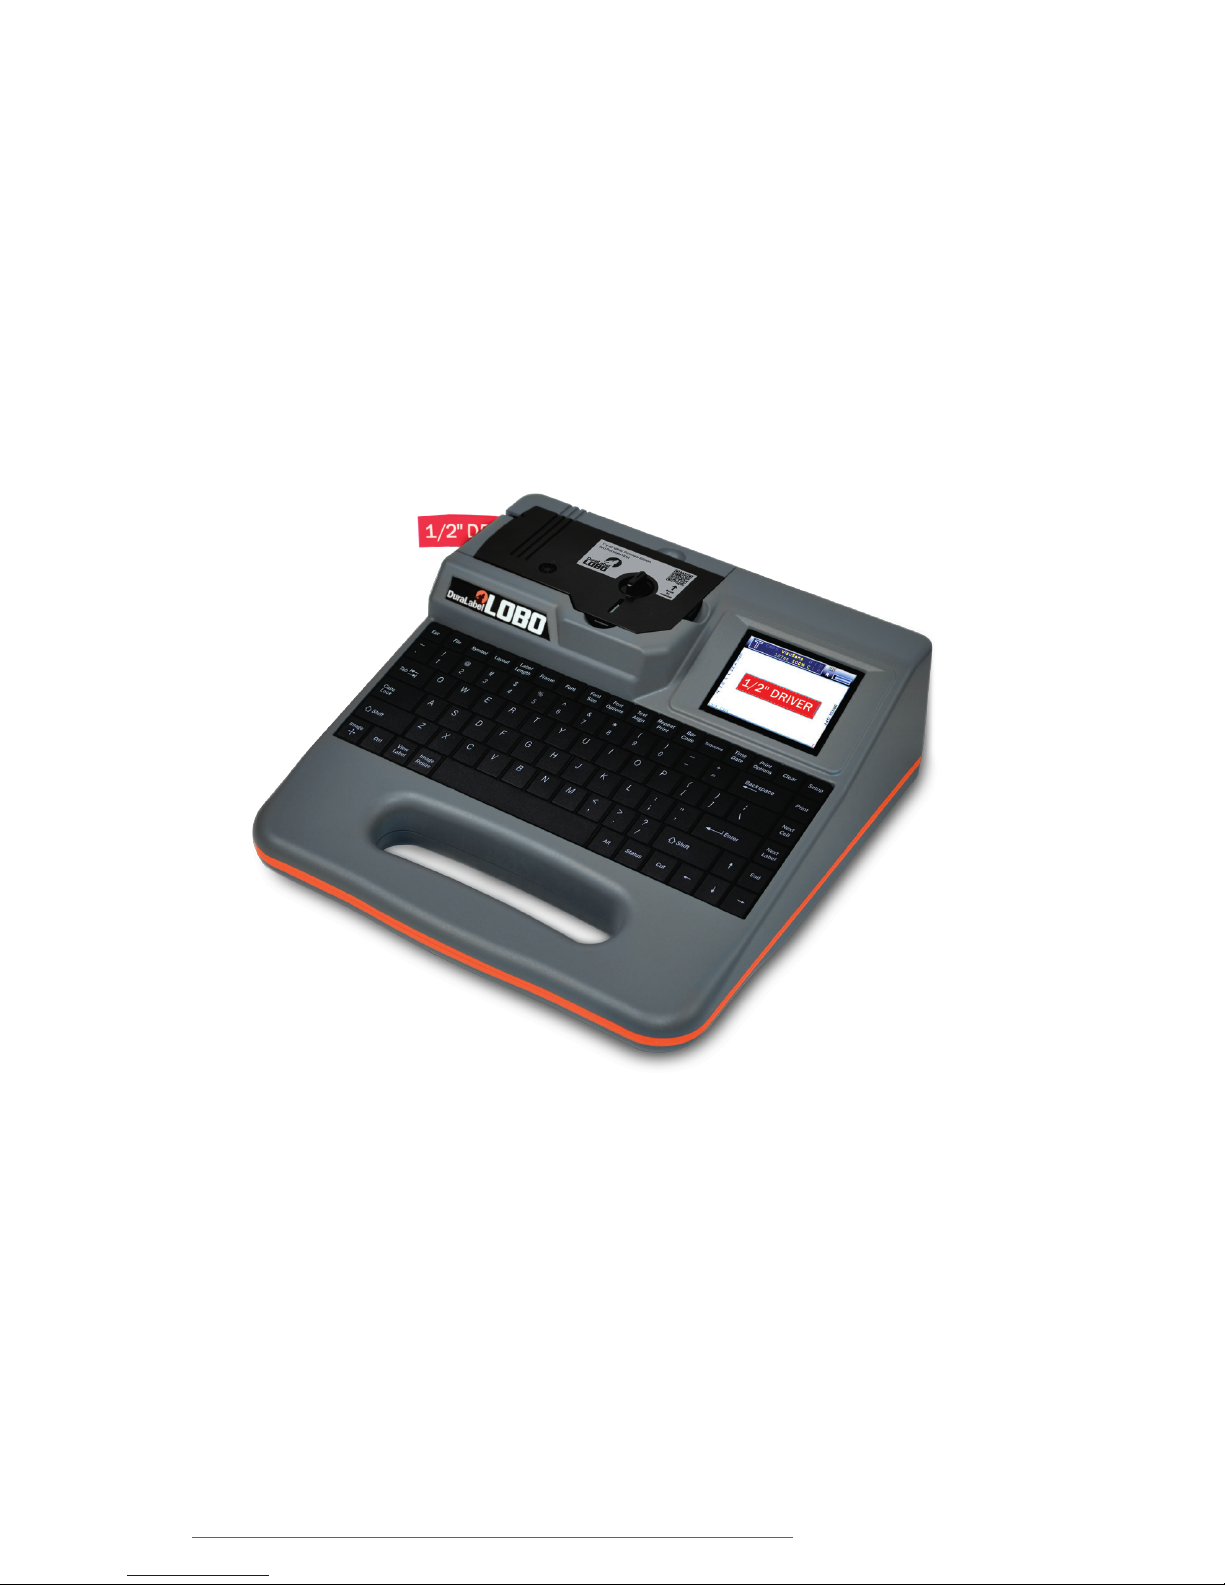
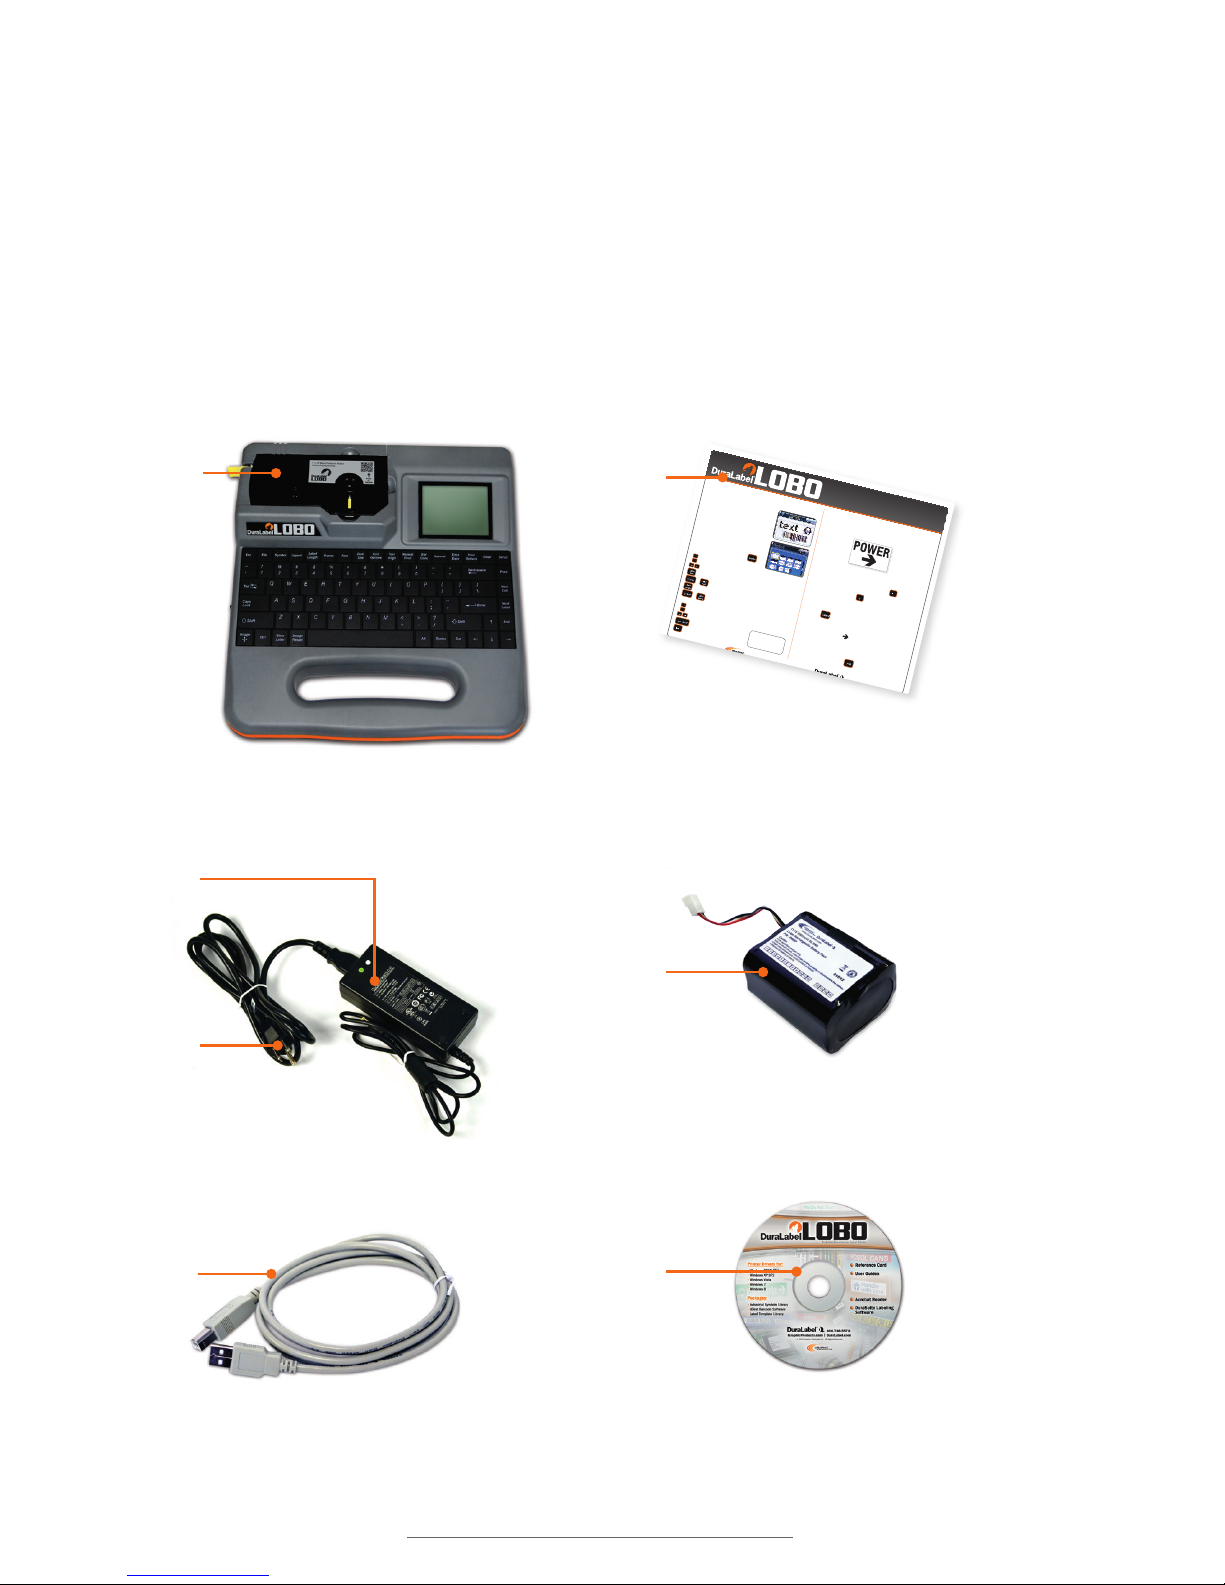
5. What’s in the Box?
4
800.788.5572 • DuraLabel.com
Reference card
Use this card to get started using the Lobo quickly, and as a long-term user reference. See the
complete Lobo user guide for more operating instructions and troubleshooting tips. Call Graphic
Products at 800.788.5572 or email support@graphicproducts.com with your questions.
BASIC LOBO FUNCTIONS
Place label content
Start typing to enter text on the label
canvas. Press Enter to move to the next
line on a label. Choose from types of
content (symbols, barcodes, sequences)
by pressing the relevant function key.
Label layouts
You can choose from label layouts that
have smaller sections called cells. There
are also vertical layouts available. Access
layout templates by pressing the
key.
Label canvas navigation
Moves cursor between content elds
Moves cursor inside a text eld
Moves to next cell in a multi-cell layout
+
Moves to previous cell
Moves to next label in a multi-label project
+
Moves to previous label
Control screen navigation
Move up and down menus
Change menu settings
Accept changes
Exit out of a menu, cancel changes
LABEL CREATION LESSON
The following lesson will walk you through making the simple label
shown below. It will also show you how to save and print the label.
Use the keyboard to type the word POWER.
The font in the label above is different than the default font, so it
must be switched. Press the Font key. Use the
key to switch
from the VisuSans font to Triumvirate. Press Enter.
On the next screen, use the
to select Entire Label and then
press Enter. This applies the font change to the entire label.
Press Enter again. This moves the cursor to the next line and
resizes the font size of the existing text.
Press the
key on the keyboard. Use the down arrow key to
scroll through the symbol categories. Go to the second category,
called Arrows, and press Enter. Use the direction arrows to move
through the symbols. The
is in the top row, near the middle.
Select it and press Enter.
Save the label by pressing the File key and then selecting Save.
Type Label1 and press Enter.
Print the label by pressing the
key.
For more label-making lessons, see the complete Lobo user guide.
The other side of this card
explains how the Lobo
function keys work.
5
6
7
1. Lobo printer
2. Power adaptor
3. Power cord
4. USB cord (optional)
5. Reference card
6. Battery (optional)
7. Lobo CD (optional)
(Print cartridge not included.)
1
2
3
The following items come in the Lobo product box.

DuraLabel.com | 800.788.5572
6. Lobo Diagram | 11
6. Lobo Diagram
J
I
K
A. Display screen: Displays the label canvas and the control screens.
B. Keyboard: A full-size 11.125” QWERTY keyboard allows input of text and
numerical data.
C. Function keys: Used for various label editing and formatting functions.
Pressing most of these keys brings up a control screen.
D. Print cartridge: Holds the print supply reel and ink ribbon reel.
E. Print compartment: Where printing takes place. When a print cartridge is loaded,
labels are printed, cut and exit here.
F. USB port: USB connection allows labels to be created on a computer and printed
on the Lobo.
G. Power: On/Off switch and DC power cable input are located here.
H. SD card port: Accepts an SD card. Allows for
saving and transferring label files.
I. Product info: Includes model number, serial
number and support information.
J. Battery compartment: The optional battery
is inserted into this compartment.
K. Reference card: This card has a label-
making tutorial and an overview of
important Lobo functions.
(Reference card ts within the outlined area)
A
C
B
D
E
G
H
F

12 | 7. Power
DuraLabel.com | 800.788.5572
7. Power
The Lobo comes with a DC power adaptor and a power cord; these allow the Lobo to be
powered by standard AC outlets. To plug in the Lobo, first plug the power cord into the
DC power adaptor, and then plug the DC adaptor cord into the Lobo. Finally, plug the
power cord into an AC power outlet.
The On/Off switch is located beside the power cord input. Pressing the
will turn the
Lobo on. Pressing the
will turn the Lobo off.
NOTE: When plugging the power cord into the Lobo, always make sure the On/Off
switch is Off.
Power input On/off switch

DuraLabel.com | 800.788.5572
8.3 Improving Long-Term Battery Life | 13
8. Battery
The battery is an optional accessory. This lithium-ion battery can power Lobo for up to 3
hours of continuous printing, or several days of normal use. When the battery is in use,
an indicator on the Lobo screen shows the battery’s status.
8.1 Battery Installation
IMPORTANT: Turn off and unplug Lobo before installing the battery.
Battery
indicator
The battery
indicator shows
that battery is
charging.
The battery compartment is on the flat underside of the system. Before
installing the battery, be sure that the power switch is in the Off position
and unplug the Lobo from its power source. Set your Lobo upright,
with its handle at the top, as shown. Open the battery compartment by
turning the compartment screw counterclockwise until the door opens.
The battery’s connection uses a special plug with three holes, which fit
over three metal prongs at the top of the battery compartment. Hold
the plug so the side with three metal leads faces toward you, and move
the plug upward, so that the three metal prongs in the top part of the
compartment slide into the three holes in the connector.
Once the plug is attached, place the battery into the compartment with
the pull tab facing out, and tuck the battery wires into the empty space
above the battery. Then, close the compartment door and turn the door
screw clockwise until tight.
If you need to remove the battery, be sure that the power switch is in
the Off position and unplug any AC power supply. Then, open the battery
compartment door. Carefully remove the battery from the compartment,
without pulling on the wires. Finally, hold the battery connector plug, and
pull it down to disconnect it.
8.2 Battery Charging
To charge the battery, simply leave it installed and connect Lobo’s AC
power supply. When the battery is at less than 10% power, it will take
approximately 2 hours to fully charge. The battery will charge even when
the Lobo is powered off.
8.3 Improving Long-Term Battery Life
A charged battery will lose its charge over time, even when not being
used. To improve long-term battery life, give the battery a partial charge
every two months. Avoid fully charging the battery before a long period
of storage.
14 | 9.1 Loading Cartridge
DuraLabel.com | 800.788.5572
9. Print Cartridge
The Lobo is a thermal transfer printer. This type of printer uses heat to transfer resin ink
from a ribbon onto the label material, also called the label supply.
In the Lobo, the resin ink and the label supply reels are both located in one pre-loaded
print cartridge. When a cartridge is seated and locked in its compartment, the Lobo
automatically scans the cartridge and detects important information about the cartridge
such as supply color, width and approximately how much supply remains.
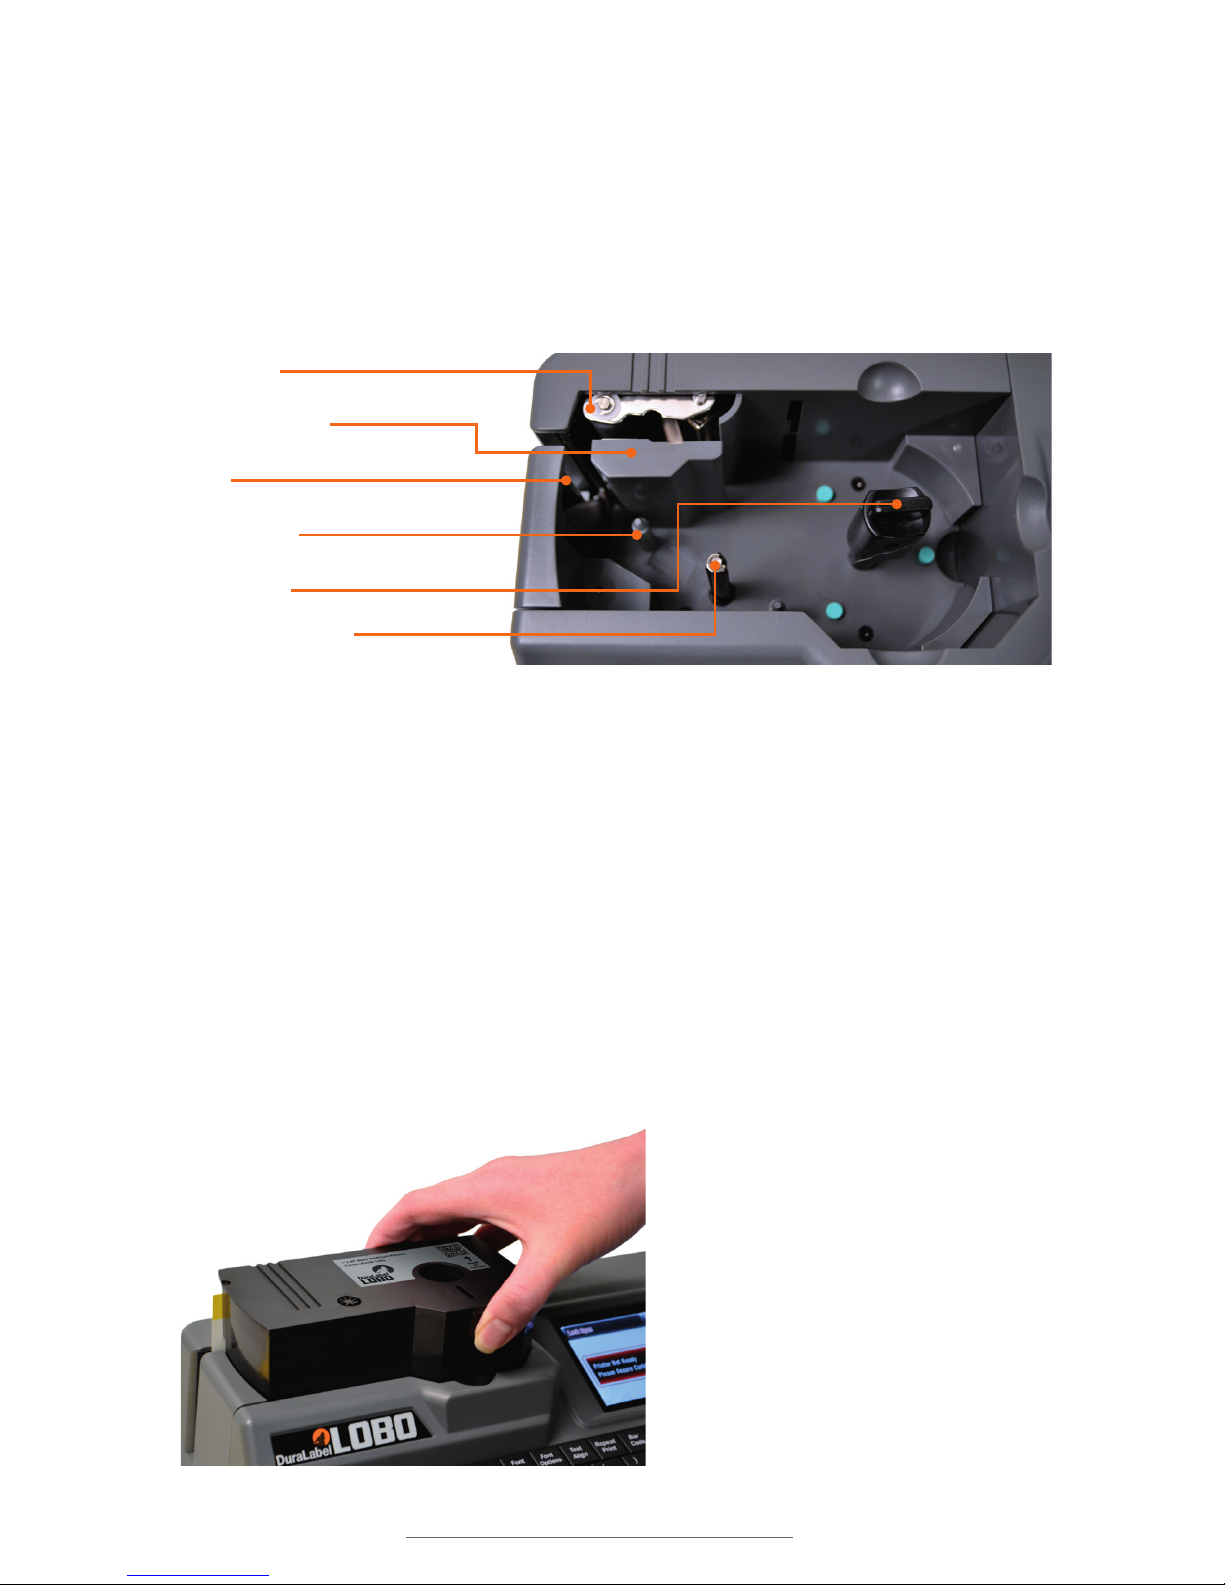
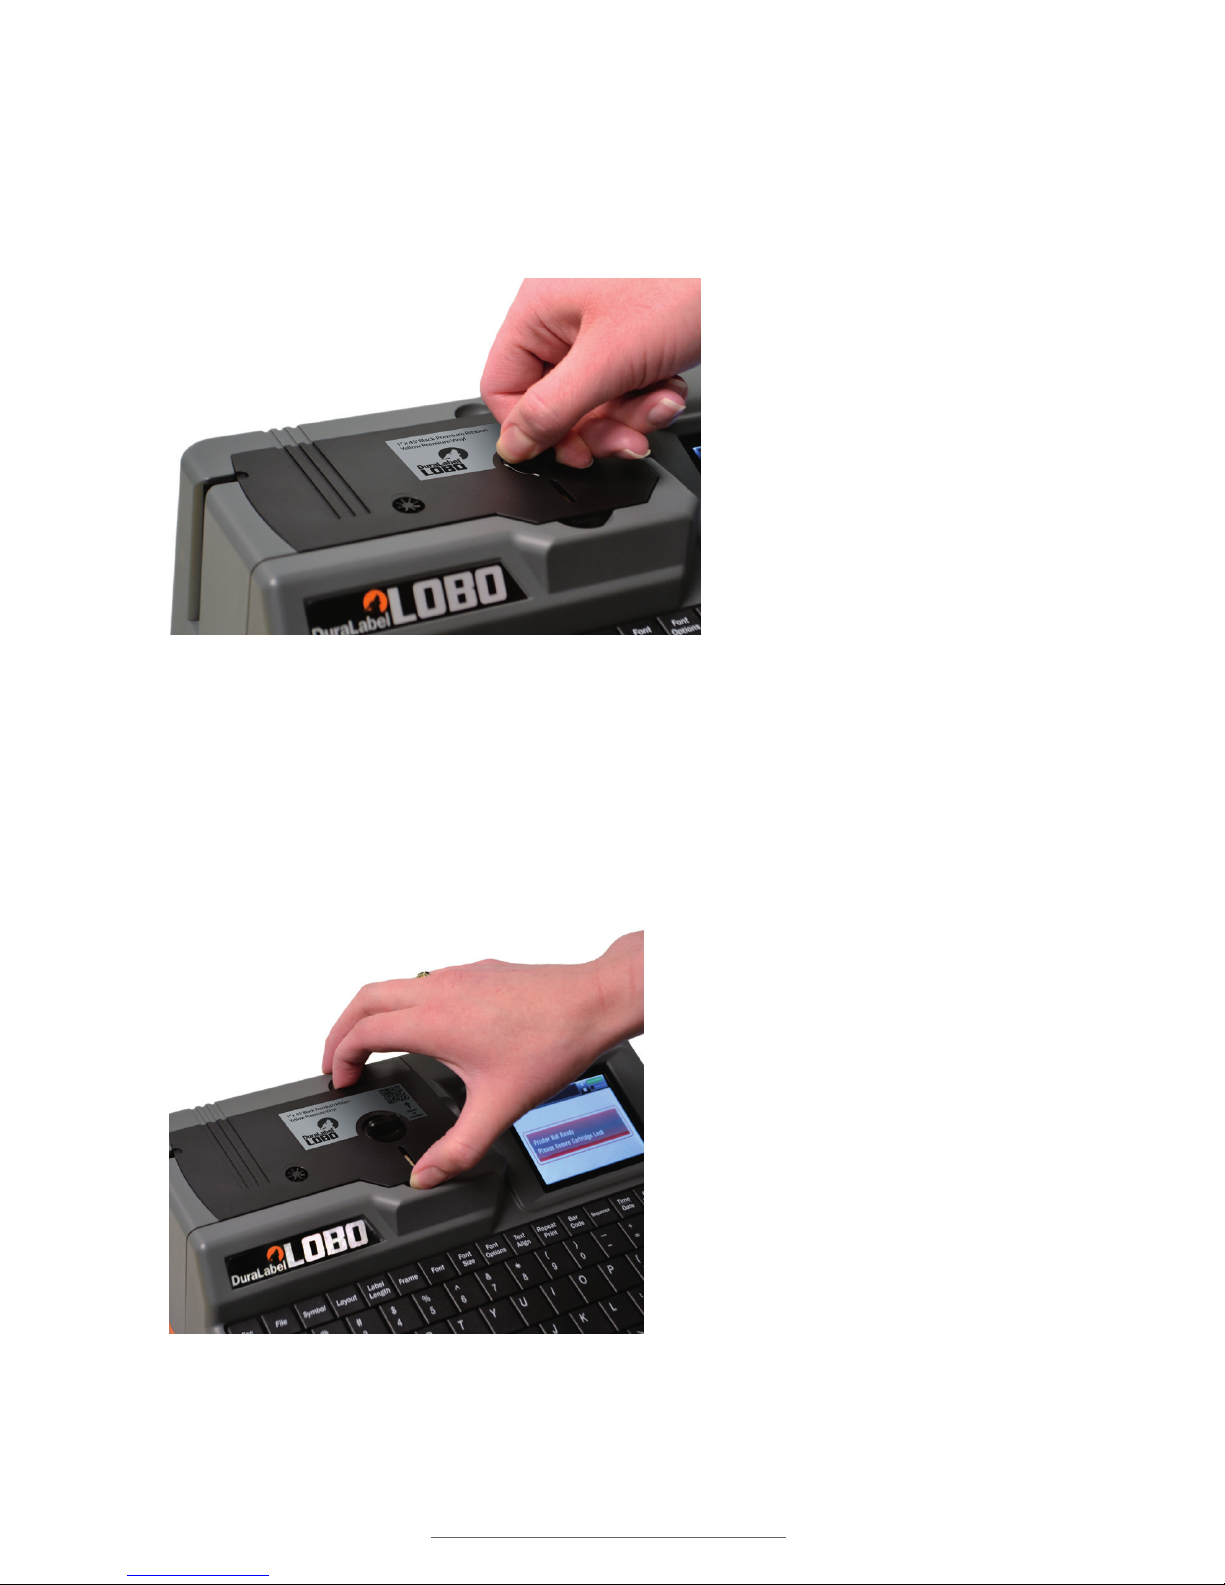
9.1 Loading Cartridge
It is easy to load a new cartridge into your Lobo. The cartridge will only fit one way.
To load the printer, position a cartridge face-up above the cartridge compartment. The
label supply should feed out of the cartridge on the left side. Slide the cartridge into
place so that the Cartridge Lock goes through the hole in the cartridge.
The cartridge is spring-loaded, so you may need to press the cartridge down into its
flush position.
When the cartridge is fully in place, turn the Cartridge Lock clockwise one quarterrotation. This locks the cartridge and prepares the Lobo for printing. It won’t be possible
to create a label until the cartridge is correctly loaded and locked.
Platen roller
Thermal print head
Blade
Alignment post
Cartridge lock
Ribbon rewind spindle
Load and lock the cartridge. You’re ready to print.
DuraLabel.com | 800.788.5572
9.3 Switching Cartridges | 15
PRINT CARTRIDGE
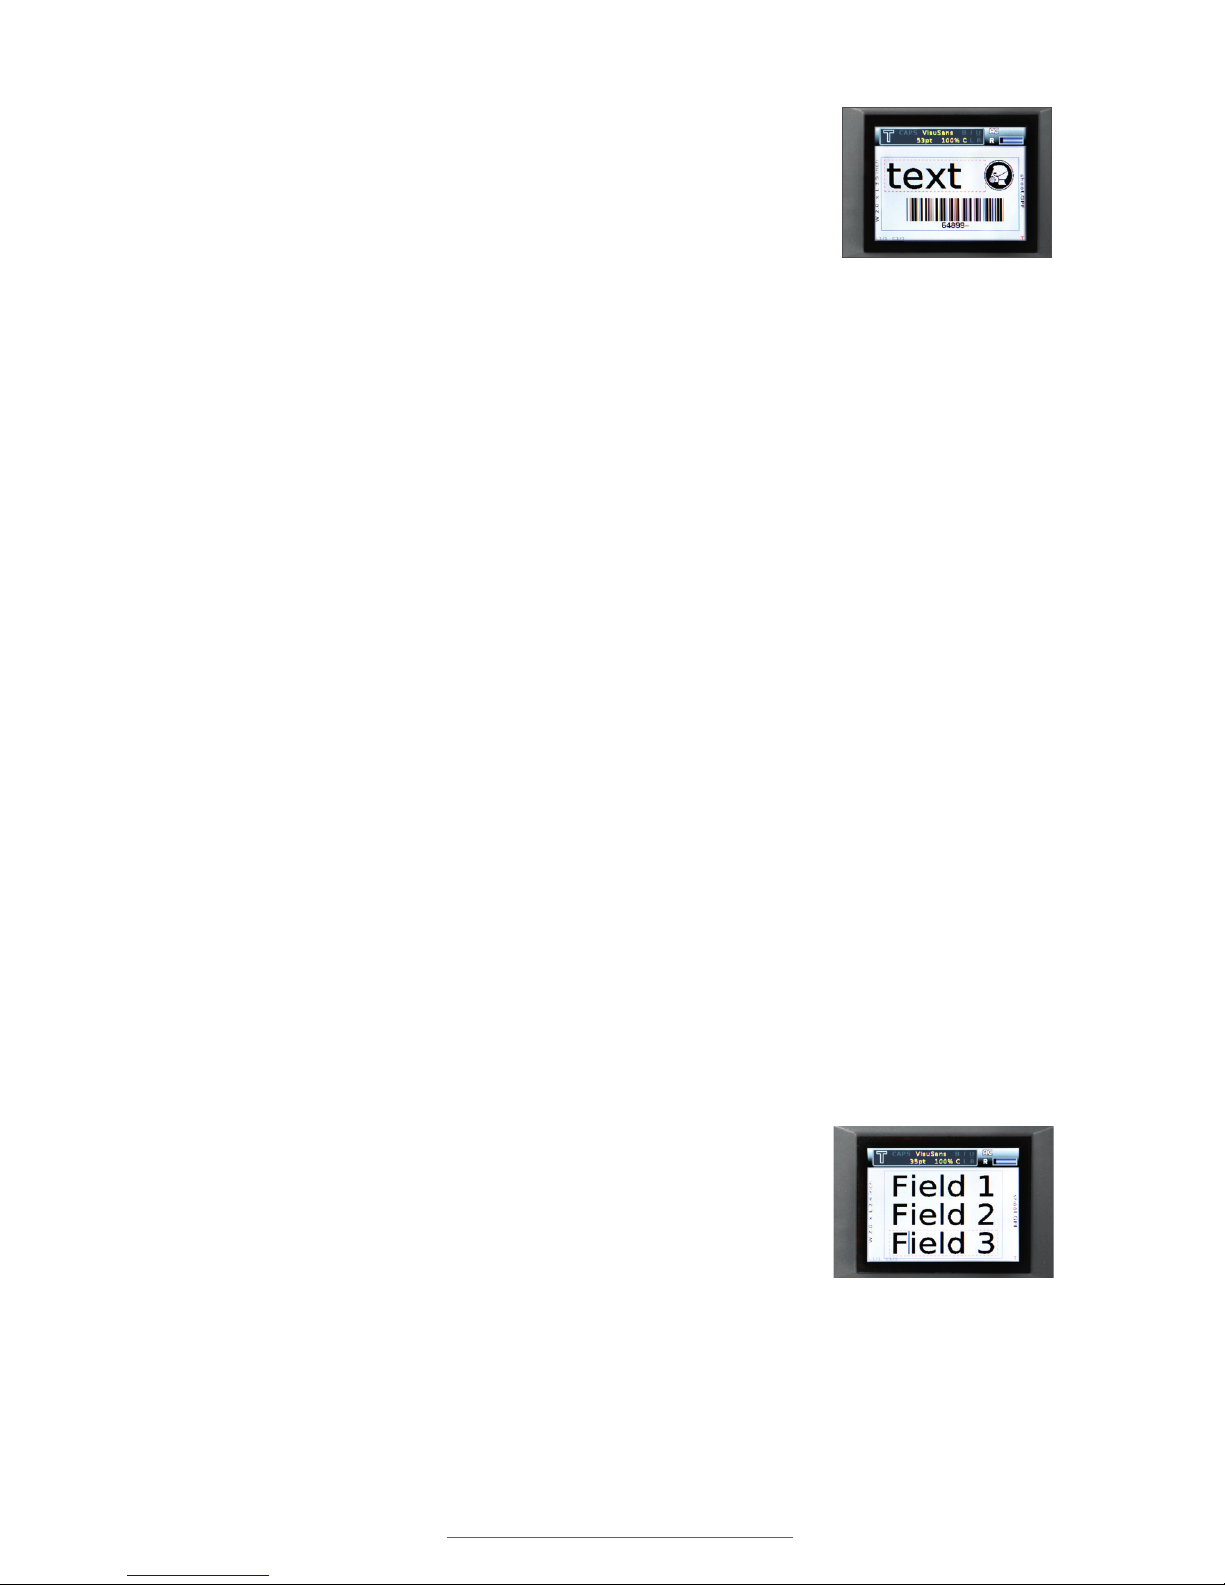
9.2 Removing Cartridge
To unlock the print cartridge, simply turn the Cartridge Lock counter-clockwise one
quarter-rotation. To remove the print cartridge from the Lobo, grip the cartridge at the
indented spaces (shown right) and lift the cartridge out.
9.3 Switching Cartridges
The Lobo can be left on when switching from one print cartridge to another cartridge.
The Lobo will automatically detect the type of cartridge loaded. You will have an option
to either save the label that was being worked on, or delete it.
Locking the cartridge.
With the cartridge unlocked, grip it with two ngers and pull it out.
16 | 10.1 Label-Making Basics
DuraLabel.com | 800.788.5572
10. Making Labels
10.1 Label-Making Basics
When you first turn the Lobo on, the screen displays the label
canvas. The label canvas displays the text and other content
placed on the label.
10.1.1 CONTENT TYPES
There are five types of content that can be placed on the label canvas:
Text: This includes any keyboard-entered characters, like letters, numbers, and
punctuation.
Symbol: The Lobo has a pre-loaded library of symbols and pictograms that are
commonly used for hazard or information labels.
Barcode: A barcode is a machine-readable graphical element that stores data. Lobo
offers several barcode types.
Sequence: A sequence field increases or decreases automatically after each label is
printed. For example, a series of labels could read “501,” “502,” “503,” and so on.
There are several format settings for sequences.
Time/Date: Time and Date fields automatically fill with the current date and/or time
when the label is printed.
Text is the default content type; you can start to enter text onto a new label immediately,
just by typing on the keyboard. The other content types are accessed by pressing their
respective function keys.
10.1.2 FIELDS
The cursor is the blinking vertical line visible on the label canvas. New text and content
are placed at the cursor’s location.
A field is the term used for a unit of content on the label canvas.
The field where the cursor is currently located has a dotted-line
rectangular border around it. A new field is created when a new
row of content is created, or when a new content type is created.
The up and down arrow keys on the keyboard move the cursor
between fields. Pressing the down arrow key moves to the next
field; pressing the up arrow key moves to the previous field.
The right and left arrow keys allow forward and backward
movement inside a text field.
Text and other types of
content can be placed
on the label canvas.
Up and down arrows move
between elds. Left and
right arrows move inside
of a text eld.
DuraLabel.com | 800.788.5572
10.1 Label-Making Basics | 17
MAKING LABELS
The End key moves the cursor to the end of a field. Shift + End moves the cursor to the
start of a field.
The Backspace key deletes text or content to the left of the cursor.
Shift + Backspace deletes text or content to the right of the cursor.
10.1.3 CELLS
The Lobo has various layouts that are selected by pressing the Layout key. Layouts have
sections known as cells arranged in various configurations. If no layout is chosen, the
label has a single cell.
The label canvas only displays one cell at a time. To move between cells, use the Next
Cell key to move to the next cell. Pressing Next Cell multiple times will eventually cycle
through all of the cells, returning to the first cell. You can also use Shift + Next Cell to
move back to a previous cell.
10.1.4 MULTIPLE-LABEL PROJECTS
There can be more than one label in a single label project. The Next Label key moves
to the next label in a project, creating a new label if one does not already exist. Pressing
Shift + Next Label moves to the previous label. A maximum of eight labels can be
stored in a multi-label project.
10.1.5 FUNCTION KEYS
Label content is formatted using the keyboard’s function keys. Many of the function keys
bring up control screens where settings can be edited. The arrow keys and the Enter key
are used to navigate these menus and make selections.
Cell 1 Cell 2
Cell 3 Cell 4
C
e
l
l
1
C
e
l
l
2
Cell 1
Cell 2 Cell 3
Different label layouts allow editing of individual cells.
Font Options Function keys bring
up function control screens.
18 | 10.2 Label-Making Lessons
DuraLabel.com | 800.788.5572
MAKING LABELS
10.2 Label-Making Lessons
The following three lessons will walk you through creating three labels. Each one is more
complex than the one before, so you should do the lessons in order. After completing
the lessons, you will understand the basic functions of the Lobo.
Before starting the lessons, load a cartridge into your Lobo and power it on.
TIPS: You can press the Esc key to cancel any changes and return to the previous
screen. If you make mistakes and want to start over, press the File key at the top left of
your keyboard, select New from the menu, and press Enter. You will be asked whether
you want to save the work you’ve done; select No. A new, blank label will be created.
10.2.1 LESSON 1: SIMPLE LABEL WITH TEXT AND SYMBOL
This lesson will teach you how to make a simple label that contains text and a symbol.
Step 1: Enter text.
The Lobo starts in text entry mode. Use the keyboard to type the word POWER.
Step 2: Insert the symbol.
Press the Symbol key on the keyboard.
Use the up and down arrow keys to scroll through the symbol categories. Go to the
second category, called Arrows, and press Enter.
Use the directional arrows to browse the symbols in that category. Select the
symbol in the top row, and press Enter to insert that symbol into the label.
Step 3: Print the label.
Press the Print key, which is at the top right of the keyboard, under the Setup key.
POWER
Print Key
DuraLabel.com | 800.788.5572
10.2 Label-Making Lessons | 19
MAKING LABELS
10.2.2 LESSON 2: MULTI-CELL LABEL
In this lesson we will make a pipe label using a special layout, some text formatting, a
Time/Date field and a frame.
Step 1: Create a new label.
Press the Next Label key to create a new blank label in the same project.
Step 2: Select a layout.
Press the Layout key.
Use the arrow keys to browse the layouts. Select the
layout and press Enter.
The layout of the current label is visible in the upper right corner of the screen.
The current cell being worked on is highlighted in yellow.
Step 3: Enter content in first cell.
Type Pipe #20.
Step 4: Enter content in second cell.
To move to the label’s next cell, press the Next Cell key.
Type Contents.
Press Enter to move the cursor to the next line in that cell.
Type Water.
Step 5: Enter content in third cell.
Press the Next Cell key to move to the third cell.
Type Install.
Press Enter to move the cursor to the next line.
Press the Time/Date key. This will place a time field and a date field on the label. These
fields are automatically populated with the current time and date, as they are set in the
Lobo Setup menu.
Press the up arrow key twice to move to the time field.
Press the Backspace key to delete the time field, leaving only the date field.
Pipe #20
Contents
Water
Install
01/22/13

20 | 10.2 Label-Making Lessons
DuraLabel.com | 800.788.5572
MAKING LABELS
Step 6: Apply text formatting to first cell.
Press Next Cell once to move back to the first cell.
Press the Font Options key to bring up the font formatting menu.
In control screen menus, like this one, the left and right arrows are used to change
settings. To turn Bold to On, press the right arrow key. You will see the setting change
from Off to On. Press Enter to accept the change.
Next, you will choose how the text formatting will be applied. Choose Entire Cell and
press Enter.
Step 7: Apply text formatting to second cell.
Press the Next Cell key to move to the second cell. Press the up arrow to select the field
that has the text Contents.
Press Font Options and turn Underline to On. Press Enter.
Choose the Selected Field option and press Enter. The Selected Field option lets you
apply formatting to a single field instead of to an entire cell or an entire label.
Step 8: Add a frame.
Next, you will be adding a frame, or border. Press the Frame key to enter the frame
menu.
With Frame selected, press the right arrow twice to change the setting from Off to Grid.
Press Enter to accept the changes.
Now you will have a choice of applying the frame to the entire label or all the labels in a
project. Select Entire Label and press Enter.
Step 9: Preview label.
Press the View Label key.
Select Print Preview by pressing Enter.
Scroll across the label using the left and right arrow keys. If the label looks correct, it is
ready to print.
Step 10: Print the label.
Press the Print key.
DuraLabel.com | 800.788.5572
10.2 Label-Making Lessons | 21
MAKING LABELS
10.2.3 LESSON 3: BARCODE LABEL WITH SEQUENCE
In this lesson, you will be creating a label, intended for use on a product shelf.
The barcode number will be sequenced data, meaning that if you printed several of
these labels in a series, the barcode numbers would read: 3011, 3012, 3013, etc.
Sequencing is useful for such tasks as creating
barcodes for a large number of products or
creating numbered labels for
many pieces of equipment.
Step 1: Create a new label.
Press the Next Label key. This creates a new blank label in the same project.
Step 2: Create a barcode.
Press the Bar Code key. This will bring up the barcode menu.
Scroll down to Check Digit and turn it OFF by pressing the left arrow key. If it is already
turned off, leave it off.
Move down to Sequence and turn it ON. Press Enter. Next, several screens will walk you
through sequence options.
The first screen selects whether the sequence will increment (Inc) or decrement (Dec)
with each successive print. Leave this set to Inc and press Enter.
The next screen selects the Input Sequence Count Value. This allows you to control
the value by which each label will advance between printing. For this example, we want
the numbers to increase by 1, leave the value at 1 and press Enter. (If you wanted a
sequence that increased by 2, like 1, 3, 5, 7, you would put 2 for this value.)
The next screen selects the Input Sequence Start Value. This is the value that the
sequence will be when the first label prints. For this value, enter 3011. Press Enter. The
barcode appears on the displayed label.
Step 3: Print the barcode series.
Press the Print key. The Input Quantity field lets you choose how many labels in the
sequence you want to print. Print three labels (barcode numbers 3011, 3012 and 3013)
by entering 3 and pressing Enter.
Step 4: Save the label files.
Press the File key.
Move down to Save and press Enter.
Type Lesson and press Enter. This multi-label project will be saved as Lesson, and can
be accessed by opening the File menu and choosing Open.
3011 3012 3013
22 | 11.1 Status Indicators
DuraLabel.com | 800.788.5572
11. Label Canvas Display
When a cartridge is loaded, and the Lobo is turned on, the display screen shows what
we call the label canvas.
The label canvas can only display one cell at a time. If a label has multiple cells, the
next cell can be accessed by using the Next Cell key. (Shift + Next Cell moves to a
previous cell.)
A label’s width (corresponding to the screen’s vertical dimension in most layouts) is
automatically based on the width of the print cartridge. Pressing Enter will move the
cursor to the next line and create a new text field. This will also automatically reduce the
size of the existing content in order to fit the label width. (This automatic field resizing
won’t occur if Font Size is set to Fixed.)
The label’s length will change based on how much content has been entered on the
label. (Automatic length resizing won’t occur if Label Length is set to Fixed.)
11.1 Status Indicators
Around the label canvas, mode there are several status indicators that give you
important information about the label project.
11.1.1 CONTENT STATUS BOX
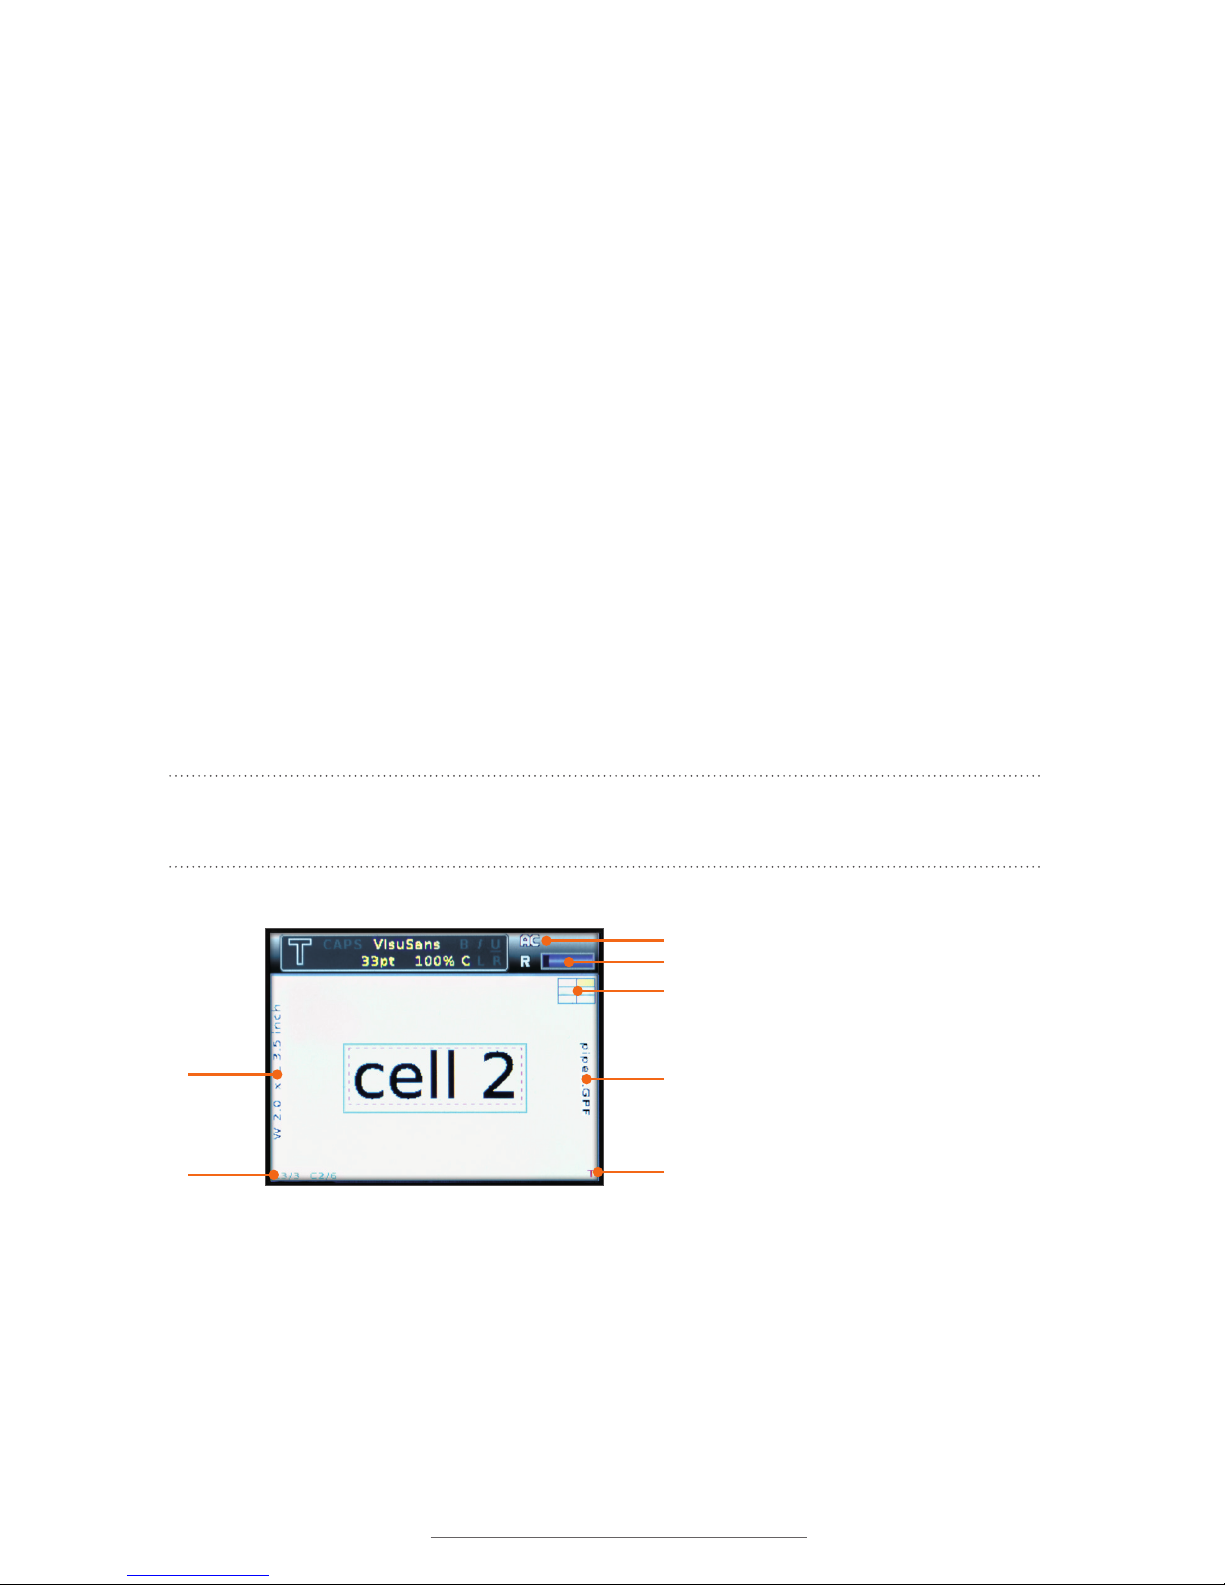
The content status box at the top of the screen displays some key pieces of information.
The large letter in the top left of the screen indicates the type of content where the
cursor is currently located. The abbreviations are:
Display Screen
Display Screen in
label canvas mode.
The display will automatically resize to keep the label cell content on screen.
T = text IMG = image (symbol) B = barcode
S = sequence SB = sequenced barcode D = time/date
DuraLabel.com | 800.788.5572
11.1 Status Indicators | 23
LABEL CANVAS DISPLAY
The content status box displays other relevant information about the content. For
instance, for a text field, the content status box communicates if the text is currently set
to underlined, bolded, or italicized, amongst other information.
A. Label size indicator: The current size of the label is displayed on the left side of the
label canvas. W indicates the width of the label, as determined by the label supply
in the current cartridge. L indicates the length of the label, which will change based
on the content that you place.
B. Label/cell position indicator: The current label (out of those in the current project)
and the current cell (out of those in the current label) are shown in the lower left.
C. Vertical/horizontal orientation indicator: The small T in the lower right-hand
corner of the display screen indicates the orientation of the current cell. When the T
is oriented normally, the label is in normal horizontal-entry mode. When a verticallyoriented layout has been chosen, the T will be rotated to the side.
D. File name indicator: If there is a file name for the label that is currently being
worked on, it will be displayed along the right side of the label canvas. New labels
added to an existing file will not display the new file name until the file has been
saved.
NOTE: The .GPF is a Lobo-specic le sufx that indicates the le was created on the
Lobo. The .GPF sufx is not visible in the le menus.
A
B
C
D
E
G
F
24 | 11.1 Status Indicators
DuraLabel.com | 800.788.5572
LABEL CANVAS DISPLAY
E. Layout indicator: This icon shows you the layout of the current label, with the
current cell highlighted in yellow.
F. Supply remaining indicator: This icon shows approximately how much supply is still
left in the printer cartridge.
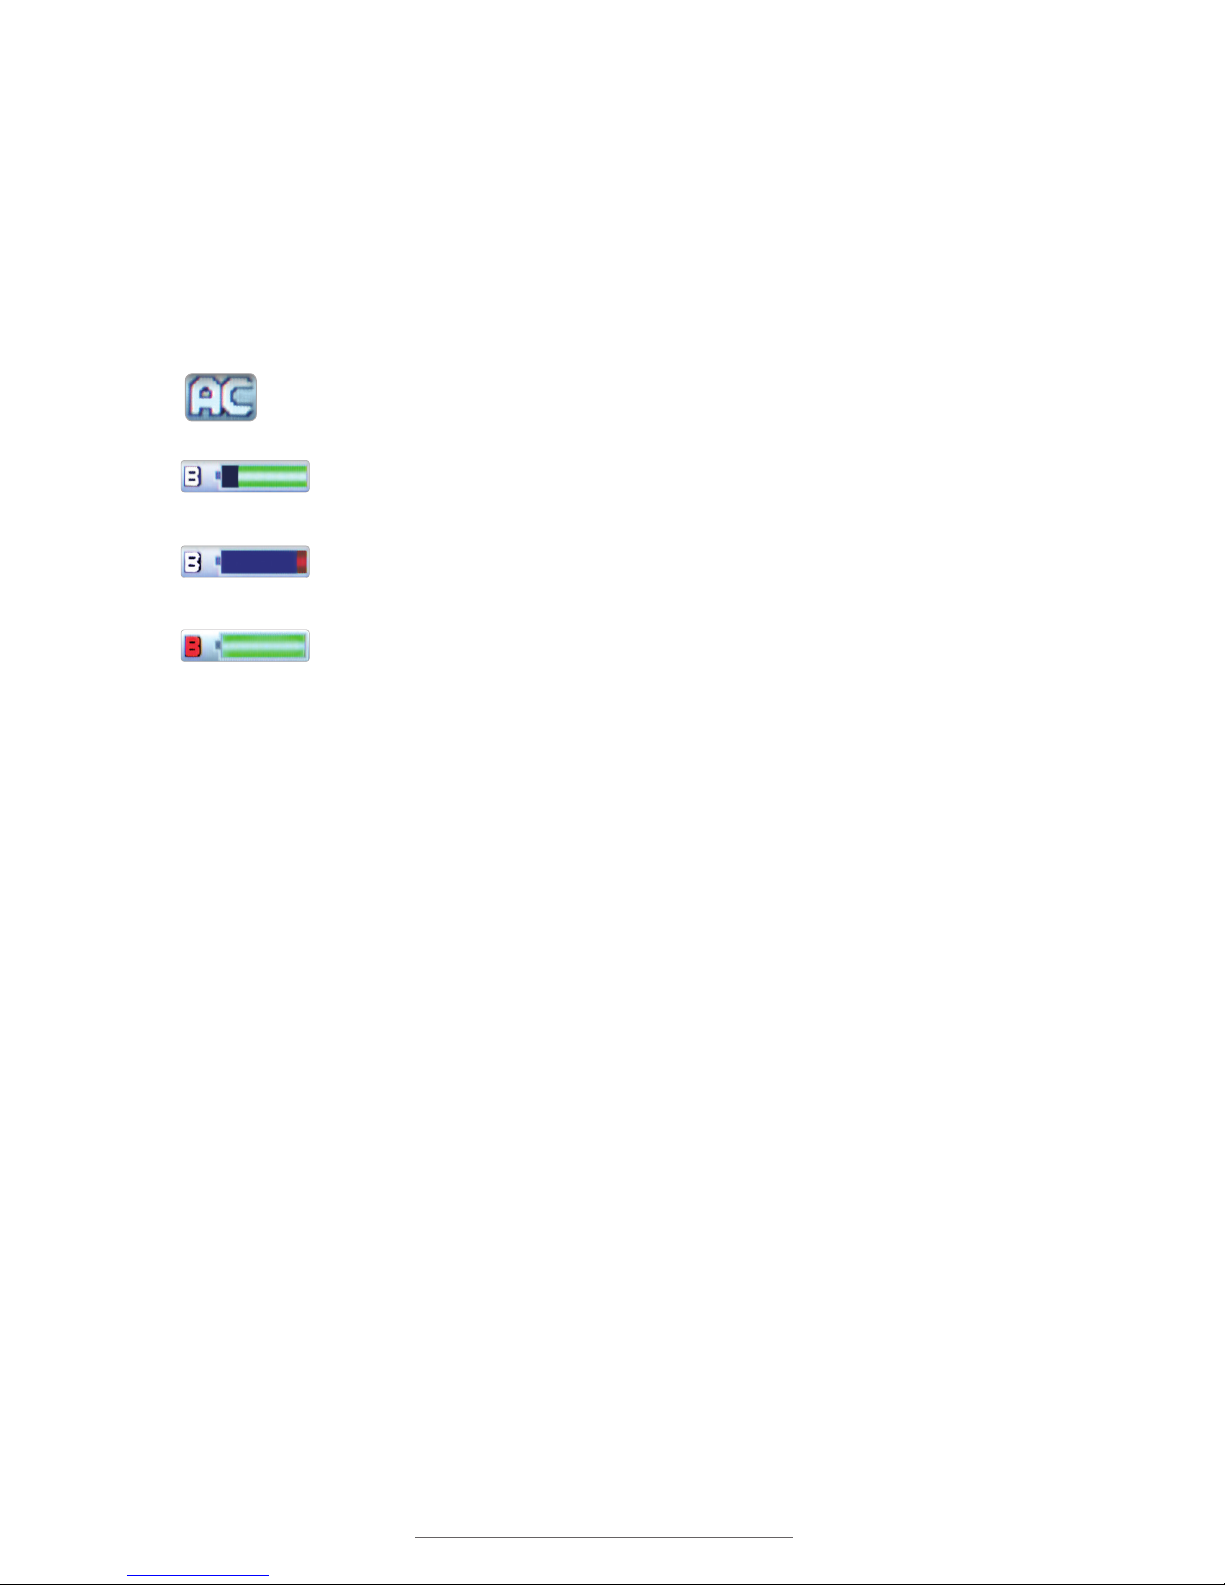
G. Power status indicator: The power status icon changes to indicate the Lobo’s
current power source.
This means that the Lobo is plugged into the power adaptor and currently using
AC power.
This means that the Lobo is using battery power. The green area of the
battery icon indicates the remaining battery charge.
When the battery icon turns red, it means that the battery is low on
energy and should be recharged.
When the battery is charging, the letter B is red and the battery icon
is filled.

DuraLabel.com | 800.788.5572
12.2 Control Screen Navigation | 25
HEADER
12. Navigation
This section will teach you how to move around the label canvas, move between labels
in a multiple-label project, and navigate the control screen menus.
12.1 Label Navigation
12.1.1 MOVING THE CURSOR BETWEEN FIELDS
To move between fields, use the up and down arrow keys, or hold the Shift key and
press the left or right arrow keys.
12.1.2 MOVING THE CURSOR INSIDE A TEXT FIELD
To move the cursor inside a text field, use the left and right arrow keys. To move to the
very end of a text field, press the End key. To move to the very beginning of a text field,
press Shift + End.
12.1.3 MOVING BETWEEN CELLS
To move to the next cell, press the Next Cell button.
To move to a previous cell, press Shift + Next Cell.
12.1.4 MOVING BETWEEN LABELS
If you are working on a project that has multiple labels, press Next Label to move to the
next label. To move to a previous label, press Shift + Next Label.
If there is not a next label, pressing the Next Label key creates a new label.
To delete an added label, press the Clear button and select Current Label.
12.2 Control Screen Navigation
Control screens and menus are accessed by pressing function keys. This section will
give you general tips for entering these control screens, moving around in them, and
making selections.
12.2.1 ENTRY AND EXIT
To enter a control screen, press one of the label function keys on the keyboard (for
example, Font Options or Sequence). To discard any changes and exit a control screen,
press that same function key again, or press the Esc key.
12.2.2 STRUCTURE
Control screens appear as lists of items; you can scroll through the items with the up
and down arrows.

26 | 12.2 Control Screen Navigation
DuraLabel.com | 800.788.5572
NAVIGATION
For longer lists, a menu position indicator along the side of the screen will indicate that
there are more items that are not currently visible. You can hold the Shift key and press
the up or down arrow to quickly navigate large menus.
12.2.3 EDITING SETTINGS
On a control screen, use the left and right arrows to change an item’s setting. In general,
the left arrow is used to move a selection to the Off position, to the lowest value setting
or to the left-most value setting (as in left-justified text, for example). The right arrow is
used to move a selection to the On position, to the highest value setting, or to the rightmost value setting.
To save changes made to control screen settings, you must press the Enter key. If you
change a setting and then exit out of the menu by pressing Esc, the change will not be
saved.
Some settings require additional information to be entered (for example, selecting a
fixed font size). For those types of settings, pressing Enter will take you to another
screen where you will be prompted to enter additional information.
The position indicator shows there are more items off-screen.
Menu position indicator

DuraLabel.com | 800.788.5572
13.1 File | 27
13. Label-Editing Function Keys
The Lobo has various label-editing and navigation functions that are accessed by
pressing the function keys. These function keys are located around the perimeter of the
keyboard on the upper, lower and right sides.
13.1 File
The File menu includes the following functions:
Open allows you to open label files that were created on the Lobo. It will display files
stored either internally or on the SD card, depending on what is chosen for the Location
setting (farther down in the File menu.)
You can only open a project file that matches the size of the print cartridge that is
loaded. If a label file doesn’t match the current print cartridge, you will see a note
explaining this and will not be able to open the file.
New begins a new label project. If you were working on an existing label, you will be
asked whether you want to save the existing label before starting a new label.
Save will prompt you for a file name to save the current label project. Files are saved
to Lobo’s internal memory, or to an optional SD card, depending on the selection in
the Location field. File names may only include numerals and capital letters, with a
maximum file name length of 8 characters.
Delete gives two delete options: Delete File and Delete All. Delete File allows you to
select a file for deletion. Delete All will delete all saved labels. (Use the Clear function
key to delete a label currently being worked on.)
Location can be set to Internal (to use Lobo’s internal memory) or SD (to use an
optional SD card.) Use the left and right arrow keys to toggle between the two locations.
To use the SD card, it must be present when Lobo starts up.

28 | 13.2 Symbol
DuraLabel.com | 800.788.5572
LABEL-EDITING FUNCTION KEYS
Free Memory displays information about the Lobo’s internal storage, and the SD card
(if one is present). It shows the number of label files, the total physical memory and the
available memory.
Copy All Files gives you two options: copying all files from internal memory to the SD
card, or copying all files from the SD card to internal memory.
NOTE: If le names in one location are identical with le names in another location and
you use the Copy All Files function, the process will overwrite the identically named
les. You will be given an on-screen warning to remind you of this when copying les.
Show File List displays a list of all of the files in the selected location, and those
files’ sizes.
13.2 Symbol
Pressing the Symbol key displays a menu of symbol categories. Use the up and down
arrow keys to highlight the desired category, and press Enter to browse the symbols in
that category.
Use the arrow keys to highlight the desired symbol, and press Enter to place that symbol
onto the label canvas.
13.3 Layout
Pressing the Layout key lets you choose from several layout configurations.
The sections of a layout are called cells.
Negative-cell layouts: Some layouts have negative cells, meaning that the background
and foreground colors will be switched in those cells. In other words, if a label usually
prints out as white-on-red, then a negative cell would print out as red-on-white. The
negative cells are displayed in the Layout menu as dark cells. (There is also a Negative
setting accessed via the Print Options key that prints a negative of the current label.)
Vertical layouts: Some layouts are oriented vertically instead of horizontally. (Barcodes
cannot be positioned vertically because they would be too small to be scanned in that
orientation.) The vertical-layout labels are indicated by the perpendicular ABC/123 text.

DuraLabel.com | 800.788.5572
13.4 Label Length | 29
LABEL-EDITING FUNCTION KEYS
13.4 Label Length
The Label Length menu lets you change between an Auto mode and a Fixed mode for
the label length.
The label length is set to Auto by default. This setting adjusts the length of a label
automatically, based on the content placed on the label canvas.
To use a fixed length, select the Fixed option and press Enter. Type the desired length
and press Enter to set the length of the label design. You will be returned to the label
canvas.
NOTE: If the label already includes content, the length may not be reduced.
There is also a Width value in this menu screen; it cannot be changed and is displayed
only as reference. The width of a label is determined by the print cartridge that is loaded.
The label canvas displays the current label dimensions (width and length) along the
side of the screen.
The black cells in some layouts represent negative cells.
Vertically-oriented layouts are indicated by the perpendicular
ABC/123 text.
After changing Length to Fixed mode, enter the desired xed length.

30 | 13.5 Frame
DuraLabel.com | 800.788.5572
LABEL-EDITING FUNCTION KEYS
13.5 Frame
The Frame menu gives options for placing frames around the label edge or around the
label cells.
The first menu item, Frame, lets you switch between Off, Border and Grid. Off is the
default setting. If Border is selected, a frame is placed around the outer perimeter of
the entire label. If Grid is selected, a frame is placed around every single cell. (Selecting
Grid displays the structure of the layout, which is usually invisible.)
Frame Thickness lets you control how thick the frame will be. The three choices are
Thin, Medium, and Thick.
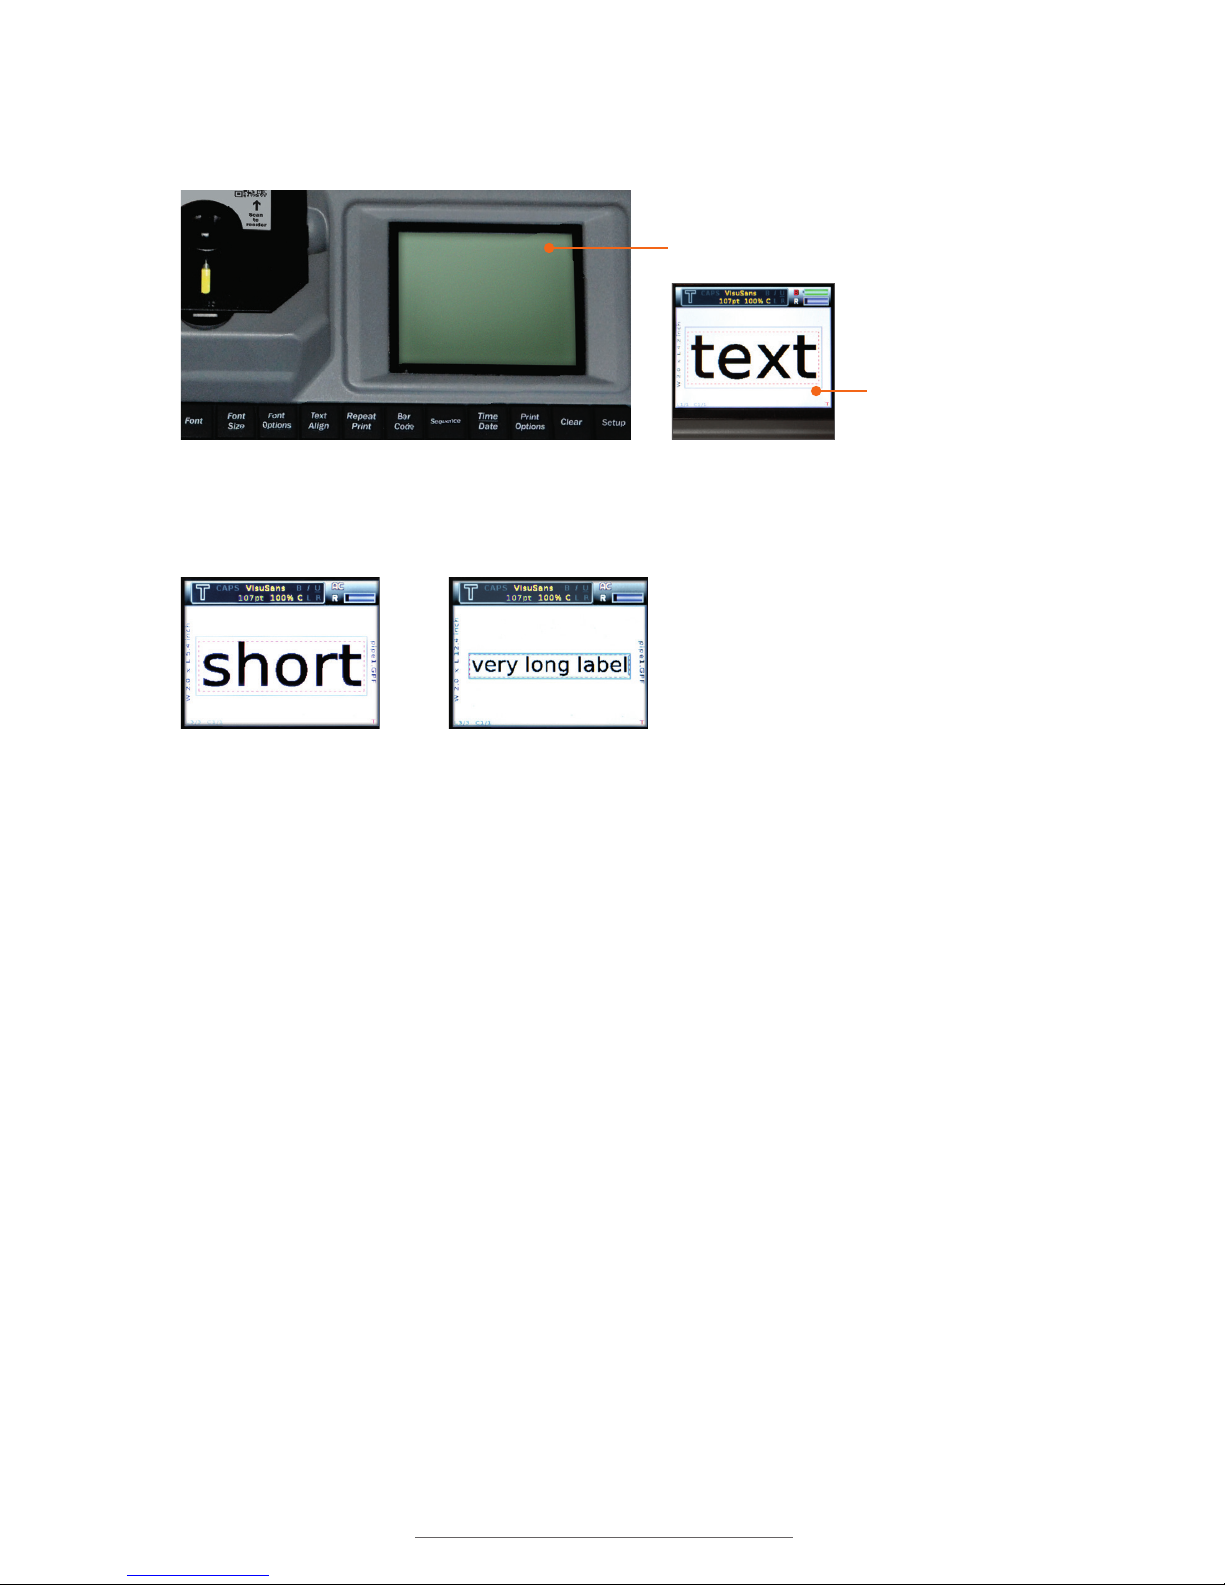
13.6 Font
The Font menu lets you choose from three fonts: Lobetica, Triumvirate, and VisuSans.
13.7 Font Size
The Font Size menu allows you to change the size of the label text.
By default, font sizes are in Auto mode. This automatically adjusts the size of text to fill
the label as content is added.
To manually enter a fixed font size, press the Font Size key, change the Font Fix/Auto
setting to Fixed, and press Enter. In the Input Fixed Font Size screen, type the desired
font size, and press Enter. (The Max value, shown below the input field, indicates the
maximum font size based on the space available.)
You can apply the font size change At Cursor, turning the setting on at that point in
the text, or to the entire Selected Field, making all text in that field have the assigned
attributes.
Labels with Thin frame, Medium frame, and Thick frame.
ABC
DEF
From left to right, samples of Lobetica, Triumvirate, and VisuSans.
Thin
Medium
Thick
Labels with Frame off, Frame set to Border and Frame set to Grid.
Layout with
Grid Border
Border
Frame
No
Frame

DuraLabel.com | 800.788.5572
13.8 Font Options | 31
LABEL-EDITING FUNCTION KEYS
13.8 Font Options
Font Options lets you edit the style of the label text. The menu
items and their functions are as follows:
Bold turns boldfaced styling on or off.
Italics turns italicized styling on or off.
Underline turns underlined styling on or off.
Character Position lets you switch the font style between Normal,
Subscript or Superscript, with Normal being the default value.
Expand/Condense adjusts the width of the text to an approximate percentage of its
normal width; the settings are
50, 100, 150 and 200.
Apply options: After choosing a font style, you will choose where the style will be
applied: At Cursor, Selected Field, Entire Cell, Entire Label or All Labels.
At Cursor will make the font style active at the cursor. This option effectively “turns on”
the chosen style; any new text that is entered will have the applied font style.
Selected Field will apply the font style to all text in the current field.
Entire Cell will apply the font style to all text in the current cell of the label. (If you have
not selected a Layout, your label may only have one cell.)
Entire Label will apply the font style to the entire label, across all cells.
All Labels will apply the font style across all labels in a multi-label project.
Label showing
subscript and
superscript font sizing.
Text
Text
Left label with Condense/Expand set to 50, right label with Condense/Expand set to 200.

32 | 13.9 Text Align
DuraLabel.com | 800.788.5572
LABEL-EDITING FUNCTION KEYS
13.9 Text Align
The Text Align menu offers controls for the alignment of your text.
Justification changes the justification (or alignment) of the label’s fields. The three
options are Left, Center, and Right, with Center being the default value. Changing this
setting changes the justification of all fields, no matter the type (text, barcode, symbol,
sequence or time/date).
Line Spacing changes the spacing between the horizontal content fields of a label.
The three options are Normal, Tight and Loose, with Normal being the default value.
Baseline changes the vertical alignment of the text. The two baseline choices are
Center and Fixed. This setting is most important when your label includes more than
one text size in a single line.
Apply options: Text Align styles apply to the entire label. You can choose to apply the
chosen style to the Entire Label only, or to All Labels in the current project.
13.10 Repeat Print
Repeat Print is used for printing multiple copies of labels.
If the current label includes a sequence you will be prompted to Input Quantity. This is
the number of sequential labels that will be printed. For instance, if your label’s starting
sequence is 0001 and you enter a quantity of 2, the Lobo will print labels with two steps
of the sequence: 0001 and 0002.
The next screen allows you to Input Copies. This refers to the number of copies of each
unique label that will be printed. For example, if you chose an Input Quantity value of 3
and an Input Copies value of 2, two copies of each of the three labels in the sequence
(six labels in total) would be printed. When working on a label without a sequence, you
will only see the Input copies prompt.
Line 1
Line 2
Line 3
Line 1
Line 2
Line 3
Line 1
Line 2
Line 3
Labels showing Tight, Normal and Loose line spacing.
ABC
DEF
ABCDEF
Left label with centered baseline, right label with xed baseline.
text
justication
settings
text
justication
settings
text
justication
settings
Three labels showing left-, center- and right-aligned text.

DuraLabel.com | 800.788.5572
13.11 Barcode | 33
LABEL-EDITING FUNCTION KEYS
The Time/Date stamp updates only when a new unique label is being printed; when
multiple copies of labels are being printed, the copies will have the same Time/Date
stamp.
For more information about printing, see the Print function key section.
13.11 Barcode
The barcode creation menu gives you several barcode formatting options. Not all options
will be available on all barcode types.
The barcode menu items and their functions are as follows:
Code lets you choose from 9 barcode types: CODE39, CODE128, 125, EAN8, EAN13,
EAN128, UPC-A, UPC-E, and CODABAR.
NOTE: Some barcode types require specic data formatting, or a specic number of
digits. If the data entered does not match the necessary format, Lobo will attempt to
create a valid barcode by adjusting the data. Always check your barcodes for accuracy.
Human Readable shows (ON) or does not show (OFF) a copy of the barcode’s content
in human-readable characters. For smaller labels where space is limited, you may need
to turn off human-readable text so that the barcode is larger and can be more easily
scanned.
Justification gives three justification options for the human-readable barcode
characters: Left, Center or Right.
Position gives two options for where the human-readable characters are positioned: at
the Top or Bottom of the barcode.
12345
12345
Left: Barcode with left-justied, bottom-positioned human-readable characters.
Right: Barcode with center-justied, top-positioned human-readable characters.

34 | 13.12 Sequence
DuraLabel.com | 800.788.5572
LABEL-EDITING FUNCTION KEYS
Density lets you adjust the horizontal density (and, therefore, the horizontal size) of the
barcode. The three options are Small, Medium and Large.
Ratio lets you change the ratio of the wide bars to the thinnest bars. The two ratio
options are 2:1 and 3:1, with 3:1 being the default value. A barcode with a ratio of 2:1
has thick bars that are two times the width of the thinnest bars. A ratio of 3:1 means
that the thick bars are three times the width of the thinnest bars.
Check Digit lets you turn the automatically-calculated barcode check digit on or off.
Sequence allows you to use the sequence function for a barcode. Barcodes using the
sequence function can accept a maximum of 13 characters. For more information on
sequencing, see the Sequence description in the next section.
Entering the barcode value: When you have set barcode options, press Enter and you
will be prompted to input the barcode value. If Sequence has been turned on, you will
be walked through a series of sequence data input screens.
13.12 Sequence
A sequence is an item on the label that changes automatically after every print, either
increasing or decreasing. When designing a label, you can add a sequence as its own
field (using the Sequence key) or as part of a barcode (using the Barcode tools).
A sequence has a maximum of 13 characters. In addition to numbers, letters can also
be used in sequence data. As long as the sequence ends with numerals those will be
the numbers that are treated as sequenced data. For example, the sequence 10AB001
would be followed by 10AB002 and then 10AB003.
To add a fixed suffix to a sequence, create a sequence without the suffix and then add a
text field directly after the sequence that contains the suffix text.
12345
12345
12345
Labels with small, medium and large Density settings.
10AB01 10AB02 10AB03
The last numeric string in a sequence will be the numbers that are treated as a sequence.

DuraLabel.com | 800.788.5572
13.13 Time/Date | 35
LABEL-EDITING FUNCTION KEYS
When you press the Sequence key, you are walked through a series of data input
screens, as follows:
Inc/Dec: This option sets whether the sequence increases (Inc) or decreases (Dec) in
value after each print. The default is Inc; use the left and right arrow keys to change this
option, and press Enter to continue.
Sequence Count Value: This is the amount by which the sequenced number will
increase or decrease in a single step, after each label is printed. For example, if you
wanted a sequence of numbers that incremented by 2 every time (such as 1, 3, 5, 7,
etc.), you would enter 2 here.
Sequence Start Value: This is the sequence’s starting value, which will be the first value
to be printed when a multiple-label print job is begun.
The number of digits in the Start Value will set the number of digits for the rest of the
sequence. For example, if you wanted each number in the sequence to have three digits,
and the first sequence value to be 1, you would input 001 as the Start Value.
Printing: To print labels with sequences, you can either use the Print key or the Repeat
Print key. For either approach, you will see an Input Quantity screen to input a number.
This is the number of labels with changing sequence data that will be printed. For
instance, if your label’s sequence begins with 0001 and you enter a quantity of 2, the
printer will print two sequential labels: 0001 and 0002.
13.13 Time/Date
Pressing the Time/Date key places a time field and a date field on the label canvas.
The time and the date fields cannot be edited on the label canvas. They are special fields
that auto-fill with the current time and date, based on the current time and date set in
the Lobo. These fields will update after each printing to reflect the new time and date.
AB100 AB200 AB300
Labels with a Sequence Count Value of 100.
Pressing the Time/Date button will place a time eld and a date eld on the label.

36 | 13.14 Print Options
DuraLabel.com | 800.788.5572
LABEL-EDITING FUNCTION KEYS
You can change the Lobo’s internal time and date by using the Setup menu. The Setup
menu also allows you to configure the Time/Date key to place only the time or the date
(not both) onto the label canvas.
13.14 Print Options
There are three items in the Print Options menu: Mirror, Negative, and Rotate Label.
They can be toggled with the left and right arrow keys.
Mirror makes your label print as a mirror image, or “backwards.” This effect will not be
applied to the label canvas; instead, a small M in the lower right corner of the screen
will indicate that Mirror has been turned on.
Negative makes your label print in negative, or with inverted colors. For example, a
design that would normally have black text on a white background would be printed with
white text on a black background. There are some layouts that include negative cells;
these cells are displayed in black in the Layout menu.
Rotate Label allows you to rotate the label design 180 degrees for printing, or return
it to the usual 0 rotation. This option may be necessary when using a specialty supply
that has been partially pre-printed. For most labels, there will be no reason to rotate the
label, because the finished label will be the same either way. The rotation will not be
applied to the label canvas; the effect is only visible when the label is printed.
After changing any of the Print Options, you will be prompted to apply the effect to the
Entire Label or to All Labels in a multiple-label project.
Maintenance
Performed
05:07:37 PM
01/11/13
Time/Date elds can be useful for many labels
that have time-sensitive information.

DuraLabel.com | 800.788.5572
13.16 Setup | 37
LABEL-EDITING FUNCTION KEYS
13.15 Clear
The Clear function gives you several ways to delete label content:
All Labels: This command erases all labels in the current project. Current format
settings will still be present.
All Labels, Restore Defaults: This erases all labels in the current project. It also erases
any changes you have to the label’s settings, returning them to their default values.
Defaults can be edited through the Setup > Set Defaults menu.
Current Label: This erases only the current label. This allows for the removal of a single
label from a multi-label project.
Current Cell: This erases only the contents of the current cell.
Each of these options is followed by an “Are you sure?” prompt, requiring you to select
Yes before the deletion is completed.
13.16 Setup
The Setup menu allows you to change the following formatting and printing options:
Set Defaults: This menu allows you to edit the default values for many of the settings of
the Lobo, including text formatting, label-cutting preferences, frame preferences, print
preferences, and barcode settings. These edited default settings will be saved on the
Lobo even when power is shut off. To restore the Lobo settings to their factory presets,
use the Factory Reset option at the bottom of the menu.
Auto Cut: There are three available settings for Auto Cut: On, Off, and Mark.
1. On: This is the default setting: it automatically cuts the labels based on what is
chosen in the Cut Mode options: either Every or Batch.
2. Off: This setting turns off label cutting. If Auto Cut is Off, multiple labels will
print out continuously without a separation. If necessary, manual cutting can be
performed by pressing the Cut key.
3. Mark: In this mode, the printer prints marks between labels instead of cutting
between labels. The labels can be manually cut at a later time.

38 | 13.16 Setup
DuraLabel.com | 800.788.5572
LABEL-EDITING FUNCTION KEYS
Cut Mode: There are three options for Cut Mode: Off, Every, and Batch.
1. Off: Turning Cut Mode to Off turns off the automatic cut between labels.
2. Every: When Auto Cut is set to On, the Every option will cut between every single
label that is printed.
3. Batch: When Auto Cut is set to On, this mode prints labels in a multiple-label print
job continuously, without cutting between labels. The only cut performed is after all
labels from a single print request are finished printing.
Print Speed: This setting cannot be changed and is only shown for reference.
Print Darkness: This setting cannot be changed and is only shown for reference.
Language: This lets you switch between available display languages.
Units of Length: This lets you switch between Inches and cm (centimeters) as the unit
of length in Lobo menu screens.
Font Size Units: This lets you switch between Points, Inches and cm as the displayed
font size unit in Lobo menu screens.
Time/Date Stamp: This lets you edit the setting of the Time/Date function. The three
choices are Time, Date, and Both. By default, both the time and date will be added
when you press the Time/Date key. The other options will insert only the Time or only
the Date.
Time Format: There are two Time Format options: 12 hour and 24 hour. Selecting
12 hour will use the 12-hour time format, with AM or PM shown after the time, while
24 hour will use the 24-hour time format, popularly known as military time.
Date Format: There are two options for the date format: Short and Long. Short will
display the date in the MM/DD/YY format, where MM is the month number, DD is
the day number, and YY is the year number. Selecting Long will display the date in the
longer Month/Day/Year format; e.g., Oct. 08, 2012.
Set Time/Date: This menu lets you edit the internal time and
date settings of the Lobo. There are six units of time and date
information, ranging from the year down to the second.
The Set Time/Date menu lets you set
the Lobo’s internal time and date.
Selecting Batch mode will print multiple copies of labels continuously.

DuraLabel.com | 800.788.5572
13.19 Next Label | 39
LABEL-EDITING FUNCTION KEYS
13.17 Print
Pressing the Print key will print the current label you are working on. Change printing
and cutting options in the Setup menu.
13.17.1 PRINTING A SEQUENCE
If the label currently being worked on has a sequence, pressing the Print key will
present an Input Quantity prompt, choosing how many labels in the sequence series will
be printed. (See Sequence for more information about working with sequences.) If the
sequence series contains Time/Date stamps, these will also update with every print.
13.17.2 PRINTING A MULTIPLE-LABEL PROJECT
If you are working in a project with multiple labels and would like to print multiple copies
of the labels in the project, use View Label >List of Labels to choose how many of each
label you want to print.
13.18 Next Cell
The Next Cell key is a navigation key. If the label being
worked on has a multiple-cell layout, pressing Next Cell will
move to the next cell on the label canvas. Pressing Shift +
Next Cell will move back to the previous cell.
If you are working on a label with multiple cells, an icon with
the label’s layout structure will be displayed at the top right
corner of the screen. The current cell will be highlighted
yellow on the layout icon.
13.19 Next Label
The Next Label key is a navigation key. In a multi-label
project, pressing Next Label moves to the next label. Pressing
Shift + Next Label will move back to the previous label.
If there is no next label, pressing Next Label will create a
new label.
The number of the label currently being worked on is
displayed in the lower left corner of the display screen.
A maximum of eight labels can be created in any one label project.
Use Clear > Current Label to erase a label from a multi-label project.
Pressing Next Cell and Shift +
Next Cell will move you forward
and backward in a multi-cell
layout.
The L3 on the display screen
indicates that this is the third
label in a multi-label project.

40 | 13.20 End
DuraLabel.com | 800.788.5572
LABEL-EDITING FUNCTION KEYS
13.20 End
The End key is a navigation key. Pressing End will move the cursor to the very end of
the current field. Pressing Shift + End it moves the cursor to the very beginning of the
current field.
13.21 Directional Arrows and Enter
On the label canvas, the up and down arrow keys are used to move between content
fields. The left and right arrows are used to move the cursor inside a field.
In the control screens, the up and down arrows are used for moving through menus,
while the left and right arrows are used to change settings.
On the label canvas, the Enter key is used to move to another line of content. In control
screens, Enter is generally used to accept any changes that have been made.
13.22 Cut
Pressing the Cut key advances the print supply reel approximately one inch and
performs a cut.
13.23 Status
Pressing the Status key displays a list of all of the Lobo’s
current settings.
Use the up and down arrow keys to scroll through the
status screens.
13.24 Image Resize
Image Resize is used to resize an image or symbol. When
you press Image Resize, the first image on the label will be
selected, and a box will appear around that image. If there
are multiple images on the label, pressing Image Resize
again will select the next image.
With an image selected, press the up arrow key to make the
image larger or press the down arrow key to make it smaller.
When you are finished resizing an image, press Enter to
accept the changes and exit the image resizing function, or
press Image Resize again to select another image.
Pressing the Status key shows
all current label settings.
Use Image Resize to make
symbols larger or smaller.

DuraLabel.com | 800.788.5572
13.26 Image Move | 41
LABEL-EDITING FUNCTION KEYS
13.25 View Label
Pressing the View Label button gives you two options:
Print Preview and List of Labels.
Print Preview displays a preview of the current label. This
is the only way to see the complete design of a multi-celled
label. If the label is too long to be seen all at once, the left
and right arrow keys can be used to scroll across the length
of the label.
List of Labels displays a table of all of the labels in the current project. This table is
used to control how to print a multi-label project. The Copies column of the table lets
you input the number of copies of each label you’d like to print. After setting the copy
numbers for the various labels in your project, pressing the Print key begin printing the
specified copies.
NOTE: You cannot print labels that have changing sequence data or changing Time/
Date data with the List of Labels printing function. It only prints identical copies
of labels.
13.26 Image Move
Image Move is used to move an image or
symbol from its original position. When you
press Image Move, the first image on the
label will be selected, and a box will appear
around that image. If there are multiple
images on the label, pressing Image Resize
again will select the next image.
With an image selected, use the arrow keys
to move the image around on the label
canvas. When the image is in the desired
location, press Enter to accept changes and
stop repositioning images, or press Image
Move again to select another image.
When you reposition an image, the adjustment is made relative to the image’s original
location, or anchor point. Adding other text or content can move the image’s anchor
point, causing the image to move as well. To remove an image, you must delete it from
its anchor point.
Pressing the Status key shows
all current label settings.
Even after the image has been moved, its anchor
point is still in its original location on the label
canvas, to the left of the Exit text.

42 | 14.1 Installing Printer Driver
DuraLabel.com | 800.788.5572
14. Printing From a Computer (optional)
NOTE: The Lobo CD & USB cord are optional accessories. If you did not receive these
items and would like them, please contact your DuraLabel representative.
You can connect a computer that runs Microsoft Windows to the Lobo to create and
print labels. To use your Lobo this way, you will need the Lobo driver software installed
on your computer.
14.1 Installing Printer Driver
The CD that comes with your Lobo includes the printer’s driver software. These steps will
walk you through the driver installation process. Administrative rights may be required to
install the driver.
1. Turn on the Lobo and connect it to your computer with a USB cord.
NOTE: Windows XP Users: If the Found New Hardware Wizard notication appears,
simply close it and continue to step 2.
2. Insert the Lobo CD into your computer’s CD/DVD drive.

DuraLabel.com | 800.788.5572
14.1 Installing Printer Driver | 43
PRINTING FROM A COMPUTER
4. Lobo Driver Wizard
3. A startup screen should appear automatically.
If it does not appear, go through your Start
menu to select “My Computer” or “Computer,”
and double-click on the icon for your CD/DVD
drive.
4. Click on Driver Wizard, then click Next in the
Driver Wizard setup window that appears.
5. Read the Windows Printer Driver License
Agreement and click the I Agree button.
6. Select DuraLabel Lobo from the list of
possible printers in the next window that
appears.
7. Choose the install location and click Install
on the Choose Install Location window that
appears. A window shows the installation
progress.
8. In the next window, select Install printer
drivers and click Next.
NOTE: You will receive a notice if a previous
driver is found that should be removed. Please
refer to the following Upgrading a Driver section
for instructions on uninstalling a driver.
9. A Plug and Play Detection window appears.
Click and select Graphic Products Lobo and
click Next.
NOTE: Windows 8 users, do not select the listed
printer. Instead, check Install a driver for another
printer and click Next. Select Graphic Products
Lobo and click Next. Select the appropriate port
and click Next.
5. Windows Printer Driver License
Agreement
6. Selecting a DuraLabel driver
3. Lobo startup screen

44 | 14.1 Installing Printer Driver
DuraLabel.com | 800.788.5572
PRINTING FROM A COMPUTER
10. Enter Printer Name and set it as the default
printer, if you choose, by checking the
adjoining box in the Specify Printer Name
window that opens. Choose a sharing option,
then click Next.
11. Review information on the Completing the
Seagull Driver Wizard window that appears.
Click Finish if the information is correct. If
it isn’t, correct previous selections and click
Finish when the information is correct.
12. A Driver Wizard Completed Successfully
window appears, confirming the printer driver
installation was completed successfully. Now
click Close.
13. The previous window closes and a Completing
the DuraLabel Driver Setup Wizard window
appears. Click Finish to complete the new
driver installation.
10. Specic Printer Name, Default and
Sharing Status
11. Completing the Seagull Driver Wizard
12. Driver Wizard Completed Successfully
13. Click Finish on the Completing the
DuraLabel Driver Setup Wizard window.
The driver installation is now complete.

DuraLabel.com | 800.788.5572
14.2 Upgrading a Driver | 45
PRINTING FROM A COMPUTER
14.2 Upgrading a Driver
If you’re upgrading from a previously installed driver, follow these steps to uninstall the
driver that exists on your computer.
1. Load the Lobo installation CD. (Alternatively, download the printer driver from the
Graphic Products website.)
2. Press the Uninstall Driver button on the startup screen.
3. Click Remove printer driver, then click Next.
4. Click Use advanced printer driver removal options, then click Next.
5. Check all existing DuraLabel printers, then click Next.
6. Check all existing DuraLabel drivers, then click Next.
7. Check all existing DuraLabel components, then click Next.
8. Check the files associated with the deleted items you wish to remove, then
click Next.
9. Review the list provided, then click Finish.
10. Click Restart.
The new Lobo printer driver may now be installed. (Follow directions in the previous
section, Installing printer driver).
NOTE: If upgrading from an older driver, you may need to restart your computer during
installation of the new driver.
Because the Lobo is not an edge-to-edge printer, an unprintable margin exists at both
the top and bottom of the label canvas. To avoid print quality issues, always design
labels with at least ⅛” (3.1 mm) of space at the top and bottom edges of the label.
When your computer prints to the Lobo, its settings may override the internal Lobo
settings. If you change back to using Lobo on its own, unconnected to the computer, you
will need to reset the Lobo settings; simply turn Lobo off and wait at least five seconds
before turning it back on. Then, you will be ready to design and print labels again.

46 | 15.1 Cutter
DuraLabel.com | 800.788.5572
15. Cleaning Instructions
For all cleaning procedures, follow these steps first:
1. Power off the Lobo printer. Remove battery if installed. Disconnect printer from
power source.
2. Remove cartridge from Lobo printer.
3. To clean, place a cleaning swab between your forefinger and thumb and squeeze
until it snaps. Alcohol will be distributed to the cotton side of the swab. Rub the
swab on the areas indicated on the following components.
4. Always allow 1-2 minutes for the component to dry before reconnecting power and
operating the printer.
15.1 Cutter
CAUTION: The cutter blade is very sharp. Do not place your ngers in the cutter.
• Locate the cutter mechanism at the left of the cartridge bay. The moving portion of
this mechanism is a scissor-like blade, visible when looking at the left wall of the
cartridge bay.
• Rub the swab along the flat and sharp surfaces of the blade. Try to remove any
build-up present.
• Locate the cutter shear bar. This is another metal part, located to the left of the
platen roller when facing the printer straight on. Clean this part using the cleaning
swabs in the same fashion as the scissor blade. Swab the face, corners, and two
sides of this part.
• Check the label exit chute for buildup. If necessary, clean this portion of the plastic
housing in the same manner.
Shear bar
Scissor blade

DuraLabel.com | 800.788.5572
15.3 Polyester Printhead Shield | 47
CLEANING INSTRUCTIONS
15.2 Printhead
• Locate the printhead component within the cartridge bay, near the platen roller. The
printhead is located on a white ceramic rectangle. The printhead heater line is a
very thin black line travelling almost the entire length of the ceramic piece.
• Rub the swab along the entire heater line. Try to remove any build-up present. If
excessive build-up is present and more leverage is needed, insert the swab through
the cutter opening and clean the heater line from this angle.
15.3 Polyester Printhead Shield
• Locate the printhead component within the cartridge bay, near the platen roller. At
the very top of this component is a thin, clear plastic film made of polyester. This
shield helps guide the cartridge safely over the printhead. Over time, it may collect
adhesive.
• Rub the swab along the top surface of the plastic film. Try to remove any
build-up present.
Printer heater line
Polyester printhead shield

48 | 15.4 Platen Roller
DuraLabel.com | 800.788.5572
CLEANING INSTRUCTIONS
15.4 Platen Roller
• Locate the platen roller inside the cartridge bay. This is a black rubber roller located
in the upper left of the cartridge bay, near the printhead and cutter mechanisms.
• Rub the swab along the entire length of the roller. Try to clean around the entire
diameter of the roller, or as far as the cotton swab can reach. Try to remove any
build-up present.
Printer roller

DuraLabel.com | 800.788.5572
16.3 Cartridge Lock Will Not Lock | 49
16. Troubleshooting
This section describes several problems that may arise with the Lobo, and suggests
steps to resolve them. If you encounter a problem that you cannot solve with these
instructions, please contact your DuraLabel representative for support.
16.1 Printer Has No Power
16.2 Printer Doesn’t Respond to Commands
If the Lobo display is lit and yet the printer won’t respond to keyboard commands, first
try pressing Esc to exit out of any menu or submenu you might be in.
If that does not fix the problem and the Lobo is still unresponsive to all commands, you
will need to turn the Lobo off, wait five seconds, and then turn it on again. Unfortunately,
you will lose any label data that has not been saved.
16.3 Cartridge Lock Will Not Lock
If a print cartridge is in the Lobo but the Cartridge Lock will not turn clockwise to the
locking position, the print cartridge is probably not pushed down completely.
To fix this, press down lightly on the print cartridge with one hand while you turn the
Cartridge Lock clockwise with the other hand.
If the Cartridge Lock is in the locked position, but you are getting the error message
“Printer Not Ready, Please Secure Cartridge Lock,” please see the corresponding
Troubleshooting section.
NOTE: The Cartridge Lock should be easy to turn when everything is aligned correctly.
Don’t force the Cartridge Lock to turn if it isn’t turning easily; that may result in a break.
If using AC power:
• Check to make sure all plugs
are fully connected and secure,
including the plug into the Lobo,
the plug into the DC power
converter and the plug into the AC
power outlet.
• Check to make sure AC power
outlet is working.
• Is On/Off button turned to On
?
If using AC battery:
• Check to make sure battery is
installed correctly.
• Switch to AC power to test if printer
is working normally. If so, the
battery is probably not charged or
is not working properly.
• Is On/Off button turned to On
?

50 | 16.4 Canceling a Print Job
DuraLabel.com | 800.788.5572
TROUBLESHOOTING
16.4 Canceling a Print Job
The only way to stop a label that is being printed is to turn off the Lobo. Unfortunately,
any unsaved label information will be lost.
16.5 Label Doesn’t Feed When Print is Attempted
If you have attempted to print a label and you can hear the cartridge advancing but no
label comes out, it means that the label supply reel isn’t able to advance. This is usually
because the label supply has slipped too far back and cannot be grabbed by the platen
roller.
To fix this, remove the print cartridge and see where the label supply is positioned. If
it is too far back, it needs to be pulled forward at least a half-inch past the edge of the
cartridge. Also make sure that the label supply is positioned underneath the cartridge’s
two side guides. (See image right for reference.)
After fixing the label supply position, return the cartridge to the Lobo and lock it.
16.6 Label Print is Not Lined Up Correctly
A label’s print can occasionally come out lined up incorrectly. When this happens, it
will usually be because a new print cartridge’s tape is off-center. To fix this, remove the
cartridge and check to make sure that the tape is aligned correctly between its top and
bottom guides.
16.7 SD Card Isn’t Working
For the Lobo to read an SD card, the card must be read by the Lobo when it is powered
on. If there is no SD card in the card slot when the Lobo is turned on, you will not be
able to read from or save to the card.
If you are working on a label and want to save to an SD card that the Lobo is not reading,
save your label to the Lobo’s internal drive, turn off the Lobo, insert the SD card and turn
the Lobo back on. You will now be able to save to the SD card from the internal drive.
If the label supply is too far
back, it cannot be printed.
The label supply should overlap the
cartridge edge and go under the guides.
Supply guides

DuraLabel.com | 800.788.5572
16.10 Label File Doesn’t Match Cartridge Type | 51
TROUBLESHOOTING
16.8 Saved Label is Blank
If you have opened a saved label and it is blank, there are three explanations:
• It is possible your label project contains multiple labels and the first label is blank.
Check the label count indicator on the display screen to see if there are multiple
labels in the project.
• It is possible you are looking at an older version of the label and you saved a more
recent version under a different name. Browse the internal drive to see if the label
might be there.
• It is possible the label was not saved correctly. If the previous two explanations are
not true, then the label project was most likely not saved.
16.9 Labels are Wrinkled or Missing Ink
Sometimes, a newly-inserted print cartridge may print labels that are wrinkled, or labels
with some parts of the printed area missing. This is usually a result of the ribbon not
being properly tight.
If this happens, turn the cartridge’s ribbon rewind spindle counter-clockwise
(the direction indicated by the arrow on the top of the cartridge). A full 360° rotation
is recommended.
16.10 Label File Doesn’t Match Cartridge Type
If you try to open a saved label file, and the file doesn’t match the dimensions of the
supply in the loaded print cartridge, you will receive an error message that reads:
Selected template does not match current cartridge.
Below that message, the Lobo will display the necessary cartridge needed. For example,
it may display: Template width: 1”
Pressing the Esc button will clear this error message. You can then remove the current
cartridge and insert the correct cartridge. (Note that you can leave the printer on when
switching out a cartridge.) You will now be able to open the label file.
Cartridge rewind spindle

52 | 16.11 Error Message: Cutter Jam
DuraLabel.com | 800.788.5572
TROUBLESHOOTING
16.11 Error Message: Cutter Jam
A cutter jam occurs when the cutter is not able to complete a cut. This can occur when the
label material has become overlapped or jammed, making the material too thick for the
cutter to cut through, or when the cutter can’t cut the supply due to adhesive build-up.
When this happens, the screen will display this error message:
Error: Cutter Jam
Cutter Jam
Press ESC to open
First, press the Esc key to cancel any remaining prints and open the cutter.
Next, if there is any excess label supply material that caused the print jam, attempt to
remove it. If you successfully clear the jam, attempt to print again.
If you still receive a jam error message, you must unlock and remove the print cartridge
to clear the jam. Save the label you are working on, and then turn off the printer.
Remove the print cartridge. Attempt to clear the label material from around the cutter
using a tool (such as a pen or pencil).
WARNING: The cutter blades are sharp. Always turn Lobo’s power off before clearing a
cutter jam. Never place your ngers or any body part between the cutter blades; use a
tool to clear jams.
When you have cleared the cutter jam, replace the print cartridge, lock it and turn the
Lobo back on.
16.12 Error message: Please Insert Supply Cartridge
If the display screen reads:
Error
Please insert Supply Cartridge
and Secure Cartridge Lock
This means that the Cartridge Lock is in the locked position but the Lobo is not sensing
a cartridge in the print compartment. Unlock the Cartridge Lock by
turning it counter-clockwise, place a print cartridge in the Lobo and then lock the
Cartridge Lock.

DuraLabel.com | 800.788.5572
16.14 Error message: Supply Out | 53
TROUBLESHOOTING
16.13 Error message: Printer Not Ready, Please Secure
Cartridge Lock
If the display screen reads:
Lock Open
Printer Not Ready
Please Secure Cartridge Lock
This means that the Lobo is not sensing that the print cartridge is locked. Make sure
the print cartridge is flush with the top of the Lobo and that the Cartridge Lock is turned
clockwise a quarter-rotation so that it locks in place. When locked, the Cartridge Lock
should be in the position shown above.
If the Cartridge Lock is in the locked position and the error is still displayed, there may
be a problem with the Lobo sensing that it is locked. Try unlocking and locking the
cartridge again.
16.14 Error message: Supply Out
If the display screen reads:
Supply Out – Insert or Replace
Cartridge
Press ESC to Clear Error
This means that the Lobo print cartridge is empty and needs to be replaced with a new
cartridge.
Once a new cartridge is loaded and locked, press Esc to clear the error message.
Locked position

54 | 17. Specications
DuraLabel.com | 800.788.5572
17. Specications
Printer
• Type: Thermal transfer
• Print Speed: 2 inches per second
• Resolution: 203 dpi
• Maximum Print Width: 1.79”
• Maximum Label Length: 100”
Interface
• Keyboard: Full-size 11.125” (W) QWERTY keyboard
• Display: 3.5” diagonal color LCD
• Communication Interface: USB-B, SD card slot
• Internal: 400+ saved labels
• Expandable memory available via SD card slot
Software
• Embedded label creation software
Power Requirements
• Input Voltage: 100-240V — 2.5A, 50-60HZ
• Output Voltage: 19V DC, 4.73A
Battery (optional)
• Type: Lithium-Ion (Li-Ion)
• 3 hour average continuous print time
• 2 hour charge time when battery is < 10% power
Environment
• Operating Temperature: 41°F - 104°F (5°C - 40°C )
• Operation Humidity: 25% - 85% non-condensing
• Storage Temperature: -40°F - 140°F (-40°C - 60°C )
• Storage Humidity: 10% - 90% non-condensing
• Ventilation: Free air movement
Label supply
• Type: Continuous
• Width: 0.50” minimum, 2.00” maximum
• Capacity: 45’

DuraLabel.com | 800.788.5572
17. Specications | 55
SPECIFICATIONS
Ribbon Supply
• Type: Resin
• Width: 1.02” & 2.03”
• Capacity: 59’
Printer body
• Dimensions: 4.35”(H) x 11.63”(W) x 12.25”(D)
• Weight: 5.0 lbs, excluding supplies & battery

56 | 18. Symbols
DuraLabel.com | 800.788.5572
18. Symbols
The Lobo library contains over 1200 symbols, accessible by pressing the Symbol key.
This section shows all of these symbols, organized by symbol category. Note that future
Lobo firmware updates may change the symbol library.
Arc Flash
Arrows

DuraLabel.com | 800.788.5572
18. Symbols | 57
SYMBOLS
CEMA
Electrical Symbols
ACOUSTIC DEVICES
General
ANALOG & DIGITAL LOGIC FUNCTIONS
General
CIRCUIT PROTECTORS
Circuit Breakers

58 | 18. Symbols
DuraLabel.com | 800.788.5572
SYMBOLS
Electrical Symbols (cont.)
CIRCUIT PROTECTORS (CONT.)
Current Limiters
Fuse .................................................
Lightning Arrester
Protective Relay
COMPOSITE ASSEMBLIES
Amplier
Circuit Assembly
Network

DuraLabel.com | 800.788.5572
18. Symbols | 59
SYMBOLS
CONTRACT SWITCHES CONTRACTORS & RELAYS
Aneroid Capsule Operated Switch
Phase Shifter
Rectier
Repeater
Basic Contact Assemblies
CONTRACT SWITCHES CONTRACTORS & RELAYS (CONT.)
Electrical Contacts
Flasher

60 | 18. Symbols
DuraLabel.com | 800.788.5572
SYMBOLS
Electrical Symbols (cont.)
CONTRACT SWITCHES CONTRACTORS & RELAYS (CONT.)
Flow Actuated Switch
Limit-Switch Sensitive Switch
Liquid Level Activated Switch
Locking Switch
Nonlocking Switch Momentary or Spring-Return
Operational Coil Relay Coil
Pressure-or Vacuum Activated Switch
Pushbutton

DuraLabel.com | 800.788.5572
18. Symbols | 61
SYMBOLS
Relay
Safety Interlock
Selector or Multipositional Switch
Switch
Switches with Time Delay Features
Switching Function
Telegraph Key
Temperature Activated Switch

62 | 18. Symbols
DuraLabel.com | 800.788.5572
SYMBOLS
Electrical Symbols (cont.)
CONTRACT SWITCHES CONTRACTORS & RELAYS (CONT.)
Thermostat
FUNDAMENTAL ITEMS
Antennas
Battery
Attenuator
Capacitors

DuraLabel.com | 800.788.5572
18. Symbols | 63
SYMBOLS
Capacitors Letter Combinations
Continuous Loop Fire-Detector
Delay Function Delay Line Slow Wave Structure
Ignitor Plug
Oscillator
Permanent Magnet
Pickup Head
Resistors

64 | 18. Symbols
DuraLabel.com | 800.788.5572
SYMBOLS
Electrical Symbols (cont.)
FUNDAMENTAL ITEMS (CONT.)
Spark Gap
Squibb Electric
Thermocouple
Transducer
SYMBOLS USED ON SYSTEM DIAGRAMS MAPS & CHARTS
Exchange Equipment
Radio Station
Space Station

DuraLabel.com | 800.788.5572
18. Symbols | 65
SYMBOLS
Telegraph Equipment
TERMINALS & CONNECTORS
Cable Termination
Telegraph Repeater
Qualifying Symbols
Telephone Set
Coaxial Connector
Connector Disconnecting Device
Connectors Commonly Used Power Supply Purposes

66 | 18. Symbols
DuraLabel.com | 800.788.5572
SYMBOLS
Electrical Symbols (cont.)
Test Block
Wave-Guide Flanges
TRANSFORMERS INDUCTORS & WINDINGS
Core
Inductor
Transductor
Transformer
TERMINALS & CONNECTORS (CONT.)
Terminals

DuraLabel.com | 800.788.5572
18. Symbols | 67
SYMBOLS
TRANSMISSION PATH
Alternative or Conditional Wiring
Associated or Future
Circuit Return
Conductor Cable Wiring
Distribution-Lines Transmission-Lines
Intentional Isolation of Direct Current Path
Pressure Tight Bulkhead Cable Gland End Sealing End

68 | 18. Symbols
DuraLabel.com | 800.788.5572
SYMBOLS
Electrical Symbols (cont.)
Eng Apparatus
TRANSMISSION PATH (CONT.)
Strip Type Transmission Line
Termination
Waveguide

DuraLabel.com | 800.788.5572
18. Symbols | 69
SYMBOLS
Eng Apparatus (cont.)
Fire Safety
General Safety

70 | 18. Symbols
DuraLabel.com | 800.788.5572
SYMBOLS
GHS / 49 CFR
General Safety (cont.)

DuraLabel.com | 800.788.5572
18. Symbols | 71
SYMBOLS
GHS / 49 CFR (cont.)
GHS / 49 CFR No Border Diamonds

72 | 18. Symbols
DuraLabel.com | 800.788.5572
SYMBOLS
Hazard
GHS / 49 CFR No Border Diamonds (cont.)

DuraLabel.com | 800.788.5572
18. Symbols | 73
SYMBOLS
Hazard (cont.)
Information
Injury

74 | 18. Symbols
DuraLabel.com | 800.788.5572
SYMBOLS
Injury (cont.)

DuraLabel.com | 800.788.5572
18. Symbols | 75
SYMBOLS
International Plugs
Letter Symbols

76 | 18. Symbols
DuraLabel.com | 800.788.5572
SYMBOLS
Mandatory
Maritime ISO-17631

DuraLabel.com | 800.788.5572
18. Symbols | 77
SYMBOLS
Maritime ISO-17631 (cont.)
Medical

78 | 18. Symbols
DuraLabel.com | 800.788.5572
SYMBOLS
Package
Plastic
Medical (cont.)

DuraLabel.com | 800.788.5572
18. Symbols | 79
SYMBOLS
PPE
Prohibited

80 | 18. Symbols
DuraLabel.com | 800.788.5572
SYMBOLS
Stack
Prohibited (cont.)

DuraLabel.com | 800.788.5572
18. Symbols | 81
SYMBOLS
Target Organs
Tools
WHMIS

800.788.5572 | DuraLabel.com
©2013, 2014 Graphic Products, Inc. All Rights Reserved
v2.0—01/01/15
 Loading...