

Page 1
800.788.5572
DuraLabel.com
USER GUIDE
9000
Page 2

Graphic Products®, DuraLabel®, PathFinder®, Toro® and Lobo® are Registered Trademarks of Graphic Products, Inc.
© 2009, 2015 Graphic Products, Inc.
Minimum System Requirements
Operating System: Windows XP SP2 or later, Vista, Windows 7, Windows 8 or 8.1
Memory: 128MB RAM
Hard Drive: 100MB
Additional Requirements: IT Administrator Privileges
Supplies
DuraLabel supplies and the DuraLabel® 9000 printer have been optimized for
compatibility and print quality. Use only DuraLabel supplies from Graphic Products with
your DuraLabel 9000 printer.
Copyright Information
No part of this guide, including the products and software described in it, may be
reproduced, transmitted, transcribed, stored in a retrieval system, or translated into any
language in any form or by any means, except as documentation kept by the purchaser
for backup purposes, without the express written permission of Graphic Products, Inc.
Products and corporate names appearing in this guide may or may not be registered
trademarks or copyrights of their respective companies, and are used only for
identification or explanation and to the owners’ benefit, without intent to infringe.
Specifications and other content contained in this guide are furnished for informational
use only and are subject to change at any time without notice, and should not be
construed as a commitment by Graphic Products. Graphic Products assumes no
responsibility or liability for any errors or inaccuracies that may appear in this guide.
Page 3
DuraLabel.com | 800.788.5572
Introduction | 1
Introduction
Congratulations on the purchase of your DuraLabel 9000 thermal transfer printer. This
guide will have you printing professional-quality labels and signs in no time!
Call us at 800.788.5572 with any questions about your DuraLabel 9000 printer. We’re
here to help with all your label and sign-making needs.
Page 4

2 | Contents
DuraLabel.com | 800.788.5572
Contents
1. Warranties
4
1.1 5-Year DuraLabel Printer Warranty
4
1.1.1 Repairs
4
1.1.2 Batteries
4
1.1.3 Warranty Details
4
1.2
5-Year DuraLabel Premium Vinyl Warranty
5
2. Loading the Printer
6
2.1 Printer Parts
6
2.2 Supplies
7
2.3 Loading Vinyl Supply
7
2.4 Printer Ribbon Parts
10
2.5 Loading Ribbon
11
3. Connecting the Printer
14
3.1 Inserting the Installation CD
14
3.2 Using a USB Cable
14
3.3 Using a Parallel Cable
16
3.4 Upgrading a Driver
19
4. Configuring Printer Drivers
20
4.1 Continuous Vinyl Printing Instructions
20
4.2 Die-Cut Label Printing Instructions
21
4.2.1 Label Supply Calibration
21
4.2.2 Driver Settings
22
4.2.3 Media Sensor Adjustment for Die-Cut Labels with Headers
22
4.2.4 Media Sensor Adjustment for RTK Color Bar Die-Cut Labels
23
4.3 B Mark Label Printing Instructions
24
4.3.1 Label Supply Calibration
24
4.3.2 Driver Settings
24
4.3.3 Adjusting the B Mark Media Sensor
25
4.4 Cutting Labels in Intervals
25
4.5 Adjusting Print Speed
25
4.6 Adjusting Darkness
26
5. Installing Labeling Software
27
5.1 DuraSuite Labeling Software
27
5.2 LabelForge Labeling Software
27
6. Label Creation
28
6.1 Label Creation with Your Word Processor
28
6.1.1 Using Templates
28
6.1.2 Setting up a Microsoft Word Document
29
7. Label Design
30
7.1 Text Boxes
30
7.1.1 Changing Text Box Size
30
7.1.2 Positioning Text Boxes
31
7.2 Graphics
31
7.3 Merging Information, Sequencing Labels
32
7.3.1 Creating an Excel Spreadsheet
32
Page 5

DuraLabel.com | 800.788.5572
Contents | 3
CONTENTS
8. Configuring Ethernet Card
37
8.1 Setting an Ethernet Port using the Diagnostic Tool
37
8.2 Installing a Driver for the Ethernet Port
37
8.3 Manually Configuring the IP Address
40
8.4 Setting a Static IP
40
9. Cleaning and General Maintenance
41
9.1 Print Head
41
9.2 Cutter
42
9.3 Platen Roller
43
10. Troubleshooting
44
10.1 Speckles Appear Throughout Label
44
10.2 Fading of Text/Graphics Occurs During Printing
44
10.3 Hash Marks Appear Throughout Printing
44
10.4 Solid Printed Line Appears Across Entire Label
44
10.5 Unprinted Horizontal Lines Appear
45
10.6 LED Flashes Between Green “ON-LINE” and Red “ERROR”
45
10.7 Printer is Printing Labels but not Cutting Them
45
10.8 Receive a “No Ribbon” Error Message
46
10.9 Receive a “No Paper” or “Paper Jam” Error Message
46
10.10 Printer Cuts Labels Off-Center or into the Next Label
47
10.11 Wrinkles Appear on Half of Label
47
11. Specifications
50
11.1 Printer
50
11.2 Indicators and Buttons
50
11.3 Communication Interface
50
11.4 Power Requirements
50
11.5 Environment
50
11.6 Label Supply
50
11.7 Ribbon Supply
51
11.8 Printer Body
51
Page 6

4 | 1.1 5-Year DuraLabel Printer Warranty
DuraLabel.com | 800.788.5572
1. Warranties
1.1 5-Year DuraLabel Printer Warranty
Graphic Products’ DuraLabel printers are warrantied to be free from
defects in materials and workmanship for a period of five (5) years
from the date of purchase. Within this period, Graphic Products,
Inc. will, at its sole option, repair or replace any components which
fail in normal use. Such repairs or replacement will be made at
no charge to the purchaser for parts or labor, provided that the purchaser shall be
responsible for any transportation cost. This warranty does not cover loss, damages
from accident, or equipment or parts which have been misused, altered, neglected,
carelessly handled, used for purpose other than those for which the printer was
manufactured, or damages resulting from unauthorized service.
1.1.1 REPAIRS
Repairs are warrantied for 90 days. If the original warranty is still in effect, repaired
units will remain under their original warranty or for 90 days from the date of service,
whichever is longer.
1.1.2 BATTERIES
The optional battery packs for the DuraLabel Toro and Lobo portable systems are
warrantied for three years from the date of purchase.
The battery for the DuraLabel 2000 PLUS system is warrantied for one year from the
date of purchase.
1.1.3 WARRANTY DETAILS
The warranties and remedies contained herein are exclusive and in lieu of all other
warranties whether express, implied, or statutory, including any liability arising under any
warranty of merchantability or fitness for a particular purpose, statutory or otherwise.
This warranty gives the purchaser specific legal rights, which may vary from state to
state.
In no event shall Graphic Products be liable for any incidental, special, indirect, or
consequential damages, whether resulting from the use, misuse, or inability to use
the product for any reason including defect. Some states do not allow the exclusion of
incidental or consequential damages, so the above limitation may not apply in all areas.
Graphic Products retains the exclusive right within all warranty periods to repair, replace,
or offer a full refund of the purchase price at its sole discretion. Such remedy shall be
the purchaser’s sole and exclusive remedy for any breach of warranty.
Page 7

DuraLabel.com | 800.788.5572
1.2 5-Year DuraLabel Premium Vinyl Warranty | 5
WARRANTIES
General maintenance and cleaning of the DuraLabel printer is the purchaser’s
responsibility and is not covered by the warranty. Expendable items or parts such as
label supply and ribbon are not covered by this warranty.
NOTE: SpeciÀc preparation may be required before shipping. Please contact your
Graphic Products representative to ensure correct return procedure: please call
800.788.5572 for details. Graphic Products, Inc. shall not be responsible for any loss
or damages incurred during shipping.
1.2 5-Year DuraLabel Premium Vinyl Warranty
DuraLabel supplies are tested for durability under various conditions, including UV
exposure, moisture, heating and cooling cycles, abrasion, and chemical exposures.
Graphic Products warranties labels made from its Premium vinyl supplies for a period of
five (5) years.
Within five years of purchase and after proper application, Graphic Products will replace
labels made with DuraLabel Premium Vinyl which become unreadable or fail to maintain
adhesion with the labeled surface. In such instance, Graphic Products, Inc. will provide
a one-time replacement roll of the same supply.
Page 8
6 | 2.1 Printer Parts
DuraLabel.com | 800.788.5572
2. Loading the Printer
DuraLabel ribbon and vinyl supplies have been optimized for compatibility and print
quality. Only authorized DuraLabel supplies from Graphic Products will print correctly in
the DuraLabel 9000 printer.
An instructional video demonstrating how to load DuraLabel ribbon and supplies is
included on your installation CD.
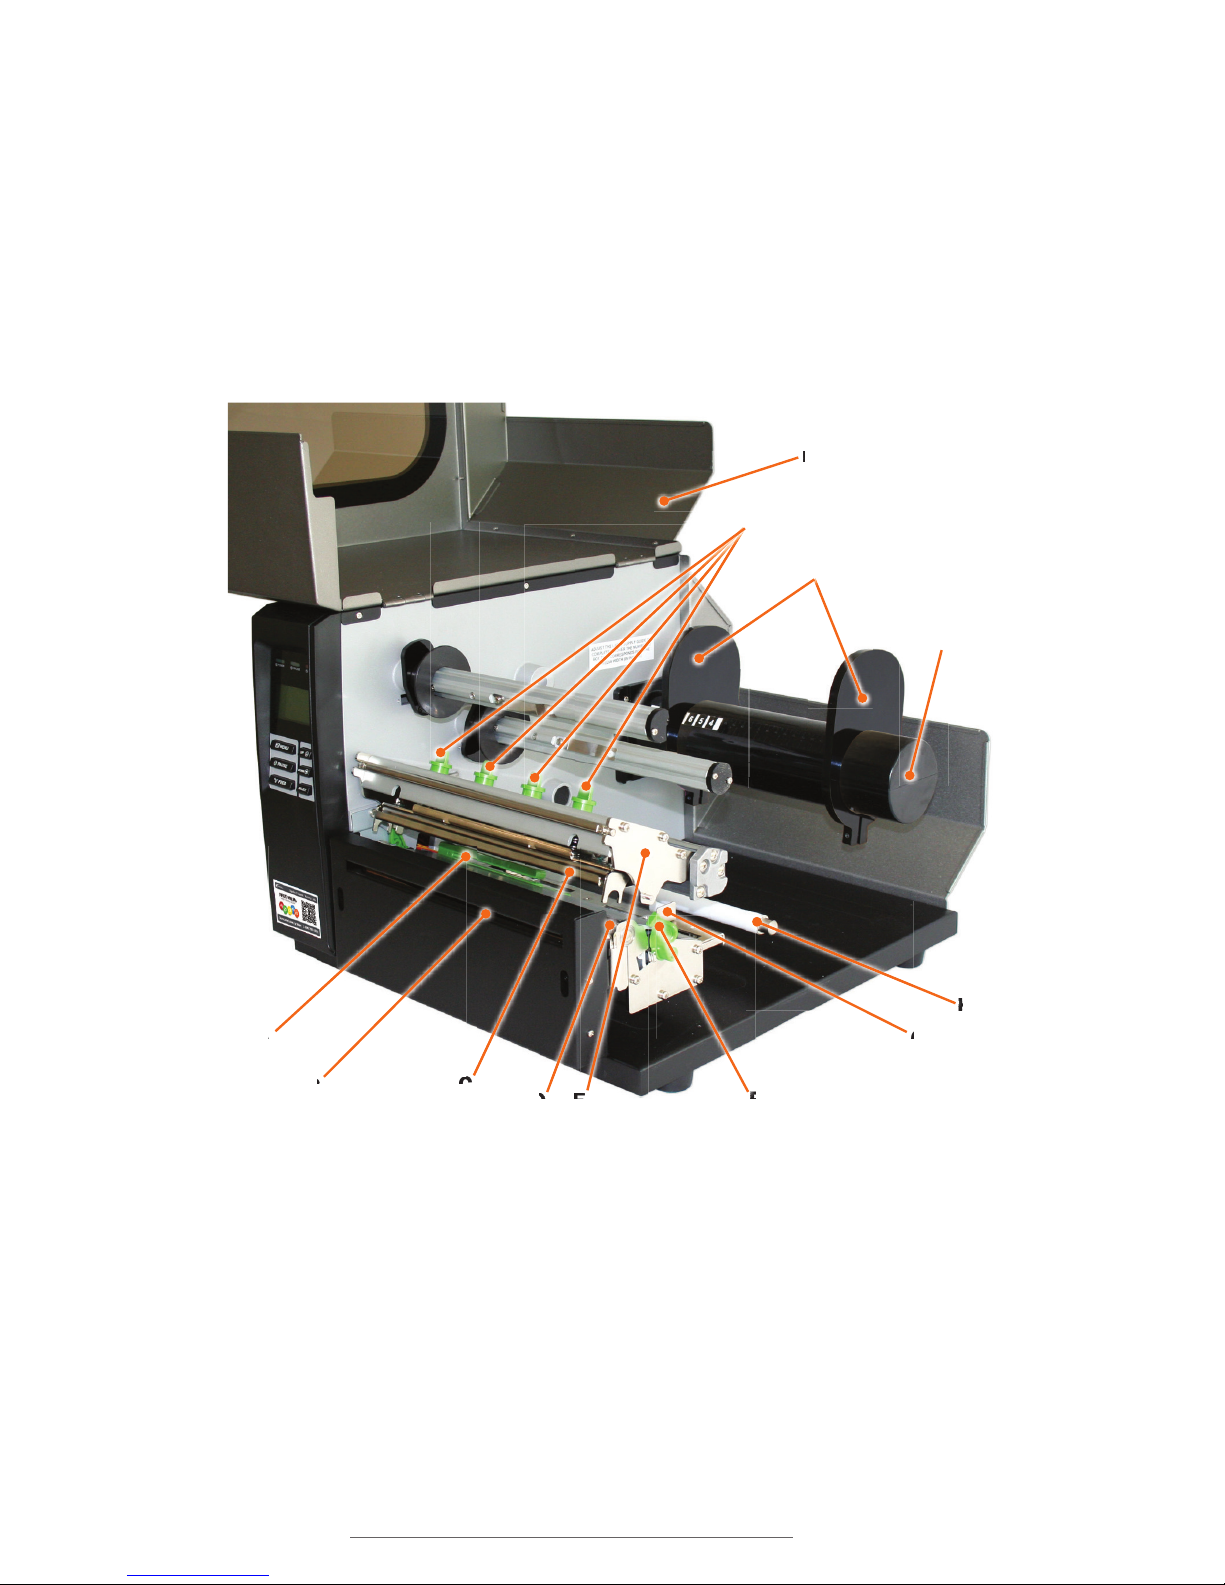
2.1 Printer Parts
A. Media Sensor (green)
B. Printed Label Opening
C. Print Head
D. Platen Roller (black)
E. Print Head Mechanism
F. Print Head Release Lever (green)
G. Adjustable Media Guides (white)
H. Media Guide Bar (metal)
I. Supply Bar
J. Supply Guides
K. Adjustable Pressure Knobs (green)
L. Printer Cover
A
B
D
C
F
G
H
I
L
E
J
K
Page 9
DuraLabel.com | 800.788.5572
2.3 Loading Vinyl Supply | 7
LOADING THE PRINTER
2.2 Supplies
The DuraLabel 9000 ribbon and other media have been optimized for compatibility and
print quality. Only authorized supplies from Graphic Products will print correctly in the
DuraLabel 9000.
2.3 Loading Vinyl Supply
IMPORTANT! Always turn the printer OFF when loading supplies. Always wait at least 5
seconds before turning power back ON.
NOTE: Watch a demonstration of supply loading,
viewable at DuraLabel.com/duralabel-videos.
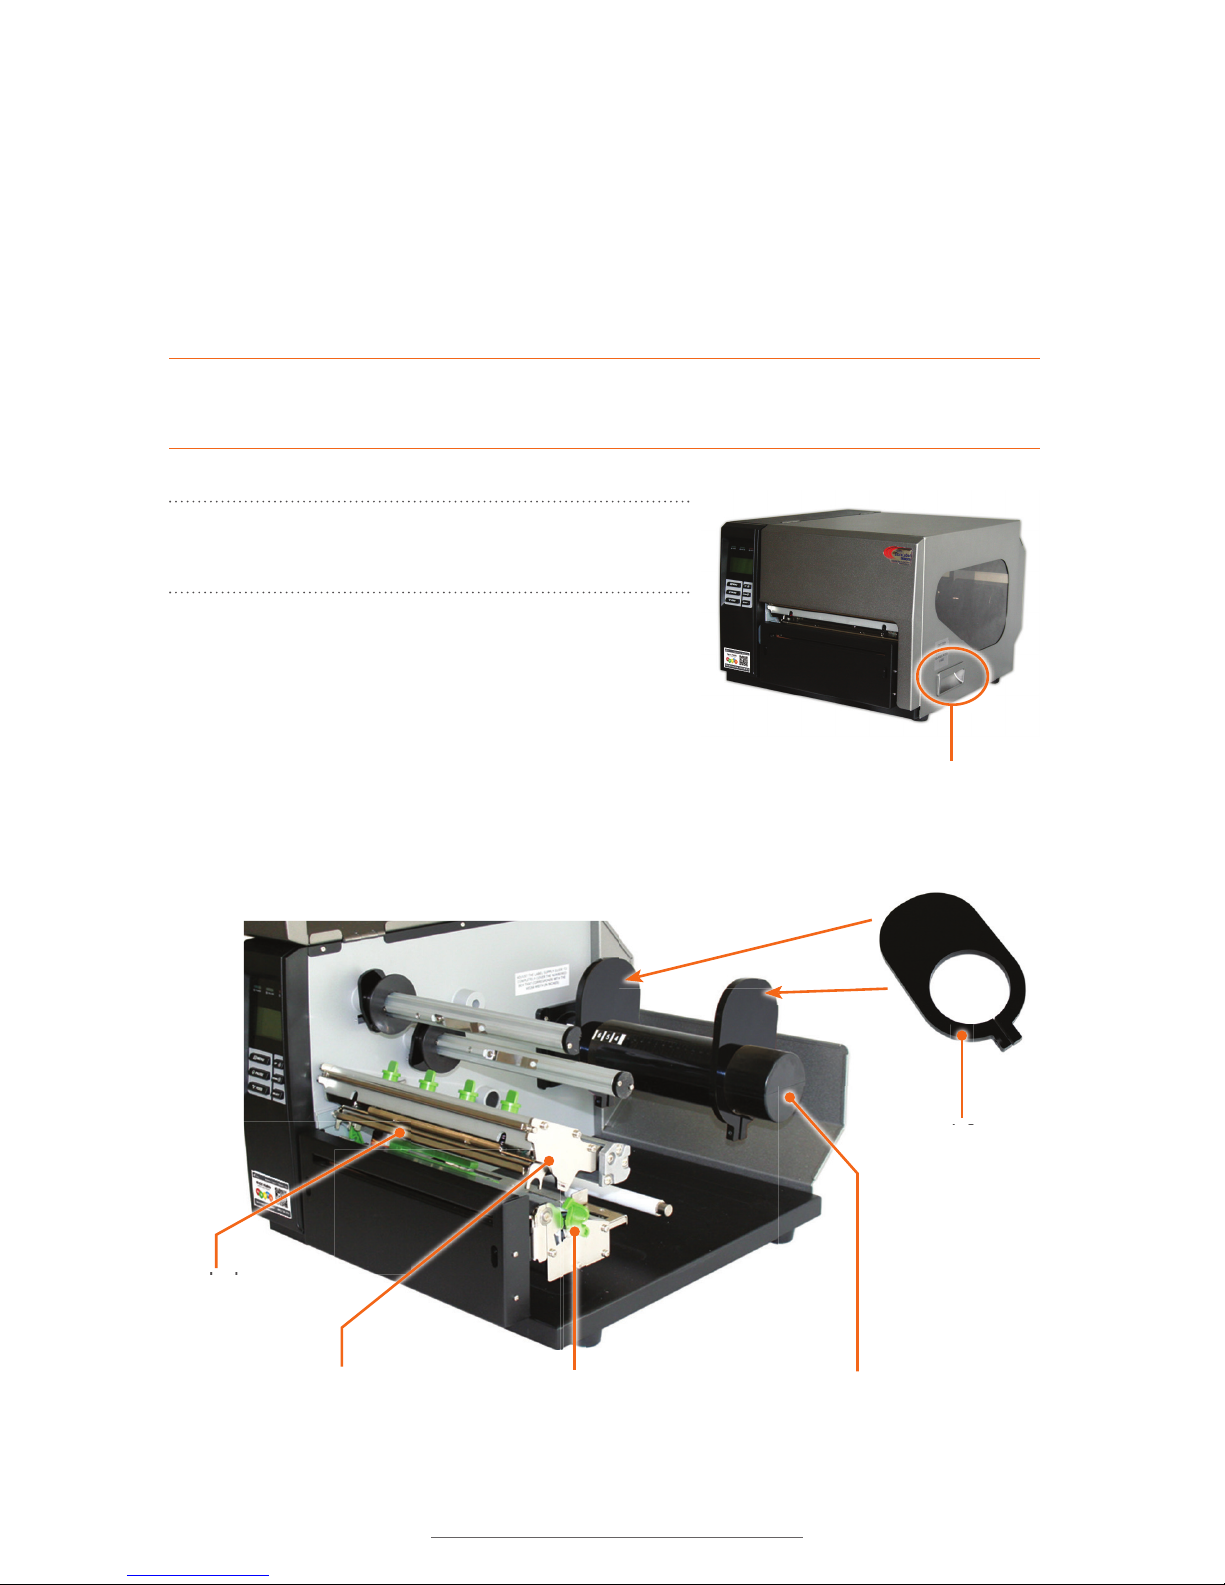
A. Open the printer cover by lifting up on the
handle.
B. Push the green print head release lever to pop
up the print head mechanism.
C. Remove and set aside the outside supply guide from the supply bar.
Supply Guide
Supply Bar
Handle on Printer
Cover
Print Head
Print Head Mechanism
Print Head Release Lever
Page 10
8 | 2.3 Loading Vinyl Supply
DuraLabel.com | 800.788.5572
LOADING THE PRINTER
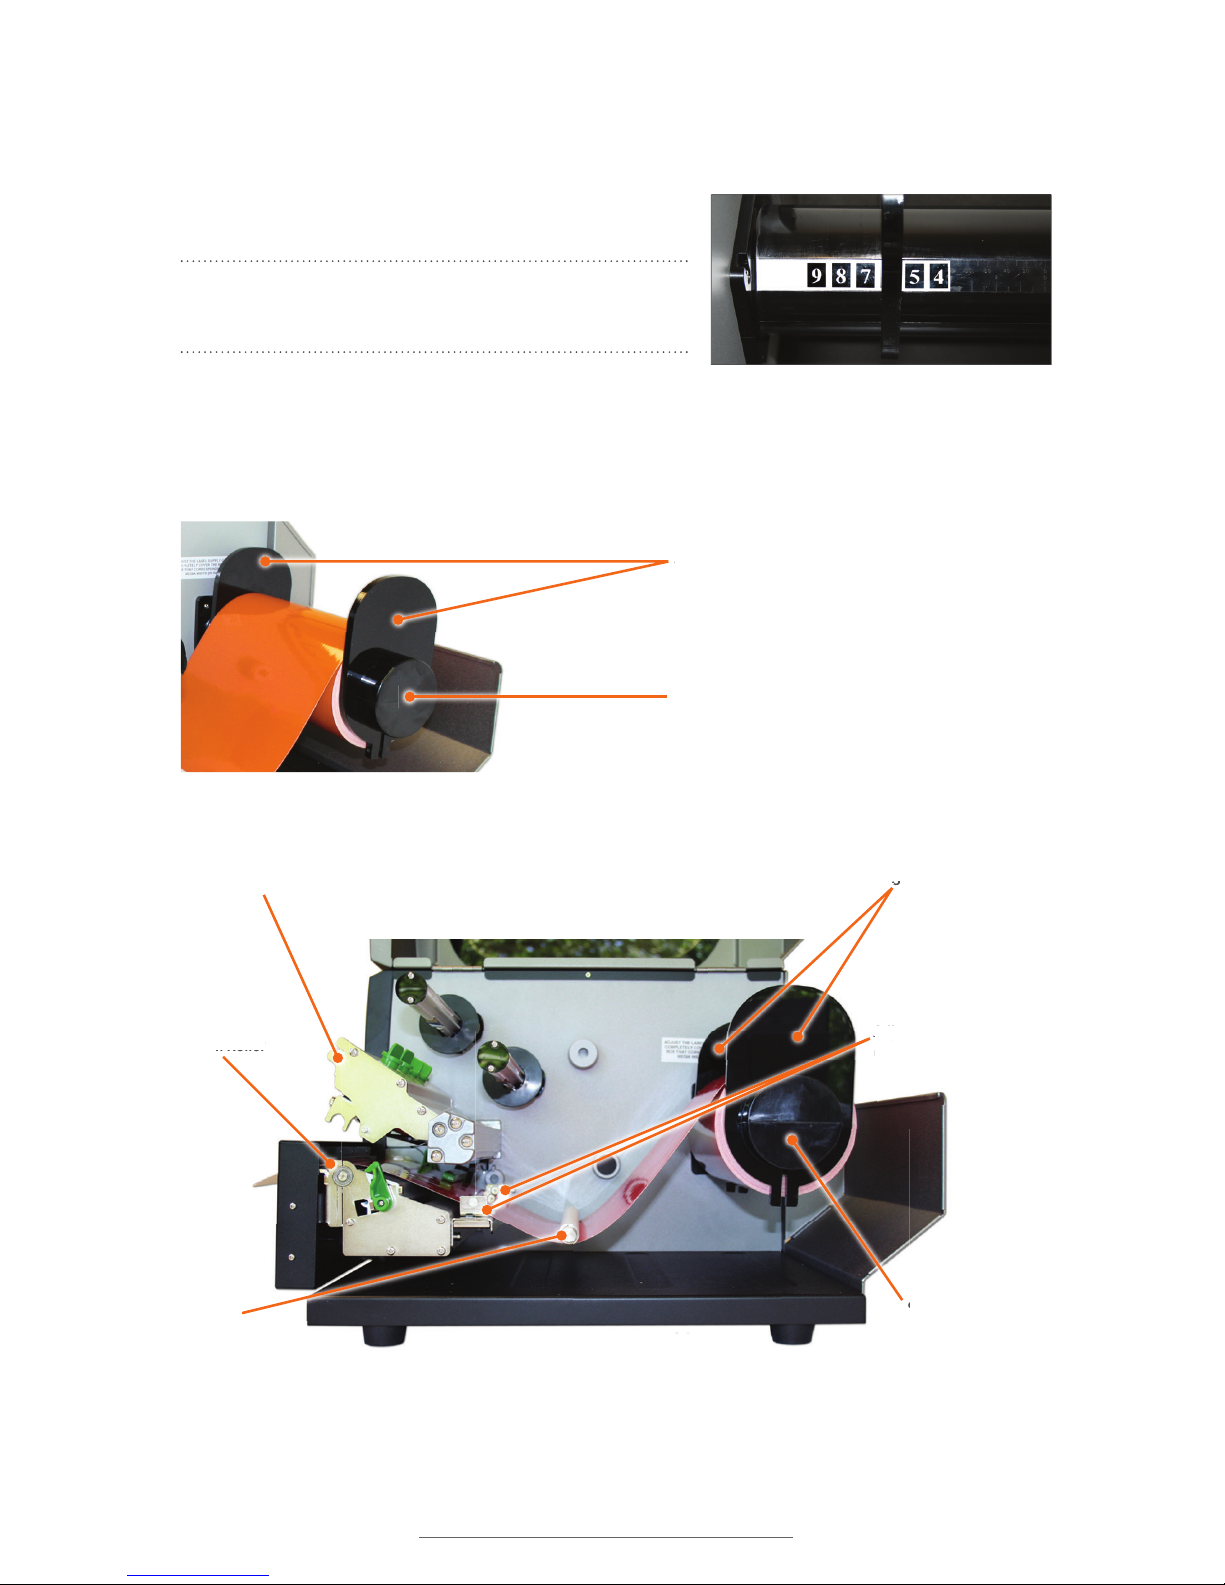
D. Adjust the inside supply guide to cover the number corresponding to the size of
label supply being loaded (see photo below).
E. Place the label supply onto the supply bar.
NOTE: Label supply should roll over the top and
toward the front of the printer.
F. Fit the outside supply guide onto the label bar,
against the label supply but with enough room
for the label supply to rotate with ease.
The inside supply guide is set for 6" label supply.
Supply Guides
Supply Bar
Loaded supply and outside supply guide placed on supply bar
Loaded vinyl supply moving right to left.
Adjustable Media
Guides (white)
Platen Roller
Print Head Mechanism
Supply Guides
Supply Bar
Media
Guide Bar
R
r
Adj
u
ui
d
AAA
Page 11
DuraLabel.com | 800.788.5572
2.3 Loading Vinyl Supply | 9
LOADING THE PRINTER
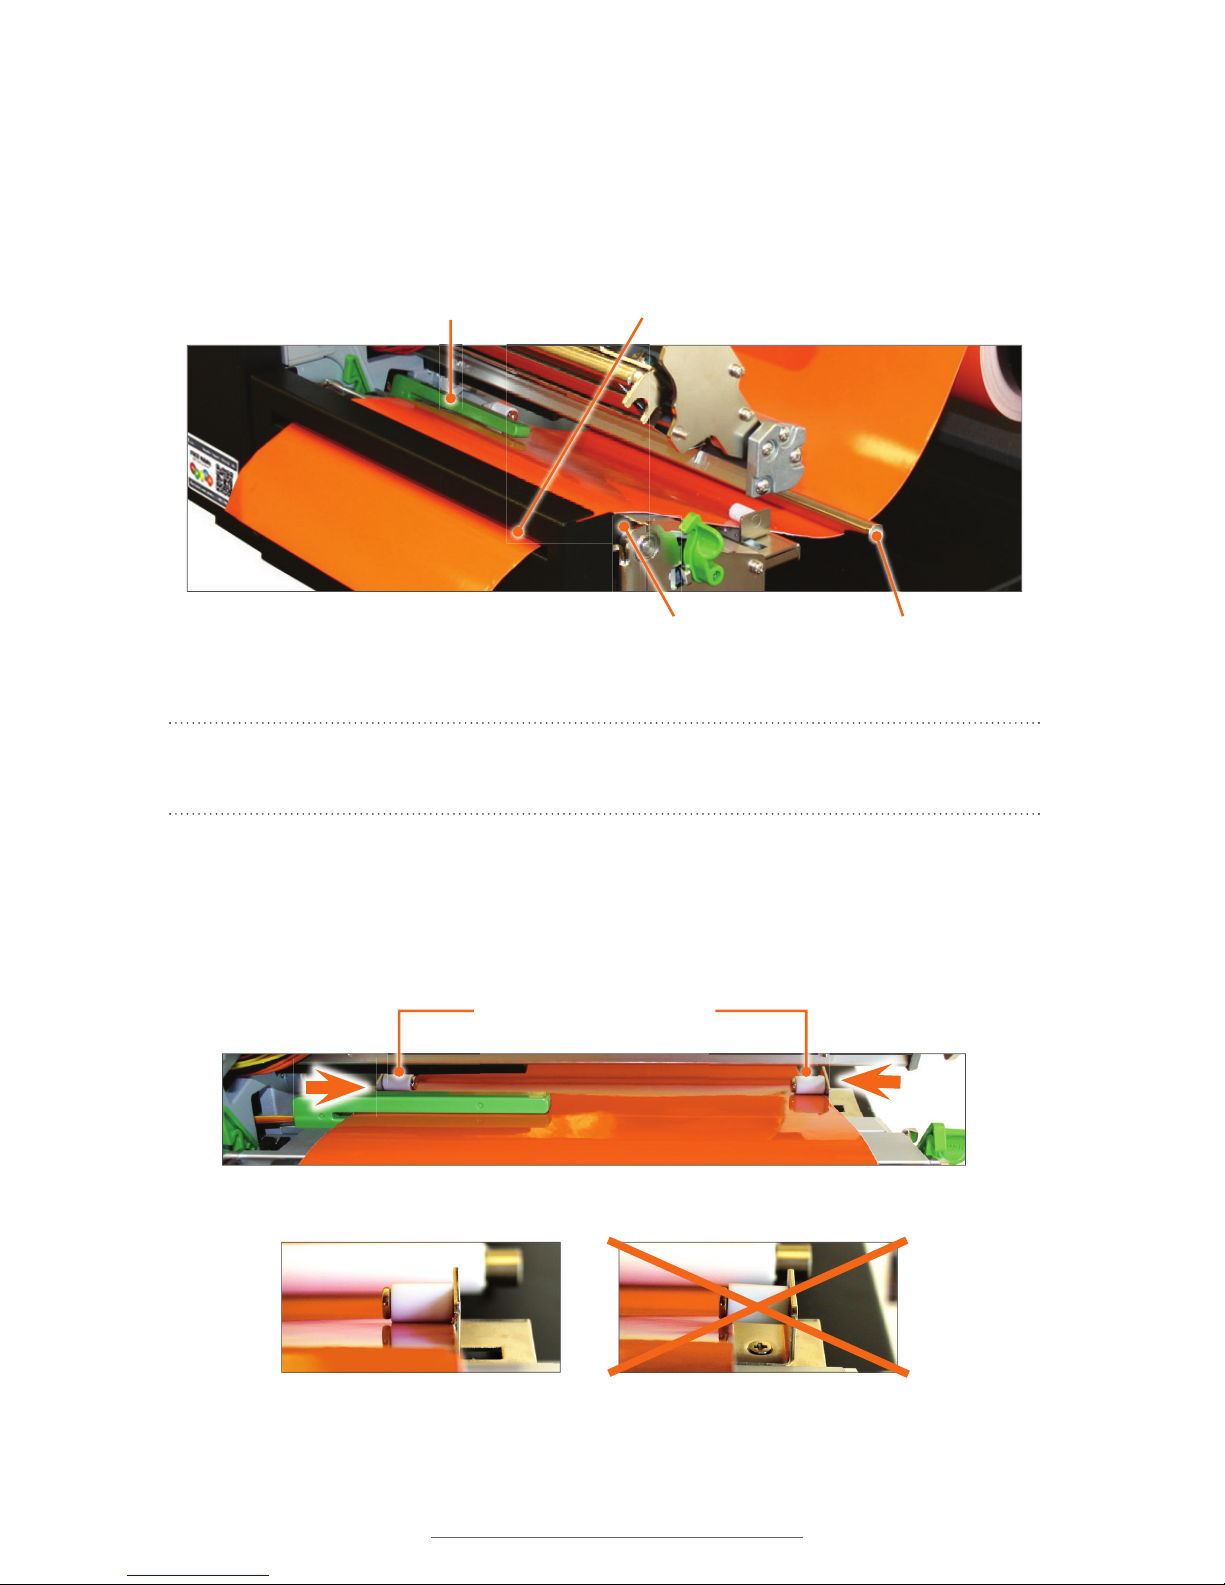
G. Pull the leading edge of the label supply and thread it under the media guide bar
and through the adjustable media guides.
H. Pull the label supply over the black platen roller and through the printed label
opening.
Adjustable media guides Àtted to width of vinyl supply
Adjustable Media Guides (white)
Guide Àtted correctly
Guide not Àtted correctly
Vinyl properly loaded
Media Guide Bar
Printed Label Opening
Platen Roller (black)
Media Sensor (green)
NOTE: Make sure the label supply threads under the green media sensor, located
under the print head.
I. Move the adjustable media guides to fit the width of the label supply, securing the
label supply in place.
Page 12
10 | 2.4 Printer Ribbon Parts
DuraLabel.com | 800.788.5572
LOADING THE PRINTER
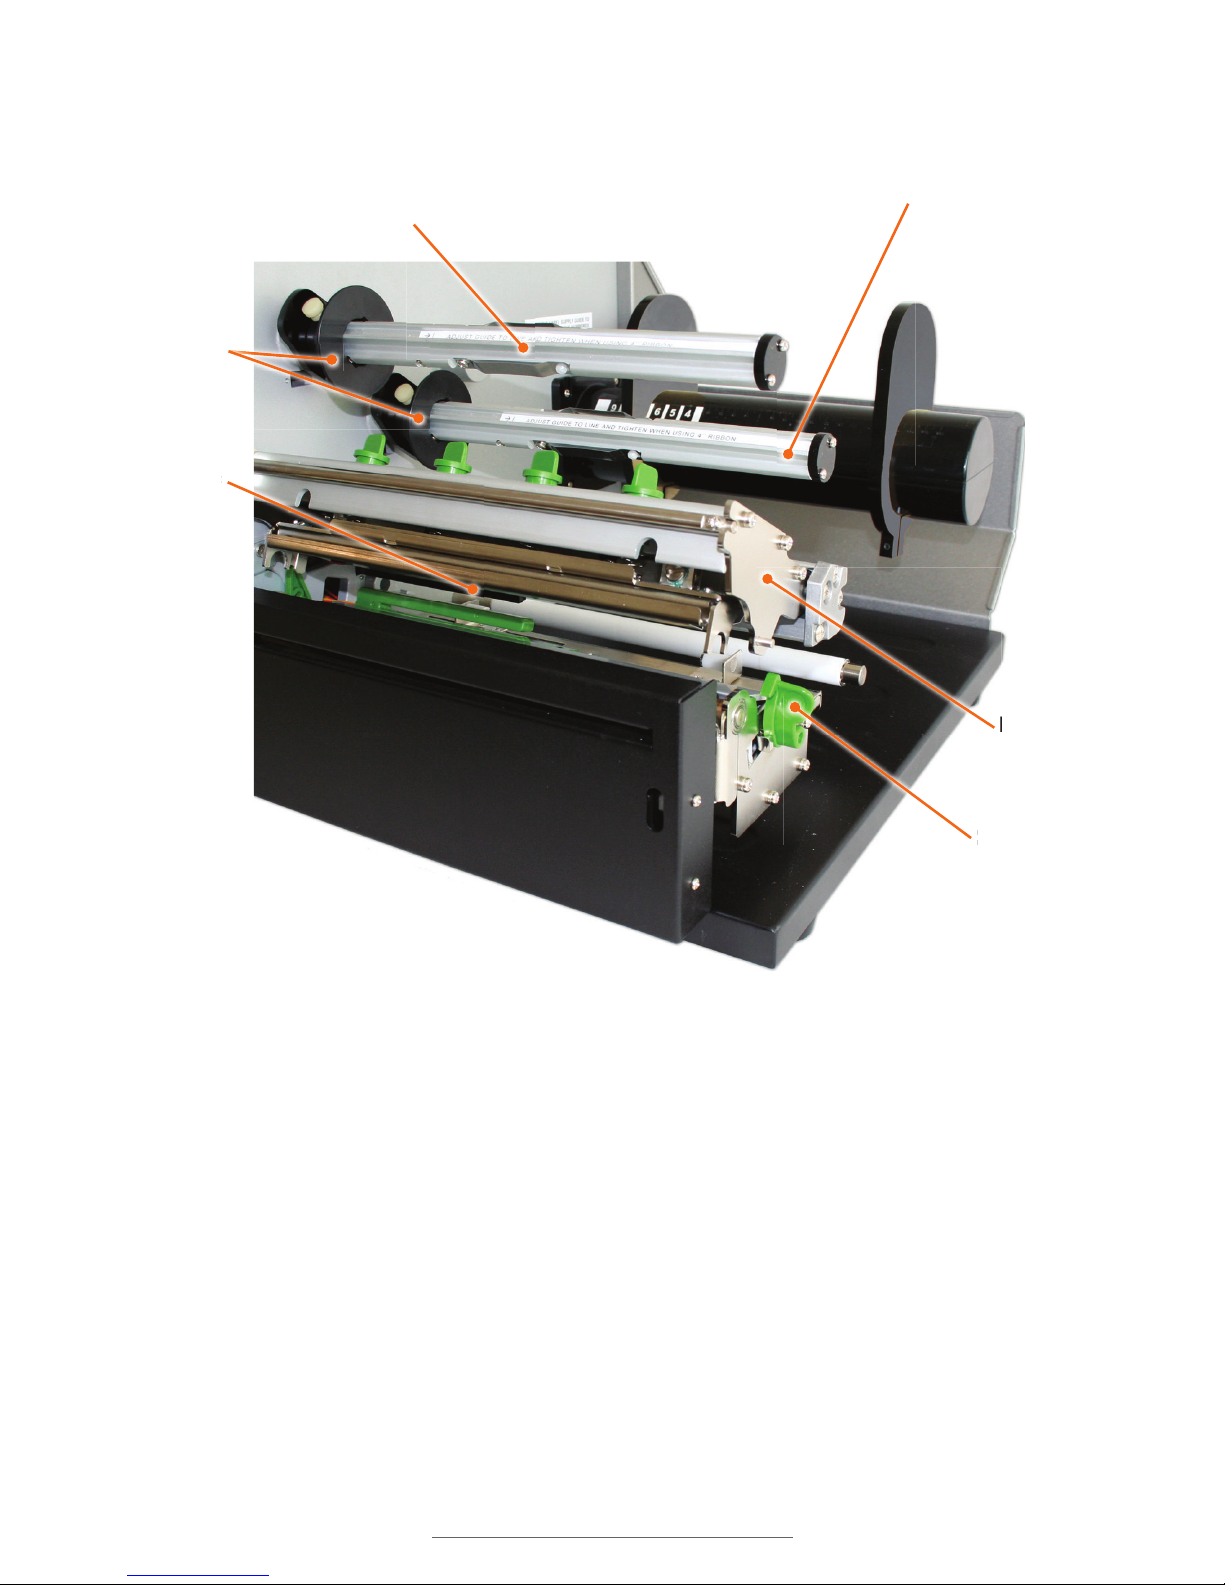
2.4 Printer Ribbon Parts
B
C
A
D
E
F
A. Ribbon Rewind Spindle (front)
B. Ribbon Guides
C. Ribbon Sensor (black)
D. Print Head Release Lever (green)
E. Print Head Mechanism
F. Ribbon Spindle (back)
Page 13
DuraLabel.com | 800.788.5572
2.5 Loading Ribbon | 11
LOADING THE PRINTER
2.5 Loading Ribbon
IMPORTANT! Always turn the printer OFF when loading supplies. Always wait at least 5
seconds before turning power back ON.
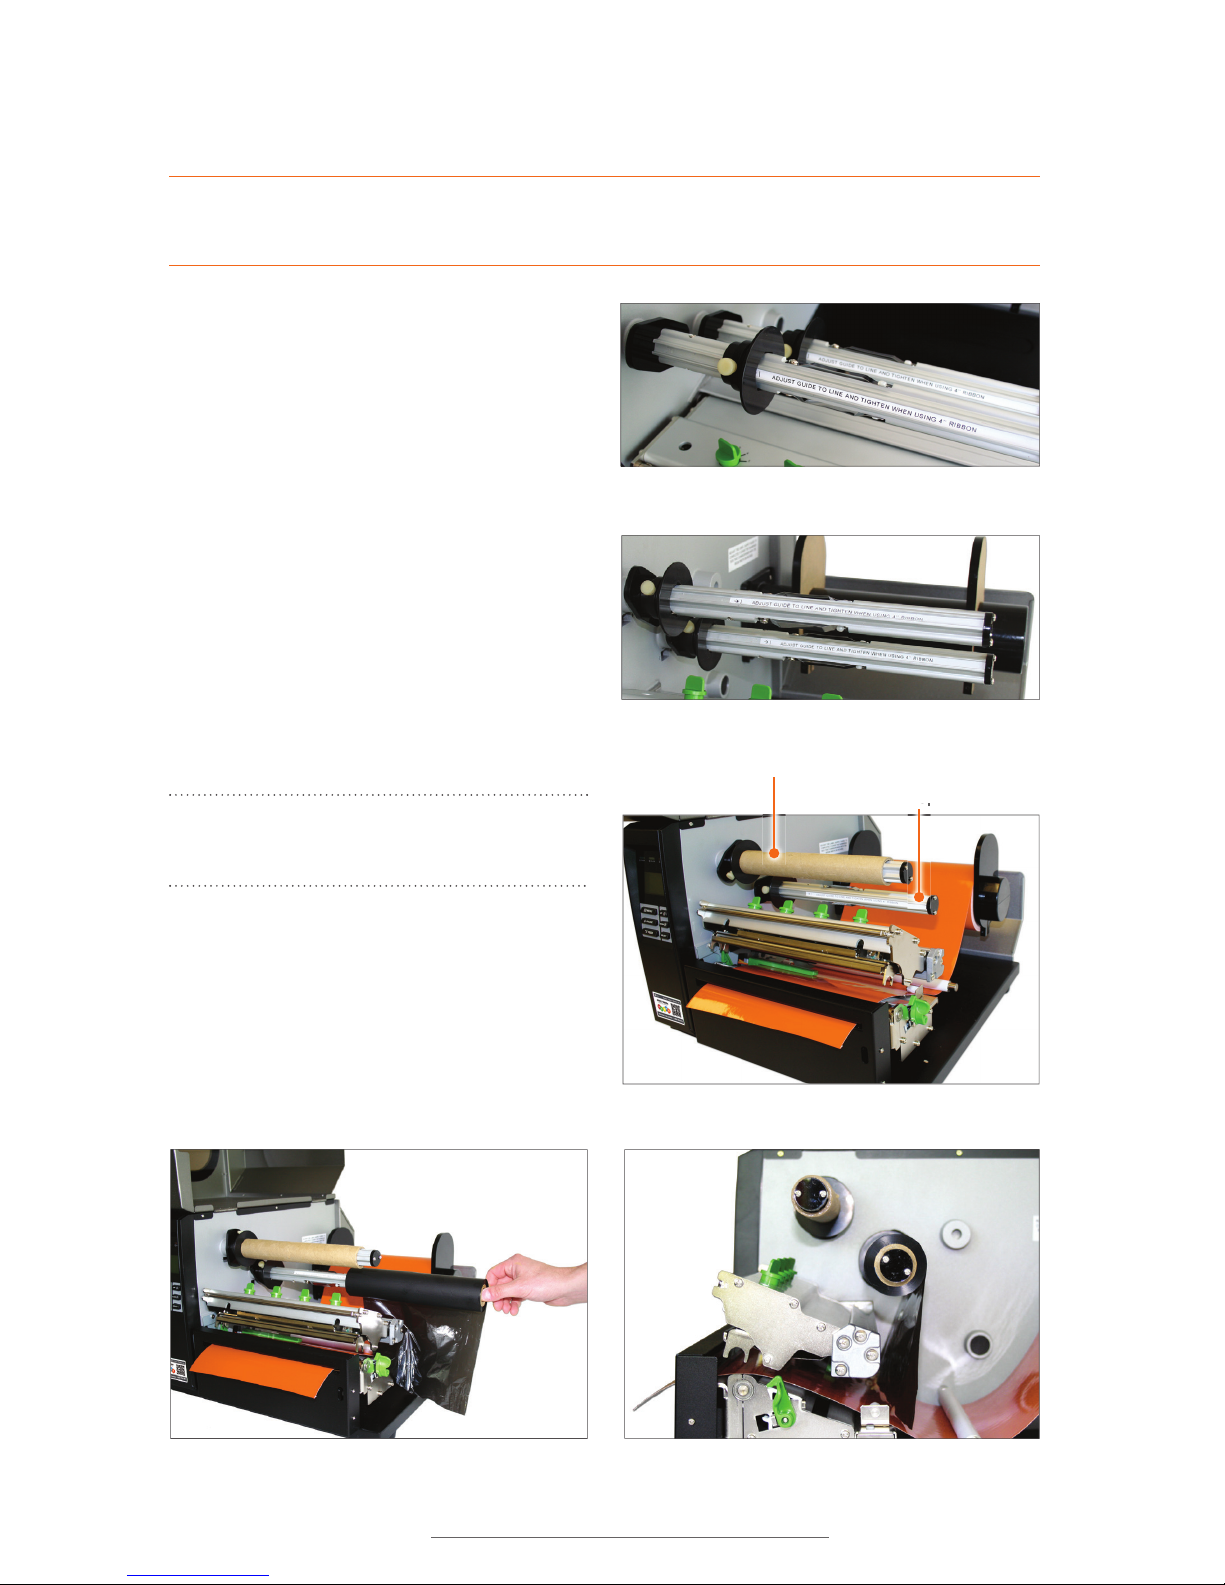
A. Set ribbon spindle guides based on
loaded ribbon size.
a. For 2.33” ribbon, move each
ribbon guide to the line indicated
on the ribbon spindle and tighten
the screw on the top of each
ribbon guide.
b. For 8.66” ribbon, move the ribbon
guides against the inside printer
wall.
B. Slide an empty supply core onto the
front ribbon rewind spindle.
Guides for 4.33" ribbon
Guides for 8.66" ribbon
Empty supply core applied to front ribbon rewind spindle
Ribbon Rewind Spindle
Ribbon Spindle
Sp
NOTE: Make sure the empty supply core
is Áush against the ribbon guide.
C. Slide a ribbon supply roll onto the
ribbon spindle, flush against ribbon
guide, with the leading edge hanging
down toward the back of printer.
Ribbon supply being placed on ribbon spindle Loaded ribbon supply on ribbon spindle
Page 14
12 | 2.5 Loading Ribbon
DuraLabel.com | 800.788.5572
LOADING THE PRINTER
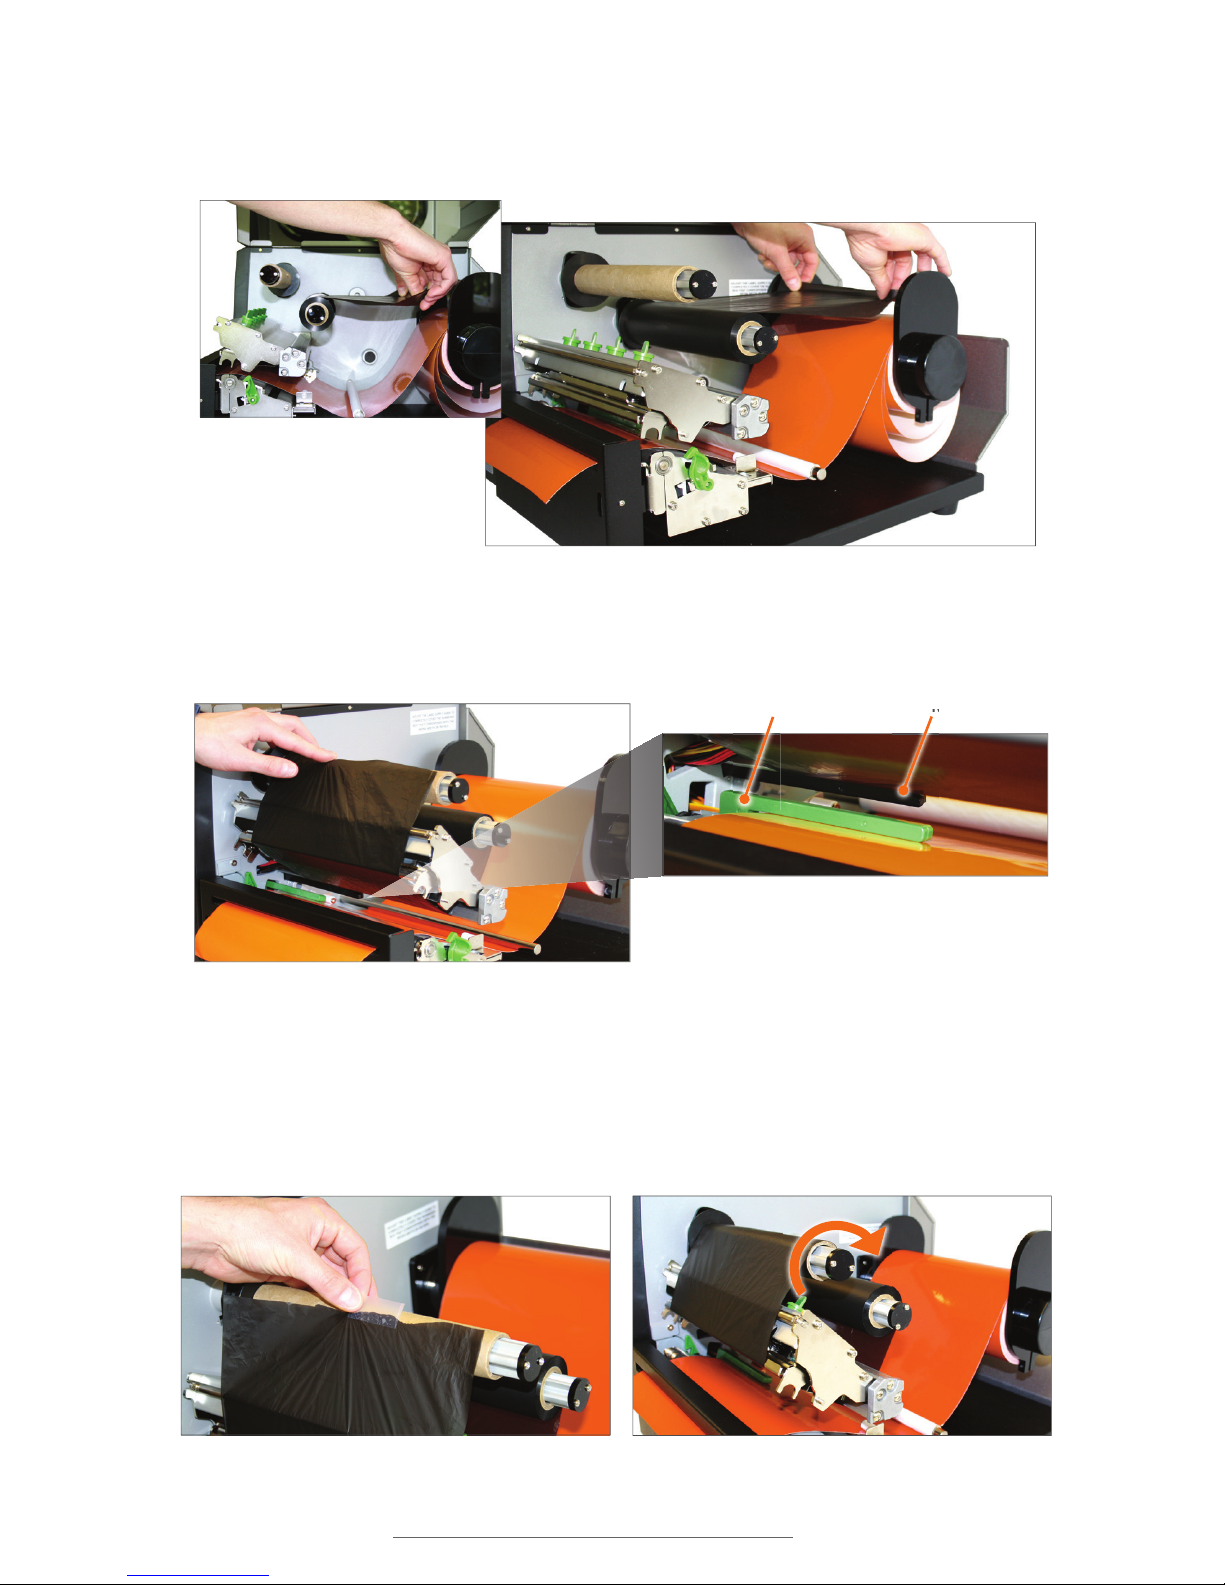
D. Pull the leading edge of the ribbon supply toward the back of the printer to provide
enough ribbon to go through the printer.
E. Pull it down and thread it underneath the print head mechanism and above the
ribbon sensor (black bar above green media sensor).
F. Tape the end of the ribbon supply to the front of the empty supply core.
G. Roll the ribbon rewind spindle clockwise a few times toward the back of the printer
to tighten the ribbon and remove flaws and fingerprints.
Ribbon supply pulled to back of printer
Ribbon supply being pulled toward back
of printer
Ribbon being threaded underneath the print head mechanism and above the ribbon sensor.
Media Sensor Ribbon Sensor
Ribbon being taped to front of supply core Ribbon supply tightened
Page 15
DuraLabel.com | 800.788.5572
2.5 Loading Ribbon | 13
LOADING THE PRINTER
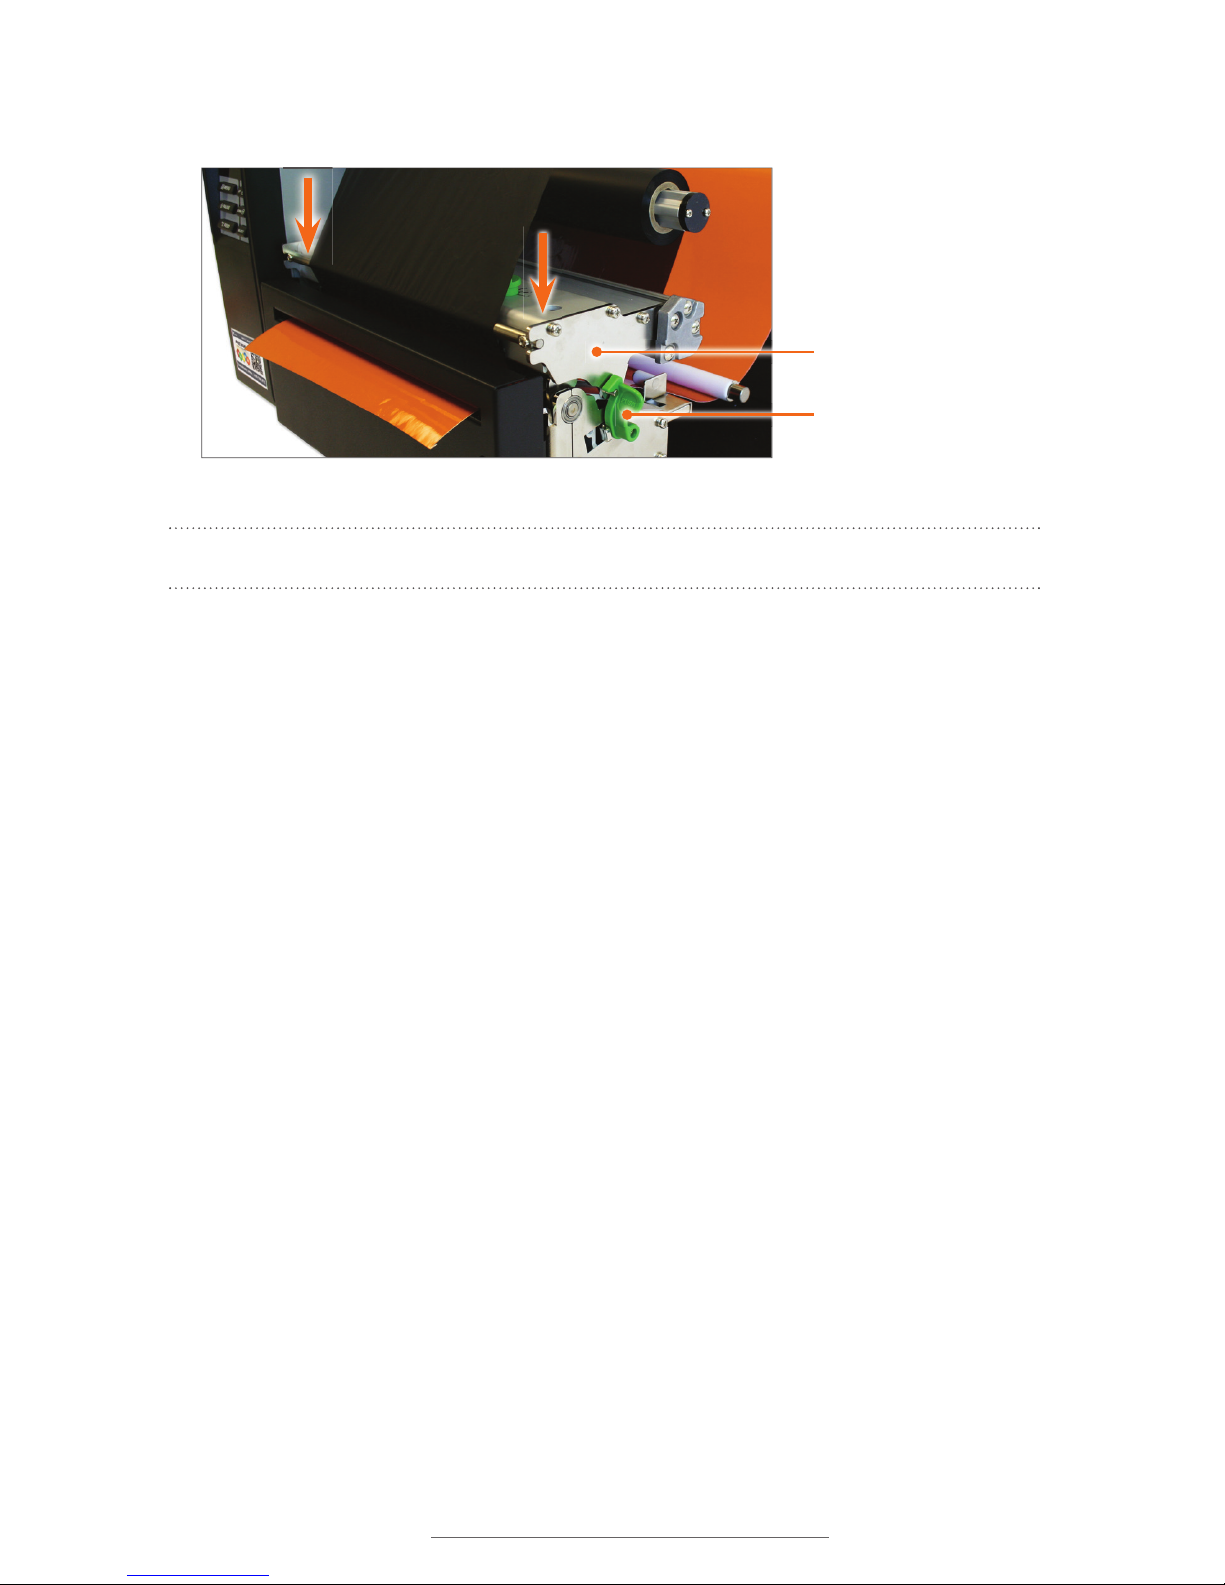
H. Press down to close, with a hand on each side of the print head mechanism.
NOTE: Make sure the print head release lever latches closed.
I. Close the printer cover.
J. Turn the printer ON.
Print Head Mechanism
Print Head Release Lever
Closed print head mechanism
Page 16
14 | 3.1 Inserting the Installation CD
DuraLabel.com | 800.788.5572
3. Connecting the Printer
Connect the power supply from the DuraLabel 9000 printer to an electrical outlet.
Connect the USB or parallel cable from the DuraLabel 9000 to your PC and power ON
the printer.
3.1 Inserting the Installation CD
Before inserting the installation CD, refer to the instructions for the type of cable you’re
using. When using a USB cable, follow instructions in Section 3.2, Using a USB Cable.
When using a parallel cable, follow instructions in Section 3.3, Using a Parallel Cable.
NOTE: When printing RTK, arc Áash and other die-cut or B Mark labels, you must
set up the printer driver and printer. Refer to Section 4.2, Die-Cut Label Printing
Instructions, or Section 4.3, B Mark Label Printing Instructions.
3.2 Using a USB Cable
NOTE: You may need IT administrator privileges to install a driver.
The following instructions are only for those using a USB cable. Skip to Section 3.3,
Using a Parallel Cable, if installing manually.
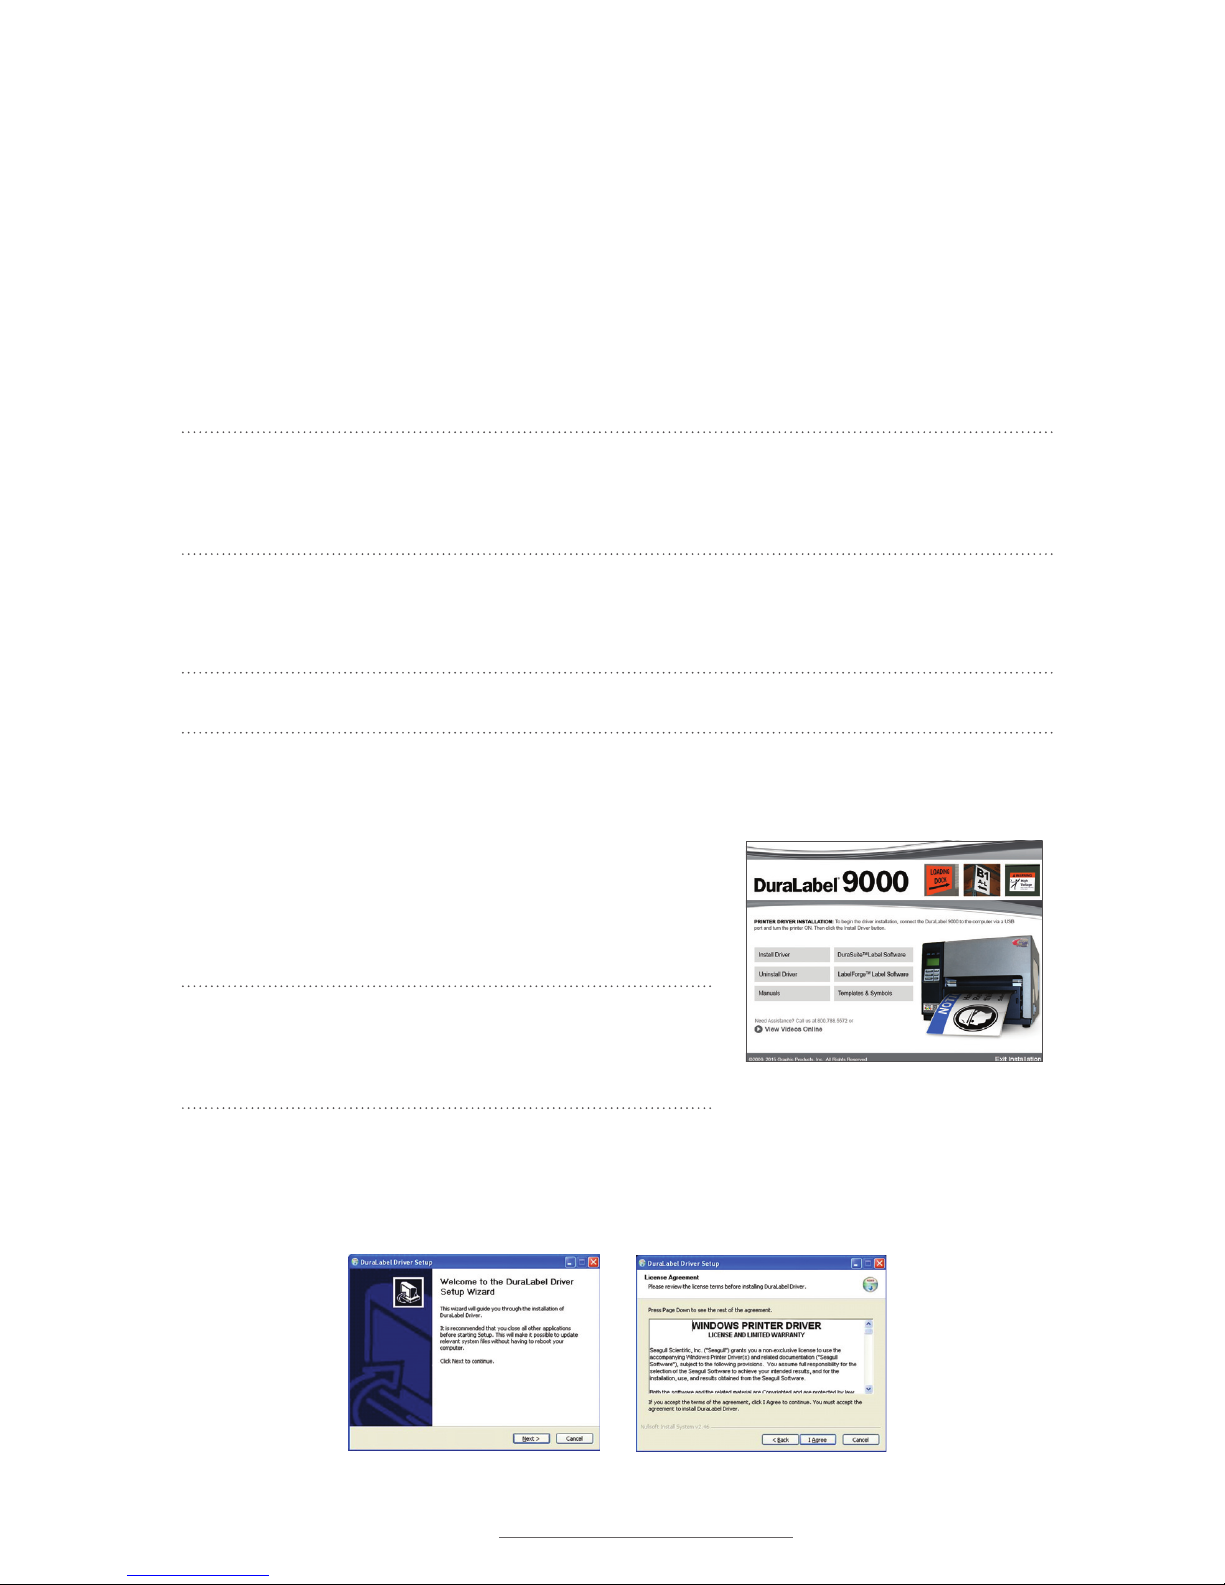
A. Insert the DuraLabel 9000 Installation CD in
your computer’s disk drive. A DuraLabel 9000
startup screen appears.
NOTE: If the CD does not run automatically, go to
Start > Computer and double-click on your CD/DVD
drive, which should show the DL icon.
B. Click on Driver Wizard, then click Next in the Driver Wizard window that appears.
C. Click I Agree on the Windows Printer Driver License Agreement window that
appears.
DuraLabel Driver Setup Wizard
Windows Printer Driver License Agreement
DuraLabel 9000 Startup Screen
Page 17
DuraLabel.com | 800.788.5572
3.2 Using a USB Cable | 15
CONNECTING THE PRINTER
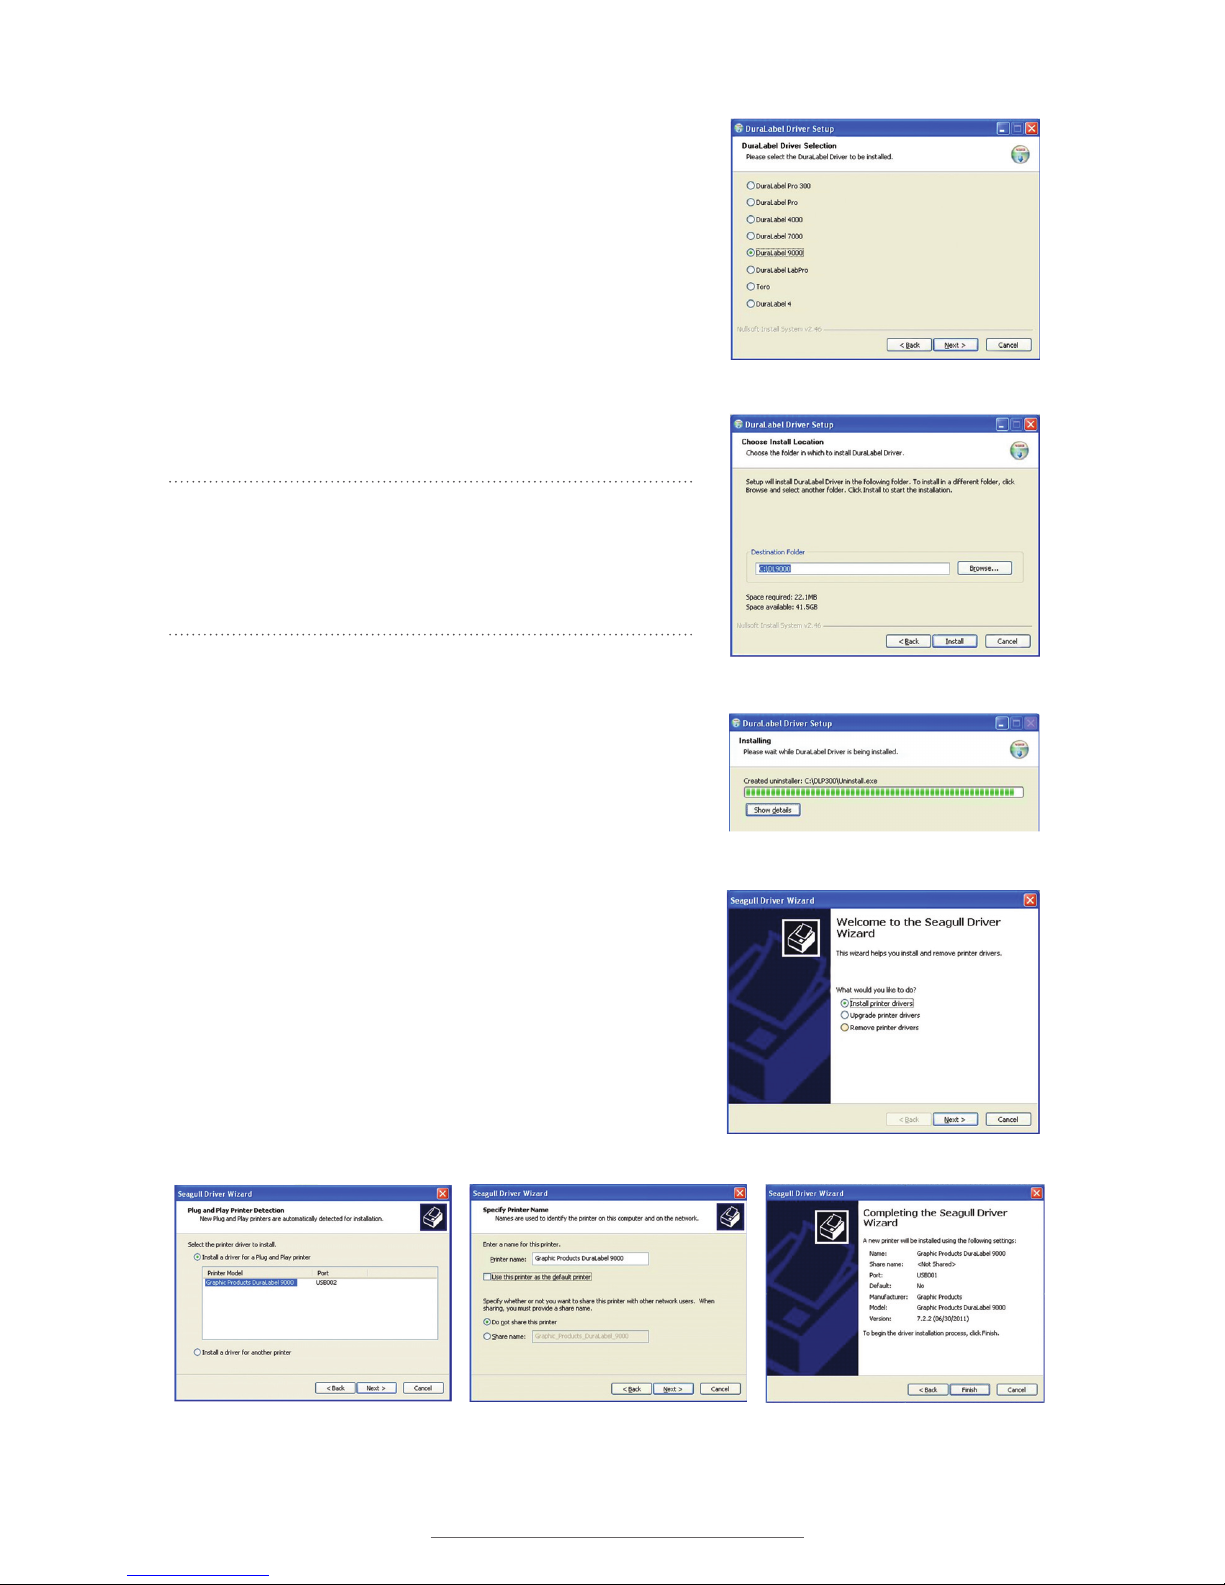
D. Select DuraLabel 9000 and click Next on
the DuraLabel Driver Selection window that
appears.
E. Choose the install location and click Install
on the Choose Install Location window
that appears. An Installing window shows
installation progress.
F. Select Install printer drivers
*
on the Driver
Wizard window that appears and click Next.
*
NOTE: You will receive a notice if a previous driver
is found that should be removed. Please refer to
Section 3.4, Upgrading a Driver, for instructions
on uninstalling a driver.
G. A Plug and Play Detection window appears.
Highlight Graphic Products DuraLabel 9000
and click Next.
H. Enter printer name in the Printer name field in
the Specify Printer Name window that opens;
set it as the default printer by checking the box
below the Printer name field. Choose a sharing
option, then click Next.
I. Review information on the Completing the
Seagull Driver Wizard window that appears.
Click Finish if the information is correct. If
it isn’t, correct previous selections and click
Finish when the information is correct.
Selecting a DuraLabel Driver
Driver Install Location Window
Installing Window
Install Printer Driver Window
Install Driver for a Plug and Play Printer. Specify Printer Name and Default and
Sharing Status.
Completing the Seagull Driver Wizard
Page 18
16 | 3.3 Using a Parallel Cable
DuraLabel.com | 800.788.5572
CONNECTING THE PRINTER
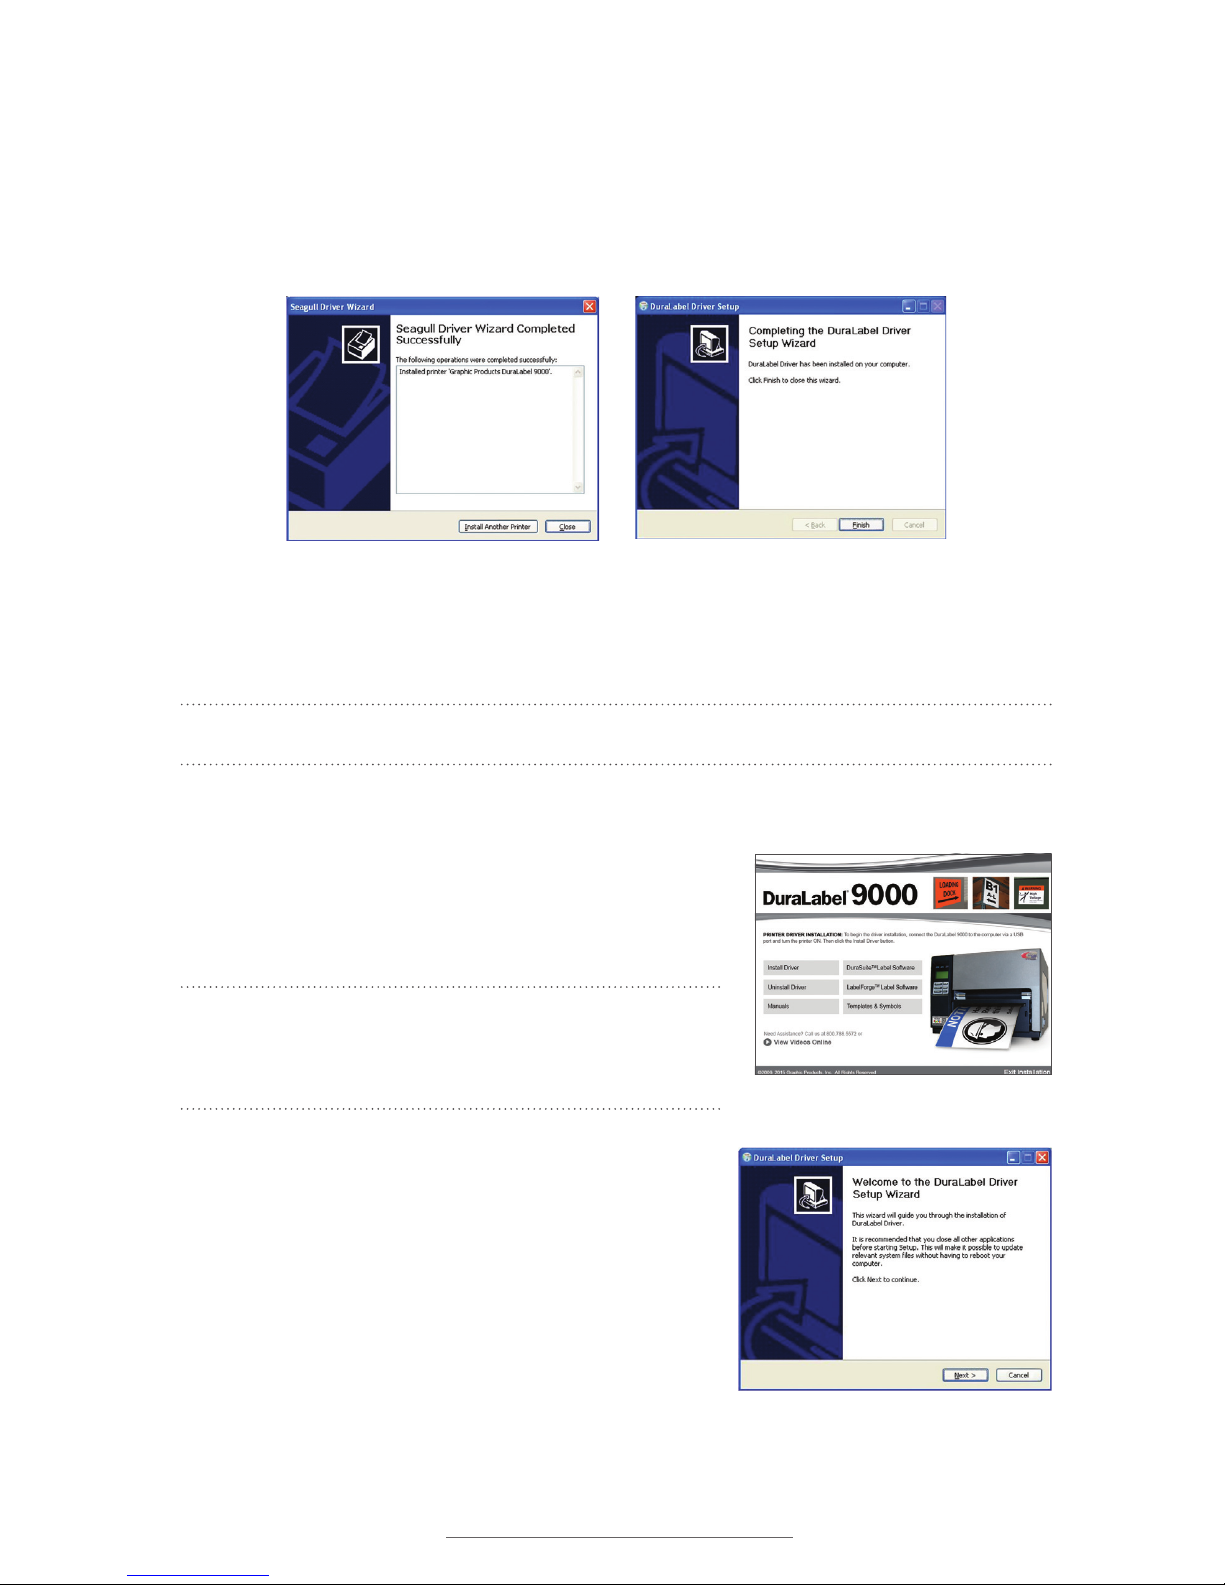
J. A Driver Wizard Completed Successfully window appears, confirming the printer
driver installation was completed successfully. Now click Close.
K. The previous window closes and a Completing the DuraLabel Driver Setup Wizard
window appears. Click Finish to complete the new driver installation.
3.3 Using a Parallel Cable
NOTE: You may need IT administrative privileges to install a driver.
The following instructions are only for those using a parallel cable:
A. Insert the DuraLabel 9000 Installation CD in your
computer’s disk drive. A DuraLabel 9000 startup
screen appears.
NOTE: If the CD does not run automatically, go to
Start > Computer and double-click on your CD/DVD
Drive, which should display the DL icon.
B. Click on Driver Wizard, then click Next on the
Driver Setup Wizard window that appears.
C. Click I Agree on the Windows Printer Driver
License Agreement window that appears.
Driver Wizard Completed Successfully Window
Click Finish on the Completing the DuraLabel
Driver Setup Wizard window. The driver
installation is now complete.
DuraLabel 9000 Startup Screen
DuraLabel Driver Setup Wizard
Page 19
DuraLabel.com | 800.788.5572
3.3 Using a Parallel Cable | 17
CONNECTING THE PRINTER
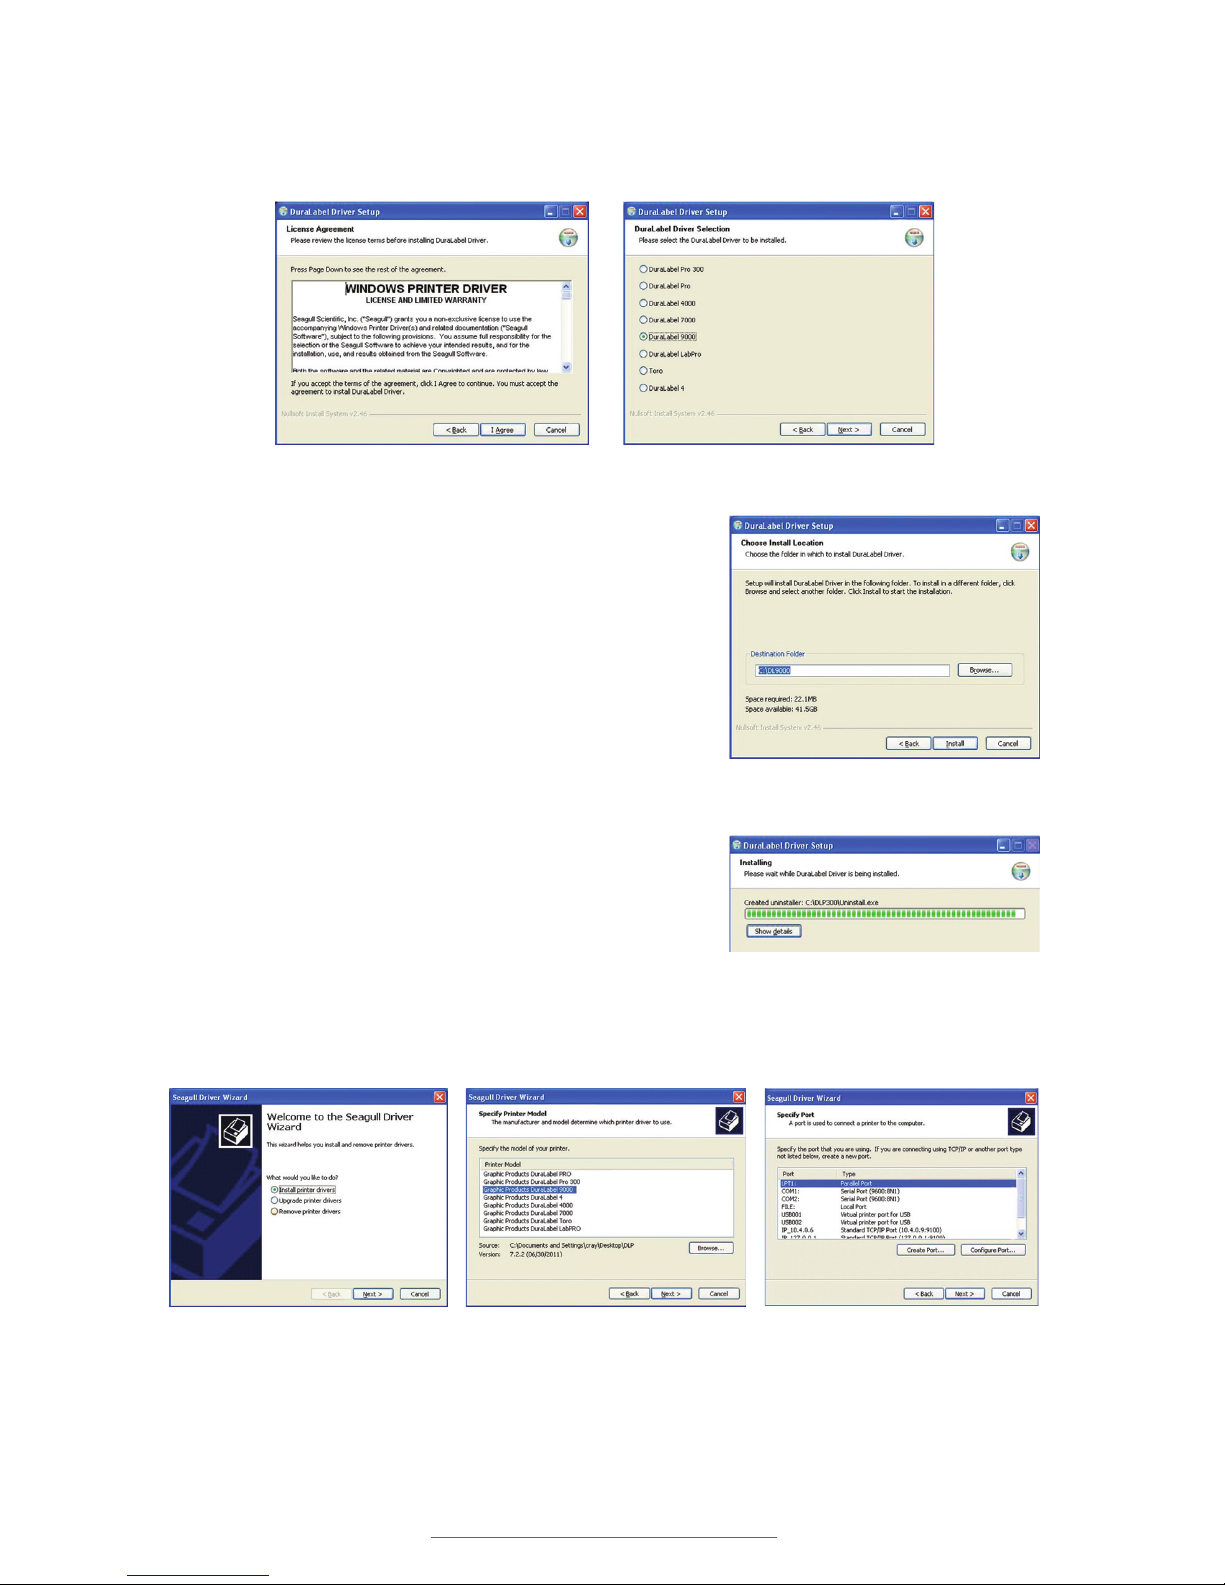
D. Select DuraLabel 9000 and click Next on the DuraLabel Driver Selection window
that appears.
E. Choose the install location and click Install
on the Choose Install Location window
that appears. An Installing window shows
installation progress.
F. Select Install printer drivers on the Driver
Wizard window that appears and click Next.
G. Select Graphic Products DuraLabel 9000 on
the Specify Printer Model window that appears
and click Next.
H. Select the LPT1 port on the Specify Port
window that appears and click Next.
I. Select Printer Name, set the printer as default
and choose printer sharing options on the
Specify Printer Name window that opens, then
click Next.
Windows Printer Driver License Agreement
Selecting a DuraLabel Driver
Install Printer Driver Window Specify Printer Model for Driver Installation
Driver Install Location Window
Installation Progress Window
Select port LPT1 when using a parallel
cable to install a driver.
Page 20
18 | 3.3 Using a Parallel Cable
DuraLabel.com | 800.788.5572
CONNECTING THE PRINTER
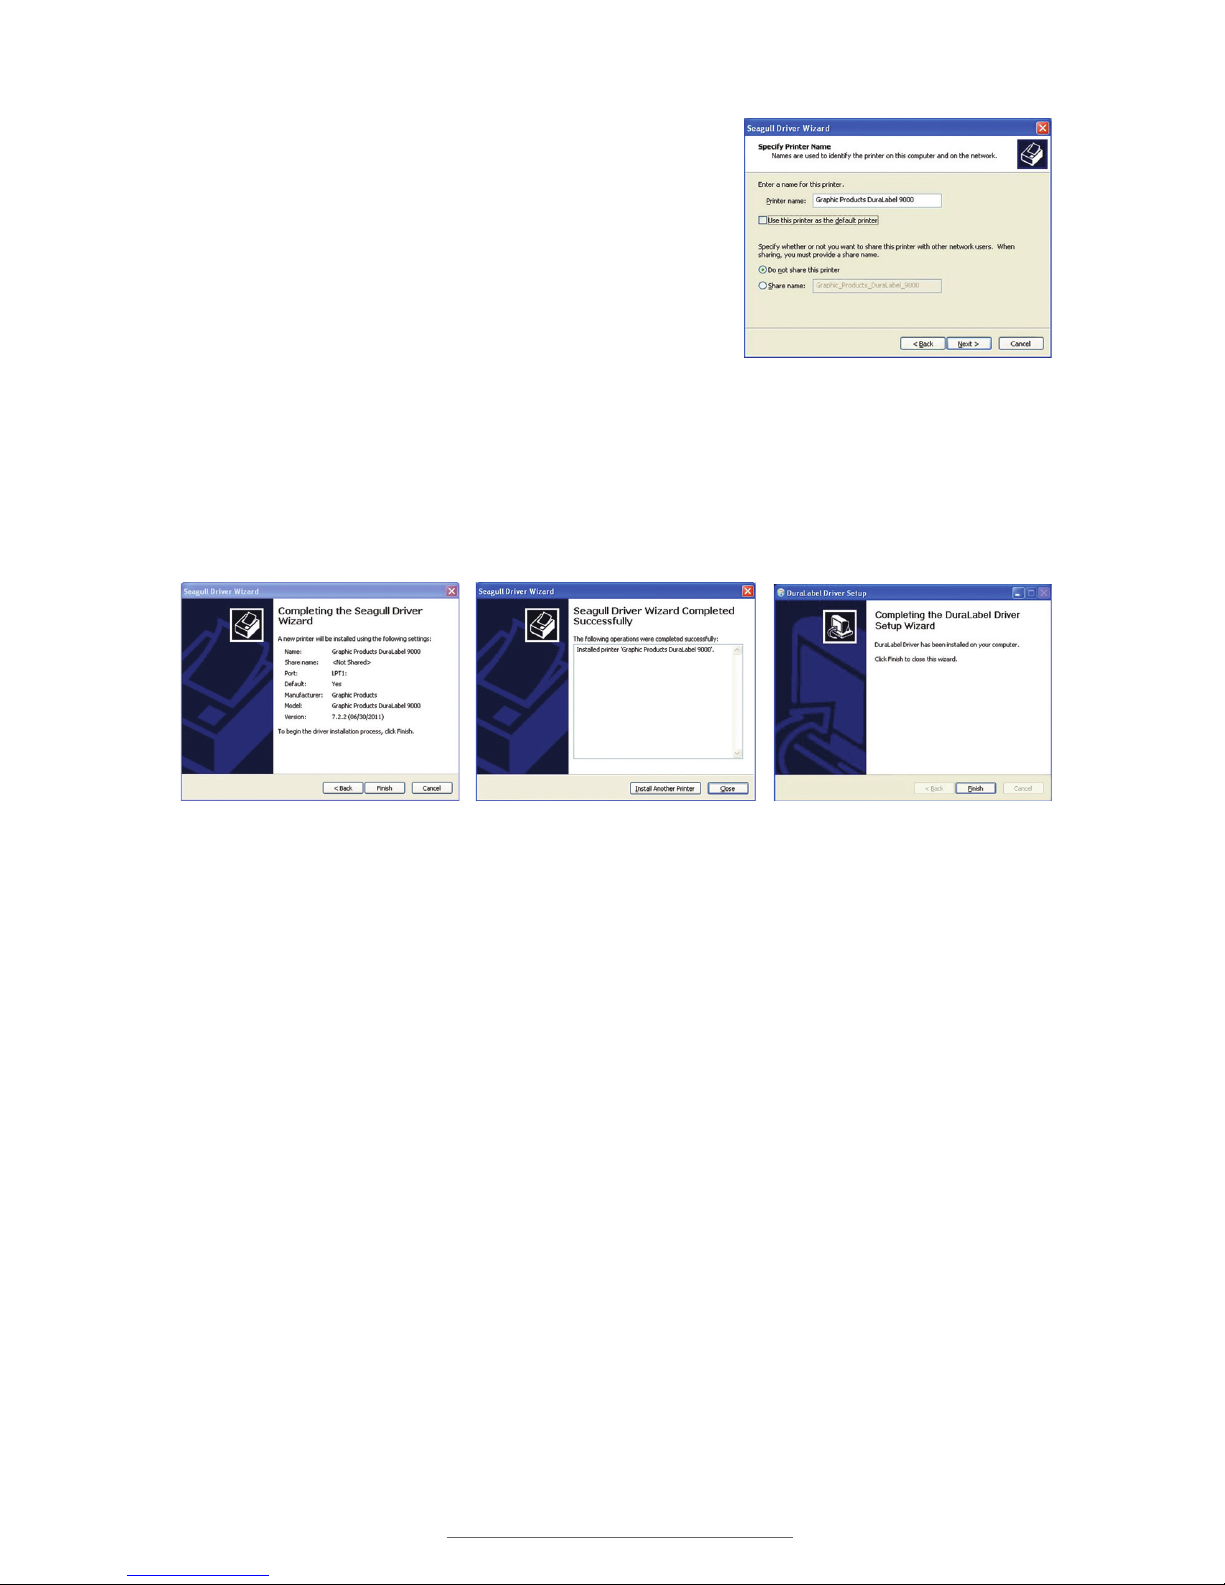
J. Review information on the Completing the
Seagull Driver Wizard window that opens and
click Finish if the information is correct. If it isn’t
correct, revise the selections made in previous
steps and click Finish when the window’s
information is accurate.
K. A Driver Wizard Completed Successfully
window appears, confirming the printer driver
installation was completed successfully. Click
Close.
L. The previous window closes and a Completing the DuraLabel Driver Setup Wizard
window appears. Click Finish to complete the new driver installation.
Printer Name, Default and Sharing
Status
Completing the Seagull Driver Wizard
Driver Wizard Completed Successfully
Window
Click Finish on the Completing the
DuraLabel Driver Setup Wizard window.
The driver installation is now complete.
Page 21

DuraLabel.com | 800.788.5572
3.4 Upgrading a Driver | 19
CONNECTING THE PRINTER
3.4 Upgrading a Driver
If you’re upgrading from a previously installed driver, follow these steps to uninstall the
previous driver:
A. Insert the installation CD.
B. Press the Uninstall Driver button on the installation screen.
C. Click Remove printer drivers, then click Next.
D. Click Use advanced printer driver removal options, then click Next.
E. Check all existing DuraLabel printers, then click Next.
F. Check all existing DuraLabel drivers, then click Next.
G. Check all existing DuraLabel components, then click Next.
H. Check the files associated with the deleted items you wish to remove, then click
Next.
I. Review the list provided, then click Finish.
J. Click Restart.
The new DuraLabel 9000 printer driver may now be installed.
NOTE: If upgrading from an older driver, you may need to restart your computer during
installation of the new driver.
Page 22
20 | 4.1 Continuous Vinyl Printing Instructions
DuraLabel.com | 800.788.5572
&RQÀJXULQJ3ULQWHU'ULYHUV
IMPORTANT! Perform the driver conÀguration before opening the document you plan
to print or close any documents you currently have open before making these changes.
A. Click Start > Devices and Printers*. A Devices, Printers and Faxes window
appears.
*NOTE: If you do not Ànd Devices and Printers in your Start menu, you can access
it in your Control Panel.
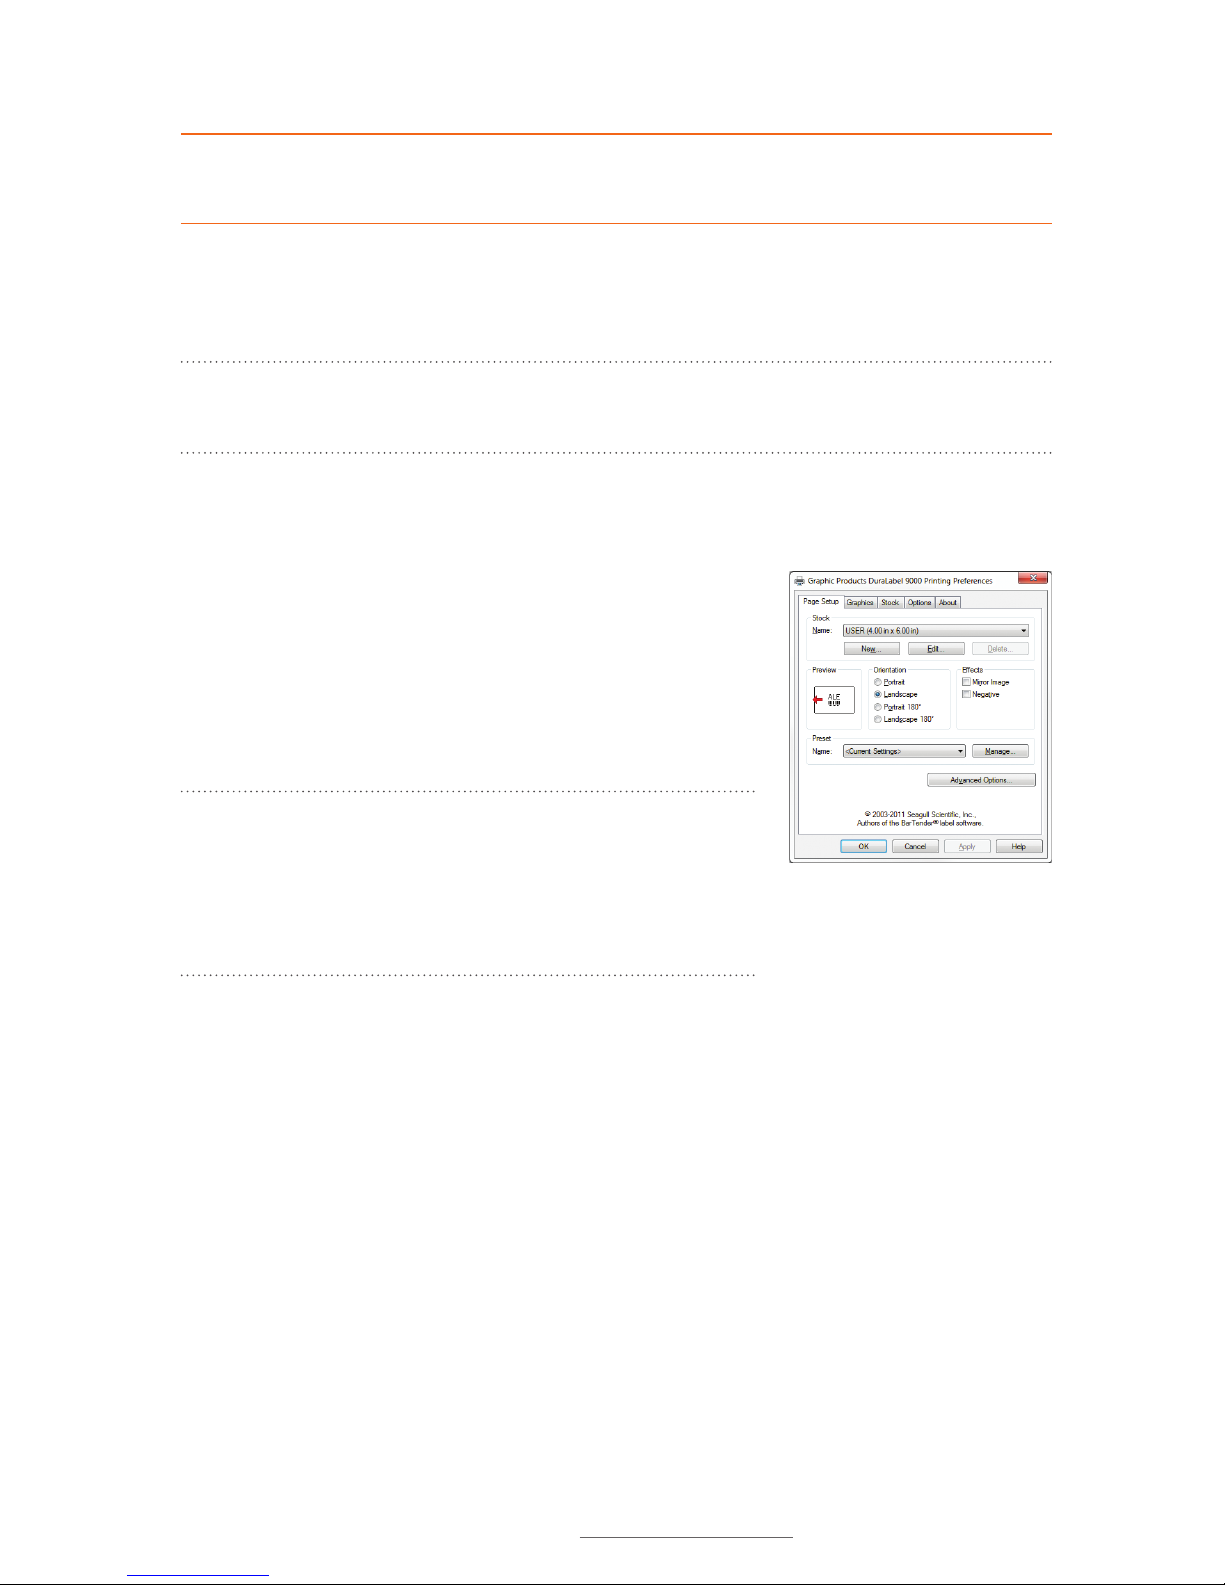
B. Right-click the Graphic Products DuraLabel 9000 icon and select Printing
preferences. A Printing Preferences dialog box appears.
C. Click the Page Setup tab and select Landscape or
Portrait, depending on your label’s orientation.
D. If your label size is not shown in the Stock Name
drop-down menu, click Edit and set the size to match
your label size.
NOTE: Your DuraLabel 9000 printer drivers are preset
to several print values. Please be aware that changing
a preset value is not fully supported by all software
programs. For best results, make changes to preset
values from the Devices and Printers window.
4.1 Continuous Vinyl Printing Instructions
Your printer driver has been preset to common settings to reduce the steps needed to
set them manually. You can change your settings by following these steps:
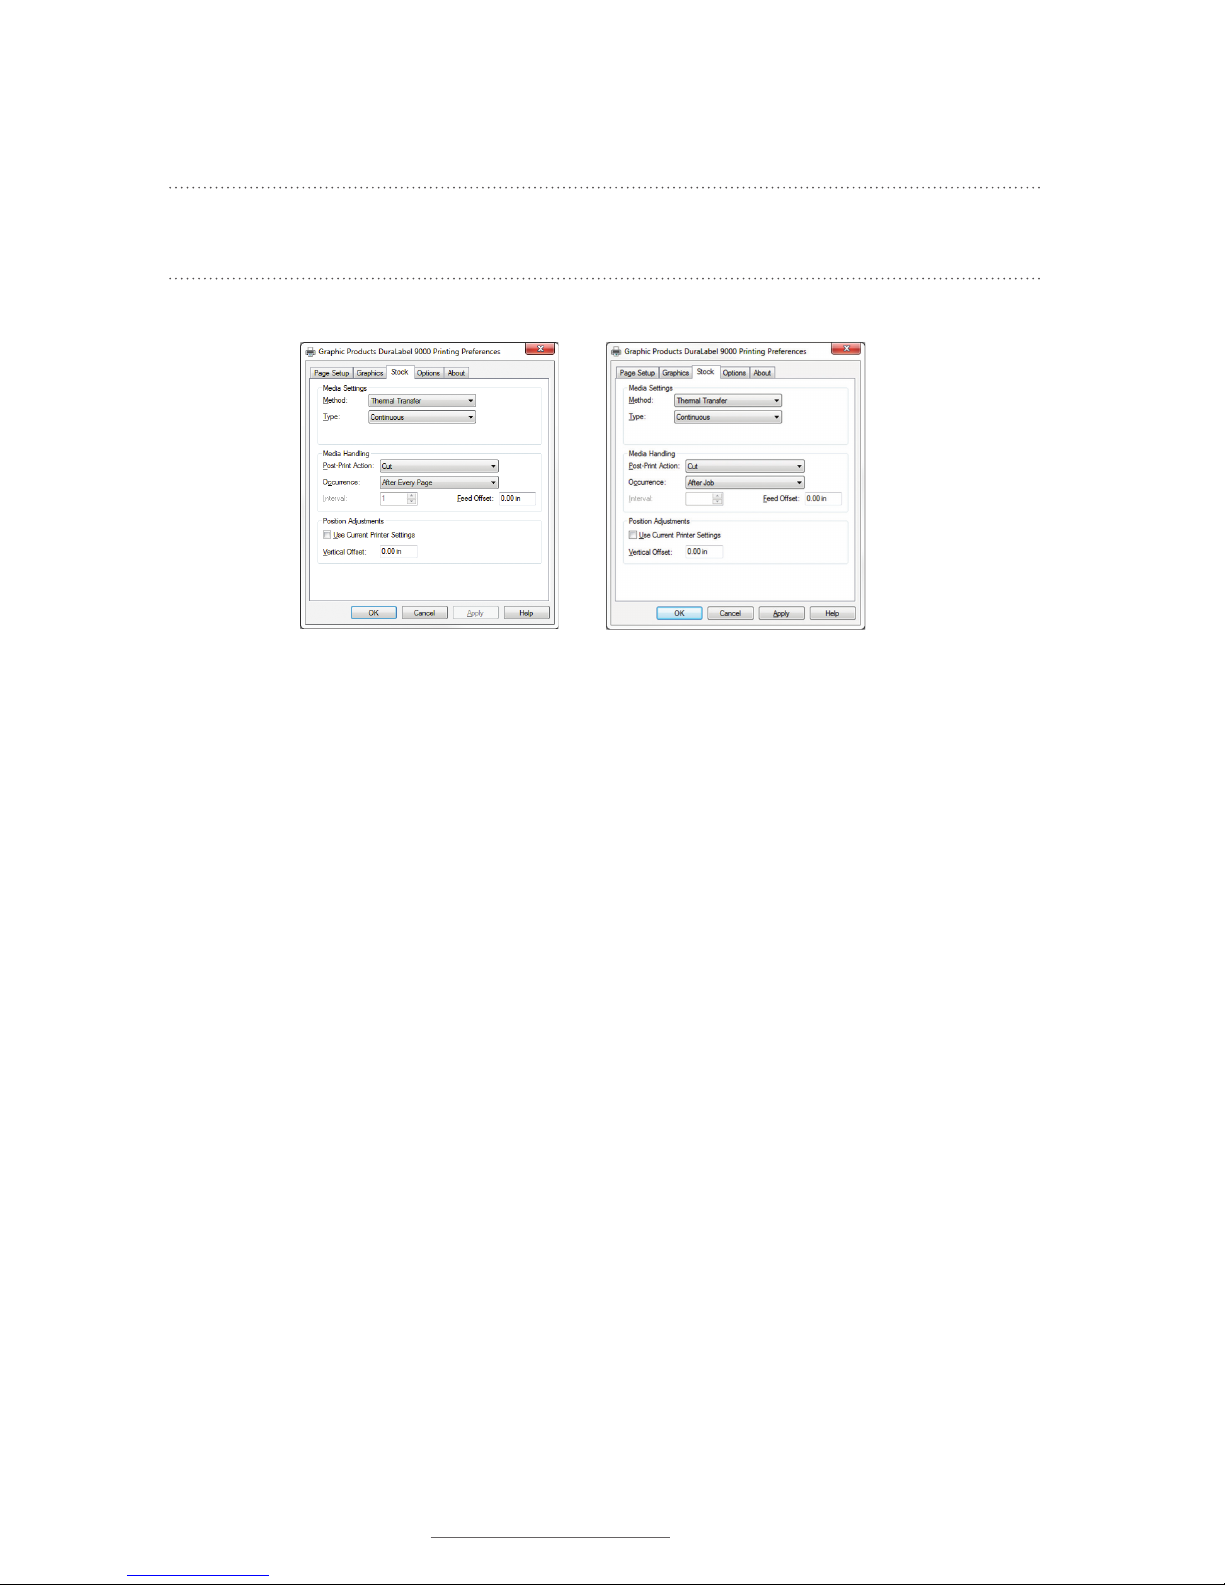
A. Select the Stock tab, then select Continuous from the Type drop-down menu under
“Media Settings.”
B. To cut after each label, select Cut from the Post-Print Action drop-down menu and
select After Every Page from the Occurrence drop-down menu.
C. To cut after each job, select Cut from the Post-Print Action drop-down menu and
select After Job from the Occurrence drop-down menu.
D. Click Apply.
Printing Preferences dialog box with
Page Setup tab selected
Page 23
DuraLabel.com | 800.788.5572
4.2 Die-Cut Label Printing Instructions | 21
CONFIGURING PRINTER DRIVERS
These settings may be adjusted in Printer Properties* when printing your labels.
*NOTE: This will show as Preferences if accessing File > Print from DuraSuite
Labeling Software.
Printing Preferences dialog box,
with Type set to “Continuous” and
Occurrence set to “After Every Page” on
the Stock tab
Set the Printing Preferences
Occurrence menu to “After Job” to
print multiple labels on a single length
of supply.
4.2 Die-Cut Label Printing Instructions
4.2.1 LABEL SUPPLY CALIBRATION
Label supply must be calibrated to print die-cut labels. Using the menu on the left side
of the front of your printer, follow these steps:
A. Press the Menu button.
B. Select Setup.
C. Select Sensor.
D. Select Calibration.
E. Select Gap Mode.
F. Select Automatic.
G. The printer will begin to feed supply as it calibrates.
H. Follow directions in Section 4.2.2, Driver Settings.
Page 24
22 | 4.2 Die-Cut Label Printing Instructions
DuraLabel.com | 800.788.5572
CONFIGURING PRINTER DRIVERS
4.2.2 DRIVER SETTINGS
Your printer driver has been preset to reduce the number of steps to be completed
manually. You can change settings by following these steps:
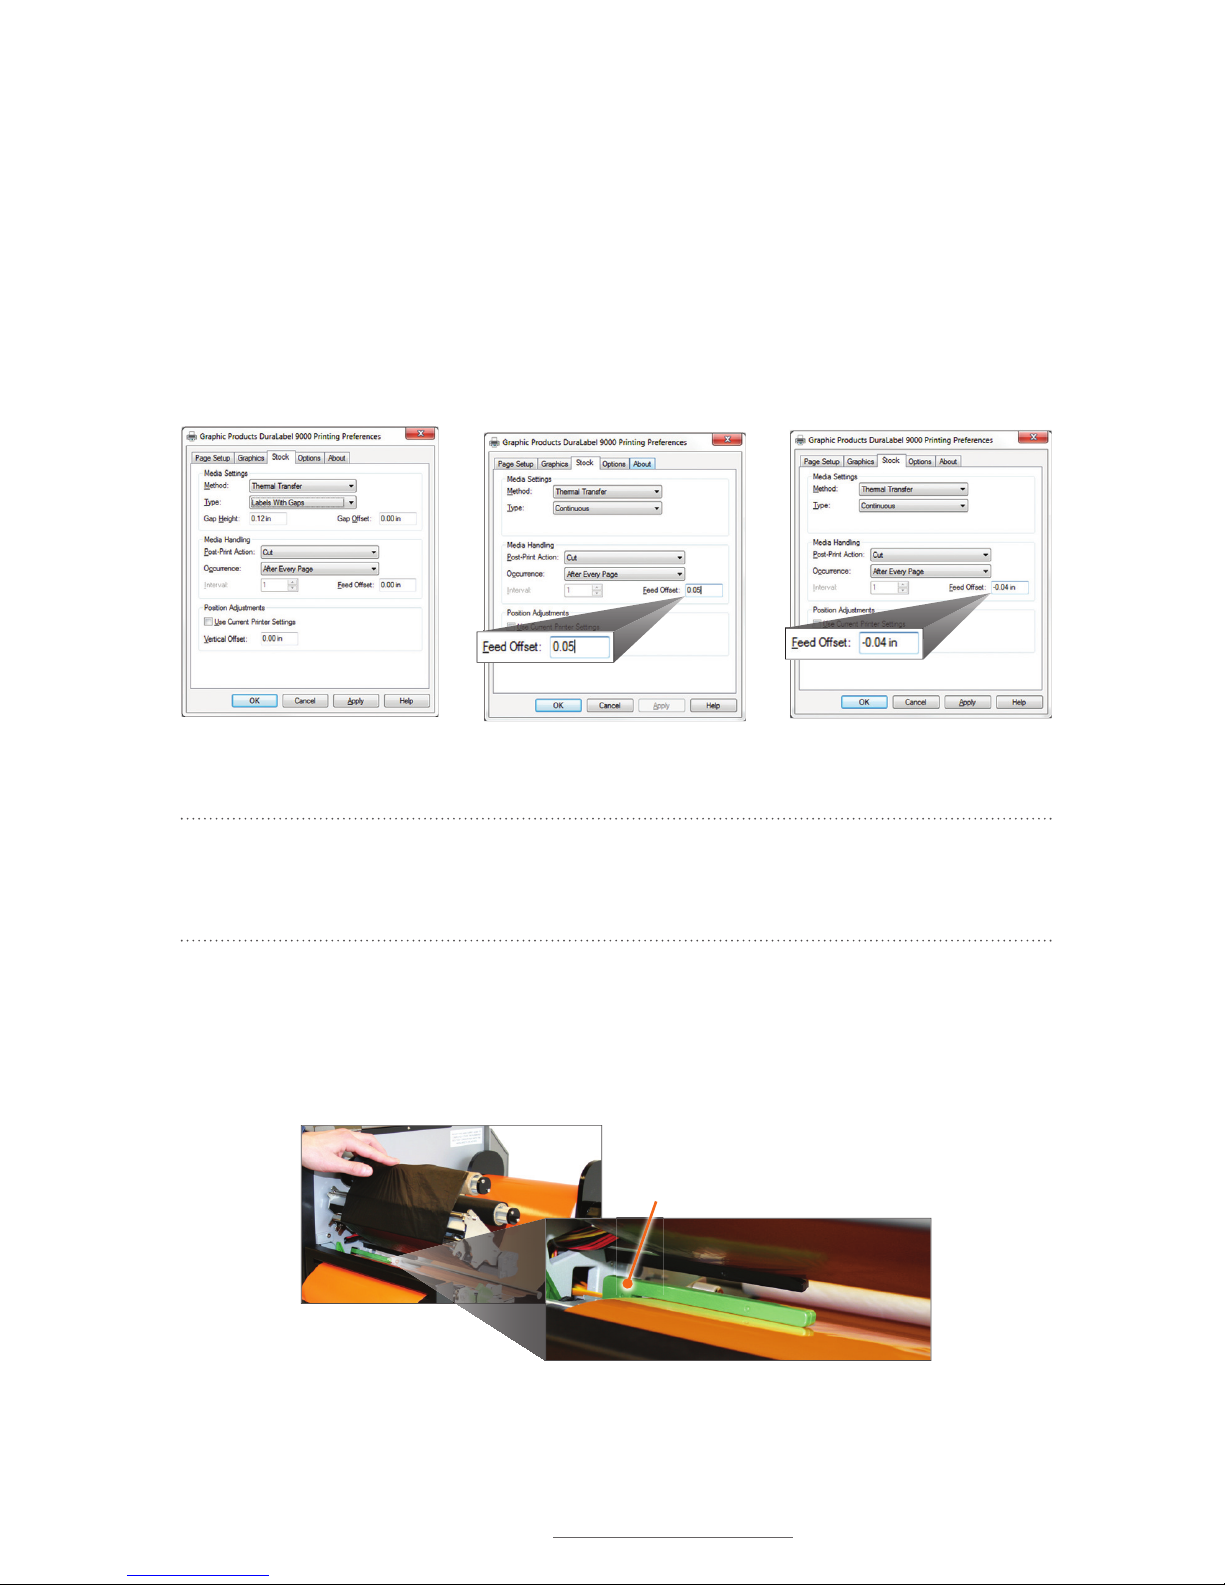
A. For die-cut labels, select Labels With Gaps from the Type drop-down menu.
B. Set Gap Height to 0.12 inches and Gap Offset to 0 inches (default).
C. Click Apply, then OK.
NOTE: Ensure the printer cuts directly in the center of the gap by adjusting Feed Offset
on the Printing Preferences dialog box Stock tab. The 0 default setting works best for
most label supply.
4.2.3 MEDIA SENSOR ADJUSTMENT FOR DIE-CUT LABELS WITH HEADERS
For optimum printing on die-cut labels, the media sensor needs to be adjusted either to
the right or left.
Printing Preferences dialog box, with
Type set to “Labels With Gaps” on the
Stock tab
If the printer does not cut correctly, adjust Feed Offset up or down.
DuraLabel 9000 adjustable media sensor
Media Sensor
Page 25
DuraLabel.com | 800.788.5572
4.2 Die-Cut Label Printing Instructions | 23
CONFIGURING PRINTER DRIVERS
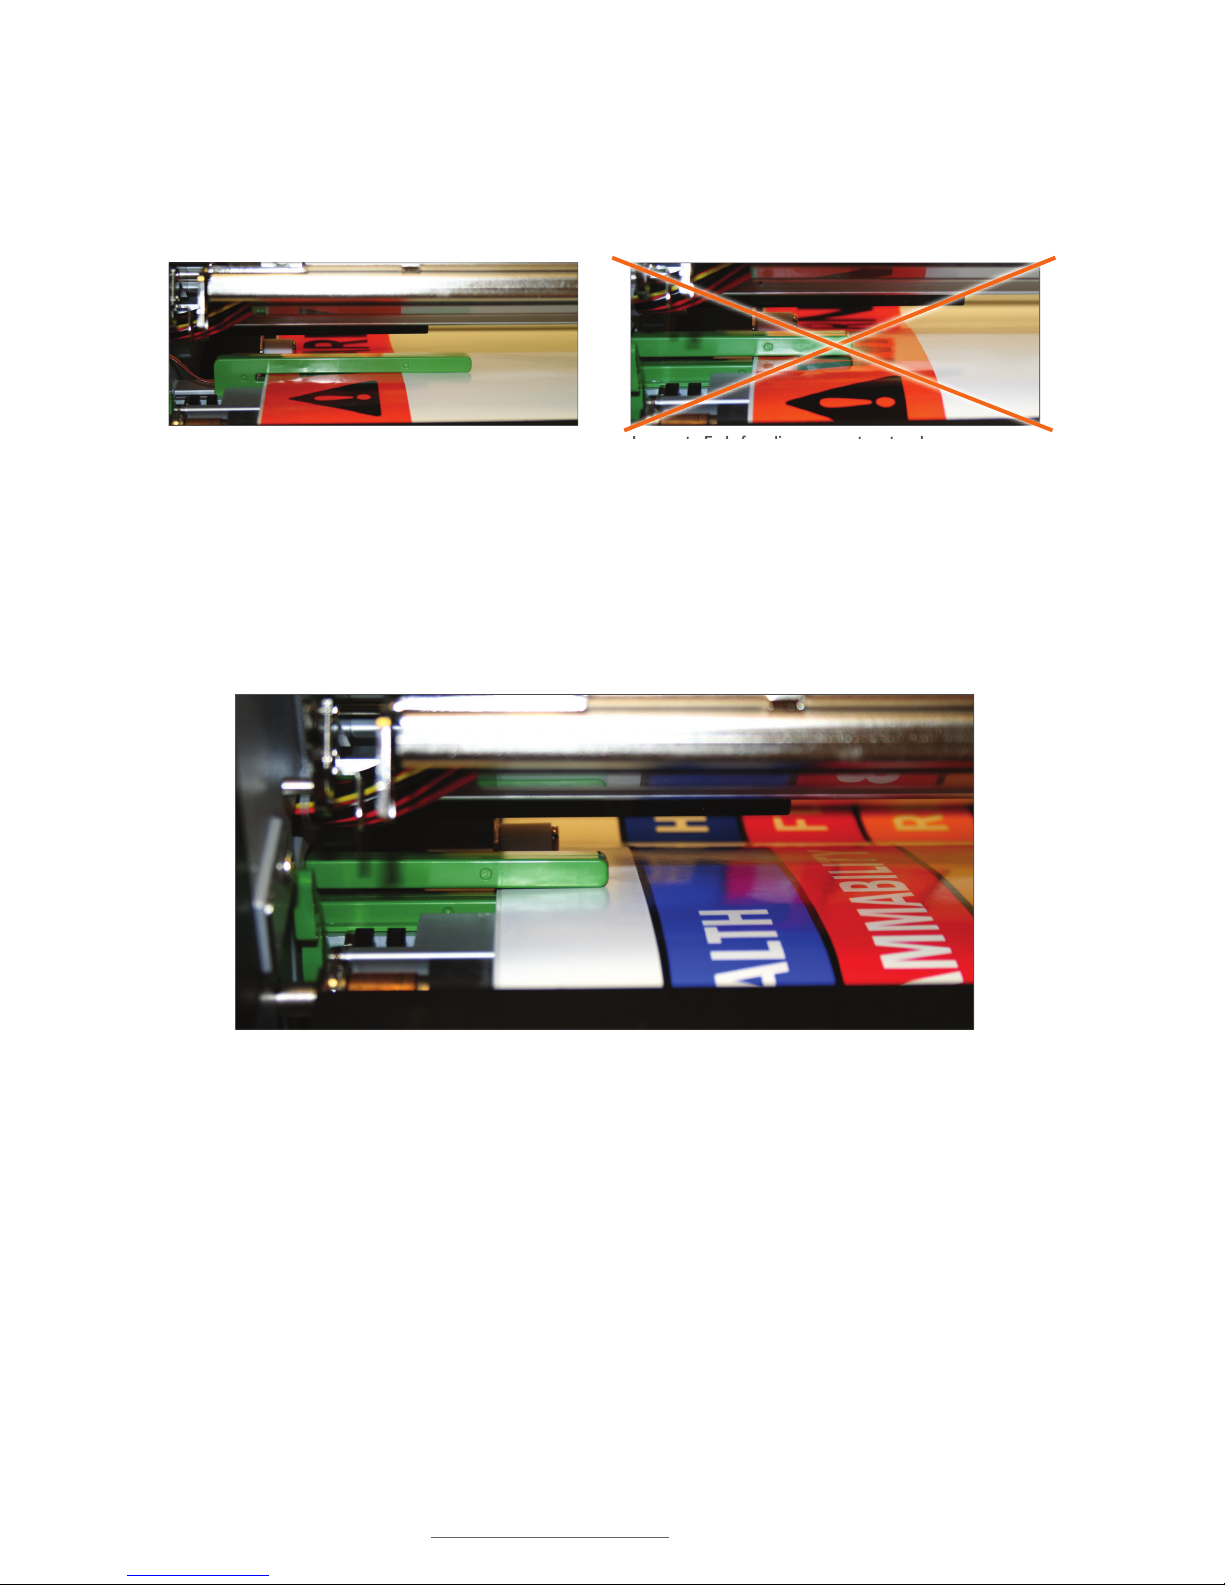
For die-cuts with a pre-printed header at the top—such as arc flash or NFPA labels—
the media sensor should be adjusted so the end is centered over the blank printable
area of the label. Slide the media sensor until its end is located over the blank white
printable area.
4.2.4 MEDIA SENSOR ADJUSTMENT FOR RTK COLOR BAR DIE-CUT LABELS
For RTK color bar die-cuts with a blank printable area at the top, the media sensor
should be adjusted so it’s centered over the label’s printable area. Slide the media
sensor until its end is located over the blank white printable area.
Incorrect: End of media sensor not centered over
printable area
Correct: End of media sensor centered over printable area
(white section of label)
Correct: End of media sensor centered over RTK color bar label printable area
Page 26
24 | 4.3 B Mark Label Printing Instructions
DuraLabel.com | 800.788.5572
CONFIGURING PRINTER DRIVERS
4.3 B Mark Label Printing Instructions
4.3.1 LABEL SUPPLY CALIBRATION
Label supply must be calibrated to print B Mark labels. Using the menu on the left side
of the front of your printer, follow these steps:
A. Press the Menu button.
B. Select Setup.
C. Select Sensor.
D. Select Calibration.
E. Select B Mark Mode.
F. Select Automatic.
G. The printer will begin to feed supply as it calibrates.
H. Follow directions in Section 4.3.2, Driver Settings.
4.3.2 DRIVER SETTINGS
Your printer driver has been preset to reduce the number
of steps to be completed manually. You can change your
settings by following these steps:
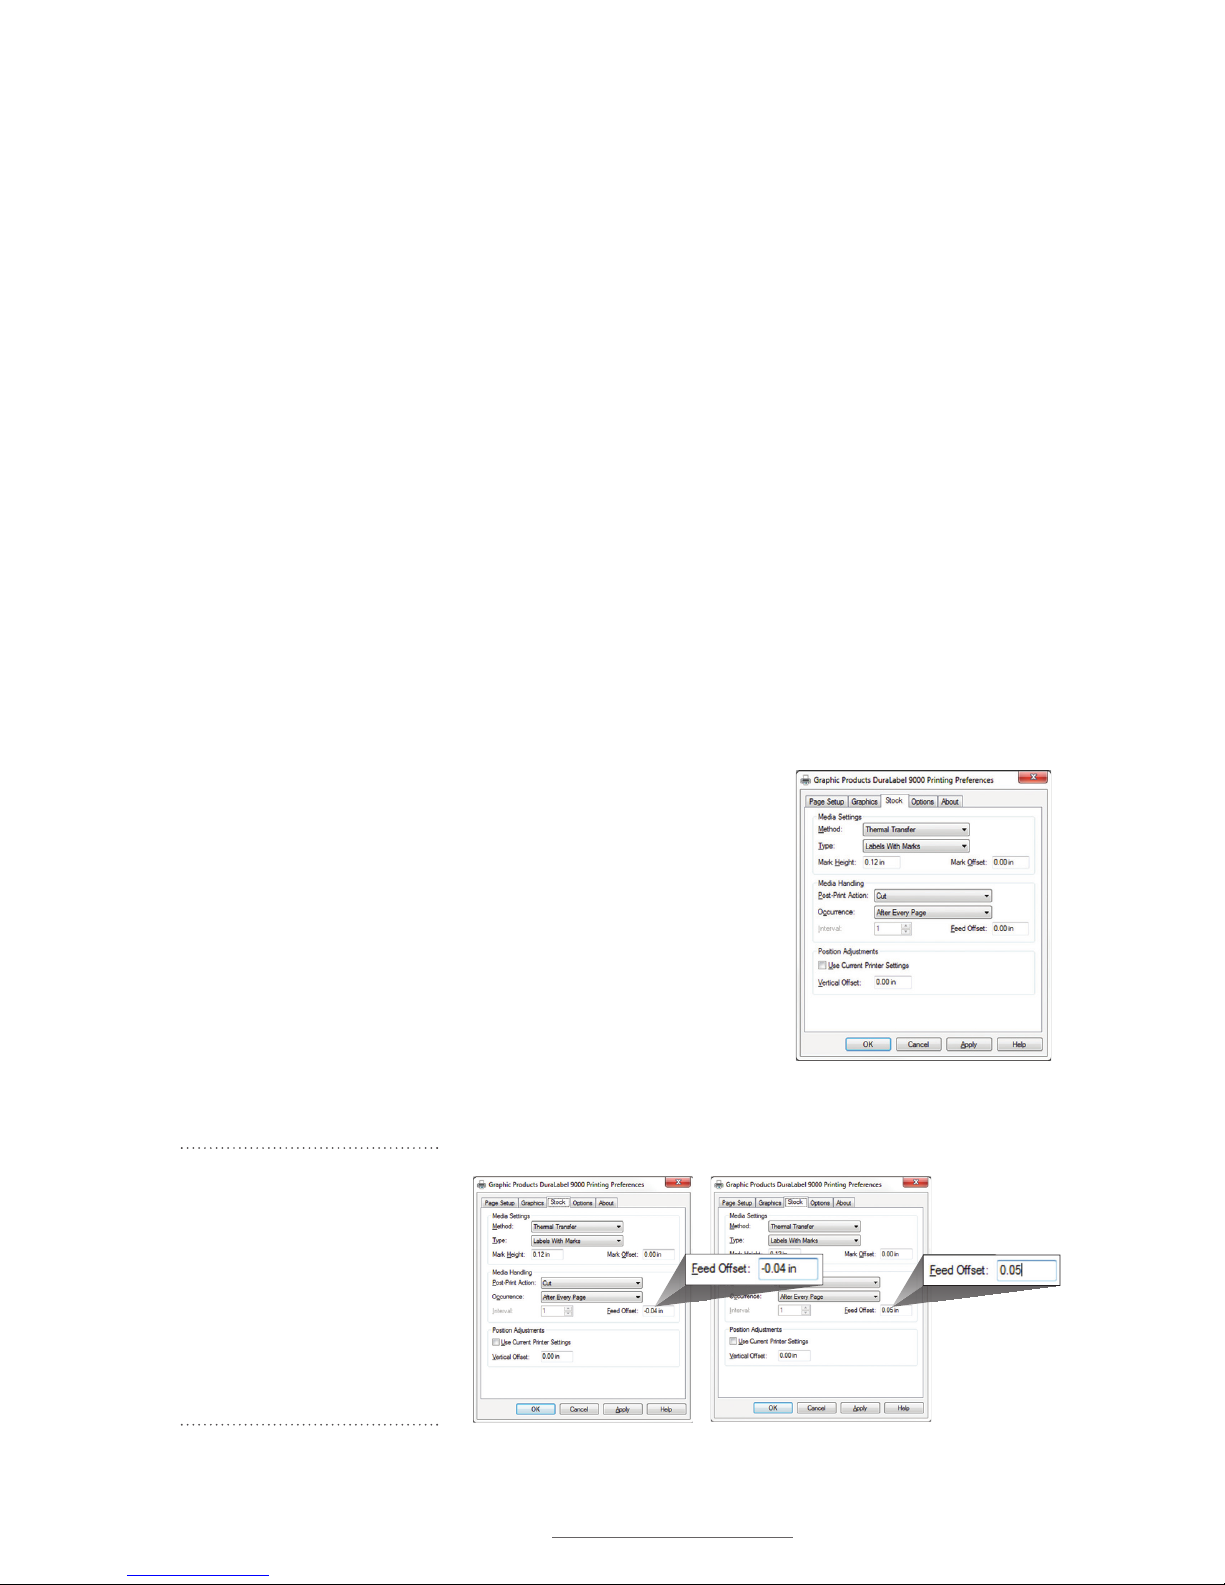
A. For B Mark labels, select Labels With Marks from the
Type drop-down menu.
B. Set Mark Height to 0.12 inches and Mark Offset to 0
inches (default).
C. Click Apply, then OK.
NOTE: Ensure the printer
cuts correctly on B Mark
labels by adjusting Feed
Offset on the Printing
Preferences dialog box
Stock tab. The 0 default
setting works best for
most label supply.
Printing Preferences dialog box, with
Type set to “Labels With Marks” on the
Stock tab
If the printer does not cut a B Mark label accurately, adjust Feed Offset up or
down.
Page 27
DuraLabel.com | 800.788.5572
4.5 Adjusting Print Speed | 25
CONFIGURING PRINTER DRIVERS
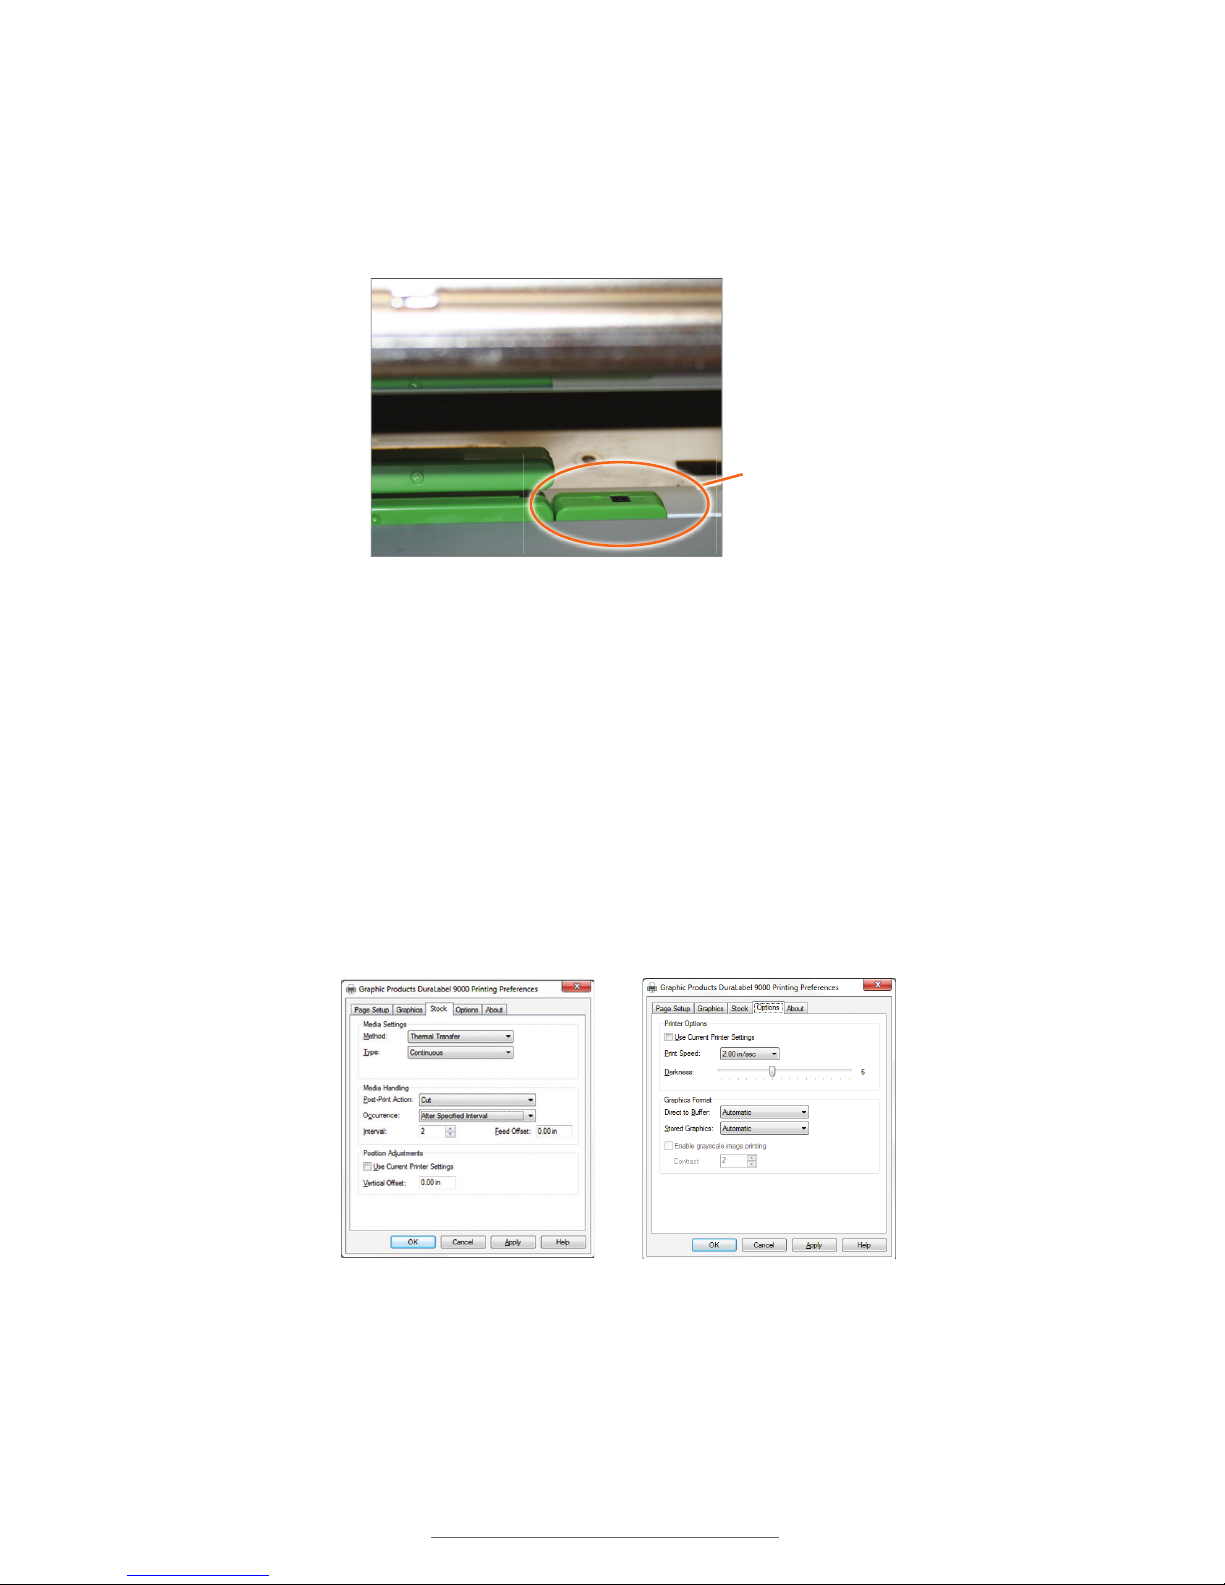
4.3.3 ADJUSTING THE B MARK MEDIA SENSOR
To ensure the media sensor is correctly positioned, check the position of the mark on
the back of the B Mark supply, then, if necessary, adjust the media sensor to ensure it
is positioned under the supply mark.
4.4 Cutting Labels in Intervals
To cut labels in intervals, set “Occurrence” to After Specified Interval. Set the interval to
the number of labels needed, then click Apply to save your settings.
4.5 Adjusting Print Speed
Choose print speed from the Options tab, clicking on the arrow to the right of the Print
Speed drop-down menu. A 2” per-second setting is recommended.
Align the media sensor (circled) under your supply,
ensuring it is in sight of the B Mark for proper
alignment.
Media Sensor
Printing Preferences dialog box, with
Occurrence set to “After SpeciÀed
Interval” on the Stock tab
Printing Preferences dialog box, with
Options tab chosen
Page 28
26 | 4.6 Adjusting Darkness
DuraLabel.com | 800.788.5572
CONFIGURING PRINTER DRIVERS
4.6 Adjusting Darkness
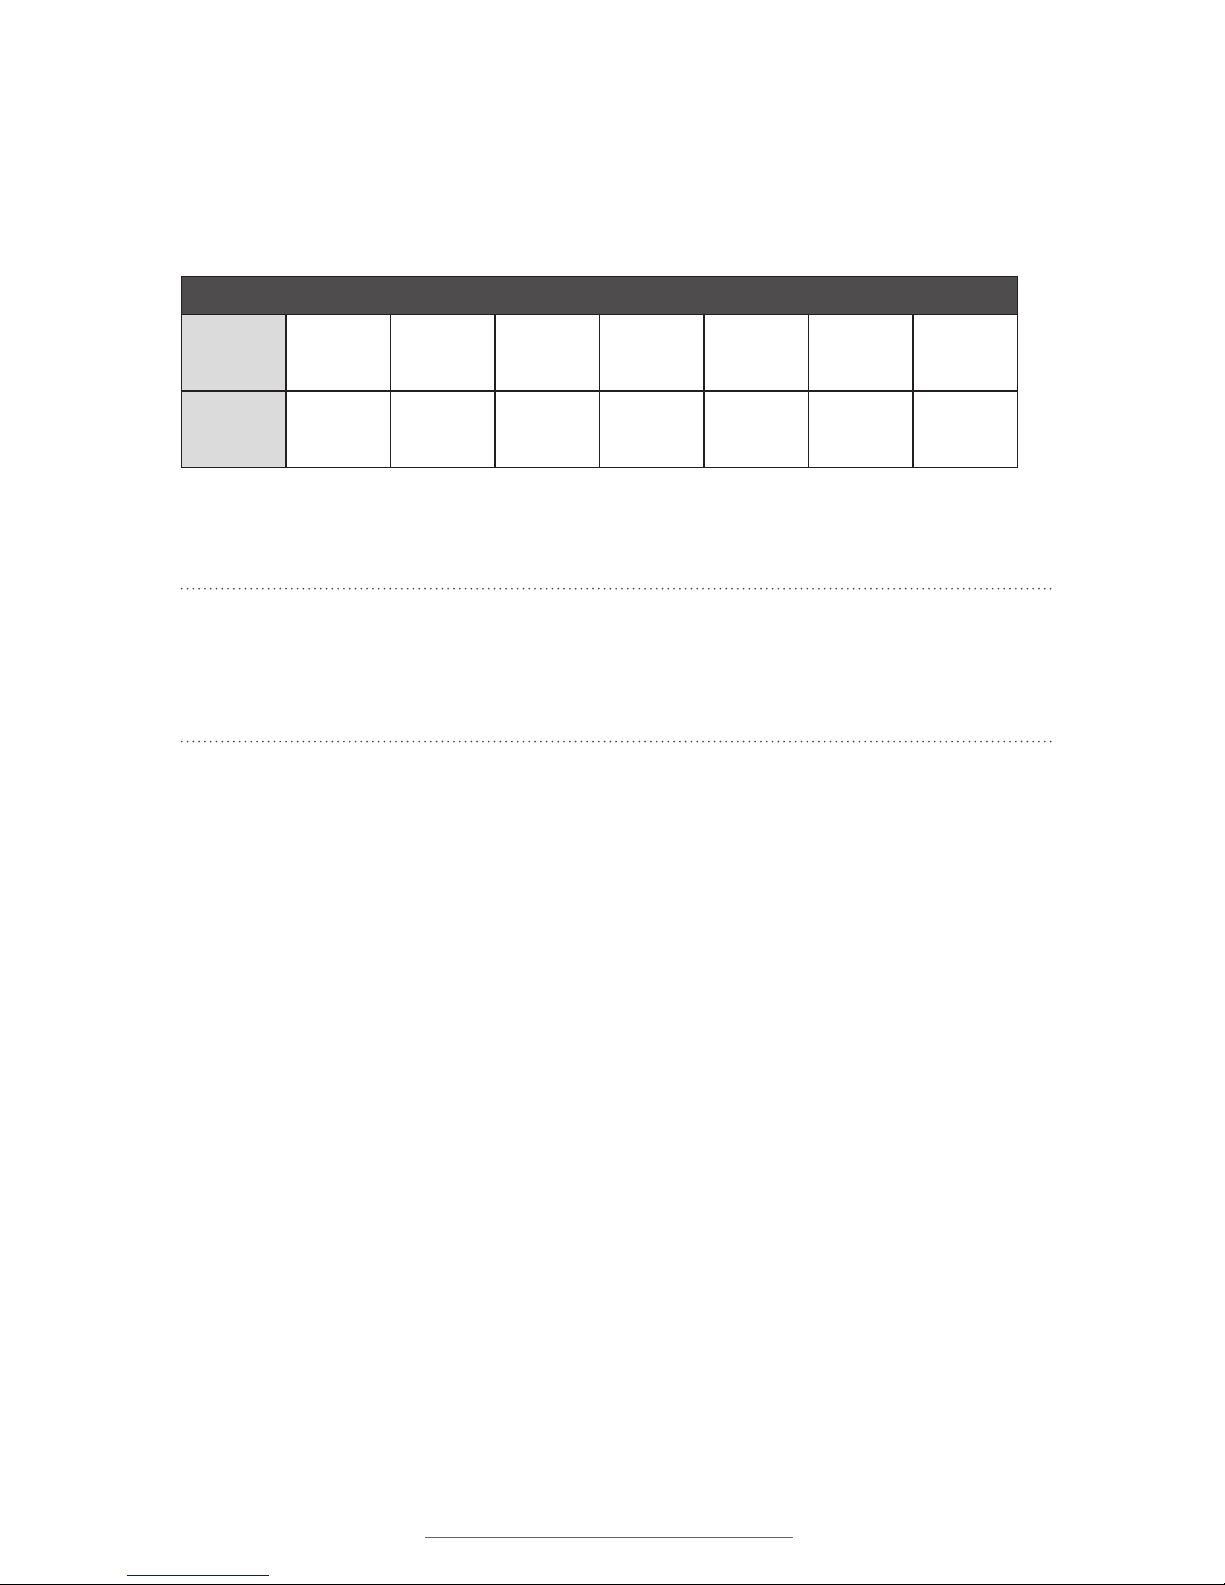
Change darkness settings from the Options tab, dragging the slider on the Darkness
bar (see Figure 14). Darkness can be adjusted in single increments from 0 – 15. Keep
the Graphics Format settings on Automatic.
Recommended Darkness Settings for Ribbon: (Print Speed Set at 2)
Ribbon
Standard
Black
White Red Blue Green Orange
Die-Cut
Labels
Darkness 5-8 5-8 5-8 5-8 5-8 5-8 9-12
When satisfied with all your settings, click Apply, then OK. Your driver is now set up and
ready to create labels.
NOTE: You may need to change print settings to optimize the DuraLabel 9000 for
printing with some ribbons and specialty supply. Higher speeds generally require
higher darkness. If a ribbon wrinkles, lower the darkness. Increase darkness to ensure
all ink is being transferred from the ink ribbon.
Page 29
DuraLabel.com | 800.788.5572
5. Installing Labeling Software | 27
5. Installing Labeling Software
5.1 DuraSuite Labeling Software
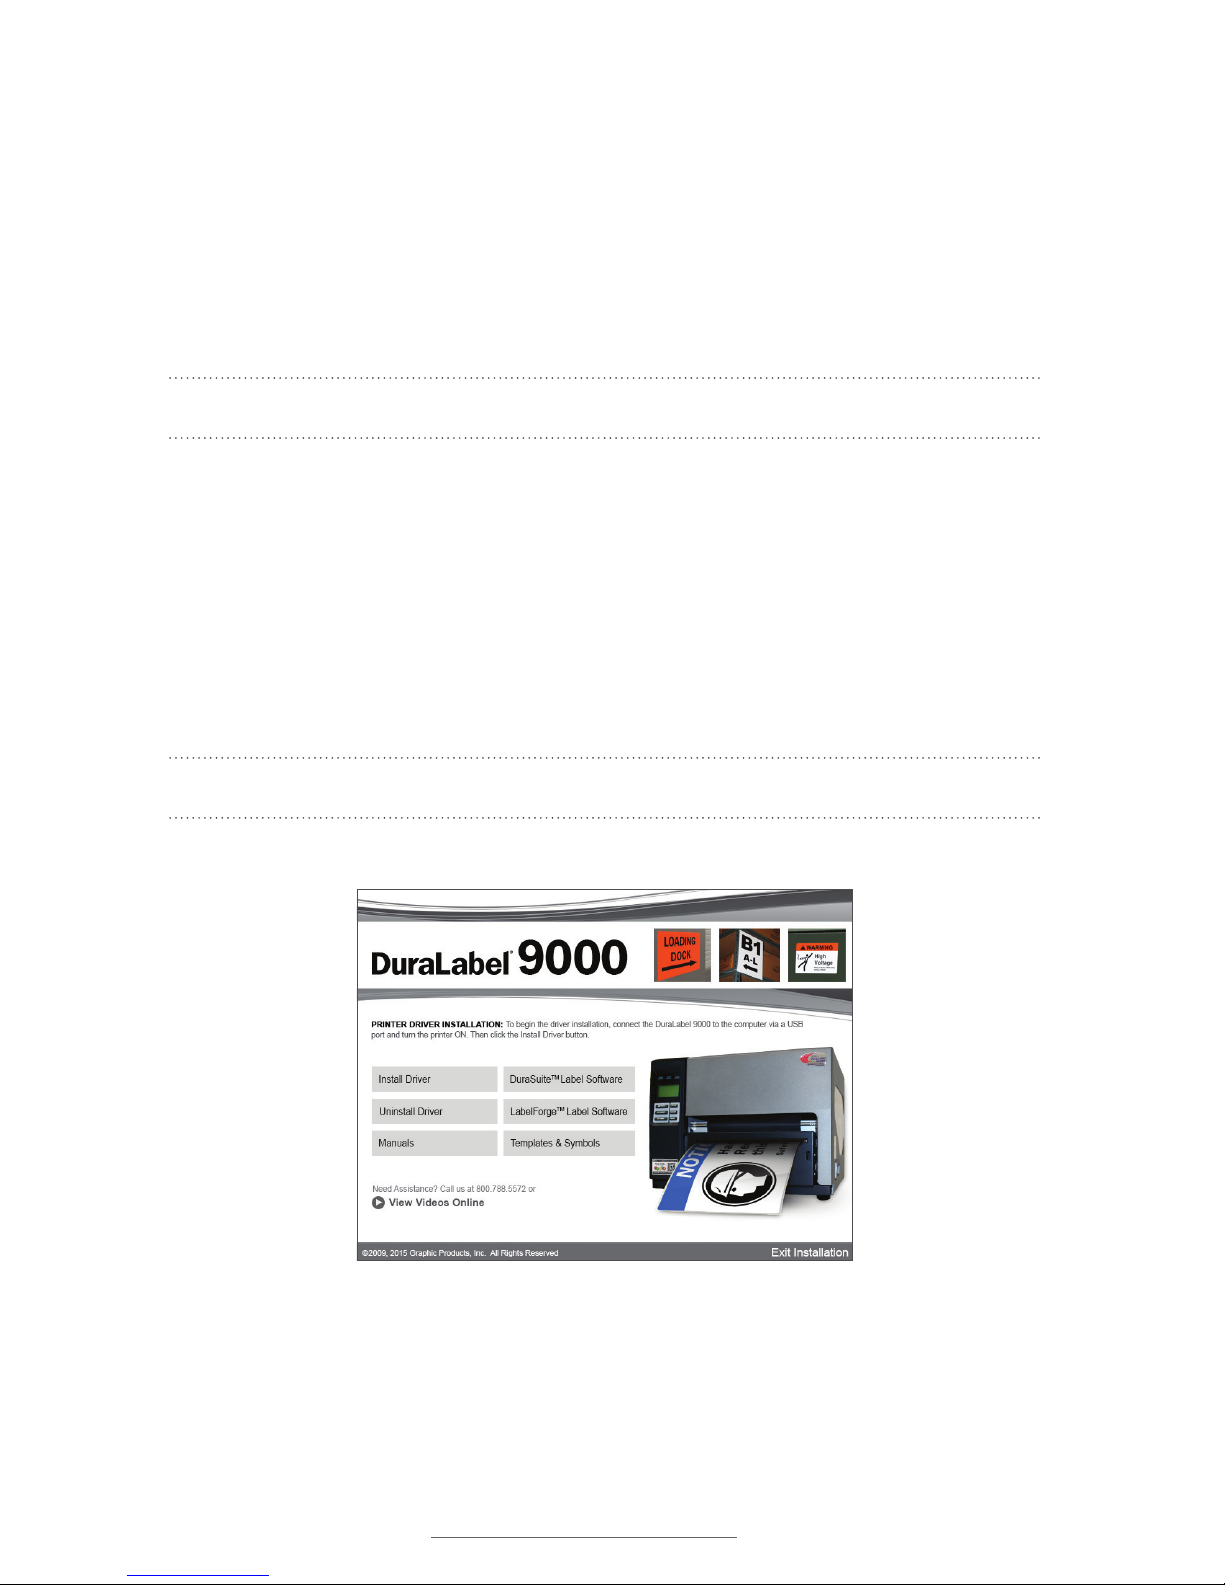
DuraSuite Labeling Software lets you create professional-quality pipe markers and
arc flash, NFPA Diamond, RTK, GHS and custom labels, quickly and easily. To install,
from the DuraLabel 9000 startup screen, click on DuraSuite Label Software and follow
the directions that appear. Refer to the DuraSuite Labeling Software User Guide for
additional information.
NOTE: You may need IT administrator privileges to perform this installation.
5.2 LabelForge Labeling Software
LabelForge Labeling Software lets you design your own custom labels and signs and
includes barcode creation tools for 2D and linear barcoding.
To install, from the DuraLabel 9000 startup screen, click on LabelForge Label Software
and follow the directions that appear. Refer to the LabelForge Labeling Software User
Guide for additional information.
NOTE: You may need IT administrator privileges to perform this installation.
DuraLabel 9000 Startup screen
Page 30

28 | 6.1 Label Creation with Your Word Processor
DuraLabel.com | 800.788.5572
6. Label Creation
This section describes how to create labels using Microsoft® Word. Variations may occur
among different versions of Word, but basic principles are the same. The DuraLabel
9000 is designed to work with any currently supported Windows software and should
work with the software installed on your computer. Both Microsoft Word 2003 and
2010
*
were used to describe procedures in this Guide.
*
NOTE: Navigation may vary depending on your version of Word, but the tools will
be the same.
The information in this section assumes your printer has been properly installed and is
connected in the online mode.
6.1 Label Creation with Your Word Processor
DuraLabel 9000 printers operate off a standard Windows driver that allows access to a
wide variety of software packages.
6.1.1 USING TEMPLATES
IMPORTANT! If you do not follow this step, you will need to create all labels
from scratch.
The DuraLabel 9000 provides a variety of templates you can install from the installation
CD startup screen. Click on Templates & Symbols and follow the instructions. When
installation is complete, templates and symbols will be accessible from a folder titled My
Documents\DL9000 Templates & Symbols.
To use a template, open Microsoft Word, select Open and browse the DL9000
Templates & Symbols folder. Any template you choose has been set up to print correctly
on the DuraLabel 9000 printer with minimal augmentation.
Page 31
DuraLabel.com | 800.788.5572
6.1 Label Creation with Your Word Processor | 29
LABEL CREATION
6.1.2 SETTING UP A MICROSOFT WORD DOCUMENT
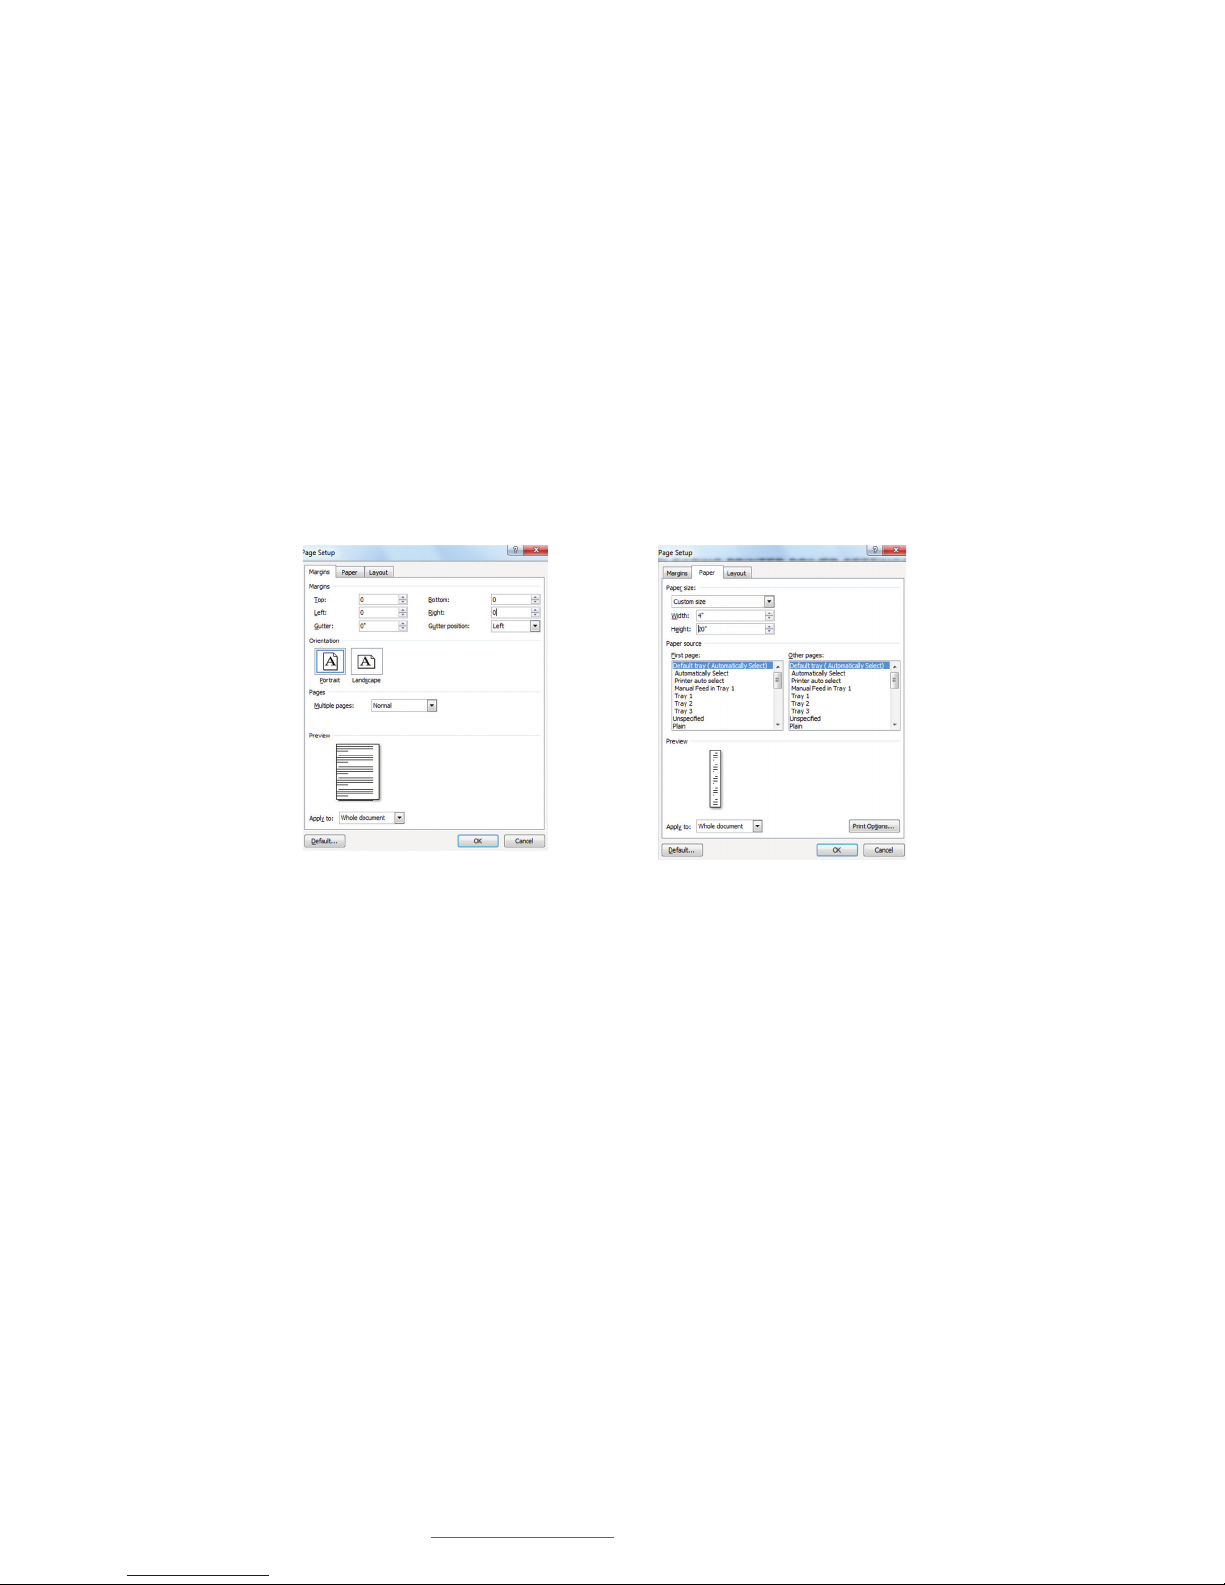
When opening a document, change size and margins to match your label’s size. (Word
processors default to 8.5" x 11".) Click on the File menu, then Page Setup. Click the
Margins tab on the Page Setup dialog box that appears. Set all Margins to 0 to print
on the entire supply.
Set Orientation to Portrait if label width is the same dimension as the supply width
loaded in your printer. Set orientation to Landscape if label height is the same as the
supply width loaded in your printer. Click OK when done.
Now select the Paper tab and set the Paper size to the size label you want to create.
Either the Width or Height should match the width of supply loaded in your printe
Page Setup dialog box, with Margins
tab selected
Page Setup dialog box, with Paper
tab selected
Page 32
30 | 7.1 Text Boxes
DuraLabel.com | 800.788.5572
7. Label Design
7.1 Text Boxes
Text boxes let you position text anywhere on a document. They can have borders and
be filled with color, or have no borders and be transparent. They’re ideal for grouping
text and graphics. You can format text within the text box to whatever size and style you
choose.
Add a text box by clicking Insert on the Word toolbar, then click Text
Box. A menu appears displaying several text box templates. Click
Draw Text Box at the bottom of the menu , then draw a square on
the blank page where you would like the text box to appear.
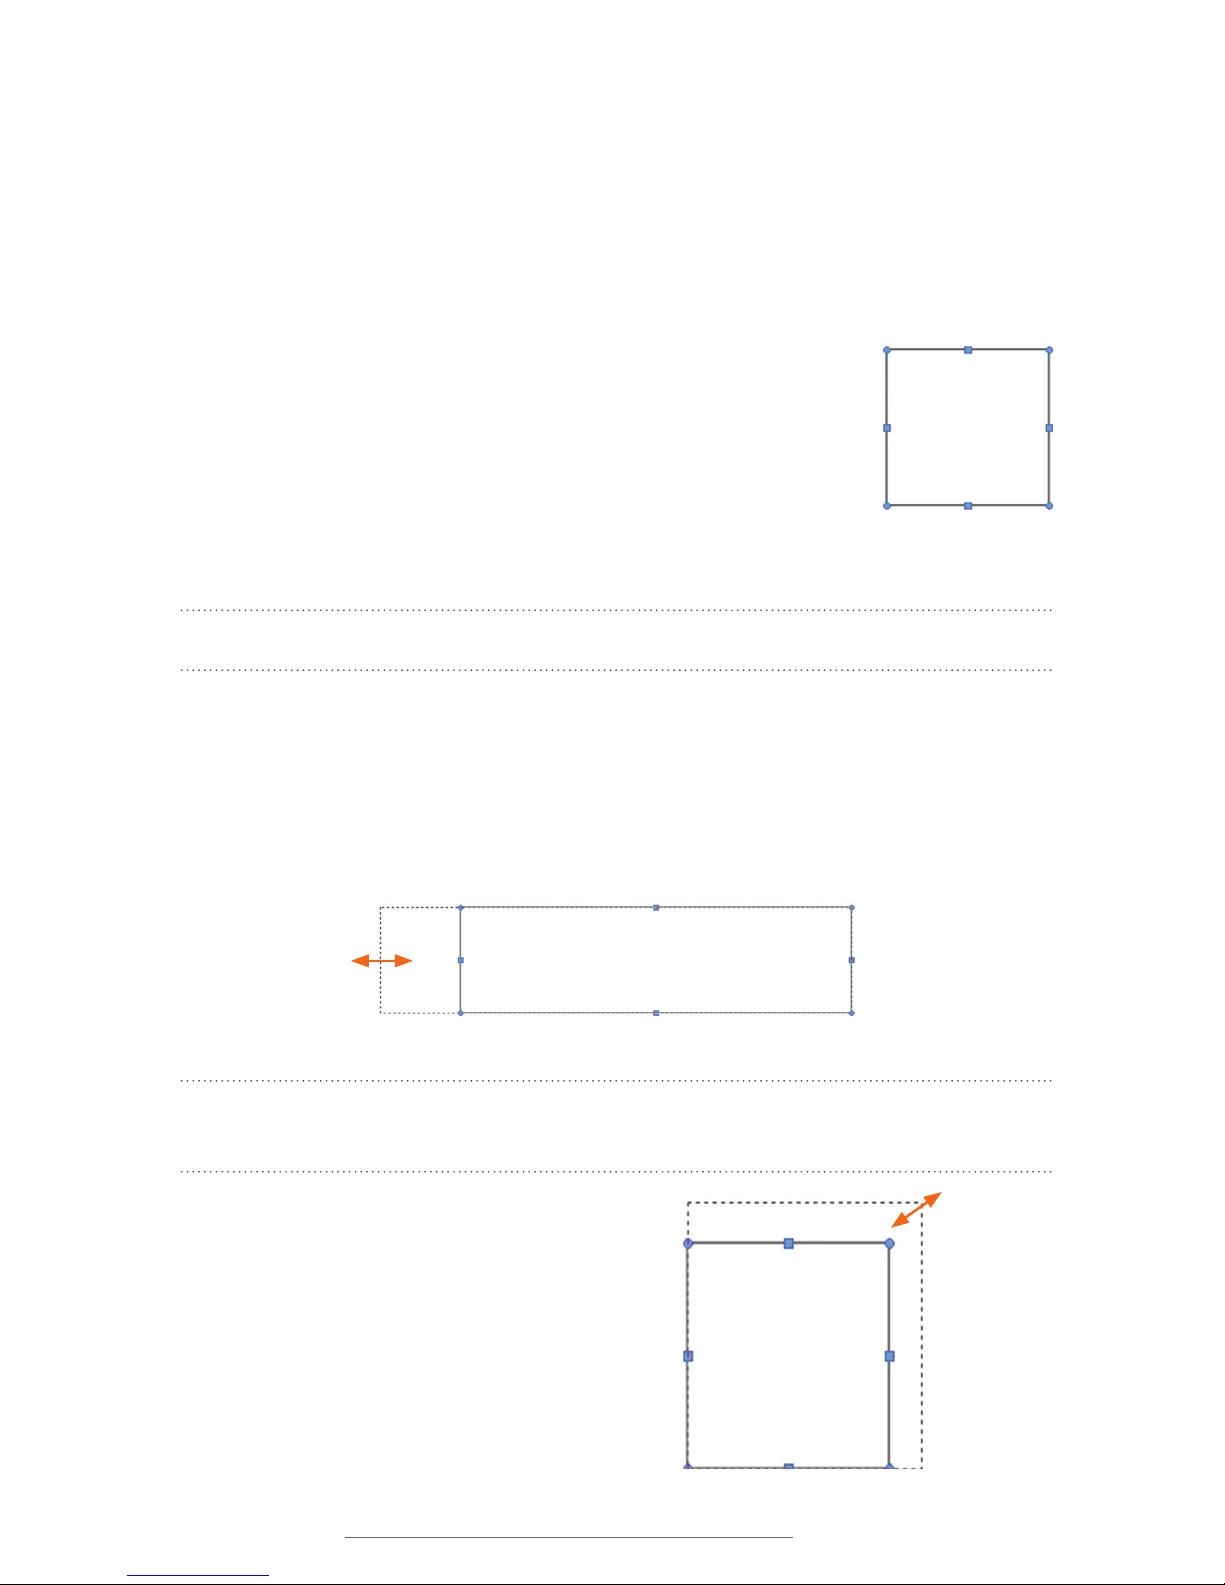
A text box with eight small boxes (handlebars) along its border
appears at the location you clicked. You can begin entering text
immediately. The text box expands as you enter text.
NOTE: Right-clicking on a text box allows you to edit some of its properties.
7.1 .1 CHANGING TEXT BOX SIZE
The “handlebars” let you change text box size. Click on a handlebar and drag it until the
text box is the desired size. Dragging a middle-top or middle-side handlebar changes the
width or height of the text box. Dragging a corner handlebar lets you change width and
height simultaneously.
NOTE: Pressing the Shift Key while dragging a corner handlebar changes a text box’s
width and height proportionately.
Text box with eight
“handlebars”
Text box lengths and widths can be changed by dragging a handlebar
until the text box is the size you want.
Text boxes can be resized proportionately by holding
down the Shift Key while dragging a corner box
(handlebar). This text box is being enlarged by
dragging a corner handlebar while pressing the Shift
Key.
Page 33
DuraLabel.com | 800.788.5572
7.2 Graphics | 31
LABEL DESIGN
7.1 .2 POSITIONING TEXT BOXES
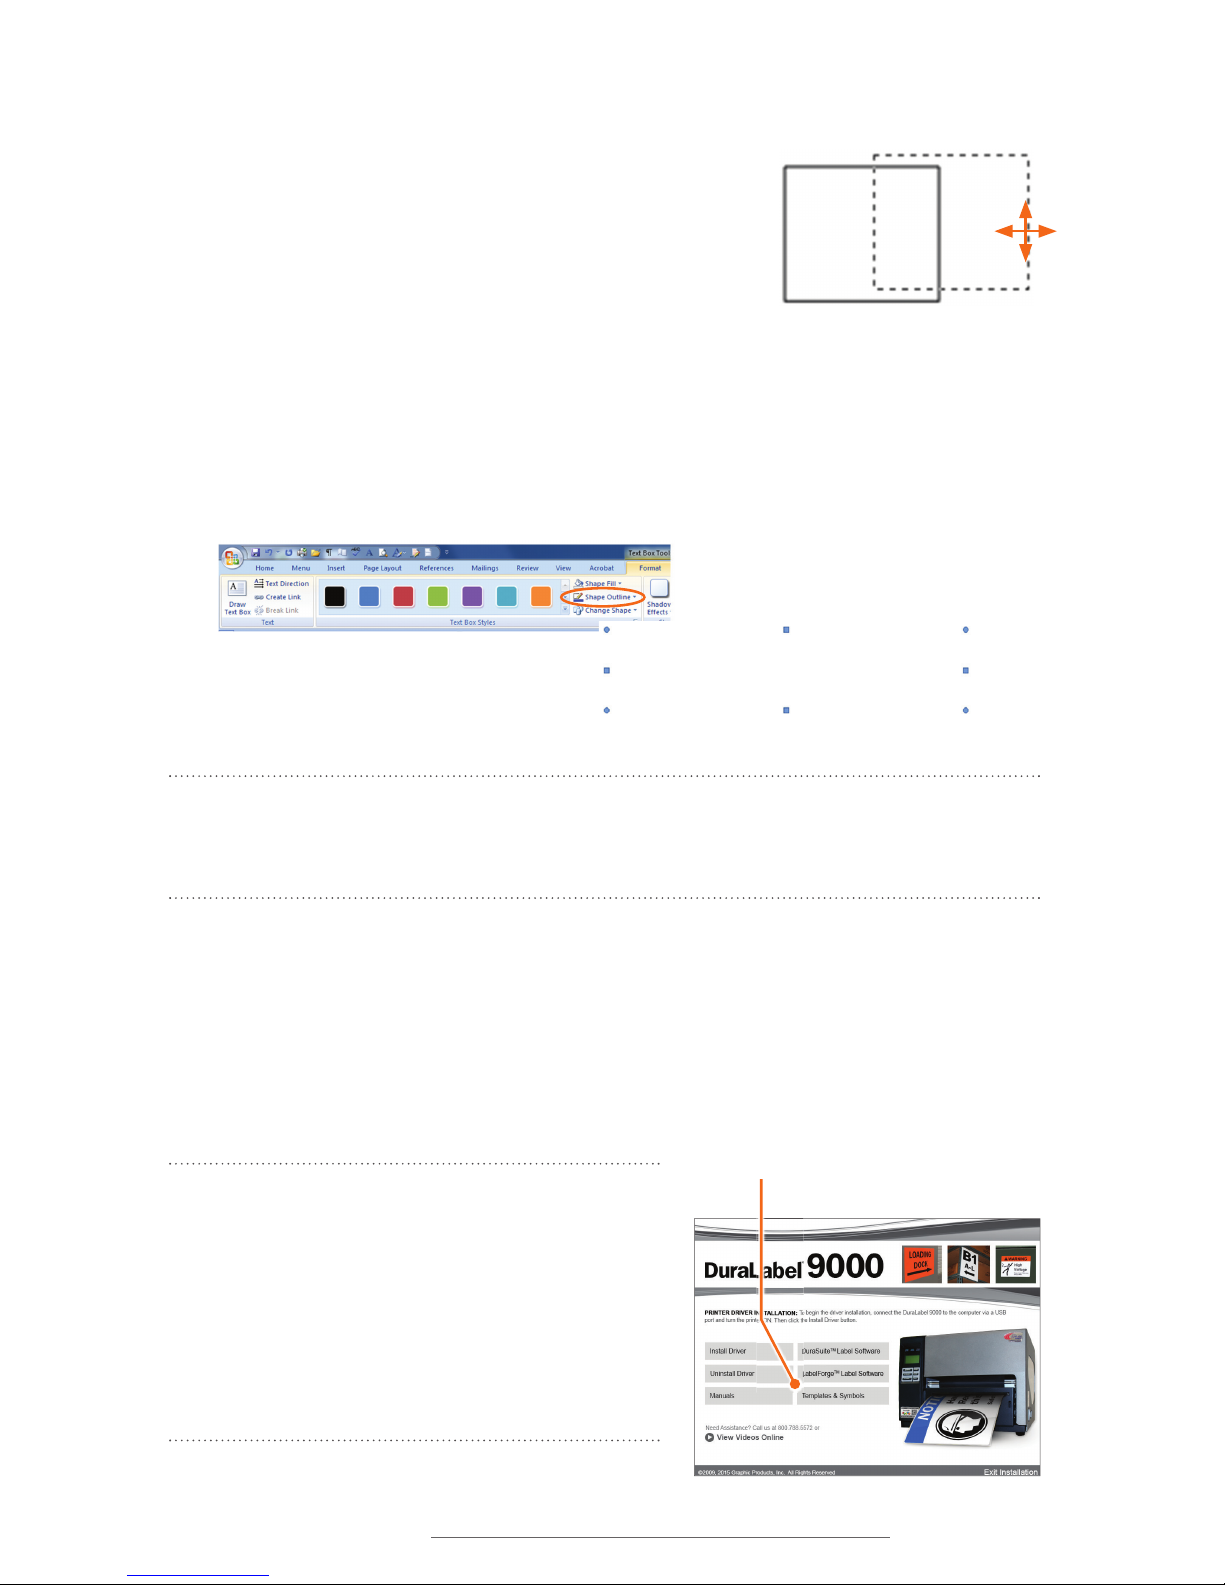
To position a text box on a label canvas, place the cursor
anywhere along the text box’s border, but not on a
handlebar. Your cursor will become a 4-headed arrow. You
can now drag the text box to another location.
If you don’t want the text box border to print on your label,
double-click on a corner of the text box. A Format tab
opens on your computer’s menu bar
*
. Click Shape Outline,
then select No Outline from the options that appear.
*
Describes Word 2007 or Word 2010 procedure
The text box disappears.
NOTE: If you choose not to use a text box for your text, you will still be able to print your
label, although you will not be able to move your text or graphics freely. Consult your
word processor’s help Àle for more detailed information about using the text box tool.
7.2 Graphics
To insert a symbol on your Word document, select Picture from your Insert tab, browse
for the symbol you want to add, select it, then click Insert. The symbol now appears on
your Word document. Move and resize symbols
as necessary.
NOTE: Graphic Products provides you with
industrial safety symbols in the DL9000
Templates and Symbols folder on your
DuraLabel 9000 CD. Run the CD, then click on
Templates & Symbols on the DuraLabel 9000
Startup Screen that opens. You can store the
Templates and Symbols folder in any convenient
location on your computer.
Click Shape Outline from the Format tab, then
No Outline.
Text box with its border removed
Placing your cursor along a text box
border creates a 4-headed arrow. You
can now move the text box by dragging
it with your mouse.
Access Templates and Symbols by clicking
the Templates & Symbols button on your
DuraLabel 9000 Startup Screen.
Page 34
32 | 7.3 Merging Information, Sequencing Labels
DuraLabel.com | 800.788.5572
LABEL DESIGN
HINT! When determining a symbol’s size, make it large enough to be recognized from a
reasonable distance and check regulatory requirements to ensure compliance.
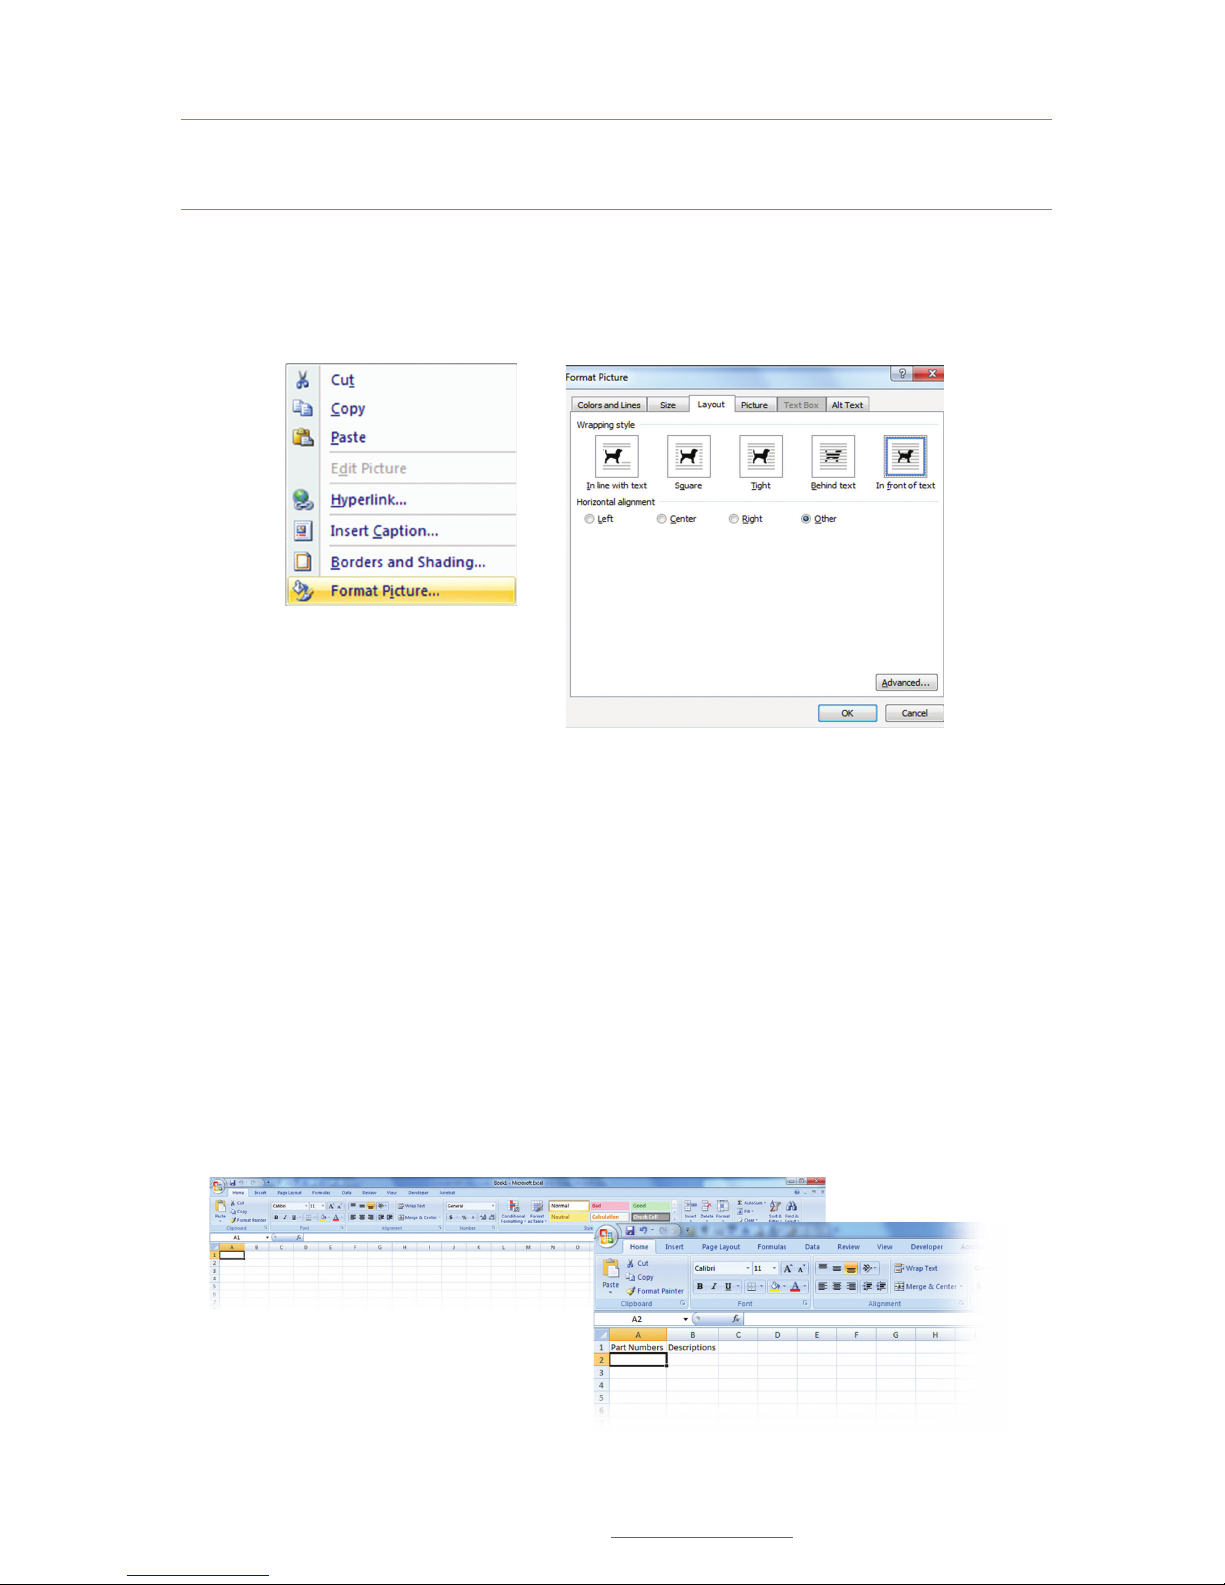
To freely position an image or symbol, right-click on it and select Format Picture from
the context menu that appears. Select the Layout tab on the Format Picture dialog box
that now appears and choose the “In front of text” text wrapping option.
Context drop-down menu, with
Format Picture selected
Position an image on a document by choosing “In front of
text” from the Format Picture dialog box.
7.3 Merging Information, Sequencing Labels
Follow these steps to effectively create and efficiently organize labeling projects.
7.3.1 CREATING AN EXCEL SPREADSHEET
Successful labeling projects often involve merging Microsoft® Word and Excel documents
to produce well-coordinated, sequentially organized groupings of labels.
Start by opening an Excel document, placing column headers in the first row (Fig. 1).
For this example we use Part Numbers and Descriptions (Fig. 2).
FIGURE 1 Blank Excel document
FIGURE 2 Excel document with headers
Page 35
DuraLabel.com | 800.788.5572
7.3 Merging Information, Sequencing Labels | 33
LABEL DESIGN
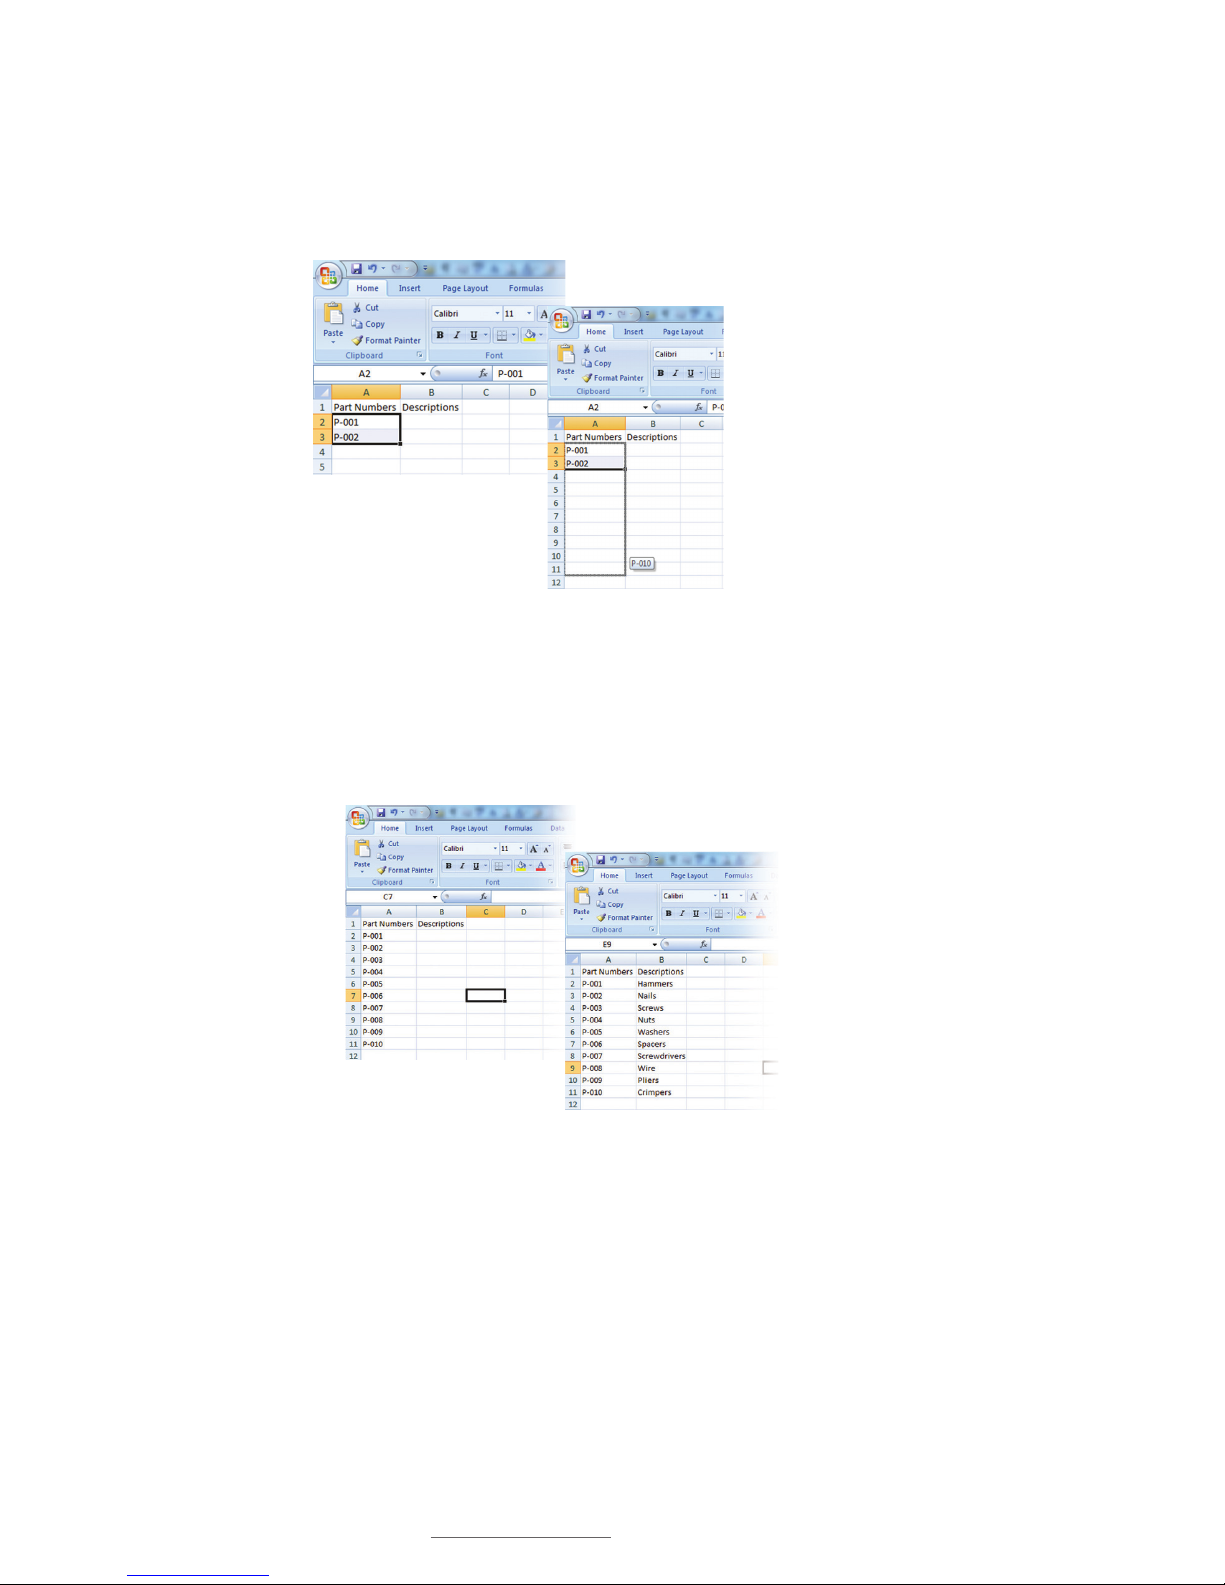
A. Enter your first two sequential numbers in cells A2 and A3 (Fig. 3). Select cells
A2 and A3 and place your cursor over the little box in the lower-right corner of the
selection. Your cursor becomes a “+.” Now click and drag the selection down the
number of cells equal to the number of labels in the sequence (Fig. 4).
B. All the column’s numbers will sequence the same as the sequence used in the first
two rows (Fig. 5). This example reflects 10 labels, with a sequence of 1.
C. Now enter the data for Column B, e.g., Descriptions, that relates to the data in
corresponding rows of Column A (Fig. 6).
D. When all your data has been entered in the Excel spreadsheet, name and save
your document in a location where you can easily find it. Consider placing it in a
folder with other project documents. Close your Excel document after naming and
saving it. You’ll come back to it shortly.
FIGURE 4 … then drag your
cursor the number of cells
equal to the total number of
labels in your sequence.
FIGURE 3 Enter two rows of
numbers …
FIGURE 5
The spreadsheet
reveals plans to
print 10 labels,
with Part Numbers
sequenced by 1
FIGURE 6 Enter data under
Column B that relates to the
data on the corresponding row of
Column A.
Page 36
34 | 7.3 Merging Information, Sequencing Labels
DuraLabel.com | 800.788.5572
LABEL DESIGN
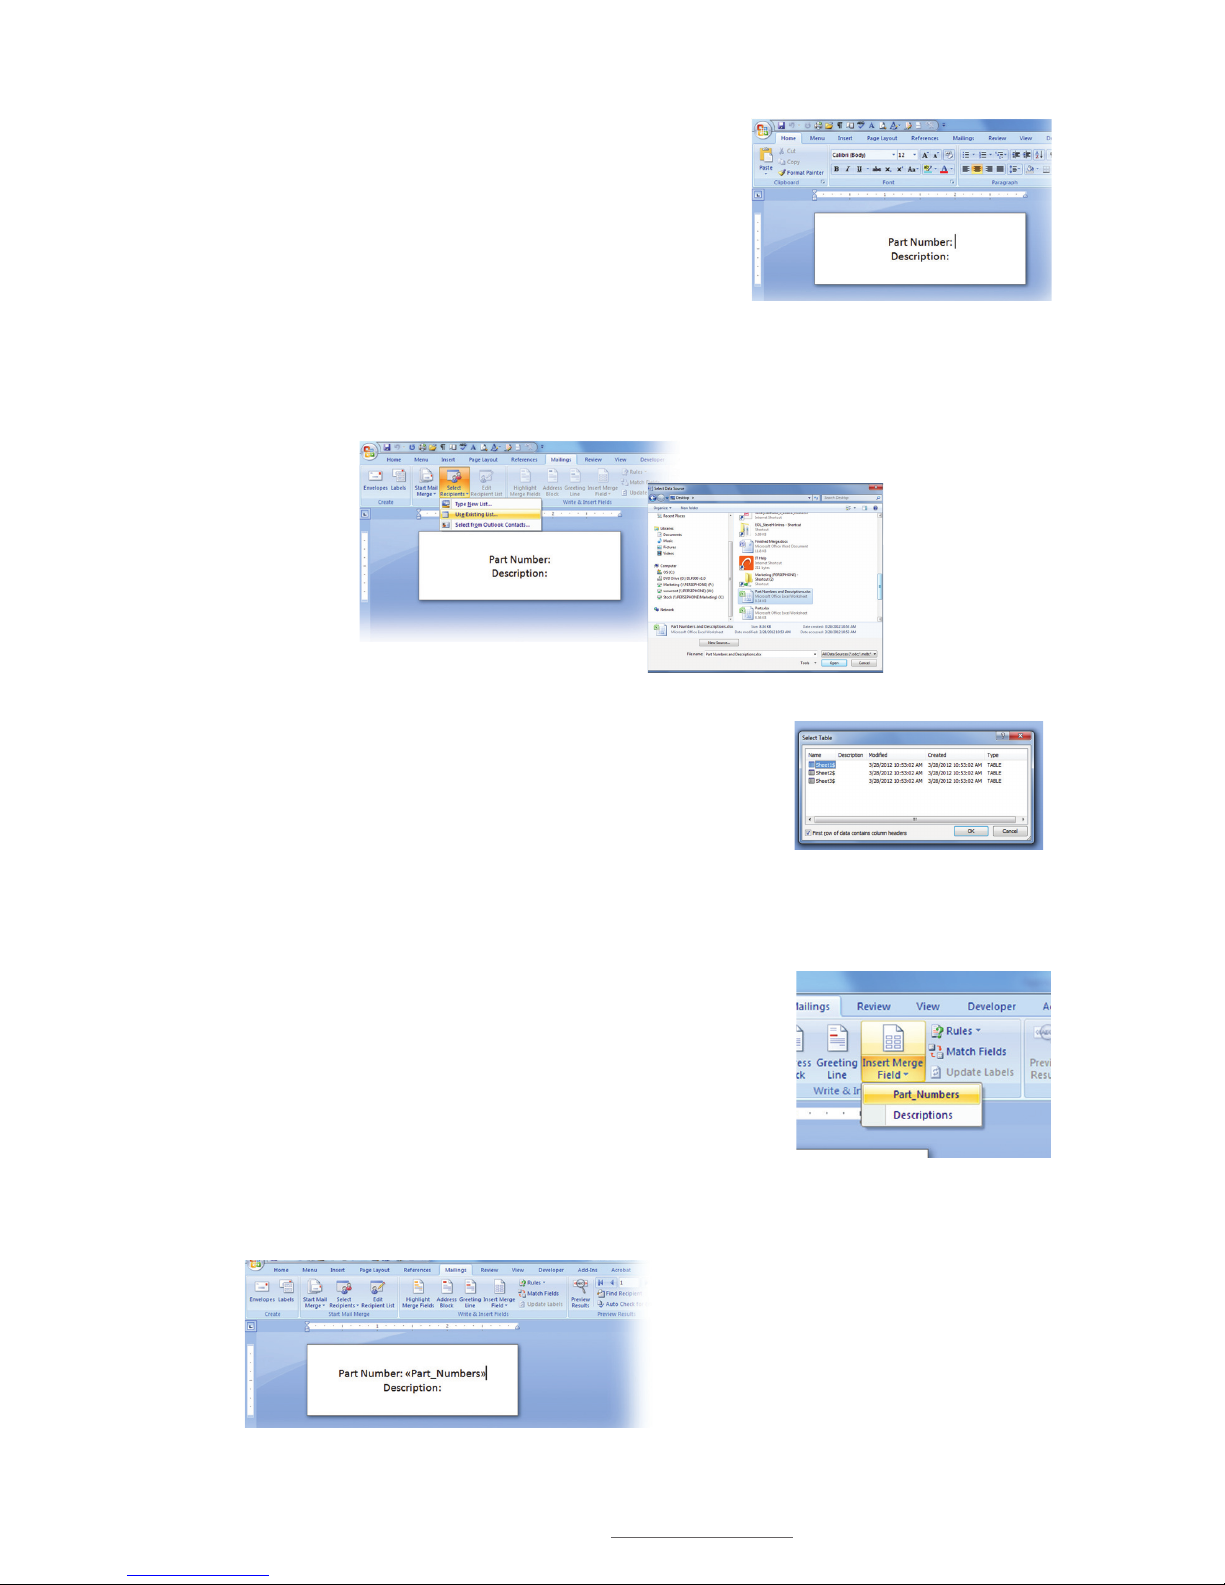
E. Now open the Word template you want to
import your Excel data into. In Figure 7 the
static text “Part Number:” and “Description:” are
already typed in. Now place your cursor where
you want to insert your data.
F. Select the Mailings tab from the Word menu bar,
then click on Select Recipients and Use Existing
List (Fig. 8). A Select Data Source window
appears (Fig.9).
G. Locate and select the Excel spreadsheet you just
saved using the Select Data Source window (Fig. 9).
A Select Table dialog box appears (Fig. 10).
H. Select the Excel Spreadsheet page where your data
is located, e.g., Sheet 1, on the Select Table dialog
box. The Select Table dialog box closes when you
make your selection.
I. Now click on the bottom half of the Insert Merge
Field button on your Word toolbar (Fig. 11). The
names of your column headers will be displayed.
J. Select Column A header. A Column A space-holder
(<<Part_Numbers>>) appears next to the Column A
header (Fig. 12).
FIGURE 7 Word document ready to receive
data from an Excel spreadsheet
FIGURE 8 Choose
“Select Recipients”
and “Use Existing List”
from the Mailings tab.
FIGURE 9 Navigate
the Select Data Source
window to access your
Excel Àle.
FIGURE 11 Bottom half of the Insert
Merge Field button selected, with
column header names displayed.
FIGURE 10 Select the Excel sheet
number where your data is located
from the Select Table dialog box.
FIGURE 12 Word document ready to
receive data from Excel Column A.
Page 37
DuraLabel.com | 800.788.5572
7.3 Merging Information, Sequencing Labels | 35
LABEL DESIGN
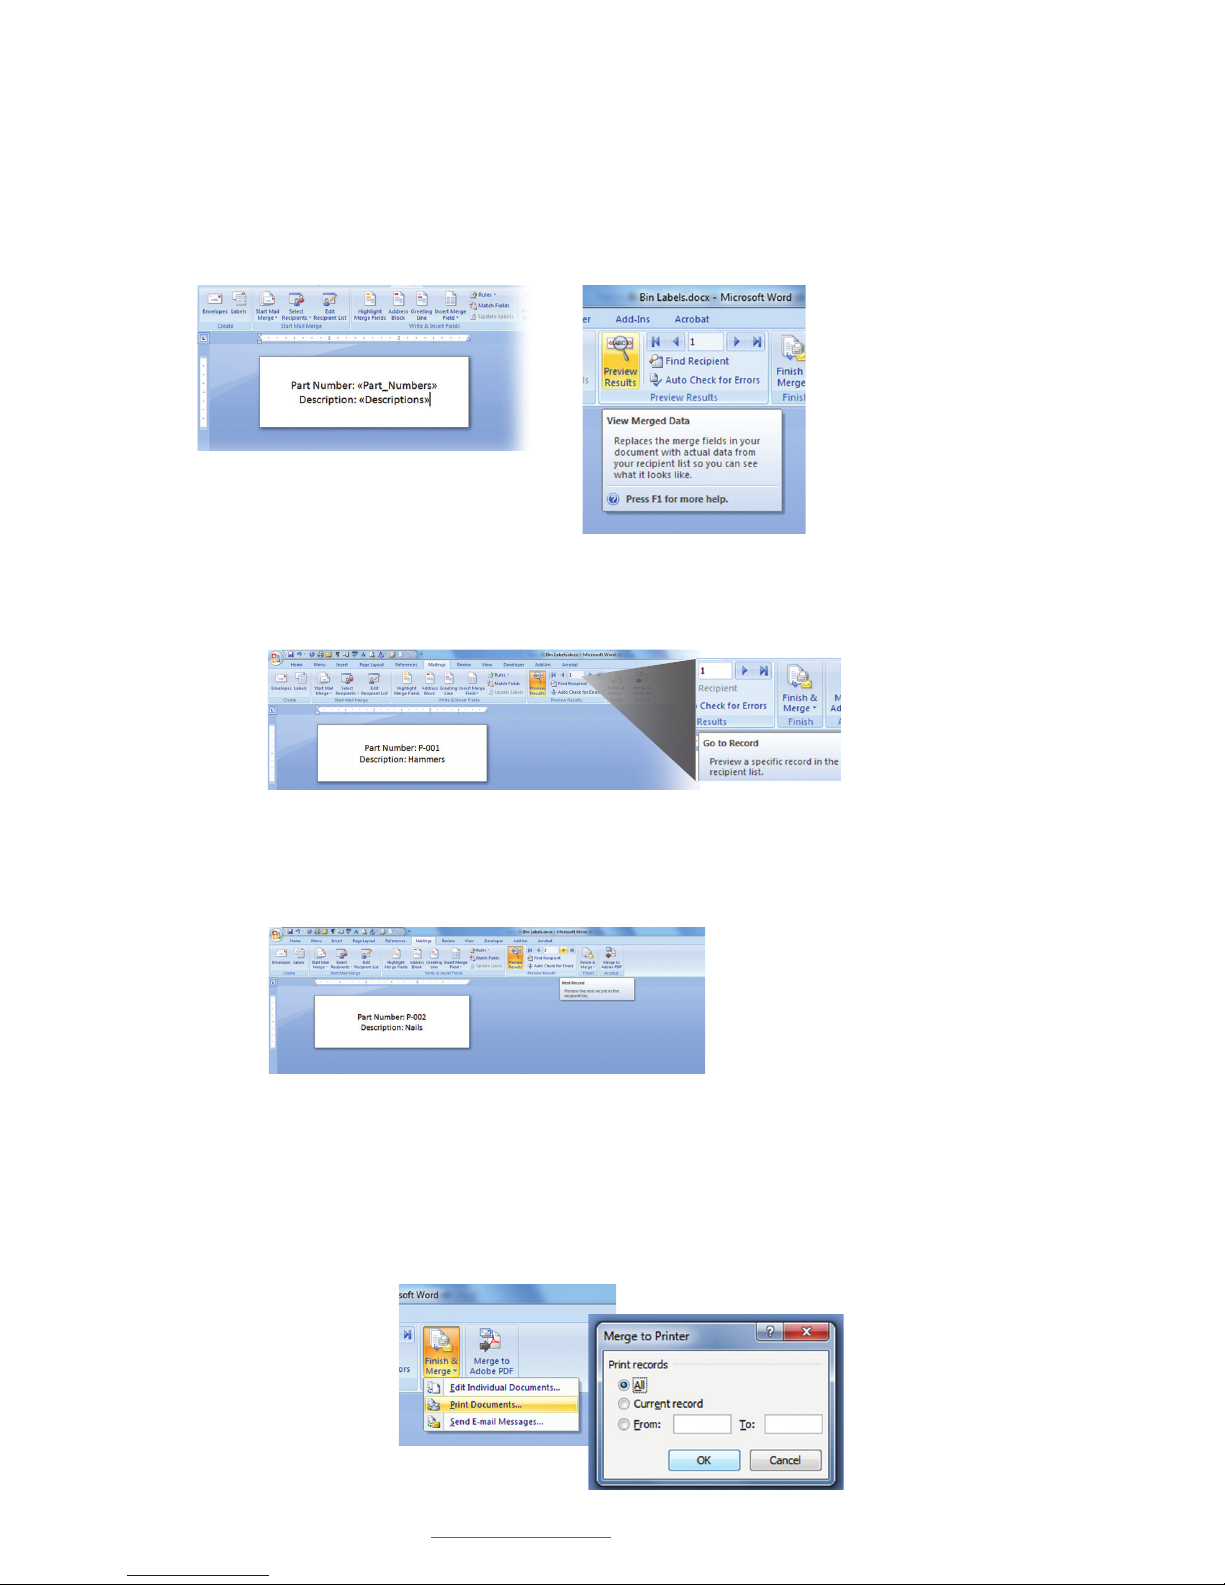
FIGURE 13 Word document ready to receive data from
Excel Column B.
FIGURE 14 Click Preview Results
to display View Merged Data
window.
FIGURE 16 Word template with Next
Record arrow selected and second
label in the sequence displayed.
FIGURE 17 Click Print
Documents from the Finish
& Merge drop-down menu
to start the process of
printing sequenced labels.
FIGURE 18 Select
labels for printing
from the Merge to
Printer window.
FIGURE 15 First label in a sequence, with content imported from an Excel spreadsheet.
K. Select Column B header. A Column B space-holder (<<Descriptions>>) appears
next to the Column B header (Fig. 13).
L. Select Preview Results from the Word toolbar. A View Merged Data window should
appear (Fig. 14).
M. With the Go to Record set at 1, the first label in a sequence should now appear on
the Word template (Fig. 15).
N. Click on the Next Record arrow to display the next label in the sequence (Fig. 16).
O. Now click the Finish & Merge button, then click Print Documents from the drop-
down menu that appears (Fig 17).
P. A Merge to Printer selection box appears, offering the option of printing all labels,
the current record, or specifying a range (Fig. 18). Check the appropriate button.
Page 38
36 | 7.3 Merging Information, Sequencing Labels
DuraLabel.com | 800.788.5572
LABEL DESIGN
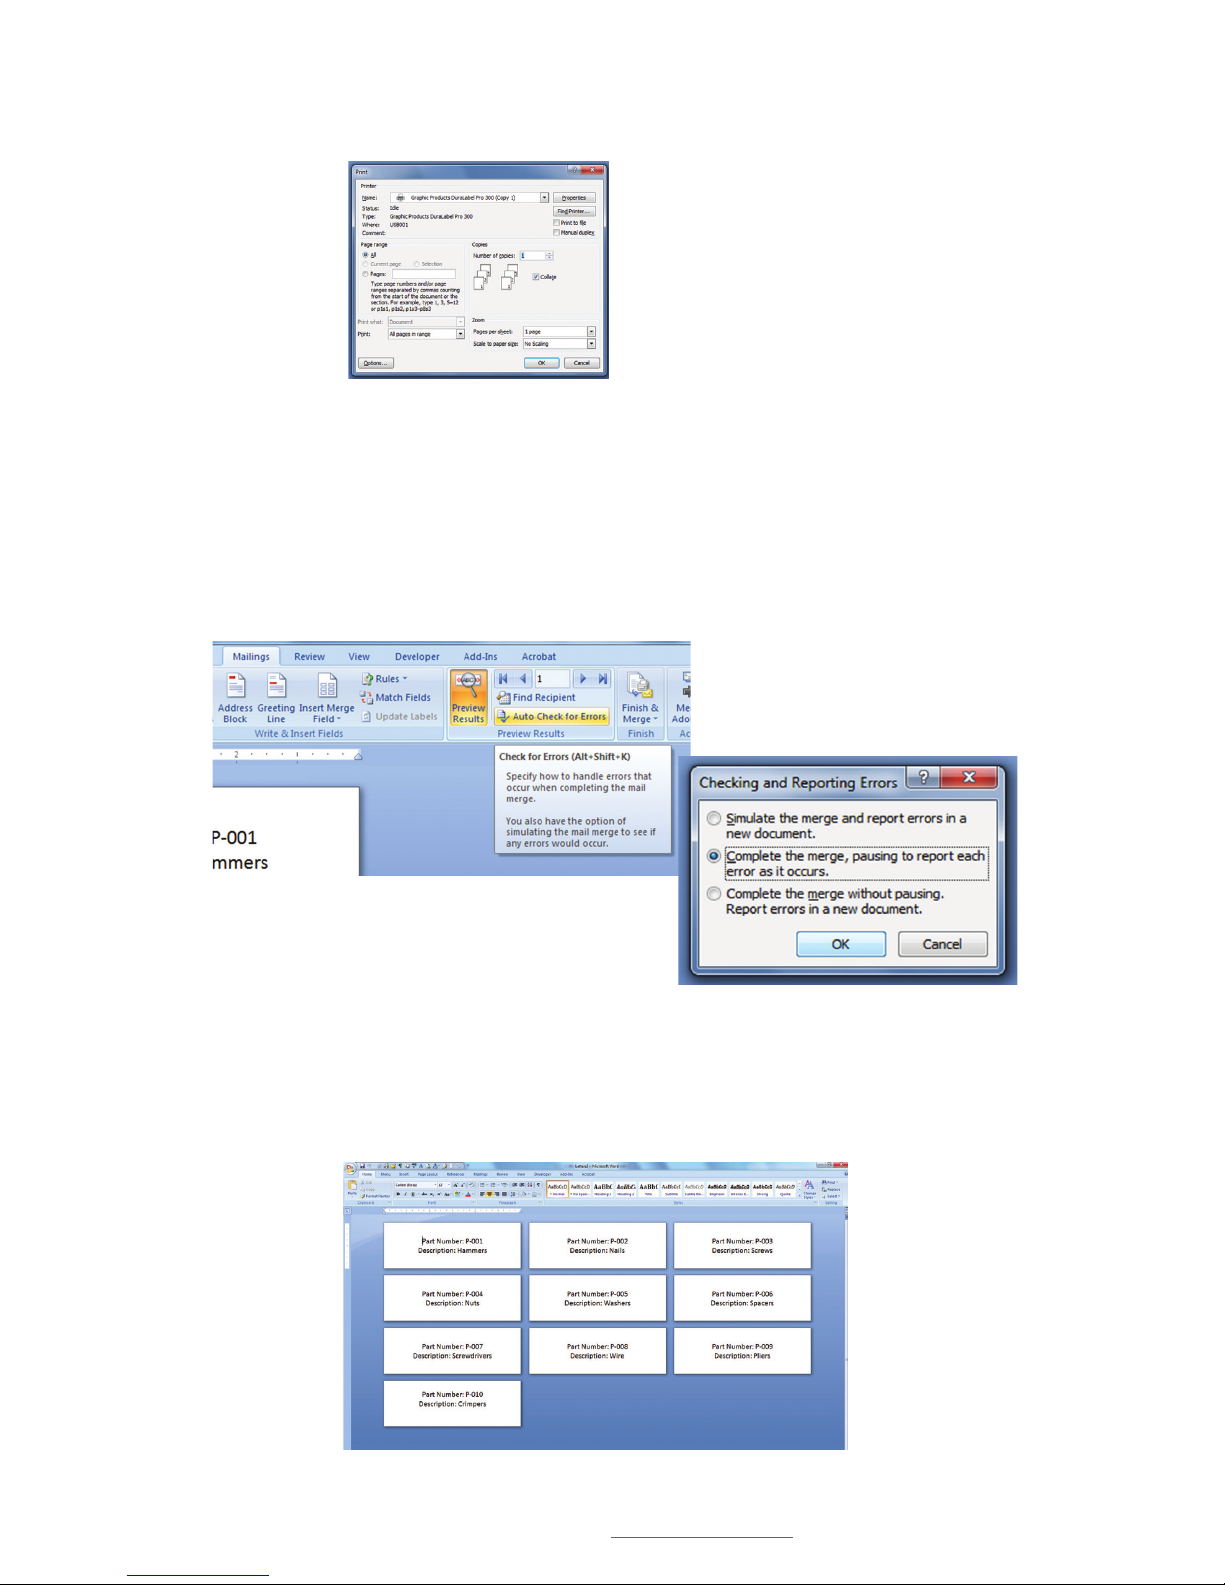
FIGURE 19 Select the DuraLabel
Printer you want to print your
sequenced labels with from the Print
dialog box.
FIGURE 20 Check for errors before printing your labels using the
Auto Check for Errors tool.
FIGURE 21 The Checking and Reporting Errors
window lets you decide how and when you want to
receive error messages.
FIGURE 22 Your labels are displayed in sequence prior to printing.
Q. Select a DuraLabel Printer from the Print dialog box that appears (Fig. 19).
R. If you would like to save a separate completed merged document containing every
page in a single file, select the Auto Check for Errors button under the “Mailings”
tab (Fig. 20).
S. A Checking and Reporting Errors window now appears. Leave the second option
selected and click OK (Fig. 21). Your labels are displayed on a single document for
your review (Fig. 22).
T. View your labels in sequence on the Word display that appears. If they are ready to
print, go to File, then click Print. Your labels print as they appeared.
Page 39
DuraLabel.com | 800.788.5572
8.2 Installing a Driver for the Ethernet Port | 37
&RQÀJXULQJ(WKHUQHW&DUG
The internal Ethernet card can be configured using the front display panel buttons and
LCD on the DuraLabel 9000.
The Menu button on the front display panel will provide access to the printer menu. Use
the UP and DOWN buttons to navigate through the menu. To enter data, use the UP
button to increment the highlighted digit by 1. The DOWN button will shift one over and
highlight the next digit. Pressing SELECT will accept the selection. Pressing MENU will
take you to the previous screen.
8.1 Setting an Ethernet Port using the Diagnostic Tool
Use the following steps to set a port with the diagnostic tool:
A. Open My Computer, then right-click on the DuraLabel 9000 disk icon and select
Open.
B. Double-click on the DiagTool_128.exe to run the tool.
C. Click on Ethernet Setup from the Printer Function buttons on the left side.
D. On the Ethernet Setup window, select DHCP or set a specific Static IP, Subnet
Mask and Gateway. Click Set IP. The printer will restart with the new settings.
8.2 Installing a Driver for the Ethernet Port
Follow these steps to install a driver for use with the Ethernet port:
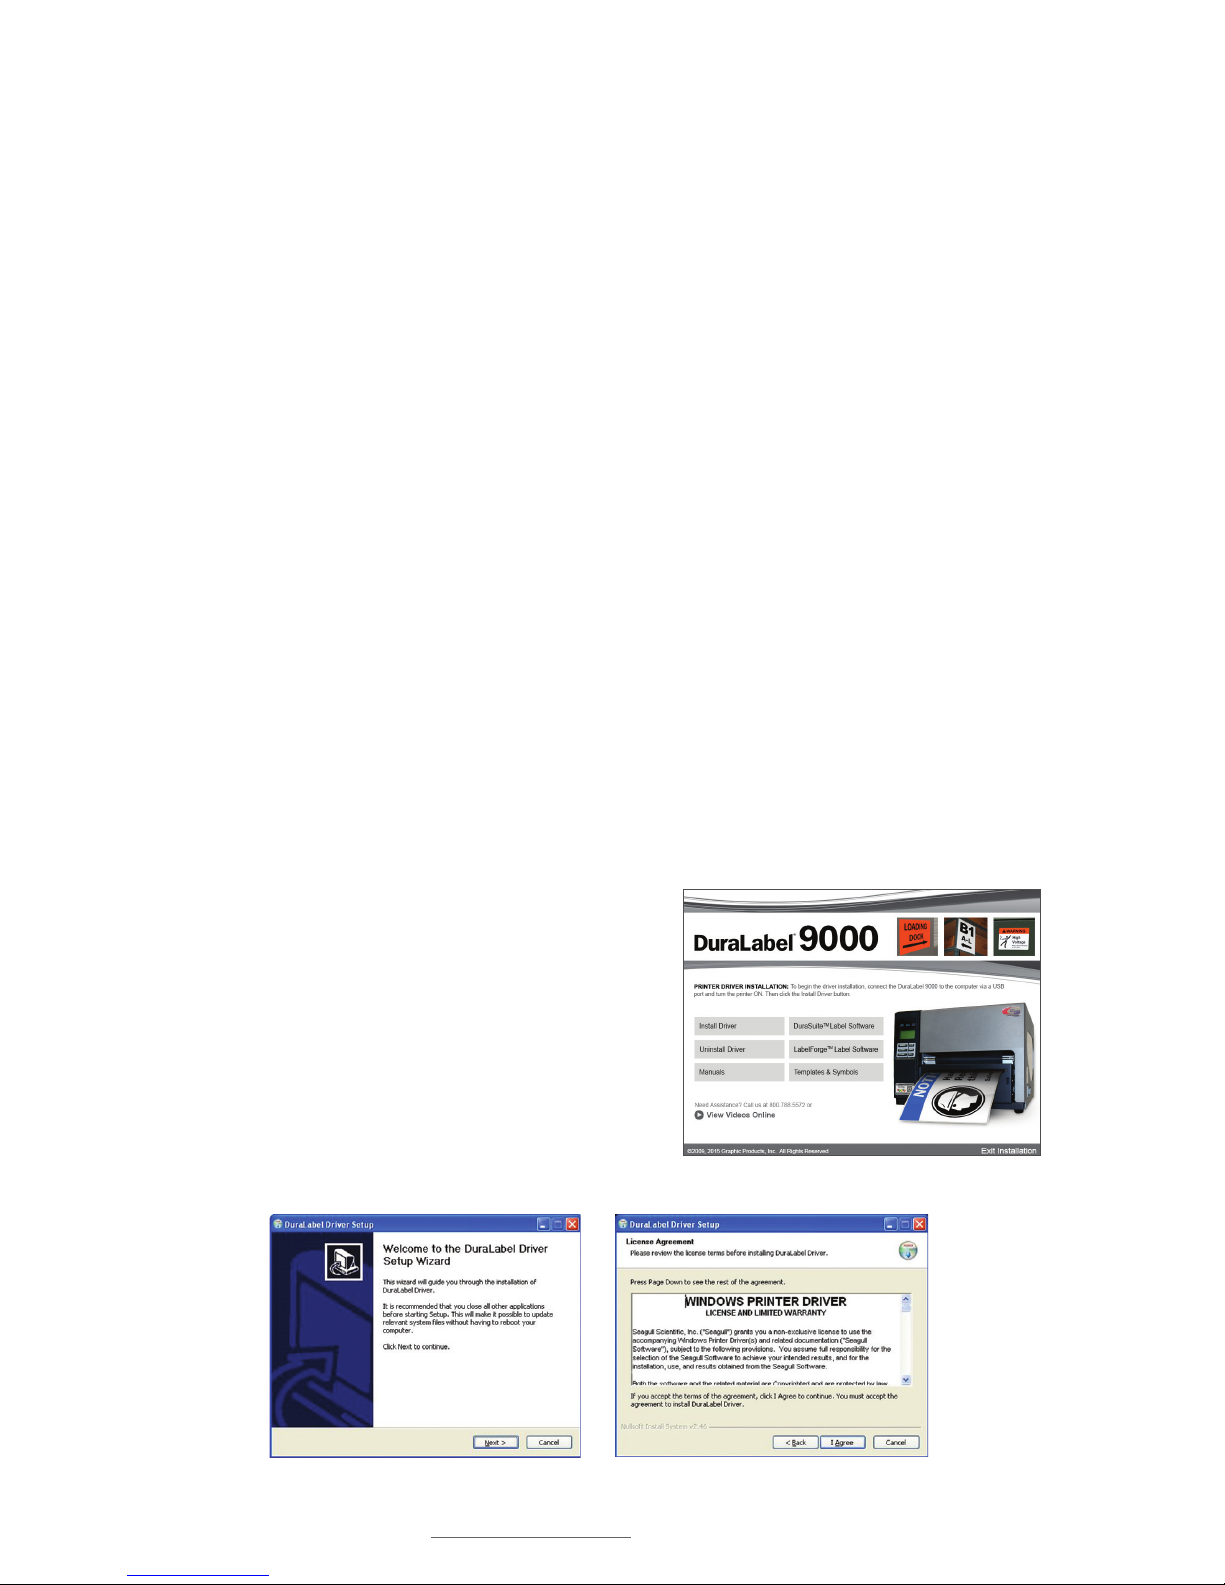
A. Insert the DuraLabel 9000 Installation CD
in your computer’s disk drive. A DuraLabel
9000 startup screen appears.
B. Click on Driver Wizard, then click Next
on the Driver Setup Wizard window that
appears.
C. Click I Agree on the Windows Printer Driver
License Agreement window that appears.
DuraLabel 9000 Startup Screen
Windows Printer Driver License Agreement
DuraLabel Driver Setup Wizard
Page 40
38 | 8.2 Installing a Driver for the Ethernet Port
DuraLabel.com | 800.788.5572
CONFIGURING ETHERNET CARD
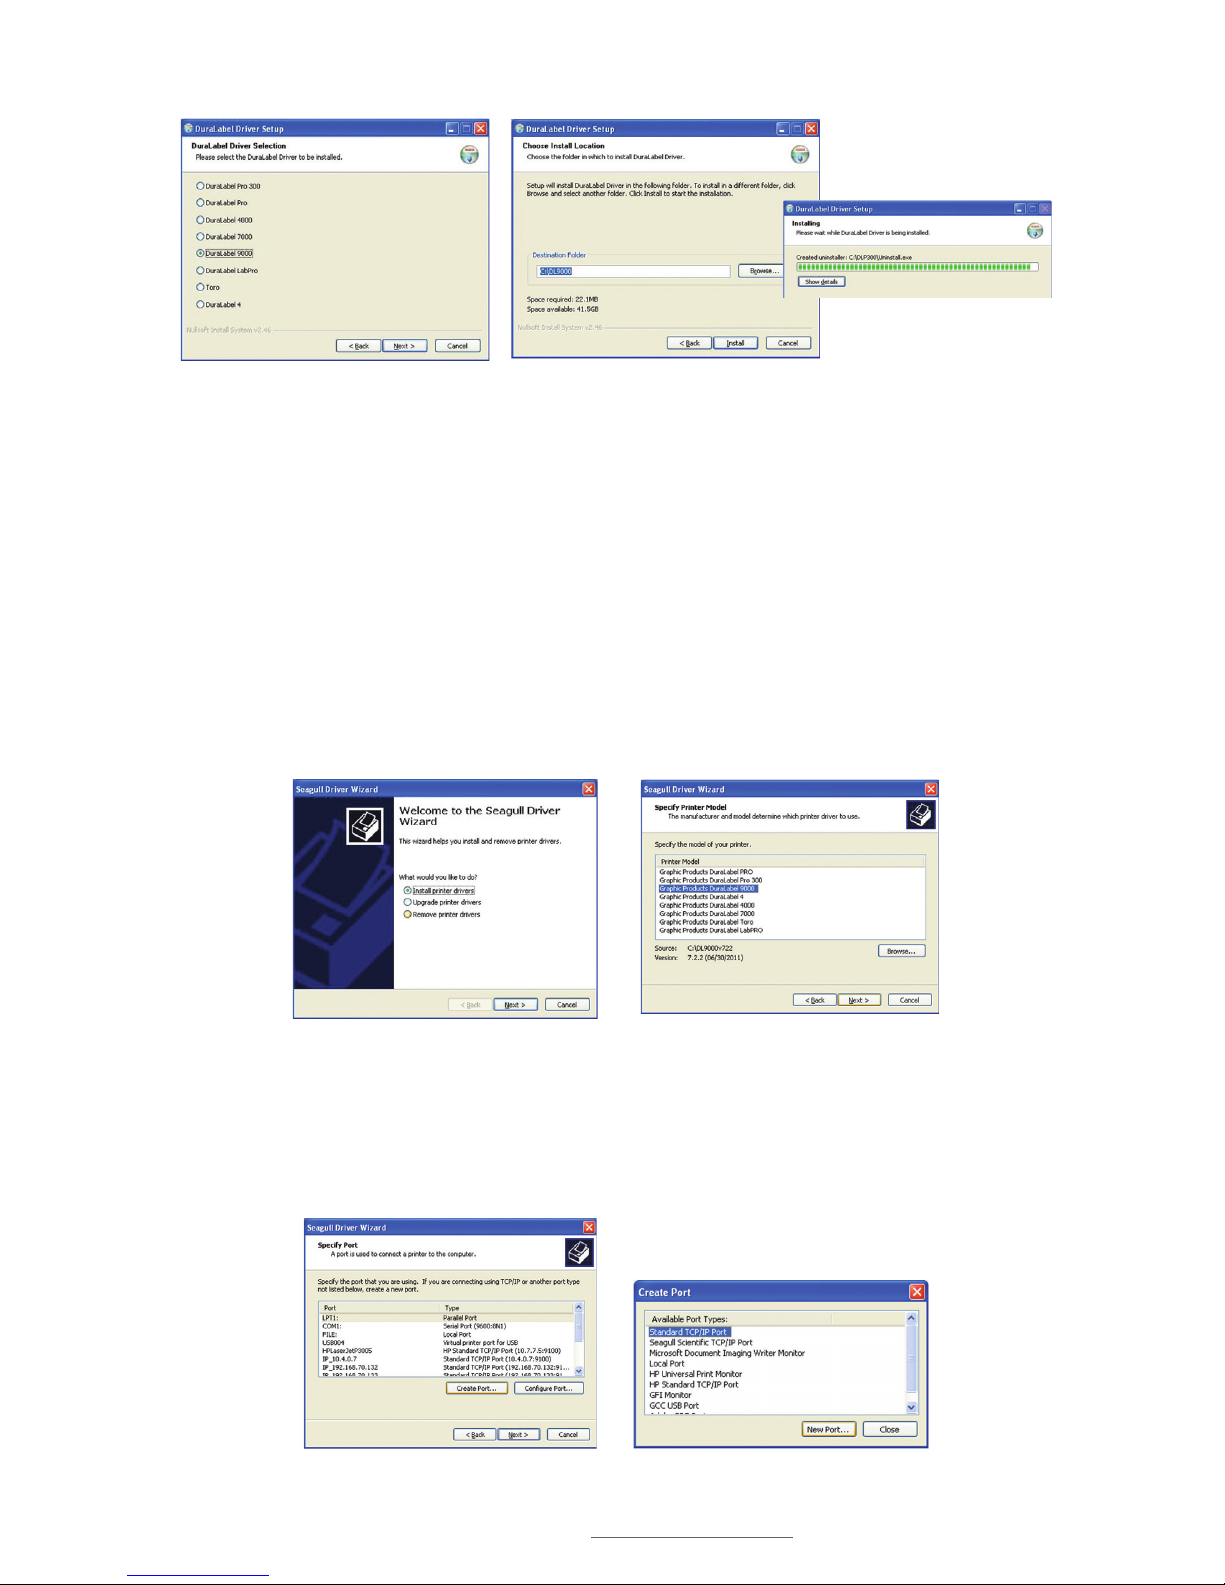
D. Select DuraLabel 9000 and click Next on the DuraLabel Driver Selection window
that appears.
E. Choose the install location and click Install on the Choose Install Location window
that appears. An Installing window shows installation progress.
F. Select Install printer drivers on the Driver Wizard window that appears and click
Next.
G. Select Graphic Products DuraLabel 9000 on the Specify Printer Model window
that appears and click Next.
H. Click Create Port on the Specify Port window that appears. A Create Port selection
box will now appear.
I. Select Standard TCP/IP Port on the Create Port selection box and click New Port.
Selecting a DuraLabel Driver
Driver Install Location Window
Installing Window
Install Printer Driver Window
Specify Printer Model Window
Specify Port Window Create Port Selection Box
Page 41
DuraLabel.com | 800.788.5572
8.2 Installing a Driver for the Ethernet Port | 39
CONFIGURING ETHERNET CARD
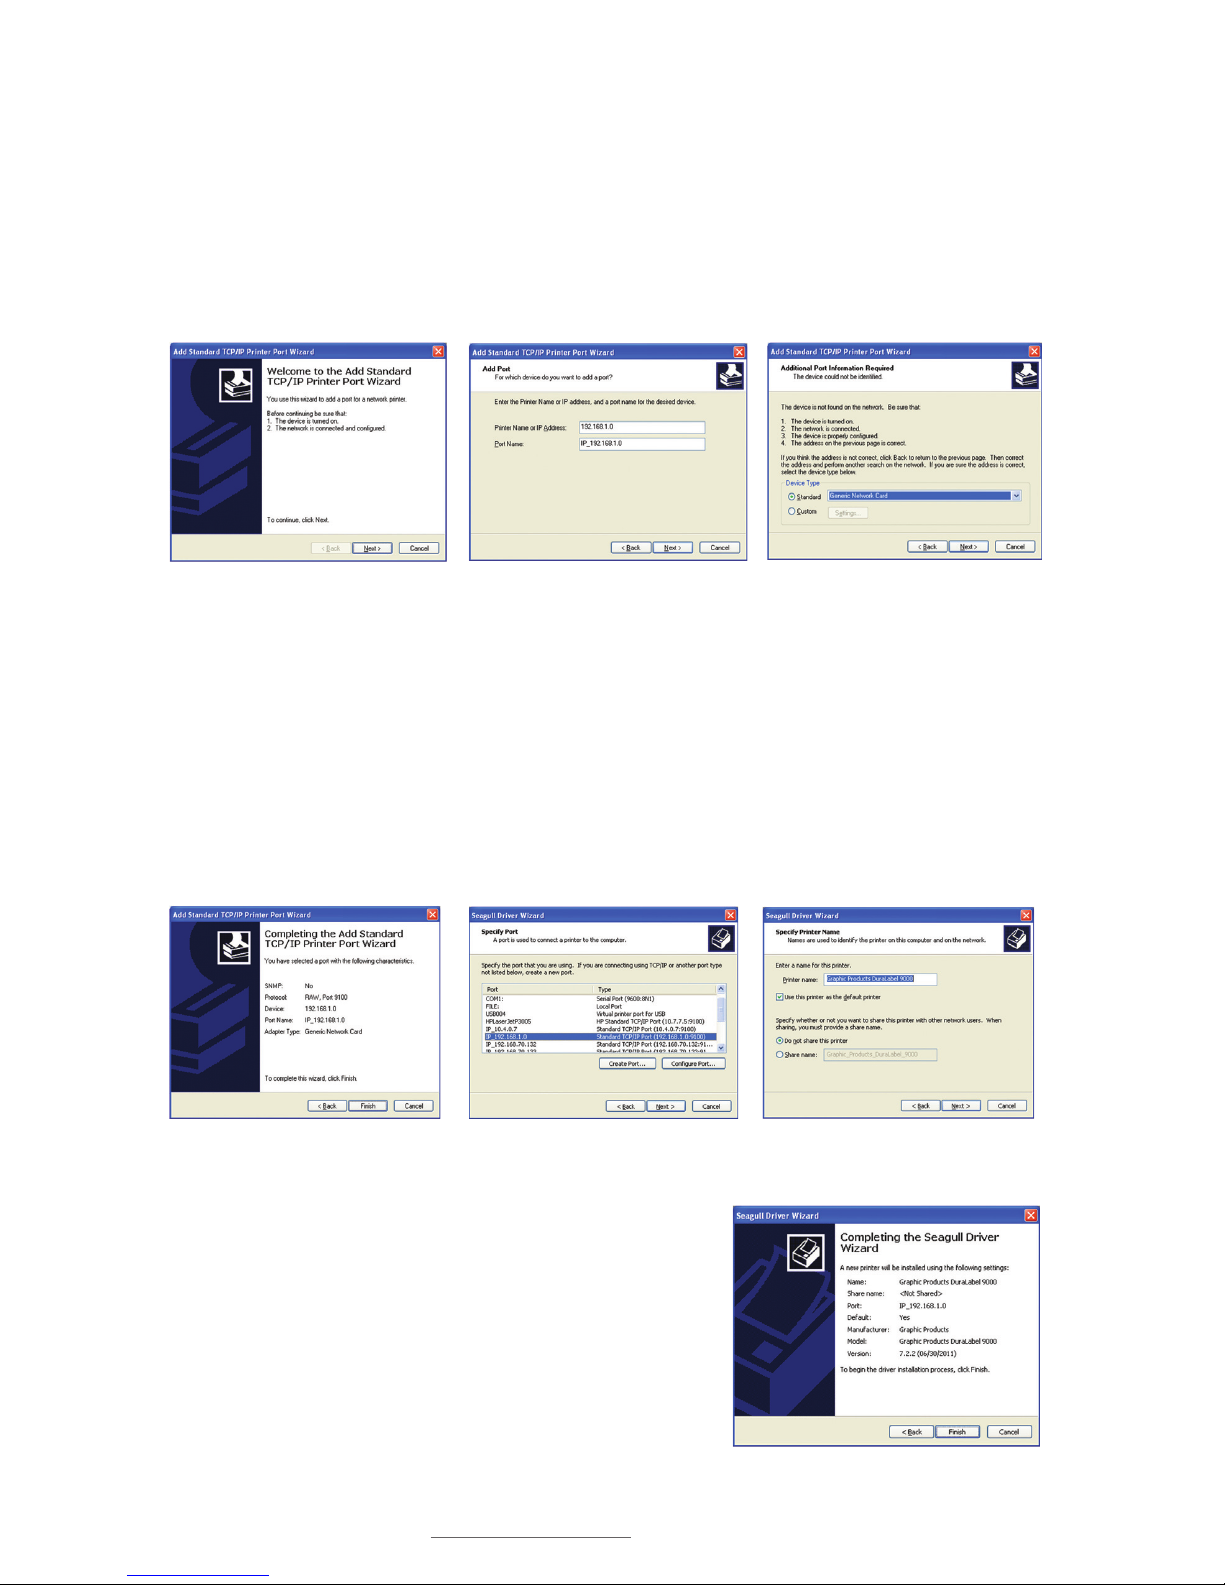
J. The Add Standard TCP/IP Printer Port Wizard appears. Click Next.
K. Enter the IP Address and Port Name in the Add Port dialog box that appears, then
click Next.
L. An Additional Port Information Required window now opens. Select Standard:
Generic Network Card under Device Type and click Next.
Add Standard TCP/IP Printer Port
Wizard
Add Port Dialog Box
Additional Port Information Required
Window
Specify Port Window
Specify Printer Name Window
Completing the Add Standard TCP/IP
Printer Port Wizard Window
P. Review the information on the Completing the
Seagull Driver Wizard window that opens and
click Finish if the information is correct. If it isn’t
correct, revise the selections made in previous
steps and click Finish when the window’s
information is accurate.
Completing the Seagull Driver Wizard Window
M. Make sure the port information is correct on the Completing the Add Standard
TCP/IP Printer Port Wizard window that appears, then click Finish.
N. Select the newly created port on the Specify Port window that now appears, then
click Next.
O. Select Printer Name, set the printer as default and choose printer sharing options
on the Specify Printer Name window that opens, then click Next.
Page 42
40 | 8.3 Manually ConÀguring the IP Address
DuraLabel.com | 800.788.5572
CONFIGURING ETHERNET CARD
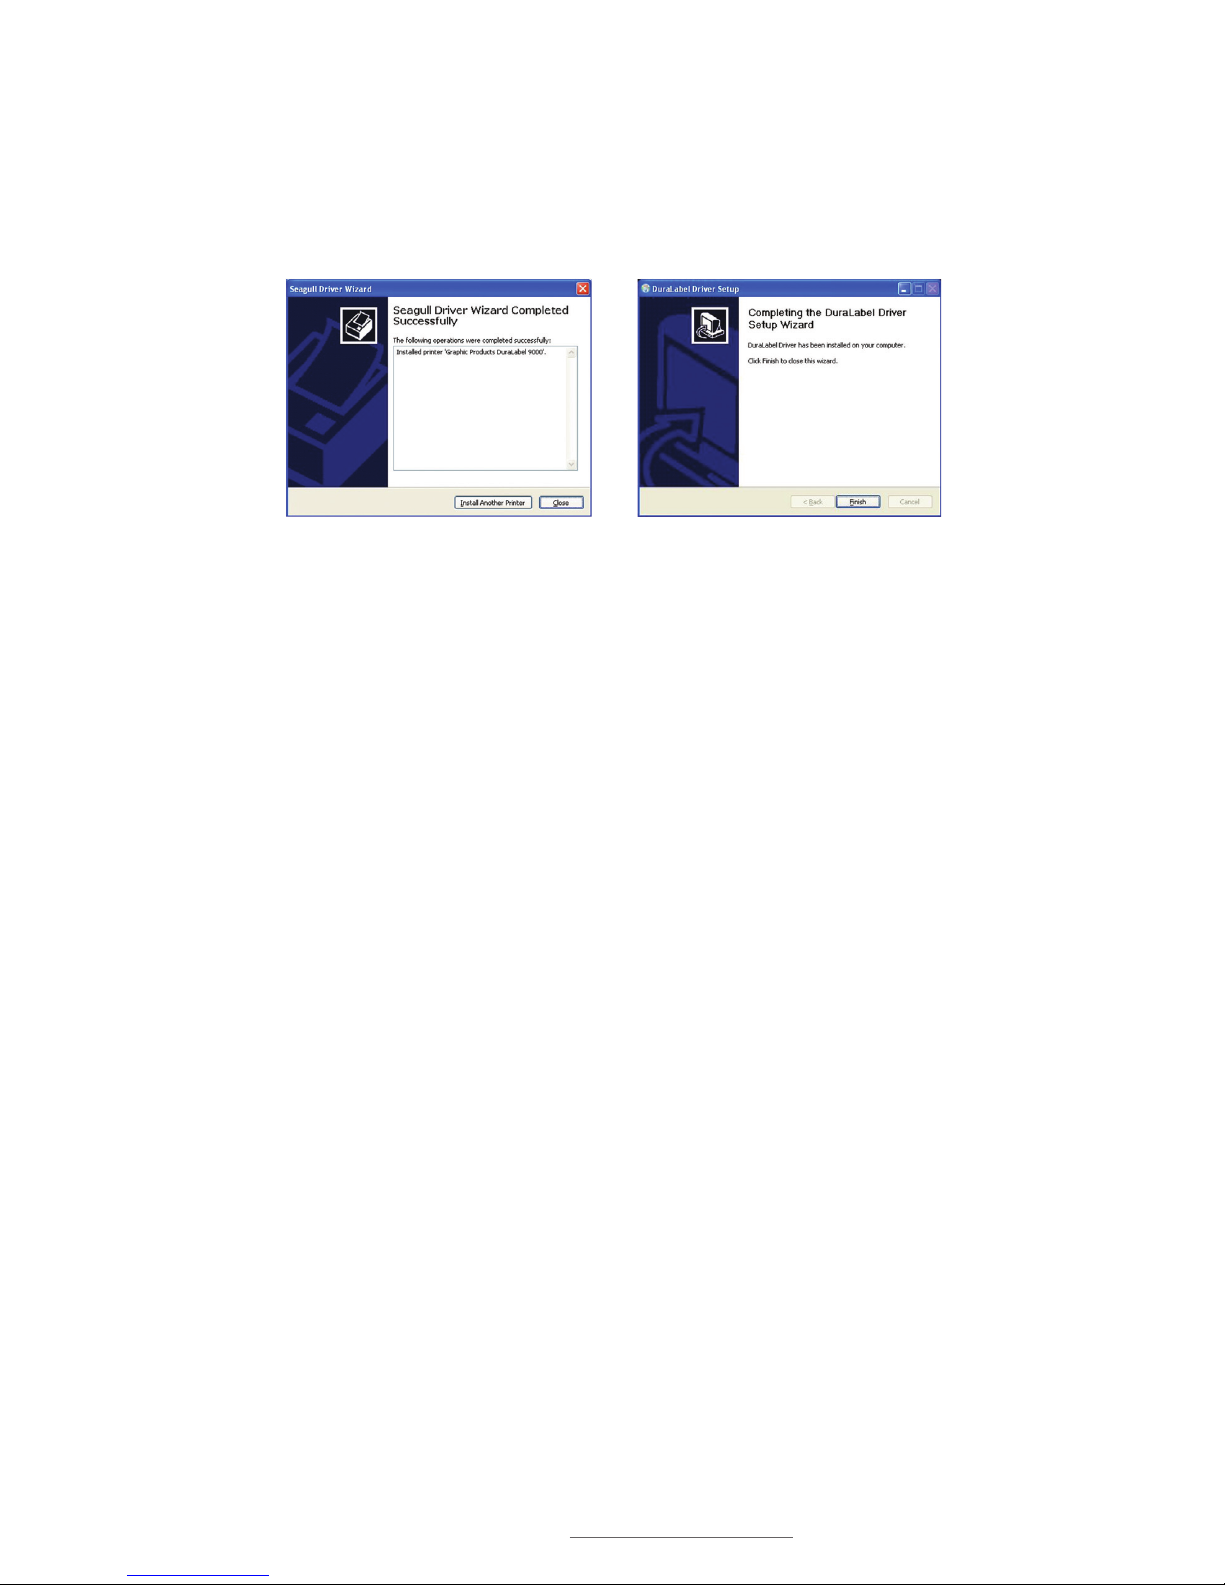
Q. A Driver Wizard Completed Successfully window appears, confirming the printer
driver installaton was completed successfully. Click Close.
R. The previous window closes and a Completing the DuraLabel Driver Setup Wizard
window appears. Click Finish to complete the new driver installation.
8.3 0DQXDOO\&RQÀJXULQJWKH,3$GGUHVV
A. Press the MENU button.
B. Select Main Menu.
C. Select Setup.
D. Navigate to Ethernet, then press SELECT.
E. Select DHCP or Static IP.
8.4 Setting a Static IP
A. Highlight Static IP and press SELECT.
B. Set the IP address using the Up, Down, Menu and Select buttons as described
earlier.
Driver Wizard Completed Successfully
Window
Completing the DuraLabel Driver Setup
Wizard Window
Page 43
DuraLabel.com | 800.788.5572
9.1 Print Head | 41
9. Cleaning and General Maintenance
IMPORTANT! Always turn the printer OFF before cleaning, performing
maintenance or loading supplies. Always wait at least 5 seconds before turning
the power back ON.
Basic cleaning of print head, cutter and platen roller will prolong the printer’s life
and help produce crisp, clear labels and signs. Refer to Section 2.1, Printer Parts, for
additional cleaning and maintenance information.
9.1 Print Head
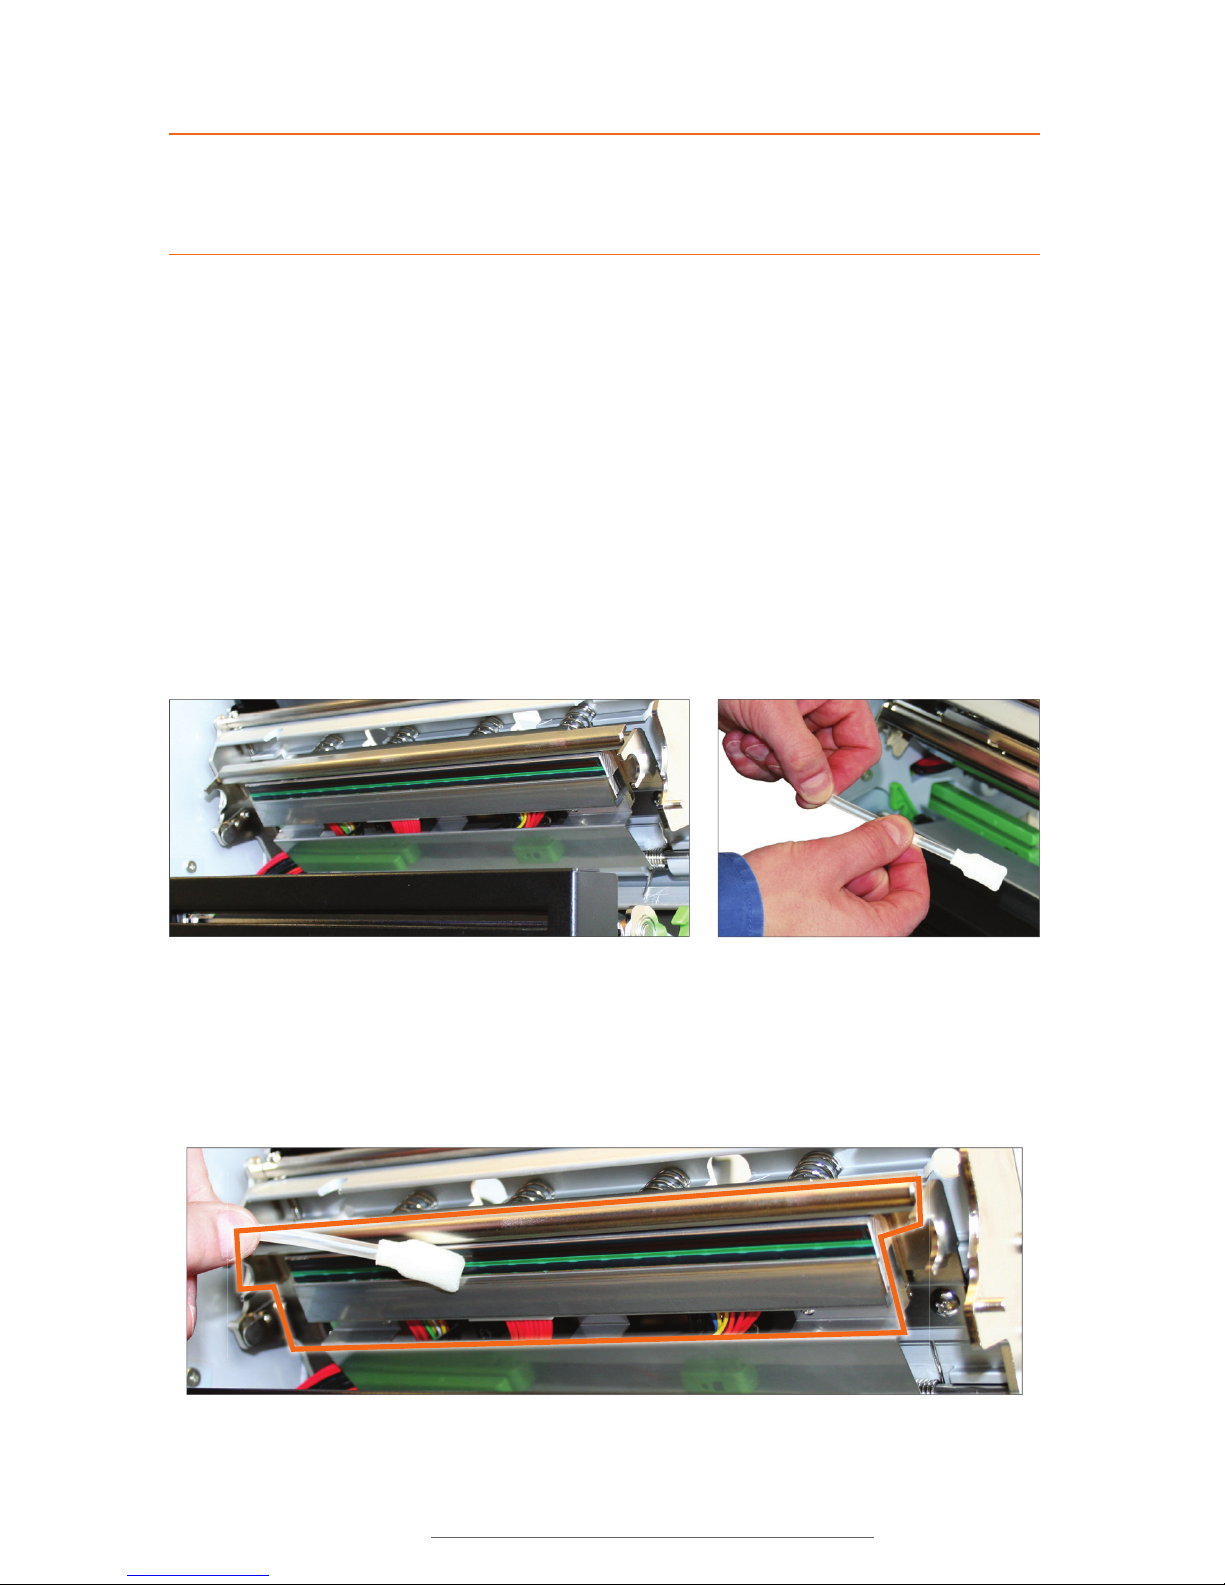
A. Pop up the print head mechanism by pressing on the print head release lever, then
remove any loaded supplies.
B. Use a pair of scissors or a blade to separate any ribbon from the ribbon spindles.
C. Place a cleaning swab between your forefinger and thumb and squeeze until it
snaps. Alcohol will be distributed to the cotton side of the swab.
D. Run the swab back and forth across the print head several times to remove any
built-up adhesive, ribbon residue or dust particles.
E. Clean the front and underside of the print head.
Print head exposed
Opening a cleaning swab
The entire outlined area should be cleaned.
Page 44
42 | 9.2 Cutter
DuraLabel.com | 800.788.5572
CLEANING AND GENERAL MAINTENANCE
9.2 Cutter
A. Open the DuraLabel 9000 cover.
B. Rewind any loaded supply away from
the cutting mechansim.
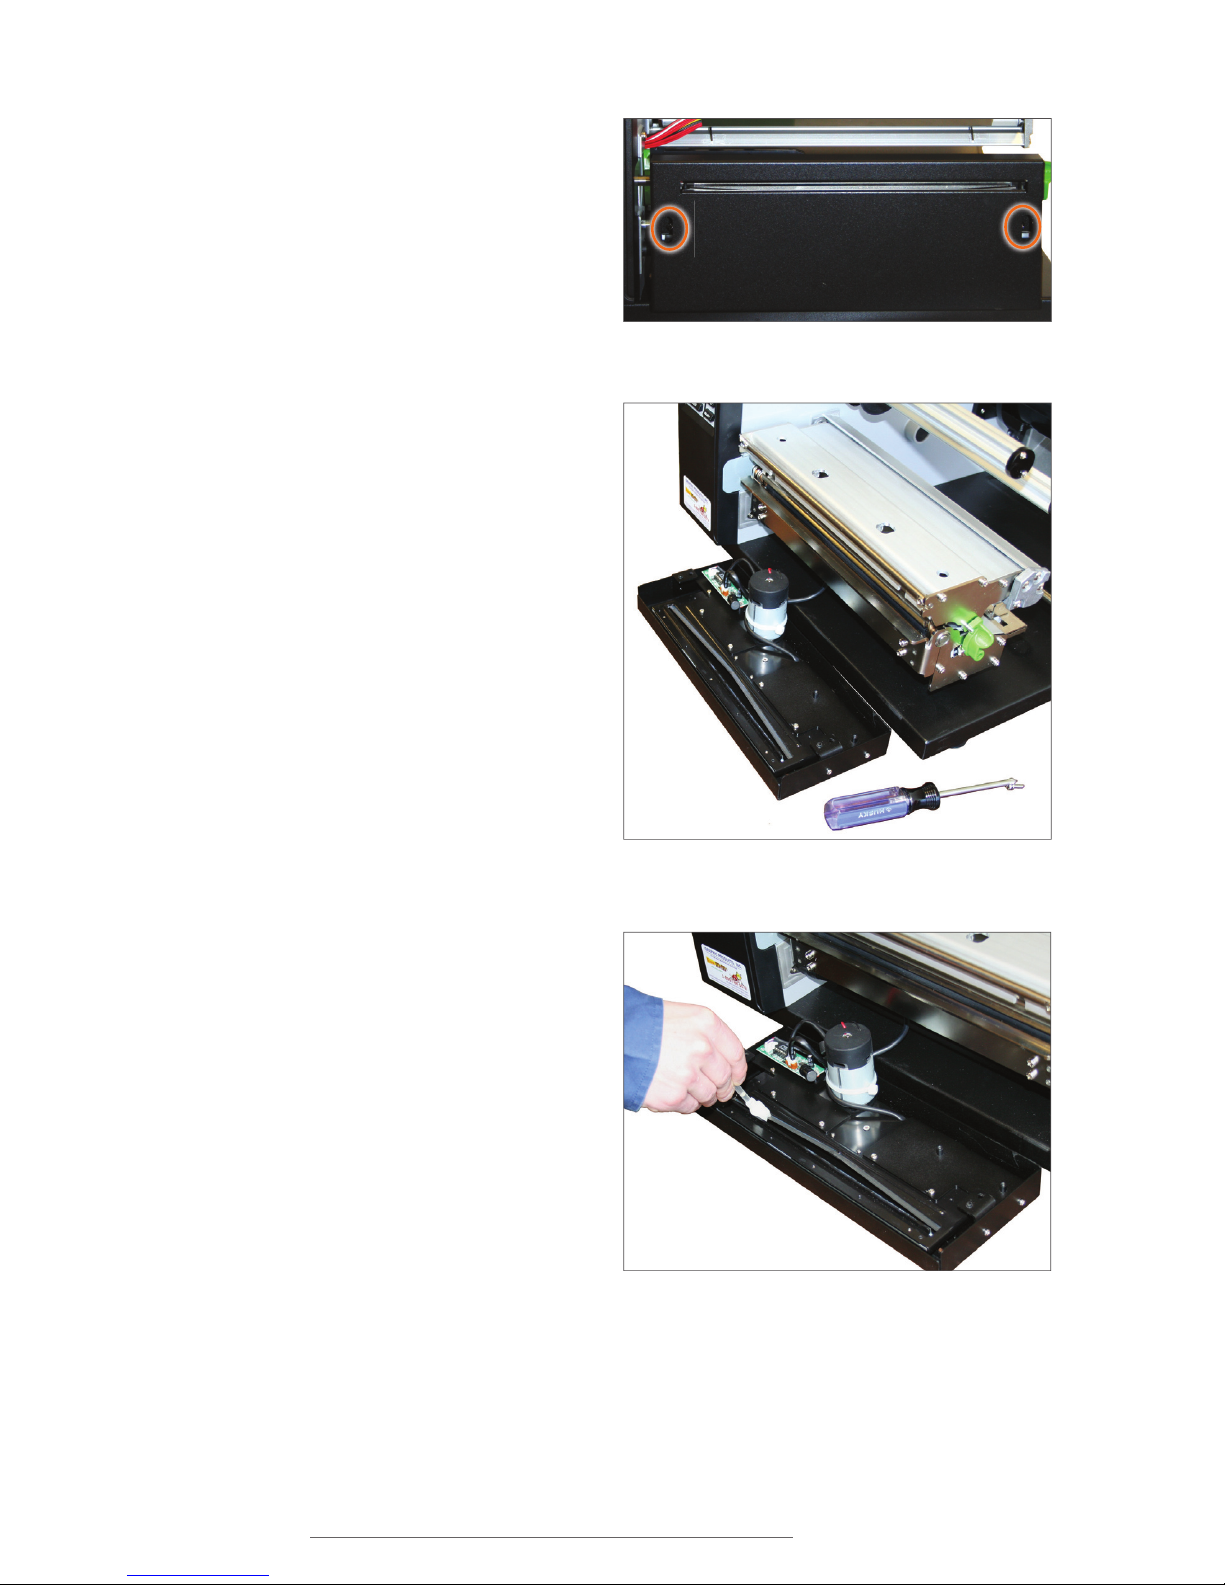
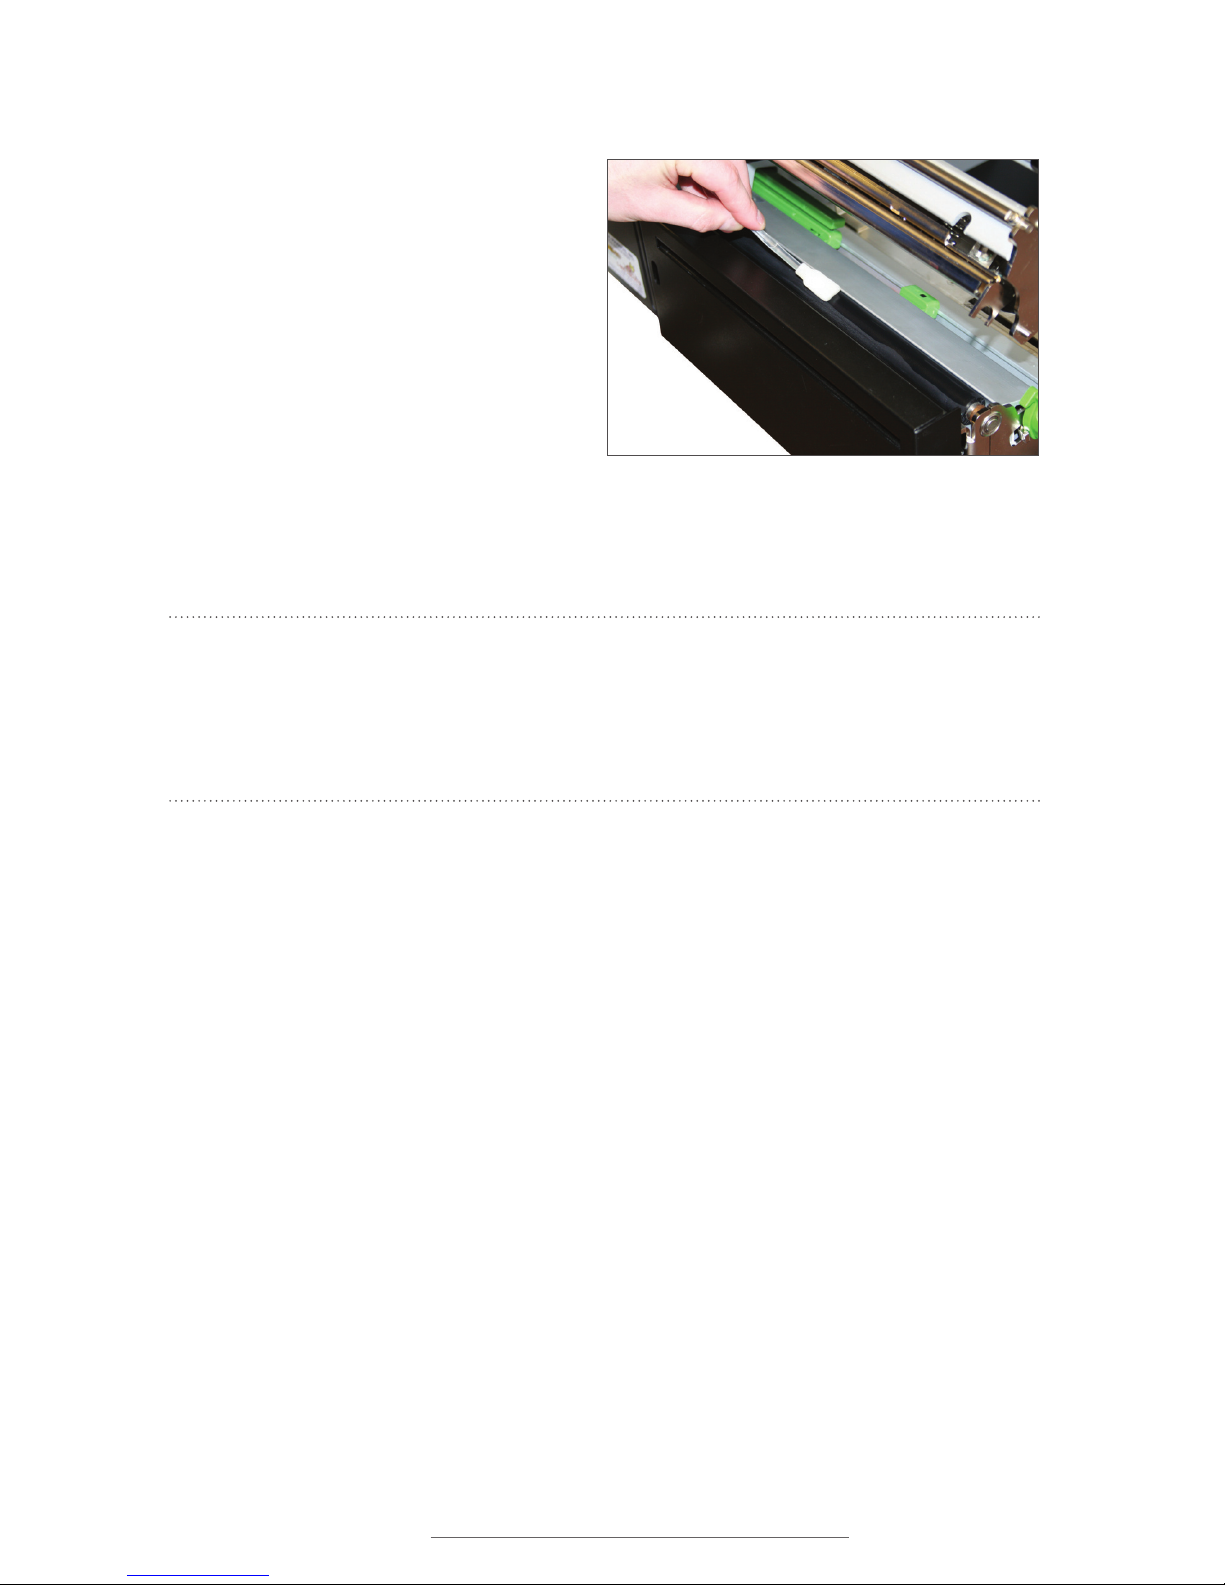
C. Using a magnetic screwdriver,
remove the two recessed screws on
the front of the cutting mechanism.
D. Lift up the cutting mechansim
slightly and pull it away from the
printer body.
E. Place a cleaning swab between
your forefinger and thumb and
squeeze until it snaps. Alcohol will
be distributed to the cotton side of
the swab.
F. Run the swab back and forth
several times across all sides of the
cutting mechanism’s cutting blades
to remove any buildup of labeling
adhesive.
G. Attach the cutting mechanism to the
front of the printer and tighten the
screws.
Remove the recessed screws, shown inside the circles.
Detached cutter mechanism, exposing cutting blades
Cleaning blades inside cutter mechanism
Page 45
DuraLabel.com | 800.788.5572
9.3 Platen Roller | 43
CLEANING AND GENERAL MAINTENANCE
9.3 Platen Roller
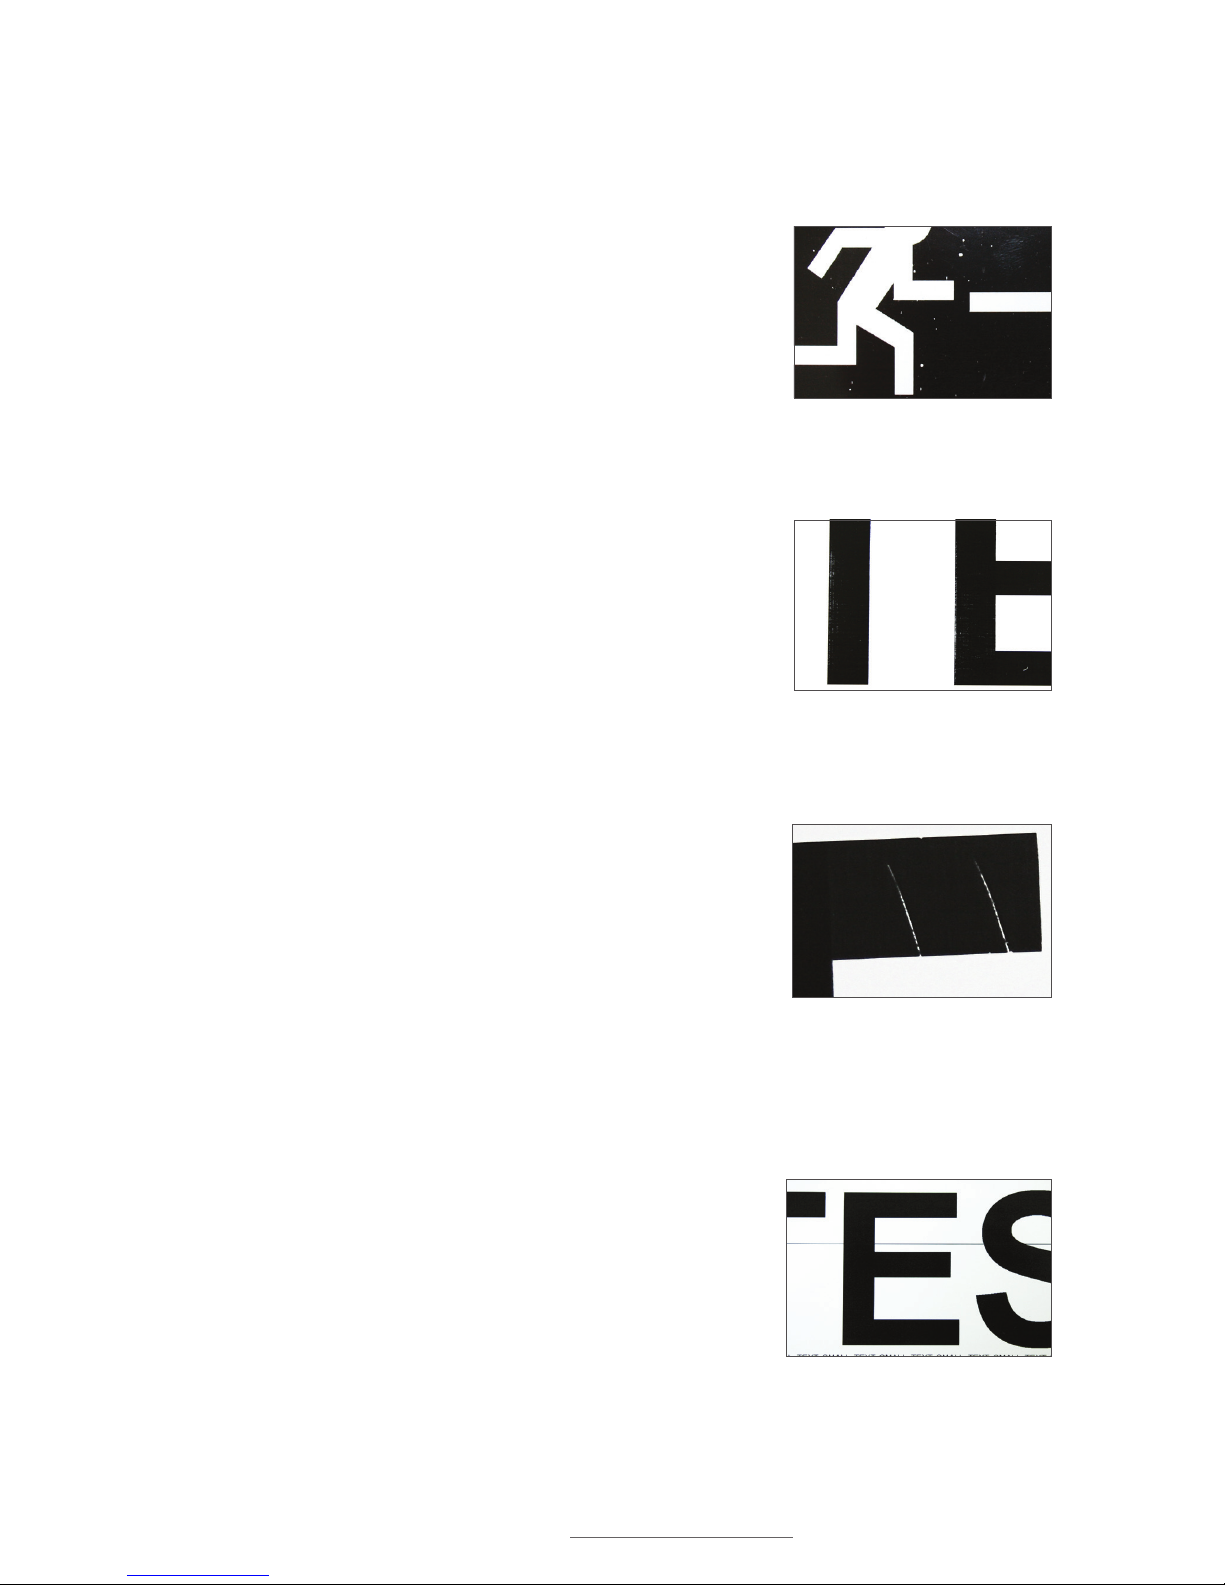
A. Place a cleaning swab between
your forefinger and thumb and
squeeze until it snaps. Alcohol will
be distributed to the cotton side of
the swab.
B. Run the swab back and forth across
the platen roller several times to
remove any buildup. Rotate the
platen roller to clean all sides of the
roller.
C. Give the platen roller a couple minutes to dry, then reload your ribbon and supply.
Your DuraLabel 9000 is now cleaned and ready to use.
NOTE: To maintain optimal performance, the DuraLabel 9000 printer should be
cleaned after every two rolls of supply. The print head, cutter mechanism and platen
roller should be cleaned with alcohol swabs to remove buildup of adhesive, dust
and other substances. Always turn the printer OFF before cleaning, performing
maintenance or loading supplies.
Cleaning Platen Roller
Page 46
44 | 10.1 Speckles Appear Throughout Label
DuraLabel.com | 800.788.5572
10. Troubleshooting
The following solutions address some of the most common printing challenges. Please
call Graphic Products for free customer support.
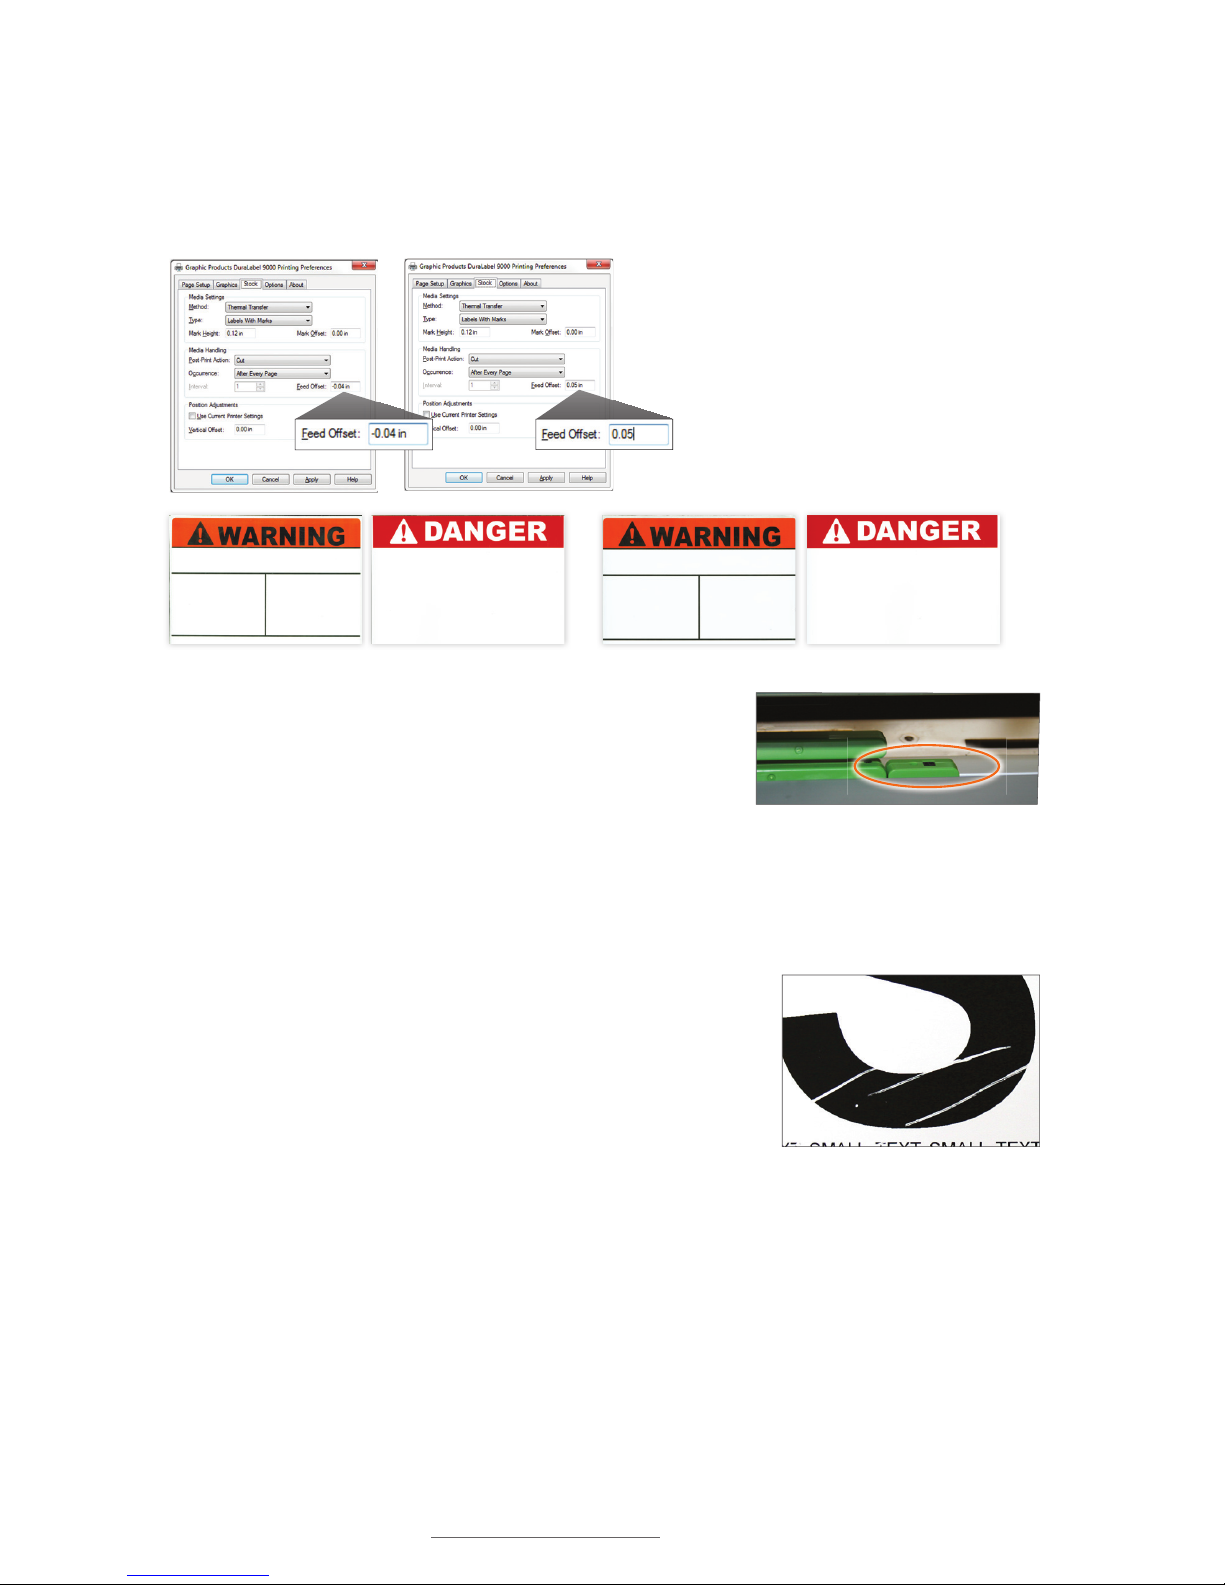
10.1 Speckles Appear Throughout Label
Possible Cause: Supply has not been stored properly and
dirt has contaminated the supply.
Solution: Replace the label supply if the problem persists after
the first few prints. Store supplies in a dust-free environment.
10.2 Fading of Text/Graphics Occurs During Printing
Possible Cause: The darkness is set too low.
Solution: Increase the darkness.
Possible Cause: The print speed is set too high.
Solution: Decrease the print speed (see Section 4.5,
Adjusting Print Speed).
10.3 Hash Marks Appear Throughout Printing
Possible Cause: The darkness is set too high.
Solution: Decrease the darkness.
Possible Cause: The print speed is set too low.
Solution: Adjust the darkness setting. If this does not
eliminate or satisfactorily reduce the hash marks, increase
the print speed (see Section 4.5, Adjusting Print Speed).
10.4 Solid Printed Line Appears Across Entire Label
Possible Cause: Print head is damaged.
Solution: Contact customer service at 800.788.5572.
Dirty vinyl supply
Bad print head
Incorrect print settings
Incorrect print settings
Page 47

DuraLabel.com | 800.788.5572
10.7 Printer is Printing Labels but not Cutting Them | 45
TROUBLESHOOTING
10.5 Unprinted Horizontal Lines Appear
Possible Cause: If the horizontal lines run partially through
the label, there may be foreign particles on the print head.
Solution: Clean the print head.
Possible Cause: If horizontal lines run through the entire
label, the print head is defective.
Solution: Replace the print head.
10.6 LED Flashes Between Green “ON-LINE” and Red “ERROR”
Possible Cause: Printer doesn’t recognize supply.
Solution: Follow these steps:
A. Turn printer OFF.
B. Turn printer back ON and try printing again.
Possible Cause: Supply roll may be defective.
Solution: Replace supply roll.
A. If printer begins working, previous supply roll was defective.
B. Call Graphic Products for return instructions and replacement.
10.7 Printer is Printing Labels but not Cutting Them
Possible Cause: Your printer is looking for gaps but it’s printing to a continuous roll
Solution: Follow these steps:
A. Save the template you’re using and close any labeling program.
B. Open Devices and Printers in your Start menu.
C. Right-click on the Graphic Products DuraLabel 9000 icon and select Printing
Preferences.
D. Select the Stock tab.
E. Set Type to Continuous.
F. Click OK.
G. Reopen your template and try printing again.
Burnt-out pixel
Page 48

46 | 10.8 Receive a “No Ribbon” Error Message
DuraLabel.com | 800.788.5572
TROUBLESHOOTING
Possible Cause: You may be using pre-printed labels with gaps your printer doesn’t see.
Solution: Follow these steps:
A. Ensure the Stock tab is set to Labels with Gaps.
B. Open the printer cover.
C. Ensure label guides are closed around label supply.
D. Check that Media Sensor Bar is positioned properly. Refer to Section 4.2.3, Media
Sensor Adjustment for Die-Cut Labels with Headers.
E. Calibrate label supply:
a. Press the Menu button.
b. Select Setup.
c. Select Sensor.
d. Select Calibration.
e. Select Gap Mode.
f. Select Automatic.
g. Follow directions in Section 4.2.2, Driver Settings.
F. Close printer cover.
G. Try printing again, with printer set to Labels with Gaps.
10.8 Receive a “No Ribbon” Error Message
Possible Cause: Ribbon is loaded incorrectly.
Solution: Refer to Section 2.5, Loading Ribbon, in this Guide.
10.9 Receive a “No Paper” or “Paper Jam” Error Message
Possible Cause: Vinyl is loaded incorrectly.
Solution: Follow these steps:
A. Ensure vinyl is loaded correctly.
B. Initialize printer, recalibrate, and try printing again.
C. To initialize, press Menu, then select Initialization. When asked Yes or No press
Initialize one more time to initialize the printer. Recalibrate per instructions in
Section 4.2.1 for die-cut label supply, or Section 4.3.1 for B Mark label supply.
D. Call Graphic Products if printing issue persists.
Page 49
DuraLabel.com | 800.788.5572
10.11 Wrinkles Appear on Half of Label | 47
TROUBLESHOOTING
10.10 Printer Cuts Labels Off-Center or into the Next Label
Possible Cause: Feed Offset is not on correct setting.
Solution: Adjust Feed Offset to proper setting.
Possible Cause: Media sensor is reading B Mark label
content.
Solution: Move media sensor to edge of the supply,
away from any printed content, but still positioned
under the supply.
10.11 Wrinkles Appear on Half of Label
Possible Cause: The ribbon wrinkles due to uneven print
head pressure.
Solution: Set the adjustable pressure knobs. Increasing
the pressure sometimes helps reduce unprinted specks,
as well.
Die-cut and B Mark labels cut correctly (l) … and cut off-center (r)
Adjust Feed Offset to a setting where printer cuts die-cut or
B Mark labels correctly. The 0 default setting works best for
most label supply.
If your B Mark labels are printing offcenter, align the media sensor under
supply but away from any printed content.
Ribbon wrinkled
Page 50
48 | 10.11 Wrinkles Appear on Half of Label
DuraLabel.com | 800.788.5572
TROUBLESHOOTING
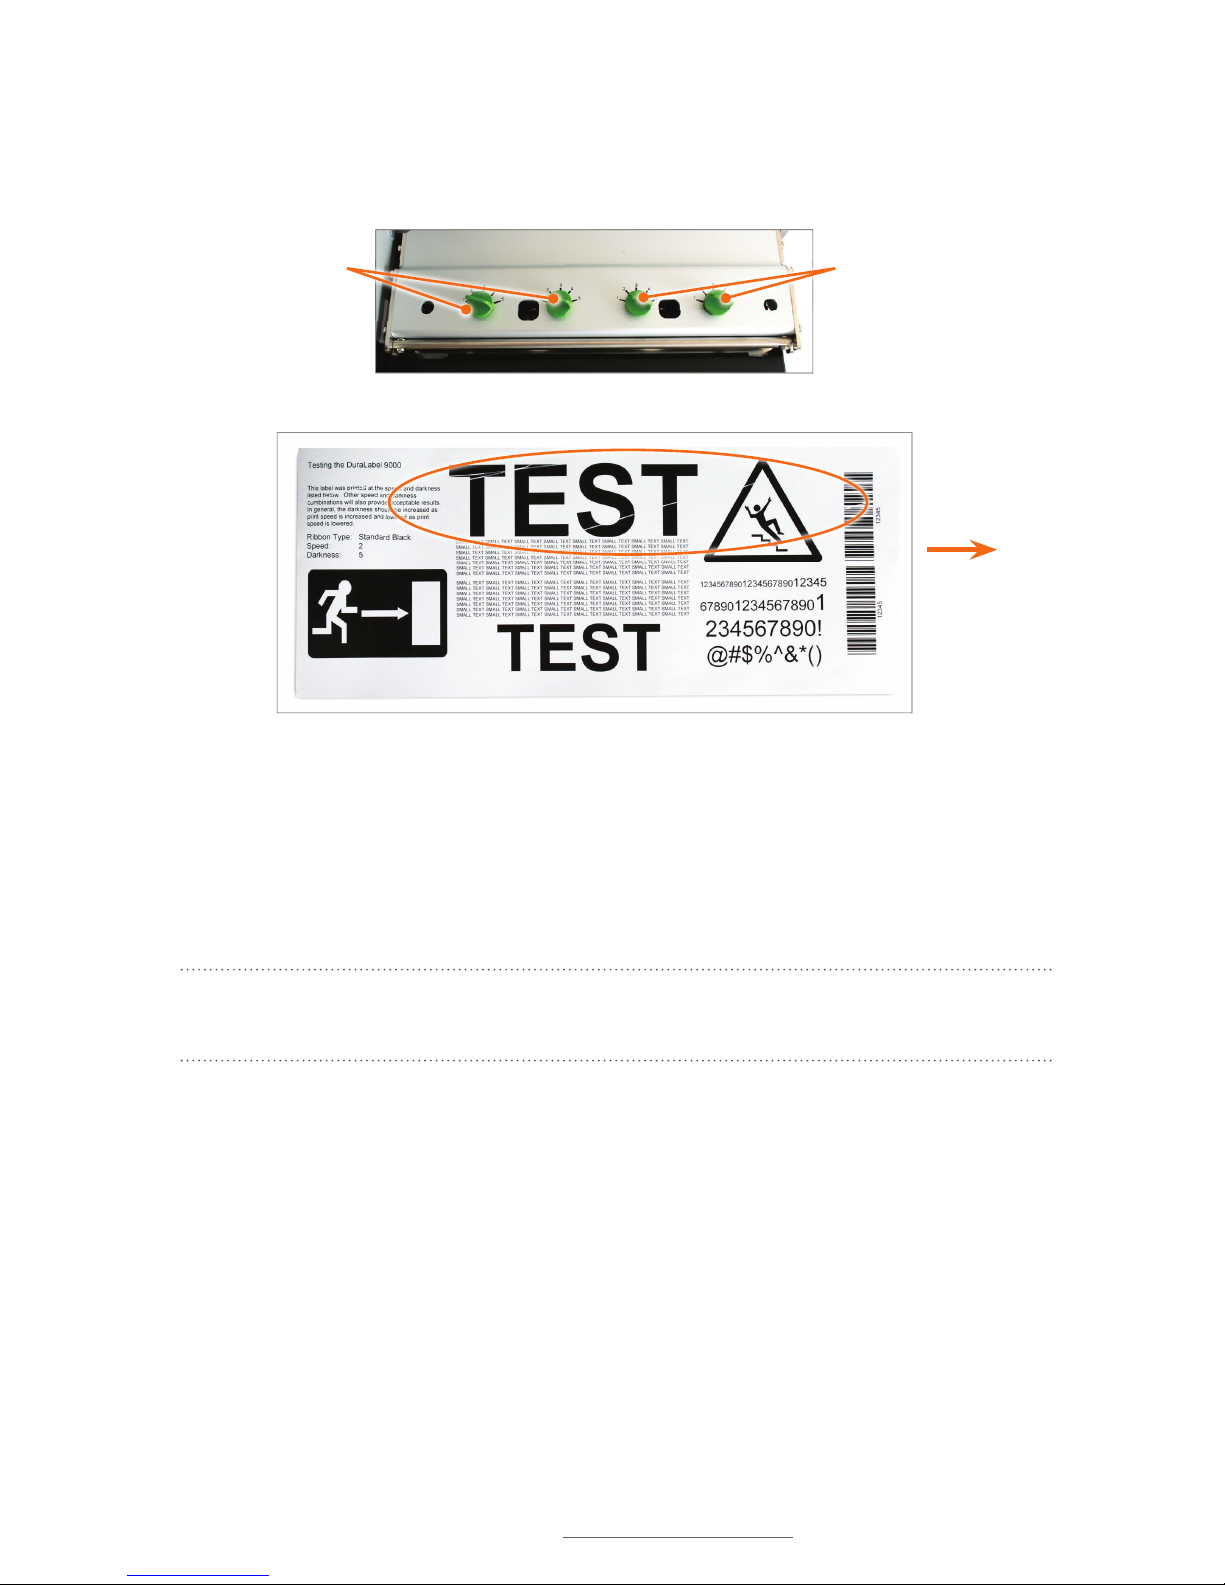
SETTING LEFT ADJUSTABLE PRESSURE KNOBS
For wrinkles on the right side of the printed label, set the two left adjustable pressure
knobs.
A. Press down on the far-left adjustable pressure knob while turning it clockwise to
the desired pressure setting.
B. Press down on the adjacent left adjustable pressure knob while turning it
clockwise to the same pressure setting as the far-left pressure knob.
NOTE: You may need to experiment to determine best setting, based on type of label
or sign.
Left adjustable
pressure knobs
Right adjustable
pressure knobs
Ribbon wrinkled on right side
Front of
printer
Label dispensed
this end
Page 51
DuraLabel.com | 800.788.5572
10.11 Wrinkles Appear on Half of Label | 49
TROUBLESHOOTING
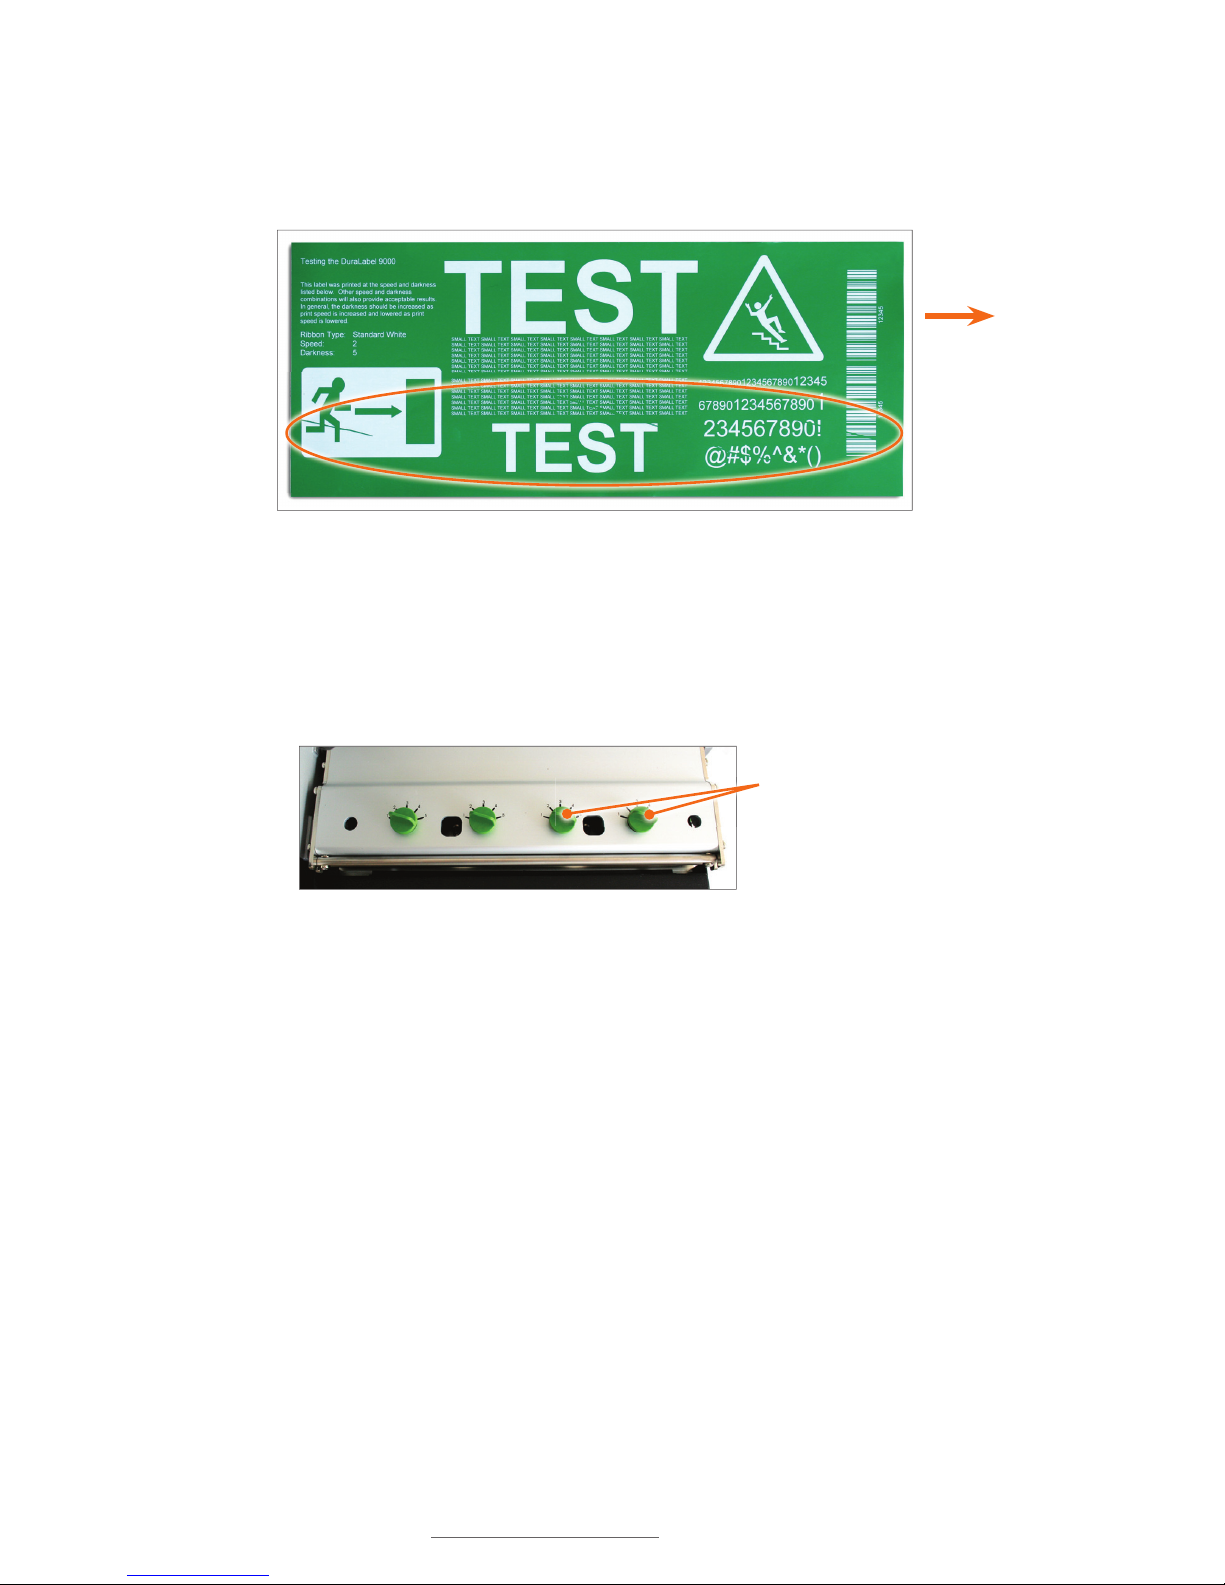
SETTING RIGHT ADJUSTABLE PRESSURE KNOBS
For wrinkles on the left side of the printed label, set the two right adjustable pressure
knobs.
A. Press down on the far-right adjustable pressure knob while turning it clockwise to
the desired pressure setting (see Fig. 4).
B. Press down on the adjacent right adjustable pressure knob while turning it
clockwise to the same pressure setting as the far-right pressure knob.
Right adjustable
pressure knobs
Front of
printer
Label
dispensed
this end
Ribbon wrinkled on left side
Page 52

50 | 11.1 Printer
DuraLabel.com | 800.788.5572
6SHFLÀFDWLRQV
11.1 Printer
Type: Thermal Transfer
Print Speed: Selectable, 2" or 3" per second
Resolution: 300 DPI
Maximum Print Width: 8.64"
Maximum Print Length: 100"
11.2 Indicators and Buttons
Indicators: POWER, ON-LINE, ERROR
Buttons: MENU, UP, PAUSE, DOWN, FEED, SELECT, POWER
11.3 Communication Interface
Communications: USB 2.0, RS-232C and Centronics
Memory: 8MB Flash memory, 32 MB SDRAM, SD Flash memory card slot
11.4 Power Requirements
Input Voltage: Switching power, 115 VAC/230VAC, 5A/3A, 50 – 60 HZ
Worldwide Voltage Compatibility
11.5 Environment
Operating Temperature: 41º F – 140º F (5º C – 40º C)
Operation Humidity: 20% – 85% non-condensing
Storage Temperature: -4º F – 122º F (-18º C – 50º C)
Storage Humidity: 5% – 90% non-condensing
Ventilation: Free air movement
11.6 Label Supply
Type: Continuous, B Mark and Die-Cut
Width: 4" – 9"
Gap Height: 0.12"
B Mark Height: 0.12"
Page 53

DuraLabel.com | 800.788.5572
11.8 Printer Body | 51
SPECIFICATIONS
11.7 Ribbon Supply
Type: Wax, Wax/Resin, Resin
Capacity: 984' with 1" core
11.8 Printer Body
Dimensions: 18.5" W x 21.65" D x 13" H
For more specifications, please call 800.788.5572 to speak with a representative.
Page 54

THIS PAGE IS INTENTIONALLY LEFT BLANK
Page 55

THIS PAGE IS INTENTIONALLY LEFT BLANK
Page 56

800.788.5572 | DuraLabel.com
© 2009, 2015 Graphic Products, Inc. All Rights Reserved
02/17/15
 Loading...